Transcripts
1. Introduction: Welcome to my class, sketching a house step by step My name's in round on. This classic is for anybody who likes houses on looks to draw houses just like I in this class. We're going to be learning how to draw house using a humble pencil. Yes, that's all. We're going to use a mobile pencil, a couple of small tools for the Let's get started. We will be looking at simple one point perspective in this entire class, so we're not going to do anything complicated. We're going to keep things nice and simple so that you can construct your house. Using one point perspective, we will be looking at the main elements of the house, the main building walls and constructs the roof, the windows, doors, chimneys on. We'll go into these with a lot more detail and come up with some nice fun ideas of how we can construct and design these beautiful house evidence. In this class, you will be provided with six exercise sheets that you can download and print off at your leisure and also work with me systematically throughout the lessons in this class so that your skill level can build up and you can have a bit of fun designing your own elements. I'm really building that knowledge understanding of how to construct your house. Once we've completed all the class exercises, way will be moving on to designing and constructing a complete house from scratch, using all the elements on learning that we've learned in the exercises in the private lessons. After completing this class on doing the exercises on the full sketch, you will be ready to delve straight into designing your own house. And this is what you'll be doing for your class project. I can't wait to see what you come up with. So remember this is a nice, long structured class for all you house enthusiasts like myself to sit back, relax, get yourself a nice hot drink. Get yourself some trees on. Let's get started witness class.
2. Getting Started: Materials: Okay, let's make a start on this nice little class. Okay, So what we need in terms off materials for this shortly old class is a basic pencil sharpener to sharpen your pencil. Obviously, Onda a couple of rulers now, you don't have to have two rules like may If you just got one ruler, that's fine. Items like toe have like a long ruler and a short one on. You'll understand why? Just in a moment on finally, you need some paper to drawer on any surface again, we don't need specific materials or, you know, artist quality materials in this class because that's not what this is class is about. We basically just need whatever you've got lying around in the house, especially at this time off. Kind of like, you know, it's not very great time with this covert virus out there. Corona virus. It's, you know, we're all stuck at home and, you know, some people are not very well. I hope you are well on. Do you know this is just really to get you a little bit creative to get your mind off things and just do it? Nice little exercise, enduring house. So we're not gonna get too technical As I mentioned before, this is just gonna be basics. But we are gonna talk a little bit about perspective because we want to kind of, you know, make it look a little bit correct again with art. I'm sure if you have watched my classes before, I'm always saying that art is a subjective subject on you know, there's no right or wrong way of doing anything, cause it's just purely about expression. So that was it for this first little materials introduction. So just again, we've got the pencil. I'm using a to B pencil, and you can use which of pencil like you like I was like to be, because it's slightly softer and you can get some darker tones. But you just use which ever one you have available HB two B and a pencil lets you have. I've got himself a couple of rulers about myself, a sharp now on. I've got myself some paper. I'm just using a little bit of card. I've got here a little bit more sturdy, used whatever pay, but you're like, so let's move on. So the first main part of the class
3. Warm Up!: Okay. Welcome back. So what we're gonna do now is we're gonna kind of do some short, little rough sketches of what we're gonna be talking about in the later part of this class On what I mean by that is I just want you to get your piece of paper. Whether you're working in a sketch ball. Korans, individual sheets. Just get your paper. You serve this. Get your pencil. I just want you to loosely sketch a couple of these shapes that I'm about to do right now. So the 1st 1 that I want you to do is a square. Now, you don't need to use your ruler for this path. This part is just kind of, you know, to use the memory muscle on the flexibility of year kind of fingers and your drawing tools just to get a bit warmed up. So what I want you to do is I just want you to do a rough square just on the top left. Do you pay? Just like this? Doesn't have to be, you know, very symmetrical or anything. Just a rough square and just keep practicing this. Why'd you going across and what this will do is this will just get you into the habit and the mode off what we're about to do later on. I mean, we're gonna be using rulers at, you know, to make things a lot more accurate. But this is just as a warm up exercise is always good to get warmed up before you do any type of drawing or creative work. And I think this just works out really nice. You know, if you just draw some squiggly wiggly lines or, you know, just draw some shapes and you know, it will just get you ready for the classes just like this. Draw some square scored small squares. Biggest squares. Just do them really rough. They could be completely, you know, off angle. It makes no difference. Were not drawing anything symmetrical, Perfect. They're just warming up. So again, a couple of different variations in sea. I'm doing some longer rectangles here at its widest squares here, and some smaller ones just, you know, just follow this pattern. You don't have to do exactly what I'm doing, but just get these creative fingers warmed up, and that's all we're living. So that's what I want you to do for this first, quickly a lesson. All this class. Just warm yourself up with doing some shapes in terms of squares and rectangles just like this, and just Phillipe Page nicely. And that's about the only spend about, you know, 2030 seconds on that on what that will do is I'll just kind of get you ready for the next one, So let's move on to the next one.
4. Construct & Process: Okay, so now you've had a little bit of a squiggle around with your pencil or you whatever drawing tool using. Just come up with some random squares and rectangles on. Now what we're gonna do is we're gonna actually delve in to the actual drawing part itself . So if you just turn your page around, that's what I'm going to do. Let's not waste any paper waste. It is no good at all on what we're gonna do now is we're gonna start drawing and thinking about how we're going to construct our house. So house is very simple to draw. It's quite, you know, it's basically just drawing squares, rectangles, triangles, different shapes and just putting them together, laying them out. But the order that you draw them in is really important when you're during a house on that can effectively make your house or make the actual process a lot easier. So what do I mean by that? So what I want you to do is I want you to get your ruler, get your drawing two of your pencil on. I just want you to draw a line going across the with off your rulers. Whatever size rule you using? I've got one. That's 15 centimeters. If you've got one that 15 centimeters. Great. If you haven't, then that's not a problem. All I want you today is just draw online, coming across a nice horizontal line about that big. So if you've got if you've got a decent sized ruler, just measure 15 centimeters on, make that go all the way across. Let's met. Let's keep everything the same. So what I've got here is I've got 15 here. I'm just gonna put a little line going down like that. And I've got zero. A little wine going down like that. Now, this is what's gonna act as our perspective. Now, I'm not going to talk too much about the details. You know, the complex one point perspectives and two point perspective and human three point perspective. The only reason I'm talking about perspective in this kind of easy going class is so it gives us a bit of a guide to work towards. So what we've done here is we've just drawn a horizon mind This horizontal line is effectively our horizon lines. So that's all I wanted you to do. Horizon lie on this kind of will guide doors to how we're gonna draw the angles of our house
5. Perspective: Foundations: So we got horizon line here on these little two points that I've done here. These little lines you can just do a little lines. You know, you could just do they all round circle Just draw a little round circles on the corner on again. You don't have to be 15 centimeters. It's a centimeter. That could be You know, they have it as long as you page if you want, But this is just for illustration purposes. This horizon line is effectively gonna be where your vanishing points are gonna be for your house. So this points here on this point here are gonna act as your vanishing points on what vanishing points If you don't already know our I'm spelling that completely around vanishing Shin points already Tonito practice on the spelling eso These are gonna be the points where all the diagonal lines goats and that's gonna make a lot more sense in what we do in the next stage. Now again, if you're using pencil like I am, it's always a good idea to have a razor toe and because you can, you know, basically effectively erase out your marks. And I haven't even got once a hand. So that's not very good at finding, is it, Mr Muggles? So let me just grab hold of a quick little raise that I've got a on. We continue with this. I just got this razor again. You don't need to have anything fancy. I'm just going over about what these labels are on so that you can concentrate on what we've got here. So you've got your little line coming across your horizon line on. What I want you to do is I want you to draw a square on that line. So what we're gonna do now is we're going to draw a nice square on that line. And I want you to do that roughly in the middle off this airline. So this was 15 centimeters. So the midpoint of that would be a what? 7.5. So that's around about mid point on. I want you to do maybe a square that's four centimeters across so my four centimeters is gonna win up to two this way, and then we have another two this way. So that's four centimeters. CSO. We've got four centimeters line going across here now. I want you to do is I want you to switch your ruler to a vertical side. I want you to do four centimeters again. So from that middle point that we did here, I want you to just do two centimeters up two centimeters down. So just keep your rule as vertical as you can on. We're just going to do two centimeters up and then another two down, making it for on. That's gonna be our midsection off our square. Now, you don't have to work it out like this and you know, perfect measurements or anything like that. You can, you know, just a little rough squared again. It's just for illustration purposes, and all I'm gonna do now is do another vertical way. That's parallel to this from that point on, then, from this point, do another vertical line that parallel to the center point so that you have these three lines. You've got these three lines or measured up nicely. There should be four centimeters in height. Onda. We can just square it off a bottom and that you go. You have your lovely little square. So you've got a nice square there in the center off this line of your horizon line now I want you to do is get your rubber raise out that middle line there so that you've just got a square. Now, if you want to, you can shake this in and again. This is just an exercise that we're doing. This isn't going to be our final drawing of our house. These are just gonna be short little exercises to demonstrate to you how to start building your house illustrations. So again, just reinforcing them lines so you can see them a little bit better. And what I'm gonna do is I'm just gonna shade in like the shade in this square so that you can see it. It's, ah, a bit more prominent that you don't need to do this if you don't want what? I'm just doing this for this particular lesson. So we've got National Square in the middle now. That horizon line, if you notice is in the center off that square, so I want you to do now is I want you to think about where this house is. Get what angle this house is gonna be at. Is it gonna be towards the left side of your page or is it gonna be towards the right hand side of your page? Now I'm gonna What I'm gonna do is I'm gonna use the left point here, So I'm going to use this left vanishing point here on from the top corner. What I want you to do is I want you to just draw a line going to that vanishing point. So basically, all you're doing is drawing the line straight line, going to that vanishing point and then from the bottom left inside, I want you to do exactly the same. Draw a line going to that vanishing point, and that's about it. So you can see it gives a slight three D effect, is kind of emerging as a three d object. Now, the next step, what I want you to do is get you, ruler. Just line it up against this edge that you did this vertical line from the end of that square on just pullets across as far as you want. I would say about up to here and just do another line from the top on the bottom line that you just do so or we do It is a vertical line that starts from the top diagonal that we did to the bottom Death and Dagnall. But you did, and it doesn't have to be in this exact position. I mean, you can measure it if you want. This is Ah, two centimeters. So just from two centimeters draw a line that's just vertical, and that's about it. So you can see now that this is finally emerging now as a cube. So we've got this left panel left side of that cube and then we've got the main face of the cube. You can't see the top, you can't see the bottom. That's because the vanishing point is on the left on the horizon. Land is right in the middle. And that's what I want you to kind of think about when we're doing this. Classically wants a really effective you can. You don't need to do a vanishing point and a horizon line. You can just, you know, roughly draw out of square in this effect. But if you're gonna once we start drawing in the elements, it usually works out quite nice. If everything is lined up properly on, you know, symmetrical and parallel. It will just give it that little elements off realism. And that's what that's what it's really about. Just adding a little bit of realism to our work, so it looks a little bit nice. So what we've drawn here now is a little cube with two sides on this main site here is gonna be the front off the house that we draw again. You can have the front of your house on this angle, and this could just be aside. But what I'm gonna do is step by step. I'm just gonna give you these instructions that you can copy and follow on. Then at the end, Once we've done all these exercises that we're gonna go through in this class, you can produce your own beautiful illustration off your very first illustrated house by using this classic methods. So let's just continue again. I'm just gonna just slightly shape this sent to make it a little bit more prominent. Andi, just add in a couple of lines here that follow the direction off the vanishing point so you can see quite easily. We've come up with an ice three d tube. So let's move on to the next one
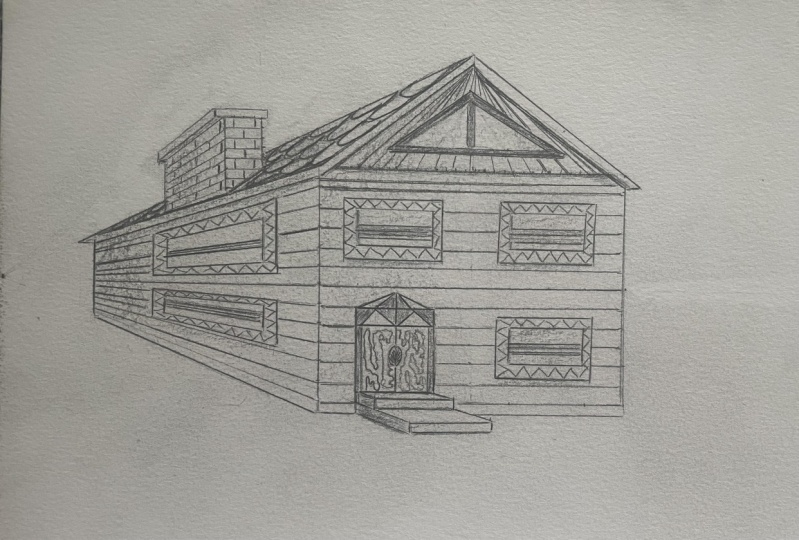
6. Perspective: Roof: Okay, welcome back. So we've basically constructed the foundation off our little house that we're doing a illustration off in this exercise. The next stage now is to add one of the main elements that most houses, if not all houses have, is the roof. So we talked about perspective a little bit about perspective horizon line on the vanishing point that we're going to use. Now let's add in our roof. Now what I want you to do is I want you to just take the paper, just drop it down a little bit on that, get you ruler outs and measure that midpoint off the top part of that house edge. So it was two centimeters. We already had a little line here. I just want you to re emphasize that little point there. So just do a little mark where it's two centimeters. We got Susan's Amazing. On the left, we got two centimeters on the right. Well, I'll do is I'll zoom in a little bit, so it's a little bit easier for you to see. That's a lot better. And so we've got this little midpoint here. So what effectively that's gonna be is is a guide for the middle part Off the roof, effectively, the pointy part off our roof on usually the pointy part off all roofs on houses is usually a triangular form. It could be a trip easy, um, style house. And we're gonna you know, it's true piecing style roof. We're gonna look into different roof styles on the next coming lessons. But for now, I just want to do a quick little construct off a roof. So with your ruler, from that point, all I want you to do is go up about 2.5 centimeters vertically. So just put your ruler against there and just put on the old dot whether zero with. So you've got 2.5 centimeters emerging from a both this point over here. So we've got little point now. It's really easy to add in a roof. All you got to do now is use that point that that midpoint get your ruler and just draw a line to the top corner off that square that you did on slightly extend it over the corner here like I've done. You can see I've got slight extension on what that will do is add a little bit more interest to the roof rather than just having it like a triangle on top of a square. So from the other side, we're gonna do exactly the same. Put your pencil where that midpoint is on the top, take. It's a top corner off the actual front part of that square. And then just bring that lying down and just bring it as as down as you bought this life. So we've just got this kind of just square it off here. As you can see that it's pretty much spot on this. You've got that drop corner coming from each side, and it's pretty much the same Now what we're gonna do now is we're gonna use that same vanishing point again and you can see I didn't raise it out completely. I've still got it there. So you'll just reemphasize that vanishing point on the horizon line on. We're gonna bring in and do exactly what we did before. So it's just zoom out slightly seat concealers. So we're gonna bring our pencil Wayne from the top point on the roof and we're gonna bring our ruler. It's that line. It's up to that vanishing point as we did with the Cube with this square. So I just want you to draw in a straight line. Went all the way, so that little point now you can see it's already added a new immediate impact. On that shape, it's already looking like a house. So all we need to do now is take our ruler on line. That ruler of or what you can actually do is where we dropped the end of that roof lie. You can take your rule from the end of that roof line from the edge and take that to the vanishing point as well. So we can actually make this a little bit more accurate on with the other one on this side and do the same. But don't don't draw it all the way across, because we don't really need to do that. This is effectively behind the square. All I want you to do is just line it up to that vanishing point and just cut it. Draw it. One what? I mean, backcourt, is that Just cut the line here. So you've got this little line there and you can see that it's going all the way towards the vanishing point. So now what we're gonna do is finish off the corner off the roof on just line up our ruler with the length of the actual roof there on which is gonna drag this across. That's about the corner off that left hand side of the cube over here. So what we do You mean is we just lining? It's OK and keeping it to similar angle. I mean, you know, even if you hadn't slipped slightly while you're doing this and you've gone and done an angle that I wouldn't worry about it too much, there is a more accurate way of doing this. What you can do is measure exactly how much you want. And then there is a formula to calculate. You know what you want, but I don't really want to go inside the technicalities of me. I just want this custody quick. And rather than getting bogged down with, you know, everything being perfect. So again, it's just a quick cluster sketch house and that's all it is. So I'm going to start against also you, so I don't kind of lose you on this point. So all I'm gonna do is I'm just gonna line that up. So step point line. It's up to the angle there, and then we're just gonna go this way and keep it straight. And you can up until you reach this point here and then once you've got that point that I just want you to join the top line that you did that top diagnosed with the bottom diagonal , going to the vanishing point and just line it up on drawer in your life and you can see we've got that side part angle off the roof. So all we need to do now is get your razor for about them lines that we don't need a going to the vanishing point. And we are pretty much built. And you can also over about this line and conceive this line over here. That's above three actual drop end of that roof. If you rub that out, just erase that's out and then with your ruler, just reinforce them lines and just make them a bit more prominent. You'll be able to see now that we've got a lovely little slant roof left hand side off this house. There we go, Just close it up. Over here, on there. We have it. So what we can do now is just shaded in just likely shade in that triangle e kind of pointy part of the roof on the front of the house. Teoh effectively just complete the structure, and that's the basic structure of our house. And then we can come up with some really amazing structures by just using this principle that, you know, we've gone through now where we just draw the foundation of the house, the square cube it off with a vanishing point, making into a three D object, just adding a roof point and then bring the root points down on that, pretty much it for the, you know, technical side of things. I know I've not gotten into it in too much detail. You can do two point perspective. You can do even with one point perspective as what we've done here. It's, you know, you could go in delving a little bit deeper. I just don't see the point of doing it in this beginner's lesson, how to sketch houses. I mean, you might already know what I'm talking teaching. Get here right now, And you might think, Oh, I already know how to do this stuff. I So I guess this is really a class for, you know, beginners or anybody who wants to, you know, start drawing houses again, and they haven't done so in a while. I just think it's a good of refresh on If you just say that he don't have to shake it and it just kind of makes that structure emerged. So there we have it then, folks. So this was this part of the class where we're just gonna come up with this last little concept house on. What we can do now is move on to the exercise. She's now, let's do that next.
7. Exercise Sheets: Okay, Welcome back. So we just constructed a super simple little house where we did a square and a little triangle, created a vanishing point on the horizon line placed in the middle. And then we did all our diagonal lines going towards the vanishing point. Caught it off Rob Dow. It raised out all the overlapping lines and we've got a nice little house structure there. What we're gonna concentrate on now is doing a little bit of practice. Now, what I've done is I've provided you with exercise sheets, but his class just to make this job easier so you don't have to draw loads and loads of squares again and again. All you need to do is print off the exercise sheets and there's quite a few of them. But we will go through them step by step on its purely just to practice. So this is exercise sheets number one. This is the foundation and the roof foundation, meaning the square that we created on the roof. The triangular roof on bits sketching houses. So if you print this off, if you have a printer, that would be great. What we've got here is I'll just zoom out. I'll show you the whole sheet
8. Foundations & Roofs - Part 1: So we've got three squares of just drawn in three squares that will make the front part of the house the foundation of the house. And then I've got three rectangles that are vertical rectangles that will also make the front part of the house. And then I've just buried it with three rectangles, that horizontal that will make the front part of the house. And what I want you to do now is I want you to practice drawing in some of roofs, so I want you to look at look at different houses that are in your neighborhood. Obviously, at this time where the Corona viruses out, don't step out in style. Who can get houses? Just have a peek through your window and see the shapes of the roofs of the houses that you live in, or your neighboring house says, or even go on on on the incident. Have a look at different roof styles, and what I want you to do is I want you to just draw these end So one this exercise sheets here. If we just do, men will go. We'll zoom in on Look at these three squares here, so if you get your ruler, I'm going to use this more Realtor. This one at the's air. Basically three centimeter square now, depending on your prince. If you've got prints on your prints of these out, they might come out a little bit smaller or bigger, depending on your princess setting. What I'll try doing is in the exercise. I leave a printer, file a pdf for UK and Europe, which we do a four and a three printing on. Also for the U. S. Which does letter size printing salt. I'll give you both options and use whichever one's correct and appropriate for yourself. If you don't have a printer that you can't print these out on them. I guess what what to do is just draw these shapes out. Just spend a little built a bit of time during out these shapes. Just do three squares, three rectangles There were upwards vertically and just draw three rectangles going across , and that way you'll have a nice little follow on cheap that you can practice on with us in this class. So let's just slightly get a bit more of a zoom in and let's work on this first square What we're gonna do is we did have greeted with our little concept sketch here. We did like a triangular house roof. So I want you to practice on that. But I want you to vary the roof styles. So what I mean by that is with the square. If you just measure the midpoint now, it doesn't have to be the exact midpoint like we did before. If you're squares like 3.5 centimeters 3.2 when you print it out, it doesn't really matter. Just get a roof estimate off the middle and just put a little dot there. So mine is three centimeters going across. They're gonna put a little dot where it's 1.5 on. I want you to do that for all three of these to do this, All three of this of it's nice and, you know, it's it's a lot easier to follow step by step rather than having to do this again and again . So I just put a little dot in the middle and again when you practice this, What happens is you get used to designing, you know, houses so quickly and easily that you don't even have toe Think about this anymore. You just quickly get your tools out. And you just south sketching, and it just becomes second nature. That's how it is with most things, isn't it? The more you practice, the more better you get at it. So we've got a homemade points on the three squares. Now, I want you to do this on this first square. I want you to just do a short a very short kind of triangular point in terms of height. And I just want you to do one centimeter. So with the ruler measure one centimeter, probably all dark, where that is. And then with your 2nd 1 I want you to do two centimeters. So just do measure two centimeters from that center point where to play? Just Probably. It'll adults over there, then finally, what I want you to do here is I want you to do half a centimetre here. So we've got half a centimeter. So we've got these different points. I never three square. You've got one. We've got one sent to me to that. We've got two centimeters here and we've got 1/2 centimeter there, just like that I want you to draw in your angles of your roof. So we've got this 1st 1 from here to the corner of the house Lets it drop down by a little bit on. Do exactly the same. Over here from the corner. Just lets it drop down a little bit. There. You got your first reef. And again, I want you to repeat that process, My doctor slightly out there, So I'm just gonna make sure I've lined it properly. I just want you to do that. So from the center just lets it drop from that corner there and just draw the line ups about little points on Dave. Exactly the same on the left side on for the final one. This one's gonna be a little bit steep. This from that center point. We just want to drop it slightly down to that center point and again here. That's it. Cross across there. And that's a so you can see. Now we've got three different variations off roofs. Now, if you think about it, what we use up depending on the floors that we have in our house, that's another consideration that we need to think about the difference in the level of floors. Usually the roofs, the higher roofs have an extra floor. Like, for example, in my house where we live. We actually don't have a triangular roof. We have what we call the trapeze IAM style roof. We have a bedroom built inside the roofs is like an attic. So depending on how you want to construct your house, you can decide how big or short you want the roof to be or how high or how tall you want the roof Today again, if you're doing a complete, whimsical style of her drawing and which I tend to do, it doesn't need Teoh reflect any of this. But if you want to just out of interest, just decide how many floors you want and then bass your judgment on how high you want the roof. But there's no exact formula, for this is just have a bit of practice and form. So this is what I want you to do this on the 1st 3 boxes on. Then on the other ones. How about practicing a different style of roof? So again, all I want to do is drawing them mid points so this has got the exact same with. So we've got 1.5 centimeters there. One of 1/2 centimeter here again, Another 1.5 10 to meet it there. If you want to draw your triangle roofs here at different lens, you can do that. We can maybe have a huge one over here. Just bring that piece of paper down so we can have a huge one. Maybe here, say, three centimeters or maybe three and lasted 3.5 Thursday like a riel classic cartoony style house with a huge roof there on may be here we can do something different. So estrus do a quick triangle roof here, just like we did before on the left and on the right. It just gives it some character, you know, designing different roofs. No point having the same roof on everything that you designed. Just give you. Vary. It just gives you a little bit of experience. So let's just let's design what we call a trapeze IAM style roof. So what minute? It is less for this one. Actually, what we'll do is we'll design maybe another triangular roof and just have it slightly different. So with this one, what we'll do is we'll maybe have 2.5 centimeters going. LaPierre Andi. Then with our wider rectangles that we have here, we'll go for the trapezius tile roofs. I think that will be a lot better. So again, over here, let's just repeat what we did above there. So I've got to 10 to me. 2.5 centimeters there in the middle one. I've got 3.5 there and let's do maybe 1.5 on this one. So 1.5, baby It I mean, you don't have to do exactly what I'm doing here. You can, you know, you can have them at any height that you want. I'm just gonna make these triangular roofs again, just like we did before. And if you just follow this, it's just a nice way of getting used to drawing in of roofs on. It's always a good idea is to draw the front of your house before you start doing the perspective lines and, you know, making it three day. It just makes it a lot easier. So we've got that there. Let's just do a zoom out and see how this looks. You can see with houses. We've got the normal square houses, these maybe just to floor houses that we just do a little. I'm just indicating with you, you know, with the line going across, Maybe that's one floor, two floors. This one's another floor. It's the ground floor and maybe have another room or peer. And then this one again, maybe just a to four house with a really, you know, low attic over there, and over here with the rectangle, you maybe have three fours in these ones. On some of them, you might even have four. With such a high extended roofs, you know you could have another bedroom appear. Why not? Or an apartment over a design studio? Why not designed whatever you want? Make your house a little clack? Or have what ever you want in its. That's what art is all about. Expression
9. Foundations & Roofs - Part 2: So let's go on. Have a look at these ones is there's gonna be a little bit more different from the ones on top. So let's design maybe trapeze iam style roof. So for this one minute, using a zoom in again, let's get good. Zoom in on that one so that you can see this properly. Let's concentrate on this first box here. So I want you to do with this one. Is that this Should be around about four centimeters across, so you can see we've got four centimeters going all the way across with this. What I want you to do is I want you to measure half a centimeter from each corner in. So let's look at the top left. Let's measure half a centime toe. Put a little point there. That's half a centimeter there. And then I want you to do exactly the same pace. We've got another half a centimeter there. Measure that on. So you've got these two points now, what these two points are gonna act is kind of like our triangle triangle points, but because we're gonna do, like, effective, like a trapeze iam shape. This will give us a slight. A guide that will be smart, you know, should be equal on both sides. So that would make more sense. You're probably thinking, What is he going on about? So let me just show you. So with this, what I want you to do is with that point that you do did here. And there are only two Drew. Another point, a secondary point. That's one centimeter. Well, let's actually let's do 1.5 centimeters will be 1.5 centimeters on top. You got another point there and then again, 1.5 centimeter. On top of that, you can see we did that where one points there, half 1/2 a centimetre coming in from both corners. Then we went vertical again and we did 1.5 centimeter going on top. As long as these two points of the same, that's what it's really all about. So here comes the fun part. Now what we're gonna do is the top points that we did want you to put pretty pencil there. I want you to do a angular line again, going to the corner of the house and just letting it drop down a little bit, as we did with the triangles on with this one already to do exactly the same. Bring in that line. Let it drop just slightly below the top part of that house. And if you want to make sure that your lines they're dropping exactly the same, you can just get you a ruler on. Just line it up horizontally with this line here and you'll know whether you've dropped it down, you know? And what we're gonna do now is close these top two points on There you have it. You've got yourself a nice trip. Easy. Um, style roof. Now you can design these in various proportions and sizes, and that's what we'll do on these next one. So we did this one, which was quite steep coming in from here. Let's do another one. Uh, that's a little bit more higher, but maybe even more steep. So what we'll do is we'll do one centimeter coming in. So let's do. Let's measure Step one, Measure one centimeter. Coming in from here. Put your little dot left. You're exactly the same. This side one sent to me to coming in from here. Put your little dog there. And for this one, Let's add in three centimeters on top. So we've got three centimeters. Keep your rule as vertical as you can. Three centimeters there. That again from here. Let's do three centimeters again. I mean, if you have a right angle tool that work really good as well. So if you have a rhyme and I've got a right angle tool head. But you don't really need this on. But this is just a nice to have type thing. So I've got myself now. It's a right angle, you know, Tool hair, right? Angle, triangle. You know, if you want to get the exact point of measure perfectly a player than you know, you can use one of these and just have that measuring going across the bottom. There. You've got your exact point. But to be honest with you, you don't need one of them. I'm not going to use one of them for this class. Could I just want to keep it nice and simple? Simple XYZ Best eso are we going to do now is do exactly the same as we did with the 1st 1 here. Use them top points to bring down your diagonal lines over the corner as we did before. Bring them down again from the other side. Close itself from its up. Look at that. You've got yourself a gorgeous little trip. Easy. Um, stale roof on. It looks quite nice. That, I think, is one my favorite styles of roofs for the houses I usually do me drawings on. So how about we do another one here on the 3rd 1? So let's do again with this one. Maybe do one centimeter again from the corner. So it's true. One centimeter there Do another one sent to me to hear. And let's have this one at 1.5 or we have this one at three. Let's maybe have this at two. So we'll do this at two centimeters. Little dot there two centimeters high. It's all dot there. Andi, bring this in as we did before. Nice and easy, Onda. We have basically just created nine different house styles with various roofs. Now excoriates That doesn't say Okay, cuz I'm getting excited on. We're going to come to the fun bit yet, So there we have it. So we've got true PDM style. How? Roofs with wide front bases. Foundations for the houses. We've got some tall houses with some really calm style roofs on. We just got some kind of basic small houses with triangular roof. So there we have it, folks, What I want you to do is I want you to just have a quick practice out that, um really, you know, just get a bit of on idea of how houses are generally drawn. I mean, this is how I draw houses. This isn't that you know that the only way to draw houses there's so many other ways, but just to keep it nice and simple, I want you to just complete this first exercise, and then we can move on to the more interesting parts. So let's move on to them now.
10. Perspective Single House - Part 1: Okay. Welcome back. Now what we're gonna do is we're gonna have a look at exercise to, So I want you to have a look at your second exercise sheet, which is this sheet over here. I'll just do a quick little zoom out. You can have a look at this. Andi, basically, what we've got on this is we've got one, two and three drawings on them illustrations, and they're gonna show different horizon line levels. So basically, as if you remember how we conscripted our first house when we did a quick little concept sketch here we did a horizon line, and we did a couple of points on the left and on the right hand side, Onda, that was just to choose which side. We wanted our vanishing point today. And we used the left. What we're gonna do now is over here, you can see I've drawn in the horizon line, but I've just put two point century can decide whichever point you want to use. This is not two point perspective, but we're still just concentrating on one point perspective. So the both the points that for your own choice, So if you decide to use this point here, and all your Dagnall lines are gonna go towards that point if you decide to use this one here and all of them are going to go towards this point. So what I want you to do now is we've practiced our roofs and different sizes are front parts of our house. I want you to practice now, get you rule or out on D. I want you to basically just practice them diagonal lines and create some variations with the levels off the horizon myself. This 1st 1 over here is right in the middle. So this horizon line is right in the middle off the square part of the house. And that's that's similar to what we did in our concept sketch. We have that horizon mind going right in the middle. So that's gonna be pretty much similar to the 1st 1 The 2nd 1 have dropped the horizon line that level with the base off the house. So what we're gonna do with that create our perspective, lines diagonal lines to the vanishing point and just see how it kind of alters the look off the house and then finally to put the horizon line above. So it's like nearly on the center point of the actual roof. We're going to see how the house will look once we've done the Dagnall. So let's stop with that one. So what I'm gonna do now is I'm gonna I'm going to stick to the left hand side. But while I suggest you do is maybe print two versions of this sheets off on do one that go to the left hand side on your second cheat, do another one that goes on the right just together of a field and variation for its. So let's just get the zoom in. So we get as much of the diagram in as we can on the screen. I think that'll do will keep its up the angle. Andi. So we're just going to do the exact steps that we did in our concept sketch. So from the top to the left inside, that should bring the lining. Bring that line in, then the next kind of edge is this one here. Bring the line in from here and you'll notice that I've not dropped the roof like I did with the previous once. So, like in our concept sketch here. I dropped the roof slightly below the point off the top part of this square. I'm not going to do that for this because I just want you to see how the's houses are gonna look. But you can do that if you want. If you want to just drop the line a little bit and do that by all means, go ahead and do that. So the final corner on the left hand side we've got down here draw your line in there and now I want you to do is I want you to decide how, how kind of long you want your house to be. So if you want, you have to be this long. Then you would just a drawer in a straight line there. If you want it to be a really small house, maybe have it up to here. So that's entirely up to you. What we'll do is we'll do about drawing a couple of I insist it will do. Maybe one line here, bring it in. There were no the line there on that gives you a slight different size of house and maybe even do 1/3 line here. So a really, really long house on, you know, make as long as you want. So basically, what we're gonna do is exactly the same. So the next step is to just line it up against the Dagnall and then just pull it across that way. So just bring the sheets in down here, pull it across that way, and then we've got our point here on the house. Just want you to join that soft with the top part and again. Pull it across again, join It's up. Bullets across again. Joining took to the other point. So there you have it. So we've got this. Looks like this. Three houses are all joined up out there. Boy, it's again. It's just to illustrate to you how this would look so with your razor. Just raise out their lines. They just drew in before. And what that will do is that a court your house in a nice a way that he can start to think about, you know, the overall structure of the house that just made the final line a bit more prominent on just dark. And your lines What that is, give you that lovely structure, and it will be a lot more easily people. So first house, let's do exactly the same. So that's where you similar to our concept sketch again. You just have a look here. You've got a similar. Very similar. Look there on It looks very nice. I always like to use the horizon line in the center. Sometimes I'm a very etiquette. Depends on the illustration that I'm doing.
11. Perspective Single House - Part 2: So let's do exactly the same for this one. So we're gonna use the left side again on Let's just bring it in from the top and see how this one will look. So bring it to that midpoint on your vanishing point from the second corner blankets in again on from the last corner. You don't really need to bring the same because it's level with the Horizon line book. I just did it for completeness. So again, if we just maybe bring the house saying this much drawer a line, then without ruler using that same angle drag it's across until it hits the point that we did our vertical on. Close it up there and they have. You can see it looks completely different, doesn't it? In terms of the viewing angle, it's like you're standing here and looking at the house from Bill O on. That's why it's like that's what the horizon line effectively represents on. That's also a nice look as well, sir. Just about them lines. So for this exercise again, just make your lines a little bit more prominent. If you want to, me don't have to make them from an analyst just exercise for you to just get a feel for when you do your class projects, which will be drawing a beautiful little housing. So there we have it. So there's our second horizon line. Variation on that was the first on the Let's Do the Final One. So this is where the Horizon Line is really high up the same principle. Say Method from the top to take it to the vanishing point from the next edge, take the vanishing point from the box, Maj. Take it to the body shooting point on with this one. Let's make it. Let's just make it similar like the top house. If you just measure just kind of use the top angle was your guide. Just do a straight line from here to the top, and then we can use the angle off the roof to just bring it towards. They're caught it off on. There you have it. See God, another lovely little diagram or illustration showing you some different angles that you can draw your house in. That's how easy it is. So easy to do it so easy to actually just produced this, and when you have a horizon line and a vanishing point. It just makes the whole process so much easier now, doesn't it? So there you have it. So what you can do is maybe just to shade in the top part of the roof if you want, you know, on the side shaved 10 on may be shaded this side just to give yourself Just make it look a little bit more interesting rather than just lines. Just roughly shaving thing you don't have to be really couldn't come out and again this one maybe just shade in this side could possibly side for possibly be in the dark But we look at shading in one of the next lessons are gonna be coming up on shading plays a vital part in your illustration especially if you're using pencil or, you know, doing black and white drawings. Shadings is great human in color Drawings of shading is is a vital elements of any drawing , Really? So let's just shake that thing on there we have it. So number one first house with a sensor horizon line second house with a horizon line right at the bottom third house with the horizon line a lot higher as that for this part of the class. So practice that Give it a go. Also practice another sheets of this Your prince. As I said before Prince out another she do the lines going towards the right side now or just alter. Use alternation. Just do it. Maybe they left one on the top, right, one in the middle that maybe another right down at the bottom entirely up to you. Just get used to drawing this style, Andi or this method off, you know, drawing lines on. I think we're ready to move on to the next one.
12. Perspective Two Houses - Part 1: Okay. Welcome back. So what we're gonna do now is we're just gonna talk a little bit more about perspective, as we did before on it will be in addition to this. So let's move on to exercise sheet number three again. This is just about perspective on just coming up with some different ideas so that you have a good bit of knowledge before you start actually designing your final beautiful class projects House illustrations. So while got here on this sheet is if you have a lock eso again. We're on exercise number three on perspective. I've got three same same little drawings. Diagrams, if you like, off two houses with a horizontal wide with the horizon line going through the middle of the square on with the perspective vanishing points on either end. So what we've got here is three of exactly the same diagram. What we're gonna do is we're gonna do three different things with these diagrams. So number one, we're gonna look at what houses would look like if you decide to maybe draw two or three or four houses and I've got two houses drawn up here on this principle will apply regardless of how many houses you draw, especially if you're going to draw them in a line and I tend to draw. My house is in the line and various grows and columns, so this is just a principle to kind of understand how houses would look next to each other , and it's exactly the same as we did before. So what I'll do is I'll get on the zoom in on that so that you can see this a lot better on as we've been doing. Let's just use the left hand side off our horizontal line of horizon line on Let's use the left vanishing point. So again, I want you to follow this exercise with the printed cheese. Andi, let's start. So over here, I've just got simple house. I've just got square on a normal kind of triangle on that repeats right next to it. So what we're gonna do is we're gonna draw our lines going towards that vanishing point as we did before, quickly draw them in from each corner on. By this time, you would kind of this would be nearly your second nature in knowing that this is what we're gonna do. Three all the different thing. What we gonna do now is we're gonna do the same for this house before we actually cook this house open. Decide how long? Oh, how wide we want the house to bay. We're going to draw in them vanishing points for the second house. So what we're gonna do is we're gonna do exactly the same. But I don't want you to draw the line going all the way across. So I just want you to draw the line and make it end to the point where the first house starts. So from this one, remember to line it up to the actual vanishing point. Just bring your line in on end it there on same for the next one line, it's off to the vanishing point. Bring your line aim to the point that it such is the next house on from the bottom. Bring your line in, line it up against a vanishing point. Bring it in until it touches and off that house. So you can see here that we can maybe draw two houses that have varying lengths so we could possibly have this house here. That could be maybe this in terms of size, we could just draw a line here, just have kind of like a normal shaped house. And then this house could possibly go and extend all the way behind that house if we want, which you look a little bit odd, but you can do that. So, what this does? Is it just give you that point? So, for example, if you've got loads of houses, you're gonna draw maybe another house here, you've got another house here and even, you know, and even a smaller house here, you can just draw all of them that go towards that one vanishing point at the end. So again, with this one we're going to do is just cut off that roof so that we've got complete house just like we did before. Drug it across to the end, cut it off, and with this house here, what I'm gonna do is I'm gonna make the house be slightly longer than this one, or may or possibly just the same size. We could do that. Maybe on the next example. So maybe the house ends here, so we've got the point top point of the triangle there. But Where would you draw that triangle? So again? Because this house is in fronts effectively its cover angle this side of the house. You would only be drawing the line that goes up to that house find. So let me explain. So take your ruler, measure it against the corner off the angle, as we've been doing, drag it across as far as you want to go. Now, you don't have to do this if you want your house to say, for example, end here. So if you've got a really small kind of, you know, a really, really shallow house, eso If you've got a house here, then it's easy or we've got to do is just bring in the angle up to that point there because we don't know where the points is. If we decide our house is gonna be longer or, you know, as long as this one and all we've got to do is look at our angle first. If you look at your angle first, just drag it as far back as you want. Just close this up over here. Maybe, and then what that does is without having to work anything else out that gives us an indication that this house is going to be about this size is probably going to be about this much hair. But it just saves you from having to, you know, effectively draw exactly the same house again and again and again where you don't have to. You just drawn this one line that represents that house, and it's just makes the whole process so much easier. I mean, if you want to, you can draw in with the perspective. Eyes draw them all the way through that house. Uh, go ahead and draw this one all the way through the house all the way to the vanishing point on the top one as well. And then, you know, you can just close it off as we did before. But I just think it's unnecessary for you to do that. So, you know, you've got this point here on. You can see we're pretty much spot on for the house to be here. See if you got the point there and then you just square it off here, it just looks really messy and complicated. And you don't really need to go into that. You know that technicality part of it, so we'll just get rid of that. Don't need to do that. Just stick to what we did before on raw about them on the horizon lines. I'm sure you've noticed up changed my razor. Got myself a decent raises. This is just a pen, a razor. Don't if you have one of these, if you do great, if you want to get one of these. And while there is all the materials, even though there's very basic materials I'm using in this class on when enlist them, as per usual in the resource is sheets that do check. That's how in the class description. So what we're gonna do is roll these out here. Let's brought this blind out there that we did for Indication purposes, and then let's just make our lives a bit more prominent. So with the first house, let's just go in a little bit dark there and that close. It's off from the top. Close itself from the bottom on, Obviously, because this is printed paper, you can't roll that's off. This is just the diagram purposes, but when you do come to drawing your own house, you'll be raising out your horizon line so you won't have this line, you know, running all the way across your house drawing. So we're going to do the same here across next one all the way there or the one going across that. And then what we can do is without pencil just to clean it up will, you know, make it look a little bit mawr nice on the eyes and make it stick out a little bit more. Just you society pencil. So just maybe shade in this area B as a refugee one, you don't need b needs at this stage because we're only practising our way. So again, just bring that same shape that that and did the same with this one. And you can see in some, you know, just coming up with simple line work. And, you know, some really easy method can just make such an effective drawing. I bet you didn't think it was that easy did. Yeah, Well, sometimes in the end, it sometimes you think something's we're gonna be really, really complicated, but it really isn't once you know how to do it. So just gonna about these extra things I did hear on There you have it. So we've got our two houses lined up next to each other following the the same perspective point on Vanishing Point on the horizon line, and it's looking really nice, So let's move on to the next one.
13. Perspective Two Houses - Part 2: on, Let's see how the houses would look if we use the right vanishing point. So again, I just want you to do this to practice. So let's just give you a bit of an idea and gets here used to do it this type of drawing on . Then eventually you're gonna get so good at this that you won't even have to bother with the horizon line or the vanishing points. You just know where they're gonna be on that all comes with practice. So all I'm doing is I'm doing exactly the same on doing this house first and then with the next one using the right side using the right vanishing point, getting them diagnosed lines and up to the house on getting that bottle morning up to the house. And there you go. So easy. So with this one, maybe we can make this hat these houses really, really long. So maybe have them up to here. Andi, just get you diagonal. Take all the way across to the point where you did the vertical line caught. It's off on with this one. You don't even need to cut this off anywhere because we can keep these the same left. So, Rob, that's out as we did before on that one is don't so just add a little bit of shading toe that like we did. But the other one just with Assaidi a pencil till you page if you want to, it makes it easier to do the shading lightly shaded. And you don't have to do this perfect. As I mentioned before, I mean, I know I keep repeating myself. You don't have to do this perfect on that perfect book. I really just want you to, you know, just think about Jenna the basic Sarah don't want you to get bogged down with too much off the details and technicalities because we're going to do a lot of detail work when it comes to the final plus project. Well, well, I'm going to do a lot of detail work for that, because I've just I love my detail. And I'm sure if you followed me on my classes and skill share. You know, uh, I just I just bought my detail. What? So there you go. So we've got some nice a long extended houses there on for this final one. What? I want you to do is I want you to use both of these sides for each house. So what I mean by that is that it's the first house there, the one on the left. I want you to use the left vanishing point to use that on. What this will do is create a bit of their variants in what we've been doing. So when all you know, designing the same house is going the same direction, and then this will give you a nice little idea on how to come up with a scene where you can draw houses that have different angles in them. I mean, we're not doing two points perspective here, So, you know, just don't get this confused with two point perspective. This is still one point perspective, but I'm using two different points in pond born perspective just to highlight this technique. CSO with this one, we're using the right as we did with the one about here. So again, let's just have this one in here. And so these isolated houses that right next to each other, one facing one way you're facing deal the way so you can see that so We've got two houses with the different vanishing, but might might look a little bit odd. Boy, why not just try to try it out and see what happens? So this one, I might just make it this much and again use the DAG no drink, drag it across, cut it off this time with this one. Um, I just bring it in to here. Might make this a really shallow went. So not very deeply house. So bring that. They're just bring that cross over here on. That's about it for that one. So are we going to do is we're just gonna what, Within a day resolve There's a baby crying in the background Are things you fed upon my house? Boring isn't shaped eso Let's just bring this across over here on a roll this out So it's hold on on. Let's just do a little bit of shading work. So make the image pop. So just a bit of shading is gonna tell my page that side Just make it easier to hold the pencil, and again, that's another great reason. Buy pencils always, you know, good to draw with, especially when you just sketching. If you're so because it's so flexible. You don't graph. I sort one of my favorite materials. I mean, I love during an Incas. Well, Bassa strongly suggest that you do not door in ink, especially at this stage in King. Would work great after you've done your graphite sketch, if that's what you want to do. If you want to finish off your sketch with, you know, some nice line work. But you know what? This day, just concentrate on the pencil sketch so that you haven't You've got these two houses that are coming together. You might think it looks a bit odd You could even cost as a bit abstract. But I just want you to kind of play around with this. So try this out on this exercise sheet on that. I'll give you a nice bit of experience designing some houses with one point perspective. On that way, we can move on to some of the more exciting elements of the houses, and I think that's what we'll do next. Let's move on to that
14. Window Design - Part 1: Okay, welcome back. So what I want you to do now is have a look at exercise number four on. Yet that's what's it's all about. It's about the windows off our house Now. This is where we start having a little bit of fun because windows absolutely gorgeous. As far as I'm concerned, I love windows, the shapes of windows on houses that just really add that kind of whimsical, cool little feature that every house or most houses have. I mean, you don't want the house that doesn't have windows, because that will be quite a depressing house and wouldn't take. So let's look at windows. Now windows come again in many different sizes and shapes, just like houses come in many different sizes and shapes. On what I've done here on this template, Terry's have drawn in four boxes, so these just normal four square boxes on. I kind of really doing this so that you can have ever practice on creating some nice window frames and follow along with me on as before I'd like to do is maybe prints off a couple of these sheets are this window exercise for sheets, and then you can follow me along with the ones that I do on this class video on this link. Andi. Then what you can do is then you can start creating your own designs and that I'll just give you a bit of a, you know, a nice a bit of practice on this window creation. So instead of having to draw every single one of these out, it's just so much easier to get it printed and start designing. So we have one, 2345 on six different shapes. The windows are not limited to these six shapes. Absolutely not. That can be complete variations of all of these shapes, but I've just tried keeping everything nice and concise on this sheet, so it gives you a little bit of variation. So what we'll do is we'll do a little a zoom in on this, so let's get quite close to this so that you can see. I think that's close enough. So I want you to just get your ruler on, get your pencil and look at this first window shape that we have on the left. Now windows are made up of usually glass on wooden frames or plastic frames. Depending on the type of house that you're drawing on, you know your own personal preference. The design will kind of depend on the materials that are used for him. And again, we're not doing realistic house during their We just do it kind of fantasy. Whimsical the style house drawings just to keep it nice. And lights now get too bogged down with too much detail. So what I'm gonna do is I'm gonna kind of go midway and I'm gonna kind of base these window designs on maybe wooden frames and glass kind of, you know, throughout this class, eso it starts off with the 1st 1 So the 1st 1 here about the shape of the window, this square on what we can do is we can just added Maybe if we measure this this one is approximately two centimeters across that if you just roughly get the midpoint of that as we did with the houses before, just market little dot where the midpoint is. I've got it at one centimeter here. That's roughly the midpoint, and then the same at the bottom. You just mark out that midpoint value to give you a rough indication of where the centuries and then all I want you to do is draw in a little wine, and there's kind of the vertical frame handle. If that's what it's called. I don't know what the technical term is. I'm just gonna call it the vertical in a frame. So that's the border. If you're right, is the founder that in a border of the window? So that's going straight through the middle on? Let's keep this one nice and simple and classical outlets do exactly the same on the left and right. Just measure out roughly halfway through on that side and then halfway through on the other side, it's about their or you don't even need to do is precise measurements. Just get your ruler and maybe, you know, just drop it down a little bit. It doesn't have to be in the middle. It could be maybe on top. But that's what we'll do with the other ones. So we'll just make a little why they have. It's simple as anything symbols. As we've got fall, it's all windows divided up. Now what? You can do it. You can start going in with a lot of detail, but out for this kind of lesson. I'm not gonna go into too much detail right now. What we'll do is we'll just sketch out the kind of the building block framework for each window, and then we'll start adding in some details. So we'll do that for each a row off the designs that we've got fourth squares going across here. Let's keep them similar self I'm going to do with this one is again. I'm gonna do a big boy value. So around about there for the vertical. So that's a dessert that was designed, one that we did on the left. This one's designed one with just the four little squares inside inside the actual window. And over here, what we could debate could possibly day, maybe to lots of that. So if you just bring you, bring your ruler down about approximately, approximately there and then you've got these small little rectangle shapes forming on the tough, and then again, just drop it down. Similar distance round about there. Of that, they haven't you got your second variation within the same design, so let's move on to the next one on what we can do for this one is we couldn't possibly if you just kind of level your ruler up with the previous design here. So level it up with this one here and just do a line going across so you don't have to do any kind of measuring or anything. And then again, but this one just make the line go across lovely. So what we're gonna do on this is we're going to divide this and we have this one split into two. We'll divide this one into three to just give it a little bit of variance. So if you want to measure it, you can. I'm not going to really measure it. I'm just gonna, you know, eyeball it on. That's why I want you to do or if you really, really, you know, adamant that you want to measure and get, you know, perfect distance between each then absolutely go for it. But not to worry, not to stress. We're not here to stress and worry about technicalities. We're just here to do nice little drawings of houses on in this term in windows. So we have a nice three by three shape going on there to get a nice little four shape there at 63 by 39 and then finally, let's let's go a little bit wild on this one. How about we do a complete different pattern on this? So what we could do is we could do a diagonal, so just do a diagonal from one corner to the other. I don't know the diagnosed from one corner to the other. Then what we can do is get your razor and I've got my lovely pen razor here. I'm sure a lot of your thinking. What's he racing with? It's just a normal penna razor eso again, with all the tools that I use in this class and there's not many at all, I'm gonna leave links toe. You know where I got these tools from? So you can have a look and, you know, get them if you really want to get them. But there's absolutely no real need for it. So what I've done here is I've just raised out that top little triangle that we did, and then from the midpoint. I'm just gonna day a line going up on there. You've got a nice little shape that conform a abstract e type of window. So again follow. Follow these designs that I'm doing, you know, in this lesson, but then prints off another streets and maybe do another complete set of designs. And you can go, as you know, was wild is an abstract if you want, it's your house and your window's. You can have them any way you want. So now we don't these four, let's added, maybe a little bit more detail on it.
15. Window Design - Part 2: So for this 1st 1 let's just zoom in a little bit more so you can see clearly that a bit too much on the zoom is that that's up. Very good. Is it? Oh, come on. Right. There you go. Right. So we got a zoom on that. So on this one, what we can do is these little ones that we designed, So this can effectively be like a split border in the window. We can effectively have. Maybe you know, I'm no there border within that. So all I'm doing here is with my hand of not using the ruler. I'm just lightly marking out where the inner parts off this frame all day. So on this side and just doing a small line up to this point, small and to that point on the opposite side over here and when it is exactly the same. You could do this with a rule around just if I'm not doing this because it tends to block the view. So just roughly live in this on again from here. We've got another one. That's probably the same. Now if you just tell if a path to the other end it will make the job a lot easier. So if we just do this from the left and bring it up and join it up to that point that we left there before and then again join it up again from that side and then finish it off from that topside on there, we have it. So that's looking a lot better than isn't it? Looks more like this. A wooden frame structure across going in that little window shapes so again with the other ones. What I'm going to do is, and then it pretty much do exactly the same is going to bring it up from here, go all the way up, and this is what I want you to try doing. What this does is it adds a little bit of death to the drawing so that it's not just a line drawing, and then when we come to actually coloring it in or, you know, shading it, if that's what you want to do, then you know it makes it a lot easier. It gives that kind of you know, more 33 dimensional effect. You don't have to do that. You can leave. Leave it as it is, you know, with just the lines. This is purely your own personal preference and choice. I like I always like to add details. I mean, if you know, May of if you follow me on, like all the channels that you'll know that I tend to go overboard with detail. I really, really like detail in my artwork. Andi, that all good? So you can see you've got a nice little pattern going on there on what we can. Also, there is we can also, with our ruler building an outer border for all of these. If you if you choose to do so on what that can do is that conform the window sill if you like. So we've got this little window still protruding at the bottom on or with women is adding these little curvy lines toe. Finish that off and maybe on the top as well. If it's in this paper the other way around, it's easy to see how you know the distance that you're adding on. So just from here, if we just square it off, just leave a similar distance on top. Square it off and it's bring it in from the corners with a circular wife on. Turn it back around and there you have it. You've got a nice little window frame going on over there. And if you want, you want to keep adding more detail. Go ahead and as much detail as you want. I mean, if you want to add a little in aboard it here, go ahead and do that. But you don't have to. I mean, again, I want you to follow this. But if you feel that I'm going into much details, then just stop where you're comfortable with or you know what you want to do. So there we have it for the 1st 2 Now for these All this while there is, I'll just quickly draw in roughly with my pencil again you need. So I would recommend you do this with a pencil at first. And then once you happy with the lines that you drawn, you know, take a bit more time. I'm just doing this really quick for demonstration purposes. I want you to spend a little bit more time on this. Use your ruler If you really want to. On then you can outline with an incline liner or just outlined with, you know, a darker pencil are colored pencils entirely up to you. So you can see here. I'm just growing these little boxes within them. Nine boxes, just I did with the 1st 1 Really rough. I mean, if effective, least very sketchy. Drawing isn't say so over here. What can do is, I might add, in amore thicker windows still So just dropping that ruler down a little bit more, taking it across and then just finishing it off over here and maybe having another pattern or another bar underneath there just to give it a variance on. We're looking really good. So turned the piece of paper around so that you can see the distance that you're drawing. So the rumor doesn't cover it up and again, maybe might make this a little bit higher. Bring that cross curve it's in and maybe have another one on top and you can just keep going. I mean, you could make the layers and layers of these borders and frames. I mean, if you notice when you're ever like walking around, you know, outside. When you look at the old Victoria buildings, especially in the UK you see that have so much beautiful architectural and designs going around the frames of the windows. It's just absolutely gorgeous. So with this one, what we do isn't dinner. Maybe just bring in a line from here to draw the window, the glass element of it on. Just border this off on Just bring in that diagonal just to follow it through it effectively. We're just drawing the shape within the shades. That's all we live in. Nice and simple, nice and easy, Nothing too complex on. Same for this little triangular paths at the bottom. Just bringing that same on I think that's about it for that one on may be, if you want to add in maybe some in the windows there you can just added no wind there. Maybe I didn't another line and then just split this into further windows and, you know, go, you know, go old all overboard with the details if you want. If that's what you like doing like me and maybe just adding another line here on just to finish it off, it looks organized, talk, symmetrical patterns. So again, with that one, I'm just gonna add in maybe a nice block. Instead of curving the edges there, I might just make them straight. Just like that. Just a show. A bit of a difference. Soon that piece of paper over on do the same on top. You don't have to do the same on top. You can have a complete, different design on stuff. I mean, if you feel that you want to curve these in, then go ahead. I think that's while do you get out of these ones in? I don't want to call the top. I I know they call the bottom. It's a It's a window itself. Yes, we call the window sill here on what this top part of the frame is called. Might be worth checking that out on Mr Google. So let's just zoom back so we can see all our lovely window designs. They're on. They have it. So we've got nice of row off windows going on over there. What I'm going to do is this was all in the square design, so this is usually a common design for a window is usually in a square, or maybe in a rectangle shape that we have here on this shape that I got on the next one down. This is basically a square with a curved tops is like an arched top that usually looks quite nice as well. So if we just quickly maybe drawing a couple of these while they was out during one example off each of them on, then I'll speed up the video so that you can see a lot the other patterns, and then you don't have to sit there and listen to me Go on with myself while I'm doing all this. So basically, we're just repeating ourselves here. But just measuring the mid mid point off the actual window on while I'm gonna do is I'm gonna to try replicating the designs that I've done on top in all the shapes just to make it a little bit more uniforms. So again, in the centre one here, sensor point is around about their center. Point is around about their bring gets in, and what we can also do is we can actually what will make it a lot easier is if you just put your ruler on the one on top and you just line it up, that will actually make the job a lot easier, so I'll just zoom back. I will quickly do that in real time on all fourth or four of the actual design. So what we're doing is and this all kind of help you to get this done a lot quicker. So my rule is only this long. So what I'm gonna do is I'm just gonna line it to appear with this top on top center section lying it's up. And then this will literally take me all the way in the center for every single one of these window designs that we've got. So is this one here? I just movies. Take a rope. Seacon. See? So again just lining it up with that top one these onto quiet. Easy. And you just have to join the points that makes the job a lot easier on these diamond shaped windows. And then we've got circle at the bottom. Keep your ruler nicely lined up on They have it. So we've got the vertical lines. Don't
16. Window Design - Part 3: on. What we'll do is we'll just add in them horizontal lines. I'm just going to roughly Aibel, this one. I'm not going to measure it out. It's roughly around about there on that circular one, and then we can go in and do our little inner borders in there out the window sills and maybe add a border around that top Cuvee area on this next one. What we can do is we could possibly divide this one up into a few more panels. But what we'll do is we'll do that maybe on the next one. So let's just keep it nice and simple. So again, this is the same similar type of style as the square. We just got a kind of stretched out square. Basically, we've got a rectangle of vertical rectangle. Now you can also have that rectangle going horizontally like we did with the actual houses . If if you remember, if we have a quick look at what we did with the houses we had nowhere me sheet has gone so although there it is so again with the house is what we did Waas way. We had some reptiles that were going sideways for the foundation for the base of the house and the handsome rectangles going up is using that same method, same principle to these windows. You could just change the shape around as on how you like. And let's continue with this on. This design is quite nice designs of every Gothic style. Eso just was even a little bit on this one. Let's get a bit of resume is you concede to Windows at same time. So what we can do? You can put this off here, do a nice horizontal line there, and then maybe have another one here for the basic quanta. This is a nice basic one continuing, going at the bottom, just joining in them corners. You've got a nice little cross frame and then with the window for the circle again, just eyeball it on, bring in that line and then what I'll do is I'll let you have in the details on the other ones. I'll just quickly add the men on this and a quick I'll just do it roughly by hand on what you can do is spend a lot more time doing this on. What we've got here is we've got a nice bit of window design going on. I mean, it's a lot of fun coming up with these designs and your own window designs. You know, it just gives you that bit of creative, you know, permission really to design your window however you want, and that's what it's all about. That's what this class is all about, having some form with sketching, not getting frustrated or annoyed, because that's not what art is about. Art is about expression as I keep going on with myself. It's about expression on. It's about enjoying yourself. So let's just finish these ones off quickly. Here on. If you're using a pencil like me, you're notice that you've got to constantly keep sharpening its again. I mean, I do have a mechanical pencil built for the purpose of this video. I'm not used it because I just wanted to keep things simple. But if you have a mechanical pencil, then that we had definitely use that one. It will save you a lot of time, having to sharpen again and again when you can see. All I'm doing is tilting my piece of paper sideways to make the job a lot easy. You know, again, you don't need to use a ruler for this stage because we're not really doing our finished piece of Web. But if you like to and if you'd like to have everything perfectly straight and go ahead and do that. So let's just finish this off here. Maybe just cult in the straight lines of vertical lines right in the center. Onda. What we'll do is we'll just carry on with this on. We will finally hopefully finish this window one on a quick little time lapse, and then we'll discuss some of the patterns and the designs that we did. So while there is, I'll carry on with this. And once I finished this actual column off the basic ones and I'll just speed of the others and then you'll quickly have a discussion. So let's do the final one here while snow this penultimate one of this column. It's the diamond when I do like these diamond shape windows because you get these in a lot of castles, you know, like old English castles. You get a lot diamond shaped circular shape windows back in the day. You don't usually get these in modern houses now bore If I was to build my own house at absolutely. We have one of these diamond windows. I don't know about yourself, but I love old school. So there we go. We've got that one done. Quickly do this circle. It's little Billy's little arches and just do a little straight line in the middle. As I'm doing, I'm sure you yours is gonna be a lot more neater than mine. I've got on the all time or on for the video lessons that I'm doing. So I'm doing this really, really quickly, Andi, we're all good ghost. So there we have a just adding them window designs on. Let's just do a quick little zoom back on. There we have it, folks. So we've got nice little basic windows in this first column. We've got square the circular arched top square We've got a rectangle we've got this rectangle with It's a triangle bits on the top. We've got a diamond design and a nice circle design. So I want you to do is I want you to follow me on this. Andi, just copy what I'm doing at in the window sills as well. I'll do that, but we'll what we'll do is we'll speed this off. Eso that this actual video doesn't take 20 days to completely separable. Let's just speed the video up and I'll see you once I've finished. Okay, so I've just quickly drawn in my lines. Let's just have a quick look at this. So we completed our 1st 4 on the top on the first row of the squares, added in some details, did exactly the same for this. But I just know added in any details at this stage, I'll do that after we go through this. So on this one. But I don't Is that just split the window up into 12345678 parts on on the next one? Why did I would put a split it into nine parts? I just followed the lines from the top all the way to the bottom. That top window on on this last one. I just created this design one in the middle of a little triangle, going in on the side. Just try. That's how you don't have to be exact again. Just do these roughly. Andi, I'll give you some slight kind of different ideas in my inspired to do your own personal designs on your windows. So again, with the rectangle next one down, it was just a split in the middle on, then split it across with a couple of lines to have, like a tiled window and again with the one next to it. We've got exactly the same of the first. We just followed that to a physical lines to give it more tales on this one to give it a little bit of interest on. Then, on this final one, this abstract, funny type of shape window just got the triangle a couple of panels designed up. And then once you start adding in detail, these a look quite nice. Next designed down. We've got this triangle top rectangle followed exactly the same lines from the top Onda. We just created less tails on this one. More tales on this on. Then we had a nice abstract pattern following on from the one of both and then we looked at the diamond shape and again it's just following the same structure from the top, just a center line dividing it into two. And then we've got the vertical and horizontal lines going across to spritzed into more panels. And on this one we just split it with Mawr vertical lands to give it a bit more interest on . Then this final one didn't do an abstract shape because it probably wouldn't have looked too good on this. But you can. You could have done the triangle from here to there. Then maybe a couple of lives going on the top. Try this out. Print this sheet off again. Do the ones that have door and then come up with some new variations off have a bit of fun on. That's why it's all about. So the final one was just a circular window. So again, following on in the same suit and just following with a vertical couple horizontal. A few more on this one. Ah, lot more on this one, similar to the diamond check now or you can do on. These is you can just add on some of the window sills just, you know, drawing your window sills lightly. Draw as many layers off window sills as you want. You know Dukie. Keep it nice and light don't need to go into too much detail. As I said, just complete the sheets and the best you can. And then what we can do is we can start considering how we're gonna use thes window designs or, you know, the actual shapes of the windows on our houses. So that's what we're gonna do on the next.
17. Window Placement Flat Side - Part 1: Okay, Welcome back. Let's continue with our windows on a lovely little house sketch so you would have hopefully followed me on the previous lesson. But we get went through all these different designs and variations of these windows, and hopefully you would have tested out some of your own design, come up with some abstract shapes or just kept it really simple. You don't have to go all crazy on the details. You can keep things nice and simple on a lot of the times. Simplicity works great. So what I want you to do now is I want you to bring out your exercise number one sheet that you did before. So this one here, where we have the frontage, is off the houses and where we were drawing in just the roofs that shaped at the roofs. And what we can do now is we can add in some windows and place, place the windows effectively as placeholders, where we're gonna kind of map out our window designed. So what I'll do is I'll just get a little zoom in on this so that we can see this a lot clearer, and you can see from previous from the previous exercise. I just did a faint line going across the middle on that. That's what I kind of want you to do. I just want you to do like a faint line going across the middle of the square, part of the house on the top, left on what that will kind of indicate is the floors in the house of one, this one that we've got here, the little square house at the top left. We've got two floors, so that's the first floor. Or, if you like the ground for on, then that's the 1st 4 So in terms of having your windows placed on where to place them, that's entirely up to you. Generally, a lot of times in houses you have maybe a window placed here on the left part of the house and then one on the right on. That's usually where you have two rooms on the front end of the house on this on the top floor, and then you sometimes have a window here on maybe another window here on the bottom living rooms that depending on the size and structure of the house, so that's one way you laying out your windows second way. And what I'll do is I'll just do the different ways across this, because the shape of the overall shape of the houses same it's just got different roofs on them. So we've got the four going all the way in Divided Pretty, pretty much divided into the four quadrants off the house that we've got the top left top, right, Bomb left, bomb. Right, For what we can do is again just do a little faint line going across and maybe just do another divide line in the middle of roughly just eyeball. It doesn't have to be accurate. We just live in just a rough little place older. So we could also have maybe one window here, and I'm just drawing these windows in as little squares were not given any designs of the windows yet. So just one on the top left, maybe one on the top, right again as before. And then maybe just one here on the on the bottom, left on over here, we'll have space for the next element that we're gonna practice. And that's Yep, You guessed it is the door. So the door could probably go there. So moving on to the other one, That's just maybe do another variation on this one so you could possibly have a window Where On the top, Left again. Maybe another one on the top, Right. And then on this one, let's just do the opposite of what we did. Maybe a little window here and then over here, less space to put a entrance point in a door. So if you just have a look, I'll just scroll back on the camera or a little bit and conceal three. You can see on a nice square house with two floors these different type of orientations and placements off the windows. Get a four. Maybe you can have three and even up to him, and you don't have to have a window on the bottom floor. You could just have a nice hat on. And that's how it got. Have a house on the house. Well, that you might be able to in an abstract world. But you know what? I'm a beacon. Just have a little door here s So let's just move on to the next lot that we've got the bottom and this is the ones that we have the rectangles with the various heights off the triangular roofs on on this one. I just got these rough, squiggly lines, but I want you to do this. I just want you. So I mean, if you put squiggly lines on from when you were doing this exercise, just rub them out so that you've got an ass clean outline drawing. Don't worry about the roof. Just about these, like rough lines that you had on them guys. And you probably didn't do this. What if you didn't just get rid of them and then just get you a ruler on? Maybe just, like roughly, divide this kind of the heights of this rectangle into three parts, Tried imminent, but equal parts. And if you want to measure it, let's just see what the measurement is. We've got 4.5, so we've got maybe we could do one here in between 1.5 on day one, just a little dot there and then maybe another one over here, just near this three. So you've got roughly they're roughly the same level. And just with your ruler, go all the way across and draw in your three levels. So on this kind of structure, this long rectangle structure we've got three levels, three floors in this house. And what we can do is we're gonna do exactly that. Say, come up with three different placeholders for our windows. And again we could just split in the middle. So just get the Middle Central point off the roof and just draw a line in the middle middle of the house that time to divide the incident Nasty. It's all symmetrical boxes and you'll have six in total because we have three floors. So we're just doing exactly the same death. And again with this, what we can do is just place our windows, Maybe one Here, one over here, Andi again. Same on this 11 there and one there on maybe not have any windows on the on the ground floor. We could just have possibly just a door here or maybe even two entrances to doors. That's entirely up to you on over here. Maybe we could just have one window on the top left on that one top right and one in the middle left. That may be one in the bottom. Right and maybe have the door entry here. Have nothing here on have nothing here. So these looks quite stylized. Quite different on on the last one. Maybe just have the window going here. Another one going down here on possibly another one going here and maybe another one going Care just completed by putting another one on the top. So you can see we've got different orientation. Have a play around with this divided top. I mean, you don't have to divide it up straight down in the middle. We can even add a fume or kind of columns of windows. So, for example, we just wrote this out over here. This one is just about this. This one out we've got stick to the floors, the three floors. I mean, you could have more than 344 floors. If you want. You can even have a floor on the attic. So if we may be split this into three, roughly just do divided up into three savages roughly. Don't that. So you could possibly have a window here. Another one down here, Another one here and maybe one going care one here on maybe one on the end at the bottom, and maybe one over here is well. And then you've got speak for the entrance here and then possibly want here for the attics . If you have an attic room, you can have one in the attic, and you can do that on all of them if you want. So, like on the smaller houses that we had here, you could maybe have, like, a circular window going here on it will be difficult to fit one out there. But maybe just squeeze a little one on here if you want to him. And you know why. No. We've got a nice, tall triangular roof here. Maybe you've got to windows, is you? Maybe have a nice circular window here on another circular one going down there. They just adds a bit of variants and interest to your a tea house illustration.
18. Window Placement Flat Side - Part 2: so add as many or as few windows as you want. And let's just go in to the final ones and just finish this off. Maybe on this one we have you may be split this off in the middle or just actually on these ones. We could probably split these into force. I'm just gonna roughly did this by pencil. Not gonna use a ruler. One to a three, just three lines in the middle to roughly split them out. One, two and three, and then again over here. One, two, and three. So on here, we can have probably two floors. I'm gonna go to force, and here you can even put 34 So what we'll do is we'll put to force on this one, and maybe on this one will have a floor that girls slightly higher because this has got higher roof on. We could just have another one down here, and maybe on this one will just have this 14 So let's have a look at this. On the top on the bottom left. Maybe we have a square window here. Maybe we have a longer rectangular window here that goes from the top floor to the bottom four. Why not a another small one here on possibly another tall rectangular window going across the entire floor. And then maybe another one here and another one here and then in the roof. If you haven't at save, could possibly pull to rectangular windows like horizontal shaped over there on. That gives an interesting look, doesn't it? So we're over here. Let's just do the same. Maybe have a square window going k all the way across in this row and then maybe have some circular windows going here that go up both the line on the top on may be. Continue this all the way across on. How about having Adam have a triangular window? It one or will do a diamond? Actually, let's do it. A couple of diamonds. That's a very let's make this into, like, a nice pattern window house. So you've got a lot this here. Andi probably could have a door that answers from one of the sides, but we'll come to that later on. Then maybe on the roof area. Custom curved windows going on the top. So this house has got a lot of windows, but again. There's no rule. How many windows you should have. Money shouldn't have. Just keep adding practicing, come up with different variants on. It's just a bit of fun, isn't it? So for this last one, what I'm gonna do is I might day these. That's long arched windows. And I really like doing these type of windows. You'll see in a lot of the whether I produced the arts during illustrations of houses and how scenes that I do. I love using these arched windows that I just find that really nice, an old school because I'm quite old school. And so I said, Well, that's just maybe put in a couple of arch windows on the top. Maybe 123 and that's it. So I want you to just practice like that on this exercise. One she So now you would have had a nice little kind of front rough line drawing with some placement windows in on. Then what you can do is once you put all them placements and you could just maybe squiggling a little bit of framework going in. So I like them. Cross rain's going down there, but don't worry too much about the detail at this stage. I just want you to just get a feel for you know where those windows they're going to be on your house so you can plan on. Then the detail work effectively comes in at the ends. All I'm doing is just adding in them frames, you know, acquitted in the window frames like, you know, a little cross there, a little cross was more frames. And just like that, maybe just add in a couple of details, you know, just to indicate to yourself that these windows and not just little holes in the house So let's just quickly do that on, I think while there is, I just leave it at that point for these arch windows administered. So it was quite nice to have quite a lot of these frames going across across each one of these windows. I think they look quite nice and then just a little line in the middle. Just indicator. That's a window. And you can see already it's forming a nice little illustration off a frontage of the house . So what we gonna do now is once we've once you kind of completed its have a practice. Maybe Prince. A couple of these out again. These exercise sheets. I just do resume back as you can. See more of the sheets. Yes, you can just basically print this out. Have a practice as much as you want. I mean, you don't have to keep printing the mouth. And if you're happy by just doing following what I've done here, that's great. But I do recommend that you try. You know, you explore the designs of windows and explore the different areas where you can place them . So what we're gonna do next is we're gonna look at the horizon line and how the horizon line and the perspective on the angled lines likely drew before in exercise two. We're looking at perspective. If you remember how these lines and angles effect, how you're going to draw the windows on the side of your house in one point perspective. So let's move on. So that
19. Window Placement & Perspective - Part 1: Okay, welcome back. So as we did before, we just added in some window placeholders into the front shapes off our house is what we're gonna do now is, as I said, we're going to be adding in our windows on the side, faces off the house as we did in exercise to when we were looking at perspective. So just bring out your sheet from exercise to perspective on by shade This in. I mean, if you shaded besides, in all I want you to do is just now raise that shading out because that will just make it a little bit easier for you to see. So let's concentrate. Maybe on this first house here that we did. So just get your razor raise out those shadings. We don't need them shadings anymore. We can even raise out the shading area from the roof that we did on Maybe just with your pencil. Just add in those lines again just to kind of emphasize those lines. Make them a bit more from prominent. So that's what I'm going to do here. I'm just gonna get my ruler. I'll do is I'll zoom in a bit more So you can see that's a little bit better on the screen . So let's just go in, darkened them lines. So we know what we're working with. And with this diagram here, what actually helps is the horizon line because you can see the horizon lines extended right in the center. Remember, this is the sensor horizon point. The one on the one below the horizon line was at the bottom, and then the one next to that one right at the end, the horizon line is going through the roof. So we're just gonna concentrate on this one for now, and then maybe we'll work towards the older ones as well. But the one with the horizon line in the middle That kind of works nicely for the angles because we have a different angle going in from the top, and we have a different angle going in from the bottom. So I'm just gonna make these a little bit darker. So that video games affair with our window placements on. Now what we can do is I want you said Well, what you can do, you can maybe just add in a couple of windows here just for reference. Just maybe put some placeholder windows on the front like we did in the previous lesson. Maybe just add a couple here, maybe add a circular window here. Little cross for representational, um, purposes only. And so you've got front. I'll just finish this off with a window here so we don't have any elements missing. So you've got this from part of your house? Well, it could actually act as the side part of your house. This could possibly be the front, but that's entirely up to you. But now that we're gonna be designing our windows on the side of the house on, you can see that this this house we've drawn while I've drawn this quite long eso we remember. We section this off. We could have like, a shorter house in terms of length going sideways, we could have a longer one, but this will work nicely for this example. So what I want you to do is I want you to think about where you're going to place the window. So this horizontal point is effectively acting as that middle line that divided the floors in the house. So if you want to put your windows on the top floor or we need to do is draw in the vertical lines first. So if you just drawing some vertical lines lightly with your pencil, so say, for example, you want a window to be placed here. So if you just draw vertical line from top all the way to the bottom very lightly and draw another one from top to bottom, very likely. What that will do is that I'll give you kind of a guide for where, how high you're gonna go. Now let's do that for this one. So we've decided that we want a window here and we want another window here. So on the first and on the second floor, or were about to do this with your ruler, Well, you don't really need a ruler for it, but I'm going to use a ruler just to make it a bit more accurate in terms of the line itself. When you ruler, I just want you to place your Oula on the edge off whether line is just remember the vanishing point that we had on the left so that the rule needs to be towards that vanishing point, and then all we're gonna do is we're going to just drop the ruler from here. So I just want you to drop the ruler down, keeping the ruler on that vanishing point. So you just keep you finger there and they dropped the ruler at this position, and then all I want you to do is drop it down by maybe this much distance. It doesn't matter if you drop it down here and further down, it will just make the heights of your windows shorter. So I should drop it down by maybe half a centimeter. So about they're just ensure that your ruler is on the vanishing points s or just move this a little bit to the side. So you couldn't see so keeping it on the vanishing point. We just dropping our ruler down that we have this much distance from the corner and all I want you to do is draw in a light line, going all the way to that vanishing point on again from the center. What? They don't want you to drop your ruler to the center off the horizon lines. Just line it up against the center like we did. So we've got the horizon line here that we drew that was already printed. So we're just gonna put a ruler there and again. You put your finger here, left on finger here to hold the rule it out and then just with the right hand, just slightly raised that ruler off and then draw a line as we did with the top, go into the vanishing point. And now what that's doing is that's produced a kind of placeholder for our window. Now what we can do is with the placeholder, or we need to do is docked in those lines, and that will effectively. So the vertical lines of duck and them on the horizontal lines using those angles of darkened them. And that is your window on the side that works towards the same perspective and vanishing point that you drew your house in. And that's how you draw your side windows. And that's the same method that we're going to use for any window placement that you do on the side. It needs to follow the lines on the angles off the house that are going towards the vanishing point, because and this is why I wanted Teoh emphasize the one point perspective because it just makes it a lot simple. I mean, you could do this in two point perspective as well, but again, it gets a little bit of a little bit more complicated. Or should I say, a bit more technical? A few more steps you need to do and considering because this is a basic lesson, just a basic easy house drawing. Lester and I want to keep things nice and simple. So again, with the window at the bottom, for what I want you to do is I want we're gonna pretty much repeat the same pattern. But before we do that, we can actually add in more windows because we've drawn in our line. That goes to the vanishing points of this line. Here we can add in as many windows as we want, so we're doing this first window. If you just put your ruler next to the vertical end off that first window that you drew in , just bring it across and then drawing another vertical line on. Bring that across, drawing another vertical line, bring that across, draw another vertical line and finally bring it across again, draw another one I mean, you can doesn't mean it didn't really make a difference at this state. How you know the actual length of the window? Because all we're doing is we're just doing this for illustration purposes, and all I'm gonna do now isn't just going to use my pencil to darken the top on bottom wise , that sit on those vanishing point lines that we drill it and you can see now that we have If we just shaved this in light, leafy shade in the shapes that we've Dorian, we've got three nice windows all lined up really nice and accurately with the perspective off the house, and that's basically it. All we're going to do now is we're going to repeat this for the top on the bottom row. Now, if you want to maybe have just one window here or just one here that's entirely up to you. But what I am primitivism inner added maybe two and leave space for maybe a door that can be the entrance points of the house. So what we'll do is again we're going to line up to the bottom part off the house now, so that bottom corner to put your ruler there, put it right towards the vanishing point that you drew in or story that's drawn in for you already. Hold it with your finger so it doesn't move. And then with your other finger, just slightly push it up and you can see can see underneath the ruler. There, you can see that you've got that much distance. It's entirely up to you. How How you want the windows, you can precisely measure them. I wouldn't bother with that. I just, you know, just eyeball it. So you have a rough estimate off where that window is gonna be the bottom part of the window. So again, all we're gonna do is we're just gonna bring that line in all the way to the vanishing point and then bring it higher all the way to the kind of midpoint of the house where the floor is with kind of the four. Lining is on just maybe about there. Just bring in another line that does the vanishing point. And there we have it against. Now we've got these two extra lives that are going to be our guys for our windows on the first floor. So if we just Maybe I want to do another window here. I'm just going to use the same vertical point that had on the window on top on the one on the end. Join up the line between the two vanishing point lines that we just don't that that same with as that window and then maybe have another one underneath here soon with Take That I know and again do exactly the same time We believe that one and maybe adding a door in the next lesson on that one. So we're just gonna duck from these up a little bit drawer in your window frames, and that's about it for that one. So let's just put a little bit. Was shade in over here. And then once this is done, what we can do is get your robot. I just wrote about all these vanishing lines once. You happy with it all
20. Window Placement & Perspective - Part 2: Once the placement of everything is done, then you don't really need these vanishing point lines, so that's fine. You can get rid of AMC Theater. Things might look a little bit messy, but the reason for that is is because we want to keep things nice, accurate. Make them seem really, because that's what it's about. We're just drawing three D objects on a two D surface on the two D space, and that's the best that we can do. Used the rights angle's. So there you have it rubbed out. Just make the lines a little bit darker, as you can see them a bit better. And if you want to start adding some detail to this, you can go ahead and do that. I've shaded the men so you might not be able to see the detail that well, So maybe just add in some vertical bars for the frame in the frames of the windows, going up right in the centre on, then maybe some. Still, the paid makes the job easier, and then maybe just a line going across on the center and just noticed that the lines on the sensor he should also follow the vanishing point line as well. So maybe it's a better idea if you want to do a line going across, just do a light line going to the vanishing point in between the windows on then that will act as your guide. But just a minute. The eyeball it you can pretty much, you know, get it, you know, at least 90% accurate. And that's why it's really about We're not here drawing perfect houses with just drawing illustrations. Nice illustrations on indications of realism in our house. So just get rid of that line to get and get ready lines there, and that's about it, folks. So if we just draw maybe a little bit off details on this front part of the house, then you'll be able to see that just within a few steps, you've been able to produce a pretty nice little drawing illustration on the house. And you didn't even really need to go into too much depth with, you know, perfect perspective and, you know, angles and all. Source. All you did was you just do alive in the sensor for the horizon. Point on did little dot at the end for the perspective lines at the vanishing point on, That's about it. And you just use your pencil to shade in some window details. And how easy was that? That was easy peasy wasn't say yes. So again, let's just move on. Maybe to the one at the bottom. On what? We won't do the exact drawing on these because it's following the same principle. The only difference is when you're gonna add in your windows from the top, you're going to use the top part of your house. So that vanishing point and you're just gonna literally put your finger there again. Drop it down. Do your line going across. Drop that down further as further as you want. I mean, if you want these windows to be really big, you can drop them down here. So we drop this down right there. Just make sure your you know your ruler doesn't slip down while you're doing this, So just decide how far down he wants it. Hold it in place and just make sure that your ruler is going to the vanishing point drawing your line on. Then you've got your two guides guide one guy to to effectively just draw in your window frames. And while there was quickly deleted every year so that you know how to do it on this line quickly that's again to an itching points to make it a little bit easier to see and then maybe have a window here. A nice, big, tall window here and maybe have another one right next to it down here. That's about it. So all I'm going to do now is I'm just gonna add in those lines. And again, that lies just a rough little guide going to the actual vanishing point just like this. I'm just eyeballing this and then maybe just close them shapes off, maybe have another one here and just have a play around with this because that the form part of it is is where you're actually coming up with different shapes and designs for your windows. When I'm just doing these vertical lines is I'm not really planning this or anything like that or thinking overthinking it. I'm just adding in these little little deep details and accents and maybe on top of their just do a little stick, a line that represents that top part of the frame and just do another thick line that represents the bottom seal off that window at a little bit of shading is that's what you want to do on the top, to represent a little bit of light hitting the house, and that's about it. So where? Let's just rub that out so we can see it a lot clearer. And you can see how quick and easy it is to add windows to your lovely house administration . And that's about it, folks. So what we're going to do now is we're going to move on to the next element, which is the doors on. I want you to practice the windows first. The placement of the windows, maybe have some windows on this diagram here, adding a couple of window designs here having some more. And then on the last one, I want you to also added maybe some more window designs. Just I didn't roughly you know where you'd have the windows. You know, BB as abstract as you want on. Maybe, you know, add in some more windows on the sides here. Just test it out. You've got these diagrams. You don't have to draw the houses out again. You've got these exercise sheets on. Once you start doing this more and more often and practice on these exercise sheets, you will be a point where you can literally just draw without having to do horizon lines on vanishing points because you'll just become so used to doing it. And it'll just again become second nature, just like with anything else where you can easily, quickly sketch a house, adding some windows on it will look pretty much accurate. So that's what it's all about. So let's just bring a little zoom back on that. That's it, though, So we've placed our windows and drawn our houses, drawn our reus place that windows used to prospective wine. Let's now practice a little on drawing doors and coming up with some nice little ideas for doors, and then we'll do exactly the same and adding our doors where we've left some space here or maybe here on these exercise sheets. So let's move on to that one
21. Door Design - Part 1: Okay, Welcome back. Let's now look at one of the main features of our houses. And that is the entrance points that we all know as doors. So we've done the windows. Now let's do the doors. And now I want you to look at Exercise five on the exercise pack on just print. That's offers. Well, if you already haven't on on that. What? You guys have got three sets off three different shapes for doors. Now again, I've only gone three different and shapes over here. You can do as many as you like. I mean it. Doors are as varied as windows are. So if we just have a look at what we did with our windows, we have so many different designs for our windows. You can do as many of these designs as you want for your doors. I've just put these on this sheet just to kind of get you warmed up really? For your door designs. So let's delve straight into that front. So let's look at this first role that we have, which is just a standard rectangular door. Doors are really easy to draw again. We're just doing simple basic shapes sharpen your pencil if you need to, because we made at a little bit of detail on this on Get You rule already. So let's just do a nice zoom in so that we can see what we do on this. So looking at the top left shape now, So we've got an actual it all a rectangle here. Vertical rectangle, and now doors usually have a door handle. So first of all, I had determined on your door where you want you don't handle today, so the door handle could maybe be on the left side of the door. So just drawer in a little circle that represents a door handle. It could also be on the sensor. You may have a do under on the center. You might have one of the right. It's entirely up to you where you place your door handles, but it will determine kind of the overall shape and construction off the door. So let's just do a door handle on the left here, just a nice little circle with another circle in debt on the inside. I'll just raise out the other ones that I just just did for illustration purposes on What we can do now is maybe draw in a frames. Usually, doors have a frame that hold the door in position. So just with your ruler just adding another border around the entire door itself. On that, this simple basic door is about it. So let's start off really simple, and then we can get a bit more creative. So we've got our simple door there where consider adding details. Maybe you could add in some light lines going upwards, and that could maybe represent the panels that would panels and doors made outs. Is adding any pattern or design that you want? A lot of the time you have natural wood grains. You know you came. Curve your grain, adding your grain like this and just follow the pattern and design of the warden grain. Do do it however you like. Now. Another element that's usually connected to the door is usually the steps, the kind of store you know, the doorstep to the house. So usually you have a couple of steps for this one, while there is, I'll just add in, maybe to step doorstep. So let's just all I need you to do is just add in a vertical line here. Having another vertical line doesn't need to be to special on, then with your pencil. Just do a little curved line that adds in the end, off the corner, bottom corner of the door and again with that one just adding in a curve mine with the following step to the top. Just like that. So keep it nice and simple on may be with your pencil, just shade in the bottom part off each step, and then that will give it some element of realism. And they will just kind of make it pop out a little bit. And that's that's all we're doing here. We just using the pencil lightly, adding that shading and shading can literally completely transform a simple line, drawing into something a lot more interesting. So we get not gonna go too much into shading Campbell. That's the overall structure of the first door. Let's move on to the 2nd 1 and maybe on the 2nd 1 we could have the door handle in the middle, so let's just get our rule around now. These are printed on my sheet as 2.5 centimeters, so sensor is gonna be around about there a little dot there for the senator, and we can just drop a vertical leg in there. That's what I wanted to do on this 2nd 1 Drop that vertical line there, so this door will effectively be a two panel door where that panel will open. This way, that panel will open this way. So naturally, you're gonna have the door handle here. So maybe you've got, like, a circular door handle with, like, a little kind of frame within the centerpiece off the door. So just like the little this after doing a little doughnut season tickets to just draw a little donut shaped there that will represent the door handle on again. What we'll do for this one is, well, maybe add in the steps first. So let's just have a simple step again, like we did with the 1st 1 one one line going across another line, going slightly wider. Let's do three. Maybe for this one. So another 1/3 line going slightly wider than that. So you've got the first line just go extending a little bit about beyond the with of the door. 2nd 1 going slightly wider than the 1st 3rd 1 coming slightly wider than the second. And again, just do a little curved line going towards the corner off the door on the 2nd 1 curve, mind going towards a top. I just close its off life that and they have it. We've got our steps now on this one. That's maybe add in a couple more details. Let's put the frame. Let's put the frame slightly wide on this one. So let's maybe have the frame extending toe where the second step is. So just draw a light vertical line just going slightly higher than the heights of the door . And then again over here, what a line extending slightly higher than the door from the second step. And then maybe we can just add a kind of detail, creative detail on the top part of the door. So we'll just close this off and maybe just from the sensor, just draw a light line doing a little bit higher than that. And then how about having a triangular shape on a frame head for the door? So I got a little triangular shape the door, and then we've got a nice little construction there, haven't we? So again, with that can add in as much detail as you want. Maybe just shade in lightly halfway on each one of them steps. So just a bit with your pencil lightly. You don't have to do this. I just like to do this, too. Kind of makes door pop out a little there. Then maybe we depends. Or to shade in the inner parts of this border that we've done just likely Andi again on this side as well. And then the same may be on the top and then just within this triangle, just put a little bit of shading again. Like so and then maybe on the door handle just shade in this middle part of the door handle . So it looks like it's a complete door handle on there. We have it. So if you want to add in some details, maybe some light lines going upwards like we did on this one, or maybe some would grains going all the way across all the way to the top that's entirely up to you can maybe be as creative as you want with the doors. That's what I love about the doors, you could really make them look quite fancy. I mean, have a look online on typing. You know, the doors, house doors and you'll see so many beautiful like old school doors. And if you type in Victorian style house doors or, you know, old school Gothic doors and they just look absolutely also so that's our second door. Don't.
22. Door Design - Part 2: 3rd 1 How about having the 3rd 1 as a handle? We could actually have handled this adore. So you don't even need handles. This could be quite a modern modern door they see. Could be like on them electrical remote control doors. Yeah, let's do one of them. So for the step, let's let's keep this quite nice and modern eso The 1st 2 were quite old school and rustic . Let's keep this one nice and clean and modern. Let's just have a two step. So the door so nice curly step, not too steep going straight in there and maybe have the frame inside the door frame. So on this one, just a nice little border going in from here again. You don't need to be super accurate. We don't said leisure how wide this is. We're just practicing here. I mean, if you want to really, really have everything to be perfect when you could just get your ruler and measured the exact width. But personally, I don't think you should be doing that at this stage. I think you just have a little bit of fun to come up with some nice creative designs, so let's just keep this door nice and simple. Add a little bit of rendering light lines going upwards on. I think this one. What we can also do is maybe just add some detail going on top, some, some curl, some curly really lines going on that stuff on. What that will do is that I'll just add a little bit more interested in the door and then close it off the top on the bottom. You can see my these curly arms and I even equal on both sides. It doesn't matter. You can just play around with it, maybe adding a couple of line details going on the top. Andi, how about just having a little dot on the top here? So this could effectively be our wild wireless door. So there's usually a while this receiver. Yeah, you know, you can go as modern technical Wilder's you want, so we've got three different variations of doors. Try these ones out, putting the sheets off a couple of times and try out all the ones. Do some shading. Use a little bit of detail. Work is just nice to get into that kind of flow of things with these elements that that we're gonna add to our house. Let's just move onto the next one here on, I think on this one. Let's do some pat panels on this curved arched door. So again, that's maybe add in a couple of steps. What I'll do is alive in the same steps across all three of them. And then we could just come up with various of panels. So just use your rule of do a little lie that effectively draws in the first step. For the second step, let's just make it maybe make it a little bit more steeper. Just make that line extend a bit mawr than the first line made that one extended. It's exactly the same. Do the same for this one. Let's just close these in close the men. So we've got this indication off some steps, some doorsteps to our lovely job, Lee house. So let's carry on this. That's it. That's LAPD on on for this one. Like I said before, let's do some panelling. So just roughly, or what we can do is because these are curved. Let's get the center points on them. So just a slight centrepoint again. 2.5 centimeters around about there 2.5 centimeters that's roundabout There. The center, 2.5 again around about there senses there. And let's just do a line in the middle, finding a middle vertical line, their vertical line, that 2nd 1 in a vertical finalist. Certain again, you don't have to follow me exactly how I'm doing these, but it's just a good idea to, you know, draw something that you're not used to drawing that mean. If you like to just have a basic, simple, straight bog standard door, then just go ahead and do that. But I'm kind of like adding details quite quite differently on these designs used to give a bit of interesting variants. So with your pencil just for me to do is roughly draw in a curve shape that follows the shape off this top part. This door on these air effectively gonna be the panels, so square them off here on may be with your ruler, just adding another panel going from the floor, and the other one just lied. It's open and maybe make these ones a bit straits as well. And then again, it's lying them oak. Do another panel on have another panel. So yeah, a lot of doors, especially in the UK. You get a lot of doors that have panels on them. It's just a nice little feature and asked the little design, isn't it for these doors s? Oh, there you go. You got a couple of panel doors there and maybe have the door handle on this left hand side . So we've got door handle on the left hand side. Little curvy, curvy shape there on if you want, you can maybe add a border to this. Ah, so we've got border. Just make the border come up from this point here, try keeping it similar. And then just curve. It's across curve. It's across here and then again, just killed these panels to that little quite nice and then just square it off from the top . And they have achieved a simple panel door with an arched kind of head. Is in a check. Probably not. The best way to describe it was just an architect. So a little bit of shading, maybe on the inner parts of these panels, just like shading the D pencil just to give an indication that we have these kind of indented panels in the door. But, I mean, you don't have to shave them. And I just have justice. Just my habit, isn't it? I just got stopped, adding details. That's one of my weaknesses in in design. I just have to keep going on and all right, let's of coupons or the next one. So on this one, maybe let's do some modern panels. So how about having borderless panels of this one? So maybe just have winds going across just like that? This could it could even be a glass window. This so we've got a nice modern door just like that on Maybe just bring in some lines on the sides. Just add a little bit more interest on bringing in may be lying. Just some random lines from here to there doesn't have to be accurate or specific. So you've got a nice It's a modern style door on if you do in glass doors and maybe just add to kind of diagonal lines across the couple and panels to give it an indication that you know it's got some glare on it. So there goes. We've got that door. The handle there. This could be a handle list door. Maybe have a little triangle on the top. So you know you can get as creative as you want to be like a wireless receiver that you can open the door where as soon as the answer. Okay, so let's move on the next one. So we've got a line here. Let's maybe that's maybe just make this a panelled strip panel door. So let's maybe just adding some straight lines without a ruler on sometimes. You know, again, as I said, sometimes the most simple things, the most effective things. You don't want to overcomplicate things because then you don't want to get frustrated with the lives like it's concede here have not measured the lives. Because I'm not really bothered about that or I want to do is just at an indication of some type of design on then just adding some shading just from the edges. Just give it that, you know, element off illustration Look, So there we have it. So we've got our three doors. There occurred the arched doors. We had our classical rectangle doors. Now I've got pretty much the same I've just designed these threat tangles with the pointed triangle heads on the top, and that's quite similar to the windows that we don't see. You can see the windows, they with the points thing. You can actually design the doors to look exactly like this as well. If you want eso. If you have, like similar windows on your house, you may want to design the fashion of the doors to kind of match the size and the shape of the windows. Then, by all means, go ahead and do that. It's entirely up to you. So for these ones, let's add in maybe over these ones. Actually, what we can do is probably add in some pillar designs. So let's make these a little bit more Gothic on old school. So let's add in maybe some steps or for these ones, we could probably add in a few more steps. So I want you to just Adan, maybe four steps on this. So we got the first step there, which is the width off the door. 2nd 1 slightly wider. He lied about that one that one said, born wider again
23. Door Design - Part 3: fourth floor. Don't worry about making the super accurate again. All we need to do is just indicate what we're trying to do. So we just curling off the first curling off the second from both corn is third on fourth on Just repeat that process for all three of them so that we've got three nice looking doors and then we can add some pillow work to these ones. And I love pill a week. They do take a lot, a lot of time to maybe construct these these style of doors. Maybe I wouldn't recommend doing these on your first sketchbook. It's entirely up to you, depending on how much time you want to spend on them. That would generally recommend do simple things on your first to your sketches. And then the more practices get, then you can concentrate on the complex stuff. So just gonna do a quick little sharp enough me ruler of me rule. I'm losing the block sharpened Hoppity Bensel. Let's just get that pencils sharpened. We could try shopping. You rule if you want to see what happens if you do, you just let me know. How does that work for you? or no. So right, Okay. Let's just come down. Goldman, Just carry on with our duels. So this one lets maybe put a little line in the middle again on do a central door handle. And how about like, an old school castle door? So maybe a nice big round door handle. What? This? I love old school castles. I mean, I just love Gothic drawings and, you know, buildings and architecture. I mean, you can, you know, you can do whatever design you want. You can follow this design if you want the way I'm doing it. Or, you know, you can just do your own style of design. So I'm just adding all these little squiggly, wiggly element to it, making a local little bit, you know, interesting on then maybe let's added some pillows and pill is a great said with pillows. Bill is usually connected to the steps off off the door. So that's why I added a few Maurin so that we have this space to work with. I mean, they don't have to. You can have a pillar on its own standing on its own. That's entirely up to you. But then again, we're having too many details in for a basic house. And I think we could probably do another class on, you know, different pillow designs and, you know, complex houses both. Let's get through this first cluster, then we can, you know, What did they say? You can You need to walk before you can draw on. So let's get on with this. So I'm not having a border. I'm adding a two pillars on the side over here. So with these pillars, one minute area, just in a circular kind of shape, on top of the pillar on the edge off the door. And then maybe just do a line going across and then doing that diagonal line here again, doing a line going across, No line that and then with the pencil just adding some rendering lines lightly, just going upwards from the bottom, maybe just a bit above halfway. Just lightly bring them in, and that can act as your pillow so we can just maybe put border cup on each one of these pillars and there you have it. So we've got a nice little pillar there, and then maybe finish this off with the top part of the race s O what? What I suggested A with this one is just maybe draw a line, extends slightly higher than the top part of the door and then bring that line in touch it to the corner of each pillar, and that will make this quite unique and interesting. I think that looks rather nice. Especially for him, You know, these old school castle style doors. So with this, maybe I didn't some more detailed in a border. And then just add in some lines, going again from here, closing, closing it's off again. You don't need to be super specific, adding your own rendering and lines and shading. And then right on the center of that, maybe have another design on. We'll have, like, an emblem type design or maybe a house number. It's entirely up to you. So I'm just doing these circular lines going in, and there we have it. So we've got a nice little old school style door entrance point. You can shake this in as well if you want, but while there is that let you shave this and I'm just gonna just color in this kind of mid part and maybe just do some light lines on the actual door panel itself, just from the top, just to give you some visual interest. So there we have it. So we've got a nice little door with some pillars on with this one. Maybe let's not do pillows on this one. Let's just keep this one nice and simple. So again, let's just do a line in the middle that maybe just have these panels going all the way to the top. His vertical panels, as we did with one of the curved ones or both on just by, you know, keep the roughly the same. I mean, sometimes it helps to just turn the page on the side so you can see how your lines air being formed with the ruler. So, just like they should bring your ruler down to drawing these lines, have them roughly the same on that's a nasty little house door as well. So for this one, maybe we could just add in a board us across the house, across the house, across the actual doorframe itself. So if you just follow along these lines, drawing maybe a border, said the page to get your angles rights. You can see them. Just do a little border going across on. We're just gonna close this off from here as so And then this will be a nice, simple it's or door the pointy topped with a pointy top head. So let's do this. Draw your on. Going across Andi. There we have it. So with the pencil, maybe just shading is kind of border that we've done. And then what I'll do is you'll be able to see this a lot better because a shading always adds depth. In my opinion, it always adds a little bit of interest in death, any any drawing again with color coloring things. Then I was as a bit more death. If you just have line work, sometimes it can seem a bit flat. S Oh, there we go. So we just added that thing. I'm not shaded. You can even shade the steps. Go ahead and do that. Let's move on to the next time we should know about that little squiggle that came out about that squiggly lines. So for this one, maybe let's do let's do some panels of this one, I think will do some nice panel drawings of this. So let's get our rule around in the sense of vertical line. Maybe have one going across here. One going across here on one, going across here on have the door handle on the side. Let's have the door handle there. I still door handle on. That's about it for that one. So for this one, maybe do another border all the way around. But let's have a nasty fat border. So as of a nice, thick fat border on this one, so that's let's extend it all the way to the last step. So from the last step, going to draw a line that goes all the way to this corner here and again, using the same angle just up to about here, turn the page, bring the angle in similar angle like seriously, just put your rule of that. Just bring its in until we kind of hit that midpoint, then certainly page again. Then we can close this off on the end of that step that we did, and there's our not thick border around our door on Maybe just with your pencil. Just maybe do some rendering lines at an angle going in like this just to give an indication that this is a border on from the top with same maybe American experiment with the chicken shade in really dark if you want. Or, you know, I did a little bit of contrasts entirely up to you now. Pencils. That's why I love using pencils, because with pencils you can easily add things in and then erase them. They don't know how you want it, Andi. There we have it. So we've got a lovely three door keeping drawers and doors and windows and rule has thes air doors that were working on Yes, yes, we are. So let's just have a look at these and see that's on the screen a little bit better. So you got three nights, a vintage looking old school Gothic style doors, and we've got our three arched doors again. Better variation in all the firms on modern, some old school on. We've got our classical doors that are on the top with a couple of steps on a few on DSA, more steps on the others and a bit of wood grain, so practice lace on the sheet and then hopefully what we'll do is, we'll be ready. Toe added these doors and counted like you know, just the outline of these doors on our exercise. She to which was the perspective one on. Then we'll have a pretty much complete house, so let's move on to that one.
24. Door Placement: Okay, welcome back. So now we've gone through our door designs with the previous lesson. What we're gonna do now is we're gonna add in our door placeholders onto our house sheet that we did on exercise to you Just bring up exercise to the perspective sheet where we added the windows in. We're going to be doing the same thing with the doors. So let's just get a zoom in on this one. You can see a bit clearer. That will do. Now, if you remember on this first house, I left a little space on the side part of the house, and I think that's a good place to start. So if you're drawing your doors on the side part of your house, then you're gonna pretty much follow the same principle that you did with the windows. Andi. Therefore, it's a good idea to draw in your perspective, diagnose lines for the vanishing points on the left before you start. So that's just decide where we're gonna place the door, so it's gonna be pretty much underneath this window here. So what a good way to do This is if you've already drawn in the windows, is just used the vertical lines from the window and just draw in. Another vertical line that follows along that path is the same for the one on that edge. Jewelry all the way down. And then you can start shaping your door. I mean, already, you can see that it looks like there's kind of an entrance point there to the building. So what we're gonna do now is we're going to just drop our ruler. First of all, line your ruler again to the horizon line, and then just drop it down from the right inside, like we did with the windows. So I'll just bring this into the screens he can see again. So on the left here, we've got our vanishing point. Just line the ruler up. So the horizon line. Just drop it down with this finger slightly below that midpoint and just draw the line, ensuring that your ruler stays on that vanishing point like we did with the windows. Just draw that line on again. If you look at this, it's kind of in the same perspective line as the top part of these two windows, So just draw that line going across on that pretty much about it now. What I'm going to do is I'm not gonna go through every single design off the doors because we'll be here forever. What we'll do is we'll just do a simple door. So let's just go for this one here. This basic door that we did on the top left. Let's just draw this in with maybe a couple of steps over here. So first of all, we've drawn out frame. We've got the diagonal line going across, so that kind of forms the basis of our door. And then we'll draw the door within this frame. So let's do another vertical line slightly in from the rights inside, Just like so. That's why I want you to do and then again from this side, want to draw another vertical mine? You can see that's actually our door element there. So with you pencil, just do a little dot on the left hand side of that line that you just drew on. That's gonna be the door knob. So this just gives a bit of an indication about guidelines. So what we're doing, Soto adding, the step or we've got to do is maybe just add in for this example. Let's just out in one step. What I'll do is I'll show you a demonstration of how to add in a couple more steps on this diagonal. This drawing is quite small, so there's no point really putting too many details on this. We'll just add in one step, so again wants you to kind of measure off your ruler against this angle here, bottom part of the house. Make sure it's to the perspective point there, lined up nicely and then just drop it down slightly, just slightly. Drop it down, ensuring that that perspective point is maintained on. All I want you to do is do a little line going like this on just extend it past the width of that door that we just drawing drawn in, and then we can erase out what we don't need. So you can see that's a little part coming out on. Then all I want you to do is with your ruler. Just draw a line slightly outside that border part of the door that we don't slightly outside it on. Just draw a line going up and then again from this side, all I want you to do is draw a line going up around about here and then with your pencil just shade in this area that's closed off in the middle, so that will effectively be our step. So let's see if we can bring a bit more of a zoom in. You can see this a little bit better. Oh, that was too much. Let's see how that works. Yeah, nothing. That's fine. So you can see over here, we've got this little kind of rectangle that is, effectively, they vertical parts off the step on. Then all we're gonna do is we're just gonna do a line going across like this from the bottom and another one going across like this from the top. Now that's angle. And then we're gonna close this line off without rulers to just bring your ruler in here and again following that kind of perspective line with the vanishing point. We're just gonna close this off from the top, and this pretty much adds your little step. Now, I know you can't see that very clearly because it's quite small. But once you raised out these lines that we've just done here with your eraser just raise out, then lines. And then what we can do is with the rays of light, we go over the shaded area and just raise out the extended lines of the door. And then we could start adding in some details on this kind of bad line that we've just done. So let's just highlight these long lines that just doing here, put the pencil all the way across, shade it in shading that slight extension of that step. Bring this in from here. Just make that door a little bit darker from the border, maybe adding some lines for the details, and they have it. So you've got a little step indication on your house. Now that's on its own. Probably. You know, you're not going to think that I don't want. I want to add a few more details to this that comes at a later stage. Once we've placed holding everything on the house itself. So that was have to do a side door on a side step again once you do your class projects, and once we do our our actual house on a single sheet of paper, it's gonna be a lot bigger than this, so you'll have a lot more space to work with. You don't have to go a step on if you don't want. I just like to put step on because I thought, you know, just add a little bit more interest. So the house, rather than making it look a bit flat. So we've added our first door here on the left hand side. Let's just move the sheet off and go on to this next example that we had. And for this one it's a lot easier. We don't have to worry about the perspective. Diagonal lines for here or we need to do is just line up. I will rule with that middle window, and this was done really rock. So it's not very accurate. Book just for illustration purposes. I just want you to draw a line going up from that side. A line going up from this side closed off from the top. Andi, you've got your lovely little door placeholder there. So again, just do a little border on the inner parts of that place holder, and that can act as the door itself. A little dawn on the left for illustration purposes, some lines going up in the middle, and then we can just add maybe just one more step at the bottom. So we just bring our ruler horizontal lie, just like we did in the door. Let's say kill, it's up. Possibly do another one girl. That's up and they have it. So we've got a nice little door entrance on that second house on. Let's move on to the final one here. If you remember, we just did some rough windows and not very accurate. So for this one, maybe we could do a big door. So on this right inside of the house, just bring your ruler green. Bring in slightly, keep it nice and vertical. Draw your door. Maybe having really high door or really huge the whole on this one. Keep it nice and abstract. Bring your ruler in again, nice and vertical. And then we're just gonna do a horizontal line at the top to close it off. And then on this one, maybe we can just do the border on this side on. Just have, like in a border on the top on may be to shade in this area to show that we have, like a slight in dense. It's like stepped in into the brickwork of the house on How about putting a door handle on the rights inside here? And then we could possibly have some steps going in. So instead of having the steps coming out, we could have some steps coming in. And that's simple enough. We just do one line there on another line there, and there you go. So this looks like you've got a nice door coming in. And then you got the social shadow area that kind effectively, the in dental side off the door that's holding the door in place and maybe just add in a couple of panels, roughly with your pencil. Justo, make it look a little bit interesting like we did in the door lesson. And there we have it. We've just placed another door into our house. I know it's a huge door. It's a giant door, so but it's all good. So that was the placement off the doors on. That's about it for the doors and the windows and the elements of the house. So what we can do now is let's just do a little zoom back on this so you can have a look, a lthough doors that we did bring back the door sheet that we did where we designed our lovely doors. Now we're at a stage where we can possibly add in the final elements off the house on. That's an optional element, so you don't have to add it in, but let's move on to that one.
25. Chimney Design & Placement - Part 1: Okay, welcome back. So we're gonna do our final elements off our house, and, Yep, you guessed it. It's the chimney. So just have a look at exercise six on the printed sheets that you've got. I've got four examples off some basic chimney designs. Now you don't have to put chimneys on your house, is it's entirely up to you. But I like to put the mine because I think it gives it a nice, interesting look. It makes it quite old school and cozy. Andi, I really like tune these. And almost if the illustrations of houses that I do, I always have Jimmy's so concentrating on this left one over here, I'll just get to zoom in again. Basically, the chimney is just a rectangle at vertical rectangle, with another thin rectangle going across the top in a horizontal form on, then some little chimney elements where the smoke comes out from the chimney. So that's all. It is really easy to draw. You can make them really complex and detailed. That's entirely up to you. Have a look on online or outside your window to see some chimneys off houses that you know in your neighborhood and I'm sure you'll find from interesting designs. I mean, you don't even have to have all this detail on the chimney. Chimney can actually basically just be a rounded rectangle. If you remember the arched windows that we did on the arched door house doors that we did a human, you can just be like this and just have a couple of lines going on. A little kind of corner on the end on that can just act as a chimney. So you've got, like, you know, a to me coming a black David. Square it off. It's making round or arch. It's entirely up to you. So chimneys a really easy to do. They just a nasty little element tohave on the roof of the house. So let's have a look at that. So over here I've got a simple house from dark drawn. If this will be a good exercise now to do, maybe some perspective work on this, and that's why I have put in the horizon line. So let's just bring it to the right hand side. So we're working with the left vanishing point, and I think that's a good one there. So what I want you to do for this exercise is placed the chimney on the left hand side, off this normal triangular roof. I want you to First added the perspective lines from the bottom of the house of the bottom left. Just get your ruler out. Drawing your perspective lines of the vanishing point as we did before. From that point on the top of the house on the top square parts of house bringing your vanishing point diagonal line. And then what I want you to do is at that bottom part of the chimney where the too many touches the edge of the roof. I want you to add in another perspective, wife. So we have three perspective wives and again from the next part, which is this corner past of the chimney, I want you to draw in your perspective wine going into that vanishing point. And then the next one I want you to bring in from the corner off this top elements while those on the resume and you can see a little bit better on that corner out of it too much. So see? That's better. So you can see over here this area that we have down here. We just want to have vanishing points on every edge on every corner. And that's usually the basic principle to use. Wherever you have an edge or a corner, you want to have a vanishing point. Mind going down that will just act as a guide for you, Teoh. Make things Look rights. You don't have to do this. But I think you know, just at this stage, if you get used to do in this, it will become second nature. As I said. So we've got one point going from here one point going from that corner and then one point going from the top all the way to the vanishing point. And that's about it. And don't forget to do the final one from the top after your house, the roof Bring that vanishing point alignment rights and just do it up to here. Don't go over the chimney and then just finish it off Pass, actually, and they haven't. You've got all these lines going to this one vanishing point on. Now all we need to do is decide how big we want the house. So for this house, I'm going to say maybe do it about their So just do your vertical line to close that off and then let's do our vertical line for the roof. So we've got the roof hair. So again, remember, what we do is line it up and then just bring it across until it touches the point of that vertical line and then just close our line on there. We have it. So we've got our house on roof. Done. Now we can concentrate on this chimney. Now, chimneys can be all sorts of shapes and sizes in terms of dimension, so this chimney could extend all the way to the end of the roof in some houses. I mean, you get a lot of cottages in the UK where you have huge chimneys going all the way across the roofs. Some extend all the way beyond the house as well. When you have this extra element on the house, that kind of, you know, acts as this big, huge chimney. But this for this example, what we'll do is we'll bring our chimney maybe halfway across the rooster. About this point, I want you suggest a little dot there and then I want you to do a vertical line again. Keep your rule and nice and straight. So the best way to do that says line it up with the side of the chimney that bring it across. And then I want you to do that straight line going up to this diagonal line that we brought across for that chimney. So just bring it up there, and that's about it. Now, if you can see this distance that we have, so I'll just see if you can see this over here. We've got this little distance from the corner off that extension of a kind of heights of the chimney. I just want you to do kind of a rough estimate of where that's gonna be here and just do another line going on top like this. So we've got another line, and then we have the top extension of that chimney. A cross this line. We want that to be around about there. So now you can see that if we get rid of all these perspective wives were that were razor this chimney, the three d element of this chimney, has started to form. So we did this little wine here That goes all the way across there. We did the other one that goes all the way across there on that small line. Did that That goes all the way across there. Now that there's these little elements that pop out on top of the chimney, they're not. They don't necessarily have to extend all the way to the end. You can have them maybe up to here or here. It's entirely up to you, but kind of the principle is the same. Which is going to use the perspective lines to kind of continue that diagonal wine for Aly elements off the house as we did before. So with your razor just rub out, he raised the extra lives within that chimney. Get rid of all them perspective wise. Now you don't need them, Onda. We can start shading this house and chimney to have a bit off understanding of how this works. So let's just darken up some of these lines and insight till the paper dark enough. Maybe this area hair of the Triple A and you can see now once you start shading on you start seeing these diagonal elements you can start to appreciate how this works. And then this little element here, maybe make that a bit darker on these little elements. I'll just leave them as they are on the top with the side of the roof. Maybe just do a little bit of shading over here. So we all blends in nicely. And then we have the top parts of that roof, that little diagonal corner on the top for shade. That and then just for completeness. How about just shading in this side? So it looks like that this side of the house is in shadow on the light source is hitting the front of the house on. I guess we could probably just likely shade this extension area here for it to be a little bit more accurate on. That's it, folks. So we've just added our first chimney to an example off the house
26. Chimney Design & Placement - Part 2: So what we gonna do now is we're gonna do the same, but we're gonna do to chimneys on the house. And it's the same principle we're going to do the diagonal lines going game from the top all the way to that vanishing point on. I want you to do this, so make sure that you've got a sharp pencil for your perspective lines. And don't drawing your perspective line too hard because then you've got to ultimately rob them out, raise them out, and then you don't want to have indented lines on your piece of paper. So that's what we're gonna do now. It's the same process from the left. Just bring it saying And from that, that corner there to get the house one. Don's first get the roof of the house door first, so we've got them once out of the way. Now let's concentrate on these chimneys. So again, or we did was we did the first corner element there on the little pencil broke. They're so oppressed to art on itself. Let's bring this one in on. Bring that's one in on the corner. Bring the one in from the court edge off that and bring the top there, Gene, and then bring it in from the top off that little element that sticks out. And there we go. So we can do exactly the same now for the one on this side. So let's start off from the top. The top element. There's We've got one line itself with the perspective point there and just bring this line in up to the edge of that roof so it doesn't get too messy. Drop your line down. Keep that perspective line accurate. One there, another one there, and that's about it. So what we can do is we can start cutting this house up and maybe like to make this house a little bit wider on the chimney a little bit thin, so that maybe make the house about up to here. So you should keep that on the camera there. So nice vertical line here. And a nice horizontal line for the roofs that just line it up. Bring it across on. It stops there. So bring that lining up there on. That's about it for the house passed. So So that this chimney I'm gonna make this chimney really thin. So I want what I want you to do is I'm gonna line took with this kind of vertical line here . And let's do a nice words, Colon going on the top with their all the way to this perspective Wine point Then just bring your ruler out slightly, do another one. But this one here. So we've just done that there but little shade there so that you can see. And then we've got another one. Bring your ruler in. Maybe up to here. We've got that one that you can see. We've got this element sets just shaded 10 from here number one, number two and then no mystery. So it's just shape this party and you can see you've got a really nice little chimney designed that after we just switch to this side here, we don't need to worry about putting this chimney because we'll keep it to the same dimension as left. But we'll just cut this area on the top. So maybe just do that Nice little shade can shake this area. Shape this area. You can see how easy that waas So with your razor, just raise out them lines. The going towards a vanishing point that you don't need anymore. And then everything will look a lot more clearer. So let's just get rid of them, get rid of them on the house. And then we can start shading in these evidence on making our chimney element to be the final editions of this house structure. Blow away that residue on Get rid of this little bit on the end Here is well, so we've got this little bit on the end. Get rid of that. We can make our lines of it more prominent, so astute that let's just make this line a bit more prominent here. Add in some shading. Make this line a bit more prominent, Add in a bit more shading. Make it slightly darker here. I didn't some shading for the to me part and then do the same here. Audience in trading to the main street in the area. Make this area a little bit darker, this corner border area and then on the top. Let's just make this a little bit more darker, and let's just make these lines a bit more prominent for the roof. I'm just doing the free hands and they might get a little bit. Want people? It doesn't matter. Bring in that line there, bringing this line for the top. Let's do a little bit of shading, just like shading to the side of your pencil and then shade in this area here is well, you can see it's making a really nice shape off the house and then just finally finish off with changing this element on you've got a lovely little illustration. The house with two gorgeous little chimneys. So there it is, folks. So that was quite an easy, little truly idea to do. What's interesting is that you can start placing chimneys in different areas. So if you want you to me to be right at the end of the house, you can go ahead and do that. All you got to do for that is when you're drawing the frontage of the house, you don't draw this area. So, for example, if we just get really rough sketch here. So if I've got a little rough sketch here of a house just a little square on a triangle and then I've got my vanishing point say, over here, do you vanishing points? Get your house drawn in, say around about that. So we've got a nice little house structure going on over here on. If you want to place your chimney down here or we've got today is just draw one line going up another line. So we know on basically do exactly the same thing that we did before you got your chimney element here. And then we've got the edge of it coming down and maybe cutting off at that same angle that we have here on the horrid hurries, horizontal out of it, going here and just them chimney elements maybe wanted to say on it's exactly that same principle. So shade, that's area ranger to a quick little example so you can have your chimney wherever you want . So you've got nice. It's a rough little sketch there. And you see, I didn't use any rulers or any guidelines or anything like that. This was just for a quick little illustration for you to understand. Both start off with the chimneys at the front like this, and then maybe come up with some variants and put some chimneys here. Or maybe at a huge chimney. You know, practice have a bit of fun with it on. We can now move on to some more interesting parts off putting our house together and let's move on so that
27. Brickwork Design: Okay. Welcome back. Now that we've done most of the construct part of our houses, we've done the base off the house with doing the roofs, and we've done the chimneys on. We've done the window went door elements. We can now look at some of the detail work that we could potentially add to our house. Now, I'm not gonna go through every single possible detail work that you can add on to your house. Just gonna cover some of the basics from the kind of details that you can put on the main base of the house on the side. Maybe a little bit of detail going on the roofs on a little bit on the chimneys. The details are going to be very similar. Our cover, maybe three or four different areas on. Then we can finally move on to doing our complete sketch. Now, details are important because ultimately, if we have a look at the houses that we did on exercise, too, if you just leave you all kind of drawings like this, then they're gonna look a little bit bland. So adding a couple of details will really enhance your illustration on, you know, at a bit more deaths. So let's firstly look at some texture work that we can add onto the actual frontage on beside kind of panels of the house. And this usually is brickwork. So the types of brickwork, very vastly, depending on the type of house that you're drawing. Usually I tend to do just standard bricks Or, you know, just a variant off. You know, abstract type textures on my house is the wild do is I'll just quickly go through some of the standard ones s so that we can kind of focus more on the overall illustration itself. So number one, let's have a look at brick were just generally brickwork. So if we look at brickwork and what you can do is you can follow me along in this while there is, I'll just get a zoom in onto this side of the paper cameras playing up a little bit. So let me just get that right. So here we go. We got brickwork here. So what I want you to do is just do a some horizontal lines like this. You don't have to use a ruler for this. Just do so. Horizontal, maybe three lines like that on for this 1st 1 We've got, like, a standard standard brick, so we'll start. What I mean by standard brick is that you just get these rectangular bricks in most houses on they just lay it. Ultimately, one on top of the other on usually dissented off on each joint. So that's what I want you to just practice. I'm just quickly on a piece of paper like so And then number two, you have a wide Brits or more kind of like higher Brix. So again, why I want you to do is do three lines roughly, but just make them a little bit higher the distance in between them. If you got one, 23 you don't have to be accurate with them. It's fine. We're just doing a bit of practice work here. So with this, we've got maybe square bricks to get the huge cinder bricks or, like, you know, cinderblock style bricks in houses on again, they usually lined up just the way the ones on the standard bricks are across one another, usually centered off on. So you have a second style of brick now, thirdly, and we get this quite a lot in the UK, especially in the countryside. We get like mawr, other uneven on even brick layering so we can get maybe the angles going in slightly differently on this one. So you can see I've just on these diagonal lines on that they kind of will act as a guide. So basically we have maybe curved curved bricks, which really is just stones that I've packed together on these very abstract. They usually just packed together in tight spaces in between the layers of bricks on these These look quite nice. Little quite rustic old school. But they give a very nice effect, especially when you're drawing a cottage style house. I probably wouldn't do these bricks for a big you know, three or four story house, but you can do I mean, you know, you can design whatever brick style that you want so you can see your all I'm doing here is doing circles like rectangle than just filling the gaps, making things looking a little bit abstract on even. But effectively, it's gonna fit within this border that we just don't have these kind of little rectangular border this'll brickwork is fitting in and it really looks quite nice, actually, once you've completed it. So these are just three examples that have got that's just zoom back on that. So we got three examples off brickwork. We've got standard bricks, which you just normal rectangles placed on top of each other on, then centred off in between. Then we've got the wide ones, which again it's more like the standard, but just bigger brick sizes. And then we've got this abstracts kind of uneven, brick layering kind of technique off adding bricks onto our house. Now again, we're concentrating Mawr on the front part of the house that it's this area that we're drawing like this in this fashion, where it's just everything is even. But when it comes to drawing bricks or putting texture on the left hand side of the house or the rights, depending on where your perspective is, then we're gonna have to follow the lines off the actual perspective point on the vanishing point so that everything is kind of, you know, looks right, and we'll kind of come to doing that when we do our false sketch that for now all I want you to do is concentrate on just coming up with some different textures of brick works, so that's just brickwork in the first colored.
28. Stonework & Panels: on. Then in the second column, you also have a textures. So if we look at different textures, that's just called textures. Here we can come up with maybe three different types of textures. Now, what I mean by textures is stonework. So you have stone with textured, imaginable storm of here. So a lot of times, like again in the UK, we have different styles of houses. We have very old school Victorian style houses about cottages, and then we have modern on. What you can do is, if you just do maybe a little rectangle here maybe multiplied by three sort of three rectangles, rough little rectangles like we did with the brickwork. And we can just add in some nice little texture. So sometimes you have this kind of slate pieces off kind of stone being overlapped each other like this. I mean, we've got this in our house for a Muggeridge on. This looks really nice in terms of texture is just like, you know, layering these little round kind of circles, one on top of the other. And then when it comes to shading, you can add some really nice effects that this type of stonework. Not sure what the actual technical term for this type of stonework is. I'm just calling it a stone with textures just like the layering. So you've got that on, then. If maybe, let's just get you means he concede it's a bit better. So you've got this, this layering off these circular shapes and then just underneath each layer, if you just probably over a shadow with your pencil. What that does is that will bring it out really nicely when it comes to adding your detail . And it'll look quite nice and different. I mean, you don't have to do this type of stonework. I'm just trying to give you some examples of what you can do once you've got your construct of your house. Don't Andi. I think this is quite a nice one toe have. Maybe when? If you've got like a side panel of the house of like it, Gary Judge, if you just add a Gary Johnson your house structure, it's quite nice to have this may be on this side making up the wall off the structure, so that's the kind of layered. So we've got layered laid, um, work on, then on the 2nd 1 You usually sometimes get like these little It's a bit like it's cement and concrete and cement with mixed in with like stones. So you get these little dots coming in. And if you just add these dots on these just random dots to your side boil, it gives that the, you know, kind of gives an idea that this is this some sort of a texture going on. I know this is quite a nice, subtle texture toe added to your walls or even your roofs. I mean, if you can add all these textures onto your roof so it makes no difference, you know, design it however you want. So this is just like adopted, adopted calling Dr Simmons. And then, oh, these aren't technical words or anything like that. I'm just giving been label so that we can differentiate them on. Then finally, you can have some maybe just normal textures that created when, like cement is used, plus to the walls, and you can just illustrate this by using lines and maybe a little bit of cross hatching on . That adds a nice little element to your illustration as well. So if we just take lines down, go at one angle, and then maybe go at the other angle, like, half way, and then maybe go across, you know, just to get some shadow work going on there and you can see it creates that little texture and variants. So over here I'm just gonna put down crosshatch crosshatch on there. We have it. So we've got three nice little textures going here. We've got our layered work. We've got detailed cement, doctor details, cement, and then we've got some cross hatching to just represent some rough lay after. So let's just get a zoom back on that so you can see this. So we've got Brick worked on here. Three examples of brickwork, three example of stone textures on. Then finally, what we can do is let's just do a little line going down there to divided talk. The 3rd 1 I would say, is panel work. So a lot of times you have Gary Jizz or like in a small houses that made of maybe would Andi so just put down panel work, a panel work, and that's what they pretty much are. So it's just like it's kind of what we call cladding. So with this, sometimes you have really steep panels, so they're just draw in some kind of life. Steep panels here on may be that layered, like the bricks will a it just randomly on each side. And sometimes they have, like, a little a double dot going on for the free joint. So let's just zoom in again, keeping it really loose and rough here. So we don't need to work. Worry about making this look even. It's just to practice a couple of ideas to get a little bit creative. So again, panel work. So I'm not gonna label this one that these are all different types of panel works on. We'll just do maybe another one that's going vertically. So again, we've got these panels coming again vertically, and this is kind of just the makeup off. Maybe the side part, Yeah, your house on may be caught. The panels here. I mean, you don't need to cut the panels. You can have the panels running all the way from the top to the bottom. I've just caught them here to, you know, give you a bit there a difference, and then finally maybe we could just do a another one that just has the panel's going across maybe some wider panels of one, 23 and then when it comes to actually shading these, just maybe at some light shading underneath each line so they looks like it's a panel that's kind of slyly indented. And it gives a nice states or effect on your house, and I think that will work for now. So let's just move back as you can see the whole sheets that So just try these out. These three different things that were just on here brickwork. Three examples of brickwork, three examples of some stonework, textures on three different examples of panel work, and you don't have to limit yourself just these designs out. Don't try out some of the designs, just drawing some rough little rectangles, you know, just to get warmed up on the detail work. And I think what we can do now is move onto the next set of detail work that we can kind of concentrate on whether Rufus and also before we move on, you can do this same brickwork on the chimney part. So if you remember, we have the chimneys that we drew s if we just do a little zoom in on the chimneys Here s kind of show you see can also have the brickwork on the two knees. So if you just drawer invert kind of horizontal lines and maybe do some differentiation, you can just easily add in some of these brickwork lines to the chimneys you can see here. Just got the standard one and I've got the squared one here. So if you just bring this across that we've got standards it was a standard bricks on here on then we've got the square bricks on this one and then we could maybe continue and maybe adding the brick staff got like, you know, the uneven bricks like this just by filled, filled the air Europe really with different shapes. That's all you need to do. And it gives it a nice of theft, maybe drawing the line of diagnosed life, fill it in slightly differently with round shapes and maybe some rectangles, and it gives it that nice, you know, cottage style. Look on, then. Maybe on this last one here, we could just maybe add in some textures. Eso maybe just some doctor textures or we can combine them to. You don't have to keep the texture is exactly the same, can combine the textures, a bit adopted texture here for some stonework on the end of this chimney, and then maybe some cross hand chain going in from the bottom to just give it that variation. And I think that looks quite nasty and unique. So just some lines up, that's all it is, just adding in some lines and textures, and you can see it just brings it out a little bit more. So let's move on to the details that we can add in for our roofs. So let's move on to that one.
29. Roof Tiles: Okay, so let's just quickly do some detailed examples for some Mabel, maybe some textures that we can add on to our roofs. Roofs are slightly different because they usually made up off a layered kind of brickwork or tiled work. So if we just quickly do how sweet it before we just a number one, we could possibly do tails and do maybe three examples of tales on our roofs while do is I'll just I'll show you over here. I'll just do a little side of a roof with the triangle pop that if you remember, we've got that with a roof over here and maybe another example here. So just roughly drawing in these roofs don't need to be super accurate with these. It's just for indication purposes on. Let's zoom in on that one on so you can see on the screen gone into far as usual, just straight in these lines out on this roof here. So imagine we have our roof on. We're gonna straighten out these lines roughly just freehand. We don't need to worry about this. We just got maybe some lines going across here. So for some tiles, if you just draw in some horizontal lines going across just like we did with the bricks. And you can see we can easily you can either make them kind of uniform, so you don't You're not leering them, so you could just do this and it's effectively you just drawing in these cubes. So you're going in diagonal following the line of the angle of the roof, and you can just kind of fill it in like that on. So that kind of comes up with a side designed usually on the front. You don't have the tile, so usually over here, you may have a window. You may have a couple of windows here, so you have kind of the the war texture going on over here. So if we just to shake this area in so it doesn't interfere with our riff tales, it just makes things look a lot more clearer. So that's kind of one example. So the second example again, it's just dark enough these lines a little bit. Keep it nice and rough, and that's all I want you to do. Just keep things nice and rough. You don't need to worry about too much. You know accuracy. At this point, we're going to make things a lot more accurate when it comes to doing the final sketch. So here's another example. What we can have is, if you just do some horizontal lines going across likely did on the example of the top. And if you do, maybe some curved tails. So what I'm doing here is I'm just doing these like you shapes that going up but a good way to kind of ensure that your lines All right, he's just do some as we did before. Just do some diagonal lines as a guide for your U shape tail. So if we just got these guides hit, so within each box you can just door in a U shape, like so on. What these? Well, there is these will look like this tales being layered on this roof on. That's how easy it is to do so where? I mean, you don't have to do them lines and keep within the lines. If you want to have a little the abstract you can and then for your next row, maybe have the tail starting from. This points that they're overlapping, but not uniformly overlapping. So we've got this kind of nicely talk pattern going on over here so you can see that the U is kind of putting across both the tiles of both and it's effectively like a brick layering process. So again, for the next one, let's go within the box. But this within the box within the box really easy, effectively. Just giving this pattern off W's or use. And then the next one, we're gonna follow this line. So we want to start midpoint on here and just start off with our used going there. You don't have to be perfectly accurate on this. I mean, even if one year is bigger than the other, it doesn't really matter, because just enough initially we're just giving an impression off tiles and you can see so quickly. We've just drawn in details on If we just do a little shade in underneath each tale that will really make look a lot more. That's a really I mean, you know, all shading always adds that kind of additional layer off, uh, quality five. Put it that way. Quality some kind of excitement from reality to it to make it look a lot better. It's it's. Instead of having just boring lines, we could make things look a little bit more exciting. And it could see just like that, just with a little bit of light shading on top and underneath each one of them, you tails we've just created and nasa little pattern. So again, you don't need to continue here. Just do maybe just a little circle, Andi, Maybe just dark in this area so that you know that with concentrating more on the roof tails on, that's about it. To be honest with you, we can go in with a lot more creative designs. But for this basic class, I don't want you to worry too much about that at this stage. Maybe once you've practiced and you've done a complete sketch and you doing the class project, you can, you know, experiment however you like with this. So if we just get a zoom back, you can see there's a little bit better a couple of examples off tiling
30. Roof Texture: actually, let's let's maybe do another one. Let's do some of rough texture design so we could just put texture here texture. And again if we just do a quick little image or should I say quick little diagram over roofs. So nice and easy. Nothing complex, not worrying about the perspective lines. Maybe do another example here like we did before. Don't need to worry about perspective or anything at this point, because we're just doing this for illustration. So let's do some maybe texture work. I didn't plan to do that. I thought, you know what? While I was doing it, I thought, I will just be nice toe fill the page up with some ideas. So if we just dark and as we did before and so good practice to just freehand draw these little roofs, you don't you know, if you're not comfortable drawing it freehand at this stage and you know, just just maybe draw them as we did with perspective. Just draw maybe four or six houses across your page on, and that way you can practice on the so or even if you print off, maybe put off some of the exercise sheets So if we've got let's just have a quick look here . So we've got this exercise sheets here. So this one Waas, let's just zoom back. This one was exercised three on perspective where you have two houses on each side. Maybe just draw in their houses as we did before with the perspective lies. And then you've got some area to practice, you know, doing some textures on so you could easily add in some lines of roof textures and tails entirely up to you. I mean, that's that's the whole point of having these exercise sheets that could be dynamic and flexible. You can put as many of them out as you want, or if you're happy to just quickly, you know, do these sketches like I'm doing here. Obviously, I've been drawing houses for a long time. I can easily sketch them fairly quickly on a fairly accurate label again, as beginners, you may not be able to do what I'm doing here, so possibly just better off. Use the exercise sheets, print a couple of these off, and then start practicing your texture work. Boy, I'll leave that entirely off to you. So let's carry on with this one. This texture number two s for this texture. Number two, What we can do is we could just do maybe some straw roofs. So what I mean by that is like sometimes you get straw structures, routes that just have these, like, why restores on them? Say, this is a lot in cottages that you'll find these nice little on a bushy, wiry roofs made of fiber. So just like this, or if you just follow what I'm doing care I'm just doing these squiggly lies going all the way to the top. They don't like. You don't have to follow the exact shape. It's just to give an indication that this roof has some wiry kind of texture going on over here. So he's the kind of like Why is a coming across that making kind of part of the roof? And if on this side you just continue it down toe on the edge, it gives that indication that, you know, it's made like with a bundle off, Maybe hey or bundle of like, you know, some sort of five tree. Five years, if you just do these lines coming across like so you've got a nice little texture going on there, and it gives a kind of a bit more of a different unauthentic. Look on, def. If you just around the areas where you've got these sharp the sharp point off the roof on from the back of your round it off, it kind of looks a lot more legitimate. So if we just do these little bumps on the top, go away and with your pencil, just create these curvy lines at these little bumps on the top and that I'll give it a nice looking out of the corners here. If you just round them off like I'm doing. They were just rounding these corners off and then maybe round off the corners here it looks like we've got some nice layers off straw. Maybe some store in an old school cottage, and I think that looks rather nice. If you just darken up these lines, just go back and forward. Create that the texture. I think that looks quite neat. So that's texture number one on textual number two again. What? You could do it and you could have the store or, you know, whatever material this roof is made out of you could have it like going across vertical lines. So we just make a thick line here. Maybe another thick line here extended outside the roof, so it looks a bit more rustic on. If we just continue doing that here, maybe one on the top on on the edge on this will just add in these lines coming in. So it looks like maybe some sheets that being held with these wooden kind of beams or metal bars on. If we just do like this rough little construction here, just like we did here. But we just do it a little bit wider. Could these lines in follow the diagonal off the actual roof? And you can see it's adding a nice little texture? Andi. That's pretty much about it. So don't worry too much about adding so much detail to these roofs again. Just get get a bit of practicing, be a little bit creative, create your own textures, create your own patterns and designs. You can design your house and roof how ever you like. That's what art is all about. Design, whatever is in your head. So let's just get to zoom back on that on? You can see now we've got four different variations off roof textures and tiles on. I think we'll leave it up that you can. You know, you can add on to this and evolve this however you like, But what we'll do is now in the next lesson, we're gonna actually do the exciting part and actually go ahead on structure and create our own illustration complete illustration of a house in the steps that we followed in the exercise. So let's get excited about that because I'm excited. I'm glad to move on to that one.
31. Full Sketch - Foundations: Okay. Welcome back. Now for the exciting part off this class. Now we're going to start doing our first proper sketch or illustration off our house using all the techniques that we've covered in the prior lessons up to this point. So what I'm gonna do is I'm going to use a little bit of cartridge paper for my illustration. I've got all my tools ready here. I've got my longer ruler. Shorter one pencil sharpener on my razor. Eso if you already at this stage to do this illustration start from absolute scratch and we're gonna do this step by step, just like we did in all the exercises. Then let's make a start with this. If you're not ready for this part yet, then just have a bit more practice off the previous lessons on. So, you know, once you've covered all the areas where the year working on the base or the perspective point or the roofs or the chimneys or a little bit more detail work on the windows and doors Who decided how to do yours in this one? I want you to follow the sketch that I do. So what we're gonna do is we're gonna do it step by step so that we all have the same sketch at the end. And then once we finished all these steps and completed our first illustration, then you're ready to do your own class project where you can design your entire house by yourself however you like, and you'll be ready with all these lessons and the tools that you've learned. Teoh do that. So for this next part now, for this next kind of coming lessons that will all gel together the kind of techniques that we've gone through in the previous lesson, we can actually put them all to the test on day creates our first illustration. So what I want you to do now is I want you to get your paper a four paper. If you haven't got a four paper, don't worry. If you got using a smaller sheet, that's fine. But generally most people have a four paper toe hand. So with your paper, what I want you to do is I want you to get your ruler on. Just divide your sheet into at half. So the usually a four just move the paper this way. Standard a four is usually about 21 centimeter just under 21. It's usually 20.9. So what we want you to do is just right at the bottom off that sheet of your paper. Just measure roughly halfway through. So 21. So we've got about 21 there, so it's, let's, let's say, 10.5. So 10.5 centimeters, I want you to do a little dot there at 10.5 centimeters on. Then on the other side, right on the other side, I want you to do 10.5 centimeters again so that we have a nice little midpoint. Now I'm going to be drawing this my illustration in a landscape style. So that's what I want you to follow as well. So if we just join in them dots that we just drew So we've got that midpoint there and they got the midpoint. That's it. See if you can see that on the screen on. I just want you to do a line that goes across, and now what this is gonna be is our horizon. Mind if you remember right early on in the lessons we talked about the horizon line. That's what it is. Now I'm going to stick to the left inside for my perspective point purely because that's what we've been doing throughout this class. Eso I'm gonna use that point that I did here. As the perspective pointed, you're gonna make that slightly darker and bigger. And that's why I want you to do Andi roughly about in the mid section off this sheet so you can measure this if you want. If you want to measure the midsection of the sheet, you can. That will kind of help us start at the same point. So this is what, 2020 Now that's called It may be at 14 at 14 to Stuart little dot at 14 centimeters. So we've got 14 centimeters from the edge of the paper all the way up to the underlined that we've just drawn. So that's roughly about the middle point of our page. Now I'm going to switch to my small ruler, don't need the big rule or anymore on what I'm gonna do now is going to start drawing in the first front facing part off the house. So with your Rula, all I want you to do is measure approximately around about seven centime Teoh lying. So put your place your ruler at 3.5 centimeters on that dot that you drew keep it nice and vertical and just drawing seven centimeters from from the top. Draw a line all the way to seven centimeters at the bottom. So we've got seven centimeters right here. So we've got a nice seven centimeters line. Now, this is gonna act as our side part off our house. Now, I want this house to put be around about, maybe let's keep it six centimeters across. So I want you to measure six centimeters now from this point. So here and then that will act as I wear on the vertical lie said, Just roughly draw your vertical line that we can do this. Quite you can. You can actually do this quite accurately. But I'm I'm just gonna kind of eyeball it, and I want you to do the same, but I don't want to get too bogged down withdrawing the perfect lines every single time. So just get your ruler lying. It's up there. Bring it across until you get to that point that we just did there and again Bring it down to 3.5 because that's what the midpoint of seven days on the top, little dot there little dark on the seven on drawer in our vertical lines. So we've got our vertical life that self. Let's close this off and then that will leave off a nice shape. It's a work on for our house. So close the shape off that, and they have it. Now what we can do is we can erase out the mid point of the house. That line We don't really need it that for this sketch. So now what we want to do now is we want to do yes, you guessed it our vanishing point minds. So from the corner of the house, the bottom corner draw in your I had no line to that left vanishing point that we did from the tough do exactly the same. That straw that's in nicely. And there we have it. So what we're going to do now is we're gonna cut this off now. You notice have not drawn the roof yet. And I'm gonna leave the roof at the end first In this first step, I want you to pretty much draw the base of the house. So let's just measure approximately five centimeters. So we've got five centimeters from this point on your horizon mind five centimeters and just do a little dot on the zero there. So we've got a five centimeters left going down there. Now all I want you to do is do the vertical line. So just bring your ruler here on, Just eyeball it on. Just bring that cross until it hits that point on. There you go. That's about right under your vertical line. This and now we have our lovely little Q Boyd base for our house. So what we can do now is again. That's just about that horizon mind, because we don't need need it. Let's just keep things nice and simple so that you can follow these step by step Onda. We also don't need our vertical lines anymore. So I want you to do is get into the habit of doing this with you doing, you know, drawing your house in these steps because it will just make things a lot clearer and easier to kind of manage. So we've got that there. We've got rid of that. You can also get rid of this horizon, my but don't completely get rid of it. Just keep keep it light slightly lights that you can see under the under the lights. We may have to draw that in later on. So now what we want to do is just darken up allies. These vertical lines with a pencil. And that's all amenity just slightly down from the more so that we have a nice complete que Boyd and I thought they usually call them Don't there. Q boards. If it's not, if it's bigger than a cubit usually called Q. Boyd. So there we go. That's just darken up these lies on. We've got itself a nice base to start our half during again close allies. Beautiful. So there we have it. So let's move on to the next step on drawer in our roof
32. Full Sketch - Roof: Okay. Welcome back. Let's now start on our roof design. So we've got our nice little to boy designed up on perspective with the left hand side Vanishing point down here on the roof. It's gonna be really easy now because we've got everything already drawn out. Just drop your paint it down. We measured this to be six centimetres across. So all I want you to do is draw in a dot at the midpoint, which will be three centimeters. So there we have it. And now I want you to extend the vertical line on that midpoint by about four sent to me to should be too, before I think for the nice number to do on here. So four centimeters, all the way extending outside, which will make our vertical kind of corner points main points off our roof. So if you just do a little dot there, just ensure that your kind of line is straight. So in order to do that, just eyeball it with this vertical line that we did here. So we've got the vertical lines. They're just bring your ruler green on that pretty much spot on. So there is so from this point now, as we did before or we're gonna do is do a DAG nor wine, and we're gonna extend it over this corner here, like so just extended, extended by about maybe half a centimetre or just just under a centimeter Tony paper to the side if that helps, and just add in your other life and extend that a similar amount. So from this corner point, now we can get this a little bit more accurate. We can extend from this corner point. I want it to be, Let's say we want that lying to be once one sent to me to see You can see I've got one centimeter here. I just want you to extend it to that one centimeter on over here again. Let's just extend it to one centimeter so that we have the equal lead on each side. Now, how far do we want this to go? Now we want this to go according to our vanishing point. Let's just draw in the lines for our mission point now. So from the corner here that you drew just drawing lights, keep it as light as you can, like a line going to the vanishing point. So there's our guide and then from the top here again, I need a longer rule for that one. So if you've got longer ruler at hand, that will definitely help. If you put your ruler right at the top on a draw in your line, going to the vanishing point, keep it nice and light. Don't press down too hard because eventually it raised them on. There we have it. Now we have our nice little angle drawn in on it will make the job so much easier. So I'm going to do now is I'm just gonna get my ruler, keep it up that angle and then all I'm going to do is just bring it to the left until it hits that corner as we did before. So or we're going to do now is do our diagnose life and we're gonna touch that diagonal line to the one that we just don't have the bottom there. So bring it all the way from the top vanishing point line that we did to the bottom Vanishing point. Mind that we didn't impress a little bit harder on this. That's fine on they have it So we have our nice roof design doing So are we going to do now is get rid off this vanishing point line that we did. You don't need to keep these in because it could get a little bit confusing if you have too many lines coming in and you might not know which one to use, so just get rid of that. We can also get rid of this line here, which was the side top line off the house. So you just get rid of that. Don't worry if you can still see it, it's fine when it comes to actually adding in details that they kind of get hit. In a way, it is always a good idea to, you know, use a light touch when you're constructing your house. The only reason I'm going in quite dark so they can see it on the camera. But if you're using a hatred pencil, it should be fine. You should be able to throw them out quite easily on. All we're gonna do now is just make these dark. Take the more prominent these lines on. We've got a very nice little have structure going on here So we're just doing a pointed roof, triangular roof house. And then what we can also do is finish off the vanishing point line and with this corner here. So if you just put your pencil on the corner there, lined up your ruler to the vanishing point and then just finish off this line and that's about it, look at that. How easy was that super easy symbols? Right now we can move on, adding in a little bit more emphasis and detail on these corner lines.
33. Full Sketch - Roof Edge: Okay, Now let's add in a little bit more detailed work on the border off our roof. So before we start that, let's just get rid of this line that goes across the top because we don't need it anymore. So let's get rid of this. You just raise, that's out and you can see I've gone in quite hard because I wanted this to show properly on the camera on. It's not ruling out completely, but not to worry about that. Once we start adding the detail, it will cover it up. So let's just do that now. It's just gets our ruler. Make the lines a little bit more prominent. Cover up those gaps that we've just revealed with Razor Onda. We should be ready now to work on our border, right? Okay, Does what I want you to do now is with your ruler lying your ruler up to this angle here that we've just don't so to this angle, actually, before we do that, let's just get rid of just notice that line there. We didn't get rid of that life. Get rid of that line on again to make this a bit more prominent, the reason I'm doing this is that you can see this a lot better on the camera, so just make that little darker. That's fine. So again, coming back to this now, I want you to get your ruler line. It's up against this. Diagnose off this edge of this roof, the kind of the drug part of the roof, and I want you to just drop this down equally on both sides round about this point. Now you can do this, eyeball it like I'm doing. Or alternatively, you can measure exactly how far you want this to go down. So if let's like to measure it just for to keep it accurate, nice and accuracy if you just put your ruler against this fine here and that's bringing across drop it down to the first number and say We want to drop this down maybe half or 1/4 of a centimeters that around about 12 points on the rule I'm there. So if we just dropped it, do a little dot that do exactly the same for this one. Just bring in the rule that make sure it's straight. Drop that down on. We've got two points on them on the rule is you don't want tea around about that. And then what we can do is we can just join these $2 or alternatively, instead of having to measure things out. You could have just put your ruler there, dropped it down as far as you want, and then just kind of doing your line just like that. But just for the purposes of this lesson, I thought, You know what? Let's just keep that nice and accurate So we've done that. So that's effectively our border area off the roof on, then all I want to do is make straight line there to join. That's up on another straight line there to join this up. You can see that's looking very nice, so we drop this down by two points on our ruler. All I want you to do is put your ruler on the tip off the top part of the roof, drop it down by two points, so want to round about there, making dot and then tilt your piece of paper on what will. There is less just guess like mitt, but more of a zoom and see conceives of it. better. So we've got I will line line a talk to the corner off that straight line that you're dead on lying to talk to this dot What this will do is this will add an equal sized border all the way across the roof edge. So there we have it on. Then turn it around now for this side or we need to do is get two points of from this corner here. We just need to measure two points like we did down here. And all that will do is around about There's dim a little dot math and then just bring in that Why, in this little dot there we have it. So what we've got now is we've got a complete roof. So what? What you'll notice is this lines going across here and over here, we've caught it vertically. Now we can fix that by just bring in our ruler right down here on because it's a drop down a little bit. We can cut it like this. So if you just bring your rule around, just drop it down, and it's effectively. This is the cut off points off this area here On what we need to do now is just erase out those lines that we have in the middle. So that's how easy it is to just add an accurate border. So I was proof. So let's just make these lines a bit more prominent, as we've been doing and just ensure that your pencil is sharp because obviously you're gonna be doing a lot of these lines. It takes up a lot of the graphite on. We want to keep our pencil nice and sharp, and all we need to do we just at this back to the line off the perspective point again. And what that will do is it will complete its up. I just get a zoom back so you can see what I'm doing. So now we using this corner to just measure it up with that perspective wine. Everything is nice and accurate now so that we have it then, folks. So what we've just done is we've just added a little equal border all the way across the edge of the roof to make it look rather nexus. So let's move on to adding some of the elements now to the House
34. Full Sketch - Window Placeholders - Part 1: Okay. Welcome back. Let's continue with our final sketch. So we've got the outline. Don't off our foundation. We've got the roof door. We've got the border of the roof. Next step now is to add in some features. Now, if you remember in exercise for we were looking at Windows. So for this sketch, I'm gonna probably do a mixture off different types of windows that we did here I might do . Maybe some of these rectangular ones, they're a little bit more simple. May have some of these points he wants. Let's see how it goes. And again, sometimes it's always best to just try something out and just see how you go along rather than planning everything to, you know, being too specific all the time. Sometimes it might not work out the way you want it to. So Well, I'm going to do is in the first start off with my placeholders. So before designing anything in, I'm gonna put in the placeholders for the windows. So what I want you to do is get your ruler. Andi, we've got basically six centimeters like we said before, and all I want you to do is where the horizon line is what we kind of erased before. Just lightly put in that horizon line again very lightly with your pencil. So you've got this midpoint going across now we want the same for the vertical side. So if on that line that you just drawn, if you just measure out halfway through that So we've got three centimeters say it's all dark down there Now the top of the actual roof should be pretty much bang on center. And it is Line it up with that dot that you did and just do a very faint straight vertical line going all the way up to the roof from the base. So we have a nice little cross section going on over here so this can act as our floors as we explained in the previous videos. So in this for this house I've got to floor house on have also got this extra room for the attic so we can have maybe another window being placed over there. So let's start designing in our window placements. What we can also do is actually just do a horizontal. Why continue its across the house that we can actually cut the entire house into half. So all I'm doing here is I'm just following along that horizon line going to the midpoint off the perspective dot That's basically just a straight line in our example here. So we've got two floors for the ground floor on the first floor ground floor here on the first world here, and the little attic, if that's what you want to do as the extension. So let's add in some placements for our windows. Now, each one of these squares here, these four squares that I've got 1234 I'm gonna possibly I think I'm going to do a little window here, another one, that one more window there. And I think I'm gonna have my door coming in here and then on the sides. I'll decide when we come to that where I'm going to place the window. So let's out. 123 windows on the front and maybe a small window on the top, like we did in our earlier examples. So let's measure the midpoint of each one of these boxes. Now, you can go about this in a kind of, you know, rough way where you don't have to be to specific. And you can just draw in roughly a placeholder kind of square, if you like, because we're doing everything with measurements. I'd like this to be quite specific. So I want you to do is I want you to just get that midpoint and just do a little X from this corner all the way into the center. Effectively, what we're doing is this little square that we had, we're just doing a diagonal line from one corner to the other and then again from one corner to the other. If you just follow me and do that on the bottom corner here about this bottom point down there, I want you to take it all the way to the top. Now, you may have a raised its out, but you can still seek some of the underline there, so just take it across. But it's going to go through this sense it by, so just make sure that you've got the CenterPoint lined up. So we got that center point, take it up, and then the same here from this corner. I want you to take it through the center. Point on. We've got it nicely lined up to that center. Point here from the corner and just take it all the way up. And these are just gonna be our rough guides. So again, with each one of these boxes where we're gonna have them, I'm gonna do another diagonal line going from here to here on again. You don't have to do this. I just like to do this because it just helps with the positioning of the window. So again, from left to right on the top one so effectively, we're putting crosses in each one of the boxes and then the other angle from this point here, all the way down there, we've got self A national. It'll pattern, haven't we? We've got an ass symmetrical pattern. You can even color it in if you want to go. Go all out abstract. So we've got a nice little zigzag across parts and got going on over here. Well, I want you to focus on is the center points off each one of them, just doing little dot there. And now let's start with the tough left. So we've got our three centimeters going across. Let's maybe have our window about 1.5 centimeters wide. So in order to do that or we've got to do is from that center point that we did just draw a vertical line and do it to the next 10 2 points here. All the lying took to the next sense point so that you've got another vertical and going all the way down. They go on. Then again, from this point to this point, do another vertical line. Now, this might seem a little bit complex, you know, with all this pattern making, but it will really help in the placement of the windows and make it look fairly accurate.
35. Full Sketch - Window Placeholders - Part 2: What I want to do now is I want to just decide how high off I want the base off my windows today. So with your ruler, let's say we want to go off by about half a centimeter. So I want you to just measure half a centimeter from the center point here they were a little dot and then maybe measure another half a centimeter from this corner. Let's keep everything nice and accurate. So it looks right. And then all we need to do is enjoy these $2 together lying. You rule a rock, join the dots together and take that line across to the next box as well. So that will should be perfectly lined up. And he conceived. We've got a nice half a centimetre line going all the way across. I want you to do the same for the top. So we've got this top here. I want you to measure half a centimeter from this point where this little diagnoses so put your ruler that half a centimetre do a little dot on then just roughly. Let's not bother too much with the half centimeter from the corner. Just roughly Just get your ruler line. It's up to this top of faint line here, and they just drop it down. That should be approximately half a centimetre going all the way across. Don't need to get to bunk down with the exact measurements just on these borders. So we've got this little rectangle with in a square for both of these on the top. While we're doing this, let's continue to do that for these two so that we don't have to continue repeating ourselves again from this point on me to do another half a centimetre down little dot there and then we've got a little corner measurement here. We might as well measure this side. Half a centimeter there maybe just did my hair just for completeness office sent to meet that, then we're just putting this all the way across. So we have the border underneath now. You might see you might know is that this line is slightly down on. That's because I didn't do with dot there, So it's always gets it's always good toe measure before you do, you draw before you do your lines because otherwise, half a point of a millimeter here and they're really construe your line and make it look slightly after wrong angles. That's why I'm there. I've just added the little point on top. So we've got a nice even mind going across on again from the bottom restaurant border stuff . So we've got half a centimetre here centre, half a centimetre here. And that. Half a centimeter. Yeah. So just making nice straight line going across. That's about it. So we've constructed these little borderlines for measurements and guides for our windows. Now it can go ahead and actually draw in our windows. Now, we've got this center line for this first kind of quadrant. This first box that we've got, we've got this little rectangle within the box. I want you to just place your ruler on that line. Andi, because we was It was three in the middle. It was kind of three centimeters across is 1.5 in the middle. I want you to basically do a window. That's let's go for two. Let's go for two centimeters from from this. Actually, this will make it a lot easier if we do it from two. So on the left hand side of each of these. So you've got the vertical line coming down here. I want you to again do half a centimetre. Just do half a centimetre off a dot there. Little mark there on the one writes at the bottom. Half a centimeter there. Let's make these windows nice. And you can see now we've got half a cent to me to come again. Just with your ruler. Measure both, then points off and do a vertical, like a way to the top. And then again from here. So you can imagine this. This is your square. I'm gonna make the blind to death. Otherwise it's not gonna raise out. So the city square this your first window? First quadrant. I want you to from that center line that we did do another half a centimetre dot So half a centimeter from that sense line little dot there and then right at the bottom, again, All the way down Half a centimeter, half sentiment from the second from the bottom. All way to the left. And then I want you to do a lie going all the way to the top. You can finish your mind and you can see Now we have a little area here, which is a perfect kind of shape within that box. And this is what's gonna form our window. So I want you to do now is I want you to just go in with your pencil, going a little bit darker and just make these lines prominent. So we've got this line here and we've got this line here and you can see now that's a bit more prominent. There's our window placement. Now. I'm going to do the same for the one at the bottom here because I want you to have to Windows. Let's pull to windows here and then we can do the same here. We just need to add our half a centimetre border from the center going in. So again from here, half a centime to that little dot there at the bottom of the central line. Half a centimetre here. And if you can't follow what I'm doing, if I'm going too fast, you're just go rewind the with video to the point that way you are kind of like, you know, struggling. And then just literally every step that I'm doing, Just follow that step, go back again followed a step. If you've not followed it through all the way, or if you have jumped to the next step too quickly, just keep make sure that you've got all these construction lines drawn out. Eso that we've got similar, if not exactly the same drawing that we're working on together. In the end of the day, it's You don't have to do it like this. You can roughly place these. Put a placement windows. I just like you toe, you know, do a little bit of measuring. I know it can be a bit tedious, Andi. We're not really going into too much complex its complexity at the moment when you say that properly, if it's too complex for me to say, we're not becoming too over complicated because again, I want to try keeping things as basic as it can. But sometimes it's just good to have some measurements. Don't on over here. What I'm doing is demand half a centimeter from the left again, half a centimeter from the rights, and you'll notice it's just a repetition of the same process that we do it again. You know, half a centimeter from here, Half a centimeter from the top. But the end result is always so much more better. So we just joining these two points up that we don't do a little. I'll faint line going all the way to the tough. No, hard. And now, you see, we have our another window here. So with your ruler and pencil, just a little bit. A little bit of pressure. Make that line a little bit darker so you can see it. That one as well. Andi, this one over here on the final one at the bottom, we just draw all the way across on there. We have it. Now, while we've got all these construction lines here, what we can also do is add in the placeholder for our door for the door. We can use this little box area that we've done. So we've got literally another window here. But instead of kind of closing the window off here, I'm going to just do the line going all the way to the to the kind of the base of the house from this corner. Just get your ruler on draw July all the way to the bottom of their and again from that corner all the way. So it's nicely lined up with that top window and then across. Let's just make it nice and simple. And there you have it. So we've got our placeholders for our three windows on our door.
36. Full Sketch - Window Placeholders - Part 3: Now, let's just added our placeholder for our kind of, like top attic window on. We don't need to worry, too, too much about the, you know, drawing all these lines because what I'm gonna do is I'm gonna have a circular window for this one on Circular windows are quite easy to do. It's no easy to draw a circle Freehand book. How I'll show you what we're gonna do. So we've got, if you measure from this point here so that top part off the border. So basically that cross section that we had at the beginning off the box. So this measurement here is approximately 3.5 centimeters. So roughly 3.5 centimeters divided by two would be around about between this point between 1.5 into. So we've got about this, I'd say just probably old. Don't round about that. Do a vertical wind going across that door. I don't need to worry about having them equally on each side. Just roughly eyeball its out on that. What that will do is that will kind of be a point for us to work our circle on. So what? We need What we also need is if you have a compass at hand on, I don't have a compass, a town, so that's not very good planning. That's great. But just grab hold of a compass. Or even if you have, like, a coin, maybe a one penny coin or a two penny coin that would work here. But if you have one of these, which are these kind of stencils, the circle stencils, these would work great. So I'm going to use my circle stencil. But I'll also show you how Teoh do this with a coin. Because I know a lot of you probably don't have one of these. You know that sometimes I'll just put this to a side and how quickly grab hold of my a penny coin or a competence to just I'll be back in a second. Let's just grab hold without a penny coin. I know that's a car. Find one. Now there goes five feet one. Okay, so I've got my little coins here, so I've got a one p and I've got five p wherever you are in the world. I mean, I'm sure there's some type of coins that you've got or or anything. I'm sure you have a comfort. You can do that. But if you don't have anything to draw a circle with not to worry, just stick to a square. So instead of them in a circle here, just draw in another square or draw in a triangle. So with my one pen, one pence, you can see that the one pence will work pretty nice there. All you do is get you get you penny measure. It's OK. So that kind of the reason we drew these lines was so that we have, like, a slight guide that will give us a bit of an angle Teoh work on from both sides. You can see that roughly about the same on both sides. Just lightly with your pencil. Just draw a circle around there on till page if you have to. Sometimes it can be a little bit fiddly. So just place Lee Penny, the That's all men today Place a penny there, draw in my little circle. I don't have to be super through. Poor accurate on there. We have it. So I got a nice little round, roundish window a placeholder over there. Now we don't have to worry about details, because I'm gonna put the details in at the next stage at this stage or within minutes doing our place. Oldest. And I got a little bit of a smudgy, smoggy hair. So if you get small, Jews went with graphite. That's what you tend to get, especially when you're using off the instruments and things like that. Like pennies. You always get smudges, but not to worry. So we've got our little circle there. I know. What I'm gonna do is I'm just gonna darken it slightly. So I'll just use my, um, stencil here to death from that again. If you don't have a circle or a penny or anything like that, Don't worry, Atal. Just drawing a square on place. It's in the middle or you don't have to put anything here if you don't want, so just leave it blank on. We can carry on with the rest of the house. So let's move on to the next step
37. Full Sketch - Window Placeholders - Part 4: Okay, Welcome back. So now we've done the placeholders for our three main windows Top little window at our door on the front part of the house. We're gonna do exactly the same for this side, part of the house now. So let's just get our ruler on or we need to do. Here is you don't need to worry too much about measurements here because because it's the side angle we need toe mawr, Focus mawr on our perspective Point It was a lot easier to just kind of, you know, place in these squares with these rough guides that we did. But for here, what we're gonna do is we're gonna use this perspective line said come up with some placeholders. So what I want you to do is, firstly, let's just add in a similar border that we did with this 1st 1st part. So if you see from here, we had a 1/2 a centimetre border going across each window. So we're just gonna pretty much do the same If you've got the horizon mind here that we drew earlier. I just want you to measure half a centimeter, which is basically this point here that's coming out from there is you don't need to measure it again. All I want to do is just ensure that you've got a point there. And then another one here on another one. Here, you've got these three points that we did, which were half a centime toe end on each side on. All I want you to do is get your ruler. So let's start off with this top one. Put your pencil there, Andi. Draw alive all the way to the end of the house and ensure that you've got Got it lined up with your vanishing points on the left. And that's all we're going to do. There just likely drawing you're lying is gonna effectively be the border line as a guy. And then again for this one, do exactly the same. Just ensure that if lined up to that munching point, why, there we go. And then the one right at the bottom. Let's do exactly the same for that. And you can see it's looking really nice on. There we go. So we've got our guides were gonna place our windows in now. I'm not gonna do another door here. I'm gonna just literally do smaller windows going across Now we're gonna just do some markings on this horizon. Lines on this vertical line. This line, that's kind of dividing the house up on what this will do is this will help his place our windows. So just line it up on that line. So I've got five centimeters from 0 to 5 on. I want you to start adding dots on these measurements here. So we've got zero going towards the right zero on half a centimetre. Do a little line. They don't want you to do one on 1.5, so we've got half a centimetre. Mind that, Then we've got 1 1.5 They were lying there. Now I want you to do another wine on two centimeters. Then the next line is gonna be on 12 on three centimeters. Then we're going to do another line on four centimeters. So what I've done here is once you don't all these kind of little dots on the all kind of dashes. We've got one to 345 We've got five. All together Now. I want you to pretty much use your ruler, Teoh measure these out now what we can do is we can do the same going across here. However, there may be some kind of give for the measurement, so I don't want to get into The technicalities are having to grit this out like we did here because it was a lot simple here, but on the perspective, I can get a little bit more complex. So instead of doing that, I don't want you to get fed up of all these grid lines. I want you to just relax a little bit and enjoy this process. So just get your ruler. Andi literally lights up against this vertical point here, find it up over there, drag it across until you hit that first point. Now we've got that first point on. All I want to do is do a faint line going from top all the way to the bottom. Carry on dragging your ruler do a another line from top to bottom. Dr that ruler again, all the way across. And you've got another line top to bottom drug. It's across again on that next boy top to bottom again, and then finally drug it along top to bottom, and you might find that one of you dragging your ruler. It might be going a bit scientist like that not to worry about that. If it does, just rub it out on use this mine till page this way and use this line to kind of do that rough kind of eyeballing exercise. So you just keeping it vertical as you can bring it down there. So if you lies like this, then you know, rabbits out. Start again, bring it there and then measure it with that line. The next line. Measure it with Measure it with all the way until we have these nights vertical lines. And now these are gonna be our placeholders for our windows. So do we need to go in and draw complex details at this state? No, we don't. We need to just border up these lines like we did here so that we've got darker lines going on the outside. So I just want you to make a dark line here. Dark line. Hope that a dark line on number three. I don't want you to do a dive final, this one, but I want you to do a dark lying on number five. So on that fifth point, So just like this, you got 123 missile line and then on this one. So what were effectively doing is we're doing a smaller window here, and we're gonna do a larger window on this side. So just get your ruler on on that first horizontal line close off that window. There we have it. So you've got two little window placements with a little line in the middle, and I'll explain what that line is all about again. Drop this down. And maybe for this one, we could do a window here. So let's just docked in this line here, and then I want you to move on to the next one. So we want to this one and dark in both of these lines. So, like, this one were jumped one, That's where jumping one here. So just darken that wine and then bring this down, Darkened up this line here. Miss that. Why darken up this line? Mr Section Dolphin up this line and then dark. Know that final line there and then close this off, darkened up the border at the bottom. And there you have it now you'll notice that Abdul, it's not symmetrical designs. So, like over here, we've got the same window following the one from the top over here have slightly changed it to make it a little bit more interesting. And that's what you can do. You can once you kind of grasp hold of this concept of, you know, mapping these window placements all over your house. You can like you have a have a play around, but it may be. Have a window here, have one here, or just have no windows and just have a door. You can do whatever you like. So what we've done now is we have added our placeholders in for our 12345678 windows on one door off our lovely house. Now we can move on to the next stage.
38. Full Sketch - Chimney Design - Part 1: Okay. Welcome back. Let's do the final little construct off the final element to go onto our house before we start doing the exciting stuff and adding the detail. So the last little bit to go in now is the chimney. So as you can remember from exercise six, we looked at some basic chimney designs on we put them in using our perspective line on for this one. We women in this one, we did one. And then we did, too, as an example. Basically, I'm going to do one chimney. I'm gonna have it slightly in the center area off this roof. So if you remember on the first diagram that we had here, we had it right at the edge on the foot part of the roof. I'm the same for the second diagram. We have them on the front. And then I did a little rough sketch on the right inside, But what were placed in the middle? I'm going to go for this middle design. I think it has a little bit more interest on so that we have a slight variance from our exercise designed. So just put that to the side on all I want you to do now is get your ruler. Get your pencil on this line that we drew here. This was the perspective line that went all the way down from the edge of the roof just above the kind of end of that edge. I want you to use that as a rough guideline. So what we want to do is we want to. First of all position were chimney. So what I'm gonna do is I'm going to use the edge of the house. So this vertical line here that we've been using quite a lot on all amenities is line of my ruler as I've been doing before. So just follow me with this. Just lying to rule Iraq when actually turn it the other way around because I want the centimeter side here. So, line that's up nicely on what I'm gonna do is I'm gonna have the and so that lower parts of my chimney being around about here. So what I want you to do it is from this corner. So you see this corner point here that meets that borderline? I want you to measure roughly approximately about 1.5 centimeter. So if you just measure it 1.5 centimeters or actually just do a straight line all the way to the top, let's not go into the nitty gritty of exact measurements for the chimney. Let's just do it by eyeballing gets Let's just do a nice line going all the way to the top there so that can effectively act as I were side of the to me there. And then for the next part, we could make it as wide as we want the chimney. But for our purposes here, I'm going to do it. Probably about up to here. So let's use this line. So we've got this line for the window on the side. If you just met, why line it took with that line there? Do you want this nice straight line going there and just do another line going all the way to the top off that rive element? So I want my team need to be this much in with So how do we have that chimney on? So basically or we've got to do is use the Dagnall lines that we have off our roof as the kind of perspective points going at an angle. So what I mean by that is what I'm going to show you right now. I know all this sometimes, you know, be a little bit complex. All these diagonal lines, perspective wines and angles and measurements. But if you just follow these steps that I'm doing, it will give you an idea where you don't have to overthink, overthink it too much. So just put your ruler across the edge off the diagonal of the roof. Now, as we've been doing or we're gonna do is drag this across left, keep in a straight as possible until you get to this point where we've just done that way and it meets the top part of the roof, and I want you to do is just do a light line cutting across that roof. So all the way down, just do a light, very light line going all the way down there and then from the end of the roof here, just line it up there and then just bring that ruler across this way. So with this one, you bought it across that way. Bring it up across this way on a soon as it meets this edge here, I want you to do exactly the same. Do a very light line going all the way across so effectively. What that's done is it's divided the roof up into three parts about this party. We got this chimney area here and we got the other parts over here. Now, we're just gonna leave these light lines in the guidance and for guides. Really, Just like women doing with everything else on. What I'm gonna do now is I'm gonna decide how far down I want the chimney to basically start. So for this, we're gonna be using our perspective point right here. So just get your ruler. Put it on to that perspective point there, line it up with maybe the bottom part of the roof just to get your bearings right on this. Put you think of that as we did before, and then just with your finger, just raise. You're rula keeping that perspective duck lined up on put approximately about here. So if we just do a light line that you've got this point starting here now, if we measure this point to the edge of the roof there, this is roughly around about I would say it's about 1.5 centimeter, so we could actually measure it exactly the way we're doing it. But I'm just going to say, just possibly just do just a 1.5 centimeter here. So if you just do 1.5 centimeter from here and just do a little dart at the circle so we've kind of done a little bit higher than 1.5, But this way we'll all be kind of drawing the same specifications and angles from that point. Now, what I want you to do is whine that off again. We did the line before up there. Just do that line from this point and give it across here on where it intersects this line that we did on the diagonal. These are gonna be our two points. We're going to start our chimney design. So we've got our two points here. Now I want you to do is get your ruler on, do a straight line, a vertical line again. We don't have to have it. Super spawn. I mean, obviously, you can line it up if you want. You can measure it exactly or use a right angle if you have one. But let's not worry about that. Let's just do exactly what we've been doing before. So just line it up to this angle here from this on the edge like we did before, driving across all the way until we hit that cross section. And from that cross section, just do a light line going as far to the end of your Rua as you can we not? This isn't going to be the kind of height of the chimney. These are just the guides again on. Then again, let's go on to this edge. Here, put your ruler there. Same thing, bring it in. And a soon as it hits this cross section, just do a straight line going all the way to the top. So now we've got hours straight line for our chimney. So next What we're gonna do is we're gonna decide how high we want the chimney cell. With this, we can actually measure rift. So from this point on this little light line that we drew, I'm going to say, Let's have it. Maybe about three centimeters or 3.5 of What should we go for? I think we should go for Let's go for three threes, threes, nice, even uneven numbers and often in prison. They don't know me. Numbers were high. Let's just go for three. Do a little dot there with the three and now we don't need to do the same here because we're going to use the perspective point. So from that dot that we just don't do your perspective line all the way down to that vanishing point. And there you go. And now you can see that we have a lovely angle, which works beautifully. Now what we want is we want this chimney to kind of just be on this side of the roof. Sometimes you have chimneys that kind of go on one side of the roof all the way to the other. But for this one, let's keep it nice and simple. Let's just keep it here. If we did it all the way across, all we needed to do was just just to cook this up, we just need to do it right, you know, just a horizontal line all the way across. But I think that just makes it a bit too easy. Let's let's continue on, make afford chimney. So from here we drew Drew this wine already to line. It's already there. Let's just continue that line from this edge. All I want you to do is continue that line from the edge and take as high as we've got these lines. So we've got this line there and then finally, all we're gonna do is which is going to do a horizontal line. That pretty much matches our one point perspective. Now, if we have two point perspective, this line would be drawing to the other point over here. But again, we're not going into two point perspective. We're keeping it nice and simple at this beginner's level, and that's all I want you to do. So just eyeball it on. Just do a horizontal line or, if you really want, you can measure from the top part of your paper. So I've got the top of my paper here on day. This is approximately 35678 about 3.8 centimeters. So again, just put that dot there at 3.8 and then three points, eight overhead. It's roughly about this if you just square it off, you got you nice horizontal line going across that and there we have.
39. Full Sketch - Chimney Design - Part 2: So we've got our side off our chimney now. What I want you to do now is let's darken these lines slightly so you can see what's going on. You don't thinking What is he drawing? What is he going on about? So it's just ducked in this line here darkened the line for the diagonal that touches the roof dark in this line here dark. And this line here docked in the line on the diagonal, on a dark in this final line on the Dagnall on What we can do now is we can't just erase all this all these kind of unnecessary lines that we don't need anymore because the chimneys pretty much cover and gets up. Now, we could have done our chimney a lot thing than this, but I just wanted to have a nice big chimney. And then maybe, just maybe, we could add a whimsical element inside the chimney. Maybe even have a little window is so why not? But you don't tend to have windows in gym these bought. If this is your house, then you can design it however you want. Okay, Now, let's just make them lines a bit more prominence again. It's taking that right back to the top and there we have it. Now what we're gonna do is, if you remember from the chimney lesson that we did, we're just gonna add in these borders. So it's adding the border to the top. And I'm just gonna do maybe one or two of these chutes come in from the top part of the chimney. So let's just add a border and for the border, I'm just gonna do maybe half no hot, not even half a cent to me to write, say, Maybe, let's just do a two millimeter border. So just 12 when you ruler little dot there 12 on your rule a little dot that same over here 12 and your ruler little doubt that we've got a nice little area that we can cut off. So the best way to do this is if you do been like a border, always have your ruler on the side where you can see that previous line. So that's right to do this Is Tony paper around? Let's just do that. And what I mean is, we can actually see where your lines going Otherwise, you might end up doing a wonky line or, you know, a wrong blind, and then you can see if you can see I put the dot here. It's slightly below on this one slightly above, so I can easily just eyeball it and just do a straight line. And that's what I want to do. What? The line must follow the line that we've got over here. So even if you're horizontal line isn't perfect. Perfect. It needs to follow this line if we just do a line that extends slightly outside there and now the extension, if you remember, will do the extension, maybe a couple of milk, maybe two mil extensions. So from this part, I want this line to extend by two millimeters. I've got one too little line there and again, I've got one want to? It's a line down. Let's just see if we can get a little zoom in on the camera on that. Once you can see what I'm doing a little bit better. So there we go so you can see just drawing a line going across about two mills going on top off that wine, and then two mills commit outside the edge of that line. And so all we need to do now is just do all that line a little bit DACA. And then we just need to extend this line that we have here so that it matches. They're dimension that we've just gone, which is actually on top. So if we just, you know, take around again, You can see here or with them in areas were just extending this line. So it extends to millimeters from both sides. So would your ruler. You can just do a roof line going up. You don't need to do any measurements from left. There you have it. You've got this nice little border on the top. Now, to extend this, we need to sharpen our pencils. So my pencil got a little bit born and to do, like, you know, this chimney design I would suggest maybe, you know, sharpening your pencil, keeping an eye sharp pencil, sharp point so that we don't get too much of a mess. So I've got nice sharp point there. Just do a little tap on the end of the sharpener to make sure it doesn't break when we're on the actual papers. And now we've got these two points here that we've just drawn into these of the left side off the border that we just don't on top of the chimney. So what I want you to do is from the top parts of this area here that we've got this corner to put your ruler there and take it down. Same angle on that perspective point. So take it straight down, so I'll just zoom back on the camera so you can see them lining this up to the actual perspective. Point here. You can see him just lining that corner up to that perspective point. And I've just bought that line all the way down. And now we've got another one here, so just zoom in so you can see this. So that bottom corner see, that's a bit too much, right? That its bottom corner again. Just put your pencil there on. Take that to the perspective point and draw your line all the way to that perspective point . So I'm just gonna show you again. I'm keeping my ruler nicely lined up to this perspective. Points. So we're going to do now is let's just get that zoom back in fast there. The camera just can't cope with May A Come on camera. Right. So we've just bought that down and what you can see is there's a slight kind of under lock him in. My blind hasn't come out very well, so I'm going to just do that again. So take that line all the way down and you can see that we've got this little edge border going on over here. So we just till the paper to make this a little easier. I'm just gonna do that. Why? I'm top again cause mine slightly come down is when I was drawing the line, the ruler just stopped. And it's important to keep your ruler in place when you're doing these lines. Otherwise you'll get what's just happened to me there and see this little line here. It's slightly dropped by maybe half a mil, and that makes all the difference. So just ensure that you're holding your ruler nice and firmly. So now what we've got here is we've got this edge going across, and then we've got the under part of the edge less so we're just gonna cut these off over here. We don't have to be super exact, but we can what we can do, you can measure maybe to milk going across. Now that might not be super accurate. Measuring two more because with distance things changing terms of left. But let's just let's just measure it to melt. So we've got two mil going across here. Little doubt there, two mil little dust that so these two dots that we just did that should cut them. Of course, you don't have to do it to male. We can just kind of eyeball it just to make sure that this area's air similar to this one here we're not working out super angles or anything like that. So now I want you to get your razor biliary razor and raise out these lines that we did these perspective lives so that we could see what we're exactly doing. That's all I'm gonna do here, gonna raise out all the lines going to my perspective point get rid of them. Don't need them now. So there we have it. Just gonna make this a little bit more clearer. Get rid of all that access bullets away slightly. Make this a little bit more visible. Someone doing is lightly raising them lines with my ruler, and all I'm gonna do is just emphasize those lines all over again. So again, start with the top. I've got my guy. Just That's a nice, nice firm line there. Next one, match their online there. Then what we're gonna do is if you can see this little area here with what this drop find there. What we're gonna do is we're just gonna cook this Lines were just going to do a slight horizontal line go into this agent can just roughly put that you don't have to be super accurate about that one. So there we have a I'll just lightly lightening up again. This is a good way to lighten up. You know, if you just use your razor, really like they just go, you don't have to go in really hard. Otherwise you're gonna lose the angles and lighting it up on get your lines drawn in nice and accurately. Just ensure that the lines that you're drawing in these diagonals are still going to that perspective point really vital that we go to that perspective point for it to look accurate . Otherwise you're gonna have slightly wonky border on your chimney. So there we've got that one on the final one lining up to that perspective point on happy days. So look at that. Doesn't look good. Just do a little prominent mark there on just across hair. Just to finish this off, actually should get rid of this line here as well. So, just lightly would you raise their just lightly arrays? Oh, going again and just Duncan up, then lines on. We've got ourselves a gorgeous chimney with a nice chimney border going all the way across . I'm just calling it a chimney border. And, Omar, what the technical term is I'm not an architect, So I'm sure they've got technical terms for all these little bits and bobs that you have on houses and all these elements. But a we're just having a bit of fun our way
40. Full Sketch - Chimney Design - Part 3: So what I'm gonna do now is I'm gonna add in my little shoots that come up these little kind of things where the smoke comes out of. And maybe I'm just gonna roughly with my pencil, just kind of decide where I want them to, Just to give me an indication to Maybe I've got one here, Uh, on. Maybe I'll have another one right down here and maybe we'll have another one down here somewhere down here. So I'm just pointing these in really, really rough. And how about maybe just have another one? Yeah. Again, I'm just gonna draw these out very, very roughly. These just my placeholders, but we're gonna measure them up and put them in. So I think we'll just stick to maybe 12 and then have a couple over here, so it's gonna be a nice, busy, busy little chimney, right? So now I want you to do is all I want you to do is bring in your ruler line. Took with this line here and do yourself a half a centimetre line doing coke. I just put a little mark legs. We've already got that previous line for center meet it there and then on this side. Maybe just measure across. This died? No. Just measure another half a centimeter across his dad. Now we've got another half a centimeter. Just get your ruler, bring it across until it hits that point. And bring that up by half a centimetre as well. Everything in harm's aren't very good. Okay, so we got our present to meet a little thing coming out there, then all want you to do is maybe, actually, let's make this one a small one on. We won't bother with the so we'll just run these Arab. So you see, you can see what I'm doing. And then over here, let's work on this one here. So with this one, we've got trucks approximately its commands. If we look at the edge of our border there, it's approximately. Yeah, let's go in half a centimeter. So half a centimeter there, little dark. Then let's make this a little bit. Why? No, we'll just keep this half sense of nature as well. So a little dot there and a little don't there. So we've got a doctor half on a doctor, one that's going starting from this corner here. So 12 Now, let's make these slightly highest. So let's make these maybe one sent to me too high. So we have it slightly different. So again with the ruler to keep yet ruler as vertical as you can. Just line it up with this side. Bring it across until it hits here and then just do aligned one centimeters high and again Bring it across on your second line one sent to me to hide their So there we have it Now for the top. All I want you to do is just do a horizontal line. Just line it up with this. Eyeball it that this one. Just raise your rule it a top. Join them two points up. Very nice. So we've got one two of these little elements coming out of the chimney. Maybe this is a double chimney, you know? And I said whimsical Double Jim name. Why not? So what I'm gonna do is I'm gonna work on this. Left one on. It's really easy. That left on or we're going to do is do a horizontal line going all the way across on this . Actually, you can use this The top this bottom line here to just draw that across. So you've got that one that's cut across there and then all we need to do is join these two points here. But just remember, even these two points need to be going towards that Onda perspective lines. So if you just put your ruler here, which is why I didn't cook itself, I didn't draw this off first. If you put this rule of that, let's just do a zoom back room. That was it of room back. What we're talking about room back. So let's just put our ruler there on that top point there. Take it right to your vanishing point that lovely vanishing point and draw your line until it maize that line less of that much more accurate than just joining the two dots up because eventually the further back you get, you're always going to get things that are going at a small angle, which is why it's not really gonna be what one you know, half a centimeter there and half a centimetre. Then if you join them up, it's not 100% accurate. But then again, we're not doing super duper architectural perfect drawings. Only know we know, and I'm gonna keep saying about throughout this entire class that probably already have. So let's just go over here. So we've done that one that on Let's just do they swan. So again, let's get humans. You can see this clearer. So all the minute it is, I'm gonna put my ruler at the end point that I'm gonna get the ruler right on that vanishing point line. It's up. So that's why it's up to the top there. And that's nicely lined up. Just draw a diagonal line may be about to hear. So we have our angle to work with. And now we can decide how high we want this little everywhere of this chimney. So I'm gonna say, Let's maybe have it, Okay, let's maybe have it joining to this dark here, that just makes it a lot easier. So just get your ruler, line it up against this side of the chimney. It bring it across until you hit this point, unless close it off on there we have it. So we've got to nice little elements on our chimney. Let's robot all these lines because we don't need them anymore. Lightly erase everything on can see. You get little bits and bobs of graph I all over the place, but that's fine. That's what makes it so flexible. This medium graph I and are all to be doing a class on how to use graphite creative way because you can do some also awesome awesome stuff with this material, these standard pencils. You can do some one wonderful creative artwork, but that's for another class and in the lesson. So let's just join up these points nicely, does it? And there we have it then. So let's do a little zoom back and see our complete house, which is now ready to start with details. So let's move on to that one.
41. Full Sketch - Window Outer Frames - Part 1: Okay. Okay. Welcome back. So now what we're gonna do is we're gonna start doing the fun stuff. Fun stuff starts right now. So what we're gonna do is before we start doing our detailed work, get your eraser and we can get rid of a lot of these lines. We don't need them anymore, because we're just gonna use vertical lines on horizontal lines with this area here. And we've got enough that the placeholders to use of the guys who just likely get rid of all this. I don't need any of this now. Now the former point stars. Now, I'm gonna leave the ones here because these ones are still gonna follow the perspective point. Whereas with the ones that we've got here, these crosses and straight lines that make the guides, we really don't need them. Now, we can really start getting creative, so I'm just gonna get rid of all this with my razor. I mean, I'm not gonna completely get rid of the lines. Just gonna get rid of him like, you know, just like to get rid of them so they don't keep coming in the way. But ultimately, if you can get rid of them properly at this point, then it's great not to worry if you can't. If you think you know, I've still got all these marks all over my house. I don't want them there. It's fine not to worry about that at all, because once we start building detail in details, gonna literally cover off everything. So he's going to do the same. It's gonna go in with my pencil of razor on again. All the materials that I'm using, which is hardly any. Maybe about four materials for this entire class. And that's all you need. I'm gonna put a list of all the materials in the resource sheets if you want to use exactly the ones that I want to use. No, I want to use the ones that I'm using. Come on. Right. Let's get hard speech rights. Ones that I'm using. Then by all means, you can get them. But you don't need to spend any money today. This classic unjust use a standard bog standard pencil eraser on a ruler on if you have a compass. Great. But I'm sure if you don't, you've got a couple of pennies lying around. You could just use them or just use something that you can draw a circle with. So we're going to do now is I'm just gonna go in with my pencil to darkened up, then lines that we've just erased so that we have some nice framework toe work with for windows. And that's what we're going to start with. We're gonna start off with our window design. So what I want you to do now is with you Windows. I want you to just measure approximately half a mil. I guess we're working half a mil on everything or actually not half a melt. Let's do maybe three millimeters from the bottom. Let's do three millimeters for the window sill. So let's just do a doctor. Three millimeter there on a nother dot At three millimeter here and then on this window, we're gonna do exactly the same, so we can just do it three millimeter dot here as you can drawer in our horizontal, so send us around. Remember, I said always have the line that you're measuring against on top, so you can see the line that you during joined these points up and it's gonna be the same line that girls across the just do a nice lightly or lying don't need to press down too hard at this stage. So we've just effectively drawn in our window. Sills can do the same here. So three mills at keep things nice and uniforms three mills that I mean, when you're doing your class project your you can do it however you want, you can draw completely different windows. You don't have to keep them uniform. You can draw them however you want. I'm just doing this for this exercise that you have a step by step illustration to draw so that we can all kind of do the same thing at this point, a bit more of a zoom in on there. I'm not gonna worry about the door yet because the door design is gonna be slightly different. So now we're doing the bottom cells. Now let's do our inner frames that go on the inside. Now, if you remember with the windows, let's just get the window sheets way had so many different designs that we were working with this simple basic illustration that we've got here. Let's stick to maybe this this window here so Maybe this one or this one. Let's keep keep it nice and basic, but this first kind of attempt, so I'm most likely going end up doing this one, so let's just bring that out of the way. Now you can't do curvy windows If you want to put a curve on the top, that's entirely up to you. But I'll let you do that with your class for object if you want. So in order to do the curves, all of you about to basically do is actually show you how to do a curve on this. I tell you what. Do you know what? Let's do a curve. I have decided to change my mind by my class. Span's gone completely out the window literally other window, no pun intended. And so let's do Kerry windows to make it a little bit more interesting. Self to do Kirby windows really easy. Let's get a zoom in so that you can see clearer. So we've got these top areas down here or we need to do is let's measure, say, approximately 1/2 a centimetre here. Let's just do have sent to me to deal with half a centimeter there another half a centimeter there. Let's do the same physics window. So half a centimetre when literally doing what we did on the window. Self at the top. But we're not gonna draw in the line. So we've got half sent to me to that. And then on this 1/2 sense meets us. You've got half a centimeter measurement from the top corners off all your windows. Let's just do it on this one as well. For completeness. Let's just do it on. Here's your half centimeter there after the bottom ones were actually three millimeters. Yeah, so these half a centimetre or five millimeters. So what we're gonna do now is do exactly the same going across. So we're gonna have half a mill going across the little dot that half a mil from that corner and from this corner, we've got another half a mil. Then again, we're going to do the same measurement on all of these three windows, half a mil there and then another half a mil going across there. Let's do that for the one at the bottom. We've got another half a mil going in the half a mil going in that now what we're gonna do is we're gonna do a little curve. So if you're gonna do a little arc, go in a cross from this point so that point to just curve nice little curved line of that science of the other. And again, if you still get paper, depending on what you what hand you're using do the same curve from one point to the other , just like so it is enough to be 100% accurate as long as it looks similar. And then again, top left of the one at the bottom. Same little curve. And then you got your arc. Well, you've got left side of the earth now again for me because I'm right handed. I'm gonna turn this around this way so that it's easy for me to follow that same kind of movement with my hand, someone a day. The same from that point to that point, just do a curved nice little curve you might find you might have a slight different Girvan each window on each side. Not to worry about that. We don't need to work out the exact dynamics or specifications so you know where to find the perfect. That's not what this class is all about. I don't want you to get frustrated. I want you to be real lapsed and enjoy this process. So but the final one just making a nice little care to join them to dust off. And there we have it, turned the paper around and look at that. We've got a beautiful little coach now with you, Ruler, with your ruler, We're not gonna raise with your ruler. I do. You're a razor. Just it raise out these corners because we don't need them anymore. Because we've got arks now, so it's like an after curvy window. Just lightly arrays, Remember, don't completely raise your time because we're gonna go over it again. Did the same for this one head Lightly rays out. Likely a raise. Our corner there. You can see that the arcs getting raised as well, but not so worry. Because once we start doing some shading work on this, you won't be able to see them corners. When you start putting the bricks in, it's gonna all look lovely. So let's just get rid of that. Get rid of that. They can see it can likely see them off. So I just with your pencil to darken up like you did before. Now you've got yourself a nice guys again. Right side, left side. First on all four of three of these window story, and then we have it now on the other sides till the paper. Now it just helps me telling the paper. Now, you suggest you try this as well, because sometimes quite difficult to draw ter pictures and, like, you know, round our arcs and circles and things like that. It all depends on how you laying a hand on You know what type of movement you've got, Whether you've got smooth movement or whether you've got, like, you know, quite rough movement. A lot depends on the person. So just do that again. You can see my little lines down a little bit overboard on introducing. Didn't that's out on? We'll get that. You've got some nice, curvy window, so let's just get a zoom out on that one. So that was the first step that we did in just adding some detailed elements. Now we're gonna move on to adding in some of this in a border frame which is just gonna go around each of these windows and then we're gonna just add in our lined vertical and horizontal frameworks that kind of make up the window, and that's gonna pretty much be about it, so let's move on to that one.
42. Full Sketch - Window Outer Frames - Part 2: Okay. Welcome back. Now what we're gonna do is do our inner border for our frame of our window that we did this nice, curved window that we've got over here nice and simple. Let's get a zoom in on the camera. So let's see how far it will go. I think that's about right. Okey doke, right. What we're gonna do now is we're gonna use our ruler and pencil again to just do some measurements so that we can get a nice equal border on the inner side off this window. And then we're going to repeat this for this. This and this, as we did with the original window designs. So let's make a start on this. So I want you to do is get your ruler on. Put your ruler on this line that we did for this kind of window sill board as to just let your line it up against that. And you should have to milk two centimeters going across approximately two centimeters. If you haven't Not to worry, then what we'll do is we'll just add another step. So from the left outside measure ruler right to the edge, like I have over here, and I want you to go in three millimeters. So again, I keep saying no 30.3 mil. It's actually three millimeters. It's no 30.3 centimeters, so I'm just gonna refer to this as three millimeters. Should really set that right from the beginning to try. Anyway, let's continue. So three millimeters from here. 123 little line there. And then from this edge, put your room at the end and we just want three millimeters from the edge. So I got 123 That little line there. Now move your ruler to the top. So move. You roll it up. You've got kind of this straight line Starting off at the curve on all I want you to do is again. Just do three mil. 1233 millimeters there and then another three millimeters on this side of 12 and three to go. Three millimeters dots here, you've got one. Their 2nd 1 there on the top one. Their 2nd 1 there. Now, before we do the lines, unless just quickly do our millimeters from the top. So what we want is we want from this corner here if you just get your ruler vertically there. Three millimeters from his with a 123 Roughly about there and again for this corner. 12 on three. Roughly about their soap with your ruler. Just join up the dots. Let's join up these dots. They're the ones on the left. We got this one that we did here on this one. So it's just joined. That's up. Nice and easy. Nice light line going all the way to the top. And again, the one on this side that's joined these two up. Nice line going all the way to the top. And these now should be similar in with you might have a little point that slightly going forward on one side and less on the other. Don't worry about that, because we're not doing anything 100% precisely. It's just as a rough indication. So we've got a nice line going on top there. We've got a nice line going on top over here. Now, the two points that we did on the top these two just get your ruler on. Just square that off across like so. So you've pretty much got a three millimeter border going. All the way around. So what do we need to do about this? Curves with the curve. If you just get your pencil and just line it up over here where this curve stars bring a pencil across, just do a little point there and then from the top where this curve kind of ends and it starts becoming a kind of straight line. Just bring your pencil there, Drop it down onto that land that you've drawn on a little doubt there and then, like we did before, just gonna join them, dots up with a little arc and there we have it. So we're going to do the same on this side. So all I want you to do is get that, Make a little doctor. I've actually already got a doctor from one of the previous flies that goes across this area. And then again, another duck that goes across this area from the point where the ark stops becoming an Afghan, it becomes that straight line. Just measure your rule. Not your really your pen soldiers. From that point, just drop it down. You know, it's cold up there. And then again, as I said, turn the paper, so it makes the job easier if you're right under it while it doesn't me anyway on, just make you little arc shape and there you have it. So what we've just done now is we've just got self a in a border. Now get your razor, get rid of all lightly, get rid of the extra lines that we've got coming in on the cross section, go over the ark. It gets on, we're going to go. So first of all starts off with the ark. Get that nice little round corner shape going this on both sides to paper around, darkened it slightly and I still try following the curve from the original life that you've got so that it doesn't look too squared off on. Then it will be great. So just with your ruler joined this little line appear and then turned the page onto the side on Join your lines from here all the way to that. Our point and again from here to that nice off point that we've got, they have How easy was that? Easy peasy, lemon squeezy rights. What we gonna do now is we repeat this for this window and repeat it for that. So let's do that, then. So no 0.3 mills. So again, if you didn't follow what I've been over here, you can just watch what I'm doing here and then just repeat that process. So let's keep it nice and simple. Three. Milk from this This corner here it. 123 It's a lie. Three mil from this corner. 123 It's a lie. Three mil from this corner. 123 It's a lie. Three milk, which is about that from that corner. It's a why. And then just from where this arc stops from this little point here where the ark stops becoming an ark where it becomes a kind of straight line. Three mills from that point coming down. What say, three on three mills coming down from here 123 for this window. What you can also do is you can use your rulers on. Just line it up against this line here that you did for the art on. What that should do is that should pretty much join up these dots here that you just don't . And that's like a rough guide to know that you know, you're doing it the right way. You're not going to mill or four mil on. What you can do is you can just join these dots up now. So just do a line that goes across nice and lightly. We're not pressing down hard, and then we're going to join these two dots that we don't. So these two, let's join them up and again. Best way to do this is send your page so you can see the line that you're drawing, which should be a kind of parallel to this. So there you go. See, that looks about right. Just get you doing your dot slightly higher or lower. That looks about right straight line going to the top over here. Send a page of round and get doing exactly the same. Joining up them two dots that we did then three mil Does lining it up with this to make sure it looks right all the way to the top. Lovely job, Leaf. Right now, we're just gonna put in our curvature points, which we're gonna roughly do from here. So this one from this point here, I've got an asset or dot there, that one round about here, this one from this curve where it becomes a kind of straight line, little dot There, this one, which is around about there. Excellent. Right? So, again, what we're gonna do is tell the page on follow the line that we did here. So there's little off Klein. We're just gonna follow that line nice and lightly, and they will follow the entire shape. So then the same again to this side, just following this line between these two points, Just eyeball it, and it should be nice as beautiful. Okay, Right. My pencil is getting a little bit blunt, so it's time to sharpen that pencil. So just make sure you got nice sharp pencil for this again. I mean, I started this sketch off with quite a decent size pencil, and it's become quite small now, isn't it? So look at this. It's become quite small, but I probably been using in between times off them in this class anyway, so it was just a fun little factor. Okay, so what we're gonna do now is gonna light in this area without razor lights in the areas to get rid of them. Extra lines coming in and out a little blood on that on. Let's just draw in the lines. I'm just gonna do this freehand so that we've got a nice clean line come in on a curve going across. You just do this with a ruler angle again. Like I said, I'm just I'm just so used to do in this free hand, I'm gonna bother using a ruler. At this point, I'm just following that line. So I mean, you could do it freehand as well, if you want, so that you go. We've got two very nice looking, very similar looking Rendell's. Pretty much exactly the same. Let's do our final one over here.
43. Full Sketch - Window Outer Frames - Part 3: so same process again. Three mil going in from this side. That corn at one t three and then three mills going in from this side. That corner 123 Lovely event from this joint here, where the curve of the line kind of starts changing the direction of the line. 123 filled out there. Andi from there won t three little dot that right now from this one. Let's do it from this answer this little cross section here where you've got the curve. You know what I'm talking about? Now it's this curve in the straight line. Three mil 123 little dot There from this section here. Three mil. 12 and three. There we go. All the doctors are Don't right now. Let's door another line so we can start off by doing the top line first on the curve on. Let's do that, said Joanie Top. Just follow the line from the top, just in case your daughter slightly out with a nice light pressure all the way across. Beautiful. Any page. Let's have a look at the side measuring up to this life so that we have a nice straight line joined them to dot stop beautiful light line going top, turning around on the other side on Let's bring this across over here. Two daughters that we just did there, measuring it up with this parallel lie and there we have it. Beautiful. Now let's do our points for our curve. So across this cross section, bring your pencil there, just drag it across, they told out there from this cross section. It's around about their drug. It's across. It'll dot there this one cross section that most we've already got these because that's what we use for our lives. We just to make sure that little dot there and then from this section there's across area. Bring that around this on again, or will even is following this curvature shape between the two dots nice and lightly on on the other side, tilting the page so it follows naturally, that movement of our hand, that little curve over here on. Look at that. We've got a beautiful third little window design that's following suit on all of these, and it's coming. Coming together quite naturally now is that I'm sure you've noticed I just make these lines a little bit darker so that when we were raised everything we don't raise the lines. Always good to have your main structure darkened out so that when you get rid of these extra lines, you don't accidentally getting rid of all the line altogether so lightly with the razor. Just do a nice little arrays on you might have to draw in the top part of the border. That's fine. Little blowing glowy on. Now let's follow in them lines to doctor them up again. I'm just gonna use freehand for this. A nice little curve going that turning my paper on the top Freehand! Bring it down! Bringing it down from this side. Lovely job. Now All a minute isn't just gonna doubt from this curve there as well, because I accidentally got rid of some of the darkness from the line while I was a raising before. Same here. Now you might think that, you know, this isn't 100% accurate, but do you know what? It doesn't matter, because again, I could keep saying we're not doing perfect architectural drawings were just doing a nice little house drawing that should look at least a little bit correct rather than having everything all over the place. So there we have it, folks. What? We don't know. You have just done the inner borders off the round act windows that we've got. Hopefully you would have followed this. And you're at the same level as may. Now on this drawing, we've got all these details in the next thing to do now is to adding the cross frames. So let's do that now.
44. Full Sketch - Window Inner Frames - Part 1: Okay, Dokey. Now we're ready to do our little cross in a frame, so let's make a start on that. Let's get back to a nice little zoom Izumi all the way in. That's too much. That's better, right? Okay, so let's work on this first top left window, as we have been doing this entire class starts on the left. Now this distance that you have in between this kind of, like window area now where the glass of the window is gonna be, this was gonna vary for everyone, because it depends. You might have, like the point mill slightly out there or in there not to worry about that or want to do is get an approximate center for this now. So if you just get your ruler on, measure this point from here so that it's easier to see mine is about that's what, One centimeters, One point. It's around about 1.4. So my halfway point between 1.4 is gonna bay around about 0.7, So my midpoint is gonna be approximately there. Now you'll remember. We've also got a midpoint mark already from the previous kind of lines that we raised out. But that might change because it depends on the actual width of what we've drawn on the census. It's always better to go with that drawing or the kind of object that you've got in the middle, that you're gonna be putting the frames and rather than just sticking to the lines, did you conceive my lines? You can see on the camera the very faint like that was a center point of the actual box itself. Because we're not using super accurate tools or anything like that. We just measuring by eye on eyeballing it a lot of the times, and sometimes your pencil can be a little bit belongs, and you might move your rule up. Don't worry about it. Just do that measurement again and put that little dot whether center area off this new shape is what we've just drawn in effectively. So what we're gonna do now is measure that's up again. Let's get this line nice and straight, so measure the center point. The reason I told you to do it here was so it's it's bang on center so that we can do the vertical line. So let's just do that again So we've got I've got five, 67 So it's around about their for may and then from the top again. Between these two points five, seven, it's around about that. So again, your measurement mind was one point. So sorry. Was that 1.4, wasn't it? Yeah. Uh, one point for it's what it was. So mine was no. 1.0.7 was my measurement. Yours might be no point a 0.0.9 not to worry about the exact numbers. Just get that center point depending on the width off this new shape that you've got. So all I'm going to do now is joined up 10 points and it should line up nicely with this line here. Nice light, light little line going there. I want you can. Also do is you can actually bring because most of this is similar. You can just bring that wine and just draw it straight in the window below. It won't be 100% accurate doing this because we've not gone in on measured. Sorry. It's out of out of the camera. Let me just make that slightly higher. So what I did here was I just put my ruler here against this line because we got two points . I just drew this line on this window below. Now that's gonna be approximate for that one. But if you want to go ahead and do your separate measurement for this and get the exact centre point you can by all means go ahead just to make it a little bit quicker, I decided to just do a line from top to bottom. So let's just do the measurement for this one now, so this one might be slightly different. Let's see what I will with this. Let's just get that center point. So my here is one point 12 C over here. I've got 1.3 years, so this one was slightly wider. So for this 11.3, it's gonna be about in between. It's actually that point there. So I haven't moved much from the original box shape that I had. So there's a little criss cross section that we did. My point is exactly the same thing. So what I can do is I can just draw and follow that line from the topping out. If your point isn't going exactly there. That what I want you to do for this one is exactly what we did there. Get the center measurement for here. Measureless across poor little centered up there the same for the bottom centered out there . Same for the top centered up. Join the vertical light. Once that store, we don't need to worry about measuring anything off, because we've pretty much got what we need. So next step now is to make this little midsection vertical border a nice kind of thick, a thick little frame. So to do that, let's decide how wide we're gonna have it. So let me just get a zoom in. So let's start off on the one on the left. Okay, so I start off on this, so I'm gonna say, Let's have this. Maybe let's go with the three milk. I think if we go with the three mil away cross, everything should look nicely balanced. We don't want to make the two things that you can't see them. So if you just put your ruler here on, actually, you know what let's do to make it easier. Let's just do it to melt two millimeters across here because it will just be a lot easier to do this. So if you put your ruler in the middle off this to millimeters, So if you put your ruler on one millimeter, you've got a millimeter on either side. So we've got one millimeter hit. Little doubt there. One millimeter on this side, little doctor. There. Now, we're not gonna do the exact measurements. Were just going to do a rough life. Follow this line here on drawing that one mil coming from the left. Send this page this way, drawing that one milk coming in from the right. So that's roughly about two mills all the way. And you got yourself a nice little vertical kind of sensor. Fray on again with this one I'm going to do is follow them lines on this next one over here . That's just zoom back so you can see this of it better, Right? So this left one that we did hear lined up nicely on Just do that straight life going on the top And that this one wind that's up nicely. Just a nice little straight line going on the top and you can see that my line is slightly bigger on this side. But to be totally honest with you, it doesn't matter. But if you really want it to be exact, then I would suggest Just measure it out. Get rid of that measure out that one bill on either side. And so one No, on either side was gonna be here, so you can see now that one should be a lot better on there. We have it. So we've got a nice vertical line coming in on the center of our window. Let's do the same for here. Let's just do the measurement. So we've got so putting the ruler on one millimeter. So I've got zero here, and then I've got to next to it. So on the left, it's all dealt with. A zero is on the right. One millimeter. That beautiful get you, Rula, Just measure that off and Wily took against its center line here. Nice clean line. Going to the top and then on this side. Nice clean line. Going to the top on. There you go. We've roughly got a nice center vertical line on our window. So are we gonna do now is do exactly the same. Going across on. I'm not gonna put too many kind of window sections in here. We're just gonna do this simple window like we've got down here in the window design that we did so well, just do this simple one that we did won't do too many here because it might get a little bit messy on the general rule is, if you're gonna have a lot of details in the windows, then you probably want to make you windows a little bit bigger on your house is otherwise especially if using pencil, you gonna keep sharpen your pencil. But that's where a mechanical pencil really comes in handy again. I said, I'm not going to use mechanical pencils because I want you to follow what I'm doing. Most people don't usually have these, but this is what I would use if I was doing a drawing for myself or, you know, one of my own illustrations. I wouldn't really use this, but for the purposes of the class, I'm just using a standard book standard pencils. He can pretty much follow as close to what I'm doing as possible on now. You can see all I'm doing is give it a nice little sharpened on the pencil again with the mechanical pencils. You have to worry about that, but I'm going to be living a separate class on graphite and pencil. So do stay tuned for that and keep an eye out. And, you know, follow the channel. Andi. Hopefully you'll be able to learn a lot more on in the world of graphite. But anyway, coming back to the world of houses. So let's do our centrepoint now vertically for these windows to finish these windows.
45. Full Sketch - Window Inner Frames - Part 2: Now we just need to make sure that we've got the center point here just to make sure. Let's just have a quick little measure. So I've got about 15 That's 1.62 my centrepoint should be What's 1/2 of 1.6? Come on, that's about no 0.8. So no point. A 5678 And this is the mid find yet. That's about right. Bang on in the middle. Let me just double check on this one. It should be the same. So this one's one point yet Should be 1.85678 So this one should slightly be here. It should be around about here. But what we're gonna do is we're gonna use our ruler to do a line going across both of them . So I've got this point it and I've got this kind of new center point that I've got here. All I'm doing is making sure that they're lined up across these tops over here. So we got a nice vertical wind and just lightly with the ruler drawer in that vertical wide about the windows on that about it for that one That's an easy. When you have two windows next to each other, you can just repeat that pattern going across. Let's just do that for this one so that we can work on all of them at the same time. Now, this one is slightly. Is that 1.8 yet that's banged on 1.8 as well. Very good. So all our windows are quite symmetrical and equal, so we've got 1.8, So we just want, uh this was 1.8. Sorry. I think these ones were 1.6. Yes, these ones 1.6. This 11 point A Oh, actually, yes. We've got slightly higher in a frame on this one, but that's fine. As long as we get the window alignment Dawn right in the center. That's what the most important part. So we need no 10.9 here, nor 0.9 is the center and again over doing is getting a ruler levelling it up with this drop in a doubt on. That's about the central. I just draw that cross. I mean, if you want me to be exact, and you know you could just do that measurement going from this side to that side and joining the dots, but I'm not gonna bother doing that. All I'm going to do now is go back to the one on top on. Let's see if we can get a zoom in on that or you to be able to see as much on the screen as you can on all we're gonna do. A Let's just drop this down. Let's not bother them in one mill down can measure one mill down if you want to be exact. But I'm just gonna eyeball it. So I'm just going to bring it down about this much from here. Little line here, A little wine. Hey on, That's about it. Now you can see that my center line is a double on both sides, and this one's think you can have it exactly the same. Or you can have a you know, thin if you want. We can just turn this around on, do a similar kind of wind on the on the bottom. So we just bring our ruler here, drop it down, keep it similar type length down here and just draw in that line. Have things looking the same So you got United States All Cross section going on there? Beautiful. Right? Let's do exactly the same for this one. Drop that down by approximately one mill, which is about here again. If you want to measure it, by all means, go ahead and measure that one. No drug. I'm just gonna eyeball it on. Turn lots around. Do exactly the same to that one. Measure it up lightly just by eyeballing. Get on. We've got that line. Beautiful. Now you can see. Look at that. That looks great. That doesn't it. I mean, it's not really I know. There's a lot of measurements going on here. Boy, you don't even have to do measurements if you don't want, especially in a class project. If you don't want to do measurements, go ahead and just freehand it, it's eyeball it, Onda. Let's see the top of results that you get. I'm sure they'll be fine.
46. Full Sketch - Window Inner Frames - Part 3: Okay, so let's start there in this circle window now, this window frames to get a little zoom in on that. So let's just do our inner circle again. If you don't have the instruments that there's not to worry. I think I use one p before now. Got maybe a five p piece. You can see that you can just put the little five p there and draw around if you want. But what I'm gonna do is I'm going to roughly draw that in a circle. I'm not gonna bother them in an exact measurement, and I'll show you how to do that. So if you get your ruler on, let's just measure that three mil on the inside. So we've got three mil measured from this part, roughly down here. So we got three melts to a three mil dot there and there were three mil dot on this side wants you three. Put your ruler across the circle. Just do three mills have got two centimeters going across three mil from here. Certain 123 and then we've got three miles from here about 2123 Now, there we go. So what? We can do is we can turn the circle this way and do that again. So just keep measuring them three mills because this is gonna be that circled I've got here is two centimeters, so just do another three melt 123 It's cold out there. 123 little dot there and then again, turning around. So basically, what we're doing is we're doing in adults for the inner border that's out three mil each and then effectively, all we're gonna do, we just join them up on produce a nice little in a circle. 123 There we go, and then it I want to read that roughly about the same self with this. Now what we can do is just get your pencil, gets our comforts comfortable position on, start doing a rare relight in a circle and just joining the dots op. But bear in mind that the dots might not be 100% accurate. All I want you to do is use the dots as it guide and then just keep following along on doing that circle. Alternatively, if you don't want to do it freehand like this, it's great to just use a compass, use a compass, measure it in three milk and then just do your inner line at three mil. Well, I wanted to show you how to do this, because I think this is quite an easy way to do it. Especially if you're trying to get used to giving things quickly on, you know, if you if you don't have a compass, sometimes you just don't have these. Tool that. And now, do you You might have a small a penny or a five p piece. That might work. But let's try keeping the border three mil because we want it to be similar to the other windows so that we go. All I'm doing is using these curvy allies just joined that soft. That's not about attempt. So you can see without using any instrument to produce a circle. We've just used these dots to give us a site guide on. We just gone ahead and created our little for for the circle. Lovely job. Leave. Right now, what we're gonna do is in a drawer in our frames. So on the center, what we can do is can lining up in this top part off the actual roof. And if I just go back? If you remember, we did a sense of points point over here. And who creates it. The box and you'll have a center point here, and then you have a center point they're or we're doing now is using them to center points . So I just tilt this to society. You can see center point that center point there. Use them to effectively draw alive right in the center of that circle. My not be spot on, but it's a kind of ill give you a rough indication of where it is. Let's just get that zoom back in, okay? So you can see now that line is roughly in the center. It might not be exact. It feels like this side is finally bigger than there. To fix that or we need to do is do another line here, and that will effectively make our vertical border because you can see that's roughly about the same. Not gonna bother about doing Mills here and Bills there. Let's just keep it nice and simple for the circle on. All we're going to do now is on this circle line. Let's just draw in our mid point, so we've got 1.5 centimeters going from top to bottom. Just get you 1.5 and then divide that by two. It's half off this area. That's roughly where it is on with the Rua. Just eyeball it. But what you can do is if you turn it around, you'll see that you would have had a faint vertical line going across hit. So just eyeball it with that faint vertical life. Drop it down up to this point and drawer in your light line that girls across very nice. Now, alternatively, what you could have done is used that line to get an exact point. But I'm not gonna bother doing that if you want to. I can quickly show you how to do that. So you have this point here If you just measured this center point that you did before and measuring up to this life, whatever that measurement Wasat, one point 123 Just do 1.123 from this side. Little duck There 1.1234 This side joined your dots opened that that's where that vertical line should be perfectly placed, but I didn't want to do that because I want to hurry up and get on with building my house. So now what we can do is maybe just do another while on top just to make this slightly thicker. So follow suit off our window designs and you can see that's just about right on. Let's do a zoom back and have a look at our beautiful house. Look at that. So we've got our front windows all don't nicely looking very good. What we can do now is work on our windows on the left on. Then we'll work on our door. And then, finally, we were ready to start adding those lovely details. So let's move on. So this left side.
47. Full Sketch - Side Window Frames - Part 1: Okay. Welcome back. Let's start doing our lines and our inner frames for the windows on this left hand side. Now so or when it is gravel to me. Rula, as we've been doing throughout this class. Andi, let's have a look at this. So if you notice on the top two windows that we've drawn in, the upper part of that window was being covered up by the slant edge off the roof. If you can see over here, it's kind of covering up the top border parts. So if you look at your lines that you kind of erased or put back in, you can see this is where the edge off the top of that sidewall is. And so the board is going to be around about here. Eso That's actually good news because we don't have to do a border for the top. We just have to do borders on the left and on the bottom side. So let's start on that. So I'll do is I'll just get a nice little zoom in on that. Okay, so let's just remember our vanishing points, is there? What I want you to do is let's do a 0.3 mil measurement from the base to add in the bottom borders as we did with these windows here. So get your ruler do a quick little 0.3 measurement here. 123 Nice. They told up there. And we don't need to do 0.3 for all of these now because we're gonna be using our vanishing point line. So just from this bottom corner edge, little dot and now, take this all the way to your vanishing point right there. Nice light, little line across that 1st 1 on. Then continue in the 2nd 1 Nice light little line going across there. That was easy, wasn't it? No. Needed to do loads of measurements on all corners. So that's nicely in perspective. With that one point there on, Let's do the ones, Let's duel the vertical ones first. Let's do this one here and this one again with this or we need to do is do a 0.3 measurement from this top corner. So 123 round about that on take it across to the vanishing point. Just like that, keeping it nice and steady. Andi. Nice line across the 1st 1 and then the same line going across that 2nd 1 Beautiful. Okay, now let's do the same for the bottom. Bottom corner 0.3. Measurement around about that on. We're going to do exactly the same. Put your little dot there. Get your ruler lined up to that vanishing point. Take that cross that one. Take it across the 2nd 1 Look at that. Don't. So quickly. So the ones on the left hand side in a lot quicker to do, then these flat ones at the front. So now what we'll do is we'll add in our vertical lines. So with a vertical lines, let's just maybe do three mil on the top left here. So we don't need to bother with the vanishing point on this one, because these are just gonna be vertical lines. So three male, if you just measure three mil, that's about roundabout there. And then on this side, just measure another three mil from this corner measuring three male end 123 round about this on. What I'm gonna do with this is I'm just gonna take the ruler and go all the way up without having to do with three mil on top because it's hidden. But however, we can make this a little bit more accurate if we drop down to the next window, because this is in the same kind of alignment with the top. And if we just measure three millimeters from this corner, so you go around about 3123 about their What we can do is we can just do a straight line that follows along all the way across both. And what that will do is that all kind of line, our ruler up. So we don't need a point on the top two lines it up to get banged on vertical. So that's going to do here. Just line it so. But this point that we did in the top on this bottom kind of point. Nice straight, little mind going all the way to the top. Now you'll see that we do in a three mil across. It's quite quite thick. It's a quiet, thick border. So with this window here, if we do another three mil going across here, it's gonna be quite thick is not gonna be much of a window. So if that happens while you do in a drawing say, for example, for yourself. I wouldn't worry about that. All you do is just to make it slightly different. Just bring it in to mill and maybe make this wine a little bit said so now you've got a nice, bigger opening for that window. So just drop in another line, maybe a mill across. So let's just do that measurement from the bottom cornice. Yes, that's around about two mil. So what you do is just dropped that line in to milk and then it raise the 1st 1 But you can't leave it at three mil. But personally, I like to I like to do it at the two mil cause I like to have the board is a little bit thin on these side ones. We just do that. There's your two mil lines. So we've gone to two mil from three milk and you can see that's a lot Finn. Now I want to do with the one on top is I'm gonna leave that at three mil, because I like the kind of thickness on that top one. Any kind of various it a little bit, or if you want to do, if you want to kind of make them the same. Then just get your ruler. I just throw this one out first. Actually, let's go ahead and do that. Let's roll that one out and let's just make these side ones to two millimeters. So just lying your ruler up. So we dropped this one down to two millimeters on. Then we've got another two millimeter border going on the top. Yeah, I think that's a lot better. So let's stick to that. Now, let's do two mills from this side. But what you got to remember is that the further down you're gonna be getting the thinner, the measurements are gonna be on these side borders. But again, we're not gonna work out more specific calculations to do that. You can do it like left. We're gonna be here all day, So let's just do this by eye on. Maybe. Let's just do two mills on this one, and then for these ones, we might make them slightly less of two mil from this point here and again from that point , top 0.2 mills want to little point there. Now let's join. Join this off, remember? Turn your page across you can see the line that you're drawing a parallel to the line above . You can see here. What we do in is to bring back the center of the camera. So we've got that point that we just did to mill in that 0.2 mil and on what this does is it does a nice line across hit. We don't need to continue it on the top because our window ends at a different by itself. So you pay for background and there you have it. You've got this nice little window opening in the center, and that one is don't. So let's do these ones off here. So that's switched to this window on the top. We did a three mil measurement over here, so there's a three mil point on. Let's do what we can do it because you don't have that point on the top. Let's just send the page around and you'll just eyeball this one. So if you have a look at this, let's just put your ruler across here and here. So the end of this window and the edge of that bottom window drop it down to you. Get to that point and thats looks nice and equal D line going across. I'm not saying it's so turn it back around again. And now you can see we've got a nicely talked window opening in the center there and in the center of that first window. So let's finish off these window borders and do the same here. So for this one, I'm not going to go in three mil because we're getting further and further away. So let's do this. Maybe two mil on these one cell. Let's just do two mil from this side in two mil measurement that from this idea again to milk measurement that want to Don't worry, if the measurements aren't super exactly my end of having 1.5 or, you know, just over 1.5 don't worry about that. They should be roughly roughly equal. So what we're gonna do is we're just gonna get our ruler. Line it up with this line that we drew here, drop it across and then finish that borderlines. Take that line all the way to the top. You got yourself a nice border now for this one. What I'm gonna do is I'm gonna wait until I put this line in. And then we conjoined both these lines because we have the measured side by side. So let's do a lot to milk measurement from here. We got nice to milk measurement going in from here 12 and just just keep your ruler lined up with this edge here so that you know that that measurement is fairly accurate on we can actually do another two mil. Don't from the bottom going there just for making the actual guide a bit more prominence of about two mill around about that. And then let's just do these over here. Just have maybe another 22 mil actually could do with three mil on this one because it's closer to us. So let's just do with three mil on this once at 123 and then at the bottom we've got line it up with this line, going to the perspective wine just for measurement sake, and we got one t three around about that. Now let's turn our page cross on extraordinaire lining. So actually, what we'll do is we'll draw this these two lives in first because we can see the lines of both. So let me just see if we can get that zoom in on that. That's better. So get your ruler. So this was a two mil point that we did on the top. This was a two mill at the bottom, and we also did a tumor on top. They're lying, you ruler, up to them three points and you've got a beautiful straight line. So finish your soft by closing that first line and the first top window and closing the bottom line off the bottom window.
48. Full Sketch - Side Window Frames - Part 2: beautiful right on your page around. Now what we're doing is we're just gonna join up these two points. And remember, these were three mill. We have this one slightly where wider than the ones at the end. And that's usually the basic principle. The further down you get, the more thin you're kind of vertical lines are going to get because they get going far away in the distance. So just close that line off. And I think that's looking really not. So let's just have a look at this. This one. Don't this one? Don't this one don't and that one don't. Right? So what we need to do now is just raise out these extra lines that we don't need on the top lightly with your razor across all four windows is that what we can do is conduct an open mind. So it's dark enough this line here. So we want to death, and that's up to this point. And then let's talk about the one at the bottom. Darken it up to that point, stocking up this vertical line. It's always easier to dark, darken up the lines or draw in the lines. You know going in the same direction. So I'm just doing these vertical lines first. It just makes the process ages. I'm just gonna dock in a police line there, on this window on the left, on this one over here. Then this one over here, then finally this one over here now a week until our page and darken off all the ones that are going towards the same directions. So this one, it was from here to here, ensuring that with all nicely lined up without perspective, point this one, this one. So let's do this one down there and that is one appear. And then the final wants these two. Just line that rule a rope, Turn it around on dawn. So the borders are doing on this now. The design. I'm not gonna do a curvy designs on the top of the windows on the sides. I want the windows on the sides of this building this little house to be slightly different . It's always not adding some variants. Otherwise, if you have the windows but looking exactly the same, then it could get it a bit boring is in my opinion, but if you want to put curbs on this. It's exactly the same way that we did This already. Even is just curving off that corner there, curving the corners. But because they go in across, the measurements can be a little bit complex. So I wouldn't do that for these ones at this point for this particular sketch. But if you want to try that out in your class project, then by all means go ahead and do that. So what we want to do now is, well, that's draw in our frame. So for the frame's gonna keep them similar to what I had over here. So let's just find the mid points off each one of these, and then we can quickly put in them lines. So for this one, let's start off with this one here. What's the measurement that we have? We've got one, and then we go, we go around, but I've got about 1.5. You might have something a little bit different. So what's half of 1.5? That's a question, isn't itself for one is point 5/2 of another half around about there, so it's gonna be around about there for me that midpoint, Put your little dot there. We don't have to do anything on the other ones. Just gonna do a nice line that goes to our Just get the camera back. See concedes that goes back to our perspective point. There are vanishing Point Raisi real up. Take it across Very nice. And while you're doing this, what we can do this. We can just slightly drop our ruler down. So if you drop your ruler down slightly around about there and ensure that your ruler is still lined up with your vanishing point, do another line underneath. And then what we've effectively doing is we've quickly just added that border for the frame like we had over here on our windows on the front on again. What we can do is turned page arouse on line off your line to the your ruler to the vanishing point to make sure that's nicely lined up to that. Drop your ruler to that center point, which should line up with these and then just drop your ruler down slightly. Try keeping its a similar length off the drop that you did before and just close this off and we've got ourself a nice central horizontal border around. Look at that easy peasy. Lemon squeezy writes. Let's do the ones on tough first and then we'll add in all the vertical drops. Eso Now, the problem that we've got here is because we don't know the exact place where the central Linus What we can do is we can use the central line from this window because it was effectively the same height as the window on the on the left hand side. We can use this as a guide, Teoh place that we're kind of CenterPoint down there. So what I'm gonna do is I'm just gonna get my ruler, put it onto that center dot that I've got in the window on line it up with this line here, so make sure it's nice and horizontal with that wife on. Just use that as my sense of point there. So I've got that center point roundabout roughly there, and then I can use this as the center line that goes to my perspective points. So if you just do that, But you put your ruler on that perspective line, use this as your guide. Take your line straight across both windows middle and again. While we've got the ruler on that perspective point just drop you rule it out slightly up to about the same drop that you did that these windows on do a line across the zone has to be super exact. Don't worry about doing them exactly the same, you know, distance. It's just at an indication that you have a central one on. Then what we can do with you can just literally against turned the paper around that you don't have to add a double line here. I mean, you don't really after ab double lines anywhere. You can just keep it to a single line or just two wives. I like to keep things in threes. Threes? Why not three's A. So all I'm doing is putting my ruler here on the top, lining it up so that middle find that we just did that and then again, drop it down slightly, gulp it down on close it off from the top or the bottom on this side. But top of the window self There we have it certainly paper around on drug ourself. Our midpoint off our window
49. Full Sketch - Side Window Frames - Part 3: lovely, right? So are we gonna do now is we're just gonna add in our vertical handlebars for the inner frames on. All we need to do for that is roughly estimate. Where that is, I'm not gonna actually do one for this window because I think this windows is a little bit too thin and I don't want to get too busy so you can vary it very it like that. Even for this window here, I'm not going to bother. I'm gonna keep these as like a window. Just a window panel on top and window panel on on the bottom of it. This is slight variance with these two windows. Let's let's do it for these two windows. So let's start with this one here. Just measure your measurement off that inner border that we've just done. So mine is mine is about 1.5, approximately 1.5. So again, let's get the half off. 1.5, which is hard for one is off. And then just this middle point there. It's actually this line that's actually going across it just slightly before that. So my little daughter is going that on. Then let's do the same for this one here. Lets measure this off. So my window here is just slightly above one. It's just 1.1 centimeters. So my Ruefly, my sense is gonna be about that. Okay, Now let's go back to this on. Put our vertical line in. Just take your ruler measure. Measure it up against this. Line it up against this window here on again. We're just gonna drag across until we get to this point and then just do a nice vertical lines going across. They can. They can draw the line over this. I know. On these windows we had this frame of both. Their sport deserves to make a difference. When it comes to shading, it's not going to make a difference at all. So there we go. We've got a vertical line. Just take your ruler to the left a little bit on, put your secondary line in, and then any page that's just got zoom in on this. Be a bit difficult to see on the camera. So again, what we did was sent a line there. We did the line on the left and now a line on the right, so just drag it down. Just keep it nice and flush. There we go. Now that one seems a little bit wide Spoke to be honest with you, I would not. What? He laughs it. Let's just leave it like that. So this point that we had here, we did a little point then. I mean, you could measure the exact point there, but I'm not gonna bother them in that. Let's just use our kind of guesswork here because it is should be quite should be rather accurate. There we go. So we just dragging across until we hit this point here and again, just raise your ruler slightly above to make sure it's in alignment. And you can use this line here to get the kind of direction of your lying. You know, it's not one key like this young alone like that, and you going up. You've got so many vertical lines that you can use as guides. So just from here I'm just anger top with this line on the top that looks about right to me , and there's my lovely little and they drop it to the left and then drawer in my second past of that line and then again turning around. Measure it up against their wind it up against the sensor. Drop it down during your line on our windows are complete. Look at that. How easy was that? Say that you didn't think it was gonna be. That's easy to draw these windows. I know it's a bit long winded, having to do all this measurements and things like that. But once you've done it at your overall look will be a lot more accurate. So we've done our windows designed from quite a lot windows. You don't variances the windows round ones curved ones, Rectangle warns ones with across in them one with, like just a normal vertical or horizontal frame. So I think our house is looking a rather nice and now the next element that we're gonna work on is our door. So let's move on to that one
50. Full Sketch - Door Frame: Okay. Okay. Welcome back. Let's start designing our door. Now we're gonna have some fun with this one. So let's just do a quick little zoom in, get the angle right for the camera. Okay, So let's have a quick look at our door designs that we did in our earlier lessons for exercise five. So we did some door designs for this, if you remember. So what I've decided is I'm gonna go for something not to basic. Let's make it a little bit meant. More interesting. Let's go for maybe this design. If you remember, we did this design which was on the top row off the kind of rectangular doors with a nice little pointy top feature that's actually on top. You can add in whichever designs you want, But for this part of the class, let's stick to the same thing as I've been saying, Let's go for this, designing about a nice little variance to our how so that we can show different elements across this house. So let's go ahead and do that. So firstly, get your ruler on measure the center point off your door. But to be honest with you, we are actually already done that. If you remember when we designed this door and created like the cross section for that quarter off the front, off the house. If you remember, we've already got that center point so I can see this on my door. If you've completely rubbed out that all I want you to do is just measure the door going across and just get that center point on this area and then on the top area, and that's all I want you to do. So mine is here, It's already here. So let's just lightly draw in that center line going across and what I want you to do is with that center line. I want you to take it all the way to the top. So I want you to take it literally, all the way to the top of the an actual roof part off the door. So take away to the top underneath that circle on that window there, self center line, about two panels to the door on. What we're gonna do is we're gonna use this as a centre point now, AB still got the line that went across when we were drawing this square effectively. If you haven't got that line, that all I want you to do is just measure approximately one about six mil six millimeters from that line that you've drawn. So from the top part of the house, just measure six millimeters onto the top If you haven't got this line. So this line is just the center line. If you remember when when we did the square, it was just the center crossing across there. So just six millimeters. And it will take you to that point that if you just do a little dot where that six millimeters is on the top or just dot on the actual center when their my little graphite chips and flew away, that's the thing with graphite press too hard and it's gonna break. Okay, let's move on. So what I want you to do is now is just get your ruler on wine. It's up to this top right corner of the door on, then do a lovely, lovely little Why going to that point that you just put their across There we go. And then again, from this top left, just join it up to that point that center point that you've got there on what that's done is it's added our nice kind of triangle elements on top of the door. Now what we're gonna do now is pretty much do what we did for these windows here. Let's measure in three milk coming in across from both sides. So start from the bottom left with your ruler three mil. Want to three Nice little three millimeter dot That and then from this side, three mil There again. So let's just do that. That's approximately there. And then what this will do is add a nice border going across from the top. This line is vertical line that we have three mil again from there. So I just put your line Your ruler off three mil wants a three roughly there on that on this side. Three mil coming in this way. Let's Dave, that said that about that Super Now, with your ruler, all I want you to do is join that dot dot So I'm sure you know what we're doing now with following kind of the same pattern on lightly with your rule with your pencil. Just do that line and then again from this side turning around just to make sure that your own doesn't go wonky Just joined them to dot saw and ensure its parallel with that line of both on we've got ourselves a nice that's all aside for now. How do we do the border for this kind of white triangle really easy or we doing is get your point from here and then measure three mills going down. So but you rule at this point here the center 30.0.1 23 at about that little DUP there three mil coming down. Now all we want to do is we want to do three mil coming down from the corners. So first, let's do the right one. First, put your rule on this right corner three millimeters. Want to three that little duck and then from this 13 millimeters there 123 And then what this will do is this will give you a nice, accurate three millimeter board. It is a lot easier than doing the Kirby once, whereas with the curve, you've got to still do it got kind of a estimated curve, whereas with this you can do an exact measurement and do this straight lines so or within is lining our ruler off between both of these points Centrepoint on that three mile gap there and then just up to this point here. So this is the border that we added in Just draw in your line. So you've got this nice line coming in over here and then turn across and then join up this dark with that with your ruler buying it up and just draw your life up to this point here, so we don't need to cross a, you know, effectively cross over the border that we just put it. There you go. So we've got itself a nice little border going all the way around. Should be roughly about three mil on What we're going to do now is we're gonna do some raising. So let's get rid of this kind of line that goes on top of the door. Very likely with Yuri Razor. Just get rid of it so you can still see the constant lines that we did before our door so you can get rid of that. I know we put that line in quite hard at the beginning, but that's no not to worry again. We'll get rid of all of this when it comes a shading on adding in further details. Now that's just Duffin a power lines dark in this corner line first going up to the triangle point that stark lines that darken up the line on the side. That stuff? No, this corner line here stuck in off the line. Third rotated page, however, your hand feels comfortable. When you're using the ruler and pencil, just rotate accordingly. You don't have to roll. Take the way I am. This just like this is the kind of more comfortable and natural space for me when I'm doing my lines and drawings. So again he's lying in this one up. Make sure everything's still lined up, even when you darkening the lines because sometimes you hadn't condole a bit wonky and your ruler can go slightly out of alignment. And again, this one of doing here all on during his dark mingle and borderline. So we have some nice solid lines going across head. That form I work puts it on drawing so again with this one. What nice doc line that I'm going with this one. Let's have a nice dark line, the beautiful. So we've got self a beautiful three milk for they're going across our door That's following the same suit as the windows that we had to It looks nice on lovely.
51. Full Sketch - Door Step - Part 1: Okay, So let's have a look at adding in some more details that this let's do the next step, which is a little bit complicated, because we're gonna be adding a couple of steps going to the door now because this house is facing towards is over here. You can see this is kind of the face of the house of living. Just get theirs. I'm going back. So we've got this area, this flat area here at the front, at facing towards us, we can add in a couple of steps, but what we're gonna have to do is we're gonna have to use the perspective point for the angle off the step. So I'm gonna go through this step by step. No puns. Intended it step by step for the steps. Um oh, I'm funny. All right. Okay. So what we're gonna do is let's just do maybe a couple of steps here. So before I do my steps, I'm gonna lighten off this bottom area because it's going to get a little bit messy because we can't put huge, massive steps there. It needs to Can you kind of need to be in proportion with our door So I just want you to lighten up this area, Don't rub it out completely, just lighting it off, and then we'll What we'll do is we'll go over it once we've added that steps in. So let's do that now. Okay? So let's start adding in our steps. Firstly, what I want you to do is I want you to measure approximately two mill going up. So let me get a good zoom in on this so that you can see what I'm doing. And for this, we need to ensure that pencil is nice and sharp. So I'm just gonna give my pencil a sharpening. And as a little quick to sharpen with the shop owner, make sure you tuck the end so that we don't have any breakages. Okay, so what I want you to do is I want you to just measure to mill going up from here. So we've got one and want to write about that. Let's do a little duck and then I get to milk on this side. So that's about there. Now, with your ruler. Just close that line off, and that's gonna effectively be the height of our step lightly closed off. You don't need to do dark lines at this stage. So now that gives us some sort of guidance, and this is gonna be the top step, and then we're gonna have another step underneath. So get your ruler. So I'm gonna get the bigger ruler that I've gotten. Now, let's get the zoom back so we can see what's going on. Now here comes Mr Vanishing Points again. That's gonna be right off in what we do in here. So with your kind of rule out, what I want you to do is get your pencil here at this bottom, left edge and line. It's up to the vanishing point lining up to that one interesting point. Nice, nicely. So we've got a nice line up with their so everything is working, correct. And then I just want you to draw a line going across here. So let me just in and drive my paper across here, you can see So my rule is nicely lined up against the vanishing point. And I just want you to do a lied faint line. Not too hard going across. Very Dylan, man. It doesn't know how long you do this line. Just make sure that line goes beyond this corner off the house. So I've done my line up to hear on. That's looking good, So we're going to do exactly the same with this point up here. But before we do that point, let's add in the same line that goes across this. It's it's just good to add in these lines. So again in this corner, I'm just putting the ruler across head and then ensuring that the vanishing point is where that ruler is residing. And then again keeping it nice. There's drawer in another ally to this corner here, you can see effectively. It's like we've drawn a path leading up to the door. So So we don't the ones at the bottom. We're gonna do exactly the same for the top. So let's start off with this one here first. You can see this top corner here. So we did one at the bottom. We're gonna do one at the top. That two mil measurement that we did line up your ruler again, we're going to take it to the Vanishing point, ensure that a ruler is to the vanishing point. Otherwise, then this is not gonna work. Take your life, Draw it back all the way as far as you want, but just ensure it's away from the house. I'm just gonna zoom back so you can see that my ruler is on the vanishing point. There's you can see. It's nicely on the vanishing point there and again. What we're gonna do is that's a scare zoo in it was living in and out all day out with, So I just dropped the pain to slightly higher. You can see now we have a nice find going on the top, Another one going at the bottom of another one going here. The final one is gonna be this corner here on the top. Same process. Put your ruler toe that point, Get it nicely lined up to the vanishing point and let's stay with Zoom back again so you can see you can see it's nicely lined up there to the vanishing point. Andi, zoom it back in again. Let's see enough on again. Nice long line. Go in across. So you might be thinking what is going on over there? Why are all these lines coming out like that? Beams of light quick out of the house. So basically, what this is going to do is this is going to provide a nice guide for us to create our steps. So what we're gonna do is we get a measure. So I'm gonna get me Small ruler for this. So let's just do a zoom in. So now it used to just concentrate on these two points here and you can see these two lines that we did it cross. If I just like the shape the men, it might be a little bit better for you to see. You can see this line here so effectively got this line and just lightly shaded this across . Now, if it helps you to shade this, go ahead. But you don't need to do this. Don't go pressing hard on your pencil. Just like the shade it's It's more visible so you can see this area here, so it's effectively a thin life going out. So what we're gonna do is we're gonna just measure now let's say we want this to come out by maybe half a centimetre yet Let's let's do half a centimeter. So just put your corner. Parts of your ruler here. Your first measurement, they're zero. And then ensure that you rule is lined up with this line. The bottom line on what we're gonna do is we're just gonna pork half a centimeter a little dot at half a centimeter there, on what we want is we want to do the same for the top. So a little half a centimeter measurement going to the top. So put your rule on the top corners were using this corner now to follow the path off that line. So again, ensure that your rulers lined up with that line that you just cruise up mines nicely lined up. And we've got half a centimetre, doctor. So or we gonna do now is just to join that join your ruler off, but lining up to them to does do a little mine upwards on that path. And so that's effectively the step coming out. That's a top step coming out now going across. Do we need to really go ahead and do the same measurements on this side? No, we don't. All we need to do is just lying your ruler off like we've been doing in everything else. Just lying your ruler off with this line of the house. If you can see him, I'll do. Is I'll just make this a bit more easily visible. So just line your ruler up. Put your rule on this point here on. Just ensure that it's nicely lined up straight with that one on. Then just draw a line going all the way across. So I have no put that on the camera being a bit silly there. So I need you to see what I'm doing it. So let's just do a nice line going across and they concede that's cut across this entire section. I want you to do the same for that one. So turkey paper around. So again, all we're doing is use this, so do your straight line. So this top point here, which is going to do a straight line going across, use this line that you just drawn in, said kind of eyeball it. So that's about right for May. There, don't worry. This is not 100% accurate. Vickers in the steps We don't need to be super accurate, because when it comes to actually shading it in, you won't be able to see any of any of this any way so turning this around again. I know it all looks really complicated with all these lines, but I promise you it won't be. All we're going to do is do a line across on that measure approximately the same life that we have between the door. So we've got Well, it won't be between the door. No, it won't. Will it be between two? That's the question, isn't it? No. It's gonna be the left going across the door from this point of this party. So if you put the ruler hit our door, my door is two centimeters. So from this corner on this line that you've drawn in, so do you know what? I'll draw this line in a little bit darker for you. I'm gonna be raising its out anyway. Is just so that you can see so you could see that line and then the one on top. See that once that's after bit better that isn't actually can see them two lines. And are we gonna do with follow that line from this corner and it two centimetres across? Let's appoint there another one on the top again. Just drop your rule of pop. A little bit to center me is left, and that's where our step is gonna end. So I'm just putting the line in vertical line all the way to the top.
52. Full Sketch - Door Step - Part 2: Now what we can do is get your razor, get rid of all of them lines, get rid of these extended loans that we've got here, and I've put them in quite hard not to worry about that. And you'll see now that the step will start to emit. You don't have to do it like this with the way that afternoon, especially when it comes to your A class project. Just roughly, you know, put dots across and you get the measurements approximately right. You don't have to have anything, exactly. Don't want you to stress about this. I just want you to follow it. If you can't follow this, if you think this is just too much doing too many lines and it was getting really complicated, then don't put your step it just put a step one step in like I have. Don't worry about the 2nd 1 that we're about to do, but the 2nd 1 is actually a lot easier, so I'm just gonna get rid of the lines across, hit lightly with my ruler, lights on the whole thing off, and I'm gonna draw this step in with a dark a light and you'll be able to see now that this has emerged as a nice little step, we're just going over these lines, that line bottle mine line on top and then a diagonal line to this point here. There you go, Baseline. I went all the way across. You can see there we have it. We've got a nice little step that's drawn with perspective in line with the overall house, so let's just get rid of them. Why does it get keeps nice and clean? The great thing is, when you're working with pencil, you can easily have all these lines all over the place. But if you finish off with inks, if you use a fine liner, which we're not going to do in this class convergence basing this on basic pencil sketches . But in your class project. If you do do all these lines and decided to go ahead and deal this step or, you know, add in multiple steps, then tried going over it with a fine line or if you want. If you have one at hand on, then you can rub out the entire pencil line and you'll just have a nice clean drawing. So there we go. Let's just move back on there to show you the entire house and you've got that lovely little step there. What we're gonna do now is added another step, another element off the step. And you don't have to. But I'm just gonna add it in to show you how Teoh kind of you know, very your drawing And maybe at further elements on, depending on how your house emerges. So let's do that now.
53. Full Sketch - Door Step - Part 3: Okay, Welcome back. Let's add in our first or second step our additional step to our steps to the house. OK, so I'm going to do now is we did our little step ahead. I'm just gonna lightly shame the scene with my pencil so that you can see this a lot clearer. You can see I'm just adding in a little bit of shading with pencil here, she can see that that's the kind of vertical, down facing parts of this step. Now add in our other step or we're going to do is it's actually a lot easier than adding this initial one in, because now we have this structure. We can just follow the same steps going along, and it's just gonna make it so much easier. So if you get your ruler on due to millimeters from this point coming down and you'll see that now, this next step is gonna be quite easy on. All you've got to do is just decide how many steps you want. Really. That initials stage of placing the first step is always difficult, depending on how many you know, how complicated your houses. And that's why I kept this house. Really simple. Not too complex. But once you've got, you know, good grasp of that, then it just makes it so much easier. Now we've done our little line coming down from here. All I want you to do now is due again with your longer ruler. If you're using a longer and shorter ruler, I'll just soon back what we're going to do. We're gonna do the perspective. Mine again. So using your one point perspective point, which is over here, put your ruler there and then just resuming. You don't need to see all of it. Just do a zoom in. So that's nationally lined up. Bring your ruler well to this point here nicely. And as we did with the step before, just nice little line coming about about up to here. Just extend it slightly beyond the house. Don't need to go further than that. And then with our ruler positioned in exactly the same position for that perspective point . So we've got this over here, it can get a little bit fiddly, but don't worry about said as long as you've lined it off, that's all that matters. So with that, all I'm going to do now is it's just a little bit back, so you can see what I'm doing or amenity now is lift the ruler op. So it touches on this corner lifting the ruler absolutes, which is that corner keeping to that perspective point on doing the line coming out here and then again, keeping exactly the same position. Just lifting your ruler up up to this corner here. It's bottom corner of that first step and giving another life extending its out on. That's all we've got to do from the perspective point. You can see now we're just adding another steps. It looks like these lines role going in this direction. And then we just decide how long we want this a step to extend out on the 1st 1 I mean, the 1st 1 we did half a centimetre. Shall we say this one we could possibly do. We could actually have this one full centimeter. So to make it a full centimeter here just to make it easy little dot there on that line, line it up with this line that we've just drawn in and then drop it the top again. Line it up with this line your ruler and just do that once in to meet it off. That So we've got one centimeter. Just close it off. You don't need to use a ruler for that. And then all we're going to do now is just gonna I this up with this vertical. Let's go horizontal line here. Get your rule of that. Drop it down until it hits that point that we've just drawn in on Do a nice horizontal line going across. Drop it down again. Nice horizontal line going across all the way here. Then from the point that it touches this line get your ruler little dark and square it off . Do a nice drop down vertical life. There we go. So get your ruler. Get your really gonna raise with your ruler. You raise that it raise out these extra lines that we have Like I'm doing here all these extended lives. We don't need them anymore. These were just guides to our perspective. Point blow away your residue on and we're ready to start darkening these lines that we've got a nice, long extended step coming out Might be thinking this. This is not how steps look like, but it's just kind of to help you. I understand how you know, to use perspective points to really, you know, drawing any elements. Really? So let's just do that. All I'm doing here is darkening them lines again so that you can see the movement better from the tough there. Bring that line across dark in the top. I'm very have it. So now you can see we've got lovely little step there to shake this area here so that you can see you don't need to do this at this stage. You can do this when we start adding details on again. Just I didn't gain that corner line over here and there we have it. Now you might be thinking this looks a bit odd, doesn't it? Now the house is how seems to be as if it's floating off both that bottom step. Well, this is what I was talking about before, where we can adapt our house depending on the elements that we have. So or we're going to do to adapt this house to make it look a bit right is basically add in a bottom border to the house, so you'll notice a lot of houses on the foundation. They usually have, like a little vase that goes up extends high depending on, you know, the type of structure that there is on. That's always good idea to add that in at the end, depending on how many steps you do. I mean, these steps are quite you know, them If they extended out quite a lot, I mean, we could have even cutting off over here. But I did. This is that it's easily visible for you on the camera so it doesn't get too difficult with the lines overlapping each other. But when you're doing your steps in your class projects, just have them maybe a little less deep and maybe cut them off here, have another step or even do curly step since entire, entirely up to you. So what we're gonna do is we're just gonna measure from this point, put your ruler line. It's up against this nice vertical line that we have here, and then just measure to mills from that point served. Zoom in a little bit so you can see a bit better two mil coming in from hit nicely, because that would step was to melts at 12 round. About that this one from down here just maybe do a light line coming down. Extended Dow don't need to do any measurement for that, Andi. Then we can just cut across and join these up. So line up your ruler with this vertical horizontal line there. Drop it down to that point. And it should be pretty much the same from this corner on. Just drew a nice horizontal line there on then, with your longer real life using a longer year rule, all you need to do is get your little dot from this point on what we're going to Dio. Yep, You guessed right. We're gonna line it up to that vanishing point there on the left hand side. There, just do a line. Nice, lovely line going across to that point that we dropped dropped there and there we have it. So we've just added a lovely little border Dark? No. Pioline's get rid of this extension extended little magic. It's just in extended line. So what we're gonna do now is just darkened off them lines that we did. So it looks nice and correct on. We have a nice little based border off our house. And when this corner just joined up that line, that that adds up to this vertical line and all Mina do is a way to the top that on there we have it. So we've just added in our second step, so that's pretty much it don't for the steps. What we can do now is at in some detail work on the actual elements. And so I think that's where the fun is going to start now. So we've done the structure. Structural design. Don't get rid of all these extra lines that you have here. You've still got them. Don't need to worry about these lines. Now. We've got a nice little construct, got a nice little house building building blocks, if you like and kind of structures all don't for our elements on. Like I said Now what we can do is have some fun adding in the details. So let's move on the level
54. Full Sketch - Window Shadow - Part 1: Okay, welcome back. Now we're ready to do some very nice little detail works on our lovely house structure that we've just made. So for this, we've got to ensure that you have a nice, sharp pencil. So before you start in any detail, ensure you've sharpen your pencil on. Otherwise you're just gonna get really blunt lines for details and you get frustrated with it. Get your pencil ready. Nice and sharp. There we go, pencilled on on the side. Their ruler will need rule that we might need a really we might not, but just keep it handy. Let's keep the rule it on a side on. Let's keep our eraser ready. So let's start on detail work. So I'm gonna do is I'm gonna start off with adding in some detail work to the actual windows now. Ah, good idea. When you're using pencil is have another piece of paper, just a blank piece of paper on. Place it for your kind of wrist to lean on. So especially if you're working in detail to do it in some shading. So I guess generally, depending on what whether you're right on little left handed, it's always better to start off from the top. If you write and it starts off from the top left and start doing the detail, we're coming down. So that yet avoiding having to put your kind of a wrist on the work that you've done on. What that will do is that I'll end up smudging the way. But, however, if you if you kind of have a preference of where you want to start doing your detail work, like what I'm gonna do now, it's always a good idea to have another sheet of paper. Use that lean hand on and to just place over the actual design work that you do it so that you know, smudging or rubbing out that previous works. That's what I'm going to do. I'm going to keep my sheet with me when I started, you know, doing the design work here on then when I'm moving here so I could just cover it up with this piece of paper as I go along. If you see a picture sheets of paper coming in and out, that's the reason why. So it's just move the sheets of paper out of the way for now because we don't have any detail work yet on. What I'm gonna do is I'm going to start off with this window here. I always like starting with the top left. It's just a personal preference, but I think let's start off with a top left so that we can see it clearly while we're going along on, I'm gonna get maximum zoom in as I can so that you can see the type of detail that I'm doing. And I'd like it to follow this detail. You don't have to follow it precisely. Just try imitating what I'm doing. But we're not gonna go into much detail. We're just gonna add in some simple lines on some shadows toe make this kind of illustration a bit more interesting. So let's start off with adding some darks to the inner side of these friends. So I'm going to be thinking about this, that the light source is coming in this direction. So from head light sources hitting it. So we're gonna added the shadow area on these left kind of dreams and edges off our structure. So let's start off doing that. So just with your pants up lightly, all I want you to do is just lightly Doc in this lineup here, where every very likely don't need to press down too hard and then move on to this one here , slightly darken that up. I feel slightly very slightly. Turn the page, Doc. In this line on a dark of this line, you can use a ruler to do this darkening. But I like Teoh. Do it freehand so that you know everything doesn't look too robotic. But by all means. If you want to use a ruler for their strict, use your ruler tow line off your lines and just dark in that area and you can see now if you compare it to this one here, it's already static, adding a bit of death to the illustration. So I'm just gonna go over this a little bit harder. Teoh really give myself nice, clean edge on. I think that's what can really nice. So just adding a couple of extra lines off shadow in the in the same direction. It really enhances your illustration and really adds that nice elements of debt. Now what I'm gonna do is I'm going to do this for all the windows s so that we can easily complete the illustration. So I've done this first step adding in the dark's just on the window frame the a cross section. I'm going to do exactly the same over here. So if you want to just forward this part, you can or you can watch it in real time. It's entirely up to you. You're just gonna hear me repeat the same thing again and again, so I'll leave that decision to you. So again, just going here with my pencil darkling gulp. Just a little line underneath there, turning the page this side. Now it depends how steady your hand is. I mean, I'm not really I've never had a steady hand. And Haman illustrates that was always told in art school that, you know, you can never paint because you've got wobbly hand in this. In that way, it didn't turn out too bad for me, did it? Never let anyone say you can't do anything, especially if you have a slight handicap or a slight disadvantage. It makes no difference. Just persevere in life on you will succeed, God willing. So let's carry on with this or that. The same one, 23 little dark areas and then for this one again. Let's start off with this one here starts off with the Knights of Vertical Line and there we have it. Try keeping them similar on all three windows. That way it'll look nice. Andi, I think we gonna hopefully produce a very nice little illustration of a house. And then hopefully, once you complete to this, then you can add in which ever type of rendering lines or shadow. And you want to your class project and I can't wait to see what you guys come up with. So hopefully you would have learned some basics. With this class up to this point on, you would have hopefully enjoyed it as well. So I'll just do a little zoom back so you can see on all then when those Now we've got a nice little bit of death going on. Now let's do the next part. Let's get that zoom in back in again. There we go. It was a bit too much. Okay, so let's add in a little bit of shadow on this area now. So on the inner part of the frame, I'm just gonna turn my page here because that's how I'm comfortable on again. I'm just gonna follow this shape, keep turning my page on. We're just gonna have that effectively. It's like adding another border in, isn't it? We're just gonna have that border and up to that point there. And then we're gonna continue over here of that nice little bit of death. Beautiful. Okay, doke. Now turn that back around so you can see in. See, it looks a little bit three d. Now, doesn't it Looks like this some kind of death to each one of these kind of bars that we've got these airframe bars off the window. So repeating the same thing over here. Start off that this one, maybe going up looking very nice and again on that corner, turning it around just following that shape. Nice and easily. And if you kind of like it at this stage, if you're following any in your pencil and girls outside mergers to raise it, no problem at all just to raise it all your baselines. That there for you to drawing again if you need to. Not a problem at all. And now what we're gonna do is do the same for this one here. I'd rather the reason I'm kind of doing this on all windows in stages is so that it just makes the job a lot easier. And so you don't forget what you did on the previous window. You can, alternatively, you complete one window at a time. But I always like to do it like this because sometimes when you do one complete window on you go into another and you kind of, you know, you realized that it wasn't the right decision to do a shadow here. This way, it will give you kind of this uniform. Look on, Deacon, build the decisions that you do systematically. So let's move back to the window. One top. Now, what we're gonna do is turn that around. I was just going to continue this line just to this area down here on. What I'm gonna do is I'm gonna get my piece of paper now. I'm just gonna cover this up, because now I've got these graphite lines rendering lines at lease easily smudged with my hand. In fact, lean on them. So I'm just gonna cover that off on lean my hand on that piece of paper and then here, or we want to do it. Just bring this across up to this point. You don't want to go away across the curve and just dark. No power lines accordingly. Lovely. Sell us. Used the same technique than this one. Here, take it across. So it should be lined up. This one, the one that you did here nicely. Don't. I'm not. Final one over here could move that piece of paper down. Just bring that line across. So is bringing across here little line there and then just shaded in. We'll get that gold you say.
55. Full Sketch - Window Shadow - Part 2: So let's move that one back. Andi, there we have a So now we can really add a lot of details to these windows. You know, we can start adding in would greens. We will do that. I don't want to do it too much because I want us to just follow at the same level so that we're not like, you know, spending too long on this. I want you to kind of really delve into the details when you do your class project. This is just to give you a bit of an idea out wide in some small details to enhance your drawing. So let's move on to this top window here. The nice circle, the circle window. Let's get a lovely zoom in on that one. Beautiful. So we got what we did today was we need it exactly the same. Use my paper to cover that area up so no small jets don't want no smudgy smoggy right at home. Let's do this one here, sir, across this one, and then follow it across the top. Now it's a little bit of shade there and then turn it around if you want to. If it helps you get the angle. Right. We're gonna do the same here as same of this side. Okay? Right now, we're gonna do this area here, this curvy area just from the right hand side. So tilt your paper. However, you like to make your hand comfortable on just lightly with your pencil. Don't going to dark straight away, do it nice and likely to get, like, a bit of an idea of where this line's gonna bay. Then follow it up with a dark line on. There we go. So we've got ourselves a knife shadow in a shadow, carrying on, turning it around. Let's just do the shadow on this side. Maybe about what? To here. So now all the way just up to here on this bottom part of the curve, because obviously, like it's gonna be hitting it from outside. We do it all the way that it's not gonna look quite right. Turning it again or we need to do is finish it off on here. So let's just do that just a little bit down here. Let's just make this one a little bit thicker so we can actually see. There is a bit of shadow going on. Turn its around. Lovely job, leaf. Right. Let's get that zoom back on that one. Okay, so now we've got our four windows. Don't that's but a shadow going on. Their next step now is to do a little bit of shadow on these outer borders. So just a little shadow on this side here on this side. That's all we're going to do. So let's start doing that tilting me page paper over there on Let's get that zoom back in. Okay, So with this one, and it starts off by doing these here just very, very lightly on against some shadow for these window sales. I'm going to do the same on on this because my hands in the same position, right position. It's always nice toe. Try getting a couple of things. Don't at the same time to avoid having to, you know, keep changing your position. So a little bit of a shadow, not too much. Now we concern it's around. Remember, the shadows are staying on this left side, so I get that back into the camera so you can see you're right. Let's just do the shadow going up here. We don't need to do a shadow on this top area because the light's not gonna really produce a shadow on that top Erica effectively looking at this from bottom up. So we just carry on a little bit of shadow up to where the curve stars. Take that across the the same for this one. So a little bit of a nice shadow just go in all the way across to the top where the corner starts on. Don't worry, if you shadow bigger on this one than it is on the previous one. Not to worry about that were not calculating the exact measurements of shadows. Otherwise, literally, we're gonna be here all day on. I want to keep it nice and light and for so doing the same here, starting with that left shadow just hitting that corner when the corner stars Very good. Only paper around called the others up for no smudgy, smoggy on. Maybe just a little light shadow here. And I think we're doing on that one. Let's have a quick look. So there's a top two and there's about one looking varied us on again with the window with the circular window Let's do that one. Now. So with this one, we could probably add in a shadow at the bottom here. So we're just gonna have the shadow from this point upset around about here so lightly with the pencil. Just lightly add in a little bit of shadow, but some shading very rarely light. We're not pressing hard at all here. Just taking it. Maybe this point. Maybe a little bit to the top there. And there we have it. That looks about rights. And now I'm gonna go in a little bit harder with my pants off. It's just see, going in a little bit harder to darken up that nice shadow that we've just created. And I think thats ones looking very nice indeed. Cells. That's about it for that one. Beautiful. Okay, let's do a zoom back and see what we've produced. There we go. OK, I'm happy with that. Hopefully you would have followed that on. You've got something similar. Like what I've got on next. What we're gonna do is move on to the shadows on the door on. Then we're gonna add in some more shadows here so we can finish off this front section. Then we can move on to this section. Yes. Let's stop that now.
56. Full Sketch - Window Shadow - Part 3: Okay, Welcome back. Let's start our shadow work on our door here. So let's just get at Zoom back in. Now we're gonna follow the same suit that we did with the windows, so the shot is going to be in very similar places. Let's start off. May be by adding the outer shadow here. So let's just add ourselves a nice shadow following this line from this point all the way to the top. How did a nice bit of shadow there and there we go. Nice little bit of shadow going a little bit harder to darken it up, make it look really nice. Make it pop on. Let's add in shadow on the inner line here. That's that's always the shadow there and now dark. And that's all holding the page, adding, Some shadow on this side don't need no shadow there because that's where the light's gonna be hitting. And then maybe just maybe, a slight but a shadow on this corner here just to emphasize a little bit. Okay, now let's move on to the steps. So with the steps, what we can do is we can just without pencil lightly add a bit of shadow on this kind of sidestep that. And then on this part here, where we very likely we depend. So no need to press hard at all. There we have a lovely Okay, so now what we can do is maybe have some a shadow on this roof part. So if you see this little area here, that's kind of hanging out. If you just put your shadow in this entire little triangle What? That all there is that report like that one decide of that Slim's off the roof in shadow. And then what we're gonna do is we're gonna add some shadow on this line here, so just follow this line, get back on the cameras to follow this line and just adding your shadow there, follow it off all the way to that tough. You can see God's off a nice little shadow duck, and it's up now. And if you end up like, you know, adding too much shadow one or, you know, darkening and area to more, just get your razor outs and it raises it. Not a problem at all. They have it got nice, soft, mid mid tone shadow on the inner part off that roof on that roof edge Sell. What we'll do now is let's do resume back and see how things are looking. Yeah, I like that. I think that's looking very nice. Get more of a zoom out. See the whole picture. Very good. So we've got mass shadow going on on this front. Part of the light source is coming here. It's hitting the house from this angle, so we got a couple of those elements in a bit of shadow of cast shadow. Now, what we can do is we can put our focus onto this side and had the shadows in here. So once the shadows are all complete, we can start adding in some fine tuned details. So let's go ahead on and do that now. Okay, let's continue with this. Andi, let's start adding some shadow to these side windows. So now that the this is gold going in at left angle like this compared to the frontage off the house, so what? Our shelters are gonna be on these areas, so we're gonna have a nice, bitter shadow coming care. Let's make duck. And that s so you're not gonna have shadow on this side. You're gonna have the shadows coming here. They're gonna be on this right? Answer. It's like on this We had everything on the kind of right side there and then the main one on the on the left. On here. We're going to continue that on just pretty much follow suit. So But this 1st 1 don't let's start adding the outer shadow shadow here. I mean, you can start adding so many nice, realistic shadow to your drawing. You know, you can keep going on and on having so much detail to it. But there's got to be a point where you just decide that you're gonna stop on on again for this sketched. I'm not gonna add in every bit of element of shadow and, you know, highlights or you know, every bit realism. So I'm just gonna adding these little shadows here, like this one that I'm doing here just to make the drawing the illustration look a bit more interesting. S. And now when the days are going to sharpen my pencil, I can feel that the tip off my pencil is getting a little bit. The lodge pencils, pretty much running out, doesn't look a size that now that just just about fits the screen cousin is so you can see with graphite, you've got to keep Scharping. And again, if you're using a mechanical pencil, that won't be a problem. So here we go. Just getting my paper across there. Let's add in some more shadow here. So this beam going to the top as a dead till the paper added some shadows at the bottom here. And then Adams, the horizontal shadows on the bottom here way go. Very nice. So if you just get your pencil, maybe just duck in the edge so it looks like it's protruding outside. So again, keep them edges nice and clean. Can use a ruler today. These straight schedule, if you want. That's no problem at all. Again, I'm just gonna darkened the edge. I don't want the edges to be too soft on there. We have. It's now I'm gonna work on this one here. Gonna kind of follow the similar lines that I did. Just bring that off slightly. Then There we go. Nice light. Little shadow line going across. Now we can just have a nice clean edge. Teoh Shadow. Very similar to this. Kind of with that we had over here, try keeping it. Same if it doesn't be the same, Don't worry about it. It's not the end of the world. So that's just do the same hip window, tilt the page, bringing across. Then you can have a shadow part here on may be a very light, shadowy area here. We don't need to make a huge shadow at the bottom, because realistically, you won't really be able to see it on their Not to forget the top beam over there. Your full shadow. That's up. Lovely sets. Have a quick look at that. Yep, It's looking quite nice. So let's continue with this window here. Bring my paper to cover that up. You get a nice bit of shadow over here on the vertical lines. This woman the and tilted Last Bitter Tilt Tilt E on. Let's do the out. So one here. No need to make a huge shadows to slight outline. Shadow one underneath here, across the beam that's going across. We're not gonna have one on the top because it's covered with the kind of edge of the roof covering it. So that shadow would be prob approximately here for these ones. It would be approximately here, but that's fine. It's covered up, so it makes our job easier. One less thing to do. OK, let's just make them edges. Nice and clean. Suggest press down a little bit on the edges. Make them nice and sharp looking good, right? Let's finish this off by him in the last bit of sugar work on this final window. So again, using the pencil, just add in some light showed a work. Now you can see my my lines get quite dark pretty quickly, and that's cause I'm using a to B pencil here. So if you can see here to be pencil there always nice and soft, it's always my preferred pencil. You have to press too hard to get darker line. But if you're using say, for example, you know the common common great of pencil, the hatred be tensile, then you may have to press a little bit harder or, you know, for these shadows come on compared to what I am doing. So if you think it wise, his shadows coming on so quickly, what was his penance? Also dark and that's the reason. I mean, if you have a to B pencil, that's great, you know. Go ahead and use that one. But if you don't no problem at all, so I turn left to the side. Let's add in these top ones goes over here. We've got the full frame of the window element way. Let's add these top ones in at these ones in here, right down there so that finally other one in at the bottom keep this one nice and thin. We don't want this one to be too big because it's effectively the bottom of the window towards the end. So we go. OK, so let's turn this around. Let's do a quick zoom back and see the whole house in its element. Very nice that you can see what a massive difference that makes just just adding a couple of darker lives around all the elements in your construct in your little house building. So what we gonna do now is a let's add in some shadowy elements to maybe this chimney area , so let's move on to that one now.
57. Full Sketch - Chimney Shadow : socket. Okay, let's move on to the shadows off the chimney. Eight. So it's gonna tilt my page like this. Cover all the areas that we've worked on to avoid our smudgy smudges on. Let's just get a bit of a zoom in on here, okay? So now with this, what we've got is we've got this little structure here. I didn't want to put maybe some type of element designed here, maybe like a little cabin window type thinking that chimney something nice and whimsical, but I'm going to leave it as it is. I'm gonna let you do that if you want. For your A class project. Let's just keep things that since simple eso for this one, let's add in some shadow. So our light sources, if you remember coming in this way so we got shadows. Here s so basically these elements over here, we're gonna be an absolute shoot sort of shadow on them. So let's just darken them off as we go along. So I'm gonna put this area in a bit of a little bit of a shadow here, So if you just follow that life in this area down here on, we just create a nice little shadow. Keep it nice and soft. You don't need to press too hard on you can see this area here, This kind of little element that's come in outside. This is the underneath part of this elements. Or just get that back on screen. This was gonna probably most likely being complete shadow. So it's just dark, and that's up to be darting this element off over here. And then all we need to do is make this wine wearing a very nice and crisp so that it doesn't bleed into the shadow that we've put science is effectively a cast shadow. This is effectively adding a cast shadow to this area. On it, we don't have an extension on the front. The front is nice and flush. So we've just got the extension coming out now from this area here. We didn't did. We actually didn't do a line which we should have if you just get your ruler, put your ruler on this corner. Andi, I'll get these zoom back in. So if you remember our vanishing point here, so we have vanishing point there. Just get your ruler, put it on the vanishing point. Take it right to the edge. There on just drop in Nice life with this. I've got it. Balancing on the vanishing point got Zoom back in on their seat and see this a bit better. You see my finger there, Right? OK, so there's the angle. Take that in over there and you've got yourself a little off corner cut out. So with this little corner, this is gonna be in shadow as well. So if you just call it that in with the pencil, they have it. You've got yourself a nice little shadow created and then go back in over here and just dark in this area off. That's all I'm doing with my fellow soldiers darkening this area to ensure that this air yet is incomplete shadow compared to the rest of this construct. And you've just got this slightly or drop kind of cash shadow coming down. This we depend. So just slightly do leave very loose lines coming in like this. It looks like we've got an eye shadow going on their rights. Okay, so let's move on to adding some actual details. Now. I'm happy with the shadow areas. We could possibly put some more shadows in here. But we'll do that while we're adding the details on at the end. Remember, you don't need to worry that all we're doing the shadows now. Can't we do them later on? You can do the shadows at any point that you're like. This is just kind of a more systematic approach. I'm using Teoh kind of, you know, a step by step instructional approach for you to follow. So let's move on now to adding some lovely details to our house.
58. Full Sketch - Door Details: Okay, Welcome back. Let's start with adding some fine details into our elements. Now let's zoom into the door when it starts off with the door. Because that way it works very well. So I'm gonna use my sharp pencil. And if you remember, with the exercises that we did with exercise five on doors, I'll just bring that here. Just get zoom back. So we're kind of the door that we've got here is effectively. It's one of these three designs that we've done. It's more close to this one and this one. We've got a couple more steps on these, but in our house, we've only got two. Now I'm thinking, Let's keep it nice and simple. You can do a nice, complex one for your class project. I'm going to stick to this one here, and I might modify it slightly. We've gotten a thick border there, so I might add in a little pattern. So let's do that. Let's stick to a nice, simple design on maybe idea a little pattern on that border. So would you. Ruler. All I want you to do is get your ruler on drop in a center line from this point says you've got these two triangular tips. Line your ruler up that we should already have that center line there that we rubbed out. If you haven't got it, not to worry. Just do that on line atop against this. And just remember, we just use one of the lines to use of the guys who is bringing across Andi. Just do a nice little light from this corner all the way down to keep this nice and light. I don't need to go into hard on what we're gonna effective. We do. Is we just gonna do these little panel lines going all the way across Now another good way of doing this. You don't have to do this from the middle. The only reason I did that was so we have a guide. They can see my lines a little bit wonky there. That's because I didn't do an exact measurement. So if you want this to be super duper exact, you can Otherwise if you want it to have slight variance in the line, sometimes that looks a bit more natural. If you have everything to symmetrical, especially on the details on the inside, it can't own kind of looks a bit odd. So what I'm gonna do is instead of doing that center line, I decided that I'm gonna go across this way. So with my ruler, or I'm gonna do is line this up over here and just drop in a nice light. Little right there. Drop it down a little bit. Like little land. We don't need to do no measurements. They're just gonna do this by eyeballing gets drop it down again. Similar distance If you're distances very, it doesn't matter. It'll just after the effect of this Drop it down. Carrying on same way. Drop it down, Adaline. Drop it down. Keep it similar to the line on top. Drop it down again on you've got room for, Maybe squeeze in another one down there. You don't have to do the exact number of lines out. Don't just drop down line so that you've got a nice panel off straight lines going vertically on your store. And there you go. Look how easy that was. So in terms of the door handle, while we can have a door handle in the middle if you want, this could be a two panel door, But I'm gonna have this on the left hand side around about half way through here. Just drop in a little door handle like there's just a little dot on that about it for that . There you go. How easy it was that easy peasy. Lemon is queasy rights. So we've done our little lines for our door. Nice and light. Not too hard. Now, what I want to do is I want to do a little pattern here. I think that we nice to just add a little pattern to show a bit of a kind of wood grain effect on what I'm gonna do is for this pattern. Well, I'll demonstrate this on another sheet of paper. So what are the results? Get this paper here for for a wood grain. Sometimes you can you can do different after pattern. So I've just got to little minds here, so if we think that these two little with but wouldn't bars here, we can do a pattern like this is gonna be completely random. So you could do circular patterns like this because if you think in, would you just get all these random circles that make up the wood grade on this is all I'm going to do all the way across. I'm just gonna create these little wiggly lines and then just keep adding more lines to them, and that's what I want you to do. So you don't have to follow my pattern exactly for this step. Add in your own pattern if you want. Nice. It's a curve your eyes on this is all we're gonna do or with wood. Sometimes you just have lines that are all just going one way. So you've got this nice curve coming in here and you've got all the rise that just keep following that same curve and it looks really, really nice. So I'll leave that decision up to you. I give you some kind of element for adding in your creative wise at this point, Um, as long as you add in some type of texture here, that's all I want you to do is you can see we've got a smiley or wood grain, and we're going to do that now across all the way here. So if you want to follow me and do exactly as I'm doing, by all means, go ahead. So I'm gonna start off in this corner, your nice, little curvy line there and just follow with further curvy lines at the bottom. And here she's been doing it. Sir, Call another circle in there, maybe follow the lines this way and then hit. Create another line. Maybe another grain coming up like this. Follow that line and you can see it. Emerging into a really nice pattern looks quite interesting. What it does is it also gets rid of these lines that we had here. Remember? I said, don't worry about them lines. The details will cover them up. And that's exactly what we're doing. I mean, we're not doing the light, these patterns because of those details. But just doing these into add a little bit of interest to our structure and our illustrations that again creates in the little lives just like so mass little circle. Keep it nice and random. Don't want till robotic. I wanted to look a little bit natural. So a couple of lines there may be a little dot death and that you go Look how quick and easy that was right. I'm just gonna added maybe another line here. Another line here. Just call up that line that was going across that beautiful A. Okay, heads do the same now for our windows, and that's what I'm going to pretty much do for our windows. I'm going to do this nice patterned effect on our windows and maybe have some kind of wood grain lines going across the window. Sills on that will add a nice bits of various. So let's move on to that one.
59. Full Sketch - Window Details - Part 1: Okay, Okay. Let's start doing the patterns for our window frames. So I'm just gonna tell this to the side, And what going to do is I'm gonna use my free hand for this. I'm not going to bother with a ruler on with these window sills. I'm just gonna follow the line above it. So I'm just going to do these little lines. And if they can, if you few handshakes like mine doors and it creates a slightly wonky line that's actually good for this effect because it looks like it's kind of it's more realistic, isn't it, In terms of Wood Crane. So I'm going to do that. Started 12344 lines at as many as you want going across on. Then again, get my piece of paper called the artwork up and then do the same for these two. So again, we're just following the systematic way of adding in details just lightly, not pressing too hard and just adding in some rendering lines. And there we go. So we've got some more on that one on on this one again. Sometimes the lines might not go all the way across. You might end up having a line that's slightly variant from the other one. Not to worry. Just continue the line from another point. It's just to add in a bit of rendering lines. So there we have it quickly dawned. Look at that. Look how easy that was. All we did was added blinds and look how nice it looks. Beautiful. OK, so now what we're gonna do is I'm gonna work on this one here again, just like it did with the curly patterns here. I'm going to do exactly the same ad in my rounded Kirby patterns. So go ahead and follow me while I'm doing this. Starting here again. You want to add in your own patterns you can on doing another curve this way that effectively, these air just arcs, aren't they were just drawing in little arcs on wearing them with stretched mind. So this 1 may be coming up like this, that one continuing this one going across like so And then maybe some. All the lines coming in at a different angle. Another circular one here nicely. So it's a wood grain. Nice circle coming across here. Some off circled circular lines coming out like that. And then maybe on this side, we just have these lines coming here. It's all dot Look at that. How easy was that? Now it's quick and easy, and they're the same now for these two. So just cover up our artwork so we don't do no smudgy small Jake. Andi, Let's just carry on with this. So again, this one might staff with a curve like that. It's just so much fun doing this kind of random texture work. I really love it because it, you know, everything's bean so technical often our you know, we've created these structures with precise millimeter lines, you know? Well, as precise as we can be with, you know, limited tools and then effectively, we're creating more of an abstract look to our house as well. So it adds a nice kind of mixed, not mixed media, but mixed design looks. So how I think it looks rather nice. So there you go. I've just finished that one starting on this one now. Nice line. Were care maybe a little shaped like that? Keep the curves full. The lines of the curves on it's looking really know. So just follow these lines. They're like little s shapes and see shapes from the ultra bet on that. Just simple shapes. Simple filling in these gaps with these curvy lines. It adds a such a nice effect. So curvy line like that. Another curvy, curvy over here. How about a nice long curve coming in from there? I would just finish it off like that. Look at that beautiful lady. Let's just do a zoom back and see what we've created. Well, that's looking nice, isn't it? So nice bit of detail work on our house. Let's move on to the round, circle the circle window and let's just get Zoom in on with this one. While Dima is, I think we'll do something similar on. We got a bit of a blurry blur on there. Let's just see how far can resume go on the camera. There we go. That's right. Okay, so that this one What Minute, Airways? I'm gonna literally Dave the same. So it's just follow the shape off the circle and just create a nice around rendering lines like this as a little bit of interest to our illustration. Nice that took care be around. CIR CLE LINES and just taken out lines in different directions. Just like that. Follow it through again. Follow that line through there. Don't worry about, you know, following this precisely like I'm doing. I don't want you to stress it just went toe adding these squiggly wiggly lines all the way across just to fill in this space of this border here on, I'm just gonna dark in my little corners here, Maybe a little bit more. Keep them nice and crispy. Clean little blow. And we don't look out that so beautiful window designs created on our lovely little house. Now, next step is gonna be to literally imitate the same on these four windows. So let's go ahead and do that. So let's get a zoom in over here. Nice women on here on. Let's start on this one.
60. Full Sketch - Window Details - Part 2: Okay. Okay. Let's start on this one. So again, let's use our pencil to create some nice patterns over here. Something to start on, This one here. And I'm gonna effectively do longer lines longer, curvy lines on this one. And I'm gonna literally take the lines all the way across the frame. I'm not gonna do different lines to the window sills. I'm just gonna have nice, curvy lines going all the way across its nice patterned effect asked circular lines just to cover it up on. There we go. That one dot and then too, they want to This one starting on this bottom corner, doing a little s shape following them lines Little round circle, get following those lines going all the way across on. It's looking rather nice. You can You can create some really nice patterns, You know, you cannot Them, you know, like you get on the edge of mirrors where you have the beautiful, frilly, flowery type designs. Go ahead and do them, if that's what you want to do. Absolutely. This is all about having fun, isn't it? So nice circle. Circular design there. Following the grain coming down maybe. And just adding some more green type marks over here. Nice, sir. Court follow. That's through again. Upwards and out. Nice C shape over here on a couple of lines. Maybe Just have a floral type of line coming, Kia, and we're just following it on. That one's done as well. So bring my paper across, doing the same on this one, using any If you notice I'm using the edge off the tip of my pencil because we really need to keep things nice and sharp here. Otherwise, you don't want these curly lines. You know, these detail lines, blip being blocked and blurry and too thick. I want to be nice and sharp so that you can actually see them on your illustrations. There we go. Call Ringel, then render lies bringing, bringing it across looking rather than I. So out that another one there follow the pattern. Followed the shape on there we have it. So our window design frames do on our door frame is done on. We're getting really close to having a full final illustration. So next What we're gonna do is we're gonna concentrate on the brickwork. So if you remember, I just bring out the brickwork patterns that we have. So this is what quickly did before in the previous lesson. So we've got Brick worker, We're here. We'll brickwork wide brickwork We looked at, you know, uneven brickwork. And then we also looked at some stone with textures. Here, doctor. It's textures and some cross half gin. Then we also did panel work open down across the page on. Then we also had some or kind of, like, different textures for the Rufus. Well, so what I'm gonna do is I'm going to decide now which one of these textures I'm gonna use for our house. So should we go for brickwork here? Maybe? Yeah, I think we'll go for brickwork here. So maybe standard brickwork like this. So we've got this nice brickwork going across, and then we can vary it by adding maybe some random, uneven brick works like you've got this these type of bricks that make the side of the house, like longer part of the house is made up of this. And then the front is made of off just standard normal bricks. I think that will add a nice little variance to it. Add a little bit of death, and then we can move on to the actual roof itself on what you can do is you can actually imitate the brickwork that you have on each side, off the chimneys. I think that's what we'll do. We'll add the only even brick that whatever pattern we decide to do here will imitate it on this panel off the chimney on then, whatever pattern that we have here will imitate that on this side of the chimney, So let's start doing that now.
61. Full Sketch - Front Brickwork - Part 1: Okay, Dokey, right. Let's add in our brickwork designed for the front panel of the house. So I decided that was going to do this. Standard bricks. Let's go ahead and deal with that. So just move that sheet to the side, Get my finger out on for this. We are gonna need our rulers. So there's two ways of doing brickwork. You can either do it freehand and have them like, you know, a little bit natural and lacks kind of slightly slanted on each brick. That's great. That's that works great for, like, the uneven look. But if you get a panel, you know bricks on your house, and it's always good to have a nice horizontal line where the bricks follow, it kind of makes it look a bit more realistic. So I think that's what we'll do with this one. So what we'll do is we'll get our rule that we don't need to do. Precise measurements for this or we need to do is ensure that our horizontal lines follow suit. So in order to do that, all we need to do is follow the lines that we did on our guts. You can see we've still got our guidelines here. If you haven't, if you rub these guidelines out and you can't see anything and not to worry, what we'll do is we'll start planning this in right away. So again, remember, draw your lines above the area you can see. So what I'm going to do is till this this way. And I'm going to use this line here that goes across the baseline. Toe added the horizontal line. So for this one, let's say we maybe keep it this high to do really thin bricks. But what you can do is you can also do exact measurements. So, actually, let's do that. Let's do exact measurements for this. This will just make the process a lot easier. So if you find the center point of your house, we can actually do this this way. It's a new upside down, left and right. So let's just find the midpoint. So if we get the this little points here, put your rule of that on, line it up with the midpoint. Now, we already drew the mid points that moment point is around. Is there where this original dot waas? So am loan and get up there. If you've lost your midpoint, just measure across this way. And do you midpoint there and then have it to the midpoint off this actual triangles? So what I'm gonna using until this So that you can see what I'm doing. Are we going to do? Is we just get a add maybe half a centimetre kind of divisions across this? So we're just gonna do half percent to me to that little dot there, half a centime to that little dot there or the half centimeters going to go there. We don't need to do it out there. So we got to for how about half a centimetre here, So literally or noon is undoing dots every half a centimeter. That's what I want you Today's with 1/2 a centime to there? No, the half that. No, the half here off the half there, off the well, that off the after the Now that you know the one that another warned that if you've got too much if you're this area here extends half a centimetre, don't worry about it. He cannot that bottom kind of row a bit bigger. It makes no difference. And Now you can see I've got these Nice and half sends me to dust going all the way through the center of my house. And now what I'm gonna do is I'm just gonna eyeball this. I'm not going to do exact measurements on the left and right to get the exact line because there's no real need for that. What we're gonna do is we're gonna turn the page around now because we have a nice straight line going across there. We're gonna use that straight line to effectively get a zoom in to effectively do follow up lines for our brick serve is gonna put my line, put my ruler across this line here, drop it down until I hit that point that I just did. And then with my pencil, we're gonna go in from this side between the window and the door and then from that door to the edge of the house of theirs. Our first lines, you can see there are first line drawn in for our bricks. So we're just gonna follow suit and then just exactly the same, get your rule of their measuring up against alone that you did drop it down to that point. Looks about right. Looks about right from that side to that side. If you feel it's too wonky, slightly adjust your ruler. That's not a problem on draw in your next line. Doubt. Keep it nice and lights. You don't need to press hard and again dropping it down. This one measured up quite nicely with the frame of the window. There we go. I'm just closing that gap there. Nice light line going across. And if these aren't 100% the same distance, don't worry about it. It kind of ad said they're more natural looked, isn't it? So again, all I'm doing is drop in my ruler down, just making sure that this and this here is approximately right in terms of size. So there we go, dropping that line in and again over here. That's the next are. Sometimes you may have previous starts that you've rubbed out that are interfering. That can happen, But don't worry about it. Just make sure that you're covering the rights area. Okay, Doke. So let's just continue with this. My memory card ran out on my cameras, had to quickly change that, so let's carry on. So yeah, just dropping in my lines just like so, Keeping the distance from left to right. Similar. And then just added that line. We don't want to go across the door because you're just another beautiful a little illustration marks dropping the line again. And this is what I want you to do. I mean, what you can do. You can measure across this side on this side, the exact points, but I don't think that's necessary. You can do, if you really want is if you want to go ahead and do that, go ahead and you know, at these dots in both corners. But then when you come to the triangle on the top, the points of on the top, you might find it difficult, and you might have to end up adding lines across here and then here, and you might still end up getting a little bit over. You know, an error, but there's no real point in my opinion. I think you should just eyeball it, drop it down. My cam doing here on that should do the trick. So they're, Ugo added. Although I dropping it down, you can see my line's gone slightly aboard that below that dot But do you know what? I'm not gonna worry about it. And I don't want you to either if that happens to you because it's not the end of the world . And again, it will have a nice little natural look to your house because things in the natural world are not always perfectly even especially when the made by human hands secures. We were not perfect. We always end up making some sort of margin off era. And that's how the world works is you go. Let's just carry on on just added lines over here. Ultimately, all we're doing is we're just showing an indication of bricks. Now for bricks, you don't have to do every single brick. You don't have to do every single line like I'm doing OK, because especially if you're ah, if you think about it in the real world, when light hits something, we tend to not really see in as much detail, especially when the shadow side starts emerging. You know, you Seymour, when it's lit up with kind of illuminated by lights, but the shadow areas, you just can't you won't be able to see every single brick, so there's no you don't have to always draw every single brick. But if you want to, you can do because it's your house and you can design it. However you want eso. So let's just find it now you can see now I don't have a dot because I didn't draw it up it . So what I'll do is I'll just do my dot from this angle. So with this angle here outside the window, and you can do it dot on there. But then I don't want to rub it out and have to do that detail again. What you can do is you can just get your ruler the little dot there don't there dot There may be one dot there. We've already got the ones here. So again, just drop it down to that new doubt that we just did. I you talk from both sides, looking right, looking just about right there. Nice little line going across. Bring it down so that near little doubt that we did there on looking beautiful. So let's just carry on with this. Drop it down. There's that dart approximately there, do my line going across next one. About that in my line, Going across next one is here. Nice little. I'm going across Final one there on we don't. So let's turn this around. Look at that. Now you can leave it like that if you want. You don't have to draw in the bricks. This can effectively be like the paneling that we did. So if you remember on here we had number three paneled panel work. So it's effectively like this at this. This third design that we did. That's what it kind of looking like right now. You can leave it in like that if you want, and just adding a little bit of shadow underneath each one. But I think we'll add in bricks to really showcase this house because I wanted to have more of a brick look rather than a panel.
62. Full Sketch - Front Brickwork - Part 2: So how do we add in the bricks? Easy peasy or we do Is this center line that we did will use this center line as the point where we did our measurements. All we're gonna do here now is just lying your ruler up under center on those dots that we did for the center line on. I want you to alternate. So basically, I'll turn this to the side so you can see this a bit better. See if we can get a bit more zoom in to fit it if it more of it on the page. There was nothing that's looking good. So we've lined this up straight in the middle's where we've got our dot straight in the middle. Let's start from bottom up. So let's put in our first brick here. So straight line here and then Mr Line, Straight line there, Mr Line, Straight line there, Mr Line. And that's what we're gonna do. We're just gonna keep missing our lines and adding in our straight line, miss it straight. Next one straight. Next one straight. That would be the next one, so that will be in there. Miss it for the next one will be appear Missed. That one next one is gonna be a pit. Now you can see we have a nice division off brick lines going here. And now you can decide how far wide you want each brick. So let's just do this. Maybe by just guesstimating we don't need time and you can sit down and work out and have exactly, you know, two centimeter bricks going across if you want to do that. But I'm not going to bother. I'm just gonna literally do a line going across on decide where that line should pretty much end. So what I'll do is let's just do a quick little measurement across hip. So remember, we had a six. This was six centimeters going across it. I'll just turn this around so it's easy. Fetus State. So we got six centimeters going across here. Now if we divide this open to, say, one centimeters each. So we got five there for their at three in the middle to their wonder this or give us a nice little indication of how wide each brick is gonna be. So what I'm gonna do here is all I'm gonna do is start from the center and I've got that one centimeter kind of rough guide. And I'm going to use these corners off these house to come up with a line go. It's on the top. So just a straight line there. Straight line there, round about another straight line there, straight line there. And then again with a straight line about here, another straight line about there and that's it. So now this way, I've got a nice row off bricks, and I can use that as a guide for all my other bricks. So over here, I'm just going to do one here, follow it up all the way to the top, and again, should be one down here. We're just alternating. There's no unless there. So again, I've got one over here. Take it down. There's none on top. Take it down. So we've just added the line there. So Miss align their misaligned their missile line there. Missile I That's the next one will be approximately here and again. If you have some movement on this, it doesn't matter again. It will, after the natural look off the actual house. So this one, you've got this line here. Let's just finish that line going on top. Mr. Live on top. We don't need to worry. So we have won their missile. I had won their misaligned. So he's got one coming down here. Then this one got one coming down here. Now, this might seem a little bit complicated. I show you it's not all it is is we just got to establish one row of bricks and then alternate by putting a line in the middle of each brick and then just currying Get on So you can see you might get a bit confused. Thinking know, how was he got so many lines here? But what I'll do is when the ruble these lines out and we're just gonna do this line by line. So if you get your ruler So we had our lying on the sensor here. That was our sense of land that we created, and then from this line, or we did was we just added our little bricks and now they would roughly about the same size. We're not measuring them out because, as I said before, it gets too tedious measuring them out. So all we're doing is get your ruler. Bring it across. Be decided. This is where the first brick is gonna bay. Now, we were just going to do that. Same patter going across second brick, third brick. And then we're just gonna follow them lines or the way down. So this was the first line that we did. If you just see this, we've got our next step. So no brick there. So this is effectively the panel. No break breath, no brick brick, no brick and then breath. So we want our next lines ago here. Then we don't have to worry about the ones at the bottom there. Do we need any on top? There's a little one day, maybe a So we've got the line is there? So I'm just gonna keep calling where the line is going to say breath where there isn't. It's most beyond. I'm just going to say no. Brick. So brick, no Brit, no brick brick, no brick brick there. So they'll just be a little one overhead. So let's move this one across That next line that we drew keeping the line as straight as we can. So we already leave this one on the tops Let's do the top ones first. Brick. No brick on brick. No breath there. Nothing that Let's go bottom. So, brick, next line is that one. No brick brick. No brick brick, No brick on brick here without a nice line there. And we don't need to worry about the next. Now we're moving. Remember? We did these. So we're moving across here, so let's move across here. Don't need to worry about any Brookline's on top. So here, No brick brick. We don't need to bother over here because we've gotten the edge of the window. So we've got no brick brick, no brick briefed, no brick, and then bricks or Brookline There. No brick refined. That don't need to worry about that. Once you see, these ones are all complete now or we've got to do. Is adding the potential bricks that could possibly be here? And if you want to, you can just add a lie in here just to add a bit of areas. So on this corner, just Adaline. There may be other line over here. Maybe Adaline over here, That just looks a lot better than just having nothing there at all. So we've got another one here above this one. Another one here. About this one. Another one. Here. What? This one. So you see, I don't need to measure anything out. Just adding the lines where the bricks would have bean. Now, we've done all these here so we can just move onto this left side. So let's line it up again. Bring across. This was the 1st 1 that we did. And again, it's just gonna follow the same pattern as before. So no breath that makes no difference. Do we have a brick here or here? That's what we're trying to kind of determine. So no brick, They're known Brick. No brick, no bricks. That we do have one here. No. And then? Yeah, yeah, Another one here. No. Yes. No. Yes. No. So we don't want this. And now we're moving on to the next room. But before we do that, make sure we do the ones on top, so yeah, that would be a client here. It's just made that No. And then yes. No. Yes. No. And yes, that we just got one on the edge over that mostly. So you can see now that the bricks of forming really, really nicely on. Let's move on to the next lines. Don't this one that's all done. We've got our minds here. Move you ruler to that next line that we did. Lovely net. But before we do this one we can add in our center center lines that are going here just like we did here. We just added the men to complete it. So maybe halfway across this brick has put your rule of that and adding a line on the top one. Next one? No. Yes. No. Yes. No. Yes. So we want one here. No. Yes. No. Yes. No. And yes, you could see you've got a nice row of alternating bricks on again with this one here. Lets just continue with its off other. Any on the top. So we got No. Yes. No. And yes. So just one over here? No. Yes. No. Yes. So the other one is just hidden by the actual windows. So
63. Full Sketch - Front Brickwork - Part 3: seeing back. So what we can do is let you turn this across the side. You might be able to see this a little easier. So we've done our line here. So this was the whole line that we did. This might seem a little bit complex. You can eyeball it and do it one at a time. I've just used the centerpiece as my guide. Andi, that's entirely up to you. How you want to follow this? I mean, if your bricks don't say now exactly the same like mine. Don't worry. Just add in the lines wide or as short as you want and just alternate them line by line. That might be a little bit easier for you, but if you're following me and just follow the lines that I'm doing, go back and just see where I'm adding in them lines on, Let's carry on. So we've got our next line here. What I'm going to do is just make sure that my ruler is nice and straight, So no. Yes. Here. No. And then we don't need to worry that way. No. Yes. No. Yes. No. And yes, that we've got one here. No. Yes, There's no yesil. These? Yes, isn't knows that ho. Yes. No. Yes. No. Yes. No. So we don't want anyone that so let's drop our ruler down to the next point. So the next edge of that brick is that we need to do. One in the middle's of the middle section is around about there. Let's bring that there. Keep your rule and nice and lined up. So we've got was starting on this point here. So there you go. Don't need any on the top. So we've got No, no. Yes. No. Yes. No. Yes. No. And yes, There we go. One here. No. So is this 10 yeah. I'm confusing myself. No. Yes. No. Yes. No. And then? Yes. There we go. One here they That makes sense, doesn't it? I hope it does for you. Let's just carry on. Let's just move this across. So we've got the edge of this brick on. So we've got no Yes. Makes no difference over here cause we got the window. What? We need to follow the pattern to make sure we've got the right one. But just by eyeballing get at Comptel is gonna be one over here just for completeness. When the message that I'm using, I'm just going to do it like this. So it's No. Yes. No. Yes. No. Yes. So we did want it. No. Yes. One here. No. Yes. Doesn't matter. It windows covering it? No. Yes. No. So we don't want one that So there we go on. What we can do is like we did on the one on the edge over here. You can just add in some of the reclines that makes sense. So basically, we've got this bread care. We don't need to add any more here. We don't need to add any more here. In fact, what we can do is we can actually get rid of these. We don't need these ones that we put in just for, you know, recollection. They might be thinking, Oh, I just put these a And now he's making me rub them out. But to be honest with you, this give you good practice our house adding bricks. So we just want the ones that we can see. So from these ones here, let's go in. So we've got the edge of this brick, but that line there no Yes, that's covered. No. Yes, that's covered. No. Yes. We want that one. There should still be that. No and yes. No. Yes. No. Yes. So there we go. So basically, the edge of that brick is up to this point. We don't really need to put it in or I want you to do now is give it a little blow on. Hopefully it's looking like an ass Brits wall. So there we have it, folks, we've just added in our first brick wall on the front side of the house. If you didn't want to do this or if you don't want to do this, that's why I believe it in as panels. Or just follow this kind of no es es no break, no brick method that I did starts in the center point. Go this way. Add your brick lines in row by row and then alternate. Put the other one in halfway through that first brick on. That's all it is. You're just filling in them gaps on don't add in the lines over the actual elements that you've drawn. So all I'm going to do now is I'm just gonna dark enough my lines so that we can see this a little bit better. So I'm just going to darken up this line here, darken up my horizontal lines going across, and then what we're gonna do is we're gonna actually shade these in once all the brickwork is done, we're gonna shade it all then and then it'll look a lot more clearer. I know sometimes when you add in so many details is difficult to see the details. The details get hidden away within the details. But the way it's a kind of make that work is added details in due the line work and then start doing your shading and then it will. It will start to emerge and you'll be like, Wow, that's looking really good. So again, under the darkening all these lines here and again, if you make a mistake like I was doing this, it can get complicated. Don't worry about it. Just rub it out. Start again. But don't stress. If you don't want to do these kind of like alternating bricks and just do panels panels. There are a lot more easy to do. Onda again, We're using really thin bricks here, so if you want to added maybe wide by the bricks, then go ahead and do that. But it really is just a systematic approach where you start off at one point on, continue going across. Let's just do that. Let's just carry on, darkening up these lives on. You'll notice if there's a brick that you put in that's out of place. You will pop out to you. You'll be like, Oh, that doesn't look right there. And it's probably that you've done the brick on the wrong line or you've alternated it on the on the wrong line. If that pence true for a little bit out, that's the whole point than advantage of working in graphite, you can just get rid of all the errors that you've done on. Drop the whole thing down and you can start again. Not to worry, no point. Stressing it is not about stressing art is about relaxing and getting it all out on paper. Okay, Dokie, that's all done. I'm happy with that. What we're gonna do next is we're going to repeat this pattern on this area over here off the chimney. So let's move on to that one
64. Full Sketch - Front Brickwork - Part 4: okay. Don't keep so let's quickly just do the pattern over here. Now I'm gonna have the bricks similar like this over here, and it's just a very short space that we're gonna work in. So let's just quickly get a zoom in on that on with this one again. I'm just going to use a center point over here. So what? Amenities? I'm gonna use this edge off the actual because we don't have any elements in the middle of this is gonna be really easy to do, So it's three centimeters going on the top. So you're going to do them half centimeter marks going across on 234 with my rula just gonna line it's up like we did before. Drop it down, one across, drop it down, another across Drop that down another across Drop that down another cross Drop that down another across the love with So I'm gonna do is I'm gonna have the bricks Maybe similar kind of wit to these one. So I say if we do want it, one centimeter might be a bit long So I think we might do these, Let's say about seven cents and seven millimeters not centimeters millimeters. So there's my seven millimeter point that and it is another one that the one they're on another one death. And then I did it with another seven millimeter point over here. One there and one there. And now this is gonna be so easy, let me show you. So basically, what we're gonna do is in a dual line, one to one. And now the next one's gonna be in between these points one to one on nothing. How easy was that? That was so weak tea compared to this one, wasn't it? Waas? So just make your lines nice and straight with your ruler. There was just the guides I put in, and that's basically what we did here. But the thing is that what complicates it is when you have elements you called, officer, you know, alternatively, you could just do your brickwork first line in all the bricks and then the your elements. We don't really work. You know quite well when you do it like that, it works much better when you just have the elements drawn in. And then you kind of a layer your bricks around those elements. So I'm going to do here is I'm just gonna do a little darker line underneath this area, so it follows suit with the kind of shadow off this area. So just with my friend saw, I was gonna lightly dark in this area so effectively we've just met, extended out where it's turned, a border across the top on. I think that's looking very nice. And you can see I've got a bit of variance. This brick seems a little bit wider than this one, but that's actually adding to the effect of the house. That's not a problem at all. I mean, we could even have really thin bricks over there. So if you just maybe, you know, do even thin wise there like a little wine there, maybe have another little I'm here on another little line here. We can easily make this into Aiken on even a brick work if you want. And that could actually to the effects of the bricks so you could have like a double brick on 1 may be another double brick hair. I mean, if you want to do that, go ahead and do that. That's what I've done. It just adds a little bit more interest to the brickwork. So let's just do zoom back. Have a look at our national. It'll housing house See on. It's looking quite good, isn't it? So what we're gonna do next is the next point is to move on to this area on we're going to do our brick with. But for this area is going to be so much easier. We're not going to do no straight lines, which is gonna have a few guidelines. We're gonna draw in our nice, uneven bricks on. Hopefully, our house is getting closer to the completion stage.
65. Full Sketch - Side Stonework - Part 1: Okay, welcome back. So let's start with the detail brickwork on this side. I was going to do this first. I thought, You know what? Let's establish a nice little pattern over here, and then we may continue it on this top part off the chimney that we've done so before. We start doing the texture work here. Let's just add in a little kind of division line from this court. This point to this point is kind of effectively, like the crossover from the standard bricks that we have here that's going into, like this uneven texture of bricks going here, just adding a thin line about this much. So it's pretty much near enough touching that line and what that will effectively do it. It's like, well acted like a border between the two patterns. Now you'll notice if you ever have a look around in houses where you have different textured walls, you tend to get this little board airline so I just get a close up on there. So all I've done is I've just added a very thin line next to this line, so it's kind of dividing this wall in this wall is just effectively like a little border, an edge of a border to just kind of distinguish between the two patterns. So what we're gonna do now is let's look at the lines that are going towards the vanishing point, and that's maybe add in some kind of wines just for guidance for our brick layering that we're going to do, even though we're going to do a random style. So if you remember from the actual layering off the bricks, we did some examples, we're gonna do this one here where we've got some random kind of bricks laid together. Eso that's that's what we'll do. But what we'll do is we'll add in a couple of lines, going to the vanishing point. So get get your ruler on line. It's up again with the vanishing point on, then all I want you to do is keep it nice and straight on that horizon line and then just drop it down. Like so about two, probably about up to here. So if you see this little line that you have here from the edge of the ball, that little edge brick just from their drawer in your line nights and wives in between the windows, and that's about it. And then for the next promise, drop it down, maybe again, and have it probably up to here. So up to that next kind of brick line there, take your line all the way across like we have before, and then maybe adding another one slightly random. So maybe add it in between this brick here. So we've got this points here, so I'll just move this into the center. So we've got this kind of briquettes in that middle point. Just put your pencil that drawing your line because we're gonna have this effectively would have it on even. It's not gonna be symmetrical. It's gonna be nice, Andi. Kind of uneven to create that nice cottage, brick like pattern. So with the ones on the top, we've already got kind of a line here. We got a bit of a division and a gap. That's maybe add in a couple more here. So if you look at this window here, we've got counting down from here. We've got that one to maybe see on that 3rd 1 If you put your ruler at the end over there, measure, it's up against that vanishing point and drop in your line in between the windows like he did below on. Then maybe added another one on the line above. Just move your real Iraq on. Just create that little guideline for us. Toe start drawing in our curly bricks rights. Okay, so again, we need a night sharp pencil after sharp in mind. But it's gone blowing pretty quickly, because again, I'm using a soft core amusing A to B. But hopefully, if you're using a HB, you shouldn't have to sharpen. That's often on. If you're using a mechanical pencil, that's even better. So I'm gonna do is I'm gonna get my piece of paper on. I'm going to use that to cover up the artwork that we've already don't to avoid any smudgy , small Jake. Now let's start building in some pattern
66. Full Sketch - Side Stonework - Part 2: So I'm gonna do this, starting from this edge over here and then working my way in on every row. So let's start off with the born at the bottom room. Gonna leave this as it is because this is the border that we've got will do a different, slight different texture on that towards the end if we need to. But what we'll do is we'll start on this level. So with this one, I'm just gonna do some curly bricks like this round shapes another small one there. Follow this pattern if you want. If you don't want to follow this pattern that I am doing, just create your own. It's just adding in the rand. Random pebble, stale bricks, just the kind of cover. It's up very the shapes if you want to. If you want to keep them all the same, you can. That's fine. I like to vary them in my attentive artwork. It gives a nice interest to the overall composition, makes it look a little bit more interesting. Eso like this and just doing this circular Brit type things that will pebbles. They're all squashed together on again as we're getting further along the tend to get a little bit more smaller, but again, who are in perspective with the perspective point. So if we just use the guide to kind of create them little round bricks, a little round stones and pebbles, it should be looking good. So that's my 1st 1 done. That's my first. Roldan is gonna be one of the one above. So we've got a thin one here. Maybe do some more round ones. Maybe do some really tiny, tiny circular ones. Why not say, Let me just get a zoom in so you can see this a bit better again. You don't need to follow this exactly as I'm doing. Just create your own patterns. They're just circles. Make them square in some areas if you want. Just have half bricks in one area is just to fill up this space that we have to again curly lines moving onto this area here. So I'm just gonna do this shape down here. Another one like it, piling these bricks right tightly packing them up against one another to create that kind of texture on. Just going to continue doing this onto this one. Gonna do this fairly quickly. You don't need to think too much about it. Just ensure that you complete the shape of each brick We'll circle that you're doing that way, you know it look more realistic and complete your local on nice F Andi again moving onto this area. Maybe have some big ones here growing this way. Add a little bit of variance to it. Don't want the mortal the same. You have everything looking the same. Then it just looks robotic doesn't after I keep saying what means saying throughout this class, let's keep it nice and natural on sometimes natural is much better than uniforms. So let's just carry on on again. Nice big one appear. Maybe another big one. There may be a huge one down here dropping down here. Circular one here, maybe a couple of little pebbles in the gaps in between. There we go. See how easy that is. All we're doing is we're just doing these random circular Brickey type shapes circles kind of rounded rectangles around it. Triangles. That's all it is. Always even is filling in them spaces with these kind of stony patterns. And I think this is gonna really nice once it's done. Well, hopefully a look very nice once, just because you just don't know when you see when you start something, you have an idea. You just keep going with it, you know, and how it's gonna turn out. But hopefully they should turn out good. This is what you usually do in a lot of my designs. Onda tends to turn out pretty well for a couple of small circles here. Just don't go over this little edge border that we've added in. What we'll do is we'll shave that in that towards the end, we'll leave it on shaded depending on how we decided to add in our shadows on highlights. So again, going in with that sharp pencil making sure that we're pencil is nice and sharp, maybe sold long ones coming across here, dividing them up with small pebbles going across the top. And that's looking great so that only if you have these type of houses where you live, depending on the part of the world that you live in. But I just I'm absolutely in love with this type of brickwork. I love it. I think it just looks so good, especially when you're working in color and in real life, a lot of times these bricks there aled different, varying in color on textures, and it just looks absolutely amazing. It just looks like that be naturally placed together on a lot of times. This just random machinery that's used to pack the stones. Or sometimes they're actually doing by hand, like we're doing it in real life. They don't buy home that packed together by hand on its I think it's just absolutely great . Now, again, just going around, creating these nice little shapes. Andi. It's looking quite nice. We want it to look quite different to the pattern that we did on the borders there, so we don't want it to like, you know, mash up or mix up with the pattern above. We want them to kind of look a little bit more distinct. Eso what one day now isn't gonna sharpen. Repent so you can see my pencil. Got a little bit one there. Got to ensure that you sharpen your pencil, especially when you're doing detail work. I've said this before. Otherwise, your detail work is slowly, slowly gonna fade away into a blurry, blurry kind of base eso just keep it nice and sharp on again. We're not pressing too hard on this. I'm just going in over here, going in so you know that my pencils are sharp, but you can see much more. Chris Pine's on that. That's what it's really about, keeping them lines and nice and crisp spring lanes of the camera. Andi, continuing as we were doing before, this is all I want you to do. Just filling these areas on. Make this into a nice, textured, more nice one there in between them once and maybe have some long ones coming in here. Circular warms whatever you like. So finish with nearly done on this one now. So let's just have a look. And I promise you want to do all this once you fill it all in on, then when you look back, it really will transform your illustration and you'll be like, Wow, that looks pretty good. Sure it will. So just carry on on. Let's do this last kind of area here, maybe a big one down there, maybe to a couple of small little circles here. Fill that gap up and another one there go across this little section here and then just a few lines on this one at the end. We don't, so I have a look. Wow, look at that. Say, let's get a zoom out. No, zoom in. Nice amount on there. Wow, Look at that. You see already? We've got a nice bit of texture going on there. It's completely enhance the look of the house on a very good, happy days. So what we're gonna do now is we're gonna think about what texture we're gonna use in this area. We could continue this texture in this area down here, or we could possibly do more brickwork like we did here, where we had a brickwork, and then we have, like, split bricks in between each brick. I think what I'm gonna do is I'm gonna end up giving the texture work. I like this texture. I have a kind of uniforms, and it looked quite nice. So what we're gonna do now is let's move on to that one
67. Full Sketch - Side Stonework - Part 3: Okay, Okay, let's move on to this. So what we're gonna do is exactly what we did before. We're going to draw in some random lines to our perspective, point to give us the guides for our texture work. You don't have to do random lines. You can actually just random. We do that textures. That's fine. But sometimes what I find is, if you randomly start feeling things in, you sometimes get a bit lost in one area, and one area just tends to look the same. Whereas if you have these old guidelines that we're putting in like we put in here before, you can vary it nicely. It looks quite nice where you can kind of see where you go in, make the brakes a little bit bigger or smaller. I think that's quite a good way of doing it. So let's do that. So from this point here, let me just get a zoom Zoom that's gets a nice, easy museum in here. So from this point, he f so from the edge of that brick, let's just bring it down. But before we do that, let's just added a little borderline here so we can establish a lights kind of like a separation between the two. So just again, like we did on this, just keep it to similar kind of size that we did that one with the sharp pencil. Just take the lines parallel to that line at that border nicely, the border edge added there. Now we can start adding our lines self. Let's get to the edge off this edge of that one. Get your ruler to that perspective point. Let me just show you. I don't want you to think that I always know using the perspective point what I am. There you go. I've proved it. So there's that perspective point. So keep your perspective point at that same level on just drop in your line like nice light line doesn't have to be too dark. Let's drop our ruler down, keeping that perspective point and maybe put one here. So I'm just putting one here towards this edge down there. You don't have to worry, toe. You know, you don't worry if this is not exactly the same distance or high compared to mine, yours might be like slightly down here makes no difference. It's just These are just guides to help you create that texture. So for the next one, I'm gonna maybe do one at this point. So from this point, just draw that line in keeping it nicely level to that perspective, and then maybe do another one at that point there. So that's edge another one there and then maybe just have one here. So we have a nice little range of lines that we can use as I would guys. So again, as before or we're gonna do is let's just see if we can get more of a zoom in on the camp, start from this bottom corner and start adding in that texture. So I'm just going to do some little circles here, maybe do a bigger one there on just continue that same process. Nice and easy, keeping it really, really random on. I think this is really nice. Now. I did want to initially put a little element here, maybe like a little cabin window, or, like, you know, like an attic touch style window. But I thought, You know what? Let's not overcomplicate. It's already quite a complicated structure in terms of, you know, technicality of having to measure things out, I thought, Let's just have a bit of fun here with these nice, random around circle lines for the bridge. So again, just doing a couple of Brits across on some small little circular pebbles style breaks. Finishing that area rough looking good now continued on the one on top. I just feel that this is quite a relaxing process. You know what? You're just drawing in these lines in a nice illustration. I mean, it's great. It's great to relax. And again, if you can relax when you're doing your work and not over think things do much, then you know it's happy days. You have accomplished a nice little art therapy session and haven't yet as they relax with some art. Everybody okay, let's continue to bring that one there. Bring this one across. Now again, if you want to follow this pattern, I keep saying this again. Just go ahead and fall away It if you want to, you know, forward or fast forward it off till I finished. And you know you can go ahead and do that and do your own patterns. Just get this done and complete. However you like on and then we're all kind of effectively on the same page. But if you want to follow, May on do this exact pattern for this one, then absolutely go ahead. So little circles going across Andi over here. Now, if you're gonna if you decide that you want to go ahead and actually color this illustration in that you're doing that, you know, go ahead and do that, boy, Just remember that we're using a graphite pencil, so graphite pencil reacts differently with colors. So if you were, you know, if you're using colored pencils, felt tips than just be a bit, you know, aware of how they react with Graf I not always a good idea to color in a detailed graphite , you know, illustration with colored pencils or felt tips. In my opinion, I think for that you really need to have an outline. But if you want to outline all this work once it's done in ink, then you know that's entirely up to you. I would do that if you want. So there we go. So all I've done is my random little around pebbly, stony wall kind of pattern. Let's just get that zoom back on. Let's have a look at this as a whole. Yes, we'll cut back. So we've got a beautiful little structure there with some nice detail work on. I think we're ready now to maybe add in some of these roof tile ings that we did on our previous video. So let's move on so that one.
68. Full Sketch - Roof Tiles - Part 1: Okay, Dokey. Let's start doing some detail work on our roof. Now, if you remember, quickly went through some just some examples of roof tiling. So we have, like, this curvy tail. We have this square, symmetrical tail. We have, like, this texture tales here and kind of like this bamboo shoots, tail tails. So what I'm gonna do is I've decided that I'm going to go for probably this one over here. I think this will give a nice look to our kind of overall composition. So let's go for these rounded tales here. Now, you can use any tales for your class project that you want, but for this one, I'd like it to practice this round one just to give you a bit of practice on it. And now what we need is we need a long ruler, if that's what you're using, cause that's what I'm using on you've guessed it. We're gonna add in our perspective, wines that are going to our point now, these ones we should try keeping these as equal as we can. In order to do that, we'll have to do some measurements. So, in a measure with my small a ruler. I'm gonna measure the area on this corner over here and decide how how long I actually want each tile to be. So let's just get a zoom in over that looking good, right? So let's just measure this. So from the top part over here, all the way to the edge, it's approximately 6.2 centimeters. I've got around about six points between 6.1 and two. You guys might have something different. You might have 5.5 for 6.5. Whatever it is, just make sure that when you start putting these in there kind of as equal in terms of length as you could possibly make them. So what I'm gonna do is I've decided that I'm gonna have these as probably half a centimetre or maybe once and let's go with one sentiments. Let's have nice and big tails on the top because all our brickwork came like, you know, this pebble work here is very small entirely. Let's have the tales a little bit big. Then we can have some nice shadow effects of them. So from this point on the top, line it up nicely on just drag your ruler this way slightly so that I will marks Don't kind of go on this area here. So we've got one centimeter there, too. Three for and then six with that last one. I'm gonna leave that last one out, so I'm not gonna bother putting. That's just a couple of points above centimeter, but batter nomination. So let's just turn this around now get that zoom back so you can see one doing so all these points that we did So every single one of these points that we did? Yep. You guessed, right. We're gonna do a line to our vanishing point perspective line. So little point there. Get my ruler, measure it up against the vanishing point on. Just drop that line all the way into You want your life to go from here on. There's not much room there to put it ends. We just leave it at that. Get your ruler down to that next point ensuring that would stick to this vanishing point really important that we maintained the perspective of this. So it will look right. So mines going around about that. Drop that second line in effectively. That will be the second row off the tales and then this little area here, past the chimney. On the end, make sure you close it off that drop. It's a drop, its again to the next point, which is well there for May. Andi. Let's just add in that third line very good up to there and then again stand it to the back . And now for the fourth line, there's a point there, so round about that. Let's just make sure we don't get a wobble on our Rouleau. Don't want a wobbly ruler doing. No, we don't. Right? So just a straight one going all the way across from one edge to the other. And then I think my final one is this and then just measure lining that up to my perspective. Wine. Getting it right down on. There we go. So here are my horizontal lines that are going are cutting across the roof to effectively make room for the tales. So let's get the ruler out of the way. Won't be needing that now. Now, add in these curvy tales, you can try making it as you know, accurate as you want. You can have them exactly the same width. But I'm not gonna bother doing that because, you know, we've already being very technical with everything else. Let's keep things nice and loose. But to help this, what we can do is we can add in some more lines to give us a bit more of a guy. So if what we do here is, just get our ruler, line it up against this area and now just against the edge and just drag back about up to there and they will light line going across effectively. What we're doing is we're just doing a like guideline that's roughly about the same width. So about there, maybe the 2nd 1 Alternatively, what you can do with you can measure over here. So if you want to make these exactly the same, actually, let's go ahead and do that. Let's let's make these exactly the same just to keep things nice and uniforms. So my length from this area to this is five centimeters. So whatever you learn things from here to here, just you markings on there. So let's say we want one centimeters across. So we got one there, one there, one there on one that. So let's put them lines and again. So I'm gonna do is I'm just gonna lightly arrays out those lines that putting before you always make you know decisions while you're going along again sometimes. And you point something perfectly, it never happens. Evolve. You always kind of got to see how things evolve and emerge with your illustration, and then you can make these decisions as you go along on again. That's the advantage of graphite. You can just roll it out. So now let's just use these as our guides. So I'm gonna put my rule there against get that page on the camera properly. Actually, do better zoom back to conceive. That's angles. God. Yep. So put that there. You rula take it all the way to that point there. So we've got the approximate area. Don't press too hard now when we're drawing these lines because we're gonna effectively just cover these up and then again drag it back up to that point there. Just ensure that the ruler is lined up with this. I mean, you can measure one centimeter across on the top, but I'm not gonna bother doing that because we really got this chimney that's blocking everything. So we don't need to be that precise with these on again. Drag it back to that next point that you did. Make sure it's reasonably level with your lying here on the too many lines that Putin of light line and again with the foot of final want over here minds kind of going straight to the corner of the chimney, which is nice and convenience, isn't it, So? Well, there we go. So we've got ourselves a nice little grid pattern. So now for these curvy tales, you can either have them lined up exactly uniforms right underneath each other, or you can have them alternating. So let me just quickly show you an example of what I mean. So you may have, For example, we've got our lines here form to three, and there's that corner for our roof. And then these are our like guidelines that we've just done. I'm just doing this rough for the 1st 1 You may have a nice Kirby tail like this 2nd 1 Nice , curvy tail like this. And it's just to get there, doing the line down curve here, curve here. Things don't have to be exactly the same. The more candid Look, if you have a nice little bit of variance in between them that look a bit more natural. So again, this is what we're gonna do curvy over here and then the next row you can I have the next curvy going across the this way or you can have it just coming right underneath. So if you want one going right underneath, you can do that. Or if you want one kind of effectively going across, I'll just show you. If you want one going across, you can do that. So what I'm gonna do is I'm gonna probably do ones that are going across each other to kind of create that alternating pattern. I prefer Teoh. I think it looks a lot better when you have an alternating pattern and all we're doing is using the middle points of these roughly using the middle points to create them lines. And we've just got to make sure that the lines are going up lined up with the lines from our guides that we've drawn in. So again, you just continue it across. And if you don't end up going in the middle. It doesn't matter. You can be slightly offset. It's fine. You don't need to be to exact and that's what we're going to do. So I think that's what we'll do for the tails on our illustrations. So let's start off with this, so let me get a zoom in.
69. Full Sketch - Roof Tiles - Part 2: So for my first tile, I'm going to start off with my pencil on this side, drawing a line. Just a little curve over here. Draw that curve back up over there. And that's the 1st 1 Dog. 2nd 1 again. Draw the line down. Curve it. Tin used the guideline. Curve it right back up on that number Two down on the three. Next tail going across. And this town's gonna be cutting across the actual chimneys. We don't need to curve up. We're just doing one side where there's a curve. Now for the second row, we're gonna use this little point here on this little point that we just use as a guide. Nice line coming down. You can see I'm doing it to the same angle as the these two lines to ensure that you've got a nice parallel line as you come close to the edge curve. It's off. Bring it up here. Same again. Let's finish this one off here. So this is just going to be half a curve, half a curve there. They can see my pencils to beast. It's quite these lines getting quite sick, but that will work in my favorite, because what effectively that's doing is it's adding a shadow. And if you're using a hate re pencil when your lines a very thin, then you can have the shadow afterwards, and I'm going to do that anyway. So let's just carry on so again for this one, use this line here as the middle values that curve, curve this Bring it across. Bring that back up on. We're just going to continue doing this again so we can use this as our pattern. Here, Bring that line down, curve it, bring it talk. And again from this point, bring that line down, curve it on. Bring that line. Began on then. From here. Bring that line down and curve it. Lovely. So from this next line here, we've got a line coming from this midpoint. Bring it. See a curve. It's up. Take it to the top. And then from here come another line and it's half a tael there. And then from here, bring your line in. Okay, lets up. Get a nice full tail there. And now what you can do is you can just use the bottom part of this as the tales. You may have, like, an edge of a tale here. So just little curves going here in that same direction. Round killed taking it. Now, this one here, we're gonna have the tail coming across. We'll have a little curve coming here. It's OK. Going there. Don't need to worry about that one. Now we're on the second to last. So for this one, we're just using that guideline. A little curve down here. Just get the well right on the camera on. Bring that stop. Then again, with this one using the box that's created with our guidelines, it's OK that this one master talk of again bring it up that effectively the U shapes aren't They were just drawing little you shapes inside these boxes to give us a nice not trouble king. Curvy tail roof. So So get this to go. And then finally, the last one will be crisscross going across both of them. So there's that one than the other one is going to be that the next one starts from this midpoint on. It will touch this one here. Next one from that midpoint. Bring it down, curve. It's all follow that structure full of the guidelines. And finally, well, this one here, take it up there. Last one to the edge. There we go. So let's just do a zoom back. Lovely. Now you might think this looks a bit messy, but once we've done some shading on it and added some kind of shadows in between them, it's gonna look a lot better. So why would it be now is with my razor. I'm just gonna lightly raise out these lines that we don't have two million lines going on . Keep it nice and life so we can start adding in some shadows at the end. So there we have it. We've created our kind of textured house with complete different textures on the roof, on the tiles, on the side, balls on the front walls. The only thing we've got to do now is adding some details on these kind of like chimney shoots that we've got on. So let's do that next on then, but pretty much finished on the texture work on. We could start adding in shadows to really bring it out. So let's move on to that one
70. Full Sketch - Chimney Elements: Okay, Dokey, let's start there in some texture work. And some couple of couple more details on this and part off the chimney, right? That's a bit of resume. Nicely, I'm going on there. So it's truly what I'm gonna do is I'm gonna do is I'm gonna curve the top part of it just to add a bit of an element to it. Through on this corner, all I want you to do is do a little semi circle curve from that end to the other. And then again, from this end, just do a semi circle up to that. And then would you ruler or just freehand just joined these areas rarely, lightly and roughly. And you've got this likely all kind of top on the end of that little design there. So we're gonna do the same for this. A bit of a sharpened on the pencil on my pencil is pretty much running out. But I'm determined to do this entire and sketch with this one pencil. Look at the size of that now. Oh, it's it's hard. Let's continue. That's a problem with them that using soft cause like a to B, they do tend to wear down very quickly. So just ensure that you have your sheets of paper with you on so that you're not covering up your artwork and again from here or I'm going to do is do a little circular semi circle to join both them points off, and then we don't need to do anything with that. We just got this mind going across on. That's great. So with this one all a minute, Do is I'm gonna do some lines coming across like this freehand a minute of it. 12 maybe three, and then taking them same lines in that direction. One, two and three don't need to add in any more detail than that. So that's fine. And again from here, I'm just gonna add in, maybe warned to just following the kind of parallel lines above it, just adding a little bit of detail. And then across here I'm going to do exactly the same. Just added insult light lines going across on. Some of them are not taking it all the way across and just leaving them as they are just like that. So on some of them, I've got them halfway across some all the way across. It just has a nice little varies. So there we have it. We've done the detail work now pretty much on the entire house. Got nice bit of pattern work going nice bit of line. We're going now for the fun part. Now I did say the previous part was fun, but this part's gonna be even more fun because what we're gonna do now is added some shadows. So with shadows, I would suggest that you ensure that you've got, you know, a good point on your pencil, but not too much of a sharp point because we don't want the kind of edge of the pencil to be digging into the kind of detail work that covers it up. So the best way to do they say you sharpen your pencil, get your pencil so this out the way. Get like a flat object, for example, the end of your pencil sharpener and just give it a little tap flight. So give it a little tap. It will get rid of the sharpness on that point on. What that will do is it will give a nice kind of even texture when we're adding in the shadow. So let's start on that
71. Full Sketch - Shading & Details - Part 1: Okay, let's start on our shadow work. So I'm gonna imagine again. I'm gonna imagine the light source coming in from this side. So this side of the lifes will be kind of illuminating all these edges of this house, whichever it hits. And then this area, this entire area from the left should be in shadow. So, what minute there is with my pencil? I'm just going to start off with adding my shadows to my chimney area. Then I'm gonna add it to the roof elements than a little bit over here and then maybe a little bit over here, and then we're don't. So let's start off with the chimney. So, shadow coming in from there from the right top. Right inside. So with your pencil I want you to do is likely Just use a side of your pencil and just do a bit of shading on on this area Here. You can see him just dropping in some dark in this area and not pressing hard. After all, just add in a nice light little layer of shadow Not all the way to the end. Just on this edge here, maybe halfway, maybe from this point is like a cast shadow to this little kind of edge that's come in across these constructs. We've just got an eye shadow. Now, don't forget to get your piece of paper where you're leaning your hands because you don't want to smudge out them beautiful details that you did. There you go. Nice bitter shudder going on there. Lovely. So we've got a nice bit of dark on that side. Maybe. Let's add in some dark here. So we've got this area here just with the side of the pencil. You can see how I'm holding the pencil. I'm holding it like this. I'm not holding it like that because that will just put him pressure on hold. You pencil like this in between two of these fingers and then rest your all the fingers on this side, and then that way we're just using the slow movement to use that nice side part of the pencils. So again, nice little bit of shadow there, not all the way across, just over there. And then on this edge of this kind of construct that's coming out in just a nice bit of shadow down here. Just a little bit. And then on this one, no shadow going over here. Take it across the top and just dagano it down. And then maybe with this top kind of element, we can make this a little bit deficit just dark in that top element, keep your lines nice and straight and clean, and then maybe we conduct in this top elements effective. It's like a little cop on top of the on top of that construct. Just a bit more dark on this side. Beautiful. Now Well, I'm doing now is I'm just going to use my pencil to darken up these edges. Blow away that access Dark? No, this line here. Lovely. Okay, so, again, just with the side of the pencil now again, it's gonna add in a little bit more dark, because what happens is it's all about contrast. If you can add some nice, bitter contrast work to your illustration, it will really make it pop. So there we go. So now what we've got here is we've got this kind of chimney element on that will. Often it'll have, like a cast shadow going on top of the roof area. So if you imagine the light hitting it from the front here. This will add a shadow in this area. So what we can do is off this area of the roof. We can put this into a bit of shade. So just with the side pencil just dark in this area here, all the way to the edge, No pressing hard, it all you can see. It's adding a nice little blend of graphite to that kind of roof structure. So we've done that. Now, I think that's about enough. We don't need to do any more now on this side of the roof because the light is hitting its most like is gonna hit this area here. And so we're gonna have a slight shadow down Taser again. Add in a bit of shadow from this side decided pencil love way So you can say just the nice like it's a shadow on. Then just darken up this line back and forth, keep it nice and straight dark enough. This fine here the one that goes across and then finally dark. No, this line of the edge to keep it nice and crisp. You can do this with a ruler if you like. And now what I'm gonna do is I'm just gonna add in some dark on the pebble. It's like you can see where these pebble lines are, where we've got the kind of out of shells of them pebbles stark on them up with your pencil press a little bit harder. So it's like we're bringing out of details that's gonna give it really nice effect where we've got, like, that shadow cast shadow on that kind of direct shadow coming on it. We've got a nice, bitter tea. We don't need to do this for the whole thing again. All we're doing is just picking out some areas on just adding in so dark in between them pebbles just to kind of enhanced the illustration. There we go. Nice bit of enhancement. Randomly put. Put these darks around track keeping the doctor over here close to the top of the edges, where we've got that shadow and you can see it's added that nicely orbit of elements. So same for this area here. What we're gonna do is with tales that we put in just dark in the areas up on dark and the edges off them tales that we put in from this side and you can see now that these tiles started forming just on this side on the right hand side, just add a bit of dark on it, take it to the curve. So it just It just looks like there's, like, a thickness to the tales again from here. So from here, let's do this. And then what we're gonna do is going to do this for all the tales on the roof. So let's continue with. That's just adding a little bit of dark hair across the right inside, effectively adding the thickness off the tiles now, So again, over a nice and sick and then across this one here and then across this one and then across this just on the right, inside on a little bit. On this front area we go, I concede it looks like the tiles and nicely laid himself of each other. Now you can also do is with the tiles. If you feel that you you want to add a bit more, you can also add a pattern onto the tile. What We can do that right at the end to really you know, at the final finishing touches A bit of glitter, if you like a bit of glitter to your graphite pencil sketch. So all I'm doing here is again just adding in that dark, and you can see how it's making them tiles pop out. Just adding a little bit of a kind of shadow on the sickness. Off those tiles, there goes another one that then he has lost one down here at that nice, bitter dark. Very good. So we've got ourself. A nice because darks and shadows going on there. It's looking quite nice. So just with the side of my pencil now or I'm going to do is go over them tales again just to make sure that we have this area in the shadow parts. So what? To make sure that the shadow parts can be seen if you just follow where I'm calling these shadows, I mean, you might have your shadow slightly in different areas, depending on you know how your pencil is. You know, the amount of pressure you're putting on don't worry, doesn't have to be exact. Just try following the best you can all we want to do. So again. That's but a shadowy area here on this slant. Always doing is we're just doing shading. It's always in with a side of our pencil again. I'm gonna be doing a complete class on how to use graph I and, you know, be very creative Graphite as a dual count for that, you follow me on this channel on. You know, there's a lot of things that I'm going to be covering in that different tools to use. I'm not gonna be showcasing them on this a lesson, because this is purely just about drawing a house and all I'm doing carries I'm just going over them shutters again. This is just a process of layering graphite. So you can, you know, do this as many times as you want. The more time to do it, the better it will be. And I'm just gonna put a little line of the here to just duck and that's over Europe on. Let's have a look at this. If you look back and have a look and sit there we go looking good. So are we going to do now? Is we're gonna work on their next area off Shadow on for that. I'm gonna concentrate on this area. So let's move on to that one
72. Full Sketch - Shading & Details - Part 2: Okay, Welcome back. Let's start doing some shading work on this side of the house like we did on the roof on the edge of the chimney. So do a little quick zoom in on here, but right, So again, using the side of our pencil with very light pressure, let's add in some shading on this side. So again, what we're gonna do is we're not going in hard at all. We're just doing this really lightly so effectively. It's just adding in a bit of dark over that brick work that we've done. And we wanted to kind of go around the wooden frame off the window here, so we don't want you to go over there. You want it to kind of remain here on. What that will do is that I'll give a bit of contrast from dark to light, and it will kind of make that Wouldn't frame of the window stick out a little bit more, make it kind of, you know, be a bit more, uh, striking if you like. So, uh, you don't want to lose any details in the shading cause then it will be a waste of detail work and wants it. But sometimes what you have to do is you've got to ensure that, you know, to keep things realistic. It's always good. Teoh some shadows to them on Ordinaries understanding my paper to cover off my palm palm the edge of my hand, the palm of man what we're talking about. So I've already started doing 40 words. Alvin's that right? So let's continue. So again, all I'm doing is very likely with my pencil just going in on just using the circular motions to just add in the dark area. And then I'm gonna continue this over here all the way to the bottom part of the house, not going over this edge. We're gonna keep this border age empty. We may put a little texture in there. If it's necessary on again, you can't plan every single thing that you're going to do until you actually start drawing your house or, you know, it's really with anything. Really, because you don't know how things are going to turn out. You don't know what lines are marked. You make, um, that will determine, you know how you're gonna add shading or textures or further lines, and that's really, really kind of. You know, the form part of artisans that you just don't know where it's going to take you. You never You can have an idea of what you want to do. But once you start doing it, it just evolves. And more. Since you know, realization on Deacon do that in a complete, different way from what you planned. As long as you have some sort of idea, you can kind of have a bit of a guide. So what you're doing on the end result is always something nice toe back on. So again, on doing is doing a bit of dark. A. We don't want to do it over the top. We just want to keep, you know, a little bit of shade on this kind of pebble stony Peverley wall texture that we've got to just nice and light. You want to keep it the darkest over here on this side that's further away. And keep it lightest on here on dso again. Just going in with the pencil using the edge of the pencil side commune. Use that point for this, but if you the problem is again, if you use the point, you're going to really cover up them details On what? What it's kind of worth saying at this point is, why are you doing this? It may be worth just highlight, not highlighting, darkening the areas that you just going over just to make them stand out a little bit more to keep them nice. And Chris of surf all these edges. I'm just going over them while I'm doing my shading just to make sure that keep everything kind of in proportion in terms of the shadows so that we don't lose anything s Oh, there we go. Just a little bit off dark there where we had it before and it's looking great. So again, just circular motions going around here. And then what we're gonna do is we're getting kind of continuing to this area just underneath the window here, and they were gonna have some shadow here on this side because we've got this roof element coming across and over, and that's giving a effective cast a shadow on top part of the wall. So what we can do is we can even add that shadow in over here across the windows on the top but just very lightly with the pencil. Just take your pencil across the top. Just about up to there may be kind of the, you know, that the length of the actual border itself just make that come across here and that I'll give it a bit more of a realistic look like, you know, where a cast a shadow coming from the top. Andi, I think that's about it from this one. What we'll do is we'll just add another shadow here underneath this windows, effectively, the windows protruding out. It's coming out from the kind of, you know, that the fat part of the wall, so that itself will give a little bit of a shadow underneath. There on. I think that's about covered the shadow area. And now all we need to do is get our pencils sharpened up again. Andi. Then what we can do is like we did with the chimney. I just want to add in so nice, dark elements of just touching my edge of my pencil to make sure it doesn't snap off and then see if you can get more resume. And on this to show you some of the detail work that we don't too much. There we go. So again, from here in the darkest areas, what minute there is I'm just gonna go in and just kind of dark. Look, the edges off the pattern that we put in so you might not be able to see the pattern anymore because you've gone over it with your pencil. But that's no. That's not a problem, just adding effectively. Another layer off pattern just in the areas where the shadow is. You have to do it for the entire thing. Just leave a little bit of a gap, like have lasted gap here and then just continue. Add in them kind of contour lines going open down on what that does is it shows shows like an illusion that there's a you know, a texture beneath all this shadow. That's all I'm doing, K just going left and right in the circular lines, trying to follow them the best I can. And it just gives that night a random look. Eso you know, you don't have too much of a soft effect. You can see a bit of detail coming out from beneath that shadowy parts. So there we go. So again, you can do a little bit more off them detailed mines, dark lines here on the bottom corner. On that, about six. So with the dark lines, maybe do a few more over here just to kind of spread them out so that you have some detail . The areas scattered across this dark and, uh, was part of the wall. So again, just bit over here. Maybe a little bit more there, coming close to the windows on. That's about it. So I'm gonna leave that as it is, if you can see that. But I just get to zoom back on there. We've got itself a nice little shaded wall area and you can see it added so much depth to the illustration. It looks quite nice. Now I'm going to do next is I'm gonna look at these tiles again and with my pencil with a sharp pencil or I'm gonna do is drawing some lines that follow the kind of direction of the tiles. What that will do is that I'll add a bit more interest in kind of, you know, making a little bit nicer in terms of, you know, just leaving these tales blank as they are. So I'm gonna start from this top corner here and just, like, lead in my pencil. Just getting dropping these lines on the tails to add a little bit more of interest to just see that it's like a bit of a texture going across, going to do that across all the tales. Maybe at three or four lines in Andi. I think this would look quite Nash. So again, get that back inside camera. Dropping them lines just randomly. They don't need to be straight. That could be a little bit wonky. That's fine. Not too hard, just lightly just adding some lines. It looks like this kind of, you know, the fibers off the tiles are coming down on DI. Think that adds a nice little additional effect to your drawing. So just do this. Just follow this. I don't have to have the same amount of lines on each one. Just fits as many as you can. Try keeping them, you know, unilateral track, even them as close together as you can. Don't need a rule for this at all. Don't need to bother with that. And again on the shaded one just do them on all of them so that it's nice and uniform and it looks lovely. So So he goes. All we're doing is we're just added dropped in these kind of wines. Following the direction of the roof on the tails just added a bit more element. And now what we can do is in between the tiles you can see. We've got these gaps here, where them curves meet one another. What we can do is with the side of our pencil, just lightly shade them in lightly shade, the men effectively just closing off any gaps that we have. And then that what that will do is that I'll answer the depth of the actual illustration itself again, as we did before. So again, over here we've got a little bit there, just lightly with a pencil. Just go over because it's effectively another shadow. So what you can do is add another shadow element, you know, beneath each curve. So, like I've got curve here, I'm just adding a little bit more of a shadow underneath that girl. I've got that with the curve here, so effectively, it's the tailed, putting a the layer of tales, adding a shadow on the layer beneath. So again here. Just a little shadow here in between there. Bring it across the front, over here, just underneath that dark and part of the tail and again underneath the dark and part of the tail. And over here, underneath that dark in part in between the where the curves meat continue that all the way across, all the way to the top of the drawing on. That's about it for that. So I think that's looking quite nice. Let's just get a zoom back on there.
73. Full Sketch - Shading & Details - Part 3: I think we're doing on the roof pass on. We're pretty much done on the wall, every road ahead. Now what we can do is we can start adding in Maybe some detail works on the actual windows . I mean, they don't all the detail with before, but just to like I said before, I make sure that we're not losing any of the detail. Why I want you to do is get your ruler on, just darken up these lines once again. So these lines here, this window line here just nicely darkened. That's up so that we have a nice edge, kind of coming out above all of that shadow work. And again take your rolling across dark and hope that wife, like I'm doing here, darken up the one at the bottom. There we go on and on. That one do exactly the same. You know that line on dark? Not this one that's going across, maybe pencil back and forth to get nice, dark, sharp line. And then finally, on this one here, that's darken up this line lining organized nicely with your edge on your ruler. Just take that off and then again, stocking up this line on what this will do is this will make these kind of Windows really pop out and will maintain all that detail work that we did before. So finally, there's only a couple more things I want to do on here. So let's just get a nice zoom in so you can see what I'm doing. Okay, so what we can do is and you don't have to do this, but I like to do this. The window elements just so that the frames, the inner frames come out of pop out a little bit more. We can just put a little bit of shading inside the kind of glass element off the windows just starting from this one here, just with my pencil really lightly making sure that it's not as dark as this kind of in a border that we did. Just keep it nice and light. Add a bit to shape that and again to the woman tough. Add a bit of shades of the one on top and continue that onto this glass area here and answer this one. What this will do is this will add further contrast to the window frame on the glass area on the border on what that will do is it will just give a more nicer look to the actual windows themselves. Who again? Over here. Make sure it's on the camera. Nice and light, keeping it very, very light. You're effectively we just filling in these boxes, these glass areas off the window, four little boxes filling him that filling them in. And then finally, this nice big one here, feeling that one end and then finally feeling this one in and what we can do now is we can add in our lines on our frames just to darken them up, as we did on the borders off the window. Make sure your pencil nice and sharp. For this, what you don't want to do is overlap, but your line across the detail with that you did so just a straight line down there straight line down here very nice and then do all the vertical lines first and then do all the horizontal ones. It's just easier less, you know, moving the paper around. And then there we go. Nice and duck there. And you can see I've gone over that area here. Sometimes your hand slips and you know you go over it. But not to worry, or we do for that is just make the borders of a little bit darker. The patterns go over that pattern. If that happens, instead of having to rub it out, just go over the patterns. If you kind of make a mistake or a few pencil slips on, what that will do is it will just cover up that every that you doing. So that's the thing about graphic. Really easy to cover up the errors on. There we go. So I'm going to do is do my lines going across and it's keep behind nice and steady to avoid going over the design part of the frame. And then on this one, nice and easy dark one that I got the last two here. Measure up your ruler. These are all going to the same vanishing points. We can keep the ruler of the same less that we g o on the one at the bottom just to finish itself Beautiful. Okay, so I'm happy with that. Let's just do a zoom back on. What you can do is when you have a look at your picture. You're drawing once you start it started working in on the details. You can look, stand back and have a look at it to make sure everything is in balance. Though they may be like areas that you think I need to shade shade this area a little bit more to get a bit more contrast going on. Go ahead and do that, if that's what you want to do. Well, I'm going to do is I'm just gonna kind of leave it at that for now. Andi, let's move on. Teoh this side off the chimney. So let's move on So that now.
74. Full Sketch - Shading & Details - Part 4: Okay, let's move on to this side of the chimney. So for this, because the light is hitting this area, we don't need to do too much shading here or we need to Kind of possibly do is just add, Ian, maybe some under kind of crevices where we've got these little crevices between the actual bricks themselves. We just need to add in maybe a little bit of shadow in between them. We're not doing a big shadow all the way across. So what I mean by that is just we decided you rula. So he really has no idea. Pencil just lightly adding a shadow line there so effectively, we're just adding shadow lines going across the horizontal lines that we placed in so that just effectively, it just adds a little bit more definite on this top area here and make this a little cast a shadow. Drop this shadow slightly up to this point down here. So there's a bit of a cat's shadow coming in from that, um on, that's all. Give that quite a nice look. So again, over here just a little bit more down here and just, like, very, very likely we're not doing deep shadows or anything like that, that what that's doing is that just added a little bit more depth. So again, just ensure that you keep things nice and equal. So whatever kind of the depth of your shadow on this area, just keep it the same And then it'll look rather nice on if you want. You can even add in some shadows on these areas here the kind of medical lines that you know separate that bricks eso, you know, just make it look a little bit more interesting on over here. We don't need to add in anything here just maybe lightly with your pencil. Just add in a little bit of shading just in these areas, because effectively there's gonna be another shadow coming from here to here. And then over here it's just gonna be hit with lights. So maybe just lightly at in some shadows on these kind of lines that going across very, very lightly, I don't need to press down hard. It'll There you go. I don't need anything on this edge. That's kind of ledge area off the chimney. We make we put this one in a little bit of shadow. Maybe just adding a little bit more, But that's about it. I think we're doing with the chimney aspect. Now let's move on to the actual from part of the house. So let's have some fun with this. It was Zoom back on, have a look. Stand back. Have a look at the overall kind of construct of the house, the composition, and now decide where those shadow elements are gonna go. So what we can do is we can start from maybe this area here and work our way down. It's entirely up to you how you want to work. You could work from here on work your way off. I'm gonna work my way down so I don't have to keep covering off the artwork and effectively smudging it. That's a problem with Graf I It's very easily smudged, and you can lose your details and have to go back in and do your details again. So with this brickwork, what I'm gonna do is I'm gonna start off with the brickwork, attend my page like this on like we did here with the bricks. I just put a bit of shadow in between the bricks I'm going to do the same for this and again. We don't need a super sharp pencil to do this. My friends is getting blocked now, but it's fine. I'm gonna use the side of the pencil and then just with a firm grip on the pencil is lightly, added Lee over a shadow on today's. The horizontal lines are going across in between the bricks. It just like this, just adding a little bit of shadows. It's very, very little, very subtle shadow and just adding a little bit of subtle nous in terms of actual details. It really uplifts the overall look of your drawing, so just little little shadow can see. I'll get a bit more zoom in so you can see how these shutters are actually being puts on. There we go. So again, all I'm doing is just adding a little really, really like each other. We want to maintain the whites of these bricks because it's being hit by life, so I don't want to lose the white of the bricks. So it just do this carry on here, adding in the shadows on these areas about easy to just do it like this brick by brick and then maybe do this middle section. We're just doing it on the horizontal lines for now. We'll do it on some of the vertical ones if it's necessary. So again, on these left areas here, everywhere, reliably with your pencil. Just gonna do this. And that's a huge advantage of using pencil graphite, because you can just vary the shadow. Very the lines of the darkness of your lines and the values using the same pencil with just different pressure. It's very difficult today that using a fine line is with fine line is if you doing this type of work, you've got to have a good range of fine liners from, you know, very thin wants to really thick ones on. That's how you vary your marks with just thin and thick with founds in pens or depends. You can vary your kind of lines with just the kind of you know the pendant nape kind of your techniques that you use on a covered pen and neighbor and fine line is a lot of my other classes to do. Check platter. Is that something that you're interested in? So it's all good. I mean, You can draw houses with whatever materials you want, but usually it's always good to start off with a pencil sketch so that you can work towards , you know, getting your angles right. Getting your perspective right. Your lines right on once you've gone to drawing is right from the start. Then you know you can effectively color it in or shaded 10 or as that, you know, shading element. Teoh. You know, whatever kind of pencil sketch that you want, but the pencil sketch should be correct from the start. Otherwise, it's not gonna look right. So let's just get back to see how that looks. Yep, looking very good. So what we're gonna do is when we don't need to add any shadow to the vertical lines because we've got enough going on there. We don't want to lose any of the details. So I'm going to do now is ongoing. Added a bit more of a cast shadow on this corner. Tilt your paper around if it makes you feel comfortable adding, you know, straight lines is getting resuming their let's just have a bit more off a cash out of s. So with my hands off again Just going in, going in, going it up to this point of the edge of this circular window. Let's just carry on at our nice little shadow underneath that turn it around, You can see that makes such a huge difference. So what we gonna do now is start looking at some of the shadow work underneath the frames of the windows. So with this, I'm just going to use my pencil again and just add in very, very light shadow here, just underneath the window following the shape of the window because the lights coming in this way, the shadows, we're gonna effectively be on the left hunt side. So just they're very, very subtle and lights a little bit of shadow on there. And then on this window edge here, bits of a shadow here it's effectively. Were the dark areas of the window frames us of these darker areas that we put in. We just got a bit of a shadow going on the actual wall itself. A little bit of a cast shadow on the wall. Just very, very subtle. Not not too harsh, Not too dark, very sort. Also, we get across here and then turning the page using the side of the pencil doesn't have to be see even or anything like that, many of it, even if it was a little bit wonky. It doesn't matter, because that's how natural light behaves. It doesn't always be perfect. It's always like, you know, that things are never perfect in my really so you know, there's no point trying to make everything perfect. Let's just go with what we have on enjoy the journey in achieving what we're trying to achieve. So there we go on finally now doing all the window areas. Let's just do the same to the door. So bit of a cast shadow here on that door area with the light coming in from the top and then just a little bit down here, where the dark carrier was for the door, adding in beautiful shade and given it, giving it a little blow. Get rid of the residue on what we can do. Is this steps from here? These will have a slight shadow coming on to this border areas that maybe just added a little bit of a shadow here on Let's darken off the edge of the steps. So with the pencil just go in darkened off the edge of the steps on, that's looking good. So what we can do now is we can just adding some render lines across here that the steps very nice and stuffed just a bit more interest to the role looking structure. A little bit of these long lines going across nice and once keep pencil born for this. Don't we need super details here amended Darken up these ng's I'm going to the top. Welcome nicely. Let's keep the top part nice and bright because of sons effectively while the light sources hitting that so we can keep these nights of my life. And what we can do is I didn't a bit more of a cast shadow here from the frame of the door . So just again with side of pencil, just bring it in a little bit and bring it in from its off. We're here. Okay, that's a looking very good
75. Full Sketch - Shading & Details - Part 5: So let's just do a zoom back and we're pretty much nearly done on this now. What we've got to do is just adding some few details again from from the actual window aspect. Let's just lightly shade in these glass. Put glass areas off the windows on. That's all we're gonna do here, since I to shape them in ensuring we keep it nice and clean. Them window frames are inside nicely lightly. Just shape it in again for this one here at Nice and light. Keep it nice and soft, real soft shading on. What we can do is we can go in with our ruler and dark enough them edges of the frames to make the windows really pop out on again over here. Nice and light side of the pencil. Not pressing Idot's at all. Just effectively fill it up and then we've got that lovely shade. Lovely texture, pencil texture. Come again. Same over here on this final window here at the bottom. Just nice and light on again on this one. This one on this one. Keep it very loose and very life, so we've done that. Everything's nicely shaded now. Let's just sharpen a pencil a little bit because God available on Siebel Auntie pencil. So sharpen the pencil. Dab it on the end. Shake off any residue from your paper. Now, let's go in on start drawing the sharper lines. I'll get a little bit of a zoom in on here so you can see a bit better. So it's just drawing these nice dark lines. Here we go. Beautiful. Nice dark line. They're turning the page. Now. Remember what I said. Keep your sheets of paper on top of the artworks. You don't smudge it and always see the artwork above the line that you're making so that you don't go over it. So why they organized a there Nice and smooth across. Could do the same thing. This one. Do that up to that point there. Not one of to that point there. While we've got the page turned around, let's just continue here. So nice line going across there. Nice. Like continuing across here on. That's looking very nice of across here on the top. We've got our ruler nicely lined up in. Sure you've got your ruler nicely lined up. We don't want toe mess up our beautifully constructed designs because we haven't lined our ruler properly. So where we go on then, what we can do is with our ruler. Just go into this area here and mind it's open nicely. Nice straight line, like so no straight line like so over here you'll notice I'm not going all the way across, because that way we don't want to make one kind of frame part. Stick out more than another. We keep it nice and uniforms going across here, lights up, insurance lined up to the line that you've drawn beautiful and dark there and again, nice and dark on here. Lovely. So what we can also do now is on these curve areas that's just darken up. These are wines here. We don't have to darken the curve unless it's completely, you know, Blow himself in mind is getting a little bit like so. What I'll do is I'm gonna slightly darkened that curved air Europe. There we go. And then again on this side, that's just darken off this life. But we need to turn our page. We don't want to be darkening a line that we can't see so again turning our page on the exterior. Let's just bring that curve in on page again. Just bring the curving from here dark. That So I'm going to do that now. Thought this one here lost lots of paper turning, isn't it? So what is it does make a huge difference. If you do so, any paper it will avoid you making mistakes on. Then you don't have to raise anything out and do it all over again. So again, with my pencil just darkening that line Theater line returning shoots again, going in here, darkening this line. Darkening this line as well on just with the pencil is following that shape to darken it up back and forth. Doctor, this area that windows don't. And finally, let's just quickly do this one turn. It thinks way I said, Doc. Maybe nice and death there. Left on on this area. Nice and dark. Nice and duck over. Yeah. Then pay from this site. It don't do it. A smudgy, smudgy. So nice little curve was that day the curve in on the inner part as well to make sure that's nice. And uniforms on over here on the outside and she knew that. Okay, Okay, we're done. So let's just get a little zoom back on there. But before we do that, let's just quickly dark notes these lines off the door. Before we do that, we'll get these lines all naturally dark And okay, so there we go. Get that one. Don't Let's get this final one door that maybe get these dad lines doing as well. I know I'm not turning it around so I can see the line on top because my real reckoned see through the ruler there. I'm not sure what you really you're gonna be using. You might have a completely opaque ruler or, you know, a nice, transparent one like Mabel. It sometimes helps because you can see the drawing underneath, so you kind of know where your line is. Ah, now, finally, let's just do our darker lines for our steps. So let's just look at the steps this way. Darkened days up like so, and the woman topped out of that one from this one. Dr that one up, and then it starts in that base. How come there is just duck and the Dag? No one's just ensure that your ruler is lined up? It's very important to ensure that your ruler is lined up to the line that you drew because the wind that you drew waas bang gone from in terms of perspective and you don't want to be changed into perspective. Otherwise it won't look arise. So again, just docking lies or me to dark enough lines that you've already got. And now what we do is just adding some little teeny weeny details on these kind of borders on do some final finishing kind of overhaul, darkening off some areas. And then we're pretty much done on this one, so let's move on to that.
76. Full Sketch - Shading & Details - Part 6: Okay, so let's just add in. Some kind of details may be onto this border here, So just lightly with my pencil. I'm just going to draw some random wines, curving, coming in and giving out just to add a little bit of texture to that border, not to leave it completely black and again from here, just randomly. Just do a line freehand if it's wonky, it's pretty good, because that's how texture usually is. What grade did nicely thought. Wood, grain, texture there. Another again, Just add in a little bit more on. And that's about itself. For this border here, I'm going to do pretty much the same, just adding some wood textures just from curvy lines round curvy lines, just to add a bit more of interest to it. Swirly really rhymes curvy lines. However you like conduce straight lines if you want to turn it around so it can see the lines that I'm making and again so or we do in here is just adding in these lines. Curvy, curvy, wavy lines just like so and then on this edge following them. Curvy, wavy lines really like not doing it to you are very nice and light on with yourself. Last thing to do now is just to darken up them like we were doing before. So get your ruler flying atop against the edge off your roof. Do a nice line. Nice dark line down. And then from the talk again. Nice. Dark line down. Follow that across the edge. So we've got the paper here. All these are following that perspective line to the vanishing point. The one on the top there, Andi, just daft enough. That edge dropped line that we've got there. Maybe add in a couple more details that really little bit darker here. Just add in some winds going across because this area is gonna be darker on the one that the light is hitting on. Just finish. It's off by deafening these ones. So once you've got this kind of division of darker lines to shadow toe, you know, like the texture, it looks really, really nice. It really gives it that affect that the, you know, houses effectively, a three d house that's popping off your page. So you go so darkened up that line, it's gonna dark in this one year on maybe doctor in this area here on just duck and this kind of like under curve underneath here a little bit more, very good on the final lines to darken up these edge lines. So let's go ahead and do that. Let's get our ruler of scares new back so you can see the whole thing. So with my ruler just going appear is bored alive, taking it to the top, nice and dark, that next one to finish that off nice and dark. And then we've got this under border off the house, the base of the house. Take your own across nice and dark. Drop it down. Follow the exact line as it is. Keep it really steady. Duck. The edge of the house is effectively. We're just doing this out. Wind kind of outlines of Finish our house off. Nice little edge that on If there's any kind of lines that you feel that that really albeit soft, like this one here on the chimney just dark and that's all Just do that, reiterate that line again dark and it's up. And then that will solve the problem and everything else is looking fine. I just got this last final line to do here, so let's just do this one beautiful straight line that another beautiful straight line, they're okay now. There's only one window that we didn't dark in, which was a circular window. So let's go ahead and do that as well. Why not not just leave anything on darkened? Keep it nice and nice and equal on all areas. So let's just grab a hold of his roller. Just dropped me real in there. So put your paper underneath. If you're not gonna small George, your beautiful work. It's dark enough. That line on top over here. Andi, Duck in this line down here Now for the circle curly bits That's just lightly. Slowly follow that second line. Just you. Maybe you pencil back and forth, moving it back and forth. What that helps is it helps guide your kind of typical pencil so that your hand you know, you penciled it slipped forward. So again, keeping the paper covered back and forth. What that does is it darkness of shadow areas as well. Then again, follow the circle through all the way through a back and forth until the circle is complete on their looking good So when it is today, the outer circle maybe darken up the outer circle. I'm just gonna make sure my pencils sharp on my pencil is pretty much finished. So I think I might have Teoh get yourself another pencil. So I'm going to show you this pencil. But besides that pencil now way, it's smaller than the house. So let's just carry on. Let's carry on and do this at Circle Eso just lightly, slowly, gently just ducking off the edge of that so we don't have to have it precise again. It adds to that raw roar. Rustic natural look doesn't say when you have your line, that's not 100% you know, straight all the time. It just gives a nice effect. So it gets. All I'm doing is turning my tilting my page, ensuring that my hand is steady and I'm just going open. Flip truly just following that line, Follow the line nicely. Don't deviate from that line. Just stick to the actual line and curve itself. We just do in small little arcs. Now, if you haven't got a circular instrument and you haven't done a circular window here and you just don't square window. Then just go ahead and just darken up the lines of this square window. That's fine again. The only reason that in circular window was a bit of interest kind of show you different types of windows that we can put on a house or in one house. So that's about it then, folks. So we've completed our step by step construct illustration and drawing off our house. We've incorporated all the exercises that we did, where we looked at different kind of structures, roof styles on dimensions, windows, doors, chimneys, textures on. We've managed to put this all together in a nice little illustration, and now, hopefully you would have followed this step by step. If there were any areas that you found a little bit difficult to follow, just go back to them again on just try them out again. Leave some areas that if you think too complicated or you know this tune with details, you don't want to put too much detail in it. That's fine. I mean, if you want to go in and darkened areas a little bit Mawr, that's fine. Just dark, and maybe these lines free handed. You know it's entirely up to you. But the whole point of this was so that you kind of have a similar drawing to me that you've practiced with the exercises. And now, once this is all done, you are ready now to tackle your own class project. And that's what we're gonna talk about next.
77. Class Project: Okay, Welcome back. Now it's time for your class project. So hopefully by now you would have gone through all the exercises that we've done in the lessons we looked tat exercise one. It was just foundations and roofs sizes. You would have done the perspective. Exercise is looking at the different left and right perspective points and committed with some different variants. Ease off windows and placing windows looking at how to houses look like next to each other on exercise three. Then we looked at window designs different various with window desires. Hopefully you would have had a good practice on them and come up with some ideas of your own on. Then we looked at some door designs and basic designs of doors. Again, you would have hopefully taking part in this and come up its of nice ideas on Finally then we looked at chimneys as our kind of final element for our house on how to place them on the house and the Frantz in the center or at the back on. Then we looked at some texture work, brickwork, panel work, stonework, hopefully would have had a national practice. Doing these on finally looked at the roofs, textures and styles of roofs and tiling on. Then we continued with our beautiful sketch, and hopefully you would have had a nice sketch, Dawn, looking similar, like the one that I have got on. Now you're completely equipped with and you've warmed up to this class project that you're about to do so for this class projects. What I want you to do is hopefully design your own house and incorporate all these things that we worked through in the class exercises on in this complete sketch, try varying. It's a little bit. Maybe have your door on this side or even have a door on here. Try it out. Experiment on. Remember, with York actual class, exercise your class project. You don't just have to have one complete peace. You can maybe trail a couple of drawings before show what the drawings look like before and the sirens outside. Who? Something dangerous going on that Anyway, sirens got now. So yes, there's just continuing. Just continue with the exercises. Go back to the exercises, have a look at the window designs, come up with some chimney ideas or if you just want to produce another version off this illustration. Go ahead and do that. Maybe change around style of the roof. Or maybe have two chimneys on each side. Maybe have no doors at the front and just two doors here. Just try it out. Practice complete there. Do a little shading work with your pencil, and if you want to color it same, go ahead and color. It's in. That's entirely up to you. But hopefully you're at a stage now where you are comfortable with some of the key elements off drawing a basic house using a pencil on. Hopefully you'll get this complete on upload it onto the class project section for us. Also, have a look at that. I can't wait to see some of your beautiful outwork, so hopefully I'll see you on that part of the lesson on. Then let's kind of finalize this class with some final thoughts
78. Final Thoughts: okay, Just some final thoughts on the class. Hopefully, you would have picked up some nice skills And this step by step structured class I really enjoy doing the class. How you enjoyed actually taking part in the class on. And I'm really looking forward to seeing your class project. Please post them on the channel on follow May on skill shaft for more updated classes that are gonna be coming in the future over the next couple of months have also released a complete fantastical coloring book. Syriza do Check that out. I leave links in the class description on on my channel description on skill share On. Also, follow me on this channels that you'll be updated with all my legs. Classes. Thank you so much for your time. Thank you for participating. And hopefully I'll see you on the next one. So take care of yourself. Keep sketching on base
 Imran Mughal, Graphic Designer & Illustrator