Transcripts
1. Class Trailer: Does the sight of an empty page
fill you with anxiety and existential dread? SAME! [MUSIC]
Let's beat this together. Hey, I'm Vera. I'm an illustrator and
animator from Germany. I love sketching. I used to keep a
daily sketchbook before I started freelancing in 2019 and had to work too much and I couldn't
keep sketching anymore. Today, sketching for
me is to unwind, relax and find new inspiration. But often, I'm opening a
new page or canvas hyped to start something new
and then I freeze. The blank page just
gives me anxiety and creates pressure…
and we don't want that! Because I know how intimidating
a fresh new canvas can be, I've collected a
bunch of techniques that you can use
to start drawing. These are going to be fun
little exercises that you can tag along with and
share the results with us. Maybe we can inspire each
other with our sketches and discover together new
ways of breaking the spell. This class is for artists of all experience levels
because it can hit us all. As long as you like drawing
you can learn something new and gain new tools
to beat the blank page. By the end of this class, you will have gained
new confidence to start sketching and tackle
a blank page. Now, without further ado
let me get you started with an overview of the
class project [MUSIC]
2. Class Project: [MUSIC] Heeeeeeyyyy… I'm assuming you came here
because you want to draw. How about we draw? I would like to ask you to tag along with me on
my journey through blank pages and fill as
many with me as you can. I think taking action is the first and most important
step to beat your anxiety. While just showing up for class alone is a huge success already, I know that you are capable of beating that fear of
the blank page too. I will repeat this
throughout the lessons, but here is the first
big disclaimer. We are not trying to make pretty or perfect drawings or create the
perfect sketchbook. All we want to do
today is explore ways to get started
and to get drawing. I want to encourage you to share how you applied
the techniques to a page of your sketchbook
or a digital canvas. [MUSIC] Take a deep breath, relax. In the next lesson,
I'm sharing with you what I'm going
to use so you can prepare yourself to create the most ********
project ever with me. Learning courage. [MUSIC]
3. Things You Might Need: [MUSIC] Before we
get into sketching, I want to make sure to have all things ready
that I want to use. These might be
different from what your favorite tools are
or what you have on hand, so just take this
as an inspiration and replace whatever you
think needs replacing. You can always do this later in the process if something turns out to not be
working for you. I want to break in
and use sketchbook. So I'm getting that ready
first and foremost. This one is my favorite kind. I've used them for years now. They have been
discontinued though. So I am already dreading the moment I'm filling
the last one of them. But if you just wanted to draw, go and find a book with
paper that you like. I prefer a bit thicker papers, so ink does not shine
or seep through. This will also take
watercolors, okay. It's not made for
it, but it's okay. I'm not going to
drench it in water. Now I will need
drawing utensils. These are a couple I
really like to use. Colored Pencils. I love these two bits. I draw with them all the time because they have
a nice value range. You can get super thick, dark, and saturated lines as well
as very light and thin ones. I prefer them over
normal pencils because if you ink the
drawing later and scan it, the color can easily
be eliminated and will leave you with
nice clean ink lines. But this is mainly a
personal preference. You can also replace these with pencils or any other
tool that's similar. Pens. Here are some
ink pens, a brush pen, and a fine liner, as well as one of those awesome four
colored ballpoint pens. I like to work with them because they force me to commit
to what I'm doing. No Control Z or
erase, just drawing. Markers. Then I got a couple
of alcohol markers. If you have soft
transparent colors, those would be pretty optimal. But if you don't, you can also use watercolors or basically any markers
that you have. I'm just an impatient person, so having to wait
for watercolors to dry is not my favorite thing. Yeah. But if you want
to use watercolors, make sure to get a brush
and some water ready, or use one of those cool brushes with a little tank,
you'll love these. Some people like to fill
them up with ink wash. So basically ink and water mixed for a transparent shading look. Lastly, I'm getting my iPad ready to demonstrate
some of the techniques. I have a few that
are specifically right for when you're
working digitally. If you want to try these, prepare your mobile
drawing app or Photoshop or whatever
you work in, and I will try to make all techniques as
accessible as possible, but since I sadly
don't know everything, I can only show you
so much regarding my software shortcuts and such. In the next video, I'm going to let you in
on a few thoughts I have about how to approach
the tasks ahead. [MUSIC]
4. A Matter of Mindset: [MUSIC] I have been
thinking a lot about this. I think it's
important to reflect on the reasons you
might have that make you want to overcome the anxiety of starting
something on a blank page. So this could be for
an assignment in a learning environment or to practice the
skill of drawing, or you would like to generate content to post on social media. While these are all very, very valid reasons to
want to sketch and draw, today I'd like to invite
you to try to set them aside for a bit and simply sketch for the
sake of sketching. So let's slow down, take a breath, and just create something
because you can. I believe that once you learn to approach a blank page
without anxiety, it will improve your
general creativity and assertiveness, and you will be able to apply
these techniques, the state of mind, to self-set or outwardly
motivated assignments. Drawing is an act
of mindfulness and it helps activate your
brain and relax you. So now I think I'm finally
ready to get into it. Let's get started. [MUSIC]
5. Let Chaos Reign: [MUSIC] Let's go. Here's what you can expect. The following lessons,
we'll propose a bunch of different
things for you to try out. I will start working
in my sketchbook, and I want to encourage
you to do the same. But if you want to draw
digitally instead, feel free to do that. Down the road I'm
going to address some ideas that are
purely for digital use, but I might not touch on
digital drawing until then. Just bear with me and apply it to whatever
works best for you. I have structured the
techniques in an order from most chaotic
to most focused, but let's be honest, they will all be chaotic. I'll be trying these as I go, so this is a true first-hand
experience for all of us. This will hopefully
inspire you to be open for mistakes
and little oopsies. Those often bring the most
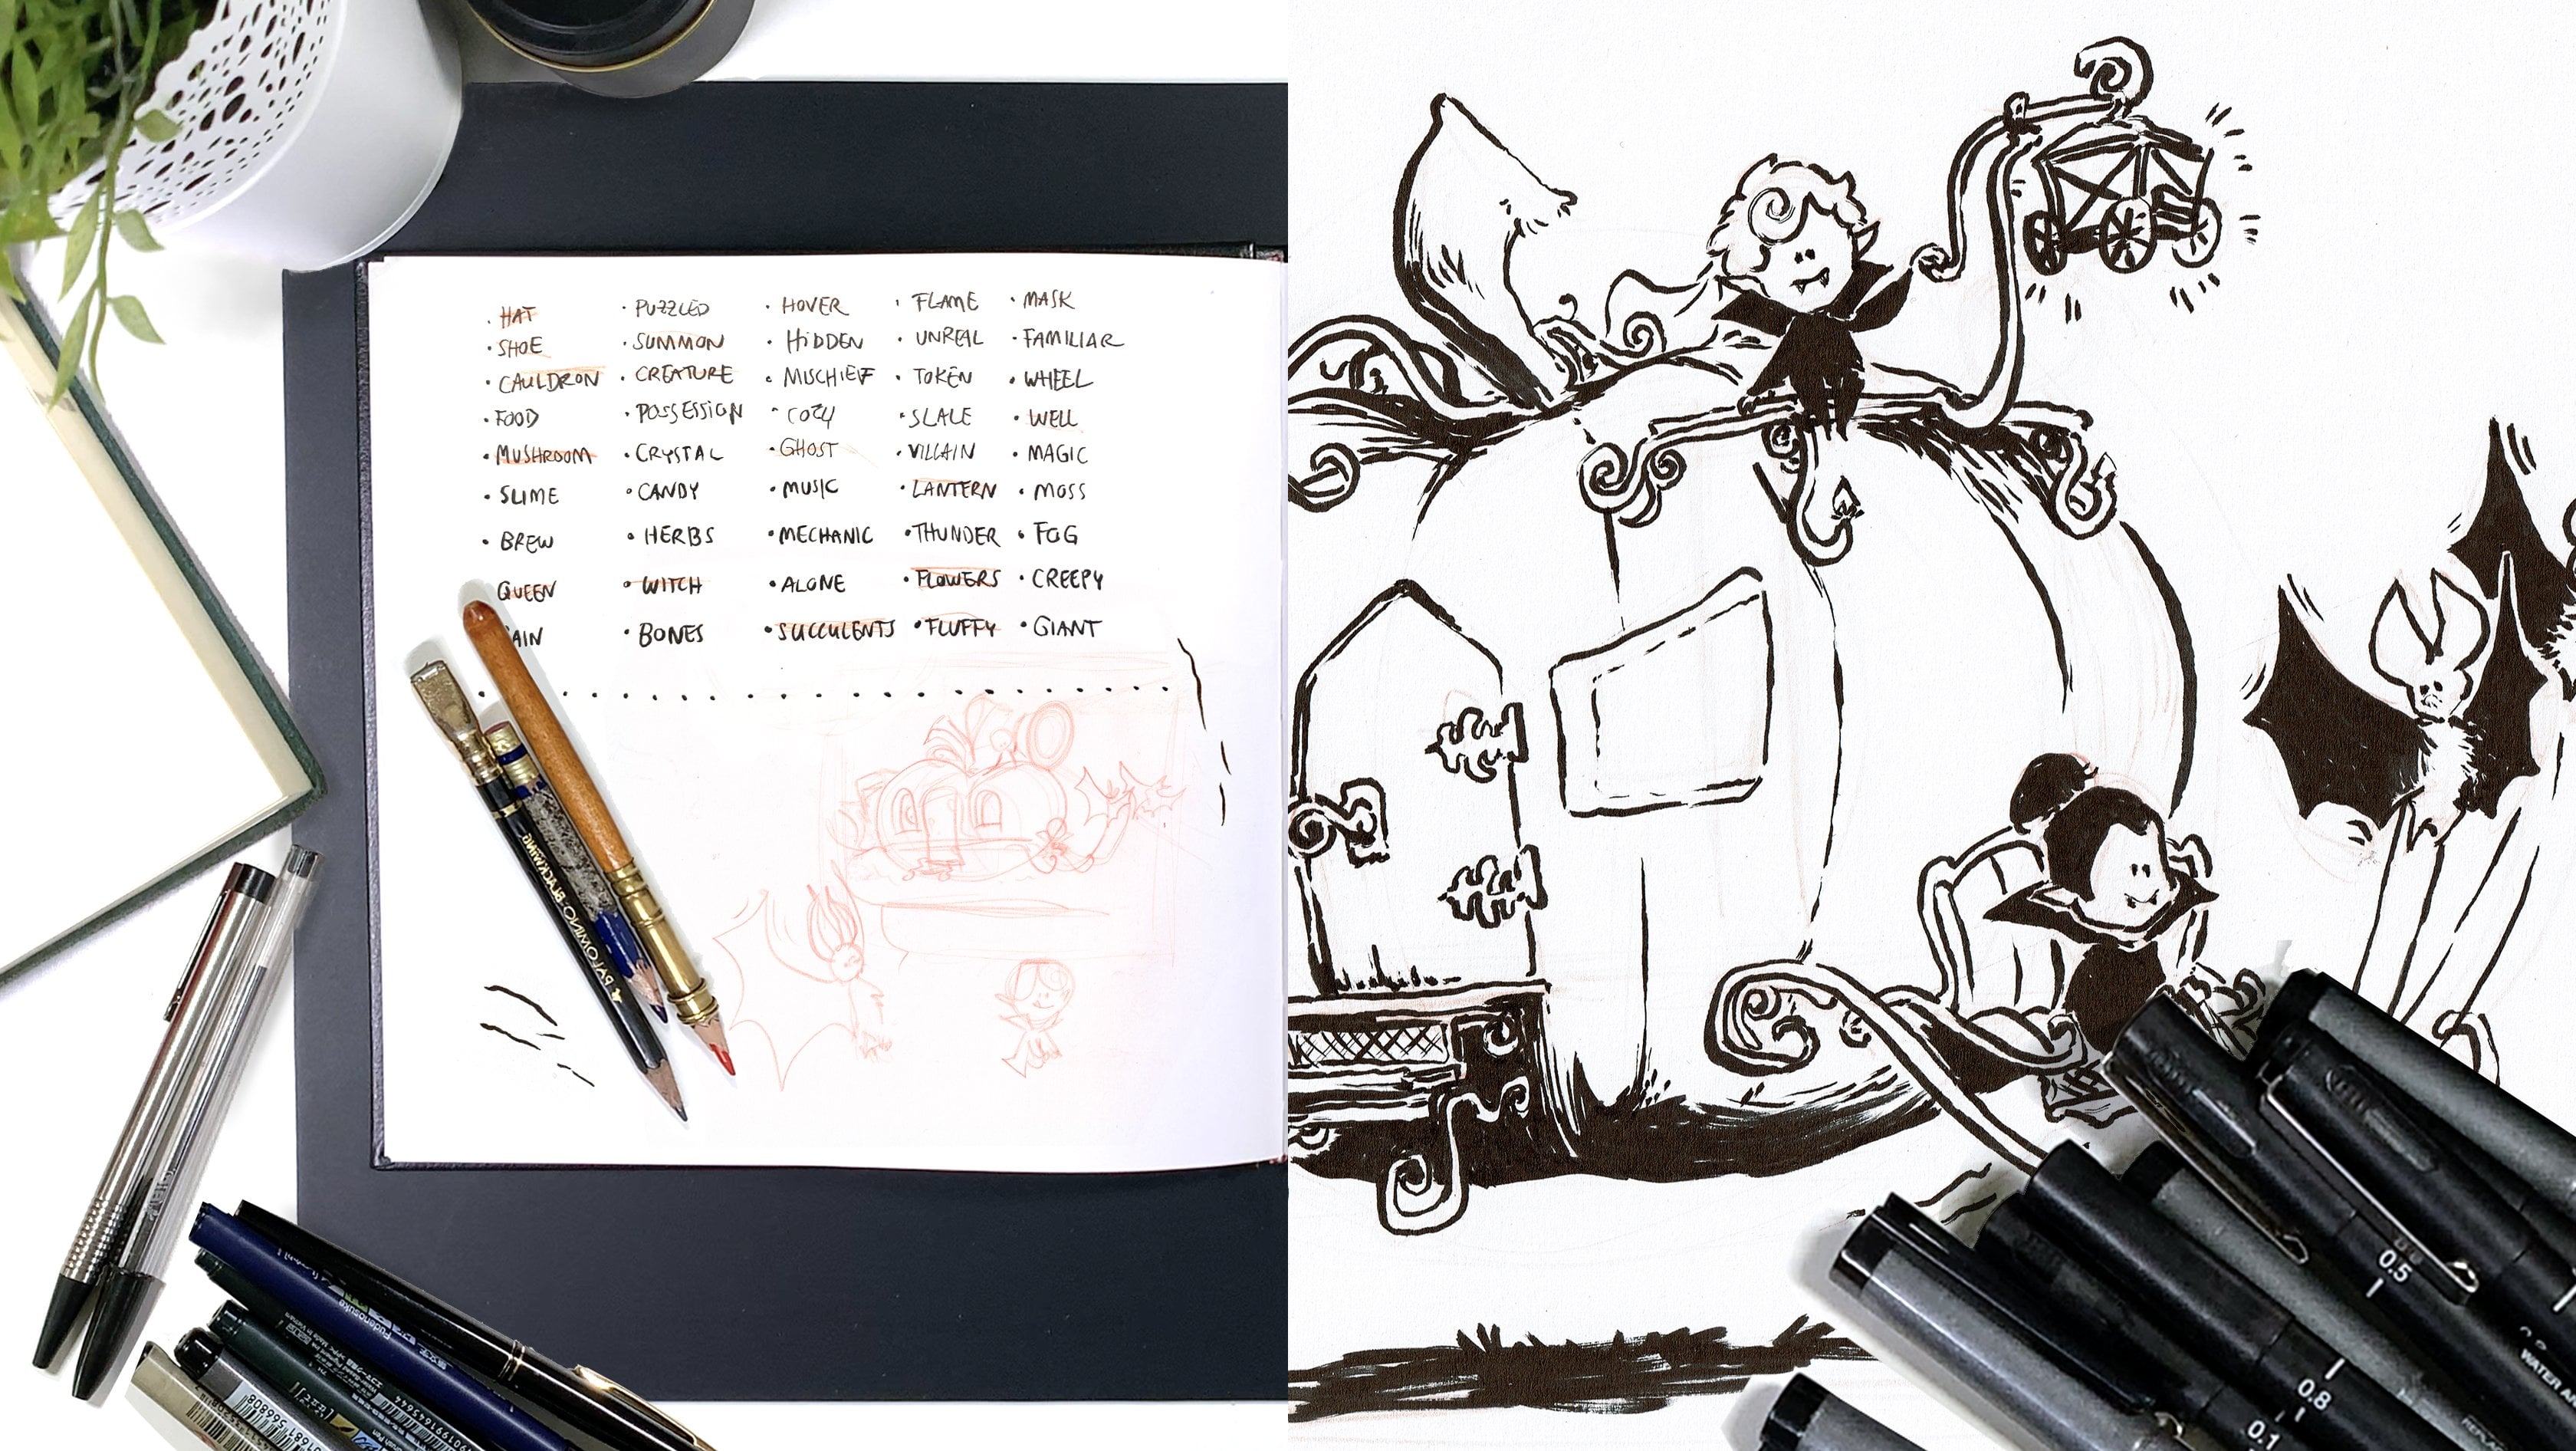
creative and fun solutions. Technique 1, doodles. Turn off your brain
and let's go. Here are the things I'm
going to use again. Let's see what
tools are in here. I have colored pencils, a normal pencil, ink pens, one is like a brush pen and
the other one a fine liner, a four colored ballpoint
pen because I love those. This is an alcohol marker that might or might not
work. We will see. I have this brush pen that
is filled with water, which I will use
with these later on. I have an eraser,
but I don't want to use that one, so gone. Here's the sketchbook, all new, nothing in yet. We will break it in together. We'll start with a ballpoint pen because I like the commitment
it forces me to make. You can use anything you want here though, it
doesn't really matter. Just don't erase. The
blank page is scary. The easiest is to just put
something on it, I guess. I will begin with some mindless shapes
to see what happens. Just put the pen on
the paper and keep drawing until you feel like
something's going on here. I like this. Let's see. I think here's some halo going on
and a little face. Maybe this is a woman or just somebody with
super long hair. It has an adventure
time feeling going on. She's actually
holding a lantern. You see, I am not loving this. It's far from perfect. But I started something and now I have this
ghost lady with a lantern and that
is good because I am filling the page and
losing my inhibitions. Let's add something else to this page because we
still have some room. I'll just do some more
random scribbling. You will see me defaulting
to characters by the way. That's just what I do. What I see here is a
raised finger like relish, cool to be a problem my friend, not everybody draws
characters. I'm sorry. [LAUGHTER] They took a shower, I think because they
are dressed in a lot of towels for no
specific reason. Yeah, it's okay. Just see what your
scribbled chaos lines turn into and let go of expectations. Just try to have fun. Perfect. This is what
happens when you just go in. Not pretty, but it works. Let's try another
page, shall we? Maybe with a different pen, just to see if that
changes anything. Switching up the medium
can sometimes help. I really like to use
these colored pencils. They have a very nice variety to them because they
can be very light, but they can also be very dark depending on how
you work with them. I started a little bit smaller down here and see what happens. You see, I already like this. It looks like an elephant. I'm really vibing with a pencil. Can you see the
variety of my strokes? I'm thinking this is
a transport elephant transporting big amounts
of textiles or something. Next scribble. I see people
embracing over here. I don't think I've drawn many people kissing
but, here we go. [LAUGHTER] There's always a
first time for everything. These are definitely
people who are deeply in love and are
embracing each other. This person is laying
here, I guess. I don't know why, but it
gives me a regency vibe. I'd love to look up references for clothing
and hairstyles, but this is not
the time for that. I'm going to get to
that, but I'm feeling inspired to just keep
drawing right now. I've been talking a lot of weird stuff while
I'm drawing now, but I don't usually
talk when I'm drawing. This is weird to me, but I felt like it actually helped me find
the shapes in my lines. Like here we have a person
who has a very nice butt. I don't know if you're
feeling comfortable, try talking yourself
through what you're drawing and see if that helps. I'm doing it for the first time, and this is of course, a voiceover recording that I did after the fact so I
could speed up things, but it's taken off one-to-one from what I
was actually saying. They are swimwear model. Don't be worried to make these drawings
look good, please. Nobody cares, this
is a sketchbook. At least the way I
see sketchbooks is that they are there
to put mistakes into, to try things, to do
all the wonky drawings, so when you sit down to
make a good drawing, those wonky drawings are
already out of your system. Just have fun. If you want a perfect
sketch book then I'm sorry to tell you that this is not
the right class for you. I think the things
we draw don't even have to be figures or things. You can also just fill
a whole page with scribbles and fill the shapes
with patterns of color. This is a really nice way to
warm up your drawing hand. If you're worried to be
too much in control, close your eyes
when you're doing this squiggly lines here. That's a nice exercise
in letting go and maybe it will give you interesting
results, who knows? I will try closing my eyes
in the next exercise, I think you get the idea here. How about a little break now? Take 10 minutes to try one of
the scribbling techniques, and see if it makes the empty page a
little bit less scary. In the next lesson, that's going to
be blobs of color and what I find in them. [MUSIC]
6. Blobs of Color: [MUSIC] We have started with
lines and seeing figures, things, and patterns
in randomness. How about we try making shapes? Now, first I'm going to use this marker for that but you can use something
as if you like. I'm also going to demonstrate it with watercolors
in the next step. This marker is dead [LAUGHTER] I need
another one. Hold on. This one is very bright, but maybe that's just
to my advantage. This time I'm going to close my eyes to draw these shapes. You can see I'm
not really lifting the pen which is a habit I
developed for sketching. I think it can bring
really good results then because you're thinking in three-dimensions but here I'm
willfully trying to create more chaos and so I'm forcing myself to lift
the marker off the page. This looks good. Let me fill in the shape
a little bit more. I'm now going to use
my brush pen which has a nice soft black line and just gives a nice
contrast to the pink. Maybe this one is more of like a technical thing so
I'm seeing some robot. I think this is the
claw or something to grab stuff with,
I don't know. I'm just making
stuff up as I go. Remember to have fun and
don't overthink this. We're just killing
the blank page here. For this robot I try to stick to a bit more geometrical
shapes and less organic, so maybe there's a
blade over here. It's a kitchen robot. It's chopping some tomatoes
or something, I don't know. I don't tend to do a lot of technical or mechanical drawings because there's
often a lot of 3D involved and I'm
getting too much into my head about
how things work but I'm trying to
let that go for now and just make it
look like something. If in doubt add more cables. This shape here could get monitor that's
emulating a face. See here I'm again making a
character, but that's okay. This up here is the storage area for the unchopped veggies. Here's a tomato that's
being sliced and a bit of the unchopped tomato
[LAUGHTER] and of course it's hovering and obviously also
need some buttons and stuff. Perfection, you hear me? Cool. I just do another one. Again I will close
my eyes and cover this up a bit to not draw into
more what I already have. Oh, you know what? This is a dinosaur. These are clearly
dinosaur arms and all dinosaurs are T-Rex
as we all know that and they also all have three
fingers we all know that and this is some kind of
the feather's scarf. I don't know what it's called. In German, we call it [FOREIGN] but English is my second
language given me a break. It's that feather
thing that people wear when they want
to look fabulous and this T-Rex definitely
is very fabulous. See how proud he is. This makes no sense
but you know what? I really like it. But something is missing maybe it's not a dynamo
but more like a dragon. Yeah. I think actually
this is just it. Sometimes you just
got to say it's done. I feel very inspired, actually. This is beautiful. I should do this more often. This is so cute. I love you. Yes, a heart is always
a good thing to add. These were blobs of
color made with marker. Let's try watercolors.
Here we are. I have this beautiful
brush pen that's filled with water and I just use what is left of my black in here to create some shapes. I think for this one I'm keeping my eyes open because
the water is already taking over
a bit of the chaos and I have less control. If you're using watercolors, it might turn on horrible depending on your
sketch book of course. The water will most likely wrinkle up the
page a little bit, but that's okay as long
as you don't overdo it your sketchbook will be fine just don't go swimming
with it or something. Now I have to let it dry but
I'm a very impatient person. We're not going to watch
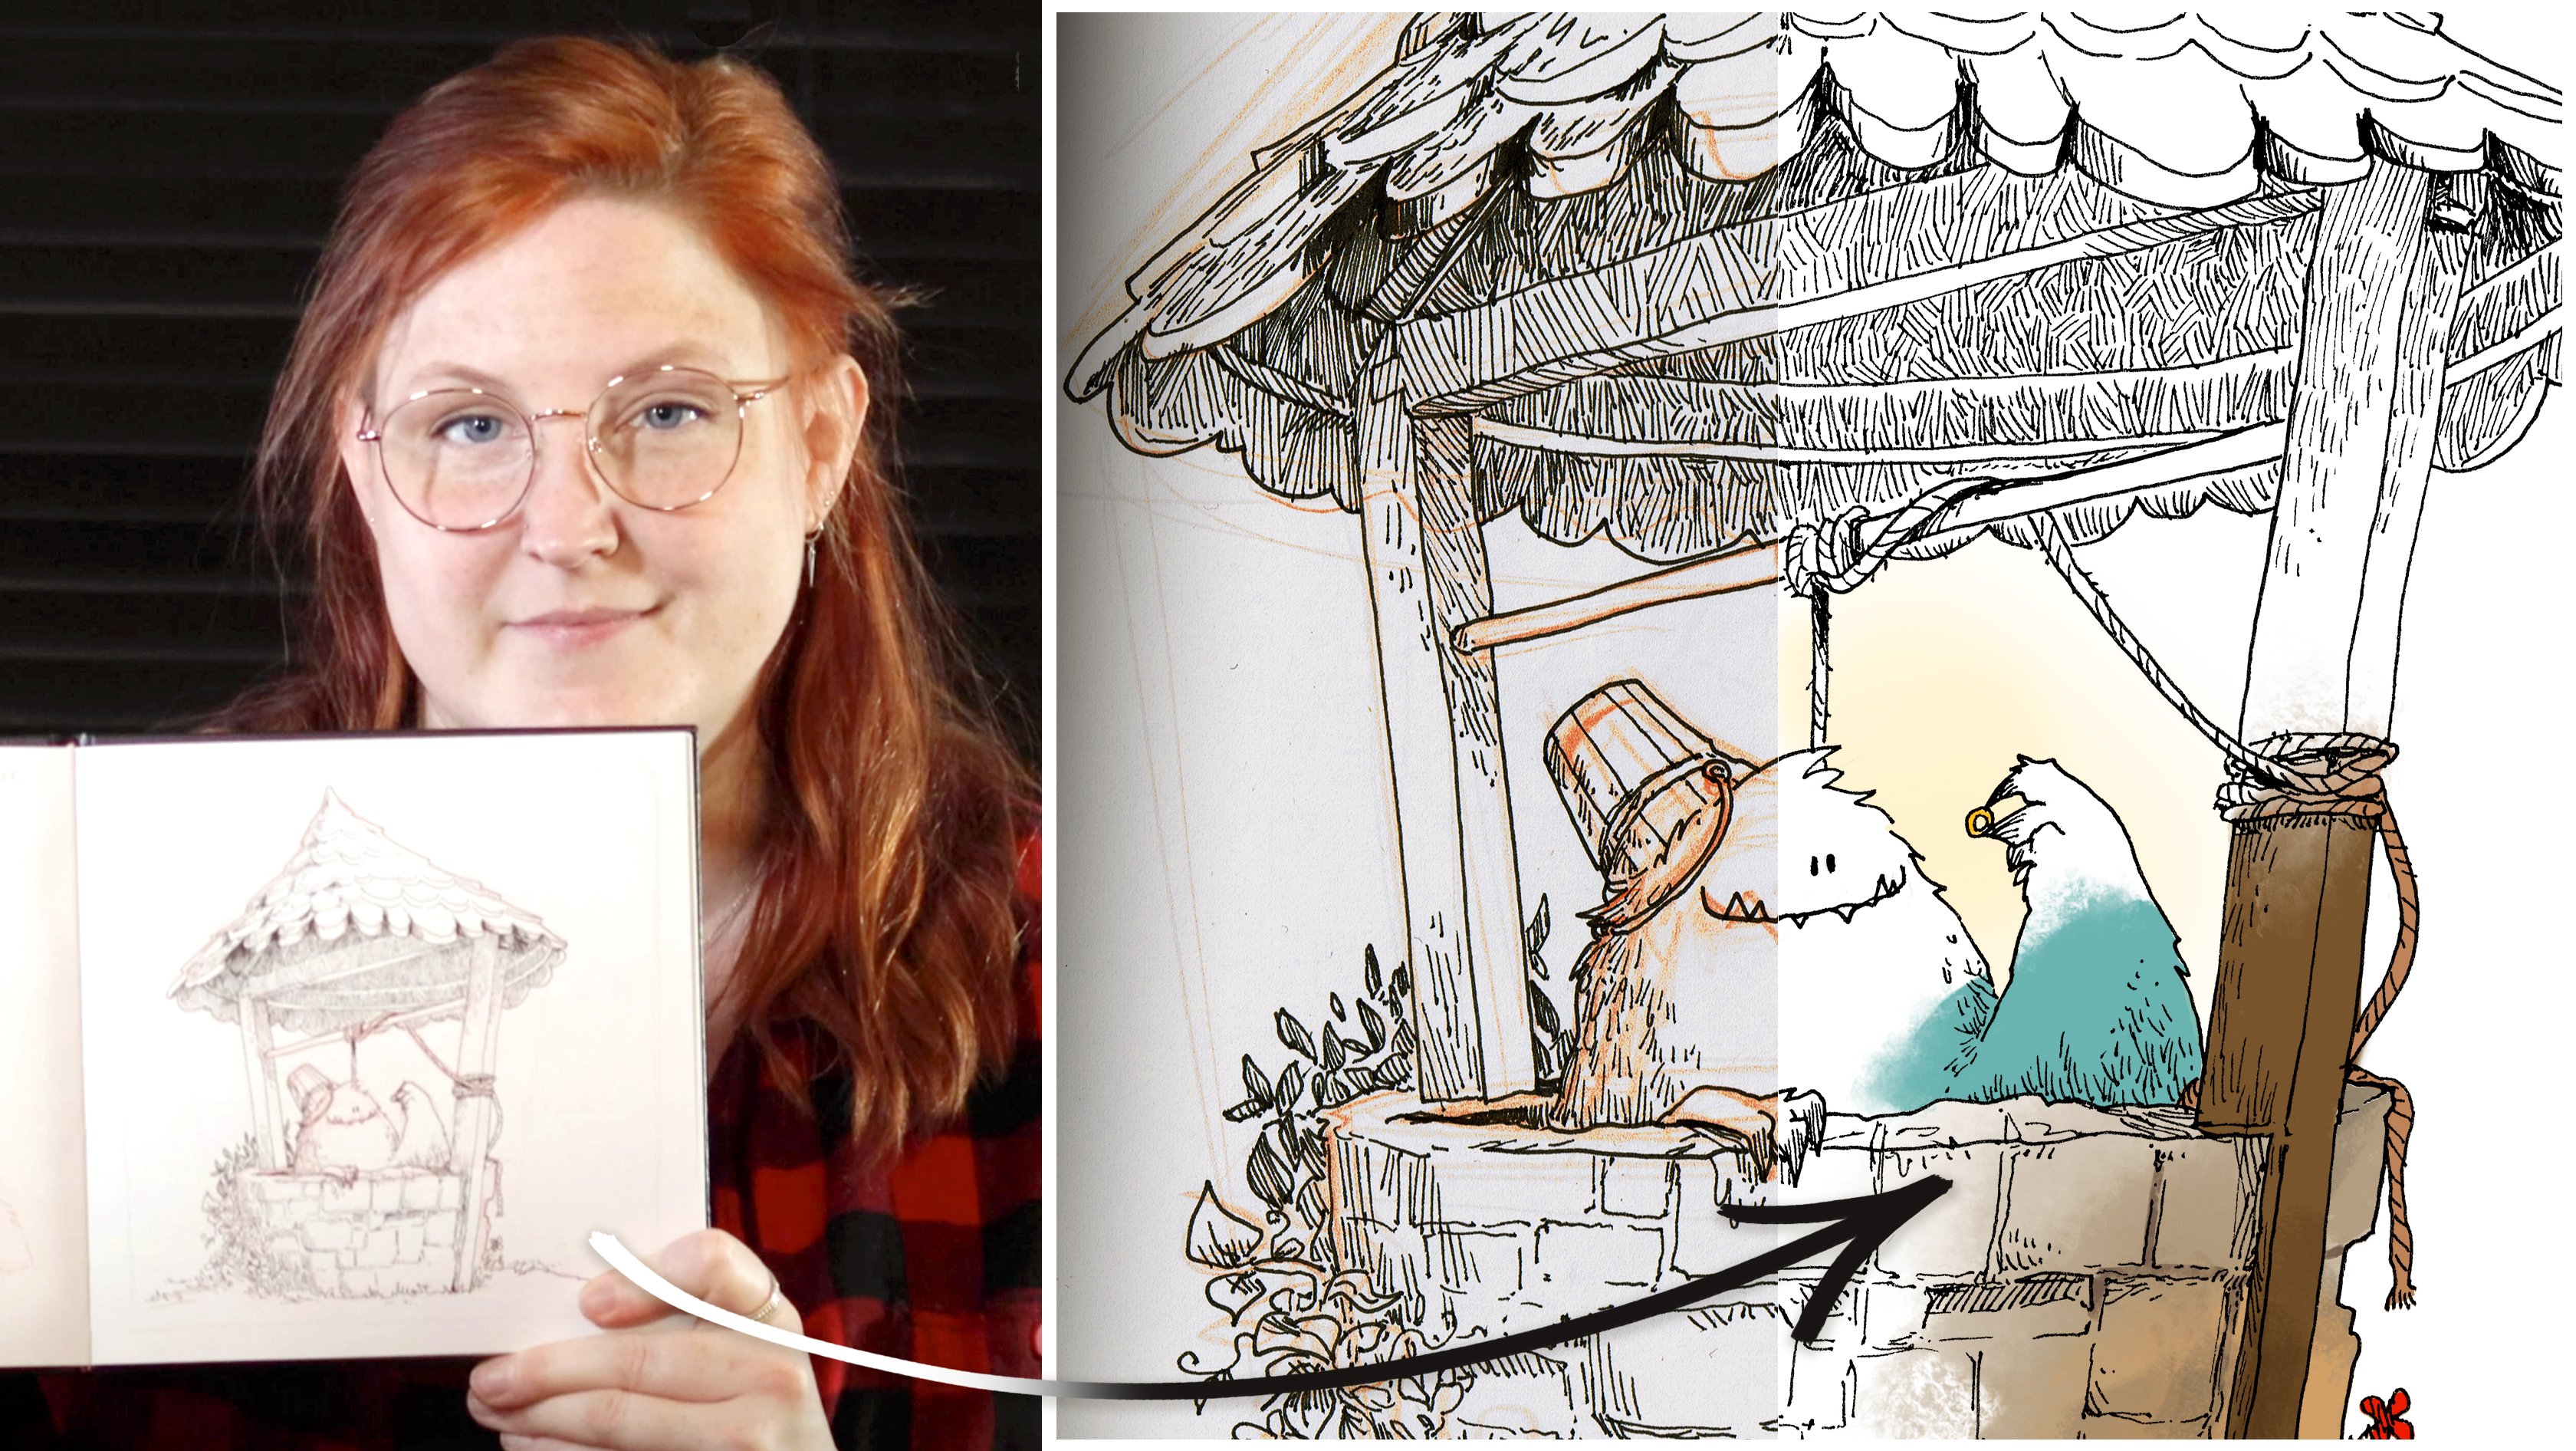
paint dry, time jump. Now it's dry-ish [LAUGHTER] and I'm going in with my
trusty ballpoint pen. We have some little eyes here. I think it's like a fox
or something like that. Here's a nose and he's also holding a cocktail glass and looking at
something behind him. Sometimes it's just a
matter of deciding to put a line somewhere and turn the
blob into a little story. Maybe his wife came
home with bad news. Also remember that you are not bound by the
shapes that are there but you can also make stuff up or use the
negative space, so the space that is created by the absence
of color here. Everything that's enclosed by the shapes and the
space around it. Don't be scared anything you make up will lead
to something and sometimes what it leads to is learning what
you don't like. I'm not loving this
drawing but it's still interesting
what it turned into. This up here is
another creature with tentical things and also a corkscrew for nose because
they really like wine. It's also probably a
little bit drunk but well, we all have our problems. This actually looks a
bit like a mix between a manatee, an octopus, and a shark and here's
the little fish that is equally confused as you
are right now probably. This could be a tail no wait. It is a hearing device in all these old timey trumpet
things. I don't know why. Well and up here
clearly a person who's yelling out
their frustration about not knowing what to draw. We've gone full circle. Wow, this was certainly interesting and wild
combination of things that I came up with but
actually you know what? Let's just move on. Maybe consider pausing
here for 10 minutes and try the new
techniques for yourself. In the following lesson I will
commit myself to chickens.
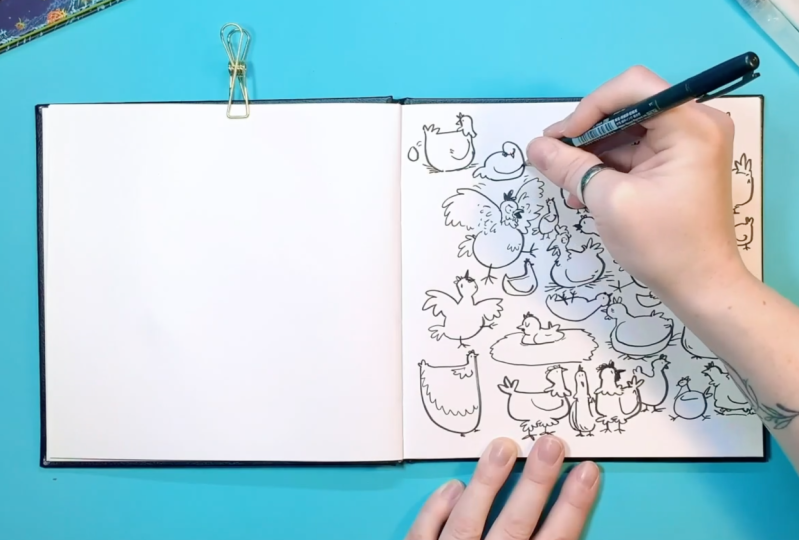
7. Chickens: [MUSIC] I think I found
my tool for today. I'm doing quite well
with a brush pen so far, so I will stick with it for
this last doodling exercise. This page is going to be a little bit different
because sometimes the page doesn't want
to be filled quite as randomly or you don't want
to be quite as random. I'm going to think of a thing, our creature, or an object, a plant, anything. Without any references, fill the page with doodles
of just that one thing. Let's say, I want
to draw chickens. Chickens have this little
thingy under the beak, and then that thingy
on top as well. They have chicken eyes and
a feathery little neck. Let's say it's a chicken. I can see that it is not perfect so I'm
taking a second here to consider what exactly is wrong or what isn't
really working. Sometimes you just
got to commit to the idea and since my idea was filling this
page with chickens, I'm committed to follow through, even though right now I feel like I don't know
how to draw them. [LAUGHTER] Even if I might
feel like it's a bad idea, I think there's always an
opportunity to learn something. This is what I want to do, fill pages and learn something. Chicken and their feet. They actually don't all have to be the same style either
so if you want to experiment a bit
and make some of your chicken more simplistic
or more realistic, that is totally up to you. I think simple is
working well for me. I'm actually wondering
if a chicken always have this thing or if
it's only something roosters have or is it just
bigger when roosters have it. I don't know. Right now, I'm only drawing what I know. I can expect anything else from myself or from you
so just relax. There is the Swedish
children's book about a guy and his cat and
they have chickens too, and those chickens are
always doing something funny like having a tea
party or crocheting. I love that detail. If your brain is taking
unexpected turns, just go with it. No matter if you want
to draw chickens with me or something else. Now is a good time to take
10 minutes and try it and look how convenient
this lesson is over now. Just pause the
class and draw for a little bit and I see
you in the next lesson, I will talk about working
with references. [MUSIC]
8. With a Point of Reference: [MUSIC] Maybe you know
this feeling when you're just a bit overwhelmed, and can't really come
up with your own ideas. Even if it's just drawing
random lines or shapes, you can't get yourself to start. But when that happens to me, I find it quite
comforting and relaxing to draw something
that is already real. That can be things that
happened to me during the day, which I like to capture
to remember how I felt and sometimes
shared with my friends. But that is not as easy
as I want it to be. I often get too much into my own head when I'm
trying to come up with solutions to how I can
present my experience best. One of the easiest things
is to spend time in public, drawing people in the streets, in malls, or in public
transportation. Over the years, I have collected many such drawings
and I love the thrill of not getting noticed by the individual because not
everybody likes being drawn. This can also present
a big challenge to you when you are
new to drawing, or you just don't enjoy
drawing in public, or it's overwhelming to you to capture something
that is moving. These all are very
fair points and so I'd like to present
you two other options. The first one is close
to live drawing, drawing people from
photo references. There are a bunch of great tools for artists out there timed online live drawing on
video of his pictures, closed and nude models. But what I have found to be
most relaxing and fun for me by also being
a great exercise, is drawing from photos
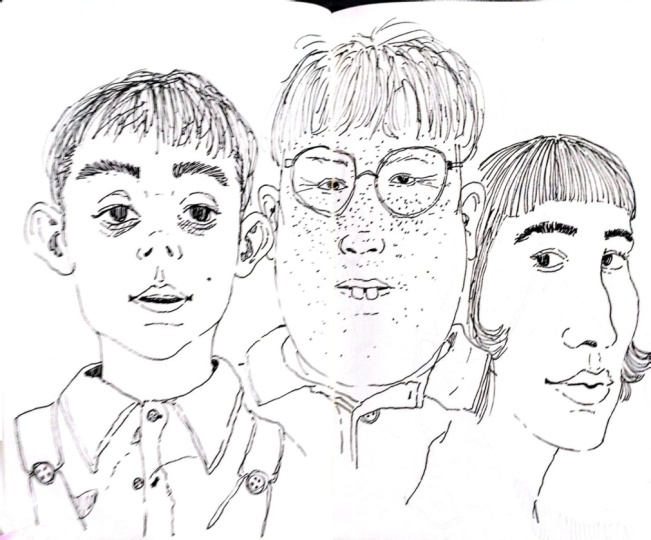
taken from life. This is a page I
found at some point. I honestly can't remember how, but here we have an American
photographer, Earth, who takes candid photos of
people at county fairs, and I absolutely loved this. All his people are so beautiful
and unique characters. Let me show you how I
like to use this as a drawing exercise to
unblock my creativity. I'm just going to go
through this folder here and see what
sparks my fancy. I like to go in and set the
basic shape down first. Image of the hat, and then a lot of wonderful old man
stuff underneath. I love drawing old people, it's one of my favorite things. Their facial features are
exaggerated by nature already like the noses and ears that just don't stop growing somehow. I think that is so interesting. Behind that big ear, I want to emphasize that
swoosh of the hair back here. You do not have to
copy a photography. I mean, you can if that
is what you want to do, but I don't like to try and achieve perfect
likeness or something. I'm here to draw and make
the drawing interesting. In order to do that for myself, I take what I see in my
reference and I exaggerate it. These glasses are
also adding a lot, they aren't round nor square
and they're really chunky. Let's not forget this eye, there is sunken in. There's so much stuff
going on with the skin around his eyes and
generally the face. You see, I'm just fascinated
by shapes and textures. It is all fun and nice to draw a conventionally
attractive young person. But honestly, for me, they are often really
boring to look at and also it is just so much easier to draw
old people because there's just so much
more to work with. Maybe you have this tool
where you tend to default to certain solutions in your
drawings, see right here, my brand randy ear program, but this is not what
his ear is shaped like. Try to draw what you
see, not what you know. It can be helpful to keep
your reference pictures upside down and focus
just on the shapes. I will no longer be an eye, but rather a problem that you
have to solve for yourself. This way, you will detach from the default program and
enrich your visual library. All the things that
your brain will produce if you think
of a buzzword. Challenge yourself and
you will become more observant and you can
become a better artist. The more variation
your visual library saves for things you see
in your everyday life, the more you will be able to draw from them when you
are making an artwork. Walla, here's our old man. Now I want to add a
person who's looking into the other direction just
for symmetry reasons. But in the end it doesn't
have to be pretty, mainly this is an exercise
to tackle the blank page, so don't forget that and relax. Let me fit this very
patriotic lady in here. I have this technique
that I think, I learned from my life drawing teacher in
animation school. Where I'm putting down
some frame where I feel the general shape of what I
am drawing will fit into, and then I work myself from
big shapes to small ones. Some time ago I was always
starting my drawing with the eye and working
myself outwards, but honestly, that just made my life so much harder
than it had to be. If that is you, see if you want to try a different
approach today, and draw from big to small. You also don't have to be
super specific with things. Sometimes it's okay to
just go in and give it some idea of a shape and then call it a day because
for whatever reason, we're doing this here, the main reason is to
draw and it doesn't have to be perfect or an exact copy. You're not getting graded
for this or anything. If you put your drawings into
a project for us to see, I won't go in and be like, yeah, you should have done
it like this and that. No, unless you specifically
ask me to do that, I will just see
what you did there, that you tried your
hand at these ideas, and I will compliment you on your bravery and
hope that you have gained some confidence and you can draw from
that in the future. Oh, see, I did it again. My brain defaulted
to lip and drew it like this and then I looked at the reference and I was like, no, this is not that shape. It has going in here. It is so fun, how
different people smile. Sometimes the corners
of their mouth is going down and it's still registers
in our brain as a smile, I think that's so interesting. We got this little chain here and then a
lot of loose skin. I think it's so fascinating what happens with a
face when you age, I low-key can't wait to see how my features will
change with time. It's not like I can really stop my body from changing anyway, so why not embrace it and
see what comes from it. She's such a character. Now I'm fitting another
phase in down here and my main thought is work
big whenever you can, unless it is for
thumbnails, of course, but with things like a face that has a lot
of detail and shapes, it just deserves more space. This one was also a little
bit too young for my taste, so find yourself an
old person to draw. I think that's just
easier and more fun. Awesome. Next, I'm going into drawing thumbnails
as a warm-up. Come along while I take a break and draw a
bunch of old people. I want to see all the old people in the class projects. [MUSIC]
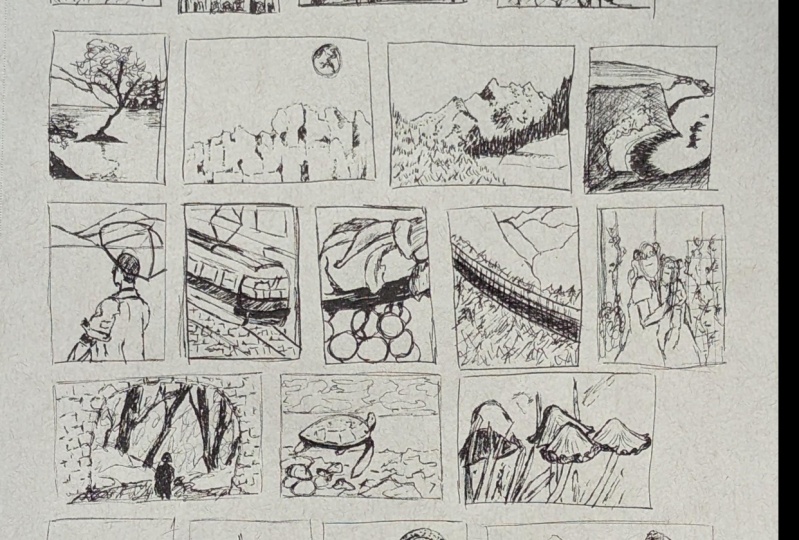
9. Thumbnailing: [MUSIC] By now you
already have a few tools that can help you to
break into a page. But in case that I
have not covered anything that's vibing
with you so far, here is the second way
to work with references. Commit to fill a page
with thumbnails. Thumbnails are tiny drawings
that are capturing an idea. These can be used to
try out variations of the same thoughts in a
quick and low pressure way, or to pump out a lot of ideas in a short time without
getting lost in details. In this case here I want to
do sketches of movie scenes. This is a great way to let go of overthinking and it trains your observation and
forces you to simplify. This page is another lucky find, and I will just dive in and pick randomly different scenes
to put on my page. This is a very nice warm up. Just go on the page and scroll until sparks something in you. This also doesn't have
to be movie screenshots. It could also be photos
from your occasion or just random pictures
you find on the Internet. The essential is identify
the composition, so how objects and
figures are distributed throughout the frame and break it down as
much as you can. Identify shapes, light
and shadow areas, directions, and orientation
of faces and objects. You can also take a show or movie you are
watching and just pause every time
the camera angle has changed to
draw what you see. This will result in basically
reverse storyboarding. You will understand
how this piece of media has been made
a little bit better. But in the end, that might already make this a little
bit too [inaudible]. I just want you to find the
least intimidating way to start drawing because usually once you have drawn
for a minute, it gets easier
with every stroke, starting something new becomes a little bit less intimidating. Take this as an
exercise to loosen you up and take away a
bit of your fear. I guess the main trick
is to just start, but that is so much
easier said than done. I just hope you can take something away for
yourself from this class. Notice how smart some
filmmakers will frame things. Super subtle but so effective. I really enjoy
noticing these things. It's like I'm learning
a secret code, and it means I can
steal these things now and make them my own, and maybe that will make
my future ad works better. Observe, put down a frame, identify shapes,
light and shadow, perspective lines
and directions. It all turns into
patterns and shapes. Do not focus on any details. We don't care for
details in this house. Now it's your turn.
Take a break from the class and draw
some thumbnails now. In the next lesson
I will show you some tips that are specific
to digital use. [MUSIC]
10. Digital Madness: [MUSIC] Are you a fan
of digital painting and feel like the
approaches so far have not provided good
inspiration for you to beat the blank digital canvas? Well, worry not. I will cover that now a bit. The app I'm working with
on my iPad is Procreate, but you can also
work with Photoshop. I will try to inform you about
the tools simultaneously. But this is just the technique, so there isn't really a
right way of doing it, but I know how it
can be frustrating when you feel like you
can't quite follow along. I will try to name
the right tools. When I'm about to start
drawing digitally, what I always do is set the background color to
something else than white. That usually is a light gray. Sometimes I like to drag it
a bit into orange or blue, but oftentimes it's
just a neutral gray. First of all, this takes down the contrast and thus
the strain on your eyes. Less straining, more drawing. Secondly, it already puts
something into the frame. If a solid color
doesn't do it for you, you can also just take a big textured brush and
paint your canvas with it. The noise this creates, adds some visual interests, and the “this is pristine and
new” effect is broken. Play a bit with hue
and saturation, jitter off your brush to
add a subtle variation, if you're feeling fancy. But if it isn't enough for you and you are
still a bit scared, here's something else
that you can do. Go and insert a photograph. Either you download something
random from Google, or you take a photo
that you already have on your iPad or your computer. I got a couple of
really cool pictures here that a friend took
at a LARP I went to. They are just super pretty and have a very nice
muted color palette. It doesn't matter at all
what is in the photo. What I want you to do now
is take a smudge tool. Just pick one with
some texture in it. The more textured and the more
like weird it is in shape, the more interesting
the results can be. Then you just go in
and smash these things together until there's just
color and textures left. This might already spark an
idea for you to go of on. This looks like a
Renaissance painting, and I want to do like a
Mona Lisa thing… totally. Just enjoy the process and maybe it sucks
then you just take the smudge tool and make
it part of the texture. You often have to do a bunch of weird bad drawings before
the good ones come out, and that is okay. Now we'll just add another
level of weirdness to this and show you
an additional option. I'm adding another random photo
that spoke to me somehow. This time I will be
using the Liquify tool. You can see how
this one is pushing the colors around and it's
like creating new shapes. Maybe something
interesting happens. Maybe there's a creature
somewhere in here now. Let me take down the
opacity a bit to create more of a
blend of textures, and colors and shapes. See there's the ugly hippogriff. No? Well. You know, I think maybe it's
not a hippogriff, but a vampire with a big
color and a huge nose, and this is cigarette smoke. You get the idea. Let
me do another one. Photo, Liquify. Just change it up
until you don't know what's going on
anymore. This is nice. Now I'm adding another picture for some coloration and texture. Maybe flip it upside down. It will be destroyed anyways. Grab your favorite
smudge tool and go in. The layer order here
is not what I want, so I'm going to play with the layer order and the
opacity with a liquefied one, and the layer mode. This looks nice.
I'm actually just going to paint some random
color and shapes in here, and blend with the rest. Experiment with the
tools you have. The process alone
can be inspiring. Now you can trace shapes
and directions you see, maybe flip or
rotate your Canvas. Oh look, it's a duck. The digital world has a
lot of options for us. While that can be intimidating, I just decided to make them my ***** and ended
up with a lot of fun, and this stupid
little drawing that left me inspired to
go and make more art. Hopefully these techniques
helped you in a way. Take some time to try them out, I'd love to see what
ideas you came up with. Feel free to share
your sketches and paintings with us in
the project's gallery. Then the final video, I have a few last words for you. So let's move on, whenever
you're ready. [MUSIC]
11. Final Words: [MUSIC] Well, holy smokes. That was a ride. Thank
you for coming along. I have to say I was
very nervous to bring you these raw and
unpolished drawings. I think it's very normal to struggle with
beginning something. We all have our blockages. So seeing me overcome these was hopefully a
bit inspiring for you. Taking a first step is hard, but if you manage to take
the pressure out of it, remove your expectations a bit and just dive in to
see what happens, the greatest results
can be your reward. Sometimes the
rewards really suck, but as I said, get all the wonky drawings out so you can get some
really good ones. I hope you feel encouraged
and I'm looking forward to see your experiments with these techniques in
the class project. Show me those pages. One last thing, it would
mean the world to me if you could take a minute to
leave me an honest review. This will not only help potential students
to decide if this is the right class for them
but it mainly will help me. Because I'm putting a lot of time and effort into my classes, and knowing if I'm hitting
the right marks and helping other artists at being
a good teacher I guess, it's very important to
keep bringing everything to the table and
making great classes. I hope you enjoyed this
one, until next time.
 Vera Rehaag, Freelance Artist