Transcripts
1. Introduction: [MUSIC] Drawing portraits with
cool hair is so much fun. It can add so much
personality and uniqueness to your
character illustrations. If you want to feel more
comfortable drawing stylized character portraits
with different hair designs, this class is for you. Hi. My name is Iva
Mikles and I'm an illustrator and designer
based in Central Europe. Drawing characters with interesting details
and hairstyles help me to work successfully on many projects, big and small, such as Lego Friends, the animated series, which aired on Netflix, illustrations for software
companies, magazines, and explainer illustrations
for various clients, for their websites
and presentations. In this class, I
will take you on a journey of designing
stylized hair for character portrait
using simple shapes so you'll get more
comfortable and have a solid starting
point when drawing hairstyles for your
character illustrations. To make learning fun and
more personal for you, I will be sharing lots
of tips and tricks that you can use when designing
your stylized portraits. You will learn how to
use simple shapes to draw hair starting from
sketching the idea, defining the line art, coloring and shading the hair and the face before
putting it all together in a character with cool outfit based on
your chosen reference. We will also be looking
at lots of references, which will help
you with designing hairstyles for your characters. In this way, you
will learn how to simplify the real life in
your character designs. You will gain a solid skill for developing your character
design style further. At the end of the class, you will have a cool
character illustration with amazing
hairstyle and lots of tips and tricks up your
sleeve to practice drawing more characters
from various references. In addition, you will also
get a bunch of freebies, practice sheets, color palette inspiration,
and much more. I will be using Procreate, but feel free to use any other drawing software
or medium you prefer. Last but not least, before we start don't forget to follow me here on
Skillshare to get notified when I release new classes and make announcements
about the giveaways. I also invite you to join me on Instagram
where you can see my newest artworks and explore the stories from my
life as an artist. I would love to see and
share your projects. So don't forget to tag me in
the stories on Instagram, in the post description
description or in the reals. Now let's get started
with expanding your horizons and drawing
awesome characters. See you in the class.
2. Class Overview: [MUSIC] During the class, I will show you many
references so you can practice observing different
techniques when designing hairstyles
for your characters. The class is split
into three main parts. In the first part, I will share with
you all the tips and tricks I use when designing
hair for my characters. In the second part, we will put the theory
into practice, first, with the mini exercise while coloring fun and
curly lock of hair. In this part, I will show you different ways how you can
approach shading the hair. Then we will move to the
project section of the class, where I will show
you how you can observe the photo reference and design your character based on this reference
starting from sketch, the line art,
designing the face, coloring the hair,
shading the face, and then coloring the outfit. You can use the same photo
reference as me which you can find in the free
additional practice sheet which I prepared for you. Or you can use your
own photo reference so you don't need to use the
same reference image as me. I will also show you
different brushes that you can use for
coloring and sketching which come with
Procreate and ideas for extra brushes that you can get if you want to
experiment further. To download the additional
practice sheets and free resources, visit my website
and subscribe to my newsletter where I will
be sharing new brushes, challenges, updates,
more tips and tricks so it's fun
and creative place. Of course you can unsubscribe
anytime you want. I have also prepared
extra premium resources like new brush sets and
they are not needed for this class because I will share with you other
techniques and brush alternatives that
come with Procreate. But it was so fun to explore and prepare these new
brushes for you guys. I hope that if you
decide to get them, you will love them as much as I do and I think they're
so fun to use. Let me show you a few things
as an overview before we get to it in more detail
in following lessons. During this class, we
will be looking at various steps we should
consider when drawing hair, such as hair design and
different hairstyles that people wear
and they are may be trending or that you like. Then we will be looking
also at mistakes to avoid, then we will consider overall
shape of the hairstyle and also how to bring variety to this overall shape to
avoid the helmet look. Then we will also talk about
shadows in the hairstyle and also the highlights of the hair and how
you can approach them. Another thing we will
be looking at is stray hair which go loose out of the hairstyle and how you
can approach that and add it to your illustration
and much, much more. Now let's start exploring the tips and tricks
in the next lesson.
3. Design & Hairstyle: [MUSIC] Another
thing, what I want to mention to you is
that drawing hair and the way how you
approach stylizing the hair is very
artistic choice, or it's design of self-expression of your
illustration as well. Because you can create hair
and draw it in a way that is more realistic or very
stylized and almost flat, and this will add to your art style and the
choices you make there. Because there are
not so many rules in the way you can
draw the hair, you can play with it
more than, for example, when you are drawing face and trying to get the
proportions right. Of course, the tips and
tricks that I'm showing you in this class
regarding drawing hair are very helpful, but you can adjust and exaggerate some of these things to develop your style further. Anyway, this illustration is part of my
drawing faces class. If you have taken it, you might already know it. But what I wanted to
show you here as well is different hairstyles which you can add to your characters. But also drawing hair is very dependent on
different hairstyles. We have this one which is more curly and definitely has
different texture than, for example, this one which has more straight hair
and it's shorter. This hairstyle is shorter than, of course, this one. Drawing hair is
very much dependent on references if
you don't have all of these basically in your head and have the visual library of drawing a lot of characters
with different hairstyles. Definitely lean on the references
when drawing characters with different hair because the hairstyle will definitely
influence it a lot. As you can see here, each hair type has a
different structure, texture, and the shape. As I mentioned, you can maybe guess that the drawing
here is very much connected to the
stylistic choices you'll make about the hairstyle
and how you simplify it. Definitely consider the
hairstyle before going into the texture and overall design of the hair as well. [MUSIC]
4. Finding References: [MUSIC] Now let's briefly
talk about finding the right reference or
not the right reference, but more helpful
reference for you, especially when you're learning. There are a lot of
images on Pinterest or other also free
resource platforms with photography and portrait, which is great, but
then what to look for. In this image, what is
nice is that you can actually see the
highlights here and here. You can also see some
of the shadows here, but you don't see
it very clearly. You can see the overall
silhouette here, but maybe you can find something which has more
interesting silhouette, then just more like
straight hair. Another thing to watch out
for is the angle of the head. Here we can see quite
nice silhouette of the hair so you can actually
tell where the hair is. You can also see the highlights. Also the shadow is pretty
defined, which is great. But here, the head is angled, so it's tilted to the side, so it will be more
difficult to figure out how to draw
the hair and it's little bit more advanced than just straight portrait within either frontal view and this is also three quarter
view slightly. Try to avoid these type
of images as well, especially at the beginning. Then in this image, is very hard to see where
are the shadows and highlights because it's
very dark as you can see. We can see a little bit of
highlight here and here, but it's very hard to see the silhouette because
I'm not sure where the hair strands are ending and basically the
overall silhouette is super hard to see. On top of it, she
also has a head here. We don't even see
the back or the top of the head where the
hair basically ends. Try to avoid images like
this also at the beginning. Even though the face is quite
nice in three quarter view, the eyes are leveled. The face is good to
use as a reference, but hair would be tricky to
find the right silhouette. Let's look at the next one. This type of reference
image would be quite nice to use because
it's frontal view. The face is towards
us as you can see. You can clearly see
how to place the eyes, nose and the mouth. The head is not turned, so it's easier to see the hair. Also in this image because she has darker hair against
lighter background, you can see the silhouette
of the hair quite easily. You can define the hair. You can see the loose
strands, but here, because the hair is
so dark and there are not so many reflections
visible in this picture, it's hard to see where the hair ends or grows
or where it split. Try to find references where you can see the highlights
and the shadows. To summarize, regarding
the reference images, try to find images of the hair. First, if you are a beginner
from the frontal view, which is easier to practice. Another tip is to try to find
images where you can see the shadows in the hair and also the highlights or the
reflections on the hair. If we look back at this image, in straight hair
it's easier to see the texture of the hair
rather than curly hair. So I would suggest you to
start with straight hair. Then try to avoid the tilted
head like in this picture. Because that's a more tricky to draw and figure out where is the silhouette of the hair and how to draw the face
together with the hair. Overall, try to find an image where you can see the
silhouette clearly. Now, let's move on
to the next part.
5. Beginner Mistakes: [MUSIC] Now let's look at some common beginner mistakes when it comes to drawing here. One of the first
things which I want to mention here is try not to draw every strand of the hair because you will
drive yourself crazy. First of all, it would take
you super long time to draw every strand of
the hair and also, it doesn't look that great. This is one of the things which you should try to
avoid when you are stylizing drawing the
characters because you also want to create something quite interesting and
stylized, probably. This is one of the things, try to avoid drawing
every strand of the hair. The second thing is when
people start drawing hair without adding any volume to
the hair of the character. Basically, you would just draw the hair like this without adding any extra shape above
this skull of the character. A lot of people forget adding
any volume to the hair. Try to add volume to the hair. Another common
beginner mistake is starting to draw the
hairline super high. If you want to draw for
example a band on top of the head and the hairline
is way too high, it starts to look
quite odd because naturally the hair is growing, maybe from somewhere here so, the hairline would
not be so high. But maybe if you consider some historical
figures actually, or some historical drawings, some of the hair lines
there in the paintings, or people actually were
wearing the hair like this. If you're creating
maybe illustration with the historical sub-tones
or very specific style, you can get away with this. But I would suggest
you to consider more natural hairline and we will talk about hairline
and how to adjust it later as well but
watch out of that. Hairline, all
strands of the hair, super flat design of the hair, so no volume, try to
avoid these, well, unless you want to draw a
character with very flat hair. But I just want you
to be aware of it. One of the last things, what I want to mention here is the shape or the silhouette. For example, if you
want to draw curly hair or something which has
more repetitive shapes, try to vary the
shapes of the hair. For example, I wouldn't do the bumps or these half
curves all the same but I would maybe make this one bigger and maybe another
smaller one here. Basically, try to add
variety in the hair, so don't create the same shapes. I might do another class
just about styling the hair and different styles
but these are some of the things I wanted
to mention for you here. Try to match or try to create the hairline in a position you would be happy
with not too high, and not too low which will
be also quite unnatural in broad spectrum of hairstyles or the hair you
usually see on the people. Then every strand
of the hair, flat, no volume and shapes
which are too repetitive. I think this is enough for this part and let's move
on to the next one.
6. Hair Shape: I already mentioned a few things about the shape of the hair, but let's look at
it more in detail. First of all, what
I mentioned to you is to notice overall
shape of the hair. What I see here is like a
triangle shape of the hair. But of course, if you would
just draw a triangle, that's not very
interesting hairstyle. We want to break off
some of these shapes. What you can see
here is this shape. You can see that the hair has a bump here and then
it curves here. There is already
variety in shapes. Then here we can see that the hair is cut behind the neck. In this type of shape, try to always connect the hair at the same
height or that you can see how this side of the hair is connected
to this side. You will not suddenly
draw maybe one part of the hair here and other part completely
in a different height. Always consider how the hair is connected behind the neck. We can also see that there is this small bump which I always draw when
I'm drawing hair. The shorter hair
goes upwards here, Then because of the
gravity, it goes down. Shorter hair up,
longer hair down. Then you would break off
the silhouette here, because at the end, the hair is again lighter. It goes up slightly. We have this overall
silhouette here. We have broken up here,
you will go down. We have a little bit of
curve going back up. And then you connect them behind the neck in the same height. Consider the full
silhouette here. Now let's sketch this
also with the face, so we can start practicing. If you haven't done my class where I mentioned all the
tips on drawing faces, check that out because this
might be too quick and I will just quickly sketch the shape so we can
draw this hairstyle. If you are not
comfortable just drawing the hair and the face just
by looking at the reference, you can always bring
your reference as a separate layer and draw on top of the layer above
the reference image. I will quickly draw the
rough proportions for my character and I reduce
the opacity of that layer, also the reference layer. And then I will be drawing
on the layer on the top. Okay, so I have a sketch
based on this photo. And as you can see we talked
about the overall shape of the hair and breaking
of the silhouette. I didn't just draw a triangle
here for the hair style, but I created this small curve to create more
volume and movement. And the end of the hair, as I mentioned to you, when hair grows out of the head, the hair goes a little bit up and then it goes
down with the gravity. And then there is some
movement here at the end. I mentioned to you this back of the hair that try to connect
the hair at the same height. The illustration
is more readable and people see what
you mean by that. This is more like
how to end the hair, even though the
hairstyle might be a little bit longer
here in the front, then you can create like
this type of curve. Now let me show you a
few more examples of how the hair can end and what to pay attention and
how you can draw it.
7. Smooth & Wild Style: Now, let's compare the
shape of the hairstyle and the overall
silhouette of the hair on these two references. As you can see, they
have similar hairstyle, if you think about it, but one has this mass of
hair flopped to the side. But if you draw the hair, let me make the brush bigger. Here, for sketching, I'm just using one
of my custom brushes which are nice for sketching but you don't need
them for this class. Let me draw this. Let's just make it quite simple. Imagine you would draw
hairstyle like this, that you would just
end the hair here. It might look quite
strange in your drawing, and people might not be able
to imagine what you mean. I would make sure that I make
this line curve downwards, so people who are looking
at your drawing can imagine that the hairstyle
continues behind her neck. Again, don't do
just straight line, but try to curve the hair
so people can see that the hairstyle continues
behind her neck. Because here we can clearly see where the hairline
goes, but again, if we just draw something
like this and like this, how you see it on the picture, it might look strange, because it would look
like it's cutoff. Try to always connect the
hair behind the neck. You are basically stylizing, and people can imagine how the hair is connected
behind the neck. Let's look at more examples now. Here, we have two more examples. Let's first talk about this one. Her hair has more smooth
shape at the bottom. I mean, if you disregard all
of this hair flying out. Let me sketch around
the hairstyle. You can include some of these. You can imagine that her hair
and the overall hair shape is connected in a more rounded
cut or rounded hairstyle. If you simplify this
hairstyle even more, basically her hair would
look something like this, being more round
around the head. Then because of the gravity
and the volume of the hair, there will be more
hair at the bottom and going closer to the
face around the neck. This is how I would simplify
the hair most of the time because you can disregard
this loose strands of the hair with this one. Here you can see I already ended this little bit
higher than this one. I can always correct that and try to connect the
hair in a smoother shape, because we are
stylizing the hair. I would use this shape
when I want to show that the character is more put
together or more simplified, so basically the end of
the hair is more smooth. Let's compare it to this one. Here we have more frontal view even though she is turned, but this one is a more
three-quarter view. You can see the shape
around the head is already a little
bit different. You can either create very
round shape around the head, but to make it a little
bit more interesting, I usually create curved
shape on the left side here because she is in three-quarter
view on the right side, so we have more volume here. As in the previous example, here I would go a little bit up as the shorter hair grows out and then more straight line
and then curve back inside. Here we are already creating little bit more
interesting silhouette than just round shape. Now, to compare the
bottom part of the hair, that's what I
wanted to show you. Here, it's more smooth,
as I mentioned, but here we have so
many strands of hair or these hair sections. If I would draw all
of the sections, her hair is still stylized but it looks a little bit
more wild or scruffy. You can definitely design the hair following these shapes, especially at the
bottom like this. Her hair would look more wild. It's different styling
than this one. You can still draw
these ends of the hair which are more pointy
within the shape. We can delete this part so
you can imagine it better. But the shapes here at the end
are within the silhouette. I am not breaking the smoothness of the
silhouette that much. Always pay attention
how you want to stylize the ends of the hair. Is it more smooth and
more put together, or will it be more wild and you will use these
triangle shapes. This is one tip, or one thing to pay attention to when you are stylizing the hair. If you want to create the
same styling also on the top, you can always add
this little bump where the hairline is. We have the hairline
here on the side. We'll talk about the
split of the hair more in the following part. Now, just to recap
what we talked about here is the volume of the hair. The overall shape of the hair which we have here
around on the face. Paying attention to
the overall hair and overall hair shape and disregarding some of
these lose hair for a while. Then the other thing
is to pay attention how you want to end the hair
shape or the hairstyle. Do you want more wild look
for the ends of the hair or do you want to
have it more smooth and more put together? Now, let's move on
to the next part.
8. Hairstyle & Hair Split: Now let's talk about
the hair split. As you can see on
this photo reference, her hair is almost in
the middle of the face, but the middle of the
face is somewhere here, so the hair split is not exactly where the middle of
the face would be. Because, of course, most
of the people don't split the hair exactly in the
middle of the face, but it's more or less there. But what I would
suggest you do is to actually draw the
hair split more aligned with the middle of the face because that will
help you to balance the face features because if you place the hair
split slightly off, that might create these
visual illusion that the head or the face doesn't
have a correct symmetry and it should start
somewhere here. So basically what I
would suggest you to do, if you want to create the
hair split more on the side, push it even further. You either do it aligned
with the middle of the face or a little bit further, so not too close to the middle because that can throw
off the illusion. I would suggest you focus
on two options like this. Even though this is not exactly how it is on the
reference photo, because you're stylizing either
create it somewhere here or you would split her
hair somewhere here. If you go to the other side, it might be tricky
to create the curve, but of course, you can do that. These are some of the options which I would
suggest that you do when you are thinking
about the hair split. Now, let's look at
more reference images so I can show you the same
idea on more references. We already looked at these
two reference images and as I mentioned to
you, for example, here, the hairline is very close
to the middle of the face, so what I would do here is to push the hair
line somewhere here if you want to do that, and then create the
shape with the curve. The hairline is not too close
to the middle of the face if you don't want
to place it there. Here, I feel like the middle of the face is still a
little bit too close, so even though the hairline
is here or the hair split, I would place it further
down to the left and then create the curve
and the shape of the hair. What you can do here
with this hair split, you can see it's
little bit curved. You can do that as well, just to create more
variety in shapes. But there, you have
to be more careful how you create these shapes because it can start
looking a bit odd. So in order to simplify it, I usually don't curve the
hair split that much. You can start here and
then you can connect it with the curve of the fringe or these hair which is
growing out of the face where the hairline start. You can do something like this
and push it further down. These are two ideas
that you have, the hairline on the
side of the face, this one is curved, this one is straight, and then we looked at the hairline in the
middle of the face. You have these two options, like further away from the
face that we are looking at, or more on the visible side, so we have the middle split, side split, straight,
split here, or curved. Let me show you another
idea what you can do. Here we have these two examples. This one, as we
already looked at, she has the side split with the hair going in
this soft curve, and this is what I usually
like to do with illustrations, that the hair again grows up and then goes down in this soft movement as
I showed you before. Going up from the hair split, and this one is the example where she has it almost in
the middle of the face, but the middle of the face
is aligned with the nose, the mouth, and the chin, so the hairline should
be somewhere here if you want to create it in
the middle and then again, go up and down
following the face. I can delete this part so
you can see it better. We have the middle and then
we have the side split, and now we can compare
it with the fringe. Here we have the back
of the head here, and on this one we
don't see it that well. But obviously, she has also
the back of the head there and then her fringe
is quite high up. Basically the hair split is here and her hair split is here, so we have it this direction
or this direction. You can then draw the
rest of the fringe and then create another
hair split here, creating the fringe shape and connected with
the hair here. We talked about the
hair split in this one. This one is more straight,
which is horizontal. This one is almost vertical but following the head's shape. Don't make the
hairline like this. Obviously, as you can see, even on the reference picture, you would make it more like this and to follow the head's shape. Then as you remember, we had this one which
was more on the side, so we had three versions of
the hair split on this one. Now let's move on to
the next example.
9. Hairstyle & Hairline: [MUSIC] Now let's talk
about the hairline. Because it's also one of the
important things to consider where you place the hairline on the character illustration. Because that can
influence the look, as I mentioned to you before
in the common mistakes, where to place the hairline. So let me just sketch it out. Here, we have the eyebrows and the hairline is somewhere here compared to the
end of the head. You would consider what
is the distance here, so you don't want to place
it too low or too high. That's one of the things. If I place the hairline too low, maybe her forehead
would start to look quite disproportional
to her face, but if I want to create
maybe cuter character, I can always create bigger
forehead like kids have. But if I place the
hairline far too high up and then maybe
create something like this, then she might start to look more like an alien
because you would imagine a huge skull or basically something
what you don't see very often in the hairstyles. Consider the height. As you can see it here, we have the placement. Another thing, when I
start with the hairline, I would start with simple curve. But as you can see, the hairline is not just
one curve, because usually, the hairline goes little
bit up in the temples, then it goes back down
where the eyebrows are, and then it curves
again towards the ear. On this reference, you
don't see that well, and, of course, you have different types of hairlines
on different people. We will look at some
other references. But as you can see, even though I kept it
pretty simple here, I created a line already curved. I didn't just make
one straight line. This is one tip what I always consider when drawing hair, that the hairline
is not straight. First, the height
compared to the top of the head and the eyebrows. I usually keep it longer
here and shorter here, and then you have the curve. Now, let's look at more examples of how you can see the hairline. Here, we have two
very bright examples. On this one, you have
almost profile view, but it's still a
three-quarter view, and here we have a frontal view. First, let's look at this one. As I mentioned to you, we have the height
of the forehead. This line is not
completely straight. It is following the shape, how the forehead is curved. Then you see there is
less hair in this area, so I wouldn't draw
the hairline to go super far out because then she might start to
look like she's bald. Even though she has
less hair here, I would just curve it slightly, and then you have more
hair towards the ear. I would create something like this and then smoothen
out the line here. It's always curved. But if you feel like
that she doesn't have too much hair or the character doesn't
have too much hair here, you can always
reduce this curve. [MUSIC] So something
like this and consider where the hair
volume also goes here. You can notice that
the hair goes up here slightly and then
we have the forehead. As I mentioned to you
in the common mistakes, don't just draw
the hair following the head shape just like
this, always go up. We will have the
forehead and then the hair would go
up, growing up, and then you would create
the rest of the hairstyle. This is how I might simplify it. [MUSIC] If you add more hair
here closer to the ear, like the sideburns,
this might start to look more like a
more manly shape. You don't want to create too
much gender classification, but this is what
usually people in the society consider
more manly hairstyle. I wouldn't add too much
hair in this area, even though females have
hair there too, of course. Now, let's look at this one. Now, I will take yellow again, so you'll see it better. This girl has very
curved hairline. I might simplify it. I wouldn't create maybe
such a curved line, but as well kind of
contradicting what I'm saying, it might create a very interesting hairstyle
and interesting character. Maybe you can keep it like this. Always consider the hairline
that it's not straight. Here you can
smoothen it out more or you can keep it more
interesting and curved. This depends on your style. But if you want to make
it more simplified, you can smoothen out these
curves a little bit more, but still keeping
it quite curved. There you go. Then I would add
her hair following the shape and the
silhouette of the hair. [MUSIC] To recap
about the hairline, always consider the hairline is curved in three-quarter
view on the forehead, then it goes little bit
up near the temples. Here, especially
with men hairstyles, you would create the
curve more here, and then it curves back up
to the ear near the eyes. If you want to create
more manly hairstyle, you can add hair here as well, and then you can create
the rest of the hairstyle. In the frontal view, you can create
more straight line or a little bit curved
on top of the forehead. Then here, this is very
specific hairstyle. It's more curved because she has very interesting hair
sticking out on the temples, but you can simplify
just going out here. You can always redraw this one. If you want to
simplify this area, you can create actually
something like this. Very interesting hair shape. You can study different
hairstyles to see how people have the
hairline growing out, but most of the cases you have hair more straight
here on the temples, it goes back, and here near the ears goes in
that curve shape. Then you consider the distance among the hairline
and the eyebrows. As you can see, this girl
has higher forehead, this girl has quite
short forehead, so you can play
with the distance, but then consider what
would be maybe too low. This might be too low or
this might be too high. It depends when you
look at the picture, but you might see, okay, maybe that's why my
drawing is not working, the hairline is too
high or too low or it's not curved and then it looks too
much like a helmet. Now, let's move on
to the next one.
10. Hair Direction: Now let's talk about the hair
texture and the direction. We talked about the
volume of the hair and we talked about
the overall shape. Then we talked about the
hairline, hair split. Now let's talk about the direction and how it
influences drawing the hair, and of course, the texture. Because of the
direction of the hair, it's easier, I think, to spot on straight
or wavy hair. That's why we're starting
with these two examples. So let me show you what I
mean on a separate layer. You can notice that
hair direction from the top of the head it grows out as we talked
about a little bit, and then it goes down. But because of the
wind and the volume, you have different directions
how the hair flows. Here, again, it goes up and down, and then here it goes straight. And on this specific hairstyle, the hair goes back
towards her torso. On this side is
little bit different. You have these two waves. First it goes down, then out. There is a repetition of this wave going
down and up and up. Again, the repetition
of that same shape. But as I mentioned to you, try to avoid exactly
the same shapes. So you can see this one
is slightly longer, this one is shorter, and this one is longer, even though you have
the same shapes, but they are not
the same length, and also the curve
is not the same, like this one is a
little bit bigger, this one is more shallow. Here on this other side, you have similar shape that basically going other direction. Now she looks a little
bit more like Medusa. But anyway, so this is how I would approach the
direction of the hair, always going up little bit from the hairline and
then going down and depending on the volume or
the wind, they would curve. Let's compare it with this one. It's the same going up
first, then going down. But as you can see, some of her hair is
influenced by the wind. Here it goes out. But this one, it's probably
a little bit heavier. It goes down, and these ones are going
back to her torso, but she still has few of
these hair strands going up. Again, just going down around
the skull and here because these small hair strands
are probably very light, they go up here, but the top part of the hair here it's
heavier going down, here, again, going down and from the ear because usually we
have the lighter hair here. It like in those old
commercials when you have the wind in your face and the
hairdos out from the face. But then at the bottom, it goes back down. Consider the direction,
grow up and then down. This is usually the
movement which I'm considering when I'm drawing the hair without the reference. Let's look at different examples where we don't have
straight hair, it has a little bit
different direction because these long hairstyles
have heavier hair. Basically the gravity
is pulling it down. But still you have some curves, so it's not super straight
in these two examples. Now let's move on
to the next one.
11. Direction & Texture: [MUSIC] Now, as you can see, we have different
texture of the hair. In this picture is little
bit hard to see where the direction of the hair is because of the
darker background. First, let's look at this one. The hair is probably heavier, so it doesn't curve that much. But because of the
movement or the wind, it goes out a little bit here. Again, here it's a
little bit heavier, so it doesn't grow
out that much. But still it goes up then
down around the skull. Then here because
she probably turned, so the hair goes this way. Here it's a little
bit more straight. Going up around the skull down
and here going down again. This is the movement because
consider where she moves. Probably she moved
from this area here. The hair is not so falling
down straight as on this side. Let's talk about direction of
the hair on this hairstyle. Because the hair is usually
lighter around this part, so you have the hair growing out slightly more out and
then falling down. Then it will go down here. As you can see with the
curves going down here. It grows out a little bit more based on the gravity
because this hairstyle is probably a little bit lighter
than this hairstyle because she has these like braids and they are longer,
probably heavier. You can see the braids or the curls going in
different directions. Consider the
direction and try to notice where are the
hair strands going. Notice the highlights then in that way you would
see the hair better. Now, if we talk
about the texture. We have the braids. If you want to draw the braids, you can simply draw bumps,
something like this. There are different ways how
you can draw the braids. I can create another class about drawing
different hairstyles. Maybe let's move this so
you can see it better. I would approach drawing braids following the direction
as I showed you. It will not be exactly straight. But there are different ways
how you can draw braids, but this is how I
usually simplify braids with these
like half circles. But I think it's
definitely fun to create different hairstyles
and stylize it differently. This is just one of the ways how you can stylize the braids. Now, if we look at this one, because of the curls, you can see here that they
create this type of movement. It's sometimes hard to see
because there is a lot going on in these
beautiful hairstyles. Let's simplify it
more in this way. This is how I would
create the curls. Either just with
half circles if I want to simplify a lot or you can play around with different shapes within
this beautiful hairstyle. You can play with
half circles and creating and always thinking
about the overall shape. Compared to the
straight or wavy hair where we create it
more flowy lines, almost straight, here
we are playing with half circles or
these wiggly lines. I hope this is
interesting example of texture and
direction of the hair. Just to recap, think about the direction of each
specific hairstyle, because every person has a little bit
different hairstyle, how the hair grows
out of the head. Is there a wind? Is there movement? Is the hair heavy? There will be a
gravity involved. Think about the direction
of the hair and then think about the
texture of the hair. Would you describe it with half circles or the
squiggly lines? After you thought about the overall shape
and other things, what we already discussed. We can recap what
we talked about. We talked about overall shape. We talked about the
ends of the hair. Is it more smooth? Or is it with smaller strands? Or then think about
the hair split. Where is it? Is it on the side? Is it in the middle? Then we talked
about the hairline. Where is the hairline? Is it higher up or
it's little bit lower? Now, we talked about the hair direction
and the hair texture. These are some of the
things to consider and definitely try to
experiment with those. Now let's move on
to the next part. Here, this is the example from the drawing faces with
astrology inspiration. You can see what we
just looked at from the reference photos
in the illustration. We will be doing another illustration
later on in the class, following the reference image. But here, you can see what we just talked about
to compare it. Let's start with this
one growing out, then following the head
shape and then going down. Here I'm using the idea that the hair is lift up by the wind. In this one, you can see that I'm following
the same idea, going around the skull, lift up from the wind a little
bit and then going down. Same here, around the head, and then going down. Then I'm using all these lines following the same direction. Here, I added a little
bit of variety, but the hair still follows
the same direction. The same here. It's not only
outside of the head, but also the direction
within the hairstyle. Here the same as we talked
about just a second ago, using these half circles to create the direction
of the hair. I'm following the front
hair shapes here. You can imagine that the hair is growing from the skull outwards and still using these different
shapes to create hair. If you want to see the full illustration
process of this one, please go ahead and check out that class as well if
you haven't done so yet. It's a good practice
to draw hair as well with more
examples, the better.
12. Hair Sections: [MUSIC] Now let's talk
about another thing, what I think about, and you should consider when creating hairstyles to create variety and interesting shapes
into your illustrations. There is hair sections
or hair chunks. How you can divide the
hairstyle going from the overall shape into
the hair sections. Let me show you on these two examples because
you can see the hair chunks or hair sections more clearly than in some
other reference photos. Then when you are drawing your illustrations
and hairstyles, maybe from a memory, you can invent these
hair sections. For now, let me show you what hair sections I would consider on these illustrations. I would consider this one, one of the hair sections
which goes to the back. Then I will take another color for this
other hair section. They are divided by
the shadows, right? You can notice them clearly. There is a shadow here. I would consider this one
another hair section. Then you can split
also this other side into two hair sections. One will be more on the top and one will
be more at the bottom, closer to her neck. Let's take a different color. Maybe this one. This will be connected
behind her neck. This would be another section. It is up to you how many sections of the hair
you want to create here. Maybe we can take dark
blue for this last one or a purple. As you can see, I divided the hair to
different sections. I don't like end of the hair
so I can adjust it here. It's like that anyway. We can draw these also
on this other character. Do you already see how
you would split the hair? Maybe let's start
with a yellow again. I can have this one
as one of the shapes. Then subsection would be maybe this together
with this part, considering the amount
of light it's getting. Then let's take maybe
this green one. We stay consistent for this
bottom part of the hair. You can split this one into two sections maybe
if you want to. Here, we can take maybe
something like this. [MUSIC] Maybe add this part to it. Then we still have
little bit of hair here. This would be another section, and I would separate
these with shadows. Let's look at the drawing
we made previously to apply this method on
top of that one as well. With this one, try to remember that I'm
varying the shapes, so they don't have
the same width. You have these squiggly lines. Now looking at the same
example as we had before, let's try to add the sections
to this drawing as well. Because creating
sections will help us define other
shadows more as well. Especially if you consider
maybe hairstyles like this, because you don't have very strong light source
and it's quite hard to see where the shadows are
because also she has two different colors
in her hairstyle. Let's sketch these sections
as in the previous example. Let's create the section
for the darker area, which is this one
around the face. This area will be also
little bit darker. We can create already
section in this part. We can plan to have
it darker actually. Then let's create
another section, which is this one. It can be slightly darker as well as you can
see, it's here. [MUSIC] We can see that this section is more
clearly in the shadow. So we can already start thinking about that this
will be darker area. Then we have this section, which is little bit lighter. Then we have these two sections. You can think about shading
within these sections. You can create darker area here and lighter area here
and then connect them. For example, it can be
lighter here and darker here, but we'll practice that
little bit later as well. You start observing the sections when you look at
someone's hairstyle. Because it can be
quite tricky to think about where to add highlights, where to add shadows. Now let's move to the
next part. [MUSIC]
13. Sections & Loose Strands: Now, let's look at
more hairstyles. I will show you
another cool tip, which I think about when
drawing different hair. I will sketch the silhouette of the hair as a first thing. We already discussed that. This would be the
first silhouette. Then I would consider these hair sections
keeping them uneven. Now, as you can see
on this reference, which is super great, have these loose
strands of the hair which would break the
overall silhouette. Even if you don't have these loose strands of hair
in the reference photo, I always try to add
few loose strands like this to make the
hairstyle more interesting. You don't have to add too many of these loose
hair strands. For example, you can
pick and choose how many you want to add
and you can invent few. I already have one going here. I don't have to add this one even though it's already there. Because this one
is quite curved, I can curve this one
as well just to align or balance out the
styling of the hair. As you can see, I can
just draw it like this. I'm trying to leave them
in different height, so they are slightly different. Maybe I will not add this one because it will
create better flow if I keep only this
one and this one. You can work with the hairstyle, so you don't have to keep it exactly as it is
in the reference. You will think about
the hair sections, as you can see here. Then you can add these
loose strands of the hair. For example, here, we would see the
shading pretty nicely. As you can see
already this section, you can see it's lighter
here and darker here. That's why we are
creating these sections. Because you can balance out the highlights and
shadows much easier. You will not just add shadow to this top
part of the hair, but within the sections. Then making the
overall silhouette with a sections
more interesting. Adding these loose hair. Then of course, the
sections are following the direction of the hair
as we already talked about. If I show you how
I would approach this one just for more examples, because looking at more
examples always help, I think. You can see the overall
silhouette is quite bumpy. I can simplify it a little bit, but still keeping it quite lose. I'm already thinking
about the sections. This will be one section,
another section. This can be a loose strand. This would be another section. Here would be a loose
strands of hair. I can add this as a section. Another. I can split this one
in two sections, and add one more section here. Then keeping few loose
strands of hair. It's up to you how many loose strands of
hair you want to keep, and how many sections you want to have within
the hairstyle. I think this is super
helpful technique when observing hairstyles. You will look first
at the silhouette, then you would consider the
direction and the texture. Then you can start thinking how you would split the
hairstyle into sections. Now let's go to the next part.
14. Mini Exercise: Now it's time for mini-exercise. Here I want to show you the
ribbon shading technique, which is super secret or
not so secret anymore, a way of shading hair because then you can create very nice
and glossy looking here. I found this reference where we can base our
mini-exercise on. First let me show you what
I'm paying attention to. I will take a section of this hair trying to look
for this ribbon shape. Then I will be noticing
the darker areas and lighter areas
of this ribbon. Let me duplicate this shape
so we can see it also here. This will be the ribbon and
I was drawing with these chunky smooth-out sketching
brush which I created. But you definitely
don't need this one, but these are some of
my brushes which I made and you can get them on my
website if you are interested. I created hair and also fur pack and sketching pack for this one. But if you don't want
to get these brushes, you will get similar look
from some of these brushes. I would recommend, for example, 6B pencil, HB pencil, or technical pencil. These create similar
look and you can adjust the size for this
sketching exercise. You just need to get
used to this brush. Now we will change the color and I will take darker brown,
something around here. You can download this
in the resource section so you can use the
same brown tones as I will be showing you here. Now, I will take the
different sketching brush, but you can use any brush
from the sketching section, as I mentioned to you and I
will recreate this shape. Let me make the brush bigger
so we can see it better. Create similar shape to this. Thinner, thicker, and thinner. Something that resembles ribbon because then the ribbon
would continue higher up. Now I will create this
ribbon shading so first. I need the silhouette. The best is to work from
dark to light colors. You can drop the color. Now, I will do the Alpha Lock and take the lighter color tone. The darkest areas
are here on the top, here in the middle where it's more narrow
then here and here. The lightest areas are here. As you know this, the highlights are
not straight lines. Always try to follow
the shape of the hair and they're a little
bit wider on the edges. I can delete this part here so we can see the
shadows better. Now I can add even
a lighter shade. Try to vary the size here and then we will have
the lightest tones in a smallest areas. Now what you can do is
either use the color picker and create these two-tier
shapes within the hair. Always picking the color
which is close to it, trying to keep the same
shapes as we did before. You will follow the
direction of the hair as we talked about and you would create
these nice transitions, mimicking the hair shape. From the distance, it will already start
to look as shaded hair, which is pretty cool. This technique is more
time-consuming, but still works and you can use any brush
for this technique. Then other technique is
to use the smudge tool. Always pushing out. This will help you to blur
the edges quite nicely. Going from one side to another, always having the direction
of the hair in mind. Make sure you don't smudge the colors together too much and keep the variety so you will still have
these three color shades. This is little bit
more blurred out. One of my favorite techniques is to actually use hair brush. As you can see, I need to
rename them for the brush pack because I just created
them which are super cool, different hair brushes, so I think this one
is my favorite. Let me adjust the size. Like this, I can easily draw
more hair shapes in one. This is the fastest technique
because of the hair brush. You can see you have
three different ways. You can use any brush to create
these shapes by yourself. You can smudge with any brush, or you can use
custom hair brushes. This is most efficient
when you create a longer brushstrokes,
not shorter ones. If you want to smoothen
out this part, even more, you have to make sure your
layer is on Alpha Lock, and then you can go
to Gaussian Blur, and adjust the smoothness. You can see it can be too
much or just little bit, maybe few percent to make
the hair more glossy. Then as we talked
about hair sections, I can create another
hair section, just dividing these highlights to make it look more natural. As you can see, we have super nice glossy
ribbon-looking hair shape. This basically creates sections within this small section. It depends how much detail you want to have within
your illustration. But like this, it's super easy and you can create this
beautiful glossy hair. Always work from dark to light
and use transition colors. You have the shadow color, you have the mid-tones,
and the highlights. Here I have two colors
for the highlight. Then you will have divisions within the hair
silhouette or hair shape. Because here we have
only one hair shape. I really like to shade
hair this super cool way because you can create
these beautiful glossy shapes. Now we can move on to the
next part where we will color the full hairstyle
using this technique. Let's do that.
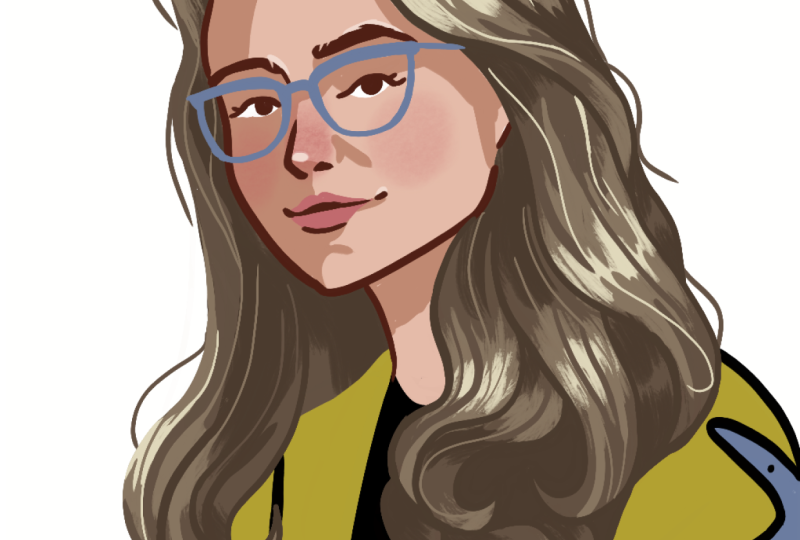
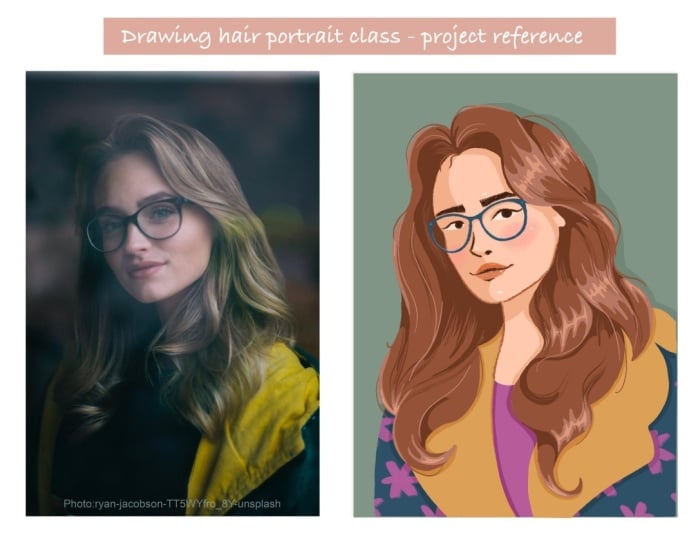
15. Let's Start The Project: So let's start with our project. You can choose any
reference that you like. I chose this one because
I feel like here you can see nice
flow of the hair, there is a three-quarter view which is always interesting, and then we can see
the highlights and the shape of the
hair quite clearly. Also it has quite
a lot of volume. It's already partially
stylized for us so it's a great reference
to practice from. I will duplicate the image so we can practice creating
the face on top of it. Especially if you're not
used to drawing faces I will speed up this process but I will show you how I do it on top of this
picture for practice. The more you do this the less
reference images you need. You can also watch
my other class about proportions
and drawing faces. But this is generally
how I would do it. I would look at the reference and then sketch on
a space next to it, not necessarily on
top of the picture. Here first I always start
with a loose sketch. I will choose one of the
pencil sketching brushes. Again, here you can take any of these sketching brushes
from this folder. Let me see if I have the
brush which is big enough. Now, I will reduce
opacity of this one so I have a rough guide, so it's very soft there. I will create another layer with a more tighter sketch and I want will choose a
different brush for it. So here what I mainly to achieve is to place
the eyes correctly. I will take a darker
color and you can get exactly the color palette which
I created for this class. You can add the glasses
on a separate layer if you want to because
you can keep them maybe or maybe you decide you
actually don't want to keep them before we
start adding the hair. Then you can sketch
the outfit loosely. Of course you can also watch my outfit drawing
class if you want to. After having a loose sketch, I can always use the
free hand selection tool and move some elements, if I feel like that can be
in a different placement. She is quite high up this part, so I can move it a
little bit lower still keeping in mind
the middle of the face. I think this is fine. I think this is nice. Now I can start
drawing the hair. We had the loose sketch. I will create the hair
on a separate layer. So first, as I don't see
where the hair is now, based on the reference, I can make the reference opacity a little
bit higher again. Now I can loosely sketch
the sections of the hair. Starting with the hairline
here, as we discussed, I need to take the darker color, make the brush bigger. This would be one
of the sections. Always thinking
about the sections as we practiced before. Here I can see it ends there, so I can do that, keeping the hairline here. Let's see if it works
with the forehead. I think this is quite fine. Then I will make a
little deep here, and connect it
with this section. Here, we can create the
connection of this section. Here we see there
is this nice wave, so I can do that. You can see it here. You can create
actually two sections. This one connects
to this section. Then I have some loose strands of hair coming out of there. Here you can imagine, again the ribbon
shading technique and we can connect
the hair here. Here, even though
it's not there, I can add more hair so
we have more volume. Here we can create nice
direction connecting the hair, and here we can create
another section like this. They tuck behind the
other ones quite nicely. Here we can create
another subsection. Here there is a nice curve, but here it's touching the neck. I can imagine the
curve going here so I can be a little
bit more creative. It's not exactly
how it goes there, but based on these curves, you can imagine the
shape of this curve. Here let's create another
section of the hair. Think about what we
discussed before, how the hair ends. Here we have this shape, but I'm not sure if
that's super nice, so maybe we can
create a curve here. Let's do that, and maybe not keeping
them in the same height. Let's do this. As we discussed before, creating the driven may be
creating the overlap here. That's nice. Here we
can create a section. We have more layers here. Here, I can reduce the opacity
of this reference image and see how I can
adjust this hairstyle. I don't need it anymore. Here I can reduce the
opacity of the outfit, so it doesn't distract
me that much. Here you can consider if
you like, the hairstyle. Here when I'm looking
at the hairstyle, it is quiet stiff on this side. What I can do, I can reduce
the opacity of this one, add a redraw on top of it, adding more volume
and more curves. I always find it easier
to draw in more steps. We can add more movement, especially when you
are practicing. Let's create another
version of this hair. I quite like this curve, so let's emphasize it
a little bit more. Hair growing out, down, and creating
these nice curves. As you can see, you can create this
a bigger variety, as I mentioned to you before. You can also adjust whatever
brush you are using. You can adjust the stabilization so you create smoother
brush strokes. Here, you can do this. Make sure that you don't end the brush stroke exactly
where the other one ends. Here we want to connect them, and here we want to
create more volume. As I mentioned to you here, it feels a little bit stiff. What we can do is this and
add this type of subsection, even though it wasn't there. On this side, I feel
like it's pretty nice. Maybe we can create that
this hair goes behind her shoulder and add
another subsection here. Then create maybe this
curve a little bit bigger. Then I can delete this part. We have this subsection and
this one creating a curve, and then connecting them. Let's do the same
on the other side, creating a variety in thickness
of these hair strands. These two end in
the same height, so as I said, it's not the best. So maybe we can create
something different. Maybe something like this. You can play with the shapes. I think this works quite well. Here we can invent some
loose brush strokes because as we looked at
with other examples, it's always nice to add those. Maybe we can add one here so we don't break the
silhouette too much, so maybe something like this. Following the
direction of the hair, we can add maybe one
here, maybe here. You can also add them at the end of the coloring
to see what fits. Maybe this part is still
not working that well. Maybe we can connect
these two sections so there is better
flow in the hair. Create more variety because here these two sections
looked quite similar. I think here now we have
enough variety in width and also the placement
of the curls. Here we still need to add maybe some strokes
which we'll connect, always thinking about the
direction of the hair and the thickness of
these subsections because this will help us
when we will color the hair. Maybe one little strand here. I think this works pretty well
already for the next part, where we will add colors.
16. Let's Add Some Color: This is where we left off. We have the sketch for the hair, we have the glasses, the jacket, and the face sketch. Before you do the coloring, always check if you have
enough layers available. You can go to Canvas Information about this artwork
and check the layers. I have 56 layers available
for the coloring, which should be plenty. That's good enough. Now because we will have
to prepare few layers, it will take some time, so prepare some coffee or
tea for yourself and take it step by step so you
don't get overwhelmed and you can get the
exact color palette. This is the character color
palette that I will be using. You can get this
exact color palette in the Resource section. I will be using few brushes, which are something
for the solid colors, and then have
something for texture. But you don't need
exact brushes for the solid texture a
something similar to this. You can go to inking folder
and either use Syrup brush, or I like Mercury brush, or you can go to
Calligraphy folder and use Script brush or Monoline brush. Those are with solid colors, so you can use those. If you want, you can get exact brushes that I use
also from my website. But again, they are not
necessary for the project. Now let's start putting
down the base colors. First of all, this is
what we did so far. Right now, we can delete the rough hair sketch because
we don't need it anymore. Then from the jacket
and the glasses, we need to separate
it into two layers, so I can go to Selection tool, select the glasses, swipe down, cut and paste, and we will have them
on a separate layer. We can have this
one under the hair. We will be creating few
different groups of layers. We will have one layer
group for the hair. Because the glasses
will be on the top, so I will move this
layer on the top. Then we will have
a group with hair. Let's create the hair group. They don't have to
be in the groups, so you would see the
organization better. Then the jacket can go under
the face because we will have also coloring
of the face and the loose sketch we also
don't need anymore, so I can delete that one. You can copy the Canvas
if you're not sure and you might need
it at some point. Here, we have faced outline, also, a rough sketch
for the hair. We don't need anymore as well, so I will delete that one. The reference, as you can see, I just hit the frame and
the photo reference. Whatever reference you have, you can have it on
a separate layer. We have these. I will delete this one as
I don't need it anymore, and the Loose Sketch, I'll just have this one
here, and the shoulders. To establish the shapes, let's start creating
a base for the face. We'll have the face outline. Under the face outline, let's create another layer, which will be the
face base color. For that, I will take
light beige color. You can choose any
color that you like. I will follow the
sketch that we have, and here because she will have
some t-shirt I can create, maybe like a half circle here, and then I'll just
fill in the shapes. Here, I notice that
I forgot ears, so I can just do half
oval such as the ear, and then I can just
fill in the shape. I can adjust this one if it
doesn't feel exactly right. I think that's fine. Good. I have base
color for the face. I can put these two into a
group and call it a face. I can collapse this one. Now, let's create base
color for the hair. Here, I will take this color which is
second from the left, not the darkest brown, and again follow the shape of the silhouette
that we created. Now I can just drag and drop. If I filled in all the edges, it should be one solid shape. Here, let me see if this is
nice, so everything works. Now, I will reduce the
opacity of the sketch and I will be using
it only as a guide. Let's create a separate layer. Create the clipping mask
and take the darker color. When you look at the
reference image, try to notice where
are the darkest areas. Usually the darkest areas are around the roots
on top of the head and the face is casting
the shadow on this side, and then there are darker spots where
you see the layering, so the ends of the
hair are lighter. I see the darker area here, here, and here. That's what I will create here with help of the
lines, what I have, so let's do that. This part, as you see
there are some strokes, so I will create exactly that. I will try to vary the length of them so they are not
ending at the same level, and still following the
direction of the hair. Here the hair goes this way. Here I can just close it because it's
behind the face shape. I think this works nicely Here I'm always ending
it with half circles. Always try to vary the shapes. Then I can add some
shadow here to divide this part. This is enough. Then as I told you a little bit, to the roots of the hair. To divide these two sections, I can add some darker
colored tones here, and to divide this
section as well. There is some darker areas here, so let's do that,
and behind the ear. To divide these two sections, I will add some
shadow here as well This curve can cast the shadow as well. Let's add a shadow here too. Then you can assess if you
have enough shadows as it is, which I think works
quite nicely. Next, we will be adding
a lighter areas. We can rename these shadows. Now let's create
another layer with a clipping mask for
the highlights.
17. Let's Add HIghlights: Now it's time for
the highlights. I will take these lighter color and also with a clipping mask, I will look at the reference. She has colored in highlights, so it's a little
bit harder to spot where the highlights are. Here you can also decide
where to put highlights the same way as we were
looking at the ribbon. I can put some highlights here, and then on top of the head following the shape of the head, and then some on these
strands of the hair. So basically ends of
the hair sections, so here, here, here, and here. Let's do that. Now we can add one more layer because these are more
like transition highlights that we are going from lighter
brown to even lighter, and I can use this
lightest brown and just add slight touches in
the middle of the highlight, just to add extra glossiness. I think this is nice. Here on the highlights
we just did. Let's take the lighter brown. It depends how much
detail you want to keep. You can keep these
transitions quiet smooth and the hair will look
a little bit glossier. More stylized. You don't have to keep
these rougher edges. You can round it up like this. Now let's add another layer
to divide the sections. I will take the darker color. For this part, you
can either use just one mono line brush
as we did until now, and just draw this dividing
sections like this. You can reduce the brush size and just draw them by
hand just to create a little bit more definition
to the hair like this, or you can get the brush
that I showed you. I can basically do this
quicker like this. I can make it smaller. I need to create this
also clipping mask. Basically you would just draw few lines on top of the lighter tones
and darker tones just to create more variety. I will create another layer. Now I will take the
same color as the hair, and I will create few
lines here as well. Clipping mask we have on, so just to create
more texture here. Making the brush bigger. Again, you can do
this with any brush and few more brushstrokes. I think this works great. Now let's create few
loose hair strands as we created with
practicing before. I will take, again,
a smooth brush and with the same
mid-tone color, I will draw few
loose hair strands. I think this works great. Maybe we can add one
here, maybe one here, maybe something here, and this will create
more volume in the hair. You can vary the
thickness of your brush, and following the
direction of the hair, what we established before. We can add some hair here, and maybe something
to the fringe just to break the
shape of the forehead. I think this is nice. You can add as much
as you prefer. These are loose strands. This is not with clipping mask. Then I sometimes do
another one lighter. Then I can take
the lighter color, which we used, and I will
create few loose strands just to create little
bit more variety. We are done with the hair, which is super cool. You can play with loose strands and more shadows or highlights in different areas if you want. In the next step, we will add some
shadow to the face and colors to the jacket.
18. Let's Add Shading: [MUSIC] Now let's
color the face. First, we need to make sure that this is all in one group. It's hair. Good, so now it should
be in one group. It is in one group. Now we will be working. Let's double-check. We
have the base color, we have dark shadows, mid-tones highlights,
lighter highlights. Then we have the divider
shadow strokes which are these divider highlights. More lighter strokes, we had a loose strands
in darker brown or like mid-brown and then lighter strands
which we added here. Perfect, so that's that. Now let's look at the face. We had the face base
color and now we will create a shadow in this angle
based on the reference. Let's create another layer, create a clipping mask
and let's test out this lighter brown if it
works on this skin tone. It might be too dark. Let's see. I think it's too dark, so let's reduce the
color a little bit. Slightly lighter
and more saturated. This should work. Maybe I can save it so we
have it for next time. Good. First of all, try to notice where
are the shadows. I see the shadows on
the face under the hair here and on the left
side of the face because there is light
coming from here and then we have
shadows on the neck. Let's do that. First, adding shadows on
the forehead as we see it here and under
the hair which is casting shadow on this side of the face and a little
bit on the cheek. Maybe not as much. Something like this
and then on the ear. This is fine. Let's add the shadow on the
neck because the head is casting a shadow on the neck and a little bit the hair
the same way as here. Then this side of
the face because the forehead is curved
you can see the shadow is a little bit curved so you can decide if you make it straight like this or this like
a slightly curved, I like that look
a little bit more and then the whole side of the face under the nose you can see there is a
little bit of shadow here and here so let's
go to the middle, under the nose, and finish the shadow here. You can see there is this
half circle on the chin, so it's not straight. Here there is a little
bit of shadow under the mouth and then it's rounded, so like this and rounded off. Then I can fill in
the shape here. Here you can notice
there is a shadow on top of the eye from
the eyebrow curve so I can add a
little bit of shadow there and then from the glasses. So just under the glasses. Perfect. I think we're set
with the shadows almost. There is a little bit of shadow here in the corner of her mouth, so let's do that and then
at the bottom of the nose. You can make it more
realistic but this is the amount of shadows
I like for this one. Let's create the next step. We have the shadows. Let's add cheeks as in my other classes just to add little bit of
color to her face. For this one I will be using some soft texture brush which you can originally find I
think in the Artistic folder. [MUSIC] For that I will take slightly pinkish
color and light tones and on a separate layer add little bit of color to her face. [MUSIC] We have some color
in the cheeks. As usual you can reduce the
opacity, rename cheeks. [MUSIC] Let's go to the smooth brush. Whatever brush you
are using until now, use that and take a lighter color to add few
highlights to the face. Actually I can take this type of beige color for the highlights
so with a little bit more off-white and I will add
it to the color palette. First of all, let's reduce the brush size and
add white to the face. Let's zoom in so we
can make it easier. I will add some
white to the eyes. Here I'm making
sure I don't go too much here so she doesn't
look too surprised. I'm keeping it here. This other side of the eye. I want to make sure that
it's in the same height. I think this works and I will add little bit of
the highlight on the face. As you can see, she has
highlight on the nose. Here, little bit on the chin, on top of the mouth
corner here on top of the forehead and
slight highlight here. Maybe that's enough. I will put the highlight here. She has highlight here, so it depends how much light
you want to add to the face. I think this is enough. Perfect. We are
done with the face. You are doing great. You can add the highlight
to the mouth as well if you want but
you don't have to. Face outlines can be
nicer if they blend. Let me Alpha Lock this. I can make the outlines in a little bit darker brown
color so they are not black, so let's adjust the color. I think this works nicer. This one will be the
color of the shirt. I will keep the eyebrows
and eyes darker. Let's see how this looks. This will be maybe
darker brown because it's casting more
shadow and this was not on a separate layer. Let's see how that looks. Maybe we can keep
this darker I think. [MUSIC] Maybe a darker
brown works better. [MUSIC] Perfect. We are done with the face. Nice. Now let's create
base color for the jacket.
19. Let's Add Color To The Outfit: I will create another layer, and I will make the
dark jacket blue. You can choose, of course, your own color that you prefer. I will create loose
shoulders here. I'll create a shape like this and connect it
behind the neck. Let's bring the frame, which I have here on the top, which is this white thing. I'll bring this here. I have the frame, which is just white. As you can see, this
is the base color, now I can just drop
the color in there. This is the same color, so it's more difficult to see. Let's put it to multiply
so we see it better. Now, I will draw the
hoodie in yellow color. We have some nice fun
color in this portrait. Of course, it needs to be on a separate layer. Here, I will create shape
following the hoodie, which is this wiggly shape. Here, I will add a little bit of volume and connect the shapes. Perfect. If you're wondering how
I created this frame, I just used the rectangle tool. I zoomed out, and basically, you can
connect the shapes like this. Then you can fill
it with any color. You will just fill it with white and keep it on a separate layer. Let me rename it so
we know what it is. Now I will go back here, and on a separate layer
under the hoodie, I will create a layer
called T-Shirt, and I will add more
brighter color there. Because it's behind
the other layer, I don't have to be super
precise with the shape. I can just drop the color
in there, which is perfect. Now, let's change this into the normal blending
mode because now we can see it. It will be blue. I think that works quite
nicely on top of this jacket. Here, we just need to clean
up the shapes a little bit. I need to clean it up here
so it doesn't go out. We can add one last fun
thing on the jacket. We can add some texture
in the same colors. You can draw maybe some flowers, for example, like
this. Let's zoom in. You can draw few flowers, or I actually
created a fun brush, which does the same trick. I can create a clipping mask, choose that brush
with the same flowers and just fill in this area, which is super quick. Who doesn't like fun brushes? You can get these brush from
me as well on my website, or you can draw it by hand, which is also an option. There you go. This is the
character with cool hair, and we can also change
the background, if you want to have it a
little bit more colorful, I can change it maybe to
green or you can change it to pink or whatever you like. For example, like this, it will be super bright. I like the green option there, so let's do that. There you go. We can maybe add some shadow here
on the T-Shirt, which I can set to multiply. Choose the same
color of the shirt, and I need to first change it to the
brush which I was using. Make it a little bit bigger. Add the shadow from
the hair and hoodie, and reduce the opacity. We can add the shadow as well on the jacket here. We have shadow here and
shadow from the hair, this is completely optional. You don't have to do
this part anymore if you want to keep
it very simple. I can change to the same color, we have it set to multiply, and I can add the
shadow from the hair. Reduce the opacity to have
it a little bit more subtle. Just to recap, so we have the jacket, we have the shadow
on the hoodie, we have the hoodie, the yellow part, we have the shadow
from the hoodie here, we have the t-shirt color, texture on the jacket, and the base color. We can group all of these. There you go. We have this cool, fun character and I hope
you like it and you create something that you
love either by using the same reference or
different reference, which may be it's your portrait or other
photo references.
20. Let's Summarize: [MUSIC] Let's briefly summarize what we have talked
about during this class. Before we jumped into
the mini exercise and illustrate the full
project with cool hair, we discussed various tips
and tricks which you can use when designing hair
for your characters. For example, we looked at various tips which you should consider when drawing hair; such as hair design and different hairstyles
that people wear, and they are maybe
trending or that you like. We also talked about mistakes
to avoid as a beginner. Then we also talked
about overall shape of the hairstyle and
also how to bring variety to this overall shape
to avoid the helmet look. We also discussed and talked about shadows and
highlight which you can notice on photo references and how you can use them
in your illustrations. Another topic we
talked about are loose strands of the
hair and much more. You can always go back to the
individual tips and tricks and re-watch part of those videos if you
want to practice more.
21. How Did It Go?: [MUSIC] How did it go? I can't wait to see all
your awesome artwork. Please share your drawings
and illustrations, also the work in
progress if you want, in the project section. If you want to expand on the knowledge you
learned in this class, you can watch my
other classes about characters called illustrate
expressive people, and also about
colors called color palette and color and
light masterclass. Visit my teacher
profile to find them. If you would like me to share
your projects on Instagram, please tag me in the
Instagram stories, in the post and
post description, so I can help you and your art to be discovered
by more people. If you enjoyed the class, please leave a review
because first of all, I learn a lot from
your feedback. Second, you will also help
other students to discover the class and you might contribute to their
artistic journey too. If you have friends
or family members who would love to learn to
design character portraits, faces, and character hairstyles, please share this
class with them. If you have any questions
or suggestions, please leave a comment in
the discussion section, I would love to help out. Thank you so much for watching and see you
in the next class.
 Iva Mikles, Illustrator | Top Teacher | Art Side of Life