Transcripts
1. Welcome !: Hello, I'm Barbara.
I'm an architect, and I hate perspective rules. If you want to know more
about perspective rules, by the way, this is a great
book from Stephanie Bauer. She's an urban sketcher, and she's written this great
book to explain you all about perspectives because I'm not going to explain
it in this class. You want to learn more about it, there is my first drawing
made easy class or there are some great fellow
Skillshare teachers who in real detail about
perspective rules. In this class, I will
show you how to draw buildings without using
prospective rules, just because I find
them boring and they take all my fun
away when I draw. No kidding, if you like
to sketch buildings, you can also sketch it without prospective
rules in a great way. Find your own drawing way, and there's no police coming to check afterwards if the
building drawing is correct. So this class is all
about fun way of drawing and about learning a way
of looking to a building, about looking at the building, like it's a bunch of lines. It also takes away overwhelm, and you will have a great sketch without studying
perspective rules. You will learn important
perceptual skills from the book by Betty Edwards, drawing on the right
side of the brain. Is a class for all skill levels, either total beginners
or confirmed artists, who want to see a new way of looking at things and
maybe try new techniques. My purpose is not to make
your sketch like me, but to make your sketch like you and to find
your hand drawing. Let's get started and
don't forget to subscribe, follow me on skill share
here on the button above. So I can contact you if I have an announcement
to make or a giveaway. In the next lesson,
I will explain you about your class project
and the class materials. Thank you for
following my class.
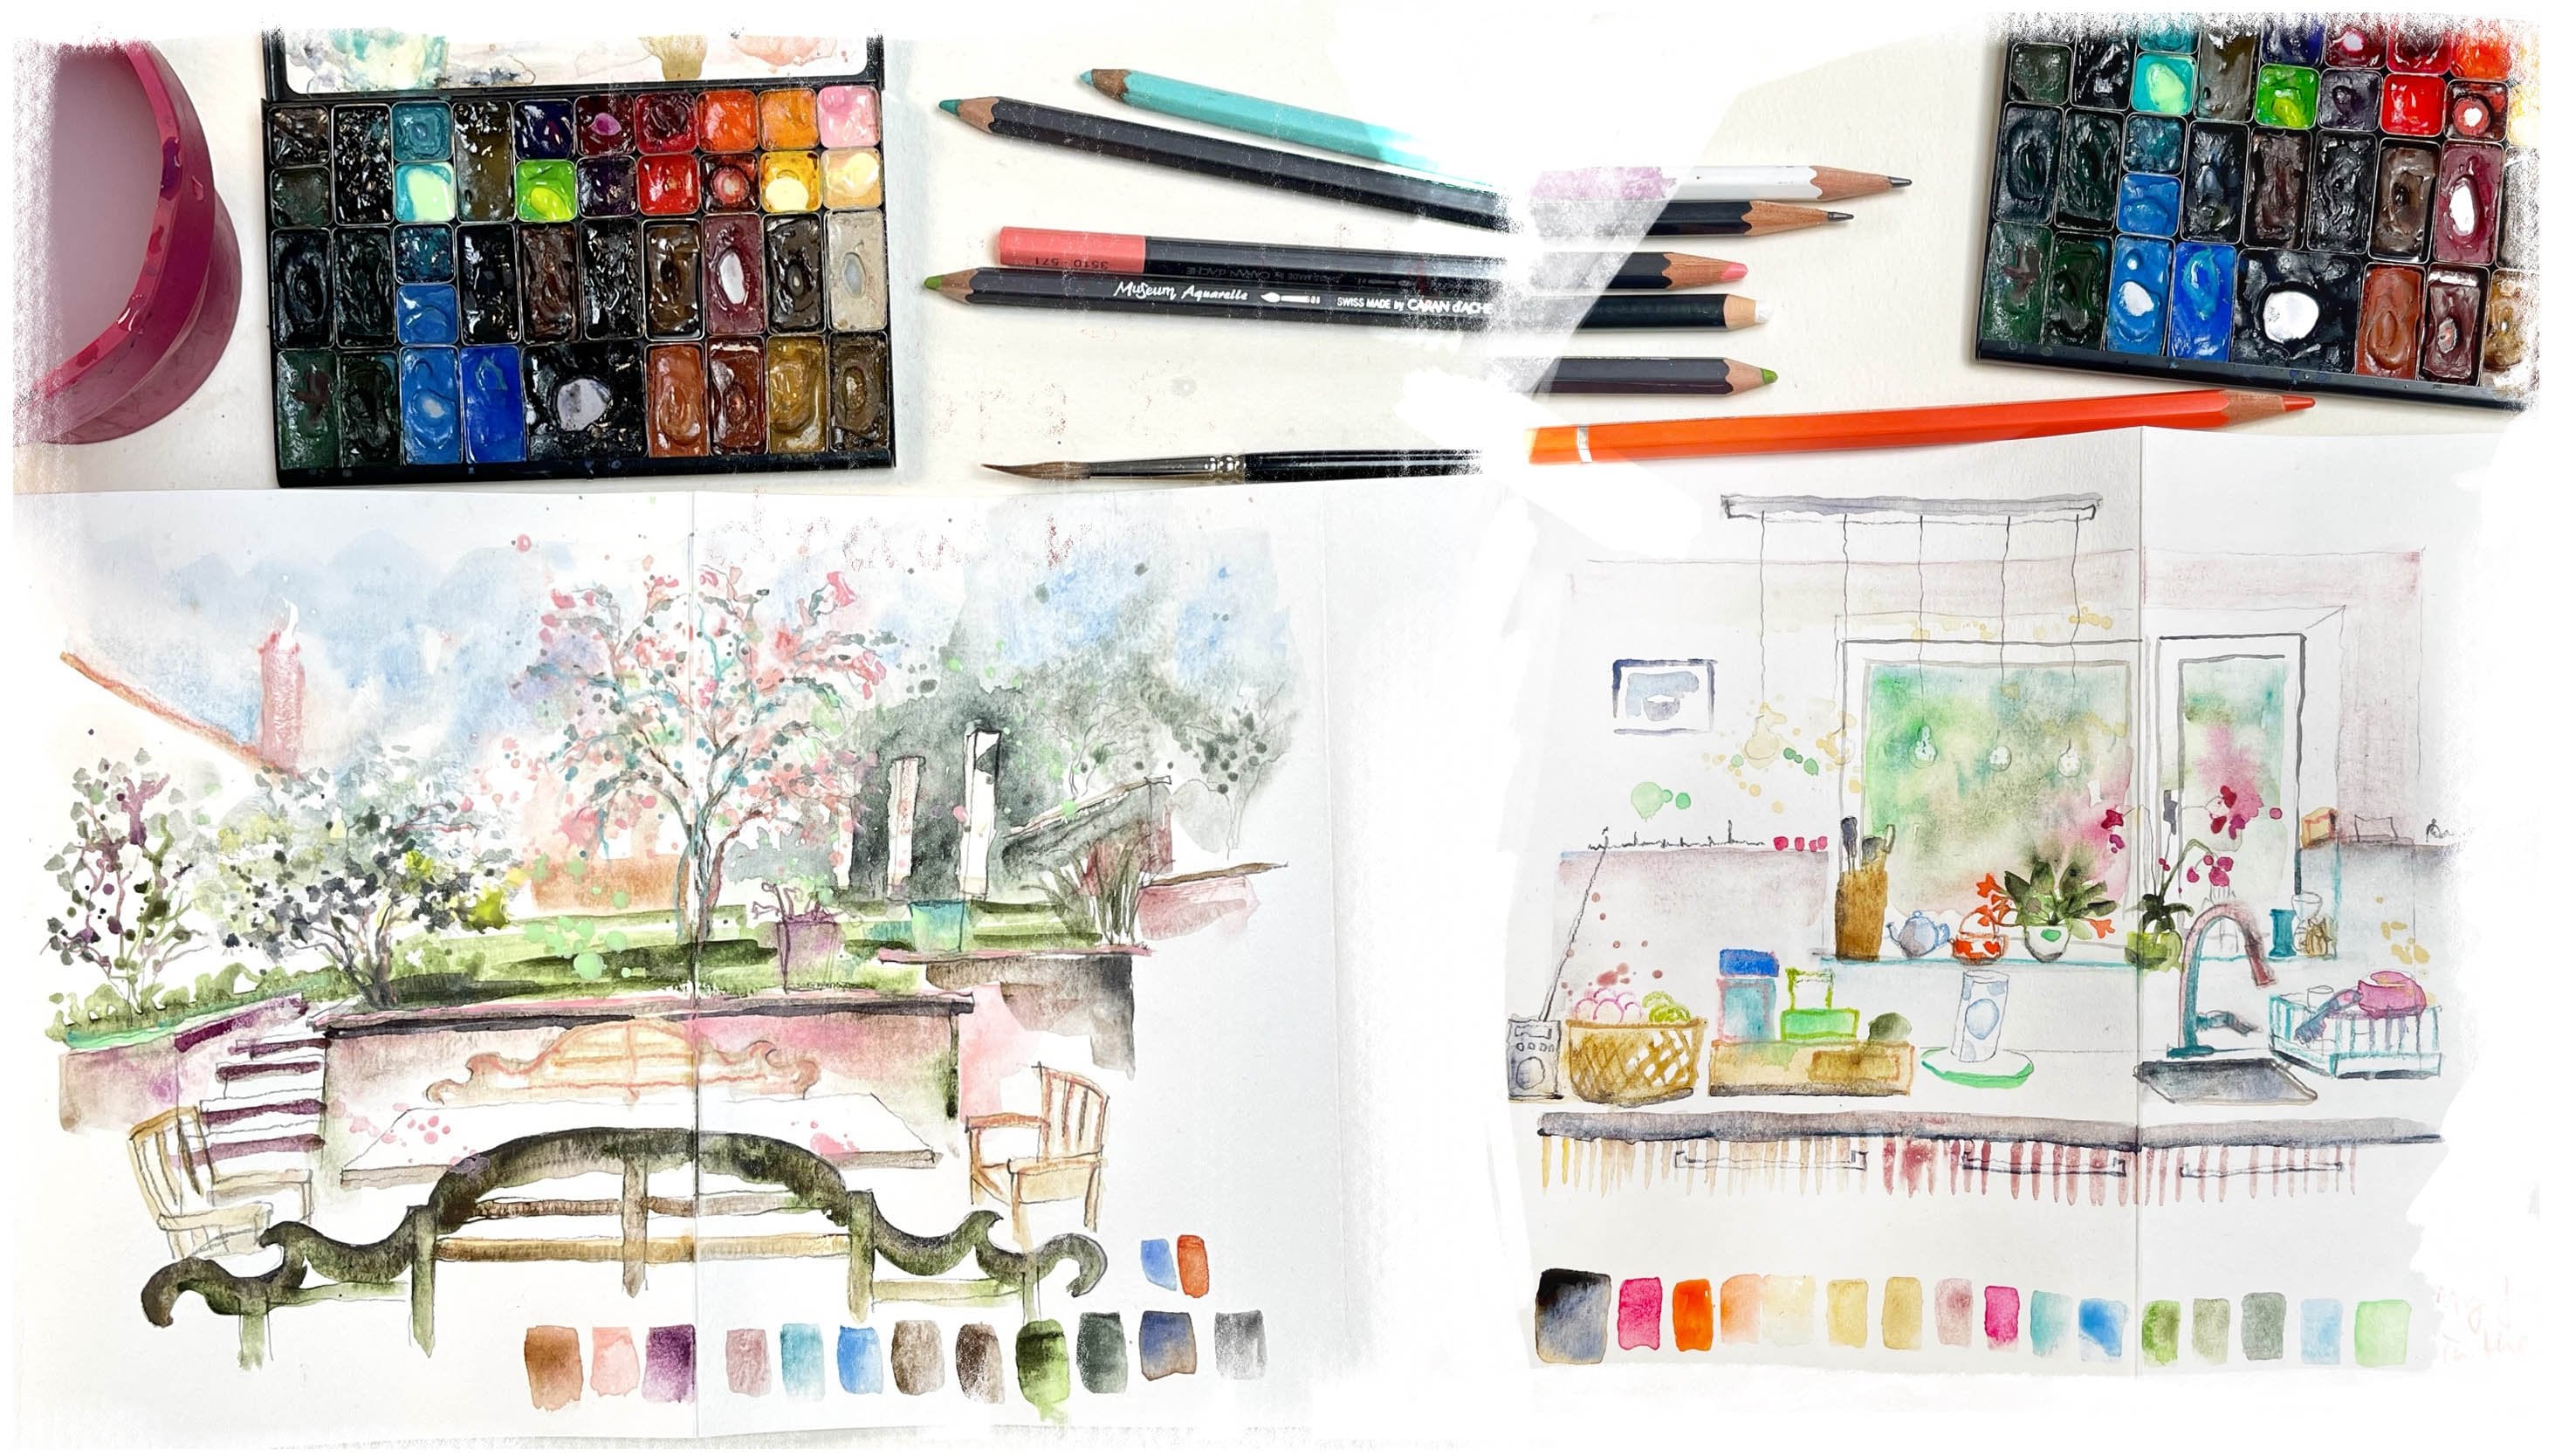
2. Class Project and class materials: So for this class you will
need a soft to be pencil. I'm fine ballpoint pen or other fine liner
with waterproof ink, kneaded eraser or soft eraser. Brush and watercolor, if you
like to make watercolor. Sketch book, which
is not too small, as a class project, you will make a
drawing of a building. In this class, I will make two drawings and one
with watercolor. The best practice is you choose a building that you like
in a place where you live, or the building where you live maybe or maybe your
childhood home. The best is that you choose
a building that you like. And if you don't have any
building that you like, you can draw my reference photo. I will put in the resources. I get to hear so often, but you're so talented
in drawing and painting. And I don't have any talent. I can't even draw
a straight line. But again and again, it's not about talent, it's about skills. You can practice. I draw a lot every day, almost. Like learning how to
write and play music. You can learn how
to draw and paint. If you practice, if you train your drawing muscles every week, so please share your work
in the class projects. This is very encouraging. You can also like and comment
on other people's work, which we will make their day
and make them very happy. And maybe you can have a lot of inspiration
from other classmates. So in the next lesson, I will explain you a fun way to look at a
building you want to draw. And thank you very much
for taking my class. I hope we will have fun together and I look forward
to seeing your work.
3. Different Ways Of Looking: Drawing methods I want
to show you is based on the five perceptual
skills developed by Betty Edwards in
her fabulous book, drawing on the right
side of the brain. If you haven't read it yet, I want to encourage
you to do so. But the Edwards has
worked together with neuroscientists
to write this book. And it's really magic. It opened a whole new
world of seeing for me. In my first Skillshare class, I go deeper in this method. If you're interested in it. It's my first-class
drawing made easy. But in this class we will
concentrate on three of the five perceptual skills
to draw a building. Here you see a brain that I
also show in my first-class. And it shows this right
side of the brain, which is the emotional
and artistic side, which makes us make good music and make good paintings
and drawings. This is the left
side of the brain, which is our rational side. And related to language and analysis of what's
happening around us. And this makes us draw what we think we see
instead of what we really see. And today we will try to
get into our right side of the brain to find more fun way of drawing
and looking at things. So the key to improve our drawing skills
and to have more fun and joy in drawing is to
learn how to see in new ways. And to do this, we have to bring the right side of our
beautiful brain into focus. And it will make the
left side shut up. So this left side is telling us we can't
draw and we should be doing something more
useful instead of drawing like working,
earning money. I made this worksheet from the perceptual skills
of Betty Edwards. She's treating in her book and applied it to
urban sketching. And in this course
we will just tackle a couple of them like
the perception of edges in the
perception of spaces, and the perception of
proportion and light and shadow to draw our building.
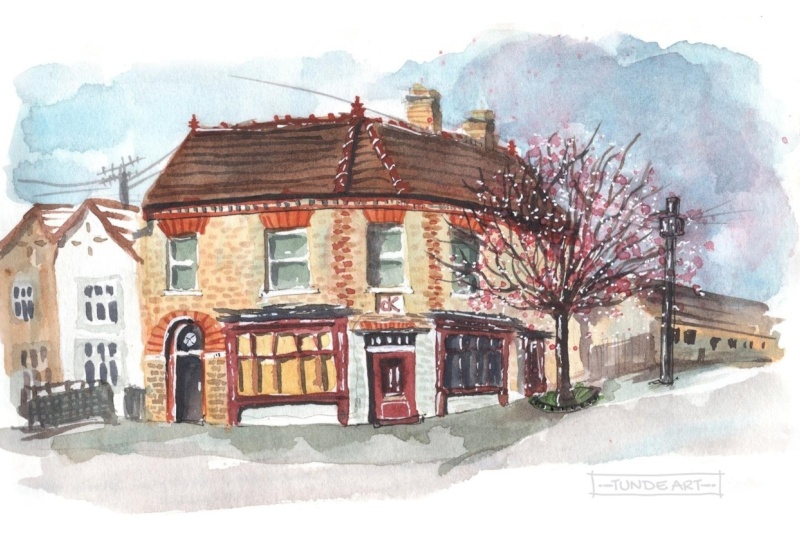
4. Drawing "A Bunch Of Lines": So let's get started with
drawing this building. I draw this building because it's a building I
know very well. And I like a lot that
I have renovated with my office building in
Brussels in the forest. And you can draw this building
from my reference photo, or you can draw a
building that you like in a place where you live or another building
that you like. I encourage you to draw a
building that you like. I will put these sheets on top of it so I can
explain new things. We will look at this building
as a bunch of lines. So it's much more fun. And the lines are the edges of the different parts
of the building. And I will show you how to find a way to look at them
in a different way. So we will not draw this
width perspective roles. So the trick of drawing
a building without perspective roles is to look at building as a bunch of lines. It's not a building. It's not a window. And the roof, It's
just a bunch of lines going in
different directions. And this makes it much more fun to get drawing from observation. So the lines are all the edges which are
composing the building. And we will just as the
first perception rule, look in what direction
the lines are going. If you can't see it very well, you can use a viewfinder
or a picture plane. So this is a plastic sheets I made with a grid drawn on it. And it helps you to
look at something. You can look through
it when you go outside sketching or when you
want to draw an object, you can just look through it
and see very well like this, in what direction
the lines are going. And help you to see better. The size also of all the lines, two lengths, and
the proportions. I want to show you all. So these sketches I made,
I'm drawing outside. So you can draw your
picture plane grid. This in small time snails
in your sketchbook to make small sketches of layout of where you
want to put things. So I looked and draw the grid to the scenery
I wanted to draw. And I made several
different thumbnails to try to find a nice layout. And afterwards I made
a bigger sketch. So did this also helps to
draw your grid on your page. When you look through
the picture plane, you can see very well where
you can position things. Let's draw our picture plane on the paper so I can explain
everything to you. If you want. You can use a ruler or
you can draw by hand. Without the ruler. People often tell me that, Oh, I can't even draw
a straight line. So I can't draw. That really doesn't matter. I mean, in nature there are very few straight lines
and I like wobbly lines. So let me show you how I look, in what direction
the lines are going. What this picture plane
does is it helps you to put a three-dimensional objects, which can also be just
an object like this. To put a three-dimensional
object on a two-dimensional plane
on your sheet of paper. That's the most difficult part. When we start drawing. What you can do is to find
important axis vertical. And to put this on the
line of your grid. Then we will try to see for each line in what
direction they're going. So e.g. this roof is stilted. And what can help you to see how tilted
duties is to imagine a clock on this
intersection of our roof. We will imagine o'clock. So this would be 12:00. And then we have. This line of the
roof which would be at 01:00 rising if this is 02:00 and this is 03:00,
04:00, 05:00, 06:00. So this helps to see approximately in what directions
these lines are going. And again, if it's not totally correct,
it doesn't matter. You can then move
your grid also a bit to see this line,
which your clock. And you see this line is a
bit further than the 01:00, so it's more tilted
than this line. Let's continue. Here. We have this line. So we can move for grid again. And what would this be? It looks like this is 11:00. Can also imagine then
o'clock here, 12:00. So you see very well,
it's not vertical. And then there's the roof here. And this is vertical. Then we go to here. And we can imagine
again a little clock. This is again 01:00. And like that, we go through
the whole building to see in what direction
the lines are going. To perception of spaces is to see which is in front
and which is behind. So we will first, we will first draw this tree because building is
behind the tree. So we have this tree. Another thing which is
interesting with the perception of spaces is to look for negative spaces and
positive spaces, e.g. to make you look in a
more abstract way to the building until your scenery and to make your left sides, rational side of
the brain shuts up. You could look at
negative spaces. And so that would be e.g. if the tree and the building
or the positive space, then the sky would be
the negative space. You can either draw the shape of the building or you can draw what's
around the building. So you can look at
the shape of the sky. So instead of saying, I draw the tree is saying I
draw the edge of the sky, which is surrounded by the
tree and the building. So this is the space of the sky. And it's just another way
of looking at things. So e.g. here, I could draw it. Instead of drawing
this little building here with the canopy, I can draw this space I
see around the building, which are the trees
behind the building. This is a more tricky part, but it can be applied
to plenty of things, also to drawing
other objects like furniture and in the
book of Acts yet words, it's a very
interesting chapter to exercise your way of
looking at things. So to measure the lengths
of the lines of the edges, you will have to find a basic
unit which is easy for you. And to measure the proportions
of everything you'll drop. And please trust your
side. If you see it. Just draw it. E.g. this would be
my measuring unit. And I see this door is
in the middle and it's about one-third of this line. So this is another door
with another door width. So let's measure the tower. It's this wide and I see it goes 12 tree and a little
more in the heights. And I can use this also as a measuring unit to draw
this part of the building. So it wouldn't be until here. And it's a bit wider. And let's measure the door. It's this wide and it's quite
high compared to the width, two-and-a-half times
height of the weeds. And this way you can
measure almost everything. Just find for yourself easy measuring units of
what you are drawing. If you draw e.g. this part, you can see it's almost
as wide as this part. You can use your pencil or find stick to
measure everything. We will see this is like
this, white as well. And in that way, we can measure
everything that we draw. And finally, if you want
to do some rendering, we will look at the
light and shadow. Under the roof and
under the windows. It will be much darker than when the parts of the
building are in full light. And then here you have
the shadow of the tree. So while you are drawing, you can also already look, whereas the light and worries, the darkness, here is
darkness and here is light. Let's draw our building now. Our sheet of paper.
5. Urban sketch in pencil: The first sketch that I make, I look through the
plastic picture plane to the neighbor's house, in front of my house. Draw the window because
it's cold outside. This picture plane
helps me to draw the three-dimensional
object I see in front of me on a
two-dimensional paper. Normally, I don't draw the picture plane on
my sheet of paper. But here I will do it
to show you thought exercise how you
can easily draw it. So if you're a beginner, what you can do is to
draw first the grid in your sketchbook and then
draw the objects on it. And then afterwards you
can erase to create. Now I have a vertical
sketch book. So I make vertical sketch. So actually I should hold
my picture plane vertical. Another good reason
to draw a grid on your sketch book
page first is, is that this page, which is divided into thirds, will help you to make an
interesting composition. So a quick reminder of what we learned in the
previous videos. You're not drawing a
building, houses or trees. You're drawing just
a bunch of lines. Second is that I'm not drawing the edges of the roof
of the window and door. I'm just looking in what directions all
these lines are going. And in this way, when I stop myself
from naming things like that window is
higher than that window, is that I shut down
my rationale side of the brain because the
rationale side of the brain, the left side, is
related to language. So just try to look
abstractly to what you're drawing and look in what direction the
lines are going. The grid of the picture plane
can help you with that. And then also is that I tried to look at the proportions
of all these lines, one compared to the other. So that line is as long
as the other line. So that way I tried to make
my proportions correctly. Finally, we have
the perception of spaces and the perception
of light and shadow. For the perception of spaces, try to see if you see
negative and positive space. Maybe you'll see the
shape of this guy, which would be the
negative space of the shape of your
houses and trees. If you draw the edges of
the houses and trees, you have the houses and trees, but you also have your sky. And this is another way to make an abstract look at
what you're drawing. And to shut down your
left side of the brain. Then you'll have the perception
of light and shadow. When you draw, you can
already see which line is in the shadow and press harder on your pencil to have
a darker line. And so you immediately have
some light in your sketch. So the purpose of drawing
from observation, the idea that the basic
realistic drawing is copying what is seen
on the picture plane. And in reality is not really
like taking a photograph. We could say that the purpose of realistic drawing is not
simply to record what's there, but to record your
unique perception. How do you personally
see something and how do you understand the
thing that you are drawing? And by slowing down and
closely observing something, your personal expression and comprehension will
show in your drawing. And you can do that by
simply taking a photograph. And also your style of line, the choices of what you draw
and what you don't draw. Here's your personality
and it enters the drawing. And in this way, you're careful observation of
your subject will give the viewer the image of your subject
and an insight into you. And in the best sense, you will have expressed yourself
in a uniquely human way. Another purpose of drawing, It's that empties your head
and it's like meditation. It will activate new
connections in your brain. Now, I'm erasing
here the middle of my drawing because I find
the tree is too high and I can't fit
the roof window of the house in the bottom of the garden well
in the drawing. So I'm erasing a bit. Normally, I don't mind if
it's not totally correct, but I would like to fit that little window
nicely above the tree. Tree is in front of the window. So of course, I don't see
the window completely. But I'm trying to
make a new way. A nice window here. Even if it's not like that in even if it's not
totally correct, like it's in reality. So again, it's my interpretation of what I'm seeing
through the window. So let's finish
this drawing now. And I hope you'll have fun with your drawing and please post
it in the class projects. In the next lessons, we will make a ballpoint pen
sketch or ink sketch so we can't erase and it will
heightened concentration I find. And then as a bonus, if you want, you can
also put some color.
6. Ink Drawing : Preparation: I have my grid on
my piece of paper. But I think then what
would be easiest is to draw your brakes on
your picture if you want. Let's do that. So you can easily see measure everything. Because when we look through
these transparent paper, I don't see it very well. So I will just throw
it sheet of paper. Write approximately. Again. It doesn't matter
if it's not correct. I mean, we're just making a drawing seasoned employee to check if it's correct or not. So it helps you to
measure your building. And you don't worry about all the vanishing lines
and prospective rules. It's smith drawing
much more fun. And again, if it's not totally
correct, We don't care. Just want to recognize what
you would draw and draw. But to find beautiful. Don't worry what's
fathers might think. The lines of my grades
are a bit dark. So I use kneaded eraser to
make them a bit lighter. It's quite disturbing
to draw a big grid.
7. Ink Drawing: I will draw with
my ballpoint pen. It's a waterproof ballpoint pen. So I always start with the
part that I like most. So let's start with the tower. Measure approximately where
it starts on the grid. And I will go to
this intersection. And again, my line is quite
wobbly and doesn't matter. I liked that. These intersections
of this thirds grid are known to be the most
interesting for the viewer. So when you have most interesting like focal
point in your drawing, you will better position
it like on the third, on the intersections
of your grid. And then I go to the width
of the tower, which is like, we can say, if this
is the middle, it looks like it's on
a fourths of the grid. So that could be
a measuring unit. This is my roof going
this way approximately. And then we said that
it's about 01:00 here. And this is symmetrical. Again. If it's not totally
correct, doesn't matter. What needs to be
darker with shadows. I press harder on
my ballpoint pen. So I already think of
where is it too dark? And where is the light? And then the roof
going down here. So again, just a bunch
of lines things. Where is it going? In? What direction
is odd lines going? Is it going up or down? Just think every time in what direction
the lines are going. And since I started
looking this way, I enjoy my drawing much more. And then you have this roof. Starting. At this point. You have some nice decorations. And you can also look like this. Just tilt your
ballpoint pen or pencil and use it as a measuring
stick to see the direction. So it's like this. If you don't see it quite well, it helps. Like this. You can see it's, this point is a bit
tilted, much like this. What is interesting
with drawing with two ballpoint pen is
that I'm much more concentrated because
I can't erase it quite that way,
but doesn't matter. And this is going
almost to that line. This column is on the crate. That's easy. I will make
to vegetation in pencil. So DC's vegetation. A bit of a hill. The shape is not quite correct. It really doesn't matter. I mean, of course I find it annoying and
it's not correct. But I think, oh, well, I can still make something
something out of it. Even if it's not correct. Sometimes you just
don't see it well, if it's going up or down. So you have to find
ways to help yourself. And sometimes you think no, it can't be like that. And then you have to just trust your eyes and trust
what you see. Sometimes it just looks weird. Like, oh, is it really
that way? It looks weird. And then most of the
time when it's finished, you think, oh, well, yeah. And again, also, don't
try to draw everything. It's just impossible
to draw everything. Let's go to the next roof. Again. It has these
little decorations. Then there's this tree. Am I drawing the tree? Or am I drawing this shape? And I see there's another
piece of the roof here. My drawing the tree? Or am I drawing the
shape of this guy? I like to juice pencil. Texture of the nature elements because it makes them very rough compared to the building. The building lines are pain or a ballpoint pen and
this nature elements. Texture. If I want to really like what's
exactly there, and then just take a picture. I think there is our building and we're
gonna add some color.
8. Bonus: Let's Watercolor Part 1: I wet the watercolor to
make it more smooth. I wet the sky because first
paint the sky. Again. Here are not really rules. I think you just
do like you wish. I use cerulean blue
for the sky, Harris, my color chart, civilian
boat I think is a nice sky. Blue. I tried to
make the clouds. And I tried to
have a movement in the sky to make a movement towards
tower of the building. And the clouds I leave white, like this surreal and blue
because it's very granulating. There's also some blue. You can see here
through the window, you see this guy. Then there's also, I will
make some parts darker. Maybe it's cobalt blue. Again. If you want a pink sky, just make a pink sky. Don't need to make
like what's there. In reality. Maybe we can add some pink and some to class. To class. If you're afraid to
start your watercolor, you can just splash some colors, too dirty or paper. So that's done. Now we add some trees. And I do it while
they are wet so they will melt a bit with the sky. And afterwards, um, Michigan had some that I like when the
colors go into each other, flow into each other
on everything is wet because that's watercolor. So the trees that are in
front or more dark green, then the trees which
are in the back, there are lighter green
and cooler green. So I take green earth for
the trees in the back. And then cross is even more yellow, green, green. And now I let it dry
and then do the rest. When it's more dry.
9. Bonus: Let's Watercolor Part 2: Now I will paint the shadows. I take this mixture
of gray I made. It's orange and
ultramarine blue. And I paint the shadows. I took a smaller brush. Again. This is not really totally
like the reference photo, but don't let that
spoil your pleasure. I wouldn't be afraid to go
to our quick job shadows. I rest my finger on the paper so I have more
stability, which my hand. You also paint the tree with the gray shadow from the growls. And you can also make some variation color
inside the building. So everything is not the same. Even some orange to have
something happening inside. So interesting to use
these wax pencil. Like to keep some white
***** of the glass. We dispensing prevents
the watercolor from staying on the paper
because it's crazy expensive. When you press the
hair of the brush, it absorbs the excess paint. And in the glass some
reflection of green. You see the paint doesn't
stay on the right. Now I do it on purpose to let all the colors flow
into each other. So I continue why
it's still wet. Maybe I will wait for
the light pink to dry before I make some extra
lines with the dark pink. It's not going. Of course, like I planned. That's watercolor. That's also what makes
it so stressful. But then again, sometimes
we have nice surprises. It's always even after
years of painting. Again. Continue of exercise of how to see and
trust what you see. Even after years of painting. It takes lot of time too, to really like trust
what you see and be able to draw it quickly without
thinking overthinking it. Even after years of painting it. I'm not happy with it. Takes so much time to
exercise and continue. Just continue and try
to have fun with it, even if it doesn't turn
out like you want. Try and his brush to make the fence give some structure to lead the eye to the building. This is a eradicate two
brush with synthetic hair. And you can try to
erase a bit like this. You'll clean the
brush in the tissue. Sometimes the hardest part
is to know when to stop. So I think this
painting is finished. So when your paint, It's a bit like when you draw, just look in what
direction the lines are going and which space
comes in front and behind. And experiment with your colors. Just use your favorite colors
and that will be fine. No, I stopped this painting. Please share your sketches on the platform in
the class project. I will be happy also to answer all your questions. Thank you.
10. Final thoughts: Well, you made it. I hope you've enjoyed
this class and I hope you will
continue sketching and even go sketching outside to exercise your new skills
so you don't forget them. And I hope these exercises give you different points of
view in observation, sketching, and that
these watercolor or exercises were fun for you. I promised that the
more you do it, the better your drawings
and paintings will get. You can apply this way of
looking to any object. It's not only for buildings, it can also be useful to
sketch people and portraits. I hope that this
makes looking at buildings to draw
more fun and with less overwhelmed by
looking just at them like as if there were a bunch of lines because that's
what they are. So your class project is
mainly about finding yourself a fun way to sketch and enjoy sketching without stressing
over the results. And discover your
own hand drawing and new ways of looking at
things you want to draw. So make a drawing
of a place to love. Look at the buildings and
the lines, the edges, in what direction they're going, what size they are
compared to one another. Where is the light and shadow? And try to render your
drawing that way. So thanks again for
taking my class, and I'm so happy to be here
with you and without you, all this wouldn't be possible. So I hope that you contact me
if you have any questions. And if you'd like to
see more examples, you can follow my
work on Instagram. Please keep on dreaming. Make the world more
beautiful with your art. The world really
needs art today. And maybe we will be together somewhere, urban
sketching someday. And please leave a review on my class to tell
me what you think. Reviews are really
important for teachers. Leaving. A review is really
the best you can do to help a teacher make progress
and to get better. And also for your
fellow students so they can find a class
which they like. And don't hesitate to reach out. If you have any questions, you can post a discussion and
I will reply immediately. Thank you. And see
you on Skillshare.
 Barbara Luel, Architect, Author & Artist