Transcripts
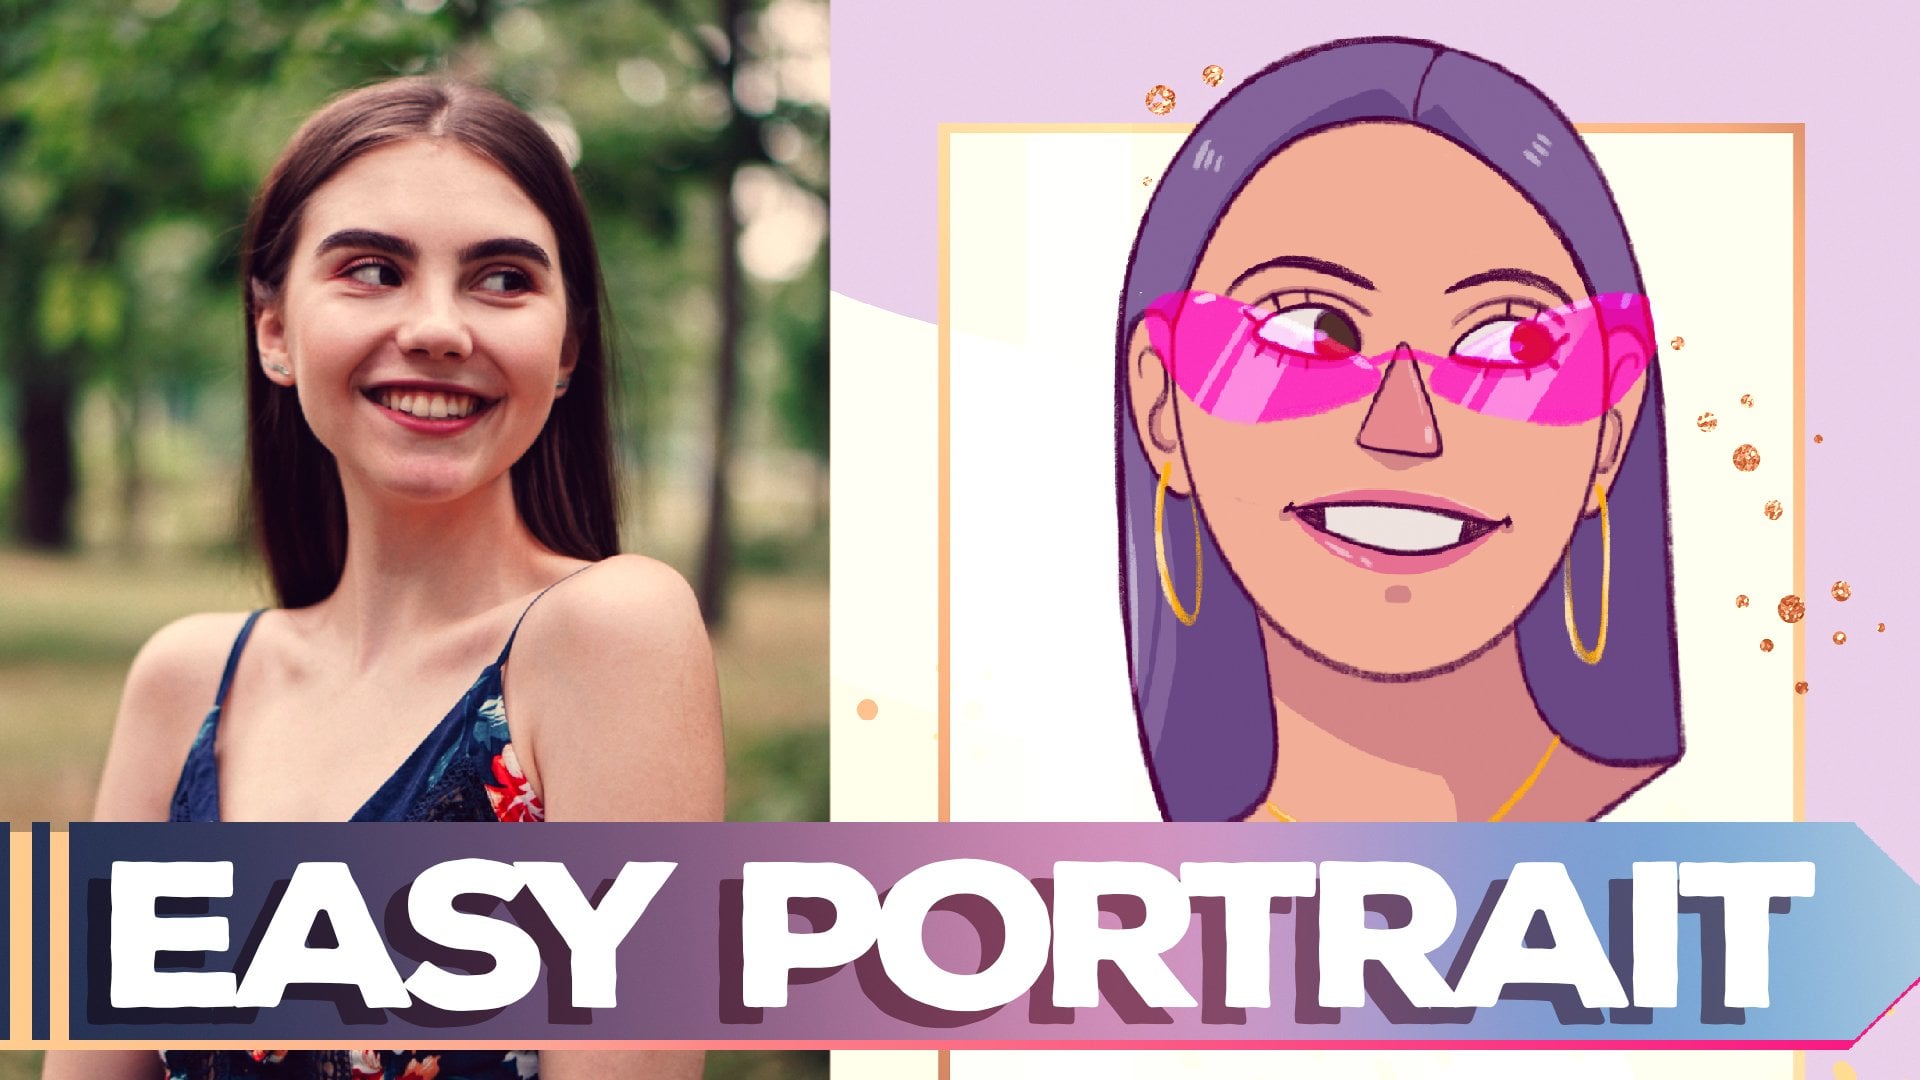
1. Introduction: Hey, what is going
on, Everybody? Thank you for coming
back to another one of my skill share lessons today. We're going to keep things super simple and I'm going to
be teaching you how to draw a stylized cartoon
profile picture. I've had different
cartoon profile pictures that I've done of
myself for years. And people would always ask
me, oh, how did you do that? Could you do one for me? And I thought I need another
lesson for skill share. And this is something that a lot of people asked me about. Let's just make it a
whole lesson by itself. Today we're going to
go one step at a time, learning how to draw a
basic character profile. And then how to personalize it to be whoever
you want it to be. You can be drawing yourself. You can be drawing
he is your friend. Or you can be drawn a
completely made up character. It is up to you, but let's go ahead and get to
it. Let's begin.
2. Sketching the Character: All right, let's get
started. We're going to keep things as
simple as possible. We're not going to
make it too difficult. I'm drawing on the procreate
app on my ipad Pro. I have a 12.9 inch screen. I'm using the second
generation Apple pencil. You can use a regular stylus. I'm not sure if it still
has the touch sensitivity, but I know you can't like tap the pencil like I'll be doing. But whatever you have, whatever works, if using your
finger, that can work too. We're going to start
a new canvas by tapping on the plus sign
in the top right corner, standard on the procreate app. You're going to
have one that says square RGB 2048 by 2048 pixels. That is the canvas size
that we're going to use. If you wonder why I have so
many is because I've created a whole bunch of
different canvases for different projects
that I've worked on. So we're just going to
stick with the square. Because if we're making
a profile picture, most profile pictures
spit into a circle. And all we need is a square. You can always take this, export it to a
different size canvas if you want to do some
other stuff with it later. I like to draw in
colors because it helps me to see what is
going on on my canvas. And I'm just going
to leave it at red. The brush that I'm going
to be using is a pencil. So to find that, you're going
to tap on the brush icon. This is the brush library. On the left side, you have
your different categories. So you want to find the
one that says sketching and then find the one
that says six pencil. This is all standard
with the app. There's not anything that
I've altered or added. This should be on
your procreate app unless the new updates
are not on there. But either way, use
want a regular pencil. You could pick the pencil
that you like the best but I like using the six pencil, so that's what I'm going to use. Didn't mean tap that again. And we're going to tap off, I'm going to try to
make this super, super, super simple, okay? Typically, when I'm drawing
y'all know I like to draw a whole bunch of lines like this to get my circle
just the way that it is. For today's sake, I'm going to try not to
do stuff like that. Remember we want
to undo something. We just use two fingers to tap on the screen,
and it undoes it. I'm going to draw a circle. And I'm going to
hold my pencil on the screen to make
it a perfect circle. So watch me first. So I'm
going to draw a circle. I hold the pencil on the screen. As you can see, it's made it smooth, but it's not perfect. If I want to make it perfect, I use my other
finger and tap it, and mine was so close to
perfect, you can't even tell. Let me draw one.
That's not that great. All right, so let's
okay. So you can clearly tell that that's
not a perfect circle. All right. Now, there you
go. You see a difference. That's how it was
without tapping, and now I have a perfect circle. And I don't want to take
up all the screens, so about like right there. Okay. I'm going to tap the arrow to just move
it over a little bit. All right, so for
this profile picture, we're going to make it
so that the person that we're drawing is
facing our right. All I'm going to
add to this circle is just a line for the jaw. Now this is going to be
one of those rough lines. Because this is just
suggestions, really? You don't have to draw
yours exactly like mine. And even if you want to, you
can do it on another layer. I'm going to do all
of my on the same layer jaw for a person. If you're thinking about the
facial structure of some, somebody's jaw is going to be on the lower
half of their face. This shouldn't be
something that you're starting way up here at
the top of the forehead, it should be
something that you're starting towards the bottom. So I'm going to
get rid of these. Maybe I'll leave
those just so you can see where I'm starting mine. I'm starting it right there and I'm just going to
curve it out a little bit and then connect it into
the back part of the circle, just curving out a little bit and then connect
it to the circle. I'm making all these rough lines because we will always
clean it up later. All right. That's just a little
line to show that this is where the cheek, chin jaw area is going to be. Remember if I'm going too fast, pause, rewind, Do
what you need to do. Next thing is I'm
going to do the ear. The line right here was to show where the
jaw was going to go. The ear is going to go about on that same line right here. We're just going to do one ear. The shape from my ear is
going to be like an oval. If you imagine my
oval being here. Well, you don't have to imagine
because it's right there. That's the area where I'm
going to put the ear. Simple shapes like a C. All right, So we have
our circle for the head. We created the cheek jaw
line and we created the ear. This is really all we need to
start our profile picture. I'm going to come over
here to my layers. I am going to add another layer. Right now, we have two layers. We have head, we have layer
one and we have layer two. I'm not going to worry about
renaming them right now, but let's go ahead and go on layer two because
we're going to add a couple of things
that we don't want to add on layer one. All right. Again, I've added a layer just
by tapping the plus sign. So now I have layer one, which is where we did
the circle the jaw, cheek, and the ear. And I've added layer two. I'm going to tap off
there. To get rid of that, I'm going to draw a
line that's somewhat curved from the top of the circle to this
line that I had earlier. That's to show everything
from the nose up. Then underneath this line, I'm going to draw another one. From this line to
the bottom jaw area. This is the signify nose down. This is going to help
me to understand the center of where the face is. Because keep in mind the
person is looking that way. The center of the face is
not going to be right here because they're
looking direction. All right. That's also why
we don't see the other ear. You could have the
other ear over there, but I'm not doing that today. We're just doing the
one ear. All right. Hope that makes sense.
Take the Ar off here. We're going to draw ovals or circles and ovals to
signify the eyes and the nose. First thing we're going to start off with is going
to be the nose. Let me zoom in and I'm just going to do
just a rough nose, right here, sideways, oval. You have this line here to
help you with centering it. We shouldn't be drawing the nose all the way over here,
because as you can see, that is not centered on the face over here
wouldn't make sense. This line is here to help you. You want to try to
make sure that line is close to the middle.
Doesn't have to be perfect. That's where our nose
is going to go above. The line on each side
is going to be an eye. Now when you're thinking
about perspective, when something is closer to
you, it's bigger to you. When something is further
away, it is smaller. Just like my hand in the video. When it's close to the
camera, it's bigger. When it's further away from
the camera, it's smaller. The eye that is on
the right should not be the same size as
the eye on the left. I'm going to do an oval that is scrunched because
it's further away. Then for this one, an oval, circular type shape, that's
a little bit bigger. Okay. I put them both on
the line for now. We can adjust stuff A please. I'm trying to record a video. We can put them both
on the line for now. We can adjust them
later if needed. So we have our nose and
we have our two eyes. We're not going to worry
about the pupils right now. We can adjust those later. I hope. I hope I'm not
going too fast. All right. Won't keep it moving. We're
going to draw some eyebrows. The line for our eyebrows is going to be
kind of like this. We want to keep our
eyebrows on this line. I'm going to take that
off. I want you to see kind of the area
where I'm going. My first eyebrow can
just draw right there. Second one is going
to be touching this outside of the circle because ports this side of the
face is further away. And we can adjust. And we're going to make this personalized after we get
just the basic shapes down. And I'm going to give
it a simple smile, curve line, curve
line, fancy nothing. Fancy, Simple drawing,
simple shapes. Okay? And that is all it takes
to start off the person. Last thing I can add is a neck. And this is the one thing
that I want you to notice. We want to make
sure that the neck is actually holding the head up. I'm going to do is
I'm going to start another layer just to
show you an example. You don't have to do
this, I'm just doing this for demonstration purposes. I'm not going to put the
neck way over there. That neck doesn't make
sense to the head. I'm not going to put
the neck over here. Again, that neck doesn't
make sense to that head. So let me show you a
trick that you can do. I delete that layer
I just did so far. We've been drawn on
layers 1.2 We're going to go ahead and
combine these two layers. I'm going to tap on layer two and I'm going to
choose merge down. Now everything we've drawn
is all on the same layer, which is still called layer one. Here's the trick that I use to make sure everything
is centered. Let's go up to the screwdriver. Whatever this is, we're
going to tap on that. We're going to choose Canvas. And we're going to
choose Drawing Guide. We're going to click
that on, and then you see you now have a grid. This grid is not what we want. We're going to go down to Edit, Drawing Guide down here. All these different options
that you should play around with and utilize
at some point or another. We're going to choose symmetry. Okay, I'm going to turn
the opacity up and I'm going to turn
the thickness up so that y'all can see
it on the camera. But symmetry, opacity at
max, thickness at max. And then I'm just
going to tap done. Now I have a line down
the middle of my canvas. But keep in mind when you do that drawing assist is automatically going
to be turned on. Meaning that if I
draw on this side, it's going to be mirrored over
there. We don't want that. So we're going to do is going
to go back to our layer. That's why it also says
assisted is because it automatically comes
on tap on the layer. We're going to uncheck
Drawing Assist. Okay. Now what I'm going to do
is come over to the arrow. The arrow gives you
all of these points. To help you to
center your picture, we want to line up these two blue dots with
the line on the canvas. So we're just going to
carefully slide it over. Doesn't have to be perfect, but we just want to
slide it over to make sure that our picture
is staying center. Once you have it slid over, tap that to get rid of it. Now when it comes to the neck, this line is pretty much defining where the
middle of the head is. So when we draw our neck, our necks, that line pretty much represents where the middle of the
neck should be. That is one easy way to find out where exactly do
I place the neck, center the head, and then draw the neck outside
of that line. As you see, I draw two lines. Just put a little bit of
curve to him and then I can do a little curve for some shoulders because it's kind of like a
stylized character. They don't have to
be regular shoulders if you're thinking
about a regular person, a real person, your shoulders go out further than your head. If you touch like the corners
of your shoulders and then move your hands up,
you never touch your head. When we're thinking
about cartoons, you're typically scrunched
underneath the head. Okay? So we have that. We're not going to worry
about clothes or anything, so now we have our full person. We have the head, we have eyes, nose, mouth one ear,
neck and shoulders. We have everything
we need to begin to personalize this to whomever it is it's
supposed to be. And this would also
be your time to make any adjustments
if you want to. I'm leaving it just like this. We're doing this all
under layer one. So now let's rename layer one. We're going to tap on layer one. We're going to choose rename, I'm going to label
this sketch SK, E, T, C, H, And I'm
going to tap off. And now we're ready to
begin the next step.
3. Finalizing our Character Outline: All right, now that
we have our sketch defined on what our
person will look like, now we're going to
lower the opacity of this layer and start defining how we want
our character to look. I'm going to tap on
my layers option. I'm going to tap on the end and I'm going to pull
this opacity down. I'm going to make su
y'all can still see it. I'm, let's do 50% maybe. No, I need to do 40, right? That what y'all can still
see and it's good for me. So I lower my opacity down to 40% and I'm leaving this
at normal. Tap that. And now we're going
to add another layer. Now we have our sketch
layer on the bottom, layer two is right above
it tap to get rid of it. Since I drew that
first layer in red, I don't want to draw the
next layer in red as well. Because like I said,
I like to be able to see what's going on. So I'm going to choose
a different color. You choose whatever
color you want to. I'm just going to
go to blue, red. Blue and purple are the colors
that I work with the most. So I'm just going
to go to a blue. Now we start defining the character a little bit
more. This is what we can do. We can zoom in. And let's
just start with the nose. I'm going to come
down. Let's first make sure I'm on the pencil. I haven't changed anything. I'm not going to draw
a line right there, and then I'm just going
to follow the line here. I'm not doing the whole thing. Of course you can. You
can go up as high as you want to. It's totally up to you. I'm defining the nose. Okay. Define the mouth. Just going over what I've done. If you wanted the
mouth to be open, you could then come in and
just add a second curve line. I would not change
the face shape. I leave the face
shape just as it is, but you can open
it up like that. Add a tongue if you wanted
to or if you want it teeth. You can do that. You have so many options
for how you can make subtle changes to change the person that this is
supposed to be For now, I'm going to leave
mine with the mouth closed with just the one line. I can also add a line under that to further indicate
that the mouth is closed. All these choices are
completely yours. Come over to the ear,
just trace the ear shape, just as it is for the
inside of the ear. We can do a curved
line right there, and then we can take
it a step further and can do a huge lobe. You can make the lobe smaller. Again, no wrong way to
do this at this point. I can't wait to see what
y'all come up with. All right, next up, let's go to, we can do the eyes. I'm going to just
redraw the eyes. Pretty much just
redraw the eyes. Again, this is still going to
be somewhat like a sketch. If it's not perfect,
it's not a big deal. All right, now I'm going
to do the head this time. When I do the head,
I'm going to follow just the outside line. I'm not going to do
these inside lines. I'm just going to start up here, come down in my circle and
then go out into this part. All drawing like
this where I can't turn the ipad is so hard, I think I'm going to have the jaw come in front
of the ear maybe. Let's see, I'm going to erase this and see
if I like that. Yeah, I like that a
little bit better. I'm going to keep my ear and stop it at the jaw and
let the jaw come in front. I'm going to continue the
rest of the head up here. And then of course the
neck and shoulders. All right. Eyebrows. Now we
see what the eyebrows are. This is when you
can start making your choices on what the
eyebrows are going to look like. If I am making
this look like me, I know that I have
thicker eyebrows. Where the eyebrow line is, I may make that the
center and just draw an eyebrow around it to
give it thicker eyebrows. Remember, this side
is further away. I may do that, or I can take it off
the face a little bit. And that kind of adds
to the silhouette of the character
choice is yours. And then I can erase
that little bit there. This is your time to start experimenting with
different things. Okay, so if I turned
off the red layer, turned off the sketch
layer, that's what I have. That's exactly
what I want. Okay? All right. Now, the
one thing that really, excuse me, brings a character
to life are the eyes. This is my trick to drawing eyes that don't look
like they're cross eyed. Now, nothing wrong
with being cross eyed. Maybe you need to draw
yourself cross eyed. So hey, this part
doesn't apply to you. But for those who are
not trying to do that, go ahead and add a third layer. We're going to just
draw the pupils inside of the eye right here. I'm going to say I'm
going to do a circle. And of course, like always, you can do the circle, Hold it, press it to get
it a perfect circle. But I just do that one, Then I like to duplicate mine. I have my circle on three. I'm going to swipe
left, choose duplicate. I'm going to click the arrow, and I'm going to
move it over here. Now as you can see, it looks crazy because this is, this is further away, which means this pupil should
match as far as scale. So I'm going to come back over
to my layer, choose this. And I'm just going
to scale it down. Okay, now I'm going to color these in
just to make it a little bit easier
to see on camera. And then I'm going
to make sure these are on the same layer. So I'm just going to go
ahead and tap layer three. Merge down, now the pupils
are on the same layer. Now here's something cool
that you can do, tap off. If I tap up here, as I move this around, I kind of get a better idea about how my eyes are looking. It almost looks like
animation. It's cool. I use this eye to be my guide. So if I want my character to
be looking at the camera, to be looking at the
person who is drawing, who's looking at it, then that eye probably should
be about right there. If I want looking down, it will go there and I can
make adjustments as needed. If I want my
character to look up, I can make adjustments looking
all the way to the side. I'd have to put some more
space in between them. Same thing if I wanted the
character to looking that way. But for now I'm going
to keep my character. I'm looking about here. And I think that right eye ball, I mean the right
people might need to come down a
little bit in size. So in order to do that, I'm going to choose the lasso tool. I'm just going to
choose it like that. I'm going to scale
it down just a little bit more
and move it down. Okay, now here's one way to
check what you're creating. We're going to flip the
whole canvas and see how it looks over here to the gear. I got to come all the way
down to flip horizontal. When you flip your
picture horizontal, you get a better idea of are those eyes looking in the right direction,
are they not? You know how you're
feeling. The ear, I could move it up, but I like the ear being off from
where it's supposed to be. So I'm going to leave my
character just the way it is. I'm going to flip it
back to where it was. Now I'm going to turn
off the sketch layer. Now I have my basic
character outline. Now we're going to
lower the opacity to this and we're going
to personalize it. Okay, so we're going to go ahead and merge down layer
three to layer two. And let's rename layer two, and we're going to
name a final sketch. The sketch layer
is now turned off. We're going to turn the opacity
of the final sketch down. I'm going to go back
to 40% perfect.
4. Personalizing Our Character: All right, now we're
about to finalize the look of our character. Right now. We have the
sketch layer which what we started off with on
red is turned off. We have our final sketch,
which I'm using blue. You might be using
a different color, and now we're going to add
a layer above this one. Remember, final sketch
has been turned down 40% and we're going
now to this one, and I'm going to
change my color. I'm probably going
to go to a purple, but I'm going to make
it a darker purple so it stands out on this blue. First thing I'm
going to personalize will be the clothing. I'm going to keep the
shirt. Very simple, you experiment with
what you want. So for example, you can
give your character V neck to do something like that. Or if you want it
to be like a jersey of some kind, you know, you make a deeper and you can do something
along those lines. But for me I'm just going
to keep it a basic shirt, just cross right
here at the neck. And then I'm going
to add a collar around just like
that, nothing fancy. All right, so that's going to be the shirt
for my character. Next. The most
important part for most of all is hair. I
don't have any. Technically, the top of his
head works just fine for me, but we're going to
pretend that I have hair when I'm doing hair
on a character like this, I'm going to definitely
do it on its own layer. So let's go ahead and
add another layer. And we're going to name layer
four hair, rename hair. This is where you can go crazy. This may be something you
decide to charge people for. Then you're going
to take this basic person and you're
going to change them into every single person
possible and charge people. That's some business
advice for you. Just make sure you
give me a cut. Let's say when I did have hair, I would draw my hair line
right in here and then came down and back and
then here. Just like that. I could leave my character
just like this and be done. But let's say I want to
give my character a little bit of height and hair. I may come over here and I
can do something like this. That's an option I'm going
to turn this layer of. I'm going to do several
different hair choices just so you all can see how simple it is to change the hair, So I'm going to
add another layer. So let's say you have long hair, let's say it's hair
that's to the side. Let's do this here. Let's
say you have hair that might cover part of there. Maybe I'm going
to come out here. Remember hair grows
off your head. If I have long hair, I'm not going to
draw it down from here because you have
to have some kind of level of height between where your scalp is on your skull
and where your hair is. Hair. Although it's thin, when you put a bunch
of hairs together, it should have some
kind of height to it. I would start maybe out here in the open space and come down. Then I could come over here and there's so many options and I can take it behind
the body like that. Maybe. Let's say you want to
go with a higher hairstyle, but the person that you drew, you don't have enough space. This is the easy thing to do. Your sketch is here. Your sketch should
all be on one level. I'm going to turn off
the shirt for now. All you need to do is just
choose the final sketch, hit the arrow, and
just scale it down. Depend on how much
space you have on your canvas, Move it down. If you want to do a
higher hairstyle, these will be choices that
you have to make on your own as far as like where you
want to place the character. So let's say I'm going to
make a higher hairstyle, I'm going to scale them down, move them down a little bit, and then I'm going to
go up here to this one. And let's do something
way out here. Something funky, maybe
comes down like that. This is what I mean
by the head we drew is a really great
foundation for anybody. Okay, so however the hair
is that you want to draw, you draw on its own layer. That way, if you mess
up is easy to erase. And even with a
hairstyle like this, I could even add a little
bit over there on the side. I say, you want to do bangs. Come down here maybe. And then maybe the bangs will
cut right across there. Just like that. Maybe there's
a head band involved. Maybe just make it wavy. Okay. You have so many options
for how you do your hair. Of course if you wanted
to add more details to your person like eyelashes,
you would do all of that. You know, draw them on there. And, you know, have kind of little simple
things you wanted to do. If you wanted there to be
lips, you could do that. Or I could connect the lip to that bottom line that
I had from earlier. If you wanted a earring or you wanted some kind of a
special kind of earrings, this is your time to play around with all of these
options for the person. But I think I'm
going to continue with that funky
hairstyle that I did. I'm going to erase all this off. Where is that
hairstyle? This one. So I think that's pretty cool. And to me, I moved the
shirt. I moved the person. So let me move the shirt
so that it's back, you know, on there. Once you've gotten
to a place where you have the hair the
way that you wanted, the clothes the way
that you wanted. We're now going to
get this all on one layer and erase
everything we don't need. All I'm going to do is
to combine all of this. Wait, don't combine it.
Almost get the step. We're going to go to
the final sketch layer and we need to erase
away the scalp. Erase away everything
that's not supposed to be seen up here where you see the eyebrows going
to erase all of that. We can erase the scalp
because we don't need it. And then erase
shoulders right here. Now we're ready. So I can turn this layer
all the way back up. And then I can take
all the layers once you have the person
the way that you want. Now, if you want to
be able to experiment with different people, this
is what you should do. Probably should have
told you this earlier. Let's say you want to be able to make this into
multiple people. Duplicate this layer. Duplicate it a couple of times and turn off the other ones and or lock them if you
swipe left and lock it, that means it can
never be deleted unless you unlock it and
all of that kind of stuff. That way when you combine
all of these together, it won't make you
get rid of that one. I'm going to leave
this one locked and I'm going to combine
everything above it, and this one is still off. I'm just messing up all kinds of ways I feel like I'm giving you got too much
information at once. Bring this opacity up first, erase away which you don't need. I feel like I just
got real confusing. And then you can combine
these together once you erased away everything
that you need. I forgot I went back. Okay. So now I can just
pinch all of this together. I had not everything
on one layer. Now what I'm going to do, once I have everything combined, is I'm going to just
make it all black. Going to tap on the wand, come down to hue,
saturation, and brightness. And I'm going to
turn the brightness all the way down to black. And now I have my character
in black and white. You could stop here
if you wanted to, but we're going to keep
going a little bit further. My character has
taken up a lot of space on my screen right now, so I'm just going to reduce the size just a little
bit by choosing the arrow and just bringing them down just
a little bit in size. I'm going to come over
here to my gear and I'm going to turn off
the drawing guide because I don't
need it right now. And that gets rid of
that line in the middle. Now we're going to add the
circle for the character. I'm going to add another layer. We're going to draw a circle. Press down so we
have a nice circle. We want the circle to almost
take up the whole page. That way when it's
on its own layer, we can move it around. Maybe we'll place it
so that the bottom of it just barely touches
the shoulders, maybe the top goes behind the hair or
something like that. It's cool looking. Then I can erase what I don't need of the circle because
it's behind the hair. These are all things that you'll have to make the decision on for your own character. And then for the Sherm
going to erase those lines right there. All right? And now my character
is done completely. I have it framed in a circle
and it's ready to go. You can stop right here. Or you can take this a little
bit further and add color. Y'all want to add color to it? Okay. Well, let's
add some color then.
5. Adding the Base Colors: We have our character
drawn. So now we're going to add color. Of course, we still
have this locked layer, that's where we did
the outline at. I'm just going to move it all
the way down to the bottom. My circle was on its own layer. The final sketch was
on its own layer, is going to combine those two. Now they're under the
final sketch layer. Of course, I still
have this X one because remember I made
a whole bunch of copies. So that's why final
sketch layer, we want to keep that at the top. We're going to drop
down the opacity. I'm going to go down to
about 30% this time. I think you should
see on the screen. Yep, I'm going to
come under that one and I'm going to
hit the plus sign just a couple of times just to give me some space in between. Now, we're going to
add color to this. We're just going to
do large areas of color to make this a
little bit simpler. And of course, it can be as realistic or unrealistic
as you want. The choice is yours. First thing I'm going to
do is focus on the head. For the brush that
I'm going to use, I'm going to use, let's use a brush that has
some texture to the outside. Maybe pick a brush in
the charcoal area. I'm going to do the
charcoal block. I'm come over to my color, pick a nice skin tone color. This is not me, obviously. I'm going to pick a
simple brown right there. Just going to go in, make
sure I'm on that layer. That's not the
final sketch layer. And I'm going to take
my time and just trace only the head. All I'm focused on
right now is the head. And it doesn't have
to be perfect. Now I can drag my
color and drop it, but with this type of brush, you might end up with a lot of little spaces like that
you can drag and drop. Or you can just color it in. The choices is really yours. I'm going to color it
in today for the sake of not ending up with
any of those spaces. Because even if I were
to drag and drop, and I have those little spots, I can al color on top of them. But today I'm going
to just color it in. All right. And a layer empty layer
underneath there. Remember, I added
three when I did mine. So make sure that
you're not drawing a layer that has
something on it. I'm going to turn off
the face layer and I'm going to do the neck
with the same skin tone. Keep in mind, change
the brush size to whatever works best for you, for the part of the
picture that you're drawing that's a little bit big. So I'm going to bring
it down a little bit. I'm going to color it in. Okay, I'm going to add my shirt collar
layer above the neck. I could name these, but it's not really that important because you
can tell what's what. Above that, I'm going
to add a layer. Let's go with, we do
like a lime green shirt. I think we can always
change a layer. And I'm going to do just
the collar right now. I'm going to make sure it's
close and come around. Remember, you can
drop your color in or you can just color it. I chose the charcoal brush on purpose so that it was
so it wasn't super perfect and it has some natural
texture to it underneath. You can do it on the same layer as the neck or you can create another layer above the neck and under the collar to
do the shoulders. And it's okay that
it's going outside the line of the circle
that's on purpose right now. All right, so for now
we have the face, neck collar, and shirt. Next thing is going
to be the hair. I'm going to add a
layer above the hair, or I can use this layer that
doesn't have anything in it. And if you're ever unsure if
a layer has something on it, choose the layer And
then choose the arrow. And it'll tell you if the
layer is empty or not. For the hair, we're
going to give him some purple hair just because I want him to be
a little bit different. But this is not actual
self portrait to me I'm going to use to
stick with the same brush. Because the hair is
such a large area, I will probably
drop in the color. Remember, it's not important
that I stay exactly on my outline. Drag and drop. Remember, when you
go left to right, that determines how much
color is filled in. So we want to go over as
right as far as we can. Without it taking up the
whole page like that. I can come in and see any areas where the color didn't drop in that great
and adjust those. All right, so that's cool for this little area
of hair in the back. I don't want to draw it on
the same layer as this, so I'm going to put it on a
layer in between the face and the hair, just like that. All right, next up we're
going to do the eyes, we want to do the
eyes above the face. I'm going to add
another layer there. I'm going to go to white. I'm going to take my time coloring the
white part of the eyes. Same thing side. If you did the majority
of your drawing today, doing a circle of
oval and holding it, you can do the exact same
thing to color it in. I could trace, hold,
and it would snap. But just with certain brushes, you just got to be mindful
that it may not look perfect. I appreciate y'all
sticking with me. Whoops. Thus far as we draw some cartoon profile
pictures. All right. Eyebrows, because I
made his hair purple. I'm going to make the
eyebrows purple as well. I'm going to do a darker purple. So if I want to pick a color
up that I've already used, just hold my finger
down on the screen. I'm going to come over here and make it a little bit darker and that eye brought
out completely erased. I can draw a little bit right
there now for the eyes, same concept that
we did earlier. I want to make sure
that I'm putting the eyes right above
the white part. So I'm going to add a layer in. I'm going to do brown eyes,
maybe some over here. I think I'm going to play
around with them later. All right, and then we're
going to just trace and hold. I'm comfortable
with the way that looks just like earlier. I'm going to duplicate it. So I'm going to swipe left, duplicate, choose the
arrow, move it over. And of course, scale it down. Scale it down until
it fits you where I need it to fit and deselect. Now we have the basis
of our character. If I turn this off,
that's all it looks like. Without, without
all the outlines. So we'll have to make sure
we add those in later. Now we're going to add simple
lines to define everything, and then we'll go on
to add some shading. I'm going to do my
outline on the very top. My final sketch is going to stay at the top of the picture,
but right above the hair. We're going to add another one. We can name this one outline, U, T, L, I, N, E. I have certain brushes
that I like to use, but for the sake of doing a brush that y'all
can use as well, we're going to do
the six pencil, so I can go to rest and find it, or I can go back to
sketching and find it. I'm going to show
all how to alter a pencil so that it's a
lot more streamlined. Okay. Meaning that it'll give you a nice movement and not so accurate to how
you may actually be drawn.
6. Adding Highlights and Shading: All right, so I'm going
to alter this six pencil. So all I'm going to
do is I'm going to swipe on the pencil and
I'm going to duplicate. So now I know any pencil
that I've altered will have this little symbol in the
corner. I'm going to tap on it. I'm going to come down
to stabilization. And the amount of
the stabilization, I'm going to bring it up and you see the higher that
stabilization, the more interested
that line will be. Let's move it to let's do
60% 60% stabilization. Okay. All right. Now I am on my outline layer with my 60 pencil
that I have altered the stabilization to 60% I'm going to hold down the
skin tone that I use. I'm going to come
over here to my color and I'm going to drop
it down a little bit. The pencil is turned all the
way up and I'm just going to outline all of these
lines that you don't see. When I turn off
the final sketch, just carefully follow them and see. With that stabilization
turned on, it really just helps you to
create a nice smooth line. It really makes a
huge difference. I'm going to do a line right up here at the top of the eyes, because I like to do
that to show where the eye lashes are because
just about everybody has them. For the green, I'm going
to grab the green, drop it down a little bit. I'm going to do just in this area and now when I turn off the layer,
it looks like this. Still very rough, but we're going to add some stuff to it to make it a little
bit more interesting. Looking next, I'm going to alpha lock all of these layers so that we can add
some shading to them. The Alpha lock, I'm
going to start with the hair layer, tap it twice. Alpha lock, and I'm going
to go down and alpha lock. Every layer that I color,
something in the eyes, we can move those to the
same layer so we can merge those down so that the
eyes are by themselves. Remember the eyes, we can
move them around if needed. I'm going to Alpha lock them. I don't need to Alpha lock
the eyebrows and the eye, but will alphaloc them just for the sake of
doing everything. Face Alphaloc collar. Alpha lock, shoulder for
the top of the shirt. Alpha lock, and
neck, Alpha lock. Now I'm going to drop the
original final sketch. I'm going to drop that
opacity down even further. So I'm going to drop it down to about 5% You can see
it a little bit, but I can see a whole
lot better in person. All right. I'm going to keep
my shading simple today. I'm going to start with my hair. If you don't want to shade directly on the hair
that you've drawn, you can just add a layer above it and choose clipping
mask, for example. Anything that I shaded
on this would only show up on the hair because I
had to clip to the hair. I'm on that layer, I'm going to choose the
color of the hair. And I'm going to make this hair going to go over to the
right a little bit. Because when you're adding color and highlights and
shadows and all of that, you can go straight up. But visually, it looks
a lot more interesting. If you go up into the left
or up into the right, in this case I'm going
to grab my purple color. I'm going to turn
the dial towards pink and then go
up a little bit. The brush that I'm going to use, I'm going to use that same charcoal brush that
I colored in with. But this time I'm going to
use it much higher in size. And I'm just going to shade
at the top just like this. It's going around the outside. Nothing fancy, just like that. And then I'm going to
grab that purple again. I'm going to go down and I'm
going to go to the left. I went up into the
right the first, I'm going to go down into
the left towards blue, and then I'm going to
shade at the bottom. As you can see, that
really changes how it looks in this area. Up here over here, I can
leave it the same or I can go try to use that pinkish
color and do the side, but I'm not going to
worry about that. I'm not going to go to the face. You don't want to go crazy
with the face colors though. The face and clothing, and hair. I don't look at them the same. I'm going to go up a little
bit and I can go over. This is another time
to just experiment with how you're
shading everything in. If you want to give
like rosy cheeks, then you can take
it over to like red and do this only
in the cheek area. I wouldn't do it anywhere else. I can go further up if I want, like little glare spots,
like maybe on the nose. I can do something right there. I can maybe go over
here in the ear. You got to decide where
you're going to try these different shading
techniques out. I can do some on the side here. It's really up to
you. I'm going to grab a brown to go
down a little bit. I can do the bottom of the nose. I'm going to do too
much. The bottom of the nose can do right here, underneath there, and underneath the lip can do the inside of
the, the bottom of the ear. I will say just
continue to add shading until you get it the way
you want it to look. I'm going to leave
that same color that I have selected and go
down to the neck. I'm going to use that
same color on the neck. I'm going to add a
lot more because of the shadow that our
head casts on our neck. You kind of see how the green looks like this on
top of the neck. I can just use my pencil. I can use a pencil brush. Actually, just clean it up a little bit so that way it looks like it's actually where it's
supposed to be. All right, now let's
grab some green. I'm going to go up into, I'm going to go to the left, this time towards yellow brush. A little bigger,
looks a little bit. And do the same thing
for the shoulders right on the outside, grab it. And I'm going to go over to the right and down just a little bit and
not going down too far, I can go down underneath
where the collar is. And I could even do some
on the collar because, you know, the head will cast
a little bit of a shadow. All right, let's go to the
eyes, grab that brown. I'm going to go
down this time and straight across, super simple, grab the brown up, get the top side
looking pretty good. One thing I see that I
want to do is I want to add some, something
to the hair. I can turn off my final sketch
and he's essentially done. But I want to take it just
a little step further. I'm going to turn my
final sketch back on. Up here on the outline. I thought I named this
outline. Not crazy. Okay, maybe I am a
little bit crazy on the layer where
we did the outlines. At this layer, I'm going
to add a little more. I'm going to grab
this pinkish color that I use for the hair. I'm going to go up a little bit further and I'm going to
go back to the pencil that we altered and I'm going to use it to
outline right in here just because you
can't see it that well. See, doing that really makes that stand out
a whole lot more. All can zoom in and
see it right there. I can take some other
colors and just go out just a little bit just so the hair doesn't
look as perfect. A little lines like that, I can use the lighter
color as well, so adds a little bit
of a little bit to it. I can also go inside
and draw lines. If I wanted to go to add a little bit of contrast,
it's totally up to you. And then I'm going
to grab some white, the inside of the eyes. All right, my character is done the way
that I want him to. The last thing that I
want to do is the circle. What I'm going to do is I'm going to go underneath the neck. Because for me, my neck
is my bottom color layer. And I'm going to get a
layer underneath that. I'm going to add a layer there. My picture is purple,
brown, and green. I want a color that's
going to complement either the hair or
compliment the shirt. I'm going to touch a color
that's in the shirt, come up to my colors. I'm going to go over
here to Harmony. Complimentary may
already be selected. If it's not, choose complimentary and you
can see what color is the opposite of the
color that you chose, I'm going to choose,
let's do a studio pen. Let's go to inking, the brush category of inking. And we're going to
go to studio pen, find studio pen, we're going
to draw another circle. Try to stay in line with the
circle that you did earlier. Hold it down some out
there and fill it in. Okay, so there we have a circle. Now I need to adjust the circle because I want the shoulders
to be fully in it. So I'm just going
to take the circle and move it up just a little bit, just like that. Then what I can do
is to make sure that this part of him is
actually in the circle. I'm going to choose
clipping mask. Now the neck is
clipped to the circle and then I'll clip the
shoulders to the circle. Now his hair sticks
out at the top, but his shoulders stick in. Then I can turn off
my final sketch. I can stop here, or we can add some
shading to the circle. Alpha, lock the circle,
grab that color. Let's come back over
here, the disc. And I'm going to go
over to the side. I want it lighter. I'm going
to use charcoal again. Oops, just right in the middle
behind him. Just do that. Just to add some of that
texture to the circle. I can grab the circle color, get a little bit darker
and maybe come along the bottom just like
that he's done. Or we can take it another
step further and we can go ahead and color the
background under layers. Choose background
color, I would say pick a color that you think will
complement what you've done. I have a whole lot
of cool colors. I have blue, purple, and green, which are
all cool colors. I think a warm color background probably makes the most sense. Let's go maybe like a yellow, orange, maybe towards red, because we don't have
reds and we don't want it to be too harsh. I
think something like that. Of course, we can
shave that as well, or we can just leave it like
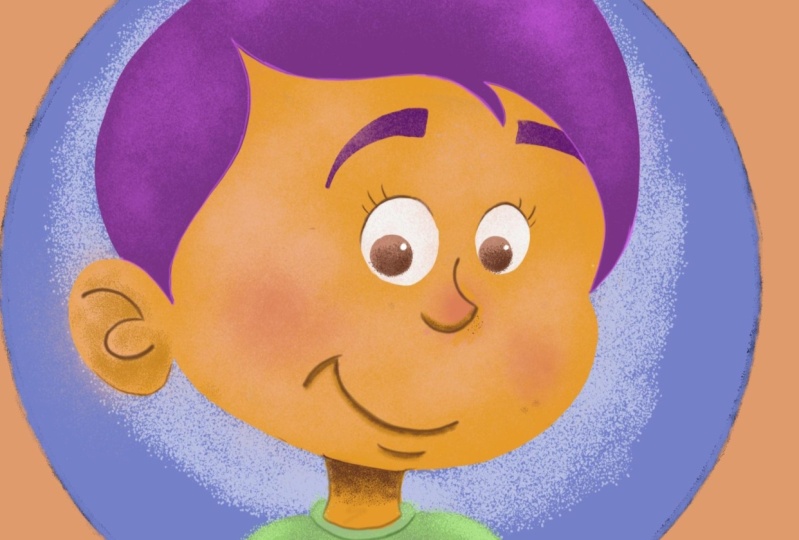
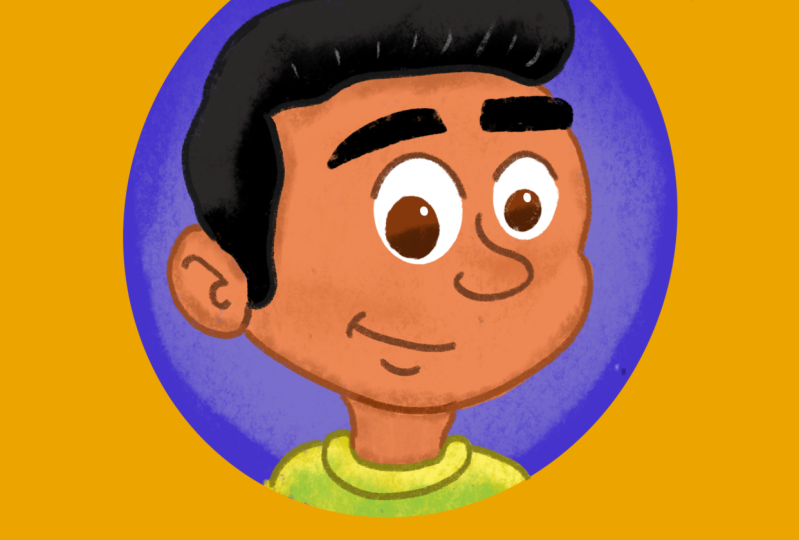
this. There you have it. You have a simple
and easy, cartoon, stylized profile
picture that you can then to use on Facebook, Instagram, or wherever else. If you wanted to exploit just the character
without the background, you would come down and you
would select background, and that way you have
a transparent picture. You would choose the gear, choose Share, and choose PNG. And that's going to
save it to your ipad without the background.
7. You Did It!: All right, thank y'all so much for joining me for
another lesson. This turned out a whole lot
better than what I thought. When I was first thinking
about how this might go. I was kind of unsure, but I'm really happy with
the way he turned out. I can't wait to
see your projects. Please make sure you post them in the class so that
I can see them. And also, I made some
discussion posts asking for suggestions on lessons that you would like to
see here on skill share. Please, if you get just
a couple of minutes, drop in and just tell me some of the things you'd
like to be taught, how to do and procreate. I can't wait to
see your projects. Thanks again for watching. My name is Travis and I'll be
talking to all, so please.
 Travis A. Thompson, Let's Create!