Transcripts
1. Introduction: My name is Travis a. Thompson. I'm an illustrator
and former teacher. I'm so glad that you've
joined me today for my first digital drawing course. Today we're gonna be
learning how to draw the Easter Bunny
using the iOS app, Procreate using your iPad
and your Apple pencil, or maybe just a sheet of paper. It won't be exactly the same, but I think you can still get the hang of it.
Let's get started.
2. Procreate Basics: Alright, so I wanted to
start you off by actually getting a look at the bunny. Don't gotta be drawing
today we're gonna be drawn the Easter Bunny and gonna
be something very simple, very easy, and very quick. I think, I think this would be a nice Beginners lesson
to kinda understand my process for how
I use Procreate. Like I said before, more than likely these
just gonna be called. This is how I do. It, may not be the easiest
way, the best way, but this is how I
do it and I always, I'm able to achieve the
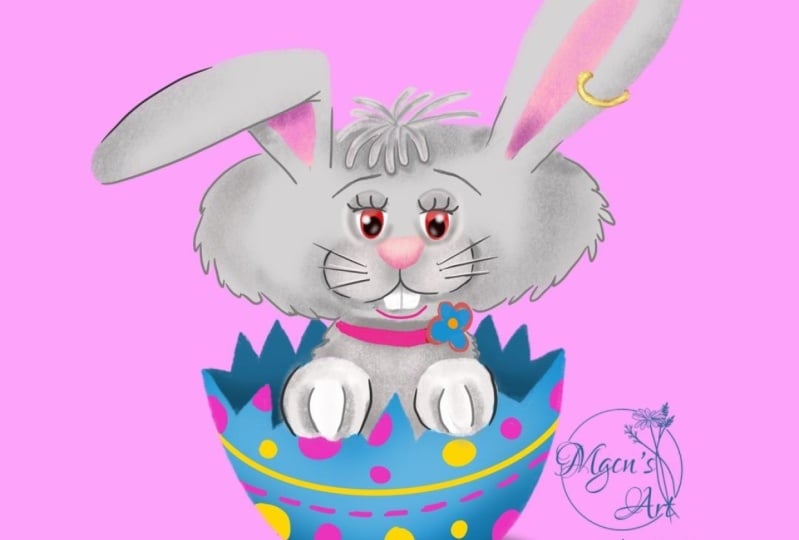
results that I want. So this is the bunny that
we're going to draw today. I'm gonna be using my
iPad Pro Course 12.9, second-generation Apple pencil,
which I absolutely love. Alright, so we're gonna
go back to my gallery. We're going to
start a new canvas. When you look and
open up Procreate, you can see all your
different stacks. I'm an illustrator. I do different books,
I do stuff for myself, and these are different
things that I'm working on. But we're going to start up
with a brand new canvas. So we're going to
tap the plus sign in the top right corner, and we're going to choose the small black box right there. This is going to allow us
to create a canvas that is exactly the size that
we want it to be, not a predetermined
size, if you will. All right. I'd like to draw my
pictures usually in like a ten inch by
ten inch canvas with a higher than 300 DPI because I just liked the
opportunity to be able to scale it up or scale it noun. It's not a vector, but
I feel like that's a good place to do
your sketches it. So we're going to
make sure that we choose inches down
here at the bottom. We're going to make our
width and a height, both 10 " 1010. My DPI is currently 400, DPI is dots per inch. So if you were to
look at the screen, you have 400 dots for
every inch that you have. They're not really dusted like little tiny squares,
but pixels, whatever. Alright. Note, I'm an
illustrator of children's books. A quick thing you can always do if you're illustrating
for print, meaning it's going to be printed out with some
kind of printer. You want to change
the color profile. Over here on the left-hand side, we were in dimensions just now. But if you go down
the color profile, you can change the color
profile being used. Currently, we're
sketching on an iPad and we're going to use this for a tablet or a phone
or something like that. So we will leave it at RGB, which is red, green, and blue. Because when you think
about how light is created in colors are
created on a device, it's using red, green,
and blue light. When you mix red, green and blue light together, you get white. However, if you're creating something that's going
to be printed out, you do not need to sketch
it and draw it in RGB. I learned the hard way
that the colors do not transfer poles very well. You want to choose CMYK if this is
something that you know, you're going to print
out what those do. And I Easter Bunny, if you think this is gonna be something
you've got to have printed out in a book
of some sort and go ahead and choose CMYK that cyan, magenta, yellow, and black. Because when you're
thinking about inc, Those are the five colors of ink that are used
in most printers. So you will want to use CMYK. I'm not going to be
printed out or anything. So I'm going to leave mine at
RGB with the display a P3. Again, height and
width, both 10 ", we're doing 400 DPI is gonna give us a
maximum layers of 37. We're just gonna be a great number of
layers to be able to utilize when not going
to use all of them. But we're probably going
to use moles and we got to go into Cree, hit Create.
3. Procreate Tips: The great thing about this
lesson is you can pause it, rewind and fast-forward, muted if you only want
to hear what I'm saying. But that'll be the good thing. This is my first lesson
that I'm ever doing. I'm so excited to be able to test out the waters
of teaching online. I've been a teacher in
schools for so long, but now we're doing
this, doing it this way. A couple of things in a way
that I use my Procreate app. Today, I'm gonna do my best to only use brushes that are
standard with procreate. There are so many brushes that are out there
for you to use. Just gotta go out
there and find them some you can pay for. Some are free, but
I'm going to use what comes standard on the app. Okay? The first pencil, the first brush that I'm
going to start off with, there's gonna be a six B pencil. In this section right here you have your
different categories, categories of your brushes. So we're going to get ours
from the sketching category, and we're going to
choose the six B pencil. Like I said, I have
so many extra one. So you may see mine and have different sections and things that you may not see on yours. It's because I've
been downloading free stuff because I'm
not about to pay for it. Alright, so again, we're
gonna use a sketching pencil. We're using six B. Then I'm going to
tap the brush tool again to get rid of it. Over here, determines the size brush that
we're going to use. This first ladder is how big
the brush is going to be. I'm going to use my
six B pencil at 100%. And then this
determines the opacity. And I'm going to
use this at 100%. When I do my sketches, I
like to sketch in a color. I don't really like
sketch it in black and white because
I think is boring. So I'm just going to choose, I'm going to leave it
at this teal color that I have. Nobody's going to see. This is going to get turned off when we get to the end of
drawn-out Easter Bunny, but yeah, pick whatever color
you want to use. We're going to change it.
4. Sketching: Alright, first thing we're gonna
do is we're going to draw an oval for our
Easter bunnies head. So I'm used to being
able to turn my tablet. So this is still a learning
curve for me of being able to only draw with the app
here sitting in one place. And I'm trying to
make sure I don't shake the table too much because I realized in my last video
my camera was shaking a lot, but I'm going to start
off with an oval. I like to do a whole
bunch of lines. This now I taught my students. I draw a whole bunch
of lines and then I can erase away
what I don't need. If you were drawing this
on a real piece of paper, I what I would tell
you draw lightly. You're all really lightly. Draw really lightly
that way you can easily erase anything
you messed up. Alright, so boom, there's the
head of our Easter Bunny. Yours could have been a circle,
could have been an oval. It's up to you. One way to make an
oval really simple, simply rather I should say, is to draw an oval. Go back to my pencil is
to draw an oval and hold the pencil down on the
tablet. Watch this. I draw it, hold it, boom. And it will create
a perfect oval. I'm not trying to go for
perfection right now. I like mine and look a
little, little rough. And you may have
noticed just now, I tap the screen, that's one of the
gestures you'll always see me use
it is if you tap the screen with two fingers or my nails are dirty but
oh well, who cares? If you tap the screen
with two fingers, it will erase the
last thing you did. If you tap the screen
with three fingers, it will redo. You just undo it. So just keep that in mind. I'm going to use it a whole lot. I'm going to try to show
you some different tips and tricks that I use in
my drawing process. So we're going to
add on the ears. I'm just gonna put
a line right here. And I'm gonna put
a line right here, but we're gonna kinda
cheat this time. We're not going
to draw both ears just to make life a
little bit simple, but we at least have
where we're going to put both ears at. As always, you can do
this your own way. You can do exactly the
same thing that I'm doing. So I'm gonna start with
this air on this side, gonna kinda draw
two diagonals that come out of the hair
just like that and make it a little bit longer. And then I'm going to
draw like a stretched out oval-shaped here because I want the ear to be folded
over a little bit. There we go, right there. All right, so we have our two
lines and we have our oval. Now, instead of drawing this exact same ear
again over here, we're just going to copy and paste it. That's
the easiest way. Most cartoons are kind of
symmetrical for the most part. So this makes things
a whole lot easier. In my opinion. The
way we're going to copy and paste it is up here
in the top left corner. We have our gallery.
If we tap that, it's going to take us back to
what you saw on my pitches at the wrench is all
different actions. We'll use those in a little bit. Adjustments. This is the lasso and this is the selection tool. You see when you're on
the Selection tool, you can move your drawing around on your screen
wherever you want it to be. We're gonna go to
the lasso tool. So you're going to tap
on the Lasso tool. You want to make sure free hand is chosen down here
at the bottom. And that is still says Add. And I'm going to zoom
into my ear and I'm going to draw, you see, when
you start joining, you get this dashed line, dashed line, dotted line
have you want to call it. And we're going to draw
it right around the ear. Watch me right around the ear. And I'm going to end
where I started. So I started at the
little gray dot and I'm going to end
up the Great died. And the cool thing
is with the lasso. It's the same thing
like with the pencil. If you mess up and you kinda drew it in a place
you don't want it at. You just tap with two
fingers and it goes back or you tap with three
fingers and it comes back. After we've drawn it. We're
gonna come over here to this icon right here. This is gonna be our layers. And we're going to tap
on this right now. Everybody should be on layer
one because we haven't named any of our layers
or anything like that. Layer one is gonna
be highlighted. I'm going to tap layer one. I'm going to choose, not that. I'm going to tap layer one,
I'm going to choose Copy. Now copied it. Then I'm gonna come over here to the wrench for the actions. I'm gonna go to add. I'm going to come
all the way down. I'm going to tap Paste. And now you see I have
two ears on my canvas. So instead of me having to draw that one, I just pasted it. But the thing is, the IRR is not based in the
correct direction. Here's your cheat sheet down
here, because what you do, you just flip it horizontally. If you flip it vertically up and down, horizontally
side-to-side. So we want to make
sure that it's flipped horizontally once. And then I can use the
green dot right here. I don't know the name of
much anything on his app. I just call it what I
call it the green dot. We take the green dot and we rotate the ear where
we want it to be. So I'm going to kind of get it lined up towards that line was originally I'm going to
place it right there. Once your object is placed
where you want it to be, you can reach tap
the selection tool. And now simplest good thing is if you happen to see it wasn't where you want it to be, you can just read, tap
the selection tool, and move it back to where
you wanted it to go. Now, I want all of my stuff
to be on the same layer. The image that we pasted
in which would that right ear is under
inserted image. But on what all of this
to be on the same layer. So I'm going to tap on
inserted image and I'm going to choose merge down. And now my bunny's head
is on the same layer. Alright, now we have
the bunny's head. Now let's move on to his body. You're not going to
see the majority of the Easter bunnies body. So we're just going to
draw an oval just as a placeholder so we know
exactly where the body is. Very quick and simple. Alright, let's come back
over here to our layers. We're on layer one right now. We're going to add a layer by
tapping on that plus sign, which is gonna
give us layer two. And I'm gonna change my color because now we're
going to draw the egg. So I'm going to choose
maybe like a purple, purplish blue or
something like that. I don't want to choose
a color that's close to whatever color you
started with trying to choose something that's
a little bit different. And we're going to
draw a half and egg because our Easter Bunny is gonna be sitting in the egg. I'm just gonna kinda go
back and forth just like this to create upside down arch. Same thing with the old one,
like I showed you earlier. If you draw an oval and held it down, you will get a perfect. Oh, well you can do the
same thing for this. You can just draw
that, hold it down. Boom, gives you
that perfect shape, but I don't really want
perfect right now. I want rough. Alright? You'll see these
little marks will get rid of all of those
a little bit later. So right now you should
have your bunny ears, oval body, and this
arch right here. Now we're going to
draw a skinny oval in-between because
we still want to give a little bit of
three-dimension two. This is not going to be
my YOU popping in it. It's not going to be a
completely 3D picture per se, but we are gonna do shadows
and those kinds of details. We're just going to
make it look 3D. Alright. Now, it looks a
little realistic. So if I turn my bunny off, you'll see that I
have pretty much an egg shape just like that. And we're going to
draw one more oval on the inside to make it a little bit easier
for the next part. So I'm just going
to draw an oval, another oval. Now
this gave me one. I'm right handed, so
I'm going to wait and try to go to the left. That's looking really confused
and let me start over. Show you what I mean. This doesn't need
to be perfect even. Alright, so there we have
our egg with another line. The reason we're doing that
is because we're going to draw it cracked and want to try to keep it
consistent with how we're drawing those
on the cracks. But if you want to
make yours, you know, kinda different, hey,
that's cool as well. I'm going to choose
a different color to make it easier for
you all to see on the screen about what
I'm doing in-between here, I'm just going to draw
a zigzag line that goes from this
corner right here. And it's going to end in
this corner right here because that's pretty much
the corner of the egg. And this is the first corner
where I'm going to start. Starting here. He's gonna go down, up, down, down, up, down. And I want to make
sure I'm ending going up into this corner. Alright, so that's
the front of the egg. Now I need to do the
back of the egg. I still want to
start at that dot. So I'm gonna go down back
here just like this. In-between that section down and see the part
that got a little messed up or this.
Let's try this again. You want to, you
can always do that because nobody's going to
see this part right here and you can go down on this side
and have them meet later. Just like that. And now we have now it's a whole lot of stuff going on, on
the screen right now. So let's start erasing
some of this out. The eraser tool is right here. We've been using the brush
tool this whole time. The finger is the smudge. This is the eraser. Now when we tap on the eraser, I'm gonna be using
the airbrush category with the soft brush. This is standard. It comes with your procreate. I'm using airbrushing and
I'm using the soft brush, and I'm going to have mine
around maybe like 32 to 3%. I'm going to zoom in. I'm going to erase away what
I don't need all of this. I don't need that line we
drew at the beginning. I don't need it because I want a cracked open
looking egg shape. And then I can erase away this
part of it to any of that. And then back at the
back, erase that. And then finally that top part. Erase that as well. Again, this is just your
rough sketch layer. Nobody is going to see this
is gonna be perfected later. I'm going to erase away
these little marks that got on the screen somehow. And I can erase away
some of these dots so it doesn't look like
actual.in the corner. All right, there's my egg and I'm going to turn
my bunny back on. We turn layers on and off
by hitting the checkmark. I don't think I said that
earlier. Still learning go. We're going to turn
the bunny back on and then we're going to, I'm gonna move my bunny down into my egg a little bit more. Oops. So remember I can
choose the selection tool. I'm just going to bring him
down more into the egg. And now I want to
draw some hands for the bunny to be on
top of the egg. And I'm going to choose
the color that I originally used for the bay. And I do that by when you hold your finger
down on the screen, whatever color is
underneath your finger. On the bottom is the
color you currently have. On the top is the color
you're about to switch to. So if I release my finger
is now switch to white. But if I hold it down and
I make sure I'm over, the green is now
switch to green. And I'm just going to draw
a circle just like this. And then we're going
to start erasing away where we do not need. Alright, so I'm going
to start erasing away some of the egg. So we're gonna go
back to the egg layer, choose the eraser. I'm going to erase where
the egg is inside the hand. Erased that on both sides. And then on the bunny layer, I'm going to erase
inside the hand again, as well as the body that's
below the opening of the egg. Because we don't
need that at all. Alright, oh, I need to do
this part of the egg to erase the egg out of
the bunny's head. Alright, so there you have your basic shape for
your egg and your buddy. And I'm going to erase these straight lines that I had earlier in the bunnies
ears because I don't know. All alright, we're
done laying down the basic shapes for our
Easter Bunny and our egg. Next, we're going to be refining this and adding the details.
5. Refining The Sketch: We've just been laying in
our bunny inside of our egg. Now we want to start refining this sketch a little bit more. First thing I'm gonna
do is now that I have the size of my bunny and it's, and it's not going any
smaller, any bigger. I'm gonna go ahead and make this bigger on my actual canvas. I'm gonna do that by grouping
these two layers together. And let me show you
how to do that. This is really good if you
want to change the size of something without putting
everything on the same layer. So in your layers, when you lasers probably
already selected, we only show only have two, the one with the bunny on
it and the one with the a. And I'm going to swipe to the right to also
select layer two. So again, when you
tap on a layer, you're only getting
that one layer. If you swipe to the left, you have the option
to lock the layer, duplicate it, or delete it. But when you swipe to the
right, it highlights it. Can then we're going
to select Group. Now, my bunny and my
egg or its own group. I can turn this
group on and off by tapping the check mark
beside the word new group. I can also choose the
selection tool and move it. But you have to make sure you
have new group highlighted. E.g. if I just have layer-2 highlighted and I select
the selection tool, the only thing that's going
to change is the egg. You need to make sure that you have new group highlighted. Select the selection tool, and then you can make it
as large as you want to. You can also rotate it. Just like this. Fill up
the Canvas just like that. Boom. Now we can move on to adding
more details to our bunny. I, let's go back to the bunny. I'm still using the same green. I'm going to zoom in because
now we're going to work on the bunny space and
some other little details. I'm gonna put a little
line, go back to my pencil. I'm going to put a little
line down the middle, helped me keep in mind
with the middle is. And I'm going to draw
like a circular, oval type shape right in
here for the rabbits muzzle. You know, something
just like that. Again, this is just
a rough sketch. Alright. I'm gonna
do two oval eyes. And again, you can
just draw the oval, hold it down and
get a perfect oval. But I want my oldest
kind of slanted in. I don't want them
perfectly straight. Have them slanted in, and I have them sitting
right on the muzzle. And then I'm going
to have a nose. Remember you can make yours whatever shape you
want it to be. It does not have to
look exactly like mine. Let's see. I want my eyes to be
sitting on the muzzle. Okay. Now right here on the outside, I'm going to draw a curved line. Because what about
the job is smile. And I'm gonna kinda follow the
curve of the muzzle shape. So let me change the
color just to make it little bit easier
to see and go back. I'm going to change the color
just to make it easier. I'm drawing a
curved line here on the outside and a curved
line here on the outside. And I'm following shape
of the muzzle on, but the mother goes
all the way down here. I'm not going all
the way down there. I just kinda cut across and
I don't know if I showed you all that gesture of just
tapping twice on the pencil. If you don't want to have to
keep going back-and-forth between choosing the pencil
and choosing the eraser. You just tap twice. Every time you tap twice
on your Apple pencil, it has to be the
second-generation. No. It'll toggle between
the pencil and eraser. And now I'm back to the paint. And now I'm back to the pencil. Alright, I want the muzzle. Top of the muzzle,
their course ahead. No, I'm changing
the color because I thought it might be too hard to see it all what
they're being green. And then I want the
eyes to sit right on top of the muscle. And of course we want to change. What we need to change later. Alright, look at our bunny. Bunny is looking so cute. I'm gonna get some
eyebrows up here. So I'm going to make my, my bunny a boy. So my brain is going
to wear bow time, but if you want so you
can make yours a binding. What about up here?
With just a hairball? Make it as cool as you want to, as unique as you want him. Right here, I'm gonna give
my bunny some little fors. So we're just going to draw some like this that I've
been having a little bit of. First, just like that. Remember, pause when
you need to rewind, when you need to come back. Right in front of the ears. I'm going to give us
some more of this. Almost kinda be like a
little heart-shaped. See, in this stage is when you
work in through your idea, working through how do
you want it to look. So that's a nice space. I like that. We're
going to keep going. I'm going to add two
lines inside the ears. Because since the
ear is folded over, if the ear was
sticking straight up, we will see the
inside of the ear, but we can't see it since
the ears folded over. Alright. Alright, now we're
gonna go down. We're gonna give
them one big book to rely on in the milling, not a classic cartoon. And we can draw a little
line here for a bottom lip. All right, so we
had the shape of the hair and I think now is
a good place for us to stop. And I think I know what
I'm gonna do next. I probably should
await it before I did all these designs, but it's okay, it's no big deal. Let's go to our
groups, our layers. We're going to tap on new group. And we're going to hit
the plus sign is going to give us what's probably
should be layer for, for you. And we're going to
take both layer two and layer one and we're
going to lower the opacity. I realize I started
adding on my details on my layer one and I
really should have added on later for,
but it's no big deal. So what layer one, we're going to lower the
opacity by tapping on the end. And we're going to drop it
down to maybe about 50% or so. Same thing for the egg layer. Tap the end, drop it
down to about 50%. And now I'm just going
to redraw those details. I just did as far as the
eyes, the nose, the muzzle, all of that because
it's going to make this a whole lot
easier to understand. And I'm gonna change the color. So I'm gonna go to
a purple, I'm going to make it almost black. Alright, so let's start
off with the nose. Steel rough sketches. Steel rough sketches on purpose. I'm not taking a whole lot
of time trying to make it pretty I'm just going
over all my details. Hits in hand. I mean, the, the cheap, the smile. Trace all of this too. I think their
eyebrow, I'm brown. Going over what I just drew
the inside of the ear. Alright, now I can
continue moving forward. What I was gonna do, I don't want this line to be a
continuous circle like this. So I'm gonna take it from here. You see I'm not
going all the way back to up here where
we started our overlap. I'm going to start just pass there and I'm going
to redraw the ear. Steel drum rough, which
is root refining, refining the shapes and
stop there like that. And same thing on
the other side. You can copy and
paste if you want to. I'm gonna go ahead
and draw it out. Here. Come all the way out. Alright, now I want to connect this little piece of hair
that I drew two here. I'm just going to draw a
little bit of zigzag mines. Yes. Column zigzag lines
and give them a rabbit, a little bit of hairiness. And I'm specially gonna
do it through here. I don't want to draw his head just so nice and
smooth like that. You can do that if you want to. Your rabbit can be q,
but I'm gonna give it a little bit of variety, just doing this on the outside, on that side and then
same thing on this side. So I didn't go all the way in because we're going to
ask some more stuff. So now you see if I turn
off the rabbit layer, I pretty much have his hair fully fleshed out as far as what his design
is going to look like. But I'm going to turn this
back on for right now. We're gonna go down
to his body up. We're gonna give
him I'm gonna give him a bow tie right here. So I'm going to draw
a circle right up under that bottom lip. I'm gonna give them a bow tie. This is why I didn't draw
the head all the way to the mouth because I knew my bow tie will
be kind of big. Remember yours can look how
ever you want it to look. And then once you
have the bolt hadron, then you can draw the rest of the head to the
Botox. All right. Next up, we're going
to draw the hands. The hands are going to be
in front of the Botox. So some of this will
get deleted off. Just a real simple
curved line right here. Curved line on that side. Curved line here. And then I'm gonna give it a little bit more
of that fuzziness. Alright, now I'm going
to switch to my eraser, and I'm going to
erase part of that bow tie out of the hand. Still using that
soft brush eraser. Because the hands are holding the egg and the rabbit
is inside the egg. So it wouldn't make sense that his bow tie is in
front of the hands. Alright. We're going to draw
a line over here just to represent the arm coming over on this side
and on this side. And we're gonna give them
a little bit right here. It's going to come
over and down. And then maybe that something, maybe some buttons or something, you know, you can make it
as fancy as you want to. He has a shirt on. You don't do that. Make
whatever decisions you feel are best for
you and your bunny. See our bunny is pretty
much drawing now. And now I can go through
and I can draw the egg. I'm just going to fill
in all the places for the eggs that are not drawn. All this is on the same layer. This is still rough. Not anything fancy. Now, you probably would
see this part right here. So I'm just going to come down and keep that going right there. Just for continuity purposes.
Same thing over here. I'm just going to take
it up right there. Now. Here is where I can do just a single line and
hold it for the egg. I'm going to follow
this all around here. I don't know what
that random on this, I'm going to stop
and do it again. Hold it. And now I
have the egg shape, now I can make it
bigger and all of that, but I want it to be
right there. All right. I now have drawn all
of this on layer four. So I'm going to turn
off this group. And now I have, now I have my Easter Bunny
drawn inside of the egg. You're creating like the Easter coloring
book or something. You could have drawn this with a thicker line and you
could have been done here. Of course you want to add
your details onto the egg. You can do that
have you want to. But if you're drawing like a coloring books, that's
all you have to do. The your rough sketch first, and then you go in and refine
it and boom, it's done. Next, we're going to
add our color to RAM. And I mean, not a coach or a dark color to the whole thing.
6. Adding Base Colors Pt. 1: Now there is one step, but some artists do
when they are using Procreate and that is to even
redefine this even more. I'll just show you quickly
what they're gonna do. I'm not going to do the
whole thing, but this is just to show you an example. They'll then go in, they'll turn the opacity
down on this layer. Go in with the new layer
with a thicker brush. Maybe inking like a studio
pen or something like that. Then they'll redefine
this all over again. So they'll do this. Now. If you were doing a
coloring book for real, this is kind of the
brush that you want to use for your coloring book. We're not gonna do that today. We're going to skip that
step because it's just not necessary for the result.
We're trying to get to them. All right? Right now, in your layers, you had your layer one
with your bunny on it, your layer two with
your egg on it, which is in one group
called The New Group. We hadn't layer
four, which is this. So now we're going to
start adding color. We do not need new group
layer to layer one anymore. So right on new group, I'm going to swipe it to the left and I'm
going to hit delete. I don't need it anymore. I like to draw my colors
on different layers. Every layer of this bunny is gonna be on a different
layer for the most part, because that makes
shading so much easier. Hold on one moment,
happiness of water. All right. Now it's time to add our
color, right in your layers, we're going to add
another layer, is going to show
up as layer two. And we're going to drop
layer to underlayer four. Keep in mind, layer four
is where our outline is. We have the opacity turned down. I'm going to turn it in modest
down to like 20 per cent. You choose where you want
it, you know, for you. But we're gonna
start on layer two. This is where you can decide what color you want
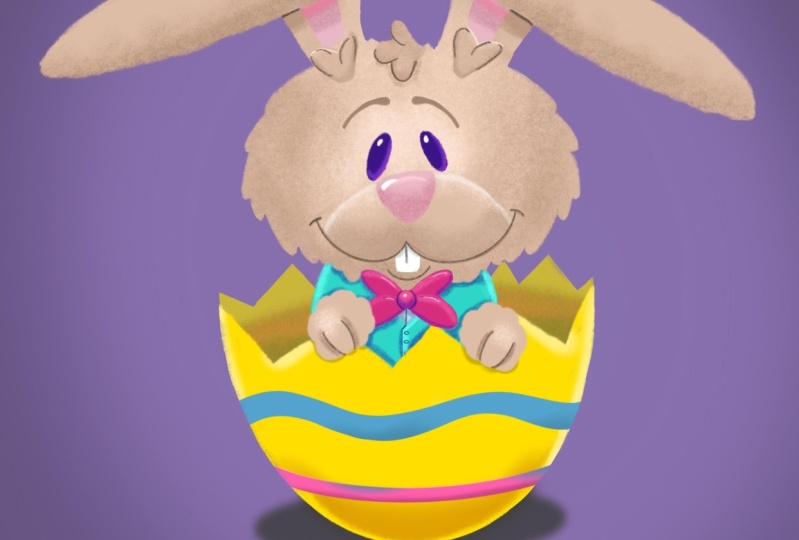
your bunny to be. In the picture that
I originally did, my bunny was like a tan colors. I'm going to continue with that. So I'm going to go into the
orange and yellow area. I'm going to find like
a nice tan color. And then I need to
change the brush. Now I want to use a brush that
I had downloaded already. But I think for this
we'll just stick with the studio pen so you want
to go down to inking? And yeah, we're
gonna do Studio Pen. We're going to use studio
pen to do our color. Look out there for some
great brushes that have different textures to
the outside of them. The studio pen has a very, very smooth look to it. But because it's a rabbit wanted to have a little bit of texture, I don't know if there's
another brush that came. I'm pretty sure there is a
brush that came with it. Maybe you can do charcoal.
Let's do charcoal. Change the planes. This time we're going to do it with
charcoal, the button. So I want you to go down
to the charcoal section. And let's choose charcoal black charcoal
block as you see, that has some texture
to the outside of it. Okay. I'm going to
bring down the size. The size that you need is
going to depend on how big your bunny is on your screen. First thing I'm gonna do is
I'm going to pretty much thought with West
End the furthest. What spurred this back when
it comes to my rabbit. And so for me, what's furthest
back on the rabbit as far as if the further rabbit is going to be this
part of the ear. I'm going to scroll
in, Zoom in red. I'm going to this part, we can just color it in. We don't need to color dropping. So just that part right there. And then I'm gonna do
that on the other side. And this will all make sense later while I'm only
doing it like this. Okay? Now, we're going to
add another layer. On layer two. We're going to tap. That's gonna give
us layer three. And layer three. I am going to do the
entire rabbits head. And what's left with either
we're going to color drop this instead of coloring
this whole thing in. So to make this easier to see, Let's turn off layer
two so nobody gets confused on layer three and we're about to draw an outline around the whole rabbits
head for the most part. I start here. Here. Come all the way around. It. It's okay if it's not perfect. You see how really don't
always follow my lines. Really personal preference or
I can go back and erase it. I'm not going to worry about
this little tough to hear. I'm not going to worry
about these little tough. So here we're gonna put
those on their own layer. I'm gonna go straight
across to this ear. Alright, now, from where we ended on the right
ear and the left ear, we're just going to cut straight across to the side of the hip. Just like that. I have all of these
little lumps right here. So I'm going to do each of those individually as a
method to the madness. There's a reason why I'm doing everything on a different layer. Because we're going to
start Alpha locking all of these layers here,
going straight across. I'm going to come around
with bright fair? Now, I'm going to purposely
leave this open right here. What we're gonna do next
is we're going to drag, we're going to drag
this circle of color and we're going to
drop it onto the rabbit. But if you have anywhere where your color
does not connect, It's like if you
pour painting here, the paint is just
going to spill out to the whole campus just like this. And that's not what we want. We want the color to be
contained inside the shape. I'm going to close this off. Now I'm going to
start moving first, drag and drop. Now. It's still filling
up the whole paper. That's not what we want here. The trick, when you
drag it onto here, keep your pencil touching the screen and slowly start moving your
pencil to the left. This is going to change
the threshold of color. Feel 100 per cent brush, brush, whole field is all
the way to the right. Zero per cent is always two
all the way to the left. But you don't wanna do 0% because you see
that right there. When you don't fill
it in all the way, you get this line all around your shape
and you don't want them. So you have to determine
where you are going to feel. And if you can't move
your pencil any further, that means you undo it, zoom out, and you do it
again until you get a field. And I like to fill it in right before it takes over
the whole Canvas. So my takes over the
canvas at about 76%, 64%. Alright, and now the entire
rabbit head is filled in. Still have the tub sit here. I remember we had
this part turned off. Remember because layer
two is turned off. So now we're going
to turn off layer three and we're going
to add another layer. And this time we're gonna do the hair and another
part in just a moment. So go ahead and fill it in. Do the
tufts of hair, these and you can kind of just cover me and it's up to you. As the artists. You know, you make the decisions
that's easiest for you. All right. Now, I want to do this muzzle. I want to do the muzzle
by itself because I want the muscles to be colored differently
than everything else. It's what I'm gonna
do is I'm going to go across just like this. Then I worried about the nose. The nose will be done
in front of the Muslim. I'm going to come all
the way over the bottom. Drag and drop. Now moving left to right.
7. Adding Base Colors Pt. 2: Okay, now we can turn
the rabbit back on. So now it looks like the entire rabbits head is filled in. I like to take stuff a little
bit further some time, but you can kind of decide, you may want to do
each of these hairs on its own layer that makes
coloring them easier. But for today we'll just do
them all on the same layer. Alright, next up, we're
going to do the nose. Now. The muzzle is on layer four. So we need to add another layer. I told you at the
beginning is going to be a whole lot of layers. You go pick what color
you want the nose to be. I'm gonna go with the pink. Just like in the original. I'm going to keep the same
brush that I've been using, which is that charcoal brush. I may make the size a
little bit smaller. I'm going to fill in the notes. This is why we want
to keep this drawing that has a low opacity. Want to keep that at the
top of our layer list. Though we always see it as we're coloring
because at this layer that had the outline on it was at the bottom, we wouldn't
be able to see it. And if you ever need
to move a layer, that's all I got to do. Just touch it, hold it, and move it to where
you needed to go. All right, next up, we're going to add this to
behave. See here's the thing. Our nose is on layer file
are muzzle is only a four. We can't see it because all
of layer three is turned on. So let's turn off layer three
so you can see the muscle. Alright. We need to put the
two in between. The layer that has
the rabbits head and the layer that
has the muzzle. So I'm gonna go to the
rabbit head layer, then add a layer. And I'm going to choose white. And I'm going to fill it in. And I see, I can cover
up here all day long. You're never going to
see it because I'm on the layer that's
underneath the muzzle. So when you're thinking about how you're coloring
your pitches, you want to think
about the order, What is closest to you, what is furthest away, and make sure that
you're layering, that you're ordering your
layers just like that. All right. The eyes are technically
behind the muzzle as well, so they can be on the
same layer as the two. I'm gonna do some purple
bluish purple eyes. I'm going to use the trick of just drawing it
over and hold again. So I get that perfect oval. And then I have that
and I can color it in n. Remember earlier where I showed you how to draw a
lasso around something, copy and paste it. I'm
gonna do that with this. Go to the lasso. It's going to draw
right around the, I go to my layer. Go to layer six, Tap it. Copy, go to the wrench,
come down to paste. Now I have two eyes, but of course it's facing
the wrong direction. So I have to do what? Horizontally flip it. And I'm going to move
it behind there. And then of course what? Merge it down? You always want to
merge it down so you can keep everything
on the same layer. All right, we're
coming along. Next up. We're going to move
to the bow tie. Now, my bow tie is in
front of the head. So that means whatever layer
I decide to put it on, I want to make sure that it
is in front of the head. I have enough space
to do 37 layer. So I'm gonna put the bow
tie on his own layer. So I'm, I gotta go, I'm
gonna go down to be paid. And another layer, I'm going
to make the bot top pink. I'm gonna do the back
of the Botox first. Then I'm gonna do the not of the boat out on another layer. Whole bunch of layers
for my drawings. Whole bunch of layers
that can go across here. It looks funny when you're
looking at it this way. But until you have
everything at it and it's kinda hard to
understand what's going on. We can drag and drop
moved that threshold. And you always want to check it up close to make sure that it's not too much. Now I'm going to turn
off this bow tie. Add another layer so
I can do the dots. But not I mean, I'm
just going to cover this morning instead
of trying to drag and drop it. Alright. Now behind the bowtie we
have his little jacket. I called it a vest. If you want it to be
advanced, you would do this one color and do the
sleeves and other color. I'm just gonna do it
all as one jacket like in my example. And all of this is
behind the head. So I'm gonna go down here
to this layer where we put that first section of the ears
on and add another layer. I'm going to make a teal jacket. Anywhere where I see
some overlapping. I want to make sure I
split those layers up. So I'm gonna do this side first. Color here, this part of the jacket like that
and color this in. Now, I'm going to add another layer and do the
right side of the jacket. I can turn this side off
so I don't get confused. All my tricks I'm giving away. Covered this in. Then over here. Doesn't have to be perfect because the edges won't be seen. And now we have the jacket. Now you see the hands. The one thing that's in
front of everything, so we're not going to worry
about the hands right now. Next we're gonna go to the egg. The egg. The egg is behind here
and right now our layers, 10.9 of steel behind the head. So I'm going to add another one. My egg is going to be yellow, just like my example, but
it's gonna be further away. So I'm going to make
it a little bit darker, just a little bit. So I choose yellow, make it dark and I'm just
filling in this part. We're just going to be
the inside of the egg. Here. Please leave all
feedback you have. I know what do you notice? The egg background should
be behind the jacket. So I need to go to my
layers, hold it down, move it behind the jacket, and being finished
on the other side. You can color it in or
you can color drop. Name is up to you. Alright, now we're gonna
do the front of the egg. The front of the egg is going to be in front of the jacket
now, but behind the head. So now I'm gonna go back to the jacket, add another layer. I'm gonna do. This one. I'm going to
actually color drop it in. I'm going to cut
across the hand. Down. Across the hand again. I remember we're going
to just draw a line, curved line around and
we're going to hold it. And then color drop their
lap threshold over bone. Next up we're going
to do the hands. The hands are going to
be in the very front. So we need to go all the
way to the nose layer. It actually can go in the
same layer as the nose. You can put on its own layer. I never put stuff on the same layer that's
close to each other. But since the nose is up here, in the hands of down here, we can start them
on the same layer. I want the hand to be the
same color as the face. So I need to grab that color
by holding down on face. Now I have the brown color. I'm gonna do the whole
shape of the hands. Drag and drop. Same
thing on this side. Alright. Only two things we have
left on the inside of the ears and the actual
shirt of the bunny. And they're gonna go
at the very back. So down here at
layer two a week, get the behind the ear. First, we're going to add another layer and move
it underneath there. And we're going to make the
inside of the ear pink. I'm going to do that. Of course you can do yours
any color you want to. Just color behind there. And then shirt color. I'm going to make it a really
light blue just so I can tell the difference
of what's what. And that's going
to be right here. And now my bunny is
completely colorblind and I can change the background color to
whatever color I want to. And you will see that the rabbit is colored in exactly
how we want them to be. Sometimes I'm making my
background's gray just to make sure everything pops
where I want it to be white. It's been wiped this whole time, but you know, it's
kinda up to you. We can turn it gray
so that we can kinda see our shading a
little bit better. But we're now down to the next, to the last step, which is adding the highlights, details and all
that fancy stuff. And then we'll outlined
at the very end.
8. Highlights and Shadows Pt. 1: Now the reason why I put all of my colors on different
layers is because I need to color block and
alpha lock all my colors. So I'm gonna go to my layers. Every single layer I
need to alpha lock, meaning a tap twice on it. When I get this menu, alpha locket, tap
twice alpha lock. I'm going to Alpha lock every single layer except the layer that has
the outline on it. Alpha lock is such a great tool because it allows
you to kinda color freely to feel something
in without overspending. If you have a spray paint is
something that you didn't cover everything correctly,
you have overspending. So let me show you. We're gonna do the inside
of the ears first. We're gonna go down
to that layer, which is this first
layer right here. That lay at the
bottom. I'm going to hold my finger down
to grab the pink. Come up to my colors. And we're going to just move it darker a little bit when I
going all the way to black, you don't wanna go too far. You want to just move
it down a little bit. Now let's change our brush. Let's go back into our options. And let's do a, do the willow or
the vine brushes. It's up to you can kind of play and play around with them. I'm going to choose this brush. So we'll just see
that I'm doing, I'm going to make the
size a little bit bigger. Just right up here at the top. It's gonna kinda
lightly do that. And then that helps
to see, oh, okay, So this is actually
in front of this, but it's not covering
it completely. Now we're going to start making
this look more realistic. You can go through and you can some color to it and add that. This is where you have the
opportunity to kind of be as creative as you want to
add how you add your colors. But that's why we alpha
lock it because I can color this whole
paper, this whole screen. And the only places you will see the colour appeared
is in the ear. And if I went down
there to the shirt, so I can come down to the shirt, hold down the blue color, bring it down just a little bit. And I'm going to just write
up here and make it smaller. And I'm going to a small
area just like that. And now we're gonna
do that for every single part of this picture. All right, Next up is
this part of the ears. I'm going to turn it on
and off so you can see exactly which part
I'm talking about. So we're going to hold
down and get the brown. Then we're going to move
it down just a little bit. And because this is behind,
should look like that. So that way if I turn
off the outline, you already see how cool
they're starting to look. So you see up here there's areas where this part of the ear
didn't fully get covered. And you can always go back
and adjust that later. Alright, let's turn
the outline back on. Next part that we're going
to start shading in. Let's see, let's do the
egg first and best. The next thing, I'm gonna do
the back part of the egg. That's why I have that
dark yellow color. I'm going to choose that. Bring it down a little bit. I'm gonna make my brush a
little bit bigger so I'm covering them bigger
area at one time. You see that? Now you can try to elevate how your colors
look a little bit. Instead of doing a dark yellow. So the yellow hat, I may
slap my slider closer to orange and make it a
little bit darker. And then that will
add a little more character to how
your colors look. You might not be able to
tail on camera though. I can maybe go a little bit darker and just
do it right here. And we're not going to
leave the egg blank. We're going to add and add
in a design in a little bit. So we're not going to
touch this right now. We're just doing
these other parts. And now I'm just going
to take my time and go through each section. I'm gonna do the best next, since the next one up. This is the left side. I'm going to choose
the teal color. I'm gonna go over towards blue and bring it
down a little bit. Adding some shadows. Shadow from the bulb. You want to think about
what's around, what it is. It's just shading in. Go to the other side. Shadow from the bot. Shadow for me being
inside the egg. Shadow. Here. And then we're going to add
some highlights as well. So we're not just
gonna do shadows are going to ask
some highlights. So I still have some of
that pure color right here. Grab that gun on, lighten it up, make
our brush smaller. Then we can do this on the edge. I'm not even on that layer. Finished over here first. We'll do it. This way. You can just explore
ways to add color. Let me turn off the outline
so you can see how it looks. So that's how it's
looking right now. Alright, next up we're
going to go to the boat. And I'm going to
show you a trick that I use sometimes if you're not really sure how
you want to add color. This is a great trick to use without messing up your
actual color base layer. Let's start with this
part of the boat first. Let's say, I'm not
sure exactly how I'm going to do this, but I
don't want to miss it. This layer, I'm going to
add a layer above it. And this layer I'm going
to choose clipping mask. So now that means whatever
I draw on this layer, I'm just going to
choose something random and make it bigger. Anything I draw on this layer, It's going to show
up on the bow. But when you look at the layer list is not
actually on the bow layer. It's like attached to it. I'm going to clear this off. So anything I do now
will show up on the bow, but it's not going to mess
up the original bot layer. Choose my pink, drop it down, maybe go towards purple. And I'm going to
have some shadows right there down at the bottom. You always want to
think about where's your light coming from? My light is coming from I get the light was shining
straight down on the rabbit. That's how I'm looking
at it. I'm going to add some highlights
picked up pink again. Raise that color, make the brush a little bit bigger so it covers a little bit more. See that it really makes a difference when
you're doing alpha lock and clipping mask. And I can drop it down and I can do some small
areas like that. If you want the bot
to really look shiny, you can go even
further towards white. Drop the size of the brush down, add just some small
areas of highlights. And do the exact same
thing. For the not layer. We're going to add
an extra layer. And so we're choosing to not
going to add an extra layer. And we're going to
choose clipping mask. And we're going to
start all over, pick the color, drop it
down, go towards purple. I'm going to just do
some rounded shadows. Pick the color, take it up. Rounded highlights. I'm going to go even
further towards white. And then do just like a little.
9. Highlights and Shadows Pt. 2: Something like that. Now if
you don't feel like there's enough differentiation
between the bot and the not. We can go back to this layer. We can kinda come
into here the purple that we use and we can
make this even darker. Just add a little bit there. You see that that's really
going to make the bot. That's too much. Just want a little bit. You
don't want too much. C, that'll really
help the bot to stand out of. Stand off of. It's looking like
as it should be a illustration for Easter
Bunny work or something. Alright, moving on. So we have is closed. We can worry about the
little buttons at the end. We do our last
outlines and stuff. Let's move up to his face. Alright, we're gonna go
to the next layer up, which is going to
be teeth and eyes. For the teeth, I'm not really going to do too much shading, but I just use a
little bit of gray to show that the muzzle is
in front of the teeth. And you know, just
something like this. We don't need to do too much
one I Easter Bunny to have nice teeth even
though he's giving out candy to everybody. And I may do a little bit of shading like right
down the middle. And then we'll add a
little line there layer. We don't need a whole lot, but I wouldn't get a
little fancy with it. I'm going to go towards here, maybe add a little
bit of purple. We want to shade in the same kind of
form that the shape is. My e.g. my, my eyes or oval. So I don't want to just shade across but you couldn't listen. They'll look like I
shouldn't say you can't. That's just not what I do. Let's see if I shaded
across like this. There might be a little cool. That's not too bad. Go towards a little
bit more pink. Something like that. I mean, if that's your thing, go for it. But I'm going to stick to
the way I normally do it, which is kinda shading,
following the shape. It's purple on the edges
because I'm going to put a little glare up in the
top, towards the end. Go further towards pain. Alright, the layers don't wash. I can add a little bit opposite direction
for the highlights. Let's go towards blue. Just
a little bit like that. That's cool. I like that. Yeah, I hope I showed on the
camera where it looks like. Alright, next that we're
heading to the muzzle. You see I'm just working my way from the bottom to the top. Of course, I skipped
over the egg and the rabbit head would do those, have to do those at the end? Actually it, Let's go
back to the rapid, know nothing about it. So let's finish the rabbit had before we go to the middle, Let's grab the rabbit head. Drop the color down, will make the brush fairly
big because it's going to kind of be largely, largely large areas
of highlights. Notice the muzzle has a change because the muscle
is on a different layer. I can do this up
here for the ears. So I wanted to pick a
brush that had like some, some texture to it. I rabbit has, for instance, we know that this hair
is on a different layer. We can shade a little
bit just like that. You see, and that makes
it stand out a little bit more just from
shading behind it. All right. Now we can grab this color, lighten it up a little bit. You see the difference
that makes me just add just a little bit of light and a little bit
of shade and color. Really makes a difference. Alright? And that's pretty much done. We may go back and
alter some stuff, some more like e.g. like where we have right here, where he'll be smile AND gate. We could actually make
that a little bit darker. I'm going to drop that down, dropped my size down. I'm
just going to comment. Do that right here. Like that. Much on that side. Too much. Alright. Now let's go back to the muzzle. Grab the color, burn, darken it. We want to make sure that we
can see a difference though, between where the
modal stops and where the back of the head is. So we may need to go back to the head and darken
it up a little bit more. A little bit. Go back to the hair. I'm going
back to the rabbit here. I'm going to darken
it up, some more. Darken up just below
the muzzle though. Just below the most. I don't want to do
too much to it. All right. Let's go back to the muzzle. Lighten up the color,
choose a muzzle. Red. That's how we want to
make sure that we can see that clear definition of
the top of the muzzle. Really hope it's
called a muzzle. Hope I haven't been
calling it the wrong thing this whole time. Make it a little bit lighter. Because ideally if
we can make it so that we don't need
any highlights. That's what I really
liked when I can make it. So there are no highlights, neat and I turn off the outline and see how it looks right now. The goal. Go to the nose. Same thing, grab the pink. It down a little bit. Shading, lighten it up top. And which occurred. And you
can go back to the Muslim, do a little bit of shadow right up under the
nose to show that the nose is actually
protruding off of the muzzle. And these are all
decisions that you can make as you're going
through the process. Nothing else is
really different. It's just a matter of just
adding and adding and adding. Remember if you don't want
to add exactly onto there, you go in and you
add another layer, do a clipping mask
is what you do. The hair is also on this
layer, so same thing. Go to the hair and the shadow. I liked. My go back to the rabbit head and dark and right there behind. Make sure that here is
sticking out a good amount. Yeah, perfect. I might even go back to the
very first thing we shaded, which are the ears, and darken
it up just a little more. Alright, so what I'm gonna
do is I'm gonna go ahead and just tackle everything. Same thing with the hands. I want to be able to show
that he has these fingers. So this is what I'm
gonna do. I'm gonna add a layer above. And I'm going to shade that
outside part of each finger. But then I'm going to erase it. I'm going to take my eraser, I'm going to choose. It can be the airbrush eraser, just make it real small. And I'm going to erase away. And I'm going to turn
off the outline layer so you can see exactly
why I did that. When you do that, may turn
into a clipping mask. Then you can see the fingers without having to do outlines. So many tips and
tricks, you can do. So many tips and tricks. I'm going to make it
a little bit darker. A bit darker. When I don't mean add some highlights. I go back to the hand layer
for this part though. Alright.
10. Final Details: Now that we have added
all of the shading, we're gonna go ahead and
add our design to the egg. So we're gonna do is when
it comes to our layers. Let's start over. I now we're going to add
the design to our eggs. We can finish up our picture. But what we're gonna do this is what we just learned about what, which is using a clipping mask. So I'm going to come
into my layers. I'm going to go to my egg layer. I'm going to add
a layer above it and make it a clipping mask. And I'm going to
use the studio pen. So if you go down to
your list of brushes, you wanna go to inking
and go to studio pen. And you want to pick a color that is going to go well with, you know, whatever
color you major egg. I'm gonna go with
a lighter blue. And you can just
create simple designs. I'm going to make a
thicker line here. I'm going to keep it
the same color you can make us cannot change it up. It goes from like a
reddish tint color. No, I do pink sticker that
things turn it this way. Remember, whatever design
you want to do on your egg is perfectly fine with you. Repeat that. Yeah, it's going to be
like that. Alright, now, I'm going to alpha
lock the clipping mask I just did because
we're about to add some shading to the egg and below I'm going to add it
to our designs as well. So I've got the egg chosen is already alpha
locked from earlier. I'm going to go up and
choose airbrushing. Go back to that
soft brush because the egg is a smooth surface, we're not going to
use the same brush we were using for the
rabbit and his clothes. So I have picked up
the color of the egg, whatever your color is, of course you're going
to pick that up. Then I go and I'm going
to move it a little bit this way and go down. I'm going to make the brush
bigger and I'm gonna put my shadow down here
at the bottom. Remember, like I
said, I have my, my life for this one is kind
of going down this way. So shadows are always
opposite of light. So if my light is coming down, my shadow is gonna be down here. Go back to the yellow again. I'm just gonna go straight
down to like a darker color. And C, and then that looks like the light is
coming down on the egg. But I want the egg to look like it has a little
bit of shine to it. So I'm going to grab the
main color of the egg again. Dropped my brush a little bit smaller and
I'm just going to put just a little
bit at the bottom. Just like that way it looks, you know, almost 3D. Now in bilayer for my colors, e.g. the pink color. I'm just going to drop
that down a little bit. He just wanted to add
it in a couple of places young to too much. For the blue. Doesn't need a whole luck of the blue as close to the top. Now back to the yellow
layer for my egg, I'm gonna do the
lighter side now. So I have yellow. Go over here. And I do like the
size a little bit. Makes it look really shiny,
doesn't, that's cool. Maybe up here. Now we have our rabbit's
hands are on the aid. There should be
some kind of shadow being cast onto the egg. So we're going to
take the color. And just behind the
rabbit's hands. I'm just going to add a little
bit of shadow that we know that these objects are
existing in the same place. You don't want to put too
much shadow behind it. You kind of play and figure
out with how much you want. The shadow will kind
of let people know how wide or how big the
hands actually work. And I can put some on
the inside as well. Alright, so we are almost done. The last two steps
we're gonna do is we're going to throw a
shadow under it. And then we're going
to do some outlining. And we're gonna be finished with my first Procreate
online lesson. I'm so happy I
have stuck with me thus far as I learned
to do all of this. For the shadow, for the
egg, we're gonna go down. I'm going to put a layer
at the very bottom. So we're going to tap a layer, going to pick it up and bring it all the way down to the bottom. I'm going to pick a color. It's not going to be black. It's gonna be more like
a dark gray color. And I'm going to use
something that should tell you to avoid having to go back and go to each
category and pick a brush. You can go to
recent and you will see the recent brushes
that we've been using. So all the brushes I've been using this whole
time right here. Remember we were outlined with the FBI shading and everything with
the vine charcoal and with the charcoal block. So I'm gonna go back
to the studio pen. I'm gonna draw an oval
right under the egg. Now it's not gonna
be a huge oval, just a little skinny
oval like that. Going to drop it. And that's gonna be my shadow. Remember, my shadow, my light
is coming from up here. So my shadow has to
be underneath it. Now, we're gonna
go to this tool. We haven't used this today.
We're gonna go here. The gallery icon is here. Then we have the wrench
tool for the actions. Now we're gonna go
to adjustments. We're gonna go down to hue,
saturation and brightness. This is where you could
change the color of something without having to go up
here and re-color it. You can manage saturation here, and you can manage brightness. Over here. We're going to come back
to this in just a second, but I just wanted to
show you what it was. In the adjustments panel. We're going to go down
to Gaussian Blur. I don't know how to say that. I've always said Galatia and is not L in there,
but it's alright. So we're gonna pick that. We're going to touch the screen. And when you move your
pencil left to right, it determines how much
of a blurb areas. Now, we don't want it
to be blurred like this because we want to still
be able to see the shadow. So we're going to bring the
shadow too far off though. The shadow, something
about like that. Okay. Then we'll go to the layer and we're going to
drop the opacity down somewhere in there. All right, now I think
I'm going to move this shadow up a little bit. Now. I would like to add
another layer of shadow. So I'm gonna go to this. I'm on the layer 18. I'm not sure what number it
is for you at this point. Add another one. Go back to your pencil. I mean your studio pen. And right underneath it, I'm going to draw
right up on me. Make it just a little
bit darker so I can see it right underneath the egg. And then I'm going
to blow that one as well for the Gaussian blue. Alright, now, that's going to make it look
a little more realistic. Now, I can probably make this shadow a
little bit smaller, bring it in some more. Probably can drop the opacity
down a little bit more. So you have to
kinda play with it on your tablet and
see what works. Alright.
11. Outlinging: Last step is outlining. I want to add
outlines to anywhere. I think that'll help
mixed up pop out. Granted, I have all these
places where I shaded in. I did shadows to
help stuff pop out, but some outlines wouldn't hurt. I'm gonna put my outline right underneath the outline layer
we had at the beginning. I'm going to put my final
outline layer there. I'm going to turn this one off because I don't need it anymore. I'm going to start
with the hair. I'm going to grab
the skin color. I'm going to drop
it down fairly low. And this is where you choose which pen or pencil
you want to use. I have a special one
that I downloaded. Can't even remember
where I got it from. So I'm going to show you how different ones can affect the
way the illustration looks. If I were to do this
with the studio pen, I'm only going to actually add the outlines where the
colors are near each other. I should've started
here, went up. So that's how the
studio pen would look. If I use that to outline. If I use just the
regular pencil we used when we first
started sketching. See that it looks a
little bit better because it has some
texture to it. How the rabbit has
some texture and it's not as smooth
as the studio pen, but it really is
personal preference. And I can add little right here. One there helps
show the fold-over. So we know we had the
big smile right here. I just picked out where crown, this is where you're
going to make the choice that you
want to make as far as how you want
to outline yours? I can choose to put one here. I think I like my arm
without like mom about it. I'm going to put one down here. Put one on fingers anywhere where you see
a color beside herself. And you want to be able to show distinction between what square. All right, I'm going to add
a darker gray to the teeth. To the tooth rather. Just like that. Get some white for the
eyes and the nose. We'll leave it there for now. He's got deleted
something and see. And just that little
bit of loan starts to really change how your
illustration is looking. We're moving to the bow tie. Both sides. One beer. For the shirt. I wanted to go back in
and add the buttons. I can just sketch them
in on the outlines. My rabbit is done. Let's take a look at it again, see if there's
anything I missed. Like up here, I could add some more lines like
this to help show for. I wanted to see
what it looks like. I don't really like that,
so I'm gonna take it off. So you can add that if you
wanted on yours. Oh my gosh. He needs eyebrows.
He'd had eyebrows. Was lower. This a little bit so I can
see what the eyebrows were. Just draw some eyebrows. Most we get. I'm going to copy and
paste this eyebrow. Eyebrows can be
even. Use my lasso. Same steps we've been
doing this entire lesson. Flip it to this side, drop it right there and
I'm going to move it down. And our Easter Bunny
design is complete. This is nice. I really hope you enjoy following along with me
as we did the Easter Bunny. Now you can go in and do all whatever kind of
fancy stuff you want to. You can change the background
to whatever color you want, and I want it to pop out. One thing that I do
that I learned in Procreate is if you add
a layer of white light, make the whole thing
white above everything. And then you tap on the N
and change it to color. This will show you how much
how your values are looking. And this can also help you to determine how to do
your background. So you see making the
background a little bit darker gives a little more contrast to the rabbits as the rabbit is. So light. And then you see the
difference that makes, that makes a huge difference in making that rabbit
pop off the page. I could this and I can
go to the soft brush, get a light version
of this color. Just something like that. And then you always
want to sign your work. Whites. Didn't use the pencil. No salmon name right over here. Almost spelled my name wrong. Shred this a Thompson.
And that is it. I had a lot of fun teaching
her how to do this today. I really did. I
really, really do.
12. Outro: Thank you all so much for
following along with me for my first online
class using Procreate. It was so much fun drawing
this Easter Bunny. I want you all to post these on social media and tag me if
you're doing it on Instagram, please tag me at
Travis a. Thompson, this TR AVIRIS at a, THE 0 and P. So and again
that's at Travis a. Thompson. Or you can send it
to me in a DM or you can send it to me
through e-mail Travis at the sieve our gallery.com or you can post it down
into the comments. If that's a thing. I just appreciate you all so
much for supporting me and coming in and following along
with this first lesson. Be sure to tune in very soon because we have another
lesson coming up very soon. I'll see you all soon.
 Travis A. Thompson, Let's Create!