Transcripts
1. Intro: Do you want to create dynamic action poses that you want to push your art to the next level, step-by-step. Then this is the class for you. Here. You'll learn everything there is to know about creating dynamic and interesting action poses one step at a time. We'll start by drawing a dynamic line of action, going through the basic shapes of the body, creating action filled silhouettes and refining them, as well as cleaning everything up for a polished and dynamic action pose. And you'll be doing the exact same thing with me. This isn't a theory class. Yoga, drawing your own amazing action fields character throughout the videos. Not only that, but you'll also learn how to accentuate your poses to give them an extra so they can stand out. I'll also give you several different resources, including a link to a Pinterest board filled with incredible poses ready to drop. So are you ready to create amazing action filled pauses? Then I'll see you in the next video.
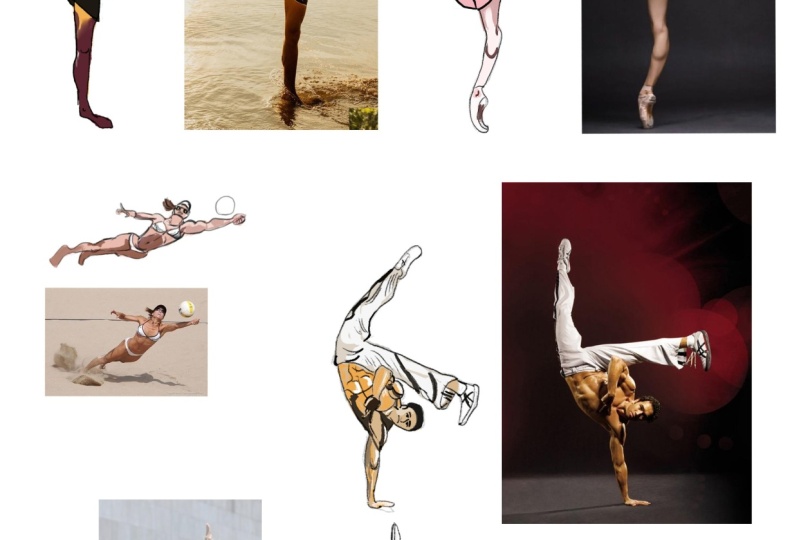
2. References And Resources: Hello and welcome. Now before starting to draw, we need references. Even when you're ready, know how to draw certain things. It's always helpful to gather some represents. When looking for a dynamic action pose, It's good to search for specific examples such as fighting poses, dancing photos, jumping, Barker poses, and people playing sports. These tend to be very dynamic and with lots of movement. Think about what kind of posts you want to draw and search for that. Some really good websites for you to use. Our pinterest.com, Unsplash and Pexels.com. You can really find anything in this. So save as many references as you can. Now, if you're looking for a very specific post and can find it, There's always another option. You can take your own photos, active boasts you're looking for and take pictures of yourself. Alternatively, you can ask your friends, ask them to post for you and take photos to use as reference. Just be sure to be careful since action forces can be quite hard to get it right. I also created a Pinterest board filled with action poses. I will leave you a link so you can search and see if there's something that peaks your interests. You can pick one of those or get your own references by using the website sign mission, and follow along throughout the class. Now this is it for references and resources. Have fun finding the perfect boss. And I will see you in the next video.
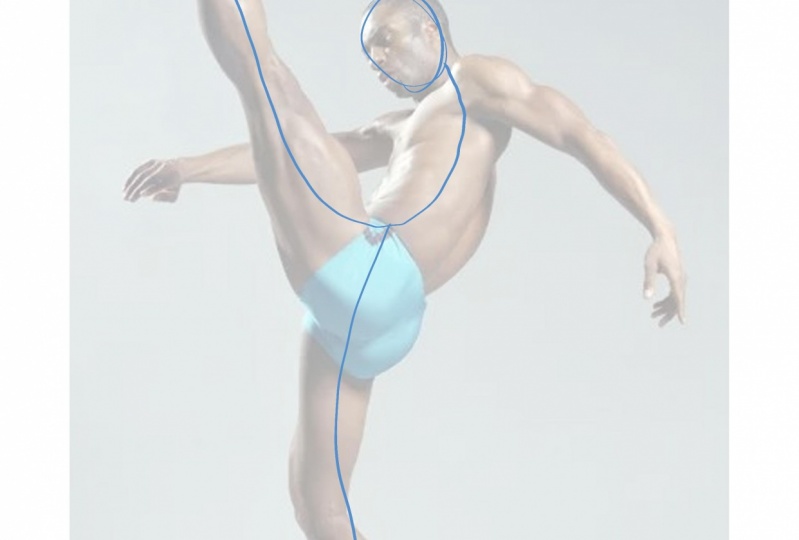
3. Line Of Action: Hello and welcome back. Now, before we start drawing a full body, Let's start small and easy. Let's start with the line of action. But what is the line of action? Simply put, it's an imaginary line that goes down the spine like this. We have our image. And now we're going to draw that imaginary line. Here it is. So when you look at your reference images, search for a line that evokes the whole movement of the Bose. Let's see a few examples. So I have here a few images. So we can do a bit of practice of line of action. And so you can understand a bit better how to find it and what it is. So there's a few ways you can do this. And if you're doing this for the first time, This is the first thing I recommend you doing. You can do this either digitally or traditionally. So we can come up over here to the opacity of our image and lower it down. Something like this. Now if you're doing this traditionally, I would recommend for you to have a few reference images, lower the opacity on the computer and then print them out. Now what we're going to do is in this case, I'm going to create a layer on top. And I'm going to find the line of action. So I have here my pencil and my red, so you can see, well, the line of action, and I'm going to find it. So for me, I say it goes from here to here. This is a possible line of action. So again, if we're doing this traditionally, just pick up a pen maybe with a bright color so you can see your line of action clearly and start drawing some lines of actions on your images. So as you can see, it's really simple, just a curved line. And it's the line that for me, evokes the whole movement of the bolus. So if I go here and hide it, okay, maybe that's not a lot. But for example, I can always draw heads. And I can already see something here, right? It's not a lot, but it will help me have a better idea of the movement, the whole balls and what I want to focus one drawing, it's, let's see here another image. I have another one here, very interesting as well. And what this will do is we'll also take off those nerves that we have at the beginning when trying to learn to draw something or when drawing something for the first time. That little bit of stress where, what if everything goes wrong? Well then let's go for a simple step. Let's just search for line of actions. So in this case we have something like this. Again, I can make here a heads. So for this one, if I look at it by itself, I think I can tell there's a person here, a very minimalistic person, but it's here. I got more images here. This one a little bit more complex because we have two people. But still that means we have to find two line of actions. So let's see. We have our head here, right? And then we got a line here. And it goes up. And for the other one, we have our head here. Feel free to draw the head if that helps. You. Usually can go just with this line, but drawing the head can be really, really helpful. There we go. We have here two lines of actions. What I recommend you doing is take your time and fill up your sketch book with just line up actions. Don't worry about drawing a whole body yet. Just draw this. It's simple, it's easy, and there's really no way to get it wrong. So just have fun with it. Let yourself warm up a bit. Let's see here another, there we go. I have here another line of action. Just do as many of these as you can. I know if my sound silly, but it will really help you because it will help you loosen up and get a better feeling of poses in general, when I started, this is something that I did. I have sketchbooks where my pages are just line of actions is just a head and a simple line, just like we did here. There's really no wrong way about it and you'll see that you'll feel more confidence. Now, one thing I do recommend though, for example, you don't need to draw just one line of action, for example, let's see this one here. So for example, I did draw it. So we have here the head, right? And this way, right, this is what I have for my line of action. But I can go here and make another one. So my Bose is a bit more complex now it's totally fine to do something like this. Another thing is there's not only one line of action. What I see might not be the same thing you see. For example, for me, I have this, the head here, and for me, it's something like this. This is my line of action. However, for you, it might be something else. You have the hand here and for you the line of action might be justice. I'm repeating myself here, but I really want you to understand this, that there's no wrong way to go about this. We all see things differently. There is no correct line of action. It all depends on you and how you see. The most important thing is that you get the feeling of the pose. Again, if I'm right here, I have this line of action here, but I can also add this one here. And we can even see the pose more clearly. So just draw lines. You can draw the head, you cannot draw the head. It's totally up to you. Just draw these lines. Have fun with it. Relax and just start having the feeling of those poses before starting to draw anything you can feel up to five pages if you wish, with lung infections, find your references, draw more than one line of action for each reference and see what works best for you. What makes more sense to you. Again, what makes sense for me might not make sense for you. So this is a time for you to practice that and see what feels better for you. So just draw lines. It's fun. It's good for you. And whenever you're ready, follow me to the next video where we're going to start practicing some shapes.
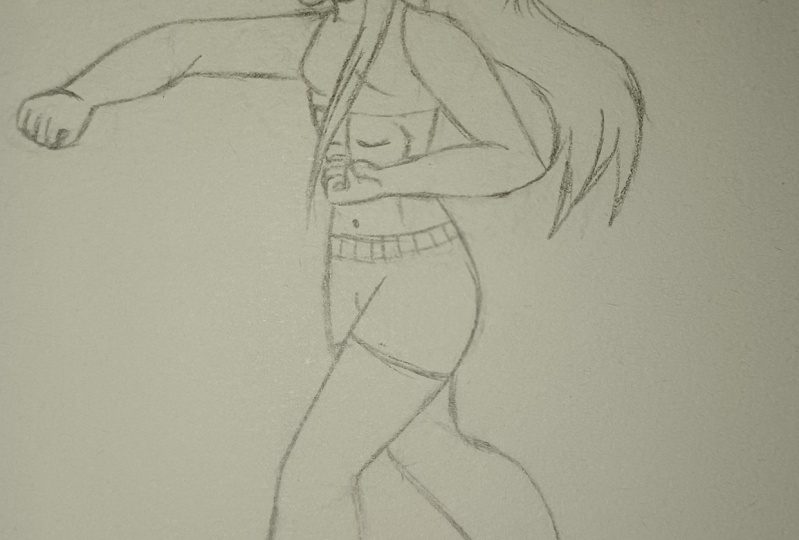
4. Basic Body Shapes Part 1: All right, Hello and welcome back. We've warmed up a bit. We'll line of action where we just focused on the post itself, the movement and its fluidity. Now it's time to go for the next step, which is shapes. We're going to start building out the body with very simple shapes. So I have here my pose. This is the one I chose. I think it's very interesting. If you don't have a reference yet, feel free to pause the video for a bit and go look for something that you like and want to work on. One thing I recommend though, is tried to find references where you can see the body as clear as possible. Sometimes in some images, people are wearing lots of clothing or the clothing is really loose and it makes it harder to see the body. And that means it will make it harder to find the shapes of the body. So of course, I'm going to be showing here the shapes I would use her body. But the more clearly you can see the body, the easier it will be for you to find shapes. So let's do this. I have here my image, my post. I'm going to lower its opacity. So what we're going to do here is fine shapes. Again, don't be afraid to draw on top of your reference. It's perfectly fine. You're learning. We're not going to be here tracing the whole phase trial, addressing everything. Now what we're going to do is deconstruct everything that we see here into simple shapes. So we start memorizing those shapes that we need to build up the body. And then we can draw bodies in any position. So we have here a circle for the head, right? You can even draw here some guidelines so we know where the eyes are or the direction of the ice, so we know where the person is looking. We can also just go here and draw a line of action. So for me it's this one. Or you could be something like this. So it's totally up to you. Here's my line of action. And now I'm going to start and find shapes. Use shapes as simple as squares, rectangles, circles, triangles. With very simple shapes we're going to be able to build. Our body does not need to make things hard for you. So let's start. I'm going to start with the torso here. And we have here kind of a trapezium rights. It's not really rectangular, more of a trapezium shape right here. I'm going to redraw this line here. We see that goes up to here. The center, the line that divides our body. Now here we have the torso. Now, if you already learned this kind of shapes to thing, you'll notice is that they're positioning might change a bit when drawing a more actionable pose. So, for example, for a torsional, usually if you're drawing from the font, you would go with something like this. Right? This is a dorsal, very simple shapes, but you can already tell what it is. Now, if you see, when we go here, things are a bit in perspective, but the shapes are exactly the same. They are just have a bit of a different perspective and positioning. So as long as you know the shapes you're using things will get much easier for this area. We have something like this and this. All right. So for the legs, I like to go with a mix of a circle with the rectangle so that the legs will fit here on the hip area with this circle, and then down into a rectangle. I can close the shape here if you want, so it's clear for you, what is my train of thought here? Now? We have a circle and then we go down again with a bit of a curve here on one side and on the other. It straighter. There we go. So we already have here a big chunk of the body done for the foot. We have a circle and then a rectangle. Now same thing. On the other side, we have here our circle, right? Same kind of shapes. And then a rectangle. This side of the leg is a bit hidden. As you can see, we got the circle for our knee. And then we go down with a rectangle but with a bit of a curve on one of the sites. Now circle for the foot and rectangle. You can even use, for example, triangle if you prefer, the shapes are used, might not be the ones you like to use. So feel free to find your own shapes and see what works best for you. Experimenting is always key. All right, all we are missing now is our arms here, so forth. Arms we have kind of a circle right here. And the rectangle. And then another one right here, right? And then we have our hands tried to divide the body into as many shapes as you want. The more shapes, the easier it will be for you to build up the body. So another circle here, another rectangle, and another one. And then we have another hand. For example, I am dividing here my handy to integers, three shapes. But if you want, you can go in and draw several rectangles. For the fingers. We do the same here. So here we are. We have our shapes, we found them all. Now. We got to learn them, right? We're not just going to leave our body like this. So what we're going to do now is replicate these shapes on the site. So first, practice on your image. Find shapes, learn the shapes for each part of the body, and then it's time for you to practice.
5. Basic Body Shapes Part 2: Now to repeat our posts here, I want to find some guidelines, right? So I know what everything is going to be. So I have here one. Then let's see where the next one is. We have this one where the thumb is. Then for the rest of the arm, shoulder area. We can even have another one for where the shoulder ends right here. Again, this is the kind of thing that have as many guidelines as your needs. Now we got another one for the torso right here, then the center of it, one for the knee and the elbow there, the end of our torso. So we're going to add guidelines to each part of the body that we feel is important to know where things connect. Just a few more wet foot ends right there. Here we have another. And finally the last one. Now, yes, this might be a lot and you don't need to draw all these guidelines. You don't need to be drawing guidelines if you don't want to. Although I don't think it's going to be very useful for you just to be sure you're drawing everything in the right places. So I'm going to cope with this one. Move it to the side. And now I'm going to start to draw my bows all over again. So we have here our head that starts at this one. We very light which our pencil. Let's start with the torso again. So don't be afraid of drawing messy lines. That's totally fine. We can always just remember that this has some three-dimensionality and draw this shape right here. So we don't forget about perspective. So I'm looking here. I'm always looking to the other side and seeing what we have so far and following the blueprint we are already drew. So as you can see, my lines are very messy. It's totally fine. Don't worry about it. This is just a sketch with just building the body. And there we go. We have here our posts completely built. Take your time as much as you want. There's no need to rush, fix everything that you want to fix. And remember, these are just some shapes. This is not the final version. There's always time to make things, right? So this is it for now. We have here our shapes are very messy shapes. It's perfectly fine. Be as messy as you want in this phase. And when you're ready, follow me to the next video where we're going to be talking about silhouettes and exaggeration. So I will see you right there.
6. Creating A Clear Silhouette: Hello and welcome back. We now have something that are ready resembles the human body. We have the skeleton or the blueprint of our drying. Now, all we have to do is start refining it. And for that, it's really good to turn your drawing into a silhouette. First, we make a silhouette by creating a solid shape of the subject we're drawing. In this case a person. It's usually done by using a single color like black. There's no features here. Only a black shape in a white background. But why is a silhouette so important in drawing? It's to ensure that your poses clear. If you draw a silhouette on top of the boss you have right now, could you recognize that it is a person and what that person is doing? This is mostly a desk that you're drawing goes through to be sure that any one that looks at your drawing will know what it is. So basically, the clearer the pose, the better. So this is what we're going to be doing now. So our next step now is to create the silhouette of our boats, just to be sure that it's clear. I have here my shapes, and this is a fairly simple step. We just create a layer on top. If you're doing this traditionally, I do recommend copying the shapes you have right now and then draw on top of those just so you always have at least one drawing of each step of the process so you can look at it later on. Or even if you make any mistake, you always have one untouched sketch. So I have here a lid on top, on top of my sketch, and I'm going to start doing the outline of the box. This is very simple, just tracing the lines you already have. And remember, we don't even have a very perfect drawing right now, so don't worry too much about it. As you can see, this is not perfect hand, but that is fine. We'll have time to clean everything up later. Now we just want to check our bows and see how it looks. And this is not a super important step, but it will help a lot. This is something that we do when creating characters. For example, when doing a new character would like to see the silhouette. So we can know if the character is readable and recognizable without its most prominent features, right? Just a black shape. But it can be really helpful to do this when drawing some random poses as well. Because you can always make your posts better. So I have here my silhouette. And as you can see, the pose is really readable. So we have this whitespace right here, that white spaces are really important because they will help turning the Bose more readable. For example, if I have a person standing still and they're just like this, It's not really easy to read, right? However, if I do something like this, here, the body. The arms here and then the legs. You can more easily understand that this is a burden as opposed to I don't even know, uh, both with the heads. An ice cream, with a circle on top. So the whitespaces are going to be really important in the readability of your Bose. There's always some things that we can do to make our pose better. So I'm just going to move it here to the side. So we can still have our shapes right here. Also take the time here to turn the bowls more into your style. For example, I like to draw the feet a bit more triangular. So I'm going to fix that in my drawing here. Now. I want to maybe move the head a little bit. We don't really have any neck here and it makes it a bit awkward. So I want to change it. I want to change the position of my head a little bit. So we have a clearer poles here. So all we're doing here is just refining serve erasing bits here and there. Look at both and see how you can make it better. That's the whole point here. Just to try to make our lives better, depose might already be really, really good. But most of the times we can always make it clearer. So a bit of a space here for the neck. This hand is quite good. This one, I don't like it as much. Now how could I do this? I don't think I need to do a whole lot of changes here. So as you can see, I'm mostly experimenting. I'm not worried about how good my lines are right here. I just want to look at the poles and know that people can tell what's happening right there. Even if it looks really weird right now. That's perfectly normal and our rights. So take your time with this step. If you have a good reference photo, you don't need to do a lot of changes, but this is my character, this is how it's looking right now. I really like it. So as you can see, this step is very simple, just blocking the main shapes of your pose. Change what you feel needs to be changed in so that the post looks better, the pose looks more in your style. And so that it is clear what's happening in the Bose. If someone is going to look at your bows, they know what they're looking at. In general, when you do this, you'll make a drawing more interesting. There's always ways to make your drawings look better, and this is one of them. So take your time with a silhouette. Try different things. You don't need to do just one silhouette and stick with it. You don't need to change a lot of things. Sometimes you might have to move a whole arm, but other times you don't. So tryouts see what looks better and take your time and whenever you're ready. Follow me to the next video where we're going to be talking about exaggeration.
7. Exaggerating Your Pose: Hello again and welcome back. So we come to the next step of creating our pose. And what we want to do now is exaggerated a bit more just to give it some more flair so it pops up more to the viewer and to yourself. How much you exaggerate is totally up to you. And a bit of a preference I have here a few examples on to explain a bit why it's important to exaggerate sometimes the bows, basically, you want for the drawing itself to be eye-catching, right? You want people to look at it and bike saturating the post. You will have that effect. For example, we have here joe, Joe's Bizarre Adventure and it's very well-known because of that. The poses, I mean, no one really poses like this, right? It's not really comfortable. The way the arms go, the legs, especially the legs, this is not comfortable, right? But it is a stylistic choice and this exaggeration is the focal point of the series and the manga, even if the characters are just sending, they will be very exaggerated. They're not just standing. They will have a lot of flair data, a lot of dramatics happening there. This is something to be somewhat some attention to and decide how you want to do it. Unless we're really going for a hyper-realistic style. Don't be afraid to break bones and muscles. It's totally fine. If that's an artistic choice you're making there, it's art, and ultimately, you can do whatever you want. Fighting games are also a genre that will exaggerate the poses a lot like for example, you see here, this leg here has this really a weird curve that, well, if we're trying to put your leg like this, you won't have this curves, right? You might even not be able to put the leg so close. It is to make this whole curve here, it's really hard. But in fighting games, artists tend to exaggerate the poses a lot. So it has some cues, some visual cues for the player, so that now what's happening in the screen, and so they know how to react. They have to react to the moves. And it's important to have some exaggeration. Again, this can also be a bit of a stylistic choice. Some games will be more exaggerated than others, but it makes things more interesting. It's not only to help the players, but it also makes things more interesting. Sometimes that exaggeration is made to show how weird the character is. Some characters will be very weird and move weirdly. The skin happen in animated series or in games, wherever medium you can imagine. And the characters will have very weird pose and very exaggerated poses. And sometimes even the limps be bigger than they're supposed to be to show their weirdness. So the amount of exaggeration you do depends on a lot of things. It depends on your preference, what you like in your own style, right? And as well as the kind of character or position your drawing. So. Again, I think this all depends on you and what you want. I think it's important for you to experiment with it and see how you like to draw things. So this is why I want to go through this part in this class. So you can experiment and see how you like to draw your characters, your poses, and so on. So I've made a copy here of my silhouette. Again, always keep your original drawings and sketches so you don't lose them. And so you know your process. Now, we're going to start chipping away at this and see how I can exaggerate this. So for example, I think I want this side to go with a bit more of a curve, right? To exaggerate too. To show his really into this pose, really going at it. Maybe this is too much. Alright? So something like this. But now we have a bit of a curve. Instead of going just this side, we have a curve happening here. So again, as you can see, this is not a huge change that I made here, but I think it's already does something more to our bows. This doesn't need to be perfect. Again, these are just sketches yet tried. Different styles of exaggeration. You can really exaggerate it. You can be softer with it. It's important to experiment, especially at the beginning, when you're still trying to figure it out, what you want to do with your art. This is really important and you can do that with this studies. So here I'm also trying to make it that the Lego bits curvature as well give it a bit more of a curve. This is a very fluid bolus, so I want curves to happen here. Think it's really important. Now this arm, let's move it a bit and wanted to be a bit more tilted. So as you can see, I'm being very mild with it while changing my boss a little bit and making it a bit more interesting right here. So if you're doing in this and traditionally, I do recommend you're drawing your photos. Again. I'm going to copy this foot here because I really like it. There we go. Let's move it this way. Maybe give it also like this. For me, this is going to be it's as you can see, I've kept it pretty mild. That's how I like to go about it with my art. But it's totally up to you. So I really recommend you experiment as much as you want. I think arts is all about experimentation. Try out different versions, different degrees of exaggeration in your drawing. And whenever you're ready, you can follow me to the next video where we're going to be cleaning up our drawing. So we're going to be finishing up our drawing. So I will see you right there.
8. Cleaning Up Your Pose: Hi and welcome back. So here we are. The last step. We're going to finish things up in this video. And this might take some time, so take your time, go at your own pace and just relax. Okay. We already did everything we needed to. So this was my first silhouette. Here is my second one, the one that I exaggerated. So as you can see, we went for something very straight and now we have some curves here. Very mildly makes my posts pop up a bit more. So again, I hope you, if you've already do this, Just take your time and experimental Lourdes, I know that it might seem a bit scary when, especially when you're starting to learn how to draw. But experimenting is a really big part of it. And if you do it, you'll see that you get less and less afraid of doing things and trying different things. And you'll find out more about your art and what you want to do it. So really take as long as you want with all your experimentations. And now let's start doing our cleanup. So I have here my silhouettes. I also have here my first shapes. So if you have those, use them as reference. We only have a silhouette here, right? So we want to have, again our skeletons. So let's go on top of it and draw our very basic shapes again. So I have there my shape so I can take a look at them and see what I need for them. Now we have here that line, right? This is the curve that we have. This one right here. Now we have the torso goes this way and this way, like this, the proportions of your shapes now might be a bit different, especially if you exaggerate things a lot to my have exaggerated the proportions of some parts of the body, which is totally fine. Don't worry about it. You just need to change things accordingly. If we decide to go with bigger Liam's because it makes sense for the posts you're doing. Then go right ahead. Right now, all we are missing is our hands here. Now this is going to be this part here of doing these shapes is going to be a very quick process because you just went over it. You're just applying the same thing again. But I'm going to use the new version of your pose. So there we go. I have my new ships here, very simplified as you can see, as I went adapted things too, how I usually draw so simplifying things even more. This is a time for you to make your last changes to things. If you feel like there's something you're still not really happy about, this is your chance to do it. I got more comfortable with trying this Bose. Since we have done it quite a lot of time since we started, right? We started with very simple shapes. We drew a silhouette, then we drew a more exaggerated silhouettes, and we went on and on drawing the same post several times. So by now, you should be a bit more comfortable drawing that Bose. And again, this might seem like a lot of steps for drawing a simple post, but it's a really good practice that I really recommend. Have fun with the whole process. Okay, Here I have it, I have my shapes. Now I'm going to go for an intermediate sketch here. So I have an even better base for my final lines. This is the kind of step that you can skip if you want. I like to have a more detailed sketch before drying my final lines, but it's totally up to you. I'm just going over my shapes here, but focusing on the main lines. I'm not going for ships anymore. I'm going for the outline of my bows. Go slowly through. All your lines. Change wherever you feel it needs to be changed. Her really like dispose. I really like what we did here. And I hope you're having fun. Remember, the most important thing, and I'm guessing this is why you're doing this, why your drawing is for you to have fun. So don't forget to do that. All right. Don't forget to have fun. I know that sometimes, especially at the beginning we're learning, a lot of times things will go wrong, things won't go as well as we want them to, and that's normal. So enjoy the whole process. Don't worry too much about the end result. Worry more about the process and what you're learning through each of the steps. This is really important, right? All you are missing now is our heads. Now, I'm not going to be adding any features here to my bows because that's not what I'm focusing on. So I'm not going to be drawing a face. French fries for our fingers here. Remember if you're having some difficulty with trying hands, french fries, you can go wrong with it with some french fries. We are ready for the line out. So I'm going to speed up things a little bit here because there's really no need for you to be watching me in real time going over all my lines. So let's do the we're just going to go over all the lines we just did, did in this more detailed sketch. So we have a clean pose. So here we are, we are done. We drew an action pose step by step. We started very simple and went through finding it little by little until we have a final drawing, a final study of the whole pose. So take your time through each of the steps, have fun and follow me to the next video where we're going to be talking about your assignments. So I will see you right there.
9. Assignment Time!: Welcome back. It's time for your assignments. We went through the whole process of drawing an action pose step by step. So now it's time to apply everything you've learned so far. For that reason, I'm giving you three images that you can use. Simply choose one of them and draw it. Take your time and go through each step at your own pace. Experiment as much as you want and have fun whenever you're ready. Share your work. I can't wait to see your drawings. That's it for this video. Have fun, and I'll see you in the next one.
10. Conclusion + Thanks!: Hello, and thank you for watching. I just want to say a few words while he watched his quit speed painting in the background. By now you should have one or more action poses ready to use. If you don't have one yet, be sure to take your time as long as you need and have fun developing that Beau's. Go through the line of action, the shapes, the silhouettes, and take it one step at a time. I would also love to see it. So feel free to post your work. I hope you've enjoyed the class and it was helpful for you to consider leaving a review so more people can find it. And it also makes my day reading the feedback from my students. Have fun. And as always, keep on drawing.
 Patricia Caldeira, Illustrator | Digital Artist | Designer