Transcripts
1. Intro: Welcome to this drawing class. My name is Christina Moyer. Today's class, we're going
to explore deciduous trees. The intricacies,
the complexities of it seems simple in our minds. But we're going to
fight that urge to draw the lollipop tree and learn
the skill of observation and how to represent what
we see onto paper into a two dimensional
form with one of the most accessible
forms of art. A pencil, a paper, an eraser. Simple things that are quite
accessible to so many of us. This is perfect for beginner to intermediate artist who has
begun exploring graphite. Who would like some
guidance on how to approach drawing
something so complex.
2. Project: Well, you might have guessed
that today's project is a drawing of a deciduous
tree. That's right. But I'm going to
help guide you into selecting the tree
that you want to draw, because I think it's
really important to draw something that you feel
interested in drawing. Yes, we push ourselves through blocks of
frustration when we do art. And sometimes we have to do
things we don't want to do. But I think it's
important to see something that you're
interested in to recreate. So for instance, this
flower back here is something that I took a
photo of that I really, something I really love and the lighting in the image and that kind of thing
really drew me in. That's an important
place to start because once you
get into a drawing, even if you've loved
it in the beginning, you're going to find
areas of frustration. So I'm going to help you through
the process of selecting a reference image of what steps to take based on whatever
image you select. And to create a deciduous
tree that is lifelike, that resembles a tree, and, you know, goes beyond the
lollipop, cartoony tree. These skills will take you far beyond how to draw
a deciduous tree. It's going to take
you into being able to look at other
elements in nature, other elements surrounding you, and being able to
represent that in two dimensional form,
which is awesome. So, are you ready
to get started? We're going to start
with a bit of a warm up before we get
into the project.
3. Materials: Okay, what materials do
you need for this lesson? For everything
we're going to do? It's pretty simple
because with drawing, what I love about it is
you don't need a lot. It's not going to be expensive. Yes, you can buy more
expensive things, but you really don't need to. Even just your printer
paper will work. But if you want to
get a sketchbook, you want to do plenty
more drawing practice then getting a sketchbook
is really helpful. A coil one is nice if you like to sketch on
your lap and have it fold all the way around and
you're not dealing with that middle line,
crease and everything. And pencils. So you can
get a set of pencils. You can just use an HB
pencil, that will be fine. If you want it to have
more depth to it, then you're going to
want some deeper ones. These higher range B's, they're going to help you out. I do have some lessons
that we talk about tonal values in make
sure you check that out. There's a whole tonal
values lesson that I have. You can actually try that lesson out and work on
your total values, but for this lesson, an H B will be fine. But like I said, if you want
to bring out some of you, just bring out all your pencils. If you have a range of pencils from your H is
all the way into like, I've got a four H here,
that's your lightest, it's actually a harder lead. Then you go into up to like eight B and you've
got a very soft lead, and that's going to be closer to a charcoal type of experience. The softer leads
show more texture. If you didn't want to
check out the lesson, I'll show you as we go along. But just make sure
you have a pencil. If you're just choosing
one pencil though, I would recommend avoiding
the H like a 2h4h. Those are really a lot lighter. They'll be lighter on the paper. I don't recommend that
because it's not going to blend as well onto our paper. That's my only
recommendation there. You're going to
want some eraser. Now, I recommend getting
a needable eraser. This one's brand spank and new. And I'm going to take
this out and you can play with it
like clay almost. It cleans your
hands while you're working. You can shape it. You can dab off to just take a little bit of pencil
off, you can wipe it. And it's way less mess. It doesn't leave all that not shaving but like the
eraser mess that you get. And then, you know,
if you're trying to wipe it off then you
smudge your piece. So let's just avoid
that altogether and get ourselves a neatable eraser. I highly recommend a natable
racer last you so long. This is my first
new one in years, in well over a decade. So you don't need to buy too many of these,
you know, in your lifetime. The other thing is
a blending stump. These come in different sizes. Just gauge it based on the size of the
paper you're using. If you're using a
tiny sketch book, you're probably going to
be drawing small things, then you'd want a
smaller one so you could blend in smaller areas. If you're using a huge
sketch book and you have a tiny blending stump and you're like trying to blend
a huge section, that's not going to be
very easy with a tiny one, Just keep that in mind depending on the size of your paper. We have our sketch book, we have our pencils, we have our eraser. What are we going to draw from? I think having reference images
is a good thing to have, especially when we're drawing something that in our minds,
we know what it looks like. Okay, let me just tell you,
we're going to draw a tree. Okay, Everybody just
draw a tree. Go ahead. Draw a tree quickly. You have 5 seconds. Draw a tree. Okay. How many of you
drew a tree like this? Something resembling this? Okay. Our we've been programmed through
our years of school. In our mind like tree, people will see that
and think, okay, yeah, tree, but it's not really
realistic in any way. What we need to do is we need
to first do some research. I compile images. Here's like my little
deciduous trees compilation. Okay? Now, whether
that's photos you've taken yourself or
photos you find, now make sure if
you're going to be copying a photo exactly, that you have permission to do. So somebody has taken that photo and that's
their art form. So make sure that
you're not just stealing someone else's art. If I'm using some of
these are my own images, then I can do whatever
I want with those. But if it's somebody
else's image, if they've asked for credit, make sure you give them credit. You know, if you go
to a site where they allow you to use
photos like pexels, I love going there to
find images as reference. And then I may not
even, you know, use the image exactly you know, but I'm using their art. So just like you wouldn't want
someone to steal your art, it's good not to steal
other people's art. As we research, we take a look, we're kind of just examining these pictures and this is part of our materials
we're going to need. So whether you print them
out, whether you have them on a device like
a phone, tablet, so you can refer
to them While we do this lesson that will
be really helpful for you. You can access some that I've attached that I think will
be helpful for the class. And choose a variety like different types of
deciduous trees. There's so many different angles that this one's
looking from below. This one shows the root
system and different seasons. You have some that are in full bloom, some
that are in winter. You've got springtime,
all different seasons that we can
examine these trees. Winter to a different time
of year is going to show, it's going to be different
for drawing that, compile them and
start examining them and this is part of your material gathering
for this course.
4. Warm up: Let's begin with a
warm up everybody. Just take out your hands, warm them up, actually, physically make them warm. And do some stretches, movements with your hands. Stretch them backwards, stretch
them forward, curl them. All kinds of moments,
little exercises because we're going
to be using our hands and so we want to take
care of our hands, give them some
warmth, warm them up. Get our little
eraser ready to go. We got our pencil.
I'm going to use A to B to B or not to be. I'm going to use a two B simply so you can see better on here. We're going to
warm up. Let's try some different shapes of trees. Just some quick light
drawings, nothing detailed. Just quick and very
light on the hand. We're just going to start
up in here and I'm going to go across and draw some
different tree shapes. And join me, if you will, just quickly sketching
maybe the branch first, the base trunk,
and then some main branches and then some
little offshoots. This is just quick,
can you do it under 10 seconds? Drying a tree. A lot of your deciduous trees without leaves look a
little bit like that. We also have just a different
varieties of trees, some have more rounded. Again, I'm just
going to come up, doesn't have to be straight line because maybe your main
branch stops here. This one here has a
little bit more rounded, a little bit more
rounded branches, and the whole shape of the tree looks a little bit
more almost like a leaf. Okay? And then we have, we have so many different
trees that you can do. There are willow trees, weeping birch trees,
all kinds of trees. This one here I'm going to draw, I'm going to start
lower at the top. It's going to come down a bit. Every end of it instead of
poking up is coming down. My main branches come out more, then things fall
downward from there. That beautiful weeping
look I personally love. I'm just trying not to make
it look too exact, but again, we're just a quick sketch here. Quick sketch, maybe
one of the branches had a little bit more
droopiness there. Okay. That's, maybe you have trees that are
totally different, maybe you don't have
them in your area, maybe these are the ones
that are in your area. They're a shorter main trunk, then they branch off into wider angles like this,
just very lightly. And then up here,
I'm just indicating loosely some
branches and leaves. Just very loosely. I
think it's just branches. The image looks like
leaves that I'm looking at. I don't
think it is leaves. I think those might be branches. I'm not very familiar
with this tree. You don't have to be a tree
expert to draw trees. Okay. I just know that
there's a lot of action up in this
section and I want to just indicate it quickly as we're just warming
up the hands, warming up the mind,
that kind of thing. Well, if there's any other
trees you can imagine as deciduous trees
give them a go. There's this one
here that's quite interesting. All right. So we have this nice curvy, it's like a big curve, but I'm trying to
just draw quickly. Don't spend too much time. It's just learning to indicate quickly the space
that a tree takes up, even with just little
gestural lines that okay, the shape indicates here. There's something going on here. I find the strong lines and
and move my hand accordingly. I'm just take in
information quickly with this and try to get the tree in there so you can
practice more of these. Just quick gestural ones if you're looking
at a tree outside. Oh, you know what? Let's
do a pillar type columner. A lot of these ones where I
live, I think they're Aspens. Like I said, I'm
not a tree expert, but they have like this
column shaped them. You can plant so many
of them close together, quite a few branches like this, but they're all in this column. Just quick sketch of it. If you want to indicate leaves, then you're going to Sometimes when I'm indicating something, I move it this way and use my pencil on
its edge to quickly sketch in some leaves. So that's it. For a warm up, that's a good enough warm up. Five to 10 minutes is
just great for a warm up. If your hands are getting messy, then just use your
eraser and move it in your fingers a little
bit and it will clean off your fingers. It's awesome. If you find yourself to be
a very messy individual, then you might want
another piece of paper to rest over top of any other sections where
you're working so that you don't smudge other sections. Once we get into
the actual drawing, we're going to work on.
5. Observing: Okay, so let's get into our drawing here that
we're going to work on. And we're going to
do this in some stages so that we can really be successful in the
outcome of our piece. So I've included
images for you to select to help guide you along. What I'm going to do right now is we're going to look at each, like some of these and I'm
going to help you decide. Because I'm not going to
draw every single one, but I want you to choose
the one that excites you. Okay? Choose one. Now, if you're really beginner, I recommend something that, that doesn't have many leaves, that just has branches,
maybe something like this. Okay? One like this would
be good for a beginner. If you're more
intermediate or advanced, try something with more detail, like leaves, especially ones that are falling down like this. That could be a
challenge. Also, if you want to find an image
that's in black and white, that could be really
helpful because we're working in black,
black and white. Then you can focus on total values when we get into the detail
section of things. Before I just get
started on a piece, I like to examine first what the reference images
are that I have options for to really make sure that I feel confident in my outcome. Another way, if you're
more intermediate, advanced, is choosing
multiple trees. A scene with a variety of trees, or this looks like the same tree but just
a whole grove of them. That would make this a lot more challenging because you're
not just looking at one tree trunk and you have competing lines
all surrounding it. If you're a beginner, I don't recommend something
this complex. If you're more intermediate, advanced and you're
watching this, then I challenge you to try something a
little more challenging. The other thing we have are trees that have
maybe their roots showing that could potentially be more challenging
because there's just more that you
have to focus on. This is a really, I'd say
a challenging one here. But next up, let's look at now you can use
your own reference image, or you're looking at trees outside what we're looking for. And you might have
already guessed from some of the
things I've already said versus how
complex something is. What we'll look at is the main trunk visible?
This one here? Yes. But it's not strongly
indicated compared to well, even that one there, but
compared to something like this. Okay. Yeah, I can
easily see the trunk. Okay. That makes it easier. Can you see the individual like main shoots off the trunk? This one's pretty
good, I'd say, yeah. Let's look at another one. Let's go back to the
other one that we were looking at. This one here. This one you don't really see
the top part of the tree. This one would be
a good practice for branches and
roots and that thing, getting some of those leaves in there, but more
in the background. The top canopy is visible, but more so up in
the higher end here. Look at the main shoots. Yeah, I can see them. There's quite a few
and some of them are very different in size. This one here, this
one's not bad. I'd say an intermediate level because you have basically
one main branches, a few other ones but
you can avoid those. And then just you have 123, some main ones there and
then other offshoots. Yeah, you don't see the
like the whole tree, but you could definitely
work with this one. Especially if on your page, you block things out to size, find out the ratio of the
image if you're not sure, you can crop your
image two by three, like 23 or whatever, and then you can
make a 23 size here, double it, 1.2 it, or do the same size
as your image. You're looking at this one here. Actually, I think it wouldn't
be a bad one to choose. There's a lot of these branches. So here, I mean, it's a
cool tree. It's different. Then up in here though, there's a lot of little spikes that give it a detail that
might be challenging. But I do think this wouldn't be nice because it does give you a clear image of the branches. There's like some
really deep shadows and good highlights in that
one and it's different. Like I said, this
one's a good beginner one because you're not dealing with much in terms
of additional detail. The challenging part might be just these odd looking
branches and how they stop. That I think would make this one a little
more challenging. But you don't have to stop them. You can finish them off
like these ones are. Just use the other
parts of the image to indicate how you would
go about doing that. This one's not a bad one. I
think this one's very doable. This one's a great
beginner. Okay. Why do I say this
a great beginner? Because it shows the whole tree. We have a pretty solid
single trunk that's visible. There's no additional
roots to deal with. You've got these fun
branches coming off. It has a good shape to it. That's pretty, when we
think deciduous tree, I think this comes to mind
for me at least then it, instead of leaves, which
are more challenging, you have just these
little branches and those are just very light, wispy lines that you can use. You can even use like a two
H pencil to indicate those or four H. Again, that one has more to it. This one here would be fine. There's some parts that might be a little more challenging, and getting some of that detail in something like
this could work. It does have more the angles
on it aren't a challenge. If we're looking
at the main trunk, there's two main trunks. This one here, find an image that excites you that you
like and go from there. This one, if you're
looking for the trunk, first of all, hard to see it. That makes it a little more challenging in terms of actually focusing on drawing a
tree with like branches. But it definitely looks like a tree when I look
at this image. If you want to focus more on leaves, you can
definitely do that. And we will do some
practice with that as well. This one here, I really like the silhouette of it is nice, but you're going to be
missing out on some of the highlighting in the
detail portion of the image, unless you want to
draw the whole image, which you can, of course you
can, This is your drawing. Okay. This one here has some good highlights
and low lights. If you want to practice
shadowing, that one's great. I like these trees have
a good trunk on them. Their main branches
offshoots aren't really strong, there
aren't many of them, but great for
practicing the trunks, the leaves and little branches that one is great
for that on and on. What are we looking for again? Trunk. Can you see the trunk? Does it look complex?
What do I mean by that? Does it have root
system below it? Do you see the detail of the trunk itself?
This one? Not really. Then from there, we
look at the offshoots, the angles of the offshoots. This one, you don't really
see them very well. Maybe up into this section, like sometimes you have this
area of leaves hiding that. But then as you come up, you'll see parts
of those branches. I'm going to show you how to
navigate that. Right here. Like I would just draw the
whole where I think it is. I don't wait to draw that
branch. I don't, you know. Oh, skip and then draw in later. I actually start off
and draw that out. Okay, here I would draw, draw those branches in. But if, you know,
they're going to be a race later than
draw it lightly. Right. In this previous
one I said, you know, I wouldn't just skip that
section, but it's very bright. I draw very lightly, but just to indicate where it is so then I can add
in the detail after. So we're going to start off
by find the image you want. I'm going to choose one that is more so that you can follow
along if you're a beginner, because I feel like if
you're intermediate, you will have greater
tools to be able to attack this project and
you'll be able to follow along fairly well. I'm just looking to
find one that I'm interested in because it's
hard to paint and draw, and do art if you're not interested
in your subject matter. Right? It's just
like when you have a reading assignment
and you don't like what you're reading,
that's a challenge. This one's cool, but I think
it's a little bit too hard. But I think that
one would be really fun to paint actually. This could be a folder that you create that's not just for drawing, it could
be for painting. I do think this one
would be not too hard, but I want to challenge
myself a little. I want to challenge you
and I think you can do it. Which one should we choose? I think I'm going to
go with this one here.
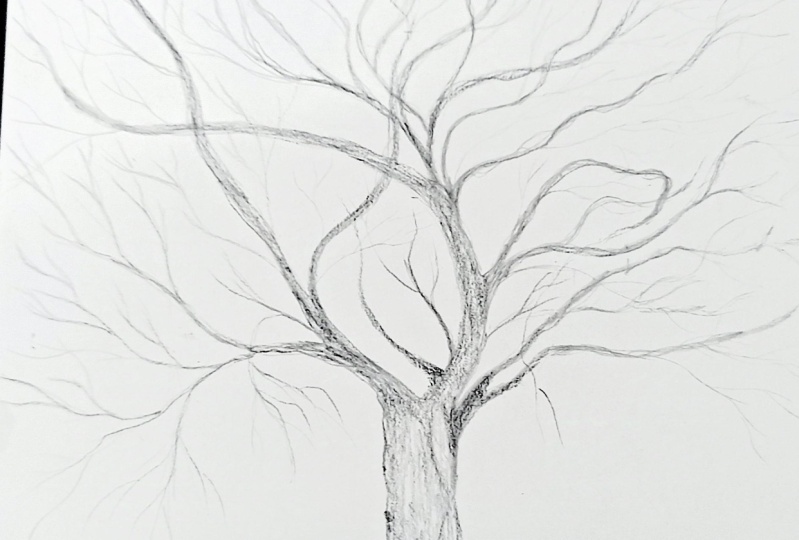
6. Shape: Let's start with this one.
I'm going to put this aside, but you can have yours
out next to you, and you do want it
visible for yourself, but I'm going to draw a bigger. Okay. I'm going to start
off by drawing my trunk. But before I start
drawing my trunk, I want to look at
the size of my paper versus the size of my image
that I'm going from my tree. So if we take a quick look at my tree where you say this is the bottom
and this is the top, where would you say is the middle point between
this line and this line? Is that the middle point? No, I'd say that's a third. If we cut that into three, want like 123 equal parts. Just imagine you're cutting a cake for someone
cutting a piece of pie, you want that equal
portion, right? Maybe you're going to give
yourself a little more, but in this case you, if somebody else is cutting it, you don't want them
to give you any less. You want it to be fair.
Imagine your paper. If I draw my trunk this big, I'm going to have
enough space at the top to finish my tree. Okay. That's an
important thing to look at sometimes
what I like to do. So I'm going to take the
area where I'm going to draw my tree and up to maybe here. Okay. Then I'm going
to find the midpoint. Or if we're cutting it
into thirds. Into thirds. You can even use a
ruler if you want. 12123 can be proximate to. Okay, so we're
starting out this way. Now what's cool
about these pencils? If you have a pencil that has this little white mark on it, you can use it as your own little measuring device if you're measuring with it. And I use this when I'm drawing, like
observational drawing, when I see something in real
life and I'm measuring, okay, this is how many of these? Just make sure you don't
bring it further and because that's going to change
how many fit right. If I bring this close, that's one whole tree. But if I bring it down to here, it's actually not that many. Let's see, This down close is actually almost the
third, but not quite. But if I'm measuring, I can create my own
measurement there. Okay. How many times this way is it? If this is 2.5 that way then we take that same
measurement we've created. Doesn't have to be a
ruler measurement, just our own measurement. This is about one. Make sure you go to the
same spot, 23. Okay. If I go like this from
the top to the bottom, and I turn it this
way, it's actually about the same width
as it is height, pretty close what I
can do on my page. So I can actually take this
and indicate it there. Now I want it to be there. Try to not move your
hands when you do it. But this is, again, we're
just giving an estimate. Doesn't have to be exact, but that's going to give
us a starting point. It's like making a grid without having to actually
painstakingly make a grid. You can get your page ready
to then start sketching. Now that I know where
things are going to go, I'm going to actually
move this over a bit. When I actually draw it, this is going to be
more on the side of it, and then I can
erase those lines. I'm going to draw my trunk. And I'm going to do this
lightly so that I can make adjustments more easily. If I press really hard, it's going to be hard to
make adjustments. I'm just going to
start and see that my tree is going straight down. I notice that the tree isn't
exactly 100% straight. I don't feel the
need to use a ruler. Feel free to draw in the
ground if there's the ground. And notice if the
tree on the ground, on the tree is actually
straight, or is it angled? And you can use your pencil to help you with that
because that's straight. If I look at that and
I pull it against the straight line and
I pull that upward, you can actually see
there's a bit of a clot, like a
little bubble to it. I just want to make sure just
gently has a curve to it. I'm just trying it very lightly because if I want to race. I can erase. Again,
I love this eraser. Okay, I'm going to start by sketching out the
outline more so. And I use these sketchy
lines to do so, because I'm trying to
find the right placement. Then after I get
my trunk in place, and I've gone to my third point, which indicated where I
should go for my trunk, then I look at the main trunk. Next, I would look
at the offshoots. I'm looking for overall shape, as well as any anything that
it reminds me of maybe, or something that stands
out strongly for me. When I look at this, I see
this strong shape like this. I want to keep that
in mind, because if I draw this line straight here, but then I draw
this one over here, then I'm not going to get
that shape if you're wanting to really make it look
like the reference image. Anyways, I see here, this comes out and then
this moves in this way. It's really about being very observant and being able to indicate your
observations accurately. Instead, I'm not going to draw very detailed super
line everything. While I don't have
my full shape, I want to get my full shape in. If I look at the very, have
your reference image beside you and see maybe where does that end? Is it the third point looks actually like that stops
right at the third point. This is my third point. And straight up and down above this, I'm
comparing measurements. Okay, that is right above that. I can keep it there. It helps if you set whatever
tablet you're using, display setting, to
30 minutes or so. That I just don't like leaving it that way because
my battery runs out. But it helps when you're
looking at a reference image off of a digital device to
change the display setting, I'm looking for comparables. Where do things arrive on
the page in comparison, especially making this
bigger than that? Right. I'm okay right now. If it's not exact right now, I'm just going to indicate
approximate also. This is giving me
the canopy shape. Let's input that shape. So this is the center, comes up, there is a bit of a dome shape and then it's a little bit more flat underneath
a little curvy, but a little flat,
not fully round for this particular one comes
down to the ground. I do have some space in there and this one
comes out further trying to indicate where those branches are
going to end up. That's going to help me see how far I need to make
those other branches, the shoots from the main branch, it's going to give me a
better sense of space. Then from there I'm going
to not exactly follow. Now you can, but
I'm not going to go how each branch is going. I'm just going to
follow some main ones. Just do some main ones
within my shape here. Get my bigger branches sketched
in just a quick sketch. Some of them are quite wild. The shapes, it's not
all straight going out, we have overlapping happening, but don't worry about
too much detail. Let's just get some of those
main branches in place that one actually
comes from over there. There's overlap and crossover happening depending
on how patient you are and how observant
you are and how much you need it to look
exactly like your image. And the thing with art is it doesn't have to look exactly. We can create a
mark that indicates something without having to
draw everything out in full. All right? Okay. So what I want you to do is get your
main branches in there. What's nice with the
phones, you can zoom in. Some of these ones
are a little crazy. Then as you start
drawing, you're like, this isn't beginner,
this isn't easy. Well, I didn't say
it would be easy. Beginner doesn't
necessarily mean easy. If it's not pushing you at all, it's not challenging enough, Should be stretching your
brain. Now we can check. Okay, does it have the overall shape that
I want and everything? I think this is pretty good. That concludes our first section of the observational drawing. Next up, we're going to add
some details to really make this pop out and really solidify where our
branches are going to be. All of that before we finish it off with some
shading and texture.
7. Branches Part One: Okay, so for this next section, what you're going to
want is you can keep the same pencil because we're
not going into shading yet. Where we're going to do is we're going to make sure that all of our branches are drawn in. Now when I'm doing these
kind of sketchy lines, it does create shading, but I don't want you to worry. If you do have some of
that, that's not a problem. I think I'm going to erase my little markings that I don't really want
as part of my image. You can shape this.
It's really fantastic. I don't want this actual
line going around my tree that was just to help
guide my little branches. But now that I've drawn them in, I'm going to still be able to
see that just a little bit. You can just erase some
of that because we don't want that in
the final look. And if you've erased
a little bit, you will still be able to
see just a little bit. This is why you want to draw very lightly because
when you draw dark, it's harder to erase. Sometimes pressing like a stamp can lift some of that color too. Okay. I feel like there's
a line in there I want to get rid of too good. Okay, that's pretty
good. One nice thing you can do is you can take this and if you want to
then put it onto something, maybe a nicer page to then
complete all your details on. What we could do is
take a light table, put your nicer page on top, tape this down, and
then outline it so you don't have all of these
sketchy lines and things. That's one thing I
love to do is do my preliminary sketch
in my sketchbook. And then if I want it to be, maybe it's a gift for somebody, I'm not going to just tear this out and give them this page. I want to put it
on a nicer page, and I use my little
light table to do that. That's a little tip for you, a little extra. Why not? It's always good to have some
tidbits going on in here. Let's get all of
our lines in place, whether they follow the
reference exactly or not. But let's draw the draw and erase anything
that's bothering you. I like to focus on the main branches because those are going to make
the biggest difference. Now I'm going to check
two is my angle correct. You can use your pencil as
the angle checker. Okay. Is it going on that
angle when it comes off? It could be a little bit better. Maybe a little bit
more out first then. It's not straight up. Make sure you're not
holding your phone like that to indicate make sure it's straight and then
you bring it across. It does tip in that way. It curves around and
tips in to that, right. Let me check. Okay. Curves out. I might have brought it a
little too far this way, but I'm not looking
for exact right now, like we're studying
these deciduous trees, right? But it's interesting. As you get closer in and
you're looking at them, it feels like I'm not even
looking at a tree right now. If you're getting to that
point, that's actually a good thing because
you're pushing your mind past what it believed a tree to look
like in the beginning. That's where we want to get to. We want to get to that point. Okay, just getting all my tree
branches more solidified, a little more clear so
that when we add in the shadows, some things. I'm already adding
a little shading, just the way I sketch. If you draw cleaner
lines, then that's fine. It doesn't have to look
exactly how I'm doing. I just find it
easier when I make these sketch marks to then, you know, I'm giving
myself lots of little lines and then I
find my way that way. I don't know, it works
for me that you can draw the outline first if
that works better for you. This one up here needs a
little more thickness to it. I'm just using a very
light pressure approach. Right now, there are so
many little lines here. We're not necessarily
going to make sure every single line is exactly.
Now you can do that. And some people that's how they like to roll
when it comes to art, they want it to be 100% exact. But you can do that,
you can just go in. What I would do if you
want to do that is get those main tree branches in and just keep doing
what we're doing, like you keep adding
them in and following. The other thing is if
you want it to be exact, then you would use a grid. I would definitely use a grid. I have a lesson
that is about that. If you want to browse that one, you can do that right here. We're studying deciduous trees. I want to practice my observational drawing
skills a little bit. We're getting those details, it's like the in between. We're still working on
observational drawing and yet we're adding detail
as well at the same time. One thing with trees is
typically you're not going to have a larger branch coming off of a smaller branch. Okay? If you look
at trees enough, you'll see that's a
key component of it, Studying how trees look, it's definitely a
great way to get that. Again, I'm filling
into where I like. Then I have some
of the main ones. In some of them they're
overlapping each other. They are a little more tricky
like this section here. It's a little tricky.
There's so many lines crisscrossing and going
all over the place. You're like, which
line do I follow? Does it go? This tree has lots of little squigglies. Now, if you're wishing that you had chosen a different tree, I'm going to
encourage you to stay the course and just complete the tree that
you're working on, regardless of if it's at this point something
you're excited about. Because you have to push
past those mental blocks of, oh, no, this is too hard. Just like any athlete
would need to. Yes, I just compared an
artist to an athlete. There's a, this is a
different level of endurance. Sometimes if I'm
struggling with an area, I'll use tonal values
to get me through it. In the section here,
I'm putting in some, just filling it in that then I can always use
some highlighting to race. It's helping me get this little
clustered area complete. Okay, We're not quite into
the detail section yet, so I don't want to go into
detail in that section. But once you have the
whole tree in place, you can zoom in and focus on an area because you already
have those things in place. If you don't have them in place, it's going to be a
little more tricky. Like I can go in here now and see that they come together, but then they go apart. But then I also
want to make sure I being aware of where it ends, so I don't exaggerate
the size of a section. Look at where the next
branch is coming from. Where do they branch off? Pull it out. Zoom in. Don't stay zoomed
in for too long. Make sure you come out again. Make sure that it's still
moving in the right direction. Have fun with it, but push past those mental blocks
that surely will come. So if you're struggling,
just be like it's okay. Just trust the process,
keep moving. You got this. And allow yourself to
make it your own too. Like if you make a
mark and it's like, well, I wasn't exactly like it. It's okay. This one here, I'm making my own a little bit. Making my own. This
is my drawing, own it, own your piece. Have fun with it, and
give yourself time, take some breaks, come back
to it with a new set of eyes. I highly recommend doing that for any heart piece
you're working on, don't you don't want it
to be overly rushed. If you're still having
a section that's like that you're
struggling with, then just do some
quick gestural lines indicating some of the
branches or just okay, like I can see, there's a lot of action
happening in here. Just draw some gestural lines in there and then
use your eraser. Just make sure
you're going really lightly with those
gestural lines. If that's the purpose for
why you're doing them. Like, I don't know
where these are going, but I know this section
has a lot of activity. I want to make sure
I get that in there. As therapeutic as art can be, doesn't mean it's always
going to be easy, but doesn't mean it's not
going to be very satisfying. And I think working through these mental blocks
actually helps mentally, You're strengthening
your mental capacity.
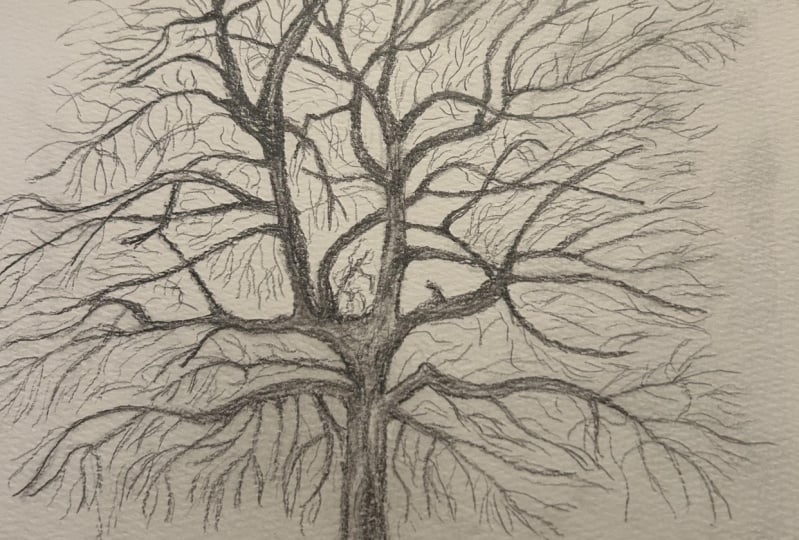
8. Branches Part Two: Once you feel like you've gotten most of your branches in place, we can take the next step
into shading and texture. One of the fun things about
shading and texture for me is the trunk. I'm going to zoom in a
little bit for the trunk. Depending on what kind of
trunk you're drawing from, it might have more
character than others. Actually, this one doesn't have as much character as
I like personally, but there's plenty
of character up in the top section of it. Here we go. I'm going
to look for areas. First of all, the texture
of the tree branch, tree trunk itself first, is it very visible? Is it a little more smooth? What I'm going to do is
I'm just going to use light pencil marks
in motions that help to show smooth or more rugged. This one is in between, looks like it has
some texture to it, but it's not completely smooth, but it doesn't have
those deep rugged bark. But at the base, I do see some shading
happening, some shadows. So what I'm going to
do is I'm going to put some marks in for that. Then I'm going to take
my blending stump. If you have a blending stump,
you can use your finger, but there are oils
on your hands that can affect how you blend. But you can certainly
use your fingers. I'm going to use
this blending stump. And what it's going to do, it's going to soften my texture into a bit of a
smoother appearance. I can take it right up
into my tree branches. You can see it's also darkening some of the areas within
those tree branches. You can fairly
quickly fill those in without any
special technique. You're not pressing hard, this is where if you used
a really light pencil, like a four, it's not
going to blend as well. Okay? Especially if you have
a smooth tree trunk, that is going to be
really helpful for that. You can even bring some
into the grass of it. How would I move
it so you can see. Zoom out a bit, so you can see the whole thing a bit.
See what's going on. See we're making
some progress here. What's cool is you can
go back and forth. I can go back in with my eraser. Now if there's some
areas that need to be lifted or have like a
brighter highlight, I can use my eraser. Maybe I don't like how
strong that edge is, then maybe I have to go
back in just very lightly. There's actually a bit of a characteristic
here for the tree. I want to indicate, I used the word indicate a lot, that's because we're
representing something. I'm not duplicating or
replicating it exactly. I'm vindicating, it just
seems like the right word. Blend it out or don't. You don't have to blend it out. If you've achieved
the right look, then you don't need
to blend it out. But up in here, I do need
a little more shading, a bit of back and forth. Get some pencil on there,
get some graphite on there. Blend it out, erase any rebellious lines,
rebellious moments, okay? So you go go back and forth until you have achieved
what you feel is. How much, as far as representing
that tree as possible, you want it to be well balanced
through the whole piece. Now, you can go in
and I like to finish off with my detailed lines. I don't want it to
be too smudged, I want some texture in
there a little bit. There's also, I've noticed just tiny little
branches coming from above into the area. This is how we will shade and
complete the whole piece, is with the same exact method. We will use our blending
stump back and forth. You've got blending
stump, you've got eraser. Let's see how you can
just a little bit off. All right, and then you can
go back in and draw in, get in those shadows
a little stronger. We're looking deeply into our image just with fine
tuning it with our eyes. Seeing where the
light is coming from. The image you can tell
because of the shadow, where the light is coming from. My darkest darks. I want
those to be in there. A great image, I think has that dynamic feel to it
because of the light, lights in the dark darks, those highlights
and low lights are highlights and shadows going. Another eraser you can get is one that it's just
like a small eraser. It does just very fine
lines and you'll see artists that do like hyper
realism using those kind. Some of the branches
might be coming, you can use this eraser
to do that as well. I can just go through if
there's branches that need to come across, we can do that too. It's going to make
it look more real. You can draw pencil with it. Just get in all the
details that you want, soever detailed
you want it to be, add in those branches.
Add it all in. Push yourself beyond what
you think is complete. Not so it feels overworked, but so that it feels not necessarily the feeling
of the piece itself, but just so that you have really represented
as much as you could. You feel like you've
come to know this tree, you're well acquainted with it. I think right now I'm using a B. Let's move back to
the two B again, I'm zooming in and out of this
to really help me complete this zoom in where do I
have that tree branches? It even there, we're there. Get those little
branches in there. So we get the shape that we
were initially looking for. Use really light gestural
lines if you want to try to, if you want to try
to indicate more of the branches
without having to make it exactly where every single line is supposed to be
according to the image. Because I feel like
that just like trying to copy my motion exactly is just
not very fruitful. You're going to find your style comes to life a little more. You're going to
notice sections where there's more action in here. There's a little more action. Okay, here, I want to
make sure I got my, some action going on in here. Maybe I'll just use some
light gestural lines. I'm just holding it very lightly and making
little motions. So moving into those areas
where I see clusters, I'm literally just, it's
almost like a random squiggly. It's not as perfect circles. Angular's super refined. I'm just, I'm making very light marks that
will help it to feel random because this particular
tree has a lot of these. Kind of feels like it's like
it has lots of detail in it. With that, if this
is just a study too, do you feel the need to
have every branch perfectly laid out or do you just
like the idea that, okay, this is coming together, I just want to get those, get the branches in
the right place. It's not equally
dispersed all around. Right, like I've
got this section, this section, this little
section, right 12. I need to make this one
a little more visible. Just very lightly maneuvering. And then if I notice, okay, I need to add more
branches, then I'll do so.
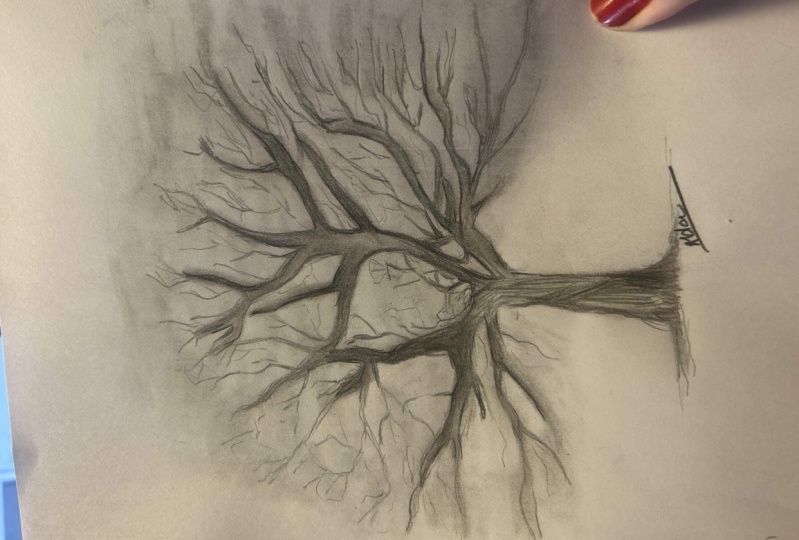
9. Refining Details: At this point, you're
going to want to look at the sharpness of your
pencil and make sure that it's remaining sharp enough for creating those thin lines. Really look for those
areas of clusters of little branches and leaves. I think there might be a
few leaves on this tree. I'm getting in the darker
tones as well as I go. Now if you want to try a dark, maybe a five B or
something to really get some deeper tones,
you can do that as well. It's going to give
us texture too. We want that kind of going over some of the areas where I
smudged but didn't redraw the lines to make
them niceen textured. Really be observant here. This area here needs some. Hopefully, we're
maintaining that shape that we originally wanted. This is a larger drawing
here that I'm working on. It's fairly sizable, it's
going to take you longer. If you want to practice
more trees after this, maybe you want to try
on a smaller scale. Maybe try a larger scale. You're going to have different experiences
with that as well. That can really help you become more acquainted
with the deciduous tree. I feel like I didn't pay as
much attention to this side. I've done more
detailing on this side, but I think it feels overall that it's
coming together in a, in a way that then
I'm cool with. I'm cool with it. The key thing for this
particular tree I think is that you do have these strong,
funky branches throughout. But then the little tiny
branches that come off, they're giving us that
shape in the end. And they're, I don't want
to draw them on thick, I want to keep a
loose hand so I can create very light marks, ones that do look
like tree branches. You can keep going. Just add as much detail as you'd like. If you need to, if you
need to add a little more, maybe we need to
create some lines crossing over these
with our eraser. Go back in and draw some lines that cross over and cut through not completely
covering where I've creates interesting kind of movement to it. Like maybe more branches that
are just lighter, right? Don't be afraid to really
follow that image, but then also be free. Be free from it. Put away that reference
image for a minute. And just what is your intuition
telling you about this? You're like, well, my
intuition right now is just saying crazy things, like it looks like a mess. We, that's just a negative
voice in your head. What I'm saying is try to
listen to your canvas in some way it's speaking to you and see what
it's telling you. What's cool about these too
is once they get dirty, you can they actually make marks too if you
need a soft mark. You know, if you
want to make some of these kind of softened, just make sure you're moving
it in the correct direction. Like we could do a
bit better up here. Let's step back and see,
okay, what's looking off, what's missing,
that kind of thing. You feel good about your
picture that you created. Now you're going to gain
a new appreciation for the deciduous tree,
it's intricacies, and those who do draw them
realistically as well, hopefully you'll find
inspiration through that and find your own style while
you're working on it too. Gain greater confidence in your drawing abilities,
your shading, All of these skills
we've been working on to create this piece. What do you guys think? A more back and forth solving these ones
out over here. I'm just blending in on
the outside and maybe within where I need to create more substance
to the branches. But again, I'm not going to
leave it just like that. I'm going to go
in with my eraser and clean up bits with it. Maybe stamp in areas you can create your shape and
then stamp it in. And then you could go, if you wanted, you
could go back in. I don't want to go with
an eight B, not really. I could go in with a five just to make sure
my branches that I want deeply indicated will be
there represented. Great. Once you feel pretty
confident about your piece, one thing I want to make sure
that I do is I can sign it, I can put the date, I just put the year just
so I know the year. But you can put the full
date if you want to know the exact date and voila, you have a deciduous tree now. You can go forward and complete any deciduous
tree. With these skills. Yes, you're going
to have to look at different angles and things, but do follow the same method, The whole, outlining the size of things to match
your reference image. Starting with that, getting
the basic shape in place, those main branches,
then building as you go. Then getting into
those details and the shading and texture back
and forth with your pencil, your blender, and your eraser to create something that looks a little bit better
than a lollipop tree. What do you guys think?
10. Conclusion: Unfortunately, my
audio malfunction. So I'll attempt to
dove this to the very best of my abilities. Thank
you for understanding. Congratulations,
you just completed the drawing lesson. Well done. Give yourself a pat on the back and I can't wait to
see what you created. So upload your project
in the student gallery. If you have a moment to fill out a review to let me
know how I did, what you enjoyed
about this lesson, what I can do to make it better. Please let me know if
you enjoyed this class. Be sure to follow me so
you can be the first to know when I've
posted a new lesson. For even more art lessons,
tips and inspiration, check out my Youtube channel
where I post weekly content. Thank you so much for watching. We'll see you next time by now.
 Kristina (Moyor) Choy, fine artist