Transcripts
1. Introduction: Hey, there, are you
struggling with making Your Art look
more realistic? Than join me in this class
today we're going to focus on some Drawing techniques
that are really fundamental. My name is Kristina Moyor. And as your teacher,
I'm really excited to help you up your a
game, Your Art Game. I've been drawing and
painting my whole life. My grandmother was an artist. My siblings are artists and
we just loved the arts. I've always felt
safe and Art class and it's just felt
like my place. And I just can't stop grading. I love to paint and draw, so I have skills in both. And drawing mediums are so vast you can use
pencils, markers, pens. Today's class we are going
to mostly use pencils, but use whatever you have. You don't have to go buy
anything special for this class. If you consider yourself
intermediate or advanced, you probably already know
about one point perspective. So this is for the beginner. If you want to
learn how to draw, maybe you don't even
know where to start. This is a great class for you, or you've been drawing,
sketching on your own, but you don't really know any of the techniques are
fundamentals of drawing, then join me in this class. You don't need much
for materials. And we're going to have
a lot of PFK-1 learning and understanding Perspective
2. Project Overview: So today's project,
we're going to create our very own work of Art
with one point perspective. So you're going use a drawing
and then make it into a painting or color
it with coloring, pencils, markers, whatever
you wanna do with it. But the key thing for
our project today is to draw something with
one point perspective. We're going to keep it
Drawing pretty simple, but show you some
of the fundamentals that will really help you on your way to make your
Art look really fantastic.
3. Materials: One thing I love about Drawing is you don't
need much to draw. You just need something
to draw with and draw on. And sometimes that
ends up being a hand. Sometimes that's paper,
sometimes it's something else. But in today's class, I recommend using a paper
that with smooth surface, so not too textured, like
watercolors textured. So find something with
a smooth surface, a ruler, a pencil
HB is just perfect. And eraser for things. That's easy. Let's go. We talked about materials, but it's best to look
at them as well. This is really just
a simple notebook, that's a simple sketch book. Really doesn't have to be super high-quality or
anything like that. This is a lower-end one, but it's nice and smooth
and that's the key. I also have a couple of rulers. One extends longer than
the page, which I like, and at least the length of
the page or close to it. And then this one is
just a bit smaller. It'll help when we're
doing smaller shapes and smaller areas. You don't just have a big
clunky thing going on. So if you're ruler, you only have one ruler
and it's this big, you can still do the exercise. You're just going to
have a hard time with one little bit of
it potentially. So try and get one
that's close to the size like a 30 centimeter, your typical will be fine. We also have an HB pencil. Use whatever pencil you have, but HB is the most common. You can use the eraser
that already is on it. Or if you have a
kneadable eraser, I recommend using that. When we need to erase. Just as a better job. Then I have a pencil
sharpener as well.
4. Understanding Perspective: Okay, Let's talk
about perspective. First of all, what
is perspective? Perspective is just the view
from certain point of view. So how I see something is gonna be different from how
somebody else see something. So if I'm standing up in the
bleachers and at a ballgame, and I'm way, way far away
and I'm watching the game. Everybody looks tiny. But if I'm right in the game, then I'm seeing things
from a different angle. People look bigger, all
these different things. Let's take another analogy. I know everybody
learns differently. So imagine this viewpoint, this box that you're watching
me in right now as a cake. You're looking at
a cake from above. And we think about
portioning a cake. You can think
apportioning the cake, almost like how you'd
make a grid on a drawing. Now, if you imagine
how much space my, I am taking for on that cake. And if you were to cut that out, that gives you some
idea of house, how much space is within the frame and where you
would put me in the frame. Now, if I have my
hand next to me and I bring it closer to you, it looks like my
hand is growing. Now. It's taking up the whole space. But wait, did my hand just
grow and then shrink? Know with Perspective, you're seeing my hand bigger
than my face right now. But when I bring it further
away, it looks smaller. Okay, so that's similar
to Perspective, how you're seeing things
versus how they really are. And we kinda have to trick our
brain because our brain is telling us what we know
that my hand didn't grow. But when we're going
to draw something, we think, well, my hand
isn't bigger than a face. So what we try and
do is we try and no, I can't I can't draw
hand beer than a face. However, my hand is here than
it is bigger than my face. For drawing or flattening
out the image. We're making a comparison. And it's going to
help us actually create more realistic
works of Art. So with that in mind, if you're still a little unsure what Perspective
is, that's okay. Just stick with us as
we do the exercises. You're going to understand
what I'm talking about. You're going to have an
understanding of how to create things that look
further in the distance, how to bring them closer, how to make it look a correct in proportion and all of that. Let's talk about that
in today's lesson.
5. Lesson One - Setting Up Your Page: Okay, so let's get,
let's get into it. So we're gonna start with our
long ruler and try to make it somewhat straight across. Doesn't have to be perfect, but we're not gonna do a
crazy angle like this. So try and make it
flat straight across. And instead of doing it, you could do in the
middle of the page, you could upward, lower. Find it close to the
center of the page. Doesn't have to be
really, really close. But let's avoid this. And let's avoid this because we want to put shapes above and below the line we're gonna
make, We're gonna make a line. Hold the ruler in place. Drag line across. Just lightly. Press down hard. When you press down
hard on a page, it's going to indent the page and then that line
will be forever there. And if that's what you
want, that's great. But if you don't want that, then that's just something
to keep in mind. Then I'm going to
find the center. No, it doesn't have to be the
exact center in the future. But for this, for the sake
of this learning, right now, we're just going
to use the center and we're going to just
draw a little dot there. So if you're wanting to
remember these things, I recommend writing down here, This is the horizon line and
this is the vanishing point. So if you want to
put it up here, vanishing point, hopefully
I'm spelling correctly. Alright? Instead of, I mean, you can write it right there, but it might be in
the way a little bit. So this is our horizon line. So if you imagine
a horizon where the water meets the
sky kind of thing, That's a really,
really simple horizon. That type of thing. This is gives us a base of where everything above and below
is going to come together. And so this vanishing point is a really important key element for doing one-point perspective. And in fact, for
one-point perspective, you just have one
vanishing point. For two-point perspective,
you'll have to, okay? So we just have the one, all the lines converge
into that vanishing point. Okay, so that's how
you set up your page. It's very simple. And then from there we'll have, we'll start adding objects
6. Lesson One - Adding Shapes: Okay, so now we start adding our objects into the
page, onto the page here. But to practice rather than creating an actual
image right now, we're just going to add in some shapes because objects
are made of Shapes. So if we just draw a
shape, for instance, if I draw a circle right there. So above the line, draw circle
above the Horizon Line. Maybe over here,
I Draw a square. Doesn't have to be perfect. You don't have to
use your ruler for that unless you're
really wanted to. He can. Down here, Let's
draw a triangle. That's kind of a messy
triangle, but that's okay. Then down here I'll
draw a rectangle. Let's keep it simple to
start out, this is Beginner. You've never done this before. Let's keep it simple. If you have done this before, you just want a refresher, you can make your
shapes more elaborate. Do a squiggly shape or try something like a letter
or something different. From here, we're going
to see if my ruler, my smaller ruler reaches the
outer edge of all my shapes. If it does, this is easier. See how I can go like
around like this. It's simple. With this ruler. It's,
it's a little more clunky. It, it's going to
get in the way. It's going to knock things over. So I'm just going
to stick with this smaller one right now. So we've drawn our Shapes. Next thing we're gonna do, We're gonna take our ruler. We're going to hold one end
of it to the vanishing point. You might have to
readjust as you go. And we're going to
hold it as soon as it brings a round
like you're spinning it around when it touches the
outer edge of your shape. While it's in line
with the Point and the edge of the Shape, we're going to draw a line. Okay? Now, very light. It doesn't need to be. In fact light pressure. Keep the pressure light so that if we want to
erase some, we can. In fact, I tend to like to
press a little harder here, not very hard, and then
lighten it up as I go. So that's the first line. It's gonna kinda look
like an ice cream cone. We're going to branch
the other edge, so we're finding the
outer edge of the Shape, the very furthest
outer edge of it. And that's really
important so that we really make a 3D looking shape. Let's do the same
with the other parts. Now, circle doesn't really
have sides, are edges really? But as a two-dimensional shape, we can find the edge of it. This one here has a point. So we'll get right to the point, get right to the point teacher, vanishing point and
edge the Shape. See how I'm getting
right to the outer edge. Now, this corner here. If I draw this one, I'm going to be drawing
over top of the Shape. If you imagine this being
like, I don't know, a building or a cereal
box or something, you're not going to see
that back side of it. So I'm gonna skip that one. I just want the outer
points, outer edges. Coming down to the
vanishing point. Make sure you've lined up
to your vanishing point. Along with that. Now, this one here
in the middle. I'm going to add a
line for this one because we're going to be able to see this one now if
you're a little confused, don't worry, just follow along. It's this lower one. We don't want to draw a cross. The Shape is the
basic idea, kay? This is something we
don't know what it is, but it's something, right? Even if it's just a block, It's something block of cheese, then we can keep going here. So one thing to keep in
mind as you might end up smudging a little bit with
your ruler right now. I'm not too worried
about that because this is just an exercise
we're just learning. I'm not worried about
smudging too much, but in the future when
I'm actually drawing my, you know, a nice piece
of work, piece of Art. I'm not going to want
smudges all over the place. So I want to lift, can maybe lift the
ruler in place rather than sliding around like
I've been doing haphazardly. Getting the corner here
to the vanishing point. So notice this one
again, same thing. If I draw this one, it's
going right over the shapes. So I'm gonna skip
that one. If it goes over the
Shape, you skip it. My top tip there. When in doubt, if it's going
to draw over the Shape, you skipped that Line corner
to the vanishing point. So that's just as 3.1
of them's hidden. So we're going to leave
that one over here. It's gonna be similar to the
square in the outer edge. Make sure it's lined up
with a vanishing point. Draw my line, sir, with your outer edges. Okay? Now, test yourself. Which of these two
would you be Drawing? Think about it. If I go here, what's
gonna happen? Right over the shapes? So note we don't want that one. This one here. That's clean, it's not
going over the Shape. Let's Draw it. Okay, so you might already see how these shapes look like. They're coming at us. Almost like a Star
Wars affected. Right? So how do you do on that
part of the exercise? If you've made it this far,
congratulations, Great job. Let's keep going.
7. Lesson One - Shorten the Shape: Okay, So next up, what we're gonna do is make
these shapes come to an end. So you might have shapes
that go continuously, forever into the
vanishing point, but you might also
maybe it stops. Maybe like a house doesn't
go on forever and ever. Maybe it's a train,
so maybe there are spots in it that you
want to create stops too. But maybe the shape is just short, maybe
it comes to an end. So how do we do that? So what you wanna do
is, Let's start with, I think the easiest shaped
to look at is probably a square for our understanding of looking at so many
boxes and our days. So what you wanna do is
you're going to match up the line perpendicular. So not perpendicular
or parallel. So you're going to match
the line parallel, perpendicular is opposite so
that it comes in this way. We're going to go parallel
to the line of the shape. If we want it to
be a perfect box. There might be instances
where things move around, but for the most part, for the basics, you're
going to move it like this. It has to match this line
and then slide inward. Okay? So you decide how far
down you want to go. You can go all the
way down here. You can make it short here. You can do multiple lines. Let's just break
it up right here, so match the line, move it over. It's gonna be a bit
easier if you keep it a bit short for now. So draw a line right there. And then we're going to have
to draw the baseline the same way we're copying
now this line here, because that's where it shows
the extension of the shape. That's the edge of the
shape right there. So we're going to
follow this line, just bring it straight down until it meets up with this
point here that we created. Draw a line across. And now you can already
see a 3D shape. And it looks like it's
floating up in the sky. We can't see the top. We can't see this side. You can see the bottom, left side and the front. Can you imagine that shape? If you're still
struggling to see the shape, take your eraser. Crystal too much. You don't want erase the actual shape that
we just created. Let me fix that. No problem. Okay. So now you can
see the floating shape. And we could create more
shapes beyond that shape. For now, let's go onto the next one and
do the same thing. Let's go on to this one because this one here is very similar, pretty much the
same as a squared. So match up the line. And now just drag it towards the vanishing
point without twisting. You don't want to twist.
Keep it the same level. Maybe this time we're
gonna make it longer. Okay? So we're going to
want to match up this line here with this at the same
endpoint as that one. So we turn the ruler
to match it up. We have a shape.
Behold, it looks like, I don't know what do you
think it looks like? They gave him some lumber. Then if we want to
detach the shape, simply erase the lines. And that's again why I
mentioned not to draw your lines too heavy and put too much
pressure on your lines. Beautiful. Now it's a real thing. Alright, let's do this one. This one's going to
maybe look like a Tobler on my mind on chocolate.
What can I say? This one, we just have
the one side showing. So based on the fact that we don't have anything coming
on this side or this side. So if the front and
then this end here. So I'm going to hold it along the line. That's my toolbar. I'm trying to think of something else
that's in that shape. There are some rulers that
kinda look like that. Perfect. Okay, So now you can see how we can make a shape look like it's real and that it's
moving into the distance. Now, what about the circle? How do we match up this edge? Any ideas? Well, we need
to copy this same edge. Otherwise, if I just draw a
straight line, I'll show you. That does not look
like a circle. So don't do that. What we wanna do is
copy this shape. So the round shapes, the oblong shapes, all those kinds of
shapes are going to be a little more tricky. But we're just going to mimic
this circle here, okay? So I have to try to
mimic that shape further down the way now you
can keep it nice and close. Or if you want to
challenge yourself, maybe make it further and we'll just try and
make it look the same. Might not be exact. We try. Okay. If you make it round, see how
much of a difference that made as opposed to that
line I'm going to cross. So the closer to this kind of
following that same shape, Let's those same
angles of the curve. You're going to have
more success in making it look like
a real object. Maybe a real cylinder, rod, something right there. Maybe it's my pencil
pencil thing there. So that's how we create the shapes using this method,
the one-point perspective
8. Lesson Two - Through the Horizon Line pt 1: Okay, let's do let's
do this again. Go to a new page. On this page, I want you to
again draw your horizon line. Maybe this time, try it a
bit higher or a bit lower. Do something a bit different. So let's, I'm gonna
do mine a bit lower. Just going to go across nice and light doesn't
have to be heavy. Again, you can keep
it in the center or try it off to the side. Maybe try it over here
just a little bit, even just a little bit off to
the side. See what happens. Now this time, what I'm
gonna do is I'm going to draw a shape that goes over top, that goes overlaps
from bottom to top. Okay, So before we just did
a shape above or below, now we're gonna go
one that passes right through the horizon line. So do you remember
what this is called? Vanishing point and this
here, the horizon line. So maybe you want to
try and use a ruler. Try, we will not even
try. We will do it. Okay? So I'm going to draw something
that passes through. Okay. Let's maybe make it
further over this way. Should we make it closer? The closer you are to
the vanishing point, it's going to change the
way that the angles look. So if I'm closer, it's going to be a higher angle. Then when I come out further, if you imagine the
top of the shape. So it's just kinda
more drastic kind of once you get
closer to the center. But let's do, I'll do
one object further away. And then I'll do one closer. Maybe a couple. Play around. Just using a ruler
because I was just making some not as great shapes. So I just wanted to use a
ruler if you don't have to. Basically just makes sure
your shape goes through. Now, we don't want this horizon line passing
through our shape. So it was another reason.
Every time you draw a line, make sure it's nice
and light just in case you need to erase it. Okay, and then let's
draw some more shapes. Let's draw a few. So in this page maybe
we'll just draw a couple. Maybe three, a couple of you. Let's decide. Come on. You choose. Over here, maybe we'll do,
let's do a search. Should we do a circle over top? Maybe something with
a dynamic shapes. So maybe it's not
quite a square. Not quite as circle. Will go rounded top. Okay, perfect. And we need to erase
this part here.
9. Lesson Two - Through the Horizon Line pt 2: Okay, so now let's
see for shape, kind of can almost
reach but not quite. But that's okay because I
can see that this line would go over top of the shape
anyways, and I don't want that. So I'm gonna go to this line and this ruler is going to work just fine for me. Say moves over here. Now remember it's fine. The outer edge, if it's rounded, still find the first part that
meets up with your ruler. Make sure you don't go. Don't extend it either. Now, this horizon
lines in my way again. Now we've erased most
of the horizon line, making it almost useless. We could have just drawn are
vanishing point pretty much. So. Now we're going to decide,
well, we could do here. I'm going to show you
something. So let's say this is actually a building. So remember we're matching up
this line, bringing it out. Now, imagine this as a row of buildings that are
all very box-like. Maybe it's like cereal boxes. And from here, I'm going to, instead of having
the same amount of space as we go further back, these lines will get
closer together. Imagine a train track. And train tracks, they look closer together as you
look in the distance. This is a similar setting, so I don't want them to be
as wide as we go along. I want to maintain that
parallel line as we go. Making it smaller,
smaller, smaller. Making sure they do get smaller. Right? Just keep going on forever
into the distance. That's what that looks like. That's what we can achieve. And so it's interesting
as we pass through, this shape, passes through both the top and bottom
of the horizon line. We're going up and down. We only see 12 sides were
versus the other page. We could see three sides of the shape when we
headed above or below. So this one back here, let's just flip back
here for a second. Imagine this shape. This is like a
flying box, right? So I'm standing here
and I see a flying box. I can see below the
side and the front. What instances can you see that? Only when it's above you. So the Verizon one kind
of shows things above. And the fact that it's
higher on our page makes it easy to
remember. This one here. It looks like something
I can step on. All right. This one looks like it's
going to fall on my head. This one here I can step
on, it's below. Okay. So that will really help
you to see as well. Okay. Let's go back to our other page. Finish this shape and see
if you can make the line. So I want you to try it. Pause, pause the video, make your line, and then watch how I do it and see
if you did it correctly. Okay. Let's do it. Let's see if you got it correct. So I'm going to draw a line
that matches this right here. So it's mostly straight and then just curves right at the end. So depending on how
far I want to go here, just curves right at the end. Did you see that? I can't see the top and
I can't see the bottom. This looks almost like a little bus station or something, right? Uh, building a loaf
of bread, maybe one. Does it look like to you? Okay, great. Now we've got a
couple of things down with our one-point perspective. We've got how to draw
shapes through it. How to draw shapes
above and below. Now, how do we incorporate
this into our art? What about a building? With a building
isn't just a box, it has a door and windows
and all kinds of things. So how do we incorporate this, these methods that we've
learned into our projects, into our art will
learn that next
10. Lesson Two - Windows and Doors pt 1: Okay, so how do we add details? How do we add doors,
all these things? So if you have a reference image that is
going to be helpful if you're just going off your memory or what you think it looks like, you might stumble
into some problems but just play along with me. I don't know. Is this
an apartment building like what does the scale
is is three stories, is it two stories? I kinda feel like it's gonna
be a two-story building. So what I wanna do is
anytime I'm drawing a line that is supposed to
be straight up and down, match it with this line here. So if I want a door right here, I'm going to match the line. We have to figure out
how tall my door is. If this is two stories, it's probably going to be let's make it
just a bit taller. It's gonna be a little
bit Bushi there. Then again, the same type
of line further down. Now the question is, where do these lines stop? But have no fear? The finished vanishing
line is here. It will tell us where that vanishing line
is going to tell us any of the lines that are from the top and the bottom
of the shape moving towards. So these ones here are
just straight up and down. They're not affected by the
vanishing point the same way. So what I'm gonna do
is I'm gonna take my vanishing point
on one end and find the top of the
outside of this edge, not the outside, but it's the edge of the door,
the outside of the door. And I'm going to
just draw a line. And instead of drawing
all the way down here. Now however, if I want to
draw doors on all of these, I could, I could draw a line going across
the whole thing. Or if you want to be
an extra smarty pants, Let's say these are all
the same kind of place. Draw a line in the center, but leave some
space, leave a gap. Just draw one simple
line, dotted line. And all of the doors will be in the right spot at
the top of the door. So that's to make your
workflow even faster. Now what you do here is you're going to have to figure
out where the line goes and make sure
we follow that edge. Draw your line. I don't need to draw up
past this line either. This top is quite close
to the vanishing point. When you're close to
the vanishing point, you're almost creating
the horizon line. When you're close to
that horizon line. When you're further away, you can see this is more
of a dramatic angle. Whereas you might
look at this and say though that's not
a shape of a door. But from this perspective it is. So you just got to
trust the process. This is one of those
things your mind is going to fight you
a little bit with. Like a door is not this shape. But it's this perspective
that makes it that way. And as you add elements, you're going to see how
that actually works. Okay? So already you
can see, oh yeah, that does actually look
like doors and all of that. Now, what if we want to
do a door on this side? What if there's a side door? Or maybe it's a window? Maybe we do a window or a door here seems
a little strange. So let's draw a window and
let's draw it up here. Maybe we have a
couple of windows. We could do a big window here and a window
here. Let's do it. Why not? What I'm gonna do
is I'm following that edge line.
Well, you know what? Let's, let's get
really high-tech here and find the center
so that we're not just going crazy here. I'm just marking out
a centimeter and from each side just
in equal amount from sides so that my window
doesn't look off centered. Just a simple, nothing special in terms
of math or anything. Okay, so now I'm
going to draw a line extending the whole building. I feel like that didn't
start at the right point. I guess it did. See you
got to trust the process. Just draw lightly. And again on the other
side, draw slightly. Good. Now I'm going to draw
a line at the top. And I want to match
it to this edge here. Just going to erase
this little bit. I always erase things that if they went past the
edge just a bit or whatnot, I just wanted to look neat. Otherwise, it can throw
off the brain a little bit
11. Lesson Two - Windows and Doors pt 2: So depending if we want our whole window to
go like this or not, maybe we want it to
come up off the ground. Maybe it's not that far down. Okay, and then we
can erase this or maybe that's, you know, a feature of the building
structure, the architecture. Okay. And then so when
it's flat like this, are you noticing something? I didn't go into
my vanishing point because this is a flat
image that's facing us. It's not on the sides, right? This is the front. This part here. We're gonna
keep our lines square. So when I go into draw
any lines for the window, I'm mimicking the top
and the bottom, right. Okay, so and then I can add in extra window elements. Right? I want to better to measure, otherwise it looks
a little messy. But if you measure it equally, you'd space them out equally. And that's going to
really bother me. So let's erase that. Let's just make it like
a big window like that. Okay? Or are you
actually measure it to make sure the lines
in the center and we just do measure it
on both sides if you want. I didn't hold it quite straight. There we go. That's
a bit better, right? What about the Windows
on this edge here? Okay, So the ones here, nice and easy flat. No problem. Over here. If I want to
go wider than the door, maybe or smaller than the door, I'm going to use the Doors,
this bit of a guide there. And I'm going to draw a line, just make it big enough that it will extend the
whole span there. I'm gonna go again
on the other side, this is my window that's
bigger than the door. Okay? Alright. Now I'm going to take my vanishing point because
this is the side where I got angles to match this angle here we don't just draw a
straight line like this. It has to meet up with
the vanishing point. So grab my vanishing
point, get to align. It doesn't have to
be at the very tip. It's wherever you
want it to start. And then again, if
you want to keep the windows going matching, you're doing multiple
elements at the same line. If it's a repeated pattern
of that kind of thing, then that's when you write draw your lines
right at that point. We're still above
the horizon line. So it's going to be a line
coming down this way. Lineup where I want to put it. There's no particular spot. I just don't want it
below the door because it doesn't make sense to
have a window do that. Okay. I'm ready. Like a line. Again. You could just do a continuous line
and then erase a bunch. But why do that? If you can just Draw it without
having to erase a bunch. And then you'd have to go in and draw these lines,
not these ones. Remember, they match up
with with these lines. These vertical lines
all match up parallel. Just doing it quickly. Okay? And then this one
here, we want to erase those lines that kinda
make it look like an H. Again, you do the same thing
if you want a line going through the middle
of the Windows, Draw a line going through, matching up with
our Horizon Line. And then this line,
if you want to draw that line that's
going to match up probably the
center of the door. To make the most sense. Go along, holding it vertically in line with
the other vertical lines. So now we have this building
going way into the Horizon. So now you can make, now you know how you
can do this, right? You can, you can
totally do this. It can get more complicated
if you're wanting to do all the trim and everything. But this is a
really great start, and buildings can
be very complex. So let's try something
a little bit simpler as we work towards
creating a project.
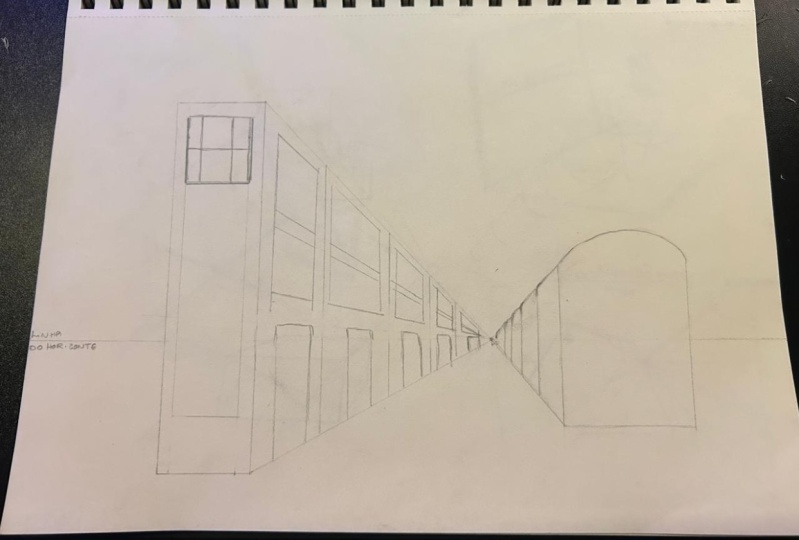
12. Lesson Three - Never-ending Road pt 1: Okay, I have a new page. What I want you to do is create your own horizon line with it. Again, let's try a little
bit higher this time. So this time bring
your horizon line up. Draw very lightly. Draw a point right in the center for what
I want to show you. Okay? So this is gonna,
we're gonna do a path. Alright? So paths are
really interesting. Paths. We normally look at a
path and think, okay, a path is the same
shape and shape, same width all the way through. But as we go way, way, way into the distance,
it goes really small. Okay? So the path, it
depends how close you are to the path as to how strong of an
angle it's gonna be. I'm not gonna do
crazy strong angle. I'm going to do. I want to measure it out though, so it's not too. So that's the same
on both sides. So it looks I'm right
in the center of it. Okay, So if I just hold my
ruler straight up and down, if you have a ruler
that has the tip on it that shows you
where to hold it. You can even use it flat like
that. Just hold it flat. Okay. I'm gonna make a little mark now at the bottom so I
know where my center is. Okay, then I'm going to
maybe do how wide of a path? Maybe six. Let's go 6 cm and centimeters. Or you can make yours
bigger depending on the size of your paper. And then I'm going to draw
my vanishing point to my vanishing point, a line here. Let me see my big ruler still just because it's a bit longer. Look very symmetrical. So now we have our pathway. So you could make this a track. So maybe there's a train track or maybe it's just
a walking path. And if it's a walking path
or even if it's train track. Well, I don't think there would be power lines right next to it, but there potentially could be. So we're going to draw some, maybe some posts
or something that go along the edge of this path. Okay, So what I wanna do is
before I draw out any posts, I'm going to draw out
a line and maybe we'll measure it out so it's
the same on both sides. Let's use the same
type of measurement. And not quite 6 cm, maybe 4 cm out. Same on this side, 4 cm out. So this is really
great if you have something that is created
really symmetrical, make note of these markings
and then you can make sure everything looks proper. If you want that
symmetrical look. So draw my horizon
line out to it. Draw my horizon line out to it. So if I'm drawing, let's say power lines, power lines can go pretty tall. So if I'm on this path are
probably gonna be pretty tall. So in that case, maybe we want to mark out some, some converging lines
up here as well. So what I'm gonna
do is let's go up. That's about our center point. And then we want it up here, 1070 years over here. Then I'm going to create
these converging lines. Going like so. Appear like so. Okay?
13. Lesson Three - Never-ending Road pt 2: Now what I have is my space for putting in anything up and down like our buildings that we had in the previous lesson. Any lines I want to
create Posts or whatever, I now have where my baseline
is and where my top line is. And you can get really
mathematical about it if you're wanting to
space things out exactly. Maybe you can use your image that you're
working off of if you have one in the future
that you're working from to find out where
things should be. But this is just
for the purposes of practicing and kind of
understanding Perspective. First thing Let's Draw is a line that goes
right from top to bottom on our outer edge. Okay? And we're gonna do the same
thing on the other side. Top to bottom edge. Draw a line, okay? Then we're going to keep
drawing lines, make, Let's make some points along
the way based on markings. So I'm going to want to
make sure everything is happening at the same
time when both sides. So what we could do is kinda
come to this Horizon Line, make note of how close
things are and then expanded as we go or vice versa. Maybe you start from the
outside and then go in, right? So we have we have 10.10. So we're not just gonna do
one at each centimeter mark. Maybe we start at 3 cm.
So down here be 17. And then maybe we'd
go down to 2 cm. So at the 515. And then maybe we go down. If we're minusing that quickly, we might not have
much space left. Butt 32 and then maybe one. And so We're down to
here very quickly, or maybe we just go a
little bit bigger than 11 and then just a bit bigger. And then maybe one. Then it's closing, closing in on itself and
it's getting really close. So let's see how that
looks by creating these lines that go all
the way up and down. Now, we're going to
stop the line as it hits where this is our
pathway Line, remember? And this is our line for where the Posts or whatever you're putting in
Powerlines, etcetera. So the key thing is trying
to hold this perpendicular. Now I've used it
correctly perpendicular but also parallel to this line, so perpendicular to
the Horizon Line. So I don't have an angle, a strange angle happening. Okay. Starting here and
stopping there. Okay. We keep going. Is there are objects and so I'm not worried about
making them too light. If you do mess up and you have
one on a bit of an angle, if it's something like a post that could be on a funny angle, then that's why huge deal to me. And maybe they stop there
depending on what you what it is your drawing or maybe
it's just so you know, or maybe we should
have space them out more to begin with, right? We're just gonna do the same
thing on the other side. So finish that up
and then let's meet together and see if
you did it correctly.
14. Lesson Three - Powerlines or Posts: Okay. Does yours look somewhat like this or did you do even better? Maybe you space
them out a little bit better so they
don't get so tight. Well at the end, they could be getting so
Titan maybe they'll get lighter to like you just can't even see them.
They're so light. Maybe it almost looks like it's a full shape rather
than individual lines. Like maybe it just
looks really close together so much so that
you can just shade it in. Like I just did smudge it a bit. And then because depending on what kind of
shape you're making, you may or may not need to erase this horizon
line because these are kind of more posts
than anything else. But we aren't going
to want to do is erase this line here. If we're not adding
any more detail. And then this top one here, unless it's a power
line that we need, that line to go across. Me, erase that there. It'll help to give it more
of that realistic look as well as you can
see when you look on this side versus that side, the posts, unless they're
really, really skinny, you're going to want to
thicken this one and then make them thinner
as you go as well. So that's one way to create a piece using
one-point perspective.
15. The Project - Let's Draw!: Now that we have a
basic understanding of the different shapes and the vanishing point
and horizon line. We're gonna do a
project with our name. So I'm gonna get a new page and I'm using a new sketch book only because I don't really have any pages left
going on in there. Now, do you remember let me bring this one
back for a second. This one here, the horizon
line didn't really affect or influence or shapes. It gives us an idea of space, but it didn't really have any
influence over our shapes. That's why I'm not
going to bother with the horizon line
in this project. What I'm gonna do is draw a.in the middle of my page is going to be
our vanishing point. You can create a horizon line if you feel more comfortable, but you don't really have to. If, if if you feel like it divides the page nicely for you, go for it, otherwise, you don't need to. But if you feel like that's going to help you
out in some way, I'll just do it.
Little quiet line. I'm going to call it
quiet just because of its very whispering,
just barely there. So what I want, what we're
gonna do is we're going to create our first and last name. We're going to put bold letters. And by using bold letters, we're gonna be able to
practice creating 3D shapes. I can either have
our shape going continuously into the distance or we can put a stop on them, like we did with these. We put a stop on it
to end the shape or you can keep it going
right into the distance. Now this is going to be a
bit tricky sometimes when we have certain letters. So you don't have to use a
ruler to write your name, but if you want to, you can. So if you feel more
comfortable and depending on how my I have
a fairly long firstName. So if you want to
shorten your name, that is cool to or
choose your own phrase. It doesn't have to be your
name so you can choose a cool phrase are saying
that you want to decide on. But basically I want
you to practice a word on the top and
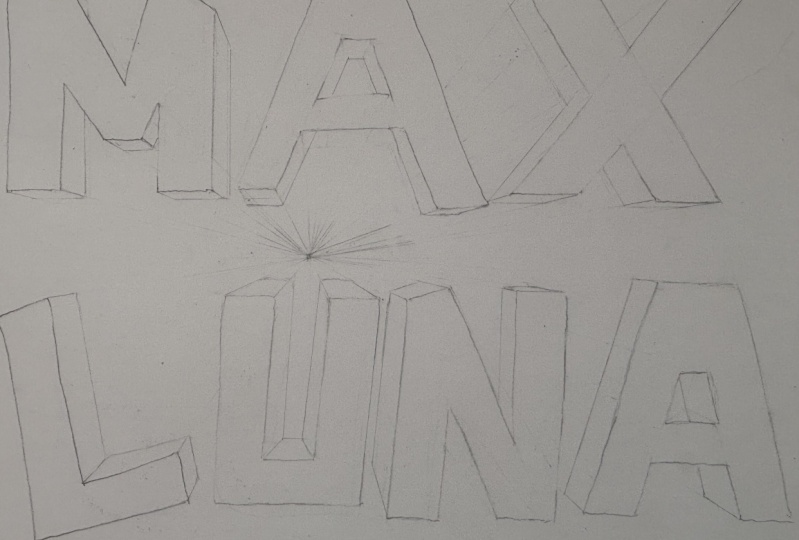
a word on the bottom. Okay. So my name is fairly long, so I'm going to
shorten it by going with and I do want
some to be over here. So don't just put them
right in the center part. Let's really spread
it across the page. Spread it across so that
we use up our space here, even if that means
you need to make your letters kinda wider. So I'm gonna do kind of curve that out a little
more than I wanted to. That's okay. You can either
erase it or fix it. I guess we'll make it
kinda fun like that. Now you can do curves and
everything that doesn't have to be straight lines
for everything. Just they do need to
be block letters. We're going to put
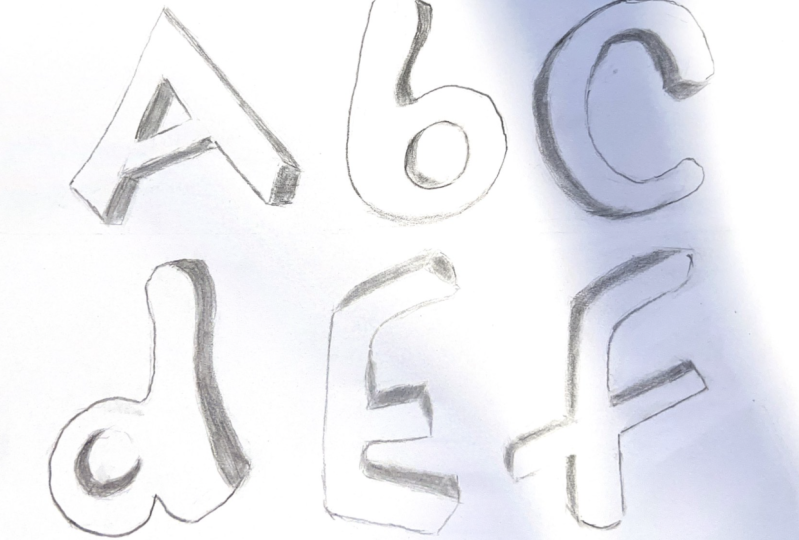
everything into action and to practice. So I'm going camo because of my business initials or chemo. And then I'll put
art at the bottom because that's now you could do block
letters for the a. Let's see how the 0
we're going to have to practice with some rounds. So it's nice to have
a mix in there. I should have made
that are like that. K would have been cool. Maybe make the tea
kind of that rounded. Okay, so once you've
put on the letters, next up is bringing all
the edges to the center. So I am going to show
you how I do that in case you're still unsure. Or you get two parts
where you feel like you need extra help. And especially we
have the shapes right above and below which
we haven't really done. So keep it close
attention to that. And let's get started on that.
16. The Project - Upper Letters: Okay, Let's see if my
small ruler can reach. See if it has reach. I believe it does. Okay, great. If, if, if I need to I can
grab the longer ruler. So I'm see how I'm starting. I could start my
Horizon Line if this helps you to have
Horizon Line Go for it. I put it in there in
part so I knew where my Shapes we're
starting and finishing, where I didn't want my
Letters to be above. But it really didn't matter if it if it ended
up being that way. Okay, Let's Draw a line. Now. If you don't want it to go
all the way to the two here, then maybe you
don't want to draw all your lines all the way. I'm going to leave
that up to you. But right here, see how that's this one right
here is the next one. It falls into place. And then that one, we don't draw over any Shapes. I'm going to stop right there. So I don't draw
over that tail of the K to get the tip here. So all of your edges, anything that shows above. Let's see if this one needs it. And I want to be
mindful of the M. So I'm not going
to draw over that. And then up here, so when I look at this one
here, it's going over top. So we're not going
to draw that one. This one here can go up to their don't need to draw it past that because this
will be in the way. Again, this one will draw over top, so we'll skip that one. This one here, just
make sure you keep lining it up to that
vanishing point. When you move the ruler, sometimes it moves
out of the way. Soon as it hits Shape. We do that. Okay, now, because
the Shape is here, I, I'm gonna be like right
now it looks a bit weird. But there, once we
do the lines for this Shape, it'll
look just fine. I think I'm going
to keep mind going right to the distance. And if you're really Beginner, that might be the
easiest way for a complicated shape like this. Maybe if you get this part right and feel comfortable,
maybe you could go. Your next step could be to block them out and make
the Shape come to an end. So maybe we'll add
that in as a bonus. I'll show you how I do mind. Let's see if we
need to draw those. So not don't need to draw that. Let's see if this one no. See if this one needs it. Yep. No Shapes and the way here. No, I can't draw over
top of the Shape. Okay. Let's go here. Make sure I'm lining up my
mom for alms upside down now. See, see, I didn't quite get
it right to the edge there. So I want to make sure it
goes right to my edge. Otherwise it makes it look
like it's not an actual shape. That's 3D. It'll kind of look skewed. It looks like my angle
of the M that I drew is exactly pretty much
exactly the line there. So it feels weird to do it, but just trust the
trust the process. Okay. Let's go right to the edge. Stop when you hit a shape. For this round shape, I'm gonna go on
both edges first. See I've got this little, I made a little
dentin it to make it fancy and to give me opportunity to do
something a little different. Two. Okay, and then that one
won't make any appearance. Maybe the tiniest bit in
there, no, Not really. Okay. So we can just leave
that one as is, unless we're cutting off some of the Shape and that's
gonna be a bonus. Okay, let's do the
lower section next.
17. The Project - Lower Letters: Alright, How are you doing
so far? Are you getting it? I hope so. If you have any struggles,
you can contact me, maybe post your progress as a project and I can
give you some pointers. So I'm happy to do that
if you post your project, I can help you out. If you make sure you make a note in there that
you want some feedback. Not going to draw over the shape once it's there, stopped. Can't draw there. Draw there. Once you get the hang of it, you won't even need
to kind of check. You'll just know which
ones that you need to do. But just for the sake of it, this being a beginner class, I just want to make
sure that you know, you get that practice in, okay. I'm not going to
draw over the shape. The r is going to take care
of this space here, okay? But if you have this
corner inside the a, I want to indicate that angle. And our vanishing point
tells us where it goes. It's lovely. And I can don't need to draw over that
and be over the shape. Draw over that. That'll be over the
shape. But that one's not the shape itself,
that's inside, right? That's the background
kind of thing. Alright, let's get
this are underway. Line like so. See how I
didn't need to draw that line all the way up there because this one is now a
shape in the way. The outside here at the top. Let's see if any of the
other shapes need it. Does this one needed? Nope. How about this one? Nope. How about this one? Nope. This one? Maybe maybe a little bit. Yeah. The first little bit. Yes. The first little bit, Yes. Now that looks really
strange, doesn't it? But that's just
the angle and you just got to trust the process. Our brains think
that looks wrong, but it's really not. It's meant to be that way. Alright, Now the side here, the T, This one I can
draw up to that shape. And then I stop. So in here can't go
over the shapes. So I'm gonna skip that one. A lot of angles on a t. So let's see if we need
to draw this on this on almost in line with it. It's basically that corner and that corner or the
same angle towards the vanishing point right here. That one won't be visible. Here. That one won't be visible. Nope. Nope. That's it for
that which feels weird, but that's the way it goes. So how did you do
with this section? So if you, you can stop here and post your
project from here, or if you want to
challenge yourself and do the bonus project,
you can do that. You can also now
take time to color. So maybe you can do bold
colors on the front. And then kind of fading
away into the distance. Getting lighter and just less intense as you
go into the distance. Or you can just do black
and white shading, maybe create a light source
is where's the light? And then think of that and
create shading throughout. So you can use that as
an exercise for shading. Do what you wanna
do with practice. Maybe you want to keep it as
this and make some notes to the side about what you'd
do differently next time, think about all those
things that we can really helpful for your practice. We'll do a bonus in this next video if you
want to join us
18. Bonus pt 1: Okay, We're ready
to do this bonus. Now I am going to Shorten to
make it a little bit easier. We're not going to make
the blocks so long. I'm not gonna go away, far
away because I wanna be able to match my lines. And I want it to be
able to cut it off. And certain points, if
I go way down here, it's not going to cut off
the Shape Up here, right? It has to be the same distance away and it's gonna be hard
to tell where that is. And I just want to
be able to find it. So I'm going to try and mimic
now you can use a ruler if it's going to help
you mimic the angle. Bit wider than that. And I Draw a line. And I want to use that felt
the same distance. If I can get that same
distance towards drew that line down here. Now I have this point of
reference to show me where. To end it here. You can already see the
shape of a real bold like lifelike 3D K
coming to life here. So this is a bit trickier to figure out where now
you could kind of measure out how far the shadow goes out and then kinda make
note of that or eyeball. It. Just makes sure we
follow that same angle. Okay, now that's going to tell me where to start this one. This one's a curve. So we've gotta
keep that in mind. We've got to follow
this same curve and it's a bit
tricky. We can do it. Okay, It's right there. So run, we're going
to end about here. Now because it curves in. You might actually not see
it until just about here. Alright, so some of these
can be a bit tricky and then you can just
have you ever eraser, fix it up where things
get a little hairy. Just want to make sure
those do match up. Okay? Now we've got to, to finish this
bottom piece there. So now we can erase the lines, the continued lines, without
erasing any verse Shapes. Hopefully, that will
give us a block letter. Of course, you'll be using
your own choice of letters, so things are a bit different. Hopefully through this example, you'll be able to create yours. With this level of guidance. Try to only erase, make sure you only erase the
lines that are For the K. We don't want to raise
any M lines yet. Okay, check that
out. How did you do? Very cool, right? So you can use this to shade and have a lot of Fun with that. Okay, next up is the M. So
I'm going to want to try and mimic this same
level, same distance. Okay? Then this angle is really tight. Okay? And then this angle here kind of curves
because I didn't draw it. Drew it with a head
nod with a ruler. So you can just kind of
eyeball it or he's ruler. And then erase the
unnecessary lines. The lines that continue along. We don't need anymore. Okay. So now with the oh, I can raise that. So see how you could have
in the beginning just drawn a short line and not all the
way. You just connect them. So continuing on with about the same same length of Shape approximately. See how I'm just following. This isn't going to cut off. We don't see the whole
inner part of the Shape. Now we erase unneeded
lines, unnecessary lines. And from there you can
treat it potentially. Do something FUN with it. Alright, next up we'll
do the bottom ART
19. Bonus pt 2: Alright, let's do the
same on the bottom here. Start or here. Let's do this is almost
a straight line. I didn't quite create
a straight line, but that's gonna
be a bit easier. Now. That's about
the same distance. I'm actually not going to
draw anything out in there, but I could've if I
made it a bit smaller. So it gets almost there. We could kind of cut it off
if we want to just do that. And then here, make sure we
follow the correct line. I almost didn't there. Let's erase the lines
that we don't need. There's nothing in there
that I need to raise. Ok. There. And along here
are and Up here. Yes, There we go. All right, same with
this, are here. Following this line here. So I'm just following
the matching line. And then we erase. Just give it about the same
distance from each section. Now, Last one, Here we go. We erase. And you can even erase the
vanishing point if you want. The vanishing point doesn't
have to be actually visible in a piece for us to be able to understand that there
is a vanishing point. In fact, if you find something, an image where there
are converging lines, feed good exercise
to take that image. Use your ruler. Draw lines that go across the page and find where
the vanishing point is. You've can actually create
your vanishing point. Now, if you're doing this class, maybe with a friend or
sibling or somebody, or parent or child, then you could test
each other's out. You could erase the
vanishing point. And if you can't
really erase it to see if they can find
your vanishing point. Maybe your vanishing point
isn't, isn't in the center. Maybe you're testing
them out and you haven't one over here or one over here. And then you make
sure you really erase it or your colored over
it so they can't see it. And then test each
other out to see where the vanishing
point really is. This is just like the
sketch right from here. You can then make a work
of Art by coloring it, by adding some FUN doodle
Art to it or something. Maybe it's symbolizes the
words that you've created. Like for me, maybe I would start implementing things that
I like to implement in my Art and doing some FUN designs in that
kind of thing to make a piece that really speaks to me that I want
to put up on the wall. Or maybe this is
just an exercise that you just keep
in your sketchbook. And you can reference it
later when you need to remind yourself how to use one-point
perspective in your work
20. One Last Thing: Congratulations, you did it. Well done. You've
completed this class. Thank you so much
for joining me. I hope you enjoyed the class. I hope you'll learn something
and you're able to complete the project and understand
the concepts. How did you do? And how did I do? I want love to hear some feedback from you
by completing a review, you're going to
tell me how I did, what I can do to improve so that next time I can make
it damage better. Stay tuned because I have
some more plants for some Drawing Fundamentals,
more painting classes. So follow me if that's
your interests. You can also check what
I'm doing day to day on my social media platforms,
instagram, Facebook, TikTok. See what I'm dreaming
up in the studio. Alright, thanks for joining me. We will see you next
class. Bye. Now
 Kristina (Moyor) Choy, fine artist