Transcripts
1. Drawing cats: Drawing cats is so much fun. Combining drawing cats, simple shapes from
Procreate brushes and flowers is even better. Hi. I'm Eva and I'm a full time illustrator
based in Central Europe. I will guide you through
every step of the process. Even if you don't have any experience with
Procreate or drawing, try to have fun during the
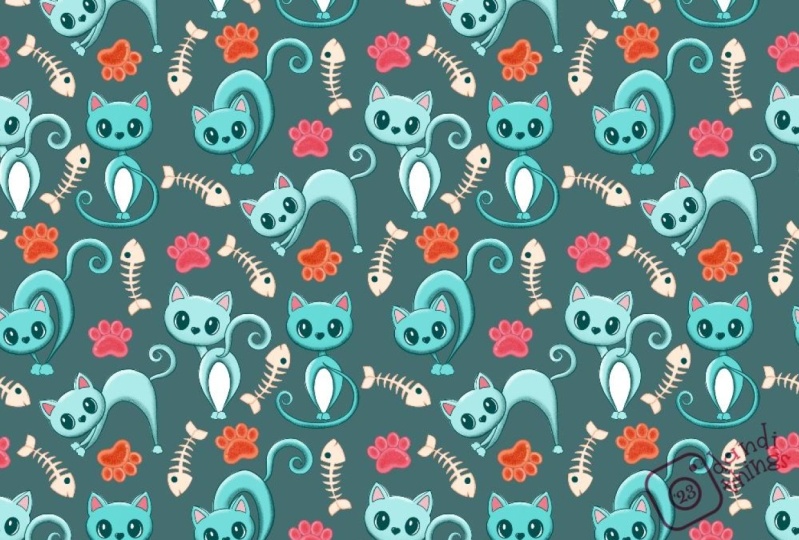
process so you can end up with this lovely colorful
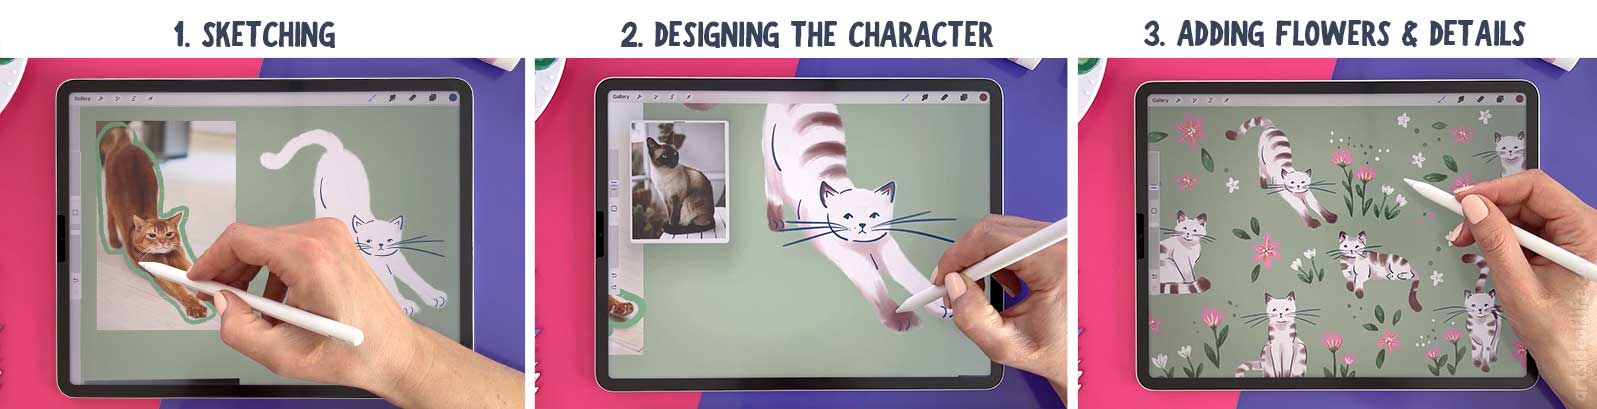
illustration full of cute cats and flowers. During this class, we will start off by looking at references. Then we will start
creating silhouettes using simple stylized shapes. Then we will add details and
colors before putting it all together in one
illustration with lots of flowers as a
lovely decoration. I hope when you watch
and follow this class, you'll be super happy about your illustration
and you will be excited to share it with others. When you are sharing
it on Instagram, please make sure that
you tag me in the image, not only in the description, because that way I can see your illustration and maybe you will see it in one
of the next videos, like these amazing
illustrations made by wonderful creative people
who watch my classes. If you don't know
yet, you can find even more drawing tutorials and classes there at Procreate
and other tutorials. I have more than
30 classes there. There is a variety
from beginner level to more advanced levels and you can also find
different topics. Without further ado, let's start and see you in the class.
2. Canvas and setup: For this class, we
will be using Canvas, which is a little bit bigger
than in the previous class, where we use also
more square ratio. For this class, I'll be
using Canvas with width 4,500 pixels and
height 3,000 pixels. The DPI of this Canvas is 300. In case I want to print it
out or don't want to use it, maybe just on the screen, it's better to have bigger
DPI resolution than 72 or 75, which is great for the screen. This will be 300 DPI as I said. This will give me
maximum layers of 73, which should be plenty for
this exercise or this, we can call it a sketchbook spreadsheet and here we
can also name the canvas. Let's call it something, which is not unlike [LAUGHTER] canvas and if you don't
see the keyboard, it's probably hiding down here. You can click on that show
keyboard and here we can just call it maybe Cats or
Cats Sketchbook Spread. Great, and you can check also the color profile here
because sometimes predefined, not sketchbook spread profile, but predefined color
profile is Display P3. But in this case, I will select sRGB, this first option,
which is great for screen we'll keep
it to RGB profile. Then you can also check if
the time-lapse settings are set to 1080p
and good-quality. I think this is quite
good enough for time-lapse illustrations
and Canvas properties. You don't want to have this activated and the
background color is white. If we're happy with
all of these settings, we can click "Create" and we are in the new
Canvas, which is awesome. Now, let me show you how you can import your reference
images into Canvas.
3. References: Now when we are
in the new Canvas which we will use for
sketching, as you can see, it's more landscape ratio so I can fit more cat
illustrations in this one. Now let me show you what are your options when
using the references. One of the options which
I use quite often is here hidden in the settings and then you would
select Canvas, and here you can enable a reference which will
automatically go to the Canvas. But as our canvas is wide, there is nothing there, but then what you
can do is importing an image and then you can
click on "Import Image". Then from the gallery, you can select one of
the images and it will automatically appear in this window with
reference images. Then you can drag it
around by dragging it by this small line here on the top. You can also resize the image
within the reference by using your fingers and pinching
like bigger and smaller. You can also resize the
window by dragging by one of the corners and sometimes this
can be really fiddly, but you just have
to get hang of it. This is the smallest window
that you can have here. You can of course, place it wherever you want. If you are maybe lefty, you can put it here on the right side or put
it here on the left, and then you can also
resize it while you draw, maybe if you want to
use the reference of the cat face so you can
just zoom in better. Maybe you want to
see the details, maybe you want to see the
pause, but as you can see, sometimes you are by accident
resizing the whole window, so you just have to try this out and see what
works best for you. This is one of the
references here, but in this case, I will be importing
the reference image directly on the Canvas
so I can sketch on top of it and show you what I'm observing
in the references because if you take a brush and if you want to sketch on
top of these reference, as you can see, it doesn't work. Let me close this,
and if you don't see actually the navigation or the details on these
reference window, you can just tap on it and these basically options
will appear again, and by clicking on this
X or closing the window, I'm sure you saw this type [LAUGHTER] of
icon already before, just click on that, and the reference
will disappear. If you go again to the same wrench icon
Canvas and reference, it will remember your last reference
image, which is great. Let me close this again and now I will show you how you can import the image
directly on the Canvas. Go into the Wrench
icon, click on it, and now you can add
the reference image, so go to the first option here, click on "Add", and then you can insert photo. Here, I'm just selecting
an image from my gallery. Click on it and wait until it's imported into your Canvas. If you want to resize it and
keep the same proportions, make sure you have uniform selected and then
you can drag by one of these blue dots
in the corners to resize your image
within the Canvas. You can also drag it to
a spot where it will be not obscuring your
view when sketching, so if you want to
exit this mode, just click on the arrow and
it's on a separate layer. To check that, go to the
layers panel here on the top right and
then you can see the reference images
on this layer. Always make sure that
you will be sketching on a different layer
so by accident, you will not draw
on the same layer, and then if you want
to save your drawing, it's merged together
with this reference. Now, let's start sketching
in the next part.
4. Resources: Now let's talk a little bit about brushes and
color palettes. Of course, for this class, you can use your own color
palette and your own brushes. But I also prepared for you a
color palette which you can download for free as a bonus
resource for this class. Also, I prepared
a fan brush pack, which is free for you to download and test
out if you want to use the same brushes that
I'm using in this class. Let me show you first
the color palette. I will be using
this color palette, which I've called cats
sketchbook color palette. I will link this in the
description of the class. When you download
this color palette and swatches for this class, you can use the same color
palette because I test out a few different
versions and tried which colors can work well together for this
sketchbook spreads. I tried different colors for the background and for
the sketches of the cats. What is great about
the Procreate color palettes swatches is
when you download them, they will automatically open
in Procreate and they will appear on top of your swatches panel so you can start using them right away. Now onto the brushes. You can download these
free Procreate brush pack. In this class, I will be using mostly the liner for the outlines and
redefining the sketches. Then we will be using
this brush number three, like in the previous class
with the floral jumpsuit, because you can create very loose and fun shapes without worrying too
much about the outlines, which is one of the
goals for this class. Have fun and create
loose sketches. This is one of the brushes
that we'll be using. Then I will be using one
brush for explanation and just showing you what I mean by observing certain
parts of the photos. I will be using a brush
from my sketch set, which you don't have
to use for this class. But definitely you can check out this brush set because
they are quite fun to use. I will be using also
this sketching brush, which has a nice texture. I like to use it for
sketching and feeling the bigger shapes when doing small thumbnails
and color explorations. These are the resources that we will be using in this class. You can also use similar
reference photos for the cat, but I think it will be quite fun also if you find your
own reference photos. But you can, of course, follow step-by-step
with my drawings. You can have fun and
you don't have to worry about looking for
your own references, so you can follow the
whole sketching process step-by-step and create your illustration
project like that.
5. Silhouettes part one: So let's start with
our first sketch. So let me zoom in on my reference image so I can show you what you can focus on. First, let's check if we have another layer,
which we don't. So by clicking on the plus sign, create a new layer so you don't accidentally sketch on
your reference image. Now I will just show
you first what to focus on and then we
will start our drawing. So in this illustration
or in this cat pose, what is very nice here is this shape and I am
using this sketch brush, as I told you, which has a nice texture. But let me make it a
little bit smaller, maybe like 7 percent and
with double-tap I can undo. I want to show you basically
the silhouette of the cat. Try to focus on this. Try to notice, where are the paws and where are the simple
shapes that you can see? Here there is a tail which
we don't see that well. So basically you can just
do this type of shape here. But because we
don't see the tail, I would suggest you to
sketch it maybe here, or we can put it
on the other side. So try to notice this shape
when you are drawing. So let's zoom out and
we can start sketching, and for this one, we can create another
layer and I will keep more space for
more cat sketches. So I can zoom in so we can see our reference
little bit better, so not zoom out too much. So let's keep it here
and now I will create a new layer for our
loose cat sketches. Now, go to the brush and
from the free brush pack, you can take this
brush number three, which is watery flow. Now go to the color pallets
and from the color palette, I will take white
color to keep the cats in similar color combination
and for obvious reasons, if we paint with white
on the white canvas, we would not see it that well. So first, I will actually
go to the background. So click on the
background color and here I will select
this light green tone. Here you can choose
maybe also green one if you prefer this type
of look, or also yellow. I tried all of these colors
with these white sketch. So but here I will keep
it to light green. And then we will go
to the Layers panel and make sure that we are
on the correct layer. So again, I'm
sketching with white, so I don't have to
be distracted by different coloring of
the cats because now I want to focus only
on basic shapes and simplifying these cats
and practicing observation. So let's do this. So first of all, as you see, this part of the silhouette is quite interesting
because the ear is sticking out and this
one is more or less, I mean, more simple
than this one. So you can start sketching, test out your brush
how big is it? This one will be
probably too big. So let's reduce the brush size, maybe, to 7 percent. Let's test it out. Maybe we can make it
a little bit smaller. So 5 percent. Okay, I think 5 percent
should be good. So you can start sketching
from this side just to follow the silhouette and
try to keep it quite loose so you can always
adjust it later. So basically, I am not focusing so much on the
anatomy of the cat, but just having fun with
these shapes and trying to follow the silhouette that I see on the
reference picture. This is quite fun and
easy exercise to practice observation of the animals and basically any other shapes
you want to practice. But I love to use this one, especially when I'm drawing outside and I just want to draw animals or something quite quickly because they move a lot. So as I mentioned to you, this tail is quite tricky
because we don't see it. So in this case, I can move it to the side and just draw something
simple like this, or you can move it to this side and basically play with the
shape of the tail here. So let me do this, and we have quite simple shape of the first cat done,
which is awesome.
6. Silhouettes part two: Now let's import
another image so we can practice this observation
of the simple shapes and drawing animals by looking at them just on the
pictures or in real-life. I can move the canvas a
little bit further down and now I will import
another image as I said, and we will add more
definition and shadows to all our silhouettes
in the later steps. Let's create another layer. Here we will sketch another
silhouette so we can rename this and call it Cat 1. This will be Cat 2. I didn't want that part. Good. Now let's
import another image. You can scale the image down, so you don't have to have
such a huge reference photo. I can place it here, so we don't cover
our silhouette. To exit that mode, you can always
click on the arrow. Now I will move my canvas, so I will have space here. I can check the layers. As you can see the image was imported next to
the other layer, but now it took over the layer that I created
for a cat sketch number 2. I will click on the plus sign, rename this one Cat 2 sketch. We can just keep it Cat 2 so we know what is what and I will
rename this one as well. This is Cat 1 and
this is also Cat 1. We can also put all
of these in a group, but for now we don't have that many layers
it should be fine. If you are struggling with too many layers
and you don't have space then you can always merge maybe the
references together, but for now I think we are fine. Let's go to this layer
which is called Cat 2. I can start sketching
right away, but for this class sake let me sketch the
outline again first. I will go to my sketch brush set and
take the texture brush. I will take maybe
the yellow color. We can see it a little bit better on this
reference picture. I will sketch around the cat so you can see what I'm
trying to notice. When I'm looking at
the reference picture there is this bomb, there is this curve, there is another curve here
and then it goes down here. Again, we don't see the tail now very
well as you can see, but sometimes it's hard
to find pictures where you see the full silhouette
which is the best. You should always try to look for the reference
images where you can see the full silhouette, but for now this one has a tail, maybe here or you can put
the tail also on this side. You can play around how you
put the tail for the cat. Again we have the
layer for the Cat 2, so clicking on the
plus sign as usual and the renaming Cat 2. Going to the free brush pack and taking this brush
number 3 then go to the color palette and
take the white color again and now we can
start sketching our cat. The brush size is the
same as last time. If you want to save
the same size, just click on the brush here on the slider
and then click on the plus sign and Procreate will remember the size of the
brush that you want to use. Perfect. I'm here
starting with the head, as you can see just
the oval shape. I can zoom in a little
bit so we see better with the reference then I
can draw the ears. Here, I can continue
with the neck, the rest of the body. As you can see, this
brush is quite fun because it looks more
like watercolor. It's quite fun to use I think especially for these
loose sketches. Here I'm adding the chest and then the feed and then I can just connect
to the rest of the body. Here I want to make sure I have all these curves which I
see in the silhouette. I think this is pretty cute. Maybe I can add little
bit more to this curve and you can play
with this shape. Let's see, maybe I can
add the tail this way as we just sketched it which
is similar to the reference. I think this is pretty cute. Let's repeat this process with the next reference
image in the next part.
7. Silhouettes part three: Now, let's create
another kid silhouette. I hope you are enjoying this exercise because
it's quite fun. I think also when you sketch
outside and you're trying to basically sketch
these silhouettes for the kids as well if
they are moving. Let's continue. You create this muscle
memory when sketching gets. As you already noticed, we have three layers
for each of these cats, so we can go ahead and create
three layers right away, and let's rename them, so Cat 3. Sometimes the pen does it own thing [LAUGHTER]
as you can see, so sometimes it's better
to use the finger to use the keyboard I feel like. This was Cat 3 not Cat 2, and let's rename the last one. I'm thinking about the
rename and I write rename, great. Cat Number 3. You can always click on
the icon of the layer, click on the "Rename" and
the keyboard appears here, or if you don't see it, it's hidden here on the side. As you can see it's
here, show keyboard. Perfect. We have three layers. Let's first import
another image. Let's take this from
the view of the cat. It's little bit in
the perspective, but we can adjust it. Use the two fingers to make the reference image smaller
and move it to the side. Perfect. Now I can zoom in again so we can
see it better as before, so we can draw on the side. Then on this layer, we will create the outline, what we are supposed to notice
in the reference image. To do that, I will go
to the sketch set, take the Number 22, the texture shading, and for this case I
think I will take pink so we can see a
little bit better. Here we have the top of
the head than the ears, as in the previous case, then we have little bit
round shapes around the head and the
torso of the kit, and there is the bum [LAUGHTER] the round
part of obviously. Then we have the smaller feet
here and here in the front. Then the tail is
here on the side. Let's sketch that. We have to open
the Layers panel, go to the other layer as before. Now, we can take the brush
for sketching the silhouette. We choose here, Number 3, go to the colors, take the white color
again and as you can see, the brush is still set to the same size as we saved
it in the last sketch. Now, I can start sketching those silhouette
for the next cat. Starting with the
head shape as before, so I will create the round
shape then I can add ears. Here, I can focus on the torso, then I can add legs, and then the bum. Nice round like a potato shape. And then we can add the
feet here and the tail. More volume here on
the side if you want. You can be more precise
if you want with the feet of the cat
and all the details, but I think for this exercise is nice to keep it as
loose as possible. It can be also quite wonky so you don't
have to worry about being super precise or
anatomically correct. You can also exaggerate
a little bit here by adding more volume to this side so we have quite interesting
silhouette which looks more like a pair. Let's move on to the next cat.
8. Silhouettes part four: Now let's add another
reference picture so we can create
another silhouette and you can select another
photo that you downloaded or you can
follow my references. Here I have a walking cat, so I'll make it smaller again. Click on the arrow
to exit the mode. Here I can sketch another
silhouette again, so make sure you are
on a different layer. Click on the plus sign here. First, we will again
try to observe and sketch on top of
this reference for us so you know what
I'm thinking about. I will go to the sketch set, take the texture shading brush, and take maybe the green
color so we can see it. I will zoom in so
you'll see a little bit better and sketch around. Maybe actually yellow is a little bit better
in this case, so you can see it better. Here we have the tail, the ears. Here it's quite rounded. The same goes on this
side and then this paw is hidden here and then we
don't see the other paw here. We can maybe add the paw there and then we have
the frontal view paw. Let's start sketching. Before then maybe let's
rename the layers. This will be kept four, also this one, and now we can
create another layer which will be also
for the cat number 4. Perfect. Go to the brushes and go to the brush pack and I will again take this
brush number 3, then go to the color palettes, take the white color, and we can start sketching. Here I will start a little
bit more to the side because we have this other cat here a little bit in the way. Let's start here. Starting with the head again, then I can add ears, then we can sketch the body. Always trying to notice the silhouette as
we talked about. As you can see, it
can be quite wonky, and I think that that is adding the charm to this
sketch exercise. I'm not trying to be
perfect, but here, if we are losing a
little bit of the neck, I will go back. We still have some silhouettes. Try to find the balance between wonky and
almost abstract, and that people can still
recognize that's a cat. What is helping us obviously with the
silhouette of the cat is that the shape of
the head and the ears, and usually the tail of the cat. Here's another silhouette. We have another cat
here on our sheets, so we have already four cats.
9. Outlines part one: Now, after we have few of
these silhouettes of the cat, let's add some
shadows and details. All of these can start
looking more like cat drawings and sketch
explorations of cat, not just the silhouettes. First of all, let's
add some details using a liner brush so we can define the face
of the cat and some of the features like
the ears and the pause. Go to the brushes, and for this one, you can take the liner brush or you can take any other brush from the inking or calligraphy section if you
didn't download these brushes. But for this case or this
part of the process, I will take the liner brush, then go to the color palettes, and for this part
of the process, I will take the blue color. Let's go to the layers and
make sure that you are not on the same layer
as the cat silhouette. Let's start with our first cat, which we can see here. Cat Number 1, and make sure that we have a
reference photo here so we can reference it and look
at it while drawing. Now, click on the plus sign
to create a new layer. Let's rename it cat Number 1. That will be the
outline or the details. Now click on the canvas to
go out of the layers panel, and we can test the brush, how big is it, I think
this should work. I have it set to size 1. In this case, I think it's nice. Now, there are different ways how you can draw eyes of the cat and how you can stylize and simplify the drawing of the cat. But in this case, I will keep the face
features black and white, and basically just
using one color. Not going very fancy with styling these cat features
to keep it simple. Even though I said black
and white and we are using this dark blue
as you already know. Let's start looking at the reference picture
and try to notice where you see the
facial features and what is important
to define this cat. Here I think we need to
define the head shape because here it's kind of lost
within the cat silhouette. We also need to define the ear because we don't see
it here in the silhouette. We can start with the ear, then you can continue
drawing the head, and you can close
the head shape here. You can also redefine
the other ear. And you can draw the middle side or the middle part
of the ear as well. Then here we can split the paws, define where they are. To draw the face, you can start by drawing the nose by creating
a small triangle. We can zoom in and drawing
a line going down. I can zoom in, but you still
see the reference image. Then you can just draw these two lines
going down as well. This is how I would approach
the face shape in this case. Then we can draw eyes by
using these half ovals, and then you can make
the cat look to the side maybe by adding these
circles within the eyes. You can see that this
cat is looking this way. You can decide where you will
place the iris of the cat. Then we can add these dots, which are next to the whiskers. Of course, you can add whiskers. Nice. So we have one part. [LAUGHTER] Now let's add
some details to the paws. You can see they
are quite round. I can just add these
small lines to the paws. I think two are
enough in this case. Here we want to define the belly and little bit of this other shoulder or paw. I think this is enough. Then let's define also the tail and the
backside of the cat, and here as well, the paw. I think in this
case it's enough. Then we can move
to the next step, which is just right here. We can look at that
in the next part.
10. Outlines part two: Now let's continue adding some details and
lines for this cat. Looking at the reference, make sure in the layers
panel that you are on a separate layer with the
cat that you want to define. Click on the "Plus"
sign, rename the layer. We can add lines to this layer. I'm keeping the same brush, which is the liner, and with the same size. Here with this cat, I can start by adding a chin
to define the face shape. Here we also need
to define the ears. So you can draw it in a
similar way as before. We can also add the outer
outline for the ears. You don't have to finish the
whole outline of the face. Then we can draw the nose the
same way as we did before. A triangle line going down and then adding two lines to
finish the face shape. Then we can add eyes. In this case, we can make
the cat to look forward. Then you can add the
whiskers as before. You can also add
the dots here to indicate basically
the areas where the whiskers are
growing out from. Here I can add a line here to the chest and define this
paw as we have here. I will draw one line this way. As you can see, there
is a little bit of this shoulder here, so I will draw that like this. Then little bit of that shoulder or basically
adjoined of the cat. Then other side of that paw. Then we can draw the same
lines as we did before just to define the cat paws. Maybe we can make them a
little bit more round. Like we see on this
reference image, we have also this other foot. You can draw that. Let's also add this other
leg we choose here. Perfect. We can add
one more line also here to finalize the shape here. Now if you compare
with this other cat, this other cat has
little bit smaller eyes, so I can go in and make the
eyes a little bit bigger. Make sure that you are
on a correct layer that you drew before. I can add little bit
more volume here as we add in the other cat. I can also move the
eyes little bit higher. I think this fits a little bit better
with the other cat now. Perfect. Now we can
move to the next cat.
11. Outlines part three: Let's continue
with our next cat, which is here based
on this reference. For that, we have to go to the correct layer,
which is here. Click on the Plus sign. You can rename it, Cat number 3. Perfect. We still have the same brush and the
same size of the brush. With this cat, we can also define the ears
like we did before. Just to the inner side of
the ear, the outer shape. We can maybe add the top of the head and chin as
with the other cat. You can try it again. You can see it's a
little bit more rounded. You can make it more
round or more angled. The cat is looking a
little bit to the side. Again, I will start
with the nose first, creating that small triangle. Small line going down, and two more lines
going outwards. As you can see, she's looking a little
bit more to the side, but I'm keeping the
face looking forward, so keeping it quite simple. Now I will add the eyes, looking to the side. Perfect. Making sure
that the eyes are approximately on the same height so you don't have one eye
higher than the other one, and also trying to keep the
size of the eyes the same. You can also copy paste the eye, so you can delete this one. Let me make the eraser bigger. But for the
observational purposes, is better if you
draw both of them. But let me show you
how you can do this. You can select the eye with the freehand selection tool with three fingers sliding down. You can duplicate and
move the eye to the side. You can zoom in, so you make sure you keep
the eyes on the same height. Now you have the same
size of the eyes. Here you have to make sure that you merge the layers again. Perfect. You have
same eyes here. If you have issue making
the eyes the same, this is a quick tip
or tool you can use how to make the
eyes the same size. But if you want to practice, I suggest that you try to always draw the eyes separately. In this case, when you are
just trying to create fast, loose sketches and observations. Let's add the
whiskers as before, and add few dots. Perfect. That's nice. Here we can add the top part of the paws, like the shoulders. Zoom out. Here I will add the
lines for these paws. These are the same
paws as before, but we are drawing
the lower part. I think because I made this line a little
bit more straight, I can draw this line
straight as well. Let me make the eraser bigger. Let's try that again. Perfect. As well as before, we can draw these curved lines to suggest the paws of the cat. Now we can add these lines for the outer side of
the silhouette, and add lines for the paws
here in the back as well. The same goes here. Let's separate the tail
from the body here. I think this is good for this outline of the cat and
we can move to the next one.
12. Outlines part four: Now, let's add lines and
definition to this cat as well. Let's find the correct layer. We have the walking cat, which is number 4, click on the plus sign,
rename the layer. Perfect. We can define
this cat as well. First of all, I want to separate
the tail from the body, so I will add a line here. Maybe we can make
it more straight. I think this works better. Then we can create the
chin as with other cats. Perfect. Then add the
definition in the ears, the outer ears, also on this side. Now, I can add a nose, which is a triangle, again, adding a short line here, and the two lines
going outwards. Now, let's also add the eyes. As before, you can copy-paste one eye with
the selection tool, freehand, using three fingers, slide down, duplicate, and move the eye to the same position
and distance from the nose. Exit the tool by
clicking on the arrow. As you can see, in this case, it doesn't work that
well because we didn't finish the eye
in the same height. So in this case, I would suggest going
back and drawing the second eye by hand. Make sure that you are
on the correct layer. Now, I will draw
the eye by hand. What I mean is not
duplicating it. Then drawing the iris again. As you can see, it
works a little bit better because it's
not a copy-paste, so it doesn't look
like it's mirrored, and you also practice
drawing the eyes. Try both versions and see
what works better for you. Perfect. Now, we can
add the whiskers. As you can see, I'm exaggerating the whiskers because I think that's quite fun thing to do. Then you can add the dots. Now, let's define also this
lower part of the cat. First of all, I will add
the torso or the belly, so I will create a line here. Then we will define this
front part of the torso, which is separated from
the backside of the cat, so you can just draw a line here and finishing it going
to the front leg. Then you can add a
line here just to separate the front
leg from the torso. Now, we can also add the paw. We have these lines
here as before. This paw, as you can see, it's a little bit tilted, so if you zoom in, you don't see the
lines on the paw, so we will not draw it there. In this case, we will draw
them here on the side, so not from the front, like on this one. I can just draw a
few lines here. To create this shape of the paw, I can just create
short a line here. Here, we don't see the
backside of the leg, but as you can see, we sketched it here, so let's add the lines
for the paw here as well, which is quite cute, and we can add the line
for the paw here as well. If you want, we can
add the lines here. This is up to you, you
don't have to add this one, but I think it
works nicely there. Perfect. We have lines
for all four of our cat, and now we can start adding
shadows and other details.
13. Adding shadows: Now, when we have all the lines for all our four sketches here, we can start adding shadows. To do that, I will go first
to our first good again. As we started with this one, go to the Layers panel. I can find the cat that I
want to add the shadows to. I will click on
the outline layer. Here, I will select Alpha Lock. Clicking on the icon of the layer and
selecting Alpha Lock. We can draw just within
our silhouette and shape. Now, go to the brushes. For this part, I will go
to the brush Number 3, but you can use any other
texture brush that you like. But here, I want to
keep it similar to the textures and brush that
I use for under silhouette. From the color palette, I will use the second
color in the second row. I will make sure the brush
size is still the same, which was 5% in this case. Now, I will look
at our reference. Here, where I see the shadows, the most are under
the chin of the cat, also here under the shoulder, and here next to the paw in
the middle of these two, and a little bit maybe we
can add here to define the tail and the back
part of the cat. We can start adding these shadows quite
simply with this brush. Here, then separating the body from the leg so I can add a
little bit of shadow here. Then, as I said, the shoulder and
under the chin of the cat and the leg. Maybe we can add a little bit of the shadow also here on the
left side because we can see that there is light from
the top so the cat is a little bit lighter on this side and here
it will be darker. Perfect. We have simple
shadows on this cat as well. Now, we can move
to the next one. Go to the Layers panel, find the cat, click on the icon, select the Alpha Lock, and make sure you have the
brush that we had before. Now, we can add shadows
to this kitty as well. In this case, I will
add shadow under the chin as well just to define, basically, the separation
of the head from the body. If you want to have
these nice textures, you can just move the
brush back and forth. As you can see, the brush
will create this smudgy look. If you want to add
more definition, you can create more
opaque strokes with another movement in creating basically and
using more pressure. Now, I will move down here. I can see the shadows more
here and here next to the paw. It's a little bit
hard to see with all the patterns on
this cat but try to know where you see the darkest area on
that reference photo. Here, we can add the shadow
on this side of the paw. As I said, maybe
at the bottom and here at the back
part of the cat. Here, you can make the
brush a little bit bigger and then we can add some
shadow here and here as well and also separating
the paws from the body. Nice. Let's move on
to the next one. Find the silhouette again. Just get Number 3, click on the icon,
select Alpha Lock, and then we can continue adding shadows as well under
the chin again. Just moving the brush
from right to left. Then we can add shadows
again separating the legs from the body
like we did before. Adding shadow here in the middle and here at the
root of the tail as well. Now, looking at the sketches, we have the tail separated from the body with a line as well. I will go and edit
on this one as well. So going to the brushes, taking the liner, selecting the other color
that we used before, which is this dark blue. I will zoom in on this cat, find the correct layer, which is cat Number 2, and I will add the
line there as well. Now, we can add shadows
to this last cat. Let's find the correct layer. Cat Number 4. Click on the icon, select Alpha Lock,
go to the brushes. Take the brush
Number 3 as before, go to the color palette, and use the second color in
the second row as before. In this case, we will add the shadow under the chin again. We can add a shadow
here as well. As you can see, I'm not drawing outside of
the silhouette. The Alpha Lock is
helping me with that. Here, I will add a little
bit of shadow on the torso. As you can see, it's also here. We can add a little
bit of shadow here, separating the leg
from the body. We have all the shadows. In the next part, I will show you how you can make these sketches a little
bit more interesting.
14. Adding colors part one: Now when we have the
shadows on all our cats, we can start adding more
patterns, colors, and textures. Here you can make it
a more of your own and add textures on the cats
and beetles that you like. But in this case, I will show you how I can use different references and add
them to all my cat sketches. Go to the wrench icon
and select Canvas. If you don't have that selected, click on the reference. As you can see, it's showing me the
Canvass reference. But here I can import
another image. In this case, I will take the reference image of this
cat because I find it quite interesting that you can have the dark paws and dark
tail and also the ears. Even though here we
don't see the stripes, but there is another
pattern on the back. We can add stripes, loosely inspired by
these reference photo. Let's go to the layers. I will find the first cat, which is this one. Still keeping the drawing
on the same layer, I will make sure that
I have the same brush, which is this number 3 brush, which is watery texture, go to the color
palette and now select a different color that you basically didn't
use for the shadows. In this case, I will go for
this darker brown color, which is the last
in the last row. I will add these details, as I mentioned to you, to the cat sketches. First of all, let's
add the darker tail. You can make it a more
realistic or more flat. You can add the stripes
which are flat, keeping the illustration flat or you can add a little
bit more realism by curving the strokes in the shape of the
tail of the cat. I think this is quite nice
to add this type of detail. Then here on the back I
can follow the shape of the cat and add few stripes, and also here. Add the dark ears. Here I need to zoom in and
make the brush a little bit smaller to fit in the
shape of the ears. Maybe that's too small. Two percent, I think it's fine. I can save the size
of the brush as well. Just draw on top of the ears. Perfect. Now, making
the brush bigger again and I can add the color
at the bottom of the paws. The same here. Here I think we can make the
brush a little bit bigger. Let's go back and maybe sudden jumped back with
we don't want that. Seven percent and
saving the size. Here, I can loosely
sketch at the bottom of the paws using less
pressure here on the top and a more pressure
here at the bottom. I will have more color
here at the bottom, so the paws are darker. The same goes on this other paw. Here I'm making the movements in this direction following
the shape of the leg. Lovely. Let's move
to the other cat using the same texture
and the style.
15. Adding colors part two: Now we can continue adding these details and colors
to the cat number two. Let's find the correct layer. We choose this one. Make sure that Alpha Lock is on, and you have the same brush, and we still have
the brown color. Now you can add color
to the end of the tail. You can add stripes as before. You're creating these hybrid
of a cat, but that's okay, but you can keep
the same styling or the same breed of the
cat as you have here. Adding stripes
following the shape of the body of the cat. Maybe I can add a stripe here, even though it's not there, and making the brush smaller and adding color to the ears, and a little bit
darkening the paws, making the brush bigger again, adding little bit more
color to the tail. I will take the middle
size of the brush and darkening this part
of the stripes. I can compare with
the first cat, and here I can make the
tail a little bit darker. I can find the first layer, and make the tail darker, so we have the similar
style as this first one, also adding color to the paws. I think the rest is similar. Now I can find this third cat. Click on the correct layer, make sure you have the
same brush, same color, and you can add similar
coloring to this third cat. First the tail, then we can add the stripes. Then we can add the
stripes here on the top. Then add darker paws, and the ears as before. Maybe we can make the brush
a little bit bigger and make these stripes
slightly bigger. I think that can work here. Also I can add the stripes here. Just to add more
color to our cat. Perfect. Let's move
to the fourth one. Find the correct layer, which is Cat 4, make sure the Alpha Lock is on, correct brush, same color, and now we can add color
to this one as well. The tail first, as
with the other ones, then we can add the stripes. I can add one stripe here. I can create darker
paws as before. Let's do that again, that was maybe a
little bit too much. Also this one. Now here in this case
it can be a little bit trickier because we have the frontal part of
the body and backside, and as you can see,
actually this cat has two stripes here, so we can try to replicate that. Having inspiration
from both cats. Then on this side we can
add stripes like this, and like this. I
think that can work. Then we can add a stripe
here on the paws, and then adding darker
color to the ears as well. Perfect. Now we have
stripes on all the cats, but we can add also another
cute details to these cats. Go to the color palette, select this fourth color
in the second row, and we will add pink to
the ears of the cat. Then we can add little bit of pink color also to their cheeks. You can make the brush
a little bit bigger. Now, find the correct cat, so you don't draw
on the same layer. This is Cat number 2. You can add the cheeks, and make the brush smaller
and add color to the ears. Now you can move to the first
cat as well, which is here. Add color to the ears. Make the brush a little bit
bigger, the middle size. Add color to the cheeks, and go to this cat as well. You can add the
color to the cheeks. Make the brush smaller, and add details to the ears. Perfect. We are done
with coloring the cats, and in the next part, I will show you how you can add more fun details to
your illustration.
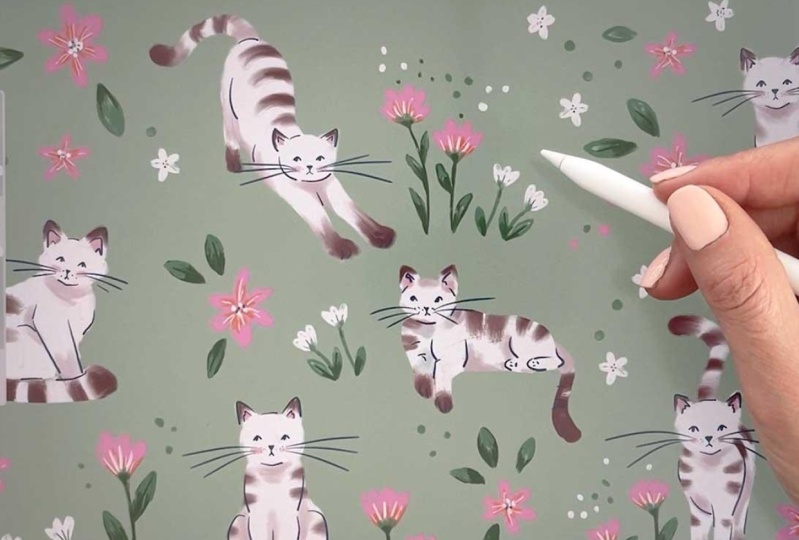
16. Adding more colourful details: Now when we have all the cats it will stray
the with them with details, shadows, and some stripes. Let's add the more fun details and more color to
our sketch books, spread illustration, and keep growing practice
from observation. To do that, I can hide all the references because
I don't need them anymore. Go to the Layers and
then you can click on each layer to hide the reference
and also the line art, the outlines that we sketched because we
don't need them anymore. We have these ones and also we can hide the reference here. Perfect. Now go to the top of the Layers panel and
create a new layer, and we will call it
Flowers and Leaves. Perfect. Now, go
to the brushes and make sure that you have
the same brush selected, but you can use any
other brush of course as before if you prefer
different brush. Go to the color palette, and in this case I will choose
this first pink color in the third row and we will draw a few flowers around our kit. Let's start near this cat and I can draw a few flowers
growing from the ground. Here you can be of course more creative and there are all all different types of
flowers that you like. You can try to keep it simple, or you can go more in
the realistic direction, or you can draw similar
flowers that I'm drawing here. You can play with the
shape of the flowers. I can add more flowers
also next to this cat. I can make the brush
a little bit bigger maybe the middle
size which was 5%. I actually liked, it may be smaller. Let's go back and
I can draw more of these flowers next to the cat and I can had another one here. Let's add some growing
flowers here as well. First, I'm using
just one color and then I can add more colors
to these flowers later on. You can just play
with some shapes, and try using different shapes or the same shapes
that I'm using. This flower doesn't work
that well, I think so. I can always go back because
it's pretty quick to draw, so I can draw this one again, just to have the
petals more defined. Some flowers here. I can add a little bit more
color to these flowers, so I can go to the Layers panel, click on the icon, select the Alpha Lock, and now I will go to
the color palette. I will take that red color, and I will draw on the
bottom of these flowers just to add a little
bit more color variety to our flowers. I will add the color only to the these ones which are
kind of growing from the bottom and maybe making the brush a
little bit bigger at the middle size for this part. I think this works a
little bit better and now I will make sure the
Alpha Lock is de-selected. I will make the
brush smaller again, go to the color palette. In this case, I will take this darker green and
I will draw stems for these flowers. I can add few leaves. You can add few leaves also floating next
to these flowers and continue creating the stems for the flowers
that you created. You can play with different
layouts and fill in the shapes or feeling
the whole sketchbook spread with flowers
if you are in a mood for that or just add a few flowers here and there just to practice drawing
different shapes. I can add few leaves here too, so we have a cat in the middle. Here, I can see this
flower is in the way, so I can use the selection tool, move this flower to the
side maybe just here, and now go back to the brush, and now I can draw the stem. Perfect. I can go to
the color palette, take the lighter green
color and we can add little bit of the lighter green to
the leaves as well. I'm adding this lighter green only to the top
part of the leaves, so we have some variety there. We can add few leaves here too, and here I can add a darker
green color as before. I'm going back to the
lighter green to filling these spots and I can add few green dots as well to
fill the areas of the canvas. You can go ahead to draw
more cats as well just to fill the full canvas
with things around, then just to have nice
field sketchbook spread. We can add a little bit more
details to these flowers. Going to the color palette
and selecting the white, we can add few dots in the
middle of these flowers, add few lines on
these, maybe few dots. You can add another flower and play around with this part. You have more shapes
on your canvas. I can add more
floating flowers here. As you can see, I'm still
using quiet simple shapes, just filling in small
details on the canvas. We can add few lines
here as well as before at your dots, also in the middle
of this flower. Same goes here and
maybe we can add another white flower
on this side and of course you can add the
stems for these flowers too by using the darker
green color as before, and adding leaves to
this one through. As you can see, it's
quite fun to fill the whole canvas with details, flowers and other
things floating around. Just have fun and play with
these types of shapes, drawing flowers and leaves
and stems and maybe dots. I'm using still the
same color palette. I'm using the pink, red, greens and the white for
these details on the canvas. I added a few more
flowers and few more cats to the composition just to
fill the canvas as I told you. This is one of the cats that
we drew together then I repeated the shapes of the flowers as I
showed you previously. Here is another cat from the similar reference using the same technique then we have this one which we
sketched together then I added another one which
is lying on the side, so this is another
sketch you can create. This cat we made together and I added more flowers around, and then we have this one
which we made also together. You can play around and
fill the canvas with the more cats and just
try different colors, different patterns,
maybe different poses. I can't wait to see your
take on this project, and your cat poses and textures, and maybe flowers and
colors that you will use.
17. What to draw next?: How did it go? I can't wait to see all
your awesome artwork. Please share your drawings
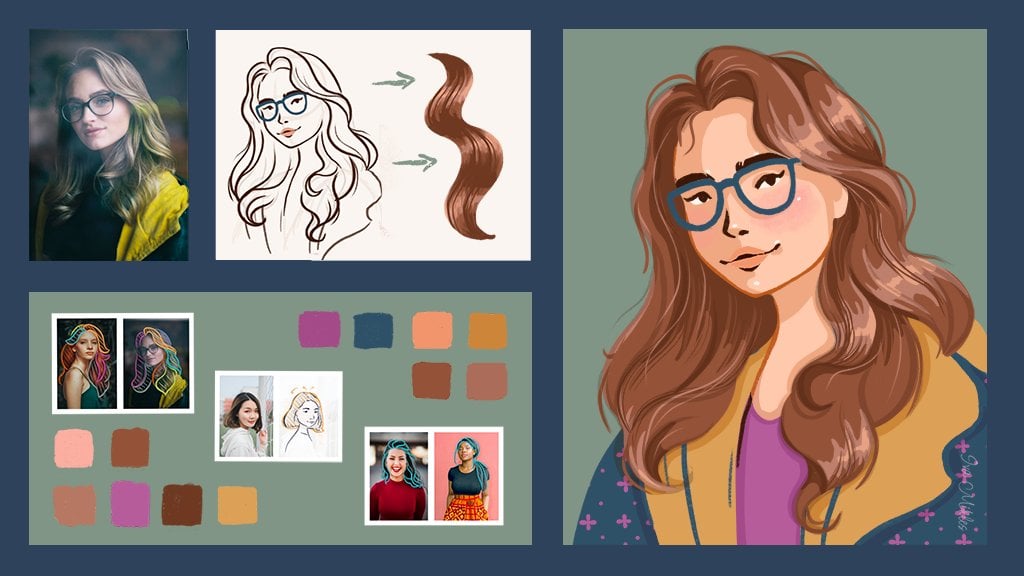
and illustrations, also the work in progress if you want in the Project section. If you want to expand on the knowledge you
learned in this class, you can watch my other classes
about characters and also about colors called color palette and color and
light master class. Visit my teacher
profile to find them. If you would like me to share your projects on Instagram, please tag me in the
Instagram stories, in the post and post
description so I can help you and your art to be discovered by more people. Thank you so much for being
here and watching the class. See you next time.
 Iva Mikles, Illustrator | Top Teacher | Art Side of Life