Transcripts
1. Introduction | Drawing Bird Feet - The Basics: Hello and welcome
to this course. Today we are going to
be painting bird feet. Bird feet can be quite
difficult to draw. They are kind of
strange looking, so I totally understand the
difficulty in joint them. However, today I'm going to
give you some of my tips and techniques on how to
best draw a bird feet. We'll start off by drawing
some really easy guidelines. And then we will
fill in the body of the foot and we'll
add some detail. And lastly, we'll add in some
shading to add some depth, and to make them look more 3D. I hope you enjoy
this course and I look forward to seeing
your projects at the end.
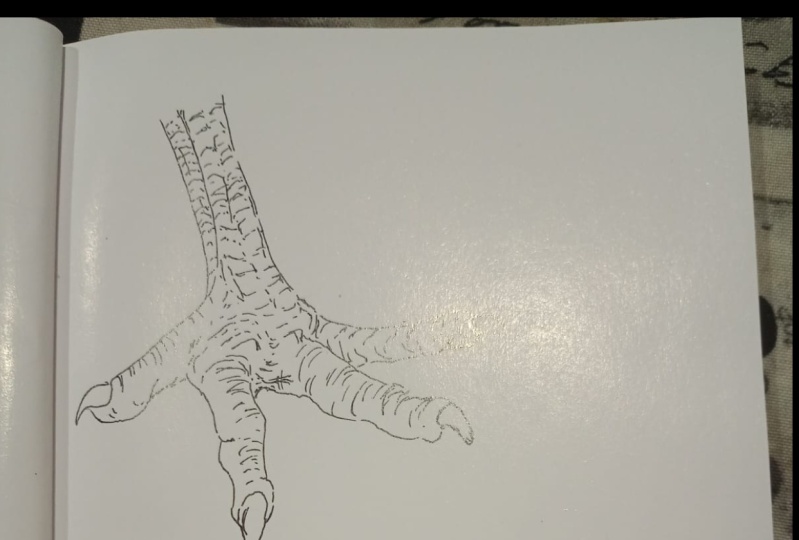
2. Perching Birds | Let's Draw their Feet: Hello and welcome
to the first video. In this video, we will be during a perching birds fit and like. So to begin with, I am going to draw
the guidelines. So I've drawn a
small straight line followed by a longer
straight line, slightly angled to the left. These show the leg and where it bends is
obviously where the joint is. Now. At each joint, you want to draw circles. The top part of the leg. You want to draw two circles, one for the first
half of the leg and the other for the
second half of the leg. Then you want to draw
a circle at the tip, at the bottom of the
lung line we just drew. This shows where the foot
is from, that circle. You can then begin
to add the feet. What's really important
when adding a feet? As you need to make sure that
the perspective of them is correct and they're
not too long in comparison to the leg
or not too small. Now, I'm adding in the
circles and the rule is 2341 for the first fit, I'm sorry, for the first TO I added two cycles and
then for the second one, I added free the third one. And the last 11 is just a
general rule that helps when drawing the body
around the guidelines. Next, if you're happy
with your guidelines, you've got your lines
in and the circles, you can begin to draw the
outline of the foot and leg. And what's really important
here is to make sure your outline hugs the circles. So you get that lovely
shape of the birds feet. But just as long as
mentioned earlier, when drawing the toes is really important to make sure you draw them accurately. And if you do draw
them a bit too long, you can always refer some away of your duodenum too short, you can always add
a little bit to it. It's just judging
and using AI to determine whether the toes
are inaccurate lymph or not. Now, when I'm
drawing my outline, I'm using short bursts
of pencil to draw, roughly draw this outline. It adds a nice
sketchy effect to it. And also you don't want
quite harsh, deep lines. You want them to be
soft and sketchy. So that's why at first, my advice is to have
short burst or pencil. Also, I do the guidelines a little bit thicker so
that you could see them. But I would advise during
the guidelines a lot, lot lighter than I have. So you probably wouldn't even need to write them
out as much as I did. The close. You just need to add these little crescent shapes, the tips of the toes. Again, be careful with
perspective and science. Here I'm just rubbing out
some of the guidelines. But if you draw
yours bit lightly, you won't need it won't
take as much effort for you to get rid of them. Okay? Once you're happy with the overall shape of your foot, you can begin to add in
those scales onto the feet. To do this, I'm just adding
small little squares, rectangles to the
tops of the toes. And also when you're
adding these little lines, you need to make sure they
are curved ever so slightly. This shows that the toe
is for D and not flat. And on the advertisers are
already good example of this. You just got to make sure that those lines are slightly curved. And it shows the 3D effect of the city's fine details make all the difference
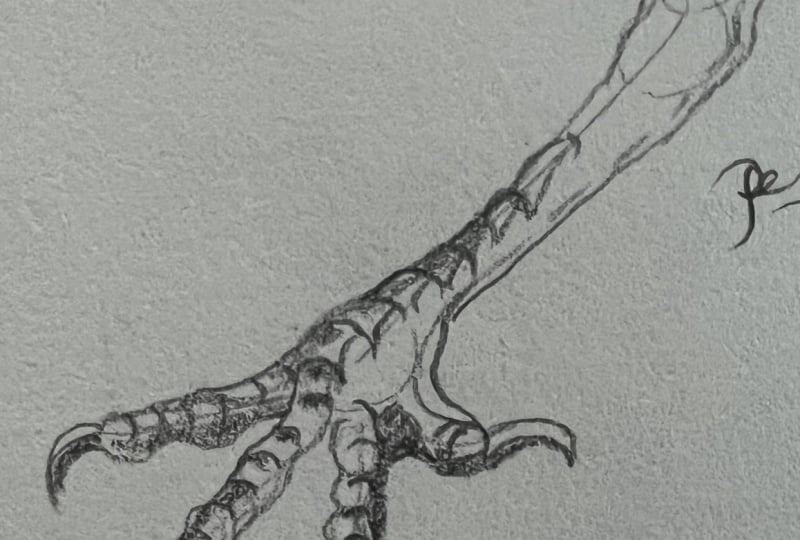
and will make your toes, feet, leg look more realistic. Once you've finished
putting in the scales and you made sure that if curved and you've joined them together. And now working on the lower half of the
toes and the lake. And I'm just adding some
little scribble marks to give the effect
of those scales. And then later on,
once we've done that, we will darken the low parts of the toes because that's where the foot would be in
contact with the floor. And therefore, that's where
most of the shadows would be on the contact between the bottom of the
toe and the floor. So now I'm going to start
to shade that area. This is the area where the toe is in contact
with the floor. So naturally there
will be a shadow cast on this side of the toes. And by doing this, by adding the shadows
and the shading, it creates more of
a 3D effect and gives more of a
perspective of the foot. So clearly the light is coming
from the left-hand side. So it makes sense
to have a lot of the shadow coming from
the right-hand side. You could spend so much
time added in detail. I spend around ten minutes
during this foot in total, but I could spend triple
that amount of time on this foot to make it super, super good at in all the
details and the shading. But if you're just wanting
to learn the basics, this is a fantastic style. You've got the guidelines, you've got the outline, the shapes, the detail,
and other shading. I hope you found this useful. We are now going to apply
a similar techniques to paint a duct for with
those lovely webbed toes.
3. Swimming Birds | Let's Draw their Feet: Hello and welcome
to the video on drawing a swimming birds foot, in this case a dark. So it's very similar to the previous video
where we start off with the guidelines. I've drawn one straight
line for the leg and a circle indicating
the Weatherford is. From that circle, I'm
going to draw the toes and they're a little bit straighter than the
perching birds. And you have to be
really careful with your ankle them and
the perspective. So always keep an eye on
how they are positioned. Once you've drawn or four toes, you need to add the clause. And the clause of
a dark are quite small in comparison
to a perching bird. I've just drawn some
very small little curves at the end of each toe. And the same rule with the
two free for one circle. So I've drawn two circles
and the first TO free and the second formula fed
and one on the fourth. And the circles are just a
little bit more spaced out. So that was nice and quick for the guidelines because you've practiced in the previous one. Now we can do the
outline and again, like the same rule
in the previous one, make sure your outlines
are hugging the circles. When it comes to drawing the
web to section of the fee is really important that you
don't make it straight. You want to put a little bit
of a curve in the middle. You should draw your
guidelines very likely. So when you vote them out, it doesn't take much effort. However, I've done a bit darker because I want to go
SPL to seeing them clearly. So once you've drawn your soft guidelines
and you're happy with the outline that you can
vote them out a little bit. Just be careful not to rub out the outline as I have done here. But because your guidelines
will be a lot softer, that's less likely to happen. For the for the nail will
be slightly different. I've just drawn a shape
there and it's more of a teardrop shape just
from the way it's angled. The first two toes, the clause will be more crescent shaped like in the perching
bird, but the fertile, because it's facing,
you're looking for, It's almost like you're
looking from above that toe, just the way the
duck's foot sits. They weren't be apologizing now, won't be a crescent shape, will be more of a
teardrop shape. Now, we can go in and add
in some detail and shading. Again, the light in this example is coming
from the left hand side, which means the right hand side is going to have a
lot more shadows. And in-between the web toes
is going to be quite dark. Once you're happy
with the shading, you can add some detail
in the previous video, I did detail and then
shade in this video, I've done shading and detail. And you can just interchange
between the two. There's no real order. You just do which
one you want to do first and which
one feels right. And in this case, getting
the shadow working first scene more
important than the data. So now the shadow work is
good and I'm happy with it. I'm adding the details
on the on the legs. I'm adding in some little lines. Again, I'm trying my best to make sure they're
slightly curved to show that the leg is free D. And on the webbed
feet as well, perhaps there's some scratches on the web section of the feet. And also, don't forget the
contact between the foot and the floor is always going to be a shadow cast onto the foot. At the bottom of the web. I've actually made it a
little bit darker just to show that it's been, that it is in contact with
the floor and therefore its shadow will be cost onto it. You can keep playing around, keep playing around with the
shadows and the details. You could spend so long on this. But in the end you've got
to stop at some point. So I hope you found that useful. Keep practicing, keep
following those steps. And I look forward to seeing your projects have a goal during a webbed foot and have a go at drawing a patch in birds FIT. Thank you for watching.
 Jessie S., Artist