Transcripts
1. Lesson 1 | Introduction: Hello guys, I'm so glad you're here with me. I'm so excited to share
this course with you. In today's course,
we're going to learn six crucial techniques
in acrylic painting. And then we're going to
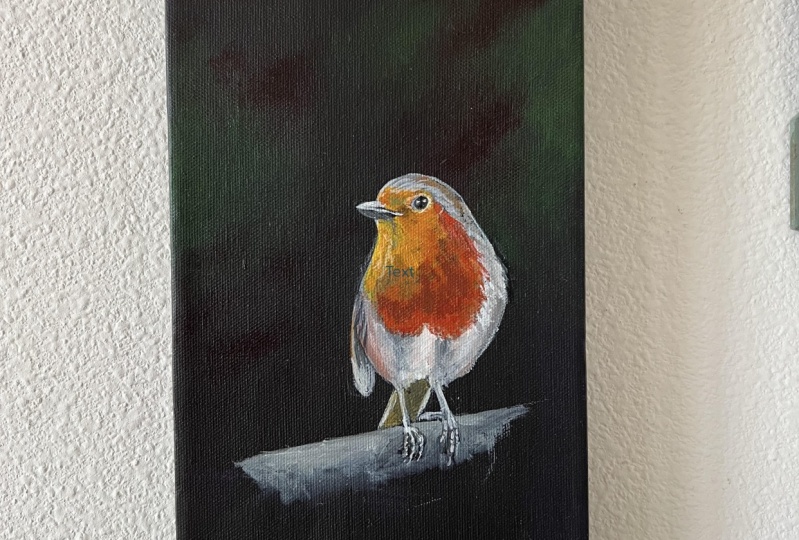
apply these techniques to a robin tutorial at the end. This course is designed for
beginners and intermediates. The techniques section of
the course is for everyone. For beginners it's
a chance to learn new skills And for intermediate
students a chance to tweak and further improve
your preexisting skills. You already have
the tutorial part of the course. It's again for everyone. But for beginners,
I would advise you to listen very carefully
to instructions. Don't rush. Take your time. And if you're not happy
with the end result, I encourage you to do it
again and keep going I hope you're looking forward to learning these six
techniques and accredit painting and applying
this is a robin painting. Let's start straight in.
2. Lesson 2 | Learning Objectives : Let's review the learning
objectives for today's course. Number one, understand what the advantages of a
crypt paints are. Number to learn two
or more key pointers for the six different
acrylic painting techniques. Number three, practice
the six techniques on paper a couple of times. And number four, the challenge. Apply your understanding of the four acrylic painting
techniques to paint a robin.
3. Lesson 3 | Workspace: What will you need your face? The first thing you will
need are some paints. You can just buy
an, a critic set of paints from any art shop. And they should have
all the colors that you need for today's tutorial. But the ones I have
a favorable or titanium white, cadmium yellow, medium hue, yellow
ocher, burnt sienna, rule Amber, cadmium, red hue, permanent rose, Winsor blue, Prussian blue hue,
phthalo green. If you don't have these
particular colors in your set, that's fine. There'll be all
types that you can use from the material you're going to be
used in a canvas in today's tutorial and we'll be
using paper to do practice. The different techniques on. This canvas is a canvas board, and it's a 15 by 15
centimeter Canvas. You can use a stretched
canvas if you drove on. The stretch canvas is
a little bit thicker. You don't have to use a 15
by 15 centimeter Canvas. You can use a 20 by 20
centimeter canvas or an A4 size. Just make sure it's not too big. Artist suggests a
smaller size of the can, a canvas board or a stretched
canvas was also fine. Or you can paint on wood. That's also fine too. Don't forget we need
some proper art paper as well to practice the
different techniques on, I'm using black and white paper, you will need some water. In today's lessons, we will be using mortar instead of other
medians that are available. Like I said earlier,
there's liquid texts. So liquid assets, you
have air brushing medium, or you have slow dry
blending medium. So there are other
mediums you can use, but we'll be using water. You will also need
your tissue or rag to draw any excess water
from your paint brushes. Of course, you need your
paint brushes as well. You'll need a flat old brush
for one of the techniques. You need a range of smaller
brushes and your need a large brush to yes. And you will need some
pallets in today's tutorial. I will bes in to
ceramic palettes and a plastic palette to you can also use glass
as your palate. That's fine, but a plate
will do the job nicely. Lastly, you will need a ruler. I have a 30 centimeter ruler. I think that's a 15
centimeter ruler. I will probably be
used in a smaller one. But this is to measure the Robin to make sure that we get
accurate measurements. That's all the materials
you'll need for today.
4. Lesson 4 | What Are Acrylics : Let's repeat a learning
objective for this lesson. Understand what the advantages
of acrylic paints are. What are acrylics? Acrylics are water-soluble and the key ingredient is a Polymer. However, when acrylics dry, they become water resistant. If you try to add more water
to, critics may dry it. They don't blend. However, we've watercolors. Once they dry, you can add more water and it will
continue to blend. Although this fast
drying characteristic of acrylics is actually
a huge benefit because the credits
don't take long to dry. That means you can
carry on quite quickly under next layer,
saving you some time. Also, acrylics are toxic free, which is fantastic
for children and I don't irritate
the skin I ever. What's fantastic about
acrylics is you can paint on pretty much
everything apart from glossy and oily services. You can paint on wood,
clothes, canvases, and paper, which I love about
that because I do particularly enjoy
painting on what? Whereas watercolor,
you can't do that. Also, you can use multiple
different mediums, so different liquids to
make with the accredits. The most common one is water. However, there are other
mediums you can use to, There's a friend
called liquid texts. You can use airbrush medium or you can use slow dry
blending mediums. Acrylic paints are fantastic because they don't
irritate the skin. There are false
drying, affordable, versatile, safe, and durable, can be used on
different materials. And lastly, can use different
liquid mediums for mixing.
5. Lesson 5 | Technique 1 | Dry Brushing: In the next few lessons, we will be exploring these
two learning objectives, learned two or more
key pointers for the six different acrylic
painting techniques. And practice these
six techniques on paper a couple of times. Hello and welcome to technique
number one, dry brushing. We're going to use this
technique to paint some lovely white fluffy clouds. So acrylics usually have
strong pigmented tones. So it's recommended
that you dilute them with some water to
soften his colors. This technique will give you the effect of an uneven brush. This can create some
really interesting effects and in some cases,
depth fulfilled. So what you'll need is your
tissue and an old flat brush. You only need to
use a little paint. What's great about
this technique is that you can
use the texture of the canvas more on this later and the brush to create
some interest in ethics. For now, it'll just use the brush to create
some cool textures. But in our robin painting, we will have the Canvas as well. Okay, so let's begin painting
these white fluffy clouds. I've pulled some of the
white paint into the brush. You should wipe most of
it away using or tissue. We want little
paint on the brush as we don't want
it to be too wet. This technique is great
for painting waterfalls, clouds, and blurred
out backgrounds. Today we are going to
paint some fluffy clouds. Remember not to wet the
brush until the very end, until you have finished
your painting, because we want to
keep this brush dry. Dry brushing can take
a toll on the brushes. So I'd recommend
using ODE of brush. If you have one, you
can use circular or crisscross motion
with your brush to add some cool effects. With these clouds, I'm using
more circular motions. And dry brushing is about layering and not
blending colors. It's great when using a
credit because the paint will dry very quickly
in-between layers. As you can see with
these white clouds. I'm just using
circular motions and occasionally is and Chris
colors, patterns as well. I'm just building
the cloud around, up and around and I'm
going to drag out those colors to decide as well. As you can see, I'm being
quite harsh on my paintbrush. That's why it's really
important to ratio. You have an old paintbrush
and flat as well. Instead of bottom, I'm
just creating some, some myths underneath the clouds using the dry brush technique. And I'm using a brush here
which is completely dry, just to drag out those that
worked paint a bit more. I'm using titanium white. You can use a slightly gray
or white if you prefer. So, yeah, I'm just adding in some highlights using
this dry brush effect. And I'm just going to
do one layer today. However, if you want
to add two layers, this is what I'd suggest. Once this layer has dried, I would use this titanium
white with some moss black. Just make a slight gray color. Make sure your paint
brushes dry and make sure you dry used in the tissue
paper or your rectangle. Then with that dark gray, you can add it to the bottom of your Cloud to add some shadows. And then you could do the same, but we've just pure
white and you're adding an extra layer of
white on top to add some highlights to
the top your clouds. Today I'm just doing one layer and it's quite useful to
have a black background. So the black background actually adds some chateaus
already to the clouds, which is why I wasn't
too bothered about adding some shadows
using a darker color. Although if you're
painting on white paper, perhaps you could make a gray and adding our
own shadows as well. The shadows are going to be
at the bottom of the clouds. I'm just adding some more clouds above the bigger
crowd I painted. And I'm just dragging
out that paint. That's really, really important that you drag the paint out. And we've cloud is going
to be a lot smoother, a lot lighter at
the edges as well. Here, I've added probably a
little bit too much paint. That's okay. I've dried my
brush and now I'm just going to drag that paint
out, out to the size. And in hindsight, that
white blob could just be a highlight as long as I keep dragging it out along the edges. So here we go. That
is your clouds. And that's the dry
brushing technique. You can use dry brushing, phone array of different things. In our robin painting, we are going to be using this
dry brush effect to create some really lovely green
bushes in the background. I hope you found
that useful guys. And let's get moving on
to technique number two. Once I've finished
painting these clouds, there are three key
pointers for dry brushing. The first one is to use no
water and little paint. Dab. That's meant to say your brush dry and the
tissue before you leave your brush in a circular
crisscross or dabbing motion to create really
interesting effects.
6. Lesson 6 | Technique 2 | Adding Water : Hello and welcome to technique
number two, adding water. This one's a little bit easier, but it's always great
to practice it. Water is a great
medium to use for diluting the strong
pigments of acrylic stem. Adding enough water
to the paint will result in a translucent coat. And I loved this effect
and it comes in handy when adding subtle shadows
to your work. Okay, So what would be great
if you pulled from the white out and mix it with some water and make
sure you fall slowly. Mix the paint and
the water together. And he usual tissue to dry some excess water off
your brush as well, then you are ready to
apply it to your paper. However, if it begins to
look a little bit dry, then you can just
add some more board or to really dilute it down. And if you drag the water and the paint out and
continue to add water, it will actually make
the white lighter. So you can create shadows
using this technique. You can create lighter
areas where there's more to her is more diluted and darker areas where there's less water and there's
more of the paint pigment. And so I think adding motor is a really good technique to
use for adding shadows, pad in depth, and adding
highlights as well. It is a really important
skill, actually quite simple, but probably one of the most
important skills you can use in your painting and
one that we'll be using quite often in
the room pattern. I hope you found that
useful guidelines and I hope you are
ready to learn more about technique
number three. The two key point is
for adding water. Use the water to dilute
and spread the color. And number two, create
a gradient using water.
7. Lesson 7 | Technique 3 | Stippling: Hi and welcome to detect neat
them for free stippling. I hope you've enjoyed the
other technique video so far. So let's get straight into it. This technique is great for painting flowers
and feathers. It's also a handy skill for creating highlights and shadows, is essentially
creating numerous dots on a surface to
create your imagery. And these dots
tend to be random. But as they go from lighter
area to a darker area, the dots or increase in volume. Today we are going
to be creating a stippling effect
using a critic paint. And let's get right into it. You need to hold
your brush, clean. Your brush needs
to be dry and you apply a W motion to the paper. I'm using an old flat brush. And by Desso it creates
of random dots all up while the counter use a single brush and rate
each dot on its own, which I will also
demonstrate later too. You can blend colors together
using this technique. It doesn't need to wait
for the layers to dry. You can simply add
another color on top if you wish to
create different colors. With this technique,
you create areas of light and shadow
just by using dots. And for darker areas, you apply a greater number of dots and you keep
them close together. And then for progressively
lighter areas, I would suggest using fewer dots and space them further apart. So right now I've been
creating lighter area. Here. There are fewer dots and
a bit more spaced out, but I'm gradually adding
more and more dots to the area and allow them to be quite close to
each other two. And by doing so, the era appears darker. And basically, with this
stippling technique, you create a gradient. And it's a really
interesting effect. It adds lots of
texture and it just makes your painting that
a bit more interesting. Here I'm using a brush with a fine tip just to add
in the individual dots. You need to try our best
to make them random. And for the lighter
area you want the dots to be smaller and
more spaced out. And for the dark areas you
want the dots obviously to be closer and they
can't be longitude. There's two different
ways you can do this effect with acrylic paints. You can either use a slightly larger flat brush by applying the paint to
create multiple dots at once. Or if you want to be more
precise about your dots and how they're positioned
next to one another. You can also use a
fine brush because you can really pinpoint where those dots are growing
on your paper. Perhaps you want to use both. Perhaps you want to sort
out with the large brush. And then towards the end we
added in the fine details, you want to get out
your final paintbrush and just add in
those final dots, but you feel like the dots
are missing from the piece. That is technique number
of free stippling. It's really cool. It's such a great way
to add loads of texture and an interest in
effect to your painting. In the robin painting, we
won't be using this technique. However, if you want to
incorporate it into a painting, then by all means please do. It's such a lovely effect, one that I personally would
love to explore more. It's a really interesting
and it's a great way to add a gradient
to your paintings. I hope you found
that useful guys, and I'm hope you're ready
for technique number four. The two key pointers for stippling are for
the dark arrows, you apply a greater number of dots and keeping
them close together. For lighter arrows, you apply a fewer number of dots and
you keep them further apart. The last one, your
brush needs to be dry and you apply a dabbing
motion to the paper.
8. Lesson 8 | Technique 4 | Blending: Hi and welcome to technique
number for blending. This is another really, really useful technique to
use in your acrylic painting. And one we will be
using very much in painting the Robyn.
For blending. You should always make
sure your strokes are in the same direction or smooth and try not to load your brush
with too much paint. So you will need to use a
fair bit of water with this. Use your paper towel to dab
any excess water as well. If the paints that you're applying to
your paper is too dry, you can just always
add a tiny bit of water just to loosen it up. Ever so slightly.
Great way to get rid of any excess paint on your
brush is to roll your brush. So there's an even amount
of paint loaded on. You can, once you've loaded
your paint onto your brush, you can roll it onto
the tissue paper to just to remove
any excess paint. Once you have your colors down, you can use a dry brush to blend the different
tones to give her. As you can see here, I've got a lighter color
and a darker color. You can either use a dryer paint brush to
blend those together. But sometimes it's worthwhile
adding a tiny bit of water. So you can use some water between the different
tones to blend those together to here I've just applied a
little tiny bit of water just to blend
that dark area with the tone here on prime,
that darker color. I'm just blending in with
the gray color opposite it. Now I'm just used in
some motor to blend the colors with
the lighter area. To make the blending smooth, you need to use two techniques. You need to use a dry
brush and a wet brush. And you have to be able to judge when to use one or the other. If there's too much
water on your paper, I would suggest using the dry brush to blend
that and vice versa. There's too much
paint on your paper. Sorry if there's not enough
water on your paper, I would use wet brush just
to blend in the chorus. It's getting the balance
between using a dry brush and a slightly wetter brush to blend the different
tones to give them. It may take a few
practice trials first, which I highly
recommend doing before attempting the robin painting. Quick quiz, what two
techniques can you use to blend in the
different tones? If you said using a dry brush or a wet brush to
blend in a different tone, you are correct. We're done. Keep practicing our practice
maybe one or two times, use different
colors if you want, just to get those
different tones blended in really nicely. I hope you enjoyed
technique number four. And we are now going to move
on to technique number five. Once I have finished painting. The two key pointers
will blend in our use a dry brush to blend different
tones of wetter paint. And use a wet brush to blend different tones of dryer paint.
9. Lesson 9 | Technique 5 | Flickering: Hello and welcome to technique
number five, flickering. This technique is really, really fun and it
can be used well. We've had critics as it can with watercolors because
they are water soluble. What you need to do is
hold the brush parallel to your painting surface and tap
it across with one finger. Tapping gently
produces a pattern of mostly small round
dots are random size. Tapping harder produces
larger spotlight marks. And also, if you tap harder, the paint ball traveled further. So just keep that in mind. Then matter how you use it
splatter is a great way to add extra touches of
excitement to your art. Two key pointers for
a flickering are. Tapping gently
produces a pattern of mostly small round dots of random size and tap and harder produces larger
splits like Marx.
10. Lesson 10 | Technique 6 | Detail: Hello and welcome to our
last technique number six. And this is detailing, this is my favorite
technique and one that I use most in my paintings. For this technique, you need quite a few small brushes
of various sizes. You can add the tiniest
detail to your painting. Your brushstrokes should
be slow and intentional. Need to wet your brush, debit dry a little. And remember, you only need to apply a small amount of paint. Wipe a tiny bit of
this paint away as you don't want too much paint
for the tiny detail. You need a little
water and it'll paint, although you need
your brush not to be too dry because you need to follow
through with a stroke. White paint can be used to
create lights or reflections, and dark colors such as black and grades can be used
to create the shadow areas. There are two key pointers for detailing are your
brushstrokes should be slow and intentional and wet your brush
debit dry a little. And remember, you only need to apply a small amount of paint.
11. Lesson 11 | Introduction to Robin Tutorial: Hello and welcome to the robin tutorial section of the course. Well done for practicing those six crucial credit
painting techniques, make sure you have practiced
it numerous times so you fill in a little more confident for
painting this robin. If you're a beginner,
take your time, pause videos often
as you would like, and just try your best
at painting this Robyn. And if you feel like you'd
like to have another go by all means I encourage
you to do that. So today we're going to apply these techniques to paint
a beautiful red Robin.
12. Lesson 12 | Robin Painting Tutorial | Dry Brushing: Hello and welcome to the
robin painting tutorial where we will explore dry
brushing a little further. Just to make you aware that this tutorial can be a little advanced if
you're a beginner. But by all means, give it a go. And you never know, you might surprise yourself, but if you're not overly
happy with your under result, just put it down to practice. Try again another day and each day you'll
get better at this. So I just want to say
that this part of the course is a little
bit more advanced, intermediate, you
should be fine. Beginners, take your time. Really listen to
the instructions given and don't be disheartened
if you're not keen, if you're finished, result. Try it again another day. In today's tutorial, we will be focusing on painting
our Robin and I've painted the
background with some phthalo green and Mars Black. Once this is dry, we are ready to use our dry
brushing technique. I want to create
a depth of field or some green bushes
in the background. Perhaps there are some pink
flowers amongst the bushes to want this background
to be blurry. It's like taking a photo, the robin will be in focus and the bushes in the
background point B. So let's just go back to basics
from the technique video. Do you remember what you
need for this technique? The fitted may give it away. You will need some tissue or
a rag and a flat old brush. Remember important, your brush must be
owed because it will take a bit of a
baton. Next question. Do we need to use much
water for this technique? If you said no, you're
absolutely right. We don't need to use any
water for this technique. In fact, it's forbidden. How are we going to
create some texture? Do you remember how we
would create texture? If you remember, I
said we will have the canvas and the brush itself to create some
interesting textures. As you've seen the footage here, we only had the paintbrush to create some
interesting textures, but we will also have the canvas to create a really
interesting effect. So let's start by
making a softer green. I'm going to mix phthalo
green with some yellow ocher. I want to make a sap green. You may already have some sap green in your
credit paint sets, in which case you can
just use that directly. Or if you want to
change yourself, which I always recommend, give it a go and make
your own sap green. I'm just going to take some of the phthalo green with a dry brush and some
of the yellow ocher. And I'm going to mix it
into the phthalo green. And I should get a
nice sap green color. Remember I'm not
using any water, just the paint and
the dry brush. The paint itself is probably wet enough if probably
a little too wet, which is why we
need to debit dry afterwards on the tissue paper. Do you remember what sort of emotion paints
to be moving in? If you set secular or crisscross motion,
that's fantastic. You can even use a dabbing
motion for these brushes. I found that quite helpful. For clouds and waterfalls, a circular motion seems
to be more appropriate. But for brushes,
the dabbing motion almost creates the
individual leaves, but slightly blurred out, which is the effect
that we're going for. But later on I will mix in a little bit more
because at the moment, I think Netflix,
a bit too bright. If you're green does
look too bright, you could perhaps add
a little bit of Mars black to darken it
ever so slightly. By adding some Mars Black to the sap green that you've made, it will darken the color, bring the contrast down, and it'll blend into the
background a lot more. Simply, you could remove more of the paint
from your brush. Perhaps there's too much of this sap green on my
brush and I just need to dab it away too much as our answer has needed to
dab it away a bit more. And therefore it produces a
lighter effect on the counts. Here we go. I am adding some
crisscross motions with my paintbrush to really
mix those colors together. And what I would advise if your paint is a little bit too
wet of Z, allow it to dry. It won't need very long whatsoever because there's
so little paint on there. Before adding another layer. Perhaps even add a darker
layer to the bottom, a brighter layer to the top
to create some highlights. Really be creative with this. I mean, copy what I'm doing but add your own personal
touch to it as well, make it personalized to you. So here I'm adding
some highlights to the top because this is for
me where the light would be. I'm adding a lighter
shade of green. By, by a lighter shade of green, I'm just adding more of
it onto the background. What's nice about painting on
the dark background is that it contrasts really
beautifully against the paint. I'm continuing to use
now circular motions to move the paint
across my canvas. I've used slight
dabbing to begin with. And then I use a
crisscross motion and followed by a
circular motion of the paintbrush to
really move the paint across again and absolutely
no water on this. And a little paint
on your brush too. Don't forget the paint
itself is also quite wet. For the pink flowers. I'm going to use permanent
rose with a little mask black, just to darken them
ever so slightly because the permanent rose is quite a strong pigmented color. So I would like to add some mass black just
to bring that tone down ever so slightly because I don't want my
background to be bright. I want it to be a dark color. Remember that you
are going to wet most of that paint away
using your tissue. And we want little paint on the brush as we don't
want it to be too wet. I know I keep repeating myself, but sometimes we do forget these really important
bits of information. I'm just mixing together
the parent rows and mafic. I'm wiping it on the tissue, removing any excess paint. Now I'm going to apply
it to my Canvas. Straightaway, too much paint on the paintbrush,
therefore, removing more, use my tissue paper.
Little better. Now I'm just mixing it using circular motions to
mix it into the green. Again, I want the appearance of the background to be blurry. Out-of-focus. Little more permanent rose. My pennant Rose was probably
a little too dark zone. I want to add more
of that color. These will be the highlight
areas on the painting. Paper remove excess paint. And then I'm adding in
some little highlights. Too much paint, wipe it off. You'll be back and forth between the parent is switched
paper and your canvas, adding in some little
highlights at the top. I did stop for a little bit because I wanted
to paint to dry it again. It didn't take very
long because there's not a lot of paint on there. And once it was dried,
I then started to apply a second layer where
I just wanted to add some highlights and some
shadows to the piece. Continue to do this,
continuing to add the paint, very little paint, no
water circular motions. Sometimes I don't emotion
and criss-cross motions to and eventually you'll get something that's out of focus. But you know, when you
paint the bone on top that some greenery
behind in my eyes. These would be the bushes. That's the robin
paid-in tutorial. We'll brush dry brushing. Let's go into the net
technique. Again. Don't worry if you're
struggling with this. Just keep practicing
is all about practice and having
belief in yourself.
13. Lesson 13 | Introduction to the Outline Video | IMPORTANT: This is the
introduction video for the lesson on drawn the
outline of the robin. I just wanted to
describe to you what you will need outline process, why you should adopt
this method to your drawing and
some side notes. Your equipment. Photos method, you will need a ruler measuring no less than 15 centimeters. You will also need
a white pencil or some white paint and water. I use titanium white
with little water, you will need a small brush, a size one would do. The outline process. This method is unconventional, boy, incredibly accurate
and relatively quick. I take measurements of the
length and width of the bird. With these numbers, I
can determine where it needs to be positioned
on my campus. For example, this campus
is 15 by 15 centimeters. The higher the bird
is 11 centimeters. So I want to allow
two centimeters above the Robbins head
and below its body. This same rule applies to
the width of the robin two. Once I have these general
measurements and I'm happy with how I'm going to position
a bird on the campus. It will begin taking measurements
of the eye and head. I always start by taking measurements around
the head first. For example, I know
I need to leave a two centimeter
gap from the top of the canvas to the
top of the bus head, from the top of the
bird's head to the top of the bird's eye is
nought 0.8 centimeters. I have my first two points. Then I take the
measurements of the eye, both width and height. Then with these measurements, I can begin to draw
the shape of the eye. Once the I is in place, I build everything else
around this point. You can see a very
detailed account of how I do this step-by-step in the next video is very far up with lots of
measurements are devised, listened to the next
video in its entirety, and then apply this
method to your drawing. Watch and listen to the next video and
then draw the bird. Why should you adopt this
method to your drawing? This method is a
great way to ensure accuracy in the shapes and
sizes of your drawing. Not only this, it
is also very quick. With time. However, you will be able to draw a lot
of shapes with just using your eye and the occasional measurement
just to check certain areas. Some side notes. Please note that the
picture that you get maybe a different size if you print your
picture out than a measurements will be
different from mine. If you have your photo on your phone and then the
measurements will be smaller. The measurements you take
from the Robin photo may be different if
you're using your phone, smarter people, or larger paper. So in conclusion, take your own individual
measurements and apply my method to your drawing. Lastly, I unfortunately
haven't recorded a small section of
the outline video because my phone
storage got used up. This was incredibly
annoying at first. But I think the footage of me explaining each
step we were apart, drawn bird was actually
really helpful and concise. So watch the entire video next and then applying this
method when during the bud.
14. Lesson 14 | Robing Painting Tutorial | Drawing the outline: This picture of the robin, I is around no, 0.6.5. Now I know the top of the
head is around 0.70.8. I know the distance from the top of the head to the top
of the eye is no 0.8. I also know that the entire length of the budge
from the tip of its beak, this is roughly around six. From here to here is
about six centimeters. Also know from around
here is around 11. I'm going to position
it in the middle, around nine at the bud is not at the bud is
around 11 centimeters. Take 1115, which leaves
me with just slide. The tip of the head
is around too. To me, this is a mock two centimeters
and we get hit is no 0.8. So the tip of the eye, remember, this is no 0.6 mark. And then you can move it around and drew the
shape of the RN. Next, I need to know
the distance from the edge of the beak to
the edge of the eye? I don't know, 0.6.6 lymph the beak important for about 1 for the edge of a lake. Then you can draw the
shape of the beak. This is the top of the head. The distance edge of
the head to the eyes. We can draw a shape all
the way up to here. Also see this pattern that
we can just roughly draw. Now for him to hit
that where it goes. Measuring about one
form of our head. One way, no, that's where it goes in and I
just talked to come out. We also know from 4.5. Then from the edge of the eye is you have this
milk and this walk. We can move this down. I want to know the distance
from here to here. That's round six,
around six market. Then we want to know the
distance from here to here. That down, that's around 1.5. So I'm OK. And then you just
follow the pattern down to the point in you marked. Then I want to know the distance
from the tip around him, which is bound to how
deep that is, 0.5. So you can see he's which
went up to about two. Also need to make sure there's about four or five roughly. Know what I'm going
to do is measure from gotten no point for going to follow it is round. Then we need to
know at a distance. So from there, just around here. I'm gonna discuss in
how much does it, the m by two just comes around like this. This really just
follows it round. Sorry about, let's say from the tip which is around
here, it's just below, just below about five
centimeters long. So just provided from
this apex to the edge. Bringing this down very close to the body is quite
straight as well. So we need to we need to
bring it out in the tool. Let me go straight down, roll it to this part
here, then roll it. You could measure this one if you wanted it to
be more accurate. It actually bringing
his buddy out. Because I can see
that this gap here, so not sworn on and then
the gap bar I provided. Then we can bring
this out like that. Then this little
wing here like that. Then how long is the
title from here to here? Let me bring this down. This isn't the corner here. So that's in the corner. Just go strike down. Let's see what this is. That lineup lines up
with the tip here. Him bring it down. We can start the leg around. Like itself is about
it's about 1.3, roughly speaking, ready, cute. At the moment, I must say, if we have a look at
the foot from the male to top is about 1 free. I can just draw in the nail. Then this part of the foot. Then we go from
the top here. 2.5. Welcome to split. The answer comes up. Chris, hey, you could even
measure the creases and then, don't forget this is the NAOH. Then from here a
little toy comes out. Then there's a little toe, you can't really
see it for well, it is a little toy here as well. Then we can work on my
light and when we're painting. Okay. So that's the foot lots
of measuring on the foot. I would advise you to measure
each of the segments out. If we're measuring
from about 1.5, then we have the 0.5. Then we have these parts. We can just build the
rest of the third round, or I would recommend perhaps
measuring those out as well. And then this tiny claw. Just add the details vital. Get this ledge and I want it to be straight
as I can get it. I'm just going to
bring it out. Maybe. Not just feel like having
more of a letter to the science because it wasn't it wasn't quite
central North for me. Don't see the target
of this foot ledge. I'm happy with the
position of the face. Haven't included this
raphe, but yeah. Just did about two centimeters. We know it's gonna finish him. Some fluffy feathers here. That was beautiful guys. And let's move on to
some cut on his coat.
15. Lesson 15 | Robin painting Tutorial | Adding Water: It, so we're going to do add in. First thing, you
need your brush. When you, if you
look at the bird, you can see it's kind of a blue, tiny bit at once in blue here. Let's try to solve as we go, white and a tiny bit of
blue that's too bright. What we will have to do
is add a tad of black. You can add a little
bit of black. We're getting closer
to the color. I would even argue a
tiny, tiny, tiny bit. Some cadmium red hue, slight purple tone to it. Maybe we can fix the
cutoff of it now. We've got some white,
some blue, white. What color do you
think I need now? I want to eat some black. Then we've lost that
purple time we meet, so we need to add
some more purple. Ready even to produce
a more purple tone, that color there is perfect. Right here. This
color is really good. I use some cadmium red hue. Once a blue, black, titanium white to get this color and I'm much
happier with this cotton. Now, let's go with adding water to our paint in. The blue is quite a lot
of this blue color. And here I'm going to add
more water to my paint. Broadway. Use a tissue as well
if you need to. Straight away, That's too
much time adding more water. I'm adding more water to get rid of the excess
water on my tissue. Too much water. Too much water. Drag this water out. Get some more water. And just drag this color out. This is just a foundation layer. We need to add layers to this and that will go hand-in-hand
mom at in more detail. But this color is perfect. I didn't say maybe
a tangible right? Actually. Of course some paint on there, but it's too thick for
this stage of painting. Just put a tiny bit
of water on my brush and I am now pulling that color away
from that spot and just using the water
to dilute the color, to drag it out across the errors in that column
needs to be there. You can see how I'm
using the water to drag out the color
too much or denounce, I'm dumping my brush, dry it. I'm utilizing the
water own painting to really just pull that out. There is some moral here. So I'm going to start
as water, my brush, just go across and then we
can leave that area for now. I believe there are some
around here as well. So I bought on the brush, pick up some cutoff, get rid of any excess water on your
tissue, paper tissue even. And then apply a boy,
you see the cover. I see the current here. Get rid of the paint. Get rid of the excess
water from my brush. And what do I need to do? I need to drag out this paint
using water on my brush. Put more water on my brush, damp the axis pulled off. Using a water to pull from the era where
applied onto the campus. We almost get a gradient
forming from the adeno photo. I'm happy with that
where the paint is. I'm going to let that dry. And I see a tiny bit of this
color on the nose here. I'm just going to add a little
bit of this color head. Again, wetting my brush, get rid of the excess
water on the tissue, and just drag that color out. Here, we've added the
bluey purple color, we've made a few twice
already blend out. So this is the first layer. When we go in and add more detail and more
blending of colors, we will add more of a kind of hair and become more prevalent. That is adding water.
16. Lesson 16 | Robin Painting Tutorial | Blending: Next up, we need to
blend some colors. I'm going to blend that the
red chest with you guys. I've already got some
red on my palate. So if I wanted to make
an orangey color, what do you need to add? We've read the yellow fantastic. So I'm using yellow, cadmium, yellow, medium hue. Newton brand. Just put a little bit
of that on my palette. So-called Red, got some yellow. And I'm also going to apply
sienna onto my palette. I'm also going to
apply some yellow or I think if we start with the yellow
most part which is here, I'm going to add some white to the yellow just to soften it because as
mentioned before, credit paints have quite
strong pigmented times. I just don't want to bring that yellow down a little
bit in terms of its color. Adding more white here. Figure it out because I've
now got too much water. Just try that. First layers. You can see there's two, not yellow and the saturation
is not high enough. Adding more yellow, so
that's a little bit better. Then we can do the detailing. We can add more yellow to this. This is the foundation
color here. I can see that there is a
yellowy color all the way down. Bring it up ever so slightly. Now what I'm gonna do, I noticed that blending, but I'm going to
utilize my water. And I've added
water to my brush. I've dried any x's and
I'm just going to pull the yellow was a slightly up like that,
kind of blends it. Now we've got a foundation
with the yellow. I'm going to make a orange. So I'm going
to use some yellow. Red. Need more yellow, more
yellow, more yellow. A little white, perhaps. Maybe some yellow. Just play around with the colors until you get a card that
you're happy with. A bit more white tad of water. Get rid of the excess
water on my brush, on the, from the
brush onto the paper. Now we can apply this orange. I'm just gonna put it
to me that's too light. It's Anita, make
this orange darker. I'm going to add a
little bit more red. Might even tad black. Smallest amount. Yeah, that's cool. About maybe some burnt sienna. Yeah, that's much better. Then we've got the
yellow hear me kind of just want to
blend it together. Pickups in the other and
our brushes as well. Bring this out. Bring it down. And you notice blank plot here. Clean your brush completely. Get the paint color off
and then dab it dry. And then we just want to pick up some yellow and white mixed, mixed, mixed mix,
little bit of water. Then we're going to blend
this collar hearing aid with the yellow paint brush. Added a car. And you remember to blend, you can use a dry brush
or slightly wet brush. Sorry, I clean my brush
completely getting the color off. I'm going to now mix
these two colors together using a slightly damp brush. I'm just going to bring
this out a little bit using some of the
water on my brush. Now I'm going to add more of this burnt sienna
orange color made. Just add it down. I'd even argue adding a tiny bit of red to make it a
little bit more red. I don't know if you've
seen avoidance chess, but sometimes it really orange. I must remember that. Let's say in that case
I'm going to add more yellow to my paint brush. I'm just applying the color RSEM about a constant blending of the colors and the
application of more columns, mortar, a dry brush to blend, and then a wet brush to blend. It was just slightly. I'm just adding this color here. More confident with
this color, though. Hence why I'm applying
it with more confidence. I do see this kind
of hair as well. It is a little lighter, so I'm going to add a bit
of yellow circle made. Just going to mod are
more paint on my brush. I'm going to blend these
two colors together. This one down here bring up
is slightly blend, blend. Because the background is dark, you can see the color coming through this foundation level. Obviously, we need to apply
thicker paint afterwards. And more detail will come with time to get the basic
colors down first. Then I want a little
bit of burnt sienna. Here. I'm using black
and burnt sienna. Burnt sienna other than black, that is just applying a
little bit of red as well. That's a burnt sienna
black and red is great combination to make something really dark
parts of this bird. I quite like the
color combinations. I am also applying that down here and I'm going to put some more water to my brush, get rid of the excess water and blend that color with the
color in front of it here, as you can see, this paint
here has already dried. I'm not going to ask for
lender in very well. I would have to
apply more paint, more paint on my brush. This is the burnt sienna of
black and cadmium red hue. Dog errors. For the dark areas, you want to use burnt sienna, black and cadmium red hue. Then we can add some
highlights on top of that when we add detailing. Part of the lesson. Also around the face. The feathers around the
beak of zoom a bit darker because some shadow being
created around a beak. Also around the eye
ever so slightly here. Now what I'm gonna
do is I'm going to grab one of my lighter colors. Blend in with the dark. I apply it at the bottom. A lovely blending going on here, the darker tone and then
laboratory now we've made, I'm actually using water
to blend together. Again here I'm going
to add a little bit of the lighter tone around. This is more than
the orangey color. Then I'm going to pick
up some yellow mixed in amongst all this ever so slightly and then we can
blend it all together. There is somewhere around here. So now what am I getting
rid of the color? Draw any excess water
on my tissue paper. And now I'm just going to
blend really needs to get rid of the water because
quite a bit of water on my campus as is. For blending, you
need to continue to add different shades
of color you see. And use the dry brush to blend the colors together
if they are too wet. Or use a wet brush to blend the colors together if
they are a little too dry. And it's just simply
about balancing the two. And continuing on.
17. Lesson 17 | Robin painting tutorial | Detailing: Detail in some base colors down with blended
them altogether. Now let's add in the crucial details
and go stop the chest. So I'm going to
start around ahead because the head hasn't had a much hasn't had
much attention. I'm going to add in some of
the highlights around the top of the beak and the top of this part here with some yellow. I'm using cadmium
touch of white, tiny little bit of white. And I'm just going
to very slowly, this technique is very slow. Make sure you're not no
rush to go anywhere. Really slow. Just take your time. Listen to some music. Ready, enjoy adding in the
smallest little details. Because it really is
a small details add up to make the
picture really pop. I'm just finding the
highlights around the beak. Very fine strokes
in one direction. Very small, very fine, small and first slow. Just adding in those details. Tiny bit of blending and
adding water needs to go on. Sometimes the skills
too much to give her, but I will try my best to stick to just detailing for now. If we focus on here,
basically small brushstrokes. Sundays could be
individual feathers here, especially around the getting the detail around the
eye is really important. But if you don't apply the correct amount of detail around the eye and in the eye. The painting just lets off. So I would spend a lot of time around this part
of the painting. You'll add in detail. I'm just going to add in some of these yellow highlights
I see at the bottom of the eye. The top as well. Very small, thin. You really do need
us a tiny brush if you want to add this level
of detail to your paintings, make sure you don't have too
much water in your brush, has nothing too much
water is never good. Make sure you tap it
dry on your tissue. And then just slide it up in
the details one at a time. Going to add, I'm going to make a new girl and
what a peachy color. White, little yellow. And I've made a very
light peach color. I do believe it's quite
peachy around this suddenly I even do an add tiny bit
more red. Type it up. I don't have a lot of water on my paint
brush for the detail. When I have a lot more
paint, as you can see, it's thick wall and
much less water. Because it's not about
blending is about adding layers on top with
the fine details. Sometimes you will need
to wet your brush just to blend in some detail
parts around him. For me, this is too harsh. I am going to wet my brush. I am going to just pulled
up a little bit down. With your detailing. You want to make sure you don't have as much
water on your brush, but enough to make a
decent brushstrokes. Brushstrokes need to be
small, intentional, and slow. This is about taking
your time and enjoying it as much as you can. It's very, very red accident. Even to watch, even
to watch people do this slightly
peachy around here. So I'm gonna grab some
page of the course. Applies in detail, run
some PHP code here. I do want to blend
it tiny, tiny bit. Let's add some
detail around here. Need cadmium, yellow
cadmium and read it. Black for the shadow
with the detailing is about adenine and the
shadows and lights. Lights, you're
adding more white. Demo black. I don't want this
to be a little bit more on. Those need a little
bit more water. Let me just put in some
orange highlights. Excess tissue paper. I'm just adding in some highlights with
this lighter orange I've made also around a little bit too much
water on the paintbrush. You can just to
the tissue paper, paint, find small brushstrokes. I didn't in the highlight areas. Awesome. Some done here is I didn't
highlight brooch brushstrokes. These highlights are
orange and then we will add white
highlights as well. If God is about what
is just about adding layers added in details, it's not just one
sweep and it's done. You need to work on each layer. I need to work on the mortar
or the brand in detailing. Much orient is a
lot more insurance. Foreign strikes, orange
feathers of him. I'm going to now I'm
going to add some white to the orange. If you want, you can make
the paint editor FEC just add some texture to
the overall painting. I think that's sometimes
really lovely to see some thick brush
strokes of paint. Just to really see some
texture coming up. You can do that so
well with critics. Something that you can do
really well with oils as well. This color is really nice with the white highlight,
especially ON delete. Neutralize his peach color. We made a bit more. What do you see how
intentional and how, how much attention I am
applying to this area? It will take you a while. This area will be
worth it completely. And the title passed by. You won't believe it
hadn't been not much done. See if you can allow some
thickness to your brushstrokes. That texture really does
make a world of difference. I can, I'm being
so international, sorry, dedicate
my paint brushes. Applying the advice
and the detail. More detail around here. The thing is with
detail, you can be as detailed as you want. You could spend hours and
hours just on a detail. There's no limit to how
much detail you can apply.
18. Lesson 18 | Let's Finish the Robin & Summarise Our Learning: So I just wanted to summarize this learning objective we've covered in the last few lessons, apply your understanding or for credit painting techniques
to paint a robin, we explored add in motor, blending, dry brushing,
and detailing. Well done for getting this
far into the course, guys, you have done fantastically
well and I'm looking forward to seeing some
photos of your progress. You can share with
me your practice pictures of the techniques, the robin painting or both. Whatever you have produced
during this course. I'd love to see
it in this video. I'm just finishing up the
detailing of the bird will from time to
time use blending and adding water technique too. You will find that you'll use all these techniques together
and in different orders. Just remember with
the detail in to make sure you use white paint to add those unimportant details and a black paint
flows shadow areas, it really makes a difference. I was slow and intentional
with all my brushstrokes when adding the detail
and formerly enjoyed it. How is your organ
painting going? Did you enjoy applying that some of the techniques
we learned in the costs, perhaps you struggled
with the painting. If you did, that's completely
No. We are here to learn. With more practice.
We can improve, suggest reviewing the techniques and practice these
skills a little more, then come back with a little more confidence and have a go paint in
and robbing the game. So let's summarize
the six techniques before we move on to the quiz. Dry rushing. There were free key
pointers were dry brushing. D remember what those were. If not, don't worry, I'm going to tell
you now you have an opportunity to re-lend
them if you need to. Use no water and little paint. Dab your brush dry on
the tissue before use. And the third one
for dry brushing. Mesial brush in circular, crisscross or tab Emotions to
create interesting effects. Blending. There were two
key pointers for blending, and they will use a
dry brush to blend in tones of wetter
paint or the upsets. You use a wet brush to blend different types of dry paint. The technique. So adding water, there
are two key pointers. Use the water to
dilute and spread the color and create a
gradient using water. Flickering, tapping
gently produces a pattern of mostly small
round dots of random size. And tapping harder produces
larger spotlight marks. Stippling. For dark areas, you apply a great number of dots and keep them
close to give them. The second one,
your brush needs to be dry and you apply a W motion to the paper for
detailing. There are two. Your brushstrokes should
be slow and intentional. And the last one,
what your brush, dab it dry a little. And remember you only need to apply a small about a paint. They are the six techniques
with the key point is each one of those do recommend
you review them again, try and get them
embedded in your mind. Practice the skill
lows are times. Definitely try and
perhaps it more if you struggled with this painting, like I said earlier,
that's absolutely fine. But all here to learn, I would recommend practicing
those skills and then returning back and
try again or try a different bird using the
skills you've learned. If you do, we're trying
to paint in a robin. Again, send it to me. I really would love to
see your improvements. I would absolutely love to see your first robin painting and you'll set them
up in painting. I would love to see the
difference between the t. That'll be awesome
if you could do that, if you are going to
do a second one. So I'm gonna let you enjoy the rest of
this speed painting. As you can see. I'm just
adding fine details. Those fine details make
all the difference. They really do. Look, I'm using
this orange paint, adding some orange highlights, and I'm also making
use of water to blend. And then I'm using
that wet brush and the dryer brush to
blend them all together. I'm using all the
skills I've taught you to produce his
stunning robin painting. And you can do it too.
And I hope you have. And if you feel like
you're not quite there, by all means, do
it again please. For the ledge, just
a tip for the top. They allege I'd make it wet on the side of alleged,
make it darker. Then you just have to use your blending skills to blend
the light into the dock. And that's all you really
need to do for the ledge. You don't even have to include a ledger if you don't want to. Yeah. As you can see, I'm
being so intentional, so slow is half careful with where I'm
placing my paintbrush. And it's added in those
fine tiny details. And that's what you
need to do to enjoy it. Listen to a podcast, listen to some music. Really relaxing to
the entire process. Okay guys all let you enjoy
the rest of this video. And good luck in your quiz.
19. Lesson 19 | Quiz: Hey guys and welcome
to the quiz section. Before we get started, I just want to review or four learning objectives
in today's course. Number one, understand what the advantages of
acrylic paints are. Number to learn two
or more key pointers for the six different
acrylic painting techniques. Number three, practice
these six techniques on paper a couple of times. And then before the challenge, apply your understanding or for acrylic painting techniques
to paint a robin. So at this point
you've practiced the sixth techniques
are a couple of times you're feeling more
comfortable with them. You understand the
two or more key point is applied for each one. You've painted the robin. You may have even painting a second Robin or
thinking about doing it, and you're feeling confident and able to answer
these questions. There will be five
quiz questions. I will ask you the question
and then pause the video, write your answer down and then I will reveal the answer t. Good luck guys. Let's go. Question number one. If I have two different tones
or dry paint on my canvas, and I want to blend
the two together. Does my brush needs to be wet
or dry it to blend the two. Pause the video, write down
your answer and then I will reveal the answer is wet. Your brush needs
to be wet to dry a two different tones
of paint that are dry. However, if the paint
on the canvas was wet, you'd use a dry brush.
If you put wet. Fantastic. We're done. Let's move on to
question number two. Question two, what
should my brushstrokes be like when adding
detail to my painting? Pause the video, write
your answer down. Your brush strokes should
be slow and intentional. Question free. What three types
of motion should I use if I want to
do some dry brush in three different
motions are circular, crisscross or Christian for if I want to create a darker
area using stippling, how should the
thoughts be placed? For dark areas, you apply
a greater number of dots and keep them
close together. For the final question,
question five, how do I spread color
across my canvas? You need to add
water and dilute it. How did you do? Did you get five out of five? I hope you enjoyed the quiz and the course are really hope
you've learned something invaluable and I hope improves the quality and
the detail of your artwork. And by all means, keep practicing these
skills over and over again because we've are it
really is just practice. I wish you all the best guys. And I hope to see some beautiful pictures
in the feedback.
 Jessie S., Artist