Transcripts
1. Introduction: Hi, guys, I'm Inga
fans Illustrator. I have been paying for 15 years. So I have a bit of
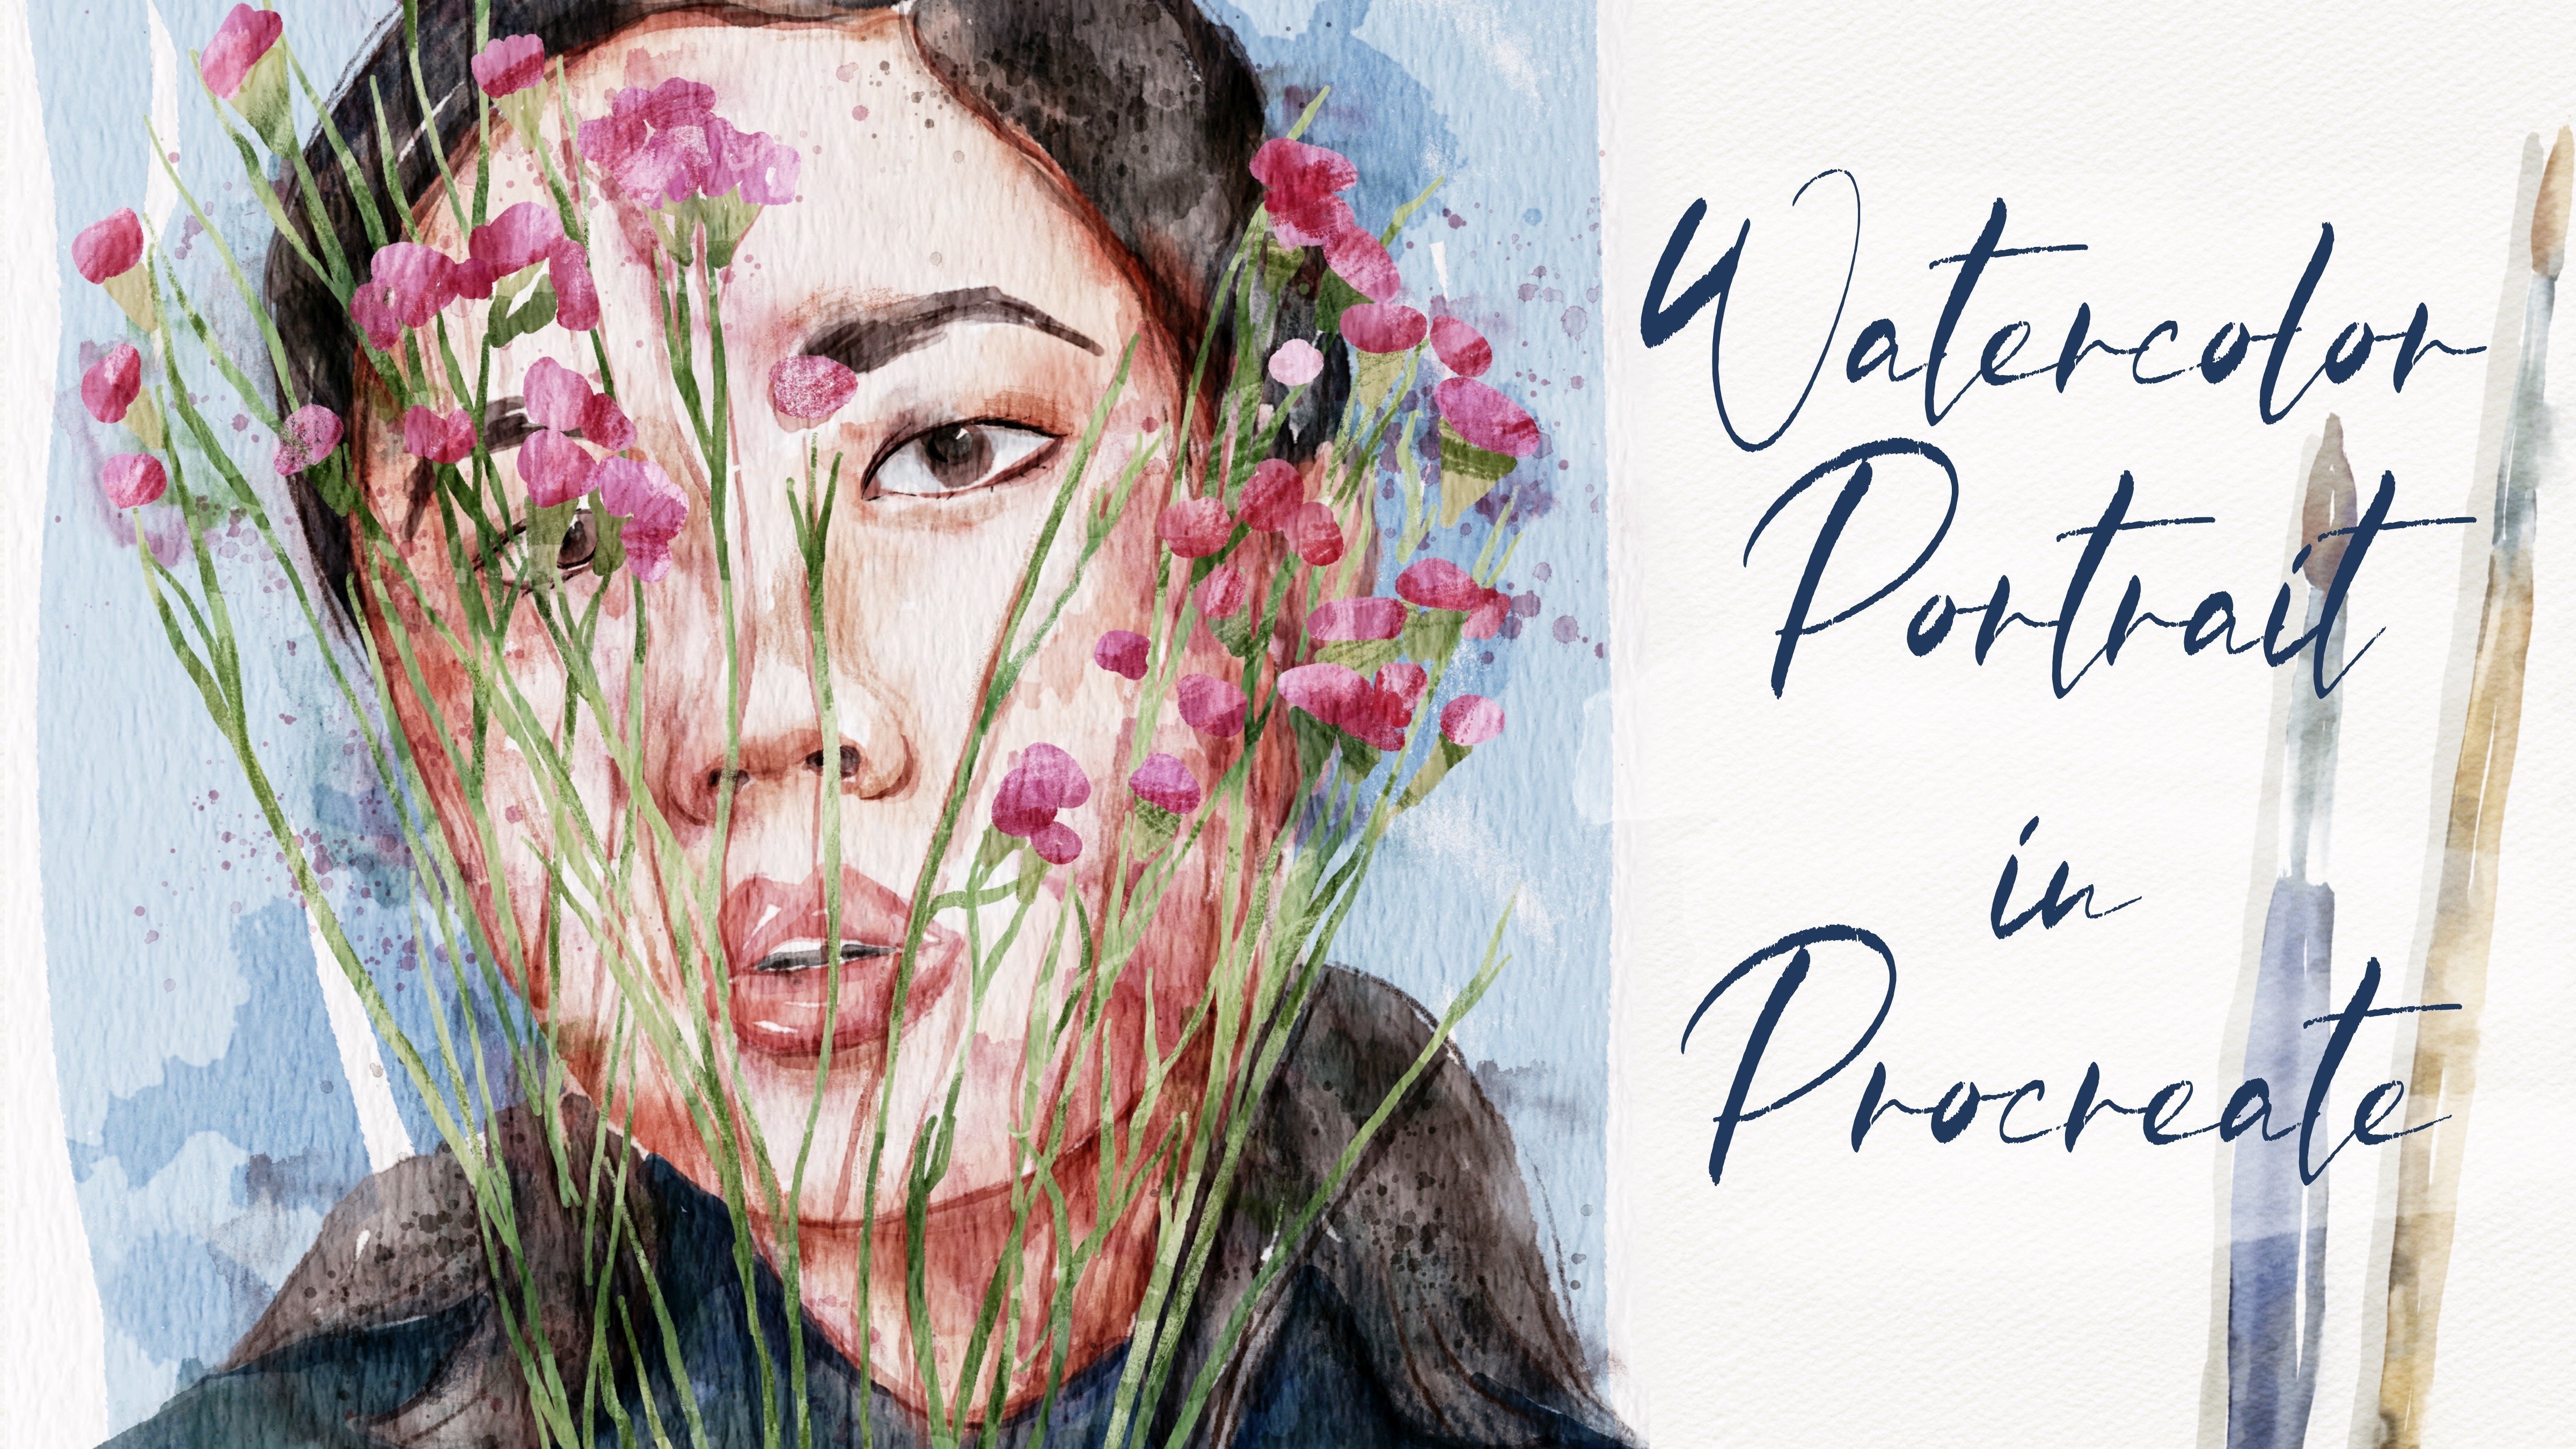
experience in this field. I'm obsessed with procreate, watercolor, magicas
and cute stuff. And in my classes, I constantly share the
knowledge that I have about the procre how to create beautiful watercolor
illustrations digitally. So welcome back to my class, and let's dive into
watercolor and pencil art and create altogether lovely animal characters
in cartoon style. And in the end of my class, you will learn more
about the procreate, especially where to
find inspiration, how to sketch in
fast and simple way, how to use layers,
clipping masks, and how to create watercolor
texture paper and how to add volume and color
variations to your art. Most importantly,
you will learn how to create watercolor
character in procreate, using digital watercolor
brushes in a fun and easy way. I will show you my whole process from the start till finish. First of all, I will show you where to find
freebies and how to import them into the procreate and is
creating texture paper. Then we will talk about
where to find inspiration. And our next step we'll
be creating sketches. And finally, we'll start adding colors, shades
and highlights. I will show you how to
create characters from the simple shapes and how to
add more and more details. So we will make our
painting process a little bit more advanced. And as a bonus, I will share with you my own custom brushes, color parte, and my own
pictures that I created. This class is great for
intermediate and advanced levels. For those who are interested in digital watercolor art and
character illustrations. And one more thing that
I want to mention. Your opinion and your feedback
is very important to me. So feel free to leave
what do you think about the class in discussion
or review section. I will be glad to receive
message from you. My dear art fellows, I can't wait to
start this class, and definitely, I can't wait to see what you apply
to project section. Let's not wait, grab your
iPad and Apple pencil, and let's paint together. Okay.
2. About Class Project: So guys, your class
project will be next. You can follow my steps and create lovely character
illustration. The same that I chose. Or think about the characters that you like and then paint them using the tips and
brushes that I gave you today. Lis procreate for this class
with iPad and Apple pencil. So if you have it or some other drawing pads or
just regular paints and paper, please join our
class and good luck. In today's class, I will
paint character Illustration. We will start with
simple drawings and then move to
more complex shapes. Our main focus will be animals, and we will combine two mediums together, pencil and odiclor. Once again, you can choose completely different topic
and draw something new. Try, experiment and enjoy
painting processes.
3. Where to Find Freebies : In this class, we will
talk about resources and where to find them.
It's pretty simple. Just follow the steps, go to projects and
resources section, download freebies,
then go to files app, and then import all the
freebies into the procreate. Also, it's hard to create watercolor illustration without
watercolor texture paper. So we'll fix this issue. Let's talk about
that in details. Hi, guys. Hello, everyone. During our today's tutorial, we're going to plain
lovely animals. We will create animal character in watercolor style
in procreate. Today, we'll show you the
easiest way how to do that. We'll start from
the simple shapes, and little by little,
we're going to jump into more
complicated characters. Let's get started. For MT class, I'm going to use procreate, and I will paint on iPad. Or if you like, you can use just other drawing pads
or just regular paper, pencils, or ink and
watercolor, whatever you want. The most important is
to learn how to turn your animals into lovely
chubby and cute characters. I'm going to procreate
and then I need to set plus and then
choose screen size. Again, where to find
all my freebies. When you open my class, please do it in browser. It can be Chrome or Safari. Why browser? Because if you
do it at Skillshare app, my freebies might
not be visible. You open my class
and then you go to projects and
resources section, and in the right corner under
the headline resources, you can find all my freebies. You download them, and
then my suggestion, you need to open procreate from one part and from another
part, open files app. Xt. From one side, I have procreate and
from the left side, I have files app with the folder where I
have all the freebies. You might find all the
freebies in downloads folder. Next thing that you need to
do is you need to drag and drop all the freebies into
the procreate, Lexis. You text swatches,
drag and drop it, and then you go to
this color palette, and here we have
animal character. By the way, make sure
that you set it as a defold I can show
it to you here. You just need to tap it. You can go to disc and here, you will see our color palette that we're going to use today. Same you need to do
with the brush set. Drag and drop it on the
top of your brush library, you can find my brush set. Here I prepared for
your special brushes, some stem brushes that you
might use as a background. So some crosshatching, that also can ease your
painting process and add some playful wipes to your art and some water color
brushes, along with pencil. I also have six per pencil, which is native procreate brush, and the rest of the
brushes are my brushes. Guys also have for you a few sketches that
you can use if you don't want to sketch by yourself or you just want to
color your character. When you've done
this transferring all the freebies
into the procreate, we just need to close files app. Another thing is let's prepare the layers for our
painting process. Vcated layers, and then I
go and grab this bag color. Next thing that I need to
do is go to the paper, make sure that you set it
as a maximum into exes. Next thing is, let's
just duplicate it and merge together. Let's duplicate again. Now let's change the plandlaer
mode to different modes. From normal, I will
go to color burn. Here I will go to linear burn. I want to duplicate one layer
again and from color burn, I will go to simply multiply. Then I want to
duplicate color burn together and select
two color burn layers, and I will merge them Same I will do
with linear burn mode. I will duplicate it, select two layers, and
merge them together. Then I will go to linear burn blender mode and move
the pasty til 60 or 65%. Then I go to multiply blend mode and also lower the
pact tel 50, 40%. We have our paper. Next, let's just group our
paper layers together. By swipe and write, I select
the rest of the layers, and then I press group. Netin let's just rename
it and write paper. Next, I will duplicate
layers three times, and on the top, I
will write sketch. Write basics, create in
shape, then Dublicate again, rename and I will write sketch, add in details, or just details. You're going to use all three
layers for the sketches, and they will be on the top. Then I will go and rename this layer and I
will write add in color. I will duplicate each layer two times because I'm going to
create a few illustrations. I will reuse some
of the layers a few times and make
sure that you set this layer on the top of your
paper layer group because I don't want this layer to be affected by the papers
that we created. Once again, when you pain when
you sketch or add colors, make sure that you paint
underneath paper layer. Now, I'll show you why
we should do that. For example, let's just
go and grab red color. Then let's go and grab pull
hard H watercolor brush, and this is one of
the main brushes that we can to use today. Then when we take this brush and put it above the
paper layer group, you see automatically you
lose this watercolor feeling. You don't have this feeling like color bleeds into the paper. And then when you place it
underneath paper layer group, you automatically
start having that. So make sure that when
you paint a sketch, it's under the
paper layer group. So you aldisa paper layer. Be HB pencil is very lovely
pencil for the sketching. It's not soft, so I think it's great for
adding basic shapes. B B pencil is a brush that
we're going to use for adding some details and emphasize
some of the basic shapes too. Yeah, B pencil abstract is great brush you just want to add some cross htchins This is cross htching also Mucartn
ways of edging and details. Board water color pasta
water if you want to make your illustration a little bit dry and also soft in some way, and also this brush
is great for adding some texture and shades. Be soft background,
very gentle brush, also great for adding
texture or to sketch and add clouds, xx brush. Wild very abstract
brush, very creative. Also can help you to add
some texture to your art. And boo flowers, this
is a broach that we're going to use for
adding background. Okay, I think we are
ready to get started. You already saw
all the freebies. We imported all the
freebies that we have, and let's just talk about the inspiration and
where to find it.
4. Where to Find Inspiration : We finally move to the
very important class where to find inspiration. What about reference pictures and how to create unique art? Let's talk about that now. Please follow my
steps carefully, and if something is not clear, I'm always ready to help
you in discussion section. Okay. Above the
inspiration, of course, the easiest and the best
way is to go outside, try to take pictures,
or just enjoy the scenery and try to think
what you want to draw. So if you like the
nature as I do, so what you can do is just go around the area
where you live or just go to the forest and look at the things around you,
what inspires you. Again, think about the main
idea of your characters, what you want to show
through your art. Or you just want to illustrate
an animal in acute way. Or maybe you just want to add some life into the
flower or the stone. You also can do it. Nature
or things around you, they can be a great inspiration. Or if you don't have time
for going outside or you just want to sit at home
and paint, it's also fine. So in this case, just go to
the sources like Pinterest, or you might go to
the unsplased.com or pexels.com and search
for some inspiration. And like I said, you can just experiment and drive
from the simple shapes, and then little by little, go to more complex ones. And I decided to
start this flowers, so I was searching for
the flowers that I like, and I found these lovely
flowers that I'm going to use for my first simple
and lovely character. And then I was thinking,
so maybe I want to create some lovely character detration
which is based on animal. Here you have a
variety of choices. Then I came back to Procreate and I saved the illustrations that I think might be pretty suitable for my today's class. Guys also will share my own
references that I found. Then I think we can jump
into the next part, which is sketching process. Like I told you, we're going
to start with simple shapes, and I'll show you
a few sketching techniques that you can use and that can help you to create your character in a
fast and simple way. Okay.
5. How to Create Sketch: Simple Characters : Now it's time for sketches. Pencil part is super
important today, so I decided to show you
two ways of doing that. First, a tricky way how
to sketch in a fast way, and second option is
more traditional way. Depending on free
times that you have, you can keep adding
more and more details. Feel free to follow my steps
or use your own sketches. Whichever will help you
to be happy. Okay, guys. As you see, I inverted
our reference picture into the procreate and I
left it among the layers, and I placed it on a layer which is above the paper layer group. Probably, I want to
zoom it a little bit, and I'm going to use this
flower for my first character. Like I told, we have a few
ways how to sketch and the easiest one and simple if you don't
have too much time, and maybe you don't really like the proportion thing and you know that you might
not do it accurately. So in this case, you can just trace the objects that you need. Let's grab boxes. Let's go with dark purple color. Let's just briefly sketch it. I'm going to speed up
the painting process. This style is suitable,
like I told you, if you don't want to alter the illustration that you
have from your reference art. But if you want to create your own character
means special way, if you want to change the shape, so this type of sketching
is not suitable for that. Then we can just delete the
reference illustration. Now we have lovely flower. How to turn just simple
flower into your character. We have six e pencil. I can increase the size of
the brush a little bit. Okay, and in this case, how
to turn your flower into a character is to add some emotions to your
art to add eyes, face expression, maybe
some other details. It can help you with
adding life to your art. L? In, you can add maybe hands if you would like to maybe some of the petals
can be your hands. Like that. I think when you add more human features
to your character, it can help you
to add more life. Different face
expression or maybe some other human like
features really can help you to make your
character special. But like I thought,
the first way of painting will be
just simple character. You won't spend too much
on adding so many details. Okay, guys, as you see, this is the first way how you
can add character. You might think about
different face expression. You might create some of the
flowers staying next to it and create some kind of
like a flower family. Example, that one.
Well, one flower is aiming to another one. Baby flower and a mummy flower. Let's just remove some
over lappins here you can change the face expression
to another one. Like said. Here we have two lovely flowers that are trying to communicate, and this is a fast and easy way, like I told you
how you can create some lovely characters without
spending too much time. I think now it's
time to jump into another way of
creating characters, and we'll create
some animal art, and I will show you also some easy way and a little bit more
advanced to doing that.
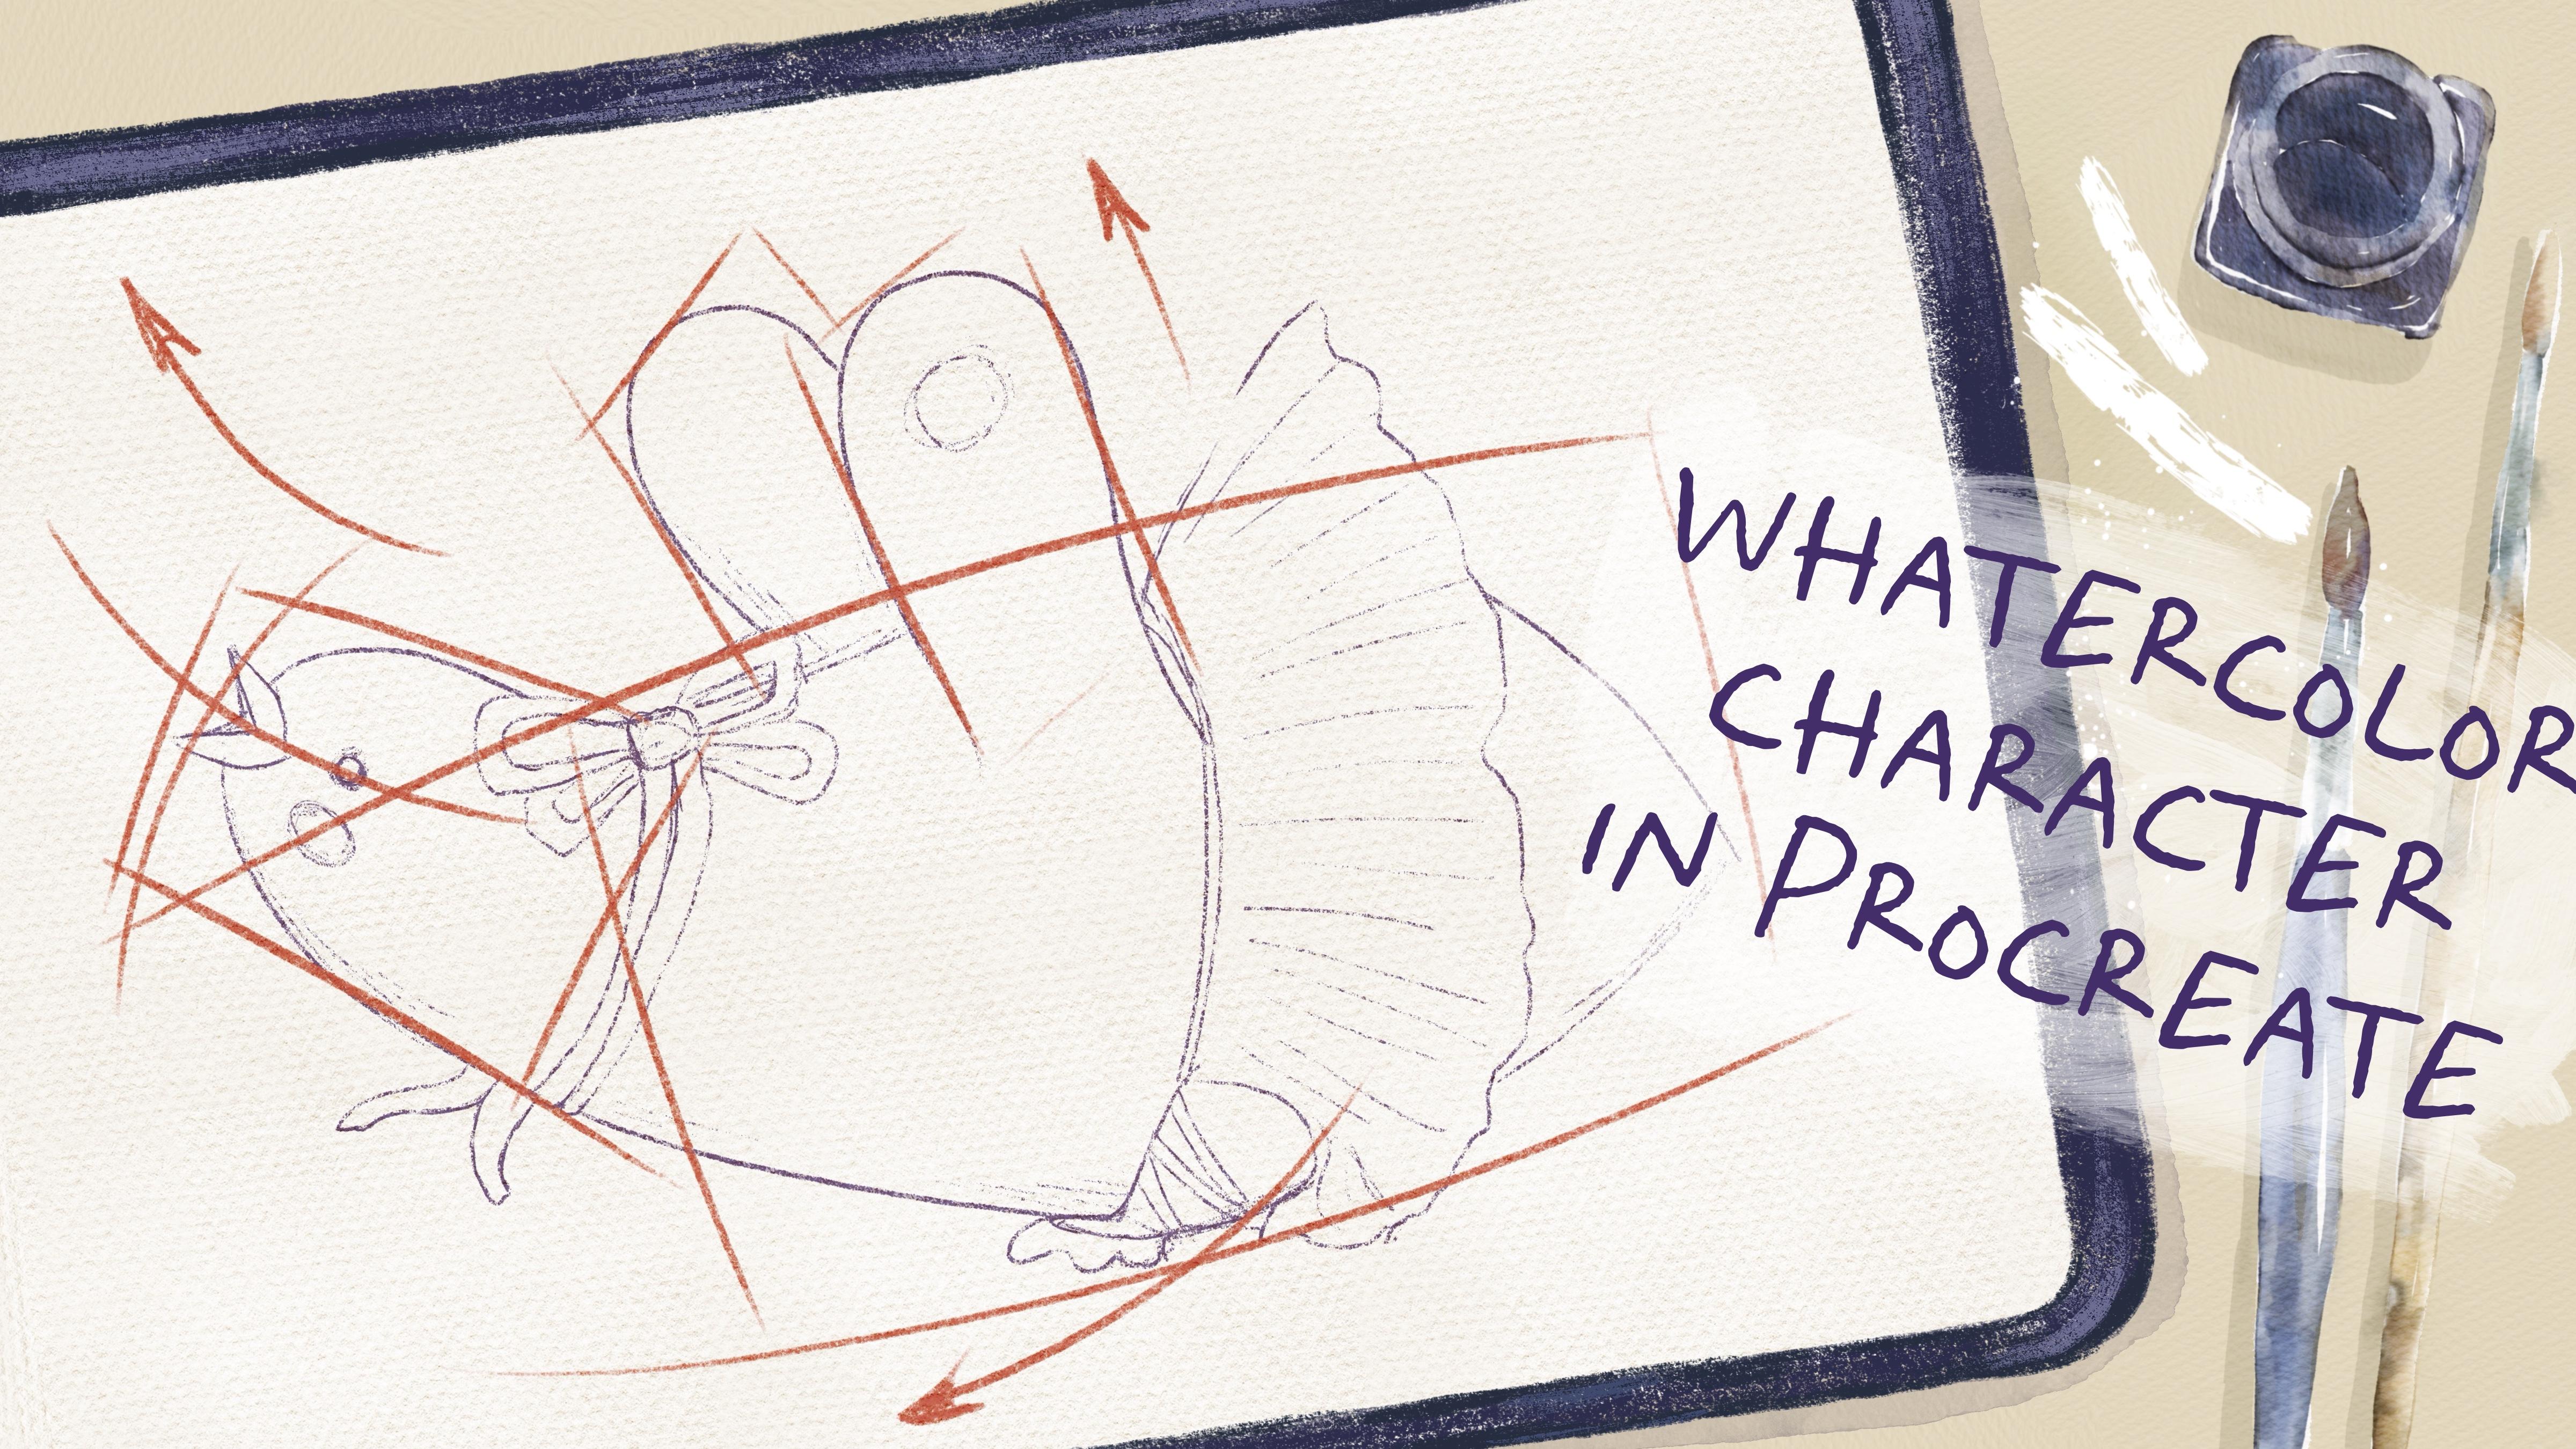
6. How to Create Sketch: More Complex Characters : Another way of creating sketch is to break the object
into the basic shapes. Again, if you want
to avoid tracing, this is a great way
how to do that. If you have the sketch penguin, we have the reference, let's lower the
reference a little. Here also you have two
ways how to do that. First of all, like it
all, you can break the object into smaller shapes. It can be rectangle, squares, or spheres like that. Here about the penguin, use this rectangle
shaped way of painting, and here you have wings. Also some rectangle. Same bodies part. I try to keep the proportions,
and at the same time, I try not to trace emphasizing the shapes and the
direction will help me to create an actual
character in the future. Okay. Perfect. We don't
need our skage anymore because we already
show some shapes. Us, my suggestion,
you also need to emphasize some
facial guidelines, like where the eyes are
or the big for example. So here I will just show with the line where the
object is looking at. And now we can remove
the reference that. Thanks to the lines, we see
the direction of the phase, we have the basic
shapes that can help us to add more details
in our next step. So we can move our
sketch to sketch. Now let's go to sketch
creating shapes, and I will lower the opacity of our first sketch till 50%. Cause we need to
see the guidelines, but we don't really
need them anymore. I just want to use the
reference picture, but I want added to the layer. So what to do? In this case, you need to go to
the action button, then go to Canvas, and here we have an
option reference. Guys, my suggestion to save all your reference art
to the camera role. That's where you can
get all those pictures. If you want to use them as
references in this way. Savi on a layer creating shapes, this one, it's empty, and now I just want
to change the color, and I will go to
the purple color. Again, I have my Bu HB pencil. I decided to use this one first, and then let's create
shapes, little by little. Guys, now let's talk a
little bit about the style, whether you want to have your
art in more cartoony way or you want to create
more realistic painting. So you need to decide at the beginning before
you start creating sketch because it will define the way how you would
sketch your art. First of all, again, if you want to have more realistic art, you need to be very
precise and in this case, probably tracing can be a good
way for creating character because you will
try to stay true to the actual shapes
and all the details. But I decide to try
the second way, which is cartoon style because I like some flop cute objects, and I decided to paint my
characters also in this way. So what I'm going to do is I have the illustration
of our penguin, but I won't follow the exact shapes and
exact way of painting. I actually I want to make
my art fluffier and I want to create pretty
fat and lovely penguin. This case, I want to use smooth lines and I want
to round the edges. The lines can be a
little bit wavy, and you also might not be perfect when you create
a sketch and it's also fine because they will add messy wipes and I think
that would look great. Okay, guys, as you
see what I just did, I made my penguin a
little bit chubbier. I made penguin hanzst
bit more puffy. Also, as you see, I tried
to make your very round. Now, I think it's time to start
adding facial expression. And you see we have
the guidelines that can help us to do that. Okay, the ice will be here, and then there
will be a p later, I'm going to use
another brush like six pencils that can help me
to add like better details. But again, this is very good
brush for primer sketch. Okay. That's it for creating
our lovely pengel. I think we can turn off
the basic shape sketch. Now, my suggestion we can
start adding tiny details. So what we did first
we break the shapes of actual reference picture into the basic shapes which
are squares, rectangles. And then we also showed
special guidelines that help us to create face in
a fast and easy way. And guys, another suggestion
that I want to give you is that try to add
as many accessories, as many details as possible, and that can help you to make your character more
like human like, especially for the
styles that we chose, which is cartoon style. And I think this is crucial to add some human like features. For that lovely penguin,
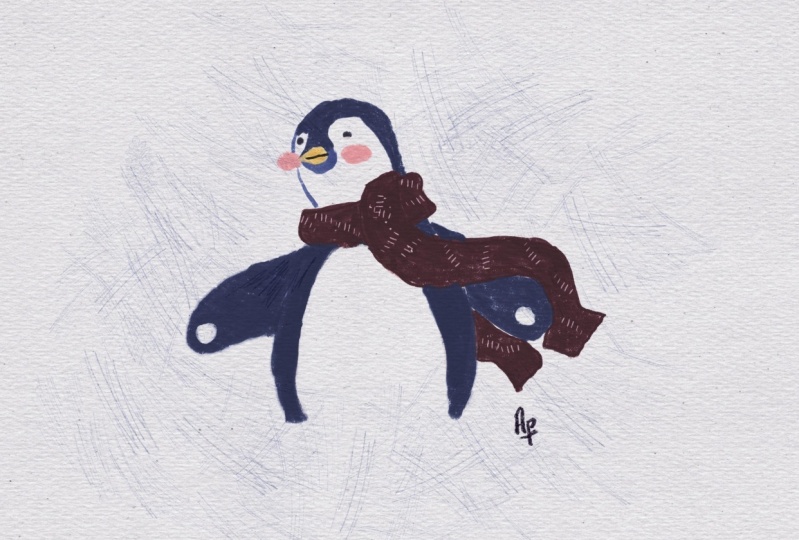
we can add some scarf. Penguins live in a
very cold environment, so I think scarf would
be a great choice. Also, don't forget about Billy. Like said, I showed
some basic shapes of the scarveGuys make sure that you paint all the details of the elements
on the new layer, which is sketch details. Now, let's go to the
basic scapes where we have the shapes and
remove the overlap bits. We can turn off our reference. We don't need it anymore. This is a sketch of the penguin. Now I show you how you
can turn basic shapes into lovely cute and
round characters without too much detail. I think we can practice a little bit more in pain
two more penguins.
7. How to Create Sketch: Penguin Characters : Okay. Now, let's jump into the second sketch and paint
second pan green. That one. It's a little bit easier because the shapes
are pretty simple. So let's go to the sketch basics and HB pencil,
anything for that? We're going to grab
this dark red color, something between red and brown. Here again, we're going
to paint rectangle. Make sure that you
have uniform selected. And about the head is
also one more cotanic. So we've done with basic shapes. You see, it's way more
easier when you just simply cut the object
into simple forms, simple shapes, and
then little by little, start adding more
and more lines. And like I total, because
we're going to paint so slow depending
in cartoon style, the shapes will be rounder and
maybe a little bit bigger. So let's do it. Now we move to sketch
creating shapes. My suggestion, let's
go with purple color. You can have some overlappins. Lines can be not too smooth
because I want to keep the pencil look and then
we can paint tail too. Okay. And don't forget
about your feet. I and big. Now let's add some details. So we go to details layer. Same brush, same
size, and let's draw. I think it might look very cool. I think the penguin might carry some lovely
toy like a car. Turn off is a sketch basics. Later, we're going to come
back and add more details if you would like to
with six B pencil. Because this brush is really called for
defining the lines, but not for adding some details.
8. How to Create Sketch: One more Penguin : Great. Now, let's turn
off this group layer. As you see I grouped all the sketching layers
into a group and call leg. First penguin, second penguin, now we're going to have
the third penguin. Let's go to sketch basics and let's change the
reference picture. Here we can define the
shape dctangle to. Max and head as a rectangle two. Move it two sides. Leg it. Now, let's duplicate it
so we can see it clearly. Let's curve it and make it
round little by little. Sofa that, don't forget, we're going to go to
sketch creating shapes, and we change the
color to purple one. Now, let's paint wings. Again, it shouldn't be too
perfect or too precise. The head and feed. And we feed, you might be very accurate or just
basic shapes like this. Let's try to paint eye line. So we have the sketch basics, and here is the main
eye line will be here. So we need to show the
direction facial direction. Six. So here, the eye line
will be as you see the side. Let's turn over our
pen. Yeah, here. Of course, it is
great if you have the reference picture,
but if you don't have, just try to schematically show where the eyes
and beak will be. Now let's start adding
details little by little. We can finish adding a face
expression, and so on. Guys here, in this part, I decided to make the face of a bird a little bit smaller. I don't want it to
build that lone because the proportion will
be not accurate in this way, and it will look less cute. That's why I decided to move this line a little bit
to the right side. So it means that the face
of a bird will be smaller. Let's try to think so
the eyes will be here. Now let's try to paint b. Also, I try to paint
in a simpler way. And then we can come back to the details sketch and
start adding some details. And I think this bird
would look great if we can imagine it as a
balerina. Why not? And this bird is bowing
to the audience, like the Clebin that was
the time of performance. Now, this bird just
wants to say, thank you. And then, Valerina
has his shoes, a special type of shoes. And maybe Ripon he rounds the neck. I think
that's important. Guys, I think now
we can turn off the basic shapes layer because it's hard to recognize
some of the lines. Turn off that one lovely bird. Now I think we can also remove some of the overlappins,
for example, skirt. Part of the body
that'll not be visible. For example here, a ribbon Let's finish adding some lines. Here we have like the pink line. So you can refine the
lines a little bit later. My suggestion, take
a six b pencil later and finish
adding those details. Let's see where plus should go. Like, somewhere here. Now I have six B pencil, and I'm trying to
add more lines. It's very good if you want to create some soft
illustrations. But again, I like to combine two types of pencil
together because I think it looks great creates this
really very realistic feeling. Like this bird is
really artistic, and thanks to the outfit,
we could show that. Okay, now let's jump into the most important part
where we go to create ama, and we will add some details and create
fur little by little, ventually we're going to create lovely art where composition will play an important
role. So let's do it.
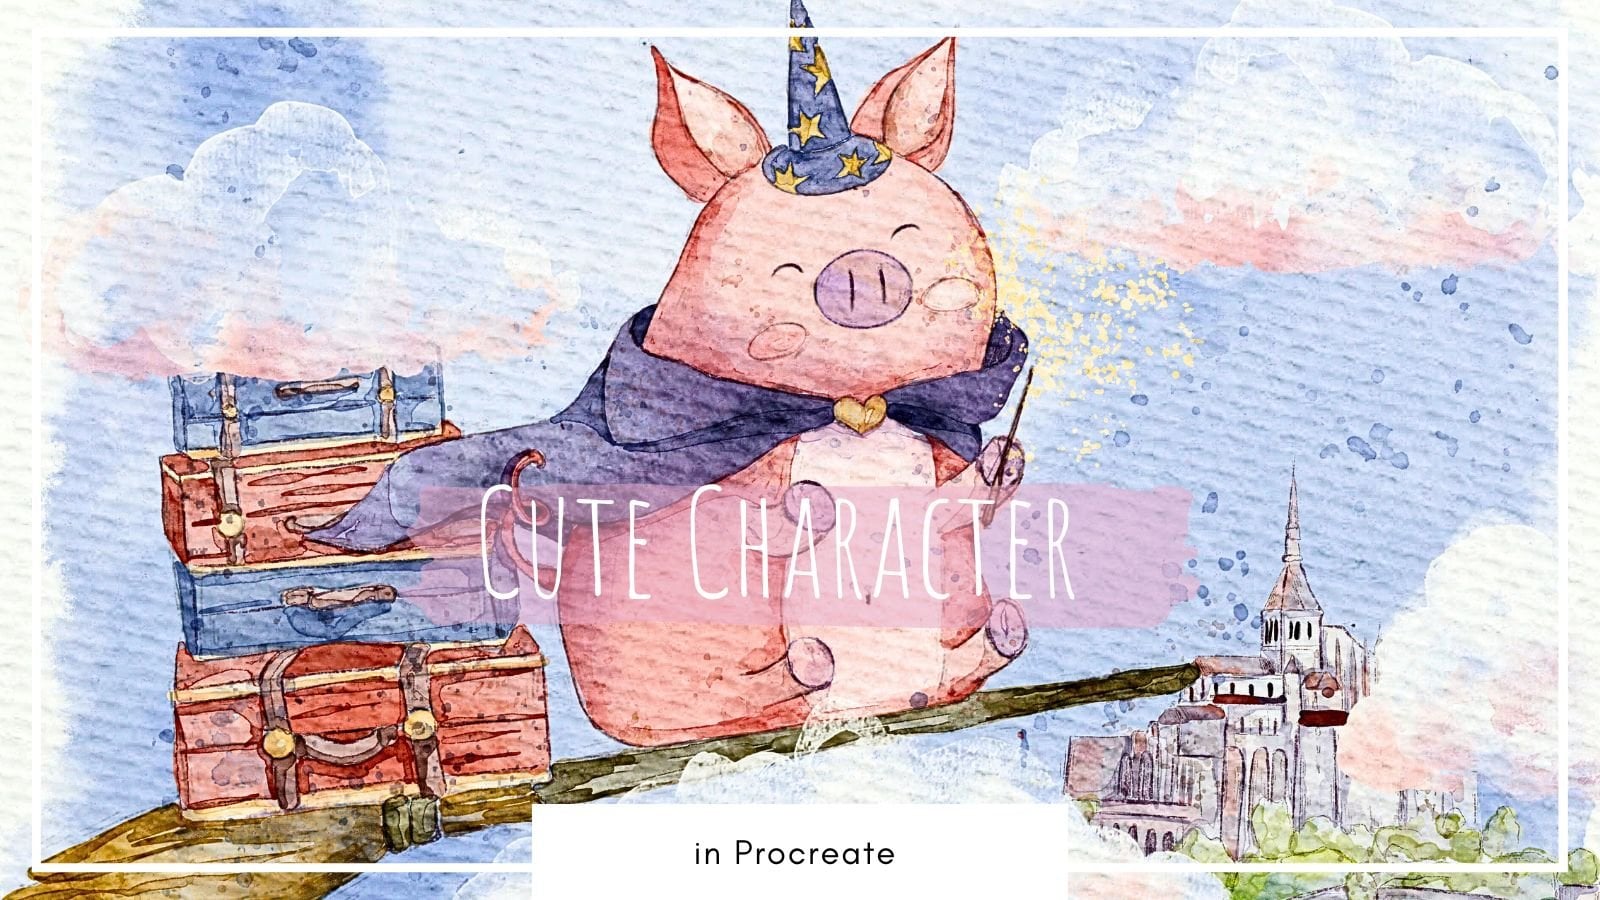
9. How to Create Sketch: Final Project : Now it's time to move to the sketching stage
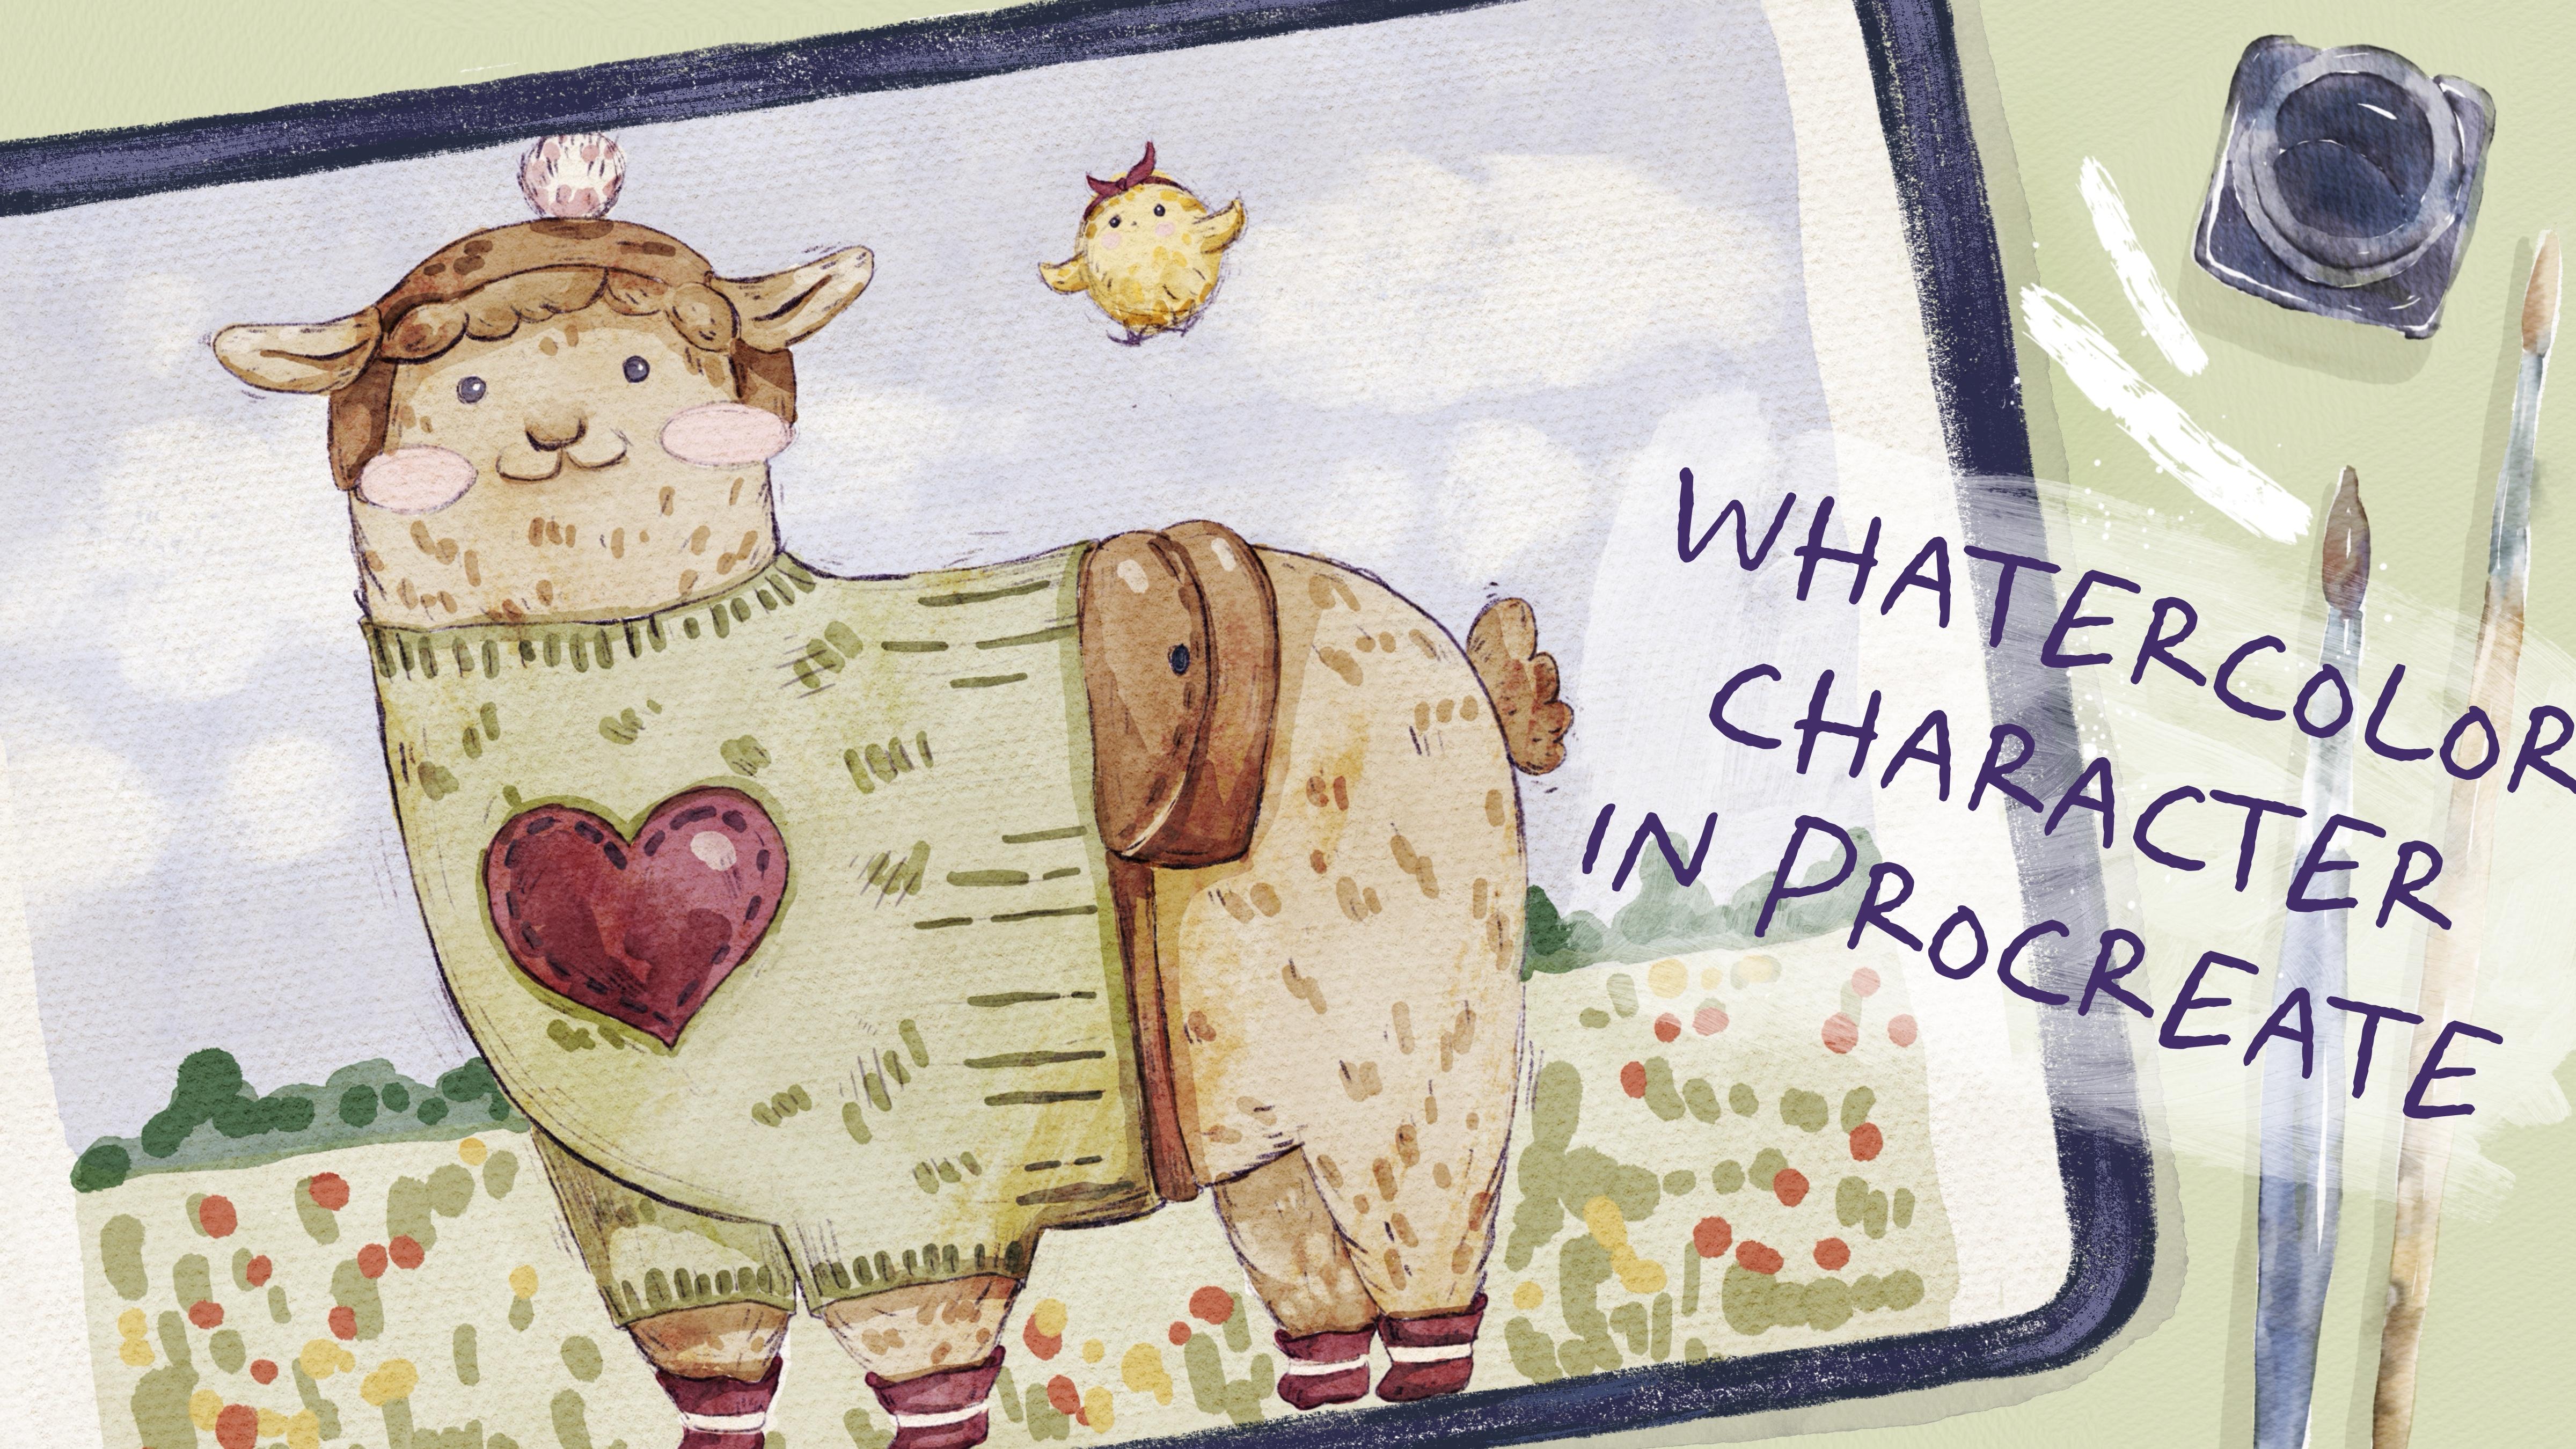
of our final project. We will draw ma. Are you ready? As a promise, this is a time for our final project sketch, and this is the
ama that I used as a reference and that's the character that we're
going to create right now. As you see it thanks
to some decoration, thanks to the cartoony way of paint and length
cuteness and fluffiness, like the animal looks very cute. Also, I decided to add a little bit more
creatures like here, we have small tiny
chicken I think together, they work very well. So let me show you how
I created the sketch, and what are the steps you need to follow in order to do that. Let's group our last
sketching part. So I have sketch basis, creating sketch and details. I selected all three sketches
and now I press group. I'm going to go
to sketch basics. I switched the
brush to HB pencil. And I also changed the color. So here, like I told you, let's break the object
into basic shapes. And here again, we
have rectangles. So let's try to imitate
the same shapes. Let's make it a
little bit smaller. Here also have X. Because of the fluffiness, it's really hard to see the
actual sizes of everything. Like it will be pretty simple, we need to define the eye line. And here we have the nose lines or direction pretty straight. Okay. Now, what you can see, like I just placed all character
that I already created. I just want to compare
what we have in reality and how to turn Alpaca
into cartoon styled art. You see here, it's like the
legs that I paint are pretty thick and chubby also the chest of alpaca
here is thinner. But I decided to add a little
bit more fat to this part. So the head of Alpaca is
pretty thick and big, so it's not the
skinniest what we actually have in real picture. Let's go to creating shapes, and I changed the
color to purple one. And let's just make the
lines a bit rounder. Now, let's connect
those two parts, two rectangles together. I want to make the head
a little bit bigger. Not about my choice, why I chose exactly Alpaca, because I think this
animal can be very floppy. Here the head a
little bit tilted. I paint the head straightaway. I changed the direction.
A little bit. Paca has very lovely
ears and some fur. Let's turn off the
basic shape line. Yeah, I forgot about tail. Also, guys, what you
need to remember is that when you want
to create character, try to make it related to you to find some
resembles in Alpaca. Maybe you can make
this animal very kind. Or maybe this animal
likes to wear some lovely sweaters is what
we're going to add later. Try to add some human clothes or try to add some emotions
to your animal. Facial expression
is very important. Try to make your animal. And maybe like cheerful
or something like that. Again, you don't need to such complicated eye shapes
or something like that. You see here, I just
paint like two dots, and it's basically enough. But what's important,
like I told you surround some story behind it. Composition is very important.
What are they doing? For example, here, maybe the
Salpaca and lovely chicken, they went for a walk, and they just want to enjoy
time together. And maybe like they have
some kind of conversation. So this lovely chicken
is following alpaca. Now let's go to the details
and add little by little, some human like features. So I already show the
friendship between the animals. And the next thing will be, I think I want to add
some human clothing. And at first, I
was thinking about adding some intertyled head because you see here on a reference picture,
this is the wintertime. But again, because I already had he similar head on
the pan pin earlier. So I decided to I don't know
where I come this idea, but I think maybe I
can use leather head that like some pilots
were using in past. Also some soft bowler
on top of that. We need to also create
some holes for years, so it should look realistic. Don't forget about hair. Show some hairstyle. Next. Still, it's wintertime, I want to show some
knitted sweater. Also, I was thinking
about adding socks. Because I think it would
look good in socks. I saw so many dogs
walking in socks or some kind of like
dogs shoes outside. So I was like, Why not to add socks or shoes
to Alpaca too. I want to make this part
a little bit rounder? Like to show the
sweater again. Okay. Let's return and this tiny tiny line, we
need to erase it. We need to show that sweater is thicker than an actual
fur of an animal. Now we need to show the
lines that sweater has. Again, this is very schematic because later we're going
to use six p pencil, unlike the Penvens
to this sketch, we will add more details. Hard why not? Because our ma is very
friendly and very kind I think final touch will be what if
we add some back. The sma is walking, maybe she or he needs
to store something. I decided also to draw some simple lesser
bag and some belt. Shows the line here. I think it's time
to show some fur to sketch details,
also can be here. I show a little by little, some fluffiness from the edges. Now it's time to
switch the brush. We are still on details. Let's go to the six b
pencil. Here I start. I want to add a little
bit more details. Guys, what's important.
Now listen carefully. If you want to add more details and make your sketch
more interesting. Try to change the
thickness of your pencil. Or if you use an
actual in pencil, try to make thicker line or thinner lines because
it can help you to make your illustration more interesting and more realistic. Later, when I start
adding some fur, I want to use pretty thick, size of a pencil. I don't use just one line
all around the illustration. I try to make them
look differently. That's why it's better
to use two pencils. Because thanks to that, you can actually create very realistic way of painting because when
you use real pencil, it's not always the
same size of the line. Also you can show just
simply some shades. I like to show that here
we have the shadow. That's why here you'll
have more protections. Will increase the size
of 46% of til exit. Also another thing is
you can actually use my cross hatching brush
and just stamp it. In this case, you
will save some time. Try to create some a
little bit messy look. You see now try to add some
very both slides and thick. You see thanks to that feeling. It's very, very smooth
and very, very realistic. And we can add some fur and
show the fluffiness Okay. What else you can
do is just go to penal abstract and you can add a little bit of
crosshatchins here, but make sure that you
don't go beyond the lines. As a thenis cross
hatching like this one. Those cross hatching, you
can control the size and those cross tings you can add around the
sweater, for example. Yeah. The sketch of is ready. Now I think we can jump
into coloring part.
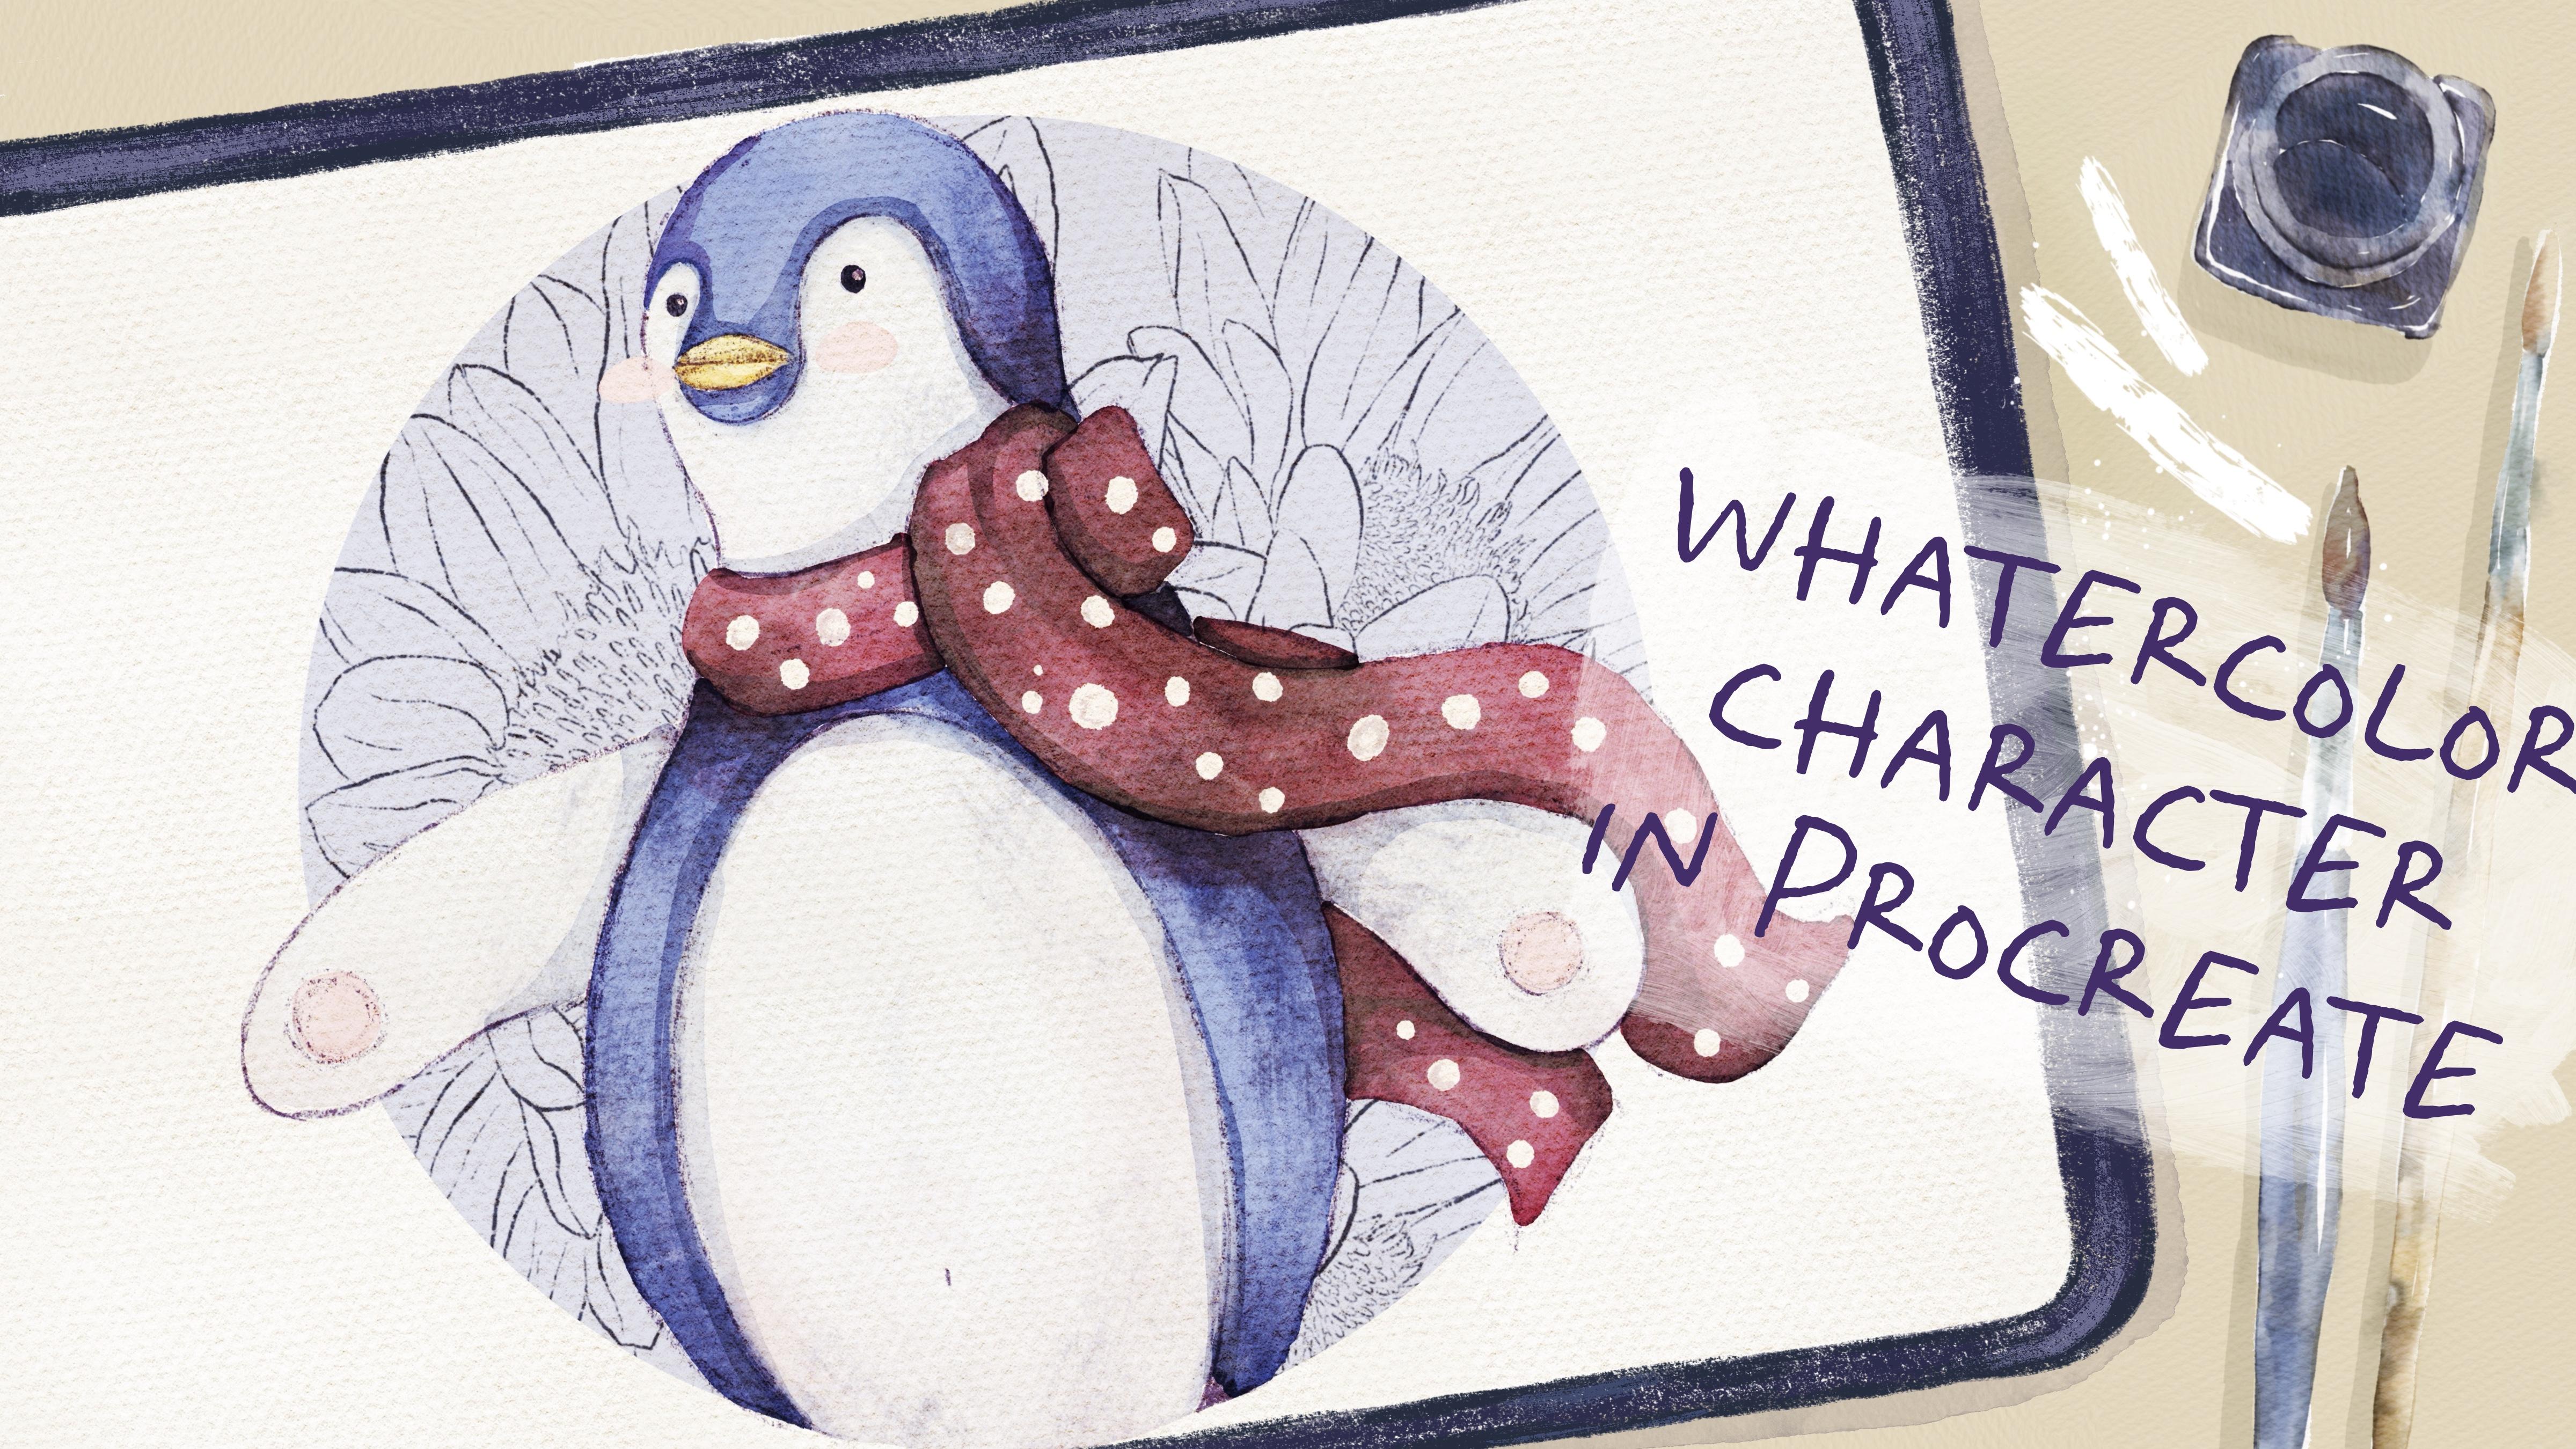
10. Painting Process: Penguin: Now we are ready to jump
into painting process. Use the brushes I provided
and the freebies, all native procreate
brushes or your own tools. Don't we get to paint
on the layers that are underneath our
paper texture group. Let's not wait and I will show
you everything right now. Okay, I think now we can place all our penguins
on the same page, and we can just group them
together. Okay, guys. Now if you're happy
with everything, let's just merge together all the detailed
creating shapes layer. For the second penguin, and then let's go to the first
one, also merge together. We don't need our basics. That's the second penguin
and the third one. No basics, this is together. Now let's amplicate
each of the layers. I just want to place all
of the sketches together. Like said, what about
the first penguin? We do have some of the lipins,
but I think that's fine. We can just do xes. We have this lovely composition where we have all the
penguins together, and I think that looks great. Also gets another way how
you can actually create your character and don't think too much about
the background. Let me show you, for example, we will go to the first
penguin, replicate it again. Let's just create some
circle behind it. It will be some kind
of background color. What about blue color? Then we will go to the
selection tool, go to Ellipse. I just think where
we will place it. We can lower the
opacity a little bit. Here, let's just
erase some of lapids. You can just erase by itself
or you just can go and grab selection tool free hand
and just follow the line. Good. Three fingers
down and press cut. Then grab eraser and finish erasing some of the parts
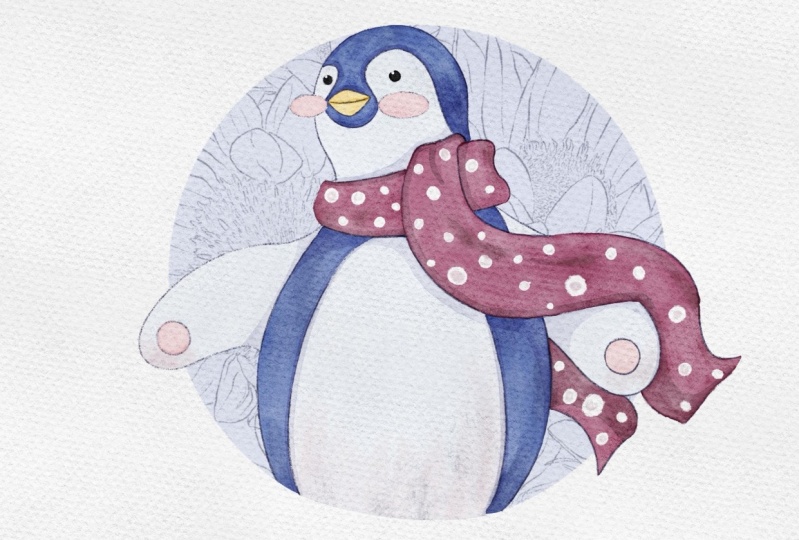
that we are not erased. Thanks to the lovely circle, we already have the background. Guys, and I think I want to color this penguin and show you also the way how you can
painted in a pretty simple way. I will use adding color layer. I will change the brush to
the bu hard edge watercolor. And then let's go and grab
this dark blue color. Will you be careful? And also, my suggestion, let's change the plan
the mode to multiply. In this case, the
color would bleed very realistically into the paper. Try not to lift your apple
pencil from the screen. But if you do it, it's
still not a problem. You can blend the color easily. Lovely pes ready. Now let's paint head. Again, don't be
afraid of overlaps. Crap eraser, and if you see
some lines, just erase them. Now B should be
yellow. You raise it. Next thing is, I want to add
some color to the scarf. Let's just duplicate
the adding color layer. So ct. So already will
keep it that way. Dublicate again, and
then press clear. Now we have another
adding color layer. Here, let's grab this
reddish dark reddish color. I think this is very
good color combination. And then p color.
Color here here. And I think I want to add some pink color to the
cheeks in this area too. Now, a yellow color, and let's paint beak. And I think we can go
to this part and add a little bit color to the belly
and this part of the fur. And let's grab this
almost white color, but still it has
some bluish tone. Now, my suggestion we can
add a little bit shades. In this case, we just press, we need to create
one layer above this layer and switch bland
layer mode to multiply. Above the colors that
we need to choose, let be purple color. But let's move a little
bit to the lighter shade. Here we need to show the
shade from the scar. This area here lovely. Now let's just say with a scarf also multiply
clipping mask. Let's grab some prop shade. Because here, I didn't duplicate and merge
together as a color. The shade is a little
bit semi transparent, but don't vor, we're
going to use curves. And we're going to add a
little bit more shade. Okay. Okay, so what are you going
to do now, let me show you. Let's go to curse Let's
duplicate it. Merge together. Neck tin is peak. Peak is on main body layer.
So I'm going to keep it. Lovely. Now, my suggestion, let's create one
molaribb keep it as a normal white
color, same brush. I want to add some dots. If you press harder, the dot
will be pickers. Like that. Also, I want to make this
color a little bit brighter. Merge together all
the shades layer. I will merge together
those two layers too. Then let's go to curse. Let's make the color a
little bit brighter. Now let's use g and shades
layer, place it above. Switch to multiply
bland layer mode. Go peachy color and
grab be pastel watery. Don't forget to clip this layer. And I just want to add a little bit of shades
here and there. Okay. And another thing, you can go and grab so
background and grab this lovely proper shade and add some texture
to your character. Just a little bit texture. And then you can experiment look at the colors
that you like. Linear burn is lovely, but I don't want color
to be that dark. I'm going to keep
multiply, merge together. Then let's go to curse and try to play with the color and see whether we can
make some lighter, brighter, something like that. I like how bright
they are right now. I think now it's time to
highlight some of the parts. Bull hard edge
watery, white color. This is already very cute, but I think you can add a
little bit more elements. So let's go to the
background and then go to multiply
blend liar mode. Then press clipping mask. And next, we'll go to
the blue flower six. Grab this dark blue color. And we have lovely background. Another thing is
like I told you, we can go to the
sketching layer, grab a six p pencil, and add a little bit more
lines with proper color, I think, and still multiply and add a
little bit more lines. And I think our lovely
illustration is ready. Now let's jump into
our final part where we going to add
colors to our ama.
11. Painting Process: Final Project : Guys, now it's time for color in our ama. At the background. I decided to add a
little bit of scenery, very similar to the one that
we have a background here, but maybe make it a
little bit more green. What we're going to do first is actually start adding
colors to ama. Let's switch to part hard
edge watercolor brush, and then I will grab
this pretty page color. You need to go to the
adding color layer. Also, another thing,
what you can do also, you can add the flowers. The one that I already used
from my pen pin background. If you want, you
can do the same. You can create the circle
and then just stamp flower. O for example, you don't
need to add the circle. Just add the color itself
as the background. I will show you what we can do. I want this to be a bit
lighter here and here style a little bit. Keep pretty cute. Now let's go with green color. And I want to add the
color to the sweater. I think that would be
great to make it green. Now think and socks
will be red, I think. Same color that we used
for the penguin scar. I think the middle
will be light. Same color put a heart. You guys, make sure
that your skitch is on multiply plan mode
because it this way the colors like
in one trial way. Now, what about head and purse? I think I'm going to go with
a little bit darker color. Okay. Brown color palette
is pretty limited. I think this is
great. I don't want the illustration
to be too vibrant. But again, like I said, feel free to choose any
color palette you want. I just want to stick to some muted colors with
limited color palette. Same with leather head. B Bird will have some kind of
hair on the top of a head. A little bit peach color. Peach color, peach color. Peach and peach. P ice. I think purple ice
would be great. So in this case,
hair band will be also to match the colors
of the outfit of the it. To Now what we need to do
is to duplicate this layer. So in this case, the color
of lama will be brighter. I will blower pass it until 50%, and then I will merge together. I don't want it, like I said, I don't want it to be too bright. Then duplicate it again, go to lower layer, and then I will go
to adjustments, press hue saturation
and brightness and move the brightness all
the way up till 100%. Why I do it, why I
created one layer underneath because this
brush is semi transparent. So when I paint, the color underneath
will be visible. So I want to remove
this visibility. I want it to be
less transparent. That's why by
duplicating the layers, you make the color more back
and then merge together. So now it's time to add shades.
12. Adding Shades and Highlights : It's almost the end of a class. You will add shades and
texture to our art. Okay. So about shades, we have the new layer above. I'll just set it
to the multiply. And here, I have the same brush. And let me think
about the color. And I will also set
as a clipping mask. So it means I will not
go beyond the lines. You see, it's very,
very convenient. I just want to reach
this cartoon style, and I think this is pretty
lovely way for doing that. And brown color. And let's show the shade from
the ears and shade here. Guys about the shade and
what you need to remember. In areas where two objects
are next to each other, we're going to have the shade. So this part of the back, we have two parts of the
back connecting together, and right between that, we will have the shade. Also, you need to see where
the light source comes from. I decided to place
my light source from the top center or top
right, something like that. That means that the bottom
left will be in a shadow. And also, we have shadow
from the sweater here, fur, also shadow from socks. Overall, this part will be in a shadow because
this leg is behind. Do to it. Maybe just a bit. Let maybe here a little bit, you'll have some
kind of highlights. But again don't
make it too bright. I made the shade a little
bit lighter because I want to differ the bag from the fur. Same here. Okay. And here I will show the
shade also is a fur. I want to show the fluffiness. Area under the mouth also
will be in a shadow. An area next to
the head and hair. This is bottom, so bottom
also will be in a shadow. And in this area, and also
the part where the heart is. By the way, I also need to add some shadow to the heart too. Let's try to do it.
Maybe slightly lighter. Just to make it look
more realistic. I blend a little bit. Lighter and then let's
create one layer above, set it as a normal, and here we're going to
have some highlights. And lower opacity a
little bit to 70%. And if some lines are too sharp, you can just plan them. Let's come back to
the shading layer, grab this purple shade, and I want to add some
shadow to the socks. A little bit shade to this
fluffy thing. Tiny bit. And what about the bird? I also think we need to add
some kind of shade here. Blushes here. And I will use this pretty
bright yellow color to make it look more realistic. Okay, we've done this
painting characters now as jump into
painting background, and that will be
our final stage.
13. Adding Final Details: So now it's time for
the final details. We will add shades
and texture to our art together
with background. And we will have a
few different ways of painting background for
our lovely character. So about painting background,
we have a few options. So I merge together all the
layers with our lovely ama, and then we will go
to background layer. And here we have a few options. First, let's go to
almost pure black color. Then we will go and
grab flowers. This one. And you can just go you
see like what I was talking about, semi
transparent brush. Even though we even
duplicated the layers, still in some parts, we still can see the color that is coming through
our lovely animal. In this case, you
just need to grab selection tool free
hand and select the area that come
through the animal. Again, this is the first way what you can do when you create this lovely matration that can be one way how to
create background. Later, if you want
to even can color, add some lovely colors
to the flowers tool. Another way. Again, we can use stem brushes and
we have a few leaves. So think about the shape and the size of our a of the
leaves that we have. And you can just put
leaves here and there. X sad. This is one more
way what you can do. If you want to make the layer a little bit brighter,
you can talicate it, and by tablicating, we actually
made it look even better. Let me just tablicate
Dablicate our sketch layer, and then I want to merge
everything together. La So guys now Cergsketch
and colored part, and now I can adjust the size of my lamin can place it in any
way in any place I want. Also, you have wildly which can be pretty cool if
you want to add more shades. You create one le bove, set it as a multiply or linear
burn, and then clip it. And here depending on the
colors that you have. Maybe you can grab this
bright green color. Again, b wildly brush. This brush is very
convenient if you want to make your
estration less dull. One thing, what you
can do is just go to the curse and play
with the intensity. Again, you might go and play with different bland
and layer modes. Again, depending on the moods
that you want to create, you might use different ways. Color is also not
bad if you just want to make your art a little bit brighter and you can
lower the pasit of 50% and it will not
affect too much, but still you will have
some lovely texture. Let's come back to
the background, and then put water color brush. Here you can just do
whatever you want. I will grab blue color. I just want to add some sky. In my background, I want to
add more sky and less ground. Again, you might do
whatever you want. I just want to create
some airy feeling. And for that, I think having a lot of sky is very important. Lines intentionally
not too straight. And the next thing that I
will do is I will go and grab the slight green color
that matches sweater. And you guys by using curves, you can adjust the
brightness of ama. I think now it looks very
good when I use curves, and I made it a
little bit brighter. Also make sure that when
you paint background, you need to stay on
the layer where you have the background color. Here we can start that in
a little bit more details. So it, let's create 1 mole
bove set it as a multiply. I grab this green
color, same brush, and then we can just
a little by little, some trees, that's
the background. Another thing is, let's just
add some clouds. Why not? Create 1 mole above, make sure that you stay
on normal glandular mode. Then you can grab be
soft background or Bo pastelewter double tab, and you will have white color. Just try to create clouds. Postal water can be really great brush
for painting clouds. So this airy filling
thanks to the clouds. And then Come back to the
multiply bindliar mode, and here you can just
start adding low sheets. If you want you might
add some flowers. Like you might
grab this reddish, and add a little off the
flowers here and there. You see thanks to
this cartoon wipe it really creates a
very lovely atmosphere. Another thing what you can
do if you want to blow the background flowers,
you always can do it, go grab free hand,
select the flowers, then go to adjustments, and you can go and grab go blow. And you can blur it that way. In this case, the lava
will be in the center and the background
flowers will not visible. But again, I want
to keep a text. Another thing, what you can do, you can again select the flowers and make
them not too bright. For that one, you
selected the flowers. Then you can coat
the curves and you might make them a little bit brighter and
desaturate them. Guys, I think we can go
this piece finished. I hope you enjoyed
today's tutorial, and you learned some
useful ways how to create character and a fast
and interesting way. And let's see each other
in the next class. This is the end of
our today's class. I hope you enjoyed
our painting process, and now you know more about the procreate where
to find inspiration, how to use layers,
clipping mask, how to create what
color texture paper, and how to add volume and
color variations to your art. And most importantly,
you'll learn how to create watercolor and pencil
character in Procreate, using digital watercolor brushes
in a fun and simple way. Guys, I will be happy to see
projects in project section, and I will be happy to
give my own feedback, and I would really appreciate your opinion about this class. You always can live
review in review section. And let's see each
other in a new class. And next time we're
going to paint another acute character
in Procreate. So
 Inga Yoon, Digital illustrator and teacher