Transcripts
1. Introduction: Welcome, Ashudm, professional
artist and illustrator. We work with global
brands such as Adopt Play Irish and Prime medio stored off ring strings
of Power Series, Develop time series
and Study series. In this Skillshare class, I will show you how to paint expressive and impressive
portraits with Loomis method. If you are interested
in digital art and you are looking for class that shows the exact
techniques that artists professional use in the
end of this course, you will learn how to create impressive and really
artistic portraits. I can't wait for show
you my techniques and coloring methods and work love. If you're interested
in portrait, let's join my class and create something
amazing together.
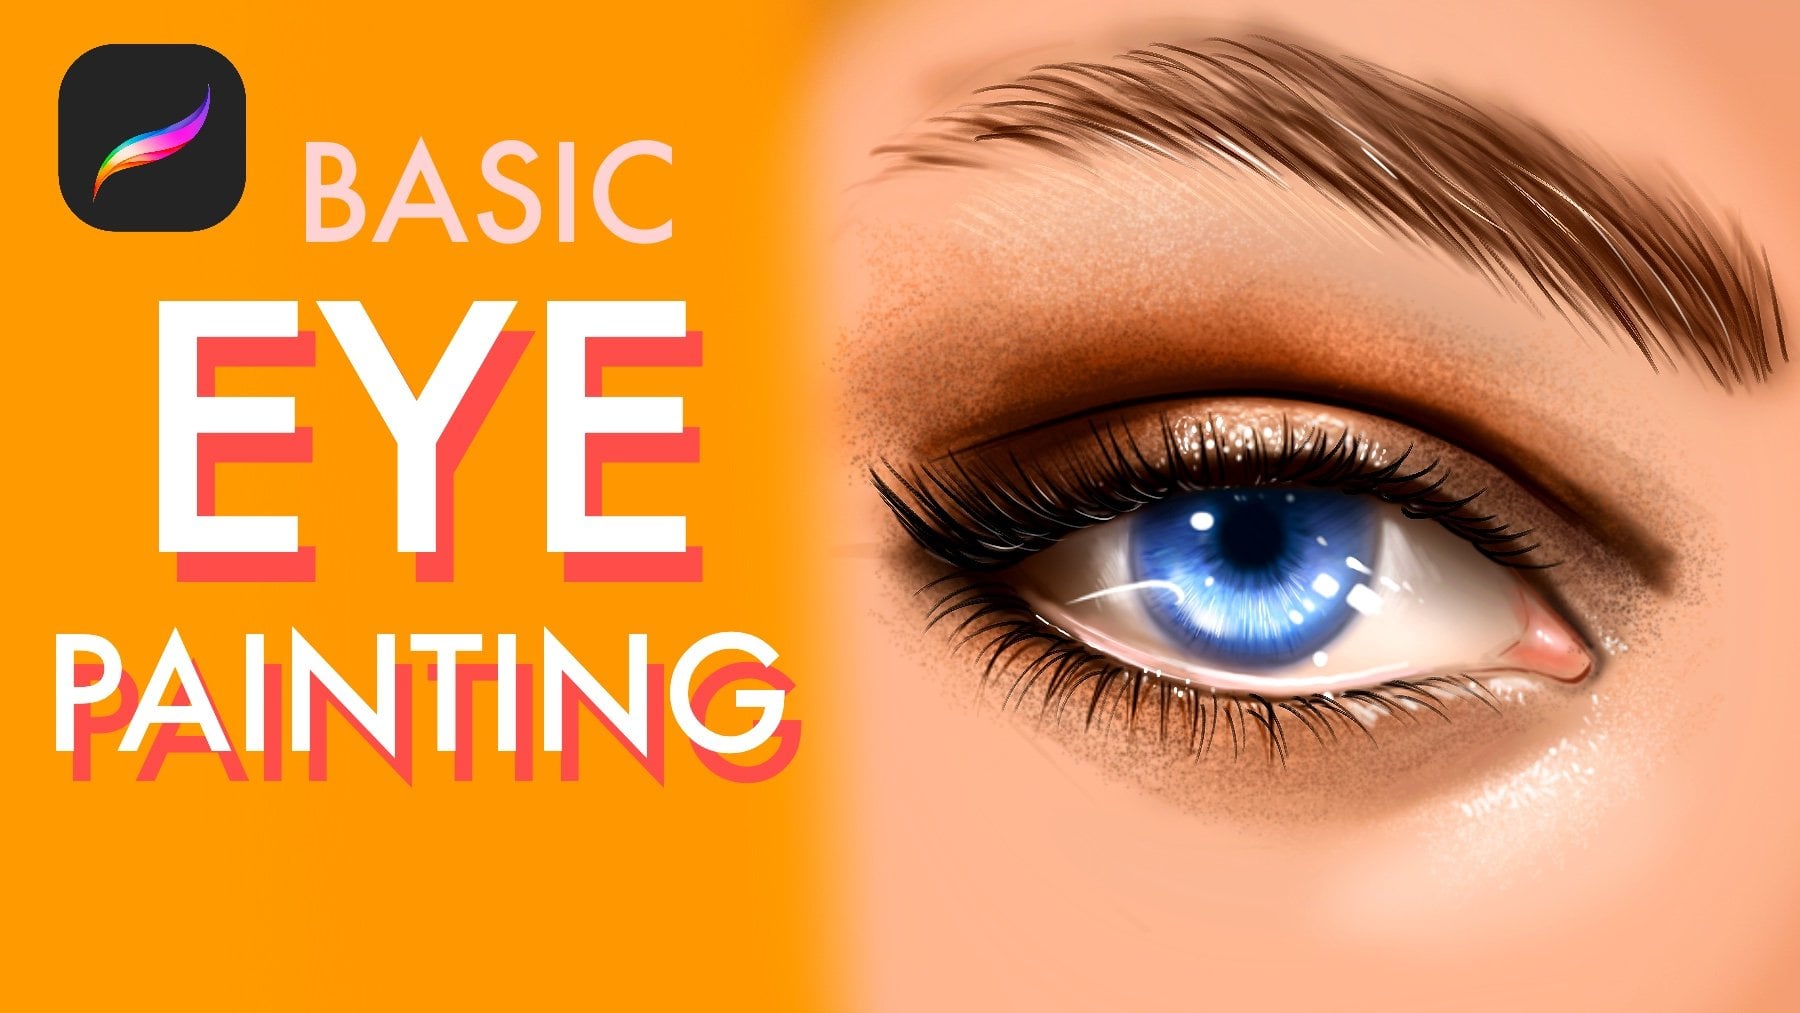
2. Learn Andrew Loomis Method Basics: Welcome. In this class, we will talk about Loomis Method and head driving fundamentals. The Loomis Method developed
by Andrew Loomis is one of the most
effective systems for constructing the human head. It simplifies the head
of the basic forms, making it easier to
draw from any angle. So at Loomis Method, we need to start from a Sapir and I will
show you like this and just like this
and holding with my pencil and begin with
drawing a simple circle. This represents the cranium, the main mass of the school. Think of it as a three
D ball, not flat shape. So at the second part, you need to define
the side planes. So for define it, cut off the sides of the saphir slightly to
create flat surface. For example, at this corner, we will divide it, and other corner will
be again divided. So this represents the samples. And draw a vertical line
down to the center. For example, from here, I will down it, and this
is your center line. And the center line will
define our main angle. So draw a horizontal
line in the middle. This is our brow line. For example, we need
to find the middle of it and we'll paint
horizontal line here. And this line will be your
eyebrow line and eyebrow line. I will edit. These lines establish the
orientation of the head. And at the jaw and chin
attack the gel to do Saphir. For example, from
here, from the sides, draw downward lines and
connect them to the chin, just like this,
depending on the angle. And for established
propositions, divide the face into
equal sections. For example, this line at the
top defines the hairline. And middle was the eyebrow line, and noseline will start from this end of the
circle this point. And this point will
be eyebrow line, and this point will
be our hairline. The face is generally
divided into three equal parts
one, two, three. It is equals. So hairline, bro, bro, nose, nose, chin. So for placed features, sits on the brawline. For example, if you paint another line here
under brow line, it will give you to place
for the eye sockets, and you can place the eye
with the geometrical shapes for quickly sketch the shape of the eye and nose ends
at the middle section. This part will be nose and
this will be nose line. You can create a planes for nos. And mode sits about one, two, three between
nose and chin. At here somewhere, and end of
the e will be the borders. And for adding the neck, the neck drops down from behind the jaw and connect to the
base of the skull from here, not directly under the chin, a bit farther away. It comes like this
and comes like this. And the real power of the
ums method is rotation. Tilt the center line
to turn the head, curve the guide lines to
show the perspective. Shift proportions slightly
depending on angle. You are not driving a face. You are constructing
a three D form, then placing features top on it. So for the noseline,
I mean earline. It will be at this part. If we divide the corner, this one is our earline
and it will be here. And if we add details quickly to complete
the Loomis head, we need to define the planes much Me visibly, for example, I'm painting the
eye here, just like this, and I'm putting the
hairline from here, and I will add eyebrow
to the brow line. And at the corner, I will make these corners much more visible and
especially this corner, and I will paint the upper lip, and I will paint a line
from here to boon chick. And basically, with this
3. Drawing Andrew Loomis Method Portrait : Welcome. In this part, we will practice
the Loomis method. At first, I will paint with
a circle, just like this. I created a ellipse
circle, and after this, I'm defining the rotation of the head from
the center line. And I will divide the corners
just like this slowly, and the right part
will be like this. After this, I need to find the middle point of center line, so it will be similar to it. And this part will define our a hairline and nosline and I will add
the chin over here, and I will complete it. After this, I will add
the fetal features just as hair and eye
and other parts. I will select much
more textured brush right now and with
a larger brush, I will put the I under
the eye sockets, for example, one eye comes
from here, just like this, and I will add the eyebrow here, and the other parts again, will be just like this. And yeah. Basically, we are creating
the nose line right now, and it comes from here. I will add the
details of the nose, and we'll add this part here. And just like this. Yeah, and this part
will be like this. And yeah, I will add the lip
detail here, just like this. And here will be. And slowly, I will
increase the detail level, and I will place the
ear just like this. And Bonchi will be
here, and yeah, it is really great male figure, and I will add also he
here just like this. And let's zoom in. And this time, I will
add some details for the eyes and maybe nose can be much more
characteristic like this. And, it's looking really great. So I can add a bit much
more mustache for make our character much
more interesting and have its own characteristic. And for hair, I will make some curly hair,
just like this. And these parts will be like maybe long hair and don't forget to add shadows depending
on your light source, and put the main
details for the face, for example, this the tails. And yeah, and neck is
also so important, and maybe we have like old dress like this and shadows under the Loomis heat and yeah. Basically, if the light
comes from the leftop, you need to place all shadows, depending on the light source. And all planes will get
dark shadows and lights, depending on your light source. So we can add many details into this illustration and
hope you enjoy this process. And the next parts
we will continue to creating Looms
heads. Thank you.
4. Andrew Loomis Method Drawing: Welcome. In this part, we will paint Loomis portrait
together for practice. At first, we will start with the shape of the
Saphir just like this. And we will describe the rotation of the
portrait, just like this. And this part will be divided to find the middle
point, just like this. And we will find the eyebrow
line just like this. And this part will
be our chin line, again, just like this. And this part will be our
nose and eye sockets. And yeah. And this part will be hairline. So we defined all setup
here and after it, let's zoom in here and try
to put the sockets for eye. And the eye sockets can
look like this at first. You can paint these lines
for make it like this. And this plane
will be like this, at here and yeah, and it's looking really
great right now. And I will continue
to create the shape of it just like
this and like this. So eyebrow will be come
here, just like this. And yeah, the eye
will be placed here. And let's make it
a female portrait. So nose can be much
more smaller here, and we will have a lip
here just like this, and here we come from here. So after decide to define
the places and planes, go to the layers and
make the opacity a bit down and open
another new layer. And with textured brush, I will start to continue
building the portrait. So, I will make it with a cat eyeline makeup,
just like this, and I will be really dark, especially these parts of eye, and I will place the eyebrows. As you can see, after defining the old planes for the features, adding tatails is much
more easy and fun. So this eye will be
placed like this, here. And, let's put the nose
here, just like this. And Yep, these planes
will be like this. This planes darker. And, yeah. Just like this. So lip can be much
more bigger here at the top of the upper lip
can be bigger and darker. And the other part
will be like this. And yeah. And for he, I will put details
just like this. And chin will be much
more smaller here. And let's continue to
adding details here. Like this. Yeah. And sometimes you can I will show you
one technique tool. You can go to the
selection tool, and with the free hand tool, you can select the specific
parts of the portrait, and you can adjust the angle and different kind of details to make portrait
much more interesting. For example, I can select this part and move it around
here a bit much smaller. Yeah. And maybe Chin
comes much more petted for make the portrait
much more feminine. And Loomis method makes
everything so like calculated. So some people have bigger
eyes, thinner eyes, and for this part, we can create the hair, much more larger and
much more longer. And for cheeks, I can make it much more straight
here like this, give it a volume, and maybe the parts much more
curly hair, just like this. And yeah, it is looking
really great right now, and I will continue to add
details over the portrait. Yeah, maybe this part's darker, these parts much more visible. And in the next part, I will color this portrait with you and finish this
Loomis method portrait. Thank you again.
5. Andrew Loomis Method Coloring: Welcome again. Now we will paint the this loomis portrait. At first, create a new
layer under the portrait and select some skin
tone like muted tone. Don't use light or
dark colors at first. Because at first, all
we need to do is create the volumes and define
the light and shadow. So I defining the shadows here here will be much more darker because light comes from the
left top in this portrait. And let's make much more
darker tones to do lip, and these parts will be really, really darker because this part will be darker because light
comes from the left top. Yeah. And maybe these parts will have volumes like this
and especially this part. And let's continue to increase
the detail level together. Yeah. And these parts
will be much more darker. And yeah, it is looking
really great right now, but what we're going to do
is increasing the skin tone. So at searching points, we will add lights
like blush lights. I will add much more
highlights over here and here. Because portrait is not flat. Some parts of face is light
and it turns think it like a turning object and try to define the planes of it
depending on the detail. So these parts will
be really darker and maybe we have a blush
here like blush color, and these parts also darker. Yeah, it is looking really
great right now and zoom in to the portrait right
now with opening new layers over the old layers. So this time, we will make the search and points
much more detailed look. So I will be a shadow here, and the other part also
will be much more darker, and we will make
her expression over the eyebrows much more visible and stronger and maybe have
lashes here, just like this. And nose will be
much more clean on this side because
this plane is much more on the front and have some highlights
over these corners, especially at these
parts and these parts. It is all about finding planes and making them much
more clear and better. So we can add the eye highlight with simple
that here, just like this. And here with this way, we are increasing
the realistic look of the portrait because it gives a really nice w and
reflections from the wet edge. So it is really, really, really important for create these details on portraits working with the Loomis method. Thanks again for
joining this practice. And in the next lessons
we will focus on creating much more Loomis
port plaits. Thank you.
6. Coloring Realistic Portrait : Welcome again. In this part, we will add realistic details over the Loomis method portrait. At first, I will
start from the eyes, and I will add much
more shadows near eyes for create much more
realistic look for the eye. For example, like this, defining the shadow
and highlights over I creates really great amount
of detail for the portrait. So you can increase
the detail level by increasing the color and
adding much more tones, different kind of
colors over portrait. For example, for I, I will use a bit much
more orange tones and white highlight
points for each corner. To create the much more
realistic and artistic look. And these parts you can
increase the shadows here, just like this, to
create volumes. For example, some parts of
the portrait in the shadow, just like this, especially
these parts and these parts. And some points will be much more lighter and some points
are much more darker. So I will make this part much more darker and even
so much darker. And especially these areas, and maybe we can
make it smoothly. You add the grade here and the grade here,
just like this. And this area will
be much more smooth. So it creates really great
effect and realistic look. And I will continue to add the
volumes over the portrait. For example, these parts
can be really darker, especially these areas
and these corners, and for hair, you can use
the middle tones and mix it with saturated tones to create much more great
and realistic care, just like this and continue
to doing it slowly and create really good brains
and volumes over portrait. For example, at this part, I make this part much more darker and
especially this part too. And as you can see, the left side in the shadow, and this shadow is
really pretty and have some volumes over here to make the portrait
much more interesting. And you can use even
the orange tones here, just like this to make portrait much more
artistic and we brand. You can put these colors on the connection points
of the light and shadow. And let's zoom into the
lip and give it a bit, much more dark red tones, just like this for make
it much more warm. And this place will
be really dark and this place will be discolor, but I can add much more
lighter colors here, just like this, and this
place will be just like this. And for eye, you can use
much more Katie makeup or some different kind
of makeup for make it much more
interesting and deep. So I created this tone here, and I will make this part
darker, even darker. And maybe I can also put the
some septum piercing here for even make our
portrait character sterilized just like
this and maybe here too, and I will use the same
brush and will increase the look of the like expression of the portrait will be much more visible with this detail. So these parts can
be much more darker. For give it a really great form. And hope you enjoy this process. And at the last I
will add some lights over the neck for
finish the portrait, and maybe wearing some
black t shirt like this, and I will make it
much more bigger and some red like
some phones here, like metal t shirt,
just like this. And yeah, it's looking really, really great right now. And with this portrait, it's pop up really great. And maybe these parts
even much more curly, and these parts much more curly. I will add some dark
tones near here.
7. Coloring Realistic Portrait II: Welcome. In this part, we will paint Lumis portrait. I sketched the portrait with
Lumis method like this, and I open new layer
under the sketch layer. So at first, start
with the base colors. For example, you can put the base colors all
around the portrait. And after it with much
more textured brush, you can try to find the angles. For example, I will
start from here, just like this and like this, I'm trying to put the shadows and light parts of the portrait. Just like this, don't be hurry
about putting the details. Just try to find
the general look of the portrait and try to define the shadows
of the portrait. For example, these
parts are really darker and these parts
are much more darker. As you can see, I'm
just trying to find the general look
of the portrait. For example, I can put the
lip texture here at first, and maybe at the cheeks, these things can be much more visible and
maybe at the nose. And after it, I will continue
with the color of the eye. It will be much more darker. And yeah, I will put
the shadows of the eye. Let's zoom here and
continue to adding detail for the eye
just like this. This part will be much more darker and maybe
these areas are darker. And for the other eye, keep doing this and add the much more shadow parts with much more darker
tones, just like this. And yeah. And after it, select the lighter brush
for the nose parts, and it will be our
highlights point. So these parts will be much more highlighted
just like this. And yeah. And after it, I will put the eyebrows just
like this slowly. And as you can see, there is a shadows
under the nose. So we need to place
these shadows. For example, these parts
will be much more darker and especially these parts and these check parts
will be in the shadows. So it is for make the portrait much more
realistic and artistic. So you need to define the shadows and highlights
much more better. For example, these
parts will be really, really dark and in the shadow and you can
use textured brush or any kind of airbrush for create the
illustrations part, and these parts
are really darker. So let's zoom into the portrait and put the really dark
tones for the lip. And these corners
are really darker, and these parts is dark also. And it is always about
turning to the shape. So in every painting, you need to define the shape and angles and try to
turn the portrait. For example, these parts
are really darker, so I will paint with the dark shadows
here, just like this. And like this and this
part also darker. So parts you can use much
more bigger brush for complete the look and add it really dark tones
over the portrait. For example, it can
have some really, really, really darker planes
and maybe curly hair. Let's take another brush. I will take a bit orange
color hair. Yeah. And now with the
really darker color, I will define the edge
and planes of the eye. And the corners
will be really dark for add much more realism
into the portrait. For example, this part will be darker and this part will
be much more darker. And these parts will
be much more defined with the with a much more
visible brush stroke, and these parts can be much more lighter because portrait
contains only one color. I have different kind of
color variations in it, and you need to find
them and lock them with brush strokes and
different kind of colors, shadows, highlights,
and many more. For example, this part
will be much more darker, especially this cheek part, and I'm blending the colors
much more smoothly to catch the really vibrant and
realistic look for my portrait. So these planes are also darker at this part and this
part and this part, yeah, just like this. And I continue with adding
the really dark tones here, and it will be really, really darker at this corner. And I continue to add colors to the hair just like
this and like this. Yeah, it is going to
be much more better with these details we
add with the time, and maybe these parts can
be much more in the shadow. And but don't overuse
the shadows because you need to find the balance
depending on your painting. So I will zoom in here
with the darker brush, I will continue to increase
the detail level and at much more portrayed details. And maybe I can select much more lighter
and yellowish brush. Here at the highlights
for the portrait. And at this part also
a bit, much more. And these planes will be much more lighter,
especially these parts. And maybe these parts a
bit much more lighter. And the checks will be
much more saturated. And what we're
going to do is add much more light and
saturated color here. Or define the lip
shape just like this. And you can also use these for these corners and the connection
points of the portrait, especially this area,
this area, and this area. And hope you enjoy this process, and I can't wait for you show much more detailed
portrait illustrations, and I will add much more
orange tones to hairs, and I will finish
this lomis head coloring, paintly coloring part. And hope you enjoy
this process and I can't wait for see your own
projects with this method. And you can always send your illustrations to
my Instagram address. You can find it from my
page and you can search it with my name and see my page. Yeah, these parts
are also darker, and these parts are also darker. And hope you enjoy
this process and can't wait for show you
much more in the next.
8. Drawing Head from Left Angle: Welcome. In this part, we will paint Loomis method
from the left angle. So just place the middle and divide the corners
of the middle and define the shape of the head
just like this and place the shadows and neck area and put the nose
area and hair line. And after you define
these things, you can make the nose
like triangle here, and the mouth comes from here under it and
connect to the neck, and this is the eyebrow line. And from here, you can create the side planes of the portrait
and place the mouth here, and you can modify the nose can modify the nose
depending on your choice. And this part will
be the hairline, and you can create the
hair here just like this. And you can continue and add
many details as possible. Basically, it was a quick
video to show you the planes. And for example, at the mouth, here is some line like
this in this angle, and you can place nose and mouth connects
to these angles. And hope you enjoy this part and can't wait for show
you much more process. Thanks a lot.
9. Character Sketch with Loomis Method: Welcome. Now we will practice
much more looms heads. I will create circle and to find the edge of the rotation
of the portrait, and I will put the eyebrow
line, hairline and noseline. And I will define the chin
line from here and ears. And yeah, if you
complete these basics, you are ready to put every
detail into your portrait. For example, instead of human, now I will create some
fantastic character like from the Lord of
the DRings universe or similar to it, like org and nose will be really bigger than the
usual size, just like this. And the mouth will
be also bigger, and it will have
really big teeth here. And yeah, looking really great. But from the eyes part, it will be much more like this to be much more
interesting and realistic. I will put the eyes on the
eye sockets, and for hair, I will use, like baldness and this ear will be
much more interesting. And this neck will be like this. And as you can see, with the Looms method, you can also create really
fantastic characters. And depending on your
facial features, you can play with the
angles of it and put shad offs of it and
set how it looks. And it is really important to create something interesting, yeah, it's looking really great and interesting with
these additional details. It looks a bit sad, but, I mean, I don't know
what happened to him. But maybe he has
some piercings here and some hairs here,
just like this. Like, different character, maybe dress have
some wrinkles here, and these parts are darker. Hope you enjoy this process, and I can't wait for show you much more press
in the next videos.
10. Drawing Head from Front Angle: Welcome. In this part, we will paint Loomis method
from the front wave. And at first, like usual, we will describe
the middle point of our portrait and we'll draw these white lines and
put the middle point for the brow line,
hairline and nosline. And after describing
this detail, put the chin line
and just like this, slowly, and to find
the eye sockets, and after it,
everything is easy. Put these side planes, and nose will be and here, and mot will be here, and I will paint
bros here like this. And let's continue
to add ice in here. I will paint much more
round the ice here, just like this, expressive
eyebrows just like this. And let's add some nos
details over here and here, just like this and put the
shadows for nose part, and I will paint the moat
here just like this. And for this part, we will paint the side corners. These side corners
in the backwards, so you can put and place the dark tones
for these corners, especially at the
right and left. So I will paint the
hair at the hairline, just like this and like this and hope you
enjoy this process, and I can't wait for show you much more process
in the next videos. But for now, we will focus on the general shape of the
head and the tails for maybe eye shadows and
maybe the bonche will be much more stronger and maybe even these parts
will be like this. And neck comes out from here
and here, just like this. And you can add
many details over the eyes and the other details depending on your portrait, and don't forget
to add them sepal if you are painting
man like male figure, and there comes like this. And yeah, in the next lesson, we will continue to create much more luminous method from different
angles. Thank you.
11. Drawing Head from Right Angle: Hello. In this class, we will paint Loomis head
from the right side. At first, I will start
with the painting the base of the
head with ellipse and create another shape for divide the corners
for this plane. And after it, put the
eyebrow line, hair line, and noseline and complete this
illustration with putting the chin line with the neck and put the eye sockets
line and after it, put the eye sockets and
at the nose from here, and this part will be
our lip just like this. And yeah. At the eyebrows, I will define the eyebrow and we will find the side
planes with this line. And let's continue
to add I over here, just like this and over here, yeah, it is looking great. And it is really great, and we defined the portrait
from the left side. And I'm adding minimal details, such as a hair line
just like this. Maybe it comes from here, and the other side
will be t like this. And the humans, you need to add the Adam's apple at the neck part just like this and let's zoom here and put some facial details and
finish the illustration. For example, you
can make the side planes much more
darker, just like this. For example, these
planes are darker, and these parts
will be darker too. And at the right parts, we will add some shoulders
and hairs will be really, really, really curvy, maybe for give it a really
artistic look, and hope you enjoy this part. And in the next lesson, we will paint much more different angles loomi
heads. Thank you.
12. Basic Coloring for Portraits: Welcome. In this class, we will paint this
portrait together. At first, go to layers and open new layer under
the sketch layer, then select some brush. For my painting, I
will use airbrush. And at first, just gently build the background color for
all edges of the portrait. For example, my portrait
will be like this. And after putting this detail, select darker tones, and apply over your illustration for create the three
dimensional look. For example, these parts of the portrait will be
really darker and especially under I
just will be like this and these parts
will be darker. Maybe these places can be
much more darker again. At first, do not
rush and just try to build the general look. For example, lights
land in the portrait, and which places have highlights and which
place in the dark. For example, I will
use lighter color for create some light
comes from this angle, and also some planes of the
portrait has these tones, and I will select
blue color for eye, and I will apply
here the blue color. And for the lip, I will use muted red
color just like this. And it looks really
great right now, but we need to create
eyebrows much more visible. And for this portrait, I want to keep the color of
the hair is a bit blond, so I will select really dark blonde at first or create a background
color for portrait. And I will apply
here just like this, and these parts will
be really darker and especially these parts of hair
in the dark and after it, I will select some hair brush. And with the much more
highlighted color, I will brush over the hair. And these parts are
much more darker, and some parts will be much
more lights just like this. I will put this shiny look for the hair texture
just like this. And I will keep adding the details all over the
portrait just like this. And maybe these areas will be much more visible and
really great color here. And just like this. And these parts will
be much more clean. And for this detail, I will make it
much more lighter, maybe with these tos, and it will be also same here. And for the shadows of the hair, you can use darker tones to create some three
dimensional look. For example, I'm adding
shadows over here, and these corners will
be in the dark also. And these corners too
at the top of it, it can be a bit pink
or reddish color here. And for the dress, I will use muted
color just like this, maybe this color is
looking really great. And with this color, I will
continue to add details. And these planes
will be really dark. And especially these parts
of the portrait will be much more visible
and these parts. And after it, you can select
different kind of color. For example, I
selected a bit red and we'll give the color here and
another red will be here. And you can add many
details as you want. But for example, I will select much more lighter
color here and we'll add some extra colors over here, and maybe these planes
will be much more lighter. Yes, it is looking
really great right now, and I will keep doing these details and we'll add
some light effects here. And here, I will use
these colors just like this and maybe a bit much more yellowish colors,
just like this. And like this, it
is looking great. And I will continue to at this
maybe shadows over dress, you can put these shadows at some planes of the
portrait just like this, and maybe this area
and this area. And these parts will
be really darker. And especially this area of the portrait will
be much more darker. And hope you enjoy this process, and in the next lessons, we will talk about
different procreatee works.
13. Anatomy Basics for Loomis Method: Welcome again. In this lesson, we will talk about basic anatomy and anatomy may sound complex, but it is really easy when
you start to think simple. And for your portraits
and illustrations, you need to learn
perspective at first. For example, we have bugs
here just like this, and we have the neck under it and the ribcage body comes
under it, just like this. At first, always try to create different perspective with
the geometrical shapes. For example, paint the
surrenders just like this. And like this, try to create a different ave for
your eye and educate your eye with these
geometrical shapes. And it will be helpful
for your figure painting. For example, you decided
to paint a character. So start with a simple
box just like this, a bit much more like stretched box like
this and neck here, and the ribcage will come
from here, just like this. And put a cylinder here like
circle and put the arms here and put another
cylinder here and put the other detail for the
these connection points. And if you go to the
face and put the head, for example, put the Loomis
head in it, just like this. And connect the lines and
put the rib cage here. You can work the body anatomy
from the skeletal works, and it will be helpful. Just like this, you can
create anything so easily. And you need to think
simple at anatomy. For example, you are painting, man sitting and
looking to the right. You can simply sketch
the lines of it. Making simple things
create much more power. For example, the human is lie down here and
arms come here, and the body will be like this. You need to simplify
everything for create much more powerful figures and
complete the illustration. And with this method, you need to understand with the first work with
simple shapes. Simple shapes is decay, and another work is skeletal and another
thing is working line, and line defines everything. For example, we have human happy and
open hand just like this or targeting something with a different kind of weapon. And it is all about
simplifying the things. And thanks a lot
again for joining this part and see you
in the next parts.
14. Learn Shape Language: Hello. In this class, we will talk about shape
language for your illustrations, and it is also important
for creating portraits. So, let's talk about
those circles. Circles represent
oftenly friendly, easygoing, and round
the characters. For example, if you think Mario, Mario is really friendly
and good character. And if you imagine
this triangle, triangle characters or things represents danger and
much more sharp edge. And for example, in Mario, some enemy characters have the spikes, for example, it is triangle. And in the Sonic, you know, the red Sonic knuckles have these spikes in his her, arm. So this one represents danger and much more
action characters. And let's talk
about the Sequare. Sequae character is represents stability and because
hard to move, right? It is strong. And
it also represents some really powerful characters and in the shape language, you need to combine
these shapes. For example, if you create a really funny and
happy character, friendly character, you can use these round shapes
just like this. Even the mouth will be roundy, and your character will
look so cute right now. And if you want to build a dangerous and much
more wild character, you can use these triangle
shapes just like this. It creates much more dangerous
and various characters. For example, if you put
the middle this triangle, it will look gorgeous. If you remember the Dracula, his body is also triangle in
many movie like dangerous. But you can combine
these things. For example, you can paint
the ellipse for the head. And for example, some spikes at the head and combine it with
the round box shape. It looks friendly and have
some dangerous things, and it is strong
and well placed.
15. Loomis Method Sketches: Welcome. In this class, we will do Loomis
Method practices, and I will start from here. And I will start from
simple shape just like this and will create my
first portrait sketch inspired by Loomis Method. And you can do these practices
in your daily routine for create your hand much more
practice it just like this. The hand comes from here. And let's start another one and try to build effective
and fast sketches. At Loomis Method, you can create much more
free hand portraits. If you working for practice, donut think about the details, try to build the face and
COVID looks and angle. For example, in this part, I will make it looking
like the much more upside, and I'm defining the lines. And yes, it is looking a bit much more
higher, if you see it. And let's start much more. For example, in this one, I want to make the portrait look like from the side,
just like this. The chin side will
look much more thin, and these parts will
become like this, and we will see hair
line more here, just like the box. For example, if you
paint a box like this, and this box go down in the
perspective, just like this. And if you place Loomis head in this perspective from upside, we will see the upside down
version of the portrait. So nose will be visible a bit, and we will see the hairline from the top of it and for example, like this.
16. Painterly Loomis Sketch: Welcome. In this part, we will practice Loomis set
with paint Ally brrush. At first, I will paint
background, the gray scale, and I open another new layer, and with selecting Skinton, I start from the base
color of the Loomis set. And I started from the circle, and I will build the
chin line from here. Just predict how it looks depending on
your previous works, or you can create the
base here for C slightly. And Loomis head comes like this, and this chin area will be here. And let's place the eyes. And I'm painting the eye
sockets here just like this, and nose will be here, and mot will be here, and these parts will
be really darker. After you add these details
on the Loomis head, you can put facial
features like I, for example, I put the
e here, just like this. And other eye will
come like this with the nose detail here. And for the lip, I will create the lip
texture comes like this, and this place will be
much more maybe roundy and chin will be and much more
softer since it is female. And I will add some hair
here just like this, and it have a different
kind of hair. Maybe much more larger here, and it ends like this. And the other side
will be like this. And with much more
darker color zooming and you can put the
details of the Loomis. For example, I can create the
eye here, just like this, and maybe this detail
will be much more thin and it will be much
more septum here. Yeah. And the face detail
will look like this. And I will put the
cheek details. Let's paint the lip detail here, and it will be
piercing here also. And I will add much more
larger makeup here and here. And I will paint hair, much more darker, just
like this and like this. Yeah, it is looking
great right now. And I will paint this
part, much more smaller, and maybe cheek parts can
be much more rounded here, and this part will and thin and nose will be much more
darker hair like makeup, and I will make the hair
much more larger, like this. And I hope you enjoy this video, and in the next parts, we will paint much
more Loomis head. And, it is basically
like this and hope you enjoy this
process and can't we for show you
more. Thanks a lot.
17. Painterly Loomis Sketch 2: Welcome. In this part, we will paint Loomis
Method, portrait sketch. At first, create with ellipse, and with the circle, continue to find the planes, as I showed before, and continue to add
details just like this. And if they building
this main step, you can select one color because it will be
painterly portrait. So paint all over the
face, just like this. And these corners will
be much more darker. And yes, after this, select darker color
and apply over here for define edge
of the portrait, for example, I find it like this and here comes from here. And after it, you can place
the eye soketsF example, these parts will
be darker because eye sockets will come here
and nose will be here, and you can also place
the lip parts here. So after describing
these details, put the other details here just like this and lip
will be much more bigger, and the hair will start from
the hairline just like this. And you need to be
sure about how to place the details for hair, for example, it will be much more
characteristic like this, and you can select much
more darker color. And this time, you can place your details for the portrait. For example, I will make the portrait much more
darker, especially this side, and I will add much
more lipstick here. And with darker tones, we are defining the general
look of the portrait. So these details is
really important for create the general
look for the portrait. And for example,
lights come from the leftop at this
portrait, and like this, we are building the
general shape of the like shutoffs
for the portrait, and you can continue and create much more
details over portrait. So I will select lighter
brush here and we zoom here. And this time, I will increase the shadows and lights
over the portrait. For example, this part will be much more lighter
over portrait, and I will make this
part much more smoother. And especially these parts
will be much more lighter and let's add details over
the eye just like this. And sns will be thin here, and maybe these parts will be much more thinner,
just like this. And yeah, it is looking
much more better right now, and I will put the shadows
for this area and we add much more shadows and
dark colors over the hair. And yeah, it's looking
really great right now, and I will increase the
shadows here, just like this. And hope you enjoy this process. It was a painterly Loomis sketch and can't wait for show you more in the next
lessons. Thank you.
18. Experimental Portrait: Welcome. In this part, we will paint
experimental portrait. So at first, I will
select one brush for experimental utrox and I will
start with Loomis Method, but I will be totally
experimental. For example, I don't know what kind of
portrait I'm painting, but I'm just trying to
be like experimental and maybe I will paint different kind of creatures
or different kind of anatomy. But it started with
the Loomis set. And after it, I will zoom here and I will start putting the facial features
like eye sockets. Again, for example, it
will start just like this and like this and yeah, it is looking really
great right now, and I will continue to increase this detail
level of the eye. And I will start from the
right eye just right now, and I will put some shadows here and maybe like most
sockets will be like this, like craturehad and yeah, maybe like lien and some
kind of different creatures. And do not rush
about any details. Just try to create the general
shape of the portrait. For example, maybe it is a sea creature and have
some tentacles here, just like this, like octopus, and it's looking really
great right now. But for defining the anatomy, you need to define the whole the modes look and
how the feature, for example, nostrils
will be like this and maybe another
detail on the portrait, yeah, it is looking
really great, and I will continue to add
details over the portrait. For example, it is shoulders can be much more
maybe larger like this. And let's zoom here and try to put the general details
much more visible. And I will finish this
quick sketch video and after some put some shadows and highlights over the design, for example, this part will
be dark and this part will be dark and this part
also will be dark, and it is looking great. And I will make this
eye much more visible, and maybe these parts will
be like this and this part. And thanks a lot for joining in this sketch video and see
you in the next lessons.
19. Experimental Portrait 2: Welcome. In this part, we will paint character
portrait and at first, start with filling
the background with gray color and open another new layer and select smooth line and start
with the Loomis sketch. At first, we will create
a circle and we'll divide the circle to find the
corners of the portrait. For example, it looks
like this side. So the corner plane will be
like this, just like this. And the other plane
will be like this. And I will add this
a eyebrow line. And at the top part, we will paint the hairline, and this part will be nose part. So after it, I will
complete the chin area, and after this, I will paint eye sockets
area just like this. And nose will be here. So after putting these details and putting these details too, I will go to layers and make the layer
opacity really low. And with this way, we will have really low
opacity background, and we will add the I and
I details just like this. For example, she will
have some almond e. So this part will
be almond site. And I will add the I detail
here, just like this. And from the other side, I will keep adding the tail
for eye just like this, again, and nose will be much more visible
here, just like this. And for a mont it
will be smiley, some smiley here, just
like this, like this. And after it, I will add the
corners of the portrait. For example, it
will be much more roundy and here will
be somewhere here. And if you paint line, from here, you will
find the punchi. So it will be easier
for us to define the details of the
portrait, for example, here and here, and some here details will come here like this and shadows here. Yeah, and it will be like this. I will continue with the sketch. And after you
define all details, you can make this layer disappear and make this layer really low opacity and zooming. This time we will create
much more certain lines and this time I will
use some texture brush, and I will focus on the characteristic
look of the portrait. And for example,
this eyesight will be like this and like this. Yep, it's looking really great. And the other side will be much more visible,
just like this. And I will add the
eyebrows just like this and nosy tails will be
like this and like this. It is really not real
character without makeup, and hope you enjoy this sketch. So we started with
the Loomis Method, and we created the main
features of the portrait. And the other details
just like this, maybe her hair is a bit
stylish just like this and have much more detail over
here and here, just like this. And for the dress, I will use some cute and great
textures like this. Yeah, it's looking
really great right now, and I'm trying to make the portrait much
more effective here. And also, she have
some let's zoom here and check out
the face details. And you can always, for example, I will
close this layer too. You can go to Selection Tool
and with the free hand tool, you can select
specific sites and select move tool and free
form or verb will be better. You can move the
planes of portrait. For example, you can make
the portrait much more roundy with less details in it, and these parts will
be much more pottery, and this part will
be really dark. And these parts will be much
more specific and good, especially the left side
will be same again. And after these details, you can put the
general details for the portrait and
put for example, dark tones for the lip
texture here, just like this. These parts will be dark and these parts
will be dark again. And yeah, it's looking
really great right now. And let's continue to create
much more detail over here, and the left side
will be detailed too. It's sketch paintings, don't
rush about any detail, but really focus on
the general look. For example, COVID looks and try to improve the
shadow and highlights. For example, you can place the shadows for make the
portrait much more visible, especially the uh left part. It will be much more darker. Yeah. And these parts
will be like this. Hope you enjoy this
process and I can't wait for show you much more process in the next videos. Thank you.
20. Experimental Portrait 3: In this lesson, we will deep
dive into Andrew mus method. Andrew lumus method
is simplifying the human anatomy and head for create portrait
much more faster. At first, we need to start with the simplified cranium,
just like this. And it is circle, but we need to dilate these
corners with cutting it. For example, just like this, and let's paint it to this color for show
you much more easily. This line is here, divides the cranium from
here and like this. First, want to start by
drawing a perfect circle, and you don't need
to be so perfect, and you can use quick
shaped hole in procreate. And for the next step, we need to define the center
line both horizontally, and vertically
across this circle. You can do this across
the front and side. And next, we will create an
oval on the side of the head. Help this oval helps us to define the side
plane of the head. And I have had a lot of
practices on this anatomy, and you can improve your eye with doing
much more examples. And let's talk about
the basic shapes. And for example, circle for the eyes and upside down
triangle for the nose, for example, the nose
line will come from here and the hair
line from here. And nose parts can be
upside down triangle. With simplifying. And you can paint circles for
eye sockets here. And after this, you can at
the chin area just like this. And basic shapes that I use for facial features
are like this. You can use two
line and this line for the end of the
lip for show it. And for example, let's do some examples for show
the head anatomy. For example, I will create another layer just like this and we'll paint
quick shape circle. 1 second. Let's do it again, just like this and
add the circle here, divide circle and
find the middle of it and find another middle of it and put another
ellipse here. It will be nose ellipse. So it will be hairline, it will be nose line
with the same angle, and we will have the center
line just like this. Chin will come out
from this area and from here and for
defining the I. Let's paint this color
here and color here and upside down triangle here
and Much just like this. And after it, select the darker color and start
to put the eye here, just like this and
do it the same for the other parts and put the
eyebrows at the brow line. This is our brow line. And after this, put ice
in it and other parts. And put the nose here and paint the lip details, and maybe have some
moustache or something. And to find these edges
over here and paint the here and maybe
he comes like this. And yeah, you can add many facial features
like this at the corners and like maybe wrinkles and other things for create
portrait much more effective. For example, I will create
a moustache here and maybe cor shadow over here to make the neck
much more visible. And with these details, you can simplify
the head and head anatomy and create
your own Loomis head. Hope you enjoy this part and
see you in the next parts.
21. Experimental Portrait 4: Welcome. In this part we will paint another Loomis
head portrait. At first, start with a sketch. And for sketch, I will use smooth line and
stabilize smooth line. At first, start with the
ellipse of the portrait, and after this define the
angle of the portrait. For example, I will make
this portrait size and just like this and finding the middle point of this
angle. And after this, I will paint another line here that reflects
the ear place, and the other planes will
define the rotation and chin. For example, this
is our chin area, and it out here like this and connects to the
chin, just like this. And if you paint another
line from the center, just like this, it defines the side plane of the
portrait just like this. And with painting the
eye sockets here, just like this and
another eye sockets here. And hair line will be here. And after it, you can put
the triangle here for create the place for the nose and also these two shape for create
the location of the mode. And after it continue from
here and define the edge, and you can define the hair style of the
character just like this. And especially these areas
will be much more larger and after you define all of them, you can select any
textured brush and start from the eyes. So at first, we will define the shape of the
eye just like this. You can define it, and the endpoint will be
much more wrinkles and some maybe he looking at the
left place just like this, and these planes
will be much more darker and eyebrows will be set in the eyebrow line
here, just like this. And the other side, we will continue to
create the tail level. For example, another I comes from here,
just like this, and I looking at the left
part just like this. And the nose will be much more interesting
here, just like this. And I will connect points of the nose here,
just like this. And maybe we can make
him look much more happy and thinking about
something like this. And after it, don't stop
adding details over the corners and
build face details. And for example, I will make the eyebrows much
more visible here and maybe moustache
will come here just like this and
another moustache here, and I will add much more smaller place
here just like this. Hair will be curly and will
come to behind the ears. Just like this. And other
side at the right place, I will do the same thing. And after you
putting all details, you can put the small
details of the portrait. For example, you can
create the shadows. For example, if the light
comes from the left top, you can set your shadows
at the right place. So for example, these
parts will be really dark, and these parts will
be really dark. And moustache will be
really visible here, and I will be much more darker. And these parts are
much more darker also. And yeah, it is
looking really great. And you can create really characteristic
and interesting illustrations with
the looms method. And it can have some different
kind of things like this. For example, we can put shoulder detail here and make this chin
much more smaller, because to make it
look much more, not real, hope you enjoy
this Loomis method portrait, and after adding
much more shadows, I will end this video and
hope you enjoy this process, and I try my best to
show you the process, and I will be really appreciate it if you give rating and
review for my content. Thanks a lot. And if you
will have questions, I will be here for
you as always, and these parts are darker and thanks a lot
for joining this part.
22. Experimental Portrait 5: Welcome. In this lesson, we will paint the Loomis heat, but much more
realistic and detailed and create the cranium and
divide it from corners here. And to find the eyebrow lines. For example, this
is our location, and it will come from here. And I will add some
details from here, and eye sockets
will be like here, and nose will be here, and these parts will
be just like this. And after it, you find the eyebrows and ice
again, just like this. And ice comes like this and
nose plane will be like this. And lip will be much more
with the lip fuller. It is a female figure, and maybe with the cat
line eyeline here. And hair will be
maybe like this. And the other part will
be comes from here. And yeah, it is looking
great right now. And I will make the layer much more less visible
and open new layer. And this time, I will
use textured brush. You can use any
textured brush in Procreate library because
for artistic look, we are done with
the rock sketch. But now we need to create
this sketch and define the edge of the portrait just like this and
define the planes. For example, I will
create the eyebrows much more strong here and we put the eye here like this and nose will look much more small
here just like this. And I will try to be
realistic in this Loomis hat, and it is really great
technique for creating the illustration and much more faster and much
more interesting. Just like this, put details, and for hair, we can define
the other hair shapes. For example, with
a larger brush, I will start to add the head
a bit much more bigger here. Just like this comes under the here and we end
here like this, maybe small and cool hair
she has just like this. And this corner will be much more darker and
especially this part. And let's continue to creating the elashes just like
this, like this. And these parts will
be much more darker. And especially the upper
lip will be really darker, too, just like this. And the nosia, especially this part
will be much more darker and this is looking
great right now and looking really
expressive with the shadows. As you can see, these shadows creates the depth in
the illustration, and it is really so important
to create the dark, really dark shadows and find the balance between
them just like this. And these parts
will be much more smaller and have the dress
also maybe like this. And it is looking really traditional and great and
zoom in to the portrait. And you can put shadows
over the eye for make the it is visible and especially these
parts can be darker. And Hope you enjoy this process, and these parts also
will be really darker, and these parts also darker and maybe ears will be much
more visible here like this. And maybe eyelashes will
be much more visible. And it is looking really great, and it reminds me the Vedness Day character or
some Tim Burton character. And you can add much more shadows over it for turn the face because
it is not flat, and you need to create the
balance and turn the things. For example, I want to make
chin much more smaller, so I can erase it from here and maybe make these parts much
more darker, just like this. And thanks a lot
again and can't wait for show you much more in
the next lessons. Thank you.
23. Experimental Portrait 6: Welcome. In this part, we will paint Lomi's
head from the circle. And at first, I'm
creating the circle, and then I'm adding the
corners of the ellipse, and I'm adding the line here. And another line here. And after defining it, you can create this brow line and find the center of portrait, and at the tails here for
create chin from other side, I will define the chin
area and I will put the ear here and another
line under the eye. I mean brow line and another line here at
the end of this circle, and it is our nose
line, just like this. And here is our eye sockets will be and hair
line will be here. So after creating these details, take a light blue and define the eye sockets and details for, like, shadows of the portrait. You can define it with this kind of color or different
kind of color. And for example, these
parts will be in shadow and neck will come out from here and maybe
another shadows here. And after defining these shadows and select darker color and continue to create the
shadows and eye shape, for example, my eye
will look like this here and maybe much
more round the eye, and I will continue to
create the other eye, but try to create all eye
details before the coloring because the general shapes are much more important
than details. So silhouette is really important before you
put details in it. So these details
will look like this, and I will add dark
shadows over eye here. And also here will be like this. And I will look at
a bit left here, focus point, and other
parts will look like this. And I will add the tails for
the mouth, just like this. It will look like this, a bit much more
expressive and realistic. So after these details, you can create bon check and maybe eyebrows
just like this, and maybe hairlines
will look like this. Hope you enjoy this process. I'm trying my best for create the portrait much
more aesthetically. And he will have some
curly hair like this. And I will add much more curls
here especially this area, and I will create the neck area, and it will be like this. And after this, I
will zoom into I and I will add small
but effective details. And with much more
shadows and bolt lines, I will define the portrait. So this part will be really darker to show the
anatomy of the eye, and I will look like this. And from other side, it will look like this
with a bolt line, and this part will look
much more effective. And eye will be connected nose like
this and shadows of it. Will be really visible, and lip can be much
more like this. And the eyebrow will look
a bit much more like this. And I will continue by adding some details and muscles here. For example, I will add Bonchi here and maybe this line here, and I will create the this part much more
masculine like this. And I will create the ear comes out from
here, just like this. And curls will be much
more bigger here, like, much more aesthetically and randomly here like this. And maybe much more larger and curl here like this. And I will add the neck
details here and here. It looks really great and we can add the shadow
over lip and here. Also muscles can be
much more visible here and maybe drop shadow
here with more darker colors. Because the shadows and drop shadows create three D
look for your illustration. It is really important
to create these details. I will add some
details over here too. It makes age. For example, if you make these lines so much, your character will
look much more older. So it is depending
on your choice. So I will add a much
more smile here and I will make this parts much more darker.
Yeah, like this. And I will add some this
the tail here or not. Let's make it live like this. And maybe one dress like
this would look great. And I will create
much more curls, mini curls and maybe piercing
here, just like this. And another piercing
at the nose. It's looking really
great right now, and I will add another
piercing here. And it's looking great. And with the practice, you can create really
characteristic portraits. For example, I will add much
more shadows over here, just like this and
much more curls. And yeah, it is looking great and it was a quick
Loomis method portrait. And thank you for joining me and see you
in the next lesson.
24. Experimental Portrait 7: Welcome. In this class, we will paint Lumis method
with painterly style. At first, start with the sketch, and I'm using some skin
color for the sketch, and you can use any skin color you wish
for your character. And at first, just try
to build the silhouette. For example, neck and
the other details. For example, some
shapes like this. And after it, try to
define the cranium, just like the previous examples and make the chin area
much more visible and you find the edge much more visible and
clean, just like this. And after it, zoom
into the face and build the pad of the
nose and forehead. This area is forehead, and there will be here, and these planes for eye
sockets and nose is here, and mouth is here. And select the much more
saturated dark colors. For the shadows for the
planes of the portrait. For example, this
part is eye sockets, and I will make this
part much more dark. Maybe even with much
more saturated color, you can blend much more
easy and much more smooth. And at this step, do not rush about any details. Just try to build the
shadows and light points. For example, you can
make this part much more darker because this part
is in the side plane. Defining planes is much more important and priority
in the ums method. And I will continue to create
this part just like this. And if you're interested
in portraits, please join my
other classes, too, because I try my best, create the most helpful
content for your artworks. And after building these steps, go to colors and select much more, saturated color
and apply over the cheek, just like this and
apply over nose and cheeks and continue
to adding details. And right now, I will select darker color and zoom into face. And with a white color, I will define the eye. You can put some
white line here, just like this to make
a place for the eye. And with a dark color, put the eye just
like this easily. And after it continue and add the lashes over the
eye, just like this. Maybe she's looking at the uh, left side, and I
will continue to create this part
again like this. And I will add the
eyebrows just like this, and I will continue
from here and we put the shadows of the
nose just like this. And I will continue to create
the portrait like this. And it is looking
really great from now, and I will continue to
add the Much details, and it will look like
this with a dark color. I will define the
lip just like this and we put the and point of
the lip, just like this. And I will use the same brush and will continue adding the
tails from here. And this part will be like this and chin much
more will be smaller. And I will paint here, here, and I will continue
to blocking the hair. But with the same color, I will use same color for
the all area of the hair, and if you wish, you can add details of it later. But at first, we need to block
the color just like this, and it will down
from here like this. Let's continue to adding
details over the hair. And the left part, this part will be much more
definite edge of the hair. For example, is
down from here like this with much more
larger brush strokes, and maybe chin and neck
will be much more shorter and thicker from
here to make it much more look like feminine. And let's add shadows of the
here and zoom into the face, and this time, I will
add shadows of the eye. This part will be really darker, and I will continue to
increasing detail over the eye. The shadows can't be black
because it will look boring. So you can consider to use much more saturated colors of brown and pink and other colors, and it will be much more better because to keep portrait
much more alive, you need much more
saturated and warm colors. But in the shadows, you can use really warm colors to keep it much
more interesting. So you can check
the color theory, and the examples of portraits
will be helpful for you. And I will continue to
create the color of the lip. This lip will be like this, and I can be much more larger because I feel like it is a bit small compared
to the portrait. So I make it much more bigger. So now it is looking
really great, but I need to make
this part much more. For example, lip can
be much more bigger, and the eyelashes
can come from here, and the chin can be much
more thick, just like this. And for the shadows, you need to use really
dark colors and especially this area because this area is in the
back of the portrait. So I need to make this
much more darker. But if you wish, you can add much more
saturated color over here near the dark place to keep the portrait much
more even interesting. So let's continue. And I will add this part
much more orange tones, and these tones will
be orange again. And to dress will
be these colors. Just like this, I will
add texture of the dress, and she looks gorgeous. So zoom in here and keep continue to add the tails
and finish the portrait. I hope you enjoy this process, and I try my best to show you the most amazing
portrait techniques, and I can't wait for show you
more in the other lessons. So be sure you checking
the other lessons because I show textures and other details
about digital art. And let's add some earrings
here for portrait. I will use white tones here. And now, it is
looking really great. And I will make
this just like this and maybe another piercings
here and zoom in here. The I will keep adding
the shadows for nose. This area will be really
black and detailed, and maybe this part
will be with a lip fer, depending on your choice, you can select
your own decision, and I will select saturated color here for
add much more shadows. For the portrait,
and for the checks, I will use much
more white color, and I will improve the
color here and here. And don't leave the colors flat because you need
to change colors with hue saturation and brightness when you're painting
the portrait to create planes because eye and
nose and chin is not flat, and it needs to be
rendered tready. So be sure you adding much more interesting colors and highlights and other
details into your painting. So it is essential to create much more impressive and really realistic
looking illustrations. So let's continue to
adding details here, and I will continue
with some hairs trends, and it will look like this, and maybe this part will
be much more curly. And nose part will be much
more defined, just like this. And I will add much
more details over here, too, and maybe here. And it is looking gorgeous, and I will finish this class shortly and hope
you enjoy this process, and I can't wait for see what you done
from these lessons. Thank you again and see
you in the next lessons.
25. Experimental Portrait 8: Welcome. In this part, we will talk about how to color Lomi's portrait and
with easy technique. At first, open the layers, and you will see we
have a sketch line art and tap to nve layer and open nve layer
under the sketch lines. So go to the colors and select some skin color and
apply over the portrait. But be sure about that, you are using middle tones, not so saturated, dark or light. So after it, select darker colors and try to define the
portrait with simple shapes. For example, there is a triangle here and another
triangle is here, and opposite triangle is here and another
triangle here at the full lip here and another big shape here and
another triangle here. You need to divide the
portrait into shapes. For example, another
shape will be here. At first, it will look
so dark like this, but don't mind it and continue
to create the details. And for here, I will add
the details like this. This coloring method is for just show the shadows
and light points. After you complete it, go to the adjustments, select gsm blur and swipe
your finger at the camas to the right and use it gently and make it
much more like this. And after it, tap to adjustments
menu again to cancel it. And after it, we will need some like saturated colors and different color variations. So open another new layer and change the layer
mode to color. Then select reddish color and apply over the place
you want to blush. For example, the parts
and maybe eye parts. The places the veins
is much is look much more red like this. And it is really important
to create portrait. Color variations is
really important. So then open another new
layer and zoom into the I. This time we will continue
to adding the I detail. For example, I will start
from the saturated color, then select much more
darker color and apply over here to make I look
much more realistic. And after making this, tap to normal base color and select a bit
much more yellowish white and apply over
the places you want to look much more vivid, for example, over
here, just like this, and maybe this place and planes you want to
make much more alive. And you can use much more
red colors over the lip. For example, I will add
the color from here, and it is looking already great, but we need to use much more
dark colors over the edge. This edge defines
the drop shadows. And for example, this part
and maybe end of the lip, these parts shows to who body
and skin reacts to edge. So you need to
make sure you make these parts much more darker or lighter depending
on your light source. And I will add much
more dark colors for the hair and like this. And this part will be
much more like this. And yeah, it is looking great. By the way, I will share
this sketch at the projects. And you can use this
reference and create the portrait by looking at this sketch or you can
use your own reference. Let's continue to make this part much more
darker, just like this. And this part will
be darker too. And at the shadows, you need to use much
more saturated colors, for example, like this. And maybe end of the eye can
be much more darker, too. And it is already looking great and go to the layers and collect all layers by
pinching the fingers together and go to the
adjustments and go to the curves and
play with the curves and make the pour plate
much more saturated. The zoom in again. The create the much more
lighter color for the edge and try to make portrait much more interesting
with the light effects. For example, this
plane is lighter, and maybe in eye, we can make this part
much more lighter too. All we need to do is preparing
the portrait and shadows. And for example, this part will be really
darker just like this. And hope you enjoy this quick coloring quite
and can't wait for see what you done from these tutorials and thanks
a lot for joining this
26. Experimental Portrait 9: Welcome. In this part, we will do
Loomis Method portrait. And at first, I will start
with the circle again, and I will make the
corners divided again. And this part will
our center line. And this is our chin line. And we will divide the
corner just like this, and I will put the
eye socket here, and I will put the
triangle here for nose, and chin out from here. And you can create
the nose from here, and eyebrow line is here. I'm defining the shape quickly before I start adding the tails, and hair line will
be around here. And after this, I will start
with creating the eye. For example, I will be
here and another eye here, and ear will out from here, and nose will be much
more shorter here. And I will add the neck
area here and here. And it looks really
great right now. And I will open
another new layer, and now I will select a
much more textured brush, and I will start to adding some painterly details to
the eye just like this. And another will be here. Loomis Method is really helpful
for creating portraits, but for make it even better, you need to practice much more and practice daily and
try different stuff for create Loomis Method and maybe make this part
much more darker because it is in the dark and let's make this
part look like this, much more sweet, and
maybe he's smiling. And I will start from the
hair, just like this. And yeah, it is looking
really great right now, and I will keep adding
the tail over portrait, and this part will be like this. And I will it like
this here will be much more visible and dark. Eight. Here will be much more bigger here and maybe some
two lines here. And maybe we can make chin much more shorter to make it
much more even interesting. And I will add chin area from here and here, just like this. And it is looking
really great right now, and I will continue to create the details of the
dress just like this. And you can also go to the
actions and Cavas and Flip horizontal and with changing the perspective and
Cavas location. You can understand your
mistakes much more easily and create the portrait much more even easy with these
details just like this. And I will make this
part much more bigger, and these parts will
be really visible, and these parts
will be like this. Also, you need to
define the planes of the portrait when you're
creating this portrait, and these parts will
be really darker and this part let's mirror the game. And I will add much more detail over
here, just like this. And for example, I can delete the eye with
razor or white brush, and we can change
the location of e. For example, she can
look forward here. Just like this. Loomis Method is really fun and helpful for create
different characters. So you can do practice and try to see what is best and working best for
your portrait and decide. So I will keep it like this. Maybe I can dilate this eyebrow and make it much more like this. Like maybe like
this or like this, it adds emotion to the portrait
depending on your line. And I will leave it like this, and I will add much more
dark shadows here and here. I will give you
another tip right now. When you go to this
selection tool, I mean this tool and
select verb you can play with the perspective and like
stretching the portrait. So it is really helpful
for adjust details. For example, you can make
her much more larger or much more look
maybe eyes like this. You can change the direction of the head with this option. So it is really helpful for create different
kind of details. For now, I will
leave it like this, and maybe I will make this
lip much more bigger, and I will add the dark
parts to the hair. Maybe curly hair will
be better like this. And the dress will be black too. Hope you enjoy this
Loomis portrait. And in the next lessons, we will continue to create different
portraits and practices. Thanks a lot and see you.
27. Experimental Portrait 10: Welcome. In this class, we will paint Loomis Method
from the right side. At first, Selec sketch brush and start to create the Cronium
ellipse just like this. And we need to
find the middle of this cronium and it
will be like this, but maybe much more centered, and I will make this
center line for portrait, and I will make the
chin just like this. And it will come like this. And there is a eye socket. And at the end of the circle, there will be nos and at top, we will have a hairline here. And at this part,
we will have here. And at brow line, zoom in here, at the brow line to find
the shape of the eyebrow. And let's put the nose here, just like this, and mouth
will be here like this. And maybe chin will be much
more shorter, just like this. And we will have eye here and maybe nose will be much
more here to keep balance. And after you define
these small details, you can make these parts much more less visible
with the new layer, I will zoom in here, and I will put the
details of the eye. From left side, eye
usually looks like this. And for example, I will
add e details here, just like this and nose
will be out from here. Maybe much more with the bone, we will add some different nose. You can slice the nose as you wish depending
on your character. In this, I will leave
it like this and I will put the lip detail here, just like this, and I will add another
detail for the lip. And maybe we can make the eyelashes much more
interesting like this. And I will add some much more hair for this part and this
part, just like this. Let's add much more beard here. And from the chin, you can add much more beard. For example, I can make
it look like this, and maybe hair is like some
metal fan, just like this. And maybe have some
piercings here, and maybe at the mouth,
have another piercing. And let's continue to create the details of
the Loomis portrait, and it will be like this, and Yeah, it is looking great and maybe these parts will be much more visible
here, just like this. From left side, we will
see this part much more shorter and maybe this
part like this and yeah, it is looking really great, and I will continue and
add much more detail. And for eye, you can add much
more specific details here and put maybe shadows and highlights over portrait to make it much more interesting. And if you close
this sketch layer, your portrait will
be much more visible and much more clean. And you need to work with
some sketch brush or inart brush for creating this
stuff. It will be better. For example, you can
make the corners much more visible to make it
much more interesting. And these parts will be maybe wavy and hope you
enjoy this part. And in the next part,
we will continue to create much more
portrait. Thank you.
28. Experimental Portrait 11: Welcome. In this class, we will paint Loomis portrait. And I will start with the
simple painting of the cranium, and I will start
with the circle, and I will paint over
it with base color. And after creating
the base color, try to put skin
colors directly over the circle and try to understand how it looks and for example, these parts will be
much more lighter, and the face will
look to this area, and neck will come
out from here. And these parts will be side, and eyebrows will be
here and eye sockets. I'm slowly building
the appearance of the facial details such as lip, nose, eyes, and the bonche maybe some dark parts
for define the eye. For example, it
will be like this, and the other side
will be like this. And nose will look like this. These parts will be darker
and lip will be like this. And this one will
be male portrait. So I will make the chin
much more like this. And maybe you can add these
details for give age if you want to give like wrinkles for describe
the facial details. So I will continue from here and I will make eye much
more darker at these parts. And maybe he has a mustache like this
and maybe even beard. It is depending on your choice. So take your time on these details for put
these old details. For example, I will make
this part much more like this and it is
looking really great. So hair will be long like this. And these parts
will be like this. I will continue to
add the hair details. For example, this part will
be much more like this. And these parts will
be really darker. And I will continue and add details over
here, like wrinkles, and maybe much more bigger
shape for these eyebrows, and these parts will be darker. Now I'm adding the shadows. For example, for shadows, you can use a bit much more vibrant and darker
color, just like this. And Yeah, it is looking
really great right now. And these parts will be darker. For example, you can add boon
to the nose if you wish. Again, depending on your
choice, just like this. And maybe the eye will be much more
bigger, just like this. And nose will be much
more lighter over here. And these parts
will be much more lighter and maybe the
neck will look like this. Yeah, it is looking
pretty good right now, and I will make the
hair much more longer and zoom in here and let's add some
details for these parts. These highlights gives a really
great effect for realism. So you can work over this area to create the
realistic look for the portrait. And for example, adding some lights over
here will be better. And after you put these details, you can open new layer with red color and change
the layer mode to color. And with this option, you can add extra colors
without losing details. So I added a bit much more pink over the lips and
maybe at the eye area, and now it is looking
much more interesting. And for shadows, you can
use some dark tones, such as a blue, just like this, and some
similar work to this. And I will continue
to add details for the neck and we'll finish this
Loomis method portrait. I hope you enjoy and can't wait for show you much more
process in the next videos. For example, I added
much more shadow here, and you can put these
shadows over here, too, because these parts
will be in the dark, and these parts will be also darker and maybe a bit
much more curly hair here. And zoom in here and
continue to make the eye much more dark
tones, just like this. And yeah, it is looking
really great right now. And with much more
darker colors, I will add the last details
I put on the portrait, and I will finish this video. I hope you enjoy and
I can't wait for show you more in the next
lessons. Thank you.
29. Experimental Portrait 12: Welcome. In this class, we will practice Loomis Method. At first, I will start with
the sketching and at first, create an ellipse and to find
the pat of the portrait. So after it divide the corners and each
corner will be similar. And after it, describe the brow line and the
hair line and noseline. And after it, describe the chin, and it will be like this. And at first donut brush, just focus on the general
shape of the portrait. And to find the
general shape and put some ellipse here and
nose will be adhere. And after putting
these general details, we are ready to create the
details of the portrait. So if you want to paint female, this chin need to be much more small like this and
face will look feminine. And for example, I start
with painting the I. At this step, do not
rush and just try to reflect what you want
to see over your portrait. For example, what
she looked like and try to improve the
likeness of the portrait. For example, this
nose will be like this and I will be like this, and I will put detail for Mut. If you don't like, you can
always go back and try to define the different kind of
details for your portrait. And I will create the
hair just like this and we'll add many
details as possible. For example, this mouth will be much more patted like this. And now I will select
different brush. For example, maybe
this sketching brush, and this time, I will create
the sketch of the portrait. Again, do not rush over details. Just try to understand
how it looks and try to reflect the details you would like to see
in your painting. I started to adding details
depending on my choice, and maybe this part
will be like this. This part will be in the dark. And yeah, lip part
will look like this, and I will add detail
over here and here. Look like this. And I will
continue to adding the tails, and maybe chin would
be much more lighter. And these parts
will be like this, and hair will be maybe a
bit curly just like this. And just like this, I'm defining the
tail for the hair, and this will be like this. I'm adding details
for these parts again and maybe she
has a curly hair, so you can add curly hair all
around the face and start from the hairline and create these details for the
curly hair and for example, these parts will
be really darker. This neck will look like this, and I will increase the
details of the hair. For example, it will look much more curly and long
and like this. And for the eye, I will add much
more makeup here, and these parts will be
really much details. And I will put some
shadows over the mouth. And let's continue to adding
details over the hair. For example, right part
will be in the dark. So a light comes up
from this leftup. So you need to define the edge much more darker at the right
part, just like this. For example, I will select free hand tool and we'll select this area and make this eye more far away
from the other eye. I will select the other eye, and this time, I will make the other eye a
bit much more up. You can always do these kind of adjustments over your
illustration to make your painting much
more acurate and give a likeness you would like
to see over a portrait. And for example, chin will
be much more darker at this point because I want to see much more dark shadows
for turned face, and and nose can be much more like this and maybe
this part will be darker. So let's continue to adding
details over portrait. For example, this point
will be really light. And the cheeks will
be much more darker. Yeah, it's looking really great. And these parts will
be much more darker. And these parts also. And let's continue
and zoom in to the eye and add some
lights over here, maybe much more soft corners and select a light brush and put the highlights over your eye because
eye is reflective. Reflective things will bring us much more shiny and
reflections over it. So I made it like this. And let's continue
to edding details. I will make this part much more darker and maybe this part. Again, these parts will
be really, really darker. And yeah, it is looking
really, really great. And maybe the hair will be
much more dark like this, and I will put the dress
details much more darker. And yeah, it is looking
really, really great. And I will put some dark, much more dark at
this right point. And yeah, it is
looking really good. And I will finish the
illustration in a bit. And I hope you
enjoy this process, and I can't wait for show you much more
in the next steps, and thank you for watching.
30. Experimental Portrait 13: Welcome. In this class, we will paint lumis
method from the colors. At first, start with the
base color of the skin and apply it like
the silhouette. And depending the looms set, at first, start with the circle. And for example, this
is the circle area, and this is the point
of the perspective. And let's make it zoom a bit to create the portrait
much more easily. This is the eye sockets,
nose, and lips. And here the ear and hair
will start from the hairline. And at first, you just need to be sure about how
portrait is look. And it tails over the
details, for example, at the cheeks and at the
nose, and, for example, let's take the darkest
tone and try to put some eyebrows and
yeah, it is painterly. So you just need to think
about how it looks. And for example, I made it the
eyes closet and like this. Maybe I can open the eye. You can always change
the details as you wish. So don't stuck into any details. Just try to modify and define
the edge of the portrait. For example, these parts are
darker and lip will be here. And, it is looking
really great right now, and I will continue to
add the details to here, and hair will be like this. And the other details
will end like this and I will make hair
really long from these sides, and the other parts
will be like this. And after it, I will make
hair much more darker, and this nose will be
darker from this side. And it will be much more
lighter at this point. And maybe this edge
is much more lighter. And after these general details, you can zoom in and put much
more detail over the eye. And yeah, it's
looking really nice. And from the other part, I will continue and paint
the other eye. And yeah, it's
looking really great. And lip will be really black. So maybe this portrait
is some gothic portrait. Hair will be dark, just like this, it is looking really nice and I will keep adding the tails
just like this. Maybe these parts
are even darker and the hair parts will be
more dark at this point, and I will paint the neck
area of the portrait. And you can select much more vibrant and
saturated shadows for nose parts and these parts of the portrait, just like this. And maybe these corners are
really darker at this point. And this point is also
dark, just like this. And yeah, it is
looking really great, and I will add much more
shadows over the neck and will make the hair much more
darker, just like this. And yes, it is
looking really great. And I will keep
adding the tail over the hair just like this. And these parts also will
be more vibrant and zoom into the eye and make I much
more visible and strong. And this endpoint will
be really darker also. And this part and for the eye, you can use some highlights that show the reflective surface and maybe these details
for create the realism and add much more interesting
look over portrait. And these parts
can be vibrant to, and we can add piercings
to the portrait. For example, we can make
the eyebrow much more tiny and put some piercings over the all areas of
the nose just like this. And maybe another piercing
is here and another is here. Hope you enjoy this
process and I will finish this portrait quickly after
I add some dress details, and I hope you enjoy
this process and I can't wait for show you more process in the next videos, and these parts will be lighter again and it is looking really great this part will be like this. Yeah, it is looking
really great right now. And these end parts will
be much more darker. And, yeah, it is
looking really great. And I will add much more detail over
the portrait and hair, and we'll finish this portrait. Maybe these parts
are even darker or have some specific
design that like maybe, I don't know, but maybe
something like this. Like maybe checker
here like this. And yeah, it is looking really great and maybe some earrings here and some cymbols here and metals here because
she loves metal, right? And some tattoo designs here or the arm and maybe and here, yeah, it is looking
really great, and I will cut hair
from this part and this part will be the body. And yeah, I look like this, and I will make the hair
much more sharp over here. This edge will be like this, maybe much more like this. And maybe even the red
color over here is a dye. Yeah, maybe red hair
in these parts. And I hope you
enjoy this process, and I can't wait for show you much more
process in the next videos. It was an experimental
portrait again, and we will continue to create much more experimental portrait, and we'll do practices
for improve our workflow. I hope you enjoy and can't
wait for show you more. And let's make this
part like this. Thank you.
31. Experimental Portrait 14: Welcome. In this class, we will do oil painting
portrait practice. At first, start with the skin
color and try to just add the main colors for the portrait and do not rush about adding
details over it. Try to create silhouette
with the bright strokes. And after you add this
silhouette and define the edge, try to add the darker
tones of the portrait. For example, if you have
some darker tones over here, try to apply it
with darker color, and painting with
really dark color will help you to create and
plant with the oil brush. It is a bit hard to use because, for example, this brush, because it's really experimental
and with the stroke, it blends automatically
and also will make your painting like fulant I will create these
parts with this brush, and I will now select some
extra artistic brush. I will select it maybe
painting and spectra. And let's continue to create
the Sutrox with much more painterly and spontaneous and trying to understand
how it looked like. And this is experimental, so you can try
different brushes. But mainly in this part, I will use artistic brushes, such as oily and
textured brushes. And for the eye part, I will use this brush and will define the look of the eye. And I will do same for the
other eye just like this. And maybe these parts are
a bit much more like this. And yeah, it is looking great. And I will continue to create
this corners for portrait, and lip will be much more bigger and maybe
with the lip folder, it is a bit bigger. And of course, it is
depending on your choice. And I will make this
part much more darker, and these parts will
be look like this. And, yeah, it's
looking really great. We have the expression
of the portrait. So all we need to do is
have some painterly edge and need to have some
hair for how it looks. For example, I started to add the curly hair just like this, and I'm blending the colors and adding the details
over the portrait. And this part will be also a much more curly and these
parts will be darker. And after you describe
these all details, you need to add some
lighter brushes over here for create the realistic
look of the illustration. So these parts will
be much more lighter. So you can create this
light effect with the light brush and
add for both eyes, and these parts will be lighter. And for lip, I will
use dark red and we add some color over lip. And for the chin, I think it can be
much more small. So I will cut it from here, just like this and from
other parts will be here. These parts will be shadow of the neck and from
the other side, I will continue to ding
dark points of the hair. And with the mini bright stroke, you can work for make your illustration much
more interesting. And for example,
nose can be much more small and I will define
the eye just like this. And yeah, it is looking
pretty good right now. And nos also will be much more
small and look like this. And yeah, it is looking really, really nice and
maybe zoom in here. And it will be really
dark over here. And yeah, and these parts will
be much more also darker. And I will make this
part also darker and maybe much more dark here and here to define
the edge of the portrait. Yeah, I will make this
part even darker. At the right part, this part will be really,
really, really darker. So let's continue to adding
details over all areas of the portrait and make it look like much more interesting
with these details. So the neck will end here and will be much more small
and from the other side, the right side will be much
more darker in this part. And yeah, it is
looking really great, and I think I created a really nice portrait
in short time. And in the next lessons, I will continue to add many
details to the portrait, and I hope you enjoy this process and see
you in the next videos.
32. Experimental Portrait 15: Welcome. In this class, we will paint portrait. So I selected hair brush. It is like textured brush, but it's great for
portraits, also. You can use any different
kind of brushes and start to sketching
the Loomis portrait. For example, I want to
make it look to front. So I will divide
the corners like this and paint the
face and nose details. And try to combine the neck and this part of
the neck and after it, you can define the nose with the opposite triangle
and you can also use opposite triangle for this part and normal triangle and
another triangle here. You can use any geometric shape fit for your illustration. So let's continue to adding
detail over our portrait. I will make this
portrait eyes closet, just like this with painting
one arc closed eyes. It is helpful for reflect the emotion and detail
of the portrait. So I will continue by making
it much more maybe like this and moustache will be like this and mouth
will be like this, maybe he's thinking something
and continue from the ears. I will paint Elvish ears, and at this part, I will paint again. And it is looking really
great and interesting. So I will make the
hair like this, like from backwards
like samurai, and I will drop shadow here. At the portraits
everything depending on your lines and
the light source. For example, if you
see there is shadow, it will be like there's another
shadow and another one. All these shadows are helping each other to give
the three D look to portrait. So these parts will
be really darker, and I will continue from the shoulders and complete
this area like this and maybe he has earrings
and some sword here at the back and I hope
you enjoy this process, and it is for
sketching character. And I try my best to show
you the exact process. For example, if you don't
like the moustache, you can always delate it. And for example, at the
different details such as scar, for example, like this. I will make the bot
eye scar like this, and it is looking
interesting now. And you can always change the details of your
painting as you wish. For example, if you want
to turn it to hair shape, much more different style, you can edit just with
adding extra strokes and this tie here and let's paint
the tails just like this. And maybe let's
paint a beard like this and if you want your character much
much more different, you can add mask
or different kind of things you can add over your painting and
change the style. For example, I can make
the eyes open with adding the different shapes
here or you can add also like some bandage here like this for
maybe like this. And it is all about the details. So I hope you enjoy this part and see you
in the next lessons.
33. Experimental Portrait 16: Welcome. In this part, we will color this
Loomis Method portrait, and it is a kind
of sea creature. And we will open
another new layer under it and we'll paint the
who area at first. You can use the sea colors or some dark underwater colors
to define the background. And after this, paint the
areas you want to pop up the highlight and look portrayed much more like light coming
from the top, just like this. And at shadows, I will
use much more green tones and much more saturated
and dark green tones. You can define the
shadows and highlights with this method much more
easily, just like this. And for the eye, I will use really black
color just like this. And it's for define the edge and give the really good brains
look just like this. And yeah, let's continue. This time, I will
select this blue, and at the top of it, I will apply this
brush just like this and maybe over the eye, I will apply the same brush, and here will be
much more lighter and ears will be much
more vibrant also. And yeah, it is looking
really great from now. And I will make these
parts really lighter. And with the really dark
hues of this color, I will add some
dark lights here, maybe much more dark blues on their eyes, and these parts. And these parts will
be really darker. And yeah, it is looking
really nice just right now. This part will be darker, too. And yeah, it is looking
really, really great. And this time, I will select
light really light color, and I will give the rim light, like the all from the back, it lights up the back just
like this and like this and open another new layer then select color dodge for layer
mode and select red color. And apply all over the ears. This will make some subsurface
look for your creature. Like we can see the blood in it, maybe like transparency effect. And let's zoom in here
and add some whites over the eyes just like
this for both eyes. And for skin, you can add some really dark and light tones over the skin or create
some fish texture. For example, not only
with the same color, use some greens and some
blues and some whites. And I hope you
enjoy this process, and I can't wait for show you much more in
the next lessons. Thank you and see you.
34. Experimental Portrait 17: Welcome. In this class, we will paint portrait
with the Loomis method. At first, start
with the cranium, and I will make the canvas
much more like this, and I will paint the
cranium like this. And after this, I will paint the side view
of the portrait. So this plane will tell
us how the portrait looks like and how
to face is located. So it will be like this, and eyebrow line
will be in here, and we will paint this chin line just like
this to define the face. And this plane will be for neck, and I will paint another
line under this place. So this part will be
the eye socket line. So this part will be eye part, and nose will be in here, and I will paint female
portrait in this lesson and let's draw together the
chin and shape of the face, and maybe lip will
look like this. And in this Loomis portrait, I will use different method
from the other parts. I will use the blurry look
and the technique I will add ICU for create faster and
much more easier portraits. So let's start. I created the general shape for the portrait, and after it, I will open another new
layer under this sketch and select some airbrush
and continue to coloring. So at first, do
not brush and just put the general colors
like the base colors. But don't add any detail. Just try to be like think for shadows
and highlight points and add experimental colors which show you to general
effects for portrait. And I will use white color
for these eye parts, and lip will be
really dark color. And maybe this neck will
be really darker again, just like this and continue to creating
the general shapes. But don't add any details. Just try to see which
part is dark and which part have the light and which kind of colors it has. So slowly try to add some planes that show the general shapes
over your portrait. For example, I will start to adding the eye here
just like this, and maybe eyebrow
will be in this part, and this nose part will be in the dark and nose plane will be in the dark
just like this. And yeah. And I will continue to add the shadows over here and
maybe over here also. And after you do this, you can select two
layers and go to verb. With the verbing, you
can modify the portrait. For example, you can make
it much more skinny look or much more different kind of adjustments
over the portrait. So it is really helpful tool
for play over the details. And after it, I will
continue and I will add the eye shadows to
pop up the eye. And just like this, it will be darker at this part, and these parts will
be really darker also. And I will add much
more dark colors here. And, it is looking
really good right now, and I will increase the
lights over the nose. And lip will be
really dark also. And this part will be
really dark again. And Yeah, let's continue. This part will be really dark, and eye will be really, really, really dark over
here because makeup will give much more feminine
look on your portrait. So I will add this part, much more darker
color, just like this. And for nose, I will
make the nose part will be like this, maybe these parts
will be darker. And I will use
some light colors, and I want to change the nose because
I want to make it much more soft and maybe it will be better to
make it just like this. Start from this point. You can always adjust the
general look of your portrait, and maybe sometimes you
can flip horizontal to see your mistakes to create much more interesting
details over your portrait. So let's continue to
create the portrait. This part of the
portrait will be in dark and these parts will
be really darker, yeah, it is looking
really great. And the right part
will be again, dark, just like this. And yeah, it is looking great. I really love this
look for here, it's looking great and
soft, just like this. And I will continue to
create the tail of the body. I will not paint details of it, because I just want to
focus on the portrait. And at this point, collect all layers and go to
the layers and duplicate it. At the top part, go to the Gaussian blur and
make really blurry look. So take a razor and
make the eye is visible and the nose and
lip and these corners. Just like this. And yeah, it is looking much more
good with the smooch tool, use it for blend the colors, and this time we
need the shadows. So open new layer and
make the layer multiplay and select skin color and apply over your
portrait like this. And sometimes you need to select much more darker
brushes to create these shadows because
these shadows is make the portrait ready. For example, you can put really dark tones over
here to turn the head. Just like the ball. Imagine it is not flat and
it is all unique planes. So you need to play
with the colors and Shadows with increasing the richness of the
colors will make the portraits much
more realistic and interesting just like this and continue to creating
the shadows here, just like this, and maybe the part will end
here just like this. Yeah. And I will continue
to create the shadows of this part and this part and
this part, just like this. And this part will
be really darker. Yeah, it is looking great. And maybe for eyebrows, you can use much
more smooth line, like sharp line for crated, like painted and really dark. And maybe with some
nature trocks, it will look much
more interesting. And I will put
some shape here to define the end of the
eye, just like this. Because it is blurry. So I want to add some emotion
into the portrait and maybe some customization for nos and I will put another
one here and here. I hope you enjoy this part, and I can't wait for show you much more process
in the next steps. Thank you for joining this
tutorial and portrait class. I hope you enjoy the Loomis method with me and
see you in the next class.
35. Experimental Portrait 18: Welcome. In this part, we will do some
proport practices. And at first, I'm starting with the base shape
of the Loomis head. And this time, it
will look front. And I'm defining the
shape of the head, and it looks front,
just like this. And after it defined the
chin and after this, let's focus on the face. So it will be like this and I will put the mouth here, and ears will be here. And after you define
these details, you can at the general
details of the face. For example, create
the shape for eye and define it to
see how it looks like. And in my painting, it looks like this and Yeah, it was looking great. And nose will look like this, and maybe mouth will
look like this. And after you paint
these details, you can select with
the free hand tool. For example, I select this
one and move it here. Also, I can rotate it. You can manipulate
the illustration with different kind of details. For example, I want
to make eye look much more like this and yeah. And the face will
look like this. Chin will be much more
short in this composition. And for example, I make
this like this shadow here, and this plane will
be much more darker. And yeah, it's looking
great, just like this. And for example, if you
want to make portrait, much more realistic, go to adjustment and apply
some Gaussian Blur. With this way, if you don't
like the base illustration, it will give you to base plane. So you can create your
illustration from zero over it. Sometimes the base illustration is different than you expected. So with this method, you can create anything again and again
over your sketches. Because sketching is from
imaginary sketching, sometimes will be different
than your imagination. So it is really
important to work with different sketches
and experimental sketches. So it was experimental, so I'm making another phase
for our illustration. So this time, nose
will be much more small and shadow
will be drop here. And yeah, eyebrow
will be like this. And for example, I
didn't like here, so I will dilate it. And let's continue
to create the face. So this time, lip will be
much more sterilized and, like, with maybe some lip
fuller just like this. And yeah, it is looking
really great right now. And I will continue to create
the general shape here and at the details for eye, and I will use smooth shading
like airbrush right now, and I will make the eye really darker this
time, just like this. And I will do the other
thing again, like this. And I will make portrait much more darker, just like this. And it is looking really great, and I will use it's
much more dark here. And let's continue
to create the face, and I will use black
tones here and here. Always think about
adjusting the values. Values are really important, much more important than colors
itself, because shadows, highlights, and different kind of colors define your
portrait, not just color. And the combination of them creates the really
clean painting. So always think about creating the portrait much more with the different
values, just like this. And yeah, it is looking
really, really great. And after this part, I will go to adjustment and
I will give different kind of color with the gradient
map just like this. Maybe this color
is really great. Let me check it. Yeah, this one. And I will zoom in here. And with this color, I will select the
textured brush, and I will increase the tail level of this
illustration just like this. And I will make the hair much more
like this this time. And I will use these
tones like this. And I really like the
portrait right now. And you can always
modify and add different details over
your illustration. And yeah, look like this. And Yep. This time, it is
looking really great. And for example, you
can add different kind of piercings and different kind of details over your portrait, and hope you enjoy this process, and I can't wait for show you much more
in the next lessons. Thank you for
joining and see you. I'm putting some highlights, and, yeah, it looks
really great.
36. Experimental Portrait 19: Welcome. In this class, we will paint another
Loomis Method, but this time we will
be sketchy at first, and we'll start from
the silhouette, and we will continue to illustration with creating
simple and fast sketch. And at first step, don't rush and just focus on the general
detail of the portrait. For example, how it looks and how portrait looks and
the other details. So I will start with
the eye just like this, and I will add the
details of the eye and nose just like this and
the placement for the mouth. So after these details, I will give detail
over the portrait. For example, it can have
much more bigger ice. In my painting, I leave
the ice much more smaller. So now I'm adding the
extra details for the ice. And I will open another new
layer and we zoom in here. And this time, I will add
details much more bigger. For example, I will look
much more larger in this shape and have the other
eye will be look like this, and I will add extra details
for eye just like this. And let's continue to make the eye much more
effective, just like this. And this part will
be much more bigger, and maybe this area
for nose can be much more like this for create the shape, much
more interesting. So forehead is a bit,
much more larger. So I will make forehead
much more smaller, just like this and give
the hair this shape for continue and create the
tails much more easily. And these other details
of the hair under the ear like at the
back part of the ear. And these details will
be much more shorter. And for the lip, I will add this detail
over here like this. Expression for portrait really important for create
better illustration. So make sure you creating the
general look interesting. So for example, chin is
larger at this portrait, a bit much more far
away from the lip. And these kind of
details will adjust the detail level for your illustration and will make your illustration
even interesting. And I will continue with the
this detail for the neck, and this part of the
neck will be darker, and I will continue to
creating detail from here, and I will add the
dress details. For example, she have
some dress like this, and other detail, for example, for neck will look like this. And this part will be like this, and it is totally
depending on your choice. For example, how you end the he or how you detail
the illustration. And let's zoom in here, and I will add extra dark here, and I will add some
shadows over here, and other shadows
here, just like this. And maybe under
nose can be darker, too, and look like this. It looks so innocent, right? And it is just because we
decided to make it like this, and we need to delay
from the top of the head because it
ends a bit thinner, just like this
much more thinner. And these parts of the portrait
can be really shorter, depending on your
choice, as I say, for example, you can plan
and add details as you wish and create different kind of style depending
on your choice. And these kind of details will make your portrait
much more interesting. So these parts, for example, look like this, and the
background is really darker. I hope you enjoy this part. And in the next lessons, we will do another practices.
37. Experimental Portrait 20: Welcome. In this part, we will continue to
practice with the omiset. At first, I will start with the sketch like the
previous examples. And this time, it
will front portrait. So I will define the
middle of it with painting it with the
middle of the portrait, and eye sockets, and let's find out
nosline hairline, and there will be ears and neck. Yeah. And this time, let's continue to create the
base part of the portrait. Then we will create another
new layer for create the painting for much more
painterly and great look. So it looks like this, and yeah, it is
looking like this. So after it open another layer and make this
layer really less visible. So with paint ii brush, I will start from the eye, and I will define the
eye just like this. And let's make the eye like this look much more sharp. And let's put the
eyebrow here and let's continue to add
details to the eye. And these part
will be like this. And yeah, it is
looking really great. And just like this at the nose, yeah, and nosline
will be like this. And let's put the lip
here just like this. And ears will be at the corners, maybe at this part and chin. Basically, we are
defining the portrait, and it looks like this. Maybe we can adjust
the tails later, but it is our first sign
for the portrait now. So after you define these parts, you can adjust things. For example, I want to make the eye much more
separated from each other. And with a free hand
tool, select first, and with MOTol you can adjust the size or different
things about the portrait. So let's do another
one adjacment. Nose will be much more smaller, and this area will be much
more close to the nose, and it will thin,
just like this. So after this, open
another new layer and make this less visible,
like barely visible. Then after it, continue
to create the portrait. So this time, I will make the
portrait of this character, much more different
than the first one. And this time, she
will have much more I makeup just like this. And this part will be like this with much more shadow. It will be look like this. And yeah, it is
looking really great. Yeah. And I will put another
detail for the nose, and nose will be
much more thinner. And it will have some maybe
piercing here like this. And the lip will be much
more bigger, just like this. And the corners will be much more confidently
painted like this. And maybe let's make
some contour or here for define the
portrait much more better. Also, let's put another
piercing here, here, and put the details of
the neck just like this. And maybe this part
will end thin, and this part of the hair
will be much more curly hair. Like the curls will start much more larger and end
thin at this site. And let's continue. Maybe these parts of the hair will be divided from
the middle point. And yeah, it is looking
really nice right now, and I will change the hairstyle because I want to see much more
different style. Maybe this kind of
style would more fit to these piercings and
my character idea. After it, I will put the hair like this like
this cat, for example, let's continue to
put shadows over this area and put
some hair details. Just like this and zoom into the portrait and add
these shadows over portrait and place the shadows and try to define how
the portrait looks. For example, I will make
the chin much more darker and these parts will be much
more textured like this. And for eyebrows, it will and
thin and it will be sharp. As a style of the character, I want to make the
eyebrow really, really tiny like this. And maybe we can put much more lushes here because my character
is kind of good, so it will have much more dark makeup and maybe tattoos on the
face or something like this, and hope you enjoy
the illustration. And I can't wait for show you much more in the
next lessons. Thanks a lot.
38. Experimental Portrait 21: Welcome. In this part, we will continue to create Loomis head portraits. At first, I will start
with the base color again. And this time, we will paint much more painterly and much
more interesting design. For example, I creating
the shape for omsat. But this time it will
be some orc face. So nose will start from this side will
be much more bigger, and the chin will be
also much more larger. And you can modify the loom
set depending on your choice. So it will look like this, and cheeks will be
something like this, and mouth will be like
this and zooming. Then we will continue to create the details of the lumie head. And I will be something like this with much more wrinkles
because it is or character. We need to put much
more visible wrinkles to create the character
much more interesting. So let's continue,
and I will make this part much more visible
and strong and like this. I will put the nose will be much more
defined, just like this. And mouth will be really
big just like this. And we'll have
shadows over here, and ear will be much more
defined, just like this. And yeah, our character
is looking really great, but I will continue to create the shapes much
more beautifully. And for example, we have extra shadows over here at the right part, just like this. And yeah. And this part will
be much more bigger, and the corners are really
darker, just like this. And this part of the head will be much more defined, and shadows of the head will
be here, just like this. And this part will be much
more defined, just like this. And this time, I will use
a lighter brush and put some lights over here
and here over the head. And at the mouth area, I will put the shadow, and we will have the some extra details
over these planes. And this part also will be highlight point for
the nose just like this. And I will add extra lights
over here and here and here. And yeah, it is looking
really great right now, and this part will
be also lighter, and here will be much
more bigger, like, much more defined
and have the edge much more visible,
just like this. And let's continue. Maybe our org have some he hair bondage and
have the hair like this. And all you need to do
all you need to do, you can increase the details of the org and put some really interesting
details over the portrait, such as lights and shadows to bring it to life
much more effectively. And this part will
be really darker. And this part also and let's make it like this and make the chin
much more larger. And forehead will be much more dark points just like this for bring much more realism into the portrait,
just like this. Yeah. It is looking really great, and this part will
be really dark. And this part also, this part, it is looking
really, really nice. Just I will add extra
details just like this and maybe over at the eyes and these shadows will give expression to the portrait also,
especially these parts. And maybe this inner part
of the nose will give us a really dark point and select much more
yellowish color here, just like this and
put some lights over the this part of the portrait to create it much more even
interesting like this. Yeah. And let's use really white color and define the
lights in the eye. So it will look like this. With shiny eye, it
is much more alive. So for the background, you can use some white colors or warm color or cold to create the outlines
of the portrait. And maybe these
parts in the dark. So it needs to be really, really black, just like this. And yeah, it is looking
really great right now. And yeah, let's make
this part really, really dark this part. And maybe let's put some
different kind of things. For example, for war wounds, like maybe different
shapes over the head, like wrinkles and stretches
to make it even interesting. So hope you enjoy this part, and I can't wait for show you much more
in the next lessons. Thank you for joining
me. Thank you.
39. Experimental Portrait 22: Welcome. In this part, we will create portrait
with Loomis method, and it will be
character illustration. So I will start
with the base shape of the cranium again
and we'll divide the corners much more visible and we'll put the details
of the character. For example, this
part will be really darker and these parts
will look like this. And maybe ear will be really
bigger like Elvish or some troll ear or some
fantasy character. And for eyes, I will use really sharp details to the
eye part just like this, and it will be really sharp. And Nos will be really big
and down here like this, like the Troy or something, and maybe he's smiling like maybe evil smile at his face and looking to
the screen like this. And yeah, it is
looking really great, but we need to define the
edge much more carefully. Maybe the nose will be end here, and the corners of the
nose will look like this. Let's paint the mouth
here like this. And some evil smile on his face. And let's put the
tails together. For example, this part
can be much more darker, and let's put the other
ear here like this. And maybe ear will be some piercings here or
different kind of things. And I will put shadows over here to create some dipped
in the illustration, and you can add extra shadows depending on your light source. In this portrait,
lights come from the laptop, something here, and let's continue
and hope you enjoy this part and I can't wait for show you much more
in the next lessons. It was a quick portrait with Loomis method and see
you in the next lessons.
40. Experimental Portrait 23: Welcome. In this part, we will practice Loomis Method. At first, start
with the cranium, just like this and
find the middle point of the portrait and divide
the corner as usual. And after this paint the eyebrow line and
noseline and hairline. Then continue and create
the neck just like this. And after it paint the portrait eye sockets to here and find the
place for the nose. It will somewhere
here, just like this. And check will be like this. And after it, I will paint the lip here just like
this and put the I here, just like this and here it will look like
this and nose will be a bit much more short
and let's put the I here like she's looking at the
middle and other I will be here and I will put The neck here and
ear will be here, and chin will be and like this. And I will paint the
lip just like this. Yeah. And eyebrow
will look like this. And yeah, it's looking
really great right now, and I will put the hair
details like this. Maybe her hair style
will be like this and hair and like this and zoom in and put the
eyelashes just like this. And I will put some
shadows over here. And for the other eye, I will apply the same
methods just like this. And, it is looking
really great right now, and I will add shadows here, here, maybe this part
will be dark also, and lip will be really dark. So I will use black here, and this part will be also
black, just like this. And yeah, make it much
more even darker. And this part of the
nose will be darker. And this part in the shadow, also this part have some lashes. And I will use much more bigger
brush for creating hair. Just like this, for
the right part, I will apply the same method. And these parts in the dark also may be much
more even darker. And I will put the shadows
for checks, just like this. And this part of the portrait
will be really dark. So you can use really
black color here, and maybe these parts of the
nose will be also darker. And let's make the lip
really darker also. And it is looking
really great right now. And I will turn the face with
adding much more shadows. Maybe we have really
dark hair here. And these parts will
end just like this. Yeah, it is looking
really great. And hair and thin hair. Maybe we have some
dress over here. And yeah, it is looking
really great right now. And of course, you can
modify the portrait with using this free hand
tool just like this. Then with the warping, you can play with the proportions
and play as you wish. If you want to
modify the portrait, it is really great option
for adding to the tails. And for example, I want to make this part even
darker, just like this. And this part also dark. And this part. Also this part. Yeah. And maybe we have extra
shadows over here and here, too, and hope you enjoy this
part of the Loomis portrait. And in the next parts, we will continue to create much more experimental
portraits. And I will add much
more hair strokes here, and I will finish
the illustration. Thank you.
41. Adjusting Detail Level: Welcome. In this lesson, I will teach you how to adjust
details for the rendering. So at first, let's start with the ellipse here with the ellipse painting. And let's say it is red, just like this middle
tone of the red. And for detail, I
will write here. Detail is made by shadow and light and color and brightness and darkness And these all the tails, all options, and maybe
even that per inch, DPI and Kavais and brush. These all the tails
create surrender. And render creates the detail. For detail level at the
render, for example, if the lights come
from the top parts, for example, it
comes like this here and it creates the
highlights over this area. And this area is our highlight. And in this highlight area, I will show you later, this is the light area and it is the medium tones core
shadow and reflected light. And the most highlighted
area is highlight area, and light comes from the second And medium is the third, and it comes later. And reflected light reflects the background light
like touches the corner. And if we say the detail
level, the tail level, it is our shadow and the shadow and highlight
area at 1 second. It will be here. Shadow core shadow. Detail level go it is highlights, for example, like this. And detail level, we will see our most detailed area
at the highlight area. So you can add many details
at the highlight area. And I will show you example. Let's alpha look here
and select airbrush. And with the darker brush, let's try to just the colors. For example, imagine it
is some textured ball. Right side will be
reflected light here. And at the light part,
this highlight area, we see the most
textures and details of the object because we see directly the visible
lights and shadows here. And at the dark parts, we see less detail. So you need to
adjust your detail, look much more visible and look much more confidently high
detail at the light parts. And it is so important for
create the illustration. You need to focus your
eye to the detail level. For example, we have a portrait
here. I will show you. We have one portrait here, and it have the shoulders, body, and maybe hairs,
just like this. And at the portrait, maybe there is so many other
things at the background. But for the portrait, you need to focus your
eye point at somewhere, and this place will be
high and RanderPoint. And it is the most
detailed area. So you need to focus your
detail point, for example, detail point at
the focus area and light areas because
light creates focus and much more high rander area. Hope you enjoy this
part and can't fate for C much more
in the next essence.
42. Coloring Practice: Welcome. In this part, we will color this portrait, and at first part, I will open new layer
under the sketchy lines. So after it, I will
select the airbrush, and with the lighter brush, I will select skinton and I
will paint the base color. So it will be really dark
color just like this. And I will also paint the hair parts just like
this and body parts. Don't rush into
details at first. Just try to build the general
look of the portrait. For example, at these cheeks, we will have really dark tones, especially at the nose, and these parts will be darker, and these parts will
be much more darker. And I will add this
part, much more dark. At first, just try
to build where is the light source and where
is the light source. It is key point
for our painting. So this part will be really, really darker, just like this. And especially this part, again, will be darker. And I will add some shadows
over here and here. And at the left part, I will keep adding to the tails. And for the hair, you can select the darker
tone just like this and apply all over the portrait. For example, I'm making these parts much
more visible, dark, especially at this part, again, will be really darker I will add some lights over
here, just like this. And zoom into the
face and select lighter brush and add
light over the eyes. And with a lighter brush, you can create the base
color for the eye. And after it's for the dress, I will use white tones. I will increase the dark tones just like this and like this. And at the corners, it can be a bit much
more darker just like this and zoom into the lip and select red color
and apply over the lip. And do not rush into any
detail just like this. And go to the layers, open the new layer,
and select color. Then with the color, select lighter tone
at the color and make the nose much more red and also do cheeks,
just like this. And the corners will be much more lighter,
just like this. And for the hair, I will make the hair much
more we brand at these parts, especially at the light
parts, just like this. And maybe here. And these parts will be darker. So open another new layer and continue to paint your portrait. And at the dark parts, we will use some
saturated shadows here and underns
especially at this part, and these corners
will be really, really darker, especially
over this eyebrow site. It will be really
dark this area. And for the left part, we will do it like this. And we will put
other lights here. Between the bon check and
this area of the portrait, you need to define these
shadows much more carefully, and these parts will be lighter at the portraate let's zoom in, especially this part and this part will be lighter
for the portrait. And again, this part will
be much more lighter here, and this chin area
will be lighter. Yeah. It is looking
great right now, and I will continue to add
details over the porpriit. These parts will be lighter, and let's zoom into I and select white color and add the
highlights over the eye. And maybe you can even use much more light color
here, just like this. And this part will
be also lighter. And with this painting, we made this really expressive and looking
much more live. So for highlights,
zoom into this area and try to put some
shiny dots here, again, just like this. And under the eye, we will have other light source here and this part
and this part. So it is looking really
great right now. And at this lip part, you can add extra lights comes
over here, just like this. And especially at the neck area, we will continue to
add some and again, zoom into the face, and these planes of the
portrait will be lighter. And especially at
this forehead, again, will be lighter, and these
parts will be lighter. Main thing for creating
beautiful portrait is describing the light and
combining it with the shadow. So I will select much more
lighter color for hair and we brush the hair with this textured brush to
create some hair strands. So these planes will
be much more lighter, just like this and like this. And maybe even much more
lights will come here, just like this, over
here, here and here. And at some parts you can create much more light shadows here to make it look like much
more alive and effective. Let's zoom into the lip. And this time, we will select
much more darker color and we'll increase the
shadows of the lip. And especially this
area will be really darker and at the eye, you can increase the
makeup of the portrait, just like this with
extra strokes, and I will select a bit
yellowish white here, and I will increase these tiny details and
these details also. Hope you enjoy this process, and I can't wait for show you much more in the next
lessons. Thank you.
43. Coloring Practice 2: Welcome. In this part, we will color this portrait, and you learned
the Loomis Method. And with the Loomis Method, you can easily create portraits, and the coloring
is another part. So in this part, we will color this portrait
together just like this. And first, just start from the base colors of the
portrait and Dutush. All you need to do is creating the base colors of the portrait. And I will create the base
colors just like this. For example, I will
create the lip texture. I mean, the base color, and forehead, you need
to adjust the colors. For example, these parts
will be really darker, and these parts will
be much more darker, especially at these parts, and these parts in the shadow. By the way, I'm using textured
brush, and if you wish, you can use any kind of
brush you comfor table with. So this part will be much more visible and this
part will be darker, for example, and this part will be darker and
just like this. And this part will be darker. And especially at this part, some contact shadows creates
realism in portraits. So these details are really important for create
something realistic. So you need to understand
the contact shadows and create the portrait
depending on these shadows. For example, these
parts will be really dark and especially these parts, and these parts will
be really dark. And these parts will
be even darker, too, and I will select blue
color for our color, but don't use it so vivid. So using muted tones is better
idea for creating the eye. And with a really darker brush, I will keep adding details here. And in eye, we will have some lights here
and here, again. And yeah, it is looking
great right now, but you need to add
shadows for the eyes because eye is not flat
or looking so uh, shiny. And these parts will be really, really lighter,
especially at this part. And checks will
be really darker, especially at this area. And this area will be much more textured like this
and especially this area, and this area like this. And you can mix the colors. For example, I will select
much more dark color here, like brown and dark. And I will continue
to adding the tail over the hair just like this. And from the other part, I will add much more lights
here, just like this. And it is looking really great right now
with these shadows. And I will keep increasing
to the tail level. For example, after
these dark parts, I will add much more
vivid lights here. Like, much more shadows
will be here and here. Just like this,
and let's continue to increase the color
here, just like this. And maybe this area will be much more even
darker, this area, and the dress will be
much more darker again. And adding details
over the portrait is might be hard for first time and playing
with the color variations, but uh you can try your best
with adding the shadows, and you need to use different color variations and increase the light and shadows. For example, at the nose, we will have some highlight
points just like this, especially at this forehead, we will have another
light area here and we'll add much more lights
here and here and here. You can add and increase the detail level with
blending colors, much more detailed and put the
details much more amazing. It is depending on your canvas. You need to create
the details much more alive and try to
understand the color. For example, these
parts are in the light, and you can add much
more hair strokes and different kind of details
for give another dimension. Open another new layer with the color layer option
and select much more, much more blush color, like pink and apply over
face just like this. And maybe this area will be much more and this area also
will be much more red. And after putting these details, go to I with the new layer. Zoom here and select this
area and paint over it. And especially this part
will be the same because we need to see light in ice
and is also not flat, so we need to have
some highlights. It is all about
understanding the highlights and connecting them with
the highlights and shadows. So I will select this color and will make my brush
much more small, and I will play
with the color here and we create some
dark makeup here, and especially this
area at the forehead, I will keep doing it and adding
some extra details here. So I will select much more darker color
here, just like this. And these parts
will be really dark and you can make corners much more blend well, just like this for make
portrait much more interesting and looking
interesting also. And this part. And yes, it is looking
really great right now. And especially this
area will be much more darker and these
parts are darker. And especially this
area will be dark. And you can increase
much more detail by adding colors over portrait. For example, I can make this area much more
red or give it a really vibrant
look because red is really feminine and strong
and effective color. So I will use this as a background color in my
illustration, just like this. And I will zoom
in here and we'll add a bit much red makeup here, like i here, and the
other part will be again. And at this area, I will add some
extra colors here. And for example, here
will be the highlight, and this area will be lighter. And yeah, it is looking
really great right now, and these parts will be darker. And yeah, hope you
enjoy this process, and I will add much
more idle details here, and I will finish
this illustration. Hope you enjoy this
quick painting, and thanks a lot.
44. Greyscale to Color Paint: Welcome. In this part, we will continue to paint portrait flow from silhouette
and with a looms method. At first let's start
with a simple shape and try to focus on the
general shape of the portrait. For example, start with
a Sapir just like this. And after it, you can
use quick shape too. And after that define the
plane like where it looks. For example, I will make ears much more bigger
here, just like this. Maybe some or from the
Lord of dings Universe. And after it, I will start
with much more lighter brush, just like this, and we'll add more details here
especially at the forehead and light comes
from the left top and I will add the details
depending on the colors. So this part will be
really, really darker, just like this, just
like this here, too. And after it, these parts
will be much more darker. So, select the gray color here. Make this part much more visible and also nose will be much
more visible and strong. And drop shadow will be here, and I will add the mouth
details here, just like this. And at the cheeks, I will use the much more
lighter tones here, and I will complt these parts, and let's zoom in and
put the shadows here. And these parts will
be much more darker. And this part also will be
darker, just like this. And mouth will be like this. And zoom into face and add much more shapes for the
connection points of the eye. And it will look
much more alive. And I'm just putting
the luscious point, and I will be lighter
just like this and much more visible
at these parts. And this part will be much more lighter this part also will be much more detailed and especially this part will
be much more textured. And let's continue to
adding details here. I will continue to increase
the shadows over here and paint theear details here, and these parts will
be much more sharp. And this one, too. And use maybe details here and let's place the
shoulders just like this. And after these details, you can go to layers and open leaf layer and
select color for the layer option and select the green color and muted green and apply all
over the portrait. So with this way, you already, created the base
colors for the portrait, and we are putting
extra colors for details without losing
any detail, for example, I will select much
more lighter brush here and will apply, and I will open another new layer with the over layer mode
just like this. And I will apply over here for create the texture
for the forehead. And this part, especially
here and here and here. And it is looking
really great right now, but we miss something and
it is a color variation. So I will select much more yellowish color
with the new layers, go to color layer mode again. And continue to add much
more color variation. You can add these
colors at somewhere, but don't overuse it, and maybe select a bit
pinkish color and add over the nose and cheeks and
head just like this. And for this eye, I will use a bit, much more yellowish color for make it look
even interesting. And open another new layer now. And this time, we will add small but effective
details over portrait. So I will create textures for the portrait and put
the textures over here. And at the lip, I will have much more darker
tones, just like this. And under the lip, I will put the shadows
here just like this. And it is looking really deep. And this dramatic light and strong light creates really
amazing look for the head. So we have really strong
character portrait. And with much more
light effects here, you can increase the detail
level. And let's zoom in. And this time, I will select the darker tones and
will define the eye. And for these other parts, I will also add
much more lights, and maybe expression will
be much more visible here. And these forehead details
will be much more visible. Yeah. Hope you
enjoy this process, and I can't wait for show you much more in
the next lessons. Thank you.
45. Paint Cyberpunk Robot : Welcome. In this painting, we will create much
more experimental, and with a Loomis, we will create something like mechanical illustration
like robot face or some Cyberpunk face. At first, start
with a Loomis Sapir and connect it to
middle just like this. And to define the
edge of the portrait, and it comes like
this and divided. We have here here, but
in this illustration, we will have much more robotic
things here like this. This is our side planes, and for eye, I will
make the eyebrow lines, but it is a robot, so all planes will be really
visible and mechanical. So these parts will
be mechanic also. And also these parts, and we will have maybe
one shape like this here, and the mecca mouth
will comes from this. And body will be like robotic
again comes like this, and after this, zoom in and try to put the
details for the face. For example, these parts
will be in the dark, especially these eye sockets will look much more highlighted, and these parts
will be like this. And as you can see, you can also create really great character designs with the Loomis head method. And you can design
everything basically. But you need to plan out
how the anatomy will look, and you can always modify
and manipulate the anatomy. For example, I have nose here, but I can make it a
robotic nose, for example, much more like this and
have these lights here. And other part will
be, again, like this. And these parts
will be like this. And this part So light
comes from this part, so this part will be
much more darker. Let's continue to adding
details over our robotic face. So I will make the face
much more like this and put these planes much more, even much more shadows here. And I will divide
this plane also, just like this and we
paint the plane too. And make the planes
much more interesting. So this plane will
be really darker. So it have another
dark edge here, and the parts will be much more visible and
much more lighter. So you can increase the
details as you wish. For example, I can
create another plane here and complete it with another dark color and
have some edge for the eye. For example, I will create the eye socket much
more like laser light, like glowing red
light here like this. Like sensors. And
for the other eye, I will apply the same
method like sensor, like eye with lumins
here and here. And let's continue to adding
details to our portrait. So this left plane
is in the dark. So you can make this
plane much more darker. So this plane will be really
darker, just like this. And this plane will be darker. And this top plane will be much more dark,
just like this. And I will continue to
increase in detail level. And I will add much more stroke
here to show the anatomy, especially this part
will be darker. And now I will
select lighter brush like reflections because
it is a metallic heat. So it will have some really vibrant
and metallic look which includes so much
reflection in it. And all reflections show the
anatomy much more better. For example, these parts will
be darker here like this. And you can always add and include different
kind of color variations in the metal because it reflects everything near
it like a mirror. So you can add much
more lighter colors and combine it
with other shapes. For example, I will make the
cables here just like this. And these cables maybe will be really, really, really brand. And these parts also will same. And let's continue. And in the end of
this illustration, I will make this much
more darker here, just like this, and we continue to adding
much more lights, for example, like this. And these parts will be metallic
like this and the cable, I will continue to
increase the detail level. For example, we can
have another cable here just like this and maybe connect it to this
part of the head. You can create
everything you wish. You just need to be
creative and don't think so much about the details or make it look like so modern. It is the character,
so it can be weird or different depending
on your painting. For example, I can even make the mouth will
comes like this and change the rotation of the face and make it like it is you have some filter
like air filter. You can manipulate the digital
art easily and much more easily if you compare
with the traditional art. So it is really great
to use these options and adventures of
the digital art. So let's put an air filter
here, just like this. Just like this, boom, boom, boom, yeah,
it's like this. And thank you again
for joining me in this arc sketch video. See you in the next videos.
46. Sketching Eye and Lip: Welcome. In this part, we will paint eyes
and lip skates. For example, you can start with Sapir for creating the eye. And after you paint a circle, you can draw a line and you can find the location
of the eyeball. For example, in this example, I looks to the right part. And you can add
shadows for your eye. And after putting this, you need to connect
the eye with the skin, and you can make it
with practicing. For example, you need to close
the eye from separating it with safir and all these
areas should cover the eye. For example, if we
paint I looking a bit, much more to the right, then I will look like this, just like this, a bit, much more out because it have really different
kind of things in here. And after this, you can
create the shape like this, like, but located to this area. To do totally right. And you can add these
details over here, and it is basically like this. For example, let's
practice from the front with and find the eye socket
and put the eyeball here. And after this, you need to make the plane like this
to close to eye. And because eye is not flat
or looking fully sapphire, it is hidden into
our eye socket. So we will see
something like this. And for eye paintings,
the visible area, this area is not
totally white because the shadow shadows will drop from each angle and make it
looks like much more tread, because if you imagine the eye ellipse just
like this and paint it, but don't think about
eye, just Saphir. So if it is tread object, it need to turn because it is not flat or
two dimensional. So in dimension, we
need to see dark parts, and it should turn and go to the back in three dimension.
Not one dimension. So these areas will
be really darker, especially these areas
and these areas. And maybe these areas
even much more darkest because the eyelashes are
much more larger here. So these kind of shadows
creates the realism. And if we talk about
the lips and for lips, you need to understand it
and make it simple lines. For example, these two lines is defines the
middle and down lip. And if I paint again,
just like this, these two corners
and make it connect with each other and put this line and another
line to the top. This line defines the top lip, the end of the lip
and this time is down lip and these two is
defined the lip perfectly. For example, I paint two
line again and paint the shape of the lip just like this and put the
open v shape here. You can put this shape much more open and define the
top of the lip. So after it, you can
connect the lines just like this and complete the lip. And from the left
angle or right angle, it will look like this, and you can do much more quick practices
to mimic the emotions. For example, if it is surprised, it will be open and like this
shocked and maybe yelling. And if it is angry, it will be much more like this. Like every emotion can be
captured with the quick lines. And for example,
flirty one will just imagine like maybe some
a litle emoji here, and it is flirty, right? Flirty one like this. So you
can add, for example, sad. So sad lap will be much more
like this in the angle. You can imagine everything
depending on the situation. For example, this is a bit much more flirty,
just like this. And you can define the
shapes and practice this I. And for example, for creating I, you can create these
ellipse shapes. This is a really quick
way and connect to lines with each other to
create perfect line and I. You can do quick sketches
for improve your, for example, this is set eye, and this is angry eye. And all you need to
is practice a lot. Thanks a lot again and see
you in the next classes.
47. Painting Noses: Welcome. In this class, we will practice painting noses. And at first, you need to understand the
anatomy of the nose. So basically, it is in
the triangle shape, but have another triangle
at the end of it, and you will place the nose
over in this triangle. And nostrils will
be somewhere here, but not all noses are same, so you need to understand
how your nose looking. For example, if I paint
a triangle like this and paint another triangle
here and put the nostrils, then there will be extra
plane here, just like this. And it will divide the nose
two like one part here, but it is in the dark. For example, if you imagine the same nose and paint
the nostris from here, and this part of the nose in
the shadow like extra plane. So the most highlighted
area is here, and these two areas
are also in the dark. So let's do another
attempt to paint the nose. We will paint the triangle. If you are painting from the
corners like left or right, you need to paint
triangle like this. So because the nose
will look to this side, and after it the white here, like, cut these sharp edge
and put the nostrils here, and here you go. And for example,
if you're painting much more interesting
nose, like for example, here have some bone
and looking downwards, you can shape it as you wish, depending on your choice. And let's paint
one realistic one, and at first, start with
the background color, and I will use the skin color, and I will put the nose as a triangle shape for show
you how to build it. And after putting this triangle, we need to add lights. For example, these
parts are in the light. So I will put the
lights here and maybe much more extra
lights over here because it is the most
highlighted area. Also, these nostriel top parts will have the extra color here. And this part will be really
lighter, just like this. And after we put the nostrils, our nose will be really
visible and just like this. Yeah. And you can
define the edge much more carefully by adding
shadows and highlights. And don't forget that
the most highlighted area often this part. And you can create
the texture of the highlight here for make it much more
even interesting. And these parts are really
darker at the down parts, like in the shadow,
just like this. And thank you and see
you in the next lessons.
48. Color Grading: Welcome. In this part, I will talk about the
simplifying portrait for better painting. It means you need to see
things like the color blocks, just not detailed,
but you need to, for example, things simple. For example, this is
a shape like this, and I'm defining the shadows. By the way, I'm using
Loomis Method again. But this time, it is not
about the Loomis Method, but it is about how to divide
the painting to the shapes. Because it is really important
for create portrait. And for example, this
is the hairline, and I will make hair
look like a block. And let's do another
try from the left side. At first, I started with
the gray and trying to define the portrait and
the shadows of the portrait. And with this method, you will learn how
to see values. For example, dark sides
of the portrait and which place have lights and
which place have shadows, you will practice it if you
try to use this technique. And after this, you can put
details over it much more. For example, shape of the nose and lip and
details of this painting, for example, ear and hair and the other
details for portrait. And it all will be easier
after defining the shapes. For example, at first look, it might not look a bit great. But with that time, you will master it and you
will understand how to create better portrait with defining the color blocks because
portrait is not flat, and it have values. For example, like thing like you turn the object and
our face is not flat. So everything should be turn
and its own unique style. For example, I will make it
curly hair, just like this. And yeah, I'm creating
this part like this, and it will be
something like this. And let's do another practice. This time, I will start with
this gray scale shape again, and I want to make
portrait look forward and quickly define the
shape for the eye sockets, nose, and, for example, hair, and basically, it looked like a quick
sketch of the placement. So after this, you
can determine is the portrait have cap or some beard or different
kind of details. It includes, for example, these dark shadows here, maybe this nose
will be like this, and I turn it into
a man portrait. So if I continue over it
to adjust the neck and put the details for the dress and everything is just depend how you want
to see your portrait. And it is really important
to create for example, these parts will be really dark, and these parts are lighter, and these parts will
be look like this. And with time, you will
master this method. And if you think the
geometrical shapes, for example, let's
paint some shape. And if light comes
from this side, this place should be
really, really darker. So it turn the shape. And for example, if you think the tree and
three dimension, this ball have the
turning edges. For example, this is one plane, and this is another plane, and this is another plane. There's many planes
in the painting. It is not flat. For example, our face is not at
the same surface. There is many different kind
of planes at every edge, for example, like this, really, really so
many dimensions. So you need to turn
the face with shading. And for example, we have one
head here, just like this. And imagine light
comes from the top. What will happen?
Shadow will drop under the nose and underlip and these planes
will be really dark. And this place will be the
most light area at the face. For example, it will be
visible here just like this. And hope you understand
these methods and can't wait for show you much more in the next
lessons. Thank you.
49. Coloring Portrait : Welcome. In this lesson, we will color this portrait. At first, open new
layer under the sketch and use some middle tones for painting all areas
of the portrait. So you need to just
adjust hue of the color because you need to make
it not so yellow or red. Use some skin color and
put the shadows over here and here because for
creating realistic portraits, you need to add lights and
shadows to define the volumes. For example, this part is really dark and these
part are also darker. And this part of the
portrait will dark. And of course,
lips will be dark, but we will add the
details of the lip later. At first steps, just focus
on the general look. For example, you can put the
base colors over the hair. At first, always think simple. And after creating
the base temple, you can add details to the background and
increase the detail level. Just like this, I'm adding
dark parts of the portrait. Yeah, I'm adding this
part, really, really dark. And always try to define
these parts separately. And for example, we need shadow, so I will put slightly
darker colors. At the shadow points
of the portrait. And for example, for the eyes, you can use some colors not so dark or some cold. And let's put the eye color, and don't use sovi
brand colors at the eye because you are I mean, we are working soft, so we will need to
adjust the light depending on our Light source. And yeah. After it open another new layer and change the layer
mode to color. Then select red color, a bit much pink. Apply over some nose,
cheeks, and lips. This helps us to create
the extra volumes over the portrait and
zoom in here and put some shadows over eye. By the way, I opened
another new layer, and layer mode is
normal, not color. Color layer mode only
affects to the color. So you need to use much more darker colors for create these
details over portrait. And I will select much
more darker colors over here and we'll add some
shadows over here too. And here Yeah. It is looking really
great right now. And I will add some
dark colors over here. And some light
sources over here and here and here and here and here. And yeah, it is looking
really great right now, and I hope you enjoy this
quick coloring quite. And in the next steps,
we will continue to
50. Painting Eye for Loomis Portraits: Welcome. In this class, we will paint realistic
eye for portraits. For this, creating realism, create the baseline. At first. It is our skin color for
placement for the eye. And after this
select darker color and apply the fish shape like some almond shape or some
different shape you wish, just try to define how it looks and what kind of details it has. As you can see, it
is totally row. There is not details
that show the I mean, there is not specific
and clean lines because we don't need
clean lines at first. And let's start to create
the shape of the shadows, just like this and zoom into
I and add details over here. These details will bring
the portrait the realism. I will add these parts much more darker and these parts
are really darker. Again, for create the realism
and just like this and I'm adding the corners
much more darker shadows for create the eye,
much more deep. So after these details, you can go into the this
middle point and then you can create some extra lights over here for
create the realism. Because eye is not flat and it has different
kind of detail in it. For example, there is a highlights like
reflection lights, and I will add these white areas for
create this illusion. And after it, I will add some dark or muted color here for create
anatomy of the eye. Maybe we can add this part, much more lights for
bring some details. And also at this part, it has lights just like this. And I will complt
it just like this. And from the other side, I will make it much more darker. Just like this. And
after these parts, you can create eyelashes, and I will use this brush. You can use any line
brush you wish or drawing brush or inart brush or inking brush depending
on your choice. You can find something
useful and create the luscious like this and make sure the luscious is
not look the same pet. So it will be look much
more specific and much more interesting because
if you make this look every single lush
will look same area. It will be boring. And I will add the details
just like this, much more lighter
and This part will be much more lighter and these parts will be
much more also lighter. And with the dark color, I will add much
more darker shades here for make the eye
much more interesting. So also, you can add some extra lights over here,
like some reflections. And you can define the luscious with really light colors
and just like this, it is looking really great. And sometimes you need to add light or the shadows for bring them much more realistic look
and at the middle point, I will add extra colors here
and here, also, and here. And it is looking really great, and I will continue to create
the details much more. For example, these parts
will be really darker, and I will continue to
adding details over it. For example, let's
create the eyebrows, and for it, I will use
my eyebrow brushes. You can find these
kind of brushes at my marketplace in Skillshare. For products, you can
check it from my page. I will add this part,
something like this, and maybe even much
more strong eyebrows will be visible here,
just like this. Yeah, it's looking really great, and I will continue to
create the browse like this. And I will make these
parts much more darker. These parts are darker, and this part is
lighter, just like this. And maybe this part will be
really darker and lighter. Just like this. And yeah, it is looking really great. And hope you enjoy this class and see you
in the next classes.
 Yasar VURDEM, Creative Art Director