Transcripts
1. Intro: Hey, I'm Mark. Today, I'm going to guide
you through Mandala like art project using vector
tools in Affinity Designer. We're going to use
different shapes, stack them on the
top of each other, fill them with colors to create this very nice geometric art. This project is
beginner friendly. So even if you never really do any big projects or artistic stuff with
affinity designer, you can just start
with this one. I'll explain this
step by step and limit myself only to
easy to use tools. Alright, let's get started.
2. Start new project: Here I am in affinity
designer for desktop. We're going to start
a brand new document, so let's click File New. And for the size, we need
something that is square. As you see, by default
is loaded A four, so I'm going to use that size, but I will use the
short edge of it, so I still can
print it on a four. Let's just change the page width to be exactly the
same as the page height, 210 millimeters in my case. So you want this nice square. You can pick different
size if you like, but try to keep it as a square, I'll put 300 DPI dots per inch because maybe in the future, I want
to print this out. I have nice high
resolution here. Let's click Create,
and here it is. Keep in mind, we are
going to do mandala. It's a very geometrical art, and some people may tell
you that you should do that with symbols that will duplicate only one part of your design
several times around. And that's one way
of doing that. Okay? We could set up
some kind of symbol here. Let me just do it quickly
to illustrate what I mean. I can let's say, draw something and
turn it into symbol. So I can draw
something like this that cover only 25%
of this artboard. Let's make it red
so you can see it, and then I can turn
it into symbol. I open window symbols, giving this pop up menu, and now I can create
a symbol from here. Now, this red thing is a symbol. I drag it back here,
flip it, drag it again. I will flip it now, vertically, drag it out again, and flip it both vertically
and horizontally. Now with the copy
of this symbol, I can just edit one
symbol on this. I will get rid of this red. Now all four symbols are empty. But if I start drawing
inside that symbol, so I got this curve now. It's not in the symbol
yet, but I can drag it in. Take a look what happened here. This line is duplicated because we put it
inside the symbol and the symbol appears four
times on my artboard, right? So that's one way of
doing this kind of art. Some people like this method. In our case, in today's project, we are going to do it
a bit differently. Without any symbol and
complicated setup, we're going to
utilize Shape two. Shape two is here on
the left. Take a look. There's so many premade shape for us to use with
smart controls. I think affinity
designer is one of the best program
with premade shapes. By default, they
always give us like triangle, circle and square. But here we got so many that we can use and also
modify very quickly because some of those shapes come with what I like to call smart controls when we can very quickly alter the appearance. Alright, so I just want to show you this method
with four symbols. That's something that
can be used when you've got very geometrical designs. But in our case, we
don't need that, so I'm going to
delete all of that. I don't have anything in my
layer panel I can start new. So before I start, I'm going to make guidance for myself so I know
where is the center. The easiest way to do that is to pull the line from the ruler. If you cannot see the ruler, head to. View Show Rulers. View Show Rulers,
and then you can just pull the line from here
and stick it to the center. If it's not snapping,
like in my case, be sure that snapping
is turned on. It's over here, the
little magnet icon. Same thing from the left, pull the line, snap
it to the center, and we can switch
them off anytime, so we can hide guiding
lines anytime we want. All right. Let's get started by drawing the very first shape. I'm going to select this start tool and I'm going to start drawing
start from the center, and then I will press
Command and Shift. I drawing from the center with perfect one
to one proportion. Make it large. All right. As you can see, I don't
have any fill color. No fill color. I got stroke
color set up to be black, and I think I will stick with 2.5 points for this
design for the stroke. All right. And now we can increase the number
of points for the star. Using the slider at the top. All right, I got 20 points now. I mentioned those
orange control points. Can you see them? You can move them around
to alter the shape. There is one over here that
can make this part rounded. And there's one here at the top that make the
top part rounded. And that's what I'm going to do. I round it, but not
completely something in between, something like this. And that's my first shape
in this design. All right. Next, I'm going to use
Ellipstol. Just like that. Now I will create a copy of it. I will press Enter or
return on your keyboard. The shape is still selected. You will get this move duplicate window and you can decide how many duplicates do you need? Ten on duplicates and then we can decide
on number of copies. I can make ten copies
or nine copies, and now we need to
add rotation to it. Each copy will have
this rotation. So even at 36 degrees, I can reduce the number
of copies to four, and then I click Okay. And here it is, we create four copies of this original one and we add rotation to it. Next step will be to
draw a regular circle. So grab the oval tool again. We're going to draw a circle holding shift
and then this time, I'm going to reposition
that with the move tool. So I didn't start
from the center, but I can still move it
to the center if I like, and we can still change the
size simply grab the corner, holding command and shift
to scale it up and down. All right. And
here's our circle. This is really nice
starting to this project. We set up a brand new
document at guiding line so we can see the center and
start drawing some shapes. As I show at the beginning, we are not using
the symbol method, so we are actually using Shapes. This way, it's a
bit easier to make changes and edit stuff because we see what
you're moving around, it's not duplicated four times. It's easier to understand plans. We got more chances
to use shape tools. That's what you want
to do in this class. You want to learn more
about those shapes available in the software. We got good start. Let's save this document so we're
not lose the progress. File, save, and let's continue
on in the next lesson.
3. Add more shapes: Let's continue on. First, I'm going to
re select my ovals. To do that, I can just make
a selection like that, or I can select them
from the layer panel. Now I want to unite all of those separate shapes
into one big shape. We can do that with just
one click here at the top. Add. All of the
intersecting lines are now gone because we
add it all together. But I want to make some changes. For that, I'm going
to use corner tool. Going to click here and drag to select all of those
points in the middle. I'm going to round those
corners all the way to here. Now, to be sure that
it's part of this shape, I'm going to turn this rounding effect to be baked
into that shape. I click at the top baked
appearance and the all right. Now it's time for another
shape from the shape to list. I don't want to
mispronounce this one. This one is coke two, COG like the mechanical
one, something like this. But we can use it in our
design. Let me show you. I draw it first with shifts, so it's one to one proportion. Place it at the center like
this and now we can double tap so we can see
those control points, those orange points. This will help us to play
around with this shape, so we can make the ending spiky like this and then we
can make the line curvy. Let's make it a gap very small and it's more like
a flower right now. What we got right
now is 12 points. Here at the top, we
can modify this value. To just ten, but I
will go back to 12. We got another shape here. Now I'm going to
draw something else. With the ellipse tool, I will draw an ellipse
like that first, but then I will
convert to curves. Why do we do that? We can control this with the node tool. Take a look. We can have
full control of this thing. We can even add new nodes
and all that stuff. Mess it up too much. I
will undo with Command Z. What I want to do
here, I want to take the note at the top,
change to sharp. The one at the bottom,
change to sharp. Perfect. Let's use the move
tool drag it into our design. Over here, I'll make
it a bit smaller. Now I want to make copy of that. I can do Common C, common V. And put the copy here. I will hold shift select both
and simply add together. That's right. We can add shapes even if they're
not touching each other. For the program now, this is just one shape, even though there are two points
far away from each other. But this will help us
out to copy and paste. If I now command C, common V, copy and paste, I can make
rotation with this copy. But the problem is, we need a very specific number. Aim for 36 here and one more
copy command C, command, V. Again, we're
aiming for this time, it will be 36 times two. We got 72 degrees over here. All right. Now I can simply copy and paste
this and flip it. I can copy and paste this
one and flip it again. We got flip here at the top. All right, and we duplicate this all around this time
using different methods. I didn't use the oh to
duplicate like before, so we can learn a new
technique. All right. Let's create something
here at the center. For that, I will grab
a star to again. Remember, press Command or
Control plus Shift while you're drawing from the
center. Let's draw a star. It's pretty small, so we
can zoom in right now. I like to zoom in
with command plus, but you can also
use the built in navigator for
zooming in and out. All right with the
star like this, I'm going to move those
orange points all the way here. That's better. I'm going to copy and paste
the whole star, common C, command V, copy and paste, and move the copy over here. This time, I will
pull this down. Like that. We got another
point for rounding to the end, and now we got those
rounded corners. I see my star is
a bit too large, overlapping with this line here, so I will make it a bit
smaller holding shift, and then don't forget to
reposition to the center. It should snap like that. If it's not snapping,
once again, please be sure your
magnet is turned on. Still a little bit too
large. Take a look. I'm talking about this area. Okay? So let's make
it a bit smaller. Okay. That's perfect. Let's zoom out of
common minus this time. We made nice progress here. Now I want to make a regular
circle here at the center. Perfect. Then I will make a
very tiny circle over here. But I'm going to modify it. I hope you still remember
to modify a basic shape, we can click Convert to curves
and we're going to pull this bottom point
all the way down and then make it sharp. Like that. Now I simply need to
make a copy of it. This time, I will show
you another trick. Instead of Command C,
Command V to copy, I will just hold command down or control on Windows
and pull it out. If you press command
down and pull it out, instead of moving the shape, you will make a
duplicate of that. We need to rotate this shape
completely to another side, so hold chip for that, 180
and place it opposite. Again, this time instead of adding those together,
we can do a group. To do that, you can
press command G on your keyboard or
in the layer panel right click and group. Okay. We got this group, I press now, Enter. You see moving
duplicate box once more and now we need
to create duplicates. We will need several duplicates. I don't know how many just yet, I would put four and now we
need to figure out what's the correct rotation angle here. You can experiment. Is it 36 again? No, it seems too large, so we need to divide the circle. Circle is 360 by 12. I got 12 shapes here. I can type here, 360, divide, by 12, enter, and this
calculate the value for me. That's really cool. Of course, I need more than four copies. All right, I got six
copies, and that's it. I click Okay. And here we are. I think the center
is pretty nice, but I feel like we need to add a bit more details here
at the edge of it. So let's do just that by duplicating this whole
star that we got here, command C, command V, and now scaling it down with command and shift press so
we can scale to the center. Scale it down until it's
kind of touch another shape. Okay. Now we can reduce
number of points to ten, and then we need to
reposition that a bit. This time, I'm aiming to touch those little drops
I made before, double tap on the
shape so you can still play with those
smart controls. Take a look that's still here, those orange points
are still around so we can make changes
and adjustments. That's nice. Now
we're going to grab this curve that we have
created from oval shapes, C, common V and instead
of scaling this, we're going to add
additional rotation to it. Rotation we need right now
should be very subtle. We got 36 degrees
divided by two. That should be exactly
18 if we want this to make as the perfect
geometrical pattern 18. Okay. If you got troubles adjusting the angle by hand like that, take a look. Here in the transfer box, I see that the rotation
is set up to -18. I can now overwrite
this from keyboard. Take a look, -20 and it's moved. We can type it from
the keyboard as well. All right. We got very nice
pattern going on here. I don't want to
overcomplicate it. Maybe just one more shape or line somewhere going on
here through the center, so we can finish this up nicely. Again, I'm drawing brand
new star from the center. This time, only four points to break our 12 points pattern
from the previous one. Okay, larger, and of course, we're going to play with those
orange points like before. We can add rotation to it and we can put it all to
the center like that, even lower. All right. Here we are, we use
several different shapes, techniques, rotation,
copy, and paste to design
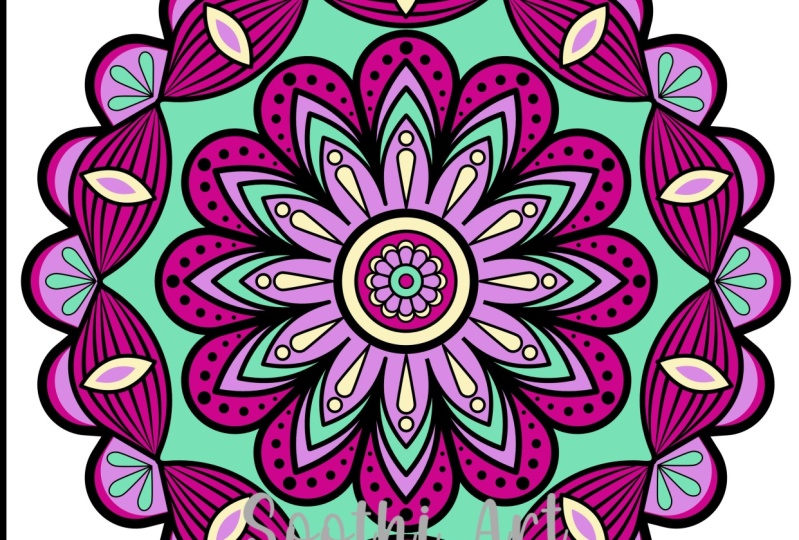
4. Add colors: Now we can take advantage
of the fact that we've been using actual
shapes, not just lines. Shapes can be easily
filled with colors. That will save us some work. We don't need to use the Shape Builder to
all the time over and over again because the shapes we got
already are good to go. Let's try to fill this
biggest shape with color. We can do that simply by picking the color here from the color
wheel on the right side. Be sure you switch
to the big circle, that's the fill colors
inside the shape. I can go with some pinkish red. All right. That was the
first shape I draw. So all of the shapes
are on the top of that, so I can still see them.
That's a big plus. All right. I think I'm going to actually make
one more shape here. Remember, this last
shape we draw. I'm going to make a
copy of it, come and C, come and V, and I'll have a
copy of it around as well. That's what I want. Let's back to filling the
shapes with different colors. Next step, I think
about grabbing this shape and filling it with some kind yellowish orange. That's better. Now, over here, I'm
going to back to the previous color and I can
use this quick color picker. I just click and
hold and drop on the color I want to have it here at the quick color picker. And now we got a problem because I duplicate this shape later on. Now it's covering other shapes. How can you fix that? We need
to simply reorder layers. I can drag this lower and lower and lower manually
on the layer panel or you can press Command Shift and then the square bracket to
bring it all the way down. Command Shift square bracket, and then we can use
command square bracket without shift to move
just one layer at a time. All right, here it is. Sometimes we need to reorder some layers because some shapes
may cover another shapes. Now I can select more than one. Group or shape by pressing
and holding shift. For the future reference,
we can group it. We already know how
to group stuff, right clicking the
lay upon a group, how do we going to
fill this area? Let's maybe go with some
shade of blue like this. I will keep it here as well, and maybe the next
one over here, I will give it
orange shade again, but maybe a bit darker like that and I don't want this to be at the top of the blue
one we just made. Now I'm going to re
order my layers. That's how simple it is. We going from the outside to the inside while we're
adding those colors. Now, those two shapes
we just made recently, I will go with the blue again because I
make them recently, at the very top of the list, I will need to drag them down. Here this. All right.
Another shapes here. I can pick the color that's
already in my design, this one, and just use some
kind of variation of it. Okay. Then we got a
bunch of smaller shapes. Again, I'm holding Shift to
select more than one object. Now I can group it. Yes,
we can group groups. Let's group groups
and it will be way cleaner here in
the layer section. All right. Something
pinkish. Nice. And I think we got something here at the
center that we cannot see anymore because of that previous shape
that I put pink in. I need to drag it
down and here this. We got more details back
at the top. All right. Guy this guy needs to be in
some kind of orange again. That's kind of
abstract our shapes. And we can also see that I didn't group
something correctly, something's popping up here. Oh, no, let's drag this down. All the way below. Here it is, and then I want to investigate what did I
left here at the top. It was the very
first one I make. I got too many duplicates. I found it right now and
I can simply delete it. How can we delete a layer? You can press delete
on your keyboard like the backspace or here
later trash bein icon, remove the layer and go to go. The center I want
the center to be blue actually and I will put the center at the very top because that's the
most inside shapes. Inside is at the
top of the stack here and outside layers
are at the bottom. Okay. Let's now go
for stuff in between. This star, I want the
star to be orange. All right. What do I have here? I got this one, I think I already use the shape below
for giving the color. I don't need this layer, so yeah, I don't want it anymore. Okay, what do I have next? I got this huge
circle all around. I want this to be
here but I want this to be at the very bottom. I dragging this huge
circle at the bottom here, and then I will go
with the blue color. But this time, I will make
some variation of this blue, make it a bit darker. Nice. Let's inspect the layer panel. It's way more organized now
we got few more groups and I can see only one shape now without the
actual field color. Let's take a look. This shape is here and I will
keep it without the field color Y
because this shape give me the color here of
the line at the top of it. This shape don't need
any field color. This way, we fill our
mandela with colors. I think it's a
pretty good one for our very first project
in this style. Now you have an idea how
you can do it all by yourself using simple shapes and basic transformations
like copy, paste, change
rotation. All right. Let's do a bit extra. What we got right now is a
perfect example of vector art. But I'm going to add a bit of
special effects on layers. Keep in mind, in that moment, when I got effects on layers, it cannot be expored as
the pure SVG or EPS. So keep that in mind. Maybe you want to make a copy
the pure flat style like that and then add effects
on another version of it. I'm going to save it
and now I will select. Command A to select. I will click FX layer effects, and I will create a
little bit of inner glow. This will give me this
light coming inside the shapes and I'm going to change the
blending mode to overlay. All right. High tensity, I will remove that, I will make it 33% and
increase the size. This way, we don't
have just flat colors, we got more gradual colors that going brighter at the edge. I think it's a nice finishing
touch for this project. Let's assume that we
want to export this as PNG with
transparent backdrop. How can we do that?
We can actually switch this white color behind. How to switch the
white color behind. Click Document Setup, head
to Colles and there is a special transparent
backdrop option we just need to turn it on and you will see this
checkerboard transparency. Let's zoom out a bit so we
can evaluate our design. That's nice. It's a
good idea to zoom out to see how it look like in the smaller
format. I like it. How I can export
this so I can later on share it in the project
section of this class. Let's click File, Export. Let's stick with PNG or
transpired backdrop. You can click here to
change the format if you are not set up
as PNG by default, and then click Export.
5. Well done: Well done, you made it. I hope you managed to draw your own mand using
affinity designer. In our case, we skip the symbol method and
do everything by hand. Thanks to that,
we have chance to practice with different shapes. We have chance to use what we
call smart shape controls, those orange points to modify different
shapes like stars, we can add additional
points, make them curvy. We did all of that
ourselves by hand. In the final stage
of this project, you put the colors
in and by the way, if you don't like your colors,
why don't you change them? You can try to make
alternative version just by modifying your colors. And now now is the time
for the final step. I already show you how we
can export our design. Simply click File,
Export save it as PNG or JPEG and add it in the project section
to finish this class. We'll be waiting for
your project to show there so we can see the
fruit of your labor. I hope you enjoy this class and I will see you
in another one. Thank you for today. Bye.
 Mark Krukowski, Kru Mark Tutorials