Transcripts
1. Introduction: Hi artist, ready to dive into the heart of visual
storytelling emotion. Think about powerful
artwork or animation. What often grabs you? It's the feeling, the
joy in the smile, the weight of sadness, the heat of anger. Capturing emotion is key to connecting with your
audience through art. In this class, we're taking on the drawing one emotion a
day, five day challenge. Over the next five days, we'll explore and sketch a different core emotion
each day, starting with joy. Moving through sadness and more, we'll break down
how to translate these feelings into lines, shapes, and sessions through
simple focused exercises. By the end of this
five day challenge, you'll have confidence
in visually expressing key emotions in your own
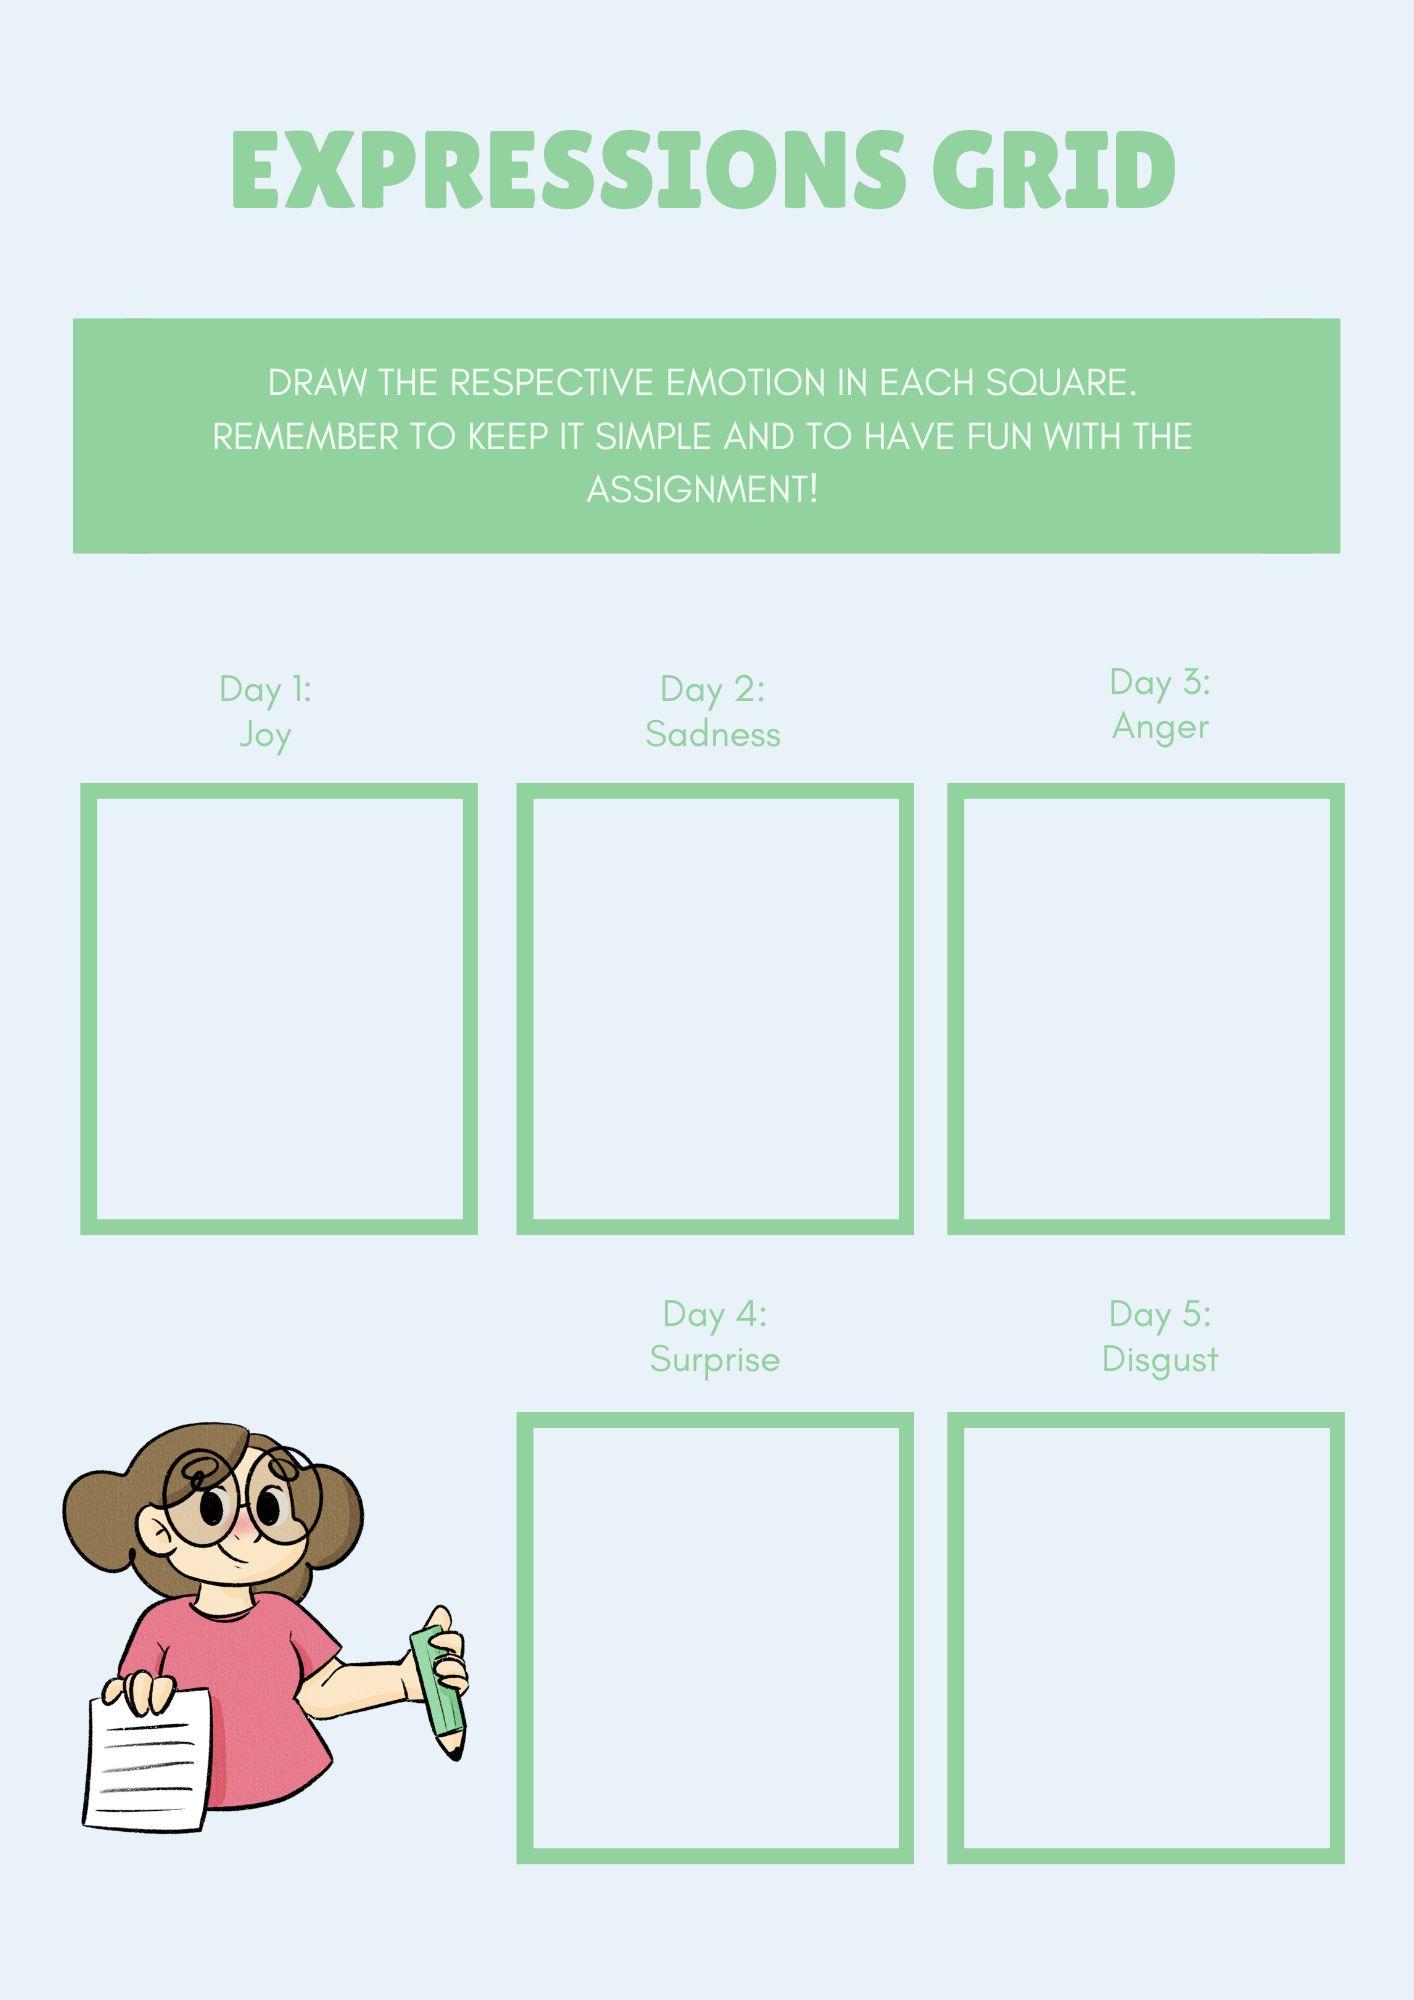
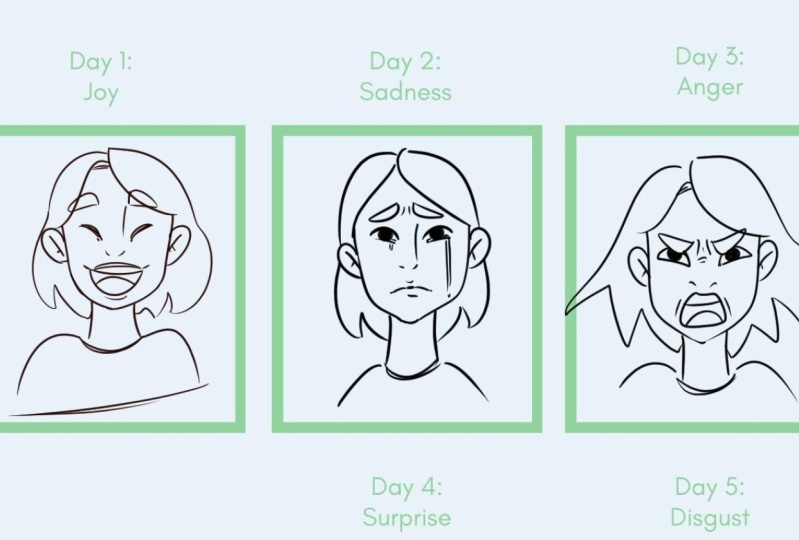
characters and scenes. For your project, you draw
all of these expressions. So you always have a way
to reference them anytime. Each day will feature
clear demonstrations, showing you simple techniques to get you drawing right away. Plus, I'll be here guiding you through
each daily challenge. So are you ready to bring more feeling to your
drawings one day at a time? Join the challenge now, and I'll see you in
the day one video.
2. Day 1 - Joy!: Hello, and welcome. This is day one of our challenge class on drawing different
emotions or expressions. And we're going to start
with the most simple one, which is an expression of joy, so smiling or laughing, all very positive and something that you probably really want
to draw in your characters. So I got here a few references. I'm going to have three
references for you per day. So depending on the
emotion we're drawing, you'll have different
references to use. So don't forget to download this reference board so you can use it for
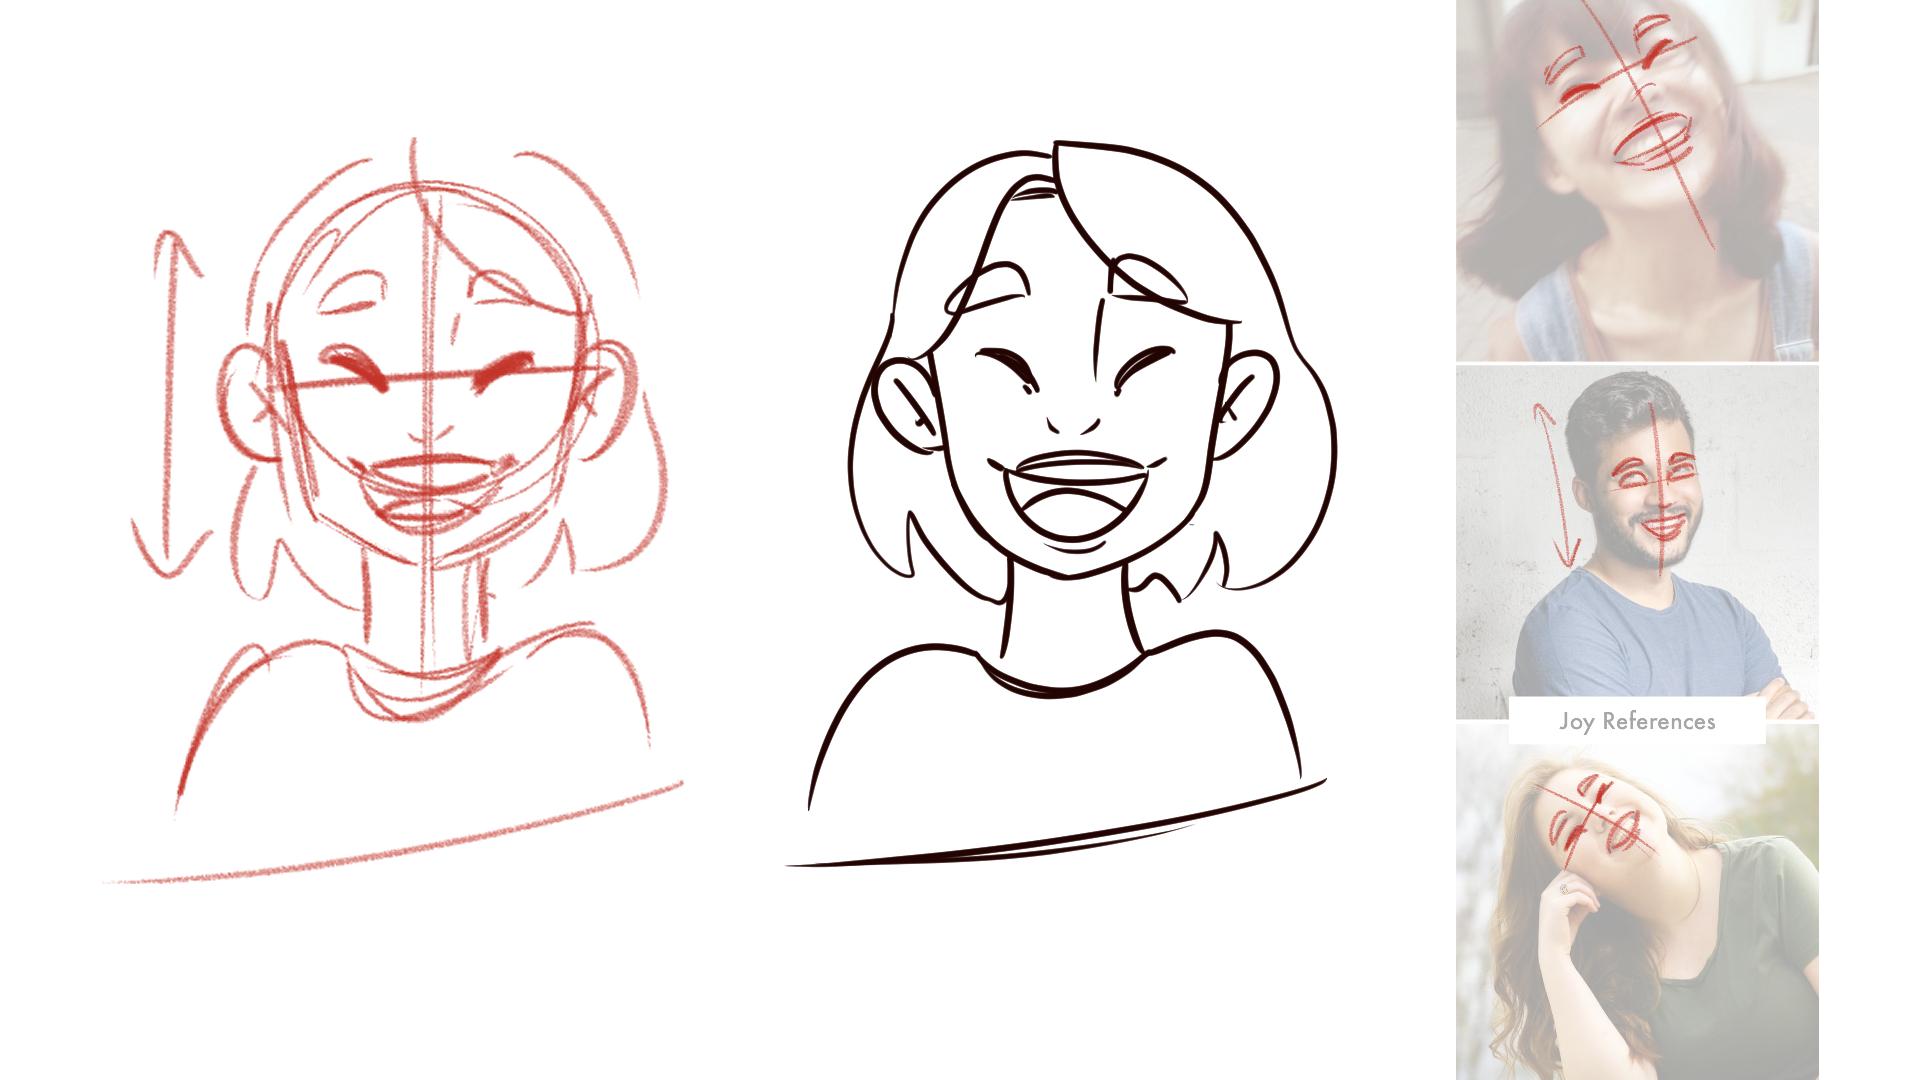
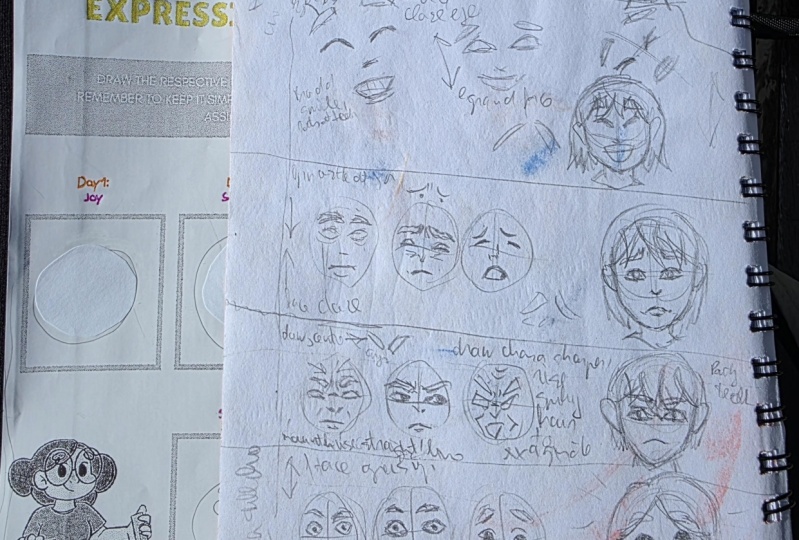
your own practice. And the first thing
we're going to do is analyze and observe our references and see what are the key points to it to
drawing a joyful expression. So the first thing
I'm going to do is I'm going to lower the
opacity here a bit, and then I'm going
to pick my pencil. I'm just going to draw parts that I think
that are important. I'm also going to draw
a new layer on top. For example, first
thing I'm going to do is draw here two guidelines, one for the center of the face and another one for the eyes. For me, these are
the main guidelines when drawing a face. Now, one thing I'll notice here is the curved eyes enclosed. Generally, when
someone is really laughing or smiling
very broadly, our eyes tend to close up a bit. As you'll notice in all
of these references, the eyebrows also tend to go
a bit higher up like this. This is just a few sketches. Now the nose is not really
the most important part here, but I want to edit
a bit as well, just so I know what it is. And then we got a very broad
smile going like this. So we have here a
bit of the lip. We don't see a lot of the
lip of the upper lip, but we do see a lot of
teeth here. The main point. So the eyes, eyebrows, sometimes the nose and the
mouth. Let's see another one. This one here is a bit more tame, but it's still laughing. We still see here the eyes
they do close up a bit, so we have the eyes a bit open, but close up a bit, and we got our eyebrows. This time, they are a
bit closer to the face. So it's not exaggerated. We got the nose. But once again, we got here a big smile
showing teeth again. So yeah, as you can see, there's a lot of
expanding on the face. So eyebrows go up, the mouth opens up. So with positive expressions, we tend to expand
the face a bit. Let's see the last one. So this is just me exploring
the shapes I can use to draw the face when
drawing a joyful expression. We got here again, the eyes
curving up a bit and closed. We got our eyebrows. And finally, we got our smile. Now, of course, we could
draw an open mouth, so just a notch like this. But for Joy, I think that
showing a bit of teeth here, showing a big smile
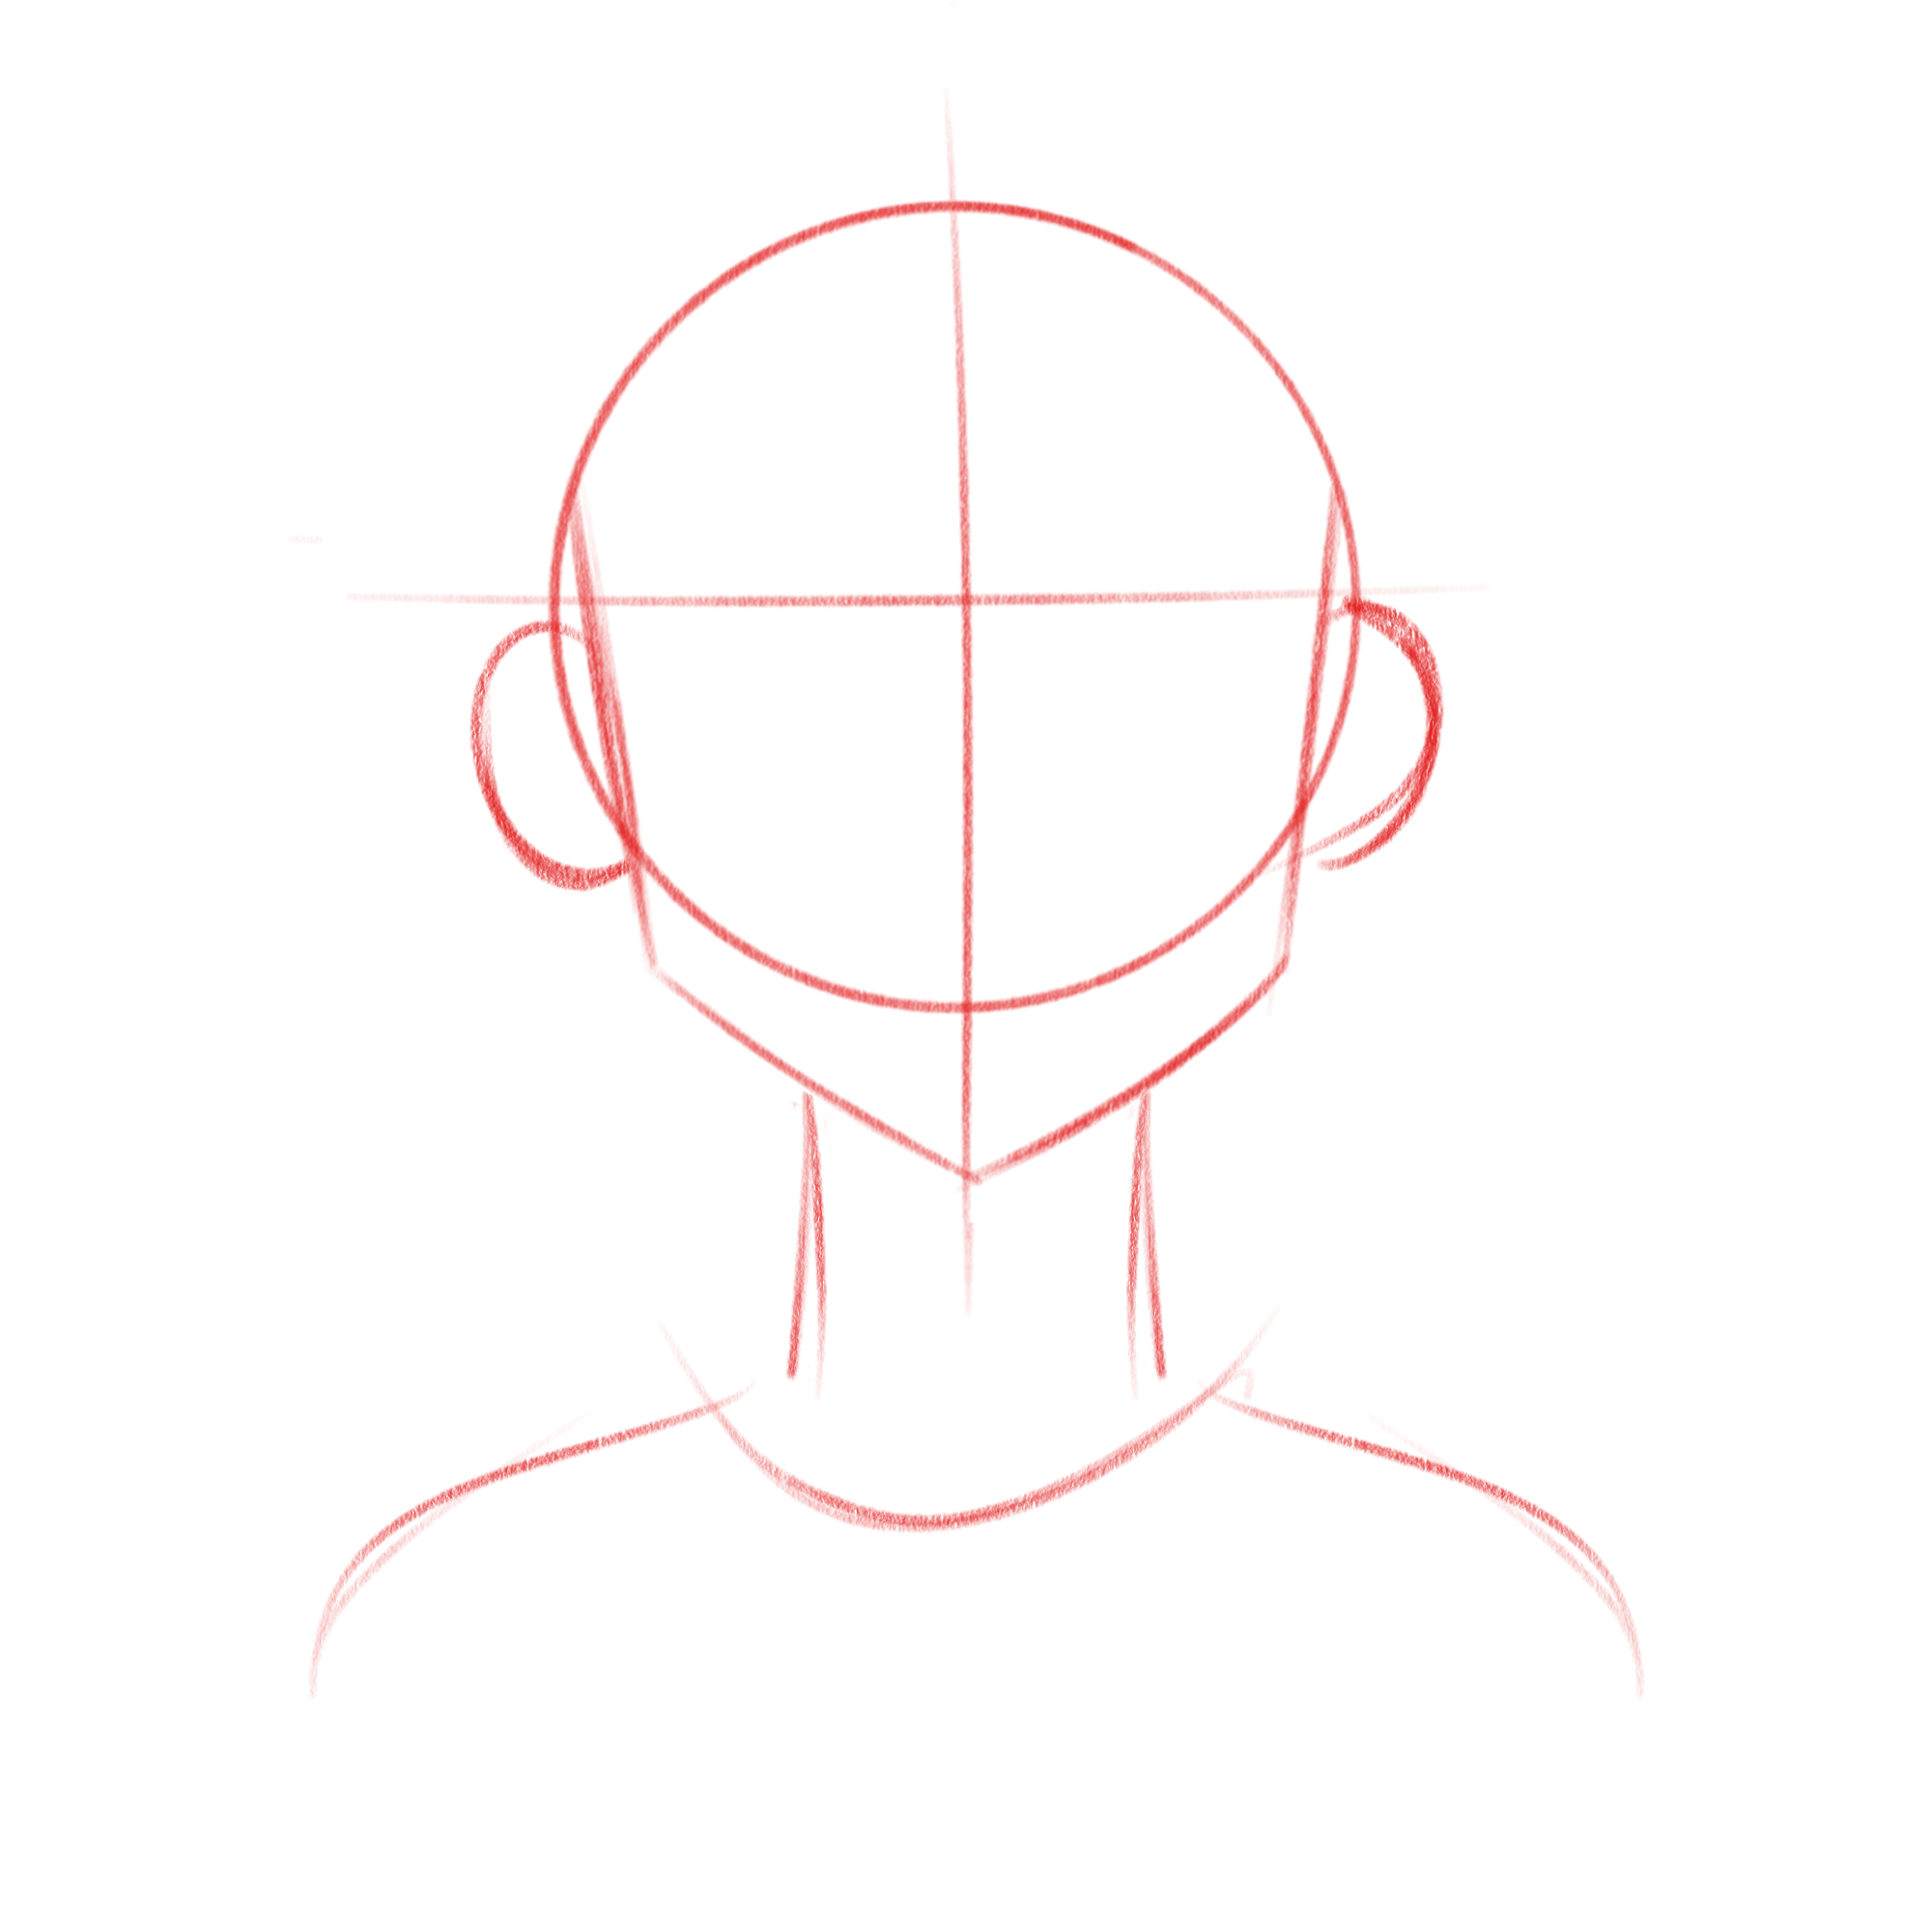
is important. Now for the actual drawing, I'm going to go
here to the side, and then I'm going to
create a new layer. And I'm going to draw just a very simple
sketch of the head. So start with the
circle, our guidelines, and now we just
connect everything, and we have a very
simple drawing of a head, just like this. I will leave you this sketch as a base for you to draw your
expressions if you want. But I do recommend you
to try this by yourself. It's very simple,
just like I did here. Circle two guidelines and
then connect everything. The measurements don't
need to be super right. Of course, it depends
on the style you're going for if you want to
be very realistic or not. But here we are
keeping things simple. So the conclusion of
drawing a joyful face. We got half closed eyes
or fully closed eyes, I'm going to draw the
fully closed eyes. So two curved lines for
the eyes like this, eyebrows going a
bit upwards, right? So the face opens up the nose, and then big smile, right? That's what we learned. And, of course, the
way you draw this, the mouth and everything, it all depends on
your own preferences. How cartoon do you
want it to be? You can also exaggerate
it even more, but there we go. If you want, you can draw some hair here or
just keep it simple, draw the face, okay? Now, so we have a
finished drawing. I'm going to go over all
these lines with my brush. I'm going to choose a
brush. Going to use a GPN. I'm using Clip
Studio point here, and I'm just going to
redraw everything. So it's a bit more clean, and you can clearly
see everything. Now, of course, drawing the
face can be very complex, and it might be a bit
challenging for you at first, but that's why we're
practicing this. I'm not doing perfect
drawings here. I'm just exploring,
drawing some expressions. We don't need to be perfect. Focus on the expression. The eyebrows, you
can either draw something very very
triangular, for example. You can also draw
some round eyebrows. Eyebrows can be drawn
very differently. So take advantage of that. And that goes for
almost everything when drawing
characters and people. We can all be very different. As you can see, I'm not being too perfectionist
with this. I'm not focusing on the clothes, the hair, anything just
very simple shapes. Let's hide here our
sketch, and there we go. A very joyful expression, and we didn't really need to
take a long time with it. Simple lines and
shapes, and it's done. Everything is much easier
when you take your time to look up at the references
and draw on top of them, find out interesting lines
and interesting shapes, see what's in common
with each reference, and then try to draw it. So there we go. This is
my joyful expression. So don't forget to
download these references, draw on top of them, try
different lines and shapes and then I use take
your time, okay? You can draw more
than one character or more than one expression. I also left you a grid template where you can add your
drawings as you go. So one expression a day, you can practice it a bit, and then when you're done,
you can add the expression you drew to the
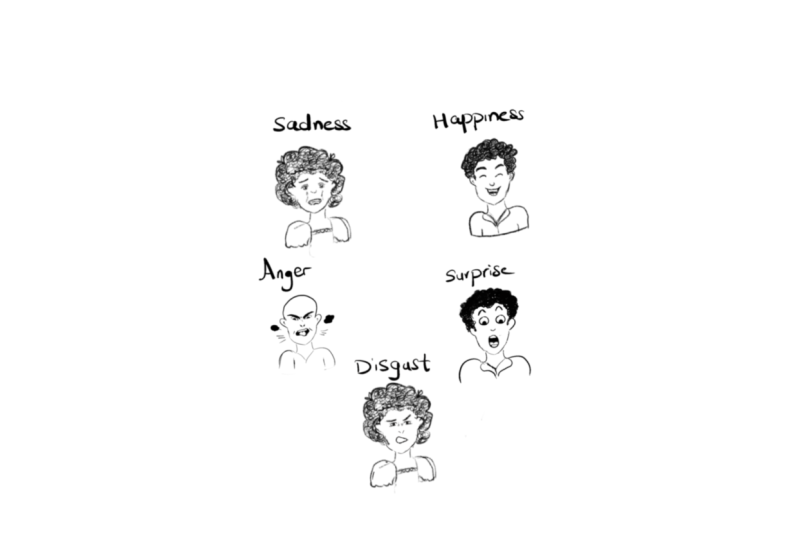
corresponding square. And then don't forget you
can share those works. You can share what you
did in the project, so I can give you some
feedback if you want. But this is it for day one, drawing a joyful expression. I hope you had fun, and I
will see you in day two, where we'll be drawing
a sad emotion. So I will see you there.
3. Day 2 - Sadness Expression: Alright, so hello
and welcome back. This is day two of our challenge class on
drawing different emotions. Today we're going to draw
something a bit sadder. We're going to draw
a sad expression, which is also something very often to draw if you're
drawing characters, if you're creating
stories for them. So we're going to follow
the same structure, the same process
as the day before. We got our references here. Don't forget to download them, and don't forget to download your grid temple so you can add all your expressions to it. And we're going to start by lowering the opacity
of our references. And discover what are the key
points of each expression. So I'm going to pick up my
pencil here, my pencil brush, and now I'm going to start by some guidelines here as
I usually do, right. So in this first example, we got some tears here, right. We do see tears
going down the face. So this is the first
thing I noticed. And then we got our eyes
quite sorrowful, right. They do not open a lot, and the eyebrows
are also quite da. You can see, it's
a bit opposite to the previous emotion where
with a joyful expression, the face opens up with a set expression or more
negative expressions, the face tends to
close up a bit. This is a very time
expression here, but there's a bit of
curvature here in our lips. Let's see the next
one. So here we did not have the
crying or the tears, but we do have something else. I think here we can see. For me, here, the main
part is the eyebrows. They do have a bit of
a curvature, right? Getting a bit close
together like this. This is the main feature of
this second example for me. So the eyebrows get
a bit closer and tend to curve downwards, right? And again, we got the eyes
not really opening a lot, but going also downwards. And again, the mouth going
downwards a bit as well. As you can see,
everything starts to get closer and inside
the face, right? Everything closes up instead
of opening up with joy. Let's see our last one, which is the most exaggerated here, feeling really miserable there. So we can really see here
the eyebrows getting closer. Together, the eyes
almost closed up, right. So as you can see, when
drawing a joyful expression, the eyes go this direction right when drawing the crying
in a different direction. So going like this instead
of the other way around. These are things that are interesting to pay attention to. And now, even the mouth is opened in a different direction,
literally upside down. So when drawing a
sadness expression, we want to do the opposite of what we did with a
joyful expression. So once again, let
me move to the side, and I'm not sure if I want
to exaggerate more or less. I'm going to do
something a bit more time and maybe add the tears. So having this reference
is also great for that. You can mix and match different elements
of each expression. Once again, I will leave
you a sketch of a head, a portrait, so you can draw
on top of it if you want. But I do recommend you to
try it out yourself as well, because I think
it's good practice. Or just the head, a bit of a neck there
and the shoulders, just so it's not a
floating head around there and now drawing our face. So we have the eyes here, right. I'm following mostly this one. So what's doing the most here is our
eyebrows and our mouth. For me, at least, that's the
areas I like to focus on. We can even here and add
some tears. There we go. So I'm going to try and draw more or less the same character
throughout these days. If you have your own characters, you can practice this with them. You can also add small details in other
areas of your characters, such as the hair,
even the shoulders, they tend to go
down a bit, right? They're not going
up. And confident now they're slumping a bit, so you can add that bit of
extra to the expression. As you can see, I'm not making
a perfect drawing here. I just want to focus
on the expression. So it's not very symmetrical. That's fine. Let's
draw our eyes first. I love drawing the eyes, exaggerating here,
the eyes a bit more. Again, the eyebrows that
are a bit triangular, the tears running down. There you go. Again,
very simple lines. Now, we can draw the
hair with less volume, for example, to accentuate
our sadness here, opposite of what we did before. These are things that
you can explore, and I hope you do
take the time for that because I think it's
something that can be really fun using the
rest of the body to explore the expression
as well, not just the face. And doing very simple things
can help as you can see, it's very different
from our first drawing where everything goes up, the face opens up and now
here, the hair goes down, the shoulders go down, the face closes
up a bit as well. It's a total opposite
emotion here and we can explore that with other parts of our
characters bodies, even if it's just a portrait. My sadness drawing is done, my sad expression is finished. This is it, very simple. Now you can exaggerate
less or more. You can add more or
less emotion to it. We have three different
expressions here. You can play mix and
match different elements. Don't forget to download
these references. Once you're done, update your
grid with day two emotion, sadness, and I will
see you in day three.
4. Day 3 - Anger!: Hello, and welcome back. This is day three of our challenge class on
drawing different emotions, and today's emotion is anger. So if you're feeling
particularly angry today or stressed or just
generally a bit annoyed, this is a great time to put
that into paper because, yes, even though I'm doing
this digitally, you can also do
this with pen and paper or any other
medium you might prefer. The only advice I have for
you is to print these images with a lower opacity so you can draw on top
of other than that, you can do this with pen
and paper or pencil. The process is
absolutely the same. So we're going to start by
analyzing our references. I have here three references. Don't forget to download them. We can't clearly see the
eyebrows of this gentleman, but we can see here
this curve right. We see here this line, so we know that the eyebrows
would be somewhere here. And we even got these lines
here and here in the nose. Got lots of lines happening
here in the face. Again, the face closes up. Everything comes
closer together. The eyes here are pretty normal. There's not a lot of
expression with the eyes here. We see it mostly in the eyebrows and the
mouth going upside down. We can even use
these wrinkles here to accentuate our
expression as well. So pretty mild, the
main thing to have into account here is the arrows
going very close together, but in a different
direction than when we're drawing
a set face, right, with a set face, we draw
something like this, and angry, we draw something like this, going downwards and into
the center. Okay, next one. So here's a bit
more exaggerated. We see things in the eyebrows, but also in the eyes. The eyes close a bit. Again, we hear a lot
of lines happening. The mouth has a frown,
a bit more satuated. I like with an angry
expression when drawing anger, I like to make the
mouth a bit using more straight lines like something like
this, very angular. There we go. And the last one, which is really, really
something furious and screaming. And here you can really take the opportunity to
exaggerate things a lot. But once again, we got
our eyebrows, right? We can see some
wrinkles in here, the eyes also going downwards, having a bit of a curve. There are even some
wrinkles in here. And finally, we got the
mouth open and screaming. There are a lot of lines here. Even here the brow, we see a lot of wrinkles
happening with all that anger. So yeah, from more
exaggerated to less, we can see here that the arrows do most
of the work, right? The eyebrows pointing down and getting closer
together and creating those wrinkles between the eyes and the eyebrows.
Oh, yeah, that's it. We're going to focus on that. For my drawing, I
think I'm going to do something towards the furious here so we can play
a bit with the exaggeration. So first, my base portrait. Again, I left you a base portrait that you
can use if you want, but don't forget that
this can be nice practice for you to practice drawing
your portraits as well. So, there we go. I'm going to lower here my eyeline a bit lower,
something like this. Okay, we can start. So going with a triangular
shape for the eyebrows, don't forget some
lines here appearing. And now the eyes, we can
close the eyes more or less depending on how angry
we want our car to be, or we can even, like, draw the eyebrows so
close to the eyes that it overlaps
with them a bit. Let's try that. All right.
Something like this. Very angry. And now we
got here our mouth. Now, one thing I like to do is play with the hair as well, make it a bit spiky, compared with the others
going a bit upwards to show that my character is so angry that the hair gets
angry as well. It's always fun to play with other parts of
the body, as I said before. So now all I have to do is go over my lines for
a cleaner drawing. So I'm going to create
a new layer on top. Also, you can draw your character's face and features a bit
pointier or sharper. To accentuate the anger, that's something else
you can play with. And now for the face. As you can see, I'm changing
the eyes here a bit, making them, drawing them a
bit more tilted than before. Don't be afraid to exaggerate your drawings,
your expressions. It's obviously all up to
preference and style even, but it's something worth exploring at times and
really exaggerated. For example, if you really
want to go cartoony, you can even draw
some point pointy, thick even or just leave it. Bit more normal if you want
something more serious. And there we go. Here
is my angry character. As you can see, I keep
everything very simple, focusing on the main
features I learn from the references and doing
it in my own style. Of course, this is right
now not a perfect drawing. If I wanted to make an
actual illustration or a comic out of it, I will probably flesh
out things a bit more. But in general, this is it. Eyebrows going
downwards, some wrinkles between the eyes and even
the corners of the mouth. And usually the mouth
goes upside down. And don't forget to fill out the third square of your expression grid with
your angry expression. This is it for today, and I will see you in day four.
5. Day 4 - Surprise :O: Hello, and welcome back. This is day four of our challenge class on drawing
different expressions, and today we're
going to jump up a bit to something a
bit more complex, but still quite simple. You'll see. So today
we're drawing surprise. So here are my references. Don't forget to download
them for your own practices. And the first thing
that I noticed right away is eyebrows going upwards, the open wide eyes and generally the open
mouth forming an O. So let's go in and draw
those features so we can get more acquainted with them before drawing
the actual thing. So eyebrows going upwards, this is the mildest
expression we have here, but as you can see,
we see a lot of the white of the eyes and the open mouth.
Not really a no here. This is like halfway open. So this is more a milder
expression of surprise. Let's go to the next one. Again, don't forget I'm
doing this digitally, but you can do this
with any other medium. Just print out the pictures with a lower opacity and you
can draw on top of them. If you want, you can even
print several copies. So you can try
different shapes and different lines because
are really no rules here. What I'm drawing might not be the same shapes or the
same lines that you do, what I see or what
makes sense for me, might be different from
what it is for you. So once again, we got
here our open eyes. As you can see, I'm
simplifying things a lot, simple curved lines,
circles for the eyes, and now our mouth. There we go. Very simple.
Just draw what you see. Draw on top of the image with simple lines and simple shapes. Then all you have to do is
redraw that to the side. Redraw. So we're basically practicing and creating
some muscle memory, so we can draw it ourselves. And don't be scared if
things look too silly. It's okay. This is a sketch. It doesn't need to be perfect. Seems a bit more scary here, this one, but the idea
is mostly the same. So now that we have
here are examples, it looks a bit scary right now, but now we're going
to draw it ourselves. So I'm going to
create a new layer, and then I'm going to start
by drawing my base portrait. This time, I'm going to draw
the eyeline a bit higher up because unlike drawing
anger or sadness, the face opens up. You can see that in all of this. Everything goes farther
away from each other, so we want to draw that. Okay, so first thing,
eyebrows shooting upwards. And now the eyes are
also going upwards, and now finally the mouth. Since I like to have
everything very simple, I do tend to draw an actual
ellipse for the mouth. Then we got a curve
here for the thong, and we can even add the teeth, and then a line for the lower lip at
least. But this is it. Now for the hair, I can again give it
a bit more volume, so it matches the rest
of my expression. So this is very simple
lines, very quickly. This is just a sketch. Now, after the
sketch, if you want, you can even make a
second sketch where you add a bit more details or clean things a
little bit more. But since these are very
simple doodles right now, I'm skipping that phase and going straight for
my final lines, which basically means
I will just be copying my sketch with new
lines and clean lines. You might have
noticed, I also drew the face a bit longer here
to reinforce that idea of surprise of the
face opening up with the emotion and now for
the rest of the face. I'm keeping things
very loose here. I'm just practicing emotions. I don't need a
perfect drawing here. So take this as
an opportunity to also become looser
with your drawings, gain that confidence, draw loose lines like
this. Don't be afraid. If you want if you're
doing this digitally, use stabilization
in your drawings. That's fine as well, but
don't be afraid. It's fine. Everything is
fixable, even if it looks not as great right now
or up to your expectations, you can try things
again and again. You're just practicing, okay? Don't fear that. Just draw
quick and long lines. And with practice, you'll
see that you get there. Also, one thing we can do
is add small symbols around our characters like
some lines like this to emphasize the
emotion you're drawing. These are things that you
can do to your drawings, simple lines around
your character that will reinforce the
emotion you're drawing. So just three simple lines
to one side and the other, and we added a little
bit more to our drawing. And this is it. I am done. We finished, we analyzed
our references, drew on top of them, and then we repeated that and tested it out
on our own drawing. And after all that's done, we have here a
surprised expression. Don't forget to fill out your grid expression sheet with a new expression with
your surprised character, and that's it for today. And I will see you in day
five for our last expression.
6. Day 5 - Disgust: Hello, and welcome back. So this is day five of our challenge class on
drawing different emotions, and today we're going
to draw disgust. This is the most complex
emotion we'll be drawing. It's our last one.
We practice a lot. We started very simple
and grew from there. So now we're ready for
something even more complex. Once again, I have
here our references. Don't forget to download this if you want to use them
in your practices. However, you can find your
own or even take pictures of yourself portraying these different
emotions if you prefer. That's also a good
way to go about it. So let's first lower
the opacity here, have a new layer on top, and now we're going once again, find our main points here, our main features of
disgusted expression. So first thing I
notice is once again, the eyebrows curving a bit
downwards like this, right? The eyes are very normal, there's not much to it, but we do notice
that the eyebrows get closer to the eyes. And the second thing I notice is the direction of the mouth and also a few
wrinkles right here. For me, it's the
eyebrows and the mouth that make a disgusted expression,
especially the mouth. The mouth is the place where
you can exaggerate a lot. But let's see other references. This one is also fun
specifically because if you noticed we got here the eyebrows going a
bit differently, right? So this one is a bit straighter, while the other curves
up a bit more, right? Something like this, we see
a lot of wrinkles happening here in the face,
between the eyes. The eyes even close up a bit, which I also think
it's quite fun. Like, something
is so disgusting, you don't even want
to look at it. Again, more wrinkles here. And another fun thing here
is angle of the lips. So as you can see, one area of the lips go higher
than the other. So let me try to do this in a
simpler shape. There we go. This is a bit more simple, so we can draw it more
easily next time. So this is a very fun one. We learned that a good way
to draw this cut is to add some asymmetry to the
expression and the face. The eyebrows at
different levels and even angles and the same
thing with the mouth, creating different angles
there, all about angles. And let's see our last one. Arrows here have a
different direction, which I also think is quite fun. So we can draw the
arrows another way, but still portray
the same emotion. And again, we see here that
the mouth open up a bit. Accompanied with that
with the eyebrows, we see a little bit of disgust. There are not a lot in this
one, but a little bit. So yeah, here are our examples. So as you can see, also, it's almost like a mix
of emotions, right, because here we
got some disgust, but there's anchoring
there as well. Here is a disgust
with some confusion. And finally, in the last one, we see some worry in it. It's a bit of disgust, but worried about it as well. So as you can see, when
drawing more complex emotions, basically, you can add
other emotions to it. So you can add even more expression to your characters and what
you want to portray. It all depends on
what you want to do at the moment with them
or of their situation. With that set, I'm going to
draw a new layer on top, draw my base portrait. Once again, feel free to
draw your own base portrait. Or if you want, you can
download the one I left you. Alright, so base portrait done. As you can see,
it's not perfect. This is just a sketch, but it has what we
need. Now, let's start. I like this idea of
the eyebrows being at different angles
and even levels. So I'm going to take
advantage of that, going to exaggerate this even
a bit more. There we go. You can even show a
bit of distrust here. Now the same thing
with the mouth. I like the idea of having
the mouth drawn differently, one side from the
other. There we go. Of course, I'm
adapting things to my character and my own style. We got here a more
questioning look like I don't really like that. That's a bit disgusting and honestly questionable.
But there we go. So now it's time to make a cleaner drawing
from my sketch. So I'm loading the opacity here, a new layer on top, and then grabbing my paintbrush, and we're ready to draw to make a final drawing or a cleaner
drawing of our character. Keep things simple. It's always the best way to go about it
when drawing something new. We can even play with that idea of different angles
with the shoulders as well, like just one shoulder going up, the other going down. A little bit more
unbalanced there, right? To use the rest of the body to accentuate the expression or
the emotion you're drawing. It's always a great idea. My character is not really
enjoying what she sees. She wants to get away from it. Like, no, I hate this. I don't like this at
all. So there we go. Very simple lines once again, and we got a very expressive
drawing right here. This was our last
expression or last day. So once again, take your time, look through the references, draw on top of them, find
more references if you need, or even take your
own if it's easier, or if you want something very specific and you can
find a reference for it, you can act out and
take a picture of yourself and use that
for your own practices, for your own sketches. Take your time. Don't forget to fill out the less
square of our grid, and don't forget to post your
project or share it with me so I can give any feedback
that you might want. Thank you so much, and I will
see you in the next video.
7. Conclusion - Before You Go!: Hi, again, artist. Congratulations on completing the drawing
one emotion a day, five day challenge. You did it. Five days, five core emotions
explore through drawing. I hope you had fun and learn
new ways to express joy, sadness, anger, surprise,
and disgust on the page. Also, thank you so much for
joining this challenge. It's been a pleasure
guiding you through these daily emotional
explorations, and I'm genuinely
excited to see how you infuse your future artwork
with even more feeling. If you've enjoyed this challenge
and found it valuable, I would greatly appreciate it if you could leave a review. Your feedback helps me improve
future classes and helps other students decide if this challenge is
right for them. Keep practicing these emotions and remember, keep on drawing.
 Patricia Caldeira, Illustrator | Digital Artist | Designer