Transcripts
1. Draw Characters 105 Introduction: Hello and welcome
to draw characters 105, clear drawing workflows. Now, contrary to popular belief, drones didn't just spring out on the page in
the completed form, we need to use a logical and coherent workflow in order to generate a rough drawing and move it into a
finished drawing. When we're learning to draw, we need to break down
the rough stage into further steps in order for us
to understand that gesture, the form, the rough drawing, the refined rough drawing. And then we move on to
the clean-up stage. In this part of the course,
we're going to be taking a look at the
multi-stage workflow, as well as the two-stage
workflow which you'll be able to achieve once you've done enough of the
multi-stage workflow. As usual, I want you to watch all the videos in
the course first and get a feel for the content, and then go through it again
and do the assignments. This part of course
is going to teach you the way that you're
going to implement the theory in a logical
and coherent way into a practical expression
of drawing characters. Hope you enjoy this
part of the course, and I'll see you in the lessons.
2. Workflow 1: Two-Stage Workflow: Welcome to the first
lesson of module five, which is the character
drawing workflows. In this particular lesson,
we're going to be discussing the rough and refined stages
when drawing characters. And let me say up front
that both this module and this lesson of very,
very, very important. It's very important particularly that you grasp these two stages, the rough and refined stages, and we'll go into
it in a moment. This entire module covers the
character drawing workflow, workflows, how we
implement our theory into producing a nice
finished piece of work. Module six has a lot of additional and crucial
character design theory. So you might want
to do Module five, go to module six, and then come back to
module five again and then understand how to add in all
those additional theories. Drawing workflows, general global art workflows,
painting workflows. They all generally
offer a similar theme. That theme is these two
stages of rough and refined. Another way to understand
this is that we want to see our two global
stages are big kind of breakdown stages as one being the construction stage and the other one being
the rendering stage, or another stage being, or another way to put it a planning phase and then
an implementing phase. Or another way to put it
again would be planning of the drawing and then
drawing the drawing, right? It may sound ridiculous.
Don't you just sit down and draw
something amazing? Well, no, not really. Perhaps when you're
very experienced, you're able to do that. But we need to
implement theory in some kind of logical
ordering, right? And we need to build
drawings up in some kind of logical
way, as you've seen, where we'd been working
in talking about things like shape
and form in detail. Right? So let's take a look. Some examples. I've
got two examples here. On the left-hand side,
we see the construction of the drawing and I'm particularly messy
and my construction. So you can see the construction of this portrait drawing here. And then the final drawing, which itself is not super neat, but it's relatively
fine and it's got a bit of a raw fish, sort of traditional kind
of look to it. Alright. You might think to
yourself, well, how on earth is it possible
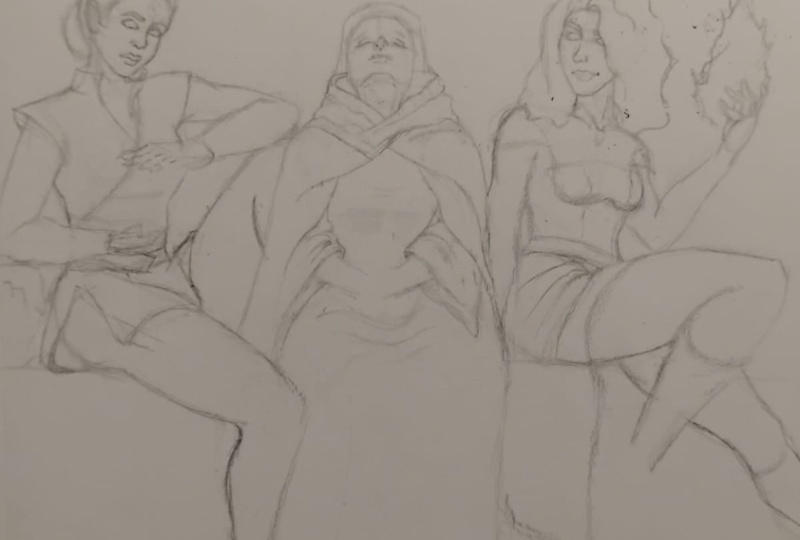
to go from this to this? And we'll get into that. Here's another example
which is a character. And this was the
construction drawing. And literally I did the
construction drawing. I put a layer on top and I immediately drew
this on the right. Once again, you might
feel like, well, this seems to be some kind
of gap in the knowledge. How did you draw her
armor and a cloth? How did you think of the
details for those things? Why is there no planning
for those sort of details? And look how crazy
and messy this is. How do you go from this
amazingness to this neatness? And we'll go into that more in detail as we move
through this module. However, just
understand that this is completely an absolutely
possible and it's about mindset, which we're going to
talk about just now. It's all about mindset. When you're doing
construction and planning, you will in one mindset, when you're doing Refund lines and cleaning and finishing
up your drawing, you're in another mindset. And a good example for
this that I want to bring to the table is an
analogy of cooking. Something I find with my
students before we get into the analogy is that they tend to try to be neat and
clean and all super detailed. And they're so worried that they work isn't
gonna look good. So they tried to be all
meet in every phase. So there are planning neatly
and they're trying to draw the volumes neatly and
everything super neat. And it ends up making this
really terrible drawing at the end of the day that's
really tight and lifeless. And the planning hasn't been well thought out
because they couldn't plan properly
because they were so worried about it looking good. Let's go to the cooking
cooking analogy. Think about it. Is a kitchen that is
got shifts in it. Super clean and super neat. I mean, obviously clean
in terms of health, but I mean, it's
not a neat place. There's food everywhere. These plates everywhere. There's cooking utensils, oil splashing, people
are frying up things. There's flour scattered
about and all the, all the bits and pieces of
the food that they're making. However, when you're
at the restaurant and you order the order of the meal, meal comes to you. It comes to you on
a beautiful plate. Hopefully. We'll, let's talk about a
high-end restaurant here. It's clean, it's neat. You're served well, the food is on the plate,
it looks delicious. It's cooked well,
it's wonderful. But that wonderful food. And it's presentation is only really a product of the planning that happened in the kitchen. And the understanding
of the ingredients and the cooking
temperatures and adding all those various
things together, right? And so the kitchen
is amazing place. It's messy, it's untidy. Perhaps it's not as untidy in a metaphorical sense as
my left drawing here. But that depends on the
kind of person you want as long as you know
your planning well and you know that
you're not looking for good and looks in
your rough, right? Because you'll get
to the good looks in the refined stage. The analogy points to that
you need to be loose, right? We've talked about
looseness and being loosen your lines and what lines
do and what loose lines do. How we want to think
about this is that the rough stage is
our planning stage, or the planning
of the drawing is literally the planning
of the drawing, right? It's the foundations
of the drawing. Weak foundations on the left mean a week drawing
on the right. Strong foundations on the left mean a strong drawing
on the right. You have to understand
this is a planning phase. In this phase, right? Phase one, which is
called a phase one, the rough stage forward slash the planning stage forward
slash the construction phase. We are building foundations. And so your mindset, yeah, let's say is much more academic. Mindset is, How do I need
to implement the theory? How can I ensure
asymmetric shapes? How can I ensure they're
opposing curves, ended know parallels,
etc, etc, etc. And we're applying
the theory and we're building the
forms and we're adding dynamism and we're worrying about shapes and were wearing metal, the
fundamental stuff. But we don't worry about the
finishing or the details. Okay? It is a creative phase, but it's more of a construction
creates a creative phase. So you're being creative
in a constructive sense in your rough phase of your
planning phase on Lake. And when you get to the right, this is the time
where you can have that loose freedom
and creativity that you see in
movies where they're just drawing amazing things. This phase, once you've got
the strong construction, you draw on top of the
strong construction and new layer or a new
page or what have you. Now, because your
foundations are so strong, you actually are
free within the, within the restrictions
you've set for yourself and the
foundation you're quite free to do as you wish and to learn weight in
detail as you wish, because things on the left
are in the right place, in the right location
at the right size with all the right theories
implemented and you know, what's in front
and what's behind, and things all foreshortening
and overlapping and there's land line overlaps
and all that jazz is happening on the left
and on the right, you are free to be
creative and loose. And definitely the most
fun phase is on the right. And usually the irony
is that the planning actually takes shorter
amount of time to do. The refunds takes longer, but the planning
is harder to do. The planning and left
is hard to do because it requires all the
bulk of our theory. And then the right
side, the refining, it's not that hard to do. It just takes a longer time
because you want to get those lines now and you're thinking about the line weights, adding little details, alright? They're really incidental. You make them up a lot of
the terms on the spot. Okay? Now once again, I know that
you're thinking to yourself, well, they still seems to be
a huge gap in my knowledge. And once again, I'll
say We will get there because as beginners, you will need to move
beyond just two stages. But you need to understand that this is where
we want to get to. We want to get to two stages. But we're going to
break these down into a few more stages as we move on. Alright, so another analogy
that I want to give you is the idea of a building
construction site. So imagine if they are doing a beautiful skyscraper in
the middle of the city. That construction site
does not look beautiful. There are trucks and
machines every way, concrete everywhere,
reinforced steel bars. Workers that are bulky because they're dealing
with sand and stone and drilling and screwing
things in and doing all that
kind of stuff that they do on a construction site. The reason I'm being
so emphatic about this is that while you may think you get it, it
depends who you are. You might get it.
From my experience. Generally speaking, I have to be super clear superinfection. It is so important that you
are absolutely rough and loose and focusing only on implementing theory
in your rough stage. Don't worry about looks, don't worry about
beauty, don't worry about appeal per se. Just use the theories, the theories of how
we getting appeal to theories of how
we're building forms, the theories of dynamism, the theories of line weights, the theories of the composition
and stuff like that. And that's why module six
is important because it's going to add tons of theories. It's really the golden module. But just understand that that
is our construction site. We must have a
construction site and we must be free and
loose, too bold. And then when we move
to the refined stage, now we can add gloss and decide on the furniture
and the Bolding and what paintings we're
going to put in the foyer and all
that jazz, right? So you can see that
it's much more of a meaningless stage in terms of theory and getting
things right, the reflect, sorry,
the refund stage. But of course the refined
stage is important as well. You need both stages
to get a good drawing. So I want to be emphatic and I want to say,
you guys guys, please remember this, remember these stages strophe
for these stages, go crazy in the rough stage, get things right
according to the theory, and then be free in
the refined stage, you can be more creative
and more loose and the refined stage to get
that refund drawing out. All right, we are going to break these down
into smaller stages, which we'll learn to
combine into these two in the next few lessons. So let's move on to those
lessons and I'll see you there.
3. Drawing Workflow : Multistage Workflow: In this lesson, we're now
going to look at breaking down the workflow into more
manageable pieces at first, before we just
move straight onto doing a rough in a refund stage. The word workflow really
means the flow of work, logical ordering of
the steps we take to get our work done and
get it down on the page. So having a good
workflow is very important for us because
it's kind of like a map. It helps us to not get
lost along the way on route to the end of our
journey, right to our goal. So what we're gonna do is
we're just going to look at some theoretical
principles here. And then we're
going to move on in the next lesson to a very long, yet hopefully detailed
demo for you. So first off, we
have our rough and refined we've discussed
in the previous lesson. And at least from a
theoretical perspective, we kind of have an idea of
what these guys entail. And all the while, while we think about
the drawing workflow, we also want to think about
our general art theory of shape in form and in detail in those kind
of percentage splits. Because ultimately
it's this sort of global breakdown of odd in general that informs
these stages. Now, in our rough stage, you could say in a sense that we have shaped form in detail
happening here, right? Shape or form and detail. Right? But we could break things down even more in
terms of shape. We would have gesture. And we'd also have
opposing curves. We'd also have our
loose lines, etc, etc. And there are quite
a few theories that would fall under shape, composition and so forth. And many of these
things we touch, especially on in module six. And then in terms of form, we have our 3D and our
drawing through, right? And then we also have
our dynamic forms, which are really
informed by shape, shape, and forms a dynamic form. And the idea is that we kind
of Bolding at these things, shape form and then details. And of course form
as well also has multiple levels of theories
that plug into form. And then when we get to detail, this would be things
like anatomy. The anatomical details. Now of course, we know
that generally speaking, the anatomy of the
character would inform the dynamic forms. But we want to learn the basic forms for the
purposes of drawing first and then add the anatomical
details, right? And this would also be
the facial features and the clothing or the
armor, cetera, et cetera. The color of the hair and so on, not the color of
the, the style of the hair and so on and so forth. And the refund stage really, in a general sense, is clean up. And clean up would be
clean lines, right? Clean lines. Easier to read lines. It may be coloring. Maybe some
compositional changes. It's really just cleaning
the entire drawing up. And to be honest with you, a lot of people
would be able to do the refining stage because
it's not a lot of the work. We want to remember that we
have something like a 90%, 10% split in terms of theory
between the two stages. And of course, we want to remember that we
have something like a 20% and 80 per cent
split in terms of time, because refinement
takes a lot of time. That doesn't take
a lot of theory. Right? Here we see just
this general kind of workflow happening here. And so we might think
to ourselves, alright, so that if I want to
do a good drawing, a mainly to follow
something like do gesture first and then I'm gonna
do like the forms on top. And then maybe I'm going to do the anatomy because I want to make sure I
get the anatomy right. And then maybe on top of that, I'm going to do close
and other details. It's just say and other details. And then once I've done that, I'm going to refine
this whole rough piece. And you can see already
at five stages here. And then maybe we're going
to add a sixth phase. Then we're going to
start doing clean lines. And then maybe after
that we'll do clean all. We'll do line weights, etc. And we're getting
to a lot of phases. And perhaps we think we could agree at a workflow
that is this long. It's gonna take a
very long time to actually get a good drawing out in a reasonable space of time. Now of course, for the
purposes of learning, this is not a bad
model to at least understand that in
some fundamental way. This is kind of how we're
going to be working. But what we want
to do is we want to combine some of these steps. Get ourselves a bit of a
shorthand because e.g. there's no reason for us to, in the forms section, draw basic forms first and
then add dynamism to them. When, if we have a
solid understanding of what the basic form is, we might as well just draw
the dynamic form, right? And the dynamic form
can be and just be influenced by
what our gesture is. Using all the theories
we've learned so far, we're going to combine a lot of these steps into
four major steps, which we will then
move forward with. And then hopefully as
we're doing those steps, as we're doing
drawings, you're doing your assignments and
you're watching the demos. You're growing to see how you can actually just
have two stages, a rough stage and
the refund stage, where you know what you want
to plug in into each stage. And so the four
stages that we're going to be breaking
down all of our work into moving forward
just for a few demos is stage one would be
our dynamic forms. So we're going to just start off straight out with a bet with dynamic forms and bold
and entire figure with the dynamic forms. Then too. We're going to move
on to rough details. And we'll just put
all the rough details that we need in there at once. Whether it's anatomy
or clothing, the hairstyle or what have you. We'll put all the rough
details as to who the character is in terms of their outfits and the appearance and their
expression and so on. We'll put that all in into
the rough details phase. Then we'll do a refund rough. This is us really
solidifying and saying, Okay, I definitely
want these things in. I don't want
these things in. You're going to refine it a bit. Refined, rough, must read. It must read clearly, even though it's going
to look super messy. Just going to write here
probably looks messy. And that's fine
because it's a rough it's a construction drawing, it's a planning drawing. And then last but not least, we're going to do
the cleanup drawing. So we're simplifying, we're
going to be simplifying all of our theory
into these phases. And we'll start getting used
to dynamic form, drawing, adding rough details
onto the dynamic forms, refining that rough and then cleaning it up in
one fell swoop. That is what we are
going to move on to next nice lengthy demo on this particular
drawing workflow. I'll see you guys there.
4. DEMO Multi Stage Workflow: We're now going to
be taking a look at a four-stage
workflow speed demo. And the speed demo
is a 13 minute demo where we're going to go
through the dynamic forms, the roof details,
the refined rough, as well as the cleanup stages. Now some important
things I want you to remember is
that we want to be aware of what we need
to be focusing on at each stage of the workflow. This particular demo leaves out many core theories
for module six, character design and
allows us to keep design theories to
a minimum so that our focus is really
on the workflow. Don't worry about looks too much when you're practicing
this in your own work, just focus on grasping the
workflow as best as you can. Following this 13 min be demo is the full two-hour demo of
this particular workflow. So please do watch it as
you feel you need to. All right, let's get started
and we're going to move into the dynamic
forms stage first. So as we start in this stage, we're really focusing
on the forms, just getting the
basic forms down. Now obviously we want to
think about the pose, the angles that we want to do. We want to bring in
that gesture theory, but we're not worrying about or being too overly
concerned about details. We're not going to add
pockets of the stage and different clothing
designs and things. Now, we're just going to focus on the big forms
and the big masses. You'll see here that I'm busy measuring out
the proportions. I've checked the angles from
our gestural knowledge, the horizontal and
vertical tilts. I've given a bit of a check. You see I've done
some circular heads just to kind of measure
out the proportions. I wouldn't say there
are 100 per cent, but in this demo
we are going for a cape crusader
type of character. So I've made his proportions just a little bit
more sort of heroic. And I'm using the
basic cylinder forms, really the basics and the
forms and the basic forms we've learned in
the anatomy module. To really just get those anatomical forms down
to allow me to draw on top. At this stage, you
really want to get the pose that you want down. You want to, you can experiment. Of course, it's a rough stage. Don't feel you have to draw anything really perfectly here. Experiment, move things
around, move parts around. If you're working digitally,
sometimes it's very easy to just do a selection
and move it around. And also if you're working
on paper, stages 12.3, you'd really just all due
on the same piece of paper, just erasing it and making
it louder at each stage. And then doing your clean
up. On the last page. There you can see I've
flipped the page around. You can use a mirror
if you're working traditionally, this
is very useful. It helps you adjust your eye
to the pose to see if you've drawn any angles
weirdly and you can see I made a tilt
adjustment there. Then I end off by religious
solidifying a lot of the forms or add
in the Cape form, just the basic shape of it. And that brings us to the
end of working on the forms. The basic pose gets completed, and we're ready to move
on to the next stage. Make sure that as
you end each stage, you're doing
everything you need to for that particular
stage of the work. So in dynamic forms, make sure that the
pose is really solid and then move over
to the rough details. With the solid foundations of our dynamic form stage down. We're free to move into
our rough details stage. And we drop the opacity
of the lower layer. Or if you're working on paper, you can simply just
erase lightly with a kneaded eraser and
then draw on top. This particular phase is really
about getting everything in the right location and
looking relatively right. But we don't have
too much concern for things looking
neat and clean. We want to get things in. So everything that
needs to be in should be in all the design elements. Here you can see I'm
adding the shape of his logo and a lot of the
details of the anatomy, but not in some
excruciatingly detailed way. It's kind of a general way. So you want to think
of it as getting all the elements you need in, in a general way. And then when we move
to the next phase, we can then refine those rough
details a little bit more. Can see here there's not
really much attention paid to his facial expression or
his hair design that much. Laurel probably just kind of enhance his head is a
little bit later on. But it's making sure the
bulk the details are in, but that the bulk of
the details aren't necessarily detailed. Once again, keep in mind
that this is a rough stage, so everything's game,
everything's changeable. Don't feel locked into anything. You'll see that even I will make multiple changes to the legs and the arms and
various other elements. That's what it's about. We're building something
and of course, we're going to have
various challenges along the way that we need to address things
that don't look right to us or things we
feel could look better. And this is definitely one of the goods
stages to change it. And of course, the next stage as well that you can see
I adjust the tilt. Once again, I'm kind
of thinking about additional elements that
I may want in the piece, anatomical details, costume
details, and so on. You want to strive to be feeling confident with each
stage in itself. Don't think to yourself, Oh, does this look good?
Does this look good? It's not about looking good
necessarily at these stages. It's more about, is it
theoretically correct? Does it make sense MI implementing the various
theories, in this case, e.g. the tilts and tilts, there are
the opposing curves there. Does my line of
action makes sense? Is it strong enough? And can you see me adding additional details and costume
details to the rough ER, the rough details
phase and getting, just getting the bulk
of all the details in building on
those foundations. The key thing to remember as we move into stage three is that this actual video lesson
is really about workflow. I want you guys to understand
and grasp the workflow, the concept of the workflow, and the various stages
of the workflow. Think about what theories
would plug into each stage. When would I use
shaped theories? When would I use form theories? When would I use both? When would I do
detailed theories? Should I be thinking
about shape, the refined rough stage? The answer to that
would obviously be yes. This particular stage is
where we are refining these rough details up to
a more appealing level. We're adding in elements. We're adding in details. We're making things
look cleaner. We're making things
look more readable. And we're building on that rough details foundation
that we came from before. Once again, we made the
layer a lot lighter. Once again on paper, you would erase with the kneaded eraser and make
it a little bit lighter. And we draw on top iterating, adding details, making
changes and so forth. An important thing to note at
this stage is that this is really our last opportunity
to make structural changes. Because when we do move
into the clean-up stage, you're not really going to
be able to, in a decent, timely fashion, make
massive sweeping changes. You want to make sure
that your structure is 100% exactly as you would have it before you move on
to the clean-up stage. And so the rough the refund rough
stage here is where you want to make
any final changes. If you're unhappy
with something, change it, go for
it. It's still game. As long as you're
in the rough stage. You can change anything. And you can build anything from dynamic forms up
to rough details, up to refund rough. Once again, even
in this stage on this particular
layer if you wish. So go for it. Don't be afraid. I change that leg twice. This is the first
change I'll make and I'll change it again because I'm not 100% satisfied that he is looking heroic enough
and bulky enough. You'll also see in a few
moments that I will do checks. I'll check for parallels, which is from shape theory. I will check the proportions, which is from anatomy theory. And I'll make adjustments based on what I think is more correct. And so a lot of the
time you'll find having things correct
according to shape theories, form theories, detailed theories is what will make
the piece look good. Not trying to make it look good, but implementing
those theories that, you know, the theory is correct. And because the theory is
correct, It looks good. Because it looks right. It's still very messy. It's still very rough and honestly go for it.
It can be messy. It can be rough because
we're building right? Or we're cooking in the kitchen. So just be Macy, be rough and do what you
need to do to make it work. Here I check the proportions and I was checking the forms. Realized his torso was
a little bit long. So I kind of brought it down
from the crotch abroad, the crotch area up a little bit. And then also noticed
some parallels in terms of the
silhouette of the legs, which I've been changed so that the internal
negative space shape didn't have a silhouette. There's my second
change of the leg. Abroad it in more because I wanted him to lean back
a little bit more, seem a little bit top-heavy, and really get that feeling of confidence out in the character. And I'm pretty happy with most
of the rough details here. I'll do a little bit of
extra work on the face, adding in some additional
facial details. And we move on to
the next phase. In this stage, we have
quantum mindset shift. We're really wanting to
be loose with the lines. Get really perfectly
straight lines going. Focusing on the shapes, making sure things
look really good, as good as they can. We want to avoid sketchy, sketchiness and roughness and really have a more
of a clean look. Now, this of course, the style you're going for
has a bit of a rough look. Then of course go for it. And really being
loose with your arm. And also thinking very
much about dynamic shapes, just the basic flat
abstract 2D shapes, making sure they're dynamic. You'll see here as I
move through the piece, I'm adding in final details. I don't stick strictly
to the underlying plain. And that's really because I
want to keep the lines loose. And sometimes when you're
moving very quickly, the lung is not going
to be exactly to plan, but it will still look good. In a sense, I'm tracing
over my drawing, but I'm being quick and being
loose with the strokes, making sure things read or
they're very, very clear. If I've defined dimensionality in one of the previous stages, I want to enhance
that definition here. And I move over all of the
elements that I've drawn out, creating these clean
lines, these quick lines, generally trying to draw
with a thinner line, because when we get
to line waiting, it's easier to wake up alone than it is to
weight it down a line. So it's easy to make the lines thicker than it is to
make them thinner. So you want to start off with a thinner line and it makes
it easier to wait it up. I'm very conscious, extremely conscious about
overlaps at this stage because I don't have all of these rough lines every way to help me see the difference between Ford and
background objects, the overlaps become
extremely important. And so you'll want to be
thinking to make sure that all of your overlapping
lines read very clearly. And then once that is done, we move onto land waiting, which helps the overlaps and shows us what is in
front, what is behind. I do two kinds of
land waiting here. We'll cover this in a later
module in more detail. But essentially, I thicken up any lines that
overlap other lines. So any objects really that are
in front of other objects, they get thicker lines, e.g. the head in front of the neck, and then a underlying line. So a line that is
being overlapped, I will put what is called
a hook shadow underneath. It's almost like a
small triangle shadow. And it just, it comes
from below that object. You'll see hook shadows
pretty much everywhere. There is an overlapping line. Don't worry too much about
that for now though we will go into it in much
more detail later on. But focus on really the mindset at this
stage of the workflow. It's a very much an easy stage. It's very, very easy. There's not much thinking to be done because you've done
all the thinking already. It's really cleaning
up, refining, making little tweaks
and adjustments, making the landscape and
making it look pretty. It's the icing on the cake. It's important to
note that really you can't do this stage on a poorly designed to work. In the other three stages, it's basically polishing a ****. It's still gonna be uttered. It's just a sheer
very shiny toad. So don't worry too
much about this. If you haven't got the
structural stuff down, get the structure down first. Finally, each consecutive stage tends to take longer
than the stage before this stage probably took about the same length of time as
the first three stages. Yet it required less thoughts, just more time in making
things look nice. As we end this lesson, let me emphasize workflow,
Workflow, Workflow. This lesson has
been about workflow and helping you
grasp and understand the stages of the workflow
and also how powerful a good workflow can be to
getting the final work done. Ultimately, we want to end
up with a great drawing. We want to understand how to make drawings look
great and look good. But before that we need
to grasp the workflow. So please don't worry
about looks at this stage. Don't worry about
looks even in terms of your own work when
you're practicing this, just focus on getting
the stages of the workflow done in grasping
this concept of workflow. And that's the end
of this lesson. I'll see you guys
in the next lesson.
6. Finding Your Ideal Drawing Workflow: In this last lesson, I thought we could talk
a little bit more about workflow as well as
funding your own workflow. As you can no doubt see, by this phase of the course, there are quite a lot of theories that plug
into different stages, different theories
that plug into shape, different theories
that plug into form and detailed and so
on and so forth. And you can also see how, especially in essence
to how we've kind of broken down some
of the things you might want to do to have a strong workflow in building your drawing
up from the ground up. Now, obviously things can go
into very granular detail. You could arguably
started drawing with a very shape-based life gesture, then bold carefully
forms on top of that, then add dynamic
forms and so on, as we noted in Module
in less than two. But at the end of the day, what you want to end up with is something that
works well for you. You will need to
eventually draw on whatever theories you need
to get the piece down. You'll find that
when you're moving to a two-stage workflow, you end up combining multiple
types of theories together. So e.g. you would be drawing from your
gestural knowledge, let's say shape-based gestures where we have dynamic shapes. You might draw a
character that has a phone-based chest,
a phone-based head. And then for the
limbs, you simply just do shape-based gestures
for the limbs. And why not? Because you ultimately
say to yourself, well, I really do understand what the form is going to
look like on top. I didn't really need to
draw the dynamic forms, perhaps not anymore if you're gained significant
experience in that, we just generally
experienced that. Or if you have a very superior
anatomical knowledge, you just indicate with vaguely what that's
going to look like. Nevertheless, do know
that there isn't such a thing as a
perfect workflow. There's rather kind
of eight workflows that follow the same
general principles, but each artist does things
in their own unique way. I've seen artists that will do this type of workflow on
each element individually. First, they'll do shape and then rough details and
a refined details. And then the cleanup
lines on just the head. And then move over to the chest. They build the entire
image piece by piece. And that is totally
doable, right? If you think like that or
if that works for you, then do it that is
totally doable. And conversely, I've
seen artists that needs to do everything in a very long, perhaps very in-depth workflow
where they want to get the gesture absolutely
perfect and they want to get the dynamic
forms absolutely perfect. And they want to get the
anatomy absolutely perfect. However, over time you will find yourself molding and bringing in all the elements that you need using the theories
simultaneously. So my encouragement to you is that especially
if you are a very, very new at drawing and you're still in the beginning stages, perhaps this is your
first drawing course. Follow that workflow
fairly explicitly and it will be a good foundation
for you moving forward. Now, a lot of people
will say, Well, there's 50 million ways
that you could do drawing. There's 50 different kinds
of ways you can do drawing. You could draw this workflow, this workflow, this workflow. But I strongly believe
that if you teach someone to do one
thing very well, they have a foundation, then when they can do
that one thing very well. Let them go and explore the
other types of workflows. So I say to you, definitely
learn from this workflow, use it, build on it. You understand how the
theory at this stage of the course plugs
into it, bolt on it. So learn this
particular workflow. Well, use it,
successful with it. And then of course, explore how you can either make it shorter, make it quicker, improve on it. Perhaps you can make
it more efficient for yourself, etc, etc. Perhaps you get to
a phase where you even draw in one stage. You don't even have a two-stage workflow of Ruffin refund. That's great. But really just remember to always base your
drawing and you're thinking about drawing on all the fundamental art theories that we've
been learning. I hope that this module has been extremely helpful to you. Please work very hard
in your assignments. And then I'll see you in
what is probably one of the most exciting modules
in the entire course, module six, I'll see you there.
 Scott Harris, Illustrator, Painter | Character Artist