Transcripts
1. Draw Characters 104 Introduction: Hello and welcome
to draw characters, 10 for drawing
characters gestures. The character gesture
is extremely important. It is effectively the spirit or the soul or the inner feeling of the character, if you will, the inner kinetic
energy in some sense, character's poses are
hugely influenced by what a character is thinking or what a character is feeling. The gesture is sort of a way to capture those energies
moving through the form. Now I know this sounds a little bit hokey, but bear with me. We're going to cover
core fundamental topics, such as lines of action, as well as dynamic
character posing. And I'm going to
teach you how to draw gestures from references, helping you to grasp a wide variety of different
poses and styles, but understanding
the inner energies moving through the foot. As usual, I encourage
you to watch through all the lessons first and
when you're done with that, and go through them again
and then do the assignments. Very excited to teach you how
to draw character gestures. So I'll see you in the lessons.
2. What is Gesture?: A lot of the time when you
think about gesture drawing, you probably have this
idea in your mind that people are doing kind
of laughed drawings. Maybe Loved drinks
from photos will have drawings from real models. But the truth really is that those artists are
attempting to try to capture the essence or
the core of the pose. And that really is what
gesture drawing is capturing the core
or the essence of the figure of the form. But more importantly, once you understand how to capture
it and how to see it, that you will then be able
to utilize this knowledge to give your character is
feeling and emotion and laugh. This course obviously isn't
a figure drawing course. It's a character drawing course. And characters of very much full of personality,
full of life. They can relate to one another. They can relate to the viewer. And people just feel inspired
and motivated and they believe in this sort of life that you're
putting into the page. So gesture is very,
very, very important. A good way to think
about gesture at its core is that it
really is the soul. The point, that entire, overall message or structure of a pose or other
character's emotions. In a sense, it's the courts,
the foundation of it. And you'll hear me using different words like
this core in essence, the directional flow
and things like that. When we talk about gesture, gesture is very, very important. Gesture falls into
the shape category. So it's very much
falling into kind of compositional category when
looking at in terms of a strictly drawing
type of sense, it would fall into shape. It's got everything to do with how we think
about dynamic shapes, how we structure the
foundations are that's shaped composition of the pose
and things like that. So it's important to remember
that it falls into shape. So the way we're gonna be
learning that gesture is instead of just having
this kind of vague idea where we're going to be drawing figure drawings or photos
are going to learn. We're going to learn gesture
in for five, for four ways. The first way is
directional flow shapes. Now, as we've learned, we know that sort of static shapes. They don't seem to have
any directionality, but when we bend them, we can give them a sense
of directionality. So the first well we
will be learning about gestures is by doing
directional flow gestures. And I'll do an example over here so that we can get a sense of what that's
going to be like. Directional flow
gestures would be just focusing really
on flat shapes. Not thinking too
much about forms, and just feeling
out the gestures. So just do something
very basic care. And you may be recognizing
some of these general, some of this general
flow from us doing the form module in module three. So this would be
directional flow shapes. It's called a directional flow shapes or really just
shaped gestures. So we're not
thinking about form. And this is really important
that we grasp this, that we are understanding
that we're grabbing this type of silhouette
is just very flat. It's still very
readable types of shapes and directional
flow shapes, right? And then we'll be doing
form, dynamic form gestures. So we'll take our
directional form, directional flow,
shape gestures here. And we will then
add form onto them, which we hopefully
know how to do. And I'm going to actually put
this in a different color. And we'll start building those basic forms on
top of the gestures. And kind of imagining
all of our structures. Put some center lines there
so that we can get that sense that the forms are based on the directional
flow of the energy. Flow gestures, directional,
directional energy, and the directional
movement kinetic energy through the forms. So then here we have
phone-based gesture, and then we'll be doing
anatomical gestures. Where are we going to combine our shape and our
form knowledge? And hopefully going to then use our anatomical
knowledge that we learned from the reference material to build on top of
what we have here. I'm just going to
lighten this little bit. And we will then start
utilizing the reference and building anatomy on top
of these structures. Obviously, I'm doing this
out of my head here. I'm going to imply some
anatomical forms here. The pics in the pelvis. Okay, so we want to, we want to grasp gestures from
a fundamental perspective. First, before we start
getting into doing crazy hardcore laugh
drawings where if you had to just
start out with there without any decent
fundamental knowledge, you would probably not be very successful
for a long time. And you'd waste a lot of
time trying to figure out why you weren't
being very successful. So this would be our
anatomical gestures where we're looking
at references and drawing out those gestures. And we will certainly get into that in the next few lessons. And then last but not least, we will then do laugh
gestures, right? Laugh gesture drawing. And I'll be like, Well,
what the heck is that? Well, once we know the
shape and the form, and we have a good understanding of the anatomy of the gestures. And we've also been doing
our daily anatomy studies. Then we can actually move
into lab-based gestures. We were looking at
people and we doing that typical thing maybe where
you sit at the coffee shop and you're looking at people
walk by and you're trying to capture the entire gesture of the person as
quickly as possible. So e.g. a, typical laugh based gesture might be
something like this. And it's not really, I'm not doing some crazy drawing here. Let's see. I'm going to draw
something like this. Maybe something like that. Quickly just doing almost
a scribble if you wish, but just trying to
get the gesture. And we have an old lady with a stick or an old man with
a stick or what have you. And these are lab-based
gestures or laugh gestures where we're
trying to quickly capture overrule
forms of things. Perhaps a man waiting
at the bus stop might look something like this. Maybe he's got a
sling bag on him. He's quite a broad
man wearing a hat. So these are really
the laugh gestures. So we want to think of
gestures in these categories. Just take a look at
them one more time. We have our
shape-based gestures, which are what we're going
to be learning first, then form, then an
anatomical gestures. And then we're going to look
at laughed gestures and all of these just your
work is done from left. We want to learn
gesture from life. So that when we're drawing an imaginatively, we have strong, strong, strong foundations
and how to capture those, those movements in the
energetic feeling and the dynamic flow of the human forms in those characters and
even more so once again, reiterating that we
want to then be able to imbue how the
character is feeling, what the character is thinking. Then utilize what we know
of gesture to better communicate these aspects
of our characters. Who are characters
all how they're feeling, what they're doing, what they're anticipating,
and so on and so forth. Last but not least, and this is a very, very, very important point that I want you to remember throughout
your drawing Korea, hopefully for the
rest of your life. But especially while
we're doing this module, it's really one of the
main fundamental points of gesture drawing is that you need to exaggerate the gesture, right? Exaggerate the gesture. And the reason you
need to exaggerate it, particularly just the basic gesture of the form
is when you're doing a drawing and you're
kind of getting your dynamic forms going
and you're doing a cool, you're trying to get all these nice dynamism happening
in the piece and so on. If you don't tilt things
enough, twist things enough. Adequate rotations and
push the actual pose. Push the pose and really try and make it as exaggerated
as possible. Not overly exaggerated
but fairly exaggerated. What happens is when we
get to the cleanup stage, where we're now putting in
some clean lines and we're detailing and we're
drawing the face and drawing the anatomy in and
the clothes and the hair. What happens is
if the gesture is not exaggerated
enough underneath, then when you start
adding the details and adding the anatomy
and the clothes and accessories and all the other
elements of the character. It can tend to kill the
gesture a little bit. So basically adding details
and adding these elements kills or really tones
down the initial gesture. That's why it's important
that we need to exaggerate the gesture a little bit so that we are compensating for
that sort of toning down effect that adding detail can
have to a character Dorian. So remember, exaggerate
the gesture, exaggerate the gesture. And you will see maybe even if you've exaggerate
a little too much, that when you do start
adding the details, the details tend to really tone the gesture
down quite a bit. So very important point
exaggerates the gesture. It's not forget that. All right, that's the end
of the intro to the module. Let's get into it.
3. The Core Foundation of Gesture: Let's now take a look
at the importance of understanding opposing
curves and directional flow. So in terms of directional flow, it really goes back to the
things I've been saying about static shapes versus shapes that have
directionality to them. And we can achieve that by bending the edges and
the sides of things to give a general
directionality to the shape. The shape really if you ask someone what direction
it's moving, it's not really moving in
any particular direction. And you might say
to someone, hey, what direction do you
think this is moving? And they'll probably
say it's moving in this particular direction. And the same applies to form. We want to avoid using non-directional forms are
forms that lack energy. I'll draw through on this cube. Just for the sake
of understanding. This is very static. It's not really moving anyway, although you could
definitely argue that this side in terms of a shape, is a directional shape for sure. Directional shapes between them, but the overall form
is very static. And so what we wanna
do then as well is edge directionality
to the forms, kind of bending our forms
in particular ways and having the form feel
more directional, right? Like it has more energy to it. Things are being
bent and twisted and there's some kind of movement happening
in the form, right? Static shapes and
forms we don't want. And dynamic shapes and
forms we do want, right? And this applies both into
our compositional thinking. We're thinking
about shapes and of course into our form
thinking when we're thinking about forms and the
three-dimensionality of the things that we are creating and things
that we are drawing. Alright, but now adding
onto this knowledge, right, so that we know dynamic is good, right? Dynamic is good. But how do we apply this
dynamism to the human form? And this particular theory
has different names. I don't think it's
ever been called the name that I tend to call it or explained particularly in the way I'm going
to explain it to you. But nevertheless,
I like to think of this as opposing curves. Opposing curves. And really the rule is that
one thing curves one way. The next thing we'll
curve the next. And you've seen this when
we've done our foreign-based. When we've done out,
what am I saying? When we've done our
forms are dynamic forms. We will make the
top of the arm bend one way and then we'll be
in the forearm another way. And really another
name for this is rhythm or flow is
another name as well. This is introducing this rhythm or flow or opposing curves, this directionality
into a character or any kind of living object. And you can obviously also put it into non-living
objects as well. But specifically in
terms of characters, we want to think about
this in terms of the form and in terms
of the anatomy. Opposing curves theory really is that we don't
ever want to have, first of all, some curves that
kind of repeat like this. Because then there's one, there's really no energy
flow through this. It's kind of stops here. And then the energy just
has to then start again. And there's a pause
in the energy flow. It's, it's kinda
like boom, pause. And then it has to start again, boom, and it loses its flow. And you can see the difference when we have
something like this, the energy just
keeps going, right? When we have opposing
curves happening. In addition, when we're
doing opposing curves, we want to make sure
that the curves don't ever oppose
in a parallel way. So e.g. here I have two
parallel and curves. All right? And yes, they're suddenly
and opposing curves fashion. But hopefully you can see that the fact that the lines are parallel means that the
shapes are no longer dynamic. And so that there is
no directionality in the shapes even
though we're using opposing curves theory. And so really what we wanna
do is we want to take dynamic shape and form theory and add it to
opposing curves theory. And therefore get ourselves a great system for drawing natural-looking forms,
natural-looking gestures, natural looking characters
that look alive, that look like
they're filled with energy that look like
they're just paused in time, but usually we're not posing
them in a single image. They're walking around and they're thinking
they're talking, they're living
their lives, Right? So opposing camps theory once
again really is just that something curves the one-way
you then it in other way. You may be saying, Hey, I've heard of something
called straight to curve, or I've heard of something
like curve against straight. And that is in fact, a
different theory that isn't got to do with gesture, has got to do more with avoiding parallels are
creating basically, yeah, non-parallel shapes, which we will talk about
later in the course. So don't worry about that for
now. Posing curves ready? If something curves one way, the next piece of it should
curve the other way. Now when we get to
bringing these theories right into character drawing, I've got a stock photo here
of a little baseball player. And we're going to draw
over him so that you can kind of see how these. Opposing curves work, as well as how the
dynamics shape works, both in the shape of his gesture and the forms of his gesture. Okay, so let's get
right into it. First of all, we can
just start by defining his head because
there's always a great starting point with characters. Just get the head
shape in there. And we want to
consider the back of the head as one of
our first curves, right? So it's curving that way. That means we can't
see his neck. Yeah. But that would
mean that his neck would then have to curve
the other way. Right? So it does that. And then we come
into his back shape. So we will imagine his whole torso
and I'm keeping in 2D for now bending that way, which would mean that
as we come through his stomach and down
into his pelvis, right? So we've curved this way. It's actually do that in blue. The shape, the dynamic
shape will then naturally kind of curve
the opposite direction. Right? So we can see this happening
here that curves down. And then this curves inwards
similarly on the front, curves down, and then
this one curves outwards. Alright? And then
we get to the legs. And they are the
whole own shapes. So you kind of, a node
can be confusing when you're trying to think about
it in terms of the pelvis, the radio they own shapes. The front of the leg would
curve down like this. So that curves in
that direction. And then the back of the
leg would have to oppose. It would make it dynamic shape
in that direction, right? And similarly for the other
leg, curves like that. And then this one curves
in the opposite way. You can see as well. Then I'm not sticking
exactly to the anatomy here. And that's a very key point, especially when we
go and actually do our practical gesture
drawing demos and exercises that we're not trying to capture the
anatomy here, right? When we're talking about
gesture until we get to anatomical gestures when talking about the
kind of the core, the solid gesture we're just
trying to capture, Right? The core directional forces
moving through the form and trying to grasp them so that when we're left with
just the gesture, we can still tell
what's going on, even though there's no detailing or anatomy or
anything that we can say, okay, this kid is running or this person is running
or what have you. Let's do the arms films. We can similar way,
just as a side note, the way teams to figure out the arms
even when I'm drawing is a draw the forearms
directionality first. So here I would say this
form is doing that. It has that kind of
directional shape. This back one's
kinda hard to read, but I would say it's doing that because I know the
direction of the one curve. So this guy is curving
that way, right? I know that the next
curve going into the rear arm needs to
be an opposing curve. So I can either have curve
and curve and then say, oh, well there's my arm shape. That would be weird
and it wouldn't make sense in terms of
the directionality. Because we know opposing
curve says needs to oppose. The correct shape would
be this and then that. And it looks way more correct. So here we then take the curve the opposite direction and drawing that to
directional shape, right? And then similarly here, if it's curving that way there, and it's curving this way here. Right? So we can then see
the curves oppose. This would incur that way, that chip gives
out there and then the opposing curve comes
down on the other side. Let's take the
reference image away. And you can see we've
got a good feeling. We haven't copied anatomy, we haven't thought
too crazy about forms and details and
so on and so forth. We're just thinking
about the gesture and the gestural shapes. This is the first key and most important
foundational thing that we need to be aware of when we're trying to learn
to do gesture drawings. So we want to capture
the opposing curves in the gestures when we fully
understand this, right? And you will do many exercises to get it into your system. Then we can start
adding on top of. And I'm by no means, let me just add by
no means is this a particular drawing workflow? It may be a workflow for you, but as we know
from module three, we want to do shape and
form at the same time. So we want to really
draw forms and then modify the forms based
on our shape theory. But if you wish to work in this workflow type of way
where you say to yourself, Okay, I'm gonna do shape just, just first, we're just
using directional shapes. They don't want to
build forms on top. Then I want to put details
on top of the forms. You can do that as well if it's better for you
to understand that. Nevertheless, when we understand this in terms of
gesture studies, we want to grasp this first
grasp the 2D first strategy, or the 2D, the directional
flow shapes, right? It's called the DF shapes. And then we want to move on to adding directional flow
forms or dynamic forms. So I'm really using these
terms interchangeably, move into 3D direction form, directional forms,
dynamic forms, right? So we can then come here to what we've done
here and then start imagining those cylinders
that we want to have going to help us define the forms and help us
really grasp drawing in 3D. And then use what we
know of the shapes, the basic shapes that
we've been learning, the basic forms remind you, we've been learning
for these elements, the pelvis and the chest
and so on and so forth. To really get these
forms in there, right? And putting in us
into lines and so on. You can see here where
I'm just really adding those forms over
the dynamic shapes. And it's giving me a great sense of motion and movement and life. Something that apart from utilizing these theories and
having this understanding, I wouldn't be able to do, I wouldn't be able
to draw this because my brain, and
generally speaking, most beginner brains
in terms of art, thinks a, let me draw anatomy, right? Let me draw an enemy. But characters, characters are
so much more than anatomy. And we really want to
grasp that and move past that so that we can
really become experts, understanding how
people move and how people move based on how
they feel and how they are, and who they are as
people and so on. But we'll get into this
deepest stuff later. Nevertheless, what we want
to understand really, I'm going to just
reiterate again. We want to have our
directional shapes. Want to make sure the
shapes and forms that we use are directional. And then we want to say
to ourselves, Okay, In forms, particularly
characters in the instance of this
course and characters, we want to make sure that
the curves are pose or the dynamic shapes curves
oppose each other, right? So we have an opposing curves, the curves that
way it curves out. The next one will then curve in. And as an addition, and I had mentioned
this in module three, we want to realize
that this happens even as we go into
a macro level. So it happens on the hand. So if we were just
doing a basic handshape here for his hand out to you. I'm just going to draw
in and hand that. I'm just going to add
my own hand in here. If the curve is
going, I'd like that. That means that the
palm of the hand would then come out like that and then the fingers
would oppose like that. Right? In a big, in a macro sense, if we just divided the hand
into two separate elements, we'd have the spot curving up like that and in the
fingers curving down because we still want to have
the opposing curves theory in me because it just makes sense and it works
and it's wonderful. And then similarly you
can go even more macro. So here we have the
palm and the fingers. But if we zoom in on
the actual fingers, and I think that we did
cover this in module three. The fingers themselves
and they join swore be made up of opposing curves shapes where we have
one piece, then the joint, and then other piece
and then the joint and then another piece that would
be the tip of the finger because the thing is
have three joints and the directional flow through
the fingers opposes, right? You will notice
immediately when you start implementing this
theory into your work, that immediately your characters will start seeming more natural, more loose, more professional. No matter what level you're
at when you apply it, suddenly something seems more informed about your work more natural and things start
seeing more alive. And that's exactly
exactly how I want to, uh, where I want
to take you guys, get us to that point. So here I'm just gonna kinda
do a quick detailing as if I were drawing an actual
finger over here. And you can see it's a living
type of finger, right? Even with very basic
anatomy that's living because of this
directional flow shapes. And using the opposing
curves theory, we want to oppose
each of the curves. Alright, I'm sure that
that's solidified. Let's move on to
the next lesson.
4. Action Lines in the Form: Let's now talk about
lines of action. What are lines of action? You may or may not have
heard of what lines of action all we're going to look at it and we're
going to dissect it. And I'm going to use this baseball kid photo again just to illustrate
the point here. Really, you get a primary
line of action and a secondary line of action in your characters or secondary
lines of action, mandu. So in this particular piece, when I look at this character, Mark had his head and
then I'll determine for myself based on what I see where the primary
line of action is. And the primary line
of action is the line that really describes and kind of summarizes
the overall movement of that particular post. So the primary line of
action is just the line that shows that
overall movement, that overall directional
movement and the line of action generally take shape as
some kind of C curve. So it could be very short. C curves are really BNC
curves or some kind of S-curves where you have these
types of shapes happening, kind of little ones and big
ones or something like that. And they really summarize
and kind of categorizing the overarching story really of the total movement
of the entire body. So the line of action, really it shows the line
of action in the form of, the line of action in
the form doesn't have any particularly
clear directionality to it other than
in this instance, kinda shows his waiting,
kinda moving there. But really it's just
the line of action running from the head
through the form. Not to be confused
with a center line, not to be confused
with the spinal line. The line of action
is a gestural line, doesn't really exist per se. But it's something
that we're using. And we want to see
in the form of the general directional
movement or the form. And this main line
that runs through the form is the primary
line of action, right? The primary line of action. Consequently, secondary line of action or lines that come from the primary live-action and flow from it in a
very natural way. If they aren't flowing from it, then the secondary line
of action onto good, not usually in real people. The cigarette line
of action generally always make sense and
there's something terrible that happened
to the person with a joints are all out of whack. But nevertheless, let's draw in some secondary
lines of action here which really follow the
opposing curves theory, right? So here we have it curving
over and then under, and then this arm
does the same thing. Alright, so the secondary
lines of action kind of flow from the
main line of action. In this leg here, the nearest leg really follows in step with the
primary line of action. And so these blue lines represent the secondary
lines of action, which really I've over complicated than
here a little bit. But really they show the overall summary of the
movement in the limbs, right? The looms and the head and legs. We can also simplify them more if you're nodding
imposing curves, Monsanto, you really want to
just draw it out quickly. And we would just do these
kind of simple curves just to show the secondary
line of action in a much more simple way there
with the purple lines. But since we know
opposing curves theory, we might as well just
use it to help us build those secondary
lines of action. So in essence, that's
what line of action is the overall, the
primary live-action. Definitely the most important. But really it's the
overall movement and the overall gestural movement and flow over the entire body. That is what the primary
line of action represents. And then the secondary
line of action is there to help us add in, inflow in step in
opposing curves. In a dynamic flow, the limbs, the arms, the legs, as well as the head, as they flow out from that
primary line of action flow. And why did we learn this? Because this is
the very best way to start off capturing
the gesture of a reference of a
real person very quickly when we're trying to
learn more about the forms, we will start with
the line of action. Nevertheless, we'll
get to those demos. Let's move on to
the next lesson.
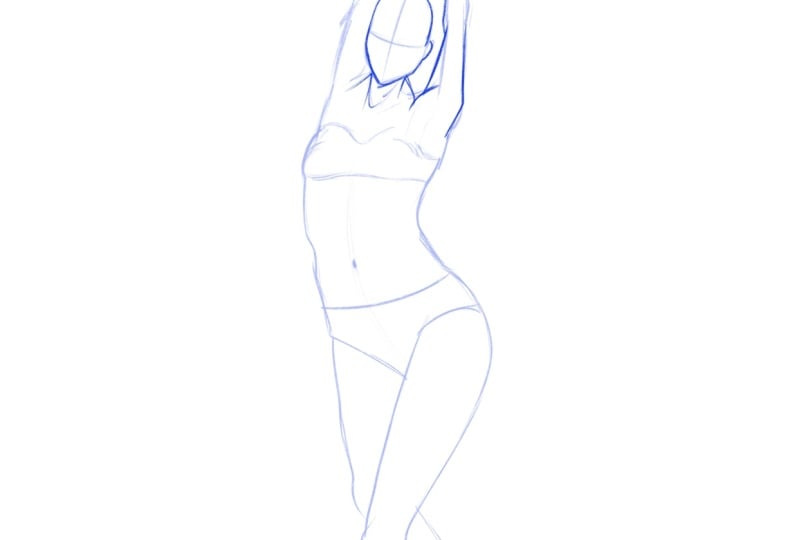
5. Spinal and Center Lines: We now understand that
the line of action really represents the overall
movement of the body, right? So in this instance of this
model that we have here, we'll draw in a circle for her head is some kind
of ellipse for a head. And we'll define
the line of action. And that's great. But there are two other
important lines that we want to know about
the spinal line, as well as the center lines
and what their purposes are. The spinal line, as
its name implies, is us imagining the
position of the spine. Fortunately, it
works very much in an opposing curves
fashion as the NIC, as the vertebrae
of the spine comes down from the neck
area, it opposes that. It bends around the back. It goes in at the stomach section and then
around down the pelvis. And this would be
the spinal line. And the spinal line
is a great tool for helping us position anatomy and body elements when we're doing complex or
even simple poses, it's a really good
measuring stick as well that we can measure out proportions against where we ending learn how
the curves working. Where do we need
to be in the skin around the forms when
you bolt the forms. And it's also a great tool in
constructing your drawings. Because if you get the
spinal line in and you're thinking about
the spinal and it helps you bid a
position where you want to put the forms on top of that spinal
line so that it makes sense in three-dimensions. So that is the spinal line. And it's really is a great tool. Let's put the line
of action here. Last but not least. We then have the center lines, also known as the axial lung. And the center line
really is a loan that we use for measuring when
we've got the forms down. So there's the center
line of the face, There's the center
line of the neck. And I'll draw it in a
form here for the chest. And that's the centerline
for the chest. And here's the stomach. Let's draw it as a sphere, is the center line
of the stomach area. And we've got our pelvis shape and there's the center line for our pelvis shape and the
center line or the axial line. Let's call it center axial. It's purpose is to
help us measure, help us to know
that we're placing facial features in a
logical way that they read. They read as balanced
on the face. And it's a measuring tool
really helps us to say, okay, this is the
center of the form. And so therefore, if
I put a button here, I need to put a button
here because that is a logical kind of measurement based off the
centerline positioning. And you can use center
lines and implement them wherever you feel
that you need them. Especially good for placing
elements on clothing and figuring out just the
general measurements of the forms right
in the center line. Just want to highlight
the center line here for us as well. Right? Center lines used
for measurement. And I would advise
definitely when you're doing your
construction drawings, using them where you need them. It's just another tool
in your toolbox to help you draw well and
help you draw effectively. So these are the three
lines we want to know, but particularly we want to wet the spinal and the center or axial line and just
their various purposes. And that's the end
of this lesson. Let's move on.
6. Horizontal and Vertical Axes: In this lesson, we're
going to look at vertical and horizontal axes, why they're important for us, how to use them in
gesture drawing, as well as how we are
going to use them in our normal drawing
when I'm busy drawing characters out of
our imaginations. So the first thing is we want to know what these are, right? What is the vertical axis? What is the horizontal axis? I've got these three
example images here to illustrate this point. The first thing we're
gonna look at is the horizontal axis of
this girl on the left. We're going to use her eyeline to define the kind of tilt, if you will, the vertical
or horizontal tilt, in this case, horizontal
tilt over her head. And we can use her
shoulder line to determine the horizontal tilt of her
shoulders and her chest area. Then we can estimate
where her pelvic line is to assume the horizontal
tilt of your pelvis. And then for the knees, I
mean for the legs we can then use the knees, which
is something like that. So we basically just
link the knees together. And when you look at these lines and you recognize
that they are not parallel, that is a very good thing. We want to avoid parallels in our horizontal and
vertical tilts, right? Let's look at the next image. Images horizontal tilts. There's a line through us and her shoulder line
and her pelvic limb. Once again, no parallels. Everything is at some angle. And then lost image, her eyeline, her shoulder line. We will have to assume her
pelvis is something like that. And her knee line. And once again, no parallels. And this is very, very key and character
drawing to achieving dynamic looking character posing or dynamic character poses. For gesture drawing, particularly
the horizontal tilts are useful for helping us quickly grasp the pose of the reference material
we're looking at. So that's the primary reason
we're learning this now, but we will touch on this again when we get to
character composition. Nevertheless, let's look at the vertical tilts
in these forms. Here we can see her
head tilting slightly forward and her torso sort
of tilting it that angle. Her pelvis tilting down
and then her legs, each individually tilting
at different angles. We don't really need to
do the arms that much. Somebody here who head tilts
it this angle vertically. Her chest is kind of tilting
of the same handles. So if this were a drawing, we might want to modify
that a little bit. Tilt the head forward
vertically or back vertically a little bit just so that there isn't a parallel. And then her pelvis tilting at a different angle,
which is great. We don't want those parallels. The sample image
here for her head, chest is tilting this way. Her pelvis is likely
tilting of that angle. And then her legs are tilting
both at different angles. So this once again goes
back to our rule as well, a rule in our thinking
about parallels and how parallels or something
we want to avoid, even in the tilts we
want to avoid parallels. The great thing is when you're talking about
horizontal, vertical, or horizontal and vertical axes, this really helps us get
dynamism in our posing. Alright, so let's close
these examples done. Let's take a quick
look at what an image looks like when we added in
and when we leave it out. I'm going to do a, just a
very quick Form drawing here. We're going to just
add in some elements. And I'm just doing a very shorthand forms here to get this in a shorthand because I'm not drawing all
the way through. I'm more imagining the
drawing through in my mind of the actual
shape of these forms. It's changed that
one a little bit. Just do this instead. Keep it rough, keep it loose. Right? Not exactly
proportionate, but it will serve our
purposes for this demo. All right, so here we
have a drawing that is pretty much hopeless. It's hopeless in all of its vertical and horizontal
main, major regions. And what I'm gonna
do is I'm going to use the selection tool, the digital section
tool in Photoshop to tilt, manually tilt piece. And introduce some
dynamism into the pose. So I'm tilting the head forward. They select the shoulders and
the arms is one body here. The shoulders this way. Rush. And I think we will leave
the legs on their own. Different positionings. Will just tilt the
pelvis down like that. And just for the
sake of incorrect, we want to now adjust
the position of the legs just a little bit based on the new angle of
the pelvis rash. So we'll grab this one
and we will adjust that. I think in this instance
we want to put it just a little bit higher, right? And now what we have
is a character that is significantly more dynamic
than the first one. Because the first one has these very parallel
horizontal axes and also very parallel
vertical axis, like everything's very,
very parallel and boring. And somewhere in the
view is subconscious. They're recognizing this
and it's not exciting them. There's no asymmetry to it. It's very predictable. Yet in this one, we have very nice opposing
horizontals and verticals. And so we've easily achieved
a level of dynamism. And suppose these two actually
very similar, the legs. It's still a bit
different. I guess these are a little bit different
now that I look at it. But nonetheless,
we've now achieved significant levels of dynamism. Just by adjusting the
horizontal and vertical tilts are horizontal and vertical
axes, whichever you prefer. I prefer it tilts
personally, right? And this gives us dynamism now, for the purposes of
gesture drawing, when we are assessing and looking at the reference
material when we get into it. And they will be demos
of this coming up. We will have a reference
image on the left and it will be wanting to capture that
gesture on the right. And looking at the
reference materials, horizontal tilts particularly, and adding in those
horizontal lines what we're trying to graph
the gesture helps us quickly get the
proportions and quickly find out the right locations for elements as we're
drawing them out. And you'll see that's great. But for the purposes
of drawing in general, we will revisit this
topic and explain how it's absolutely
critical to have your horizontal
and vertical tilts happening in the forms to
bring dynamism to the pose and a natural look and have the characters seem like
they're actually trying to balance themselves
as if they were alive and you are capturing
them in a moment of time. As a last note on this lesson, the Italian word for this act of balancing in a way is
called contrapposto, which means counter pose. And effectively It's
describing when we rest our weight on one side of
our bodies layer going here. Take this character via e.g. he's because he's
leaning back over. Yeah. He's racing his weight on his right leg which
pushes his pelvis. Alright. And his torso is now
coming slightly down, which causes the skin
area here on this side to stretch because the
pelvis is tilting down here and the torso
is tilting up. And so what you
have is the start of something that we
will go into later as well called squash and
stretch in a sense where this section and let's get a different color
here is squashing. And this section here
is stretching out. Now squash and stretch is used in many different instances. But in this instance, this is what's happening where, when, when this pivot point is moved, one side of the body stretches and the other side of
the body squashes. And it's a very
interesting thing to note. However, we don't need to learn contrapposto necessarily
in that way. Although it is good
to understand how the body is balancing itself and where the
weight is going. But what's better
for us is to simply remember when we're
drawing our characters, Let us make sure we are having this variance and
making sure that we do not have parallels in our
horizontal or vertical axes. We really want to avoid
parallels in art in general, unless we're doing
something that is more blueprint, obviously. Alright, that's the end of
this lesson. Let's move on.
7. Basic Shape Gestures : In this lesson, we're
gonna be looking at drawing a dynamic
shape gestures. And then as we move through
the next three modules, I'm going to do
dynamic form gestures within gonna do
anatomical gestures, and I'm going to do laugh
gestures moving forward. But the key thing I want you to understand is that
really we want to learn to grasp
gestures, each level, grabbing that kind
of energetic form or an energy flow and that inner
essence of the characters, but grabbing them at
different levels. So that when we
get to anatomical and laugh gesture drawing, we can use what we've learned of the shape Foundation and the
form foundation of grabbing gestures to help us really
become more accurate and really more fluent in
grabbing those gestures. So let's get right into it. And let's also remember to use all of the theories
we've learned so far, particularly in terms of shape-based gestures here,
dynamic shape gestures. We want to use our proportions. We want to use the line of
action, the horizontal tilts, the spinal line if we need to, and everything else
we know of gesture to help us draw
out the gestures. So a great way to start is to really draw in the head shape, relatively the same
size of the same scale. I've done a bucket thousands
of ellipses there, but nevertheless be
loosened, be rough, and really then start using what you know of
opposing curves and dynamic shapes to grab that gesture in the back
of the head comes around. So I'm going to draw
in just a shape there. Key thing as well is
to remember that we're not drawing anatomy, right? This is one of the
hardest things I find students struggled to grasp is we're not really drawing anatomy or
anatomical forms. We're really just trying to grab the structure of the shapes, the inner energy, the
feeling of the shapes. I shouldn't say the structure
more the directional flow. And as I see her
arm come up here, I'm just going to draw
that and draw that. And yours should look as rough and disgusting
as this as well. Because really the point
here is get the energy flow, get the energy flow down. That when someone
looks at this very scrolled I'm kind of
gestural drawing. They get the idea of what was happening with this
character's form. So I tried to keep the
anatomy proportions relatively the same, but I'm grabbing the
energy out of this form. I'm not grabbing the actual
anatomy out of the form. I can also say that
particularly with both shape, dynamic shape gestures and
dynamic form gestures, that you don't really need to
worry much about the hands, drawing the hands and things in there that are very complex and detailed
in their own right. It's better to just
indicate them. I'll literally just
indicate them with those ashamed same
shapes that we use. And this, this may
look a little lame in a sense I said in
inverted commas may look a layman's sense. But really what you
want to ensure is that you're grabbing these shapes. And I'm getting that dynamic
form to read in there. And this is effectively what the work should look
like when you're doing your daily 2D and really
flat dynamic shape gestures, you just want to
get a basic feel of the dynamic shapes
in which you've completely factored up
and drawn it wrong. So let's start again. Alright, let's get started now, drawing out the
dynamic shape gesture of this particular
model over here. And the best place to start is to always
start with the head. It'll just kind of put
an ellipse in there to get the head shape and
nothing more complex than that, we're keeping things very high-energy directional
flow focused, and then establishing the
line of action, right? Establishing the
primary line of action. So in this character, it's
something like that, right? Establishing the
primary line of action. And then what we can do to
further help us even more, It's establish the eyeline, the shoulder line here, Pelvic line. And the line. We don't really want to do
that because we don't have a good guide on the line
of action here for that. But that's okay.
We'll get those in. No problem. So now we can see we've used horizontal tilts to help
us determine these angles, which is great and
it's a good way to help us measure where
we should then put our dynamic shapes as well as using are posing curves
on those dynamic shapes. Now we have the head in the
primary action line and the horizontal tilts
that we've mocked out. We can then proceed to draw
in those very basic shapes. I'm going to start
with the arm here. And always fun drawing the
forearm works best for me. So this would be
this type of shape. As I do this, I
want to reiterate, this is really not about
anatomical drawing, right? We're grabbing the energy
flow of the gesture. That's what you want
to be thinking about. Grabbing the energy flow
of the gesture and using these directional shapes to help us get this
gesture to read well. So there I'm using
that there and I will oppose that as
we come down here. That arm. As for the hands and the feet, usually you can just indicate
them to some extent here. There It's not very
important to spend too much time trying to get little details in the hands
and things like that, especially when you're
drawing at this scale. Wouldn't even worry necessarily
about the NIC that much. I'm just going to put
in a posing curve. They're following
my line of action. Going to determine what the directional flow
is of her chest area, stomach area is
something like that. And then her pelvis
sort of here. Like a batch hoses opposed as opposed to just
just checking myself. And then I'm going
to draw in the legs. It start with a front leg. Here. Shouldn't say the
legs, I should say. Rather than I'm going to draw
in the directional shape of the directional flow of the
energy flow of the legs. And I'm going to oppose that. And look at how rough on being, you know, this is
not supposed to be pretty beautiful arch. And I want you to feel the
exact same way about it. We hit a learn, we're
busy grabbing the energy flow out of the pose. And once we've
grasped with this, we can then move on to
more advanced topics. So my scaling is
a little bit off, but it's not the
end of the world. The bulk of it is that the bulk of the gesture has been grabbed, the pose has been grabbed. Could you ask maybe a
father is six-year-old. Hey, could you copy the pose
of this drawing of mine? They probably could
because they can see the gesture and they
understand the gesture. So this is what we want
to be doing. Here. Once again, we started
with the head. And it's always a
great starting point. You can start with any
part that you wish, but starting with
the head is great. We then defined the
line of action. Then we define a horizontal, tilts our horizontal axis. Generally bullying them
on the action line and we've put on the
head there as well, helps us to get that angle. So here the shoulders
and the pelvis. Then we've started to use our directional shapes and
opposing curves theory on that opposing the curves
of each side to get our 2D directional flow. Gestures in dynamic
shape, gestures, alright. And the curves
oppose each other. You can see here how they
oppose throughout the form. That effectively is 2D, dynamic shape gestures,
dynamic shape gestures. Once again, it's not anatomy. We're not trying to
draw the anatomy. We definitely want to get
proportions as close as we can. But we want to grab the
energy, the flow of energy. If you could imagine
energy flowing through the form, that's what
we want to grant. And we want to get
efficient at doing this. We want to be able to
do it very quickly. And I would say, certainly while this lesson has been long
for the purpose of teaching, that you want to try
and get this done in 60 s. And I'm not even kidding, get it done in 60 s. Okay, where's the head line of action? Boom, pop the line of
action. Okay, awesome. With the horizontal tilt. Okay, boom, boom,
boom. Done. Okay. We're in 20 s. Yeah. Okay. Cool and directional
shape for the chest, directional shape
for the stomach, directional shape
for the pelvis. And improvement is
pumping those shapes. And because these shapes, they
really don't take long to draw that type of shape or
that type of shape, right? And be loose, be messy. I encourage you, please
don't spend time on those. Be very quick, make it messy. Just make sure that
when you're done, the gesture reads very
similarly to the original. You go, Okay, yes,
I could probably replicate the pose
of my drawing. All right, those are
dynamic shape gestures. Let's move on to
the next lesson.
8. Intermediate Shape Gestures: In this lesson, we're now
going to take a look at drawing dynamic form gestures. And very much like drawing
dynamic shape gestures, we want to use all the
theory we've learned so far that's going to help us draw these gestures are effectively. Now, let me just say
before we begin. If you are feeling like, hey, I need more practice
with dynamic forms, then what you could
definitely do is draw a dynamic
shape gesture first, and then use that shape just as a guide to draw the form on top. If you feel your
grasp dynamic forms, Let's just jump straight
into the dynamic forms. Alright, let's get
right into it. So just like usual, we're going to start
with a head shape. I'm going to use a
form hand-shaped here. Get a center line down there and draw in the form of the face. Just a basic form there. Try and keep my proportions
relatively fine. And then I want to get
my line of action in as close to possible
as the original. Alright, I feel like
I'm not exaggerating that none of action enough. So I'm going to
just kind of curve it a little bit
more. Here we go. And then I can get
my top lines in my horizontal tilts just to guide me as I
draw out the form. Okay. Those are a little bit
parallel, little almost. And then the pelvis
is around here. Right? Now that I have those in, I can then start drawing in dynamic forms to try and mimic
the form that I'm seeing. I think in this
instance I'm going to start with the chest. Have the have the line of action guide me as I'm
drawing in the form here. Just checking my width there. Maybe it's more like this. I'm just drawing in
some basic forms and getting those basic forms. Just going to draw a sphere for the stomach area and
the pelvic line. Well, the NM Chris
is around here. So in draw that there. Now I'm going to draw
the forms for the legs in which are really our
dynamic tubes and drawing through there to really feel
it. And that's what feeds. I'm just going to use a
basic form here for that. Nothing too crazy. Drawing the front
leg phone-based since it's due the arms here. This one seems to be moving
in that kind of angle. And here, once again, we're not wanting to replicate the anatomy
perfectly, right? We'll get to anatomical
gestures way. That's really our goal, is we want to try
and get the anatomy as close as possible. Here what we're
really striving to do again is get that
Diane dynamism, but did it in a form of saints. So we want to feel the
dynamism uniform sense. So learning to draw the
figure and see the forms of the figure with the dynamism
moving through them. So using that shape
theory to get that dynamism in there
and moving through there. Okay, I'm just gonna
wait this lineup just so we can see that the
head is in front. And that's relatively okay. I don't like this curvature
happening over here, I think because I had
redrawn it a little bit. I want this form to read
more on that since we get that nice replicating
crunch there, stretch here, stretch
here. Alright. And that is effectively drawing the phone-based gesture
from reference. And you can see
that it is rough. You can see that it is loose, it's messy, it's not beautiful. And again, I want to reiterate
that is the point, right? We will get to beautiful,
we will get there. I just want to, I want to
stick on this point and say, I see it so often as my
students struggling to draw gestures because they have
that fear in them of like, This doesn't look good and a
bad representation of mean, it's making me look bad
because it looks terrible. That's not the point
we're learning. So please be rough, be loose. It must look family
news, Feeney rough. And this is going to
help you be quick. It's going to help you
be rough and loose. There is a term for neatness
and professionalism and there is a time for
being rough and loose. And once again, I use the
construction sudden energy or someone baking a
cake in the kitchen, those things do
not happen neatly. You do not build a
building neatly, right? So think about that. And I hope that's
encouraging to you. And let's move on
to the next lesson.
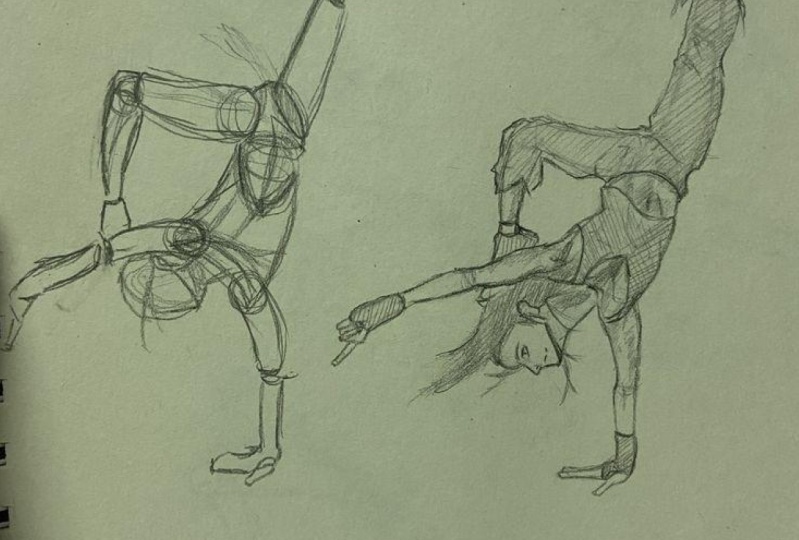
9. Advanced Shape Gestures: The entire point
of gesture drawing really is to teach
us how to grab life. Grab that feeling of life,
that energy of life, and instill it in our own
imaginatively drawn characters. We've now learned
dynamic shape gestures. We've learned to
dynamic form gestures. We have an idea of how we
can go about doing those. And we're going to
engage in exercises on the assignments. But now we want to move on to
doing anatomical gestures. Important thing to remember
when we do this though, is that we're not trying to do a photocopy of the gesture. We're trying to take
the anatomical gesture, take some of the nuance
and the hints of the anatomy and let that help our net anatomical
study as well. But really create an image that really portrays and communicates effectively the gesture
that we're seeing. And maybe even more effectively if we can dramatize
a little bit. Alright, so we're not going for a photocopy of the
gesture, right? We're not just drawing an
observational life drawing of a lof models or
a gesture, photos. All right, the second
thing is that we want to work in a
roughened refund stage, rough because if we start refund, We're going
to take long. We can draw slowly,
it's going to just end up being
horrible and stuff. And then that's why you wanna do the roughs and
then the refund to really just enhance what we've done in the rough and
just clean things up a little bit and we can take some time and make things look a little bit
more professional. So I'm going to start here on a rough layer that I have and then I'll work in
a refund afterwards. If you're on paper, you'll do your rough and
then you will just erase it with a kneaded eraser and then go into
your refund drawing. So what I'm gonna do here is
kind of indicate the head. And I'm gonna be very
rough, very loose. I'm not trying to
create a photocopy. It's a very important. And I'm going to get that
line of action and I'm going to push that line of action
even a little bit more here. Get that angle a
little more extreme. Want to use some
general measurements. Get that shoulder line in there. See that elbow lawn in a sense, one out there launch. It helps align things. Let's get that pelvic line
in something like this. Something like that. Rush just helps to lay out elements and actually
love action. It's Buddhist center
line right near it as well that can help
us position things. And I'm going to get this form in and really have that
dynamic feeling going through. So many mix up. While I'm doing this,
I'm going to mix up my shape and form, dynamic form and
dynamic shape gestures, mix them up and she has actually a very
long stomach area. Now that I look at that and keep things loose and
keeps things dynamic. Let's get those and
dynamic shapes in there. Draw a leg here. Check that knee line
is relatively right. Just trying to keep the
proportions going smoothly here. And drawing in that front leg. Dynamic shape, dynamic form. And we'll get that
foot in there. Very much like that. Rush. And a key thing as well as
just be very quick about it. The quick draw
quickly, draw slowly. You will fall into the trap of things starting
to look stuff. And that is probably one of the worst things
that could happen to your work is that it is stiff and just lacks the dynamism, blacks that dynamic feel. And here I'm copying the
shape of this contour here, just so that it looks a
little bit more correct. But I want to keep
dynamism has a forefront. So that leg's doing that. This one is doing
the opposite thing, the very opposite thing, mirage coming in here. I'm going to make
this more extreme, this crunch happening here, and make it a little
bit more extreme. We can get that brush shape
in a little bit there. And here I'm going to
follow the kind of indication of the skin going over my sphere
of my stomach, going down into
that pelvis area. I don't want to keep
things nice and dynamic. Let's get these ohms. Clearly this lower
arm is doing that. So it has that
directionality to it. The upper arm will be
doing something like that. I'm going to really
push those angles more. And pushing them is really a lot of what it is about
that we are doing here. We want to push things
went drama and interests. Drama gives us that
visual interest. This shape is
something like that. And do you see how
when we pushing it, we get that feeling of life in just the
simple drawing of it. I'm not going to over
detail the hand here, just kinda copy the
shape a little bit. That's okay. Get the general feeling going. Let's just see the angle over here is very much
something like this. Her eyeline is
something like that. Just get that general
tilt of the head and then we're going
to draw in her hair. It's not necessary. Get that Nick line in, really capture those forms. And so what I'm gonna do and
recapture that dynamism, sorry, that's what I mean to
say more of the dynamism. Let's just get her little
clavicle line in there, that little indentation
that joins her collarbone. Help us calculate this other
breaths positions Mike here. And then the muscle actually goes up there,
something like that. And we can draw in this
just as a very basic shape here for the bra, section. To keep the height's the same. And we'll put in the underwear
as well around here. Keeping in mind
contouring that shape. Alright, so now that
I've done that, I'm feel like I'm reading, getting those lines
of action reading and getting the
essence of the pose. I'm just going to
lightly erase this. I'm not doing the roughened
sketchy just yet. Just going to lighten that up. I'm gonna come in here. And
now I'm going to just kind of get the anatomy a
little bit more dynamic. Using the hints from the reference material
just to place things. Just to place thing. I'm looking at a detail here. Hey, there. Get the bend of the arms in. So e.g. stuff I'll
take is like here, I'm taking the elbow. And I'll borrow some of
these angles from the hand. And notice how fast I'm being
and how loose and being. I've said that this
is curving that way. But I actually feel
upon closer inspection. Know what I mean, just
think about this. It's curving that way. Now. This is actually
curving more like events. So I just put my Posen curves in incorrectly
there, no big deal. Just it. Right? So when is a bit parallel, just correct it like that. And we do have a big
mass coming out there. So that does make sense. And I'm gonna just kinda follow dramatized angles a little bit. Get that in there. And don't want to sacrifice
the drama raj and are, are, are kind of exaggeration
of what's happening in the forums indicates that anatomy. Do some here. I'm using the reference more as a guide to help me grasp
the gesture better, rather than using it as an image that I'm
trying to replicate. And I think it's
something needs to be constantly reiterated
is we're not trying to do a photocopy
or a exact drawing. We're trying to capture the
essence of things, right? Trying to capture the
essence of things. I'm going to come up
here and get that in. And, you know, you're
successful when you say, Hey, do I feel like there's
life in what I'm doing? Do I feel like I can feel
the flow happening, right? The opposing curves
flow happening, the rhythms happening through
the forms that I'm drawing. Being loose, being
very loose with your lines and not being afraid
to be a little bit rough. It's not the end of the world. If something's a
little bit rough. Let's get this in some
quick lines here, just to get the basic
shapes in there. And it's put in that
shoulder muscle that's clearly being indicated
at that section. Right? Now the muscle
their muscle line. And I'm going to indicate
the navel as well. Put that in there and
just feel out too. I feel like I've pushed
the pose enough. Just want to have
pushed it enough. I'm not trying to create a
photocopy once again ranch. And it will just make her hand just a little bit
bigger the back area. And once that's done, convene, just lower the opacity
here or do an erasing. Go to my refund layer. Or simply could just
draw it on top. And I'll come in now and just
really get the lines that I went in as loosely and
as freely as possible. And I'm not even really using the reference much
when I do this, I'm just kind of making sure that as I look at these forms, I'm being loose and
I'm being gestural and trying to just
get that energy and not lose it and have the
same energy in my arm constantly working right in my arm and my wrist
as I'm drawing, getting that head shape in. And I do have an example for
you which I will show you shortly of what it
shouldn't look like, right? What these really shouldn't
end up looking like. Just indicating some
of these lines. Grabbing that. Just make that a little
bit more accurate can put some land weights
where I feel I need them. As I do this, usually I do
land waiting at the end. Even when I'm doing my artworks, I will just do all the
lines that I need and then do the line
weights at the end just to enhance the drawing. Keeping the flow,
keeping things loose. And you don't have to stick
exactly to your plan either. So if you have some deviations where
you're thinking, hey, this would be much more dramatic if I say in this example, maybe I'll bend the
leg a little bit more, would add to the drama and enhance the gesture a little bit more than
I would say do it. It's ultimately you
want a natural feeling. Peace. Not over detailing the
hands or the feet. Something to keep in mind. Here we're using all
that knowledge will let knowledge of the dynamic
forms, dynamic shapes, and also drawing Lucy,
having dynamic lines, lines that have directionality using the posing
curves theory there. And literally I was
just going this curve, that curve, this
curve, that curve. I wasn't overthinking
the anatomy of us being loose with the lines. But that line like that. And I'll enhance this overlap
here with a darker line. It's just have a taper
a little bit more. Pulling the navel. We can indicate some of these anatomical lines
just for effect. So the ribcage over there, a little bit of a ribcage. And let's just finish off
this basic head shape here. I'm just kinda indicating
these details. And relatively speaking, this is something we
want to end up with. Not too many crazy details, but definitely feeling the flow, feeling the flow of the pose, having things loose,
having things natural. And if we want to tidy
it up a little bit more, we can come in and line weight things
that are overlapping. But the key thing
and this is really what I want you to remember, is your goal is, how can I best capture
the feeling of life? We're not interested really in recreating an exact
copy of something. We want to steal
all the best things from reality and use it in
our imaginative pieces. And that's really
what we're doing. This is really what we want
to learn about and do here. Right? And that would be a completed anatomy
gesture drawing, where we're really grabbing
things and pushing things and just trying
to capture that gesture. Now, let me show you an example. I did things on love, why
this shouldn't look like. It shouldn't look like
something like this. That is trying to be the exact representation of the gestural pose of the gestural reference
that you're using, right? That is not what
we're trying to do. Please don't do that. Please don't sit in manually
copy the contours and the outlines and the
shapes of things, right? That's not what we wanna do. An anatomical gesture drawing
is not anatomy drawing. That goal is the
gesture, is the feeling. It's the laugh. Don't do this. Don't do this. Even there's
a symbol on my cursor. Bad, Let's not do this, right? We want to really capture
the things we need. Capture the Flag,
capture the forms, get the looseness, exaggerate the pose
a little bit, right? And learn how to
actively take what we want from the gesture so that we can then implement
it into our own work. Let's move on to
the next lesson.
10. Drawing Life Gestures: In this final lesson of gesture, we're going to learn about
drawing laugh gestures, drawing people around you as they move around you
live around you, and really striving to
capture as quickly as possible the overall gesture or the overall pose of the person
that look of the person. And so this type of
gesture drawing, while we definitely want to use all our theories
because it's so fast, it falls largely into
the shape category. And we really want to try and grab those gestures
very quickly. Especially if you're at the sort of typical senior
at a coffee shop. You have your sketchbook
out and you want to do some gestural drawing. Capturing someone who's
walking posture is gonna be quite quick instance that
you're going to see them, you want to implement
it very quickly. And so we're gonna look at that and how we can approach that. I've got these three examples here and I'm going to
do three examples, one for each to show how
we can try to quickly capture the gesture with all
the theory that we have, understanding the dynamism, looking at the
world differently, looking at people differently, and looking at the dynamism
in May forms and trying to grab those things very quickly and doing multiple
drawings off this top. So let's get right into it. I'm going to start with soccer
dude, three-to-one and go. It's trying to grab soccer
Dean's hair a little bit. You can see it's a very sketchy
kind of way of drawing. I'm just trying to get
all of these elements in. I'm not trying to go too crazy and get some
crazy details in. I'm imagining the
directional flow here and his back legs. Get that foot shape in there. Maybe it's very sketchy, very messy, very loose,
trying to get it in. And really just kind of capture, capture this form as fast
as humanly possible. Right now I'm just looking a
little bit more in detail. Alright, pressing
a little harder, getting those shapes down. Indicating his
head a little bit. And I kind of want to end soon. Right? I want to
kind of end soon because I don't have
all the time in the world to capture this. And boom, they're pretty much, we've got the bulk
of his gesture in. Alright, Let's just get his
leg a bit better there. And that's really what we're talking about when it
comes to laugh gesture. Here I've even included
the soccer ball and trying to get the general
shapes of his clothing in. Right. So I'm not drawing
just his anatomy, I'm just getting
the general shapes of everything about him. So it appears that he is at
some kind of soccer player. And the temptation will always be when you're
doing this kind of drawing to spend more time
than necessary on it. My advice to you would be
crab a couple of gestures, sit down the coffee
shop or wherever, go to a park or wherever. Look at the people it down, let's say 510 gestures
and then afterwards, use your creativity,
lighten them up, erase them, and just add in
your own details, right? And just clean them up a
little bit if you want to have slightly nicer looking
gestural works there. But the real goal is for us to look at an image or
look at a person and capture their pose
and the feeling of their pose as fast as
possible using what we know. Let's do number two, which is
the girl with a pink hair. And here I go. I'm going to get her
face in there quickly. Get her neck in, trying to just get that
attitude over pose. Lot of it's coming from
that shoulder line or one arms coming down
the arms on your hip. I'm kind of simplifying,
really, really simplifying. A lot of these angles. Get that flow in a leg. She's got to heal on. Just kind of get it in
there really quickly. The other legs
taking the weight. Directional shapes. It's kind of more straight
because it's taking the weight and that she's
kinda tilted a little bit. I can show that just
to enhance that. Boom, and she's got
a camera and a hand. I'm just going to draw a box. And our hands here, I'm not even going to bother
with the details. Maybe put her gene line and put her v neck in the
big shapes, right? And get her ponytail
in a little bit. And that's kind of where I'd probably tell myself,
Hey, stop drawing. You've got the bulk of
the gesture in there. The idea is as well. Again, I love using
this example is, Could somebody looking at this, replicate the pose, even though it's rough
and loose as it is, could they replicate the pose? And if they can, probably
done a good job, right? You've captured, you, capture the essence of really what
that character is doing. That it's not about the details and that's what I
want to say as well. It really isn't
about the details. You want to be able to very
quickly capture human form. And the more you do this, the less lines you use and
probably even more neater. It's gonna look, it's going to look way more needed than mine or I have not done
this in a long time. Well, that advise you,
especially if you're a beginner, do it as much as
possible and it's fun. It really is fun. Eventually had the
sketchbook with millions of gestures and
have a couple of those. And yeah, it's just, it's really nice to show people, look at all these people
that I've captured, all these little
miniature people. Let's do number three. And
we're gonna start with a head. Head is always a
good starting point. I'm just gonna get
that in there. Maybe I can try and
capture the gesture over here falling in a sense. And I'm just making up a lot
of these shapes and curves. I just want to get the flow. It's quite an iconic
piece of this image. All right, good, that's
in there and let's get that shoulder line and down. Just be loose, just be
rough in the beginning. Then almond boom, that's
in other arms coming down at an angle.
Something like that. Her hands are together.
In some sense. Dress is got quite
a strange shape and I want to grab that
shape, just simplify it. Ni, over here coming
down front leg, back leg coming down
its knees over here. Tourist flows are there
up that type of shape. And coming down here, I'm thinking directional
flow, it's coming up. So this one's going to be doing this even
though the muscle is showing that the actual
directional flow of the leg is doing that. And that legs tucking
behind foot behind there. This foot's probably leaning
down, something like that. And she's on this, just to make it
clear to the viewer, she is on some kind of railing. And we can just add
the dressing in hinted some other anatomical forms. It's added Nick London, quite a big shape
there of the dress. And boom, that one's done. Alright? And as you progressively do this more and more,
you'll get better. And it's really easy
and the goal is fast. So that is effectively drawing life gestures,
go to a coffee shop, it's greatest excuse
to get a cappuccino, sit down and really
pumped these at pump. These aren't like crazy. And you'll learn so much about
people, but personalities, about clothing styles,
about hairstyles, about posture, about
gesture, right? Just a really wonderful, It's really the core of character drawing that is
the end of this lesson. Go for it. I'm so excited
to see what you guys submit and I will catch you in the final
lesson of this module, which we are covering how to
do your gesture exercises. So I'll see you guys there.
11. Gesture Drawing Excercises: In this video, we're going
to take a look at how to approach your gesture
drawing assignments. We have two windows
open here and image viewer on the left
and Photoshop on the right, as well as the gesture studies template that comes
in module four. And this is great for Photoshop. You can't really print this out. So this isn't really a god
to doing it traditionally. If you're doing it
traditionally, I would say to do about four gestures per page
instead of 20 per sheet. Once you've got this
template in Photoshop, you can just zoom in and
add a new layer on top. It's a very high
resolution file, so you can zoom in
quite close and do really nice
resolution gestures. Not that they need to
be high resolution, but so that it's
very practical use for when you're
doing your gestures. And then you simply browse
your image library on the left and then draw in
the gestures on the right, obviously based on the
timing requirements of that assignment where
there's 60-second gestures, 122nd gestures, and so forth. And that essentially is how you should approach doing
your Justice Studies, doing 20 of them, one in each of the blocks based on the
assignment requirements. That's the end of this lesson.
 Scott Harris, Illustrator, Painter | Character Artist