Transcripts
1. Introduction: Elaborate geometric
designs based on repeating shapes have traditionally embellished
architecture and places of worship
since ancient times. In this class, you'll
learn how to draw six intricate ornamental
window panels from the Mascus by breaking the geometry down into small
repeating unique tiles. I'm Diana, an
experienced teacher of mathematics and
geometric art. I teach pattern design using
traditional geometric tools, as well as geometric analysis of architectural
structures and features. I will be guiding you in
stages on how to draw six basic geometric
grids using a compass. I will teach you how to thicken your construction lines
on tracing paper. Then you will learn how to
weave each individual tile before replicating it to create the six complete window layouts, ready to decorate
in your own style. Although the complete
patterns are intricate enough for
advanced geometers, the class is also suitable for less confident artists due to the simple step by step
instructional approach. I really hope you enjoy
learning this course.
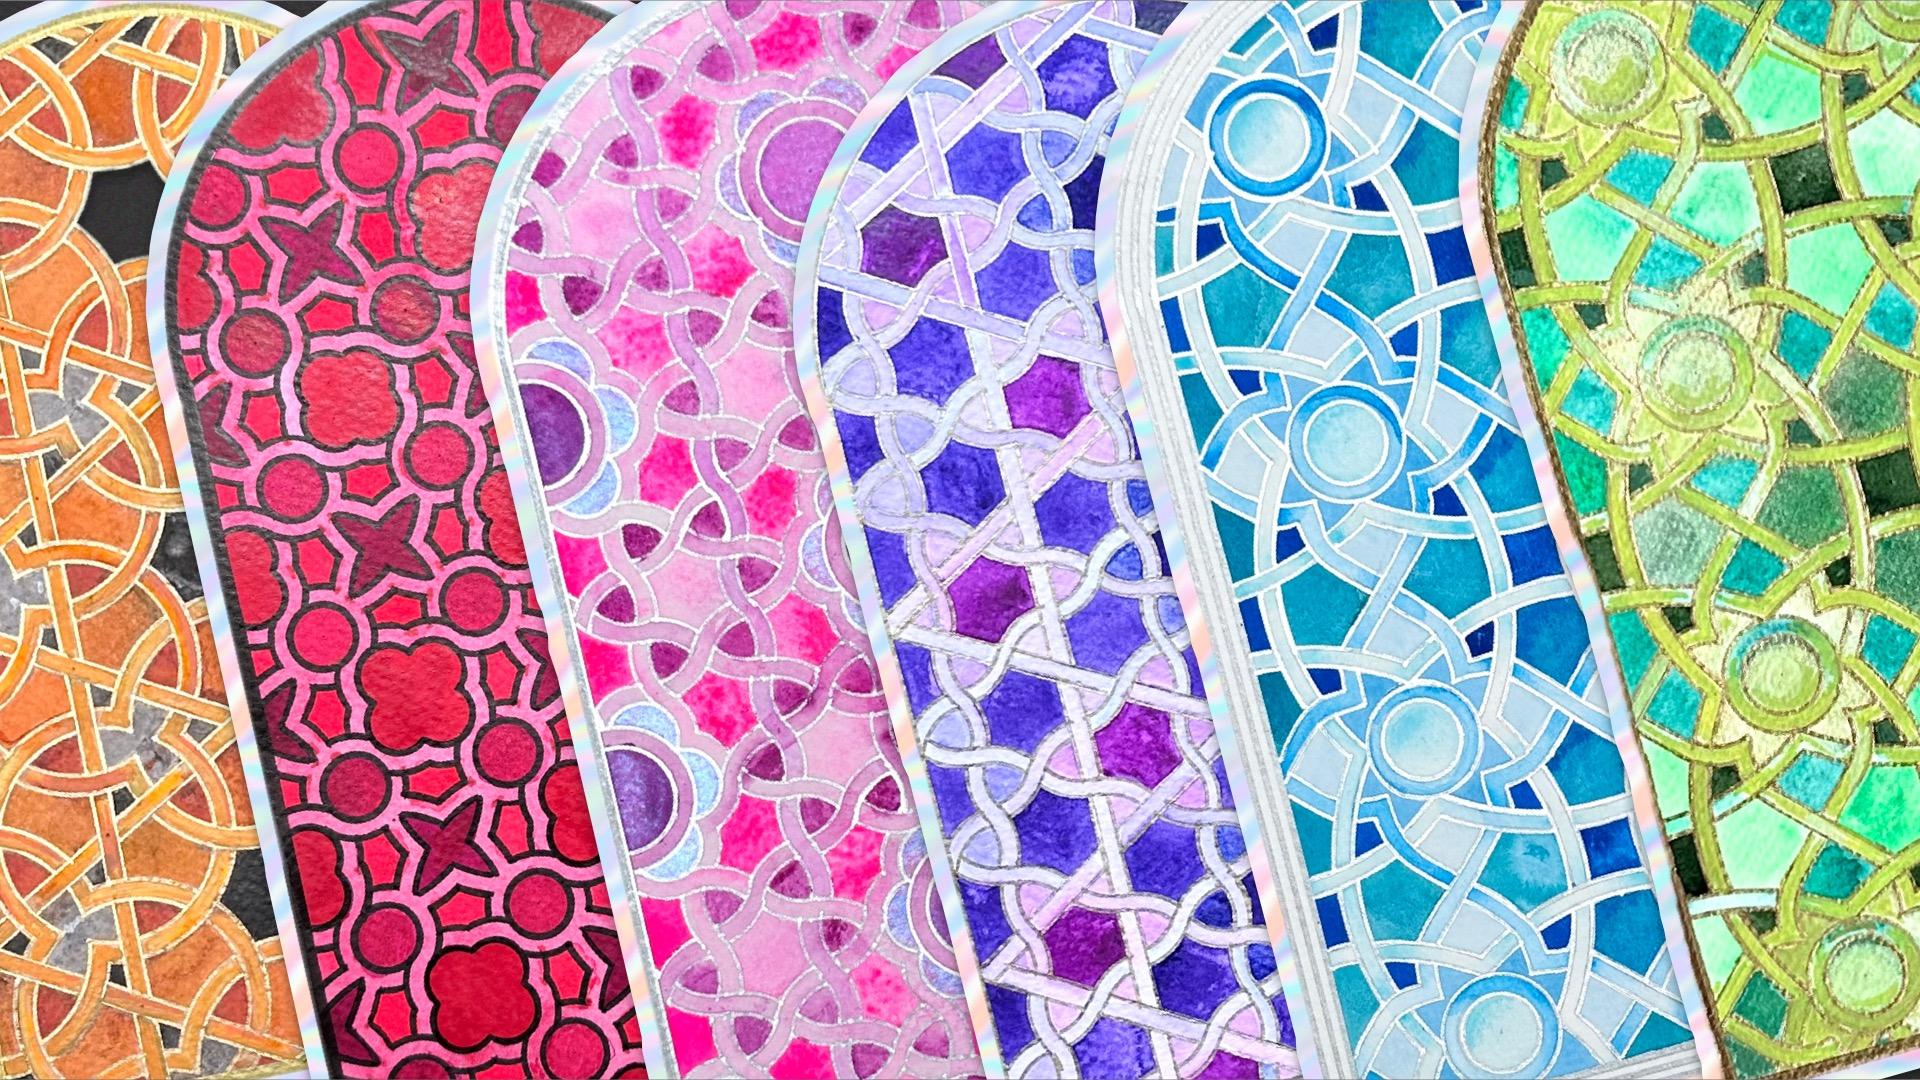
2. Project & Materials: The project in this class
is to draw and decorate the six patterns that are found in the great
mosque of Damascus. These are actually the design
of six windows and it is the ornate stonework that
goes on top of the windows. First, we're going to learn this one, which is
the simplest one. It's based on a hexagonal tile and it's the largest
grid to construct. It can be done in its
own right to begin with. The next two tiles are also hexagonal based geometries and we can actually create
them from the same grid. You could see how they
are related and in fact, you could even combine certain parts of the
different designs. The next three are
based on a square tile. The first one is
quite independent. In fact, that's a
diagonal square. W these two are static squares and very
similar to each other. You're going to need some
normal cartridge paper. I prefer thick paper
to construct on, so the compass has
a nice grip on it. You're going to
need good quality compass with a pen attachment. We're going to use a lot
of different pens and pencils in order to outline
these curvelinear designs, so it is crucial
that you have that. A ruler, a pencil,
a thin eraser. It will be very interesting for me to see whether like me, you go for a bright
and vibrant style in complete contrast of the
traditional stone carving style, or whether you just focus on the geometry and the
more authentic look.
3. Pattern 1: Constructing Orange Circles & Lines: Okay, we can start constructing the first tile for
the first design. That will be one of
the six fold patterns. That means they're based on arranging six circles
around the central one. We're going to draw
a vertical line in the middle of our page. And then we're going to
measure 3.5 centimeter radius. This is so it fits
really comfortably in an A four piece of paper. So there's 3.5 because we
need to be able to fit three of those tiles in a vertical direction and
two in a horizontal. Somewhere in the
middle of our page, we're going to draw
a full circle. With the same radius,
we're going to repeat that from below and above where the two intersections
are with the vertical line. It's one below and one above. And we need full circles here, not just partial arcs. From the two intersections
on the right, we're going to draw
two more circles, which will go through
the two centers that lie on the axis, all the way around, and
to the one below here, which will go through all
the other centers as well. There's four circles and we have two more on
the left hand side to complete the
initial six fold grid. And here. Now we've got to use some of
the intersections to draw some lines which are
going to help us construct the original tile. Firstly, we already have
this diagonal that goes through the vertical and it goes through these
two small petals. We now need to construct the
other two that go through the center and the line through the tips of those petals
or almond shapes. When we draw this line though, we need to make sure we
extend it enough to cross the outside of those circles because we need those
intersections later. And the other diagonal here through the tips of
the petal and through the center and extend long enough to cross the
outside of those circles. Next, we're going to draw the other three diagonals
that go through the bigger petals through those points that go
through the center. Let's start here.
Make sure align this point with that point
and through the center. Then these two, the
big almond shapes that are opposite each other, through the opposite corners, through the middle the
last one is actually the horizontal through
these two points and the center and extend. We have enough lines to
be able to construct the outside of the tile that we're just going to
repeat several times. Let's outline the tile and then we can
construct within that. We're going to align these
two intersections that are on the two top circles where those diagonals
cut through them. So align those two points, this one, and that one. I should also go through
the central point. However, I'm only going
to draw a line from the inner two diagonals
that I've drawn. Not all the way
from here to there. I only need that segment here. I'll do the same on the bottom,
which would be parallel. The bottom two circles, where the diagonals cross
those on their out edges, align that together,
it should go through the bottom middle
of that tip and then only go from the
closer to diagonals, straight line
through that middle. You should feel the
bump. Next, we're going to align the top
and bottom right corners. That should align
with this point here, but only draw from the two nearest straight lines now do the parallel
on this side, align the bottom middle with
the top left and then it will go through that
middle point here at the tip of that petal, but only go from the two
closest sides on either side, and then the final one,
top middle to bottom left. Although we only drawing here, the guides that
are further apart actually give us that
extra level of accuracy. And it's parallel. Again,
align this and this point on the join the nearest two
points through the middle. Now we can focus on the
pattern inside this hexagon. Let's do the curves
first to find out where the first curve crosses
through so we can measure, I'm going to align
these two corners of the two petals
that are pointing down left and down
right that goes horizontal and parallel
to the bottom side. You can draw this entire
line or just mark the position where that line
would cross that petal here. Because that will
be the distance that we need all the way around. You'll see how I'm using that. I'm going to put the
compass point in the middle of the
side of the hexagon. At the moment, of course,
the length goes all the way in and all the way to there. But we actually want
to align this now with the inner point to there. Now I'm going to draw arcs
only within the hexagon. From one end of the hexagon, to the other and see
how that line now, that curve we just
drew just brushes over those little petals and we
will repeat that six times. We always start
from the middle of the six edges of the hexagon. Down to this one, middle, and just draw an arc
from left to right, all the way that fits
inside of that hexagon. Move to this edge, bottom left in the middle of
that and draw an arc inside. Again, that's brushing through just past those little petals, then move to the next edge
and just do that all the way around to find where the next intersection
is that I can measure my next arc to
create this thickness, I'm going to align
the ruler from the top middle point with the bottom right hand
vertex of the hexagon. Like this, again, you can draw an entire line or just mark where that line
crosses this diagonal here, the one that comes from the
middle into the center. This is the point that
we're interested in. Now we're going to
use that point to measure how far to
go. There you go. This is now the distance,
and I'm going to repeat the exact same six arcs. With some thickness. Now, you should make sure
that when you draw this, this doesn't go quite all
the way to the corner. It's close but not
quite all the way. You might have to adjust if you feel like it's going to close there because the points
here don't close. There's actually a space there. When we tile that, that will
become even more obvious. I'm just going to go
all the way around the other five midpoints of the edges that
we used earlier. All the curves inside are now done with a perfect
thickness and it leaves that small but perfect amount of space on that edge because when we
replicate that tile, it's going to create
that three petal leaf. It's really nice. Now, there's also the straight line
component inside the tile, and that's basically
another hexagon sitting inside of the bigger one
in a dynamic orientation. We're going to just
connect the midpoints of those six edges that we have
been using, connect those. I'm just going to rotate the
page to create that hexagon. So this hexagon, the one we're drawing now is actually
part of the design, whereas the hexagon
on the outside is just the outside of the tile and it's not part of
the completed pattern. When we trace this, we're
going to trace this, but we're not actually
going to include that edge. That is just so we know where to join to the next pattern. Now, we can go by eye here
to thicken those lines. I'm just going to go ahead
and do the inner parts. I'm only going to draw
inside the full tile, and I'm roughly gauging this. Now we can use this point
here as an indication. Again, that's just a rough
estimate and that's okay. Now I'm going to do
the outside lines, the ones that are on
this side of this line. This is the construction done. The next thing is to actually
use some tracing paper to outline just the details that we need to
keep in the design, which will also help us to weave those lines and see which one goes above and which
one goes below.
4. Pattern 1: Trace & Weave: We are now ready to
trace this so we can transfer it and replicate
it several times. We're going to use a
piece of tracing paper, but we don't need to waste an entire A for a
piece of paper. What I recommend
is that we split it and I do that by
using my ruler halfway down the page and
then just tear it off and we'll do that again because basically a quarter of a
page should be enough. I'm using that line
to show me roughly where a quarter of the page is. And that means that
we have some leftover for the other patterns. Now you can decide whether you want to do it this
way or this way. Because the pattern is
wider going across, I'm going to use it this way and I'm going to
use a little bit of masking tape to
secure it to the page. We're now going to
outline the arcs, just the six arcs that
we actually want to keep and none of the
background below. For this, I'm using a softer, slightly thicker
pencil because when I want to transfer,
it will be easier. If you have that, go ahead. I'm going to start
with this point here. You feel the bump already
exists in the paper. I'm going to go with a
smaller radius here and just draw this arc just
inside the hexagon tile. You should notice how it
glides very easily on the tracing paper and also it's very easy to erase if
we make a mistake. That is really useful
because we are going to weave this tile on
the tracing paper. Let's go around with
those six arcs. This is also an opportunity
for you to adjust. For example, you might
decide you want to go slightly thinner
or thicker ribbon, as long as you make
sure you leave enough space in the
corners because this should not be an enclosed
shape at the corners. Now I'm going to
increase the radius to the wider part and repeat
the process six times. Now it's time to outline
the straight lines, the six edges of that hexagon, and I'm going to start on
this side so I can see. Now I'm trying to get it
as close as possible to the width of the ribbons
and as straight as we can. The good news is that if
we make a mistake now, we can erase it and start again. I'm going to do one and
see whether it looks. Yeah, it looks a good width. Again, when we transfer
that onto the actual paper, that's another opportunity to actually straighten things
up a bit there as well. I'm going to go with
the inner one because I know the inner one
should join this point and the outer should
join this point. It should get a
little easier now. As we rotate around it and
just monitor the width. The one underneath that
I've got is quite wide. I'm going to narrow that
by just going a bit closer to the left to the edge, and a bit closer inwards here. You can know the
lines underneath. We're only now interested
in the lines on the tracing paper and
continue to do that as closely as you
can. Two more times. Great. Now, the
final step I'm going to do here with a
thinner pencil, I'm going to outline just
the edge of the tile, but in a dashed line because
remember that edge of that tile is not part
of the final design. It's only there so we know where to replicate it and how to join
each tile to the next. As close to these two points
as possible on that edge, if you go to go
and a dashed line, rotate and repeat
all the way around. The tracing is now done. What I'm going to do now, I'm going to remove it
from the grid underneath, so we're not confused by the extra lines because essentially this is
exactly what we wanted. I'm going to turn this around. Now we're ready to weave it. Trust me, especially if
you're starting out with weaving and it's going to be a much bigger pattern
like this one, it's much better to weave once on the tile
and replicate it. Now, one thing in mind, if we want to do it exactly
as the original picture, we're going to have
to weave it in the opposite direction because
once we turn this over, it will then be like the origin. I'm going to start
on the inside of this smaller hexagon and
trace this arc here, the one that's top left. And I'm going to go down here
and delete these two arcs. Once you've done the
first one, the rest really follows very logically. What I want to achieve is
that inside that hexagon, inside the straight lines, the first curve on the left
overlaps the one below. That means I delete
it going down. If I do the same thing in that same
orientation to all six, then that would be correct. What I'm going to do
now, I'm going to rotate this paper
anticlockwise this way. Until I get to the
next left hand side, straight line at the top,
and this is the next arc. The next arc, I'm doing
exactly the same. I'm going to delete
these two marks going from the top to the
bottom inside the hexagon. That's the first junction
inside the hexagon. Rotate again. Like this. The next straight
line is at the top. The next arc is on the top
left, delete those two. You should notice how easy it is to delete those marks with the eraser on the tracing paper because the smoothness
of the surface, this one and the final one again rotate so that the
top line is straight, and then you have this one.
There's actually one more. If you do something in the same orientation over and over, that's one very successful
way of doing things. I will show you other ways as we go along depending
on the pattern. Now notice what happened. By us deleting those arcs and overlapping this
left hand arc over the right hand arc and by us doing this
six times in a row, the other junction
is already been weaved because we've already
overlapped that and that. Remember, every time
you have a junction, you are actually meeting two
separate ribbons in there. By doing one of them,
the other one is now automatically under this one
and over the next one over. At every junction,
they alternate. These are the six
curves weaved already. The only other thing
we need to do now is the straight
edges around that. Of course, the one rule here is every junction
will alternate. So looking again on one of
our top left, that curve, the curve going upwards, just this curve went under this junction and over this one. When we get to here, it
needs to go under that line, which means we need to delete these two arcs to make look like this
line went on top of this. Et's try it in the
other direction. Going down, under, that
will need to go over. But now we've worked
this one out. We could just go
all the way around the hexagon and just
follow these lines. This one goes over this ribbon here will have to go
under that ribbon, which means that if here
you're deleting vertically, here you are deleting
horizontally. And this will be the
same in all of them. Here we're going
to go vertically, delete vertically to go above, delete horizontally
to go underneath. Rotate, first junction,
delete vertically to go over, then horizontally to go under. Delete down, delete across. One final small detail
that we finish this off now that we've done the straight edges
of this hexagon. Remember in the actual pattern, this is not a hexagon. These are straight lines that go over and they also
overlap each other. Let's follow this line here. Here, we went over the
curve, then under the curve. This will have to go
over, which means just that little
segment gets deleted. When we continue this, that line goes over this line. Now let's
follow this line. This line comes from
under the other one over the curve,
under the curve. Now I have to go over that line. Just that little segment here. I'm going to just
go ahead and delete all of those little
segments that are here. That pattern is fully traced, already weaved and
absolutely ready to replicate now on a
coloring piece of paper.
5. Pattern 1: Transfer the Tile: It's now time to transfer the tie on which you
wish to decorate. I use watercolor paper
because I like painting, or even if I decide not to
paint, I like the texture. First, let's find the
center of our page. I'm using a four, which is 29.7 centimeters or I
always mark at 14.8. It's not perfect, but it's easy to remember that one number and use
it over and over again. We know that our design, the size of our design
with the radius we use is going to perfectly fit. Then align the two points in
the center and mark halfway. Now the vertical side
is easier because it's 21 centimeters and
we can mark at 10.5. I'm going very lightly with this because it's just a guide. This is where we're
going to see the beauty of this tile
actually come alive. Now we're going to
turn the page over. Remember, that was the
orientation and I can use the line in the background
to align these two corners. And roughly where the
center of the tile is. I haven't actually
marked a center, but we could see easily
estimate where it is. You can use your masking tape from earlier to secure this. I'm not pushing down too much because it often
tears the paper. I want to avoid risking that. Then use a metal edge of something hard
like spoon is ideal. You could of course, redraw
every individual line, but that takes too long. Beautiful. Now we're going to do two more one
below one above. This is where this tile
comes handy because it is just to show us where to
join to the previous one. Use those dotted
lines and try and get the ribbons to merge as
naturally as possible, especially these straight lines. This is one ribbon, go ahead. Careful here because some of it will rub off with
the sticky tape. That's beautiful now.
This is the bottom. I'll repeat at the top. Again, align the dotted
lines to make sure the ribbons smooth transitions, and go ahead once
you have secured it. This is the first column done, that's the full height. Now we're going to do
these ones on the side, where we're going to create
that nice triangle here. Going to start with
this one here because it's easy to fit
in between that. Make sure the angle
here is perfect, align the dotted
lines together as well as the vertical ribbon. And those two ribbons. You can see why we couldn't go all the
way in here to close that loop because it creates that beautiful threefold shape. With the side tiles, I
only need to trace up to halfway because the side ends in that corner of
this little triangle here. I'm only going to trace to about half. This is that shape. What we see here now is just
the corners of the tile, but of course that dotted
line will disappear, and this is what we get
inside the little triangle. This is how we created that
threefold little leaves. Going to do the
same here. Then I'm going to create this part
here and this part here, and then repeat all of
that on the other side. That's amazing, isn't it? The final step in
just the outlining is just to surround
it with the border. The way this pattern
ends is at the edges of what is now these rhombuses. There are three
rhombuses and it's their full width that
the pattern ends. Luckily, we have
three of them on either side that we're
going to use to align. Can you see from that corner
that corner going through these points right in the middle of that ribbon meeting the next. Faintly, I'm going to draw
vertical line. Very faintly. Form. And the same on this side, on the right hand side
of the rhombuss where the two folds meet
here and here, again, a line and
draw a vertical line. Now at the bottom, we
already have that edge. We're just going to
extend it to meet the other two lines because it's a rectangle on the bottom. For the final curve at the top, we're going to focus
on that hexagon at the top, that lower arc. This is roughly where we
want to find the center. Also, we're going to draw a line down from the bottom
corner to the top. We're not going to
draw the full line. We're going to align the
ruler and just see where that intersects with
the little line we just drew because
the distance from here to these edges
is about the same as the distance to the top
in order to incorporate that hexagon into
the final drawing. Let's see how far that
goes. That's about right. Needs to go to the edge where these two arcs touch
the sides and do that.
6. Pattern 2 & 3: Constructing the Grid: We will begin constructing
Pattern two now. You'll see some similarities
with Pattern one. It is also a six fold pattern, but on a much more
smaller scale. We're going to use
a radius of 1.2 because there are a
lot more repetitions of the circles that we're
going to be drawing. If you go much bigger
than 1.2 centimeters, the pattern just will not fit. If you go smaller, you might be tempted to round
it down to 1 centimeter, then it's just much too small
to construct accurately. 1.2 is just right. We're going to draw
vertical lines somewhere in the
middle of the page. We're going to start with a
small circle in the middle. After the first circle, we're going to
construct three more circles going down from the first intersection with the line vertically
with the same radius, move down to the first
intersection we created, this should go through
the original center and two more just going down. With each new one, we
create a new spot. Now draw three more circles going upwards from
the central circle. First one will go through the center of the
original circle. And two more after that, using each new intersection
with the vertical nine. That means now we
have seven circles. The next thing to do
is the seven circles cross on the side
with each other, now that's created six
more intersections, here, here, here,
here, here and here. We're now going to draw
six more circles with the same radius from
the new intersections to the right going vertically, and that should go through the centers of the
original circles. The six new circles have now created five new
intersections to the right, so we're going to complete
five more circles going down. Lastly, on this
side of the grid, we will draw four
more circles and that will be the last part
on this side of the grid. Now we're going to
rotate the page and recreate exactly
the same circles on this side as a mirror image. The underlying circle
grid is now complete. This is called the
flower of life. We are going to need exactly the same grid for pattern three. Because of this, I'm going
to stop now and construct Motif two on piece
of tracing paper. I can use that for
the next pattern. The two are very much related. However, if you
really would like to practice doing
more of this grid, you can recreate it
again from scratch. I'm going to get tracing paper and see you in the next video.
7. Pattern 2: Tracing Purple Curvy Lines: I've secured a piece of
tracing paper remaining from Pattern one on
top of the grid, and we're now going to
construct the tile here. I'm first going to
draw the outline of the tile so we know within which boundaries we're
actually constructing. We go into Mark the points on the outer edges of each intersection
of the circles, there are three intersections
going across on every edge of what appears to be a hexagon and we're going to take the middle point
of each of those. One, two, three, we
want the middle point. On this side, one, two, three, we want the middle point. The middle intersection of all those going down,
one, two, three, we want this one
here, here. And here. This will help us draw
the outside line. Now I'm going to align
each two dots that I marked together and I'm
going to draw a dashed line. This should also go through the very outer center of the circle that is
actually sticking out. I'm going to draw this here. I'm going to move
down to its parallel, which is between
these two points. Again, only one of
the circles will be sticking out or half of it and this would go through
the center of that circle. Now we're going to go
between this point and the side ones and
do the same here, you can start to visualize
where the pattern blends itself with the next tile and
the parallel is down here. Lastly, the final diagonal
to create a hexagon tile. You will see the hexagon tile has exactly the same orientation as pattern one with the
flat line on the top, meaning it's a
static orientation. It and we've pretty much got it to be almost the
same size as Pattern one. So when we replicate this, it will be the same size roughly in the end when the
pattern is fully completed. Now, within the actual
boundaries of the tile, we should have one, two, three, four, five, six of
the litter radiuses. We use 1.2 centimeter radius times six should be
about 7.2 centimeters. If you recall pattern one, we used a radius of 3.5, then the whole tile
should be around seven. That way we've got them
as similar as possible. Now we're ready to construct
the actual pattern inside. The way this pattern is designed
is just by ribbons that are moving parallel to each other in all three
directions of the hexagon. However, the curvy ones curve in the opposite
direction to each other. For example, when this
one goes this way, the one on the other side of the central line goes
the opposite way, they create this movement. What we're going to do,
we're going to start going down the vertical line
from the top circle, which is actually the
one that's sticking out. We already have the
correct radius. From the two centers, they are diagonally to the left and diagonally
to the right, which is going to draw
a short arc going up, one going up and
then swap the side and this one goes in the opposite direction
because it's actually part of
the same circle. Then we're going to
move two points down, not one but two
down because that is where the direction goes
in the same orientation. Again, from the diagonal left and only draw one arc until
you meet the next point. They're always going
to be no longer than those petals and then swap sides and to the opposite side. Move two points down
and curve on the left, just one sixth of the circle. Curve on the right, one last one on the
bottom, one, two down. Again, you should
get to the circle that's sticking outside. This arc is slightly shorter because we don't need to
draw outside the tile, stop where you see
the first point. It's all about the centers of those circles that we
drew underneath and here. Now, you can guess what
happens in between. In between the curves
just change direction. For us to draw the
opposite curves though, we need to put the
compass point on the lines outside
it, not the middle. Let's do the right
hand side first. Not the corner of the tile, but the first point underneath is where we're going to
use that and you can see how this is going to
just join the two together. Two down, you basically
filling in the gaps. By moving each of those. Now I'm going to rotate,
it's easier for me to work on the right and do
exactly the same thing. Not the top one on the
corner of the hexagon, but the first one down. Join the gap, two points down, join the gap, two points
down. Join the gap. This is all the curves that go through the
middle of the tile. You can imagine this exact
same scenario happens also here and here. That completes all the curves. The most beautiful thing
about this pattern is how the curves are
thickened and they become these interlaced ribbons. This is what we're
going to construct now. Let's thicken the ribbons. I'm going to use one of the circles on the right
of the central line, perhaps this one on the
bottom here and measure using that central line
because I want that thickness of about halfway
in between each petal. You could use any
of those circles. I'm going to start at the top doing exactly what
we did before. Now I'm working with a thin
pencil steel here because that's such a delicate pattern
on such a small scale. I'm going to extend this
ribbon and as before, do it on the opposite
side as well. Don't worry if these are a bit too long at
this point because we're going to merge them
together and then of course, delete anything we don't want. One, two down, again, draw inside on both sides. This one, and the last
one, it's shorter. Now with the same radius, we're going to do the side ones. Of course, at this point,
they're not going to match, they're going to go
on the other side of the line, which is fine. Once we've completed these, we're going to have
a guide of how far out to go in order
to meet these arcs. Now I'm going to go at the
top and enlarge the radius in a way that meets this outer arc. These aren't going
to be perfect, but it should work pretty well like this and on
the opposite side. If you need to adjust, do so. Two down. Check that
it will blend in together This one didn't
work that well for me here. Two down, join in,
and the last one. Of course, do the same thing on the sides and some
of these will be sticking out because
we wanted them to be a little bit longer to make
sure there are no gaps, then we can just
smooth those out. Great. The final one is here. The two ribbons in this one
direction are complete. The other two sides are
exactly the same process. The only other thing that this
pattern has that throws in that variety into it is that
after every two ribbons, the next one is straight. In all three directions,
you have two wavy ribbons, one straight, two wavy, one straight, and that
goes in all directions. That's where we have that
hexagon in the middle, the dynamic orientation one, which is basically the same
as the one in pattern one. That one goes from the midpoints of the edges
of the existing hexagon. Just like that, which
goes in the middle of those little petals
and it goes like this. Much like pattern one, we want to enlarge that thickness to roughly
match that ribbon. I'm going to use the ends of those little petals
because at the moment, we're in the middle of those
petals and I'm going to use that outer curve and draw
that just inside the pattern. As before, I'm going to rotate. Now I'm going to use the points
on the edge that are now the outer points of the
previous two edges I drew, but that will make it useful for us to see where
to draw the inner line of each and that will give it roughly a symmetrical appearance and a consistent thickness. Join those two points
that are on the edges. Next, I'm going to repeat
these two ribbons on the other two directions so
we can weave the pattern. This is it. The pattern is now fully drawn.
8. Pattern 2: Weave & Transfer: I'm going to take
this off of the grid. Remember to keep it
for pattern three, and I'm going to flip
this so we can actually see how that looks in a grid. Here is the pattern.
We're going to weave it and delete
anything we don't need. I'm going to start
unlike pattern one with the hexagon,
the straight lines. Just like then, we're going
to trace that top left line. Top left, we're
going to go above the first ribbon and then
in the next junction, it is the ribbon, the curved
ribbon that covers on top. Over under. Then when we get to here, again, we're going to delete this
little part on top so that this ribbon looks like it's overlapping the one that is
going to go down vertically. The new one now looks like it's going from under
the ribbon before. It's going to go over,
delete vertically. Then the next line, delete horizontally because
that's going to go over under and
then over again. Go to rotate and repeat this. Delete down, delete
across, delete down. Rotate down across
Down, two more times. The reason why this
was really useful now is because every
other curvy ribbon is actually being started
somewhere and we can just follow that ribbon
all the way down. When you're dealing with long straightih
ribbons like this, it's useful to just
follow the entire path. Let's start with this one here. We can see this one goes over. The next one needs to be under. That one's deleted vertically. The next one we're going
to go across across down across was already done for us because that was already there from
the straight lines, which is another indication that we had done it correctly. Let's do this one. This
one is already gone under, so I'm just going to delete
the middle line under. He's going to go over
by going delete down, delete across, delete down. Delete across. Delete down, and that already matches up with
what we had on the bottom. Let's check any of
the other ones. Down across, down
across, down across. Down down across down. Most of them are
pretty much done. Let's just check the last one. There's no that
one's already worked out and we're back to
the initial position. This is now done, fully constructed and
ready to replicate. I have already found
the center of my page and put that faint line
halfway through the page. We're going to flip the paper, make sure the pencil is making contact with
the paper and then it's in this orientation where the wider part of the
hexagon is there. Estimate where the
center is and then just make sure these
two corners as before, lie on that line. Now, the configuration here, the layout is exactly the
same as how it was in Pattern one because we have a very similar size
of exactly the same, shaped and oriented hexagon. If you recall, after
the central one, we're going to have one
above and one below because three hexagons is
the full height and then we've got one half more on either side to
complete those rhombuses. That's the same
as it was before. I'm going to go ahead. In the line is quite faint, but you can join the tile
using the dotted line. Also make sure all ribbons
cross and blend seamlessly. The two curvy ones and
the two diagonal lines. Here, make sure that
these curvy triangles also blending nicely and the straight line is also straight and only trace
up to about half. We've replicated the tile. Now we're just going
to outline the parts that we want inside and it's
very similar to before. I'm going to start with
the one on the bottom. You can see the dotted line of the central tile there
goes from there to there, align with that and extend. Then vertically, this has now for those three
rhombuses the same way as in the first
pattern and we want to cut it off at the
end of those rhombuses. Through all those ribbons exactly where they
cross with each other. At the end of that rhombus, at the end of the
bottom rhombus, the middle one, and through
those ribbons as well, at the end of those
curvy petals. And the same on this side, that side of the rhombus
here here and here, and through the edges
of those petals. Finally, for the curve, I'm going to put
my compass point at the lower end of
that top hexagon. That should be about
the same distance. Yes. Just do your semicircle or arc Pattern two is now
ready to decorate.
9. Pattern 3: Tracing Pink Flowers: Welcome to pattern three.
I'm not going to lie. This is my most
favorite pattern. I'm very excited to be
teaching you this one. Remember, this will be
simpler because we are reusing the same grid
from Pattern two, flower of life and you'll see there's a lot of
similarities with that one. What we're going to do first
is outline the tile just so we know the boundaries
we're working within and that's exactly the
same as on day two. We're going to find
the midpoint of the circles crossing and
intersecting on the outer edge. And then we're going to align this and with a dashed line, define the borders of the tile. The size and orientation of this tile is exactly the same. Similar to pattern two, there are some curves starting
at the top and going down. But the difference is
that in the middle, there's a different flower, so we don't go from the top all the way to the bottom
following these curves. The other differences that
both in pattern one and two, we have these straight lines
that we drew as a hexagon, which extended as straight lines making these bigger
rhombuses in the pattern. These do exist here, however, they're
not straight lines. In fact, there were
no straight lines in this design whatsoever. We have the same
direction but in curves. But we will start
with the familiar with the way we
started on day two, we're going to go straight ahead with thickening the ribbons. Just like for Pattern
two, we're going to use this circle here
on the bottom right and we're going to
measure against the middle line,
that middle axis. Just like on pattern two, we're going to start at the
top middle and we're going to draw just that little
arc and to the right. Then we're going to go
and do the same thing on the bottom of the same axis going up
and on the other side. Now we're going to
rotate the tile and do the same thing
going in this direction. Find the top middle point, draw part of this arc,
then on the other side, and then move down to
the bottom side of this same axis and do these two finally in
this direction as well. Now, as usual, we're
going to finish using this radius before changing the radius to go
on the other side. Now we're going to do the
next arcs going down. Not the top right point, but one point below, just here and just a sixth
of a circle, one arc. Of course, they're not
going to match up yet. Then do the same from the
bottom, not the first one, second one up, and
one sixth of an arc. Rotate and do the same. Not the top corner,
but the second point down. Draw an arc. And then from the
bottom, second point up. Draw an arc. Rotate, and repeat until all of
them are finished. We're done with these parts
now going up and down. The other thing now is to do is where the hexagon would have been if they
were straight lines. Previously, we connected
the midpoints of these with a straight line and that's what gave us that internal hexagon. Now, the idea here is the same, but instead of a straight
line going from here to here, we're just following the curves. The first curve
is going inwards. In other words, to the left. The way it goes is to
the left to the right, and to the left again and that
repeats on all six sides. We're going to use this
external point here. And we're going to do one arc to the left and we can stop
at the edge of the tile. Then skip 1.2 points down, and again, one arc. Now rotate. The next corner is pointing out. The top line is always flat. We need to go from the midpoint to this midpoint,
but with curves. Put the point on the outside, one arc, one arc,
two points down. One arc. Rotate, this
point here on the outside. One arc, two points down, another arc and
complete this way. Now, the final arc with this radius is to join these
in the opposite direction. We had left, then this one should go to the right and left. On the opposite side,
this one went right, so it's going to go left, right. I'm going to start
with the first point inwards from this corner
this time because again, it's easier for me
to go this way. Only the middle middle arc, just one arc, here. Rotate. Now we're
going on this side. Rotate until you
get to this corner. First point inwards, first center inwards,
one arc, rotate, arc, rotate, arc, rotate, arc, and the last one. And you might be able to
guess what will happen next. We will repeat these
exact same ones with the wider thickness. Don't worry that at this point it's looking a bit disjointed. Now it's going to start
making a bit more sense. Let's start again from the top. At the moment we're on
this shorter distance. Now we're going to
enlarge this to match the outer
distance that we chose. That's the same as
on pattern two. Just make sure it matches up in as many different
places as possible, adjust if you need to. Let's try this. This seems to be working
in and out at the top. Okay. Now let's move down
and do the same thing. Make sure you're extending
these long enough to join in and to cross
with any other arcs. So that distance
is working well. We're going to
rotate, do the top. Make sure they're joining
in. And the bottom. Rotate again in the
third direction. Top. And bottom. Go back to the
original position. Now we're going to do the two arcs below on
the top of the tile, second point down, and extend. Make sure you extend
this long enough that you anticipate that that will cross with the one next to it. It's better at
this point to have a longer arc which
we can delete. Otherwise, we have
to repeat them. Again, from the bottom,
second point up, draw up again, extend beyond halfway so that we ensure
they cross rotate, second down, arc, Second,
up from the bottom, go up, single arc, rotate, second one from
the top corner, extend. Second one from the
bottom, extend. You should be able to see
how it's starting to shape up at least those
ones in the middle. These ribbons here. And complete. Back to the original start. You can see what we did here. These exact same shapes
existed in Pattern two as well because these ribbons went all the way
through the middle. Now we have a
different middle here, which we're going to do last. But let's complete
now those edges, that hexagon, which is
now a curvy hexagon. Again, in the same order, starting from the right
on the outer side, and just join in, top, two points down, bottom. Rotate, so that the corner
is pointing out one above the corner one
below the corner. Notice how these are almost perfectly joining together on
either side of the center. Rotate, one above, one below. Make sure they go far enough to merge and complete
all the way around. Now, the same thing, but
on the inner middle side, starting from the left corner, just one arc in the
middle to join them. Rotate and walk around in
this anticlockwise direction. Suddenly all these arcs of those curves that go directly on top of
this grid are done. We now just need to construct the flower
in the middle that makes this pattern
absolutely beautiful. We just need to
find a few points that we need to put
our compass on. What we're going to do is
from these corners here, where these six petals
going inwards have crossed, we're going to go
through the middle, just a line through here and
here and through the middle. Or in fact, you can
extend all the way from the outer corners of
the hexagontle as well. We just need to mark
where these lines will cross the original
circle in the middle. It all goes back to
the original circle. A line from here to here, mark those couple of points
on the original circle in the middle and also this way. This is where we're going
to be putting the compass next and we're going to
be adjusting the radius. If I put this point
on the compass here, now I'm going to reduce
the radius so that it coincides with
the top intersection of the curves that
already exist. That should work
for all of them. Let's just try another few because this isn't going
to be super accurate. From this point on
the original circle and check that it goes to that intersection with the petals, the one
that's further out. What we're going to do
now is draw a semicircle. Well, a circle all the way
around the original circle. Move the point that we
marked next, and again, in fact, we don't need to
go quite as far as this, but we're going to just to
make sure they all cross. We're creating these beautiful
petals around the circle. Now we're going to do
exactly the same thing and you may have guessed it now, we're going to reduce
the radius so that it actually goes through
the shorter distance. Let's try a few of them, and again, repeat
the same petals. The final step is to just define the circle in the
middle and to do that, we're going to extend the radius to the inner point of where the little petals are crossing just here because they just brush over and just
touch over those. Just like this. And finally, the
inner radius will be the one where we can
measure against the line, the same one as we did at
the start around here, that should match the first
radius we used actually. We could have done
it then as well. One final circle in the middle. This is the construction
done and beautiful.
10. Pattern 3: Weave & Transfer: To weave this, I've put it against the background
of the grid, and we're going to start
similar to Pattern two, where we actually
did the hexagon even though they
were straight lines. But it's exactly the same way. I'm going to start
on the top left going down and I'm going to delete going down because we want the first
ribbon to overlap. Then when we get to
the second junction, across is very similar. You should be getting
very used to this. You should be feeling
like a pronoun. Down, across, and
just that little bit down just enough to
tuck over the next one. Because now when we rotate, that one is already tucked
under the previous one. That comes from under,
goes over to lead down, then across, down
across and then down. Rotate and this whole thing just repeats all the way around. The outside edges are now done. As you can see now,
just like on day two, when we start going down here, we can see this is
already above that. We're going to go over.
Then the next one is going to go across, and this is where we want to seamlessly blend the petal of this with the more circular
one with this one going up. This is going down, this is
going across, then down. Here to where they meet. Now, the two in the middle where the two curvy petals
meet in the middle, they're not weaved and then these lines here are
no longer needed. This should be a full
semicircle that is empty. The circle in the middle, again, that's not weaved. I just touches all the
leaves and petals around it. Let's rotate this way. This is at the top.
We're going to go going down, which
is already done. We're going to lead
going across just between the curved petal on the left and going
upwards to the right. Then blend these two together
because they aren't weaved, they're just one whole
ribbon running through, and then these little arcs
in the middle we don't need. That's going over and under and then it
continues onto the next. This is it. The whole pattern is weaved and ready to transfer. Make sure you flip the
tracing paper over, aligned it with the
center and the line going across through
the widest parts of the hexagon and
we're going to trace it in exactly the same way
as pattern one and two. One hexagon in the middle, one below and above
because three of those is the full height and then a
half on either side of that. Lovely. A line below using the
dotted line as well as the ribbons to help you merge in seamlessly and beautifully. That should be a continuous
curve instead of the straight lines that
we're going across before. Make sure the edges
here blending and the vertical curves as well. Then go ahead again. And repeat on the opposite side. As before we going into
outline, the final shape, we're going to use
the lower line to go all the way across. You should go about halfway
through those circles. And then we're going to go at the ends of those
ribbons that look like the curvy rhombuss the same
width as before through all the ribbons at the end
of those little petals. You should go about
halfway through the side circles and through the middle curved petals
of each of those. Same on this side, through
the middle of the circles, the ends of those petals
all through these. Finally, the circle at the top. I'm going to go with
somewhere halfway in the middle of this shape and see roughly if that goes to the end and whether it
incorporates the top. That's close enough,
something like this. We're going to erase this
and we're ready to decorate. Pattern three all transferred.
11. Pattern 4: Constructing Red Flowers & Circles: We're now going to
start the first design that is based on a square
tile rather than a hexagon. That's very exciting. This one's quite unique even though it's similar to the previous one
because of all the circles. We're going to start by drawing a horizontal line in
the middle of the page. Then we're going to measure a three centimeter
radius for this tile. I've got here 3 centimeters. We're now going to draw a circle in the
middle of the page. Then from the side
intersection on the right, we're going to draw an arc that crosses the top of the
existing circle and it extends just above that
line and also below. This is where we're estimating the corners of a square
around this circle would go. Then we're going to do
the same on the left, go to the left hand side
intersection with the line. Short arc, but long
enough to cross the circle at the
top and the bottom. Now we've created four
new intersections. From the top two,
we're going to draw a short arc somewhere
above the central point. That's where we estimate a vertical line is
going to go through. We do that from both
of these points. That's usually enough
to draw straight line because all you need for
a line is two points. However, it's always
more accurate to have a third point and
it's always more accurate to have a
further apart point. You draw an arc underneath from the bottom two intersections. Now through these
points, this one here, and this one here, and
through the middle is the vertical axis which
now makes a right angle. This is why this is the start of any square design
because of the right angle. Now, we created also an intersection with
the vertical line below and above the center, so we're going to do the
same thing as before. We're going to draw a couple
of arcs on either side. To cross those, if they're
not long enough to cross, just go back and repeat them
and the same at the top. The four intersections
that are now surrounding the circle are the four corners of a square if we were to draw
a square around the circle. Now, we're not actually
interested in this square. We're interested in
a smaller square. The tile is even
smaller than this. The tile is the square that lies within the circle and it
has a dynamic orientation, it's sitting on its
vertex, not on its edge. As usual, we're going to
do a dashed mine here. Because that isn't part of
the design just shows us where the repetition
begins and ends. And those two. It's a very
interesting design, unique. Not really that related
to the other ones. But by finding the one unit
that repeats over and over, you can make some really
intricate designs just like this one. Everything within that tile is what will be
part of the design. Let's start constructing. We're going to use the
diagonals of the bigger square. We're not actually going to
need to draw the square, but we need the diagonals of that square through the
middle and the other side. Next, we're going to need the vertical lines that go
through these midpoints. See how these diagonals
cut the sides in half. Now we're going to go
through that half. And use that line. Note that we could have
used those two arcs that we drew right at the start. If you're ever
interested in just doing the smaller square in the
middle, that would work. However, we needed
these as well. But that's a good guide if they are also going through
these two points. Basically, if you ever want
to split this radius in half, you can just use these two arcs or further into the square. As we continue. We're
going to these. They will help us as a guide. The two horizontal ones. Now we've created a static square sitting
inside that dynamic square. What we really need to do now
and that's the last bit of the line before we
can start the circles because this one is a purely
circular design again. We need to find halfway through that line here or halfway
through that line here. We've already half
the full radius, that's half of that and we
need to find half of that. Because this is a rectangle, if I draw the diagonal
of the rectangle, that would split this in half. I'm not going to
draw the whole line, but that would
split this in half. This is the size of the
radius we need next. Most of the arcs in the
design have that radius. I'm going to put the
compass point on the middle point of that
diagonal edge of the square, and I'm going to
open the compass to exactly that point we
found that half a point. From all four of these midpoints around the edges of the square, we're going to draw four
semicircles from edge to edge. There's half a circle. Another half a circle, and we do that from all
four directions. It looks so small,
these circles now. That's because we're
going to be able to fit a few more of them in there. The next step is important
with the same radius, we need to find eight
more points and we need to find the same distance on
either side of the circle. From the side of that semicircle,
with the same distance, we're just going to mark
where that crosses the side. I happen to have a gap there,
but I can fill that gap, it's not a problem with the same one, do that
on the other side. These two are basically the centers of the new arcs
we're going to be drawing. There are two around each of the existing half
circles that we drew. So just mark the distance on either side of the four
semicircles that we did. I tell you what we're
going to do now, we're going to just
outline the tile with a solid line and only when we transfer it
on tracing paper, then we're going to
do it with a dash line because we actually need to clearly see the markings
and where they intersect. Now that we have a solid line and still with the same radius, so far the radius is the same. Now we have the centers
of the other arcs. I'm going to start here basically so far we've
done half a circle. From the neighboring point now, I'm going to start from
there and from there, I'm going to start from the
edge of the tile again, but I'm only going to
stop at the first line. That's the vertical
axis. This is now only a quarter of a circle, the same size circle, but a quarter arc instead
of half an arc. Then I'm just going
to travel all the way around the
square doing that. From the next one from the line to the circle and they should hopefully
join in like this. On the other side from here, next point from the circle, from the edge of the tile
to the line and then from the line to
the next circle. It creates that curvy
shape almost like a heart and just do
that until complete. All the curves with this
radius are now done. It's such a beautiful shape. The only extra thing
we have now is the little flower for petaled
flower in the middle. Now we're going to use
exactly the same midpoint of the tile that we did use
for the semicircles. But instead of opening it
to the top of this circle, we're now going to open it to the top of the
neighboring circle. It's going to be here
where the circle, the arc intersects with the diagonal and that should be the same distance
as this one here. Yeah, perfect. Ready to do those now,
I'm going to start from the tip of that arc, draw a short arc to the
first horizontal line, skip 90 degrees
that right angle, and then another arc
to the next circle. That is it. Then we're going
to rotate and do the same from all directions. From the tip of the neighboring circle to the middle line. Now you can see
how they join in, skip that right angle
and do the other part. Again, from here, and
the last one is here. That is it. That is the
complete design done. We next need to thicken
the ribbons and weave it and we're going to do that straight on
the tracing paper, go get your tracing paper.
12. Pattern 4: Weave & Transfer: Okay, I've overlaid my tracing
paper, you can see it now. Now I'm going to outline the
tile with a dashed edge, and then all the rest
of it is going to be the arcs with
increased thickness. Now to thicken the ribbons, we're going to use
a nice distance. We're still starting from
the midpoints, of course, but we're going to
go all the way out to the original circle we
used to construct this one. That should give an extra
thickness to all those four. Let's go and try it. Again, from edge to edge, we're going to draw
the semicircle. Next to that, we've got
the quarter circle, again, from the edge to the first line, then the next one from
the line to the edge. Then the next semicircle, it's important to go edge to edge because we need
all these points later. This one I did not
extend enough. That's better moving to the next one quarter of a circle from the
edge to the line, next, from the line to the edge. I should be able
to fill the bump of those holes underneath. Semicircle, and
complete the rest. Now, the reason why it was important to have all of
these meeting at the edge is because this will
help us determine the inner length of this.
This is the outer length. This was the original length. The inner length will be where that meets the outer edge
of the previous arc. Let's compare it in a
few different places because it's not
going to be perfect. Let's go ahead. The same thing
with the shorter length. And that will give the full
thickness for all of them. This should merge in with the outer edge of
the previous one to the line and from the
line to the next outer edge, and then inner semicircle and complete the rest going
around the tile this way. The final step is to thicken
the flower in the middle. Again, we're starting from
the midpoints of the edges, but to enlarge to the inner arc of the neighboring
circle, here and here. Because these merge together. And go ahead. Again, we are now going
to decrease this to the top of that
circle and repeat. Now, as this is made
the flour considerably thinner and in the
original design, these aren't overly pointy. I will make an extra
thickness from here to try to have a
consistent thickness with the rest and that will just merge in with those circles
because these there's no weaving between the
star and the circles. The weaving goes only
around. Let's try this. That was a bit of an
arbitrary distance, but in order to make
them the same thickness, that will make it a
lot more consistent. As we said before, these just
touch and join in there. They don't actually weave, only these parts weave. The way this weaves
is that these just join in with the flower here. That's not even a weave, they just touch and so we can just join
these arcs together. But on here, we go down this
way, and then we stop here. I'm going to rotate and
then we're going to delete this because that looks
like it's over this one. Then here, again, down, going this way, stop and
then this goes over. This one goes down this
way over the circle, and then the circle
goes over the ribbon. Then the last one,
ribbon over the circle, and then the circle
over the ribbon. This is the entire design
weaved and ready to transfer. Okay. We're ready to transfer. This replicates
quite differently to the ones we've done so far. A, because it's a square but B because it's
dynamic square. Let's flip it over and align it. But bearing in mind that it's actually a bit taller on the top than it
is on the bottom. I'm going to go with
aligning these two. As long as it fits, it doesn't really matter. I'm going for it. We're going to do two below but going sideways
because otherwise, it'll be very difficult to
guess the correct angle here. We're going to draw one on
either side using that. Now see how all these
shapes are coming alive. You have the circle
being completed, part of these petals being completed, and most importantly, you can see how the weave just runs through the correct places. And one more below
on the other side. One below. Beautiful. Two more above here, and
another one in the middle. Two more here. The way it goes at the top, it just goes up to the
top of that middle star. Here we need a half of these. The final step will
be to outline this. This turned out quite large. We can go across the bottom through the
middle of all the shapes. Then on the side
through the edges of the tile, here, here, here. Seeing on the other side,
edges of the square tile, which is halfway
through the shapes. And finally, at the top, the original design goes
just over that petal here. We could try and use this point. And it's ready to decorate.
13. Pattern 5: Constructing Green Circles & Leaves: The last two patterns
are very similar. In fact, they are
the same design, but they have
different proportions, so they are constructed
separately. We're going to draw
a straight line across and we're going to use radius of 3 centimeters and begin to construct
a square tile. Circle in the center. This time we're going
to draw some arcs that are fuller than what
we did on pattern three. We're going to draw just
over half a circle. We're still aiming to
find these corners here, but we are going to
need this whole arc and the same thing from
the left hand side, from the two new
intersections at the top, two short arcs, long enough to
cross, and just in case repeat on the
bottom as well. Draw the vertical axis. And repeat from the two new
intersections with that. Long enough to cross
with the other two. Because this time
we actually need the fuller square that
goes around the circle. Let's align the corners of that square and draw
the tile around it. Should go through
the middle here. Now we need the two
diagonals of the square and the smaller dynamic square within the circle by
joining the four points. The last line we need before
we can start constructing the arcs is joining
this point here, the top middle with where
these two circles cross. If we were to draw a line
through these two points, that would half this part and we need this to just
proportion correctly. Because like I said, that will
be a different proportion from the next tile. From here, and the
point we are now interested in is where the
diagonal cuts the new line, and that is here, and
that will tell us where to position our central
circle of that design. So in this design, the circle
in the middle is smaller. So from the center,
open the compass to this new point and
draw your circle. Now we just have two sets
of overlapping arcs to do. It's not actually as
complicated as it looks. We're going to put the point on the bottom corner of the tile and we're going
to open the compass to where the original
circle on the other side crosses the diagonal
to here this point. That should be the same
distance on that side. So these are the larger, well, longer arcs that have a
thinner diagonal appearance. Let's go with that. From
the edge of the tile, through the point
we chose and we stop at the first
horizontal axis here. We skip the 90 degree angle
and from the next axis, continue to the end of the tile. Rotate and from this corner. Same thing from the
enth of the tile. Now notice how we're joining the min already, which
is what we want. Skip the next part and
complete all the way around. Okay, these leaves are now done. We have four more in between, and to find where they are, we're going to start
from the points where the new arcs
intersect on the axis. So just here, we're going
to open the radius to where the petal of the original circle crosses that
edge of the tile. So to here, and it should match on the
other side as well. From the axis on the left, just draw an arc
to this point here where it seamlessly joins the straight edge
on the other side, from where we cross
the straight edge to the other axis,
rotate and repeat. The center is where
the two flatter arcs join on the axis, the distances to that point here and join with the line
and on the other side. And complete all the way around. This is the design constructed.
14. Pattern 5: Weave & Transfer: Now we're going to
thicken the ribbons on the tracing paper. Now, this central
circle just about touches this corner
of these petals here, but not the other ones
here, there's a gap. There's a space of those leaves. We're just going to judge about halfway that distance between the circle and that point
and then draw the inner arc. Starting with the longer arcs, again, the ones we
did from the corner, we should be able
to feel the bump already on the paper below. Just here, it's about
halfway and just draw a parallel arc to
those existing petals. And judge about
the same amount of distance on the other side now above to make the
ribbon consistent. You can always adjust it. Now we have an indication of what ribbon we want to go for. That will be the thickness
that we're going to want to stick with. Let's try the other petals, the ones that start from
the central points here and the top and let's do
the inner point here. That will join
here on that line, but it won't go anywhere
near the circle. I would say that's
a good distance here and on the other side. Make sure they join in.
Now let's make them wider, on the other side of that line. About here. Looks good. Let's try it. Yeah, that's
consistent thickness. Repeat. Let's now join in
the middle circle. The middle circle should
open just enough to touch that little corner
here on those four points, but not the diagonals. There should be space.
That's perfect. It just about
touches those four, but it has a space in
between the other ones now just decrease on the other side, make a consistent thickness. That looks right. The final step is those corners, the right angles to do that, we're just going to
align the ruler. We're going to be looking at the original straight
edge and align our ruler parallel to that while touching just the
ends of those curves. Try and join with the
curves that we have. I'm going to do the
outer edge first before doing the inner, that will be the overall size. Again, parallel to the
original edge and try and seamlessly merge with
the curves we had. Now for the inner
part, the same thing, but on the other side and I prefer to do it
here so I can see. Again, try and judge the same amount of distance
on the other side of the line while also being
parallel and joining in. The other good
indication as well, is those points will
help us guide as well. Let me rotate and
show you again. From that point here and that point here should
be a good indication. Again, look for the parallel. Look for these two points, look to be parallel
to this line and look to join in with the curves. Okay, let us now complete
the tire with dashed line. The way the weaves,
again, it's quite simple. We're going to start
from the top right from the center and delete down
here, we're going to go over. Then here goes under, delete the other one or across, down across and down that
little bit that tucks under. Rotate. It comes under
the other one already, down across down. You have pros at this now. These are important
here because when we merge those with
the next tile, these are going to be continued straight and one will already
be tucked under the other. Now let's do the other side
of the petals here we don't really have a choice
because it's already been dictated for us. Since this one goes under here, it should go over here because
they have to alternate. This one goes over then under. This one then is already
gone under over. Let's check this one over. Over. I believe
that is all done. Yeah, that's all done. What's really nice is
that when we replicate this next to it four times, these start to appear like very large circles
that you might wonder where these coming
from in the pattern. The other thing is this part
here when we have four more, it creates those curvy little squares every
so often as well. It's an amazing pattern. Let's replicate. The last two tiles replicate
in exactly the same way, but completely in
a different way to all the other ones we've
done so far because it's a square and it's oriented differently
from all the other ones. We're going to flip it this way. Instead of starting at
the center with a circle, we're actually going to do four of these around
the central point. There's going to be one
here, one here, one here, one here, and then two more
in the top and bottom. In other words, there's
two full widths and almost four going
up and down with the exception that the bottom
one is slightly shorter, but you could of
course change that. I'm going to go ahead. This is it, we're just
going to do a straight line just below the circles
just through here. The sides are
obvious, just follow the tile, and then the top, just goes just around that top semicircle,
which is genius. You'll have to put the point
in the compass in there. The weave works beautifully. All these little
four sided shapes, everything works, that
can just be decorated.
15. Pattern 6: Constructing Blue Leaves & Circles: So the last pattern
produces pretty much the same design
with the exception that the sizes of the arcs
are slightly different. It has a slightly
different proportion. The difference comes from
the fact that instead of using this line that we use to proportion the middle
circle and the bigger arcs. We use that line to
join to this point. The other design actually uses a line that joins
to this point here. It's the one above, the
one where the diagonal crosses the side of
the dynamic square. Not where the two arcs
meet in the middle, but where these two
straight lines meet at the center of this
little square. It's still aligned
to the point above. If you draw that, you could see that although it's a
very small difference, the circle in the
middle becomes smaller. So that you can compare, I've put some tracing paper. Whereas previously we used this radius for the middle
square to this first line. Now we draw on the second line. This is the point where the
middle circle goes through. That's not the only difference. You can see that when you
thicken the middle circle, that will go further in the other one
will go further out. But the second major difference
is that where we drew those arcs from the bottom
corners in the previous tile, we aligned them to
this point here, the point where the circles in the grid cross the diagonal. This one here and it
went through this point. Now this goes through
the further point, the one that is up here. If you were to draw these arcs, they're all basically
slightly shifted outwards. I results in those diagonal
petals a little bit wider than in the
previous design. Essentially, the previous
design could be thought of the inner thickening
of this one. So let's just go back
to the start and see. By these arcs being wider, when you replicate this tile, this big circle in the middle
will be slightly larger, which means that it leaves slightly smaller amount of
space in these corners. It's actually closer
to that point, which means when you
replicate those, these little squares in
between the shapes that form the curvy squares
that are actually the central point of the design. They will be smaller. The
circles will be bigger here, but the little squares in
the corners will be smaller. Again, we're still going to use for the remaining
four petals, we're still going to
use the points on the axis where the
flatter petals meet. But of course, this
is now going to be further up along the axis, which means that when you
now draw the wider petals, you're again going
to go to this point, that arc meets the
straight line, but you are now coming from this point rather
than from this one. You're actually shortening
the radius by doing that. Of course, now when
you draw these arcs, they just slightly I wouldn't
say necessarily wider, they're not wider,
they're just pointier and curvier into the middle. Again, from the top into
here and on the other side, you can see how they create
that slightly curvier, longer shape because
this is further away, it goes further higher up, but it's going further down. It's almost to me, reminds me of an shape, but going steeper
downwards into this axis. These are the differences. The straight lines
here are identical. I'm not even going to draw them, but this is what I
wanted to show you. Once you thicken that, you might actually use
this line underneath from the previous construction or
design to be the inner one. But if you were to
thicken it outwards, then you are going to go with a thickness
going higher up. Above there. I'll be
something like that. I will create these
will be smaller. These will be wider and this
circle will be smaller. Again, you would be
using a little bit of space to reduce this gap here. But it will be also a
little bit closer to this, but then the tops are a
little bit further away. So I think that this is
now your six pattern. You have seen how they
are logically related, how each builds on to the next. You have learned to construct
all the different tiles. You have learned to thicken
them on the tracing paper. You have learned to
take this off and weave it just by deleting
some of the arcs. This one is almost identical
to the previous one. It replicates in
exactly the same way as a layout on the page. I'm going to leave it
for you as homework to complete this one by
yourself because by this point, you are now absolute
pros at this. I would obviously love to
see all six of your tiles, but I would be
particularly interested in seeing how you made this one and how you are now starting to see
the connections.
16. Conclusion: I really hope that you
enjoyed learning about these patterns and how
to construct them. I hope that you are beginning to see that even when something looks so elaborate and
complicated and incredible, it can still be broken
down into elements and steps to recreate this
in its full beauty. That's the good thing
about geometry. It's systematic and it has a lot of structure
and repetition. Then once we start
adding details like interweaving and coloring
in different ways, it really brings it to life. But the general idea is this basic unit that repeats itself and
it is really doable. I hope you've managed
the challenge. I set you with the
last two patterns that had a very small
subtle difference. Please share with
me what you create. The best thing is seeing
your own versions of the same things
that I taught you. I want to inspire
you with a geometry, but I'd love to see
your own unique style. Post your completed
artworks below in the project section and
tag me in on Instagram, so I can see and
share your artwork.
 Diana Reeves, Geometric Artist & Educator