Transcripts
1. Introduction: I invite you to learn
with me how to create a unique design of perfectly
shaped curved hearts. This project can simply be
a heartfelt labor of love, or your own truly meaningful Valentine's Day artwork or gift. Hi, I'm Diana, a
mathematics teacher, a teacher trainer, and
a geometric artist. Let me introduce you to my passion for combining
the precision of geometric structure with the freedom of
creative expression. In this course, I will teach you how to construct a mandala of interlocking hearts using traditional geometric
methods and tools. Whether you are a beginner
or a confident geometer, this pattern is
accessible to everyone at any artistic level to create their own unique
rendition of the design. At every stage of completing
your art project, I will provide support and tips on how to
approach each task, along with visual step
by step instructions. I will also offer inspiration on how to extend the
complexity of the pattern so you can incorporate your own ideas and
strengths, and let your unique creativity flow. Join me in sharing my love of geometry as I teach you
the geometry of love.
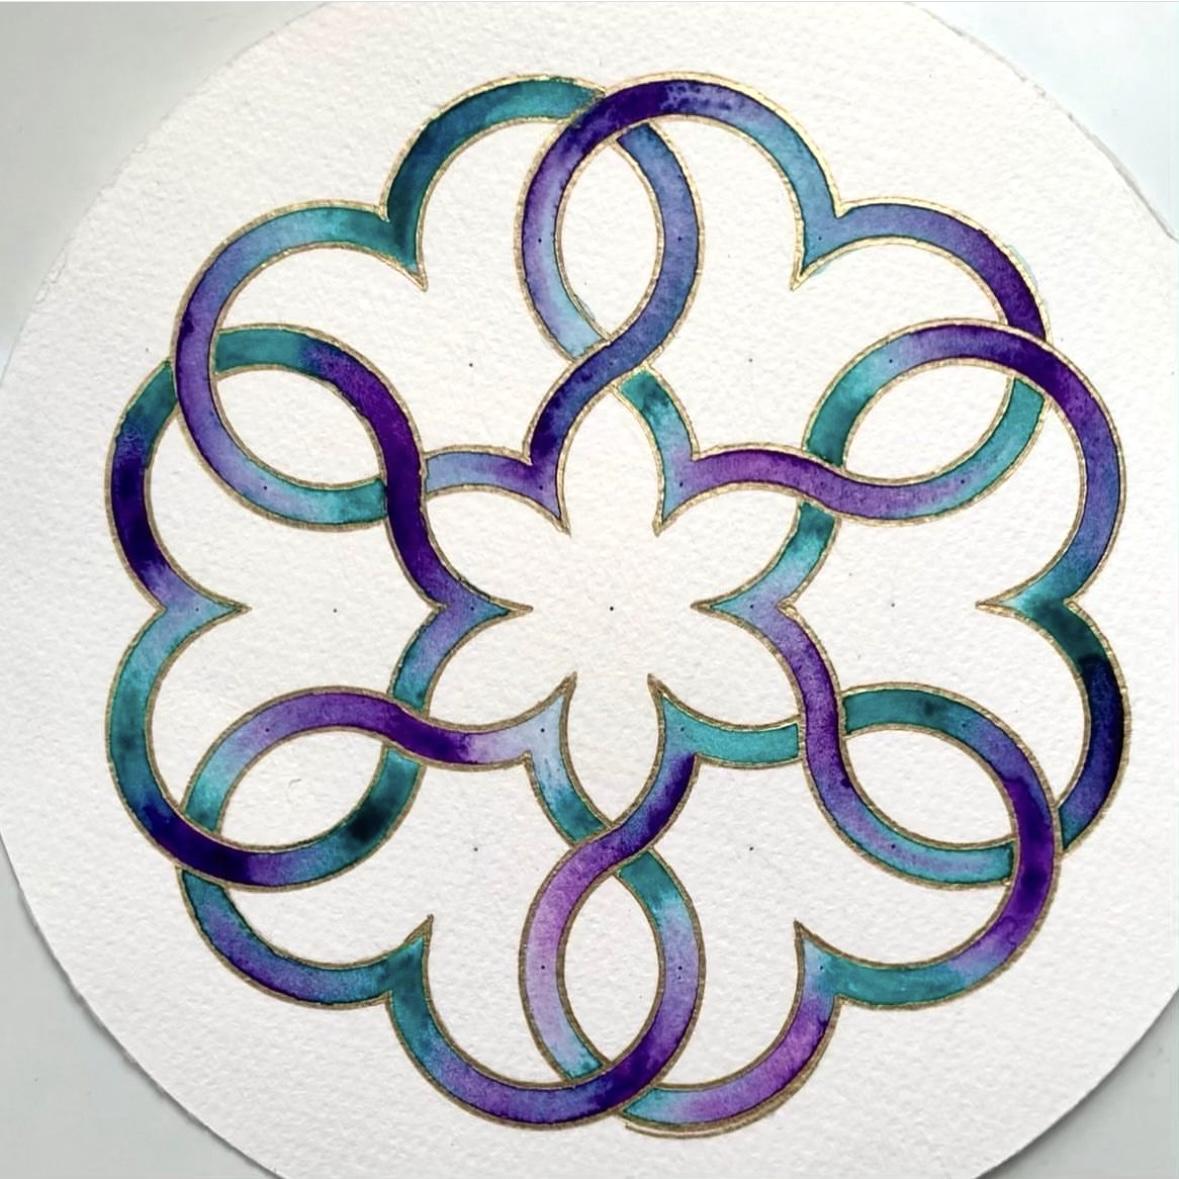
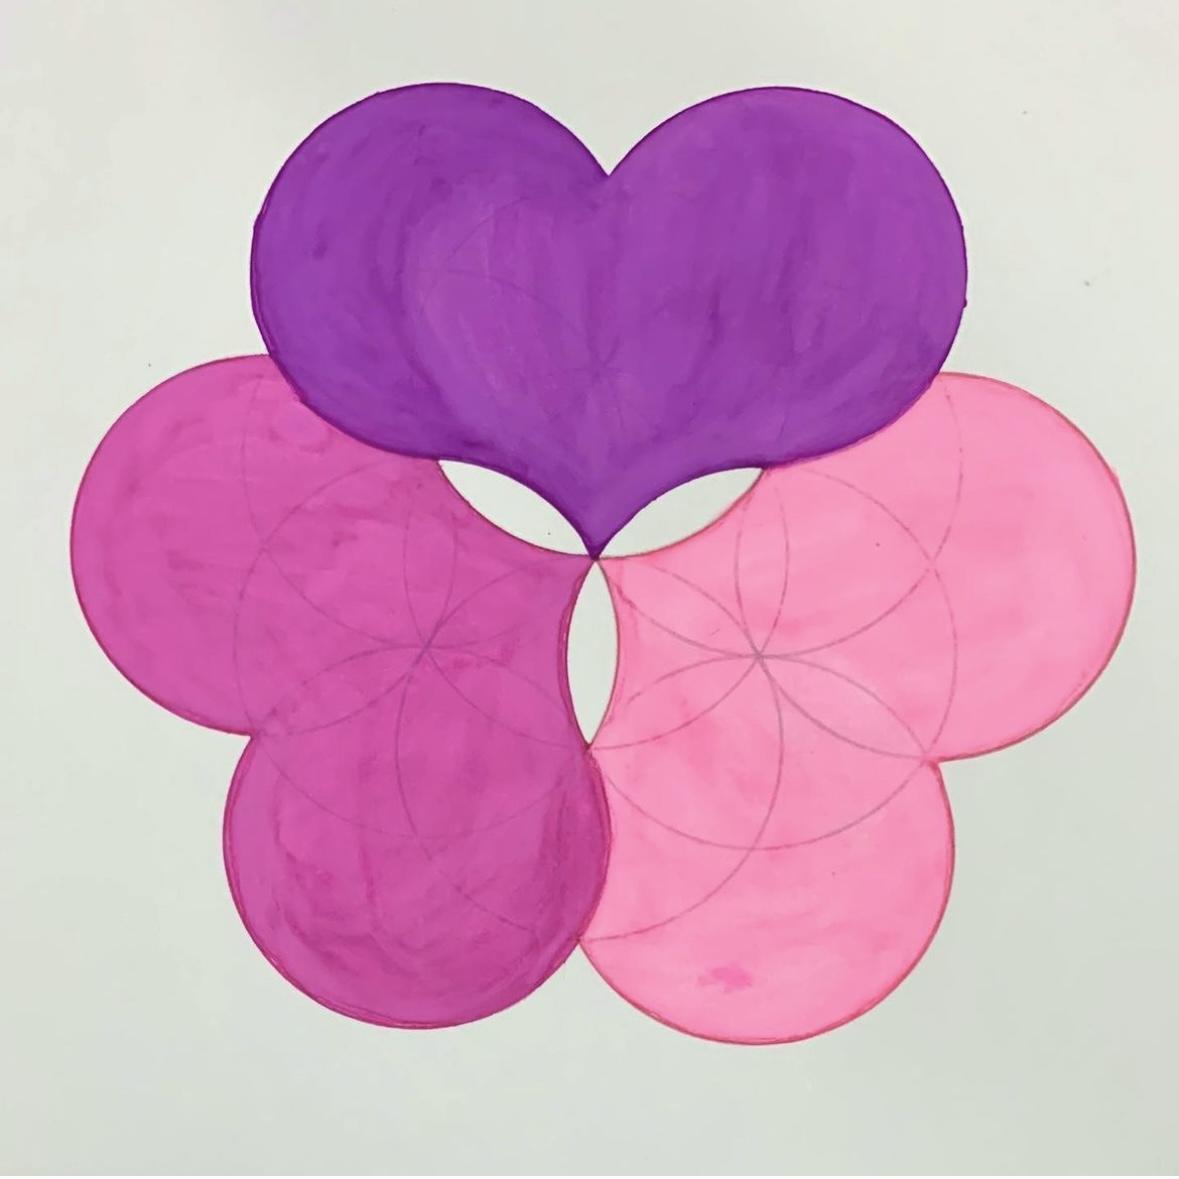
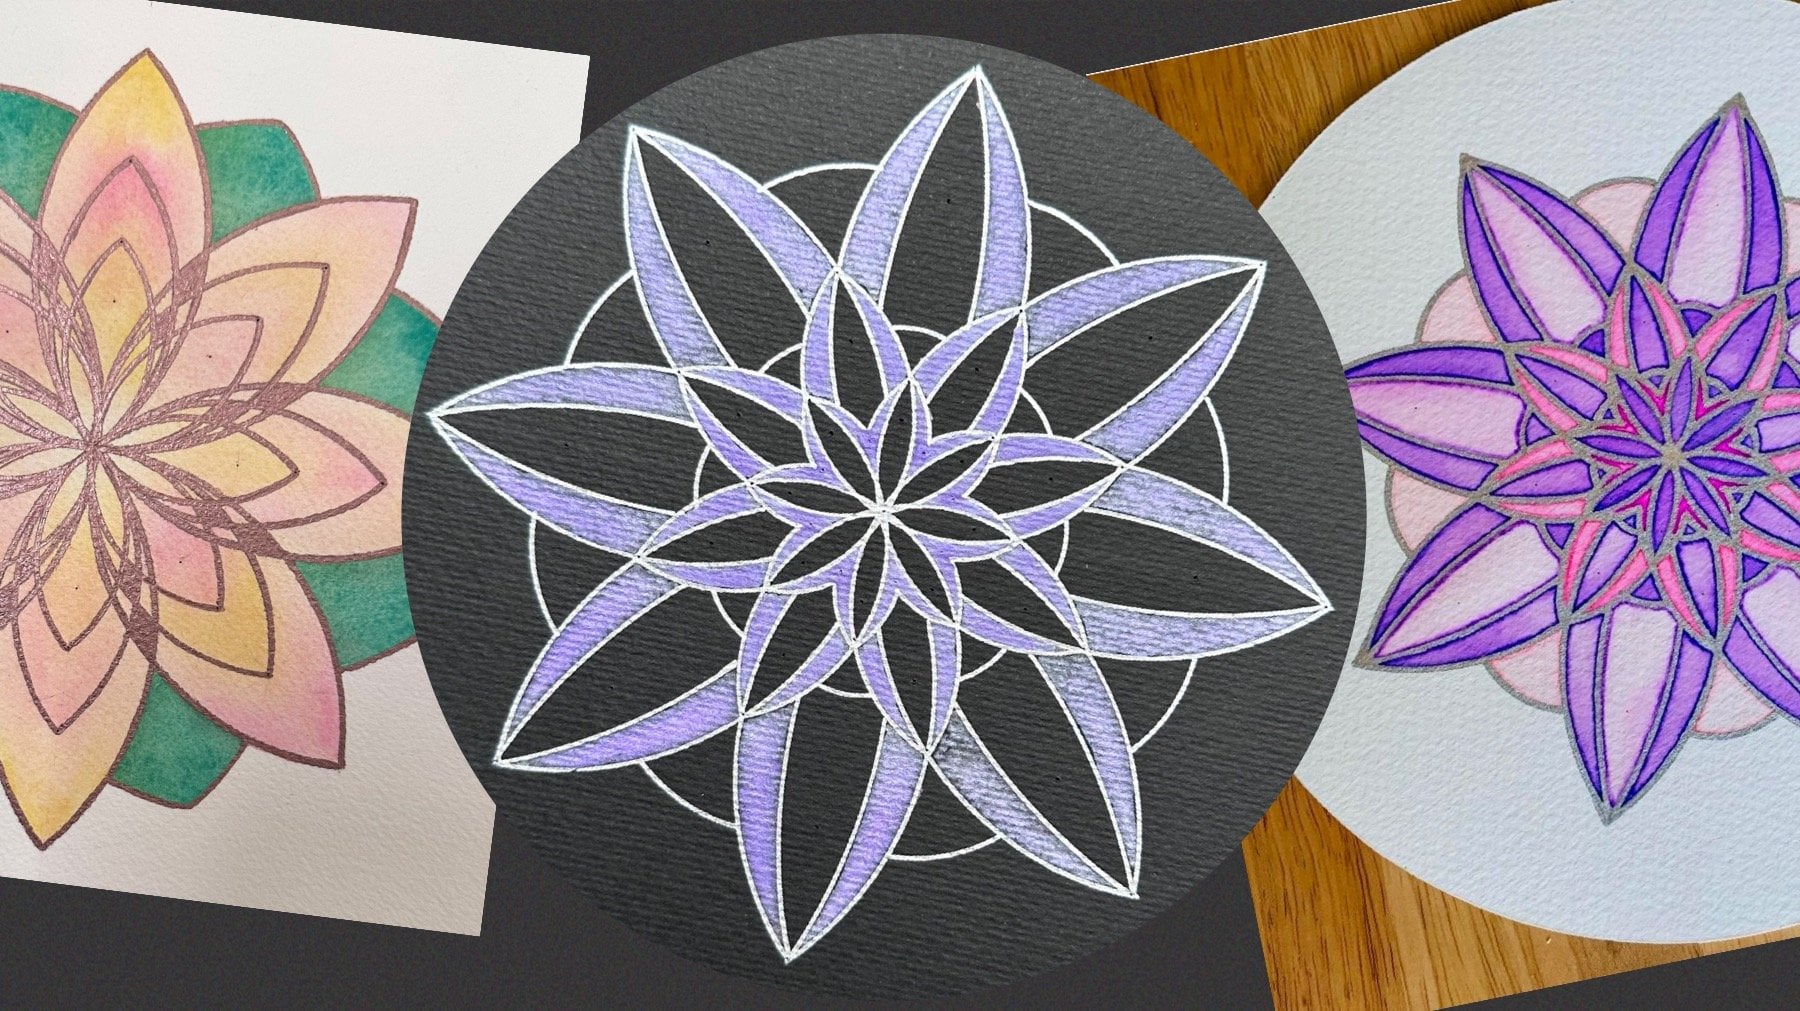
2. Project: The project for this
class is to create this unique mandala design made of six interlocking
hearts rotating around a point. To
complete the project, I have created individual
lessons focusing on each skill needing to build up to create your final artwork. First, we're going to discuss the materials you're going to need and some of my favorites
and how to use them. Paying specific attention to how to use the compass in
a bit more detail. Then we're going to
learn to construct a simple circular grid in
which each heart design lies. Then we're going to increase the thickness of
the hearts' lines. Once we have learned to
create a single heart, we're going to extend the grid and see where to find six hearts sitting within that in order to construct the
full mandala design. We're then going to thicken each of the six hearts and
then interweave them, hence giving them that
three dimensional design. We will then outline the final arcs that remain in the design
and delete any of the construction lines
that we don't want ready to paint over the mandala using
a gradient of two colors. I will also show
you how to look at the design and the grid and
create different variations, simpler or more complex, depending on your own interests. So that you can come back
and benefit from the design. Enjoy, and thank
you for joining me.
3. Materials: We're going to discuss
the materials you will need to complete
your art project. Firstly, print off
the instructions they have step by step guides on how to complete multiple
stages of art project, but it also has a
list of materials. I will give you a bit more
detail about each of those. Firstly paper you're going to need, you can construct on
normal printed paper. I personally prefer
slightly thicker paper because I don't like my
compass to slip off, so I use card. But most often I go straight to watercolor paper and
construct on that. Even though the watercolor
paper has more of a texture that might make the construction
slightly less accurate, I really like constructing
on thicker paper. I love to feel the point of my compass sinking in
and sticking in nicely. You don't have to
press hard as well to construct and you could really control how fine
your lines come out. I'm not going to talk to you about sizing of the
paper too much. I think wherever you are, you will have completely
different sizes paper. What I would recommend is
page ten of the notes, I've included a template. This template can be used to practice your
circles lots of times. It can be used to visualize
different shapes later on, so you make unique
designs out of it. But also it's a brilliant way
of determining your scale. Print that off on whatever
page size you have. And then just measure
how big the radiuses are. You need to be able
to fit eight radii along the shortest
edge of your paper. That way you don't have to then worry too much about measuring. Talking of measuring, then
we're going to need a ruler. Although a ruler in this art is mainly used for
its straight edge. Not necessarily to even measure. The only times we measure is to open our compass initially to determine our scale of the page and know
where the center and how big our paper is. The rest is just the proportions of the shapes we're drawing. I would recommend a longer one that ensures
that it reaches all distance parts of your page so that your design doesn't get interrupted
for finer details. I like using the smaller ones. I would recommend that it's a transparent one so
you're not blocking your view when you draw my
favorite one, is this one. Bigger things than
this, for the small. You're then going
to need a compass. Whatever compass you go for. I will talk to you more about
that in the next stage. But if you do have a choice, have one with a pen attachment. In this art, we use so many different pens and brushes and pencils and metallics and all
sorts that can go in there. I'd rather personally have a cheap compass with
a pen attachment, then a fancy one
that has a lead. Then we need some pencils. I am a huge fan of
mechanical pencils. They keep always sharp, they keep consistent
with when you draw. I like the little rubbers and erasers on the
end which are quite thin because something
like this will be very difficult to use for
final details in geometry. This one I would only use
free erasing the full grid. Otherwise a zero eraser, which is thin and brilliant for minor errors
and for weaving, which is what we're
going to be doing later. I would not be without
waterproof fine liners. That is because when I
construct on watercolor paper, then I like to outline my design of the lines that I'm keeping in waterproof
fine liner. Then I rub off the
construction lines and then I can paint
directly onto it. Any other marker or pen will bleed into the water and you don't want that. Well, unless you
want to incorporate that into your design. These are
probably my favorite. The ones that I use religiously. I would not be
without golden pens, metallic pens, copper, silver. All of these I have
lots of different ones. I like the thinner ones
because the 0.7 or something, I think 0.8 yeah, 0.8 of a millimeter. Only slightly thicker than
my pencil and fine liners. And they go in there, all the
thinner ones go in there, but sometimes I use
the thicker ones. My personal favorite
is this one. I know other people prefer
this one or this one. For me that make works best the consistency of
the metallic paint and how shiny it is and how it slightly
raises above the page and it helps the water stop from spilling, It's
just brilliant. Then if you choose
to paint with me, you can obviously use pencils, pens, markers,
anything you want. But if you choose
to paint with me, you can have these,
all the separate ones. I don't personally
mix them separately, like this, I work straight from that. But you will need a little bit of water, different brushes. This one you will need a fine one if you're
going to paint inside the heart or bigger one. If you're going to
do wet on wet or background to do this, then if you have water
colors and use them already, you will have those
brushes already. What's really quite
nice for this design is to use watercolor pencils.
I really like them. You can blend them so
nicely and have more of a control in a small
constricted space like these if you want to use
watercolor pencils and then you can go over some
water brush like that, that's the nice one. Then what I do recommend is using the template to come up with ideas and to practice your compass if you're
not very confident. But what might be nice is if
you have some tracing paper, I like the thicker one. This is 90 GSM. There's thinner ones
that break too easily. If it's thicker, you could
actually use your compass to practice on top and get
really good at using it. Or just with a high lighter, where you might
want to visualize different orientations of heart, different configurations
that create your own ideas. You might want to use some masking tape to secure that onto your
watercolor paper, on this paper, or
you might just want the masking tape to create
a nice border around. If you're going to use
painted background, that's a good idea. And I also sometimes use a pipette to control
the amount of water I put in my watercolor.
4. Using the Compass: Okay, As you may
have guessed it, we're now going to
discuss the compass. Actually, the correct
way of saying it is it's a pair of compasses. A compass is the thing
that gives you directions, but it's just too
long to say each time we're talking about
a drawing compass, so we can not be told off
for saying it wrong now, I honestly didn't know I had that many compasses until I had to film this for you guys. The reason why I didn't realize is just
like with everything else, I have my favorite and I go back to it over and over again. It's a bit like with
makeup or your shoes or meal that you like to cook, you just go back to
what you know best. This is my all time favorite. Not every Staedtler
one is as good as this one. This is I think called
the mars comfort. It comes with a box with
some other things in, it has like a long pen attachment. That is not why I like it. I like it for the
pen attachment here, the normal one, not the
extended 12 other things. There are two ways
to change the width. If you want to change it quickly and make a bigger change, you press these
two little handles here which releases it, and then you can freely go down. But if you want to, then fine tune and make sure
it clicks like that. Because sometimes it's in between the spiral
here, it's not quite. You need to make sure it
clicks so it doesn't move. Then you have this
cogwheel which then moves it in and out more
gradually. That's fantastic. I put my mechanical
pencils here to construct. I put my fine waterproof fine liners here to outline before I paint. I put my metallic
pens to outline with. I sometimes put a
watercolor brush in there. For example, if I have
a circular outline and I want to do wet on wet. It helps me to put
a water color brush in there which I've
wetted outlines. Then I know nothing
will feel beyond that. You could put ruling pens with masking fluid
markers or anything. This one, the other thing
I love about it is how thin and precise the pin. It's the point, that's
the ultimate one. However, you might
have any of these. If I had a choice, I would much rather go for any of the ones with
a pen attachment, even if they're cheap and not fancy over these ones that
look quite professional. But I can only use them to construct and I can't do
anything else after that. If you're doing a design which is entirely made
of straight lines, you still have to construct
circles to begin with. But let's say you erase all
the circles after using this. And then you can use a ruler and shiny pens to outline your work. Then that's fine, but I
often outline curves. In today's design, especially it's entirely made of curves. I would go for these. This is what you probably get in school. It's not that bad, as long as it's not too flimsy. Have to tighten it here,
points not so bad. This one is quite good actually. This one is also a
school type one. But probably the better one I would be very
comfortable using that. I think this opens widely. And you can have a
variety of coloring pens and pencils in there that's very nice for teaching
the kids to use. This one is just another one, I'm not too keen on this one, it's a bit too smooth. These two very similar
miniature of that one. I even got this, which
I haven't tried yet. That's a fairly new
addition to my collection. If you flip that over, that is a ruling pen, which you can put
some liquid into it and draw perfect circles with either watercolor or any other paint
or masking fluid. I'm yet to try that in design, but you could
probably figure out a way of using that
in today's design. But I'm sticking with
this one actually. I'll demonstrate one of these
and one of these, honestly. It's not hard to use them. It really isn't.
Whether you've used them or not, I would not worry. It's just making art and having that beautiful regularity
that the geometry gives us. This is very small,
I'm not used to. I'm going to show you what
I do with this first. The main movement is to
hold that comfortably. I feel like I hold it
between these three fingers, but mainly the thumb
is mainly there. All I'm doing is this - there is a reason
why this is cylindrical. You want to roll it
within your fingers one full turn if this is the point and that's
where the pen would go. I want to be able to
rotate this between my fingers until that pen came
back to where it started. I'll show you that again. Now. I'll show you
the same thing, but with the point,
touching the paper. I'm not even pressing hard. I'm just showing you the
movement between your fingers. Back and forth. That's
all you're doing. You really might
want to just tweedle that between your thumbs and
learn a really nice skill. That's really what
it is. It's like screwing and
unscrewing something. But you really aren't moving. This is just rotating.
You're doing that. You're not really changing how you're holding that,
you're gripping it, you are just rolling it from the start of your thumb to a bit
further and back. That's all there is now when you actually want
to start using it, the mistake I commonly see, usually with
younger students, but the same is they want to
hold both ends like that. No. Also you don't want it to look like upside down V shape. You want that leg to be perpendicular straight
on top of the paper. I don't want to
touch that side or put any pressure on
that side whatsoever. Let's just put a pen in
there, that would be useful. Also you want to make
sure is when you first start look, that's
completely wrong. You want them to
be the same length when they're close like
that, the same length. And then you open it to
any random distance. Now all the pressure, all the strength of
my hand goes there. I like to hold it quite low. It gives me a lot more control in putting the point
wherever I want. I'm going to put it
wherever I want, press down because I
like to feel how I've punctured the paper,
be able to see it. Now that I've put the
point in the right place, I just grab it here. Just to move my hand to the handle. I don't
touch any of this. I don't hold it like that, I don't pull that, I
don't hold it here. Sometimes I see people holding here - it is a handle for a reason. Now I'm going to just
lean slightly and let its weight take care of itself. You press here, that's
a straight line. Then you press down here. You lean that so it touches and now we're going to do that
rotation with the fingers. I'm going to make a smaller
circle with the same center. The pressure goes on
that leg with a point. And once you're happy
with where it is, just transfer between
you three fingers, lean towards to make
sure that it presses. And then you can experiment
how hard you're pressing. I'm going to press harder
here, just to show. But the moment I'm
pressing harder here, what happens? You can't see. The moment I press
harder with my pencil, my other point comes out. And really the one thing to avoid is this moving or
coming out of the point. Just leaning to the other one, but you're only pressing along that stays as straight
as possible, that can lean. I have a little
bit of a technique that I show my younger students, and I'm going to use
that one because it's what they will
be using at school. This is not awfully sharp
for very good reasons, but I'm going to put that
there anywhere along there. I'm just making a random thing providing that's nice and tight. You can push down here, hold it down here,
and not up there. And then gently move the paper once you have placed
the pen lead down. And do that for a full turn and come back
to the original position. That actually makes
quite a perfect circle, despite the fact that it's
not really a proper technique, especially if you're
doing partial instead of a whole circle
like we will there. And you want to be
able to see where to stop and you're
blocking your own view. Rotating the paper and doing that is a very
handy thing to do. You could still do the same with a normal technique
and just gently help yourself by doing
both the movement I showed you and
rotating the paper. Because I did it too quickly, mine jumped out,
but it does work. I'll show you this one. I feel like this is too
small for my hands, but that's not good because
that's moving around. Where should I go? I'm
going to just make a random circle here. It's just more for my
fingers. There you go. What I would recommend is
that you take the template I showed you in the
previous video, it's page ten in the
downloadable package, and you can go and just do different circles on top of the template
and practice that. I'm going to give you
a little exercise to try and see how things
build up so beautifully. If you draw any random circle,
no measuring required, just repeat that because I run out of steam
towards the end, then anywhere on
the circumference of that circle, the point again. And the new circle will
go through the center of the old circle because
they have the same radius. The length from here to there, from there to there, equal. In fact, from here to here, from here to here are equal. If you visualize
what happens if you connect either the two
intersections or the two centers. Let's stick with
the two centers. What happens when
you connect them? It is a straight line. You need two points
for any line. If you add the third
one to your design, again start with a random one, then another one anywhere on the circumference, the
third one, however, you have to choose it to be on the intersection,
either of those two. But I don't have
space in the top. What happens if you
connect the three centers? Now they are the same distance. It's going to be an
equilateral triangle. You can keep doing that. You've guessed it. You
may have guessed it. If I go around, I can't
do a square this way because there are no four
equal distances round there. I've got 1234 already
and I'm not finished. The square is done
a different way, but if I go all
the way around 12, second one, third one. And I'm going to keep moving
to a new intersection. Every time I do one, I
create a new intersection. New intersection,
going one direction. I've gone anticlockwise and a new intersection and a new intersection.
What have I created? Now, what do you think
is going to happen if you join the centers of
the six circles around? It's going to be a
regular hexagon. And that's the whole pattern
that we're going to learn, revolves around that practice. On that practice,
on your template, See which compass to use. But honestly, it's
as simple as that. Take that push down on
one leg, lean into it, and either rotate that or
let the paper do it for you. You will be an
expert in no time. If you're already an expert, move along and show us
you inspiring designs.
5. Constructing a Heart: I'm going to just draw a line down the
middle of the page. Roughly, I don't
need to measure it. Just a rough line down the page. And I'm going to mark where
roughly my center is. I'm going to use a
radius of 2 centimeters. I'm going to go
from zero and make sure my point is
on 2 centimeters. And now we're ready to
draw our first circle. This first circle isn't
actually part of the pattern, but without it, we
can't build the grid on which to draw our hearts. I'm going to press that leg, that's where all
the pressure goes. I'm not touching the other side. Going to hold the handle, slightly leaning towards
the direction of turn, going all the way around
from my first circle. Now what's happened
here is that we created two intersections between
the circle and the line, and everything happens
at the intersections. Now we've got two
other points where to draw another two circles
with the same radius. Once we've chosen that width of the radius, we
commit to that. Okay, I'm going to go below. If we've done this correctly, our lead should go through the center of the
previous circle that we drew that went center. Now this was the
original circle. And then I'm going
to go above and start there for the second circle, my second intersection, if
we're doing this correctly, it should go through the center below which was the center
of the original circle. There we go. Now what's happened
here is we've created two more intersection on the side on the right and
two more on the left, and those will serve as the
centers of the new circles. There's going to be four
more circles. I like starting on the right and working
on the right of my paper. I'm going to, but my point here, I know now that the new circle should
go through this point, this point, and even that point. Now we have three
reference points. Through which circle
will we have it? That is the circle. And the last one on that side
will go through there and it intersect those three
points point above, make a full turn. They went through that. I felt it with the lead
going through the bump. It's very satisfying. Now we need to repeat the
same thing on that side. I prefer to work on the right, so I like to keep the same orientation
by rotating the paper. And I can just repeat
the process in these two points
as the lower one, the last one above it. Now this one has so many other
intersection points to go through. There we have it. We now have six circles equally arranged around
the circumference of the original circle, which actually isn't
part of the design. Now, you will notice now that the original central circle is now being split into
six equal parts, each of which arc is one sixth of the
circumference of the circle. Now to make the design
of a single heart, we're going to be using
parts of the circles, parts of the arcs that
are different lengths. The first part is
at the top here, that is where the heart starts. And we're using 4/6ths of
the full circumference, starting from the
line of symmetry, where it's a reflection
on both sides. We're going to start
from that line all the way around and stop when we touch the original circle,
the central circle. Now I'm going to go over with the pencil again before
I move on to a pen. In the final design, the outline of this
heart is not going to be part of the design because we have to thicken the line. I don't want to go
with a permanent pen. All I'm going to do is repeat that part of the
circle that I need. I'm starting from
the line of symmetry all the way to the
central circle. I'll repeat that again. That is a mistake here. That is the top
part of the heart. Now you might visualize the bottom part of
the heart is here. In fact, that is exactly the same arc
as this one up here, but two
radius lengths further down. Instead of where we started with the center point on here, we move not one, but two down. This is actually in fact,
a circle we haven't drawn, but that arc is part
of that circle there. And we're just going to draw
this one sixth of the arc, because we don't want to
overload the drawing. This is where we
were a minute ago. Now we're going to go 12
lengths, the intersection. And again, I'm going
to go from the line of symmetry to the arc
I already drew. Hopefully this should
blend in nicely. Go nice and gentle at the
point where they merge. There you have it. One half
perfectly shaped heart. Now we need to repeat
on the other side. And of course that's
a reflection. Now we need to go to this point and draw 4/6ths of that circle. Starting from the edge
of the middle circle. From the edge of
the middle circle to the line of symmetry, because that's the direction
in which I'm going to draw. I can see to repeat this a few times so you can see it nicely and well. And then we should be able to delete any of
the other lines there. Finally, we need to
complete the heart. I do in this one sixth of an arc with a center down here
on the bottom left. That is two points further from the last
point we were at. Okay, and then try gently to make the blend together
nicely on the edge. Okay, I had a bit
of a momentum here, so we, and there you have it. That is one complete heart. One complete design.
6. Thickening the Outline: Okay, now we're going to
make this heart thicker. And there are a few
things to consider when thickening a
circular outline. If you're thickening
a straight line, you can go as wide as you'd like on either
side of the line. However, here,
we're a little bit restricted by the
fact that we need to ensure that all the circles cross in order to
create that shape, I'm going to go on the
inner circle first. I'm going to create a
circle that runs on the inside because that
has more of a restriction. The circles on the outside
are a bit easier to do afterwards. If I put my
compass too close together. Because, for example, I want to make the outline really
thick because for example, I would really like to paint inside so I could do
with more space inside. Then you might be tempted
to go too far inwards. And what might happen is that we draw two circles
that don't reach far enough to cross and create
that shape of the heart. I'm going to go and show you how to draw the maximum
thickness possible, that if you decide to go
different, you can go smaller. It's easier to go thinner, but you can't go any more thicker than I'm
going to show you. If you would prefer to do a really nice painted
background with a thinner outline of the
heart, then that's fine. I'm going to show you how
to make the lines thicker. Okay. We need to ensure that
the two circles that go on the inside of this shape
cross together on that line, the same way as they
did here and here. That's what this line is for. In order for it to cross, we need to at least
touch that line. If it's slightly less and it doesn't quite
reach that line, then we're not going to
be able to draw a heart. We need to at least open
our compass from that center to touch the
line or a bit beyond. Really, your lead of the
compass starting from here needs to go anywhere
between this line and that arc. Obviously, it needs
to be less than this arc for it to
go on the inside, but it needs to be bigger than that line in order for
it to actually cross. It looks quite like
a small space, but really changing that
much makes a big difference. I'm going to go with a maximum. And the maximum is to just touch here rather
than go beyond. Now for me to know exactly
where the maximum is. To help myself,
I'm going to align my ruler using these two
centers of that circle. Just mark on that vertical
line where that point is. That will be the point that my shortest possible radius
on the inside can be. Now I have a reference
point of how far to go, it's better to go slightly
beyond the slightly less. Okay. Because then we'll struggle. So I'm going to go a tiny bit beyond just to ensure they go. I think that's
pretty good. Sure. The other thing
here is I need to know the way I did here is
how far to go and to stop, I need to work out where is
my 4/6ths of my line is going to go. I don't want to
draw full circles. The picture is going to get too busy to help me with that. I'm going to draw two
more very faint lines connecting the two centers on
the right that we're using. Anyway, what that is going to do is what that line
in the middle does. It tells us where to start drawing and where
to stop drawing. I just extend a tiny bit beyond, make it nice and faint, this will come off,
it will be easier than drawing lots and
lots and lots of circles. In order to just pick
a few arcs from that, I'm going to draw another
line here in the same way. See how I'm using my
leg to align that. Okay, Now I know that I can start drawing my inner circle
with a center on here. And starting from
there and going. And in order to know where
to stop, where 4/6ths is, I'm going to go and stop
exactly on this new line. This is what I'm
going to do now. Okay, I'm going
to start here and press all the way
around to that line. I'm just going to
repeat that from the line of symmetry to the new vertical
line. There we have it. We should be able to match the new circle coming from
down here on that line. Now I'm going to draw the
other side before I come down. Because what I want
to do is I want to draw all the arcs I
need with this length. Before I change it
on this other side, I'm going to put
my center on here. I'm going to start
from this line, that's where it
tells me to start. And go all the way around
to the line of symmetry. It's going to go like that, that they should meet really nicely in the middle
on the line again. That's the deepest our heart
can go and you'll notice that it's quite a
long, sharp edge here. If you don't find
that attractive, you can go with a
thinner line later on. Now, before I move
on to find out where my outer
circles go and how to figure out that I'm
going to extend by exactly the same amount on the other side as I
did on the inside. Before that I'm
going to draw the two on the bottom
because they're going to use the same width
of that radius. If you remember, starting
from here, two points down, we're going to draw again from the middle line of
symmetry to the next line. These lines are now really,
really helpful guides, and I'm going to go
and do that now. I could have measured
across here to find that the same
way as I did here, but now I've determined
the width of my radius. I don't need to do
that. There you go. I can stop there and do the
same on the other side. Again, start from the line
going down to the middle line. And these two arcs should beautifully met down the middle. That will be the bottom
part of our heart. Now you might notice something
that is very useful here. The radius of the inner circle, of the top part actually ends
up being the outer arcs, the heart on the bottom side. Which means now we need to know exactly how far out
the outside should go. Because now we have
this reference point here to open our compass to. I'm going to just do this. This is the radius
of the inner circle. Then in the middle was the
radius of the original circle. But if I extend all the
way up to that point, that exactly will be the
radius of the outer point. I have guaranteed that
these two distances are equal by using the same
radius just previously. Now all I'm going to do here is open this slightly and be careful to see
where this joints nicely. When I press it
pushes down a bit. That should be okay.
I'm just going to check that it works
on this side as well. This one seems to be
a little bit less open, but it should work. I'm going to try it and then
I can slightly adjust it. I think that's about right. Yeah, there's a
slight bump there, but that can be repaired. And then I'm going to
try the other side and then see if any
corrections are needed. That seems like a pretty
nice and smooth transition. So I'm going to repeat it. I'm now going to confidently repeat the other side as well. You can layer how thick you do your arcs with a pencil because they can be raised
or repeated several times. Finally, we're going to
do the two inside arcs, however they are actually
the wider radius, starting from the bottom
and reaching here again. We're going to go from the
bottom to radiuses or centers, and we're going to go from
a line of symmetry to the line next to that
should blend in nicely. See, yeah, I'm just
going to repeat that. Yeah, that's quite
nice and smooth. Then from the other
side should join in this arc to the mirror
line in the middle. Just tidy this bit
up a bit off center, but overall, that's the heart. Now notice how the inner arcs are so much flatter
than the outer, but that is the
maximum distance. And it gives quite a bit of
room to paint on the inside. If you've chosen to go
even slightly above that, it will take a little bit off of both sides and it will make it considerably different
in the thickness. You can experiment and try. Now you'll see that
I've experimented it, you can have lots of different
lengths within that. That's one of two
centimeter radius. If you went for 2.2 centimeters, there will be even more
scope to variations. But I like to paint
on the inside. That's what I'm going to
stick with for today. If things go badly with
the paint later on, you can always just
extend the paint all over and then just
outline with the pin. That background doesn't
have to be blank. It's just I like to
paint on the inside. Now, in the real final design, when we're going to do
this on watercolor paper, we are going to not need
these middle lines. We're not going to go and thicken them with a
permanent pen or anything. The permanent pen is one of the last things
we're going to do, that's with a thick outline.
7. Extending the Grid: I tend to use three
different types of paper. My circular paper is 19
centimeters in diameter. The square is 20, and the four, the
rectangular one is 21. I use the same size. We will stick with two
centimeter radius. We should get that size. You could start on
different kind of paper. You could go slightly
bigger as well. Okay. My first job now where it didn't matter before when we were practicing a single heart. My first job now is to find
the center of my page. To do that, I'm going
to measure vertically, where half is since
20 it'll be ten, and I'll do the same on the
opposite side of my square. Now I want to draw my
initial line vertically. Now will connect
those two points. Again, mark ten,
where is going to be the centre of the first circle, Okay, so here's the start. Remember all of
this will come off. We'll try not to press too hard. I've measured my radius already. It is 2 centimeters. And I'm going to start
with the middle. Okay, here is the
initial circle, perfect. Now you'll remember
from before that we can put two other
ones here and here. Now in this extended grid, I need three below
and three above. I'm going to go 1, 2. Each one should cut through
the center of the previous 1. 3 and then above. Because we're humans, some
kind of error will accumulate. That's why it's a good
idea not to go in only one direction then if you start at one
end and the other end, that will be quite inaccurate. Now you'll see this
isn't perfectly overlapping here as it
so, but that's okay. 1, 2 and this is the
last one, okay. So the intersections
on the right, 1, 2, 3, 4, 5, 6 tell me where to draw the next column of
circles going down. As I just said, I'm
going to do three from the lower end and
three from the top. Because if I start here
and go all the way, they will get less
and less accurate. That way, I feel
like I'm spreading the error a little
bit more evenly. Remember, each circle should
go through at least two, if not three points
of other circles. One, 2, 3, and then I'm going
to hope that when I start from the other
side going down, they will meet in the middle. You can take your
time and practice this before you obviously
move on to this. Okay. That's not too bad. If there's a slight error, you can try and take the
average point where you feel like going to make up
for the error. Yeah, that touched well on both sides and yeah,
that's pretty good. Now we have 1, 2, 3, 4, 5. One, two, Okay. Slight error there. They shouldn't have
crossed like that. See if I can fix
it a little bit. Three, I'm going to go
down for the other two. Okay. This one
seems pretty good. Last one should, okay. Yeah, that's good. There's just a slight
inaccuracy there. And finally four. I'm going to do two up, two down on that side. It's a little too high there. Okay. I feel like possibly
the top has come out better, but it's almost perfect. Anyway, It doesn't matter. Okay. So now I need to repeat exactly the same
thing on this side. And you know me now, I like to rotate my paper
and repeat the process here. Okay, there we have it. The extended grid, you will
see slightly inaccuracies. It doesn't matter. You
can keep practicing. I am not a perfectionist. The more I accept this, the more free and happy I
feel about my art. Our brains will still perceive these shapes so perfectly because they're so
beautiful and curved. Now if you focus your
attention on the whole shape, it looks as if it's a hexagon. Each side made of four circles. And these are the six corners
of the hexagon going down. Remember we need the
line to go down. If you focus your attention
on the top corner, the actual corner circle
isn't part of it, but the two around it here
is where the heart lies. That repeats six
times at each corner of the hexagonal
now looking grid. And we're going to
do one at a time and rotate the paper so we
have the same orientation. The next stage will
be exactly as when we thickened the outline
of a single heart.
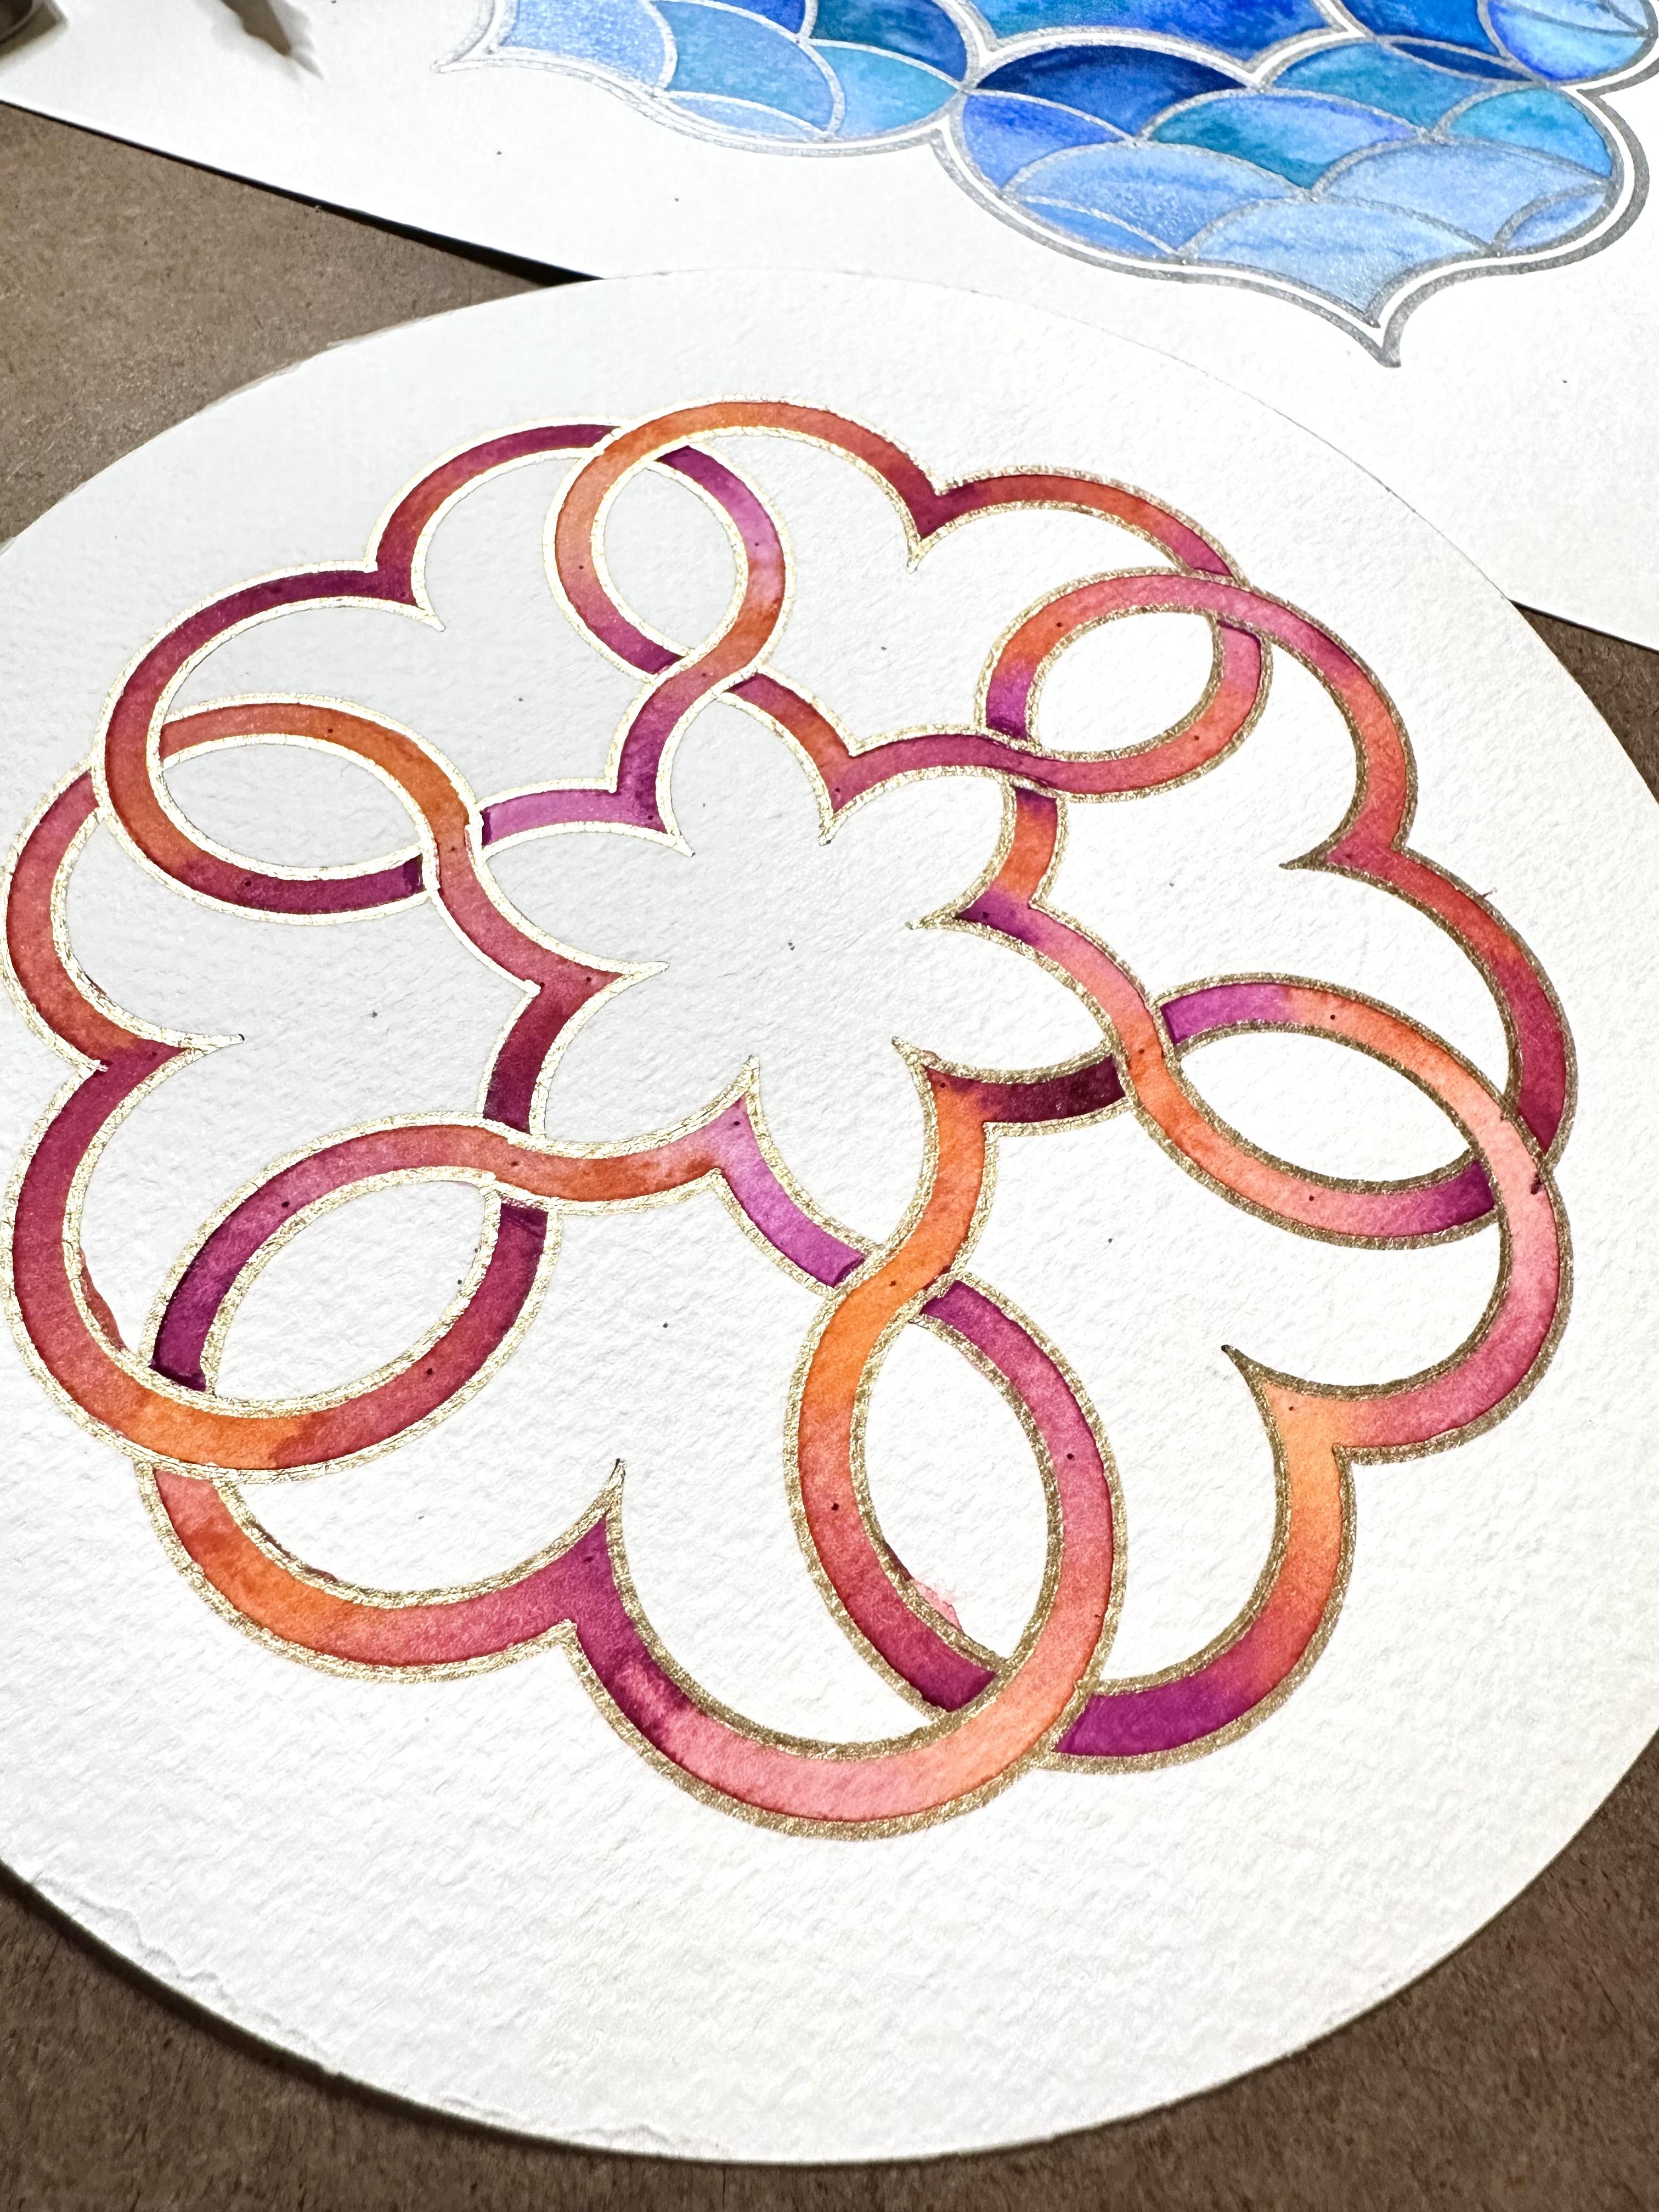
8. Constructing the Mandala: We're now going to
construct the rest of the Mandala trying to
reach this effect. I'm not going to start outlining
the actual heart shapes because we really don't want this drawing to become
too overloaded. It's going to get really
busy and difficult to see. Remember, those original lines aren't actually going to
be part of the design. We want to go straight with the circles that are
either side of this one. We're going to go
with the smaller ones so that we can ensure they're going to cross the
line of symmetry. Once we've established
the shorter radius, the rest will become easier. Now, if you focus your attention on this
heart here at the top, we're going to start there. Now you might remember that I drew two vertical
lines to help me. I will do that with
the first one, then we'll see whether we need to do that for the
rest of them or not. This is my two top centers. And then you remember 2, 2 down, I'm going to draw a
very faint line from this top center through
to the second one down. They're the ones I'll
be using anyway, very faint line and
I'll do the same here using my lead to a line and very faint
line down here. We know that if we
connect these two, we'll find about halfway where the maximum
thickness will be. I'm not going to draw a line, just going to a mark there. Now we might decide to go a little bit over it to
make sure it crosses. So it's not necessarily
100% the fullest thickness. But remember, this vertical, new line that we drew served as a guide
of where to start. And of course we stop here. I'm going quite faintly, but hopefully you can see again. I'm going to repeat
that on this side. From the line of symmetry
to the new line that we o, I'm going to repeat that
now on the other ones, I'm going to turn
that 60 degrees. Here is the new heart
at that corner. It's the corner that's
telling me where to go. It's the top two. Now, I'm not going to
draw these lines here, I just need to make sure I'm starting from
roughly above that. I'm going to go slightly beyond. If you need to do the
vertical lines, you can. But I feel like it will
get to see as long as they are crossing and that's the pencil that
will get erased anyway, just go slightly beyond. You can use that petal
almond shape to help you to go and make sure those
are drawn to the edge. Okay, another turn. These two appear. I do love rotating my paper
that. I feel like it helps me when I have the same perspective,
the same when I draw, paint a certain directions where I feel more confident drawing
in certain directions, it's how my wrist than
my hand naturally moves. For example, I prefer drawing vertical lines or
arcs going this way. I can't really paint
that way or that way. I can't twist my arm. I prefer to rotate. Okay, that's the bottom. There's top two, from the petal
going down to the middle. From the middle to here. Two more times there it
is here, that corner, the top two starting from there, stopping somewhere
in the middle. As long as they cross. The final one is here to two, either side of the one that's
sticking out to the middle. This is so therapeutic as well. I love that about geometry. Slow down, relax into it
then I'm going to take back. Now, I'm going to
do the same thing for the lower end of the heart we've just done now. Those two points is where
we need to go next, from the top to 1, 2 down. We only need to do one
sixth of an arc here, one here, one here. I'm going to start again
in the same order. From here. Then from the line, the guide that we made
down to the middle. And the same across
to the right, from the middle to this line. Now on all the other ones, I will just go to the
end of these two petals, so I don't have to draw
the lines 60 degrees. Again, here will the
top two centers, one going down vertically. Use these little
almond shapes to help. From here, 1, 2, I'll go just
one sixth into the middle. And then across from the middle to one
sixth to that petal. See, I went too deep there. And we can just delete
that later when I find my, my little rubber. Okay. It doesn't matter. All this will come
off anyway. Okay? Here, repeat, 1, 2 from the
top petal to the center. Then across one from the middle, the top, you can start to see that the flower shape that's starting to
shape in the middle, from the bottom of the heart. I absolutely love
that the six hearts are making this beautiful
flower in the middle. Okay, 1, 2. Down from there,
into the center. Across to the right. From the center up. Again, remember you can slow
this down if you need to. You can pause and you
can take your time. Finally, one to down. It's just coming
along beautifully. You can see how it's
just building up. I love how we call it the
construction because we're really building something
beautiful there. We have the outer
edge now we need to work out the radius
of the outer edge. And to do that, we are now really dependent on the
radius of the inner edge. If you remember the vertical
lines we drew at the start, I'll go from the original
centers all the way on the other side of the circle to meet that radius we just used. At the point where it
crosses my vertical line, I'll try and make sure it
matches on both sides. I'm actually going
to start here, check that it works
here, and then continue. There is the original center. This is what we were drawing. Now I need to extend
to this point here. Just here. Can you
see it just here? I want to just check that it
works the other way as well. Yeah, check that it meets here. Yeah, that's pretty good. Okay, We're going to stick
with that and see how it goes. We're going to start now
doing the outer edges of the top of each heart left. All I'm trying to do
now is make sure that I merge with the bottom marks that I've already done,
just like you did here. This one worked out really
well. To the right from the center to the. So that worked out well. We'll repeat top here and
try and cross with this one. Okay? Stop. Somewhere
in the middle. You could see roughly
where the middle is above the other one. Down until it reaches, it's a good idea to
slow down at the edges just to make that
smooth transition. It's worked out okay here. Okay, this is great. Some circles are
better than others. These might be slightly more
accurate, but that's fine. As long as the smooth curves, it's just looking great. Now I need to repeat the
same process on the bottom. Not the top two, but 1, 2 down on either side
of the mirror line. I'm just doing
that from the top, clockwise, 1/6th. It will join in with
that inner circle there. And the same on the other side, It's the lower end of
the circle of the heart. And I'll repeat that six times. The first one I
have the guide and it should, slightly high, feels slightly too high. We can adjust that when we go
with the permanent outline. This is still a
work in progress. Of course, there's
one complete heart. I'm going to repeat this
another five times now. Here we have it. A fully constructed
interlocking Mandala with the lines thickened.
9. Weaving the Mandala: Now we're going to weave. The Mandala weaving is my absolute favorite
art technique. I weave a lot of my
work, not all of it. Just so I don't get too
boring and predictable, but I absolutely love it. It can create this really
complex looking designs. In actual fact, for this design, that's got to be one of
the simplest ones to learn to weave,
which is excellent. The added bonus here is it's
not just random lines woven, but also because
it's a closed shape. When you weave it, it looks like they're interlocked and linked. That's an extra added
bonus because it's quite symbolic for the heart
to be interlocked like that. Now usually to be able
to weave properly, we need an even number of
intersections so that we can alternate between the one
shape to appear to go above and then the other
shape to appear to go above, or one above, one below. If you trace this one shape, for it to alternate, we
need an even number. Luckily, we have four
intersections at every heart. Every heart intersects four
times with every other one. I like starting on the left. And I always like to start
with the shape I'm looking at to go above first,
and then below. All we're going to do
now is actually delete the bits where we don't
want the overlapping here, we want it to not be a
continuous line underneath. It's basically interrupting
a couple of the lines. As you can see the outline
of the heart below. All it's done is just stop
there and continue there. It's just interrupting a few of the lines that we've
already constructed, that's all. Now, it might be tempting to delete a lot of the rest of the stuff as well, but actually we need the middle original
circles as a guide, so I'm not going to
delete too much of it. I'm using my zero eraser, which is almost as thin as a
pencil and it's very useful. Now you might not have that. Something like this
might be tricky. But usually pencils like these is the other reason why I
like mechanical pencils, they have the handy fairly
thin rubber on the back. Okay. Again, starting
at the top heart. Now I'm going to trace how the heart goes to the left here. I wanted to go above. I'm going to delete just it's going above the next
intersection with the heart. Don't worry about
intersections with other circles that
aren't part of it. You now need to only
focus on the heart above the next one,
this goes below. We need to interrupt
this current heart, which means the other heart on the left is
going to go above. So we're going to delete
those two lines now watch goes on top and then stops and
continues to the middle. That's really all we have to do. So we leave the other
lines nice and clear. I've deleted a little bit here. I can still see above, stop there, below. Now, instead of doing
the right hand side of the same heart, by actually doing the left
hand side of this heart, I've also done the
right hand side of the previous one because
they're interlocked, the intersections are between
two hearts at a time. Actually, we're doing
two hearts at any point. I'm just going to
repeat what I just did here five more times. Guess what? By
rotating my paper. Okay. This is the whole Mandala
constructed, weaved, ready to be outlined.
10. Outlining the Mandala: Let's start, okay. I'm being very faint here. I'm going to repeat
that. Going to go a bit braver. Nothing terrible
can happen, right? Maybe my pen is just
running out, okay? And then across here, from the middle to now, here we need to, remember, we can't go all the
way around here. We need to stop and restart. Now, here might be
a little bit useful to work at an angle and slightly rotate
the paper to help you. I'll rotate it so you can see on camera where
I'm stopping as well and from here and stop. My pen is definitely
running out here. Stop, then move the paper
again and continue. Stop in the middle. I'm still going to the middle, providing that's the
one going on top. If it's not going
on top like here, I stop at the other arc of the other circle, we're
going to repeat that. We're going to do 4/6th or 2/3rds, slightly less, because we don't go all the way to the middle. This one is slightly easier. Then here, stop and continue, but go a bit further in
here to the middle circle. That's why I said we
actually need it. Well, actually not the circle, it's the line rather
than the circle. It's quite close there. I'm going to repeat
this five more times. Okay, This is a good guide there because we've already gone a little bit further with that. And we can start here. They don't intersect,
they touch, but they do not cross. This is the full arc without the interruptions on
the left of the heart. But that's helped us to
know where to start now. Then the next one is where
we need to be careful and stop and then continue to that middle. Middle. Yeah. Yeah, I think that's pretty good. Okay. I'm gonna repeat
that four more times. Yes, my black pen
definitely ran out, so now I'm using
one that's blue, so don't mind the color change. We've done the top part
of the inner circles, Now we need to do the lower we need to think
now how far we can go. We're starting with
the shorter one because it's the
interrupted one, the one that goes behind. I can tell because
this side went behind, it will go behind lower end, behind this one,
slightly longer, two down shorter, one on the other side,
slightly longer. And repeat that here. Nothing crosses here. Right? This is the
whole point of weaving. That's how we know
where to stop. Nothing should be crossing. Unlike our construction
grid here, we don't cross. I feel like my radius
changed slightly as well. It's got a little thinner. This is the longer one crossing long. A bit further, shorter one. Now the good news
is my metallic pen is thicker than these. There's a bit of room
to maneuver and to cover up any mishaps. Like I said, every next stage is a second
chance to improve, but it's also another chance to mess up a little
bit, but that's okay. It's just part of the process. Okay, That heart's
looking pretty, I'm going to actually definitely going to paint this heart. Is emphasized, one color and
then a gradient going out. The next stage is to increase the radius and go beyond this. Now needs to match with, actually this is the
starting point because we have the vertical lines here. Let's use those to
increase the radius. That needs to match. Just here. Nerve wracking, shouldn't have to
be. There you go. Yeah, I think we're
going to go with that time because
when you press, I feel like that's okay. All right, let's now do the outer circles and
see what happens now. The first one is
the shorter one. Remember it starts from the
lines crossing to the middle. So much easier with this ben. Then the next one
Interrupt up to here, stop as soon as you reach
the next over the bump. And then continue
nice and slow here. It's joined in so nicely that first one
is working out well, the rest of them, we'll see. Let's try on this side, okay? Interrupted on the other side
of here, slightly shorter. We can always extend
them. That's great. See what happens here. Stop in the middle. That's
exactly what we want. That on top of the other, This one interrupted
from the middle, stop. And then over the other one, continue and slowly joining. That joined in
quite well as well. Yeah, slow down towards the end to joining with that flowery
shake in the middle. I'm going to repeat
that four more times on the outer arcs. The last couple didn't join in as nicely as the
other ones, but that's okay. Now we just need to repeat the same thing on
the inner edges. So let me see where
the start was. Let's start here. Okay, final stage
of the outlining. Is the inner arc on the
bottom slightly shorter and that one until you blending
with the final arc. Okay, there we have it. The outlined Mandala, I mean the shine is beautiful.
11. Painting the Mandala: For this section, you're
going to need some paints. Of course, you can decorate
it in any other way you like, but if you want to
paint along with me, you will need some paints or
watercolor pencils are nice. If you feel more in control
of doing it with pencils, you can mix up some colors and use one of these water
brushes afterwards. But I'm going to go, I quite like two
colors on this design. There's not that
much space to paint. I'm going with violet, purply violet, and
ultramarine blue. Usually, I like to
mix the two colors, where one goes above the other, one below. But I like the mixed. Today though, what
I'm going to do is start with one color. Going from the flower shape, painting outwards, blending
into the next color. Just trying something new. I like using a
pipette to control how much water I put into it. If you have one, I've
used something I had. I haven't bought
one specifically. I'm going to do that. My beautiful blue
is running out. I probably don't need
any more than this now. If I do, I will bring it back. I like to mix with this brush. That's enough for
now because I'm not actually going
to use the blue just yet when I mix that. I like to keep my water
slightly tinted anyway because I will essentially
want it to be very watery. I'd rather build up
the color gradually. I'm going to go with
just the water, and that way I can see where
I'm going to be painting. I'm going to go with
this brush now. I'm going to start
from here, outwards. I'm going to start
with purple here. And going outwards, I'm going to just
wet this first. I just about can
see where it is. You can make your water
a bit more colorful, but you'll be able to see it. See if you can see more. Anyway, I'm going to just dip
that and see how it goes. Nice. I love watching wet paint. Okay. That's kind of a bit darker than I expected it to be. Okay. So what I'm going to do is tear a piece of
paper in my napkin and just that make sure not
to use the painted bit. Okay. Now. Yeah, Maybe I prefer
the two colors mixed rather than gradually changing. I'll see how it comes out and make decisions as we go along. That's exactly what I
love about this part. You don't really know, it's not fully predictable
what's going to happen. I love that freedom. I think I like it when there's some kind of
mixture going on. I could still have the main
color here to be purple. Yeah, I'm definitely going to go over with the other pen
afterwards as well. Here though, I want purple
to go on the inside of this, I'm going to make sure per boys on both sides of
this bit under here, I will still want the blue to be my main color at the top, but with a few other
purpling nuances. I love the mixture
of two colors. I like that they can
exist separately, all they can blend into each
other, all they can mix in. And all of these combinations, then the intensity of the color
changes as you go around. Yeah, I like it mixed in a bit more because otherwise
it's kind of a bit samey. Here and there go a bit. Nice. Okay. Yeah. Decided to do
a bit of texture. Okay. I'm happy with all this, I'm going to repeat that
on the rest of the heart. I'm absolutely sure now
that once it's dry, I will repeat the silver pen, and then we'll see whether it needs any shading or anything
to deal with those lines. Now, I'm going to rotate
this way so I don't smudge my paint. Here we go, I'm now going to let the
paint dry and outline with the silver pen again and come
back for finishing touches.
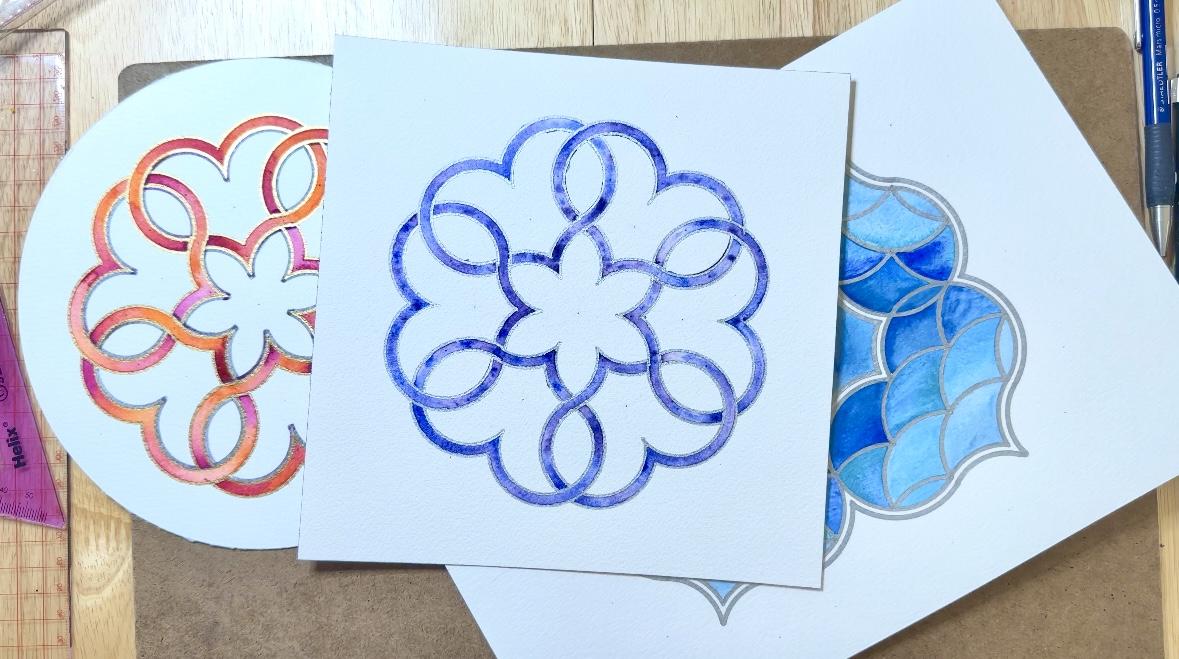
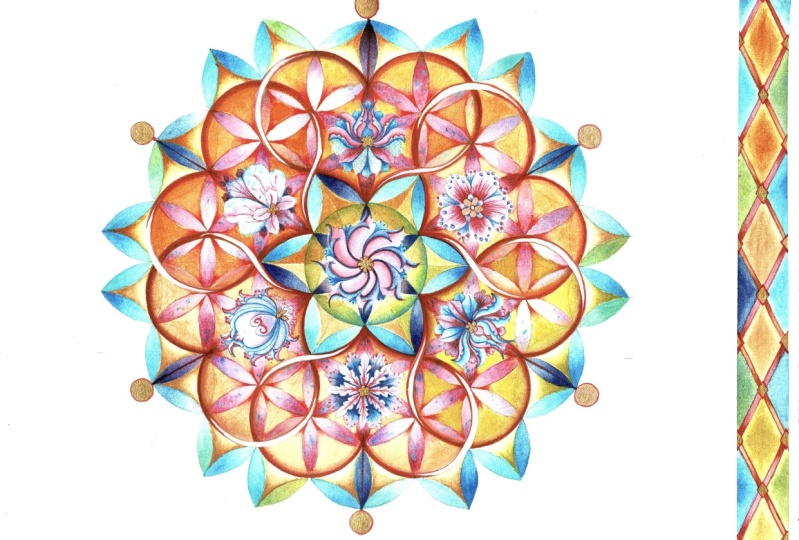
12. Design Variations: In this section, I'm going to show you a few
design variations, how you can simplify
things that might be too hard or how
you can extend the complexity or just change
the look of your design. Because I want you to be able to come back over and
over and create as many different
designs from this as possible and not just have
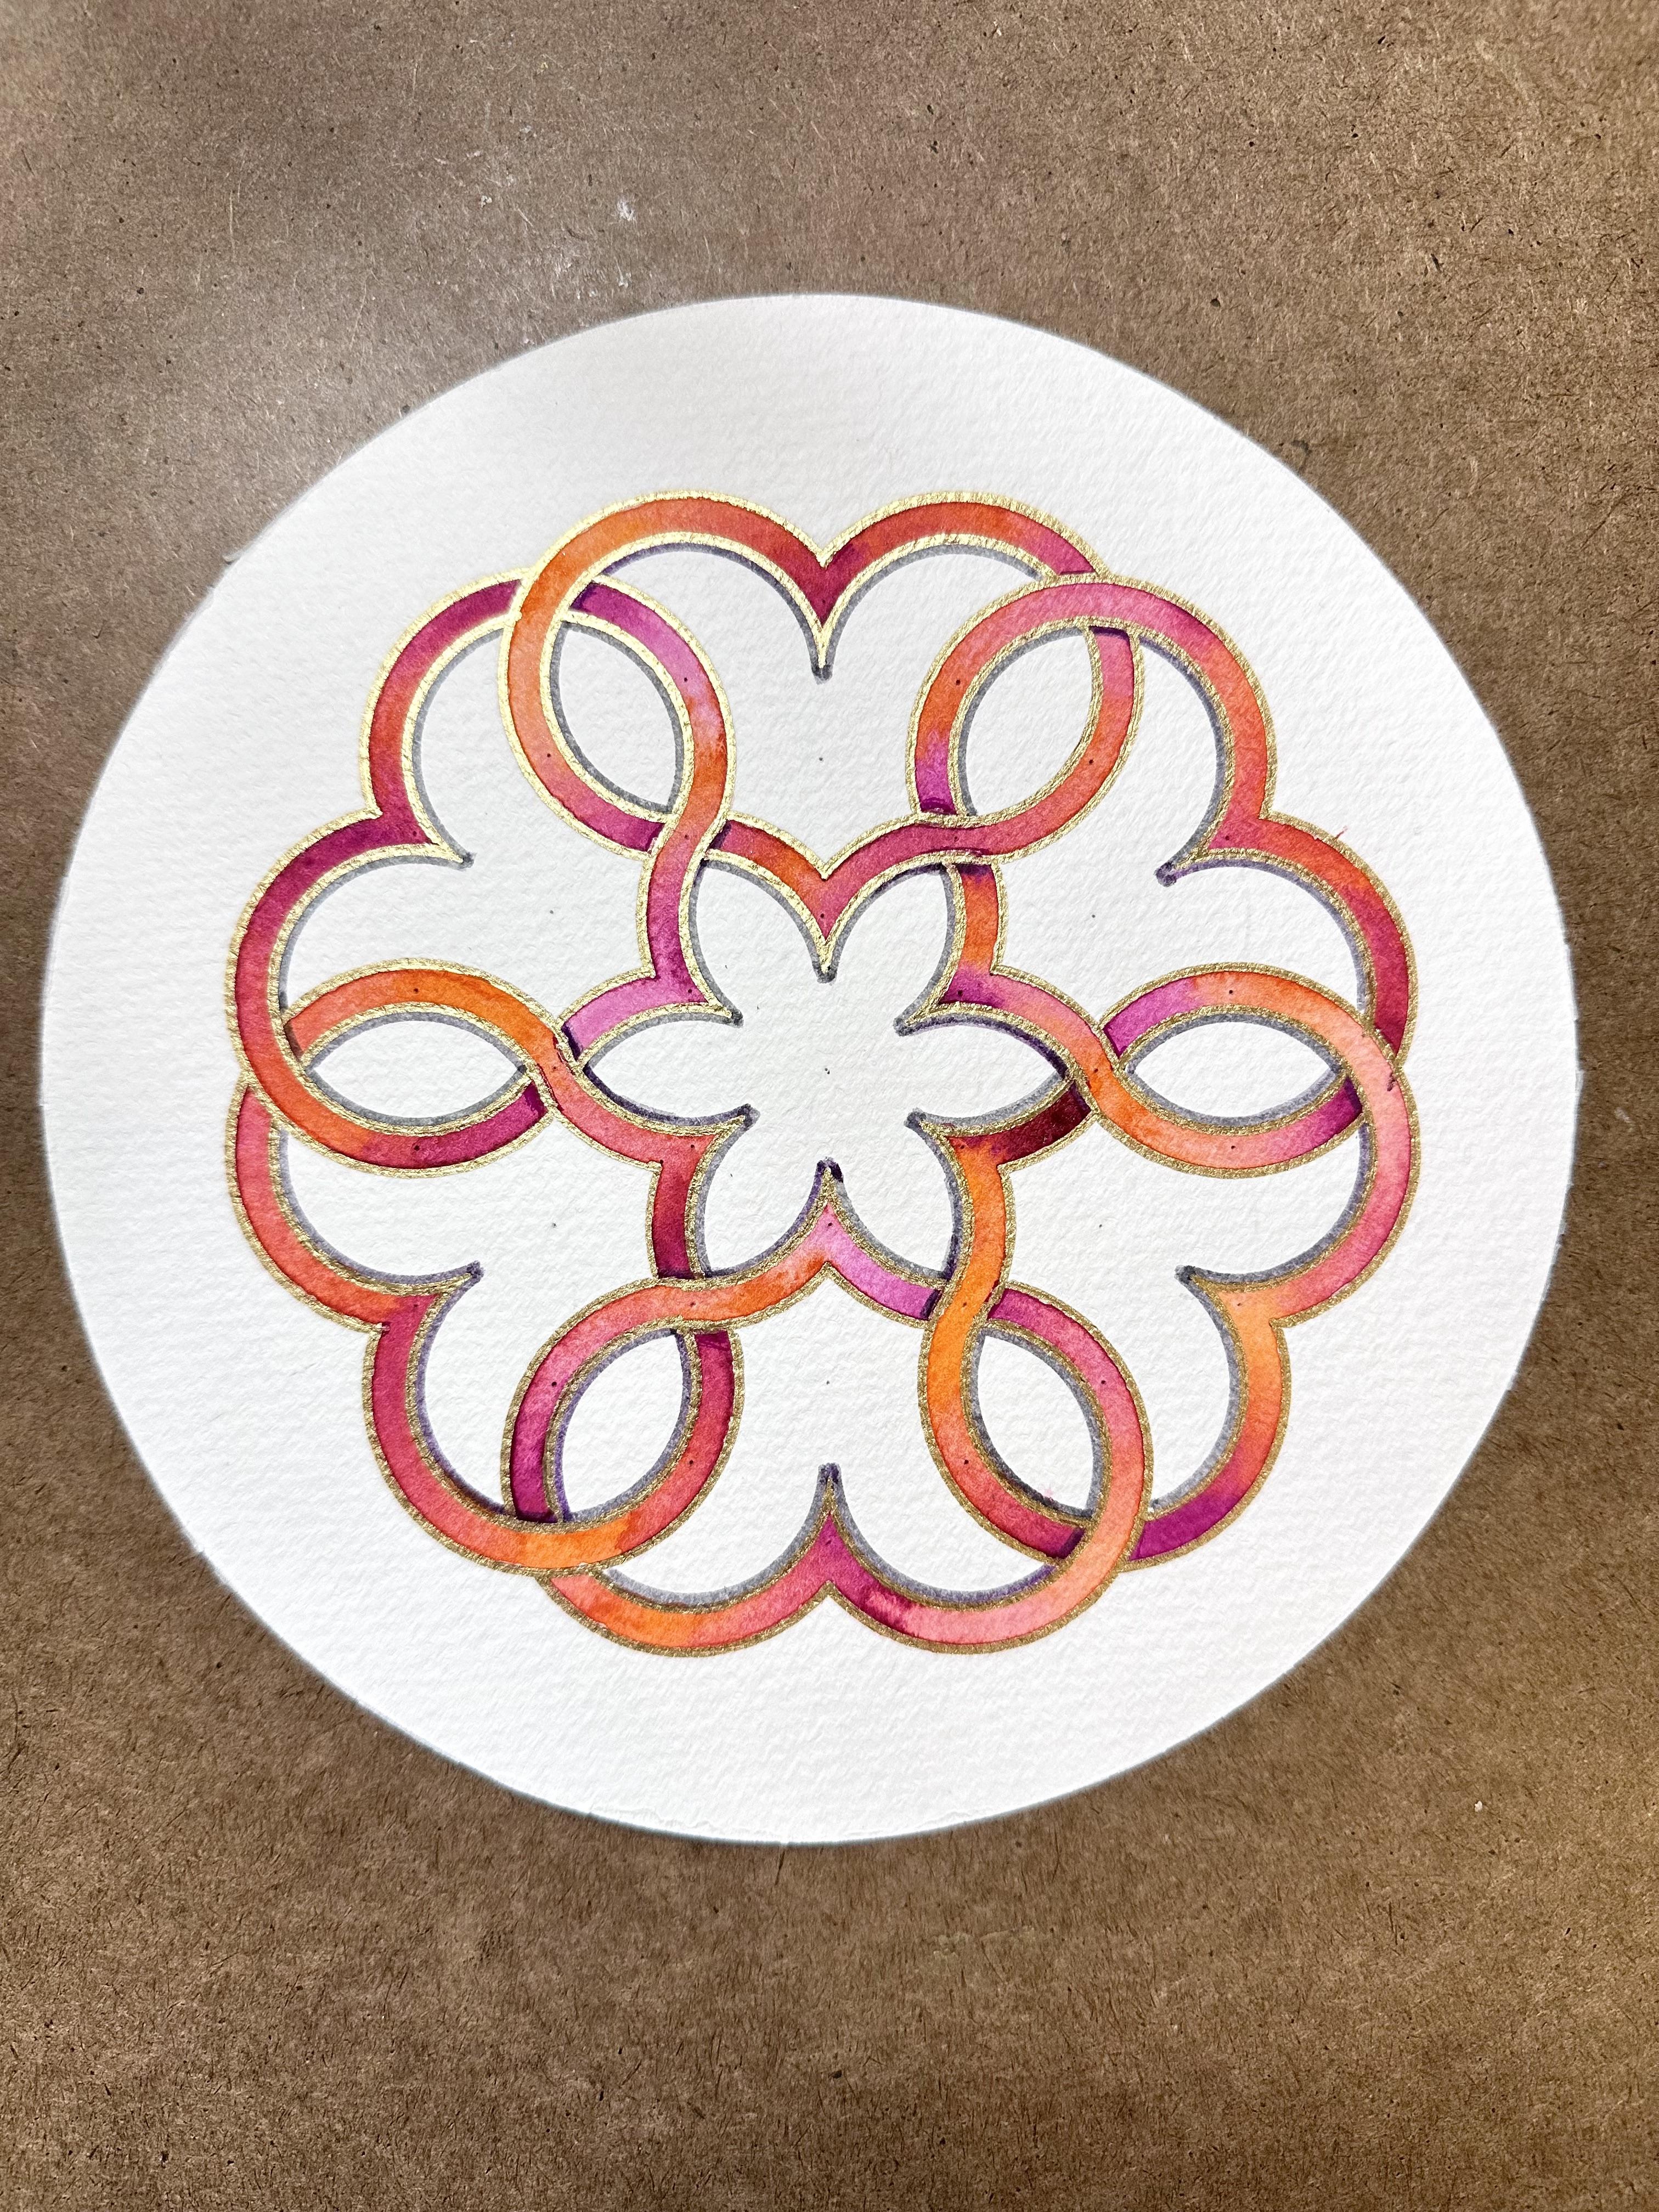
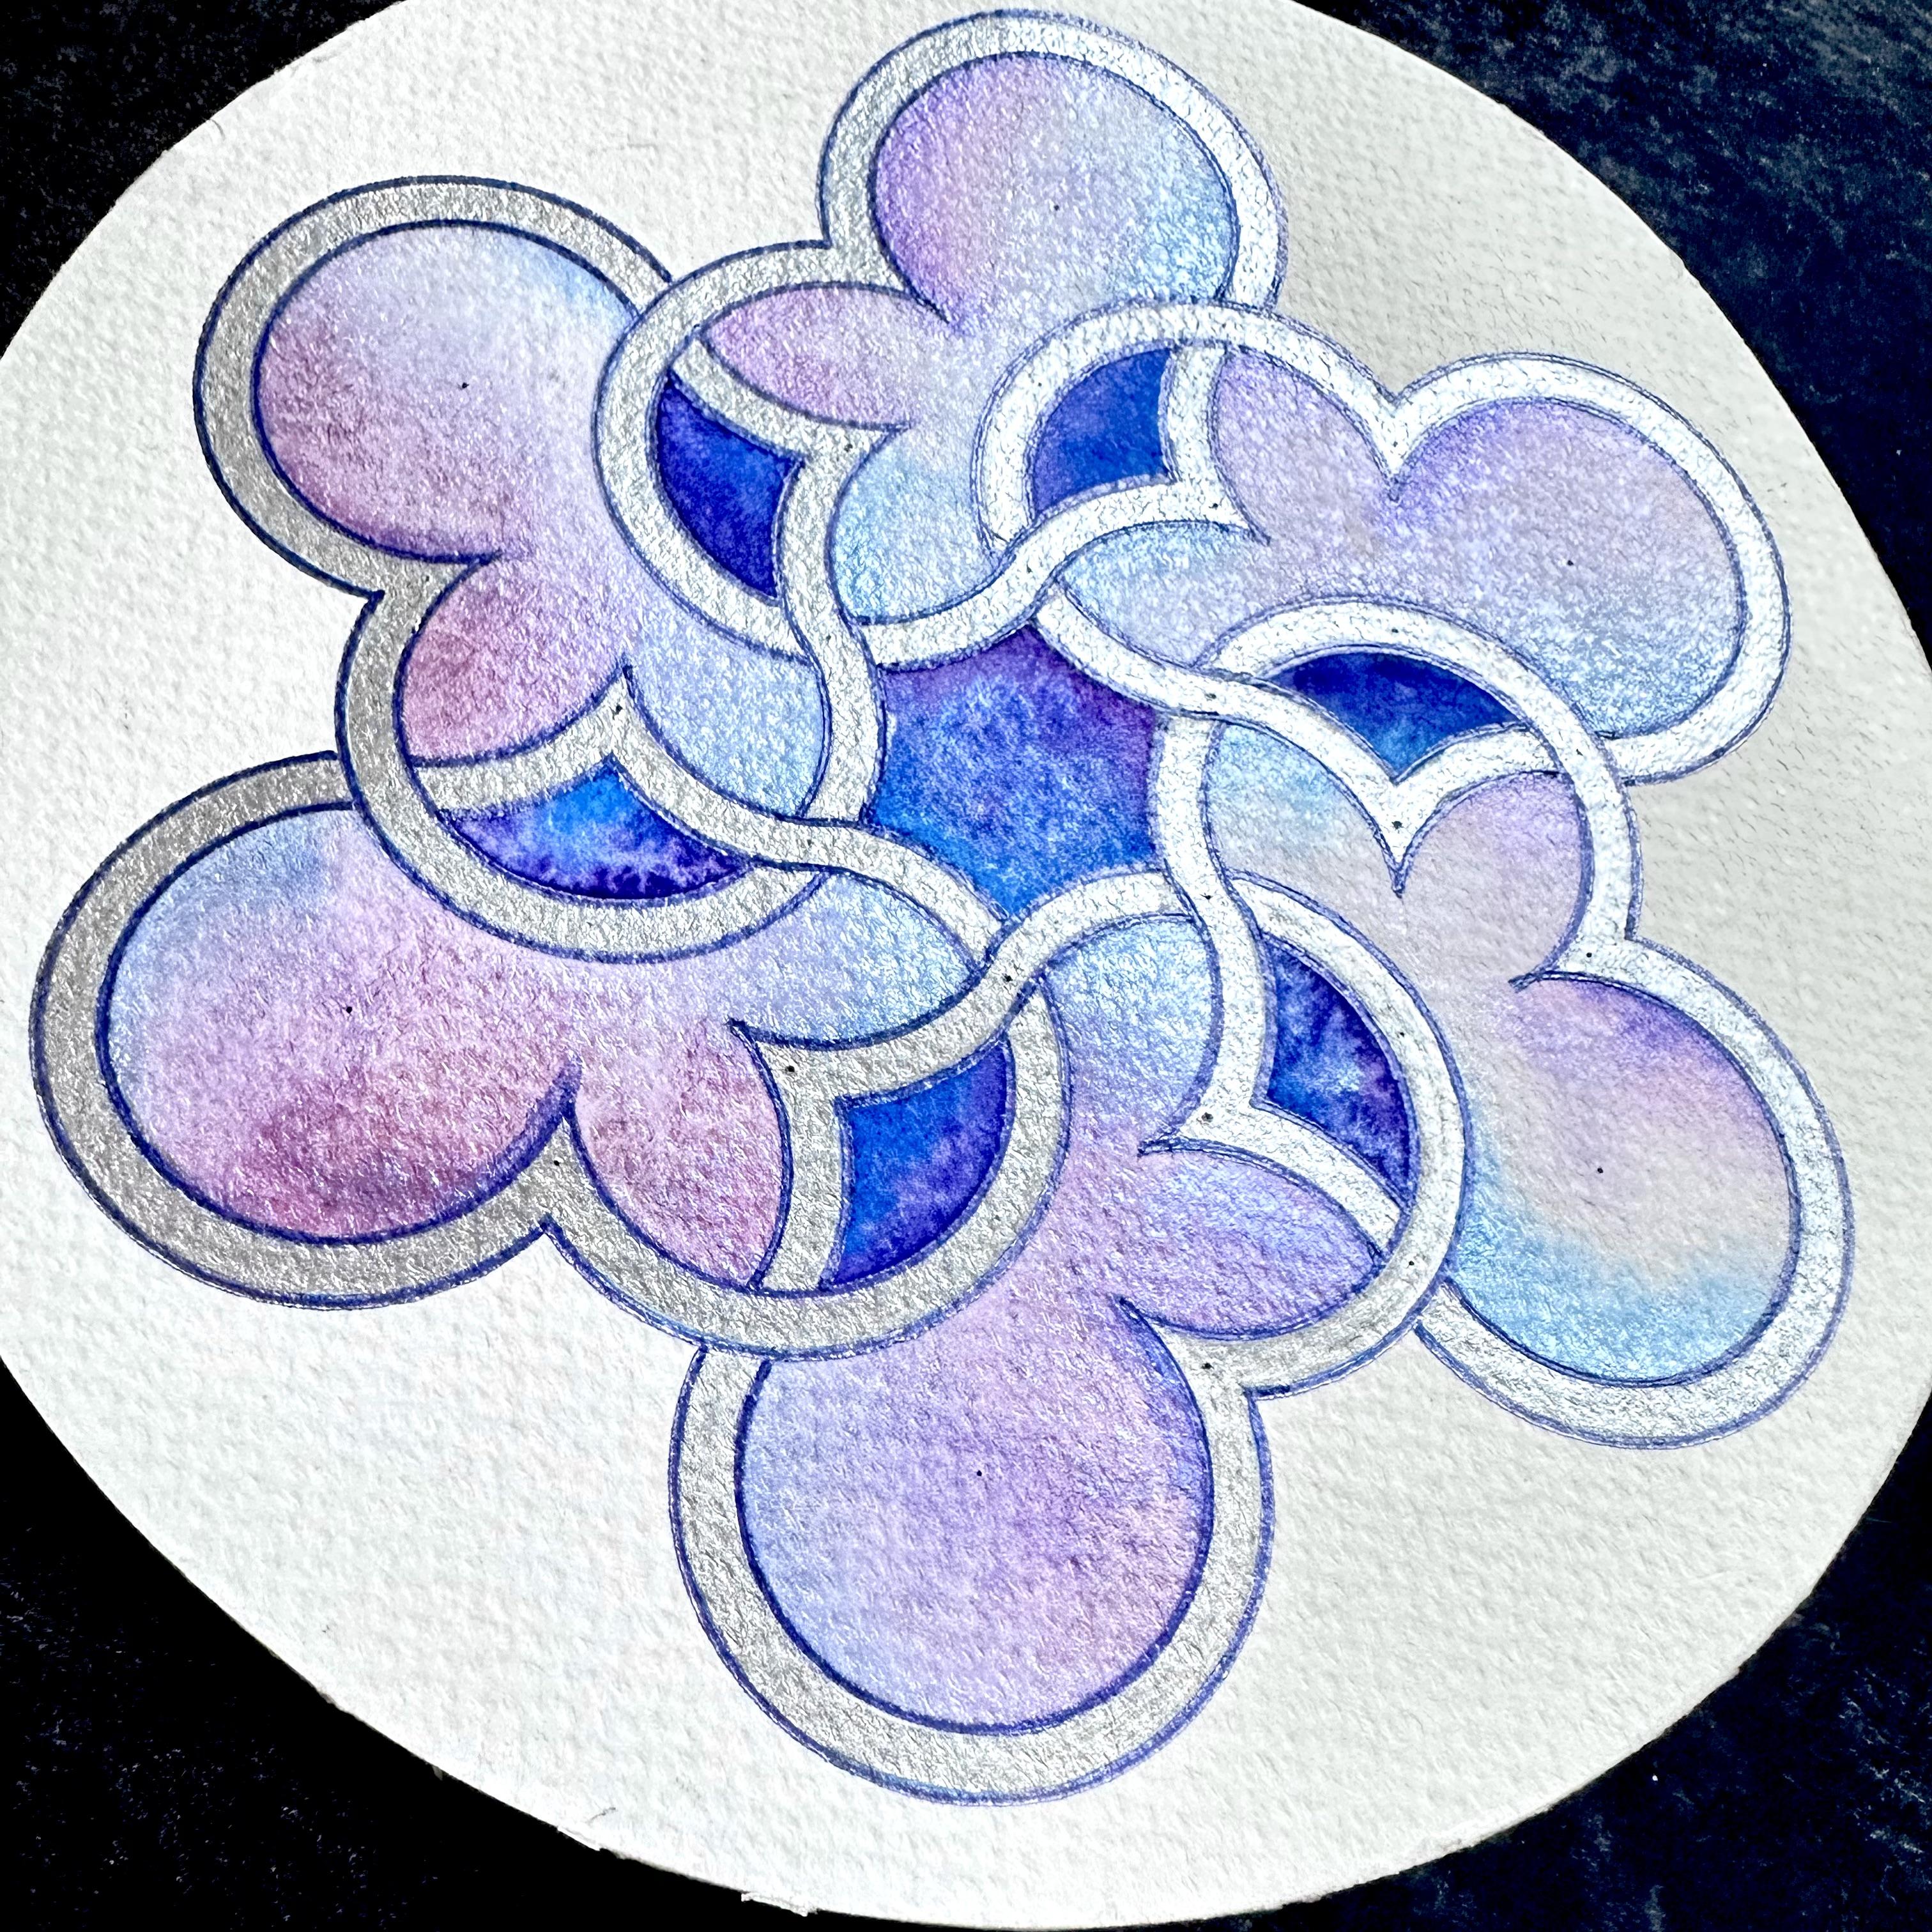
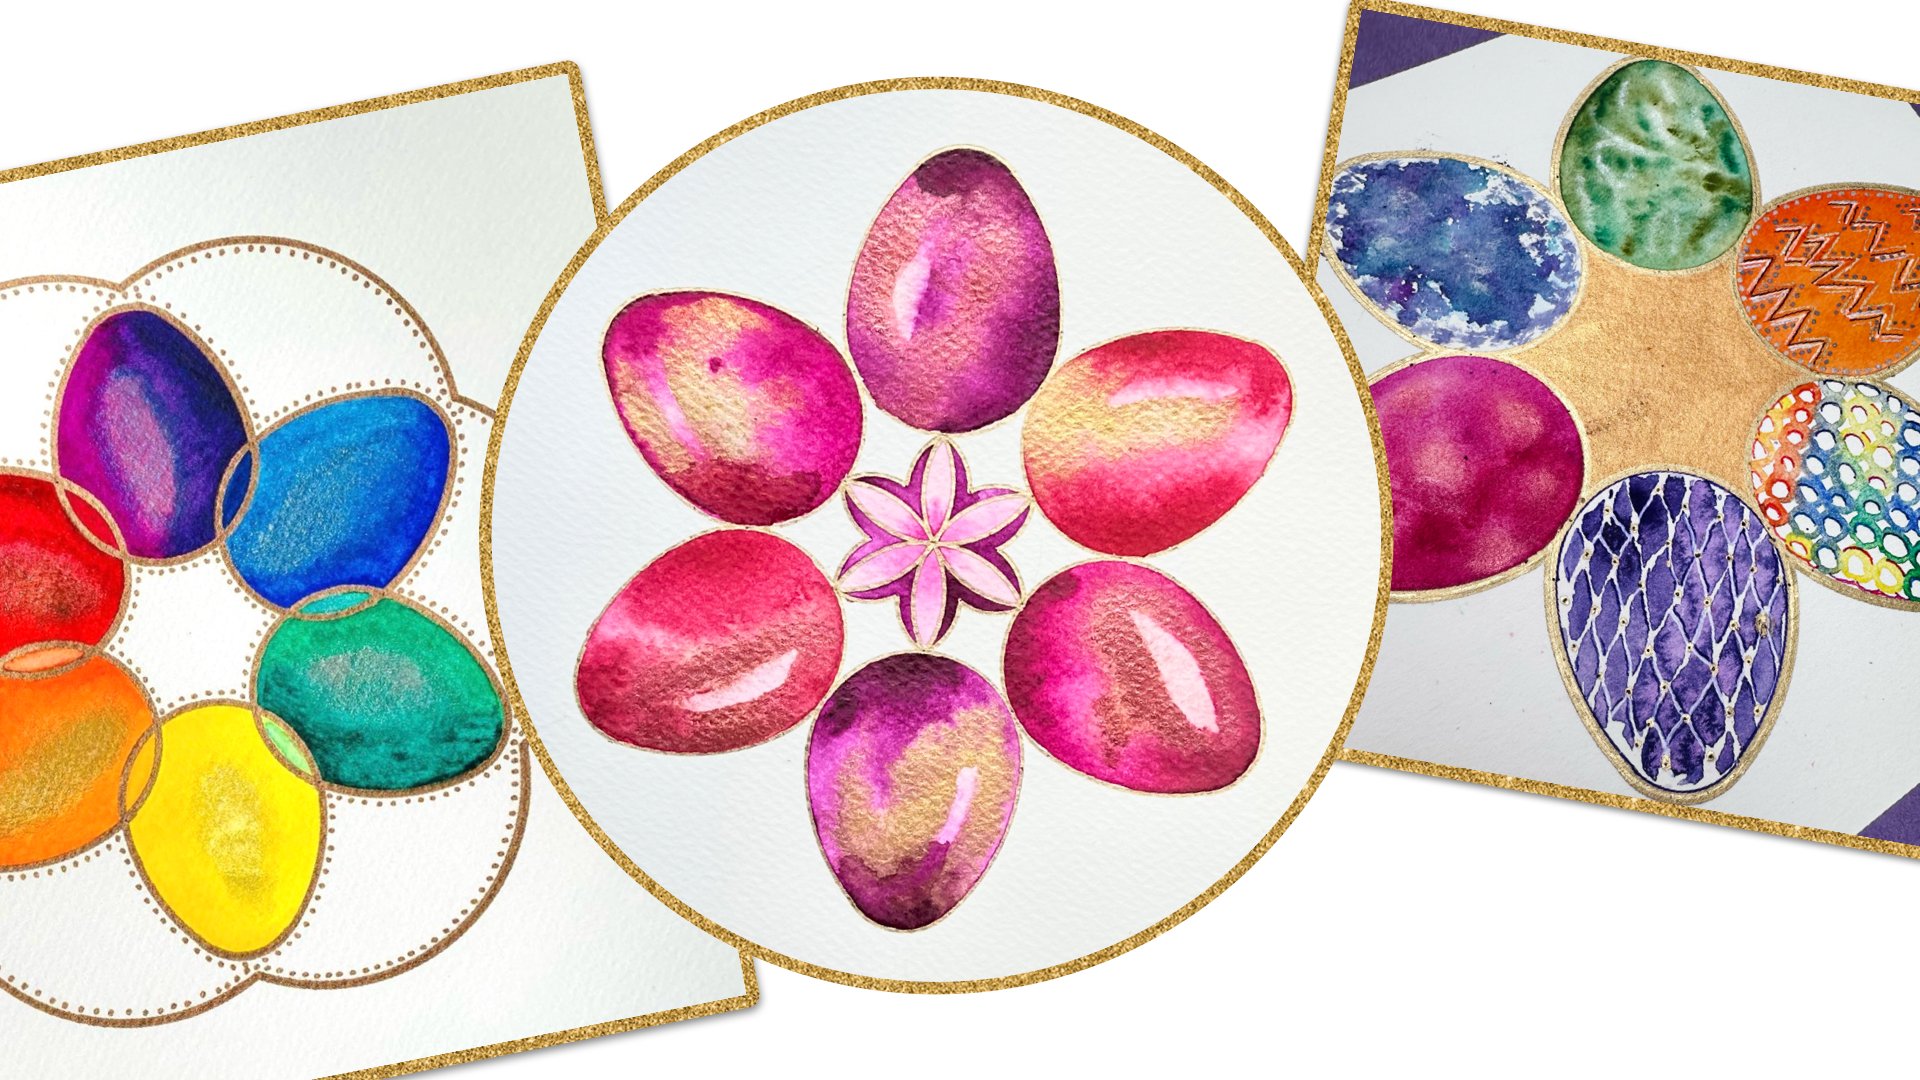
a one off experience. These are the two,
they're fairly similar how I created them. But even then you could see
the variation not just in the shape of the paper
but clearly my radius. Was it created slightly
thinner lines. I still think that dried
really beautifully. It's really pretty in
the natural light. This one was slightly thicker, the lines managed to
be slightly thicker. But I have also added a
layer of 3D shading, which does give that illusion
that it's thicker than it actually is on one
side of the gold, especially if you
paint the background, That effect looks very
nice. The 3D effect. This one, I'm quite
happy to leave as it is. I'm not even going to
bother fixing anything. I'm really happy with it. We could definitely have
gone slightly larger, like sticking with
the 2 centimeters. As if you go for this size, the full design, the one that
has seven circles in a row, that's actually eight
lengths of the radius. As long as you can
fit your width eight times within your
page, then you're fine. Now, I do realize if you're a complete beginner, it
could be a challenge. It does not mean
you can't create your own design. You really can. If you learn to just do
this on a larger scale, this one had three circles going down, that's
four radiuses. You could go much bigger even if you just use
the outline and then be creative inside and make all illustrations and
whatever your strength is. But do try and learn the geometry alongside
your strengths. Once you've mastered that, it's not too hard to
replicate afterwards. And to do this now, I
recommend that you can print the template and you could just practice making
circles on top. You could even use
tracing paper. Just reuse it over
and over again and see how close to that, or do that separately and
then overlap it to see how close to that template
your accuracy gets. Ultimately, you could just trace a single heart tracing paper just by drawing the four arts of one circle, of one heart. Then you can transfer that onto another paper in this
design or any other. But then you're,
strictly speaking, you're not using the
geometric structure as much, which is fine. If that's not what you
want to emphasize. There's no right or wrong here. You can't underachieve, you can't go wrong, Nothing
bad can happen. All you can do is
learn something and express your own creativity. I want every time
you see it again, to think of it as in a new way. You see in a new perspective. You could just do one heart
with a thick outline, or you could do six without
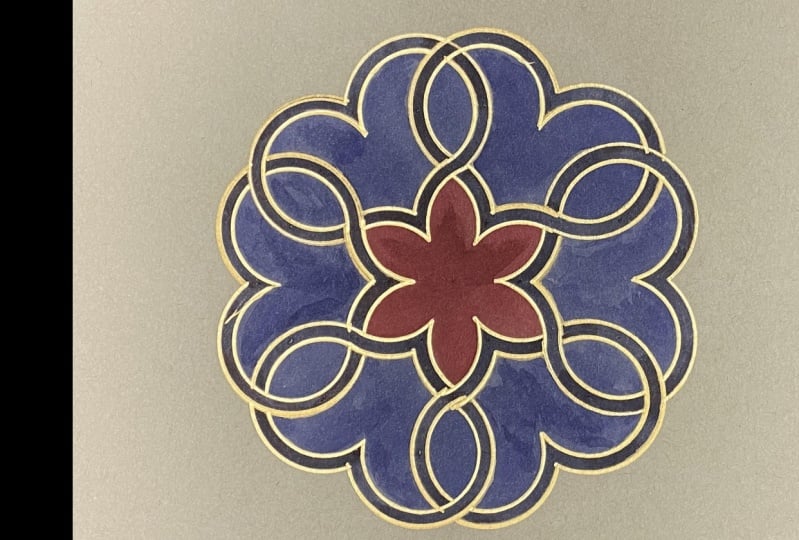
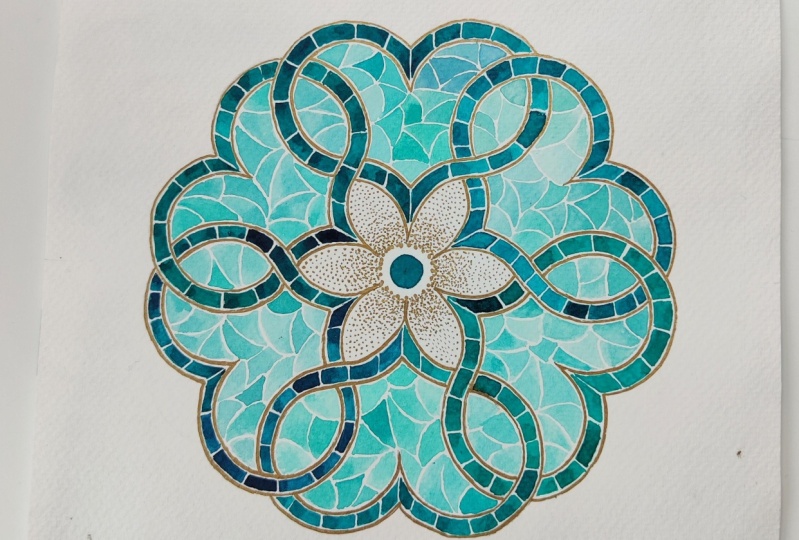
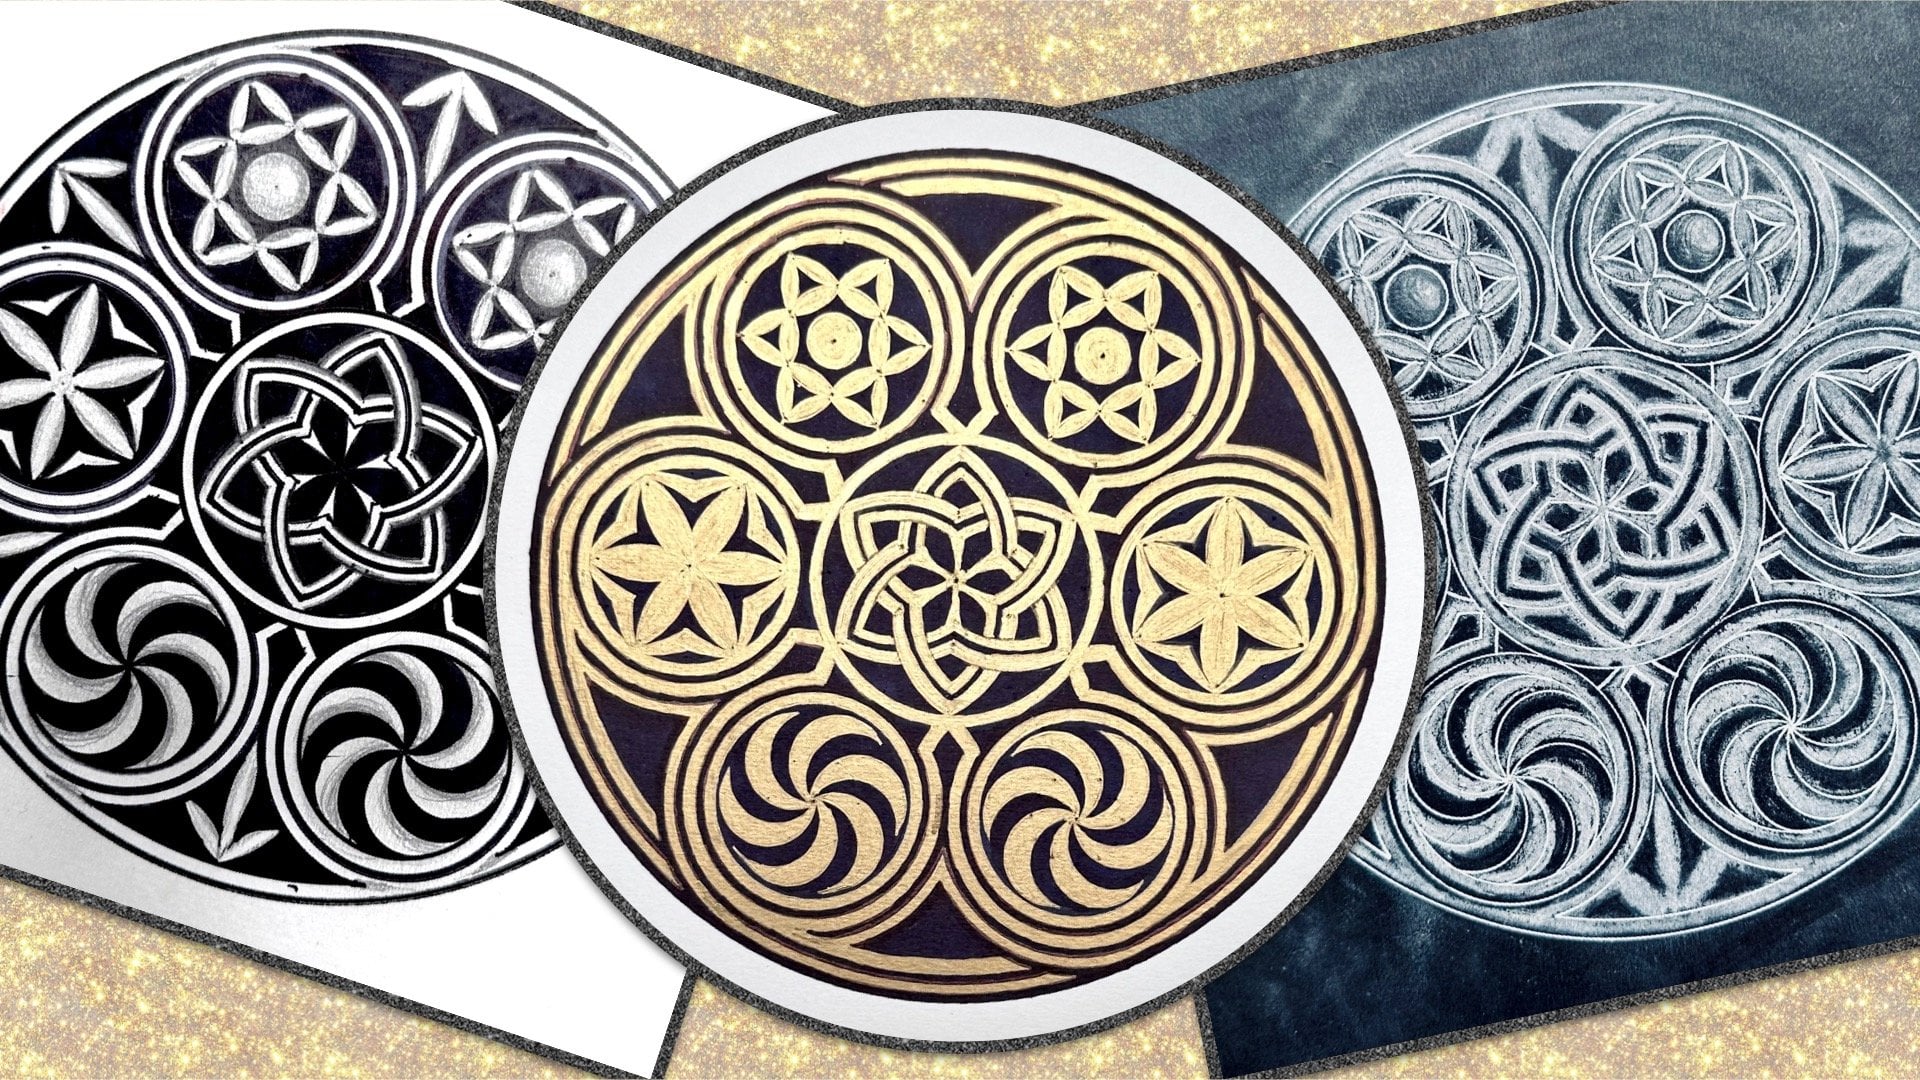
that thickened outline. Now there's a really
nice compromising one that I've done before, which is this design. You'll find that in your
downloadable package, just three hearts
rather than six. And the grid here is smaller. You could see 1, 2, 3, 4
circles going down. It's slightly less
regular shape. You have a circle in
the middle and three of those units surrounding it. You can just paint the three. There's this beautiful
technique of painting like glazing and overlapping
colors that would work really nicely or
just do the outline, or just thicken on the
inside to avoid them touching. You could do that. There's so many things
you could think of. I literally sit and look
at it for a long time, visualize it in my brain, in my mind's eye,
I'm pretty good at visualizing and
that's how I plan. Another really good
way is to, again, with a tracing
paper, overlap it, and highlight different things. For example, if you're
confident with that grid, your hearts don't have to be oriented in that same design. What happens if the orientation
of the heart changes? What happens if not pointing
inwards, but outwards? You could just highlight
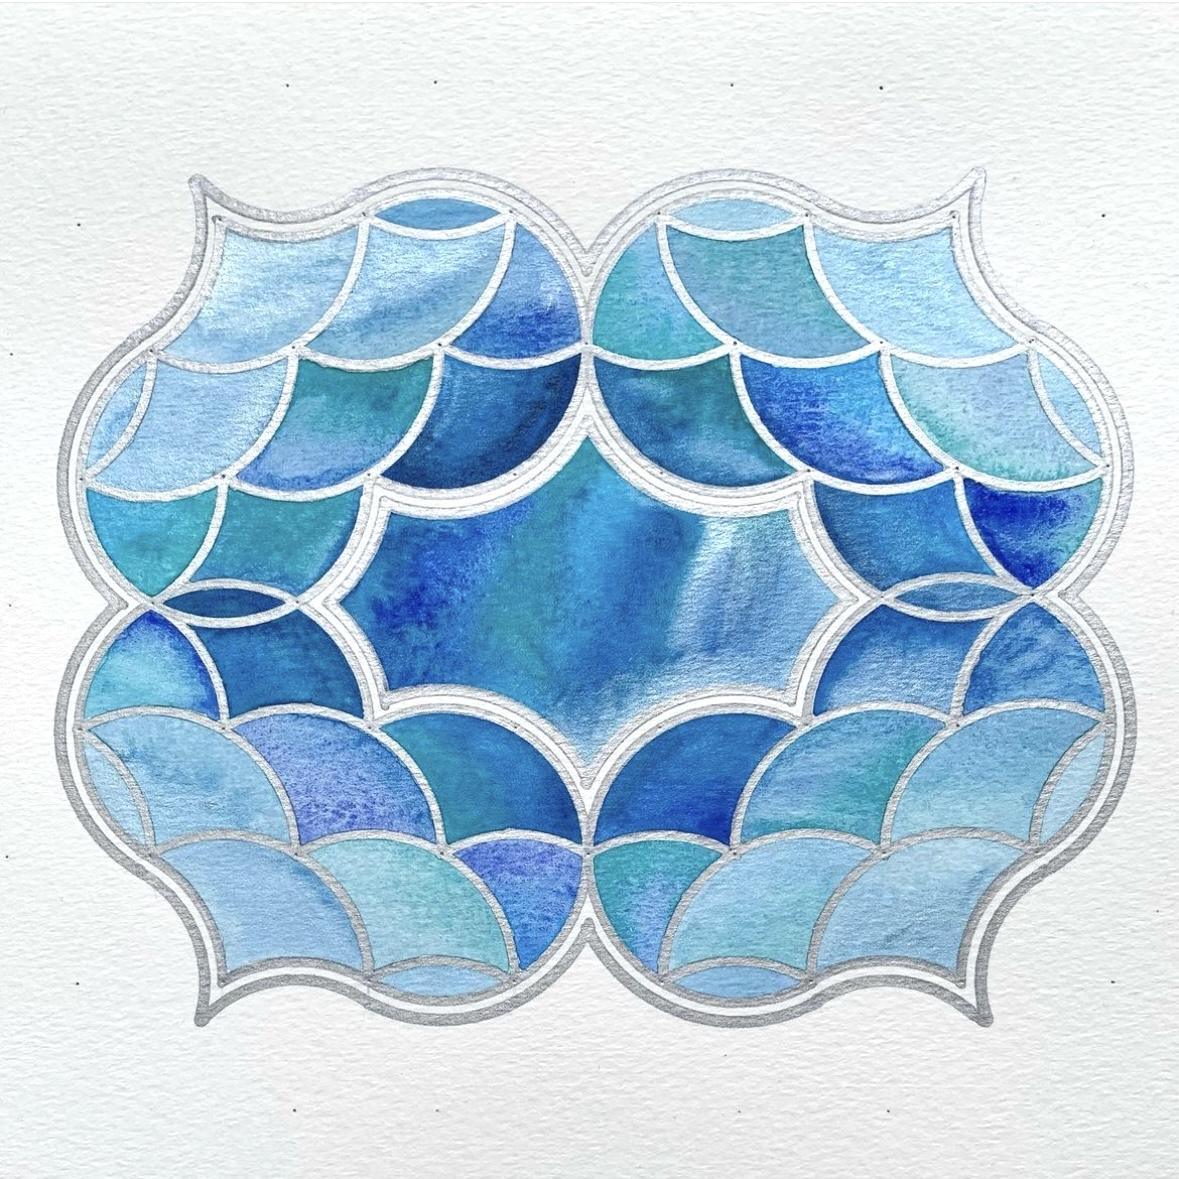
different things and see how it comes out. There's a really nice variation that I've done before
with four hearts, although that grid, in a way, looks more complicated
than that. There are four hearts,
you could just do that. I've painted that before. I still love that, gave it
a bit of an ocean feel. And then I emphasized some of
the arcs that are the grid. That's another way to
enrich your pattern. You could go for a
simpler pattern, but then emphasize some
of the lines underneath, You could keep that, but then also draw that
heart in the middle flower. I'm just mixing up my flowers, circles and heart at the moment, I've said it so many times. There's another larger one
that looks like this one here. That flower could still
be picked out from that. You could have the flow within the heart or the
heart within the flower. There's so many things
you can do this. Just be inspired and tried
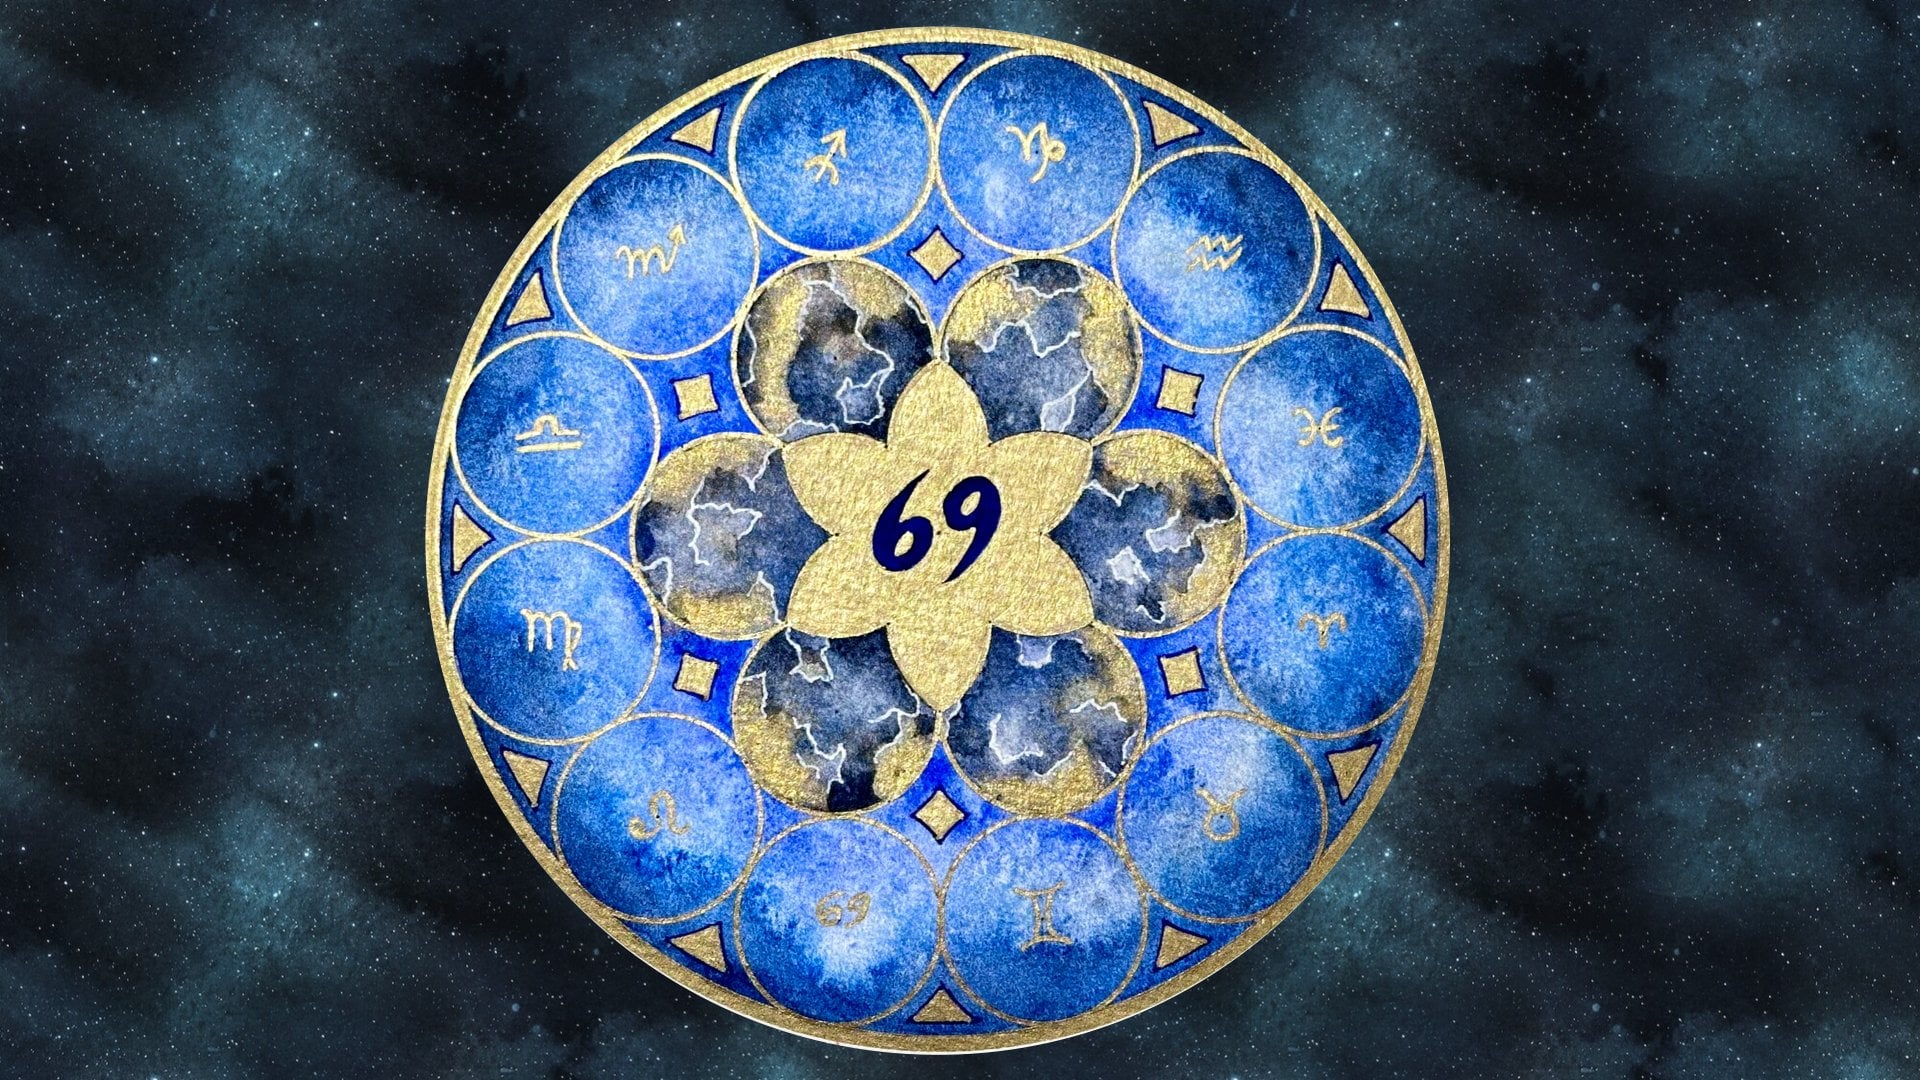
lots of different things. As I'm a maths teacher, I do like to give my kids some extensions and
challenges to try. I'm not going to teach
you how to do this, but two of these
variations include different size hearts
as opposed to these, which means that these grids coexist together in half
of the size of each. I'm not going to teach
you how to do it, but if you want to try
and work out by yourself, basically you still need that basic unit
for the big heart. Then the middle circle becomes split into yet
another seven lying within in the same
configuration. You could repeat that over
and over, infinitely. In theory. You
could even notice, if you again on this, that the top heart could repeat going down one below the
other, almost like a column. Which then gave me this idea to combine the different size
ones going down a column, and it looks a bit like
an exclamation mark. The possibilities are
endless. Enjoy yourself.
13. Conclusion: Thank you so much for
choosing to join me as I was teaching you the
love of geometry, I have. The skills that you have
learned in this course aren't just about this
beautifully shaped design, but they are longer term
skills than you can then incorporate into any
of your art making. I do hope that you can
come back and take more inspiration from the same
pattern and the same grid, and to be using your
compass comfortably so you can create unique designs. Please do share anything you create in the project gallery. It really creates
beautiful inspiration for anyone to see how you
interpreted your own design. I would also appreciate if
you share your artwork on Instagram and tag me on
there so I can see your beautiful work. I do hope that you fall in love
with your heart design.
 Diana Reeves, Geometric Artist & Educator