Transcripts
1. Introduction: Geometric art has
traditionally graced and inspired architecture
for thousands of years. Geometric structure, symmetry,
and proportions were often used to design buildings important to civilizations
across all of history, such as places of
worship and palaces. Hi, I'm Diana, Mathematics
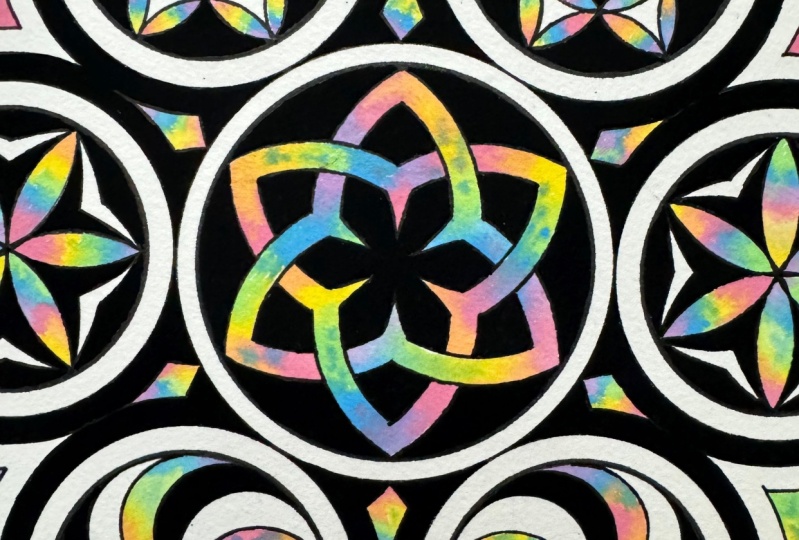
and geometric art teacher. In this class, I will be guiding you step by step how to draw this geometric stone carving
from a tombstone in Turkee. I will teach you how to
construct a circular grid of seven adjacent
circles using a compass. Then you will learn how to
draw four different designs, either a standalone patterns or as part of the full roundel. Then I will demonstrate several
variations of decorating the stone carving so
you can join along and make your art come
alive in your own style. This class is suitable
for all levels, and it includes instructions
of the full round del, as well as the
individual motifs, which can then be incorporated
in your future artworks.
2. Project & Materials: Welcome to this course
and to this pattern. For the project in this class, we're going to learn how
to draw this pattern, which I found a picture of on the Pattern and
Islamic art website, which is a huge bank
of inspiration. I have used it many times
for my own inspiration. This is the first pattern that
I will teach how to draw. As soon as I saw this, I could not stop
thinking about it. It's from a religious
complex in Turkey. It's from the tombstone
inside this complex. The complex has a mosque and you could see
how it's related to some sacred traditional
geometry based on circles, and this is what
we're going to do. This is carved of
stone in a tombstone. We're not going to
do the entire plate, the entire stone, we're just
going to do the round dell. Firstly, we're going
to construct the grid. The grid is based on
the flower of life, which is basically lots of circles in a
hexagonal orientation. Firstly, we're going
to do the frame. We're going to learn how to draw the seven adjacent circles. Then we're going to add some thickness to
all the circles. Then I'm going to teach you
how to construct the grid below each of those
different motifs that are present in this design. Now, the good news
is that all of these are lying
on the same grid. Once we learn how
to do this grid, you can then choose
whether or not to do each individual motif as a
standalone larger pattern. If you're not feeling confident, you can create these as
their own little designs. Or you might jump straight
into constructing these, or you might practice on the
side and then embed on this. Once I've taught you all four of these motifs, one,
two, three, four, and a bit of weaving even, which makes me very excited
because if you know me, I absolutely love weaving. If you need to make
courses, that's okay. I'll teach you how
to weave this. In the end, we're going
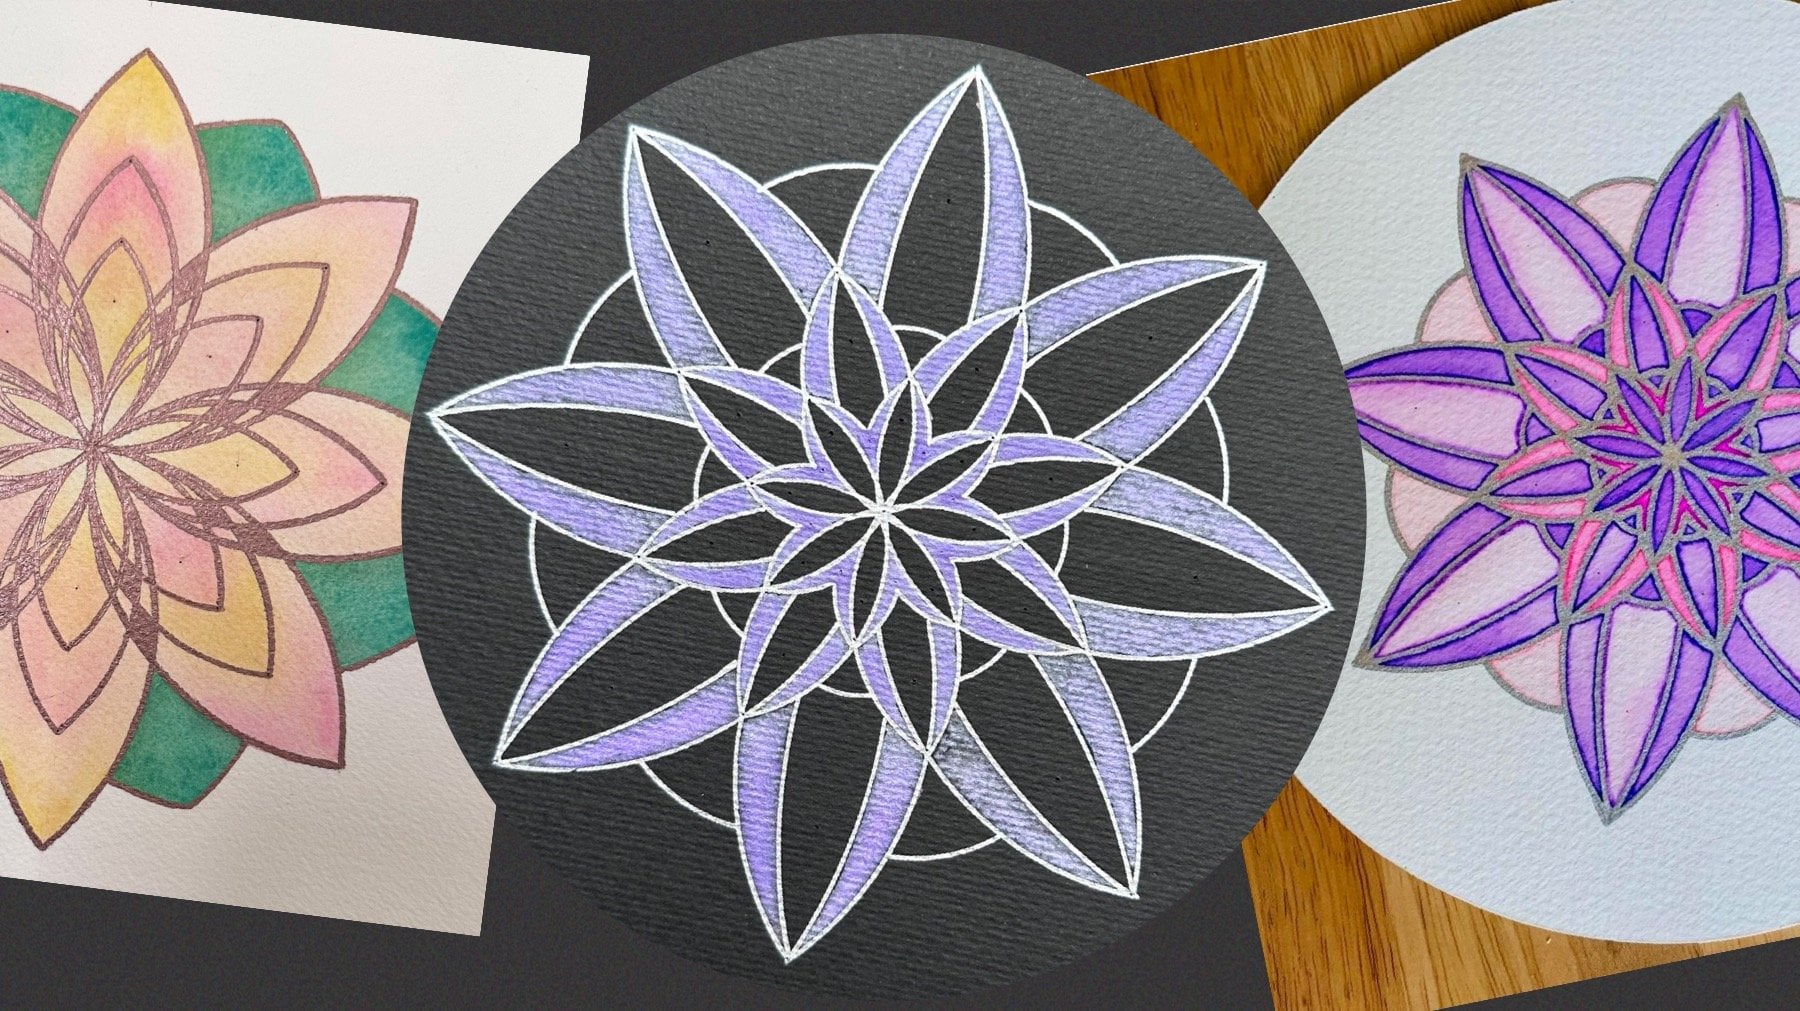
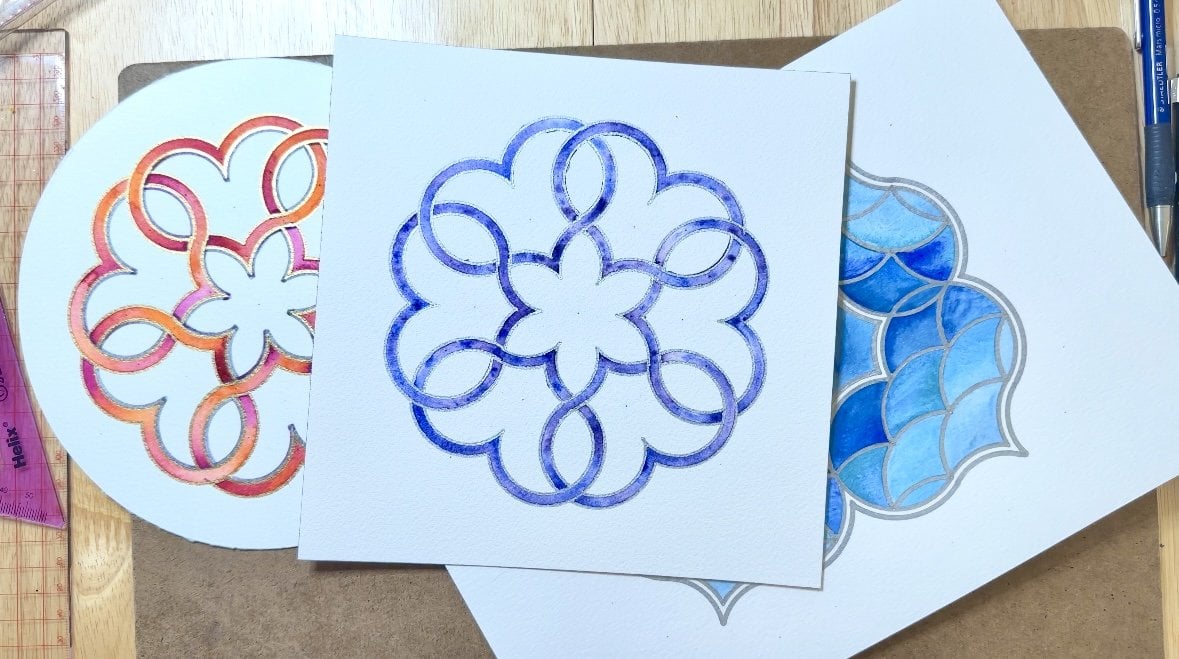
to just decorate it. Now I will show you three different ways
that I've decorated it. I loved constructing
on dark paper, white on dark paper, golden black, and
black on white, since it's such a
monochrome look. I have not used
paint for this one. You may choose to paint it. Depending on how you
decide to decorate it, it's actually one of the
simplest courses that I have in terms
of what you need. You're going to need a
compass and I cannot recommend enough to
have a pen attachment. Ruler, of course, a pencil. I like mechanical pencils, thin and accurate ones, and also ones with a rubber unless you have a separate
rubber like this. Then a couple of black markers. I have thin one, extra fine, and a thicker one,
and of course, I used a variety of different thickness
of golden paint pens. That is, of course optional. Whichever you decide to do, if you construct this
beautiful pattern perfectly with a pencil. Then you go over with
any marker by hand. If you don't have
the option to put your marker inside
of your compass, It will ruin a little
bit of the circles. I mean circles are
circles and they cannot be as perfect
without a compass, and so this is all
we really need.
3. Sizing: I'm really excited to share this construction with
you. It's so beautiful. I'm going to work on an
A four piece of paper. That's the standard,
smallest one I can get. It's the one that's
similar to letter size, if you're more
familiar with that. It's 21 centimeters
on the shorter side by just under 30, 29.7 or 29.8. I have constructed it
before on A three, but the same size
actually fits on a four. I don't think that it
needs to be too big, it's not that pattern. If you choose to do the
individual parts separately, then yes, you can
do that as well. Here is another A
four white on black. This is the size I
like to go with. Whichever size you
choose to go with. What you need to know is
that the radius needs to be able to fit across
your shorter side six times, a little bit more than six, so you can allow for a gap. This is what I'll show you. If you're working on a
different size than I am, just make sure your
radius fits. Six times. I'm going to measure the longer
side, since it's A four, it's 29.7, and I will
mark it at about halfway. It's not going to be perfectly half, but that doesn't matter. It's a circular design. I tend to go for 14.8, not before 15 because otherwise, it's just not precise
enough any way. But all we need is just
a straight line that is fairly straight
and horizontal. When you join the two sides, you should see the n 21, going to draw a straight line
and mark my paper at 10.5, which is the middle of the line. We don't need any more
lines for a while. This is a circular design
on a circular grid. It comes out of circles that are overlapped in a
hexagonal arrangement. This is known as also
the flower of life. So many other shapes come
from that geometric designs. I have 10.5 distance
on either side. I like to work with
a radius of three. If the radius is three, I need it three times on
either side of the center, as I said earlier to make
sure it fits six times. So it will get to here once I've drawn three radii,
three times 39. It leaves me with a
centimeter and a half even though we will be
thickening a little bit. Probably will end up just leaving a centimeter
on either side. You can go a little bit smaller. What's important to
note before we start, is that the original circles are what we're going
to be drawing. But actually, we are going
to make them a little bit smaller later on and
inside each of those, the radius and the diameter
that we're going to do the individual motifs
is actually smaller. You don't really want to
go too much smaller than this because it gets
tricky to get accurate. But also you don't want to
go too much bigger because these shapes don't really
need a massive large scale. Having said that, if you're
going to try on A three, half of your page is going
to be just under 1,514.8, which is what we
had on the side. You could easily go for a
four centimeter radius, which will take you to
12, leave that gap. On an A three, you could go up to four, even
4.5 centimeters. You could try that
and see how it goes.
4. The Underlying Grid: Now we're ready with the size. I'm going for 3 centimeters. I'm going to draw my first
circle in the middle. Next, I'm going to draw two circles on the
right hand side. The first one is going to start at the new intersection we created between the circle and the line that we
already had there. This is one and only one more now that we've created yet another intersection
with the straight line. That is two from the original. We've drawn two additional
circles to the original. But if you count
from the center, notice now we have one,
two, three equal radii. We're going to do the
same on the other side. We're going to start with
the left hand intersection between the circle and the line. That is one, goes
through the middle, and we've created another
intersection next to that, which gives us the second circle to the left of the central one. Again, one, two, three, three radiation on either side. This is the final outline, even though some of it will
get a little bit thickened. But in general, this
is the overall width. Now above and below where
the circles intersect, we now have one, two,
three, four intersections. Without changing the radius, we're going to draw four circles starting from those
intersections. From here, and that should
go through the two centers above and here now we have
lots of circles overlapping. There are two more
here and here. The final one on this
row is down here. Now we have one less below. We have four circles here. Now those four circles intersected three
times one, two, three. Again, with the same radius
from those new intersections, we're going to draw three
more circles as before, they go the centers above. And the last one on
this side as well. This is the lower half of
the initial grid done. Now, I'm going to rotate this
and repeat the same thing. Four circles from
those intersections, and those four will give
me three new below that. Okay, this is the
original circular grid with the original radius done. Now we need to start adding some lots of circles
going inwards, and a few going outwards. Let's see how to find
out how deep to go in. I'm going to start with
this top right circle here. I need two more circles
that go smaller, smaller than this
original radius here. What I'm going to do
is draw two lines. Firstly, I'm going to connect
that middle point here at the top and its first
diagonal below to the right. Both of these points lie on the circle that I
asked you to look at, which is the top right circle, is the center of the
top right circle, and we need to join those two
points that lie on there. That is because we
want to find out where these two circles are going to be intersecting their radii so that we can see
where they cross. Now we're going to
connect these two, the center of the
circle we wanted with the circle that is to
the bottom left of that. We are now creating two
diagonals at the right angle. In this shape here,
that almond shape, the mandol which is created by overlapping two
large circles. Then you've got one
cutting that way and one in a smaller
mandol here. Now, the original radius came from that center all the
way to this point outside. Now we're going to focus
on these two points, the one in the middle, and
the one on the inside. These two distances
are the same. We're going to use
that to create two more circles that are the same distance
apart from each other. At the top right, going
to start top right. At the moment, we have
the widest radius. I'm going to go to the point in the middle and draw the circle
that goes halfway through. Now I've got this circle. I don't need to draw
that line elsewhere. I'm going to keep this
radius and repeat this only only six outer circles that touch but don't intersect. Top right we've done, then we're going to move to the
side one on the right. Then bottom right. Bottom left and
just go all the way around the central circle without the central
circle itself, just the six that
are surrounding it. We're not creating
intersections, we're just creating
depth thickness. This is the midpoint. Now we're going to go here again and make that even smaller
to match this point. Just try gently just
to make sure that it does look like it is about the same distance
between the circles. With that radius, repeat on the same six circles
that go around. It is really nice to use
proportions from the grid to make other shapes inside it, including what adds
that three D look. Now we need to add one external layer of
those same circles. To do that, we need to
connect those two centers, the two circles at the
top they're touching, and that will go through
that middle point. The reason why we need this, I'll draw the whole line, but we just need to see how far the fourth distance
is from the center. We have the shortest distance, the middle distance,
and the original. Now we need this next one because that will enlarge the
circle by the same amount. Let's widen the radius
to that point. Here. That circle that we're
going to draw now should seamlessly join with the middle
circle on the next side. However, I'm not going
to draw full circles. I'm just going to
draw on the outside, but I didn't need to make sure they join here really well. I'm going to draw
from here and stop here where I touch
an exterior arc. Again, I do want them
to overlap like this because that point
where they intersect on the outside is
an important point. I'm going to rotate
and continue. Just those outer ones, just on the outside,
see where they cross, make sure they're
long enough to cross. See how we extended that original radius
by a little bit more, and that is the final
width of the whole design. You can judge that. If you
wanted it to be a bit smaller, maybe go to 2.8 centimeters. This is 3 centimeters on A four, so still leave some space. Now, let's deal with
the middle circle. The middle circle is actually
bigger on the inside. Because on these circles, we actually drew two,
two inner layers. That was the
original width here, but we drew two extra
layers going inwards. The original layer here is
actually the innermost radius. We can just expand that, which is what gives the illusion that it's actually
bigger on the inside. We already have this circle. We need two more, and
those two are going to be using those radius
at these two points. One here and one here. From the center. Make sure it seamlessly joins that circle. It does in places, it
doesn't in others, but that's okay if it's
slightly inaccurate. We are going to repeat this with thicker pen and decorate it, so it's not a problem. This is the outermost
of the center. This is just for a guide.
That's not even part of what we're going
to need initially. Last but not least, we need to create
the outer edge, and we need three
circles on the outside, and the three circles are the three most points that
cut through horizontal line. These are from the center, all the way to
these three points. I'm going to go with
actually the widest one first and see how that
goes. All the way here. Take your time with this
one and adjust because this one It's not
doing great there. No bad on the other ones. The second inner ones is here. Again, we're not going to
use the full circles here. We're only going to
be using partial arcs of these circles
that join together. At this point, there's
nothing to worry about. And there's the circle
of the outer frame. There we have it. These
are the initial circles that we needed to build the frame of
this beautiful round.
5. The Roundel Outline: Now, you're going to need
a fine liner permanent pen because we need to now outline the important parts that we
need to keep in our frame. This is really important because usually we need to construct the entire design before we can remove the
construction marks. However, this will
get extremely busy. What we're going to do
is outline the frame, delete the construction marks, and then we will be
left with clean circles in which to start our
new constructions of the separate motifs, which are now using a different
size than the original. This is why we need a pen
attachment because we need a permanent
pen, a thin one. I do envisage this with thicker
black lines afterwards, but the initial outlining, I don't want to risk
making a big error. The thickening of the outlines can happen later
when we decorate. You can give that impression of thickening the
black or thin in the white or create whatever
dimension you prefer later on. For now, We need to outline and be really careful because we
can't delete those, so we don't want to
make any errors. The inner circle, the
smallest inner circles of six circles are full circles. We can go ahead and
outline those first. That's one of the easiest parts, and it's also the
smallest radius we need. It's this one. Just draw Just draw those six
surrounding ones, the inner ones are
fine to outline. They don't affect anything. They don't get interrupted
by anything else. They are ultimately the size within which we're going to be constructing each
individual circular motif. The next layer of circles that are uninterrupted and we can go ahead with those is the second
layer of the same circles. This one that goes up to here. This one. This is
where I envisage this thickening those outlines. They merging really well here
and give that extra bit of depth because that's to me a nice dramatic
monochrome design. Middle ones and the
last one of that size. Now we're going to go in
the center in the center, the circle that touches
the ones we've just drawn, that's a full circle that
we can go ahead and draw, which is the one here. The one that should touch past
the circles we just made. Do this with a light
touch. As I said later, we'll thicken them a
bit so that will help. The inner circle, again, which is actually the original central circle that we did, that can be drawn
as a full circle. This one here. The rest is a little
bit trickier. Let's start one by one. Where this third circle in
the middle that we drew, not the original, not the
inner one, but the third one. The only reason why
we needed this is to see where that
third circle crosses. The outer circle of the middle, where does that
cross the outer c, the third circle of those ones? Here, and here, and here, This is what will help
us create these shapes. Another thing we need is where that third circle on the inside meets and touches the first circle on
the outside here. From here, one, two, that's the c, second
on the inside, touch on the outside, and then you go up and you stop, touch the first outer circle. Let's do that. And that is already the correct width because that is the
width that we used here. We might need to
adjust a tiny bit. Start here, go here and stop. But now, on the other side, we still need part of that
arc to the bottom there. But this time, we don't start it from where the pin
touches the inner circle, but where it touches the
middle circle, somewhere here. This. We just skip this part here
between the first and middle circle on the outer edge. Let's rotate and do it again. Put this in the
center. Start from this point here that we marked. Stop when you reach
the inner edge here. Skip a bit, start from the top and go down
again to that point. I went a little bit
too far. The next one. It looks symmetrical
on this part, but it's a bit shorter here. Skip a bit until you can touch the second circle and go down. Repeat this three more times. Wonderful. That is starting
to shape up really nicely. Now let's deal with
this bit here. We need just this
point and we need two arcs coming from
that point upwards. We don't need those parts here. They will get erased.
However, again, they stop at different points. With this one, let's
make that wider. There are two points you
can use to measure radius. One point is here, which
should join seamlessly there, but don't start
drawing there, please. You start from this point here, where the two arcs on the
outer edge of those touch. Now, we're going to on the
left hand side of the circle, go and again, stop
just like here, we stop when we touch
the first circle. But for the second part, we start from the
outer edge where we see that arc touches
the outer center. Circle. Then we go all the way down to where they touch
next and stop here. Se. Let's do it again. From that point,
where the two arcs cross to the inner circle, stop, skip two circles into the
outer edge of the outer circle and gently and stop where these two cross and finish off
the rest in the same way. The only arcs left to do
now are the outer ones, the really big size. This here we will fix later. It's basically
drawing a couple of little lines here to make
that triangular shape of that whole band
that seems like to be zigzagging around
the smaller circles. Basically, these lines here should look like they come from underneath the previous circle to the left, so they start here. But here, they should join
in with these two arcs. They go a bit longer
on this side. I'm going to start with
the innermost circle, the innermost circle is
actually symmetrical. It stops at the
first joint there. L et me make this bigger. This is the innermost of
the three outer circles. Here. Now the line from the arc on the left
and merge there and stop. Then rotate, and again, just this arc from here to here. This way, it looks like this line is coming
from underneath. The next one is let's make the radius match
that middle point. This time, we're going
to start from here, so it goes from
underneath this arc all the way until it
touches that middle arc. Let's make sure that will
blend in pretty seamlessly. That's perfect. The next one. You literally ski just this bit, start from this arc and join seamlessly. This
didn't work great. We'll fix it later.
That's not too bad. That's really nice. And this one. The outer one is going to join the whole
thing, but ideally, smoothly we'll join in with this one because the
idea is for them to look like they're
going like this. Let's extend that to the
outer edge outermost edge. Just check that it's going to lend in in some parts
better than others. Go for it. Okay. So like I said later, we're probably going to
thicken those black spaces. But for now, we have
our frame done. And now all of these other arcs are really going
to be in the way. So we're going to just erase
them and start from fresh.
6. The Motif Base: Now the frame is done, we can start learning how to construct each individual motif. Now you might remember
from the picture, these are the same, and this one is different. We have four different
types of motifs. However, if you are a complete
beginner and you decide that you might want to complete those as separate designs, or if you just want to
practice doing them before committing to the actual
round del design. You need to learn the basic grid that all the motifs
are constructed on. We're going to do
this separately and then you can decide whether to use this grid or to go
straight into the design. In any case, this is a
very important lesson. It's a transferable skill that you can take forward
and incorporate any of those motifs on this grid in any of
your future work. Let's learn the
grid of the motifs. We're going to not worry
about the size here. We can practice on a
slightly larger scale before going into the smaller
round dell spaces. We're going to draw
a horizontal line. Again, these multis
are all based on a hexagonal
arrangement of circles, and we're going to pick a point somewhere to put our cumbersome. Now here, the radius
doesn't matter. You can go a little bit
bigger and just draw a random circle at the center. Now, we're going to make four more marks on the
circumference of that circle with the same radius by putting
the compass point on the right hand intersection between the line and the circle. Instead of drawing
a full circle, I'm just going to mark the two points where
the full circle would cross the circle here and here and do the same
from the other side. This is how we construct
basic regular hexagon. Because now these six
points vertices of a regular hexagon equally spaced around the circumference. In other words, we
split this in six. Now we just need to
add a few lines. The first lines
we're going to add, since we already have this
diagonal, the horizontal, we're going to do the other two diagonals
crossing through the middle. From these points on the circumference and
align with the center, you should go through the center nicely, you
should feel that bump. One diagonal, and
the other diagonal. We already have this one. You can imagine how this
will make a hexagon. We don't need the
hexagon itself, but we're working within that. Now we split this in six, but actually we need to go
further and split it into 12. We need to halve each of
those. This is what we do. Next, we're going to
draw three pairs of parallel lines by connecting, starting at the top right and connecting every other point. Skip one, Skip this one
and go straight here. One down and it's parallel. Which again is one away
on the other side. Then we're going to
start from the top left, one, two away, so this is the
diagonal we want now, here to here, and it's
parallel down here. Just use the points as a guide. Finally, these ones
coming this way, from here to here, skip one, and last one. Essentially by doing this, we managed to draw two overlapping
equilateral triangles. Where those triangles cross now is where the
halfway point is, which is now going to split each sixth into two more
parts to make 12. This is the final
step. We're going to align the intersections
of those triangles. Again, this should go
through the middle, and there will be three of
those diameters to draw. Is the first one is vertical. Going to go for this one next. You can visualize this smaller
hexagon in the middle, go with the opposite
corners of this. And the last one in the other
direction, here and here. Now, this is the grid
complete where all four of these constructions can be made either separately on a piece of paper by redoing
this each time, if you choose to do
them separately, or if you choose
to practice them, or if you want to go
straight onto the frame, join me on the next video.
7. The Roundel Base: Now that you've learned how to construct the base
of the motifs. Now the question is, if you want to go straight
into there or when you eventually go straight
into the round D. How do we find that grid
in the round D? The good news is,
we do not have to construct this in each
individual one of the circles, even though we erased all the
construction marks earlier. Because even though
we erased everything, the really important
thing we still have and we're going to use
to make this easier. Are the centers of all the circles we've
already constructed. We're going to use
those to create these lines in a very
quick, efficient, easy way. Okay. Let's follow this. Now we're going to compare
what we have here and how to get this on that grid. If you remember from
the previous video, we first found the
three diagonals that went across
through the middle. This is the first thing
we're going to do. We're going to start
with the horizontal as we started in
the separate grid. To do that, we're going to align the two centers of
the top two circles. These two points should be visible simply because
we have already used the compass
point into the paper. Align carefully, and
now only draw within the smallest circle of each
of those in the frame. Just from here
through the center, we should feel that bump
again and again here. Let's repeat on those three, even though they're
different sizes. They do use the same
axis through the center. We're going to use the
one line for all three, and the bottom two. And this will shape
up very easily. We don't actually need our
compass for this part. Now we're going to do
the other diagonal. Let's go with this one. To do this one, we need to align the right most
circle with the one below, which is slightly to the left, which gives the
correct angle here. This will be again
only on the inside. This gives us that
60 degree angle. We've created a
sixth of the circle, which is what we
want to begin with. Align now those three centers, and again, draw the lines
only on the inside. And here at the top. Three parallels going
in this direction. I'm sure you can guess
to do the other ones, we just align the left most
with the one below it, which is to the right, and that will create the last two sixths, and we're going to do that
on all of the circles. We've split all the
circles into six. The next part was to create those pairs
of parallel lines. Starting vertically.
What I'm going to do start from the right,
moving to the left, and here is the two parallels, I'm going to do vertically from the top of
these two diagonals. For the first circle, this is
a separate line on its own. However, for the next two, they will align together, so we can make those together. Go with the two points furst
apart, top and bottom, and then make sure they align with the midpoints and
do the parallel as well. Now because this is
a different size, it won't align with
any of the other ones. Let's leave that one for last. Now we're going to focus
on the outer six circles, and complete those parallels. Top and bottom and
it's parallel. The next pair of parallel
lines was to go this way. Top left point in the
circle, one, two away. If you recall, it joins in with that point
on here on the, and one below,
which is parallel. The next two circles
we can do together, starting from this point,
joining with this point, and just make sure
that they do go through to here and
here as we expected. Then the parallel again
can be done together. Now we can add the
cross sections between each of those lines, just flit into 12. I'm going to start with
the vertical line again, going through these points where the triangles cross and
through the middle. These two can be done together. Again, going through
the two centers. On this scale, it will
not be super accurate, but that's okay because that's
just the underlying grid. Then we're going to do
the diagonals going this way and then the other way. Finally, we're going to
complete the middle, which has the same steps, but as it's on a
slightly larger scale, it will just not align with
the others and so let's do the parallel lines going
from here to here. Now, as you can see, we have exactly the same grid
in all of these spaces, and now we can start learning how to create each
individual motif. I'm going to demonstrate
directly on here, but the steps are exactly
the same whether you choose to work on a separate
piece of paper or not. Join me in the next for the
individual circular designs.
8. Circular Motif 1: Here we go. This is
where it gets exciting where we're going to put
all the designs together. Now, again, if you want to do these separately on
a separate grid, that's fine, the steps
are exactly the same. We have four different motifs, and I'm going to teach you
those in order of complexity. Starting with the simplest one, the simplest one is
actually this one to construct because it
uses only one size arc. When you look at the picture, it's basically six of those half arcs with
a shadow in between. The best way to do them is
to actually create 12 and color them in an alternating way to create that three D effect, even if you're not going
to shade it as a three D. This is what we're going
to construct now this one. This is at the bottom.
Get your compass ready. Here is the grid
that we created, and these vertical lines, what they do is they
split the radius in half. What we're going to do is
use that half radius to create a new circle with
that radius from the center. We're now going to
create a circle with a radius that was half of the
original inner circle here. We only need this circle as a guide of where
we're going to be placing the compass point for each of the individual arcs. This is the same radius
as what we need here. Now, starting from this point in the middle of the left
horizontal radius, Then we're going to be moving down following the circle we just drew to create
the semi arc. I'm going to start with the
horizontal middle point. Like this. Here is the radius of
the original circle, and that's now
half of the radius of the new arcs we need
to draw like this. We're going to draw from the
outer edge of the circle where the circle touches
that horizontal line. We're going to draw an arc
and stop in the middle. Just like this from here with the same radius and stop
when you reach the middle. Here's our first arc. Next, We started at this point. We're now going to follow the circle which
you're in the middle, go down by just one
increment where the circle touches the next horizontal line,
the next radius. That is where we put the point. We're not following the
straight lines and the hexagon, we're following the circle. You could literally do this. With the point of the compass. Slide down and put
the point on here. Now we're following
along this radius. It's always the radius on
where we've put the point on. See where that radius touches the outer circle from here and draw an arc into
the middle and stop. This is where we were just now, we're going to follow the
circle we drew in the middle and where that circle
crosses the next radius, the next line going to the edge, that is where we go next. From this point, we're going to draw an arc into the center. Do you see how it's
shaping up now? This is where it's just been. We move down one increment, following this inner circle, put the compass point on where
that needs the next line, the next radius to the edge, and then from the edge, we're going to draw an
arc into the middle. We're going to
continue this eight more times until we've
done a full circle. And this is the final design, I'm just going to repeat
those with a black pen. There we have it. This is
ready to decorate later. Now, this one is the same, but it's a mirror image of this. Just like that,
it's a reflection. That means that instead
of starting on this side, I would start on
this side with using the arc going from
the inner center to the outer edge and going
in the opposite direction. Motif one is done.
9. Circular Motif 2: The next motif to
learn is this one. This one slightly harder
because we change the radii, but it's not actually
that hard to construct. One of them goes vertical,
one goes horizontal. They are not mirror images
of each other like here, instead they're
rotation of each other. I'm going to start
with this one, and this is what we're
trying to recreate. We have three different
radio to use for three different types of arcs that all meet in
the same places. We're going to start with the
smallest one so that we can define these inner
little petals and where we're going to put
the compass is in the lines that they're not in the corners
of the triangles, instead the lines that
are on their own. He here, here, those ones. I'm going to start with
the bottom right here. That's where I'm
going to put the compass with the pencil. I'm going to open the
compass to not one but two points away like this. Remember we now
split this into 12. No 12 away, just like this. I'm going to start drawing
an arc from the bottom. It will go through
the center and out to the other
edge and stop there. Now move the compass point to the point where we
started drawing from. That's two away, that's
at the bottom right now, that will start from
two away on the left, through the center and to
the other side of the edge. Again, move the compass point, not one but two away from
where we drew just previously. One more arc. You can see now
we've completed this petal, and do this all the way around until we complete six arcs. Move this two away, and the final one will be from here and complete these two. Let's go back to the
original position. These are the inner parts of
that design, which is these. Next, we're going to do
the very outer edges, the biggest radius. The biggest radius starts
from the same points we used, so we're going to go bottom
right again as we did before. Instead of opening
the compass with one, two points away, we're
going to double that. We're going to now
go four points away. That is on the other side of
that arc that we've drawn. One, two, three, four points
away on the outer edge. We're only going to draw
the arc up until we meet the first radius going
from the center out, and that's it, then
we're going to skip. Now notice how that
goes to the top. We want just that
one arc that goes one line beyond that outer edge, just the previous line,
that previous axis. You open the compass
four points away, we draw one arc to
the first line, skip the second and third line, and then from the third to
the fourth line, complete. Then move two points down from the same location
as we did earlier. This is now already open to the correct distance,
four points away. Only one arc to the first
line that you meet. Notice now how they join in together, which
is what we want. Skip one, two lines, and from that one
draw to the edge. Move the compass 0.2 away again. That's already the correct
one arc here, one arc here, where it joins with
the previous one, Skip one, two segments, and then from there just
to the outer corner. And continue to do this
all the way around. This is the outer edge of
that nice pretty rosette, and now we have to
do the middle one. Now you see the middle one
ends in the same vertex, they all merge
into the same one. But this is now
actually going to go in between the points
that we have been using. We were using these points. Now we have to use
the points that are at the corners of
those triangles. Put the point of the compass
bottom right, but not here, as we did before, the ones in between that are at the
corners of the triangles. Now we need to be three away, not two away, like
the smallest ones, not four away like
the biggest ones, but three away, so
they're the medium ones. Notice how this arc should come in between the smallest
one and the biggest one. We're just doing the medium one. Notice the point goes
here, one, two, three, the pencil lead should come from the same corners that all the other arcs
came. Now we're ready. Just as before, we're
only going to do one arc until we meet the first
line going into the center, Skip one, two, three,
four, this time, and then only that outer arc that joins with the
final outer edge. Then move the 0.2 points away at the bottom corner
of one of these triangles. We three away already. Draw an arc to the first
line you meet. Stop there. Skip one, two, three, four segments, and only
draw the final c here. Again, move two away, short arc to meet this one. They all meet on the same
axis as the outer edge. That's a really good indication. Then skip one, two, three, four, and
now join this one. And finish off all
the way around. Okay, that's the
completed design. I'm now just going to
repeat it with a pen, and then here, I'm going
to do the same thing, but I'm going to
start constructing this way so that it's a
rotated version of this one. That's motive to complete.
10. Circular Motif 3: The third motif we're going to do is this one here at the top, which is this one. It's quite beautiful. This one has pretty
much the same orientation in both of these. However, even though it uses
just one size, actually, some of the points
we need are outside, so that makes it
slightly trickier. Here is another version of
what we're trying to draw. The first thing we're
going to do is draw a circle in the middle where we're going to put the
compass point in the middle. And we're going to open it to the corners of that small hexagon,
which is on the inside. Not the middle of this
like we did here, but this corner, this
corner, this corner. See if make sure that it will go through most of your corners. I will also have the same width as the side of that hexagon. Let's go and do that. With the same arcs,
from the points where the circle touches the
corners of the hexagon, which we talked about just now, from there, we're going to draw some arcs that join the
adjacent triangular shapes. One will go here and one on the opposite side,
just like this. We're going to move along to the next point where the circle touches the
corner of this hexagon, and again, from
the adjacent arch to the outside and on
the other side as well. Again, move along here. Now these are going to
start joining together like a pretty flower
on the outside, two arcs each go. This one will join
with the previous one. On the other side,
we have a new one, move again, here and here. The last one and that completes. This ring of arcs. Next, we're going to
do these arcs here. From the corners of the six petals of this flower that we've just constructed, from there, That will
join here and here. Now, this is where we need
to extend a little bit. We're going to draw a little bit more than half a
circle because they're going to cross within
that second layer between the first
and second circle. Again, move to the next petal, draw a circle or an arc
in a way that crosses. It goes almost to
the second circle, but not quite as far as this, but it also creates these interior arcs that
we need as well. Let's go on to the next
corner of the petal, slightly out of the circle. Through the middle and
back out the gain. Hopefully you see it now. We needed these interior arcs, but we also needed these
cross sections of those arcs. The reason why we need
those is so that we can put the compass point on them
and then be able to, this will take us back to here and then be
able to do this, which is the last type of
arcs we need to create those. We've done this one, see here. Again, you only need to draw
what's inside of the circle, but the point of the compass itself is where you need
to be on the outside. Tate and find the next
one, here's the next one. Here, like I said, it's just
below the second circle. Some of these have gone out
a little bit, on that scale, they're not really precise, but it gives that structure that we're looking
for in the design. Which is the whole
point of this. When we repeat it with a
pen, that will look better. Here are all the petals. The only ones we don't
need are actually the ones that are going
outside of the circle. They were just for the
purposes of the intersections. But those ones here
and here we need. The last little detail in this design is this
circle on the inside. In order to find how
far to go there, we're going to join
the top right point here with the 12 away, so it's almost as if we're
joining a triangle, like this. And we're going to use one
of those intersections. So where that line
crosses the middle line, the diagonal rather
than the horizontal, otherwise it will create a
slightly smaller circle. That's it. I'm going to repeat this carefully with
the pen outline. Okay, that's the third
motif constructed. Join me for the last
one in the next video.
11. Circular Motif 4: The fourth motif is
the one in the center. We only have one to
make, and it's this one. Although it's slightly larger, it's a little bit trickier
to construct and then we're going to have some weaving to do as well. That's exciting. The first step is to find halfway across the radius
of the original circle, bit like we did here, but
it's slightly bigger, and measure that we can draw a circle that
goes through all of these points inside
inside of that hexagon. That's the first step done. Now, in the points
where the circle is inside of the corners
of that hexagon. Not here where it
touches the side, but here when it's further in, these are the points we need. We're going to start
with this one here, we're going to open
the compass to the top verte inside the
circle, that top line. If we've done this correctly, this should be the same
distance from here to here. That will be the first size
arc we're going to use. From this diagonal
where the circle crosses this diagonal
just slightly inside of that vertex and start drawing from where the circle
touches to the top. These three distances
are the same. From the top, you can go down, stop where the circle is, now skip all the part
inside the circle. The next time you touch the circle is again
where the circle crosses this vertical axis from there to the outside edge, which is at this corner here. Now without changing the radius, we're just going to slide down using this middle
circle as a guide, slide down past the point where the circle is
touching the hexagon, past that, and go to the
next point where the circle is inside the hexagon and
crossing that radius. With the same radius, that should be the same distance
to here and the bottom. We're going to draw an
arc from the bottom going up to the point where
we're touching the circle. Then skip inside
of the circle and then join again where
the vertical axis touches the circle from there to the end, which ends up there. Then again, move the
point of the compass, following the circle, skip this point here and
go to this one. We've already used this
one to draw from there. This is where we go next. You
could see that distance to there and there
should be the same and the distance to there
should be the same. We're always starting
from the outer circumference of the circle, we're going to start
there and join here. Just here on that axis, stop at the circle where
we're joining the next arc. Skip inside the circle
and rejoin again from the next point that that
arc and the circle. Crossing and to the end. Se we're making these
beautiful petals. Rotate two points
away from here, and this is the only point that we haven't started
from here. Here. Join there, approaching
that circle, skip inside the circle and join on the outer
side of that circle. Now see we're creating those. We need six of those we've
created the first two. We have two more arcs to draw. Just follow that inner
circle as a guide. This is the outer part
of our design done. Now we need to draw the inner
part of the same thing. We're going to use
the same six points for our compass points. However, it's the distance
that will change. Instead of this distance here, we're going to
change and make it smaller to the points in between where the
circle actually touches that hexagon inside. No from this point,
but this point here. Also, this should be the same distance
to this point here. Now, we're going to draw arcs parallel to
the ones we want, but we're not going to
start from this point. We need to start from
the same axis that all the other arcs on the
outside we're joining. We're going to start from
here because this is where these two arcs join from here through the point
that we used to measure. Now we can stop here because this is where these
two arcs join on the cross section of this vertical line.
From here to here. Then on the lower end, again, these two arcs crossed
on the vertical axis. We're going to start from
the same vertical axis down and stop at this axis where the parallel
arc joined its next one. That's what we'll give that
ribbon that thickness. Again, we're going to follow the same order in terms of
where we're going next. From the lower end, we started previously
at the circumference. Now we're starting from
the same direction on the axis and draw an arc. To the same axis as where
the parallel arc stopped. Stop there, skip and
start from this top axis because that's where
its parallel arc also started from and stopped
at this line here. We're going to move down here. We've had an arc here, so the next arc must be
here from here to here. They're joining on the same axis as the arcs that are
parallel to them. From here to here, skip a bit to not this axis, but
the next missing one. We've already had this
one. This one is the next one to complete
this inner petal. Just a couple more
here and here. I think this is the last one. There's one more after that. That is now going to create a little flower in
the middle as well, as well as those ribbons that
we've just looped together. This is this part done. But we have this
bit in the middle that joins things
together as well. Now we need to figure out how to do these
little middle parts. These have to be quite loose
and quite flat these arcs, so they need the bigger radius. We're going to start
from this point here, the horizontal right hand intersection on
the circumference and open the compass
to the middle. But actually, we want a little
bit of thickness there, so it can be a tiny bit
shorter than the middle. Also this should cross
this point here really. But we're not going
to go as far as that. All we're going to do
is from the inner arcs that have created
that flower through the middle and to its opposite. Then we're going to
see this is like at the edges of those triangles. We're going to go down
to the next triangle, it's all the points in between the petals and then only on
the inside of the flower. Move to the next and
only on the inside, and just a few more
times until complete. This is now done. Now the next part is to delete
some of the arcs and then try and do this weaving and how everything is
actually joined together. I'm going to use my
mono zero eraser. If you don't have
that, but you do have a mechanical
pencil of any kind, those are really
good on the back. They're quite nice and
small and accurate. The first thing I
want to do is join these middle parts join
the rest of the ribbons, because when we outline later, we don't want to
cut this bit off. There's one of
these middle parts and we want the
arcs joining into. We want the arch joining into that top ribbon to
be uninterrupted. And again, just here. Wherever those six
open arcs join in with the ribbon above here. He. That will remind us
later when we outline it to only go as far as this. Then later we'll do some more
shading and that will help. But we need to try
and do our best despite knowing that we will be perfecting things later on. I'm just going to those, just to remind me where to outline later with
the permanent back pen. This part is done,
and now the weaving. Notice how on the
original design as well, this is the case. I
will show you here. The right hand side
of each of the petal is the one that overlaps, and the left hand side is
the one that goes below. Just like here.
We're going to take our rubber and we're
going to start from the top and go down on the right and basically
delete everything in there, it's quite obvious that that
is the one that overlaps. Everything and stop
to the next axis. Now, I tend to just
now rotate this and do exactly the same six times
because what that does, if you do only one side, the other side is automatically now below the previous one. Because there are always pairs. When you weave things,
there's always two things that are one
on top one on the bottom. It's enough to just create
the ones that go on top and that already automatically ascend the other one
back below the previous. Now we're going to outline
just the wth part. I'm going to start
with the inner part because they feel like
a little bit trickier. Notice here how they
do go to the middle, but they also don't really
cut each other off. I'm going to every
time I do an arc, I'm going to stop
a little short of the center just to create that illusion that they're
joined in the middle, a bit like here, but I'm
not going to cross them. If you remember,
we're going to put the compass point on
the circumference, not quite go as deep as The center, just a shy
little bit of the center. Then I'm going to just do an arc from here and stop
there for now. Then just skip the
center and then do the other side
to the next ribbon, just to create like this little petal is
meeting in the middle. Then move down here,
and do the same, just from the inner ribbon
almost to the center, skip and do the other
side of that same ribbon, and do that for
the rest of them. Next, I'm going to go
with the outer edges because they are probably
a little bit easier to do, and it will give us that
parallel indication. If you remember, this is
where the point goes, and this is where
the radius goes. Now, we have to skip this part. Let's do the tricky
part. I'm going to stick with just the
left hand sides. Start from just here, stop
where we meet the next ribbon, Skip that bit and
then just do the top. I gave you a bit of
extra thickness. That's fine. And I'm only
going to do the left hands. Move the point to the next one. First ribbon, stop
and jump over. Next one, in apart, skip to the edge. Now the left hand arcs are done. Now we're going to do the
right hand arcs and make sure we need them as
neatly as we can. Now I'm going to start from the bottom using the same points. See if I'm meeting
this one well, and that's a full arc here. Great. Move further
back. See if that. That's a bit far
for me, I'm just going to move a little bit. That looks good. Just make
sure they're joining well. That's the outage done. Now we're going to do the
parallels on the inside. We need to be careful both
to join in well with these, as well as to skip the
bits that are interwoven. Let's be careful. We're starting from the same point as before. We're going to reduce
our radius and see. If you recall, the radius
goes to that point, but also it should actually
start from there to there. That's working well. Again,
I'm going to only do the left hand side where I'm remembering to
interrupt each of them. Small arc stop skip on
top of the other one, and just to the tip of
the corner. Next point. Again, check that it will
get just a tiny arc, ski and on the other side. And again, repeat. These on the left and now done. Now we're going
to do these ones, which aren't the
interrupted ones, but we need to stop where we
meet the inner small petals. Same point as before, full arc to there. Lovely and complete and gave them a little
bit of thickness. The last thing is that we have
that ribbon in the middle, which runs in the
same wave weaved, but halfway. I'm not
going to measure this. I'm going to go by y on this. From the same points,
we need to find roughly the middle of where these two arcs were
running in parallel. Here, I'm going to go
quite lightly for now. Later I will probably thicken the line in a
similar way as these. And now the arcs
to just join in. The ribbon is done, the
middle part is done. We will probably thicken
that and obviously give it a shadow and everything
that will tidy things up. Just going to complete
these little petals. I'm making sure I'm not cutting off the petals from the rest, but rather joining
in between them. Just to create that idea
of a whole piece together. Now we're ready to delete all the arcs and start
coloring this in. Beautifully constructed
round death.
12. Decoration: We have come to the
point where we can now decorate our design,
however we like. This is where
creativity can come in and you can go true to what the stone carving looks
like or something completely different or abstract or colorful or
whatever you like. I really enjoyed
constructing these two. This was the first one I made. You could see that it's
how we started today, but I colored in
the black solid. Then I've given the
white a little bit of shading to create this. Then I really then using
white on black card, and I particularly enjoyed
using white gel pen to construct and then use the really soft white pencil
to create the shading. I think for certain shapes, that really works well,
for example, for this one. For some others, I thought
that worked really well. Of course, there can be
a combination of this. You could do it
this way, where you give it a bit more shading and then with a white pencil gives shading in the darker parts. It depends whether you
like painting or drawing and shading monochrome
more or not. I feel like I want to give this a
slightly different look. I'm going to go with
the black shadows. I'm this time not going to construct this part here,
which I did by hand. It wasn't worth doing
that with a compass, which is why I've created these as a bit smaller
this time around. Where you could see
two ribbons here, a white one and an
outer white one, these are going
to be those ones, and the darker bits I'm going
to create in black again. But I'm starting to
think that the whitter parts or the lighter parts
I might go for gold. I do like a little bit of shine, so I will probably
end up doing gold. For now, you can join me
int just separate parts. For example, the first thing
I'd like to do is where the outer circles touch
the middle circle here, the same way as we've
merged them here. I could see how there's
a bit of a shadow there and also complete this shape. We've done the inside
of this shape here. But on the outside, I'm simply going to do
a small parallel line here and just join this in. This here is goes all the
way around and around. This part here is
considerably darker. I'm going to do this all
the way around first. I'm going to color these
in as well. Those here. Of course, later on,
if you feel like it's too flat and
just too black, then you can give a bit of
lighter white or gray shading. Now I'm doing this and decide on top whether I want
to add anymore. That's given that look here
that I was looking for, and it accentuates
this whole ribbon that goes round and
around the whole thing. I still like how this is accentuated like this one here and then these ones
come from underneath. The next thing, I'm just simply going to color these in black. If I later decide to
do something on top, I might, but for now, I
want just these in black. And then I'm going to
just do all of these in black as well inside here
to make it stand out. So then I'll see whether I
want the rest still in gold, which I think I'm
definitely leaning towards gold for now. O
13. Conclusion: Thank you so much
again for joining me on yet another
geometric art course, and my first course
where I'm teaching you an actual pattern from an
architectural building, a real place in the world. As soon as I saw this pattern, I had to analyze it
and share it with you. I really hope you've enjoyed it. I would really appreciate
seeing which look you went for. Did you go for anything
similar that I did? Did you go for a look like
shaded stone carving, or did you go with something
completely different? Whatever you did, I cannot
wait to see what you created. I get so inspired and proud and joyful seeing anyone
else's creations. Please share with me and tag
me on Instagram so I can share and admire and enjoy
your work for everyone to see. I hope to see you
in my next course.
 Diana Reeves, Geometric Artist & Educator