Transcripts
1. Introduction: Hi, I'm Emily and I'm an
artist from New Zealand. I teach drawing classes
in-person and online. Welcome to this
sketch club tutorial. In this tutorial we're
going to look at using one-point
perspective in a drawing. And we'll have a
bit of a practice first of how to use
one-point perspective. Learn a little bit
about what it is. And then we're going
to use a photograph of a ban or a building. It's a cube shape
and we're gonna get there looking really good
in terms of perspective. And it's also got
a road as well. So we'll look at how
health perspective for one-point perspective can be used to create a
sense of distance. Dip in the same state, things that are receding away
from us into the distance.
2. Materials: So this is the building and
the landscape that we're going to be drawing in. I highly recommend
that you print this out so that you've got
something bigger to work with. Just because of the proportions
of this photograph, it's quite hard to have it large on screen for you to see and also to be able to see what I'm drawing it
at the same time. These are the materials
that you're going to need. Some kind of roller.
You don't need the six squares, but
they can be handy. We'll do a little
bit of an exercise first just to make sure you're okay with what one-point perspective
is and how to use it. And then we'll get
into the drawer. And I'm using my
mechanical pencil. This is about the
equivalent of an HB pencil. If you've got an HB That will be good to use to start off with a nice smooth pencil and
Vina, something darker. So I'm using a 3D pencil, a softer pencil there. I can get some nice
shading max with. We don't want to add in some
of those details later on.
3. 1 Point Perspective Exercise: So before we start, we'll
do an exercise into, let's talk a little bit about what one-point
perspective is. And you'll get to have a bit of a play around with
it and see how it works before we put it into
practice with the drawing. Now, one-point perspective is, it's quite a limited
system to use, so you can only use it
in certain situations. And you might have seen in the previous tutorial
we did when we were looking down a road
and it disappeared into the distance at a
point like this. And then we hit some mountains in the background and things. But the key thing
was that there was one point and the distance
at everything lead to. So that's one situation. Another situation is when you're drawing shapes that
are cuboidal in shape. Such as buildings in this,
what we'll be doing today. But the really important
thing when you're doing this is that one of the surfaces of that
building or that cube needs to be
parallel with your eyes. It's not going to work if you're looking face on to the corner, That's two-point perspective,
one-point perspective. We need to have This front
of the cube facing us. It might be facing us here. Might be facing us
over to the left, or it might be facing
us over to the right, in which case we'll
see a little bit of the side here as well. Just a little bit
of a practice of how this works with
the vanishing point. Now, the way one-point
perspective works, we have some rules that
we need to follow. The first one is that
we have a horizon line. The second one is that we
have a vanishing point. Now if you've watched a
YouTube video on this that I have on my YouTube
channel, the pizza Ramon line. Feel free to skip
on to the tutorial. But for those of you who
haven't seen anything about one-point perspective before or haven't tried at the sphere really good exercise just to get your head used to
the idea of it. So here is our horizon line. Sometimes we call this an
eye level and it's actually a little bit more
appropriate term because sometimes you
are looking at something and you can actually
see the horizon line and it gets a little
bit confusing. So this is, we were looking when we're
looking straight ahead. This is the level of allies. And within that, we're going
to have one vanishing point. So one-point
perspective, we've got one horizon line.
Just makes sense. And when I leave it, we've got one vanishing point. If we're looking at something
in front of us like a box, and actually I think I've
still got the box down here. If we're looking at this front on that and it's
in our eye level. All we're going to see
is the front of the box. As soon as we move it
below our eye level, we start to be able to see
the top of the box there. And as soon as we move it
up above our eye level, we start to be able to see
the bottom of the box. Same thing if we've
got it in front of us and we move it to the right. Eventually, we start
to see a sorry, that's to the left
and we start to see the right side of the box. And if we're moving
it over to the right, we'll start to see the
left side of the box. You can also have it underneath your eye level and to the right. And that means you can
see the top and the side. You can also see the front. But let's just do a
little demo here. Be quite quick. But just to show you how
that works on paper. So I'm going to
draw a square here. This is the box that we
were just looking at. It right in the center
of our eye level. And remember when
it's like they're, all we can see is
that front square. We just see the front
square of the box. So there it is. So if we then decide
that we want to move it across and draw that
on our piece of paper. Draw the exact same
square over here. And I'm making it 3 cm. That's just so that
I can keep the same the same dimensions. But you could be
drawing anything, you could be drawing
a rectangle. Then we're gonna be able to
see this side of the box. Remember it's in front
of us like this. Move it across. We start to see
the side as well, and that's what
we're going to draw, That's what we're going to use one-point perspective to draw. The way we do that is we use our vanishing point
and we connect what are called converging
lines from the corners of the box to the
vanishing point. These are just guidelines, so you draw them quite lightly. Then we're going to
put in the back of the side of the box.
Here it is, here. We've got a nice cube shape
that is in perspective. And we can get rid
of these lines here, these guidelines
in the background. We don't need the eye
level we, anymore, we don't need these
converging lines anymore. When we get into drawing
the actual landscape, I'm not going to be
using a ruler just because it can make things
look a little bit forced, but we use one at the moment. If we were then to bring this down underneath our eye level, you remember what happens? We've got it over to the side and we're also bringing it down. We can see the front of the box, we can see the side of the box and we can see the
top of the box. So that's what we're
going to draw it. And we're going to use
exactly the same method. Everything is going to go back to our one vanishing point. Now it's really important.
It's one-point perspective. Why we only have one
vanishing point. If we were doing
two-point perspective, we'd have to point at
two vanishing points. So let's draw another 3 cm
square xi that's changed in that portrait or something
a little bit different. So it doesn't matter
what kind of squeeze, draw it as long is the width lines are always
parallel, always horizontal. The height lines are always
vertical in parallel as well. So now we want to be out
to the side and the top. We're going to
connect these corners to the vanishing point. Without converging lines. We can choose where the
back of the box is. If it was gonna be
a really long box That's really receding
away into the distance. Then we might have the
back of it back here. Or if we want it shorter, then we'll have it here. Now, this is where we
have to remember that the height lines are always
going to be vertical. This is a nice role of
one-point perspective. Height is always vertical and the width is always
completely horizontal. And that's where this seats
square can be useful. Sometimes you can line
it up with the side of your page to make sure you're getting a deed horizontal line. Well, you can just
do it with your eye. Make sure it's parallel
to this one here. Sorry, you can't quite see it, it just do another one. Let's do one above
the eye level here. And then maybe we'll do
one below the eye level as well so you follow me, but you can also draw whatever kinds of shapes
that you want to. Height lines are always vertical with clients
are always horizontal. Now, we moved it across this way from the
center of sight. So we're going to join the
lines on the side here, the join the corners. And because it's
above our eye line, we're also going to be able
to see the bottom of the box. Now. We can put in the back of the box and just darken up
those converging lines, the parts of them that
form the edges of the box. What would be really
good idea as well as to just go
through and write in width, height, and depth. Remember I said the width, boys are horizontal, the
height is always vertical. With a depth is the one plane that is
subject to perspective. So that's the only one that's
going to have those angles, it start to go back
into the distance. And eventually if it
was a long enough box, they would meet at
the vanishing point. And that's just because when things are further away from us, they appear smaller and also the distance between
things if he is smaller. So you have two edges. Train tracks is a good example. When you're standing
right between the two and the two tracks quite wide. And then as they get further away from you
into the distance, they seem to get closer
and closer together, the space between them, it gets smaller
and smaller until eventually they
would vanish on it. Vanishing point in the distance is a really good example
of one-point perspective. But if we go through and
write in width, height, and depth to really get an
idea of what's happening here, Woods is always going
to be horizontal, height is always
going to be vertical. In depth is going to recede
to the vanishing point. And you'll see all
of this happening soon when we get
into our drawing. I'm going to do a
different one here. You don't even have to
use a ruler for this. But if you're not using a ruler, you really want to
try and get those, those lines nice and straight. This one is just slightly to the right of the
vanishing points. So you'll just be able to see
a little bit of the side. And then really important
here that we get out straight vertical line
for the back of the box. And are straight
horizontal line. We've got width, height, and depth when here
in this one here. So they're not
gonna be parallel, they'll start off parallel and then eventually
they start to risk and to get closer together as they move
towards a vanishing point. You can play around with
this as much as you want. I hope this has given you an idea of what one-point
perspective is. Don't worry if you don't quite get it yet because
we're going to actually apply it to a real life drawing situation using a photograph as a subject. And I think that's
really important to know how you can
actually use this. So rather than just
always drawing boxes or making up scenes from imagination that are always
going to look a little bit static and robotic because
you're using a ruler. I think it's important that we can apply this to real life as well without drawing and
sketching from observation.
4. Finding The Vanishing Point: So let's move on
and take a look at this photograph and
we'll do a bit of an analysis of what we can see trying to figure out
where the vanishing point is. If you're outside and you're
looking at the scene, and you are trying to
figure out how do you get the correct angles
for that building in the road that are receiving
back into the distance. Well, I'm going to show
you how to do that. So the first thing to do is have a look at the
angles that you can see. And you can either
use your pencil, the edge of your paint, so in line it up in
front of your eyes. Or if you're working from
a photograph like this, you might be actually
drawing in those angles. I'm looking for the
angle of the bottom of that band and then
also the angle for the top of the band. And I'm not dealing
with the roof. I'm gonna go from here
because this point here I can quite clearly see
the front of the box. And the roof looks like
it's a little bit crooked, is a bit of a bend in it. So we'll use this as well as our starting
point for the angle, this point just here. And I'm going to draw that down and follow the line
of the top of the roof. What I'm doing is I'm
looking for the point. It might just do that one again, but I'm looking for the point at which these lines all intersect. That's going to tell me where
they're finishing pointers. I'm also looking for the
line of the road here. You can see them starting
to cross and one point now end the line of the
road on the other side. And just see if
there's anything else. If we could see the top
edge of the roof that would also line up with
the vanishing point. But we can, so
these angles here, they've got nothing to do
with vanishing point because one-point perspective only works in this situation with cubes. So that we're looking
at the main cube shape or the box shape
of that building, not the roof, the
angle of the roof. We've just got to take a guess at what kind of angled letters
and we can even change it. We can make a shallower
roof if we want to. It's not going to
matter so much. What does matter is
these edges of the box. And so this is showing us where our vanishing point
is here it is here. Now we can use that to go into our drawing and start
putting in those guidelines. So it's converging lines
and then adding in the shapes of the ban in
some of the landscape. There's also one more line that we could add
that I can see, well, first of all,
there's actually two. There's the horizon line. We can see a line
that comes across here and goes through
that vanishing point. Sort of a bit of a road there. And it's sort of the top of that road must be in line
with the horizon line, I guess we were looking
anyway, that's how I level. But the other line I was going
to meet you and sometimes you'll find that the landscape, parts of the landscape will also follow the lines
of perspective. So if you have a look just here, you can see these rows of corn. The bottom of them is in line
with the side of the road. So that also converges
at the vanishing point. Or in I also forgot
the fence post here. We can imagine
there's another fence post where there's one there. There might be another
one at the side here. And those two will, as long as they're pretty
much the same size, the same height, they
will also converge it up finishing point and the
bottom of them woe as well. The bottom atoms in line
with the bottom of the band. You got all these
different elements here that are going to be meeting that one vanishing
point in the distance.
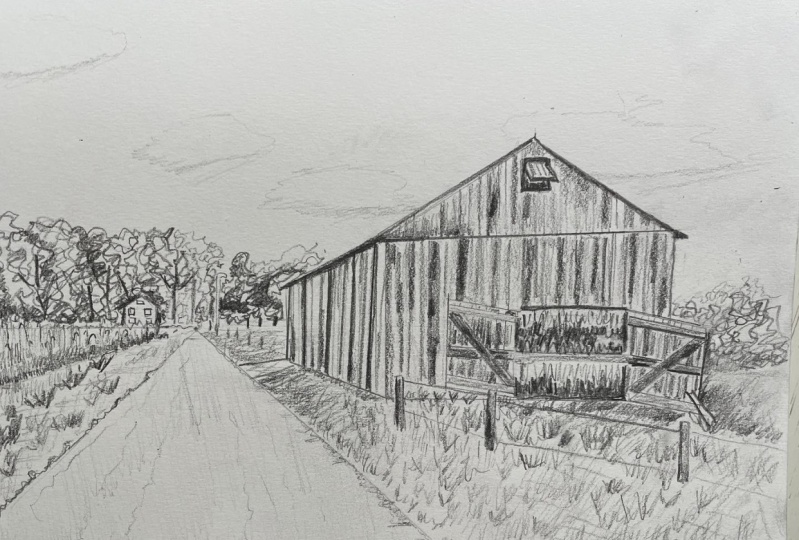
5. Mapping Out The Main Structure: So here's our resource
photograph above. Like I said, really be a
good idea to download it. If you can download it and have it on a separate
screen or print it out, then you can still work just from the screen
that you'll be following my drawer and more
than the photograph and you could also make
it your own drawing. It doesn't have to be
exactly like the photograph. The only issue is
that you're not gonna be able to see some of those really small
details in the background is another little house in
the background there as well. So the first thing we
need to do is establish that eyeline that we found
and also our vanishing point. And I will get rid of my face so that we can see a little bit more
of my sketchbook. And what I'm looking for is how far down that horizon line is, is it in the center
of the scene? Or is it a little bit above
or a little bit below? And if we take a look
at the photograph, we'll see that that eye level line that we
figured out there, that maybe one food
one-third of the way App. Here's the second third here. We can put that in. You might want to
draw a frame first, or if you're using your
whole page like I am, then you're going to look at the side of the page for grant. We want food is again, you
can make this your own. You can change it. It doesn't have to be. Just move my nap a little bit. You can't see all of my page, but it doesn't have to
be exactly the same. So you might decide
or you don't, you don't actually want to
have all of that sky in here. Prefer to leave bit of the sky out and crop it a
little bit closer. That's fine. I'm not using a ruler.
I'm just trying to get a genuinely straight line. It looks a little bit
crooked, but that's okay. I'm using my HB pencil so that I've got some
nice light lines. Figure out the
converging lines first is our guidelines and name. We can add in the details
over top and we don't need to worry too much about rubbing
whole lot of stuff out. And then the next
thing to do is figure out where that
vanishing point was. We did that before. And we've gotten the idea
that it's around about, let's just use this
as a guideline. And about here. If you are outside
sketching or you've got your own photograph,
you're gonna do a few, little, a little
bit of an analysis first and try to
figure these things out so you know where to start. So here's our vanishing
point to be in here. It's where everything
is going to meet. It's slightly above
eye level line. Sorry, it's slightly
above the road that you can see there in the
end of the road. And it is trying to
draw the whole picture. He's about halfway. So it's maybe a quarter
of the way across. The other quarter,
something like that anyway. So if we're using
this whole line here, then he's halfway
is about a quarter. So that's where I'm going
to put my vanishing point. If you ended up
putting a little bit further this way, or this way, it just means that the
spective on your band or the view of the band that you have in your drawing is going to be a little bit different
to the photograph, but you still be out to
get an accurate sense of perspective as long as you're using your
vanishing points. So here's my vanishing point. Now I'm gonna go ahead and put in some of those
converging lines. Let's start with the main ones. And the easiest ones I
think, are the road. We've got the one of the
ban and it's also add in one of the ones
that the road. This one here. This one here. If you're using a frame, then you'll be able
to figure out where it crosses that frame. I'm gonna go ahead and
just look at the angle. So I'm trying to gauge the
angle with my pencil first. You could even give it a name. So you might think it's
a little bit less. Then 45 degrees from horizontal. It makes sense.
Something like this. And then the one on the other side is a
little bit different. In another way to engage these is to look at this
triangle shape in here and then compare it to this triangle shape
in the photograph. How are they different? So
there I've got my Rodin. Let's go ahead and
put the ban in. Again, I can look at
the shape between these two angles
of triangle shape. Try and get it, try
and get at leading to your vanishing point. You see this as very sketchy and we're just doing
a sketch really, if you want to spend
a lot more time afterwards on finishing
the drawing, you can. But this is going
to be pretty loose. Sketch. We've gotten this line. And then the next thing
we might do is add in the top of this side
of the bar net angle. I'm going just below the roof there because the
roof is a little bit crooked. Look at the triangles. Triangle beneath the eye line is smaller than this
one above the eyeline. For the ban. Something like that. I'm making these lines
quite loose, which is fine. But if you have too many
lines and it gets too thick, you might want to choose a more definite placement
for that line again. And let's go ahead and put in
the side of the barn here. So we're going to
put in this line. Hopefully you can see
that in the photograph I might actually switch to pink. So we can see there's a bit more clearly Put on this line and we're going to put
in this line here. Now, you could have a look at
the spacing in the drawing. So use vanishing point. Is that each of the page where abouts does this
corner of the ban occur? It's not halfway between the vanishing point in
the edge of the page. It's more to the lift. Is each of my page is
a vanishing point. I've probably got it
about right already. So I'm going to put it in there. Nice light sketching line. And then I can look for
the back edge of the band. Not quite halfway between the vanishing point and the
front corner of the bandits. Little bit further back towards the vanishing
point, just a little bit. Whoops. Sorry, this is going to come all the way
down to this line here. We don't actually need that
eye level so much anymore. I'm just going to lighten
it up a little bit so it doesn't confuse me
like it just did. Okay, so now we've got the
side of the band here. I'm going to go ahead
and put that in just a little bit darker
so you can see it, but you might want
to keep you as quite light at this stage. Now we're going to treat
this as if it's a box. So I'm gonna go ahead and
draw the horizontal line of the top part of that
box of the bands. So I'm ignoring
the roof for now. In one-point perspective, the
width is always horizontal. It's parallel to our eyes
and as always horizontal. So let's go ahead and put
in the top and the bottom. It's going to come quite close
to the side of the page. Try and get it strikes. And then we're gonna
put it in the other, each of the band over here. This is part of the
converging line here. I'm just going to get
rid of it so we don't get confused when
you put on the roof. Now, when you put on the roof, I'm usually the peak is
right in the center. A good, good practice anyway
is to find the center of that box by drawing a cross and then draw
a line straight up. And it's going to tell you where whereabouts the peak lies. And if I look at the
photograph and I come along this converging
lines here, the kind of does line up. You can see when I move it does line up with the
peak of the roof. And there's nothing to do with
the one-point perspective. It's just, it is just
the angle that we're on. So that's not always
going to be the case. But we can copy that in this drawing because it's what we can
see in the photograph. We just need to join the dots here to create the roof
on the other side.
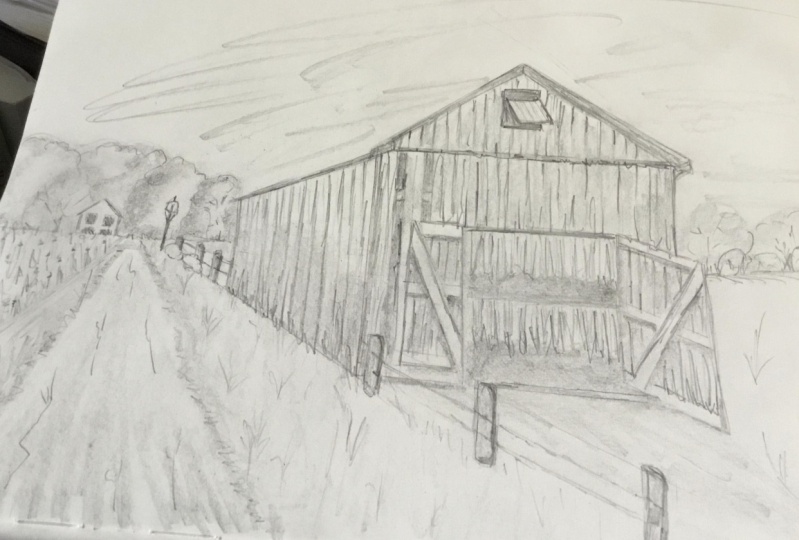
6. Adding Other Shapes: We've got our main
shape here now, and we've got a good sense of
perspective on their shape. We can add in a
few more elements, but what might be
a good idea now is to just get rid of
some of these lines. The lines you don't need. We'll put in some more
elements in the num. We will add in some of the finer details like the trees and that
sort of thing. And they didn't really have
much to do with perspective, but it's just going to be practicing how to get
different kinds of textures and contrast in
your landscape drawings. I've rubbed out the
lines that I didn't need and I've also taken the lines of the photograph
out there as well. So we can end up with
just a big mess of lines. What else do we need to add n? That was weird. How horizon line was the road is just a little
bit underneath it. And then we can see
the top of the corn was pretty much in line with our horizon line
or our eye level. In the back of the
road was as well. A few little details to help sort of position things
with my vanishing point. And they're just so that I know we everything else
is going to lead back to we can put
on the fence posts. It might be a good
idea to do now. So I'm going to put in
just one post here. You can see it in
the photograph. Just here. It's good, but it's on
a little bit of a lean. You can do that if
you want to make it a little bit quirky or you can have it straight
up and down. And then finding
the converging line from the vanishing point. That's going to show me where the next fence post
needs to start. B starts here in it's probably about maybe sudo of the way across the band
maybe a little bit. This is where it's
going to intersect. Here's another one
near the top of them is also going to line up. So here's our vanishing points. Sorry, he's out
converging lines, that one, that one. A little bit higher up here
where I shouldn't have oops. I'll just leave it
there, but bits, the tops of them
should line up as well with the vanishing point. So what's happening is
as they come closer to us, they're getting bigger. And now eyes. And I'm gonna go here and put
another one in here. We're going to have a little
bit more detail on it. And then we've also
got the wires that join those fence posts
in Beirut getting a pay those will also follow a line back to the
vanishing point. But I'm just gonna
kinda like this. It might be a little bit wonky. Might be drooping a little bit. Nina, get rid of this
converging lines here. So if you're out jogging or even if you're at home drawing
from a photograph, you don't have to put in
these converging lines. I'm doing it for
the demonstration. But you might just be
eyeballing them and going, Oh yeah, It's going
to come along here. It's going to line up. You could even use a pencil, a ruler to line things up with the vanishing point without
actually drawing the line. And Okey-dokey got a few
more details to add, a few more shapes, I should say, and then we'll put in a really fine details. So let's go ahead and put
in this line of trees here. And I'm just looking at
the general shape of it in my drawing for
beak cutoff, that here. I could extend it and just make some things
up if I want to. And we can also put in that row of the bottom
of that row of corn. I'm looking for that
triangle wedge there. The photograph. You
use, the right tool. It's that in this line. That's the one that's meeting. You're converging, meeting a vanishing point
in that triangle, which there is a little house
in the background here. And I'm just thinking
about where their lives. Vanishing point, vanishing
point is about here. You can see that little dot. Here. There's a little house just to the side of that
slightly behind the colon. So we can put that
in. It's very simple. We can only see the
front of it because it's so close to the vanishing point. Technically, we might be able to see like a little
bit of the side. But it's so far in the distance. It's so close to the center
of our line of sight as well. And score just a couple of
squares in there for Windows. Still mapping things out. So all of these little details
are still just shapes. And then we can go
through and put in some contrast and some
texture and things. Got the trees, got the corn. It's going to be a little
bit more wobbly top as well. It's putting some of
these details on the ban. We've got this little
window at the top here. And I'm just going to
draw a straight line down to find a cross-section and put that box of the window
over that cross-section. It's just so I can see
where the center of it, it's going to be quite
close to the top. It doesn't fill up half, half of the roof
slope at least knit. And then we've got
this opening here. This has got nothing to do
with the vanishing point. So all I'm doing is making
sure the lines are parallel. So we've got the width
lines and then these angles here where it's slanting
open a little bit, they're parallel
sides of the window, parallel tops, or the
window of parallel as well. And if we want to
make that realistic, we put a little bit of
width on it as well, a little bit of fun, like an
age to show that it's thick. Using a shade didn't shade on the inside here. Well, while we're at it,
it's just very simple, just blocking in some shading. And we've got the sum
open band or here, it doesn't matter too
much where you put it. If you want to be really
accurate to the photograph. We can look at where
this square shape here, where it lines up with
what we've just drawn. Almost in line with
the side of this here. But I might make
mine just a little bit further across as he was too far that
way for a drawing. So the composition of the drawing and comes
about halfway up, a little bit higher
than halfway up, actually, this box shape here. We're always comparing things with something we've
already drawn, looking at where the top of this intersex,
something else. So it's halfway is above halfway of the
height of this box. And then we've got these
open doors here in this one is pretty much wide open, so we can see the front of it. And then this one here is it
a little bit of an angle? So it doesn't matter what
angle you make it on. You could make it like
quite, quite acute. So it's facing more towards us. Spawn swung more towards us. Or you can inhibit
shallow like this yet. But the important
thing is that you make the top and the bottom parallel. So the angles need to
be exactly the same. The height of the door is
always gonna be vertical. Beautiful, vertical, vertical, vertical, horizontal,
horizontal. This one is horizontal just
because it's wide-open. Just shift this down
a little bit here. I'm pretty messy sketcher, especially in these
first stages. You'll see me doing
multiple lines. And if you keep them
light in, that's okay. It looks like there's a
bar across here as well. You can make out what
if it goes on in here? I think maybe there's some corn. I'm assuming it's corn
or something drying. And if you know anything
about bonds like this, maybe you could leave me a comment and let me
know if it's correct. I'm just going to follow
the photograph just because I don't know what
else to put it in there. And it's always good
to have a reference. I'm just putting in some shapes. I'm really just looking
at the shapes of dark, dark shape at the bottom
of the cell, it's gone. And then there's this shape in here just above the crossbar. It's quite dark as well. Block that in now.
7. Drawing The Details: So we've got a really
good structure here for our drawing in
this is the point where we can start
adding in some of the finer details,
the surface details. If you want to, you might want to take
a little break here and then come back to it and
just check your drawing, see if anything
looks out of place. So not quite right. But I'm gonna go ahead now
and stop putting in the beans are the the wooden
slats of the span. And I'm just going to add a
little bit to this roof here. So this is like this. This part of the roof
here is this part. And then we've got this
overhanging part here. So that's what I'm
going to add on. I'm just going to put
a little bit out here, in a little bit up here, then join those together. So I've got that
overhangs. Same here. And then down here
it's kind of wonky. It's like obviously in
a little bit warped. It doesn't matter if you make
it a little bit crooked. Through the front
of the barn here, there are planks awards
that just go down. So they're all vertical. You might be able to
get a rhythm going, trying to get them the
same distance apart. And more about
creating a pattern, then doing every one of
those planks of wood. Meticulously. Same and the front of the
band is a little worm. How box or something over here. I'm just going to ignore that. Getting a rhythm going. Still using my HB pencil. I'll move to my darker
paints or soon. I couldn't be doing these
a little bit darker. There's a couple of them broken Wednesday around the associates and make sure we put
some detail and knows. There's a broken one. Here. Shade that in a little bit
lighter down the bottom. So it shows that there's
something in there. And then there's
another broken one, couple of planks across. Again, I'm just
showing that there's something happening
in near this. Struts. It go across some dark
parts and some light paths. This is Math making, just kind of erratic, sort of mark making to
make it look natural. The details on the
door of each one, we've got that cross plank here. It goes from corner to
corner. Same on this one. And then we've got
three horizontal ones and they're going to follow the angle of the top of the door and then bind those. We've got the thanks, it just go downwards. You could spend a
really long time trying to get these
perfect and blowing up the photograph and trying
to see the exact details. But all I'm doing
is I'm looking for patterns and then
putting those in. So look here the
photograph first and then once I figured
out the pattern, which is very simple for
these parts, I just dumb. Look at the drawing and
just work on the drawing. We can round to the
side of the bond here and those are all
straight up and down as well. They're all vertical there. They vary in how light
and dark they are. And the thinner than
these ones are specie as they get further away from us or closer to
the vanishing point. Those are gonna get
closer together, those planks of wood. And so back here, we're going to have
some really fine lines. So using the tip of the pencil. And they're a little
bit wonky on this side, so it doesn't matter if
your lines are wonky. So if you are drawing like this, you probably going
to get a wonky line. Then if you're
drawing like this, when you're drawing
like this, you're going to get a rhythm going. When you try to draw a
straight line and draw slowly, that's when you're going
to get a wobbly line in. I think in this situation
is actually kinda nice. While we're here,
I think would do more work on this, this year. And then we'll come over and do some of
the other details. So for shading, for
this, it's all gray. And I just use the
side of my pencil. I'm still using the HB because
I quite like how sharp it is for this wood texture. I don't want it to eat too soft. It's what I'm doing
is just taking away some of the white. And using the side
of the pencil. Lines that I drew should still show through
underneath you. Very quickly blocking
in some shading. And it sort of just gifts. Gifts it a bit more
substance now. Even all of that I
can share it across. And then what we
can do later on, I'll show you a little bit
now as we can go through and add in some darker details. So you might want to look at the photograph
as a reference, but because these bits
of water or withered, sometimes the areas that looked darker aren't
actually the shadow areas. So what I tend to do
is just find that underneath it a bit of a shadow there because
that's what's natural. So the light will be
coming from the top. It'll be hitting the top
of the crossbar there, but there'll be a bit of
a shadow underneath it. Excusing kinda flicking
motions to put those in. And just adding some contrast, darkening up anything that's in the foreground is
quite important. That's gonna be this going to help to
create the illusion of depth because things
that are closest to us add a darker and brighter. You put it in a darker
line under here as well. And this through here is
quite dark and it's where I might need the pencil using a line or linear
motion to shape it. And rather than
going up and down, It's quite dark here. I don't mind that I get
these sharp Vmax because I think that's quite
nice for the ban. And then the strong
contrast in here as well. I'm not gonna, I'm not gonna
do all of it because I want to get onto
the rest of this. But just to show you
how you can read a bit, forgotten is a few planks
in here too. For the corn. I think about using maybe
like some kind of a pattern. Have a look at it first, and then try using your
pencil on a kind of an erratic sort of a way
to make it look like this. Those things hanging down. If it's too wide variety, you can just shade
over top like this. So what you don't want
to do is draw something. Well, you could draw
something like that. It might look okay.
But I think using a flicking in quite an
aggressive, hurried Mac. Well motion will
give you something that looks a lot more natural. Just very quickly going to put something in there.
I can come back. And I'll just put a bit
more contrast in here.
8. Drawing Trees: Okay, So I want to move on, get a little bit more done
in these details here. And then you have some time after you have as much time
as you want to work on it. So let's have a look at, let me say, You know, what I forgot is the awesome. There's also some fence
posts behind the building. There might be a
bit hard to see in the photograph on screen, but there are a few
little themes post here and I can just see my
converging lines store. I'm just going to put those in. Now. We're going to put in
some of the trees and shrubs. So that was my road section. And shrub here in a
little one behind it, some drawing in the
shapes of those. Now I'm going to draw
in the shapes of the trees that I
can see as well. So looking in drawing is I look and putting in
some of those shapes, defining the individual trees. But don't worry too much
about them being perfect. Completely accurate,
because who's gonna know? No one's going to know. I can see my building here is what? A way too big because they should be a lot
more tree above it in also, if I look at this
converging line here, That should intersect
further down, it shouldn't seat belt here. That's not too bad.
Maybe it just need to make my building a
little bit smaller. The smaller it is, the further
away it's going to look. So that's also going to increase the sense of depth
that we've got. You can get to these trees. How are we going to
do these treaties? How do you think we might
be able to do them? A couple of different ways. We could approach them. We could approach them individually or we
could approach them. It is a mess. If we're
approaching them as a mess, we could just shade in all of
this area, block it all in. And if for some
drawings that might be enough, might do this. And then you might just add in one darker layer over top for where you can see
the darker shapes. I haven't gone very
dark because I want to do it a little bit more,
say something else, but that's fine if you
want to just do that and just bring a little
bit more contrast and it might be all you need. But otherwise you could create a texture that's
maybe a little bit more like what you can see
that you can kind of see like, um, I guess bubbles of
shapes, rounder shapes. And so we can use a
roundish pattern or shading mark,
something like this. Use your pencil on
the side if you want a really soft Mac. And I like to change it. So if you're just doing it
all the same way like this, it can look a little bit,
little bit scribbly. But if you change, it makes some bigger, some smaller, maybe change
the direction of them. You'll get something that
looks a little bit natural. So we'll do a layer of it. And then what we're gonna do is bring in the darker
parts the same way. So looking for shapes of dark. And that's going to give us
a sense that there's some, some parts of the
tree that aren't receiving light in It's going
to create a sense of form. So let's go ahead and do that. Let's get rid of that line. So starting off really light, I'm left-handed, I'm
moving from right to left. But if you wanted to,
you could start over at the side and do the same thing if that
feels more natural for you. And then once you've gotten something that feels
quite natural, I've left a little
bit of light as well in the lightest parts. Then you're going to go over in bringing some shadow
areas, specie underneath. All of those trees are
darker towards the bottom. No light getting down there. In the light at the top. I've got quite a hard line here, got light in the dark and I could just use
something in-between, less pressure on the pizza
if I want to merge those, inhibit not quite so extreme. And a few sort of few levels of branches or
bubbles of leaves. And each one, you've got a light and then
behind that lighter area, behind each of those lighter
areas will be a dark area. And it's going to help define
the one in front of it. So what I'm looking at in
the photograph is this here. We've got this light pad and then there's
this dark patch. On the side of it and
go light pad and then slightly darker, light, dark. Move over to the side for
the right-handed people. He also wanted the focal point of your drawing to be on the ban and also probably on our vanishing point
because that's where all the lines
are leading to. And if you put a whole heap of detail and really fine shading, lots of high contrast over here that's going to distract
from everything else. So you could just treat
this really loosely. And it will look like
a mess at the start. But once I add in some contrast, it's going to bring
some form to it. A little bit of an area and NEA, which is like sky showing
through the trees. So try and leave that. So that was big mess here and I'm just going to bring
in some docs. Looking at the
photograph, looking for the shapes where I can see dark, especially lower down, pencil max and nice and soft because
it's in the background. I don't know, bring too
much attention to it. Well, you might have
a few sharper lines as through here I think I can see your trunk that's
coming up through here. It gave him the
trees we can see, but the sky can see a
few branches and things. The rest of this
video is going to be working on these
different textures. So we'll move on to the
grass soon. The road. If you want to if you want to work on
it in your own time, you could do and just
sort of come back to the video when you're ready
to move on to the next part. So you don't have to listen
to me the whole time. It's couple of shrubs
just down here. And same thing, you're
going to be light. And you can have a dark patch
of light in a dark path. And this one here is
getting a little bit lost. So brings more dark behind it. See if you can get
the sense that you've got these two shrubs. You created that
each thereby putting dark behind it is actually
really duck behind you. Same with this tree. You're creating the form of that tree and the
age of that tree by adding some dark and you
can make it a little bit jagged and there. So you get that
sense that there's some leaves sticking out. But again, I don't want to
put too much detail near my house in the
background is now lost. So we're going to do the same thing on it a
little bit, adopt behind it. And then I'm going to use
a sharp pencil to add some detail using
the same pencil, but I'm just going to use
the tip of the pencil. Shading those windows.
9. Drawing Grass: Landscape drawing
is really all about mark making is just, there's just no way that
you can draw all of the fine detail that you
can see in the photograph. So what we do for each of these sections is we
look for a pattern. And we try to recreate that pattern in a
really natural way. We look at the corn. That's kind of a tricky one to do because there is so
much detail in there, but we know what
corn looks like. We know that it's up
and down as long. So that's the first
part of the pattern. I'm going to start off light. And then if you look
at the photograph, you can see that it's
darker underneath. I'm not just going
up and down or from bottom to top like I
was here or top to bottom. Going up, down, up, down. Maybe changing the angle a
little bit, double lines. So they'll get a little
bit of variation there. As we come towards
the foreground here, that might be where you add and it's hard to see
in the photograph. But if you know what
corn looks like, you might add in something
that looks like it's got some, some leaves hanging off it. And just by having
that little bit of extra detail on
something like this, and it's got these leaves. Let's go to the top leaf on the other side just by
having something like that, or a few of those
in the foreground. That mean creates
the illusion that all of this is the
same as this here. So I can have it Nina are
really quite detailed one here. And so you can see those
leaves quite clearly. And then they just
disappear into pattern. That's the first part
of the pattern that we can see or what we know
about colon the cecum part, if we look at the photograph, is that this is dark
lower part here. And it's quite important to
put in that creates our form. We have contrast. All I'm doing is just
shading over top, but I'm not making
sure I don't have a hard edge to my shading. I'm just here in
the inner shading. A little bit of sort of
grass and stuff around here. Don't need to edit and you can leave out whatever you want. Great thing about landscape, drawing or painting as you can, you can really choose
what goes in it. So long as you've
got the main things. I'm just adding a
little bit of contrast, especially at the front. So again, using that same kind
of like a rhetoric of Mac. Scribble, scribble,
scribble, scribble, scroll, scroll, scroll, scroll. Okay, we're just about done. I know it looks like we
got a lot of space here, but these will be
really easy to fill in. I'm going to put
some more detail in these fence posts
in the foreground. We can see the
front of it is more in shadow and then
the side of it. So this one will be the same. We have the side and then
the front of it here, just adding on another plane
and the front plane of it. It's gonna be darker. Usually a scribbly map
because it's wood. And also a sharp Mac. So tip of the pencil
because it's in detail, it's in the foreground. A broken line for the wire. Just so that it looks like
it's catching some light. The fence post the Docker here. So remember as things get
further into the distance, they're going to get lighter. You're gonna get
blurrier, less detailed. Definitely need to add some
dots into this band here. So when you're adding
these and again, you don't want like hard
lines all the way across. You want kind of a broken line, what we've got down here. So it's sort of doing
something like this or maybe like like that to get
something natural. If you're in doubt, make
it darker at the bottom. Little bit lighter at the top. So all of this front
here is in shadow and technically it should
be darker than this. So that's something
that you can do. I'm just going to define
the age of the barn here. And even maybe even
just shading this part, given idea that it's
more in shadow. I don't need to go through
and put my lines and again, so I'll leave that for
you to play around with. It, even just
putting darker part at the top of those lines. It gives it a little bit
more, but more depth. More interest in dimension. Let's play around
with this grass here. So it's, it's pretty light. So if you squint at the
photograph is pretty light except for there's an
area of shadow here. I'm just going to actually
shade that and now lock it in. I know where it's gonna go. I'm using this kind of
direction coming on out on an angle because I can see the shadow comes out
in that direction. And also the light's
coming from over here. So it just makes sense to
make the shadow go that way. And the grass here, the important things
is this Each, we want it to be a
little bit wonky. It can be dark at the front. Sorry, you'll see mine coming
into picture in a moment. Few little patches of
grass that coming out. And then as we get
further and further back, it's going to disappear. Lighter. Keep noticing new things is a
bit of a path here as well. Three, easy to put an end. There's a few levels
to the grass or a values to the grass. Is it lighter edge down here by the fence
that's a little bit darker. So sometimes good idea to
map out those areas first. And then you need to come up
with some kind of pattern. And we know that grass
sticks up like this. We don't want it
to look like that, but we could use
that direction at least in just try and create a more natural sort of emotion. So veering the size, small, big, different directions
overlapping each other. And that can all go over shading or you can share
it over top like this. The most important part, it will most important
area to hit. Fine detail will be
in this area here. It may be in here
as a bit deeper. So that's where
I'm going to stop. Don't need to cover
the whole thing because a little bit
like the corn over here, we do a little bit
in the foreground. And then we create the
illusion that all of this area is made up
of the same textures. The same thing. Let's all grass. This is all just kinda brown. A little bit of a darker
edge of grass only. You might be able to see your
3D that just doing there. If you were looking at this is a drawing and you didn't
know what we're doing. Hopefully you start to
make up this part here. There's nothing in there
at the moment, it's white. But because you've got
this little pattern here, it sort of creates the illusion
that this is the same as that in a year it
might just be shading, maybe follow the same
direction up and down. Using pencil on its side. I've got quite a
hard line here for the ban and probably
should be a little bit softer because some of the
grasses and overlapping it in back here. So there's no white back
here in the photograph. So it needs to be shaded in
with something even if it's just a very simple block in shading is a bit of a maybe like a feat,
something over here. And then we got the grass
on the other side as well. So at the back
here, just shading. As you come towards
the, the foreground. We want to add in more detail
and especially their age. Natural looking each, try not to control
your pencil too much. Sometimes it helps to
hold it through the back. Get something that's
a little bit wonky and you can't control it
and it's actually good. It gets lighter as we go back. Looking for any little dark
areas and shading those, using the grass pattern to
fit a line that comes along. Quite hard to see in
the photograph here. But the ear as well. And then same thing,
I'm just going to rely on my pattern. If you really struggled with
this, hold your pencil, fear the back, and
just go with it. The worst thing to do
is to have something that's too regular
to all the same as beta that you've
got a little bit of Mason in the grasses, the same as everything else. We've looked at the trees. The corn is going to be
darker at the bottom. So anyway, you want to create
a bit of, a bit of height. You're going to have
some darker shading at the base of whatever
area of grass you shading, you see that it makes it look like this is sort of
a clump of grass, isn't shadow down here. You can do that in these
smaller parts too, if you want to.
10. Adding To The Road And Sky: In the road. This is kinda up to you, but I think I think you need to
have something in there. You might want to follow
the direction back to the vanishing point
that could make it look a little bit
like a dirt road. Or even if you want it to
look like a paved road, this rule does help
with the composition. Draws your eye back down it. Really flinging my pencil, barely touching the paper because I want this to be light. If you've got some tissue
or some toilet paper, you can just blend
that out a bit. Get rid of some of those maps
is still going to show up. So don't go crazy with your
mark making on the road. We want it to be quite subtle. And same with the sky. It's kinda hard to put in this cloud around
here and there's another cloud up and in the
other corner over there. If you wanted to put those clouds and we've
really got to shade in all of the blue of the sky because the clouds are
going to be white. Have you just sort of draw
them and they can look funny. They're going to look like
sheep clouds in the sky. But what you could do is think
about the base of a cloud, the bottom each of a
cloud of being in shadow. And there might be all
you do is just add in a little bit of shading for what would
be the bottom of the cloud or maybe
the parts above it. So as soon as I put
shading here and here, this starts to look like
the white of the cloud. But this is our main focus. This in our vanishing point. This up here is not as important in if
you've put a lot of dark shading in there or a lot of detail is just
going to draw your eye away. And then people will really notice that it doesn't
look like a cloud. So all it needs to be,
it's just a little bit of smudging something to
fill in that whitespace. If you've got big
white space up here, it's going to look like you're
drawing isn't finished. Just putting in
that little bit of shading makes it intentional. That's what I want
the sky to look like. I want it to be very
light and unfinished. It's not that I've just
forgotten about it. The side here, it
looks very unfinished because I need to put in a
little bit more grass there. And it should, it
should line up here. Lines up with L line
of trees over here. And then this tree
over there as well. Same way, just blocking
it in small circles. I don't want us to be too
dark because I don't want to take away bring the
AI way over here. I think that must be
almost finished. This one. It's pretty but a shading
lower down creates the form of the tree and a
little bit of grass. We haven't done
all of this area, but that's all grass as well. I don't want to bore you just by repeating what
we've already done. So you treat it the same way. Look for patterns in the grass. So this sort of shape, it comes down here. Photograph shape. It might be we
concentrate your pattern, make it a little bit darker. You bring it a little bit of pattern
into the shadow as well.
11. Balancing Values: So at this stage
what you wanna do is have a look at
the photograph. Have a look at your drawing
in a species squint at the photograph to look
for lights and darks. And I haven't finished
this part of the bands, so obviously this is
way, way too light. If I squint at the photograph. That ban is quite imposing. If I squint at my
drawing, it disappears. Your eye goes here because
it's where the dark is. Saying that I don't
want to make this too dark because I want to keep
some of the detail on it. So that is something I'd work on is building
up the darks, shading the whole thing. Just with a light layer
maybe with your HB pencil. And then coming
in and putting in those details with
the darker pencil. Really, I'd probably want
all of this to be like that. In the United, my dark
details over top. Let's balance it out and make that mean that this looks really light,
which is what I want. And it means that you are not drawn away from
this by this dark area. And then obviously, we
really need some darks. And here it's going to
draw our eyes to the band. Make us think about
what's inside there. The big dark area, even though it's solid, dark, I'm, I'm still using
some interesting map making. I don't want it to be just
like a big black hole. It's going to distract
you from everything else. In the room. We can put in these corns
maze, whatever it is. I'm using that same movement
that we practiced here, but I'm just
bringing some docket documented able to it
layering over top, especially where it
meets the dark part and it's dark and
the bottom of it. And this dark at the top of it. So just bringing in some max
to join those two areas. Here, Let's look up some max, different directions,
different links. There are some quite long
ones that go all the way up very quickly, do part of
it so you can see it. Continue that along there, and continue this along here in that same kind of map
making along here. Indian isn't really
ducks in these areas. Now, we'll keep
working on this and put up a finished shot
at the end so you can see what the differences between how it is now and
with the extra shading. But I don't want to just have you just watching me
working on my drawing. And the other thing is,
it's up to you how, how much work you do on this. You might want to just leave
it quite loose and light. You might want to spend. You could spend another
couple of hours on it. Now that you've got the
structure and you've got the techniques to do the
different types of shading.
12. Summary: I hope you enjoyed
that tutorial. We focused on one point
perspective and how you could use it in a
real life situation, how you can apply
it to your drawing. Remember, it is really only useful for specific situations. Sometimes you might be,
I use it for part of the drawing and not for
other parts of the drawing. And sometimes there's just not going to work because you're not in the right
kind of situation. So keep that in mind. But it's a really good
skill set to have. Even for drawing
from imagination, you have more of an
understanding of what happens when something recedes away
from you into the distance. Remember the rules of
one-point perspective? We have an eye level, we have one vanishing point. So that's the second row. The third row is that the height and the width
are always constant. They are always vertical
and horizontal. It's only that depth plane that changes in their
receipts back into the distance into
the vanishing 0.1 plane meets the one
vanishing point. And that's why it's called
one-point perspective.
 Emily Armstrong, The Pencil Room Online