Transcripts
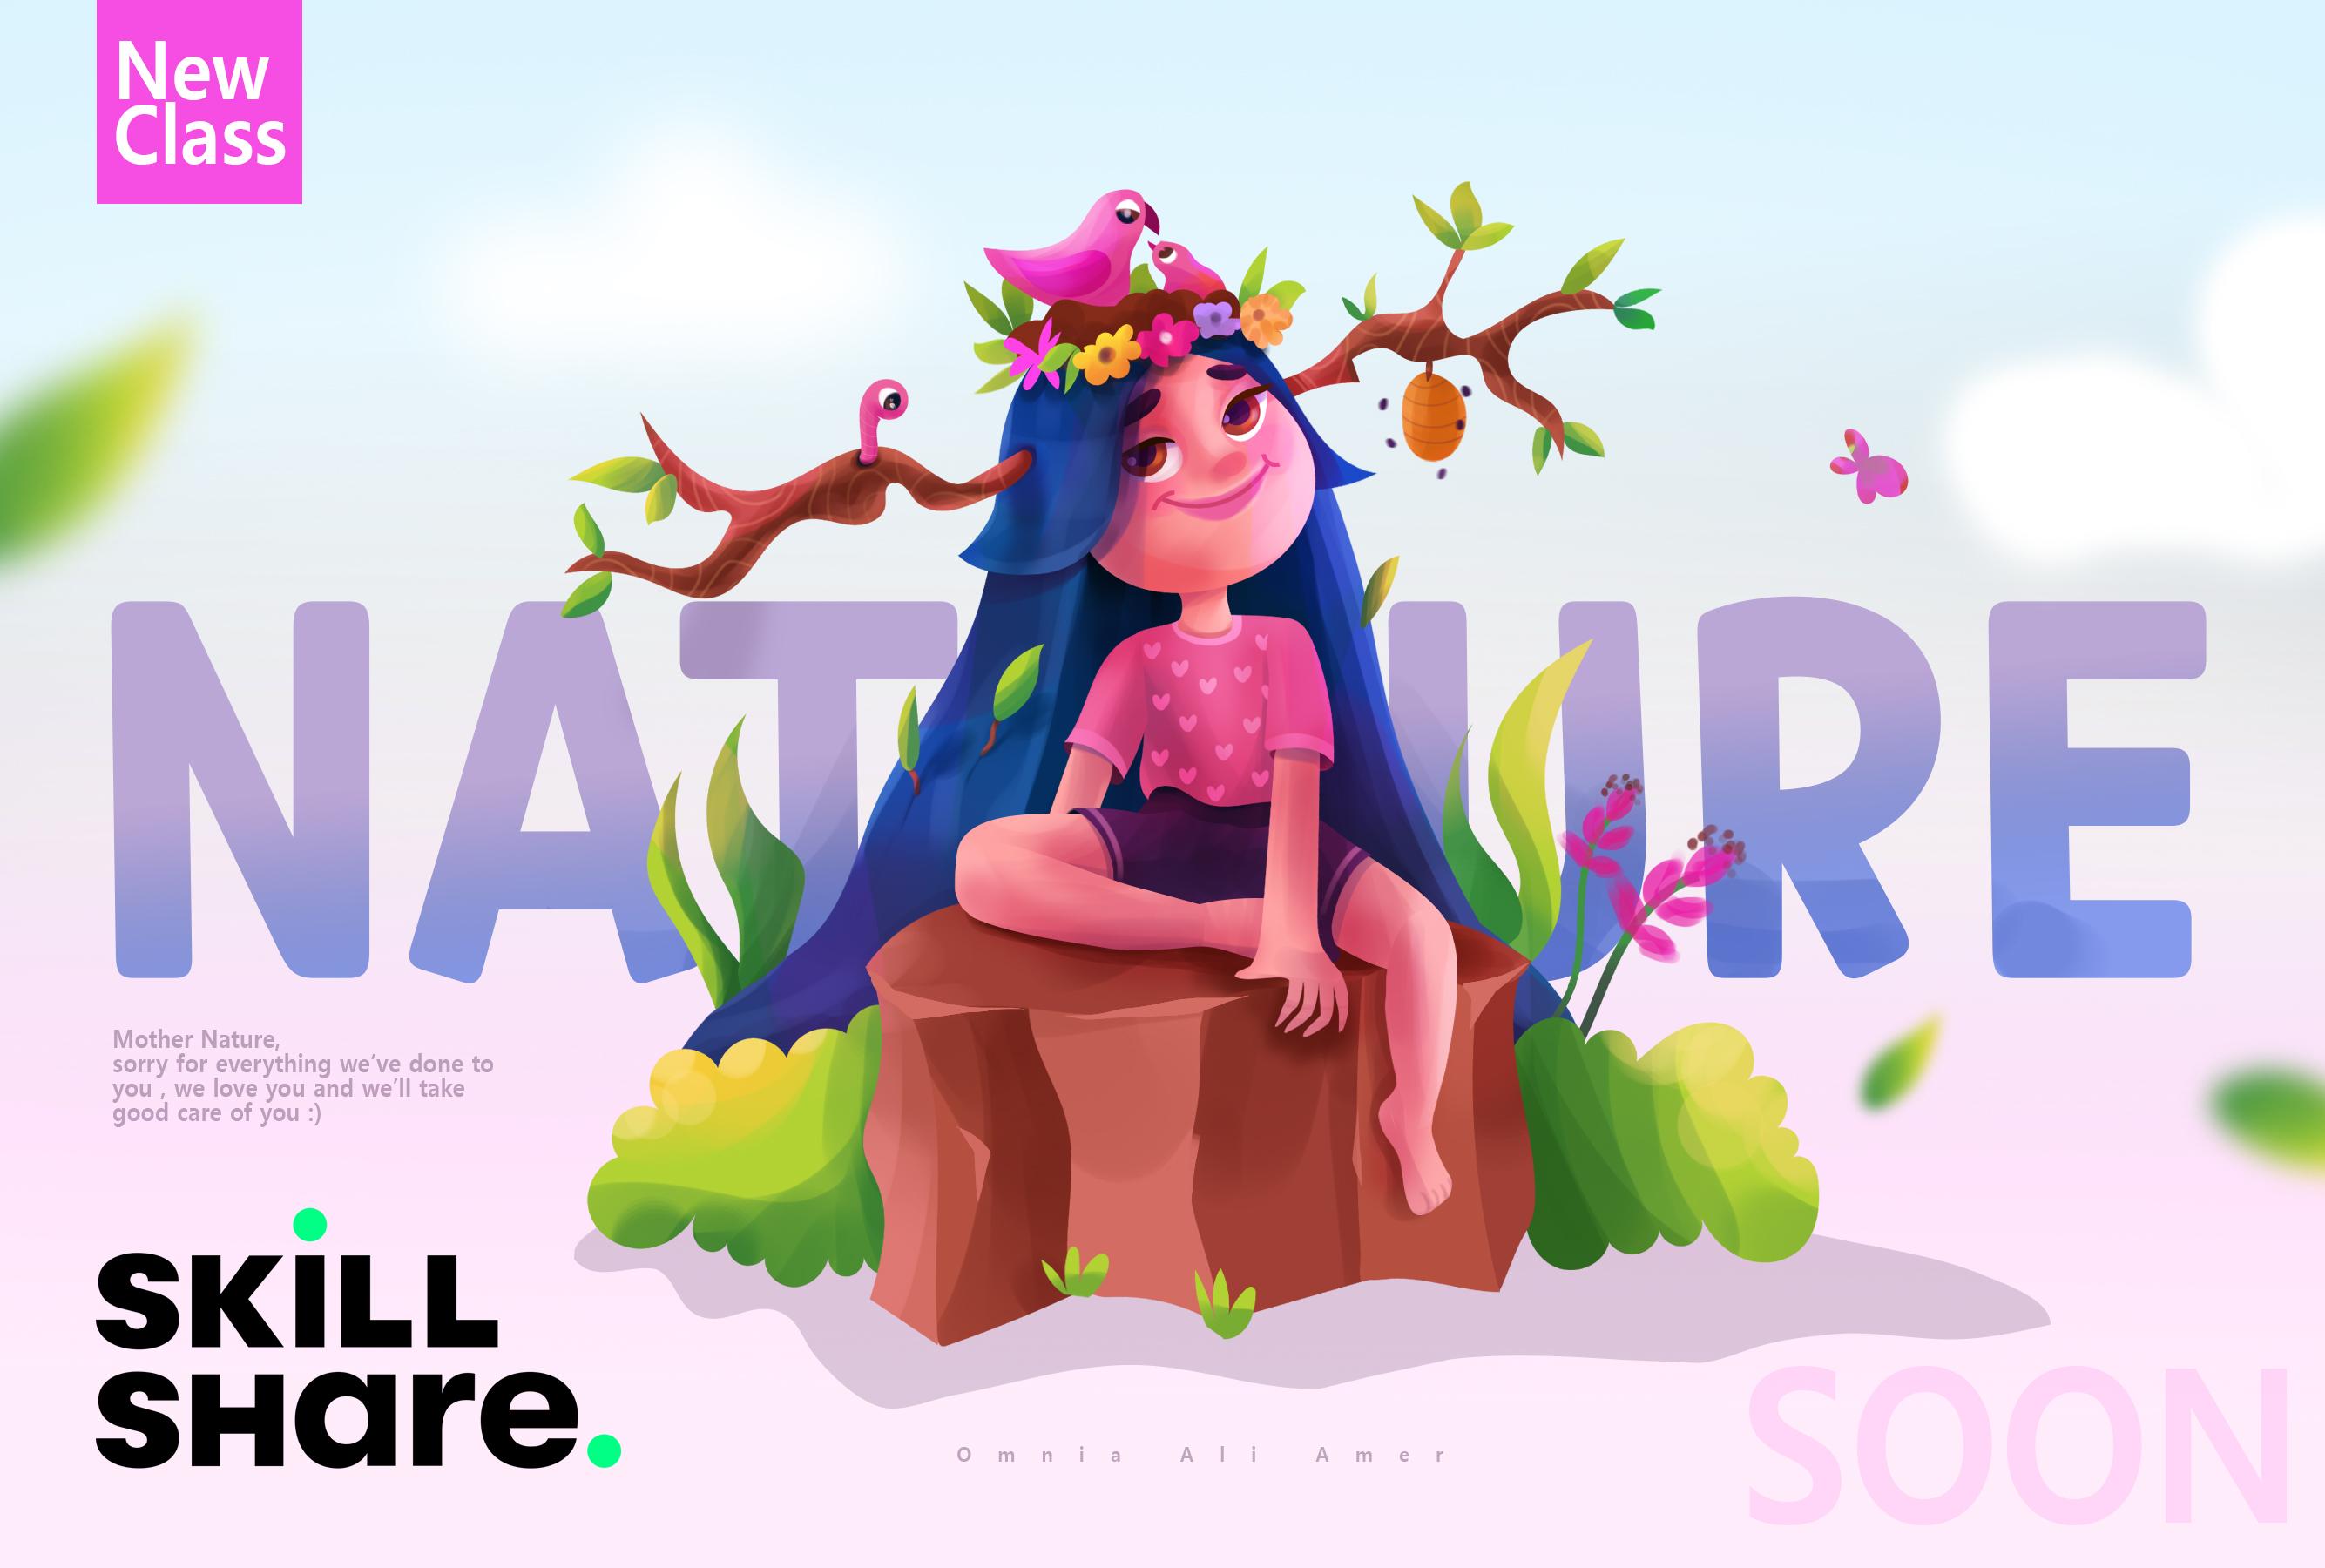
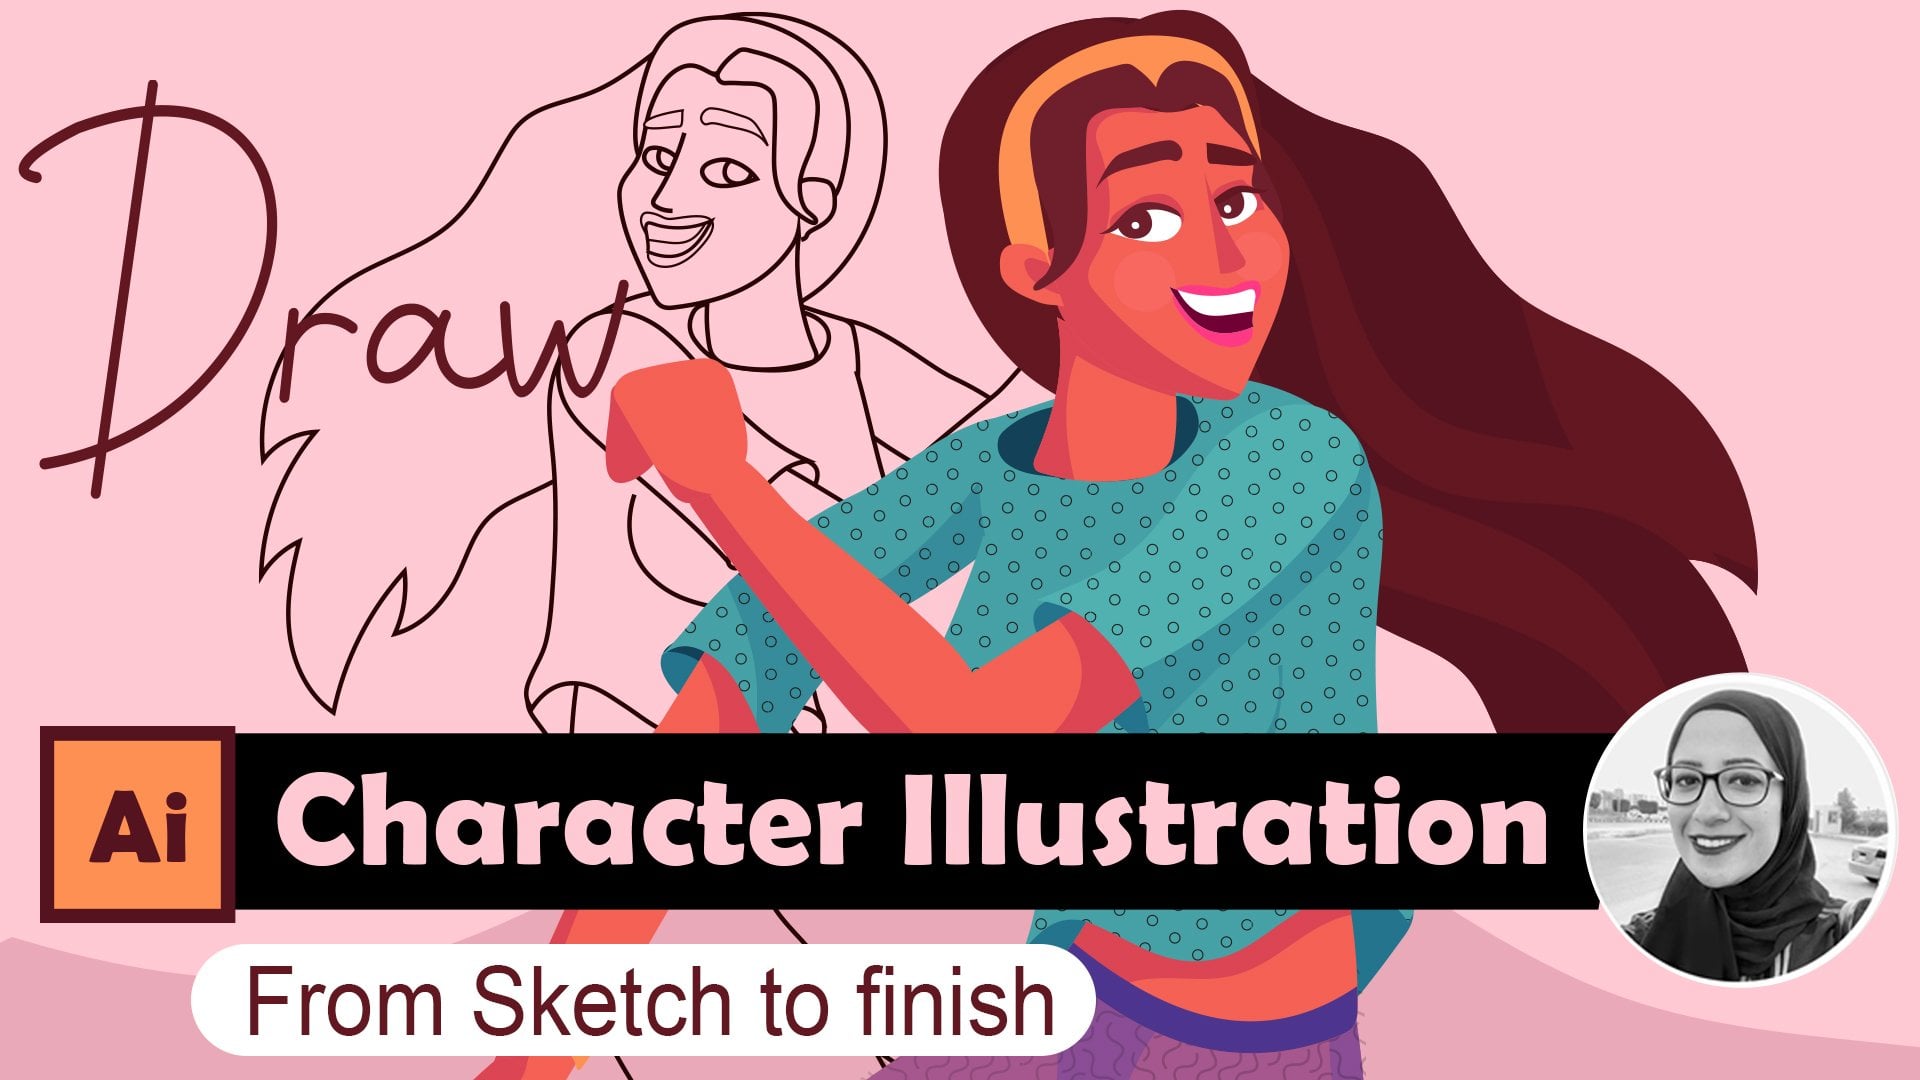
1. Class intro: Digital illustration and character design have been my passion for so long now. Allen, they anger a character artist and that is treated. Welcome to my Skillshare channel. I consider myself a mother on a mission to make the world a better place with my art, I see my characters as my babies. I just dive into the story of each one of them and enjoy the process of creating more and more every day. So in this, I'll take you through my thumb proceeds to create MM, the nature saver. We will start with a rough sketch all the way to a vector line part. Then we block some colors and take all that to a whole other level with my techniques in digital art. Hope you enjoyed this class and it helps to start your own character today. So let's get started.
2. 1-Sketch: Welcome to the class and thanks a lot for joining. Hope you enjoy it. So for the first lesson of this class, we will start by sketching our rough sketch on Photoshop. So you just open a blank document. And you can definitely use any sketching medium that you like. You can on, Procreate on your iPads, you can sketch, sketch book, Autodesk Sketchbook program for also app on your tablet. So you can just sketch on anything. And of course you can sketch on a paper with a pencil. So as you can see here, I just put my rough sketch for Emma. The first thing you'd like to do is to, to start roughly to make some simple shapes, simple proportions for the body and does a block your masses. The head, the body, the arms, and the legs. So you have an idea for right exactly you would like to do here with your illustration. So as you can see here, and i is a nature savers though. She likes nature and likes everything about it. He spends a lot of time then in the nature with some birds and animals. And so, so that I wanted to add some elements that would reflect that. That's why I made a nest with two little birds inside. And I also wanted to add some branches coming out of her, of her hair. And I can nature crown or something. And just to add to the concept I had in mind. So if you have watched my previous classes, you will totally understand the fact that in my characters before I start them, I kind of make something like a moodboard of what I want my illustration to be and what I wanted to convey and to reflect. And what are the feelings that I wanted to express. And in this illustration is all about nature and that she's all about anything related to saving the animals and saving than nature. Now, after I finished my rough sketch, I created a new layer above that. And 2032 a little bit down for the first layer. And now I'm refining my ions to make clearer so that in the next step in the vector lines in Adobe Illustrator, everything will be just clear. It's really good in this tab to add as much details as you want and to start thinking a lot about your concept and why do you live to ads and make. So that in the next step, it says don't leave anything for the guesswork and you get to decide everything here in the sketching part. All right. So just keep going here and there to continue refining the body parts. I believe this part needs a little bit of modification. Login that IZ you have none that amazing in character anatomy is actually going on the topics that I'm trying to study nowadays. And very soon I will make a whole series here on Skillshare about the body anatomy, the body parts anatomy, and it will be great. So for now, let's leave this like bats. I come back to it later in the vector part. Now let's reply in this cute little nest and add some details to her hair, some branches and leaves. All right. And here is the huge rock that's to sit in on. That just adds to my concept and how she's blended in this scene into nature. All right, and the head branches and add some details. Old that will help override button just like that. And maybe a cute little worm coming out of this branch. And that's all for this lesson and see you in the next lesson.
3. 2-Vector lines : So for this lesson in this class, we will be heading to Adobe Illustrator to start working on our vector lines. So let's get started. We've had to agree for the shop and select M to select this control C and control V in the Adobe Illustrator to start working on it. And the next thing that we'll be doing, take the opacity a little bit down like that and lock this layer with Control or Command 2 or from the Object menu above, lock selection. And now our sketches ready to draw on I will create a new layer here and as head the target icon and make from here the blending mode as multiply. So then we can work on it. I prefer to use the pencil to start drawing. It's really amazing, gets very easy to redraw and to edit and modify. And I can just dry, click on any path that I've done and simplify to make the anchor points a little bit less so that the path is smaller. As you can see here, I change the stroke color and width just like that. And I'll keep going and keep drawing on my sketch till I finish it. Does like that. So you can see, you can just redraw on a path, just one divides. And it's super easy. Just try to have fun in this process as it's really nice and you find that very easy at first. Maybe you can just feel that would be the structure is a little bit tricky. I am old, but it can be a little bit tricky, but believe me, if he does dry and you practice a little bit on it, you will find everything very easy and very straightforward. So with the pencil tool, you just keep going like that on every line. And don't worry, I know well that we have a lot of overlapping here in the lines, but don't worry, all that will be gone in the next lesson. When we just add the colors and the Locard colors for this illustration. I'll ride that. Just keep going. As you can see, I just divide the poorest like the legs into two parts. That will make it easier for us to color in the next lesson. And just The Beatles like be like the bad parts of its leaves behind her arms. All right, and now her shorts. Then let's continue. And therefore the branches, you'll just DO that and some leaves. Or what I'm using now is the pencil tool and just redrawing on any path or just right-click on it to make it simplify. You can also right-click on the pencil icon and the toolbox to the left and choose the smooth tool it makes exactly like the simplify option. You can just head smooth and select any, keep smoothing the lines that you're having and everything will be just fine. It's very simple. You can also hit N and the keyboards, as I told you for the benzyl. And now for the rock that just hit him on. Thanked us, keep drawing. Just like a normal pencil and everything should go for very fine with you. Hope you're enjoying this process and hope you're following along right now. All right. Feel free to create any character that you have in mind that you can definitely search for some references on Pinterest or Google sketch in part to add more details to the character and through the concept that you have in mind, you can come up with any character. Alright, and the beehive and some branches here and there. And then her other leg. Just like that. As you can see, I keep quantifying and keep going again and again over the path that I drew just to modify that. And that's all for this part. See you in the next lesson.
4. 3-Color blocking: And now that we're done with our sketch and vector lines version on Adobe Illustrator. We will now start color blocking. It's very fun. So let's get started. This is the palette that I will using an OEM need to do is to select any part of your illustration and head I or choose the eyedropper tool from the toolbox to the left. And just select the color from the palette that you want or from the color panel to the right, from the panels. So as you can see here, I just chose all the skin parts and pets I, and choose this color and immediately everything got colored. Very easy. It's very nice. I now select the eyes and choose the white color. All right, now let's continue. And for these branches, I just select these two branches here and select this color and maybe change it a little bit. And for her hair, who just create that. And as you can see, we're now solving the overlap and problem. And how did we do this? It's very simple and very easy and I'll tell you right now how to do this. You need to do is when you have an overlap object or something that you drew because you have it above. Another thing, you just select the one above and right-click and choose to reorder that override or old you can do is to hit control or command square brackets just to take this object one step above all the items or one step back. And you can hit Control or Command Shift square brackets to take it all the way to bet to the back or all the way to the front. It's very amazing shortcut that you will use a lot in Adobe Illustrator. And that's very nice. Arise from just let's keep going. So as I told you all that you need to do, when you have an overlapping object about any other object, you just right-click and Arrange. And you will have the four options of drink to frown, bring to back or bring forward or bring backward. And as I told you that shortcuts for that will be as you have now on the screen. All right, Z you can see all I'm using now is I just select any item that they have or any object that I have here in the illustration heads I and select the color and the color palette. And now I'm using a really nice technique also it is a draw inside join side you can find here in the toolbox to the left, It's an amazing mods any old you need to do is to select the object and hit the join type moment and you can draw inside this object. It's very easy. I use it to draw the eye pupils here and the eye. And I also use it like in my previous classes to add the shading and lighting inside the objects. So it's very easy and you will like it a lot and you'll use it so much. All right, you can hit a and select any anchor point that you have in any path that you have drawn. And just to modify that. And as you can see here, I selected the hair and trying to change it, just trying some colors here. And now I will select this, the mouth and choose appropriate color. And now I will draw the eye lashes. Also with the pencil tool you just hit N and draw the eyelashes. In the structure is not hard at all. It's really easy, can be a little bit tricky, but it was practiced. It will be great with you. So just to recap here in this lesson of color blocking allows me to do is to choose the color palettes you'd like to use. And just hit V and select the object and then hit I to select the color that you want. And that's it. Right? I just had the color palette for now. All right. And as you can see here is another way that you can use to rearrange your layers always need to do is to take a layer that's above and drag it in the layers panel and take it, take it down or below done layers that you want. It's really easy to eat, anybody law it. And that's all for this part. I hope you liked it and see you in the next lesson.
5. 4-Digital painting: And now that we're done with the color blocking, we now came to the fun part or the digital painting part, where I will share with you the techniques I use in Adobe Photoshop. But all we need to do now is to export. Export as Photoshop. Just to export your layers and choose these options here. And just hit Okay, what it's doing now it's exporting your vector file as separate layers to open it in Photoshop and start coloring it. So now we had to Photoshop and open a new document with these specs. Just like that. And you just open the fly of the shoe was lost, exported from illustrator. And here it is. As you can see, it's all separate layers. You just select this into your new document and re-scale it, hit Shift and scale it just like this. All right, and now you have your illustration ready to be finalized here in Adobe Photoshop. It's very simple technique and you will enjoy it. So let's start. All right. Every single item here in the illustration as separate layer and all what it will do now is just add a new layer, hit all between them to mask it inside. And then I will choose darker or lighter in color than the object color. And with the soft brush, standard brush from Photoshop, you just make just like this. So here for this part of the hair, I just create a new layer, hit Alt between them to mascot, choose a darker color and start to add shadows and highlights. It's all about that. For me. I just sense it still studying lighting and shadows, but this is my technique to add shadows and lighting. And it's very fun for me so far. You can definitely check references for this or just make, as I'm doing, I just hear imagine where the light is coming from. So I mentioned the light is coming from the sun and it's coming from the right part of her face. So the other part will have some shadows and also some shadows behind her back inside the hair. Just like that. Remember to keep it simple. So again, we just select the color, you hit Control and click over any item in the illustration just to select the layer for you. And you just select new layer above that, hit Alt between them to mascot. And with standard soft brush, you just choose darker or lighter colors to add some effects to each layer. So for example, here I can, here I'm adding this color inside the face. And you're free to make this. And you're free to make the layer mask in the object to make it as multiply to add more shadow effect. All right, So let's continue. So as you can see, adding these effects actually took the illustration to a whole other level, as you can see it add the more depth to the illustration. In Adobe Illustrator, you always get the illustrations so flat and it just doesn't have any effects on it. So this step is actually crucial and very, very changing for the illustration takes us with the whole other level. All right. As you can see here in the nose, I just add some shadows below it. And you're free to add as much details as you want here in this, if, in this illustration, if you have checked my previous classes, I have one of the classes that I've added. A lot of details in this step. In the other glass and a ADD, I used a lot of brushes to add some textures to the clothes and everything. So you can definitely check that too. All right. So as you can see here, I'm just adding some lighting and shadows to every part and just keep imagining. So I'm imagining then this branch is coming through her hair and and it's inside so it needs to be coming out of a hole or something like that. So you just keep imagining and keep applying that to your illustration and everything. Who should go fine. Now I added some more shadows to do her hair. It added more depth and some color to her lips. It's also added the great effect to. So you just play with the colors, whether it's darker color or lighter color to add some more effect. Just like that. All right. And here for this arm, I'll be adding some effects like this. Let's keep going. Alright. Just keep adding details to your illustration. Adding some spots of highlight to each part 0 that gives, gives great look at it adds up to the final concept that you have in mind. Editorially turns out amazing. At the end. Just some final touches to your illustration and it will take it to a whole other level. All right. I really like this effect with the green colors on the leaves. That just adds something to the leaves, not just flat colors. As it comes out from the Adobe Illustrator for any vector software. And as you can see here, I'm adding some, some little branches coming out of these leaves. And it leaves a little shadow on her hair. And as if it's coming out of the hair. Some little details, but it definitely makes a difference. We'll write. Just keep adding colors and using the soft brush always gives that blending effect. As if you're using a smoother or using a blender. Brush. But it's really easy for this part. I felt that there is something wrong with her legs and her arms, so I will try to make that drives. I just use the pen tool. You hit P, right-click on the pen tool in the toolbox to the left and choose that Free Transform so that you can draw like the pencil tool in Adobe Illustrator remade this leg and these two parts and added a layer masked in them by hitting Alt between the new layer and that object layer. And then use the brush tool as well with a darker color to add the shadow effect. Just like that. All right. And now for the other leg, I feel it needs to be done too. So I will try to modify that as well. Let's just add some effects here. And as you can see, I'm changing the order in the layers panel to the right just to make sure that nothing is overlapped over anything wrong. So let's continue by hitting P, The Free Transform pencil tool from the toolbox to the left. I also drew this foot and adding some effects. Now, Let's continue for right. Now as you can see, I'm trying to add or to make a little pattern and her and her top and tried to make it cute, just repeating in shape. He can make some hard, some stars and EQ think inside the clothes. Or you can just use some ready-made brushes from any website or right. So let's continue. I'm just changing the order of the, of the elements here for the layers in the Layers box. And as you can see, I'm adding some details here in the flowers. I know we're still having a missing leg, but it will definitely come back to this later after adding some details above or right. And some shadows here below this, below these flowers. And as you can see, it's already added a huge difference and edit the depth. And you can now feel the masses and feel like as a 3D thing, not just a flat illustration or right. And maybe some shadows here below this arm. Just like that. Maybe I'll just remove this texture in the nest. And then the, the bell. Now for this beehive, I'll just add some shadows like this. So I'm liking Mike that. And just some lines like this and maybe a little b's. And from the, the effects, I will choose the blur effect from the menu above. All right. And now also we had p for the free transform. And I will try to figure out this leg. I know what this is so late, but it's better late than never. So I know that a should have done that and done my homework in the sketching part. And so a lot of references, but it's all right. It's good to show you now that you can save a part of your illustration, even in, in the final steps, it's totally doable and it's totally good. All right. Now I think it's good. I just add the colors. I will mask layer and make some shadows inside that. Just like this. And I totally like it. Oh, right. And it needed some shadows below here. And let's keep going. Let's also dropped some shadows here on the, on this rock. As you can see, just using the soft brush. It's just a standard brush, but using a dry it gives you the right Effects. You can keep checking references like for the grass or cartoon grasses. Drawings on Pinterest, rock, cartoon illustrations on Pinterest also to add more effects. And we also hit P for the free transform here to draw these hands just like this. And for rights, I hit a to edit the anchor points. Let's keep adding some details here and here and there. All right. That's looks cute. And that's keep going. Oh nice. I feel that Hair, Hair needed to be just like bat. And maybe add some little leaves like this and change the color for this butterfly. Because this one, and add a mask layer. Just like this. All right, I'll add some details to the bird. Okay, the mother buried in the baby bird. We'll just add some details here and there. And it already looks just cute. You can blend as many colors as you want. It will also give a cool effect, just like this. And it will complement other colors in the illustration. So it will all feel blended and feel right. Okay. For the leaves, you can always tell the kids anything that you have in the illustration and just keep the obligate demands and rotating sets so that it doesn't feel boring or repeated. Okay, let's continue. I just keep adding some details to Herod close overrides and some shadows to our hands. To invite. Just keep going. Let's make some flowers here. You can definitely check references for flowers and grasses and plants and just make like them. All right. So you can see I just made some glare effect here. From the Filter menu above. As you can see here, you just can add this effect. But I kinda feel that it got so heavy, so maybe I'll just deleted. You're free to do this or not. So it's okay. Now that I finished all, I will group it and then mask layer and make its overlay from the blending modes. And as you can see, you and I use the soft brush with a bright color. I'll just add some effects. And that feels great. It feels almost like the lighting. And this is one of my favorite steps ever. I got back inside the discussion group just to add some details. And maybe add some shadows here. Maybe. All right, let's get back to the overlay layer, just like that and the soft brush just at the effect of the light. Can you see that it's really great? I, you like it. I just like how it turns out overrides. Let's add some details here into this branch, I just mask a new layer here and add some lines. Just like this. It looks very cute. Cat is like a real tree, branch or right. You just keep going through your illustration and see if any part needs to be done and anything is messing until you're finished and everything will be cool or right. And now I'll hit D and write anything. I didn't, typography or adding the text to your illustration. Always gifts, always gives the final touch. I will add this here and I'll put it behind her to the back. And maybe you make a spacing between the letters just like that. Just to complement the illustration as you can see, it just looks amazing. It looks amazing. Right? Maybe I'll change the colors for that. And maybe mask layer in debt and mask a new layer into the decks to make some shadows as if this text is behind the hair. Why I like it. You can always play with, play with typography. And for me I feel that this is sold on now and I'm so satisfied with how turned out. Thanks a lot guys for watching and hope you enjoyed this class and hope that you'll, and, and hope it inspires you now to start your own character. And I'll be more than happy if you shared it with me in the project section below the class. And also feel free to ask me any question in the discussion board. If you can leave a review, if you liked this class, that would be more than grades or rights. Also, check my channel for more other classes about character illustration and more. And this minus 2 gram, if you would like to see my daily sketches, illustrations, and time-lapse videos for me, drawing and also my YouTube channel. So thanks a lot for watching again, guys. It was on the matter with you and see you in the next classes.
 Omnia Ali amer, Character Artist, Illustrator