Transcripts
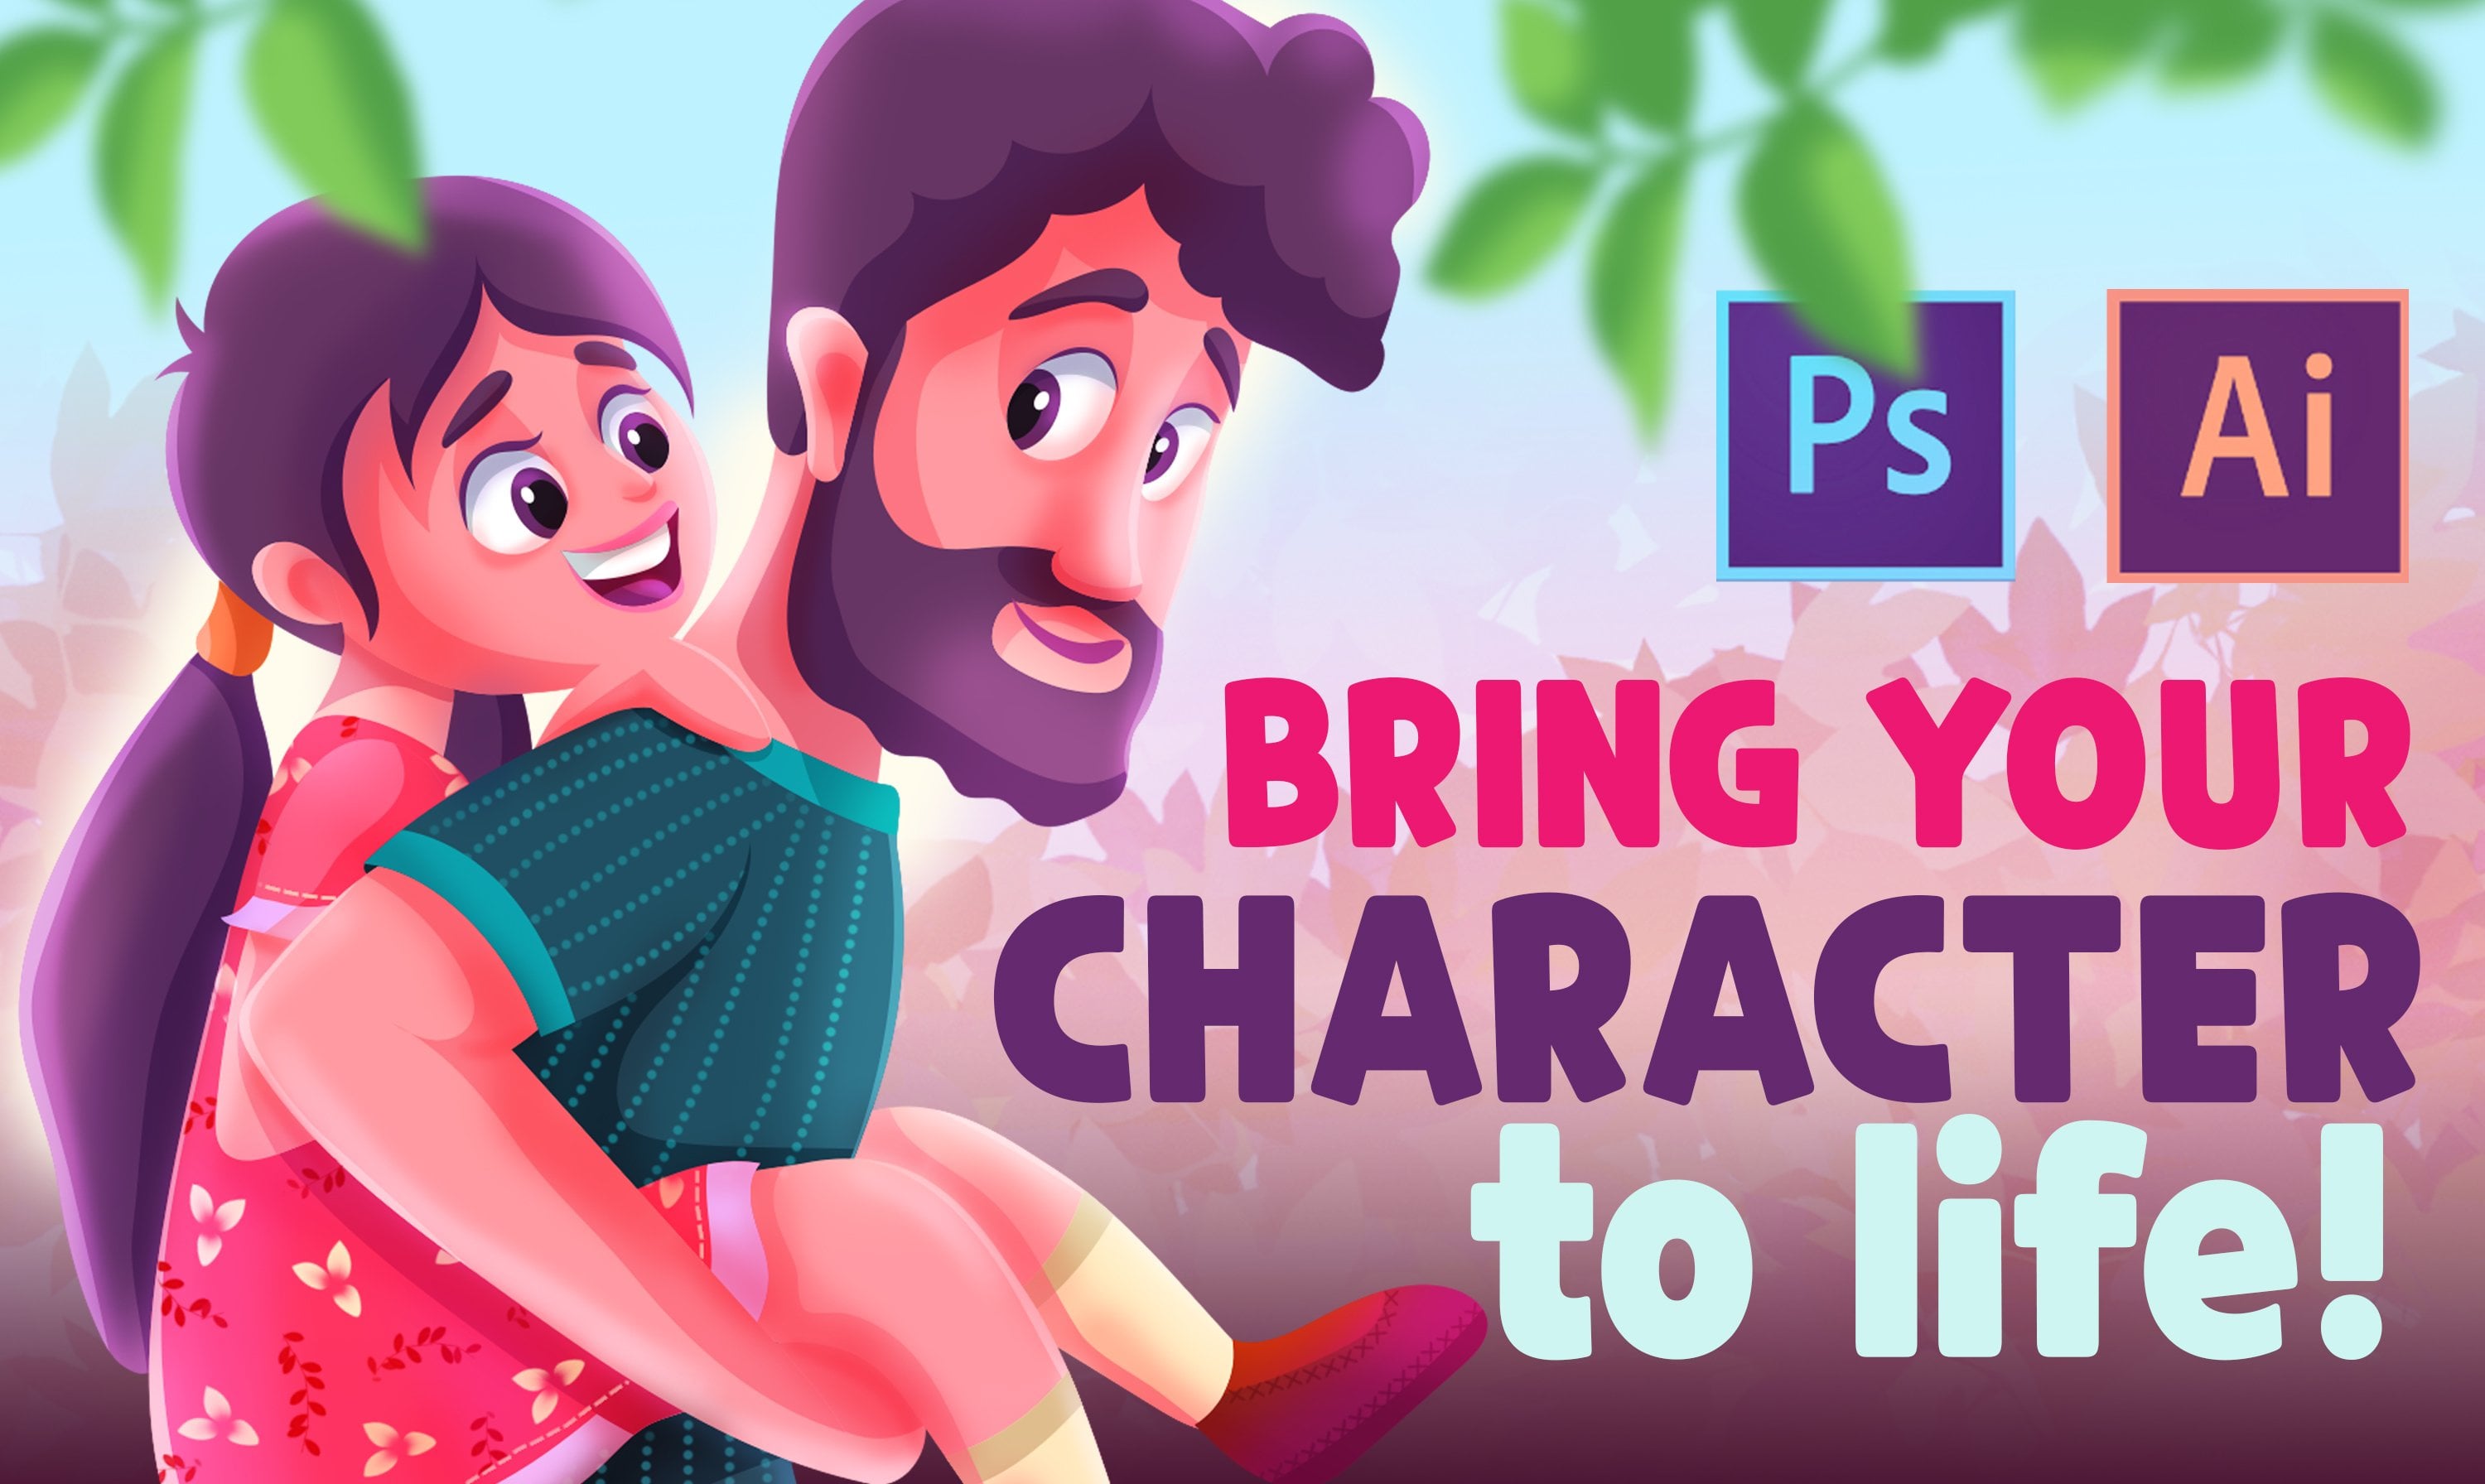
1. 0 intro: Hey, guys, welcome to my skill share channels. I'm on the hammer at the Digital Artist and illustrator For more than five years now. Through my career, I have experienced different design areas by printable design, stationery and Brandon pattern design, character design and even UX design. But the closest to my heart so far with the character industry ation. So in this class I would be showing you how to create the girl character from scratch with Adobe Illustrator. We will go step by step together through a funder in sharing with you all the depths, tricks and weeks I use in my work. The product of this class is really fun. I will be sharing with you my entire illustration process starting from how to come up with a unique concept and then take us to the next step which is sketching. After having a final need speech, we will turn this into a vector line version with illustrator. We were also exploring the colors together and get the truth, the right color palette for the project using this palette to do the color blocking for your character. We will be also adding shading lighting to add more deft after dad will be taken this to the next level and play around with brushes, pictures and patterns to make this character even more UniChem. By the end of this class, we'll be presenting the finest character in the best possible way. Say can share with your friends or even social media. Thank you for deciding towards this class and hope you enjoy it. I'm so excited to see two guys, so let's get started.
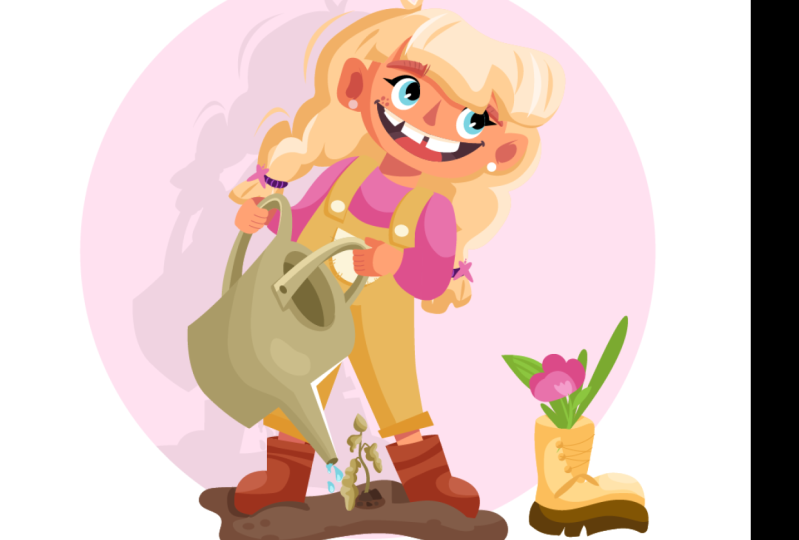
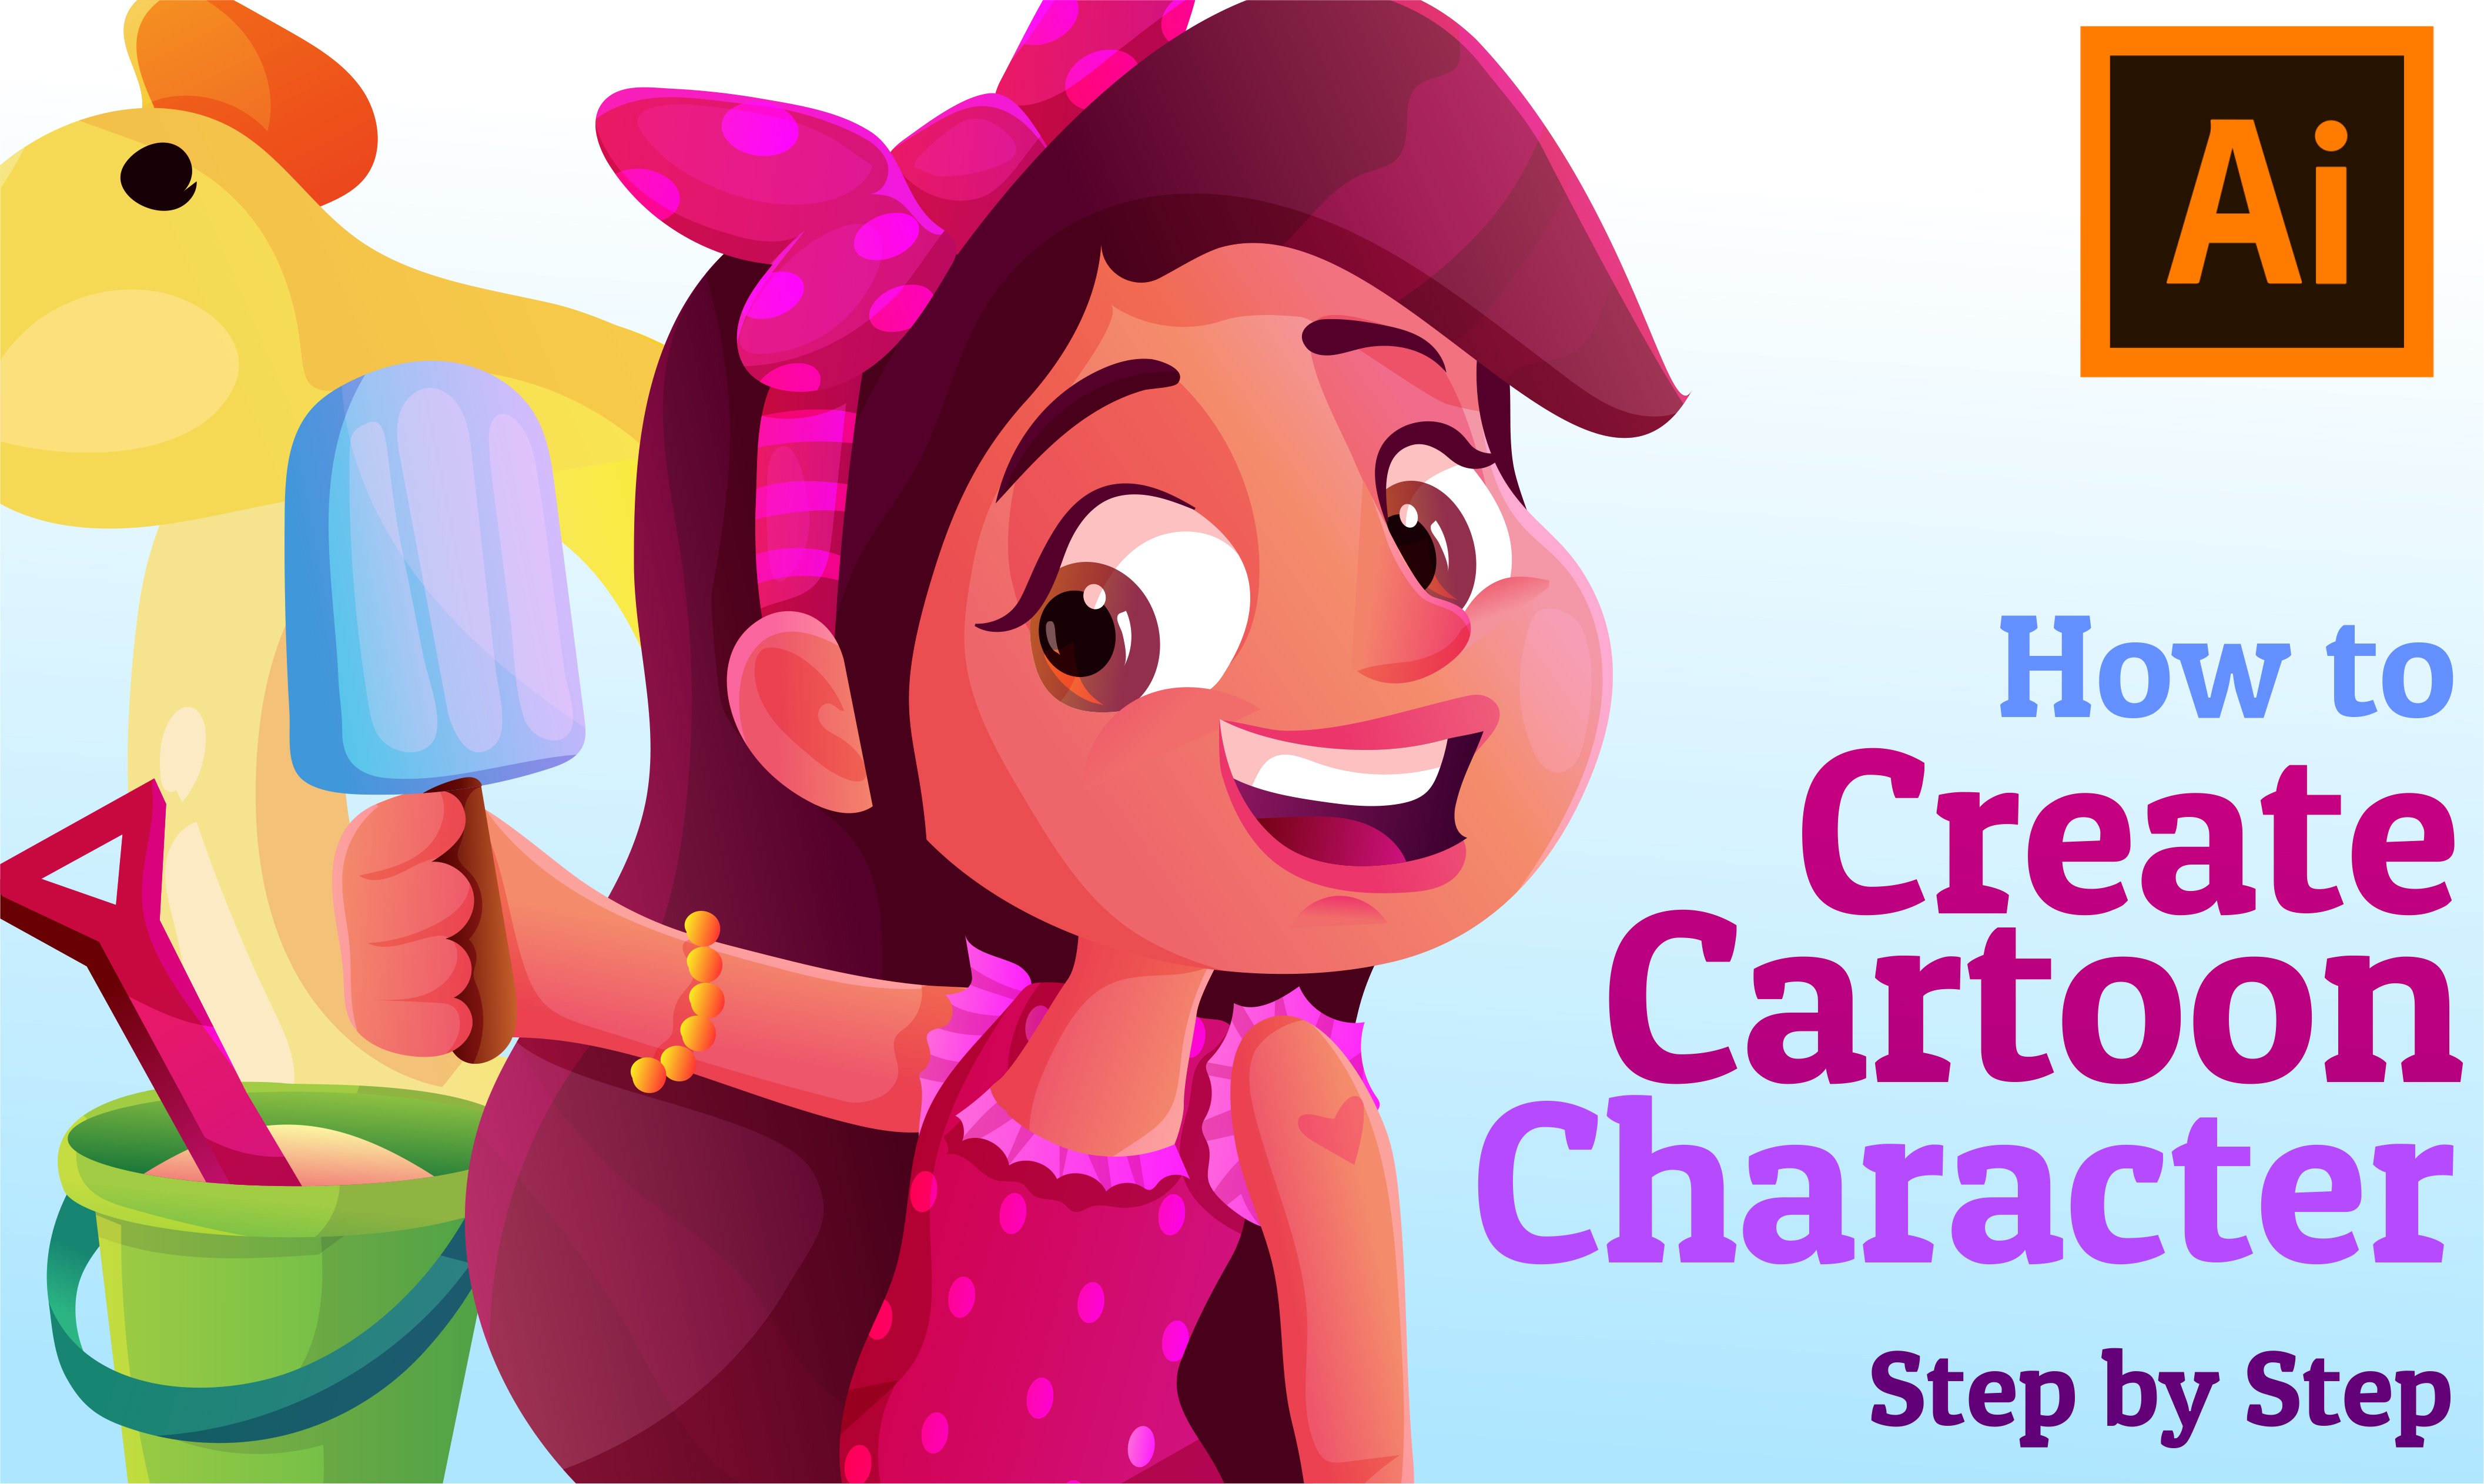
2. 1 concept: So for the first listen in this glass, we will be talking about how to come up with a concept for your character. It's a super important step, because after a Destin inspiration session, you will get to know your character a bit closer, and you will have a specific for so on. Afford. Like you Imagine clearly how she looks like her age, her personality, what you likes and everything about her. The more effort you will put here in this step, the closer you get to a unique concept. So to get inspired, I usually go through some of the creative platforms like drivel. The hands Pinterest tango who emitters works pretty well, too. So I doesn't search with keywords that better describes my character and collect evidence to add to my character board. This is the character board agreed from the images I like. We have a clear persona now for Nora, a five year old girl who loves rainbow unicorn, pink color and belly dancer. She's funny and, like smiling. She also likes to wear the stuff. You're totally free to imagine your own character with as much detail as you want, and now that they're done, we will be using this board in the next. When he starts sketching the characters
3. 2 sketching: So after finishing our reference or persona board for our character, it's now telling to skeptic There are so many Softwares that you can use for sketching. But I prefer to work with the Doobie Forest, so I'll start with a blank document and create a new earlier. Then select the brush tool or have a view on the keyboard. Always remember to keep it simple and the joy this step. You're creating your character from scratch, and you're totally free to make as much details as you can or to keep it simple as you can . So now I simply start with that line a straight line to oppose everything on it. Remember to use the basic shapes for the head. Start with a circle two circles for the I, the nose and the mouse and now dropping the pupils simple eyelashes and eyebrows and does some simple lines to define their shape of the face to around cute years. It's a little girl, so some cute details will be really nice and will fit the character. Start drawing the hair was a little cube bank just playing around with the mines? Now comes the TR with a golden crown on it and then continue hair shape, then the neck and her dress, you little chubby arms. Remember this? Tribes from the persona board? I'd like to make the top of the dress, floral design or floral pattern. It's kind of cute and simple. Small hands for this character remembers. Just drop Flynt's Where Is Catching? Were enjoying just playing around with lines tryingto headed old around. These are cute cheeks, some details in the mouth and her level to too scared. I mean now point comes the length for the Rainbow Boot, also from the persona board. So the fund here is We already have, like a picture of this character in mind from our persona board and the searching process, and we kind of know who she's. And now I will lower down the capacity and create a new layer. Do we find my lines a little bit, starting with it, face trying to re flying the lines as much as they can. Great to be easier for me in the next step way will that to rise thes lines and mouth and eyes, trying to make it free size as I can and refined as I can eyebrows, thank you, traveled the years I didn't like step. It's It's where all the art happens and the other oy now refining the hairlines to make it clear your character you can play is the way you want. For the Harry can just make one ponytail we can make to 20 Things can even make this character of a different age different smile. Come play around as you want. That's the really fun with this step, because you just make this as unique as you can and now dry the ground, make it clearer the finer nines and for the dress I'm just drawing. So you fall in lines here and there, and this skirt you can chose to make your character just wearing bands or something and the chubby arms. Just try to keep it simple and cute as much as you can. It all adds to the persona that we have already defined before the reference board in two hands. I think you adding that he dates to the dress cell lines to her skirt, edit spelt, living more and the floral pattern here are her top. He has cute hamburger legs. I'm drawing this boot and the other making boots. Maybe it that this one a little bit. And then comes the details in the boot. You remember. It's a rainbow boot show. We can add this Rabel lines here looks really, really cute. You can add some unicorn horns here. Here. Not sure about this yet how it will look like. And the illustration? You can remove it later and now our sketches ready?
4. 3 vectorize: and now the decries. This. We have to use this marquee or tangled tool in photo shop to select our character control, see control commands he and open a document in Illustrator and Control or Command V and with the selection tool. Or you can hit be on the keyboard. We just select our character and lower down the passage. He'd like to 14 or 15 or something, and from the menu we choose Object lock selection or control command, too on the keyboard that makes it easier for us to draw. You have so many different tools to draw with here. Administrator. So many drawing tools like this pain brush here. Six free lines as you can and this of a truth mental and the regular pencil. You also have this pencil tool. He can draw Freehand lines, but it's really fun to play around with these tools. Guys bust for me. I just prepare the pencil tool or and on your keyboard, this glass. I just prefer toe. Put the pencil away, just given a break, and I'm playing with the freehand, told by the pencil to keep it simple for me to draw. Frequent. I started with the face. I draw the face, the pencil tool and then tool circles for the eyes. Just remember to keep it simple and use a basic shapes as you can. We'll make it simple with the pencil tool of, um, during the nose in the mouth. You can always hit any of these anchor points, and to make this sharp corner, you can hit this Aiken end. It's will be set and ready. We hold. So have here the smooth tool. It's a really nice tool because after your draw with a pencil to weaken, always, you know a just in the in the path that you have drawn with a pencil tool or any other tool to small than this a little bit. So here in the face, I will adjust and modify the path just to simplify, to make it more rounder. I am nicer. I can't can play with these anchor points to make the shape better and clearer and even rounder the fund industry story that you can draw with whatever way you want. You have so many tools to play with, but for me I prefer the pencil tool and then small. The path was Ah, the small stool. It really works perfect for me. Then hit and or pick up the pencil toe to draw the two years control C Control veto. Duplicate any shape you have, and then here I two is transformed vertical to horizontally. Flip this around. I have the two years now my hidden or choose the pencil toe again from the tool bar to draw the nick and the dress. It's really fun to play around with your tablet in dentals Freehand drawing pencils in Adobe Illustrator's Easy. It's really nice and with a small stool even. Always adjust these lines and anchor points to simplify the path more and to make it cuter and nicer. Yes, make this. And now the skirt. You don't have to stick with this catch you have already done in for the shop. You just can always added this whenever you want and just play around. The anchor points to adjust. The past that have drawn with a pencil tool and the small stool will always make everything better and smoother. Okay, so I'll continue drawing that the pencil tool, and here comes the legs. I will be drawing too cute legs year and for the boots. I also drove it with the pencil tool. Really nice of Smalls. You don't have to. Yeah, I can make this corner straight corner and you don't have to draw this boot again, years transforming flip it vertically to reflect it vertically. And he ordered the other boot done. And now comes. Yeah, I'm using this really nice tool. The curvature tool. It's really amazing. It's like an easier version of the pencil for the curves. And so and I will just when you double click on a on any anchor point, you just you make it straight lines with this cover chortle, and I will head this tool again, and I'm drawing the bank. It keeps drawing vertical curved lines, tell you, double click on the anchor point to make it a street corner. And now for the crown, I will use that the pen stool year to draw it around and done. Keep it simple. You just have to keep it simple. Enjoy the process. For me, drawing is like I suffer simple, easy thing that you express your soul with it so you don't have to stick to any standards or anything, just in a quick if you like. And now for the cheeks and making bees to Alberta's with the circle tool. And that the Penta, looking to draw some details in the years really nice and easy, can just select these two with the selection tool and adjust it back to the pencil toe looking to draw the eyebrows. I just make a line, and with the stroke, I go up with the errors and use the wet school from the toolbar. What's to for Sheff W and just go to the end off the line and play around them from the object. Expand appearance. It would make it like a shape, a feel shape, not a stroke anymore. In control, Sequent, Olvey and I transformed to reflect a tourist horizontally to make the other eyebrow the same for eyelashes. Io make a path or a small bath with the pencil, had the stroke up again and then make it like best Dream looks nice and looks like a cartoon eyelashes and then transform reflect or simply again for the other eyelash. It really looks nice in here. He is the face, same as we did with the eyebrows and doing in for the arms. I'm just drawing simple path, smoking in a little bit with this more stool, then hit the stroke. If you hit chest, you can hit the stroke with, then increments up or down. And then what? Stool here and go to the end the stroke to make it. Why there? Or natural and can always adjust. The anchor points here. You just you hit a and select any anchor points you want and play with these handles. Each anchor point has one or two handles that you can play around, too, you know, reflected or more. Get around. I think it's here nice and from the object I chose expand appearance to turn this into a fill shape, not a stroke anymore. And control C control V transform reflect horizontally before the other arm. Now it's really nice to draw the hands. I keep it simple. I just draw shaped like this and growth in just a simple thump. Yeah, just a simple film and que chubby little four fingers here for the rest all the hand. Don't worry, it's not that good. You can always adjust it later. It's all about playing around. I select them all with the V and I can help control G or right click Group to make these shapes as a group and then controls he control the I reflect that reflected her simply for the other hand. And for these two hands, it's done. Now I think I yeah, they play around with hair a little bit to look even cuter, and now I think it's nice. Add some more details. I click V and chose the eye and use the draw inside here. Drawing side makes in shape. You just roll right now inside the circle shape of the eye, so I'm drawing the pupils inside the eye. It's one of my favorite tools here because it's it's like an easy masking to to draw inside than usual. Now I will select this people and control C two draw inside the other. I draw inside and control V to duplicate it here, copy and paste for the mouth. I'm using the same drawing side method to draw in it the and can drawing shape of cartoon teas and in the tongue in here. Yes, then close the draw inside, but this most of all, I'm going to smoke there now, the little bit and playing to the handles off the anchor points to it. It shape. Feel the tongue. Good left. Yeah. As you see, it's old masked and be mouth sitting denies for the hair. I I want to make these little triangles, so I just draw with pencil tool this shape, okay. And then select this and the bank and use that really interesting tool here. Cold, the shape builder tool, the shape builder toll and I now hit old to Yeah, just to take away or to cut any shapes I want from the shape I have. It's really interesting. And now I have the bank I had in the sketch. The same for this, For the hair. I'm going to make this like that and just hit like this to remove these parts. And then So it's it did this again. No problem. You just go around and the around. Did you do it? Just select the two of them. Shift them or the shape builder toe and then old too. Subtract these little triangles from the hair shape civilians. Interesting. And you can play around this with this shape builder tool as you want to greet marvelous shapes Now the crown. I could make it here and now The built the dress This eye dropper is I hit I When you just select any shape and you want to copy the attributes of any other shape, you just hit I and it will be the same for the build. I just draw inside the top, the dress and I You're the belt. All what I need is object on look old to unlock the background and then selected and lead it And now we have the victim line of our character down.
5. 4 color: in this lesson, we will be talking about exploring the colors and the color blocking in Google. You just hit a to be cooler. It's one of the tools to use and choose any of the color palettes you want. Here you go. You open the website and you can find a lot of color palettes and I had explored and you can go around through. Like many pallets, other artists have submitted. And here you have the search box that you can type any kind of key words like girly, and you will have tons of millions over color palettes from all around the world. You can choose whatever you want to step on it and you just hit it and you have a palate for me. This is my favorite palette that it always used. And we will start Calder blocking how I created these. I just make a circle and chose to feel it with ingredients feel. And here opens the greedy impanel. Yeah, you can always hit G and opens this lines. You have the two colors. It's always black and white or gray scale. So you hit here and chose RGB and tools. Whatever color you want from this bar and for the other color set of the white, you can use any other color also with the RGB and just pick it around and create your amazing grating color that you can use in your drawings. And you can make this like bad. Take this up a little bit and play around. Yes, can also find this circle to reflect it. Isn't it cool? It's one of the amazing feature hearing that a BCC illustrator Sesay the greedy int. So we just closed this panel and start blocking colors for our character. I first select the skin layers like the hands, the face and go on. So let's just start. You can start. They're at a time. It was first the face and chose this name for the hands I had I and the neck and for the legs to I had I just a copy color from the skin here and for this Kurt using this nice being colored and for the top maybe Maybe this color? Yes, with the built. I think this color is nice too. You can choose. Arrange right quick, arrange send backward to make this layer go to the back and for the arms and using this color and send backward if it made, if adjusted in cool to the back as you want. You can always head to your layers panel and see this problem like you could try again and still nothing happens. That means that you had to go layers panel and see that the arms are above the dress to just take it and drag it under the dress. And here you go for the hair. I just select the hair and the banks and I like this color and a range Santa back then the years I yes, and quite the eyes and a steak like that and then the cheeks. It's all about color plucking. No details now coming in the coming lessons for the teas by and take it here and for the tongue. I can. I dropped any color from my pouted for the mouth. I think we can make it a little darker, so I select from here and make bit darker. Yeah, maybe like that. I think it works well and then take this a little bit to the right. I think it's nice now. We just from all this and now bring to front to make it above The banks here can go down with this a little bit. Yeah, just a little bit to make it nicer. And then I select the pupils, and I dropped this collar. Maybe this, like a dark. Yeah. The inner circles of the people make a dark like them. I was here. Yes, I think it's nice. And for these to a little highlight. Yeah. Can you tell me a little bit, too? To see it and select the life color. Same for this one. Okay. Now, for the eyelashes that they have here well again, choose the stroke color that they want. Think this one works nice to Okay. And now for the eyebrows I can I dropped Carter from the mouth here and now I think it's it's nice for the face now for these two lines, details, lines and P year. I can I drop from here and flipped to make it the stroke line, go up with the stroke a little bit and take the tongue. Maybe a little down and Okay, so we opened the layers again. Yeah, the layers panel again to take this neck. Just take it in the head group or the head layer I have here. So I just select the neck control X toe, Cut it from the leery it's is now it's already is now. And go to the head and open the group. Take it here and you can arrange Send her back. And I think it's nice now for the crown are just select all the layers of it. And so, like this orange color, it's really nice to go a little down and that's it. You can take the old play around the I a little bit. I think this people needs to go up to the right a little bit. Maybe. Yeah, and yeah, for the body. I think the body needs to be up a little bit. And for the boots I will. No, I just looking Just looking for another color like this one. Yeah. I think this calories is amazing. Here show, I think. Now. Yeah, everything looks really nice and cute. I chose the field color and head Jean just to flip this a little bit to make a darker from from under the hair to the Yeah, the lighter color here. I think it's nicer. You can play around the grade in Tulloch's. You want off also? Yeah. Yes. And the He Yeah. Who play around the radiant in the hair Israel taken from the dark. This color pack. I imagine that our source slide is coming from the left off the screen and we'll talk about more in the listen of lighting and shading. This can go down. Go. But yeah, I think much cuter. We can group this crown like like group or control or command G. He gets nice now. We forgot the nose. It doesn't. I dropped this just human to see that everything is working eyes and here for the cheeks. I will. Yeah, reflect this a little bit Double click and used this eyedropper to choose color of the face . This is really nice. Okay, You can just puppy based this one and take this mouth a little bit to the right. Okay. So that these three lines and change these change a scholar little bit take a darker and maybe the opacity a little bit down. I think it's nice. Okay, so now you just can't go around and see if you want to change any color using your palate. But now I feel it's it's nice you could just play around. I just I modify your character as you want, and now color blocking is done.
6. 5 shade: in this lesson, we will be working on the really interesting step, which is adding shading and lighting to your character. And here I imagine that the source off the light or the light source is gone from the left of the screen. So I first select the face layer and chose the draw inside here in the pencil tool. I just draw a shape here below the bank and I dropped this color changed the blending motor multiply, and he was a little bit down. And then, with the pencil tool I endured, I'm dressed Raul Ah, highlight layer in here and select a color for it. Maybe this yellow color as highlight for the face. And then with the pencil tool, I drove some shading below these hairs trends. Maybe you're just it a little bit holding thes anchor points and play around with the shape of the shading and defined like this Same here with the other strand. We'll be drawing shaving shape. Okay, now it's not inside the base. Select the face and draw inside again with a pencil tool. I just draw this trading shape like this, and with the anchor points I would fight for the years. I will select it and just it just this. Grady INTs till make it a bit darker behind this hair strand, and then it'll drawing side with the pencil tool and I drop the shading and the highlight from the face. Same for the other year. I will draw inside with the pencil tool, adding shade and I light layers that I pick it with. The eyedropper can just hit I on your keyboard. And now we have just added some dips. Did the character face? We select the hair and draw inside it with a pencil tool Start with making shading layer here just behind the head. I dropped her. Yeah, exactly. Just added some tips to the hair and then behind the years, you make a sheeting, layers will, and same for the other ear sheeting layer. Just like that, Shadows always add dips to your administration and same here, just below this bank. You can see how it just booked up from the illustration, and here I will be adding hi life color to the hair. This one works just a just a little bit. Pick it up like that. And now for the banks. No, let's work on this First, Leandro, Inside this shading layer, it's not inside. Let's just make sure you have selected it. I think it won't work too. So let's use pencil tool and drilling this this time it works with the eyedropper. I just select the shaving layer Now for the bank. I weep, modifying the Grady int colors a little bit to make a darker from the right. Just affect with the source light we're having here in the administration and draw inside this hair strand and some shading layers that and highlight like this one. Same for the other strand. I will have the shading layer to make it look like it's below the bank and also the highlight layer. Just thes anchor points and play around with handles like that. The interest modified this one Okay, like this, it looks nice already. Now, for the hay bank will draw inside highlight layer like that Also defend the light source were having here and for the right side Well, at the shading layer. Mike, that this looks nice. Okay, maybe duplicity little bit down. And for the eyes, you just make a little shading layer here maybe with that great color and Lenny Moto multiply and the same for the other. I is drawn inside this trading layer. I drop her and pick it from the other eye, and that's it. Well, here for the mouse, I'm thinking of adding some lips. They'll make it look even more to you to adjust wrote like this and pick this color control X to cut it and try to base it behind the mouth. Now I got inside the mouth. No, just control X again. And so that the face and control f just to paste it in it's place and hit this color. I think this bright color works and makes it look nice. Okay, for the neck. And just adjust this great in here and drawing side with a pencil tool, some shaping and lighting with the eyedropper. I just pick it from the face and highlight. Also picked from the face. I think it works. Okay, that's it. Okay. And now for the top I selected and drove inside with a pencil tool. I'm just drove a shading here shading layer and I dropped from the face shading. And then for this skirt, I will add some lines here just to look like a normal skirt, and I drop same shading like this, then print that ingredient. I'm just flip it like this to fit the life source of the scene and play around the gradient like this. Maybe I will draw inside with a pencil tool. Some highlight layer prepare. I am truly another color that will fit the skirt color, maybe bright pink. I think that it would work just moving around like this. And yes, they play around the anchor points to adjust it like bad. Think a brighter color would be nicer. That needs some adjustment. Just with this, most I go around to adjust it, and with the anchor points and the handles just trying to go to fight, maybe that would work. Just move this layer here a little bit to the right and with the anchor points as well, just adjusted. This layer still needs some work show with this handles and anchor points. I tried to modified and I think it's it's better this way and then for the top I draw inside and over here below the neck and I dropped this color. I think it's nicer now. Now for the legs. I'm just flipped this great in here to fit our light source. More of it to here? Yes, exactly. The grieving gives us the grieving. Gives us the feeling off Salander or that around this of the leg and the same for the other thing. Okay. And draw inside this leg the pencil tool shading shape like that and I drop from here. Okay? For the other leg, draw inside with the pencil tool. Another shading layer like that. It's really simple. Just enjoy every step. And for this arm, I have draw inside with the pencil tool. Ah, there shading layer here to give some depth to it. Play with the capacity a little bit, Take a tire. And for this arm, I draw inside also some shade in here and I drop this car. Okay. Now, for the and this this color in the year and maybe send it back Tills go to bags show. We know what's the problem here. You just take it from the layers panel do down there and transform Reflect for the other leg, As you see. Just added that that's already to the bush. As if our legs are captured exists in sigh the boots just with this simple step. Okay, so this thes Yeah, I need some shading here to feel that it's inside the mouth. As you see, every there were adding in the shading inviting process or step adds to the final version on this. Okay, No, what's left? You keep just going around your character and see if there is any other thing you can add to it. Okay, let's head to the boots drawn side, like the pencil tool and as some shading in here, you know, we have this under point to go up OK with the other one. We just draw inside sheeting that And you know how smooth I'm going with that pencil. You just express yourself. No regulations here. Oh, no, nothing to stick with. This book needs shading here. I think it's nice now. Right? Okay. This boot, I think it needs like a highlight layer in the direction of the solar sublight. No, you will draw it again. And from the colors panel here in the tool bar. Whose this caller Yes, this story and color gives the feeling of ah highlight on the boots okay. And for this Buddhas, well, we'll make this highlight layer, and I dropped this color. Just move it. No. Make sure that you're selecting the right there. Okay? Down a little bit. You just keep trying to select it and playing the anchor point. Still, you get to the right cheek and this anchor point that will as well. And now the boats already. Okay, Now for the crown, I will draw inside shaving. They earn here. I dropped from this one. And where the circles I would roll inside another one like this. Small that a little bit with the small stool. And for this circle as well, I will draw inside of the pencil tool. Another shading layer. They will. I drop from here and another one for the last circle for the crown and only dropped the color as well. Other headlight layer I dropped from the face to match their light source. I now think we're done with adding the shading and lighting for our capture. You can just keep going on alone. But I think I'm I'm just satisfied with it right now. And let's head to the next. Listen
7. 6 details: for assess. Listen, we will be adding some details to our drawing or illustration. So I just take the car veteran pool to make that tiara for the crown, go up with the struggle little bit, and then then choose this shape to hand errands, okay? And change the color. Maybe something like reddish orange or dark orange. Okay, go inside the group of the head and based that they are in here, I think it's nice. Just need to go up with the struggle. Will bed, Jane the color. Two more reddish thing. Everything works. Yeah, that would work. Okay. And that's that. They are in the face. I will add, like, an al apps year just right below the eyes can behind the eye there to add a little little dips to the eye socket. Could flip this round and more like this. Okay, these are nice. What else needs details? We have hands, right? So before the hands we first saw, like, the end of the sleeve the pencil to won't go The struggle little bit up and I dropped this color flip and up with a stroke choose surrounded ends like this in here. I think That's nice. Okay, well, so that this one and make the hand above this rape small it a little bit. And just paste this layer in here to put it for the other hand. Make sure you're selecting the right player. Okay? Just reflect a little bit. And being a hand above, make a grounder like that and it works for now. Okay, Now we have the hands the hand palm have, like, some lines in it. These lines would just draw with a pencil tool. And I dropped like this one. Yes. And draw the other one. And I dropped like, this line. We just take these to select them, go down positive a little bit Google that and then select the two of them old drag to give them transform. Reflect present Abbott Morty days to the hands here. Okay. I want to change the method here. Just goto. Okay, Now we re adding some retains to there boots and draw inside. Consult too. Remember this boots will be hang a rainbow shape, so I address chose higher stroke and some colors for their ample Start with this being keep color and another one for maybe this orange color and another one for this green and last one to be a little bit Brogel. Okay? And then just select these four lines to adopt. Locate them for the four for the other boot. Just select the four control or commence e and just draw inside the other boot and hit control or command V to baste it in here. Just play around with these handles and reflected a little bit. I think that Okay, okay. Work. I can just take it that bigger and but that right, the left. Okay. Now, as you see, the highlight is below these before lines of the rainbow So I'm dressed selectees trading alighting to be above the rainbow How you make that is by control your command square brackets to go backward or forward Just make it Lending wards overlay with highlights to be on top of their four lines off the rainbow. And now the boots are done and they are ready to work. Okay, These are the details for the boots. And now I think this ground in the tiara need some detailing. So I just chose to draw some circles like that. No, I just move it around like that old to talk located and I just select the three and change the blend. Emoto Overly like this. E think it's brighter and nice that work really nice or did you feel sport?
8. 7 texture: this. Listen, we'll be talking about, I think, some patterns to our illustration to make it more detailed. We start with them. Bank and hair. Just draw some lines as hairlines. Some corner like this think it's dark. Chose this shape. I think it's dark. Make it live the broader. And this is nice. Okay, Keep drawing the lines like that old along the bank. Then select them all and choose the shape like this. And now the hair is more detailed than ice. Okay, maybe these you'll make them a little low. But city from the appearance here in the pool, we go down with the capacity and for the rest of the hair. Just try to choose the drawn side. It makes him lines like the bank from here like that. Okay, I just chose I dropped dead. And for the other side, I'll make, like, two lines like these fans will let them lord opacity because this is a darker side of the hair and it will look like this. I think it's cool. You just can't take this one a little bit to the right, and it's better. Okay, now, we just had to the arms if you remember in the persona she had love stripes can draw some stripes in the arms, hair dressed leaves I'd like to make it striped. Maybe there are tons of ways to draw stripes in any shaping that a stranger. I just repeat, I prefer to make like this to go along with around this this leave and I just choose to overlay this color. And I think it's nice. This is a bright color I needed in this league. Injustice, control C control be for the other arm and transform Reflect. And here we go. Now the arms are ready to And now comes the part where we draw the pattern for that dressed up, I will like to make it floral. It would be cuter, so I just draw a little flower here. It was this collar maybe, and just copy around all around like that and make it smaller. So let them all make smaller and then head to object Pattern Make what it makes that opens the pattern maker here in illustrator re just just and made them. And now your pattern is added to the swatch. The swatches panel. So for this top I just need to select it and add the floor. It'll pattern to it. So all what I need to do is make it like this, and at the pattern, do it and just hit Linda Mode overlay. You just take it control. Exe cut and added inside the total like that. Okay, that works for now. I don't believe these. I don't needed I had to need them anymore. And now comes the part off. I think the patterns look nice right now. And just to let the pencil tool and add more details. Lions. So this kurt change its color toe. Something like pink color that maybe yeah, go up with a paucity little bit and go with a brighter color. And yours, this shape and draw another one with this shape and another one with this shape too. Okay. And now we have added textures and patterns and details already character. And now I think it's done. Yeah, it's still my bed. Let's head to the final part and final listen
9. 8 presentation: Now that we have finalized our characters Now the time to present it you can present them the way you want for me. I just go with some simple around it rectangle. It was a simple shaped like this and draw inside it and paste the rainbow We ever drum before. Make it a bit bigger. Yeah, like that. And of it thou there. I think it's the better way to the best way to present nor the girl hold off the rainbow. Exactly. I think it looks nice. And now, And just draw another rounded rectangle here and change its stroke color. Does something like that or maybe Okay, make a little bit smaller like this. And she was a purple color. And maybe it will make it. Yeah, like this. Maybe this stroke the stroke would be nicer if it's a dashed stroke toe with the head stroke. Chose the dashed line. And it shows the dash and the gap which are the spacing between the dashes And here we go do that You will get the pencil tool and we will create a brush If this change the color maybe green color. Okay. And then with the pencil tool. You just roll that relief here and copy it here. This reflected a little bit and take it like that and just select these three shapes like this and go toe the tool tools panel and select the brush panel. Create new and create you brush and choose pattern brush and hit. OK, just leave us with the default options. And as you can see in the brushes battle now it's a new brush. Let's right the pencil tool. We just doll. As you see, we use our pattern brush you can create this May brushes is you can Okay, face it here again. And maybe the way out of this dropped Make the leaves more and smaller. That describes that Norrell loves the nature Took I really like it. Okay. And now it's dying to state, as you have finalized the class. Thanks old guys for watching. And we change the color from the colors panel. Okay. And here in the next warp options we chose be like this and we just make a bigger like that . And yes. And now that the class is done and our character is finally done, I hope you guys enjoy the class and hope you will use it in your career and in your coming illustrations. I hope you find this helpful enough for you. Do come up with your own character and share it with me in the projects part. So if you have any questions just shared with me in the comments below the class, and I will be here to reply to you guys and answered all your questions, looking forward to see all your projects, it was on the other with you and thanks for watching.
 Omnia Ali amer, Character Artist, Illustrator