Transcripts
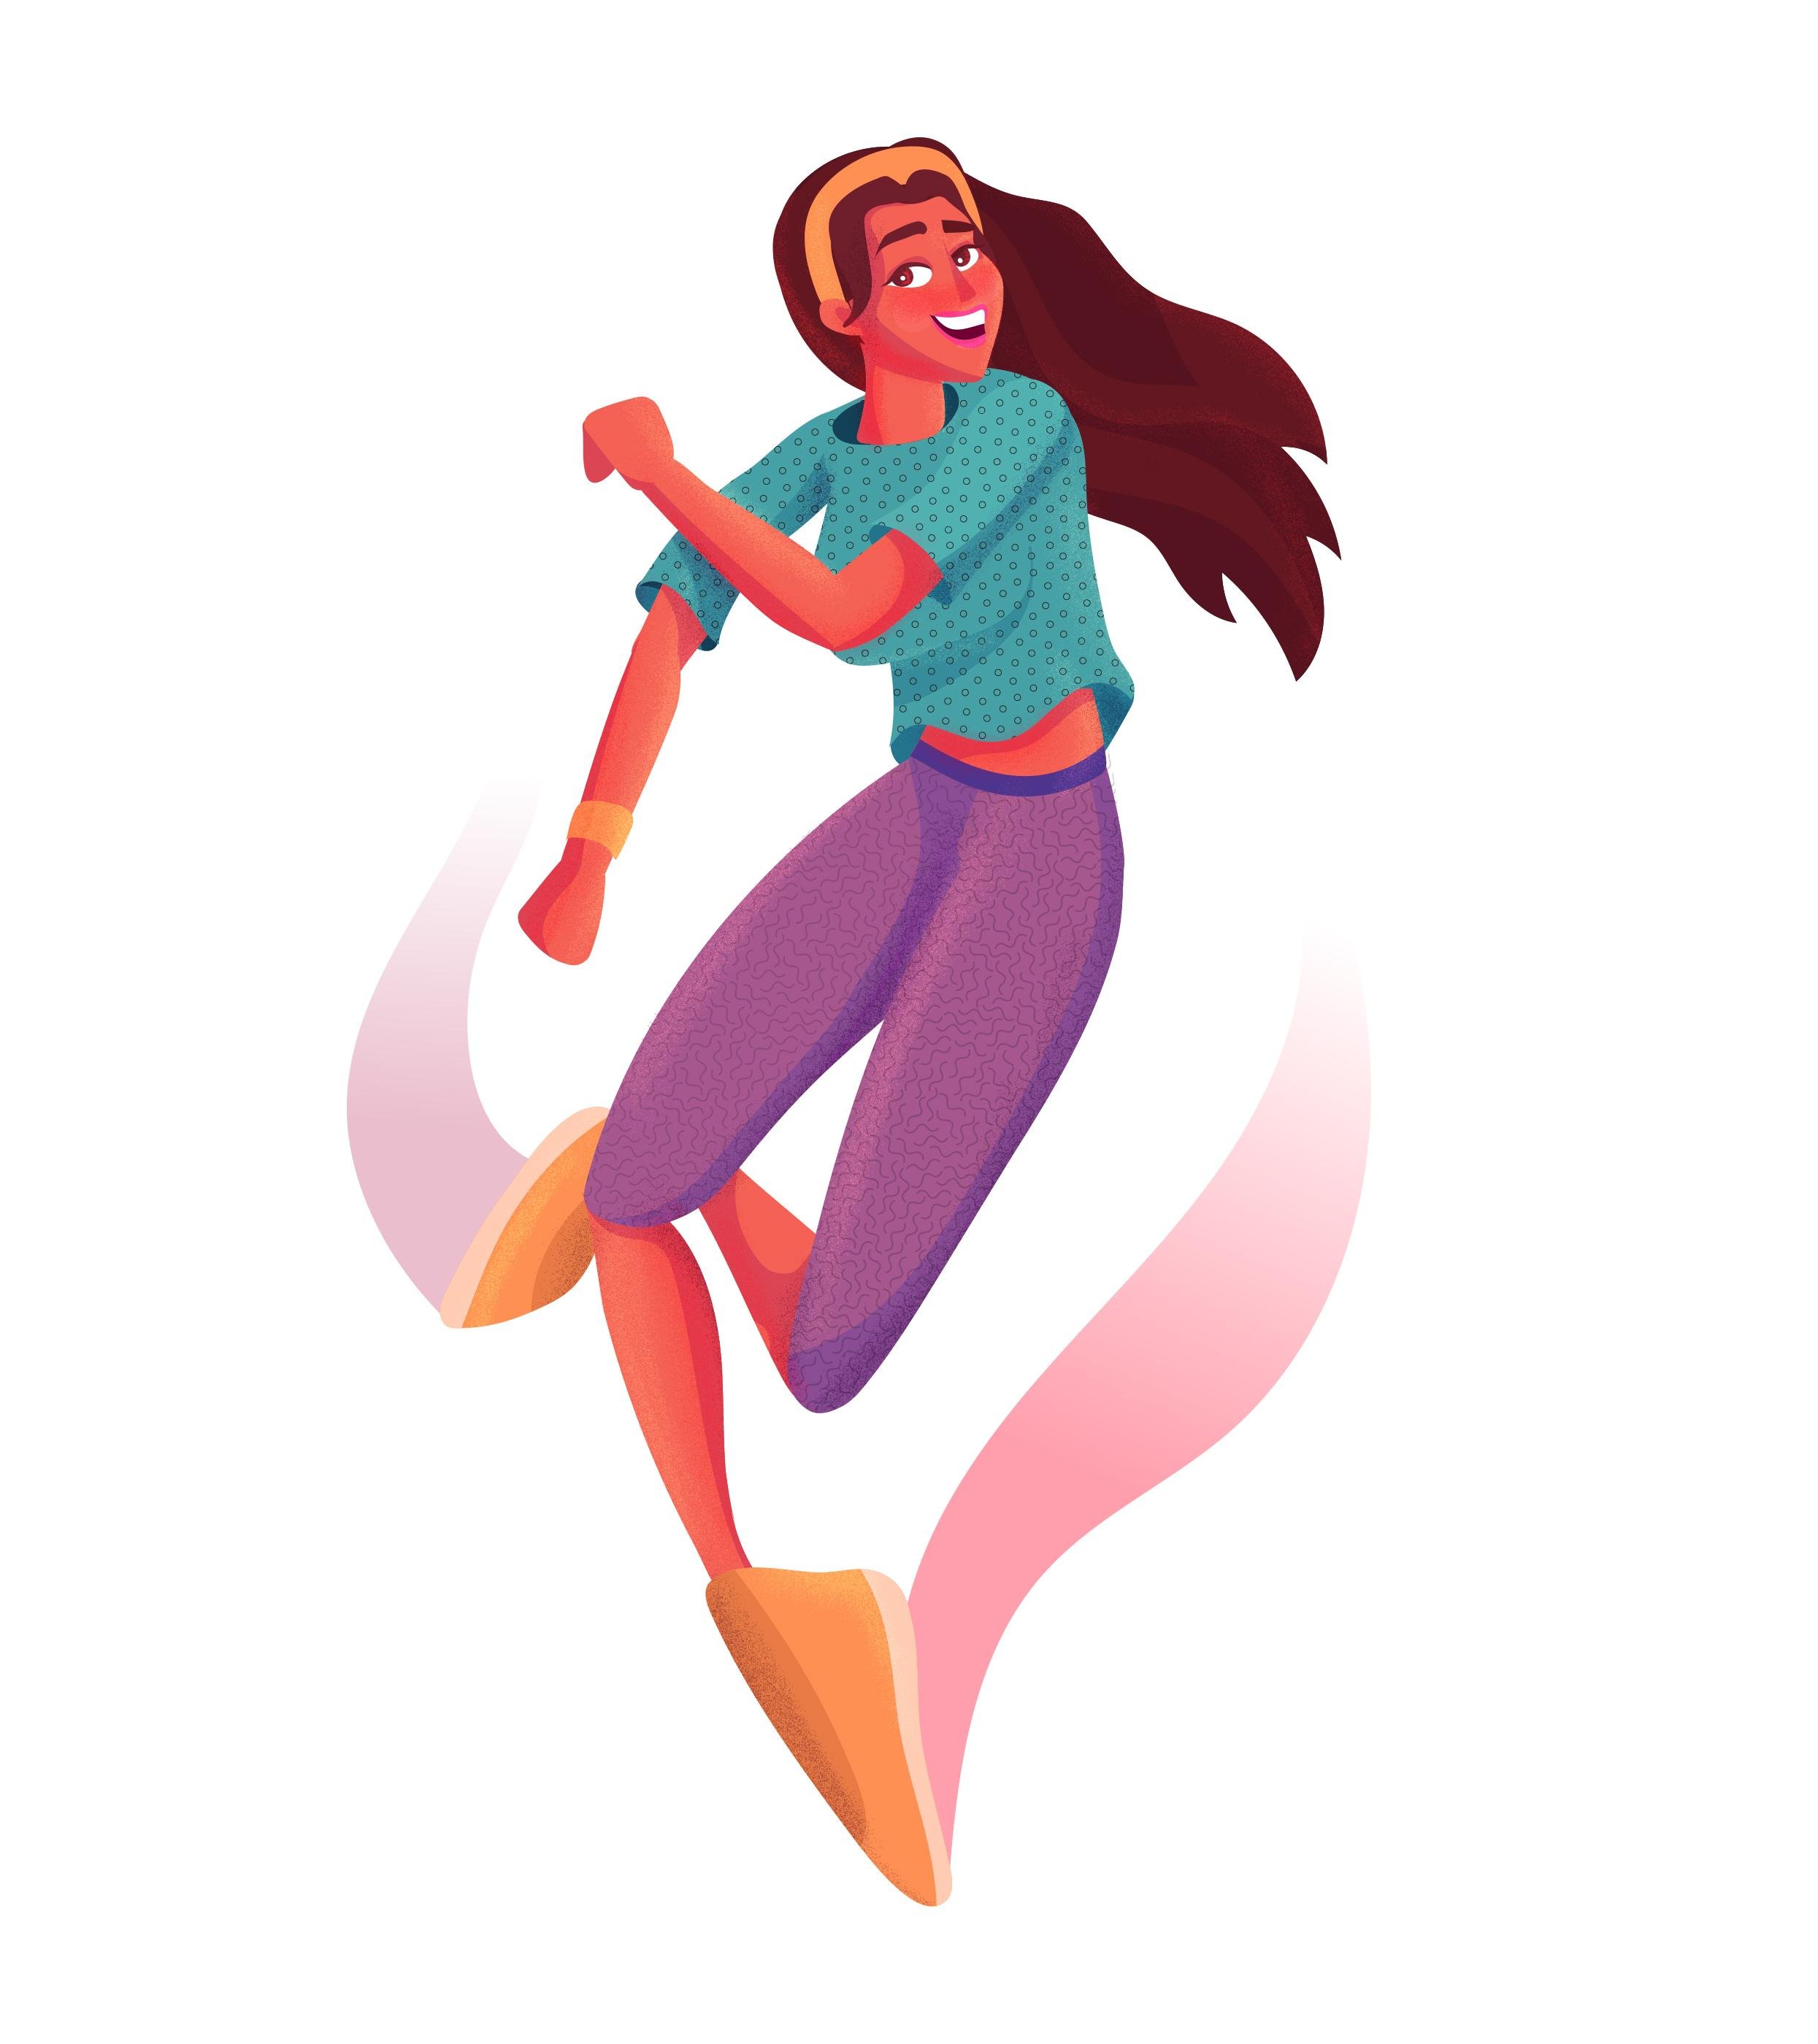
1. Class introduction: Art is fun and it's where everybody character in the station is really fun to do. And it doesn't have to be hard. And you don't have to study then schools. It's all about observing people around you everywhere and paying attention to the little details that makes everyone different and unique. Process all these information in your brain and grab a pencil and a piece of paper and just start sketching around. You'll be surprised by Hadley are expressing yourself on paper, your own me. In this class, I will be showing you guys my process to create this illustration from start to finish, from sketching to vector lines, colors, textures, and old through to the final. As I show you my tips, tricks and tweaks that I use in my everyday work. I hope you guys enjoyed this class and let's jump into the first lesson.
2. Sketch with me!: So for the first lesson in this class, we will be working on this couch. So I open Photoshop and in God, this photo from Pinterest, I searched for figure drawing references. You can search with that too. And you will get like a lot of figure drawing references. You can search for characters or four figures that's that are running or jumping or whatever you want, you just search with that. So for this photo lists, choose that red line. This is the action line per desk character. Actual line can be broken like that. No, it has to be one line. Just like that. Can one line. So this is the main action line. Alright? So now I'm just trying to analyze this character to know like where everything is going. The arms, all the joints, torso, hips, and the legs direction, and the feet and everything. So now I cited this figure drawing so fast. Now I will be working on my version of it. I will make the actual Nian and I will be drawing this, you know, just by my, I observe and draw it B accurately the same I'm just doing I'm just drawing it with my style and I'm trying to stylize it a little bit more as I'm intended to make this as an abstract character or a cartoon character a little bit so it doesn't have to follow the real photo. Alright? So I just keep sketching. So roughly like that. Trying to refine the initial lines that I made in the beginning.
3. let's draw in vector : And now that we finished Horace sketch, we will take it to Adobe Illustrator. We just select it and copy it to a new file. Take the opacity down and lock it by control local man to or from the object menu. In Adobe Illustrator, We have a lot of tools to draw with laying the pencil and pen tool and the curvature tool. Now, I will be starting to work with the pen tool. Let's make the stroke a little bit dark like that. And with this most tool, you can find it by a right-click on the pencil tool from the toolbox and smooth Amy sheet that you're drawing, dots like that. And now I'm working with the curvature tool. It's easier for the curves. All right, just like that. And remember, you are just free to use any tool that you want. And eventually I just get back to my favorite tool, which is the pencil tool. I like to draw freely with hand. Drawing with a pencil. I like the feeling. So I just keep going like that with the pencil tool joined to draw all the parts from the sketch. And as I told you in the previous lesson, you then have to take with the sketch. You can just keep modifying on the go. And after you draw, any party can also modify it with these anchor points by hitting a and select any of the anchor points or the handles and just modify this part. And now drawing the hair in this hand. And this malware here. Alright, let's continue. Okay. And now for the legs, let's just draw a line and that try to keep your lines loose and tried to be comfortable oil drawing them and always remember to have fun. And they always say my classes, drawings all about having fine. You then have to be strict with what you're doing. Just enjoy the process and try to remember the way you use to draw when you're a kid. It's always fun that way. And that's all for that vector line version. So let's head to the next lesson.
4. Coloring time !: Now after you finished the vector lines version, here is my color palette that I will be working with to color this character. Okay, to color IOB, selecting each of the items or each of the shapes that I've already made in the last lesson. And then hit I to choose the eye dropper tool and then pick the colors from my palate. Oh, right. Now I just duplicated the sketch. Then we'll choose the face and choose this eyedropper tool or head i to choose that color. And just keep going with all of the parts of the body and her clothes, her hair, and everything. Just hit I and choose from the palette. You're free to choose any colors. Usually when I'm trying to find colors, I just go through, you know, Pinterest, Instagram, the hands or any of the graded platforms just to find and, and inspiring color palette that really triggers me to do and you character. And I also use Canada.com to choose my color palettes and also to be cooler. Or Adobe Color is to choose the color palettes as well. All these are, does helpful tools to help you choose the right color palette for your character illustration. So much keep going. You just select each shape and hit I. Do so like the right color for it. All right. Even in this coloring step, I just keep modifying my shapes. I redraw on the vector lines with a pencil. Just make them smoother or to make them more accurate. If you're noticing sometimes sound the shapes are above other shapes, so I want to send them to back or something. So I just select any of the shapes and right-click and range and choose whether I want it to go backward or forward, or even go to the bank or go to the front, above all of the layers. And that has helped keys on the keyboard or shortcuts on the keyboard, which is control or command. The square brackets, left and right square brackets. Keep trying them. They will save you a lot of time. And as you can see, I'm just keep editing and modifying my hitting a and selecting the anchor points and the handles and playing with them. And as you can notice, I'm also changing the sketch itself and the character itself. The positioning on the face of the hair, of the bow of the, Anything. Confined. And now I'm adding acted. This is my fun part or this is my favorite part. I'm drawing inside of the shapes to add some shading. This is this icon here below the colors in the toolbox. It's the drawing side. I just select any shape and hit this icon, go inside and make a random shape of shading inside of it. It adds more depths and it takes that character to the next level for me. So I just loved this step. One, right? You just keep experimenting and playing with all these layers and options and colors. It's upon step, actually, the colors step to fund a step because you take the sketch that you worked on, maybe four hours or less or more or anything. You take it to the level that you can see that it's alive and it's colorful, and it looks nice. Alright. You just keep coloring, modifying, and editing your character. I'm really excited to see what you come up with. In the project section below. I really want to see the characters that you'll count with and the color palettes that you will be using. So it will be so nice if you're practicing with me now. And following along on right. You're free to add details as much as you can. And with the same technique that we're adding shades or shadows in each shape, you can also add some lighting. When in this character I'm not adding any lighting because I will do some final touches in the last lesson of this class. So keep following. Override an alpha here, sneakers, I add some details. But as you can see on keeping the details a little bit abstract, because this is the, you know, the theme of this character. I don't want it to be so heavily detailed. I just wanted to be a little bit surreal or abstract in the lines and her movements and everything. And now my friends on the days in the hair. And I just keep modifying the shape of the hair. Thank that. When the pencil tool I just redraw on any shape, then if he'll need some modification. Right. You'll always find something to edit. It takes a lot of time. Now I will draw the phase like an abstract phase. I'm just simple eyes and with the Joe inside I'm made this circle inside. And simple lips. No heavy did a details. You're free to make the silence. You want the Permian, this character, I just wanted to be a little bit simple. And the focus here in this illustration is more about the movement that she is making, not rounded body or the face or anything. Ok. M for the other eye. And just make the same thing DO inside another circle. And this island here. And I took it behind the i layer by hitting control or commands square, left square bracket in the keyboard. Ok. And maybe a little circle here on the cheek. And you can change the colors while you're drawing till we feel they are satisfied with what you're doing and you're happy with it, though, right? I think it's nice now. So now for I'm really fond step, we will take this and go to the swatches and choose patterns. Basic graphics here. And you can choose from the lines or the gods or, or anything in this. I chose here the dots and you can find the variety of dots. These watches are our standard swatches with Adobe Illustrator. So you'll find it in your version. As you can see, I take all the character, make it smaller for the texture to be bigger and clearer. Alright? So I choose from the other shapes and again, basic graphics. And now lets choose these lines. You'll find also a variety of lines. And it was anything you want. Let's remove this. Okay. Maybe take their past 11 down and the blending mode to multiply k. I still can feel it. So let's try another thing. Again. Patterns, basic graphics, and let's try the final one should the textures and let's make it large thumbnails. So we can see through this. You'll find some interesting textures here. And I really like them, kind shapes like that where this here. They are really cute and I really feel happy when I'm adding them to my illustration. So you just keep going through this and tried to find uses for them in your illustration. Maybe some of these extras can be used as a grasp or at ikea or anything. I like this one here for her pants and let's keep going. Alright. I'll make the blending mode to multiply. And that's okay. You can move this same thing for, for her t-shirt. I'll be adding some interesting texture here. Think that drawing sides and choose the texture or make a shape inside of it and give it that lecture on right? Plus like that, I think it's really interesting. And I just gave a little better a persona for this character. And now we will choose all of it and hit this amazing Puppet Warp tool. It's my favorite part, guys, check this out a few. If you're just choosing any of these anchor points here, you can move any other body parts. Really. It's perfect. It's one of the most perfect tools in Adobe Illustrator. Yeah, I think we can take my pet. Like we can exaggerate the movement just that she's making. You can go freely. While I just get amazed every single time I use this. Okay? Maybe just keep playing around with this tool. And by the way, this tool works amazingly also when you have a front view character like with straight legs and straight arms, you put the pinpoints. Our tool in the joints parts. It's a little bit like animation. When you're building bones and making the rigging of a character. And you just keep playing and make any position you want. Here we have a little bit when limitations, because this character is already in position. X0 is nothing the neutral drawing position. Okay? And maybe the head. Ok. Let's choose the wire again. And you can also rotate this. As I told you, I have some limitations because the character is none other position. Ok. As you can see, after you finish at the Puppet Warp tool, you will find some parts of the body that just got messed up. Any needs a LeBron of modification. You just keep going with the smooth tool and working back to light's fine and nice. So now let's head to the next.
5. Add some more details : Now that we've finished the character, let's read some details. As you can see here, I feel that her hair is not the best, so I will be working more on their face and her hair with a pencil tool will just keep going like that. And Buddha layer to the bag. My work a little bit more on here on the hair shape. Maybe make something free like that. You just keep everything and keep going. You're free to make the hair short or long? On time, they think? Maybe yes, maybe like that. And let's make the 3's like that. They feel that their eyes needs to be a little bit open and the eyebrows a little wet thick. The to be centered cause it's a girl. Yeah. I had a feeling that these eyebrows fits fits a boy's face more. Ok, let's work on that and try to make her face features look a little bit feminine because I have a feeling right now, guys and low, if you're agreeing with me, but this character face looks a little bit like Tarzan. And yeah, it looks like Tarzan. No, it has to be a little bit girly. Okay, let's edit that. As you can see it a little bit. Modifications. Turn the face from a boy to a GRG? Yeah. When we make this thinner, yeah, it totally changed how her face looked like. Wow. It was really ugly. Okay. I'm glad we edited this. Alright, so let's work on the legs. Just something quick like that. Well, it changed a lot. All right. I'll just make something here like a head band or something to be more supportive. Maybe modify the shape a little bit, something like that. And we knew that another color other than this one. So let's just select the color of her shoes and maybe work more on PET. I think it's much better now. Yeah, it looks very nice. Okay. Alright, maybe something like that. Lets remove this one. Okay. I will draw inside the hair to add some details like some shading and some lighting for the hair. Just a little bit. All right. Maybe add something on her wrist. Same color out the headband. And it looks quite nice. Before the end, you just keep going through all the lions to see what needs to be smallest and what needs modification. You just taped a, Select the anchor points and keep editing. Alright. Maybe this yeah, this lane here needs to be a little bit straighten like dance and lead bed sicker in here. Yeah. I like the line now. Next, select these two and smoothing it, mental it. Yeah, it's much better. And maybe take these state this upper part, upper body here and rotate it a little bit, then rotate oldest, my pet. You just keep exaggerating the movement. It's an abstract character so you can make anything you want. I'm thinking of adding something like flames or something like that. That's coming out of this. Okay. Something like flames coming out of her shows. I think it'll be nice. So as if it's like an illustration to be used as an ad for this brand of shoes. Maybe you can use the fact that now I will select these two claims to making green gradient, right? From this red to white, I think looks interestingly that yeah, I like, like this. And that's all for this part. So let's head to the next lesson.
6. Now some final touches !: So for our final lesson here we will be adding some final touches to the illustration. So I will select this and open a new, a new file in Adobe Photoshop. Alright, and I will paste it here as a smart object just like that. And you'll make a layer and had all between the two layers to make it masked. And it will choose this brush here, this dotted spray brush, and make it Overlay. And just choose some color that's a little bit light, just to add some lighting touches as I told you before, that I'd like to add these touches with this spray brush. It just adds this amazing texture to the illustration. In a real light. This texture, as you can see here, it says Pray dotted texture. It's, It's quite nice and I feel that it adds some worms to the character that I'm making. Ok. Just keep ad in it. And the overlay gifts, that effect of the lighting in unlike has if it's a lie or enlightened. Okay. And for the legs, maybe back of the shoe. That's perfect. And just based on your personal preference, you keep adding this effect, this lighting effect till you are satisfied with it. On right? Maybe for the eyes. Yeah, you like it. Okay. And now I will be choosing and another color which is a little bit darker than the face. And maybe adding some Mino read touches with the same sprayed brush. And I also like this step. A lot, gives that tanning burned skin effect. So the characters just really interesting. Okay, let's just keep it for the skin. Then we choosing a darker color here. But now in the new layer which is multiply and also masked inside the illustration to make some shadows, spray shadows as well. This Photoshop step is actually my favorite. It takes your flat illustration from Illustrator to another level. And it becomes just ready to use as an ad or anything and ready to share anywhere. Yeah, so that's it for this character. Thanks a lot everybody for watching and don't hesitate to ask me anything events, caution panel below. And also, I just can't wait to see your characters and illustrations that you'll come up with after this glass. Also feel free to watch my other classes per character illustration. I think you'll find it really interesting. And for more of my work, this is my Instagram. I post my latest works, sketches and time-lapse videos for my process there. So thanks a lot everybody. It's on the IMA with you and see you in the next class.
 Omnia Ali amer, Character Artist, Illustrator