Transcripts
1. Introduction: People bought right on my favorite subject to
draw since my young age, there is some expression
on grading the realistic for Dr. High and TMZ, an illustrator and a graphic
designer from India. And we are going to jump into illustrating the
attractive poor guy. In this class. You will learn the
techniques do you use when illustrating
the port, right? And a simple week. Those are practicing on strokes, practicing on eyes,
nose, and lips. How to sketch this object
that we have taken. Hope you draw the
outline from the sketch. How we can make the
hat to look realistic. Calling this object, how do the shadows and
highlights to as objects? Finally, adding the background
to the illustration. In this class, I will be using the Procreate app and my
iPad Pro with Apple pencil. By utilizing this class, you will learn how it
will be easy to convert the photo and do an
attractive illustration. This class is for anyone who wants to learn to
draw the board right? In an easy way
without any need for measurements on board
drawing in Procreate. So let's dive into the
class and how fun.
2. Class Project: Have you ever imagine
a favorite photo into an impressive illustration by following the easy steps which I have given in the class
on how to make this gauge outlined and coloring
the poor grade you could do with an ISS. For your convenience. I brought you the color palette, which I have used for the class in the project
and resources section. So with the help of it and
also on following my steps, losing station and posted in the project gallery
with three section, that is sketch, outline and
the final illustration. So I could see a progression
to the final illustration. Let's get started.
3. Canvas Creation: In this lesson, we're
going to discuss a book, how to create a
customized Canvas. Open a custom canvas. In the dimension step, we could find the width
and height darpa Canvas. For it. We can choose if it
should be in millimeter, centimeter inches or pixels. Here, I'm choosing inches. So for the width, let me give it as do a Lynch's
for the height 12 inches, based on the width and height. Maximum days. If I change the width or height, then the layers
will be affected. As foreign. Now, I'm giving 12
inches by 12 inches, has the dimensions
for the canvas and also DPI should be 300. Okay. Then let me give it a title for the
Canvas as a square. And color profile should
be in Display P3. Now, Canvas been recreated. In the next lesson. See mode setup of brush too.
4. Brush Tool Setup: In this lesson, we're
going to discuss about the brushes and how we can customize a open the brush library
in the sketching. Fine, no one brush, swipe it, do a lift to
duplicate the brush. In the brush properties. Go to stabilization. You could find amount
and a streamline. Tried to draw in
the drawing pad. And just the amount and
just the pressure and just the stimulus location
and just no motion filtering. Now, in the inking
fine grain brush, duplicate it in the
properties and that a stroke but just the fall off and jitter and just the streamline stimulation
and motion for elderly. And next, we will
use soft pasture and those KG for
smudge assaults. Now, we will use the rent grinding and soft pastel
brushes in this class. In the next lesson in this
new live script back this.
5. Unsplash - Choosing an Image: For practicing the
portray drawing, you can use your own
photo or else can use some other images for getting
the high-quality images. Use Unsplash.com. Inhale, I'm searching
as good trees. So I will get the Ray B of
images related to the topic. From these images. I'm choosing this
forever in station. In order to do that practicing separately and tilting
as ice permanent. So that you will get the images
related to the ice alone. Choose one image and crop
one day the butt needed. This applies for
nose and lips too.
6. Stroke Practice: The main requirement for the further lessons is
practicing this group, select drying toothbrush, which we did in previous
lesson in the Canvas. Start to do the practice. Draw the horizontal
lines with any job. Just be free with your hand. Continue to draw the lines. Can you feel
comfortable to draw? Now, draw the vertical lines. Continuing with a
regular space in java. Make comfortable on drawing vertical lines and draw the diagonal lines
from dark blue water. Even if you're on a date
again was slightly do it. I'm drawing those lines. Now. Again. Draw the diagonal
lines from bottom to top. Keep practising. For your convenience. Create a new layer. Practice the diagonal
lines as we did before. Great and new layer again. Do the switch from
outside to inside. Keep doing it. Even. You can use the
empty space for practice. Now, do this will, from inside to outside. Dry on the possibilities
for drawing this one. Keep doing it. In a new layer. Draw that goes vertically. In redoing the glucose. Draw. Another good for
the hand control. In another layer, gone
up goes horizontally. Again. Draw that
goods in-between two codes in new layer, grown apart from large to small. Now, drawing a goes
with continuation. Make the imaginary sink down, and draw that goes around it. Keep doing it in another layer again
and draw that go. But by making to join
the Duke goes on, dry some of the positive AD. Even you can try a
different vanishing. Increase the Go, make
it to join and the end. Go to the previous layer dried to draw that goes
in medulla tiptoe. Tried to follow the steps in the reason New
Mystics may happen, but these are all for
the control of overhead. In the next lesson, let's able to practice on ice.
7. Eyes Practice: We have done this group practice
in the previous lesson. With that experience,
Let's try to practice on praising the ice from
the reference image. I have some of the examples to do to practice
on drawing the ice. Let's reduce the opacity. Zoom the Canvas. I'm using customized
Darwin do brush, start to draw over
the eye blue line. And so we will get the basic
structure of the eye Bruce. And for all the eyebrows, that will be the partition. Identify the
partition in the eye, Bruce, dog, a line
for the partition. Follow the scene on another hybrid with the reference image and let it grow the hat strands, which represents
the hat or I Blues. Even draw the small
has grown slightly. Code lines on following lines
for hat, on Folder mode. Make those lines closer. On top of that. For intersection lines, draw
in an opposite direction. Even know that tiny
head witches over the gross follow the same
steps on another site. On hiding the layer, we could find the output. Let's move to another
example for hybrids. Follow the same steps
which we have done before. Draw the basic structure, and start to draw the remaining. Follow the same steps
on animal site. As far now we have
finished I'm routes. Let's try on the ice, absorbed the image, and draw
the eyes with the eyeline. Draw the eyeball with the pupil. Now for the bottom, eyelashes, follow the eyelashes
as in the image, try to draw the eye Nash from
inside our unknown so dope, Mr. draw that eyelashes. I like. Even draw the lines
over and below the scene follows
for an animal, I hide the layer and see
how it looks like. The scene. For another
example, for an eye. In this example,
eyelashes or bids. So constantly over
it and draw the tiny has also follow the same steps on another site. We have finished the basic
sketch needed for the ice. Create a new layer, drag it to the border. With our customized
dry ink brush. Keep the brush size to six and draw the outlines
or with your sketch. As we have discussed, make the lines even
more closer on further seem States follows as we have done in the sketch. Hide the layer for the output. Follow the same steps
on another side. And then let's move on. I follow the sketch. On drawing the island. Don't put too much pressure. We gender at the
end of the stroke. Gotta eyeball and pupil. Draw the eyelashes gently. Hide the layer for the output. Follow the same steps. On animal side. We have completed
the practice on ice growing US more than
elephants images for practicing the
eyes thoroughly. In the next lesson, let's do the practice on notes.
8. Nose Practice: What is the next? But
after ice obviously knows, it's very simple to draw the
nose from a reference image. Let's mourn on doing it. Create a new layer. I'm told the structure of the nose draw the
National alley and the nostrils join
the two nostrils. And that is a dark
shadow in the nostril. Make it that too, along with darkening that part. On absorbing the image, we could see shadow
region of the nose. Draw the bridge of the
nose to do the practice. With the help of another image. Create a new layer
behind it. Dry. Brush, draw the outline over the sketched known gear. Much pressure for the goes
in the nose and the bridge. Follow the same steps
on animal sight. Hide the layer for the output. In the next lesson, Let's see on
practicing the lips.
9. Lips Practice: We have done with the
practice of eyes and nose, will be ellipse RD
already to draw lips. Let's jump into it. Create a new layer for drawing the lips on
each end of the lip lines. Make it as Diigo. Rather cubic bow of the lip
as in the reference image. Rather loyal. Follow the same. For
another example. In a new layer,
draw the outline. Follow the same steps
on the animal side. Hide the sketch layer
for the output. Now enable every outline layers. So as of now we finish the practice session of
the eyes, nose, and lips. Sketching the subject will
be in the next lesson.
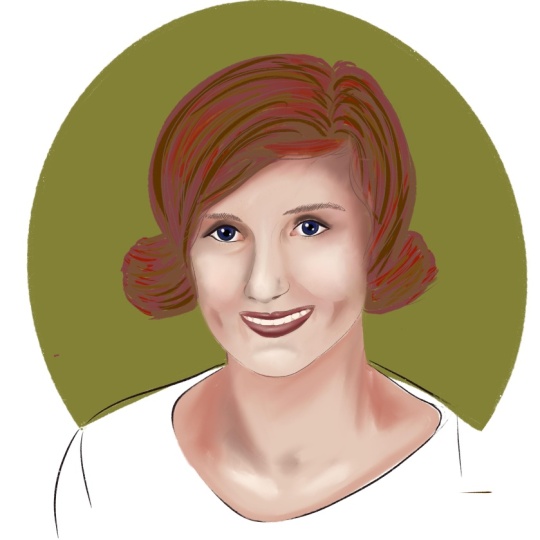
10. Sketch The Subject: All the experiences we
have gathered so far. Sketching can be
done with an ISS. Follow my steps on sketching. Place the image at
the same dough into Canvas and reduce the
opacity to 50 percent. Create a new layer. Use Darwin to brush, keep the brush size to 50 percent as we did in
the practice session. Implement the techniques
in this lesson. Make the structure of the rows. Do the partition or
the intersection of Aibo has and start to
draw the head starts seeing a place on undergo. As in this image, we have fascial I brew. So based on the sketch,
they're growing. Now, you want to ice, draw the eye as
well as eye lines. Thicken the eyelashes. And also all of the islands. Next, draw the eyeball
and the pupil. As we could see the highlight. So far, the highlights make
the circles follow the scene. For other, I do make sure the
sketch hide the layer often so we can see
the sketch clearly. Let's start from rejecting. And the nostrils. Do the darker shade in the
nose clips. Draw the nasa. And also don't forget to highlight the
shadow of the nose. We have no do lips, but as discussed in
the practice session, follow those for
sketching the lips. Leave the space for
drawing the deep. Finish it with lower-level. Got a jaw line of the phase. Lead the space, the hand. And also drawn the years
as it is in the image. Now, we are in the crucial part that is
drawing the head for that. First, we have to observe
how the hat flows. Just look conduct
darkest, had stats. So grow according to that flow. We could see often it
goes and it is flowing, do end up always note on the
shadow regions in the Hat. Do the partition. To understand the flow. On hiding the layer, we can find how it looks. Those are basic guide
for the flow of hat. For doing that lineup. Follow the steps. As I said before. We can zoom that
canvas for the better of the ass off. Now, we have finished
14 does the head. Let's draw that are a
quarter of the Hadoop. All of these loop gone, how the flow of the hat and
do the sketch accordingly. We should look on the curves
and bends of the hat. At the end of the sketch. Draw the tiny has for
the real answer to. That is no need to
build every tiny house. Just focus on some of them. This is how the face
and the hat looks. Next, we're going to sketch
the hands and the needs. Do the sketch as it is
in the reference image. Finishing up with the sketch
of the dress, they reach for drawing the dress. Just looked it up on, on the shadow region and sketch only on the
shadow region. So we could make the shadows
of the risks accordingly. Hi The image. Finally, we're done
with the sketch. The next loser will be the most interesting part of
this class that is, line up.
11. Start To Draw: We get the basic
structure needed for our illustration.
With the help of it. The fun part beings choose the customized
in right into brush, create a new layer and drag it behind their
current layer, rename it as Sketch, and rename the new layer as faced outline brush size to 8%. In this class for line art, we will draw the phase and hat in separate
individual layer. In the beginning, we could choose any of the
color for the light. At the end, we can
change that color. So choose any of your desired
colors for clearance. Hide the layer. Often. If you feel to change the brush size, do it according to the sketch. Don't give much pressure
for the eyelashes. So we can clearly see the ice but follow the same steps. On animal side. Draw the nose and the lips
according to the sketch. Create a new layer
beneath the sketch layer, rename it as Hans undress. Now start to draw the hats. For the lines of
the shadow regions. Don't give much pressure. Be gender or worried. In the next lesson,
Let's see a book. How did draw the head?
12. Drawing Flow Of Hair: Now we are in the crucial part. I'm drawing the hand for
both tried illustration. Create a new layer beneath the sketch layer and
rename it as head. Keep the brush size 25 percent. Always start from where you feel comfort to
start that growing. Based on this case, do the outline first
after the we can make them detailing and then
do the partitioning. So we could understand the flow. Based on that, draw
the half-strands. No need for the headstands
to be much closer. Just drop according
to the structure. Because of having the gap. We can see that realism in it. If you are comfortable
with drawing the head, that is no need of partitioning. Just go with the flow. For the hat and the
aim and the beginning. That will be then
soft lines together. So it will represent
the shadow for the hat. Always, constantly
on how Phil is. On following the sketch. We can make the father
had student outlining. You can also draw the
slope in a single switch or can bust in the middle
and stock from it. But never necessarily
Zoom canvas for the book. Goes on lines. If we meet that guy for
the flow in the sketch, we could easily make
the hand strains. And also it will hurt us
partition for easy drawing. For drawing the hat. Make sure to follow the steps, which I said in stroke practice, listen to a wine,
the shaky lines. You can adjust this deglaciation of the brush in the properties. Draw the head with a
convenient direction. On hiding the sketch layer. We can see how
realistic the hat. We are F2 going to finish
the 14 out of the hat. First of all, draw the flow
as adult in the sketch. Keenly watch over it to
avoid the overlapping. If you don't feel bright
on the flow of hat Erised that but uncorrected
aspect of slope. By keeping that as based, draw the fallen a flow of hat, and Zoom the Canvas for the
Beaufort had strengths. You can also draw
any of the direction and also don't miss the
shiny has to draw all over. We have completed the
line on for coloring. Let's see, in the next lesson.
13. Coloring The Base: Actually, BCE is the
important thing in our life. It a place for drawing. Two, we have to choose what should be the base
color for the sketch. Layers of hat, hands
rest and face outline. By selecting and pinching
those with two fingers. Go to Adjustments, Hue, Saturation, Brightness,
and just the brightness. If you reduce it, it will turn to pure black. You can adjust
according to your need. Here. I'm selecting 40%, create a color palette
for skin had undressed. I have already created a color
palette in separate layer. I have chosen the color which
I have selected for hat. Create a new layer beneath outline and rename
it as had color. Choose the default dry ink from inking the brush
size to 70 percent. And feel the head colour. Reduce the brush size to
10 percent for the minute. Cheap. Keenly watch
over all the edges. Even you can reduce the size if you want
to be more precise. Now, create a new
layer beneath had color and rename it
as a face color. Now choose the face color
from the color palette, increase the brush
size to 100 percent, and start to Colorado phase. As in this, we do want
the brush size to be a 100 percent so that we can adjust the size
as per your wish. Create a new layer for coloring the hands and color the hats. Again, create a new
layer for dress. Choose the color and foreign. Another method, just
do the outline first. And then we can do
the coloring for the address by
increasing the brush. Create and another
layer phone bill. Choose the color and do the coloring to the buttons. Do. Now behind the belt layer, create a layer for Nick shadow. And from the reference image, choose the color of shadow and make it like
that in the drawing. For Neil's, create a new layer and choose the light pink color. Even if you want to
lighten the sheep, go to the brightness and I'm just now next shadow seems part. So choose the outline color. From the color will
choose the dark GOCE. Teach that layer to alpha lock, and then Fill Layer. Now, it feels good. In the next lesson, Let's dive into shadowing
and highlighting the face.
14. Shadows And Highlights For Face: After coloring
based for the face, the shadows and highlights are
important to be realistic. One, create a new layer
foreshadow for the face, just a Buddha face color and
make it as tipping mosque. Choose the second shape of
the face color as this, the real color of the face and the base color we have given will be the slight
highlight for the face. Keep the reference image
aside for the guy. Use the dry ink brush. Give the shadow as it is in the image that is
on the forehead, near the nose, lips, chin, cheeks, and along the ice. Use soft pastel brush was merging with 50
percent of SICE. Much it all over. We have given mutation. If the SMAT is too far, then select with the base color, draw on it and
against much aldose for further shape. And again giving the shape on the forehead and smudging it more through the years and give the sheet again and smudge it. Choose the third phase
color for the slight shadow to the face with the help
of the reference image. The shadow regions are
no dot on the base. And I started this much on a report of the face, size of the me baddie. Why zooming the canvas, the shading can be more precise. In order to spread this one, just zoom on the canvas
and do this matching. Choose the fourth phase
color for the shadow. Now those shadows are
in their headlines. Near the nose, lips, cheeks, genes, along the ice. And on the years. And it's time for smudgy
increase or decrease the brush size according
to their necessity for this much. In the image. That is a shadow in the
bridge of the nose. So give the shades
on the bridge. Again, choose that
third base color for shading on the cheekbones. Choose the fifth dephase
color for the deepest shadow. For this, be more
precise on the forehead, eyes, nose, cheeks, chins, and near the head. Smudge it. And that is a shadow
near the monsters. And do the work on it to give the shadows
below the lower lips. Create a layer for eyes. And Bruce, make it
as a clipping mask. Choose the white shapes
for the eyes and reduce the color opacity
on his each end. You so much for the blending. Do the same for other. I choose the dark brown shade for the eyeball on
the top section. For lowest section, choose light brown shade and
blend those two colors. For highlights in the eyes. Choose white shade. Choose the hair color
shade for the eyebrows. Create a layout for, let's choose the base lip color
and give it for the lips. Make it as Alpha Lock. Choose the darker shade for the shadow of the lips
from the color palette. Now, it's time for an blending. Create a layer for deep, beneath the lip layer. Choose the deep color
from the image. And reduce that color capacity. For the highlight. Choose white sheet
from the palette. For the shadows near the teeth, choose the next shadow color. Over the ellipse layer, create a layer for
Face Highlights. Choose the white sheet, and reduce the opacity
in the reference image, we could find the highlight. So do the highlight
over the nose, near the eyes and
just echo the lips. Aren't highlighting everything. Blend those highlights. First, do the basic
highlight shade on the upper and the lower lips. And then can make
the highlights, or whether it blended slightly. Concentrate on the cheeks and also in the chin over the blended area and dying you
the highlight for realism. If needed, blended again. In the next lesson, let's give the shadows and
highlights for the head.
15. Shadows And Highlights For Hair: After detailing the field
in the illustration, let's concentrate
on shadowing and highlighting that
had created Leo. Yes, Iran had color as her highlight and make
it as clipping mask. Now choose the head girl. Change the layer blend mode
to screen as this nail is to do the highly in the hat with the Handbook
reference for DOE. Sparkled the highlighted
area in the Hat. Make those areas
to be highlighter. Simple Crick, and do aims
of headstone is dense. Then the middle part will
have the highlighted area. Based on that, do
the highlights. Now with the smudge tool to
blend the highlighted area, leaving middle part to
be more highlighted. Create a layer and we'll
go ahead and highlight near as the hat shadows, make it as clipping mask. Teach the blend
mode to multiply. This layer is to do the
shadows in the Hat. Choose the base had color now, no doubt the shadows in the reference image and make
the shadows accordingly. As we could find the
shadows on the forehead. Colored it with this
much good blended. The highlighted area
that is a shadow. Make the shadows near the
year behind the hats. And also in the
intersection of has that Charlotte's make the
shadows on everything. Whenever you feel to blend. Just do ask like that. So we will get the idea on
whether it looks good or not. Always do the zoom out to make sure that
everything is okay. Now, I have the feeling
that is a lot of drop shadows on the
top of the hat. So I'm lightening those areas
and blending it as well. Now our illustration seems good After detailing
the face and hat. In the next lesson,
let's do the shadows and highlights for
dress and the hats.
16. Shadows For Hands And Dress: Phase and the hat alone
doesn't get completed. To do the completeness, we have to do the details
on the hands and wrists. Create a layer for hand shadow. Just able to hand color layer, make it as clipping mask. Choose the color as we did
in their coloring or face. The immediate corner next to the base color is the
actual skin color. And the base color is the
color for highlights. These points were discussed in the previous lesson itself. According to the
shadows in the image. Give it the colors
and blend it aspirin. Next, choose the
light shadow color. Give the colors. Again blending. So it very much with
the existing shape. Choose the deep shadow
color and give it on the pleased where it has deep
shadow than the previous. By reducing the
best guys blended. The scene follows
on another hat. When Noah, you feel the
shadowed area is far more. Then reduce the shadow by choosing the base
color from the hat. I'm applying it on the hand. Again. Create a layer and bolded less alone and
make it as clipping mask. Choose that dress shadow color, and reduce the brush
size to 10 percent. Make the shadows
over the line area, and also do the shadows as in the image which has deep shadow. Now it's time for blending. The deep shadow
dress color and drop a walk rather what has
deep shadows on TheDress? Create a layer for the belt shadow above
the belt color layer. Make it as clipping mask. The color from the belt and from the color we choose the
darker shade of it. Now, do the shadowing
on the bit. We help finish the enter
illustration of the gun. Now. In the next lesson, we will create a color palette
needed for the background.
17. Color Palette For Background: Based on the main drawing
which we have done so far, let's create the color palette for the background
from the color, we choose the
slight greenish hue and adjust the saturation. Check whether this color
matches with the drawing. The selected color will be
the main background color. I'm going to do add on colors to the main
background color. For that, I'm choosing the
local flow from color wheel. We just less saturated
and with high brightness, Gullah, check whether it matches
with the existing color. I helped plan to add some leaves and butterflies
in the background. So let's choose
the colors for it. Let's choose the orange shape from Galloway for
and butterflies. Let's choose the shape. Do the confirmation by
cheating with these column. Okay, it's fine. And then let's do some
light and low shape. Do. The one thing we
should keep it in our mind is every color
should compromise each color. Let's choose light,
pinkish colored. Next for the lease. Choose the green shade. Then I need some darker shade. And I'll create a new pallet
and rename it as background. Choose color, and place
it in the palette. We can see every colors or compromising with
each other when. In the next lesson, let's sketch the background
for our illustration.
18. Creating Background: To enhance the
main illustration, we need to make the background. In this lesson, I will give you the ideas on sketching
the background. Create a new layer for background and rename
it as background one two-step column from ballot and growth and fill the color and
bowel the sketch. Create a new layer.
Four bedrooms are good. And choose the light
alone and with mono line brush under
calligraphy, ROI, so good. I've just do bring that layer all the way down, just a boulder
back on one layer. Now, select the Alpha Lock
and choose the darker shade, color half of the circle. By using soft pastel English in smudge tool to
blend the colors. Again, choose the lighter color of it and colored
it on top of this. So good. Again, blended. Create a layer for
sketching the background. Juice Lenovo and do brush. And start to sketch with some basic leaves on either
side of the drawing. And also draw the
simple structure of butterflies on both side
and also on the board. Them. Create a new
layer for background, lease and reduce
opacity for the sketch. Choose the green
color from pallet. Use gray into brush. Keep racialized past 12 percent. Now, start to draw the leaves, sunlight shade of it, and make the layers. I'll follow up coloring on
top of that, each nice. Then blend everything. Create another layer
for butterflies. Choose the orange sheet from the ballot and draw the
structure of the butterflies. The debranching,
choose Alpha Lock for the layer and colored it on
the edges of the butterflies. Now do the smudging with the yellow sheet, goddess or good, or
with a bunch of slides. And release the Alpha Lock. Now, draw the states
off the record of lice. Smash those yellow circles. Those are the layers we
have gone to still now. I'd lost and they are portrait illustration
comes to an end.
19. Conclusion: Congratulations, you have
made it till the end. Hope you guys enjoyed the class. Do let me know if you guys have any doubts regarding the class
in the discussion section, make sure to submit
your class projects. I'm very excited
to see your works. Follow my Instagram page so
you could sync on my updates.
 Jemsee, Webflow Designer & Digital Artist