Transcripts
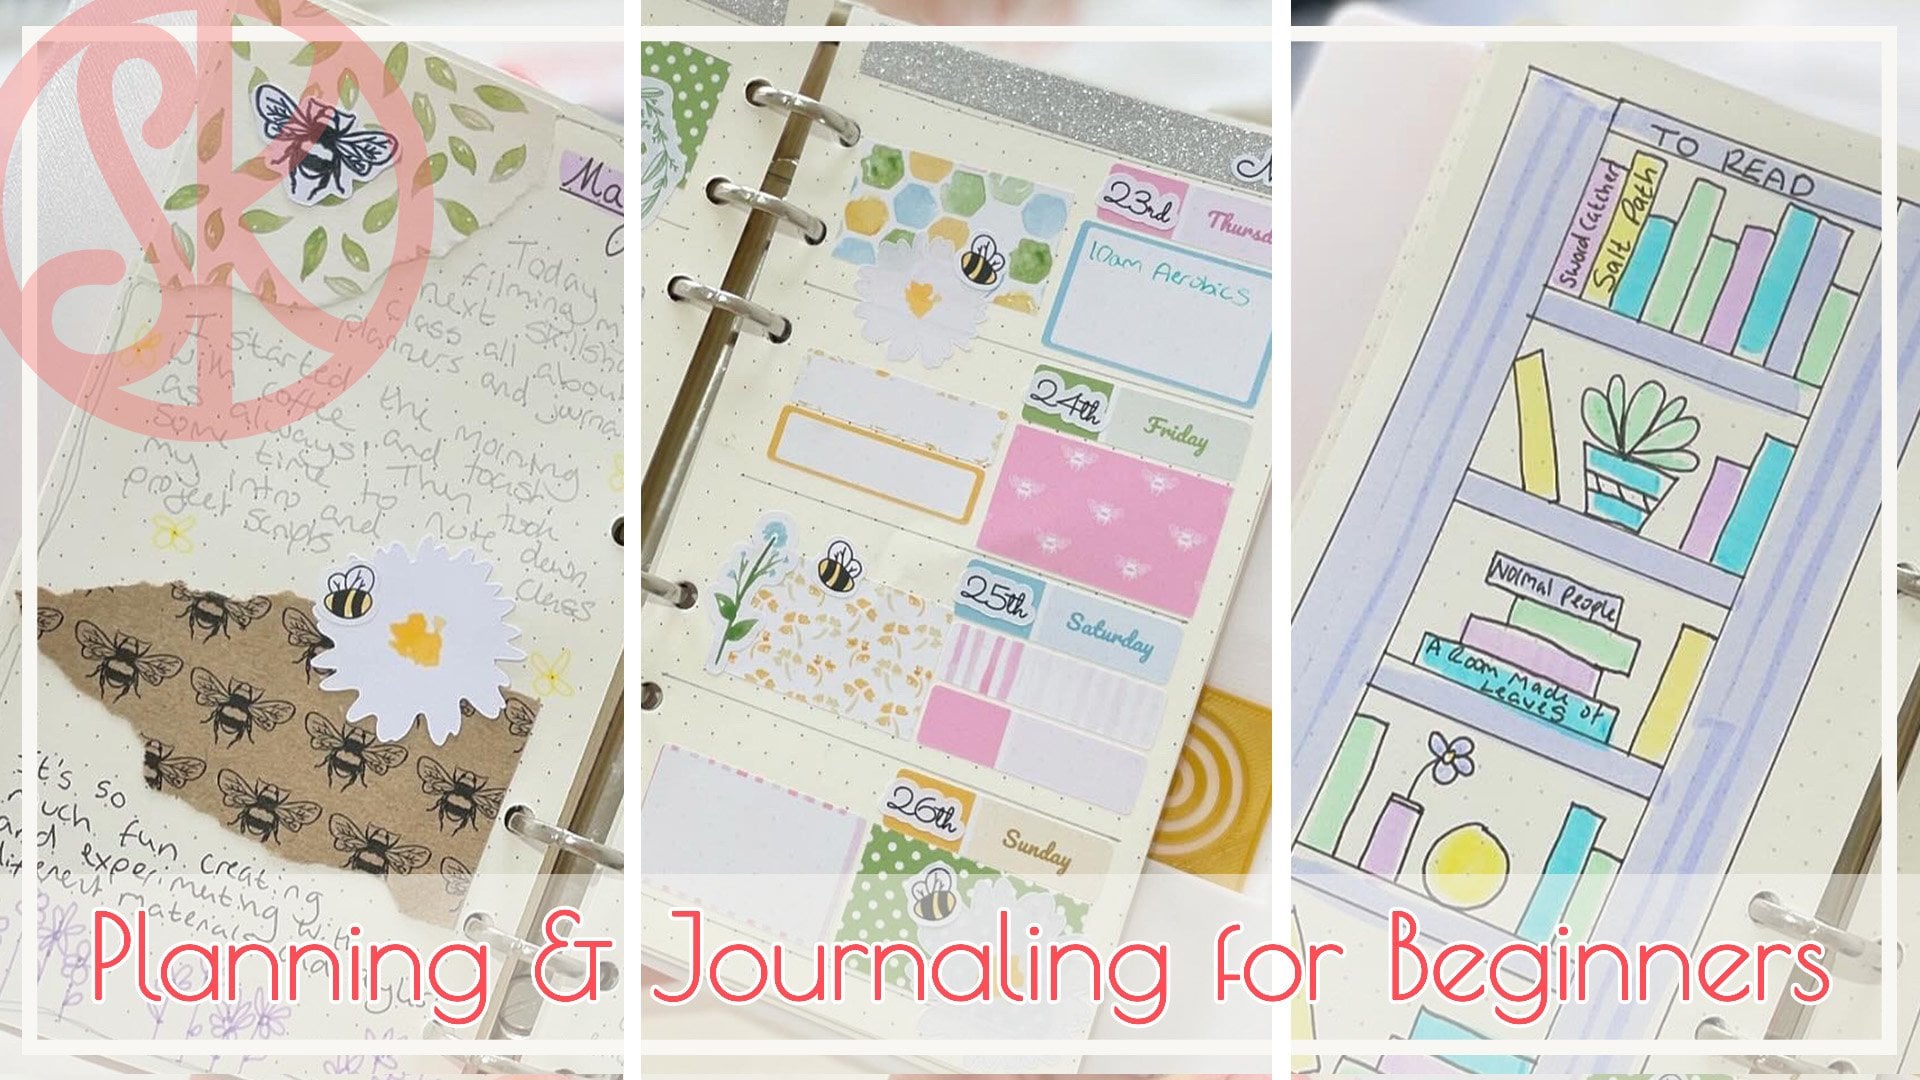
1. Introduction: Hi, I'm Sarah Douglas, business process manager and
creative business owner. I know firsthand how overwhelming
it can be when you're an artist entrepreneur or small business owner trying to juggle so many balls at once. It can sometimes feel like
you're chasing your tail, trying to keep on top of all the things you
want and need to do. In this class, I'm
going to help you move forward in a practical
way by showing you how to capture all those
things going on in your business and
shape them into a creative workflow
that works for you. We'll start by capturing all the different things you
work on in a brainstorm, and then we'll transfer them to a beautiful process map that
will give you confidence and clarity in the
way you manage your business and your
time as creatives. It's not often that
we step out of working in our business
and work on our business. But making time for an activity like the one I'll show
you in this class is crucial if we're to reflect
on the way we do things, identify what works
and what doesn't, and even identify some
new opportunities. By the end of this class,
you'll find yourself saving time in your
working practices and enjoying a greater confidence
around decision making for your creative business once it's all mapped out
in front of you. I've used my years
of experience as a business process manager and my qualification as a Lean
Six Sigma black belt to pack tons of helpful hints and tips into this class
to help you shape your business into something flowing enjoyable and beautiful. Instead of wrought with
tension and uncertainty. My small business sticker kitten has lots of different facets. I design and make craft
supplies and stickers, but also handmade earrings. I teach on skillshare
exhibit at craft fairs. And I'm also branching
out into art licensing. I have e mail newsletters and social media posts to
keep on top of too. If you're like me, there'll be so many things buzzing
around your head, it's hard to even know
what to focus on at any one time and you
end up procrastinating. So let's get clear on
our businesses together, you can decide how you want
to create your business map. Good old paper and pencil, posted notes, whiteboard
or on screen. This is about making
something that works for you. Are you ready to get
started? Let's dive in.
2. Class Overview: Hey there. I'm so
glad you decided to join me to level up
your creative business. The focus of this class
is on learning how to create and interpret
a process map, a visualization of the
workflow for your business. But there's so much more extra you'll learn
along the way. First, I'll give you an
overview of the class project and explain some key terms.
Then it's over to you. We're going to get
brainstorming to capture all the aspects of your creative business that you've
got going on. Next, I'll talk you through putting them into a process map. And finally, we'll talk about
how to interpret and use your new map of your business to help you reflect
and make decisions.
3. Project Overview: For your class project, I'd
love you to work along with me and create your own
brainstorm and process map. As I show you how, this is how you'll truly get the
most out of the class. You can do everything
with pencil and paper and post it notes, or you can draw on a whiteboard. But I recommend creating
your map on screen, either with software you already have and
are familiar with, or using a digital
whiteboard such as Miro, which is available online and specifically designed
for process mapping. It's free to sign up and
that's what I'll be using in the class afterwards. Upload a screenshot of your finished process map to the project gallery
here on Skill Share. As long as you feel
comfortable sharing, you're behind the scenes And I'm happy to give you any
personalized feedback you'd like on your
business map or any ways that you can
get the most out of it. Now before we get started, let's talk about
a few key terms.
4. Key Terms: Firstly, let's talk about
what I mean by a process. It might seem obvious
to you or it might not. A process is a series
of steps taken to reach a certain
result in your business. It could be the process
of making earrings, or packing and
shipping an order. The process of creating artwork. The process of setting up
and delivering a workshop. What we're going to be
doing in this class is noting down all of these little processes
and visualizing how they connect together to make up our business as a whole. What is a map? When I say a
process map for this class, I'm talking about a
simple flow chart with my background
and Lean Six Sigma. I know there are many different
types of map we could do, each with a different purpose and offering different insights. But this is an
introductory class, so we're keeping it simple
with a flow chart Now, without any further ado, let's jump into the
first activity. We're going to get started
with some brainstorming.
5. Brainstorming Introduction: Okay, grab a piece of paper and a pen or pencil and
maybe a cup of tea, and we're going to get
started with a brainstorm. This is a way to
capture all the things going on in your head to do
with your business right now. We don't need to worry about
any order or structure yet. We just want to get
things down on the page. I'm going to start by putting
a question to myself, what's on my plate right
now for stick a kitten? This is the bit you might
find most cathartic, just getting it all out of
your head and onto paper. Bear in mind that this
isn't a to do list. Don't make it too specific, but also don't make it too
vague that it's not useful.
6. Create Your Brainstorm: Grab your paper
and pen or pencil, and then just write down everything you can think of
to do with your business. That's in your mind right now that's occupying
your thoughts? The way that I phrase mine, I'm going to put what's
on my plate right now. A mind map like this will
just help you to start to untangle all the different
things that are in your mind, in your head, that are going on in your business
that you want to start to fit together in
your creative work flow. But first, let's just
get them onto paper. So we've got something
to start with. I'm going to start with my website and the products
that I have on it. The main things that I
sell are craft supplies. Then I also have an
store main things that I sell are stickers. This doesn't have to be neat, this doesn't have to look
beautiful for anyone. Although if you want
to, you can make it look nice with
different colored pens or some stickers or
however you want to do it. But for now, I'm just doing mine as simply as I
can to get my thoughts down the other thing I sell
and the website as well. But I tend to associate different products selling
on different platforms. Right now, this is just, whichever way your mind works, just get it all
down on paper and we can untangle it afterwards. Earrings, plan charms
and that's grouped into three D printed
items, make stencils to. When I think about
stickers as well, a lot of what we have is
what I call icon stickers, things like little
cats or little plants. But we also have
planar sticker kits. Other areas of my business, I'll have a separate one
for skill share classes. I also upload our designs
to print on demand sites. I have a few of those. Red Bubble Society, six public. There's a new one I've
come across but haven't tried yet called contract. We also have a website
integration for print. I also want to branch
out into art licensing. Even though that's something
I don't do right now. It's something that's occupying
my mind a lot of the time because I'm thinking ahead about things that I want to
do with our business. I am going to add
art licensing here. For that, I want to
finish my portfolio. I need to think about
pitching or agent. I do also have a patrion account which has paused at the moment, but it's still something
that occupies my mind. There are other aspects as well as want to focus on developing my
practical artwork skills. I'm going to put
artwork over here. Digital link to that. I'm going to write
collection club I subscribe to Patrion Collection Club
run by Christina Hookans, who is a top teacher
here on Skillshare. Each month we design some artwork around a
new theme each month. I just love it. I think it's such a fab way
to push myself to actually create artwork and to move past that barrier of fear or
thinking I can't do something. I'm going to put
that down because at the minute I am
spending time on that, I also want to work on my
physical artwork skills. At the moment, I'm
enjoying doing water color, if I can spell it. Other things that I
work on as a part of my business are e mails. There are different
things that I want to do with my e mail automations. Segmentation and just keeping up a regular e mail
practice to customers. I also do the news
letter promotions such as free shipping. I guess linked to that, I'll put it coming off the
same branch as social media. Although I have put a lot
of that on the back burner. It's not a top priority for
me right now to just keep up that social media posting in the way that
maybe I used to do. But I still want to capture it on here because it's
something I think about other things coming up. I've got a couple
of craft there, you can see at the minute, this doesn't look much
like a process. This just looks like me scribbling down different
things that I can think of that I work on at
the moment. That's okay. This is if you're
feeling in a muzzle, in a tangle to get these things out of your
mind and onto paper, it doesn't matter too much
how you link them up. The only thing that
I would say is, don't be too fake that
it's not helpful. Don't be too specific
that you've created yourself to do list If your
page is filled with tiny, tiny writing saying must
send this E mail to this person or must list this particular product
on the website, then that's probably
too granular. If you find that
that's happening, what you can do is just create a separate section or grab
another piece of paper and just write down
anything on your mind that you think Actually that's a bit more of a to do list item. It's a one and done rather than something that's a continual
part of your business. Once you feel like you've put down all of your
main categories, you can just have
a look over again, see if there's
anything else that you haven't thought of
for the website. I've remembered that we are working on a big
update right now. A refresh and a revamp. We'll put down redevelop
site linked to that. We are also creating a new logo that is a one
off type of activity. But for me, redeveloping
the website may be something that keeps
happening over time. It's a big enough thing
that I've put this down here also linked
to craft supplies. I want to just note down
considering wholesale, as that's something we have done in the past but
aren't doing right now. I'm going to read round and
just see if there's anything else in terms of my artwork. I do also want to work on my digital skills for
Illustrator, Photoshop. Procreate learning is really
important to me to help my business develop
skill share classes. I have some classes
on card making, and now I'm also branching
out into helping small businesses manage
their creative workflows. Let's split that out into cards, watercolor,
small business. That's the types of
classes. Anything else? I can always come back
to this if you want. You don't have to do
this all in one go. You can come back to this
over a series of days. As you think of things that crop up and
you think, oh yes, there's an area here that's
also part of the way I run my business or a different type of
product that you make. That didn't jump into your
mind right away that you can come back and write those
down as you think of them. But once you're happy with it, then this will be the basis for starting to make your
creative workflow map.
7. Review Your Brainstorm: Now that I finished
my brainstorming, I did go back and
add a few items. I left a little while
and thought about it. I added a few new categories, stationery, homeware,
and art prints. Because even though these are things that I don't
do right now, the things that I've
been thinking about, I have started some of
the processes for these. I've got some printer
for six to do, lists and calendars
and greetings cards. I've got some sample
towels printed, and I'm thinking about
designs for art prints. I've included those here because they're part of things
buzzing around in my head that I want to
try and capture when it comes to putting this together
to a creative workflow. Before we jump into the software to start
making our workflows, first I'm just
going to reflect on everything I've written
here and start to think a little bit about the order of things and
how they connect together. For me, the crux of everything I do probably starts with
artwork over here. First thing, artwork
Without artwork, I can't do any of the
other things for you. That might be something
like making earrings, if that's what your
small businesses, you might have those on your
website, on an Etsy store. You might sell wholesale. You might go to craft fairs. But before any of
those things happen, your starting point is
making your product, whether that is artwork
or a physical product, or even if it's a suite of
services that you offer. You could use this approach to think about how those
connect together as well. First of, artwork is going to be the place that my
workflow begins from. Then the next thing
to reflect on is what represents the
core of your business. Even though, for example, I do print on demand right now, that is not my core focus, that's not my core offering. If I were to include that as
the first step on my map, that would feel a little
bit out of sync with how my business really looks,
how it really works. I would picture for my
particular business. The next step would be
somewhere over here. My website and my Ets store. Stick is one of the core things that we do and craft supplies. I'm going to group these together and
this is going to be, let's put number two here for craft supplies and
stickers as well. I think of those
as one category. Then the things
that come off here, earrings and planer charms, they are not our core offering, but they are
something we're very actively working on right now. I might put those in
their own little bubbles. The third item of importance, as it were, again, this isn't a science. This is just something
to help you start to piece together an order for the way that you run
things in your business. For example, if you
sell things wholesale, you might not put that
near the start if that is something
that happens at the end of your chain
of working on things. For example, you might use your artwork to
create your products. You might upload it
to print on demand. And then it's not much further
down the line that you consider whether those products
might be sold wholesale. On the flip side, if you're
a business where you're creating something
primarily for wholesale, then you would perhaps put this further ahead
in the process. There are other things as
well that you might not feel fit into a
workflow right now. For example, I've got
skill share classes here, our website redevelopment here, that doesn't really fall into a chronological flow of things. That's okay too. I probably won't give them a
number for now. I could just leave them
on here as they are. Then when I come
to piece together my process map in
our software online, we can consider whether this becomes part of it
or whether that is a standalone thing that isn't dependent on
something else. For example, I could
create a new class about Christmas watercolor
cards that you can make. That wouldn't be dependent
on whether I'd done any artwork for my
stickers or products that it's a facet
of my business, but it is connected in the
workflow. And that's okay too. Not everything will be same with things like social media, e mails, promotion,
or maybe craft fairs. Not everything will fit nicely into that workflow bracket. But when we jump onto our software and start to
piece things together, you should find
that it starts to flow a little bit more easily as to what's separate and
it'll be easier to do what. We can see that on screen.
Let's move on to that next.
8. Mapping Overview: Before we start creating
our workflow maps, I'll talk through
some practical tips and some key
principles of mapping. Your finished map will
look something like this, everyone's will be different. You're going to create
your map in a way that works for you and
is appealing to you. If you're using paper, you may prefer to do your map in pencil so you can rub out
if you change your mind. Or even Betty, you
might like to use little sticky notes so you
can move things around. If you want to do this
as a one off exercise, a whiteboard or post notes
on a wall will work well. But if you want to keep your map and return to it and tweak it, I recommend creating
a digital version. Use any software
you're familiar with that allows you to
create shapes and text. Or use a digital
whiteboard such as Miro, which is free to
sign up to and use. And it's pretty intuitive. It has mapping tools
built in to make it really fast to
create and tweak maps. That's what I'll be using.
9. Create Your Map: As I mentioned in
the previous lesson, you can do your workflow map
in whichever way suits you. But if you're following
along with me, you'll see I've
opened up Miro here. Go to Miro.com and sign
up for a free account. And then when you've logged in, you'll see this view
here next to me. I've got my brainstorm. I can use that as the basis
for putting the map together. What I'll start with
first is a new board. I'm not going to focus too
much on how to use Mio. It's quite intuitive. It will also give you some tips and tutorials if
you're new to it. But I will give you
some hints as we go through to move around. Use your mouse or track pad, then scroll or a pinch
zoom to move in and out. What I'm going to start with is very importantly, I think, making the board look pretty, which will also
give you a chance to test out how to
use the shapes. I'm going to make some flowers to decorate my board
to begin with. Before we do any pieces of the map using the shape on here, I'm going to go to All Shapes. It pops up some options here, need to go trawling
through unless you particularly
want to have a look. But I'm going to grab
a few clouds that can represent our flowers that you can drag to change the size. What you can also do
is change the colors. Here I have added
our custom stick, a kit in color, my
business color. You can do that by
hitting the plus button and typing in the hex
code of the color you want that fills
in the inside. And then for the
border of the shape, I'm just going to make
it the same because I want mine to look flat. I'm going to add some circles to be the center of the flower. If you hold down shift, you can get it to make
an even size circle, then we can change
the color again. It's quite simple,
quite intuitive. And you can zoom in and out
to place things as you wish. The other helpful
thing is that you can highlight and control C, control V to copy and paste. As usual, I can make a
few flowers here, oops. If we want them
to move together, we can also, if we select, should be a way to group them. Can I do it here? I'll try
ang to group. That worked. Okay. Kanji will group your
images together so that the flower stays with the circle when
you're moving around. I think I've only done
one of them, haven't I? Let's group those. Kang and then I want to add
some stars as well. So go back to our
shapes on the side. I'll choose the star. Then I'll click and drag to draw the star. I'm happy with that color. You see that it remembers
the last design that I used. I'll do hold down shift
to make it even again. Do a couple of different sizes. Let's have some small stars. We'll have some big stars. Oops, I'll do it one to narrow. Sometimes it does things
you're not quite expecting. But this is just a
chance for you to have a play around and get
used to the software. If you've not used it before, copy and paste again to make
a few more tiny mini stars. I know many people would put this at the end of the process, this kind of decorating
and making it look nice. But it's important to me,
I'm starting with that. But there we go already. I'm feeling better
because I'm not staring at a blank
canvas anymore. We've got some we've got some lovely stars and
some lovely flowers. It's looking nice. You don't have to do stars
and flowers, of course. Whatever you like.
Whatever ideas you have, however you want this to look. Okay, there we go. Now we've
got some items on the board. It looks lovely. Let's
group these stars together. I'm going to click and drag
to highlight them again. And command G to group them. And then I can move
them around as a group. I can also command V
to copy and paste. You can rotate and
move them around. Have a play around as you want to get used to the controls and to make
your board look nice. Now let's move on to Mapping. As I mentioned
earlier in the class, we are going to put
together a flow chart. I'll decide on the boxes
that I want to use. I'm going to go
for rounded boxes because I like the look of them. You can go for square boxes. And I'm also going to
change the color of this. I'm going to have them as my sticker kitten
default business color. When you double
click on a shape, you can type in it. I've identified from
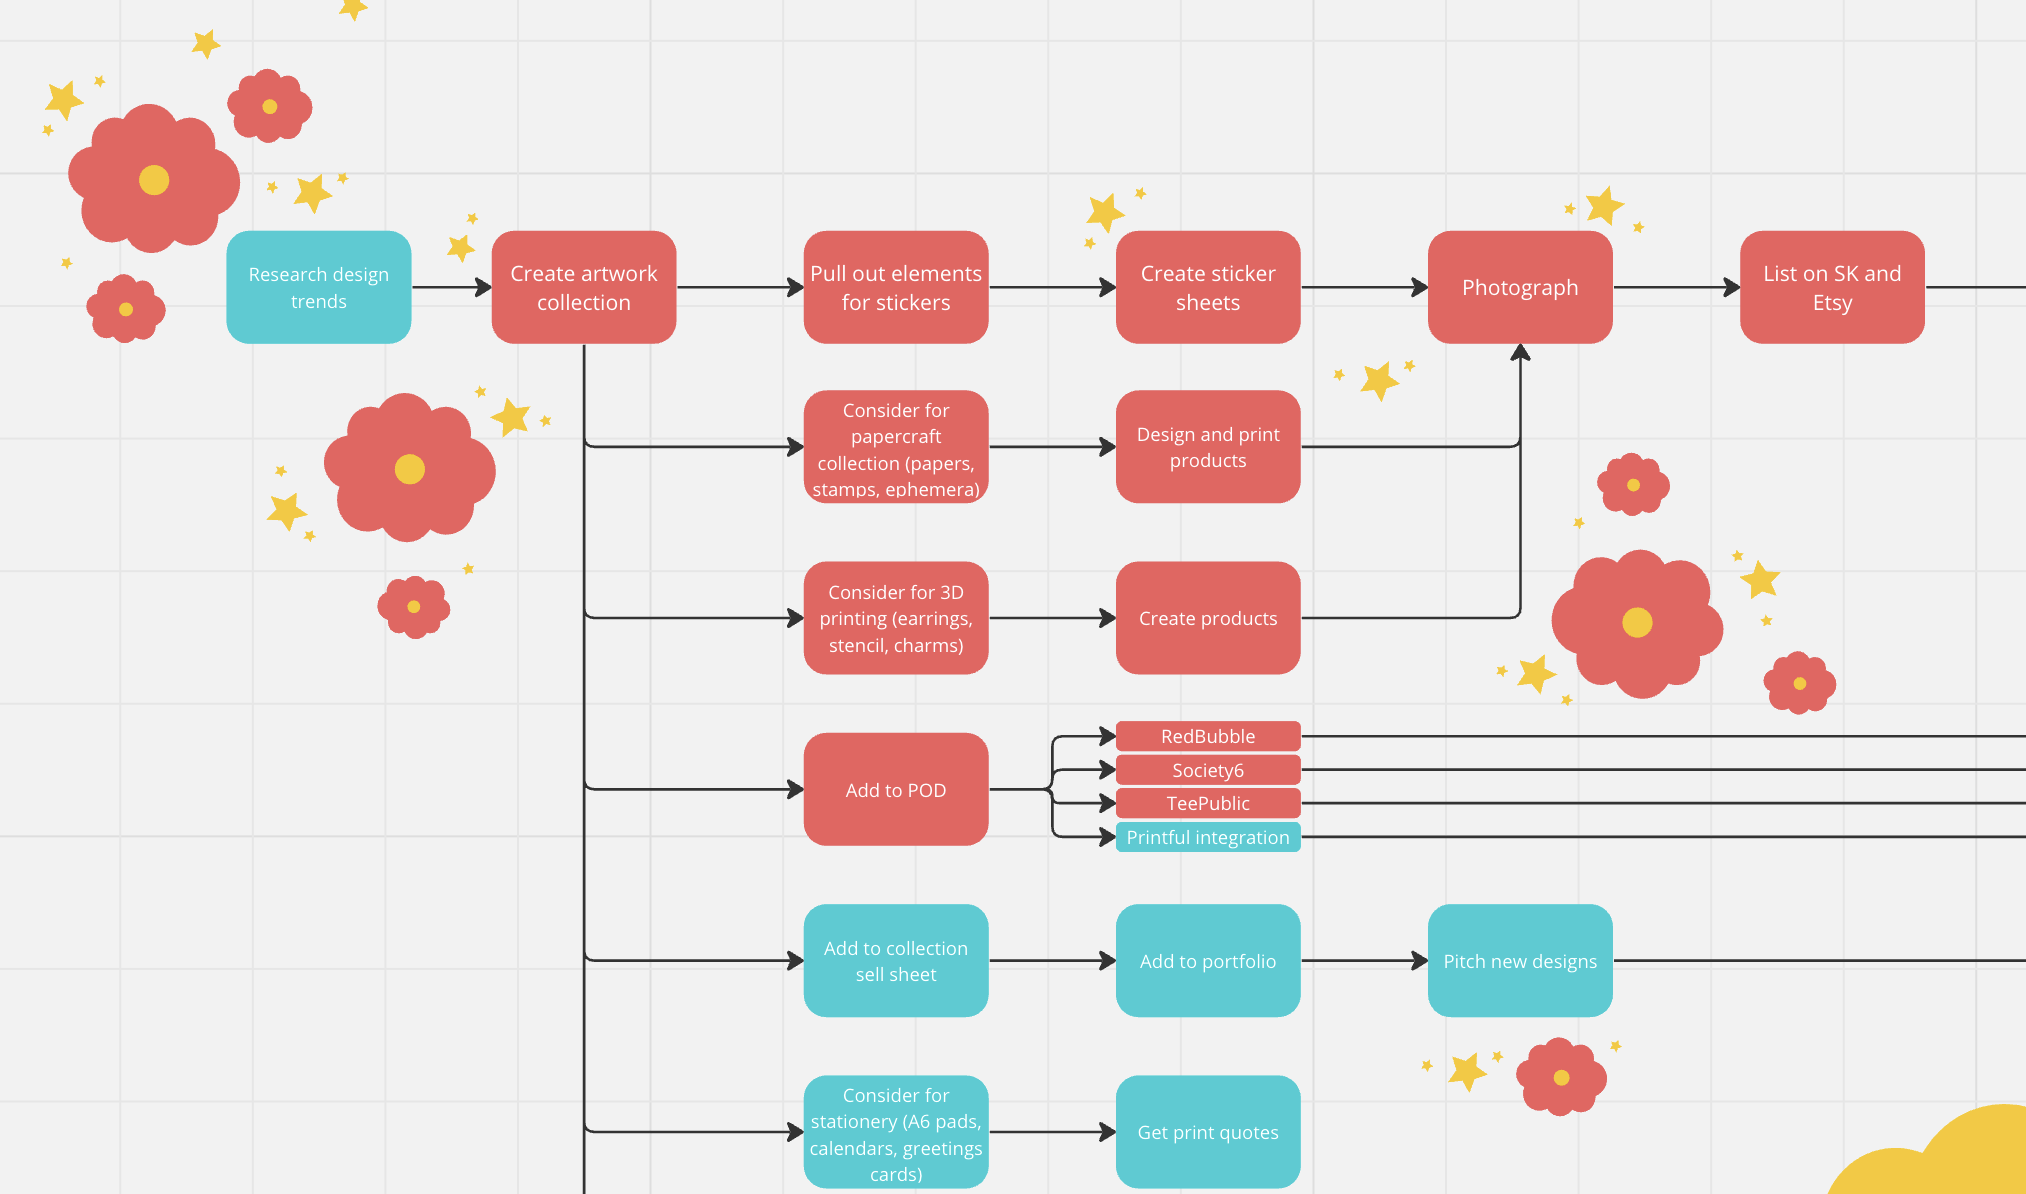
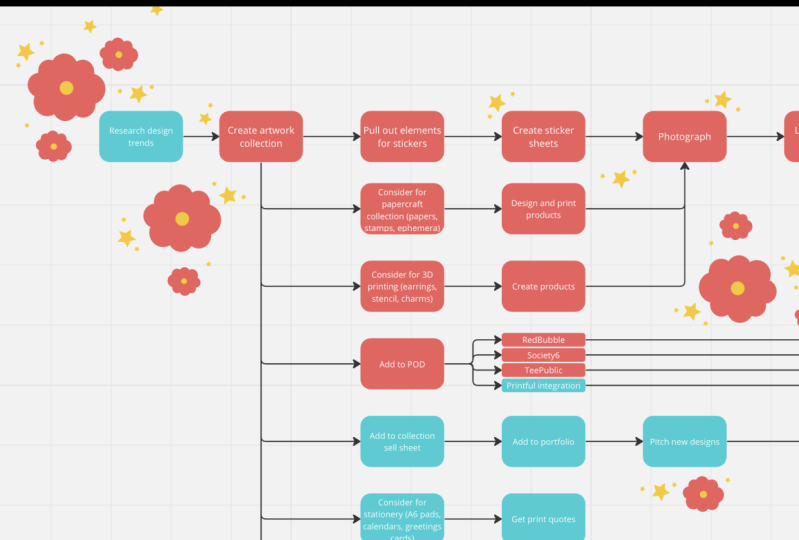
my brainstorming that the core starting point, the kickoff for everything
I do is creating artwork. That's what I'm
going to put here, create artwork collection. Because normally if
I design something, I don't just design
a couple of things. I'll do a range of different artworks
that all match together an artwork collection. I also want to change
the text to be white because I think that looks nicer against this color. Next step, as we did when we reviewed
our brainstorm before, we looked at the core things that we do for our
business and we decided a rough order to
start putting them in. I marked artwork first, and then next I noted down
stickers and craft supplies. And then after that,
earrings and planer charms. As I go through, I'm going
to keep referring back to my brainstorm here and pulling out what I think flows
naturally in the process. If there's anything
that doesn't fit yet, that's okay, I can
leave it to one side. Or if there's something
I'm not sure about, I can just put it in
and move it later. This way of working in
Io is quite flexible. If you need to go back and add something in
later, you can do it. Doesn't have a problem with
formatting or managing extra pieces put
in after the fact that you always have the
option to move things around, change connections, and redo anything that you're
not satisfied with. I've decided what I'm going
to do is all about stickers. Once I've made my artwork, you'll see that when I
hover over this dot here, it suggests that, that I might want to
drop in a next box. If I click, it will drop
in that box for me. It'll put in the
connecting arrow and it will put the box
there ready to type in my next step after creating
my artwork collection, Look through it and
decide which elements I want to pull out for stickers. Pull out elements for stickers. When I did my brainstorm, I simply wrote down stickers. But now that I'm describing
this as a process, I want to use active words, create, put, doing words, verbs. This is because the focus now
is rather than on things, or products or ideas, it's on what do we do, What are we actually
doing at each stage? Create artwork.
Pull out elements for stickers, following them. For that, I create
sticker sheets. Whoops, ever gets caught up. Create sticker sheets. Next in my process, there's a couple of things
you can think about here. The first is, how granular, how detailed do you
want to go here? What I could do is go off on a tangent about how exactly I create sticker sheets, about testing them, about printing them,
about cutting them. But because I'm not
treating this as a process, I'm treating it as kind of a higher level
capture than that. I'm not going to put that
complete breakdown in. So I'm going to skip over the whole printing cutting
testing phase in detail. I'm going to skip
straight to photograph. Photograph. Yeah, it's
being a little bit slow. Let me go photograph because
as you'll see when I move on this photograph stage won't just be what
I do for stickers, that's what I do for all
products I create photograph. As I mentioned before, you
can pinch zoom to move in and out if you find
you need more space. If we zoom out really far, you can see that you've got
absolutely plenty photograph. I would list those stickers on our website Sticker
Kitten and on our Etsy store list of Nk. I do want to put in
here about sharing on social media we'll in the next. Lesson about how to make good use of our maps when
we've completed them. I want to use mine as in some ways a checklist
reminder of all the things I want to consider or I
want to do whenever I make new artwork and
make new products. So I'm going to
include sharing on social media here as a prompt
to myself to do that part. When we get to that stage, fire e mail and social media, and then I'm also going to put Pin images because I have
a Pinterest board as well. Let's see out a little bit. The other thing I'm going to do is think about things that I don't do yet but
that I might want to do. I'm going to put those
in a different color, so if I add a new box here, I'm going to write down, notify wholesale customers in brackets, craft. Now, I don't sell my
stickers wholesale, but I do offer
other items I did. It's not something I
do right now because that's the part of my business that isn't active right now. I'm going to change
the color of this would be a nice color
should we go for this nice bright teal. That's just one line, one flow based on stickers
with this extra bit here. Depending on what you
have in your brainstorm, you might want to think about what else you can pull out that is directly springing
off this artwork. Starting point or whatever
your starting point is. Or you might want to think, oh, do we diversify into other
things further down here? There's no wrong way
to create your map. It's just whatever feels more flowing for you,
Whatever is more useful. Remember as I said,
you can easily change, create these differently
later on if you need to. Say, for example, I decided I needed
another step in here. There's a couple of different
ways you could do it. But I would just copy
and paste a box. Put in extra item. Then I can highlight
all of these, budge them along a little bit, drop this guy in here. And then we can drag
the arrow to change it, and then pop a new
arrow in here. You can see that took
me a matter of seconds to add in that extra item. Let's undo that for
now. Controls to do, we'll get rid of that extra box. The other things that I
noted down as some of my key business processes
that I work on, paper craft is the
other main elements. Stickers is one. And then any artwork
that I create, I think, do I want to make this into a stamp
set or a paper pack? Consider papercraft. What I'll do is start
a new row down here. Because to me, that
is a next step, a different step in the process. I wouldn't join it
on in the end here, because I don't
want one massive, great, big, long trailing thing. It's not something that
has to happen afterwards. Let's call this consider
for Papercraft Collection, papers stamps, ephemera
paper card toppers. If your text doesn't fit, you can change the
size of your box. But I like the look of
keeping all mine the same. I'm actually just changing the font size to make
them fit the box. Okay. Consider for paper craft, as I was saying, because this isn't something that's
dependent on these. I wouldn't put it over here. It's something that can happen straight after this first step, that's why it has
its own new line. Then what we can do is just
have a new arrow coming from this original start point
here and dropping down here. I'm going to look over
my brainstorm again and just start pulling out the other elements as
well and adding those in. Okay, so as you can see, I've just gone through and
added down the main items from my brainstorm that kick off following the artwork
creation fit. I might budge all these up a little bit so they
fit on my screen. The way I've done
these as before, I've used the blue to
mark items that I am. Looking into, or that I want to be part of my business workflow, but that aren't yet here. Adding my designs to a
collection cell sheets which were linked
to art licensing. So I'm going to add those
next steps in a moment. I've also got some
more down here. Consider for stationery. Consider for art prints
and nursery wall art. Consider for homewares. These are all areas
of the business that I don't do right now, but that I would like to
be part of my workflow. I wanted to include those
because as I did my brainstorm, I captured things that
I'm thinking about or I started looking into
or I started work on, but that aren't necessarily the core of what I do right now. From each of these,
I'm going to go through again and think about how they link up or what the following
steps are for each one. You can do this whichever
way suits you best. You might prefer to just
add one item at a time and then follow it
through its journey. Or you can do as I've done and pop down all of the
main ideas first. And then think about each one in more detail as you get to it. Items that I think about
papercraft collections for. The next step would be to design and print
those products. I'm not going to go into detail
and break that down here. If I wanted to have a
separate document where I captured all the
steps involved in designing and printing a paper, craft collection, I could
definitely do that. We can talk in the
next lesson about why that might be
useful, but for now, this is enough detail for what I need once those
products are made. You can see why I did this one. First, we link back up here because the process is the same following that I would
photograph the items, list them on my
website and net store, share that on social media, and then notify
wholesale customers. That's why I did this lane first and then
moved on to the others. Next, consider for
three D printing items, earring, stencils, charms. The following step for that would be to create
those products. Then you've guessed
it, that can link straight back up to
photographing them here. One of the nice
things about Mira, you can see that when
you drag that arrow, it meets it up for
you and joins it together so you
don't have millions of lines all over the place. Next, add to POD. Currently, I upload our designs to several different POD sites. I do actually want to break that down here because it just if I am going to then use my work flow as a
checklist later on, I want that visual aid to
help me go through and say, upload to this site. Upload to this site. Did
I consider this site? Let's pop all of those in
as their own little boxes. But I don't think I need a great big long
box for each one. What I'm going to do is make
a smaller one for each line. Let's align that, then. I'm going to copy that down. This one and another.
There we go. Then I do also have a website integration
with printful, but I don't use that
fully right now. It's more of a something
on the back burner. We'll mark that as
blue for something that's not cool then, because I like
everything to look neat. I'll shift these
up a little bit. You can play around with the formatting and
alignment as you wish, but I like mine to look nice
and neat and evenly spaced. You can use the arrow keys
on your keyboard to shift the little boxes a tiny bit at a time so that they fall
into the right place. It depends how important that
sort of thing is to you. I like it to look neat,
I spend the time on it. Then we can just drag the
arrows to join our boxes here. Or I can use the
arrow tool to grab a new arrow and connect
that over like this. Then for all of these, because they are uploading
to print on demand sites, they don't involve photography
or website listings. We would skip, possibly to straight over here to
sharing on social media. If I added a new design, any T shirt design, for example, to my
print on demand stores, then the next step from that would be to let
people know about that new design via e mail and my social
channels. There we go. You can see that
that links to this, but it's not relevant to this. If you're being strict about
your creative workflow map, you might not want
to have things linking that aren't
relevant here, but just do things
in whatever way feels natural and comfortable
and usable for you. I don't mind too much
that this is applicable only to these two lines. I think my map is going
to be simple enough that that won't confuse me or complicate
anything too much. But if you are unhappy with the way you've linked something up or it's not working for you, then of course you can
play around and change it. Let's have a thinker there. Any more? Next step, add
to collection cell sheet. Then the next thing
I would want to do is add to portfolio. So let's pop that in.
Take portfolio then. It would be a case of
pitching new designs. Then you might take a little bit of time here
to think abstractly. If you have captured items that aren't part of
your current workflow, I haven't finished
my portfolio yet. But it has started, I haven't pitched our designs
for art licensing yet. But if I were to, I think
I probably would want to share those designs
on social media too. I'm going to link it up here
to this social box as well. Down here. Consider
for stationery. The next step for that would
be for me get print quotes. Then the following steps would be to design product,
manufacture product. And then we'd link back
up to photography. But because this is still, um, in its infancy, things
I don't do yet, I'm actually not going
to add that detail yet. I don't want too much detail on the things that I'm not
actively doing right now. But of course, that's completely up to you If you're designing a work flow that is a lot more comprehensive than
what you have now, something that you want to try, and you're kind of testing out different ways that that
could work for your business, then you might want
to add a lot of detail on these items. Or you might have gone
the other way and decided that actually you don't want to include
anything that doesn't represent what you do right now. It's entirely up to you. So I'm going to
leave that as it is, even though it doesn't
finish off anywhere. I'm okay with that for now. And then for this one here, I'm just going to add
a note for myself. I'd love to have our designs as art prints or
nursery wall art. We have some cute dinos and unicorns and mermaids
and things like that, and I think they'll
be so lovely as like personalized
prints for a nursery. When I was thinking about those, I did think about two
different options. One of them actual art prints, physical prints, and
the other downloads. I'm going to capture those as two different possible workflow
ideas here in two boxes. One of them would
be a print product. Let's make that a
smaller box then. If I copy and paste, this box would be a
digital download. It's enough for me
for now to have captured these as
ideas without spelling out how exactly I
might print them or the mechanisms for download. And then this one
here considered for homeware, towels and mugs. There's a few different
ways I could go about that. I could set them up on print, on demand sites, I could
order them from a wholesaler. I could get myself a heat press. I could make them myself. But for now, I'm just
going to leave that as it is because I haven't explored that option any further yet. For me, this is
looking near finished. It's not hugely complex
and that's good. I don't want my business to feel too big and
complicated right now. There was something else that I thought of as a precursor step to the way I work right
now that is actually doing some research on
current trends and designs. Before I start creating artwork, I'm going to add that in
as a new preliminary step. Maybe if I just shift
over my flowers a bit. Me flowers, look, you can also
shift them all in one go. And we rotate them a bit like that. And
then they can go there. I'll add some more
flowers at the end. I'm going to copy this
blue box paste over here. Then my new kickoff step. I'm thinking, because
I don't do it yet, could be research design trends before I start creating artwork. So let's link that
with the arrow Ab. Okay, now take some time at this point to reflect on what you've got noted down so far. You might want to
tweak some things, move some things, or you might want to leave it
and come back another day. You might want to go back and review your brainstorm
again or even add to it. When I was kind of putting
together my practice ideas. I've done this once
before as a practice, so I could figure out exactly how I wanted my
work flow to look. You could do the
same if you wanted. You could do it on paper before
you did it on the board. Here though, I do
think this board is flexible enough that if you're not happy with
what you've done, you can change all around. Yeah. You can come
back and you can add things or you can
take things away. Yeah, just take some time to feel kind of comfortable
with what you've put together And anything
else I want to add? Yeah. The other
thing I would say is that if you've got items left on your brainstorm that you didn't add to this map yet, then just have a think about if you need to
capture them on here. One of the things
I noted down was our website, rebuild
and redesign. Which I wanted to capture because it was
something that was on my mind and I was thinking about and I knew needed to be done. But I've not put it into my workflow because it's
not something that I am going to be
doing often for me. If it was something that did need a regular update from me, then maybe I would capture that. But now I'm happy
to leave that off. Same with creating skill
share classes, for example. That doesn't fit into my
product workflow here, Even though that is a part of the way I run my
business right now, I haven't added it here. If I did want to capture it, what I might do is
to create maybe a little island down here with some extra items that
didn't fit in the workflow. I could do this
by using a shape. Should we go for this
nice cloud shape again? Maybe I'll make it this
nice gold, yellowy color. We can say, let's add a box, copy and paste a box. Create skillshare classes that can just live in
this bubble here. Whilst I think about
how to integrate that, or if I want to integrate it, or if I just want to leave it separate and have my own
little flower island here of things that aren't part
of that product workflow. Let's pop in the website. Rebuild here without
an R website rebuild. The other thing you
could do if you find it more appealing, is to create all
of your items as boxes beforehand and
rearrange them on the page. And then once you're happy with the way that
you've set them out, you can then add the arrows
to connect them together. It's entirely up to you. Then you can also spend some time adding some
more detail decoration, some more flowers and stars, or however you want to do it. However you want to lay this out to make it look
most attractive to you. That's it for creating our maps. In the next lesson, join me as we talk
about how to get the most out of our
maps. See you there.
10. Reflect on Your Creative Workflow Map: Now that you've
finished your map, let's talk a bit about how
we can use it as a tool for reflection and to help
with your creative business. You can see that I've adjusted
the flowers on stars on mine a little bit to make
it look a bit nicer. And I'll probably continue
tweaking them as well. Once your process flow
chart is complete, some things to think about. A firstly, how do you
feel about what you've created about the process of brainstorming and
creating this map? Did it feel good for you? Do you more organized? Do you feel more clear on your business or
was it difficult? Do you feel more confused? Do you feel that
you have a lot of disparate parts that
don't match up? This is just something
you can use to reflect and decide what you want to
do about that, if anything. Next, how do you feel about
each part of your workflow? So now that you've put all
these elements in together, as you go through and
look at each box, how do you feel
about each thing? How do you feel about
your start point, the core of your business? How do you feel about each
step that comes after? How do I feel about
creating sticker sheets? Really good. How do I feel
about photography, enlisting? I feel really good
about all these things. How do I feel about
these other elements, the things that I don't
yet do in my business? How do I feel about that? Creating stationery, creating art prints,
creating homeware. At the minute, I feel a
little bit overwhelmed. This looks like a lot. And I think that for me, that's a sign that maybe I can't suddenly rush into all
these extra elements. What I can see now
I've done this, is that it's a bit clearer to me what the core of my
business is right now. And that these items, even though they would be great fun to do and to
get stuck into that. If I feel overwhelmed
by them right now, I might not have capacity
for that at the moment. So it can be useful in that way. It doesn't just
have to be a kind of a data or a sort of strict process
view of what you do. It can be a way
to reflect on how you feel about what
you do as well. Other things to think about. Is there anything that you
want to start or stop doing, anything that you've marked down that you don't yet
do in your business? Do you feel particularly
excited by that? Do you wish that you
did that instead of something that
you currently do? Is there anything that you're
looking at that you think, Wow, I really don't
enjoy this bit. I don't get much from this bit. This feels like a bit that I want to take
out of my workflow. It, it doesn't bring me any joy. So that's something
to consider as well. One of the ways that
you can use your map, as I'm going to do for
mine, is as a checklist. So whenever I create
artwork now what I will do is open up my map and just run through
each of these things. Are there any elements I want
to pull out for stickers? Do I want to use any of this for a paper craft collection? Are there any three
D printed products that I could make
from this artwork? Do I want to upload
the designs to POD sites and then
in the future, do I want to consider them for these other avenues as well. And then for those that
I do take forward, I can follow the steps as
I've laid them out here. So creating the stickers
in the products, photography listings,
sharing on socials, which may seem simple I suppose when I lay
it out like this, but that's what I'm hoping for. What I actually
find is that I have a lot of projects on
at the same time. And that I might be photographing
something over here, but starting some new
artwork over here. But I'm considering
something that I created months and months
ago for stationery. So if you feel a little bit
like you're jumping around, then this might help you to feel that you have a workload that you're in control of by starting with one thing
and following it through. For example, if you
keep creating artwork, but always get stuck at a certain stage
without moving on, and maybe you can dig into
the reasons for that, that's something helpful
to consider as well. Where are your blockages
in the process? So do you get, for example, the photography
stage and you have 20 different projects
waiting here that you haven't got round
to photographing yet. And if you notice, there are points
in your flow chart where work tends to build
up a bottleneck of work. You can then start to
investigate further. You can think about why is that? Why do I get stuck
at that stage? Is there something preventing me from doing that
part of the process? Is there something that was
getting in my way or is it that I just don't like
that part of the process. Once you've identified
those things, you can start to work
through them and to improve that to help you move
forward with your workflow. The other things that you
consider that you can consider to take your
map to the next level, perhaps adding some timings. Say for example
here I might want to start looking at how long it takes me to do each stage. Let's add a new shape. We'll make this, we have
an orange star this time. I might want to say
creating artwork takes me, let's say, five days, depending on what it is
and how complex it is. If I'm spending
five working days and that we can put that there, pull out elements for stickers, How long might that take me? Well, all in, maybe
not very long, maybe half a day. Half day to decide what I
want to make into stickers. You could probably do these, in what's the word I
want, consistent timing. So if I'm starting with
days, I keep with days. Or if I'm starting with
minutes, I keep with minutes. If I'm starting with
hours, I keep with hours. Whatever works for you,
however you want to do it. And then creating
sticker sheets. How long might that take me? Well, if I've got
quite a few to do, maybe I would give
myself two days for that and so on and so on. If you find that useful, you can start to do that
for your workflows, just your core workflow, all the other things as well. You might want to
do it for aspects of your business that
you don't yet do, to see how long that
would take you in reality to see if that is
something you could actually build into
your workflow. Or whether it's far
more commitment in terms of time than
you'd anticipated. Once you've done
that, that again, gives you something else
to reflect back on. What takes the longest in your business. Is
that proportional? For example, if I'm finding that listings are taking me days and days and days instead
of a matter of hours, I might want to think about why that process is being
dragged out to dig into whether the time I'm
spending on listings is very long or whether it's
just that I'm leaving a long gap in between
doing each listing. And is that how I want to work? Is there something I
could change there? These are all different
ways that you can reflect on your business. One other thing you could add as another tool for
reflection is revenue. You could say, for example, okay, I've created
my sticker sheets. How much revenue does
sticker sheets bring in? And you could decide on
the time period for that, whether that's over a month
or a year or a quarter. You could then go and look
at your other avenues. So creating earrings. How much revenue
does that bring in? And then maybe I would
add another shape here, or a star, something with
that information attached. I could also come down
here and do a projection. If I were to move into
doing stationary items for six to do pads or
cons or greeting cards, how much revenue
would I expect to bring in from those
particular items? If I got X many made, took out the
manufacturing costs, what is my revenue that's left, and then attach it to here. So remember this. Would this map be in terms of each
artwork cycle, each time I created an
artwork collection, what would I expect to be the revenue for any stationery I decide from that collection. Obviously, that would
take you some time. You would have to do your
numbers, work that out. Probably have your spreadsheet
set up if you don't already to capture that
kind of information. But you may want to attach those kind of
headline figures to your workflow map to help you spotlight things that are key for you in
terms of revenue. Or maybe spot those things
which are disproportionate in terms of time spent versus revenue it brings in for you. That's one other way
that you can take this map forward to a next step. What else might we want to consider probably revisiting it. I think for me, because I want to use
this map as a checklist, I'll come back to
it fairly often. But I would say if you've done this as a one off activity, come back at least every
three months to revisit your map and just do
the same reflection that I've talked
about in this lesson. So is there anything
that feels good for you? Still feels good, doesn't
feel good anymore. Anything that suddenly
takes a lot more time. Anything that's a
new avenue that you want to add in or
you want to explore, all those kind of
questions you can go through again
every three months just to help you take that time to step out
of your business and look on it as a whole and reflect on where you
are with things. Now, I hope this has given you
an idea of how you can use a creative workflow map like this to organize and
reflect on your business.
11. Final Thoughts: Congratulations, You have
reached the end of the class. Hopefully you are now
feeling a little calmer, more organized,
and more inspired about the workflow for
your creative business. Head on over to the
project gallery and upload a screenshot of
your finished process map. If you're happy to share
your business processes and I can give you some tailored feedback if that's
something you'd like. You can also use the discussion tab below to ask
any questions about mapping or figuring out your process or anything else
you're feeling stuck on. Finally, I'd love it
if you could leave a review of this class
in the review tab below. It will really help me to know what you liked
about this class, what you find useful, and what you would
like to see more of or differently next time. So I can keep making
content that helps small business owners and
creators like yourself. If you haven't already, please also hit the follow
button next to my name to follow
me as a teacher and be notified when I
post new classes. You can also find
out more about me and my small business
over on my website, which is
Stickerkitten.com dot K. And you'll find me on
Instagram and Facebook too. I also encourage
you to sign up to my e mail newsletter
to hear about all things Sticker Kitten,
and about new skill. Share classes from me too. Thank you for joining me
in this class and I hope to see you again in
another class soon. Bye.
 Sarah Douglas, Papercraft designer & illustrator