Transcripts
1. Introduction: Hi, I'm Sarah Douglas, card maker, crafter and
small business owner. And in this class, where kick-starting
your creativity with a seven-day watercolor
card making challenge. In this class, we'll create seven beautiful handmade
cards together, one each day for
a week and under 15 min a day will be using simple watercolor techniques and straightforward designs to
create our greeting cards. By limiting our time spent, we're taking off the pressure. No need to worry about
getting something to look perfect or just dive again, I'm making that space for
creativity in our day. You can use this
class as 15 min a day warm-up for whatever
creative activity you have planned that day. Or you can do all the cards in one lung session
or one each day. It's entirely up to you, whatever suits you best. This class is about
having fun and experimenting with whatever
materials you have. You don't need to have
the same supplies as me. You don't need to make
exactly the same cars. It's all about having
fun and being creative. This class is suitable
for beginners and watercolor and card making. So you'll definitely
benefit from a few basic card baking supplies such as stamps and
can embellishments. I for making cars for
over ten years now. And I love combining
craft supplies and watercolors to create
unique handmade cards. I run a small business
called sticky kitten, designing and making craft
supplies such as patents, paper stamps, stickers
and embellishments. And my handmade cards have appeared in magazines and on TV. I can't wait for you to join
me in this class to create seven of your own unique and
beautiful handmade cards.
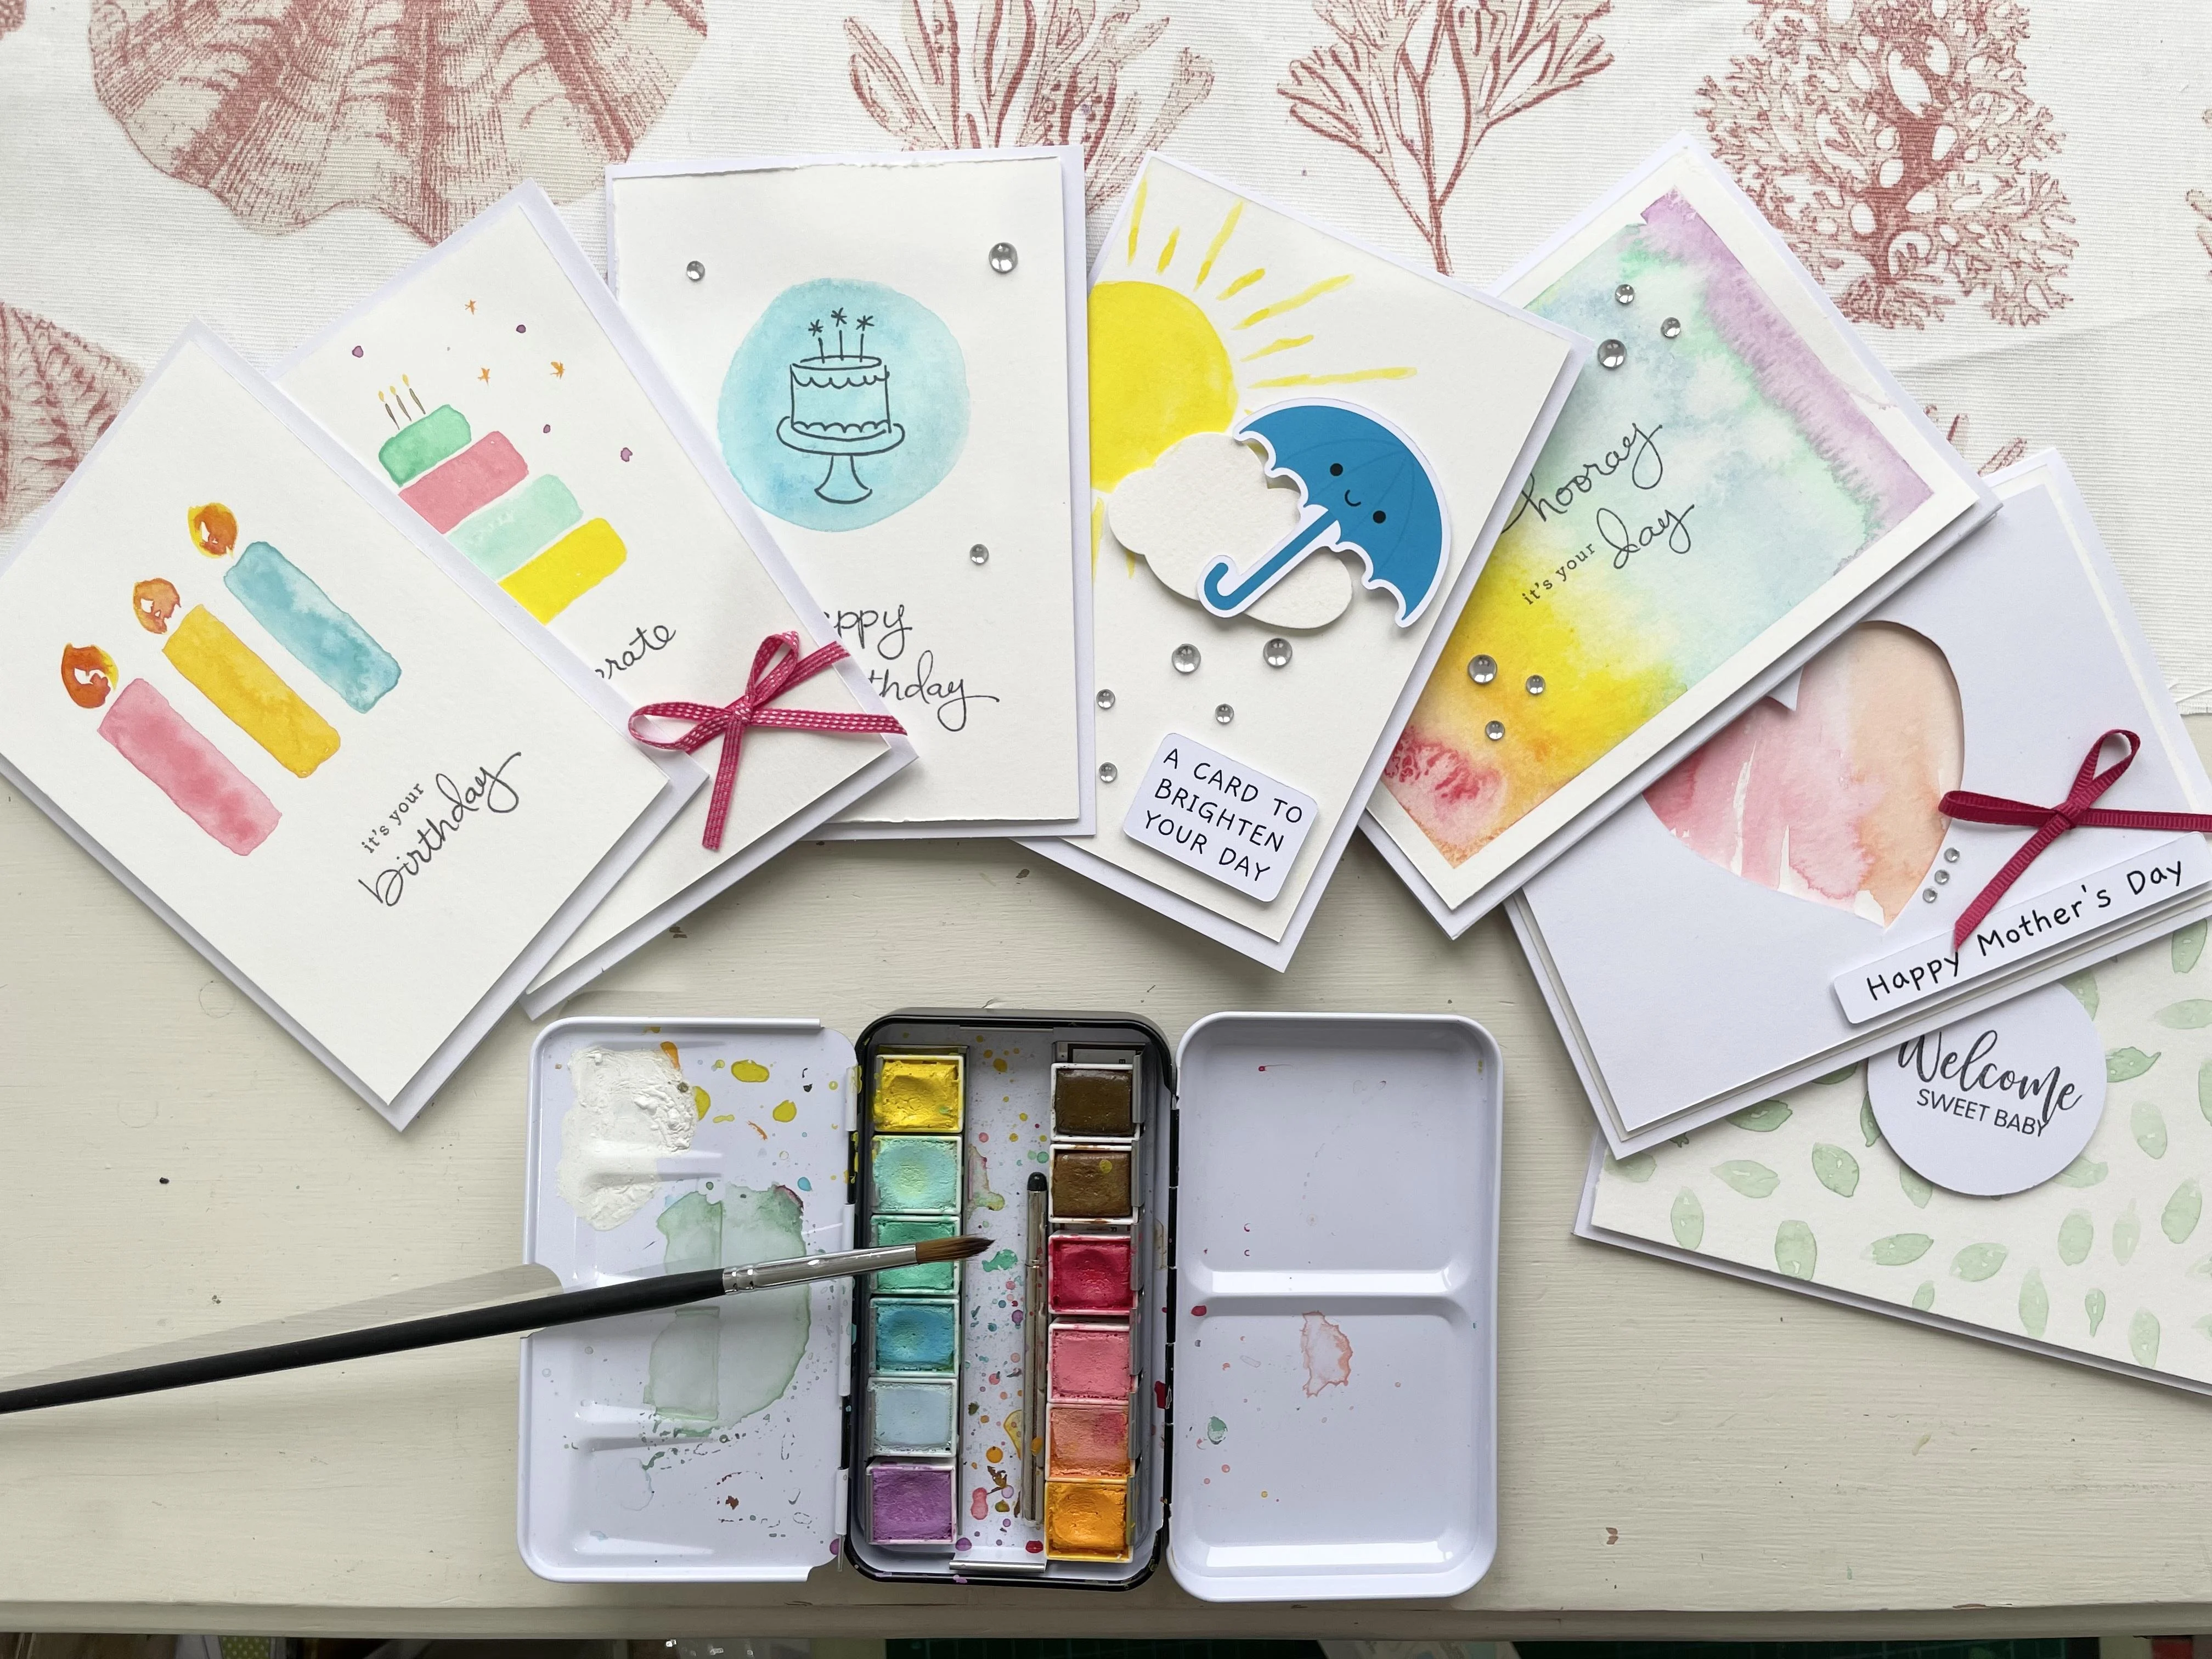
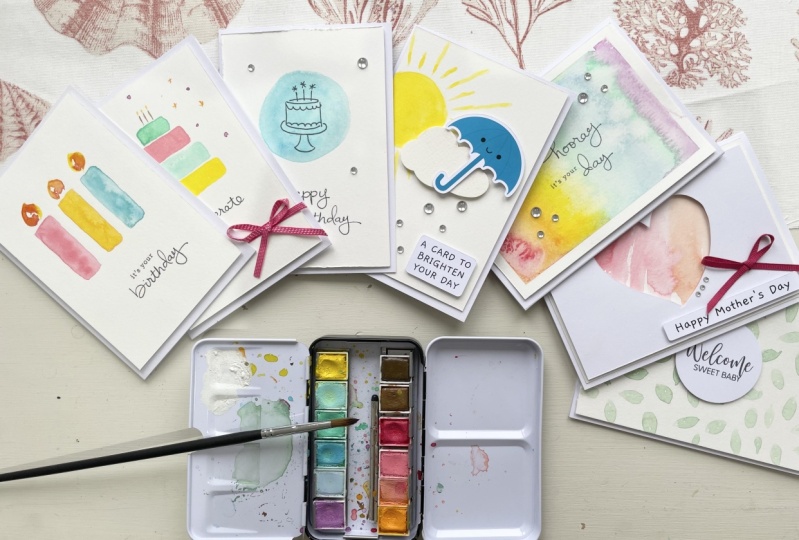
2. Project Overview and Supplies : For our class project, we'll be spending
seven days creating one card each day
and under 15 min. By the end of the class, not only will you have seven
beautiful handmade card ready to give to your
family or friends. But you'll hopefully have
loosened up and warmed up with your watercolor
practice and your card making. And you'll feel a
bit more at ease. Making time for
creativity in your day. Supplies I'm using for
this class and clear this pastel dreams watercolor
palette from Prima. I love these colors because
they're really bright and vibrant and you don't
need to mix them. And they come out very brightly with quite a fun
application of color. I'm also using a size
four round brush. This style around me. I could find smooth
watercolor paper, which is a hot pressed paper. And I'm cutting that into small sections to fit
each of my cards. You don't have to use exactly
the same supplies as me, please do just use
whatever you have. I would recommend
hot press paper because we are going
to be stamping on it. And if you have cold
pressed paper that might be a little bit too grainy,
but you can try it out. What works best for you. You also don't need this exact
brand of watercolor paper, but I do recommend having a
good quality watercolor paper because that will
make a difference to the overall quality of
your finished cards. In terms of card
making supplies, you'll need some A6
white card blanks, and these often come
in big packs like this with envelopes
already included. You'll need a good water
resistant black ink like this Momento
tuxedo black ink. They'll need some
sentiment stamps. Say something like this. I say happy birthday or thank you or whatever sentiments you
want to use on your cards. You will need a
clear stamping block and acrylic block to
use with place stamps. And you'll also want
some embellishments, some silver gems like this, some colorful ribbon in
terms of adhesives and using foam tape on
nearly all of the cards, tacky glue and also some
foam pads like this. Some extras I'm using that you may not have include punches. So I have a Cloud punch. I have a two-inch circle punch, but don't worry if you don't
have anything like that, I'll give you an alternative and looking to use those
for the cards. And I also have a
printed ephemera packed with some weather themed pieces that I'm using for
one of the cards. If you don't want to make cars, you can do this practice in
your sketch book, of course. And you can paint or use calligraphy where I've
used stamped elements. It's entirely up to you. Let's dive in.
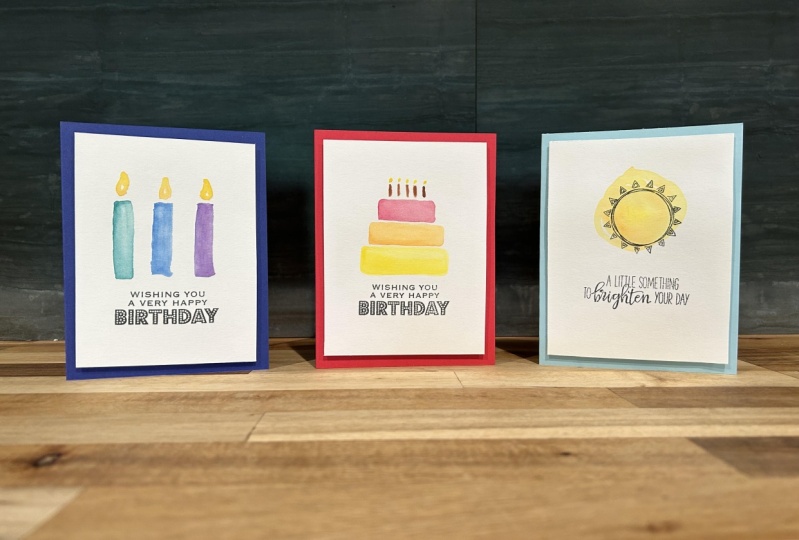
3. Day 1: Watercolour Birthday Candles: Hello and welcome to day
one of the challenge. We're going to start with
a really simple cards. So I've just made a rough mock-up pair of
what I wanna do my car, just three simple candles that I'm going to stamp the
sentiment underneath. So what I've done to start with, as I've just taken
some watercolor paper. So this is what I'm using, the aquifer and smooth hot
press watercolor paper, and I'll just cut
it into quarters. And I'm just going to check the size that it
gets my card blank. Before I start, I'm
using an A6 card blank. And when I put the
finished piece on top, I want it to leave a
small border so I know that I need to trim this
piece down a little bit. I'll just do it by eye.
I'm not going to measure it and to trim it down. I'm just using a ruler and
a craft mat and a knife, but you can just use scissors. Okay, so that looks
like a good fit. I'm happy with that border. So this is the right
size to start painting. I'm using the premium
marketing pastel dreams. What's color palettes? I love this pellet because it has
all pastel shades in it. And you really don't need to
mix the colors very much. You can just pay and they
come out ready vibrantly. So let's start with
the middle candle. I'm not too worried about
these being perfect or knee. In any way. Autistic masking is just kind of a fun way to create the card. And the reason that
I'm doing this on watercolor card rather
than straight on a card. Blank is firstly because we do really need
watercolor paper. And secondly,
because if it comes out in a way that I'm
not really happy with, I can just redo it and I
haven't wasted a card like we have a Blake handouts
bit fab enough mud will have a pink one, maybe a light pink actually. So of course, with their son, with all of the cards that
we'll do in this challenge, you can choose whatever
colors you like best or that you think your recipient of the
card will like best. I just really loved
these pastel colors. So I'm going to use
this palette for all of my cards in this challenge, but you can mix it up and two completely different
color mixes for each card. Or you can keep them all
along a similar theme, just whatever suits you best. Okay, here we go. Let's just neaten up that
blue one a little bit. Then we'll let some
flames on top and yellow. I'm going to add a dark, dark pink in the middle. Mentioned we'll just mix. Make it look a little
bit more flame like. Okay. Now we can just leave that to dry before we start
the sentiment. But in the interests
of just saving time, I'm gonna go ahead
and do it now. You can use whatever
sentiments need. So if you need birthday cards
for birthday sentiments, so if you need a kind of celebration card or
happy anniversary, or as we go through, just choose whatever
sentiment you need for the occasions
that you have coming up. Okay, so I have a
clear stamping block which is a little bit grubbing. I was using it to try out some watercolor
techniques last night. And I'm gonna go for, it's your birthday, will do. It's your first. Let's move this out of the way. And the income using is this Momento tuxedo
black dye ink. It's a water resistant ink which we don't really
need right now, but we will for some of the lighter cars
because we'll be starting on top of watercolor. Not while it's wet,
but never know. So to clean these stamps off, you can use a baby wipe or soap and water or
like a stamp shammy, which I have, but I
don't know where it is. So I'm just going
to start this off on a bit of scrap
paper to clean it. And now I will stamp
birthday underneath. Cool. Once this is dry, I'm going to mount
it to my card blank. And I can stick
it down flat with some tacky glue or I can raise it up a little
bit using some foam type. So this is the foam
tape that I use. So just three pieces
along the back. Stick it to the card blog on your card for the day is done. Thank you for joining me for today's cars and I'll see you
tomorrow for our next one.
4. Day 2: Watercolour Birthday Cake: Hi everyone. Thank
you for joining me on day two of our car
making challenge. So today I want to
make a cake card. We're going to paint
the layers of the cake with watercolors,
something like this. Except I've written on my
little draft here that I would maybe want to do them
a bit closer together. And then we're going to stamp the sentiment underneath again, same as we did yesterday. I've just trimmed down my watercolor paper to
fit the A6 card blank. And we are going to paint on here and then stamp underneath, similar to yesterday's card. So let's get started. Again. You can just use
whatever colors you like. So I'm just going to pull some nice looking colors
from my pastel palette here. On the button. Yeah, we want do we
want I think '40s? Yeah, Let's go for four days. It's gonna be a lavish cake
on your birthday, doesn't it? So maybe if we stop
about halfway down, you'll notice that I haven't
sketched anything out. I'm just starting
where I think and painting and that's just
because well, firstly, copy. Not really want to spend a long time sketching and
getting things perfect. I'd rather just
dive in and start and then redo it a couple
of times if I have to, if it doesn't look
right, you know, I think you kind of do these creativity
exercises enough times your confidence
grows a little bit. And that's the aim of
this class really, so that by the end of it, you'll be feeling a bit more ready to dive into
something creative each day. So you can kind of use this as a warm up each day to
whatever you're doing. You can carry on
beyond this as well. You don't just have to stop at seven if you have other
ideas, you can carry on. And of course you
can adapt this for different times of year as well. So we've done a birthday card yesterday in a
birthday once a day. It's near Christmas, then maybe you can
change it up a bit. And this could be
like a red and green Christmas cake or
something like that. And of course, you could
do Christmas candles that we did yesterday. This is a poly. So these are just
ideas to get you kick-started really on
doing something each day. And the reason that I
liked this is because it's a combination of two
of the things that I love. So I love doing kind of quick, pretty watercolors, and
I love making cards. And this is kinda
the best of both. What color should
we have them talk? A green. What flavor that
would be meant to maybe strawberry
underneath the blue, the blue brain,
my son would say. Okay, well that's
a little candles. We'll just use brown. I'm going to do them quite finely. And then just a little bit of yellow on top for the
flames of the candles. Go. Now you can leave
this to dry now, or you can do your stamping
and then leave it to dry. I'm just going to go ahead
and do the stamping. I'm using the same
set and I'm gonna use the sentiment celebrate just to stamp underneath
the cake here. Let's close this and we'll
get out the ink pad. If you're not a
competent stamper, you might want to
stamp on a small piece of separate card first
and then stick it on. But I'm just going
to take the risk and stamp straight onto. Here. We go. Cool. So that card is done. We just need to mount it onto the card blank when it's dry. And if that's a little bit too plain for you and you have
a little bit more time. If you've got more than
5 min in your day, you can add some little
extra embellishments, may be some gems or maybe you could paint some extra
details on the cake, or you could draw
some confetti in the air or whatever
you wanna do. Think I will add a little
bit more detail to mine. So I'm gonna just add some
confetti around the cake. What color should we do? What do orange, just
tiny little stars. Some purple bits to go for that. I'm doing them in threes
because things tend to look quite good and not something above here to thank you for joining me
for today's challenge, and I'll see you tomorrow
for our next time. My God.
5. Day 3: Stamped Circle Card: Hello and welcome to day three of our card
making challenge. So today we're going
to do a really, really simple quick card. And we're just gonna
do a circle of watercolor paint and then some stamping on
top and underneath. So just as with the other cards, I've trimmed this down
to fit the card blank. And I'm going to go for just
this nice pastel blue color. I think quite a pale color. And all I'm gonna do
is the big circle, the center towards the top. And then when that's dry, I'm just going to
stamp straight on it. It looks a little pale, so maybe I'll mix in
some of this dark. We want bigger size. Just dropping a
bit more pigment. I'm worried about it
being perfectly round. I will just drop in a
bit more pigment there. Okay, So leave that to dry and then we'll do
our stamping on top. So I'm using the same stamp
set as the previous two days. And I'm just going to
use this cake image. Of course you just use whatever image that you
want from your stamp sets. Or if you don't want to stamp. And like kind of doodling
or illustration, you could always sketch a little picture and
fine line there. Instead. I'll just hold it on for a few seconds to
allow time for the ink to transfer. There we go. That looks good.
It's pretty central. And I'm going to stamp a
sentiment underneath as well. I'm going to stamp
Happy Birthday, so let's do happy first. You can put them both on the stamp block,
can stamp together. But I just find that
to align them nicely. It's sometimes better
to stamps separately. If you are into calligraphy, instead of stamping a
sentiment you like, you might like to handwrite one. So you can just make this
challenge completely around adapt which aspects
we like to use. So I can see that my paper
is a bit rough on one edge. So instead of trimming that down before I put
it on the card, what I'm actually
going to do is make the other edges refer to match. And you can do that with
scissors or a craft knife. So I'll just use
this craft knife and I'll run it along the edge. And it gives a nice rustic
textured paper book. Again. Then we just need to mount that to our
card blank with foam tape. You can use scissors
to cut your foam tape, but I find it tends to
make them quite sticky. So I just tear it. Difficult though it is it doesn't have to look
neat on the back. Here we go. I can see that I've smushed my ink a little bit
here too, which isn't great. So I'll have to think about some embellishments
that I might be able to add to cover that up. Maybe some strategically
placed gems. Thanks for joining
in today's challenge and I'll see you again tomorrow.
6. Day 4: Weather Card: Hello everybody and welcome
to day four of our challenge. In my pile of ideas here. Challenge for today
is going to be to create a card based
on a weather theme. So what I want to do is just
watercolor as simple sun and then put a cloud on
top and then we're going to have some text
and some rain drops. So let's make a
start on our card. Same as we've done the
other day is A6 card again. Just turn that down. Just do it by eye so I'm
not measuring anything. But then what I will do is check it fits I want yes, that's fine. So what I'm going to do first
is to create the Cloud. So I actually have a punch which punches
out a cloud shape. But what you can do is just sketch out the
cloud and cut that out. If you don't have anything
like this to hand. I've got some scrap card
here and I'm going to use, I think I should just
about fit a cloud. Try not to waste any scraps
of paper. Let it go. I want my cloud around here. So one of the things that I do for cars that are
maybe a little bit more complex is
kind of plan them out first before I start
sticking things down. So I know I want my cloud about here and I'm going to
paint a sunshine here. And then let's think about
some other elements too. So I want to put some of these crystal raindrop
type of gems on the card. And I also have this pack of ephemera with different
sentiments and images. So she is a sentiment, a car to brighten your day that I want in the bottom corner. And I could add one of
these other pieces too. So a rainbow or an
umbrella maybe. But let's see how it looks after we paint the sunshine in first. So if I look back, my quick sketches are two
different types of sudden. So I think I prefer the lines, so maybe that's what I'll do, but it's a bit bright. I might try and
add more water to my paint to make it a little bit more washed out from there. Now make it thicker
to want to think, maybe I want it coming off
the edge of the paper. Maybe I want it like quite a
great big bright sunshine. Yes, I'm just going to paint right off the edge onto my Mac. Then some rays,
flesh less starch. And I met him quite Eve
and maybe we'll have some alternating
long and sharp race. Okay, happy enough with that. It's just something simple. And then we want
the cloud there. So I want the clouds
to be raised up. So I'm going to use some
foam tape to do that. Her butt off. And again, you can cut out with scissors, but it tends to
gunk up businesses. Just rip this off. This is still wet. And the interests saving time,
it's going to stick it on. So where do we want our Cloud? Well, let's have a think
about the other elements. So maybe we want
that down there. Maybe I want because this is
a car to brighten your day. We're going to put
some raindrops on it. So should we have an umbrella to maybe just have a play around
with your cards as well. Whatever elements you have to do your weather themed card. Just kind of move
them around and, and see what you
think you're going to look like the Lakoff. I might put that cloud there, then have some fella
off to the side here. And then I'll have
some raindrops. Haven't done my son paler. Maybe it would've been
better, brighter, but it is what it is because
these cards is so quick. What I would do if
I'm not completely happy is I would probably just make another
one of these cards. Just do it. Do another one. Instead of trying to
redo or fix what I have. Just make another
quick card the same, then fixing the bits
that I don't like. So let's have that written down that you have this here, maybe. Then let's stick
this piece down too. Then we'll add some
gentle, some raindrops. So you can use, you can try and use your
fingers for these. But if you have a
pair of tweezers for any gems or
embellishments that you have, but sometimes can make
life a little bit easier. So rather than trying to
pull them straight off, I slide them along the
backend to get them off. I'm just putting these
particular plan, just see what looks
nice, looks like this. And then we can attach this
panel to our code base. Paint is still a bit wet, so I might do is just the strips on here in roughly the right place and then put the panel on top. Again, what we're all about in this challenge is
kind of quick cards, just something to dip into and sparks some
creativity each day. Doesn't have to
be a masked face, just some things,
fun and bright. You go, that'll be enough
to attach our panel. Doesn't matter if the tape is messy because we're
not going to see it. So let's try and get
this in the center. I mean, you may prefer to let us dry before you try and do this, but I'm happy to just go ahead and thank you for joining
me for today's challenge. I hope your cards have come out as beautifully as you want it and I will see you again
for tomorrow's times.
7. Day 5: Rainbow Watercolour Wash: Hello everybody and welcome to day five of our code
making challenge. Today we're going to
do a watercolor ombre, a wash, something like this. And then we're going to stamp her sentiment in the
middle once it's dry. So to start with, I'm
going to tape this down to my craft board because
I actually want it to have a border
around the edge, unlike this sample
one that I did, I want it to have a
neat straight edge. So I'm going to use washi
tape if it will behave to mask off the edges so that hopefully when I peel
it off at the end, we'll have some nice
straight lines. So I'm just going to
spend a bit of time doing this so that it looks neat and the paint
won't seep underneath. Okay, after much messing about
with useless washi tapes, I've finally tape this down. And so what I'm gonna do
is just strips of color across the whole piece paper and then just let
them blend together. So I'm going to do
this wet on wet. So I'm going to wet the paper first just to allow the colors to blend by
themselves as they go across. You can do this with a bigger
brush to make it quicker, but this is just what
I've got to hand. If I'd been organized enough, what I could have done was some kind of a at least piece of cardboard or something so I
can tip it forwards and let the excess trip to
the bottom and then just clear away
the bead of water. But it's done. So we put about the
right amount on. But we'll see I'm going to
start with this kind of darker rose pink color and just
do a straight alone. I think it might be
going underneath, but we'll see when we take the
tape off, what's happened. Then going into Should we have next given to orange
and then a yellow? If I want the colors
to blend a bit more, I might just add a little more to mind too much if it blooms, I quite like that effect. And by blooms, I mean, when it dries like that, I know some people
don't like that. Look, they didn't like
it when that happens. But now I'm going to go
straight into blue paint, a strip of town. It's quite a light
color, so we just need to add a bit more pigment. Then let's try and pick a slightly brighter
place and how that, but the nice thing about this pastel palette is
that you don't really need to worry about color mixing. So if you've got a
palette where you need to mix all these bright colors to get the effect you want them. This type of card will take
you a little bit longer. Then just at the end. Do this green and then
finished with it. I wasn't planning to do
this many colors, but then purple. So all we need to do is to
just leave that to dry and then we can take the tape
off and see how it looks. Came we had a little bit
of a bleed through on this side and a little
patch missing up here. Mind if that has
happened on nosy, you've had a lot of it bleed through and you don't like it. If it looks really bad, I guess what you could do is just completely trim the borders off and you adjust
the painted piece, but this will do for now. I'm okay with this. Hopefully you've
also trimmed down your card before you began, so it fits on there. But if not, I'll
just trim it off now so that it fits
on your card blank. And what we're gonna do now that the stri is just sample on top. So I'm keeping this simple
and all I'm gonna do is, uh, sentiment in the
middle of the card here. So again, I'm using this
same sentiment stamp set. You just use whatever
stamps you have to hand are I've mentioned before, if you're particularly
good at calligraphy or hand lettering and want to do something yourself in
the middle of your card, then by all means do that. I'm not great at calligraphy. I am going to stick
with stamping for mine. So let's choose a sentiment. So what I've done
is just aligned the stamps on here roughly where I think I want
to stamp the sentiments, Sex, I've got lots of space. I've gone for a longer one. So it's going to say hip,
hip hurray, it's your day. And I'll start with the
bigger words first, array and day, and then I'll
stamp the other to the side. You can stop them
all together if you've got stamps
that fit closely. But because I want to get the positioning to
be more precise, because that's the focal
point of the card that I'm going to stump these separately. So let's start with array.
So we want that about. Again, I'm using this Momento
tuxedo black dye ink. So now we'll start
the next part. Beginning of the
picker word again. Okay. Stan thing is done. I'm pleased with how
that's come out. If you're not happy with yours, if you've got smudges or the placement doesn't
look as good as you want it. You can always stump again
on a separate bit of cod and just place
it over the top, raise it up or foam tape and cover the part that
you're not happy with. It's always a good solution for covering up any bits that you don't like when you're crafting, just stick something
over the top. It looks a little plain to me. So maybe I'm going to
add some embellishments. So I'll use the
same gems that I've used on the previous cards we've done and put some little g
you drop type gems on here. I want them together or do I
want them spaced far apart? If I just drop them
on their first, I can move them if
I change my mind. Why do we want that?
Show? Gems are pinging all over the place, by the way is mine
have been just kind of put your finger on them as you would like
sliding them off. Otherwise they'll be like
Gems all over the place. We finding gems in
the carpet for days. If you put them
on, very likely to start with, you can
move them around. If you don't like the position. You can even put the back on the sheet if you change your mind. Like if we group them together, I stuck that on down firmly
so that one's staying. You can spend quite a while moving things around
to get them to look as you want them. So because this is
a simple college, and if you have
some time left and you're sort of
ten, 15 min a day. You can take your time to
place the gems as you want. Whatever looks good to you. Great. And then
three is like that. Then if you're happy
with that position, then just press them down. We need to do now is just mount
this to our cart like so. Same with the others. I'm just going to use
foam tape to do that. Just check that that's gonna
be in the center before you stick it down. Okay. Upside down. Well, you know what happens? What I normally do if I do
something like that as I just cut off the card blank
and stuck on any one. So that's what we're gonna do.
Nice things just happened. Don't know. I'm rushing to finish because my
daughter needs a bath. So let's stick that on a new car blank
and then we're done. Easily fixed. And then that I can
use for some standing. We go, we've just made
an extra second durable. So just some tacky
glue on the back. You know what, why not
leave these mistakes then? And then if you do
the same thing as me, a good way to fix it. Let me go right way up this time. So thank you for joining me for today's card making challenge, and I will see you
again tomorrow.
8. Day 6: Aperture Heart Card: Hi everyone and welcome to day six of our card
making challenge. So today I want to
make an aperture card. And I'm gonna do that by having the worst color element
underneath and a panel on top that I'll cut a
shape out of so we can see some block colors that
we're going to do underneath. I'm gonna do a heart shape and today I'm making a
Mother's Day card, but just use whatever
shape or whatever sentiment fits the
occasion that you need. So to start with what
I'm going to do, you can see I've cut my
watercolor paper dad's size already to fit on
the A6 card blank. And I'm just going to
trim this down to match. So I'll just use this
piece as a template. And I'm going to
trim it smaller. So I will draw around
so I can see the size. And then I'll actually
just cut off more. And I'll do that
evenly. Top and bottom. Again, I always prefer
using my craft knife, but you can of course,
just use scissors. What if you have to hand? Okay, and then we'll just
check that this layers up as we want before we
do anything with it. So that looks like
an even border. I'm happy with that. So what I want is a heart-shaped
aperture here. If you have a die casting
machine and a dy, then you can use that
to get a really smooth, professional, heart-shaped
if you have a heart die. But for anyone who doesn't
have that equipment, what you can do is just draw
a heart and cut it out. So let's do that. I want it to be
roughly in the middle. So let's see, about halfway. Want to leave for
him for sentiment. Will make the cut with a craft knife and I'll carry on with, this is around the inside of
where I've drawn the line. But if you can see
the pencil line too strongly to the craft knife, then I can always flip it
over and use the reverse. I would definitely use it
die and die casting machine for this if you have it because
it'll look much neater. You know what? I've
done it wrong, have an I, because
I'm keeping this bit. So what I wanna do actually
is outside of the line. So if you've done the same
as me, then no worries. We just redo the
outside the line. Don't worry. You're probably thinking why she
did it like that. Well, it wasn't meant
to be, you know, why I keep these things in so that if you've done
the same as me, then you know how to rectify it. Okay, So we're gonna cut round. I'm trying to do it
as neatly as I can sign and spending a
bit of time on there. Okay. So we have
our heart shape. You can flip it over and
see which side looks nicer. Layer it up. Like this. Like this. It looks a
little choppy maybe. Should we use it like that? I think I'll go with that. Then what I want to do is
just paint some blocks of color underneath so that
they show through the heart. So I might just roughly
mark out where my heart is so that I can get the effect I want my
guess there's no kind of clever way to do this. I'm just going to sketch underneath and try
and get a rough line. So I know lots of pain somewhere to not
bother painting. Yeah. That's fine. You're
not going to see that. We're going to raise
it up with foam tape. But he shouldn't be
able to see that. So I'm gonna go
for three colors. I'm going to get some pinks. I'm going to start
with this dark one. Do you like a kind of want
quite a squishy effect? Go for the medium pink, the lightest pink. Looking at the
oranges that okay. I want it to have this
kind of brushed effect, so I'm not completely
filling it in. I want it to look swished. It's not really the word for it. But you know what I mean? Like white bits. So you can just
kind of hold that above and see if that
looks kinda how you want. That looks okay to me. So we can just
leave that to dry. And then what we'll do is put foam tape on the
back of this panel. Get it ready to go over the top. In terms of sentiments, I have this happy
Mother's Day sentiment. That's what I'm doing
with this card. You can use a sentiment
stamp that you've got or you can print
something out like this. Type on a computer, print
it out, cut it out. Whatever you wanna do
with your sentiments. It's not fly my desk shoe. But this is from my
sticky kitten range of femora for a pack of
everyday sentiments. And I just love these because when you're designing cards, you can just grab whatever fits and build up a card
really quickly. If you're not in the
mood or the position, show any stamping that day. You can just use those
pre premade ones. Okay, so let's get
off foam tape. Let's do it straight
along the sides. When you put this on the back. Again, I should use this but
it comes up my scissors, so I just try and tear it.
It doesn't always work. So Let's just look it up and he is my son does not have to clean
them afterwards. Um, what was I saying? When using foam tape? You just patch it in really. Wherever it needs to go. We're going to let me do a
full strip along the bottom. Not quite a good thing
about foam tape. I suppose you can
just cut it to fit. You can cut it at
certain angles. Let's have a piece
of metal that it doesn't have to be neat. You can not going to see this. However you want to do it. Then we're going to need to
send a bit along the top, along the side of it. The aim is to get it fairly
even so that you don't have parts of this panel which
dip more than the others. Otherwise it can look buckled. Nearly bag will have
**** piece here. And I just want something
to support maybe that corner in that
space a little bit more. Let's just check
when we can't see any visible pieces of
tape. That's good. So remove the backing next. If you're wondering why did
you get double-sided tape? I'm most craft
stores will have it. Or if you're more
of an ICO crafter and try to avoid using phones and plastics and things like
that and you're crafting. And an alternative is to use pieces of cardboard stacked up. Now that can give you the,
the depth and the height that you want without
using fine pieces. So let's just align
this as best we can. So once you stick it down,
it's not coming off. We go. Then I'm going to attach
this to the card. I'm just going to clear it. We could use another layer
of foam tape if you want, but I'm happy with the amount of dimension we've got
from just one layer. So I'll just glue this on. This is tacky glue. Just a bit thicker than PVA, but it's essentially
the same sort of thing. Never go. And then we need to make a
decision about our sentiment. So I can have it right on the bottom or cross the
center out to the side. I quite like doing things slightly off-center
off to the side. But at the bottom
also looks nice. It's a little bit planes, so we probably want
to add some extras. So what I also want
to put on this card. So I've got a piece
of ribbon here. So I'm going to tie this into a bot and that's
gonna go on as well. So what I do with
embellishments, sometimes it's it's
kinda get them ready and place them on the card
and move them around and decide where they look best before I actually
stick anything down. That's kinda one of the parts
I enjoy the most actually. It's like that little mini
design process of seeing what looks best way to one it's adding and what needs removing, getting the balance
of whitespace, write your code looks
kind of well-designed. Okay, so we've got a bot. Let's make the loops
look a bit nicer. Tuck them up a bit that down. We've got happy Mother's Day. It's quite a long Sentiment. I'd rather it was on two
lines if you see what I mean, but well, it is what it is. We'll see what we
can do with that. Let's see what looks nicest. It might take you a bit of time to do this on your own
card and that's alright. You can take that time to
make sure it looks good. To make sure it's
styled how you want. It's quite sweet. Card also need something else,
maybe a little plane. Sometimes I play my cards out beforehand and
sometimes I don't. I just test them out
when I make them. Either is fine. Sometimes you find that if you do
plan your cards, you'll end up making something different to what
you thought anyway. And you think, Oh, well,
I might as well have just tested it out. Instead of planning
or sketching. Sometimes it can
be fun to sketch out cod ideas and designs. First. We have a bow in the middle. Do we not want to take node? I think we want to take away
from the element two way. Why did I have it before
that I thought was alright, Was it further down? That's the other
thing. If this is a few variations
that you think oh, that looks okay,
That looks okay. You can just take a
photo and then move your elements round
and then have like a swipe through
your photos. And then pick the layout that you think looks the
best and go with that. Happy Mother's Day. I'm gonna go with that. I want to raise this up. I think I will raise this up. So what I've also got his phone, my trauma here, I've got
these little foam hexagons. So when foam tape is
too big or bulky, he sees little foam pieces. Normally famous glass, but
these are for Mexicans. Have that along the bottom. And just put things
in a little desk pen as you go with a wise you find, you get pieces everywhere. And then when I've
finished Crafting, I just emptied my
mini desk been day. And then with ribbon I
tend to use tacky glue. Just in key pieces, in key places on the back. The lips, the middle. The long bits. Then have
that off to the side, slightly touching the sentiment. You might have an IFA to sign quicker than mine and you can get the placement
right straight away, but it usually takes me a little while to do
something. I'm happy with. That. That's looking
quite sweet. I could add some
gems or something. If I was going to add those, I might do them. Maybe curving around that just to add a bit of balance
to the elements. But for now, I'm going
to keep it like this. So thanks for joining in
for today's challenge, and I'll see you tomorrow.
9. Day 7: Watercolour Leaves: Hello everyone and
welcome to Day Seven, final day of our card
making challenge. I'm so pleased that
you're still here with me and that we've
reached the end. This is our last card a
week's worth of cards. So if you're here and
you're on your seventh, then well done. Congratulations. I'm so glad that you've
been able to craft a long. So what we're gonna
do for our final card is watercolor leaf
background pattern. So here I've just used a practice piece to see what
kind of leaves I want to do. I tried out a few
different designs. So here I've done kind of a shape with a gap
in the middle. This one, I've done leaves
with a trailing stalk. Then in here I tried, I'm pressing the brush down
like that and lifting it off. So have a little
experiment first on a scrap piece of card and see how you
wanna do your lease. There's no right or wrong way. And then when you're happy
with the look of them, or if you'd like a mix,
you can do that too. Then you can do your
card ready version. So let's make a
start doing leaves. So same watercolor palette that I've been using
for all the cards. And I'm gonna go for
this orientation again. So this is called a
tenfold because it stands up like a tent, I suppose. So again, I've
changed the paper to size and I know that it fits. And what I'm gonna do and
I've painted the leaves, I'm going to use a
circle punch to stamp out a piece of a playing card. And I'm going to stamp on the
card and put that on top. So that's what, that's why
the sentiment will go. So we don't need to leave a gap or
anything because we're going to put
a piece on top. So let's start
painting some leaves. I've got this color hair, which is quite bright and that's what I used for this one. But I'm going to go
for something a little bit more subtle and just mixing this color here
that's already on my palette. So I think this is just
this green that I've already dampen down with a
little bit of this brown. So we can add a bit
more and just take some of the intensity
of that color, make it a little bit
more of a muted green. I'm just going to stop. Don't know what kind of
leaves I want to do. Like to mix again, the ones that are painted like a gap and the ones where I press the
brush down and lifted at all. And you can choose what
size you want it to. Your leaves. Really big
leaves are small leaves. About why I'm gonna
do is just vary the direction of the
leaves ago and you can think about whether you want to have some leaves coming off the edge as well as
though this is part of a continuous pattern or
whether you just want to keep them enclosed within the page. So I can do some of
the stalk like that. Press down, lift off. This is quite a slow, peaceful, kind of hard to make. We're not in a rush
to dash their leaves. You can do if you want
to make it quickly, you can do some super-quick
leaves, just dash, dash, dash, dash,
dash plus the page. But I'm just going to
take my time on these. You can also treat this as an exercise in
brushwork as well, like I've had practice
and brush control. If you want to try and
do like a fine stalk and then the big part of the
leaf and then lift up. You can treat this
brush control exercises you can do with the added bonus that you
can make it to come out. I'm quite happy with this. Color is coming out. I think what I will do
is just go off the edge. It looks as part of
a larger pattern. I quite like to leave gaps. You could do solid leaves
if you like that look. But I find that when
I leave gaps in my leaves and flowers, much prefer the way they look. I think it's because it draws attention to
the fact that they're painted look like
blobs on the page. They look a bit more artistic. Hospice mean, I'm no expert in watercolor. I just don't like the
look of whatever works. But there are some
amazing classes here on Skillshare you can
take if you really want to get kind of
leaves and flowers down to some really
amazing detail, the rules of classes
you can take. For me at this stage, watercolor is something I
do more relaxed I suppose, and just feel like
I've got something artistic and creative in my life because I do run a
creative business. Now that I have two children, it feels like there's really not much time at all for
creativity, for anything. More than anything,
had a relaxing face. That's one of the reasons
why I wanted to do this. Challenge this class. Because for anyone who like me struggles to find
just 15 min a day to, to do something like this. Then I wanted to show you, I suppose that if you can
just grab that precious time and do something that is really low effort
and low stress. And then at the end of it you can think, well, you know what, I've got a bundle
of cars that I can then use for
whatever's coming up. So it's not fun if it
serves a dual purpose of the bit of time to self
creativity and also that time. Feel like you've actually
made something and produce something and look, these pretty things exist now because of that quick
time that you put in. Here we go when elite. And then of course there's a variation
if you wanted, you could do this a
different colored leaves. You don't have to do a page
of green leaves you can have, you could do like Autumn Leaves, different browns,
yellows and goals, or you could do Party leaves and pink and blue on whatever. Like I've splashed my card. Let's see if I can
drop that off. It's gonna get covered anyway. See with my classes you get a little messy that's lifting. Once that dries, we can make
the sentiment to go on top. So I'm just going to check
that that covers the smashes. This it does. So let's just put that up here. What I'm going to do is use the circle punch
to purchase that. Now I imagine not everyone
has a circle punch. So what you can do
obviously is just to draw around something
and cuts it out. If you have a dipole, a machine and some circuit
dies and he could do that. This is just some scrap card. We don't need the bank,
we're just going to use the front so it doesn't
matter what's on the back. Just position it out. Say Look, I positioned
it and I still managed to get it wrong. I'm trying to be
economical and see how many second look and
get out of this scrap card. Doesn't matter. We'll
just do it in the middle. Okay? So what I'm gonna do is
stamp the sentiment of hair sticking up for it
didn't punch very well. And so I'm using a
different sentiment pack. So this is a company
called waffle flower, and this is a sentiment set called essential
celebrations. So I'm going to
make a baby card. I'm going to go for the
welcome sweet baby sentiments. And I'm going to stamp
it in black ink. I really loved these
scripty sentiments. I think they make a great professional with,
without too much effort. Do have my own range of stamps
on sticky kitten website. But for these cards, I wanted to kind of like a script d flowing
type sentiment. I don't quite have a set
that has not yet anyway. It was designed
more stamps sets, but we're not there yet. Let's think this one up. Let's check. My leaves are a
little bit thick. Lines. You can learn and do
better next time. Yeah, maybe dainty leaves. You know what, it doesn't have
to be absolutely perfect. It's a process. It's a process. We can do it over and over, make it better and
better each time. But as long as you enjoy it and you're okay with
what you've made. You don't have to be
perfectly happy with it, but you don't want to hate it. If you really hate
it, then maybe do. And again, I really like, I want to make things
that I'm happy with it. If I hate it, I
would do it again, but it's okay. Okay. This is mostly dry. We've got one or two
white leaves still, but I'm gonna go ahead and
put this on the middle. I'm using foam
hexagon xdx again. So just whatever sticky
pads that you've got a fine or you
can just deliver on, but it looks better
with some dimension. And I'm making this for my friend whose babies
due this month. We don't know if it's a boy
or a girl, so it's neutral. And then we just need to
mount this to the cart. But I think I probably will use tape to
raise this up a little bit. I think these leaves
in nearly all trice and we should be okay. Just turn it over. Okay. Yeah. You just need to attach this. The front and this
card is complete. Let's try and get it central. And I won't press
it down too hard in case some of my
leaves are still wet. I'll just press it down
in between the leaves. It's simple, but I'm
pleased with it. Come on and join me
over in the next video where I'll just talk through a summary of the cards we've made and some little changes
and additions that I made. See you there.
10. Final Thoughts: Thank you for taking part in the seven-day
watercolor challenge. I hope you had fun
creating your cards. There's just three
more things to do. So firstly, have a look through your cards and make
sure you're happy. Change anything
that you want to. Secondly, please leave a review. Not only does it
help me if I can see your feedback and know what you liked and
what you didn't like, and what you'd like to see
next time in a future class. It also helps your
fellow students decide whether this
class is for them. And thirdly, don't
forget to upload your projects to the
project gallery section. I'd love to see what you
have made and to give you some helpful and
constructive feedback if that is something
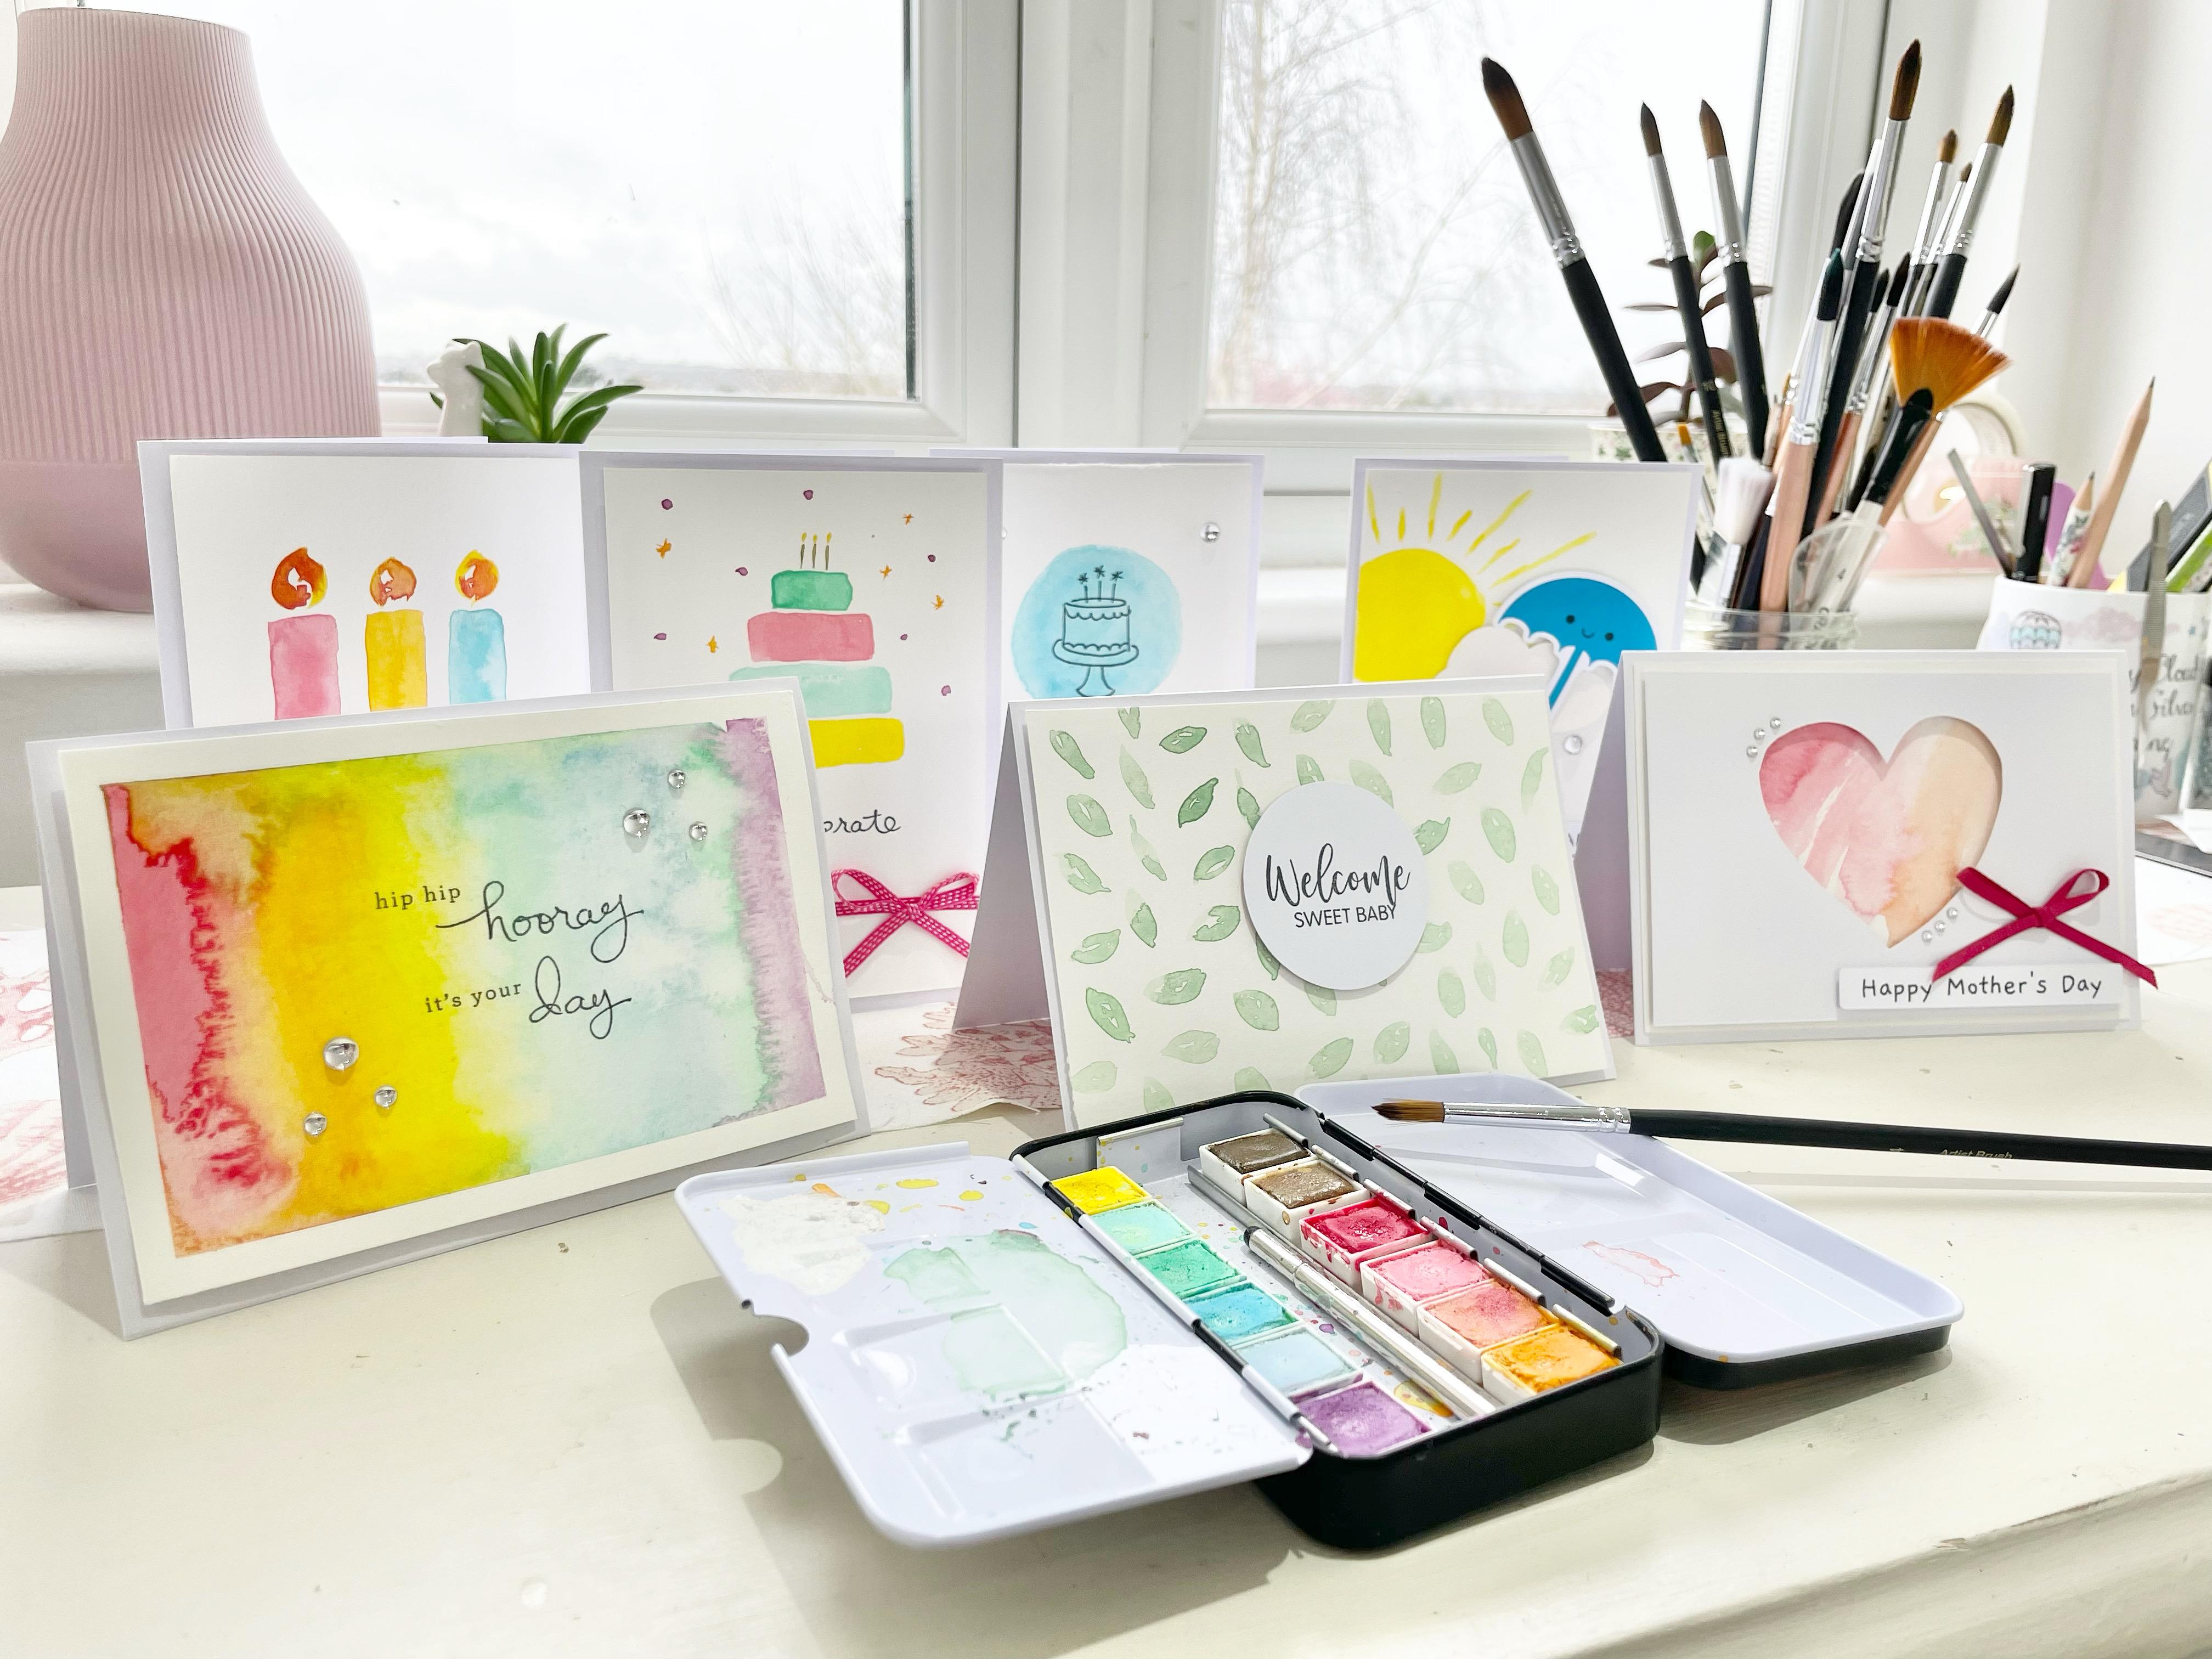
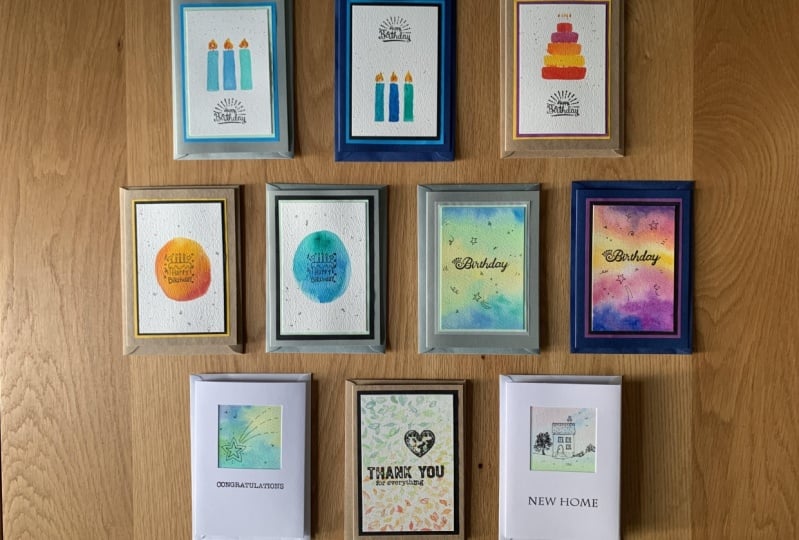
you would like. So what I did for my cards
just before we finish, some of them I kept as I
showed them in the video, some of them I add
a little bit extra. So the second card from day two, I added a strip of ribbon
across the bottom here because I thought it looked a little bit plane
at the bottom. The happy birthday cards
that we did on day three, or I had a little bit of
a smudge on my stamping. I just added some
gems to the page, cover up the smudge
that and then just some extras
to tidal together. The way the column that
we did on day four, I went sunshine again with some more yellow
pigment because I thought that actually
looked a little bit pale. The sun is going to know. The Mother's Day cards. I added a few small
gems just around the heart to finish it off and make it look a
little bit less play. So again, thank you
for joining me and I look forward to seeing your projects uploaded
to the gallery.
 Sarah Douglas, Papercraft designer & illustrator