Transcripts
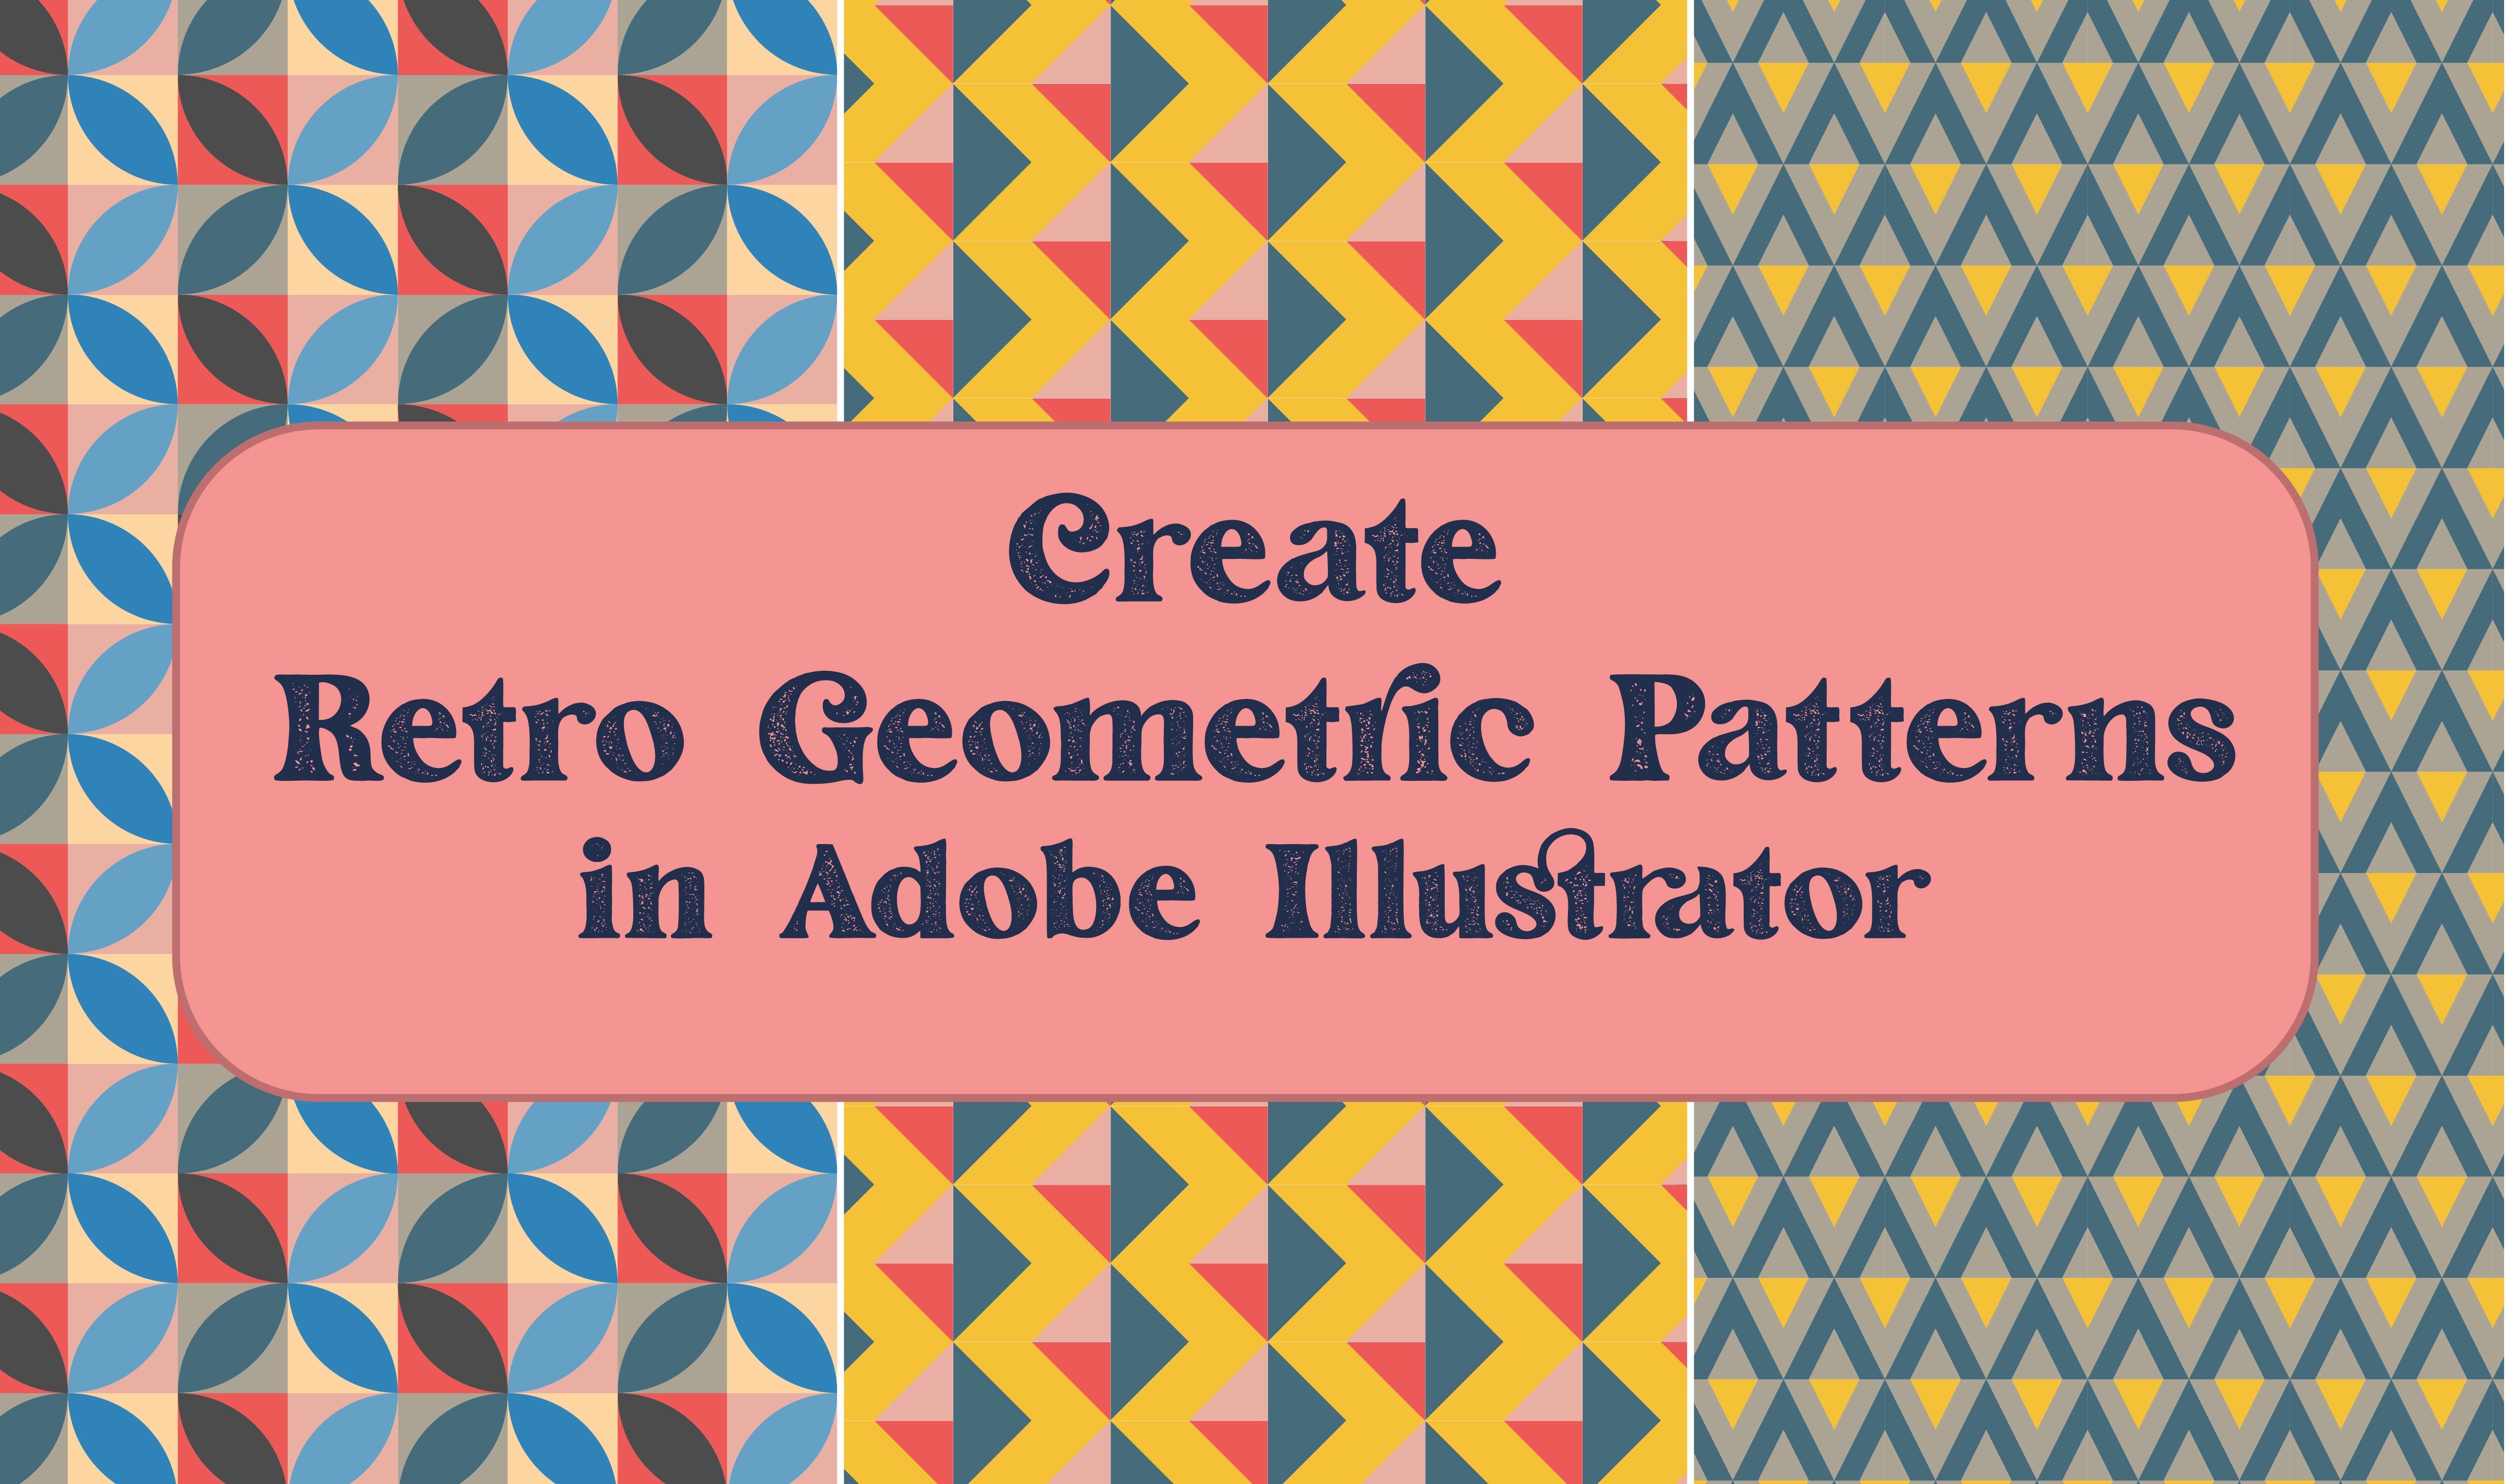
1. Introduction & Class Project: Welcome to this
Skillshare class, or you will learn how to design vibrant seventies patterns
in Adobe Illustrator. I'm Joanna Maria, a digital illustrator and graphic designer
from Poland. I create mainly vector
art and surface design. This class is a follow-up to
my other Skillshare course called create retro geometric patterns
in Adobe Illustrator, which was inspired by the
fifties and sixties design. If you wanted to know more, go check it out. Today, I will teach
you how to create eight different patterns inspired by the textiles and
wallpapers from the 1970s. Vintage flower,
peacock, flower bed, aquamarine, crochet, bubble, square, and
criss-cross pattern. This class is for all levels. It means that you don't
have to know all about Adobe Illustrator in order
to design the patterns. If you feel comfortable
with the program, you can jump straight into
designing the first pattern. If not, check out the lessons that precede it: documents setup, color palettes and
color settings, as well as pattern types. As a project, you will create a pillow mock-up of your
70s inspired pattern. You are welcome to
use the empty mockup and color palettes created
by me for this class. Check out the list of
my favorite shortcuts that I've prepared for you
in the class resources. I highly encourage
you to publish your work in the class project
section of this course. Without further ado, let's
jump into the first class.
2. Inspiration: I have always been inspired by the design styles from the second half of
the 20th century. The 70s is for sure, one of my favorite decades. Let's go for some
of its phenomena. Flower power was a peaceful
resistance movement that started in the US in the 1960s and developed
in the 1970s. Flower became a symbol
of peace and love. The movement spread
thanks to the hippies. The so-called flower
children dress the part. They loved, bright
colored clothes with embroidered flowers. Their style was the symbol
of nonviolent protesting. Make love, not war. Hippies had a
significant influence on the mainstream fashion, but they weren't the only
inspiration at that time. The seventies was a decade full of trends, often simultaneous. Victorian and then the word and the revival of Gypsy
and peasant trend, punk and glam rock. This co, as well as the
ethnic and Bohemian style. The last one also
inspired mostly by Native Americans
and European folk. It featured bright prints
and floral patterns. Women loved to wear
a peasant blouses, ponchos, and maxi dresses. Men's wear at the time
included bell-bottom jeans, tie dye, and funnel shirts. Both men and women were homemade accessories made
from natural materials, such as wood, leather, shells, and Indian beads. Back to nature trend was also permanent in
the interior design. It was visible both in the environmentally
friendly materials. Entity, earthy colors that gradually replaced the
brighter neon colors. Patterns definitely
wear a thing. They dominated, not
only the wallpapers, but also curtains and
carpets, the most popular, where geometric, floral
and psychedelic patterns. One of the best examples of groovy home textiles were
crocheting. Blankets. Don't forget, people in the seventies were very
creative and resourceful. They also might
crochet it vests, ponchos, tops, and waistcoats. I loved this DAY
spirit so much that I decided to create one of
the patterns to honor it. Man, get unsurprisingly
crochet pattern. These were my main sources of inspiration for the patterns that I created for this class. You can now open Adobe Illustrator and
go to the next class. Are, if you are familiar with the program
and its settings, you can go straight into
designing the first pattern, the vintage flower pattern.
3. Document Setup: Let's start with our projects by opening a new file in
Adobe Illustrator. Now we're going to
set up the document. I will name it. 70s patterns, skill share. As you can see, I said the
width of the art board to 5,000 pixels and the
height to 3,000 pixels. To color mode of it
chose is RGB color. Because I'm working
with the screen. Is your intention is to print the patterns are sent
him to the printing company. You should choose CMYK. I also chose the highest
resolution possible, 300s PPI pixels per inch. Let's create documents. Next we're going
to do is check if the smart guides are
set to on their own. So we are going to
leave them like that. It will be very helpful with
working with our shapes. Another thing that
I want to see are the swatches, layers,
and properties. We don't need all
of these swatches. I will delete most of them. Click on the first one, holding Shift, click
on the last one. Now we'll drag it into the bin. Now I will even parts. This works is that they
want into the document. Go to Library user-defined
swatches set that we'll use. Our seventh is palettes. We can either drag it and
here are another way is to click on every folder icon that will import into
the swatches panel. Can close this window. Now we have everything prepared to work with our documents.
4. Color Palettes and Color Settings: Best website for creating
a color palette for app project will be
Adobe Color website. So we go to explore and
tweet type 70s as a tag. Now we can look for different color palettes that
have already been created. We can add them directly
to our library. So I select the
ones that I like. And then from them, I will
select the best ones. All of these colors are
connected to seven days tag. You can type whichever you like. Then I go to my library and
check out different motifs. I have nine, but I will
select just a few of them. I download the file as an ASE format to open it
later in Adobe Illustrator. Now we can go to Adobe
Illustrator swatches, other library and access the files that we have
just done, loved it. I opened all of them at once. Then to save them as a
swatch as a swatch group, I'm going to click
on the folder icon. As you can see, the purity in the swatches panel right away. I repeat the process
for every color group. Now I'm going to delete all
of the unnecessary swatches, leaving just the ones that I have just added to the project. And then I go to
libraries, save swatches. I named them 70s patterns
are other 70s palettes. I can access it directly
in user-defined libraries. Now I can use this palette in every project that I created. Now let's go to creating
websites and global colors. To do it, I double-click on the color in the swatches panel. And I click on global and the cube icon to make
sure that it's safe for web. And I repeat this process
for every color that I have. This will change them slightly, but it ensures that they will be displayed this
way in every web browser, regardless of the platform, there are fewer web colors than the ones that are
displayed in Illustrator. That's why we will have fewer colors in our
swatches panel. If you're not working with web, you can leave the pilots
as they were before. Us for the global colors. Let's see how it works. So I create two rectangles with the same fill,
this bluish color. I create a new rectangle holding Alt and dragging
their time rule. And now I double-click and
change the global color. So it also changed the color of the rectangles
at the same time. As for the CMYK to
change the color modes, we go to File
Document Color Mode. Here you can change
directly from RGB to CMYK. The differences that's
CMYK works best for print because it's
a mixture of cyan, magenta, yellow, and black. It's perfect for the ink to make sure that the color has
been changed to CMYK. We double-click on the swatch, then you can see the color
mode has been changed. So CMYK, RGB is red,
green, and blue. So the color values
are different. Now we can see CMY and k. If you are working
just with the screen, not creating the file for print, RGB will be perfect for you. So don't change the settings. Now we can move on to pattern types that we have
in Adobe Illustrator.
5. Pattern Types: Now that we have setup
our new document, I would like to go through the pattern types in
Adobe Illustrator. Let's start by
creating a rectangle. So we'll click on
the rectangle tool. And we click on the art
board to pop up window shows us different dimensions that we can choose
for our rectangle. I'm going to do
hundreds by 100 pixel. Let's make a close-up. So let's change the fill color. Here. Fill and stroke, stroke, I will set to none. And color, maybe
this bluish color. Now to create a new pattern, the easiest way
is to simply drag the rectangle into the
swatches panel right here. To edit the pattern, we double-click on it. So this is not good because
it all blends into one shape. That's why I'm going to
expand the width and height. Let's keep this
proportion linked. So I'm going to 240
for the beginning. So this is the grid
pattern, the basic one. I will show you other
options that we have. There's also a brick by row. You can change the brick
offset right here. Let's stick to the half. Then we have brick by column. So it's basically brick by row. But in reverse. Dan, we have Hex by
Column or Hex by Row. Sometimes I like to
make more copies. It gives me a glimpse to
what it will look like. We can dim the copies so that we know which shape is
the original one. When you're ready to
save your pattern, you click on Done. If it's under one to save
the changes, you cancel. You can also save a copy. So we've done to
make any changes to the original pattern, but to create a new one
with the new settings. You can also name your
pattern if you want. Okay? So I click on Done. To prove it a pattern. I create a new rectangle, which will be ten times
width times the height of the previous one. And the fill is now
our new pattern. To make sure that it's this way. You'll see here that
it's not the stroke, but that's the fill. Our shape. To see a different
scale of this pattern it, you'll click the
right mouse click. Tend to transform, scale and transform
patterns, not the objects. Let's make it hundred
and 50 per cent. The other way around 50% go
further away from Jupiter. So these are different
pattern options in Adobe Illustrator. These are the basics. And now we're going to
expand our knowledge with some more
elaborate patterns.
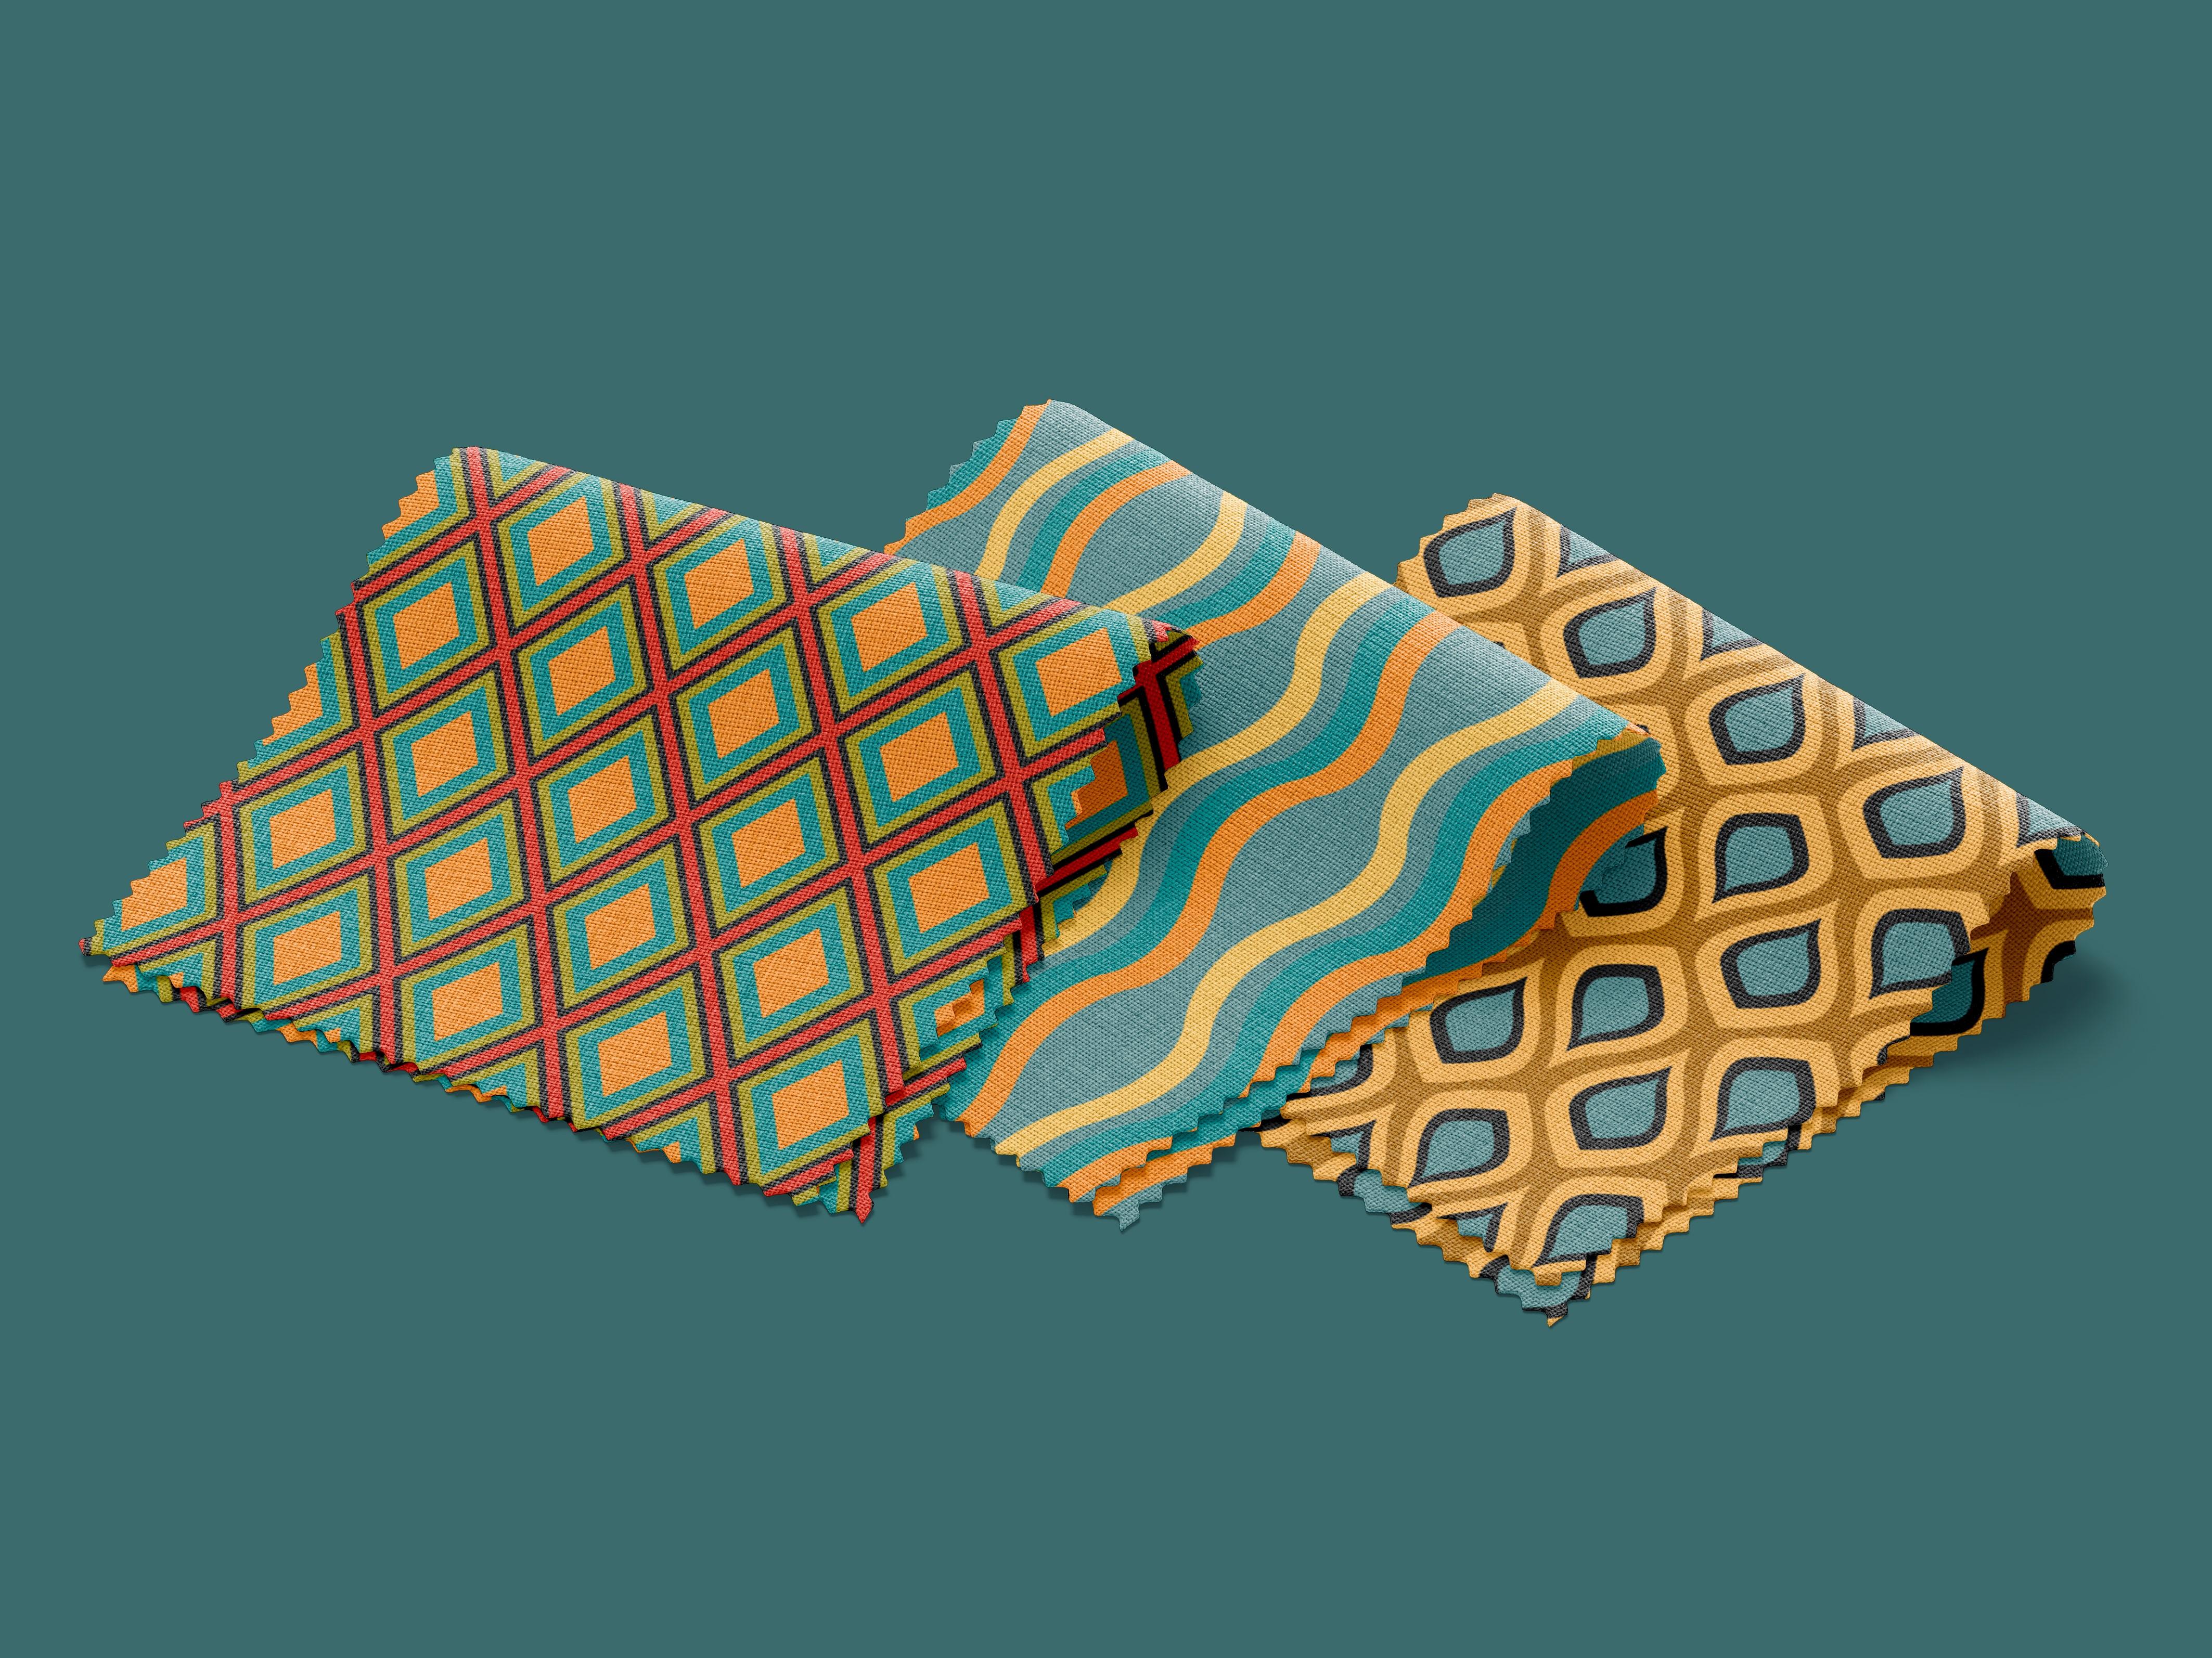
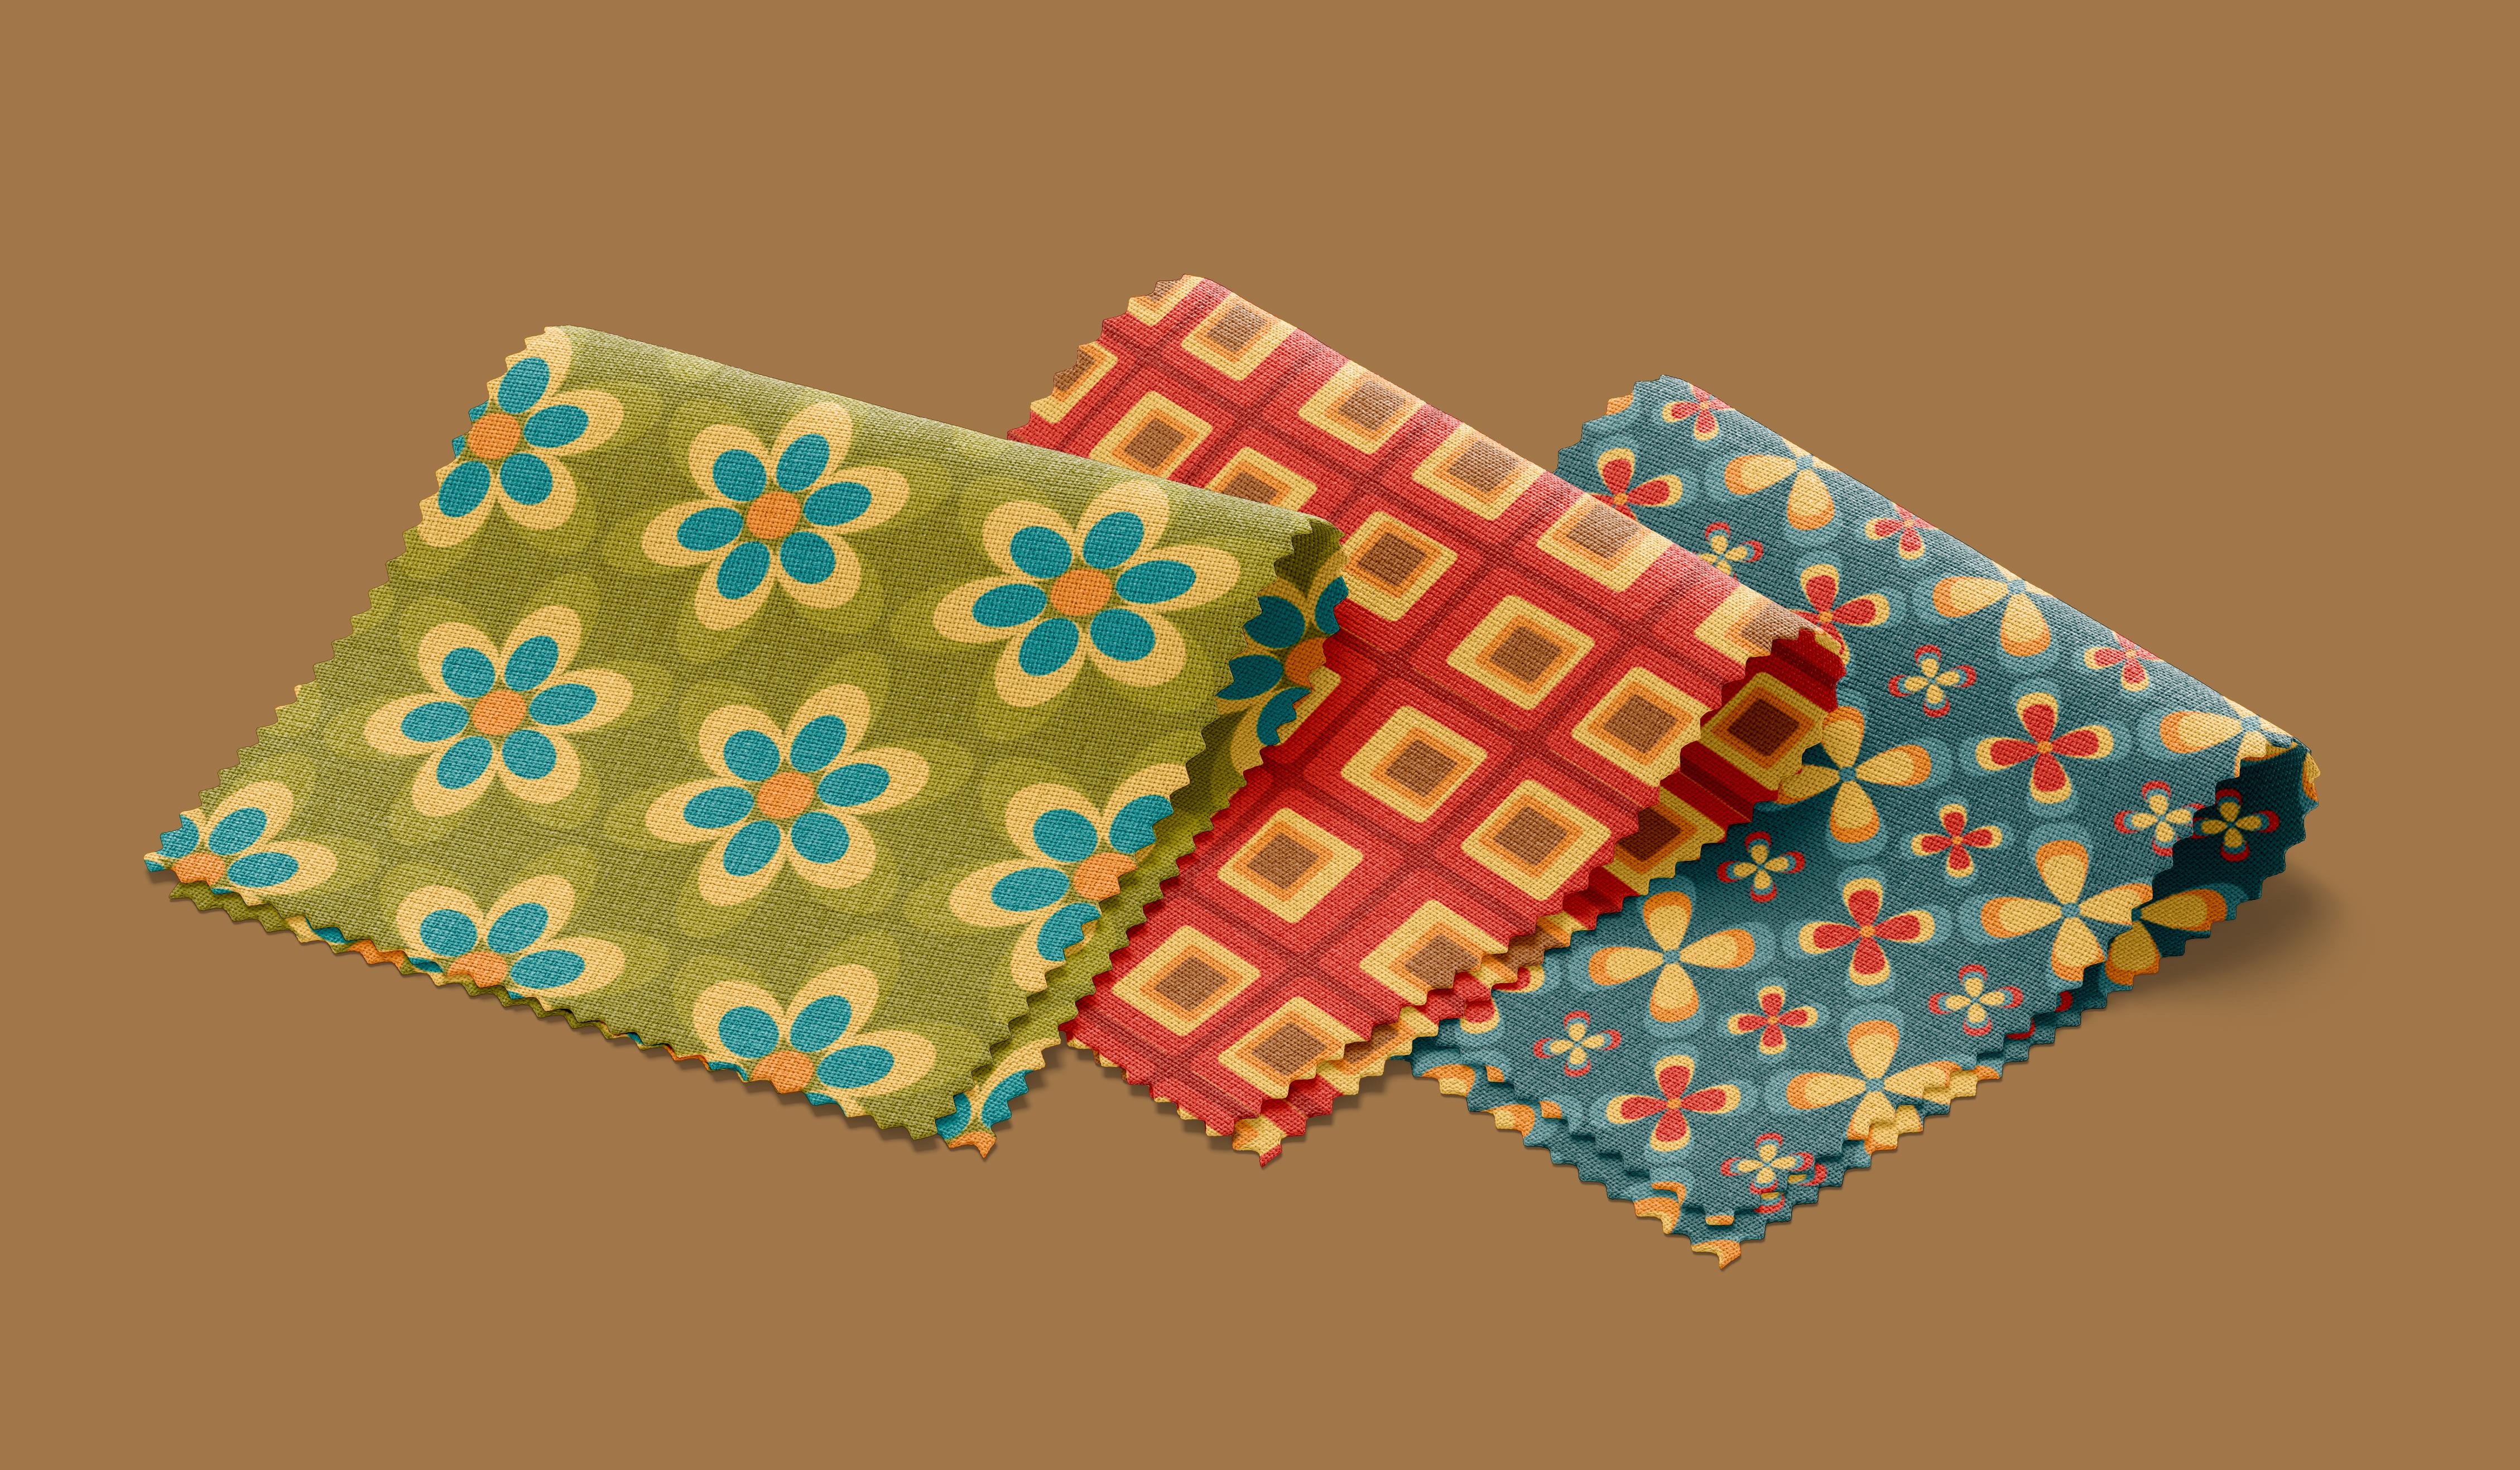
6. Vintage Flower Pattern: The first pattern
that we are going to create will be the
vintage flower pattern. Let's start by creating
an oval shape. Here with the Ellipse Tool. You can see the
swatches right here. But to make the process faster, I will use the Eyedropper tool. You can also use letter I on the keyboard to
make it's faster. Now, I do Control C, Control V to paste
it in the back. Now we will be editing the shape that is nothing
different but in the back, I click right transform scale. Let's make it 130%
and click Okay. Now I changed the color
into this yellowish ones. So I on the keyboard, click. Let's repeat the process. Control C, control
V. Click, alright. Transform scale hundred
and 40 per cent. Okay? And to pick this greenish one, now we select our free shapes and we align them like this. I can see the difference
between the shapes. I will make a few changes. Make it a bit wider. Also the middle one. It looks more or less
like the original. Now I select all three shapes. I go to Object, repeat. Radio. In the Properties panel, I changed the repeat
options. I choose six. Enter. And let's make it a
bit closer together. One less step is to create
this ellipse in the center. And now with the selection
tool and holding shift, I make it bigger. I'm pretty happy
with the results. To create the pattern. I select everything and drag it into the swatches
panel right here. To edit the pattern, I double-click on the swatch. Now we have to select a
different option, brick by row. And we'll leave the half. We have to make the gaps
between the flowers smaller. Click right here and told
that the arrow down. Actually, I want to change the height rather
than the width. So this is about it. When you're ready, click Done. It is best to test the
pattern right now. I select the rectangle
tool. Click. Let's make it 500 by 500 pixels. It's a bit too small. So again, right-click
Transform scale. And maybe 200 per cent and only have the transform objects selected not to
transform patterns. Again. Perfect. If you don't see
the same thing that I do, make sure that you have the fill selected,
not the stroke. The stroke should be empty. Now let's move on to
creating the second pattern.
7. Peacock Pattern: The second pattern
that we're going to create is to pick a pattern. Let's start by
creating an ellipse with the Ellipse
Tool holding Shift. To make it even. Let's change the color
with the eye dropper tool. With the pen tool, we're going to create
two triangles. We click right, transform, rotate, hundred ten to 80. Coffee. We track the second
triangle to the bottom. When you have smart guides on, you can see this
little pink lines that help us create a
perfect symmetrical shape. To make sure that
it's all centered. We click here on
Horizontal Align Center. Now we merge all three shapes into one shape with
the Pathfinder tool. Click Shape Modes unites. Let's go to Effect
war and bulge. Let's leave it on
the 50 per cent. We aren't creating this shape. So now I will create the black one and
then the yellow one. Control C, control V.
Right-click Transform and Scale. Hundred and 20 for
the beginning. Turn to feel color
to black here, or with the eyedropper tool. Let's make it even bigger. Maybe hundreds and
ten right now. And the final yield
shape control C control V, right-click Transform, Scale. Hundreds. And for it
to change the voltage, we can go to Properties,
entity effects. I think I will make it
70% the same width. Other two shapes. To create a second shape, I copy and paste a different
drive to try here. Towards we have to do
is voltage -70% hit. Okay? What we did was the
exact opposite of this shape. Let's bring it closer together. Tracking to the swatches
panel, Double-click. Going to stay with
their current, but make the cells smaller. Both the width and height. Let's test out the pattern. Going to create a rectangle. Let's say I'm thousand
1,000 pixels Transform, Scale transform
patterns, and maybe 70%. This is the final result. Now we're going to move on to create interference pattern. It is called flour,
butter, butter.
8. Flowerbed Pattern: To create the third pattern, the flower bit pattern, we're going to work
with the pen tool. But first, let's
create a rectangle, 500 by 500 pixel. We're going to use it as a
guide for the basic pattern. So let's make the
fill and stroke black so that we can
see the rectangle. And let's turn it into a guide. So I simply lock it. We want to be able to move it
and edit it at the moment. Now let's create
the first petal of the biggest flower
with the pen tool. I'm going to click in the
center of the rectangle. Now, hold Shift C. It's most by 45 degrees. That will do. And now we click on the
first anchor point. We have the first pets already. Let's make it blue with
the eyedropper tool, we create the orange shape
and the yellow shape. Control C Control F, eyedropper tool and
scale transform. Scale. 70%, maybe 80. Okay, let's repeat this
step for the yellow shape. Let's align it to the bottom. Let's take all three shapes, object, repeat, and radio. When it four petals. Enter. Let's bring them
closer together. Now the ellipse in the center
with the Ellipse Tool, eyedropper tool and blue. Let's turn off the lock
on the rectangle for a moment and bring it to
the center right here. Now it's perfectly in the
center. It's looked again. Now let's work with
the other flowers. So what I'm going to do is group the whole shape
with Control G, Control C, Control F. And I am going to create the
first flower right here. By transform. Move horizontal, that will be -250, vertical, -250 pixels. Okay? We have to be very precise. Otherwise the
pattern won't work, will create a grid. And every cell of the pattern is going to
stick to the other one. They have to be
perfectly aligned. Actually the size is wrong. So I have to repeat this step. First, Transform and Scale. 80 per cent will be just fine. Okay, and again, move,
Transform, Move. Now let's change the colors. So we need to change the
center and two other colors. Let's ungroup the
shape for a moment with Control Shift G. To change the repeat, we have to double-click. Now let's group this one. Hold shift and click
on the Ellipse. And control G to group. Again, right-click
Transform, Move horizontal 500s, vertical zero. And copy. Decreed the second flower. Let's do the same for the
remaining two corners. Now let's work with the
remaining four flowers. Control C, Control F. Transform Scale. 80% is fine. Now let's click Transform. Move 250, vertical zero. Let's do the same
with this flower. Control C Control F, transform, move horizontal,
zero, vertical, 500s. We have two flowers left. Let's click on this one. Control C, Control F, transform, move horizontal -250 and
the vertical -250 hit. Okay, Let's change the colors. I'm going to actually scale down this flower because
it's too busy. The pattern is too busy. Scale 80 per cent. To see if it's
perfectly aligned. I'm going to go to view
outline is just fine. So again, view GPU Preview. Let's move it to
the right as well. I have unlocked the rectangle. Now I'm going to change
the stroke color to none. And copy the
rectangle Control C, Control F, and bring
it to the top. Now I'm selecting
everything and create a clipping mask so that we only have what's inside
of this rectangle. So Control seven. To see if it worked. We take it to the
swatches panel. Double-click. Let's make seven copies. Click on Done. Let's test the pattern. The pattern is a bit too dense, so transform scale
transform patterns. And maybe 200 per cent. We have created a perfectly
seamless flower bits pattern. Now let's move on to
the aquamarine pattern.
9. Aquamarine Pattern: Our first pattern, the
Aqua Marina pattern, is the most challenging one yet. But I'm sure you're going to
rise up to this challenge. We're going to work
mostly with the pen tool. But first, let's create a line with the line
segment tool right here. When you're done,
see it is after the rectangle tool holding Shift to make it
perfectly horizontal. I'm going to adjust the length
in the properties panel. It shouldn't be 500s pixel. Click Enter. I'm going to make it bigger so
that you'll see better. Similarly to the
flower bit pattern, I will use the line as a guide. So in the layers panel,
I will look good. We cannot edit it at the moment. Let's select the pen
tool and click at the very beginning of our line. Now let's go to the center, but don't click yet. I'm holding shift. You can see it moves
by 45 degrees. And now I click at the
very end of the line. We have just created
a perfect wave. We don't need the line
anymore so we can either hide it, are
deleted completely. I'm going to hide it. Now. What I need to do is create two other
waves like this. Right-click, transform and move. Let's move it by 30 pixels. Let's copy its first transform. Move and copy it. With Control D. I'm going
to repeat this action. Now select all three
and reflect like this. Right-click Transform, reflect vertically
90 degrees and copy. I'm going to move
them down vertically. Let's make it 210 and
see what we've got. The next step is to create a rectangle with
the rectangle tool. It should intersect
with our waves. So width is 500 pixel. I'm going to change
their properties. The height, 420 pixels. And let's align everything. The next tool that I'm going to introduce is the
shape builder tool or Shift M. It's Create Shapes
from the existing ones. With the plus, you create a shape with
minus, you delete it. I'm going to delete
this part and this part and create shapes
from the existing ones. The next step is to change the fill color and
delete the stroke. That easiest way is
to click Shift X. Now everything is black, so I click on the
shapes and with the eye dropper tool,
change the colors. I select everything and bring
it to the swatches panel. Double-click. And I will
select brick by row. Let's change the height. We have our aquamarine
pattern ready? Now let's move on to
the fifth button. There, crochet pattern.
10. Crochet Pattern: Our next pattern is
called crochet pattern. It's made up of circles. So let's start by creating
an ellipse to 140 pixels. Okay? Let's change the color. Right-click Transform Scale. Let's make it 70 per cent. Copy. Change the color. Transform scale. 70% copy change the color. For Dell highest ellipse. For the green ellipse, I hit Transform
Scale and 30% copy. Final step with the patterns
cell is to go to Effect, Distort and Transform, roughen. The size will be absolute. Four pixels, detail 10/"
and smooth. Hit. Okay. Now we group all four circles. We take them to the
Swatches panel. We wanted the gaps
to be smaller. Let's maintain the proportions. So we change both the
height and width. I want to bring them
as close as possible. It's done. And let's
see what it looks like. In a rectangle. We have created a
crochet pattern. The next one will be
the bubble pattern.
11. Bubble Pattern: Our next pattern,
the bubble pattern, is also based on circles. We can use the ones that have created for the previous
pattern did crochet pattern? First, let's ungroup the shape with Control Shift to treat. Now, we have to make sure
that there's no effect on it. In the properties you
see. There is nothing. If there was, you'll
simply go to Effect are often need to make sure that it's all non-zero and TikTok. And align this to the bottom. I'm going to make the
green shape bigger and take it a bit up like this. Holding Shift. I scale it up. Now I changed the colors. The next step is to create
three more circles like this. What I need to do
is first crop it. Now holding Alt, I
take it to the right, leaving a bit of space. Now I'm going to reflect it, Transform, reflect, and copy. The next step is to
rotate the circles. So first I'm going to
modify the patterns cell. I will rotate it to make
sure that I do it right. Hold, shift and rotate. The circles facing right
will be at the top. Let's crop everything. Now we have our basic patterns, so let's take it to
the swatches panel. Double-click. Go to
create Hex by column. I'm going to change the lips. I wanted to gaps to be similar. So both the width
and the height. I think like that's happens. It means that we had
our circles selected. I need to go back and
change the pattern again. Window history. Let's go to New Swatch. Closer history. Let's make
sure that it's not selected. Double-click and taken Brick
by Column. Width and tight. Best test out the pattern. If you are worried
about the lines, you can see that they
disappear when resuming. They won't be visible at all
in the JPEG and PNG experts. Now let's move on to
creating the square pattern.
12. Square Pattern: Let's create our next
pattern, the square pattern. First of all, let's
create a rectangle, 250 by 250 pixels. Let's make the field
read and stroke none. With the selection tool, the direct selection tool. We're going to round the
corners just a little bit. Double-click here, just
drag it a bit like this. This should be enough. When they ate more
red rectangles. I'm going to go to Transform, Move horizontal 270, vertical
zero. Hits, copy it. With Control D. We're
going to repeat this step. Let's select all
three rectangles. Transform, move
horizontal and vertical. 270. Hey, it's copy. And control D. To
repeat this step. Now we need to create
the yellow, orange, and brown rectangle
inside of the square. Let's start with the middle one. Transform scale. 70 per cent. Copy. Change the color. Let's do the same for
the orange and brown. What we need to do
is first group, these two, the orange
and the brown one. We're going to copy the yellow square and align it correctly
in every rectangle. Holding Alt, I'm
going to drag it. Now it's time to
move the brown and the orange rectangle
holding Alt. This is one way to do it. Another way is to start with all four rectangles and
copy them eight times. Den, you block the
red square and you move the rectangles
inside of it. Each time. I find this way faster
and easier for me, you can try both ways. Let's select
everything and bring the squares into
the swatches panel. Double-click. The next step is to create a width and
the height that will be similar so that each
distance is the same. Let's maintain the proportions. I will make it 20 pixels bigger. Hit Done. Let's create a rectangle
to test it out. Different fill color. You see now we have the stroke selected so we can
see the pattern. Let's change it up and
make the stroke none. We have our square
pattern ready. Now let's move on to creating
the crisscross pattern.
13. Crisscross Pattern: Our final pattern is
called crisscross pattern. Let's start with creating a line that is
perfectly horizontal. To make sure just hold shift. Their lunch should be 200 pixels is difficult to
adjust the length so you can just go to Properties and change
the width into 200. Hits Enter. Let's deselect the line and create a new
one that is 300 pixels long. Again, you can hold Shift to make sure that it's vertical. 300 pixels. I can change it in
the properties panel. This time we change
the height, 300. Click Enter. Select both
lines and align them. Horizontal Align Center, and also vertical
aligned center. Let's go to layers
and lock both lines. We're going to create the boundaries of
this diamond shape. Now let's go to the pen tool and click on the anchor points. We don't need the lines
anymore so we can delete them or
turn the view off. Select the diamond
shape and turn the stroke into
fill with Shift X. Let's make it red. Now. Transform Scale 90% to copy. Change the color. Let's do the same for the
rest of the diamonds. Now select everything and group. Take it to the swatches
panel, double-click. We select brick by
column and a half. Now we need to change
the width, the height. I will zoom in so that we make sure that we do it correctly. We want to close
these gaps Done. And let's see what
it looks like. Change the stroke
color into fill color with Shift X,
again, Stroke None. We have our final pattern,
the crisscross pattern. Ready? Now it's time to
export the pattern files.
14. Export: We have created
eight different 70s inspired patterns in
Adobe Illustrator. Now it's time to export them. First, let's expert all
of the patterns, samples. Makes sure that the
rectangles are the same size. In the properties panel. Let's make the width and
height 1,800 pixels. And the same for
every pattern sample. Let's select every sample. Holding Shift and clicking
on the rectangles. Right-click collects for
export as multiple assets. You can select either PNG for a transparent
background. Our JPEG. I recommend JPEG if you want the background
to be colored, but you should color it first in Adobe Illustrator
to make it easier. Otherwise, you will have to later delete the
background by hand. The easiest way to create a
background in Illustrator. Let's make it with
the example of the flower beds pattern
is to hit Control C, Control V to paste in the back. Now we can easily
change the color. Let's select something
from the swatches panel, e.g. this dark blue. Now to export it as a JPEG, you select both collect for
expert as single asset. If you want to later change
the background, e.g. in Adobe Photoshop, I
recommend exporting it a PNG format with a
transparent background. The expert, the
patterns as swatches. You have to make sure that in the swatches panel you
only have them visible. Click on Save Swatches
and save the patterns. You can also save it
in a different format. E.g. as, VG or EPS. Both formats are readable
also in other programs. As VJ is better for web and EPS is better for high-quality
image printing. Before we save the file, let's make sure that the
color mode is CMYK or RGB, depending on the use
of the patterns. Rgb for screen and
CMYK for print. When you have saved the file
and export it the patterns. Let's move on to creating a pillow mock-up with
your chosen pattern.
15. BONUS: Pillow Mockup: To see how your pattern will
look as a textile design, it is best to create a mockup. I have uploaded a file pillow mock-up to the resources
section of the project. You can open it up in Photoshop. This is the base of the mockup. To enter your pattern, you double-click here on this
icon of the Smart Object. You go to the folder
with your patterns and tool to drag the
assets into Photoshop. Now we click on Control
T to transform. And we make the pattern
as big as the canvas. Now it's time to
change the background. You can turn it off if you want. We double-click here. I want to make it as
organic as possible. So I take the eyedropper tool, click somewhere
onto pattern e.g. on this brown color. I make it a bit
darker like this. Now we save the smart object Control S and we can close it. This is what it looks like now. To make the pillow
brighter, we click here. You can change the brightness. I'm going to leave it on 50. Now it's time to change the
background color. Again. I will take the color from the pattern, this greenish one. And let's make it
a bit brighter. You can save the file with Control S are
exported right here. Let's select the JPEG option. The highest quality. And okay, this is what the
finished pattern looks like on the pillow.
 Joanna Maria, graphic designer and illustrator