Transcripts
1. Introduction: Hello everybody,
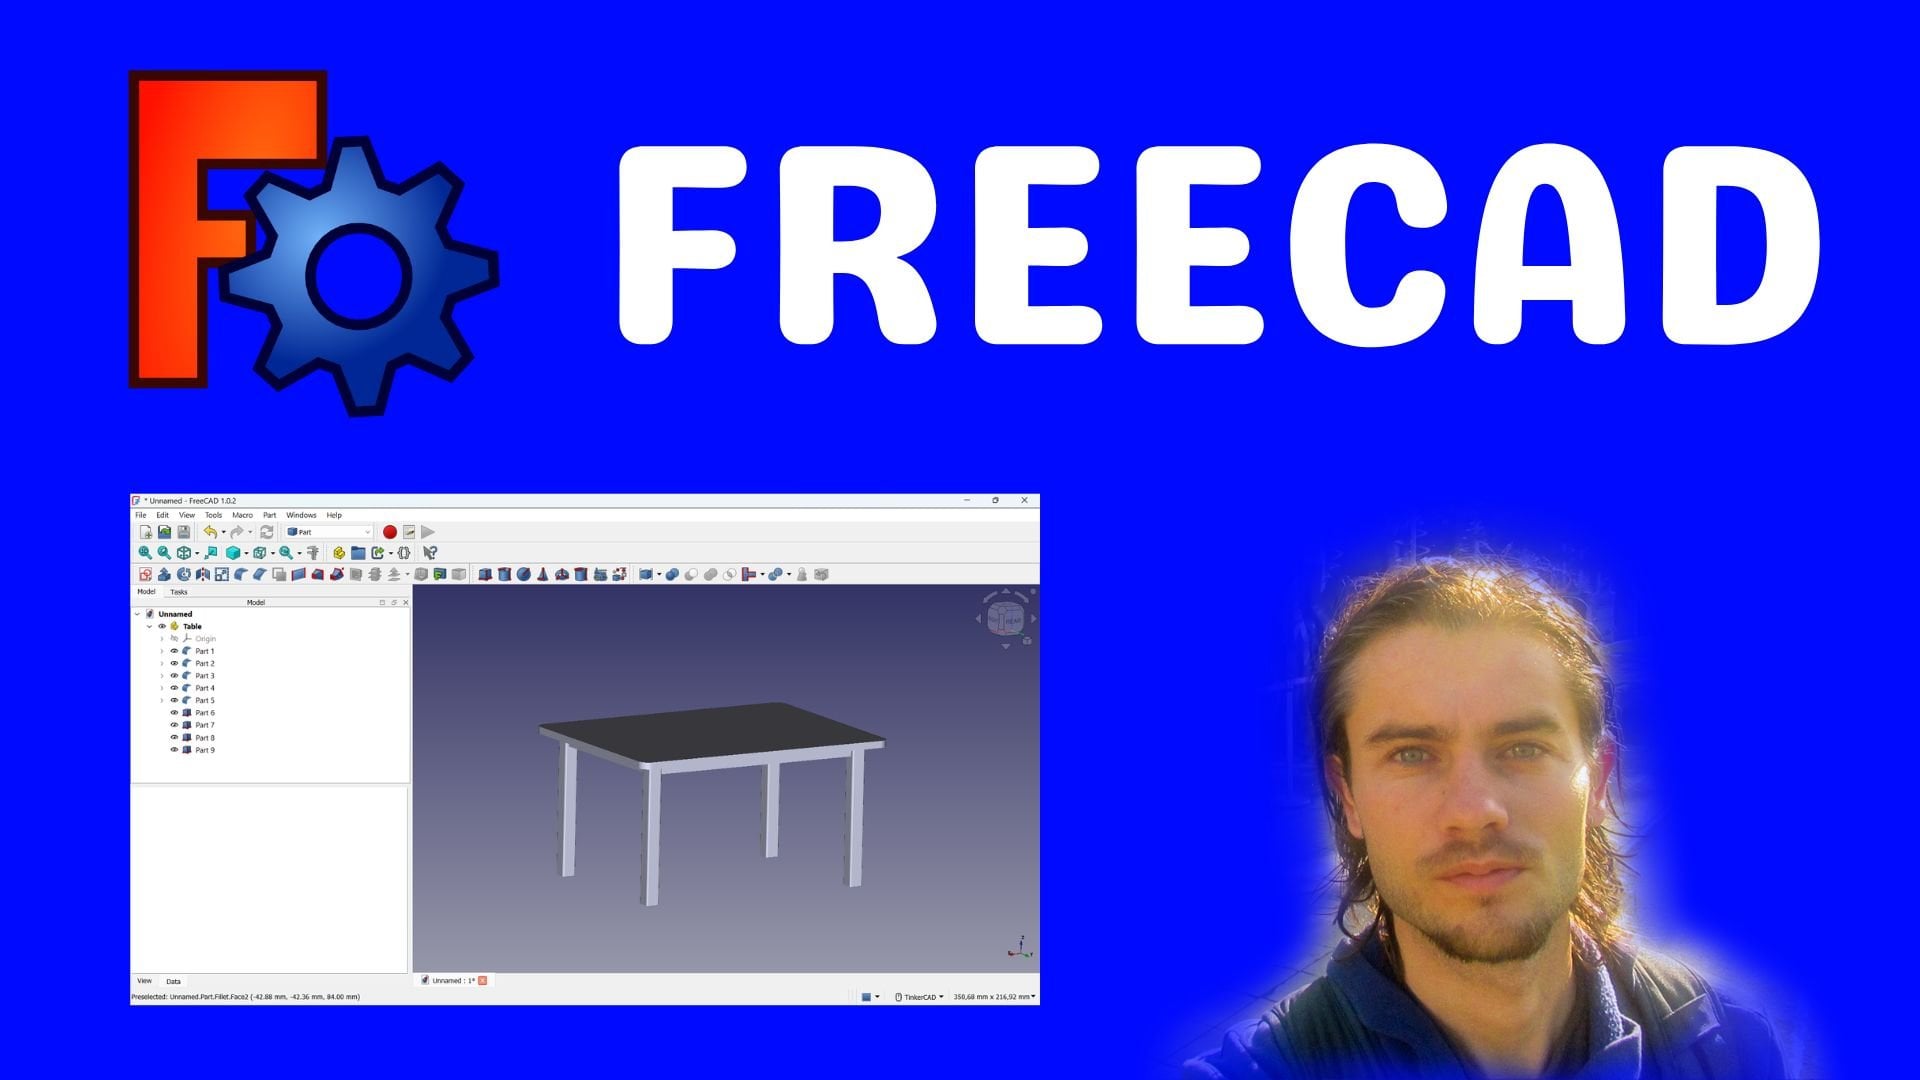
It's Nicholas and welcome to this curse design. Spark mechanicals
are complete curves. This is NPR spark mechanical. It is a CAD software. It is open source and
it is a free software. It is definitely a non-ideal
software for people who want to start in CAD with very great, very great tools
software and gives a possibility to quickly
create a 3D part. This part then can be
destination for printing. You can also just credit
part as 3D models, integrated tools that help
to bring any ideas to life. It is also a software
that will allow you just to work in 3D modelling. So now let's see
more in details. What are the advantages
of this software? First, it is open source, it is free, it is accessible. It is also a very great CAD
software for beginners. So if you want something
with not too much features, this definitely does, and spark
mechanical will be great. It does not work area of powerful configuration
for your computer, just with a normal
computer, simple computer, you can work efficiently on
this and spark mechanical. It is also perfect
for beginners. You have a lot of
ergonomic tools. It is, you can find a complete sketching
system, advanced sketching. Since then, this software covers all the features necessary
for a CAD software. And you can work for whether secretion
of element for e.g. 3D printing, whether
for 3D modeling. So now is a training curves. In this training you will learn design spark
mechanical software. And at the end of the training you will
be able to work on your own to make all
your part design, OK, to create all
your 3D models. Getting start step-by-step from scarf scratch with a
dashboard and navigation, working with a
different sketches using the different
sketching tools. And then convert sketches
to 3D models with the different features
added to appearance and also so much more at the
end of the training curves, you will have also a lot of
training session will allow you to apply to different features seen
during these curves. If you want a perfect
complete curious to master design spark mechanical, this course is for you.
2. Start with dashboard: Let's start with this
and spark mechanical. So the first things to do, each to see and to
explore the dashboard. On this area, you can find different type of work benches. So the first is you can go and file and you can
create new document, open an existing document, and you can also save your work here you will have the
desire to spark options. This is a Preferences
and I will explain after how you can edit
these preferences. Then you can find your
sketch work bench. I'm going to show you that it's very important in these two, have the sketch work
bench because at the beginning you don't
have this one bench. You can just have this one
bench using the preferences. I will explain just after. You have also a
design Workbench. So here you can have also
different tools for modiolus. You're in transform your
sketch in 3D models. Here you can find
display Workbench, workbench, and charity trust
Help Resources workbench. If I just come back here. So this is a different
tools that you can use, undo or redo actions on the
top and do the last section, reduce the last section. It is something useful. But, but this area you can find, we have a stricture panels. We have structural panels here. And here we can find
information about the structure and
information about the views. We have a Properties panel and then we can find properties, layers and quick guide. I mean, every time when e.g. I'm using one of these two
loans are design mode. I will be able to have
different information. If I just go on this area, you can find a different
tools like Selection tool. Let's just go on the
sketch options here. Just before let's
create two new document because here I don't
have a new document. So this is why you don't
have access to any seams, go and file to new
document, new design. Now this is my design and the things that I can do it too. E.g. if I create
one of these tools, I can click on my circle tool. Just start and create my first circle with
a specific value. I can work with e.g. 22. And then I can go on Zoom
design model. Each time. If I click on one of these
two legs are pulled tool, you can find different options
on the Properties panel. And every time when
you do something, you will have also information in your structure panelists. Structural panel is
like construction tree, is like a construction tree. So this is the first
thing is to understand after if I just come back
with my actions truss here, you can find also you have
the possibility to move, drag and move the panels. E.g. you have
district your panels. If I drag and move, I can move these panels e.g. on this area and put these
panels to tally on the right. If I want to drag and
move the layer panels, I can go right-click and drag
and move the layer panels, e.g. on this area. Personally, I think
that so panels by default are good on the left. And it's not really good to have this panel on the
right because we need space to work on
this middle IRA. If you want to put the
panel on the left, you can arrive on this
area and take a glance. Now you have different options. And you can seek to have this
on the top or on the right, on the different columns. It depends on where you want
to observe right position. I can put this on the top. And now I have again
my structure planners. The top if I select
my layer panels, and here you can
find a nodal icon. And I can position
e.g. on the right. And now I have another colon
to position my layer panel. I can drag and move
again outside. If I want to position my layer panels on
this area, I can e.g. go in some wider and I will add my Layer
panel dress here. If I drag and move, I can also go here and
positions layer panels totally on the page like this. If never e.g. you drag and move these
different window and it's difficult for you
to position. Again. It's not a problem. So only things that
you have to do, it's to go on file. You select these unpack options. And when you arrive
on appearance, you can just raise it. Docking layout, raise it
documented yet layout, you don't resist anything, just the layout of
your dashboard. And if I apply here,
take your glands. Now, I'm like at the
beginning and it is perfect. So if you have trouble
trouble because you move and you didn't want
to move any any panels. You can just go and file these unpack options and
raise it ducting layout. You can find on this
area with small 3D cube. And thanks to that, we can
see the different axes. It's extremely practical
because you can click on the different
view using this element. So you can walk on the
z-axis, y-axis, x-axis. And each time you can
find right view using these panels when you walk on the plane or you can also activate the plain view. It is also extremely practical. On the bottom right corner here, you have different
selection tool. So you have a selection filter. You can find also a
box selection apply. You can also use a spin pan and you have also the zoom tool, but I will explain after that, it's better to select on your most what type of Bhutan you want to
add the navigation. And you can also edit this
button in the preferences.
3. Edit preferences: Let's see preferences. It is important as we're
beginning to take your glands on the preferences
because you can e.g. change the navigation. You can apply sketch one
bench directly on this area. The first things to do to have access to the
Preferences go and file. Design stock options. So now you have this panels. The first things to do, you
have just something popular, changed, the most popular option in design spark mechanical. By default, you have
your performance options graphic with a render quality. This is the value by default, you can keep this value after you absolute different
interface options with the displays of the tool types that you
message and window also sings, I'm not going to change any sinks and your
control options. I'm not going to
change any things. Also. If you walk on appearance, as I explained just before, you can raise it ducking layout every time when
you want to come back with the first layer would
with these different panels. If I just continue, you can also change. You have a rebound
style on the top. If you want to change
this ribbon style, you can click here. You have also a cool option. By default, we will keep
decent spot mechanical blue. This is same hue.
Just want to turn it towards a colossal interface. You can work on rebound
style and color Shen. By default, we will have
the cross-section in sketch show coaxial face group
or these type of things. And let's keep these
different parameters. You have the selection. We don't have any
specific change to do. Snapping options, stepping
options, the snap radius. So we have a grid and we can we have a grid and we can change snap
radius if we want. C is the same for
sketching options. If I just continue little bit, you have also solid with
incremental position. Let's keep the snap
prejudice at ten pixels. Let's work now with the unit. You can transfer you need
for all the new document, our own needs this
document by default. Me personally, I'm using
metric and millimeter. Sometime if you prefer e.g. to work with inches, you can apply interior. In this course, I
will walk in metric because I used to
work in metric. You ever saw. So lend some time. If we worked for
industrial paths, we can stay in millimeter. But if I want to make the
design of a models like e.g. a. Table with furniture and
it's things like this. Maybe I can change
for centimeter. And if I want to make a
different type of design, maybe I can walk also in meters. In the course we will stage most of the time in millimeter. Just to show you that at any
moment on your document, you can change the unit angle. Let's walk in degrees mass
cramps density derived. So it's okay for that. After if I continue
sizzle navigation, by default you have
this navigation and I'm going to change it. So navigation just for me after up to you to
see what you prefer. If I just click on ten, take a glance and NB middle mouse button and be right-most button,
LNB, leftmost button. If you want to apply spin, we'll use an ND
middle mouse button, Spanner, Shift plus and NB. Personally, I prefer to change if you want to follow
me, you can follow me. If you don't want to follow
me, you don't follow me. It's not going to change
anything for the course. I will just tell you
to zoom to rotate on your view and after up to
you to see what you prefer. So personally for spin, I'm going to change and I can click on spin Kwanza, right? And I'm going to
apply air and B, I prefer about the pan. I'm going to change also and
just apply MMD and zoom. I can keep this parameter. And yes, it's perfect. After Zoom with most whale
in zoom mode in spin, I can keep all these
different parameters. And the stress license I've told you over
to Eclipse view. Let's keep sphere. So I'll change for
AirBnB and MMD why it can be interesting
because as I'll explain, a RMB, just the right-most button and m and b
middle mouse button. And you can do everything with just right-click and
middle mouse button. If I just validate,
I'm going to show you, if I just go right-click, I can just rotate on my, on my walk plane. I can just rotate if I click
in the middle of my most. So it means with
my scroll wheel, I can drag and move like this. So it is extremly useful. And if you just move the, moves the scroll wheel, you can zoom in and zoom out. Zoom in, zoom out. So it means just
with a right-click and just with the mouse wheel, you can do so. Sweet. Most important things
about genetic variation, just with these two buttons. And it's extremely useful. You don't have to click on
Shift Control or any things like this to move on your space. After, if you want to keep the Beijing Design spark
mechanical navigation, you can. But if you want to follow me, you can also use this because I think it's extremely simple. If you change spin and pan
for l and b and m and b. If I just continue,
you have also advanced parameter why it is
useful by default. You won't have to
sketch options. By default you don't
have the swap bench. And it is not really
good because you don't have all the tools that you
need for the constraints. And also tools that you need to really make, make
advanced sketches. If you take the Blanton sketch because it is now a
different workbench. I have all these tools. So it is a drawing tools. After I ever saw
modification tools and I have all my constraint. And by default you
won't have this one. And you won't see
all the constraint. It's not extremely convenient. So I can advise you
to go and file, design spark options, advance, and enable constraint-based
sketching. You need to click
here and after to restart this and
spark mechanical. After maximum undo step 50, I think it's totally enough. He wants to change. We can change or you have the language. By default. Your
language will be from the position of your computer's
language by default, offshore computer, if you need
to change, you can change. You have language,
you have a lot of options here to File Options, not seeing specials to do. Your final option for
exploitation, e.g. AutoCad or DG of
different options. And you have customized
nursing specific to do it just if you want to create
a shortcut, if you prefer. But since you're
curious, I won't really use a lot of shortcuts, so it's up to you. If you prefer to a shortcut
you can do for you. But I think it's not
extremely useful to add a lot of shortcuts in
design spark mechanical. So this is a frostings
to do for preferences. Two important things, checksum navigation if you
need to change, and other important things. Advanced parameters enable
constraint-based sketching. And if you have to change
the language, you can.
4. Create document: Create a new document. So to create a new document, it is not very difficult. You just need to go on
file and you can find new, find new document, new design. And thanks to that, you can open a new element lies ECC
is a design number one. If you need e.g. to create multiple
document at the same time, it is also possible just go to File New and I can create
an order on design, just go and file new credit. But no doubt design and phi
new craton or down design. So now I see that I have
designed spark mechanicals open. And as you can see, we have exactly four
document at the same time. So this is the first
things to understand to create a new document. It is just pretty simple. I can also click here, click here, click here. If at any moment you just
want to close this tab, but you will have to save, if you want to save your work. And I can come back File new, new design anticoag lenses
is now my design number one. So first things to do pretty
simple, just go and file, create two new design
and every time you will have your first document. So now what's happening
if you want to open directly a 3D models, who you want to impart to
3D models that you use on a different 3D modelling
software or CAD software. I created different models using different CAD software or
3D modelling software. And I would like to open
whether in OBJ widow in STL, STL format file. And I can click
directly on open here, as you can see before, I use recent document, pangolins RBG bench will
be g. I can click on open and just go
on my 3D models. And I would like to
open this bench models. I have different options. This is STL options,
and this is e.g. OBJ of options. If you don't have the option, just click here and all fine. If I just want to see
anemia OBJ options, I can click here and I
know this is my OBJ file. If, by the way, if you want to open a decent spark mechanical
document, you go directly, you do exactly the same thing, but here you just apply design, design spark mechanical file. And so finding these are
span will be S duck, duck. So let's just come
back bench file. I can click on OBJ, it's better and
ceilings this file. And now you can find some bench, depending of the
softwares that you use. Maybe this position
will be little different on the axes because
also graphic designs, also 3D modelling
software and don't have exactly same type of coordinate. And you will have
something on the left. This is my structure, my construction tree,
and I have my bench, and I have multiple faces. So after It's not extremely convenient if you want
to Egypt that it's small if you want
to develop a scene using a next stereo 3D models, but it's not extremely
convenient if you want to eat, eat your models, even if you have options and
you can get a little bit, but you have a lot of, a lot of face, as you
can see, n subdivision. Let's see a second example. I can go and file,
click on Open. And this time I can
select 3D models. And let supply my
ruler like this. I can change. Let's apply this time STL
file and just click here. So now I have a new document and I in protein disease element from a different 3D modelling software inside these
and spark mechanicals. I'm seeing terrorists
thing. If I select every sync with my
selection tool, I can select everything
with a frame of selection. If I go right-click here, you have the possibility
to convert to solid separate piece like this. So you have different options. If I go on convert to solid, I can match faces
just like this. Now I will explain a little bit more in details after it's extremely useful because I can now add my different faces. And if I need to work, it is possible because
I have a solid e.g. I. Can take this part
and if I want to pull, it is totally possible. Just like that. If I want to create a sketch on the area to make some change, it is totally possible. If I want to separate something, it will be possible. I can use e.g. might split body tools and just to
click on this face, click a target body. I can click on somebody. Then I can click on a
face to create a plane. And I can separate events here. It's unable because
I have too much sin, but I will show you after
how you can use this tool. You can, yes, you can separate. You can use a split body. You can click and try to
separate with something. That's not possible
because I have a lot of element
on the same plane. But I will explain how
you can use this tool. So first things to do. You can file, you create two
new document, your design. If you want to import your
work, you're going to file. And I'll just open your work. You're going to file open and
you select what you want. If it is a radial design, spark mechanical failure,
just click here. If it is a different file, you can see leak or BG, STL. So most of the time.
5. Master navigation: Let's explain the navigation, how you can actually get
on your space of work. So the first thing
that I'm going to do it just to create a sketch. So I can use the
sketch mode and just create a rectangle
from the center. So define rectangle from center. And here you have
the panels and you can see the eggs of
users that you want. E.g. I want to have a top view. So I can click here
and directly I can go on my top view
and create a rectangle. Let supply to value like
26 by 22 millimeter. And end sketch editing. After, let's just click here and drag and move
and apply your value. Let's just apply a value of
20 millimeter, like this. So bad. The navigation. The first things
that you can do, if you go on the right, you have different options. You can use click
on spin and you can just go left-click and
use the spin tool. You can also go in this area. You have different
type of rotation. Rotate 90 clock twice, and rotate 90 counterclockwise. If you just want to crop
rotation on your view. First things to do, you
have different tools here. You can also use a pen tools. And thanks to that,
you can drag and move on your space of work. And the last options is zoom tool turns a
scroll wheel or try. You can click here
and left-click and you can zoom in or zoom out. With these different tools. The n is just to, just to do exactly the same
things that if you use your center button on the mouse and just
show right button. As I explained before, when you go and find you select
these and spark options. And then when you
click on Navigation, you have these different
options and spin, pan and zoom. As, as explained before, we have RAF change personally, spin for R&B, band for M, M B. So it means to work with
some middle mouse button. And the rightmost
by done to make everything if you want to
keep so basic parameter, you can keep the asic parameter. It is not a program. So thanks to that,
with these things, I can go right-click and I can turn like this
right-click, I can tell. And if I click on
my mouse wheel, I can try and move like this. If I just move the mouse ways, I can zoom in and zoom out, zoom in and zoom out like this. So this is a first
things to understand. Frozen education. I've taught to select
the view that you want. You can just click on this
area and you have this cube. If I want to walk on the x-axis, I can click on x, z axes. I can click on z-axis, y-axis. Just like that. If I just come back e.g. on this type of view and I would like to work on front view. I can click on the
green print like that. If I want to walk
on the top view, I can drag and move little bit. Now I can click on blueprint. And thanks to that, I
can be on top view. So this is a single important
things to understand. You can use this element, it is extremely,
extremely convenient. Other things to do, you have also a plain view. I'm going to create some symbol. If I click on Sketch mode here, I can click on this
face like that. And if the directly, I want to be on zoom
view of my work plane, whether I can click on the top view or I can
just activate plain view, display your design so that
you are viewing the grid. Add on. If I click here, it is perfect directly. I'm exactly on the right view, so I can hardly tell times. And let's create a
circle, circle tool. Click on the center of
Persian credit to circle. You can tabs of value. Let's click on ten millimeter
and just finish the sketch. I can drag and move
like this with my Muslim and Christian
extrusion with my pool tool, you can click on support tool. You have different options, just keeps a basic options
and left-click here, you can create in the
middle. Just like this. If I just go unsold left on
this panel one more time, you can find the same tools. So you have against
this pin tool exactly like here it is
exactly the same tools. We can use this tool again. You can use your pen tools or you can use again,
your zoom tool. But it's not really
important because you just use the different
button on your mouse, but just zoom, you have
just to zoom box in. So it means you can go
left click Create Frame of selection and you can zoom
directly on the specific area. This is just
something little bit different some
time it is useful. If I just go on this
area, you can find them. So all the basic view
that you can use here, you have a snub,
you pick a face. So I can click here, select this face and directly
I can go on this view. Sometime it can be useful also. Last things is to click here. And if I go isometric view, I can apply isometric. If I want symmetric, I can click on tree
metric like this. So iso metric to metric view. But some you like this left. And you have also type of view, basic views that you
can apply right, front and again back. Oh, I can just apply
also on view like this. Any way you can tell it to
you to see what you prefer. Personally, I don't
use this too much. I don't use this too much. I prefer to work only with. So right-click and the Center
on but turn off my moose. And to use also this cross-sell. I think here I use
most of the time this can a man because
for me it is the best. And sometime I like also to
click on the plain view, just like this to be exactly perfectly positioned
on the right view.
6. Edit grid: Let's explain how
to use the grid. A grid by default, you
can find this grid when you start in your mud extremly useful
when you work with sketches to use the grid. First things to understand is
how it displays this grid. You can select this
view for the w. And you can find we have a main part and we have
subdivision inside. So it means I have
multiple subdivision inside a main square
to edit your grid. First things that you
can do is to go on file, SELEX, decent spark options. I've talked to Solexa. You have multiple
options and you can find here you have units. And if you continue, you can find grid
me now grid spacing 1 mm and number of green line pair manager,
ten millimeter. So it means that I have ten subdivision with a
grid spacing of 1 mm. If e.g. I. Change the number of
subdivision and I just apply to Lexis. And then I click and validate. As you can see now, I have this main square and inside I have only
two subdivision. Two subdivision. If I just click on my
sketch tools, lines, and I just go here, you can find web 1 mm here. And wherever main square inside we have just
two subdivision. And each time we have
1 mm, just like that. I've taught it depends
about what you want to do. You can edit your grid, these and stock options. Let's walk again with units. Continue. If I want to change
not every 1 mm, but e.g. every ten millimeter
with four sub deviation, I can validate trust like this. And now if I click
on my line tool, you can see we have ten
millimeter, 2030, 40 millimeter. So now I'm walking
every ten millimeter. We subdivision for subdivision
inside a main square. So this is the first
thing is to understand, you can eat it. Display of your grid, gone file, decent spark options, and let's residual
parameter to default, raise it to different
places after to the swap. So this is a first
things to do why it is useful in my
sketching option. Because if e.g. you
create something, you can use your
grid and you can snap with a number
of millimeter. I can snap with 20 here, can walk vertically
if I want five, I can apply five. Here. If I want five, I can apply A5 and I can
just snap to the grid. As you can see, this is why
it is useful to use a grid. Now some time you
can, you want e.g. to not snap to the grid
because here it's every 1 mm. So for sure I can
create two liner. And if I go in this direction, I can enter a value. I can enter directly to 0.5, and I will have my print
directly in the middle. As you can see, I
can press Escape. And now I'm not exactly on my grid because I apply
a different value. But you can also remove
the snapping options, warrants or left and you
have the properties panels. If I extend little bit, you can find Snap
to Grid and snap to anger generally when selected. So cross-sell with snapped to the angular snap
increment Gennari, we keep snap to anger
because it is useful. But if you, this
activates the two e.g. and you select one of these
two lines, the line tool, you can start where you want, so I can start here, I can arrive here,
Continue here. It is not a problem
because now I don't have any snapping options. Something also important
is you can work with it. So creed, Let's
select everything. You can create a frame of selection and press
Delete on the keyboard. If you don't want to have
the display of the grid, click on display and you
can find on the right this option, show sketch grid. I can click here and now
I don't have any grid. You have the feeling yes, you have something
onto a background, but it's not very important. And now I don't
have snap to grid. I don t tell, show
sketch grid and I have a lot of freedom on my
sketch. I can click here. And e.g. I. Can create a construction
line in some either S1, this axis, credit
construction line. And after I will explain that
you can create symmetry on your construction line with just right-click Set
as mirror lines. Now I have some freedoms. So it means I can e.g. create two line just
like this here. To hear with specific value, I can create two nodal
line truss here. If I need to enter some value, I can use my dimension
tool still exist, print to this line. And I can tell you if
I use that I want, if I want 20, I can apply 20. I can also apply a circle, e.g. from this one to this
one, just like this. And come back with e.g. Leonardo line just here. Here. You have a lot of
freedoms because you don't use snap to grid, but you need to enter dimension. You need to enter a lot of guy because it can be
more difficult. Using this one. I'm going to select everything
and just press Delete. If you want to have
your grid again, just click on display
and you can reactivate. Show sketch grid if you
want to snap again, just reactivate Snap to
Grid and snap to angle. Now if I create any
sinks like rectangle, I can come back to
designer and much sketch. Click on Sketch. And I can create
e.g. a. Rectangle. You can activate the options defined rectangle from center. And if I click here, I
can again snap for sure you can enter two values of France value and just
signaling value. But you can also just
use your grid. If e.g. I want for t by t, I can go on 40 and
then I can extend, extend until to
obtain a value of 30. And I can snap to my grid and then we'll add
some precision. I can create a nodal
line, e.g. just here. And I can extend four
millimeter, 12 millimeter. And every time you
can snap to the grid, Let's delete every sink, press Delete, and it's okay.
7. Export work: Let's see how to
export your work. How you can export your
work and at the same time. So you can save your
work, save your models. So the first things to do, Let's create two basic models. Simple models. We're going to use the sketch
mode and work on axis, I need to change and
I can click here, select new sketch plane. We will work on the Y-axis. Click on the y-axis,
and thanks to that, you have a new work
plane on this area. Now I can use this view and
just I would like to create like a square and craft my
first-line form, z, sprint. To sprint, you can snap, you can apply to value. Let's first value will be
60 millimeter, like that. Press Escape. And then you can create a second
line just here. And I can enter some sink
like 60 millimeter again. Then I can come back. You can continue and let
supply four millimeter. Come back with 56. 56 and just close
with four millimeter. After two crashes. This sketch, Let's
finish the sketch here and create an
extrusion CDX of Pull tool. Click on the face and
create an extrusion. We can apply 60 or
so and press Enter. Now, we'd like to cry
to all on this face, on this area and
all on this area. So frustrating this face. To sketch again,
NCLEX Review tab. You will see that it will see everything
in details after it, just to show you how you
can export your models and credit just something in the
center with 20 millimeter. Finish the sketch. Change the view and
you can drag and move with support tool just
inside to create two. Let's repeat the same
thing on this area. Click on this face to sketch. Now we have the work plane
directly on this face. And you can select View, click on this red path to
be perfectly on this view. And then with the circle tool, select the center and
create some sync with 20 millimeter diameter
and finish the sketch. So now with a pool tool, you can click on this face and drag and move to create an
extrusion on this direction. So perfect. Now we have is this
element and how you can export and save your work. So to save your work, it is pretty simple. You just need to go and file. And you can select
Save, File, Save. And I can click here. Now you just need
to select something on your computer where you
want to export your work. I'm going to export
here and tap e.g. square. It will be so decent
spark mechanical file. So ds mechanical file, print is dark and I can save
my work, and that's okay. Now I expand this
work in export, save my work with the design
spec mechanical folder. Now if you want to export your work in a different format, like OBJ, like STL. If e.g. someone want to reuse these models on different
3D modelling software. It will be possible, but you need to
export your work. First when you go and file, you can select these
and stock options. Stock options you can
go here, file options. And you have more advanced
parameters like RBG, SketchUp format, STL format. If I select OBJ, it will show you automatically, so you need will be automatic. Detect, detected from
your, from your models. So if you walk in
millimeter automatically, it will be in millimeter. And you have Export
Current graphy you can do is activate. You can change the resolution if you need the
most of the time, I will keep this parameter. You can do the same
thing for SketchUp. You can indeed
parameter if you want. And you have also for STL file. If you need to make some change, you can go in this file options, but you just don't know options. Now if you want to
export, you have, the first possibility
is fast export options. When you click here, you
can use STL for printing. So it means printing
with Ultimaker Cura. And you can just export
into basic STL format. So I can click here
basic STL format and I can still exist name
square, save as STL. Again. Here you can find some
options if you want, and you can come back on this area with decent
spark options. And I can just click on Save. And that's it. If I want to expert
in different format. Because finally I have
uneasy STL file, STL format. By the way, if you want
to export only in PDF, it is also possible just to
have a view PDF passage. You will have a view
with different faces. You can also export in PDF. Now if I want to
have more options, because you don't find
these options here, you need to go File, Save As. And this time when you
go and save as type, you have more options, e.g. you can export for
AutoCad point D, F. You can also add OBJ. Obj. You can also
export for SketchUp. And you have also
just to image file. You can just export as an image file if you
want with JPEG or PNG. Let's work with OBJ. File, save as type OBGYN, just expanse of work. So it means that now if e.g. I want to open, I can go and file open. Here, this is my design spark
mechanical file, square. And I can open this
and that's it. The best things to
do. It's too close. Close this one first open. And if I want to
reuse my mother's, I can click here and that's it. This is my deeds
and spark folder. Now, if I want to reopen in
my OBJ folder or file open, and I can select e.g. change here for all phase. If I change for all phase, you can find here this
C is my OBJ folder. Here this is my STL folder. You can also apply a filter. I can click on OBJ, and this is my square in OBJ. I can double-click. And now it is little different
because it is OBJ folder. So we are facets, As you can see,
different facets. And if you reuse the
modalities and designs, mechanical, just open
your d's and spark, make any CAD file. But if you reuse on
some input in OBJ, you can then go
right-click and you have convert to solids and you
can match faces just here. And now you can recuperate
a solid just like this. So this is how you
can save your work, how you can export your work, and your interest is to
find the different files. And sometimes it is useful.
8. Start with sketches: Let's start with
sketches extremly important in this software
to work with sketches. So it means we can just
go here, we have sketch. And first things to understand is the different
work planes that you can use. To enter in the sketch mode, you need to select
a work plane first, and you click on Sketch mode. You enter in the sketch options. And you can choose a walk planes that you want to
choose, the work plane. You can go on this area, select New Sketch Plane. And you can see the x z plane, x y plane, the plane x y plane. If I click on proceed, I will work on the top view. If e.g. I. Click here and y-axis, I will work on my front
view, front work plane. And the last possibility, if I just click here x-axis, I will be able to work
on my sidewalk plane. Let's come back to
the top work plane. Let's click here again
and select the Z axis. I've taught to do this work, you need to be on
the right view. To be on the right view. Whether you can click
on perfect view here, whether you can
click on plan view. And it is useful also. But if you have like this, I know it is a top
view so I can click on the blue sphere on the
top. Just like this. After, when you enter
in the sketch mode, you can find different tools. This is a drawing tools. You can find also
modification tools. And then you can find
different type of constraint. If e.g. I. Cracked a line like this, first line here and the second line may
be dressed like this. And then I create a nodal line from this
point to this print. Each time I wouldn't be
able to add constraint. E.g. if I want to
have some sink, like if I want to have
some sink like parallel, like this, I can
create a Nadar line. Here. I can activate my
parallel constraint. Click on this line to this line. And now I have
something parallel. Each time when I we click
on one of these element, I will have different
option like to color, and I will have as
options also constraint. So here, if I click here, I can find the cure of
constraint like that. If I want to remove
these constraints, I can just click on this area and I can remove
the constraints. So it means now I don't have
the parallel constraint. So this is how you can apply
different constraints. But I will explain
in details after, Let's select every sink and
make some sync bicycle. Let's grab the rectangle first, I can click on my
rectangle tool. And every time you will have options on the properties panel. Options on this Properties
panel. I can e.g. define a rectangle from center and click here
in my center point, draft a first rectangle. And I can apply to value, whether using my grid, whether I can press
tabulation on my keyboard. And I can enter 60
millimeter tabulation table. And I can tap 40 millimeter
and I can press Enter. After to lose this work, Let's crack a little bit more. Let's create a circle e.g. address here, and create a
circle with 20 millimeter. Let's go to another circle
here with 20 millimeter. Each time you will have some interesting tool
you can create e.g. wounded corner or a phyllite. This one to here can apply six. I can click again on
my affiliate tool, this one to this one,
Let's apply six. And you have multiple
transformation tool. I can e.g. use trim away
extremly useful if you want to remove only specific
edges just like that. So e.g. I. Created this element. I've taught to do this work. I can click on and
sketch edging, and now you can come back
on your design mode. Automatically. You
will have a soft face I've taught to
create your sketch will add a shocked face. And from this surface
you can use one of these tour support
tool to create volume. And I can go left-click drag and move on the
direction. And e.g. I. Can drag and move
six millimeter. And now I convert this
phase to a solid. So now about the sketch. If I want to create e.g. something directly on this face, I can click on so phase. And if I click on Sketch
mode automatically I have a new work plane
directly on this part, directly on this path. E.g. here I can use
suicide, you like this. And I can create
another rectangle, e.g. let's apply five or six by 12. And I can finish my sketch and now I
created a new sketch. So I have a new soft phase
directly on this work plane. And I can extend like that. The values at Taiwan's, let just apply 40 millimeter. I can take 40 millimeter, just like that here. After you can also change
the position of your sketch. So it means you don't need
to work on the x-axis, all directly on the face. Let's take an example. I can click here again and
go and create a sketch. But this part, I can just
did that with movie Creed. And if I click on
Move grid, now, I can change the
position of my grid. And sometime it is useful I can change the position y naught at 20 millimeter,
validate like that. And then I can just
create another rectangle. Click on my side view and
create another rectangle, six Pi 14 or seven by 14. Finish my sketch. And now you can find this
new surface directly on this swap planes at
that position from this phase to 20 millimeter and I can create an
extrusion again. Let's work with six
millimeter e.g. after I'm going to
show you you have multiple tunes, can create e.g. Shaylan just like this here. So it's this extremity
and protons that they're beginning to understand
the work plan. You can even create
work plane just onsite. So it means I can go on my sketch mode and I want to position a
new work plane, e.g. just here, just like that. Now it is on this face. And I can also click
on Move grid again. And e.g. I. Can change the position and y
position at ten millimeter. But after you have
also a cursor, so it means you can take this
one and take your glands. You can drag and move
the work plane on different direction
using the rotation. It is also a possibility.
Just like this. Let's come back on, create a new sketch. Click on this face,
just like that. Now I can walk on this
face, as you can see. Just go on my top view
and create a circle from the center point with maybe
ten and another circle, this center point we
stand millimeter. Each time. Don't forget
to finish the sketch. And if I click here and
Control click here, I can go left-click and drag
and move on this direction, just like that, and create an extrusion to
remove materials. This is how you can
start with sketches. Just understand how to
start with work plane, finish the sketch and after you can use your different tools.
9. Drawing tools part 1: Drawing tools on sketches. Let's see how you can use these different tools
to create your sketch. First things to
do, Let's enter in the sketch mode. Sketch mode. And we can click on this axis. We are on the right axis
directly and click on this view. After to do this work, we have different drawing
tools on this area. First, I'm going to show you the basic drawing tools like how you can
create a rectangle, circle, just this
type of shapes. So first things to do. You can create some rectangles. Basic rectangle is you
select first print, and then you can select a
second print and you can create a rectangular lexis
after you absolute possibility directly
to add value. If I just come
back with my undo, is my history panel,
undo redo action. I can click on the
rectangle again. Click on this sprint. If I want to enter
to var2 value, you can directly types of Fraass value like 40 millimeter, as you can see, if you want
to tap the second value, you need to press tabulation. On your keyboard tabulation. You can find the second
value and I can tap e.g. 25. Now when I finish, I can apply, okay, press Enter on my keyboard. And I created directly rectangle with 25 by 40 millimeter. You can check our
chancellor dimension at any moment using so dimension
tool, create dimension. And here I can extend like
and check that I have 25. Here can extend an
IF 40 millimeter. If you want to change, you use your sees
dimension tool. You double-click on dimension. If I want certainty, I
can tap certainty and I can extend my rectangle. Here. I want 60, I can tap 60 and
extend my rectangle. First things to understand, you can also create
a rectangle from the center to a rise. Every syncretic
frame of selection first press Escape to come back with your
selection tool here. And when you have your
selection tool by default, you can create a frame
of selection and press Delete to create a rectangle from the central
extremly useful click on the Rectangle tool and you can find define a rectangle from center on zoo sketch
options here. So click on Define
rectangle from center. And now if I start
from the center point, take a glance, we can cry to
rectangular form the center. Extremely important. I can apply 50 millimeter
on by e.g. SO2. And thanks to that, I
can make something with little symmetry if I create a darker on this area or
Ghana's soccer on this area, I know that I have exactly the same space between this sprint and
the center point. And this point and
the center point. Let's work with a
second type of element. Select every sin, press Delete. You can crowdsource
basic circle. To create a circular dressed. You can start from the
center or anywhere. I can go left-click and dressed, grab my circle using the value if you want to
until the value, It's simple. Left-click and P4 to do the second left-click
just enters a value. If I want 16 millimeter, I can type 16, press Enter. And I created a second
circle with 16 millimeter. So it's not very difficult
to create a circle. After you have also
more options here, you can create a three-point
rectangle and an ellipse. First, let's select everything again and press Delete supra and rectangular is just little
bit different because it just you create a first print
with Angular specific angle. By default, you have 90 degrees. If I go in this direction
and I can apply 20 millimeter and then I
can extend on a direction. I can extend on z direction. Sometimes it is useful if
you want to make something in diagonal with specific angle, I can create a line just here. Not apply 90
degrees, but go e.g. in this direction. Let's
work with tabulation. Tip 60 degrees. Press Enter. And now from this, I can walk e.g. on this area and I can
continue with different light. But sometime it's not
extremely convenient because they redirect
you to the line tool. Let's click again on this
sweep parent rectangle. Click on this print, go in this direction. And now I can extend
and take a glance. We can be sure to have this line in this life
pair of parallel and this line and this line
parallel after if you want, you can also enter on dimension
with your dimension tool. So here I can double-click
and tell like 40. And she, I can double-click
and enter like 25. Just laziness. You can also create an ellipse, so it means not a
perfect circle. So Francis, just click
on the Ellipse tool. You need to first your
acidic to frost print. It will be the center point, and then you need to
select X2 length. So first I can go e.g. in this direction and
apply a value of 20. And then you need to enter a second value to
create your ellipse. And let's work with something
like ten millimeter. And I created this
ellipse. As you can see. I'm going to show you again, create a first sprint like that. Then you can select a
second print. So e.g. here we stand
millimeter and then you can extend just like this. Here, 12 millimeter. And I can extend four
millimeter here. Let's work with the degrees. And I can extend
at my convenience. Just like this. Let's press Escape and just remove all these
different element. You can also create some basic
lines, extremely simple. You click on the Line Tool. You just want to create
one line, you cried. So first point, the second print and you press escape
to stop the line. And you have created one line. If you want to enter dimension, click here and you can
enter dimension in degrees. And just with the length. If I just want to add something
we started millimeter, I can type Satya
millimeter presenter. If you want to have Angela, you need to select
the first point. And you can enter the length like 30 and then tabulation on your keyboard to enter
also degress and I can tell 45 degrees,
just like this. If you want to stop,
you press escape. But if you want to
continue, it is possible. So if I select my
line tool again, I can create something here and apply your value
like 20 millimeter. And I can continue on the
directions that they want. Light here, ten millimeter. I can continue in this direction and just snap to my grid and just come back here and just
come back here and adjust, apply different lines exists. After to do this type of work will be able to
finish the sketch. And every time just
click on one of these tool to convert your
sketch to a 3D models. So basic things
is support tools. And thanks to that,
you can pull on this direction or
this direction. And I can enter a specific
value like 20 millimeter.
10. Drawing tools part 2: Let's continue with
this drawing tools. Let's come back on
the same block plane. So it means the z plane. You can create a sketch
and go on top view. So after to do this work, you have also more
specific tool. So it means you can e.g. just create a tangent line. You create e.g. a. Circle from
this point to this sprint. Then you can find
the tangent line, click a curve to start
the line, tangent to eat. So if I click directly
on my circle area, e.g. this print directly,
I can pull a line and the line will be
tangent to the circle. And I can extend just like this. After if I press escape and
I drag and move my line, taker glands are circular, Will follows the
size of the line. We don't use these too much, but sometime it is a useful. Now let's select everything
again and press Delete. You have multiple
options to create arc. Tangent, arc you can
find so sweet print, OK, and you can find Sweep arc. So first let's create
a rectangle from the center point, rectangle, defined rectangle from center
and craft a frost print like 40 millimeter
by millimeter. Let's select the first
possibility tangent arc. You need to click
your line or curve to start the arc tangent. So I click e.g. on this
print, trust exists. And after, if I click
on this point here, I can create a tangent arc. I'm going to show you again if I just select the sprint e.g. you can, Let's do this again. Click here, I can
see Xist print. Then select the sprint. And you can just go left-click. You are going to stop here. But you have also the
possibility to select the first point
selector, second print. Sometime it's not extremely
convenient ceilings of frost print settings
or second print. And here e.g. I.
Can enter a value. I'm going to show you again. I can fit here and
I can click here. You have millimeter and degrees. I can tap e.g. 16
millimeter press tabulation and enter a degress. It can be 120 degrees. Press Enter. And in this case, I created this type of
tangent arc sometime it is useful because you
can apply tremor way. I can cut here and come back
on this direction, e.g. Lexis. And yes, this is this type of
things that you can do. So this is the first
possibility tangent arc. You can also work
with a sweep print, our basic three-point arc. So acidic the first
point, cilia, second print, and
then you just need to extend with assault point
at your convenience. E.g. I. Can apply like degress
and a value here. I'm not going to
change the radius, but just to digress, Let's walk with 60 degrees. And I can create something
like this. One more time. I can use this tool, trim away to cut this line, to this line, this line, and not turn this render. You can also create too
sweet point arc wizard to snap to anything so I can
create a frost point here, the second point here. Then I can extend with a degrees and a
number of millimeter. The last type of
acts that we can create is sweep, sweep arc. Here you need to select the
center of your of your AKS. So first, let's select element
and just press Delete. If I want to create to
NAC from this center. Again, click on
this tool sweep arc defined my center
print and glands. Alright. And arrived at e.g. 40 millimeter with 90 degrees. I position my second print
and then I can create my arc. You can do what you want. If you want 90 degrees, you can turn 90 degrees. If you want 180 degrees, you can apply it 180 degrees. Let's show you
again. Click here. I can see my first
point, second print. And if I want just 270 degrees, I can go here. And updates is random. So this is a semi after
I can create two line, says print, this print again, this point to this point. I forgot to show you these
tools sweep point structure. We don't use it too much with just position the first
0.2 second print. And then you can extend for your sweet points
your care personally. I'm not really use this
tool suite point self-care. I've taught to do this work. Last two things that
I'm going to show you, just a point and
just the spleen. Let's select everything again. And first, I'm going to show you how to add a
print on your sketch. I can click on this
view first and create a rectangle defined from
the center. Just like this. Let's work with two value
like 46 millimeter by 32 millimeter and
create a line e.g. this point to this sprint
and the sprint to sprint. We can cut this area using the trim tools and
left-click here. It is possible to add a point where it is useful
to add a brand because you can have more precision or you
can cut a specific area. If I use my trim tools here, trim away and I click here, I'm going to remove
all this slide. If e.g. I. Add 0 point, click to create a plant, I can add a point where
I want on this area. E.g. I. Can add a point here and
now I created a new print. If I define a dimension, I can define dimension from
this point to this point. Here. It's not very
convenient dimension. I can click on this point. And if you zoom little bit, you can try to find this point. But yes, Sometime
it's not extremely convenient in knots exactly this that I wanted to show you. I wanted to show you that now, if I use trim away, I can only remove this
part of this part because I created I created
a new point here. And let's position three-point arc exists like this
and just go e.g. in this direction. Adult brain can be useful in different way. I can add a point here
and a point here. You can use this one
just to snap e.g. if I click on my line
tool just to have a reference or you can
use also just to cut, to cut like tremor way. And I can remove this
part again, this path. The last thing that I
wanted to show you, the spleen tool,
extremly useful. It's not possible to apply the
spleen tool with geometry. First we are going
to change the plane. Let's click on End sketch edge, edges, and let's work with a different
plane. Sketch mode. You can go left-click outside
and you have no options. Acidic new sketch plane. And thanks to that, I
can click on my y-axis here to work directly
on Z's work plane. So Y-axis, I think I'm not
directly on the right view. Let's click here. Select a new sketch plane. It's not working properly. I think something is wrong. I'm just going to click outside first and click on
Sketch mode again. And yes, now it's going
to work properly. So I can click on
a different axis. It just that I'm not exactly
on the right reference. I need to click on
this view first. And now I can click
on white. Perfect. If I select this view, I'm now on the front view. And I can use my spleen tool. So principle of the spleen tool, it just go left-click and you
can add different curves. Print like this. If you want to stop, you just need to press Enter, because if you press Escape, you are going to
remove your walk. So let's do this again. Click here, click here, click here and click here. And I can just press Enter. And now I can obtain this
type of render exists. And it is useful. If you just press Escape, you can click on your spleen and you
have different print, you can make some adjustments. So I'm going to show you again when you have your
selection tools here, you click on your spleen. You have no access to different things and you can
drag and move the print e.g. not clicking here. Here you move every single
brush clicking on this branch, you can change the curve. Here. I can change the account also. I can change the curve
on this direction. You can edit your spleen
at your convenience. We have also this last
print if you want to make some transformation
that be careful because sometimes it is
extremely sensitive. So when you move this one, be extremely careful because sometime you can
have some trouble. I can also make some adjustment. One more time. It will be useful because
if I finish my sketch, I can click on the pool options, but work with your face. So it means I can click
here and I can extend to just create a surface like this. I can go on my constriction tree and you can find a surface. So it's okay for that. We have seen all
the different tools that you can use to
create your shapes, to create your sketches.
11. Add constraints part 1: Let's explain the
cost trend constraint on sketches extremly in protons. So the first thing
is to do click on Sketch mode and
select this plane. I can walk here. And I can directly activates
the right phase, just like that. Right view. After to do this work, Let's start with constraint. You can find your
different constraint here. You can apply this
on different edges, or it can be an angle
or multiple edges also. Let's first graph two lines, create a first-line here
and create two line with 16 millimeter press Escape
and credit to say go online, e.g. dressed like this. Here. I just same time you
can create two nodal line, just like this, press Escape and credit to nodal
line. Just like this. Oops. Crowd to say gone
line just here. I'm going to do is
activate snap to grid, snap to angle during a y. First. The first important constraint, it is coincident constraint. So it means here,
if I link here, they could glands
now automatically I will create a
coincident constraint. But you can apply this
with coincidence. So you click first
on the constraint, then you click on the sprint, then this print and
automatically you have created a coincident constraint. If now I drag and
move this print tech. Oh Glen's, the two
entities have a link. If I double-click here, you can find the
point constraint. You double-click on. So print and you can find the constraint. If you want to delete
the constraint, just go left-click here. And now I remove the constraint. It means that if I take
this line or this line, I have now freedoms. Let's apply again
coincident constraint. Click on this sprint and
click on this sprint. If I want to apply the basic
constraint in protons, you have perpendicular, I
can click on perpendicular, and I want to have 90 degrees. So I can click on the
first line, second line. And now I have 90 degrees. And I can drag and move here every time I will
keep 90 degrees. You know, you hover over. You can also add 0 dot
type of constraint. Something and protons also
is parallel constraint. Parallel constraint. And you ever saw resultant
vertical first I'm going to show you a reasonable vertical because it's simpler. Click on Horizontal,
click on this line. And your line will
be horizontal. Vertical constraint click on this line and your
line will be vertical. Now, if I drag and
move this one, drag and move this one, I will keep horizontal
and vertical. I can also create
a coincidence from sprint to the sprint,
just like this. Now, let's see the
parallel constraint. I can press Delete here. I can create a first
line just like this and activate two
first-line with e.g. 20 millimeter press tabulation
and 90 degrees like that. And I can create a second line for two sig online, e.g. here. I can enter, so t milimeter
tabulation and 100 degrees. If I want to have these
two lines parallel, I can apply my
parallel constraint, palette constraint
and I can click here, and I can click here and automatically or you
have something parallel. I mean, if now I drag
and move this line, I will keep every time. So parallel constraint. If I click here, I can
go into the options. I have different constraint. Constraint coincidence on my
x-axis, I can remove that. By default, I have
also 90 degrees, 90 degrees constraint. So by default, each
time when e.g. you create two rectangle, two rectangle, just like this. Or you just create two line form on the
axes automatically, you have automatic, you
have auto constraint. If I press escape and when you press Escape or you can use
your selection tool. If I double-click
here automatically, IF perpendicular constraint to my x-axis and automatically, or you have a
coincident constraint, but again, delete this
one, delete this one. And now if I click on this line, I can, uh, freedom. It is a same for rectangle. If I just click on this
line automatically, you can find directly
original tile constraint and you have also
coincident constraint. This point is
coincidence and you have also a horizontal constraint. So this is why we
have 90 degrees. And if you select every sink, if you click here and you
press Control, click here, click here, and you
double-click, you can, you can convert to a
construction element, but this I will show you after. This is why if I come back
to these two parallel axes, I can double-click here, remove this constraint,
and we move this constraint on Nikita
equal n. If I turn like this, I can also click here. Just drag and move. And you can find the
parallel constraint. I can click here,
double-click and remove, also coincident that. And I can drag and move. And now two lines will
follow just like this. After all, but all the other
type of constraint you have equal distance constraint. Apply an equal
distance constraint between two set of sketches. And if I create a single
rectangle just like this here, I can apply my equal
distance constraint for this line and this line. And now I will
keep the distance. I will keep a distance
just like this. So you can enter
each time a value. And just like that, if you click on Add
to ensure selection, you can click on this one. And you can e.g. click on this one,
click on this one. You can press Control. And then you can set the item or items that we'll define
some maintain distance. And it can be e.g. this line. And thanks to that,
if you validate, you can be sure to maintain
this distance here like this. It is something little specific. We don't use these to
merge this constraint. At some time it can be, it can be also useful. So you need first to
select a line like that. And after you can set, ensure it can be this one or
this one, just like this. And thanks to that, you can add your
limits and just keeps a constraint and
keeps a distance. Dark constraints
that I can show you. You have equal
radius constraint. If I select everything just like this, I
can press Delete. If r is on Purana sketch, you need to create first circle and you
create a single circle. And you want to have
exactly the same size. You can apply equal
radius constraint. You select the first, you select the second. And now I have exactly
the same size. If I press Escape, I can use my selection tool. And if I just drag
and move like this, I will keep every time the same distance between
these two circuits. So this is why it is useful, but you can also, if you need, applies this
constraint on more circular. It's okay for this first
part of constraint. And I will show you the
next constraint after.
12. Add constraints part 2: Let's continue with constraint. So first thing that
I'm going to do, each one not time to
go in the sketch mode. And we can select these axes
to work on Top work plane. So after, Let's continue. Here we have more constraints
that I can show you. E.g. midpoint constraint, apply your midpoint constraint
between two sketch entity. I'm going to create
a rectangle first. Just like that and work with, I can work with two
different value. So first, let's select a rectangle from the center
of snap to grid. It's better. And now I'm going
to go on this area and apply 26 by 16 millimeter. Now I can remove snap to grid. And if I create two line, e.g. on line directly here
with zero degrees. And I want to position this line exactly in the
middle of this line. I can use directly my
midpoint constraint. I can select this edge. Then I can select
this edge also. Just like that. Let's do this again. I'm going to click again
on midpoints constraints. And I can select this one. Then I can select this
one and automatically the print will arrive on
this area, as you can see. So you can, I'm going
to show you again. You can click here. Then you click not on the edge, on the print and automatically, so print will arrive in
the middle on this area. But take your glands rectangle. The size of the rectangle,
maybe can change. If I just show you again, I can click on this line
and click on this sprint. If you don't want to have this, it is perfect because you can apply directly a
fixed constraint. If I apply fixed, I can go on this
line and apply Fix. And thanks to that, as this
line won't move anymore, and you can find the
color is different, it is a black color. Now, if I use again
fixed constraint, if I use again
midpoint constraint, I can click on this line, click on this sprint. And automatically this element
will increase little bit. But I think if I apply directly my a fixed
constraint just here, just he undressed here. Maybe it's not directly the size and just go onto the midpoint
cost strangers here. And just here. Now, it's okay, nothing is moving because I needed to add more
fixed constraint. Again. Going to show you,
just click here, click here, and it's perfect. So you can fix elements on time. It is useful because a
lot of things can move. If I select every sink. Just press Delete. And creatinine does sketch like this one to this one I can
apply snap to read again, make something like 20, 14, 17. He never just create
something like this. And the fact is now I
can drag and move e.g. the sprint or I can
also move this print, but I can apply something fixed. If I don't want to move
this one and this one, I can just click
here, click here. And now if I click on this part, it's not possible to move because I have
fixed constraint. And if I move this part, they could glands here nothing
will move on this area. If I move, this product can
only move in this direction. So this is why you can
apply fixed constraint. I can apply your cervix
constraint here, here, or here. And now I will be
able to move on needs this part after its not
possible on this sprint. It is not possible
on this point. Let's select everything
again and press Delete. So we have seen these different constraint coincident,
meet print. I need to show you also
concentrated constraint. Let's first criteria rectangle exists 20 by 30 millimeter. And I can create a circle
here, like eight millimeter. And I can create two Sig
on Sackler dress here. If I want to have the
second circle in the first, perfectly in the same center, I can use my
concentric constraint, concentric pecans, a frost
circles, the second circular. And now I have the same center. So it means if I
take the center, I will move the two soccer at the same time. Just like that. Why not to position this here? So this is a constant
drink constraint. If I position this
element just here, I can show you another
constraint, tension constraint. Apply a tangent constraint between stitch sketch entities. If I create two
line near circular. I can remove snap to grid just crypto line, just like this. And I want to pull the line perfectly tension to the soccer. I can use this constraint,
tangent constraint. First I click on the line on
the circle, and that's it. Now we have the line perfectly
tangent to the circular. If I drag and move the
line and the saccule will have to increase the
size, just laces. And if I change the
positions are line also, we follow just like that. So this is the
tangent constraint. And after I think I
show you different, the other type of constraint, what you can use. And definitely it is useful because I'm going to
show you an example. I can crack Just rectangle here. Center point, snap to grid and
create something like that for t by t. After e.g. I want to create something
with a first-line. I can create my first line. Just like this. Third dimension, like 20 on this direction. Press Escape. Credit to second line just here. And I can enter a value of 20. Then let's walk again, create a coincident constraint from this sprint to sprint. Then I can apply your
parallel constraint from this line to this
line, just like this. If now I press escape and a dragon moves,
these lines are, two lines will follow.
As you can see. Now, if I complete with
a nodal line, e.g. on this direction, e.g. in this direction. And I want to have coincidence. So I can click here on
this sprint to sprint. Then I want to have
some horizontal, I can activate horizontal
constraint. With this one. You can make a lot of things. I can craft a
structure just here. And maybe the credit line, e.g. yesterday our lines this
one to this one and apply my constraint tangent
here to here. You can make multiple things. And why not to come
back on this direction. Sharma can also
use my trim tool. I can click here, click here, and e.g. just click here. Just click on this one. Let's apply No.2 again
with my sweet print. One, print to print and
create something laziness. I don't want to create
something specific it just to show you liters a
constraint at the same time. Just like this. Each
time, don't forget, if you want to
editor constraint, you click on your line and
you can find this one, delete a single constraint. And when you click here, you can have a list of the
constraint from this edge. Here I have directly
attention constraint. But I ever saw two
coincident constraint. I want to remove what? I just need to click here. And now we'll take a glance. I don't have anymore my
coincident constraint, my tangent constraint.
Like this. You can also change the color of a line if you need you
click on your line and when you have access
to color it, e.g. you want to put two
line in red. You can. If I go here, if I want to put this
line in dark blue, again sometime it can be
useful for the conception, even if personally I don't really use it as a
change of color.
13. Add dimensions: And dimension on sketches. Let's see how to add dimension
on your sketch sheets. Click on the Sketch mode, select the top view
on this walk plane. And let's create a rectangle. Two rectangle. I have two
way to add dimensions. So first way is just to follow the grid or to tap the
dimensions that you want. So it means I can enter my first value like
40 millimeter. Then I can press
tabulation table on my keyboard and I can
tap the Save on value. Let's apply certain millimeter. This is the first possibility
to add dimension. When you create a
circle, it is the same. You can just use your grid or enters a
value that you want. I can take 12 millimeter. The second possibility
is to add n dimension. When you add the dimension
at the same time, you will have a constraint. It's not only other dimension, it is only added constraint. If I click here dimension, I can select this line
and I can enter a value. Let's work with e.g. for T4 like this. And enter a dimension here. Let's work with e.g. 34. And it's not only it's
not on your dimension, it is a constraint. Why it is also constrained? Because if I take this print, it's not possible to move because I have these
two dimension. If I just create a
rectangle just like this, and I don't apply dimension. I can take this point and I
can extend my rectangle here. It is not possible because
I have z dimension, so it works like constraints. I can't move because I have
44 millimeter constraint and sati four millimeter
dimension constraint. But that just chuck a circle or any things like
this, it is same. You can enter
dimension, dimension. Teach here. And I
can go left-click, double-click here, and let's
enter 40, 14 millimeter. And this is a semi,
if I want to reduce, if I am using e.g. my selection tool, it is
not possible to reduce the size because I have a
constraint of 14 millimeter. You can do a lot of
things like that. I can select everything,
press Delete. Let's scratch
again, rectangular. I can teach here at my rectangle wizard
specific dimension and create a circle here we switched
specific dimension also. Now let's apply dimension. Click here, left-click. I would like 40 millimeter. Let's enter second
dimension just here. Let's apply a t millimeter. And I want to also a dimension from this circle.
I can click here. And let's center six millimeter. And you can also use your
dimension tool for position. If I select my
construction line, e.g. on this area, here, I have the possibility
to click on my dimension tool and to have the dimension between
this line and this line. So I can select this
line, this line, I can drag and move and I would
like e.g. ten millimeter. So I can take ten millimeter. And now I position this line at ten millimeter from
this line here. Same for the circle. I want to position
this circle may be in the middle and on the left of Z is on the right of
this construction line. I can use my dimension tool. Click on this sprint to this
line and go answer left. To be in the middle, I
can apply 15 millimeter and I can click on this
print and this time e.g. my construction line. And here I can enter dimension. Let's work with six millimeter
and I can position. I would like to position
this on the left, so it's not extremely good. Let's click on the
dimension tool, this line to this line. Let's apply e.g. 16 millimeter. Just takes that. This tool is not only not
only to add dimension on, an advantage is also
to a dimension between two print or two
lines. Let's see. So last example, you can press Escape or use
your selection tool, create a frame of selection. The last example is I can
click on the line tool and create a line from the center with its
specific value, just like this
exists here, here. And just, just here. And now I want to
add some values. So my first value
will be on this area. And I would like 40 millimeter, I can tap for t. So every single my sketch are going to move
because this is my main line. If I click here and I
apply a value like 24, my sketches are going
to move and I can enter a value for every scene
here, can apply e.g. 16. Here, e.g. just click on this line. I can apply for teen. And because I have
40 millimeter here, 16.40 millimeter, it is not useful to
add a dimension here. I will be over-constrained
if I click and apply ten millimeter,
I ever running. So addition of one or
more eats too much and I have something in red because it is
over-constrained. So I need now to
remove 40 millimeter. All I need to remove one
of these values, e.g. I. Can click here
and I can press, I can click on this line. I can press Delete
on my keyboard. If I want to remove. I can just sometime
it is not convenient. Just come back with your
history panels and yes, Now it is better. I can do the same
thing on this area. Until value like six millimeter, I can enter a value dress here, like eight millimeter, and I don't need to
enter a value here. I will be over constraint also, because I have 24
millimeter, 6.8. So here it sure, I will have 10 mm, so I don't need to
position this dimension. So extremely useful to add
dimension on your sketches.
14. Use construction lines: Use construction line. When you work with sketches, you will have to use
construction lines. Let's work in the sketch mode. Select the top view
you can find on this area construction line and you can create your construction
line where you want. Let's take the
first example. Two. I'm going to create a
rectangle just here. And create a rectangle
with two value 26 by e.g. 36 millimeter. If I want e.g. to work in the center, I can create a
construction line, click and credit Fraass
construction line from C, sprint, the sprint, and create a second construction line
from this point to this point. Each time when you create
a construction line, it is important to understand that you have dotted
line like this. And then I can e.g. create a circle in
the center because I know that the center
is perfectly here. When you use a
construction line, if you just go left-click
on the construction line, you can also change the
color and you can fail. So cost trend with your
construction line. It works like a normal lines, but it just it is a
construction line. If I want to add another
construction line, e.g. inside, I can click here. Correct construction line just crossing this part
with 90 degrees. And now I can position my
construction line with the dimension from this
line to this line, and I can enter a value. Let's work with eight
millimeter, just like that. But because I work with eight millimeter
extending my element. So this is why I need to add a dimension here to not move. And applied statistics and other dimension here
to not move 26. Now, if I apply my dimension here to here, as you can see, are addressed pliers,
six millimeter, I just want to change
like 8 mm is going to see we're going to be possible because I
have something fixed. And why not crappy
rectangle defined from center and use this construction
line just like that. So this is why it is useful
to use construction line. But construction
line is your soul useful if you want
to apply symmetries? Let's just come back
at these livers truss here and create a
construction line perfectly in my header. I can apply the things
that you need to understand when you create a line or you create an element, you create a rectangle and
it seems that you want. If you just go right-click, you have construction on, off and you can convert a
line to a construction line. If you go right-click
construction on. So you can convert to
a construction line. Here, this line, I can
go right-click again, and these activate construction
to have a basic line. Here, this line, I want to
convert to construction. Right-click construction
on forever. So here construction,
if you want to change, it is useful to apply also symmetries from your
construction line. Right-click Set as mirror line. And now e.g. I. Can just crop for us to construction line on this
area just like this here. E.g. credit to rectangular form. I feel I can see this
part. This part. And just, yes, I think
let's work with yes. Truss here. It's not
extremely convenient. I can remove snap to grid. And until value by Fiverr. Tabulation 12 millimeter
dressed like that. And thanks to data
is the same thing on the left and on the right. Let's press Escape,
select this part. Oops. Let's use a selection tools and click here and press Delete. So now let's finish the sketch. I can just create an extrusion
on this area with 1 mm. The things that I
want to show you also is now I have a solid
and a short phase. I can remove my surface with
right-click and delete. You can keep all your
construction line. You have a curves here, construction line,
construction line here, here and here, where it is useful because
sometime you can e.g. use a construction line to
pull your face like this. You can also reuse your construction line
for another sketch. So depending of what you
plan to do after you can remove your curves or you
can keep your curves, it is at your convenience, you can just hide the curves. View dressed like this. Let's go right-click again. Did it lets you a
single example. I'm going to remove this solid right-click Delete
and create a sketch again. Construction line are
extremely useful. I can also use my top view and directly create a
construction line here. And oops, let's do this again. Here. So I can create a
construction line with a specific value. It can be searched
millimeter dress here. Do the same thing on this area. And that supplier.
So sati millimeter. I've taught to do this
work. It is nice. I can also create another construction line
in the middle. Dress here. Define this model construction
line as a symmetry lines, right-click Set
Nero symmetries and the things that I can do each to create another
construction line, e.g. from this sprint to share with
a value of 20 millimeter. I can snap to grid and define also dimension from
this line to this line. Yes, truss here. And it
can enter a value like 24. And you can tell, I don't want to make something specifically just to walk
with construction line, I can enter circle with
ten millimeter crop, e.g. another circle with ten
millimeter on just here. And can be your lines
attack can apply from e.g. can e.g. create a line from this point to this
print just like this. And here I can find a
symmetry also sukha, I can make multiple things
using my construction line or just using shock and
credit to line just here. Or you can also
convert to line and this line right-click and remove construction
to create a line. When you apply your
tremor weight works also for construction line
in these things that you want and shall not here I'm just apply on
this part, this part. And I created e.g. this type of element.
I think here it is. Again, a construction line. I can go right-click
construction on, off and finish the sketch. And I can extrude
just like this. And I can delete the
curve if I want. I can also invert
the visibility. Here. It's not really good. Just press Delete and
recuperates with you.
15. Use symmetries: Let's explain the symmetries. Symmetries extremely useful
when you work with sketches. So first things to do, Let's enter in the sketch
mode and select the top view. You can create lines
construction line, and then convert this
construction line to symmetries. So the first thing
that I'm going to do, it's to create a construction
line and just go on this part and create a construction line with
values that you want. It's not very improtant. Press Escape to have your selection tool and then
right-click on the line. And you can set as mirror line, set as Mohawk line. It is useful if
you want to repeat a feature on another area. It is also useful when you have something difficult to do. If e.g. I. Just want to create a rectangle, it is not extremely
useful to use symmetries. But if e.g. I. Want
to have some sink like it's the same
on the two sides. It's extremly useful. If now I create my
first-line e.g. here, you can find on the right it is exactly
the same thing. And I can continue just
on this direction, exert. Let's come back here. And I can go in this
direction, this direction. And e.g. I. Can come back dress here. And as you can see
each time when I'm going to do
something on the left. So something will
be on the right. I can then apply
just rounded corner. And I can click here
and apply a value. I can click here,
apply your value. I can click here, player Value, Click here a value, r again, click here a value. And I created these elements. If I finish my sketch, thanks to this symmetry axes. If I just come back
little bit before, something extremely
useful is you can do the same thing
but with four lines. Also. Let's select every sink
and just press Delete. So the things that
you can do it to create two construction
line in reminder, I can create my first
construction line here and press Escape. Create a second construction
line on this direction. Then I can press escape. Right-click on this line set as mirror line and right-click on this slide set as mirror line. And if I just walk
only on this quarter, I will be able to repeat the
process on all Socratic. So let's take an example. Credit first-line. Just go here to first-line. If you want, you can walk
with a dimension e.g. I. Can create a construction line. After if you grabbed
a construction line, you can also add
this on each sides. As you can see, I can enter a dimension from this
line to this line. And let's work with 20. And Crato, no dark
construction line just here. And enter dimension from
this line to this line. And yes, 20 is perfect. Now e.g. I. Can create a first-line
just on this direction. With a value of 16. I can create two nodal line
here with a value of 16. And then on this area I can e.g. craton nodal line form, just see sprint to
directly the sprint. The features will be
repeated on each side. If I create e.g. a. Circle, maybe UC
archaeologists here, I will add also my
circle on all sides. I can repeat also on this
area just like that. Thanks to this construction line and symmetries, I can e.g. create my element,
use my pen tool, so I can click on pool. And here I have a short phase. Let's not extremely
convenient because I have only this one to pull. So it's not extremely convenient if I go and
select truss here. You have select all
just like that, but it's not extremely
convenient in my example. But just to show you that here, I will have to work on two sketches to
repeat this process. So first sketches just
work with this one. And second sketches
walk with my circuit. Maybe because I didn't
close this one, I can come back here. Yes, I know what
because I didn't I forgot to create a
line truss here. Now it's better. If I press escape. As you can see, you can create
a frost circle just here. You can put two nodal circle
in URLs that you want. And after, if I click on
my pool line yesterday, I take a glance,
I need to work on to here. It's not close. Also. I need to come back. Seat or strange. I forgot to close my pass because of the
construction line. Yes. Trust legacies. And finish the sketch. And now it's better. I can only pull this element on this direction and everything
is perfectly symmetric. Now let's see a second example. Just click here,
delete everything. When you have your calls to
action line on the left, you can find your
different curves and the different
construction line. You can delete a racing with. Right-click Delete. Let's create an audio
Sketch, Sketch mode. Select the top view just here, and create a rectangle from
the center on this direction. Let's apply to value
like 60 by 40. Finish the sketch. Then create your
first extrusion. Extrusion with e.g. just 1 mm. Now I would like to add different holes and
using the symmetry. So click on this face
to sketch, activate. So top view. Let's create a symmetry line. Click here and create a
line crossing this part. I can press escape and
right-click on the line, set as mirror line. And now e.g. I. Can create my first
circle around this area with a value
of six millimeter and activate to dimension
from this print to this line. And dress change for six
and other dimensional. So from this point to this line. And just change the dimension
for four millimeter, not four millimeter,
six millimeter. And thanks to that, I have exactly the same
thing on this area. Let's grab our rectangle
and another circle. I can click here and
create something again, we six millimeter
and Tara dimension. This point to this line. Double-click, Let's
take six millimeter and enter dimension again, this print to this line. And she has six millimeter. I have already six millimeter. It's perfect. I'm using my symmetry line. Finish the sketch. And now I can create
an extrusion. I can click here, Control. Click here, click here, and click here, and create
an extrusion inside. And everything is
perfectly symmetric. If I don't want to
reuse this curve, I can go right-click and delete symmetry extremly in
protons on the sketches. Every time when you want to have the same thing on two sides, you can use symmetries.
16. Add fillet: Let's see how to add, fill it on your
sketch so it means to add rounded corners. So first things to do, Let's go on the sketch mode. And silica is a top
view just like this. I can create a rectangle
directly from the center, create a rectangle, activate defined rectangle from center
and that center to value. I can work with 16
millimeter by 40 millimeter. So far I've shown
you can add wounded kroner directly after extrusion. So I can finish my work, create an extrusion like 20. And just with my poll tool, I can select one of these
edge and I can add wounded Kroner at my convenience and
touring a specific value. But you can also do this
work directly on sketches. So let's just come back. It'll be four here. So if I come back to my sketch
to add rounded corners, you can click here,
create wounded kernel. You need to sit in the first
segment like this one. So second segment like this one, and be fraught to click
on the second segment, you need to enter the value. So click on the first segment. And when you arrive
on the Saigon, don't click and
tells you a value of validates your value
with another click. If I want six millimeter, I can just step six
millimeter and validate. Now, let's go on this array. Let's do the same thing. Left-click. And I can apply six millimeter. Left-click and apply
six millimeter. Let's click and apply
six millimeter. And thanks to that, I can
do the same type of work, but directly on my sketch. It is something useful too low. And if I just come
back on these areas, so not only, not only for this, it is good for lots
of things. So e.g. you can just create some seem
to craft to pass like that. And 12 a bit to our render, you want to add rounded corners. Click on these tools
and you can activate, like I can activate ten. Here, can activate ten, but be careful sometime you
will keep a line like this, these little strange,
it is little strange why we have exactly
this line staging here. In this case, just
use trim away, left-click and remove this one. I'm going to show you
that you can change. Also see options when
you use these tools. Because you can also
work with the chamfer. So first let's
select everything. I can finish my sketch, select everything, and
just press Delete that. If you want to work
with Trump first, let's change the work
plane sketch mode. Just silly. So why walk plane
and select the front view? I can zoom a little
bit and just create a line like this here
with a value of before. To do this, I'm just going to
show you some vesicle just created a rectangle and
to add your chamfer, click on the tools. Activate chunk for
mode this time. And thanks to that, you can go left-click on the frost
line, Left-click, left-click on the second line, and you can add your chamfer. You can enter different
you mentioned if you need. So this is how to add chamfer. Let's press Escape. I would like to create a square. And for this, I'm going
to create a line first. From this point to this point with 30 millimeter press Escape, create a second line. This point to this point we saw two millimeter and then
add a chamfer here. I can select my
rented Kronos tools, activate chamfer
mode, Left-click here and work with
six millimeter. But after I need to erase with tremor way this
part and this part. Next step is to add an offset. Lets see again of set curves. Create a frame of selection. And we can try to offset here
with maybe two millimeter. Just close the past credit to segment here and
create a segment here. I can finish my sketch and
then create an extrusion on this direction and tells
the values that they want. Let's take 20 millimeter
and that's it. So it is same. You
can add a chump fell after 90 is possible. You just need to click on
pool and you select e.g. in edge and you can
change the mode for chamfer will
show you just after. So we can do this on the
sketch or you can do this directly after if you need.
17. Adjust sketches: Adjust sketches. Let's see how you
can adjust sketches. And for this, you can use these different
tools. You can find. Main tool is a trimer way, but you can also use credit kroner and you can
also use the split curve. So let's zoom a little bit. Go on the top view. We are still in the sketch mode and just create a rectangle, defined rectangle from center. Credit first rectangle
with a value of 22 by 24, then create a circle. Just like this with
e.g. ten millimeter. I can also create a liner, e.g. from this sprint to
sprint like this. Let's go liter on the top. You can also create
first-line here. Second line just here. No doubt lines here. And just continue lysis. And Crato Nadar line
just on this direction, make something like this first, the tool that we use the
most is TCE trim away. Because when you want to create an extrusion, finish the sketch. You need to have
something clean. And if you finish your sketch, you want to extrude this
part totally unuseful. It's not possible. If e.g. I. Press escape and I
use my selection tool. If I want to remove
only this part, this part and this part,
it's not possible. If I just click here
and I press delete. I'm going to delete
all this line. So this is why we need to use this tool trim away
automatically. He's going to define segment
between different print. And I can erase this part, I can erase this segment, and I can erase this signal. Now I have something open, so it's perfect for my sketch. Here. I want to erase this part. I want to erase this part, this part, and this part, and now it is okay
for my sketch. So this is why it is
extremely useful. Now if I go on this area, you can also find these
tools crap Kronos and click on Line and then click on nodal line to
create to Cornell. So e.g. if I go on this
area and I click here, I'm going to remove this part. But if e.g. I. Come back to this tool, I click on this line, and then I click on this line. I'm going to remove the
two lines just at the end. But if I do the opposite
process, this part, and oops, Let's first go at
which you can press escape. To. This activates the
tools and click e.g. on this line and
click on this line. Zc is this part that
I'm going to remove. I think it's less convenient. I think it's the
best things to do. It's almost most of the time
you can just use tremor way. It is totally enough. You have some things.
This is a split care of clicks or curve to split. Then click the curve of
point to split it with. If I just click here, I can click on this one. And then if I just click here, I'm going to show you again. So on this line, as you can see, we
have just one line. And I would like to open
this line with a new point. So I can click on Split curve. First I select this
segment, one left-click. Then I select where I want
to define a point to cut. I can click here e.g. I know you can find a new point, press Escape, or use your
selection tool directly. And if I click here, you can find a new print
directly on this area, even if it is coincidence. So if I just click here, you have a point constraint and I can delete the constraint. If I delete the constraint, now, I can open just lazy, as you can see, even if
I have odor constraint. So m e just to add a print. And sometime it can
be useful because you can just cut apart. I'm going to show you if
I ever line here, e.g. and I can click on trim away, but I will delete everything. If I just want to delete a part, I can use split curve. Click on this line. Then I can position
e.g. a. Point here. And now I have two parts, this part and this part. So it means I can just trim
away on easiest area in e.g. keep this element for a
different reason exists. So this is how you
can use these tools. It is extremely useful. Let's see my last example. Just go on top view again. Critical line of construction. Click on construction line. Here. You can create a
line of constriction start from this point to this point
with a value that you want. And when you go
right-click on the line, you have the possibility
to set as a mirror line. And extremely useful
because now if e.g. I. Cracked a line on this direction and you have
the same or opposite way. You can create 20 millimeter. And I can use my liner again on this direction,
like 20 millimeter. I can do exactly the same
and the ozone direction, I can create a line just
on this axis like that. And you can press Escape
directly to have access to your selection tool and
right-click Set as mirror line. And now if I create
a circle, e.g. here, it's going to be
duplicate on the other side. Why I wanted to show
you this example because I need to
trim the film paths. And I can use my
tremor weight tool. Click on this line, this line, and it's going to be
repeated also on this area. Now I can press Escape
and finish my sketch. By the way, if you create
a construction line, you will have cherubs here. If you want to remove, you
can go right-click Delete. I can create an extrusion
with directly my move tools. And just click here. Oops, not my move tools
might prune pool tools. Let us come back. Yes, let us come back here. Selleck, Mike poll tool. And I can try and move e.g. in this direction with
the values at time one.
18. Project to sketch: Let's see how to use an external geometry
using project to sketch. When you walk into
sketch merge mode, you can find these features
project to sketch. The first things to do. Let's come back on
design credit to sketch. And we can select the
axes. Let's select e.g. z-axis, W and Crato
rectangle from the center. So acidic rectangle, defined rectangle from
center and N d2 value. Let's work with certain
millimeter by millimeter. Finish the sketch. Let's create our
first extrusion. Left-click here. And I can extrude with a
value of six like that. And now let's create
a new sketch. And to create my sketch, e.g. I'm just going to click here
on this face to sketch. And I would like
to drag and move, drag and move work plane. So click on Move grid. If I want to arrive
in the middle, because I add 20 millimeter, I can tap ten
millimeter and share my work plane is in the
middle of my saline. If I apply my sketch mode that considers a right
view just like this. And if e.g. I don't use a snap to
grid, something like that. I can take my rectangle tool. Don't use snap to grid. As you can see here automatically
you can find this edge. So it's not extremely difficult, but one of the things
that you can do, It's, one of the things
that you can do is click on this part,
project to sketch. And I can project
selected edges. If I click here,
Left-click like this. You can find now we
have edge on this area. And I created a projection. It can be useful for
different reasons. The first reason is e.g. if I take my rectangle tool, I can directly
snap to this edge. Here I have the grid,
but sometime it can be useful and I can create
something like 12 by 12. And you can see this
edge projection and I can finish my sketch. And now I have this edge
just on this napkin, e.g. extrude like this because I created a projection on
this edge, this edge. And now I can pull four
millimeter like this. And here I can pull
four millimeter also. Let's select this
one pool trust too, millimeter and just pull
here two millimeter. I can take this one. Let's make some sink
like six millimeter. So things that I
would like to do is to create two or this area. So click on this face, sketch mode and just
cry to click on your circle tool for two
soccer like four millimeter. Finish the sketch and just
extrude like this here. So now the projection. Next Telnet geometry. Let's see a concrete example. I would like to create a new
path to go inside this area. I'm going first to
create a new sketch. So click on Sketch mode. Go outside if you want to see the options and
click on Move grid, you can drag and move on
this direction with e.g. a. Value of 20 millimeter. And I'm going to
create a new path with the size of this circle. Let's select the front view. And as you can see, because the grid
is located here, because of grid is located here. And I want to have exactly the size of the
circle with the center. It is not extremity convenience. So the best things
to do is to click here, project to sketch. And you can project
the geometry of another object directly
on your creed. So now I can click
here, left-click. And I created a projection on my grid technique
glands just like that. So this is why it
is extremly useful. And I invent, don't need
to create a circle. I can just create a
projection like this. And now I can finish my
sketch, and that's it. I have my circle with
perfectly the same size. And I can extrude e.g. in this direction with a value of maybe I can work with
certainty just like this. And why it is useful
because now I can e.g. take this one, use my move tool. Click here, I have a new solids and I can drag and move on
this direction just inside. It is perfect because I have
exactly the right size. It was pretty simple because
of the external geometry. And it works for everything. E.g. I. Click on one of these face and I
want to do the same thing. I can apply. Sketch mode. Truss here, moves the work
plane on the top, just exists. And this is the same. If I just go on this
view, the top view. And I want to have
exactly this element. I can use projection,
project to sketch. And I can select e.g. this line, this line, this line, and this
line, just like that. And I can finish my work. Now I can create e.g. a new part dress here. Thanks to the external geometry. If I press Escape, use my move tool. I can click on this solids
and take again so I can go on this direction and be
perfectly with so same size. So just something very useful
project to sketch a lot of time and different training after we will use also
project to sketch.
19. Face curve: Phase care of, let's
see these features. It is possible to add
a curve on a face. You can resist only
just create a line, something like this on the face. And for this, let's
use the sketch mode. Click on the top view
and create a sketch. Here you can find this
feature phase curves. The first things to do just
to critique the demand than Scratch rectangle tool defined
rectangle from center. When the sprint you can
enter two-dimension, Let's centers with not
specific value like 50 by 30 and just validate
and sketch ADT. And now I can extrude and validate with just some
sin two millimeter. It's perfect. So now I can use these
features. If e.g. a user sketch mode, I can just use phase curve, sketch a curve on
the face of a solid. If I click here, I can just click on the
phase that you want. It can be this phase, or it can be another phase. Here in this example, let's work with this face. I can click with these
features and just create, took care of one of
the best things to do. Its first press Escape. Click here, and
click on this face. And now, as you can see, it's not extremely convenient. Let's do this again.
So click here and you need to position
of first print. Let's go and left-click and I can position my first point. And after I can create two
curve inside my convenience. So let's grab any sinks and
you can close the pass. And I created this
curve just like that. If I just click here, I can complete the
phase care of. And now I can find this
element just here. And if I just finished
my sketch here, you have the
possibility to polar. And just sketch is finished. I can come back
on my design mode or I can stay on the sketch. I will choose a pool
options, anticoagulants. I can go inside and
just create 2 h. But if I need, I can also
just extrude just like this. So this is a type of
things that you can, at any moment you can
click on face curve, you select to face. You create first print. And you can create
some curve like this. And then with your pool tools, you can make any things
that you want after. Now let's see a second example. Select every scene. First, dress, press Delete. Let's one more time
credit to sketch. I need to be on right view. Let's select the top view and create a rectangle
defined from center. Let's work with just 28 by 44. Finish the sketch. Cretan extrusion like this. I can extrude with
24 millimeter. Knows. The things that I'm going
to do is to go into the sketch mode and
city, e.g. this face. So this time I can work on this face if I'm
using my tool again. So it means face curve. You can also just
create two lines. So it means craft a
point just like this. And you can just create
a basic line here. And if you just validate, you can just cracked a line. If I click again on phase curve, I can create a line
with a small curves. So I can click on this point
first, just click here. And you can drag and
move in this direction, or drag and move on,
e.g. this direction. But you can also continue on
another face just like that. And here I can just click
on this area validate. And you can walk also on
two faces at the same time, depending of the view. And after some scene, you can go in your design mode of staying in your sketch mode. And I can click on this face. Or you have like a chat tools. And I can just pull in this
direction if I need here, I can pull on this
direction here. If I just come back, I can select this one. I think the past is
not totally close because it is not
possible to move. These elements are things that
pass is not totally close. In this example. Personally, I don't
use releases features. I wanted just to show you, but it's not a feature that
I really am really using.
20. Offset curve: Offset, care of credit
to offset curves. To do this, you can just use the sketch mode and you can find these features, offset curves. So first things to do, Let's see the swap plane sketch. And I'm going to
use my top view. The first thing that I'm
going to do is to create a construction line in
the center like this. And then you can
press Escape and right-click on the
construction line to set as a mirror online. And I would like to
create a part in you. And for this I can create
a first-line on the left, just like this with e.g. certain millimeter. And a second part here with e.g. 22 millimeter. Now, if I want to
create an element here, for sure, I can use my tool, my line tool, e.g. apply to just come back, try to apply 20 and
just come back here. But you can also create to
offset some time it is useful. It is fast when you
have a lot of things. For this, you can go
on offset curves, click Console first-line,
and take your grants. You can create an offset. If you want, you can apply control and click
on the second line. And now you can drag and move the two lines at the same times, just daisies and you until the dimensions that you
want between father offset, Let's work with to invalidate. And I can just create two
line and just closer pass. And I can finish my sketch
now and create e.g. when extrusion to
create this element. Let's see another example. I can first remove this one and say go
and remove this one. Let's enter again
in the sketch mode. Click on the top view. Oops, let's walk. I think I'm not perfectly, Let's work with yes, I think I'm not perfectly, I need to go and
design sketch mode. Click one of these tool.
Yes, now it's okay. It's just something extremly
with a lot of things it is definitely worth
to use this one. E.g. I. Can create a line. Just laziness. If you have a lot of element and you want to create
to offset, it is great. You can just click
on offset tools, create a frame of selection, and you can then
select everything and credit upset that you
want just like that. Now, if you want to
create an element with light directly or sickness, I can use my
rectangle tool first. Create a rectangle
from the center. I can sit exist sprint. Let's center to value like just 16 millimeter
tabulation, 40 millimeter. So next step is to
create a rounded corner. I can click here and left-click on this areola
to plie six millimeter, six millimeter, six millimeter, and then six millimeter. And some things that
I can do if e.g. I've finished my sketch, I can create an
extrusion like this. And after if I apply shell, I can click here and
create something laces. But if directly I want to have this type of friend
or with the face, this element on the back. I can use my offset tool so I
can come back on my sketch. So let's come back here. And let's use the offset
tools for things to do. You need to sit exact curve
so whether you can press Control and you select all
the curves that you need. With control, dress here, just here, and dress here. But it's not
extremely convenient. I can advise you to just create a frame of
selection so you click on the tool and I can
press escape for us. You click on the tool
and you go left-click, create a frame of selection. Thanks to that, you can seek every single at the same time. And now you can drag and move outside or inside depending
of what you want to do. Let's drag and move outside. Let supply two
millimeter and validate. The things that I can do
now is to finish my sketch. Click here and dress create an extrusion
on this direction. Let's apply 20 millimeter
and just validate. And now I have
nothing on the back. Yes, I have some thing
but just to show face, so it is pretty
simple to remove. I can click on this surface and right-click,
just press Delete. I can obtain this window.
21. Master selections: Creates selection. Let's see how you can
muster or manage selection. And to master selection, you can find these tools
to the first things to do. It's addressed to
create a sketch. And let's work with
this view and create a rectangle from the center so I can click Define
rectangle from center. Let's walk with two
value like cr t by 40 by 13 millimeter. First, you need to understand when you are in the sketch mode, you press escape automatically. You will be redirected
to the sketch option. And with this sketch tool, you can just select a line
here on your Sketch mode. You can also create a
frame of selection with left-click and you can
create a frame of selection. Here you have the selection tool and you can also have
multiple way to select. You can e.g. create a
selection using polygons. And in this case, you can e.g. create a polygon isis, but it's not extremely useful when you work with sketches. I've taught to do this work. You can finish your sketch and just drag and move
with left-click. And let's apply some volume. And I can apply like
ten millimeter. Now let's get to know the
oily meant I can click here and create a sketch. Again, let script to
no direct on girl. And I can use my top view, create a rectangle from
this point to this point. I'm just going to use my grid
and finish the rectangle. So after the next step is
to drag and move inside. So if you use your
selection tool, click here selection tool. You can select a face like this. You can also select
an edge like this. And you can select, also select just to
point like this. If you want to select multiple
things at the same time, you have two options. The first option is
to press Control, and I can select this suite
faces at the same time. So left-click and control. Or you can also create
a frame of selection. I can create a frame
of selections here. Or if I want to
select all the faces, I can create a frame
of selection on all the faces and know all
my solid will be selected. You can also select
all your solid on your construction tree
sometime it is faster. And I've taught you can make some modifications
that you want. If I select the face, I can use my move tools and I can just pulls a face
on this direction. I can also pull on this
direction if I need, but it's not a convenient. I can also create a rotation
just like this on this face. If I select an edge acidic, e.g. this edge, it is a same, but I work on this edge and
I can pull like this edge. I can also pull on
this direction, or again on this
direction at my notes. I can also create some rotation if I need to translate this. So each time you select
what you want and after you can create
some modification, if I select a point
like the sprint, now I have my move tool again and I can extend
on this direction. I can extend on this direction. So it is like a skirt. You can just modifies a different element using the Move tool and
the selection tool. If I take a glance on
the selection tool, you have more options.
First things to do. I'm going to come back
at the beginning. Yes. When I was on this area, if you select the
Selection Tool Box tool, it just to create a box
of selection like this. If I use my selection tool
and a change for Lasso Tools, I can just create a selection
with the lasso and she, I selected only this faces. I can also just change for Polygon tools and
sheets is the same, but you just create a
polygon of selection. And now I have selected
these different faces. You can also do the
same with paint tool. So it means you can
just click here and I can see it exists two edges
with my painting tools. You just need to click on paint. And you just use your paint where you want to
select your element. Just like that. You can select using
Boone diary sheets, little something
neater, specific, a face to add, eat
or to remove it from Von der it something
liters specific. I'm not going to develop
too much on this element. And you have also select all. So you can select all
elements on your, on your space of rock. You can select everything
that you want. At any moment you can
clear the selection. So this is a different
tools that you can use. Don't forget that when
you guns are right here, you can find exactly the
same type of things. But here it is, bucks less. So paint in this area, you just little different. You have a selection filters. By default we have
the small filters, can advise you to keep this one. And by default we have a
box selection automatic. And if I just click
on this arrow, you can find by default
to Bach selection. So it means at any moment, I can just go
left-click and create two bucks of selection. I think definitely
it is the best. So this is what you need to understand you found
to seek to face. I can click here, control,
I can click here. And on this two-phase, I can drag and move just lazy. So again, cranial rotation using the two faces at the same time. It will be also useful to, when you want to change the
color I will show you after, but if I click on
these two faces, I can go right-click. And I will have, when I use my selection tool, I'm going to show you again. Click on this selection tool. Click here, control.
I can click here, click here, and maybe
click here with control. And if I just go right-click, I have the option of color. And thanks to that, I can e.g. change the color on
the faces selected. Here you apply on also buddies that I can apply on your faces. So you can go right-click
and you can go see a colo and you
change by d for face. And I can apply so
red color only on the selected faces,
as you can see. So it is something bicycle to know with
the selection tool. Personally, I don't use
too much of these options. I'm just using the
selection tool and Soapbox selection tool. After we don't use
this, too much.
22. Create extrusions: Credit extrusion. So after to be able
to master sketches, you will be able to use
different tools to add volume and to make some
transformation on your models. And the first thing
is to do that we use the most, it is extrusion. So first let's go and
just sketch mode. Select just this view
on the z-axis top view, and just create a
rectangle from the center. Define rectangle from center. Credit the first
print with a value of 40 millimeter and
Saatchi millimeter. Then finish the sketch. So after, by default, you will have every
time a surface, you can convert this surface to a buddy with an extra option. To create an extrusion, you need to click on your pool tool and you will have your pool tool by default. And just don't select anything here by default you have
the Extrusion tool. And if you just go
left-click here, Left-click, you have the possibility to
extrude on this direction. You just extrude on
the normal direction. If you want to enter a value, stay left-click and tells
the values that you want. If I want 20 millimeter, I type 20 millimeter,
press Enter. And I created this
first extrusion. After I will show you that
you can extrude faces, but it will be in something a little different
to show you faces. When you use your poll tool, if you click e.g. on this face, you can
extend with the dimension. I can extend with
ten millimeter here. I can extend if I need. I can extend again on
this area if I need. So just cut extrusion legs out. Let's come back literally
before this leavers. So I have my shelf
face, scratches, small extrusion with a value
of two millimeter like that. Something I'm proton
to understand, you have solids on the left. And it's very important because if I cried to
note the extrusion directly on the face or any work plain In link directly
with this solids. I'm going to show you,
I just click here my sketch and I want to create something
for another extrusion. I can use one more time
my rectangle tool. Let's create a rectangle using the grid dressed like this. And let's apply 22 by eight. Finish the sketch. Now, as you can see, I have this soft phase
directly on this solids. It is not independent. So it means if I cry
to an extrusion here, automatically, I will
stay on this new solids. Automatically. I will
stay in this new solids. It's not possible
directly to cut extrusion on a new solid if you have
still this solid activated. In this case, if you
want to have two solids. So things that you can do, it, you need to do is
activate this one. And in this case,
as you can see, it's not possible to
see so rectangle. So one of the best things to do if you want to
have two solid, let us come back just
before this one. It's to move little bit
your work plane, move grid. And I can just move with
something a little different. It can be two millimeter. I can tap two millimeter exact. So now I created a little upset. I won't be directly in link. And if I use my top view, Let's create a rectangle again. Using this part to this
part, finish the sketch. And because now, because now is the element is
not directly on this face, I have a short phase. If I cried to an extrusion, like a value of eight, I will have a new solids because I don't have a link
between these two part. Here's something important to understand at the
beginning. And e.g. this solid, if I
want to pass that, I can use my move tool. Still exist view and just drag and move
with two millimeter. I can take two millimeter. And if I want to create
just one entity, it will be possible
only with combine. Select this element. Click on silica bodies
to match this one, and now I have just one
solid. Let's continue. You can also create extrusion, but to create ARDS, if I click on this part, first, I can press escape
and credit to sketch. Click directly on this face. Select the top view. I can now create a circle. And credit phrase on
permafrost circle crest here. We six millimeter and create a second circle here with
six millimeter also. Just like that. Now we'll finish the sketch. And I would like to
credit on this area. So you can, if you want, you can press Control to select
X2 two at the same time. Or if you're just sick once, instead to go in this direction, I'm going to go in
the other direction and credit to all
just like that. And I can do the same
thing just here. So automatically you
will have options. If I just come back. You can also see links
with two parts at the same time,
control and control. And just remove like
this and validate. And after it the same, you can extrude and z direction and extrude on this
direction or this direction. The last thing that I wanted
to show you first delete every sink and credit to
sketch again, Sketch mode. Let's change the work plane with y plane and select
the front view. I'm going to create an
element with a rectangle, defined rectangle from center. First, Let's create 20 by, let's increase the size. Star t by 44 by
60% will be great. And after I can apply a, fill it from this part
to this part with at least 22 millimeter
and this one to this 122 to have like soccer. I'm going to create a circle
in the middle. Dress here. Maybe I can change literally be to center point. I'm
going to click Yes. So some top one will be this one with 24 or 23. It's okay. And just create a
rectangle from the center. I can click here and
create 28 by six. Let's finish the sketch. So now if I want to
create an extrusion, but you have
multiple possibility I can extrude this part. I can extrude this part. I can extrude this part. In this example, I
just want to extract this part because you can
do the same thing with e.g. two or three sketches, but you can do this one
in just one sketch. Just click here and Extrude. Extrude. I can apply like
four millimeter. When you do this, you don't have to
forget that you have still your surface on your
so constriction tree. So you have a surface here and I have still
a surface here. So don't forget that if you
want to have a complete all, you need to click on this top face and
right-click, press Delete. And in this case
now you can find the complete URL and you
can find only one solids.
23. Create revolutions: Credit revolution, which is extremely useful to
create a revolution because you can earn
a lot of time on sketches and on the
creation of your 3D models. Let's first create a sketch. So Sketch mode. And this time we will start directly with a
different rock plane, and it will be the y walk plane. On top view. I can just use a plain
view if you need, but sometime I don't like too much to select the top view, plane view because you are
not exactly as you want. So sometime I don't like to merge to use this type of view. Let's just come back. I'm going to click here and walk with my top view.
Yes, just like that. So after to do this work, I'm going to create a line and first show you my first example, creditor line on the right. You can apply for
two millimeter. You can come back with a
value of 12 millimeter. Here. 15 millimeter. 12 millimeter, 15
millimeter again. And 12 millimeter,
you can come back here and come back here. So crowds this type of sketches. First, you need to stay along these two axes and
finish the sketch. So now, if I want to create a circular paths
using the sketch, I can use revolution. To use revolutions legs are pulled tools and
activate Revolve. Revolve here, I've taught
to activate revolve. So first things to do is select
to next is to rotate it. But in this example, I will select this
axis, this axis. So it means this line here. Just like that. After to do this work, select one or more faces
or edges to reverse after, I will show you that you can
work with surfaces also, but here I will show
you only with faces. So click on the face. And now you have two options. The first option is manually, you go left-click and
you can turn like this. It is useful if you
don't want to apply. If you don't want to
apply 360 degrees, you can apply that you
want and you can just stop here and crowds
this type of render. The second option is to just
create a full revolution. So click on the face again. And now you have this option, full pool revolve
hundred 60 degrees are swept to the end of the
trajectory and left-click, and now I created
something 360 degrees. Why it is useful?
Because if I do exactly the same part using my, using my extrusion, I will create a first sketch,
second sketch. And the sketch. So Swiss sketches to do
the same thing here. I can just create this
one with one revolution. So it's okay for that. Now, let's just select
everything and press Delete. I'm just going to come
back with my axes. Yes, Just come back here. It's going to be
bitter about two axes. Yes, just like that. Now let's see a second example. Go into Sketch mode again. Let's see Lake one more time. The y-axis and
front view. If e.g. you want to create
a revolution but directly with all
innocent slider, you can do the same work, but just lead to space
with one of these axes. Here I'm going to let
space with these axes. So first let's select
my front view. Do the same type of work e.g. I can go here, but I
lead to space and work with certainty millimeters
and maybe 15 millimeter, ten millimeter, 15
millimeter, ten millimeter. And maybe 15 millimeter
come back here ten. And just irrelevant this area. If you want, you can also
use some rounded corner. I can apply three. Jack can apply three and she, I can apply sweet. And why not? Also in this array are three. And on this area, sweet. I can finish my
sketch like that. Now I'm do, I'm doing
the same thing, but with all in
Zoom either click on the pull tools,
activate, revolve. And first ceilings two axes. If you sit exists
axis and then you select this face and
sensory hundred 60 degrees, you have this render, but
not to all in some either. So now let's do this again. Click on the pull tools, select first, but
different axes. You can press Escape. Settings or pull tools revolve
axis will be the z axis. Now, we will turn around
this axis, around this axis, nose, the face will be this
one and activate 360 degrees. And now as you can see, we have all in the
middle because we turn around this axis. For the size of this oil, it will depends about dimensions
that you lead between, in this example, two z
axes and my Revolution. It's extremly useful also to use revolution when you want
to create some sync. Difficult, like want
to create two plate, you want to create two butters. You want to create all these
things around the axis. It's so much better
to use Revolution. So let's select
every sink, press, Delete, and use a
sketch mode again, y-axis one more time. Exists and select the top view. I would like to
create, like a vase I can use for this
first my line tool, start from the center point and apply light 40 millimeter,
then press Escape. Let's use the spline tool. With a spleen tools, I can start from this
sprint and credit, just like the profiles
that I want for my vase. So I can create something
like this. Here. Here, dress, come back
and finish on this area. So now I can press Escape. I can use my line tool to
create two line from this point to this axis and from this point to this point
to close a profile. And here's a perfect example. I created just a
profile to create a 3D model from my
vase at the beginning, it's very difficult to
understand revolution. How from a sketch, you will visualize
your 3D models. When you train, when you train, after you will realize that
it's not very difficult, finish the sketch and
activate, revolve. First civics or axis. These axes are the z-axis. It's going to be same. And then select the
face, this one. If I wants 260
degrees full pool. And it is perfect to have
this type of 3D models. Don't try to do this
work with extrusion. If you try to do this
work with extrusion, you won't have a perfect
curve like this. It is only possible
with revolution. It's okay. And last step, if I want to just crack to
URL in the middle, I can use my shelf tools. Click on this top, are on this top area. Enter our value. Let's walk with 2 mm. And I can validate,
complete this, perfect.
24. Create sweeps: Let's see how to create sweeps. So extremly,
interesting features one more time, credit sweeps. The first things to do. You need to create a sketch, and then you need to
create also a pass. So it means a direction. First things to do, click
on the Sketch mode, and let's work just
on the z-axis. So top view and create a circle, I would like to create
something like a pipe. And the sweet features
will be perfect. Left-click from the center. And let's work with
20 millimeter. Finish the sketch. I've done some things
to do each to create a second sketch at the
intersection of the first, it will be our paths. Just activate sketch mode again, select y walk plane at
the intersection Lexis, and activate front of you. Creditor line,
create a frost line from the center of print. And we can extend with 40 mm
and move on to the right. 40 millimeter also. And just move on this
direction, 40 millimeter. I can press Escape, zoom literally beat
and advocacy led for better and therefore
this pipe activate. Fit features. Left-click here. And we can apply directly
like 20 millimeter, 20 millimeter again
on this direction. Perfect, So now I will add this render the n If I wanted,
I could continue. So it means I can, I can e.g. create two nodal line
at your convenience, you can continue and the sketch. Now, what is m? M
is two sticks of pool tools and to activate the sweep feature,
activated sweep feature. First thing to do to do
picker trajectory to sweep along the trajectory
will be this one. Press Control, this one, this one, and this one. You need to click on Control to select so different edges. And there's a second
things to do, It's to click on Select. And you can select
the phase that you want, crowds your extrusion. I'm going to select this face. And now you have two options to sweep at the end
of the trajectory, or just to click on
the yellow arrow. And you can extrapolate this. It is important if you
don't want to go to teleology and you want
to stop literally beat before you
can use this one. Or you can just apply at the end of the
path just like this. It is something extremely useful because you can definitely go, you can definitely create something difficult
or longer pass. Just exit. Now, let's
see something different. I'm going to come back. Let us come back
or just click here press Control ceilings with two element and
just press Delete. Let's create another,
another example. Click on Sketch, select
a different sketch. First, let's come
back on the z axis. And on the top work plane. Here we can just grab
the rectangular forms, the center on the final
rectangle from the center. Let's work with two
millimeter by millimeter. I would like to create
a curves and buddy, I can finish my sketch and
I need to create to pass. The next step is to create
a sketch one more time. I can use a different axis. This time it's going
to be the x-axis. I was not working exactly
on the same view. So I'm going to
click on the x-axis. It will be exactly same. And credit to pass
with the spleen tool. Select the right view. Click on the center. And I'm just going to
create something like this left-click and
Crick took care of. And I can just press Enter. If I finish my sketch, I can put this
surface and create an extrusion along this path
using the sweet pea chose. Let's activate sweep. First, leaves a tragic, tragic trajectories this one. And then click on Select
and click on this one. And if I activate full pool, I can create this curve. So le'ts, just like this. And I can validate, but you can do is
also the same thing. If you want to remove, it is also possible. So this is why I'm going to
show you my last example. Just click here, click here,
right-click, press Delete. And Crato, New
Sketch. New Sketch. First I can yes, Close. Create a new sketch, civics or work plane on. I need to select the z plane. So click on z. Like this. Yes, perfect. I can come
back on this direction, w and try to sketch. Let's grab the rectangular
area from the center. Let's apply 60 millimeter
by millimeter. Validate credit to
small extrusion first, just a little bit
like two millimeter. And now the next step is to create two
circular on the face. I'm going to click
e.g. on this phase. This one, create a sketch NCLEX, this side view, and crutches
circularly around this area. I think I can apply
for millimeter or maybe I'm going to
change not quite a shocker. I'm going to create
two liner and sprint, the sprint swimming emitter. And just come back here, here. And here I've just
grabbed some C-index. This, finish the sketch. Now I'm going to create
a pass and select the top view here. To sketch. I need to rich period these elements so you
can find this element. First things to do if I
use one of these tool, I'm going to try and
snap to green and snap to anger. The options. Project to sketch. And I can project this one here. And if I stay in
my top view now, I can find this element. And with my line tool I can
just snap into them either. I can use the spin tools and
just snap in the middle. And I can just create a pass. I would like to create some sing with just all following a path. And let's work here, Let's work here,
Let's walk here. And it's worked here. I
can continue if I want, but I can stop. After to do this work. Let's just validate
things that I can do now is to use my pool
tools and activate sweep. I have this short phase, so I can click on this G0 phase, as you can see that. And at the same time I can use my sweep tools and just
click on this path. If I select this one, I'm going to have this render, as you can see here. Okay? So this is a type
of things that you can do if I just come back, you can also activate cut. If you activate cut
and just click here. Sometime it can be a
little bit longer. Yes, I got something, but it's not really good
for the simple reason this sketch is not well located. So if I click on Show face
or need to click here, click here, and click here. Let's do this again. Activate the switch tools, pigs or trajectory
and select edges. I need to seek this one, this one, this one. And now if I click here, full pool, whoops. Sweep. I can press Control. Use select tools. Just click here, click here and click here, activate, cut. And if I just go on this area, you can craft all
just like this. Here. As you can see. I'm going to show you again. Activate cut and after
to activate carrot, click on full pool. And now you can credit
to all its little long when you use this one
for your computer. I just wanted to show
you that you can remove materials also using
this type of features. And you can follow a pass. Just like that. Because I created this 11 of
the problems that we have is we have separated
with another element. So now we have all
dressed like this. This is a little trouble, but because you remove that. But you can also
just use this one, and whoops, it just come back. You can also use this one
and click on curtain. You are not obliged
to go at the end. You can just remove some soft phase until
a specific area.
25. Create lofts: Create a draft. Draft, it is possible
to apply this feature. You can find this feature
in the pool feature. So the first things to do, Let's crap to sketch. Let's work on one of
these walk plane sketch. Let's use the sidewalk planes, top view and credit to rectangular form as a center
on defined rectangle. From center. I can apply to value for t
and y naught t milimeter. Finish the sketch, credit to next Tricia and just
extrude on this direction. And let's validate with a
value of 20 millimeter. It is interesting to use draft
feature, so acidic pool. And you can find draft here. Select any number of contiguous
faces on the same body, then Solexa plane, planer face, or edge around which
you want to draft. If I just select
e.g. this phase. First I can see it
is a draft feature. So click on the draft
feature pickup plane to draft a burn. It can be e.g. this plane. And then I can
click on this face. And I can drag and move
in this direction, and drag and move
on this direction. I'm going to show you again. Let's deselect everything. Let's just come back here. So first activate this feature
pickup plane to draft a. But let's sit exist plane. And after I would
like to drag and move this face on
this direction, so acidic this face. And I can enter a degress, whether on this direction, with a, on this direction, just enter a digress. Let's work with e.g. 40 degrees and just validate.
And I can continue. I can select e.g. my selection tool come back on the draft feature acidic
top plane to draft a. But this time I'm
going to change, select this plane and silica face it exists face
and take your glands. I can drag and move
on this direction. I can drag and move on
this direction also. But you can do this work
with multiple faces. So let's just come back at the moment where I just have my, my tube like this. Let's come back, select and
drag a face to offset it. First, let's activate draft, and I can click on this plane. And now I'm going to
walk with two faces. I can press Control
series of first phase, press Control, select
the second phase, and now I say t2, s2 faces. So it means if I extend, I can extend on these
two direction at the same time and
craft something like that and enter the value. I can also repeat the
procedure with e.g. these four faces at the same
time, interests come back. Click outside first to
deselect everything. Let's come back on pool. Activate draft. I would like to have this smaller and these
bigger on the bottom. The plane will be this
one. Sittings of face. I can see this face press
control, this phase, press control this face, and press control this phase. And now I can extend this for faces at the same
time on this direction. And I can just enter a value
let supply 16 millimeter and just validate is great because sometime you can
create something like this. I can Turnaround, activate e.g. a. Shell feature and crudest type of
render, just like SAT. Or I can complete
also why note I can validate with my pool tools and take your glands I
can activate to value may be 20 millimeter here, maybe 20 millimeter
or so on this area, whoops, 20 millimeter. 20 millimeter also.
26. Create drafts: Create a draft. Draft, it is possible
to apply this feature. You can find this feature
in the pool feature. So the first things to do, Let's crap to sketch. Let's work on one of
these walk plane sketch. Let's use the sidewalk planes, top view and credit to rectangular form as a center
on defined rectangle. From center. I can apply to value for t
and y naught t milimeter. Finish the sketch, credit to next Tricia and just
extrude on this direction. And let's validate with a
value of 20 millimeter. It is interesting to use draft
feature, so acidic pool. And you can find draft here. Select any number of contiguous
faces on the same body, then Solexa plane, planer face, or edge around which
you want to draft. If I just select
e.g. this phase. First I can see it
is a draft feature. So click on the draft
feature pickup plane to draft a burn. It can be e.g. this plane. And then I can
click on this face. And I can drag and move
in this direction, and drag and move
on this direction. I'm going to show you again. Let's deselect everything. Let's just come back here. So first activate this feature
pickup plane to draft a. But let's sit exist plane. And after I would
like to drag and move this face on
this direction, so acidic this face. And I can enter a degress, whether on this direction, with a, on this direction, just enter a digress. Let's work with e.g. 40 degrees and just validate.
And I can continue. I can select e.g. my selection tool come back on the draft feature acidic
top plane to draft a. But this time I'm
going to change, select this plane and silica face it exists face
and take your glands. I can drag and move
on this direction. I can drag and move on
this direction also. But you can do this work
with multiple faces. So let's just come back at the moment where I just have my, my tube like this. Let's come back, select and
drag a face to offset it. First, let's activate draft, and I can click on this plane. And now I'm going to
walk with two faces. I can press Control
series of first phase, press Control, select
the second phase, and now I say t2, s2 faces. So it means if I extend, I can extend on these
two direction at the same time and
craft something like that and enter the value. I can also repeat the
procedure with e.g. these four faces at the same
time, interests come back. Click outside first to
deselect everything. Let's come back on pool. Activate draft. I would like to have this smaller and these
bigger on the bottom. The plane will be this
one. Sittings of face. I can see this face press
control, this phase, press control this face, and press control this phase. And now I can extend this for faces at the same
time on this direction. And I can just enter a value
let supply 16 millimeter and just validate is great because sometime you can
create something like this. I can Turnaround, activate e.g. a. Shell feature and crudest type of
render, just like SAT. Or I can complete
also why note I can validate with my pool tools and take your glands I
can activate to value may be 20 millimeter here, maybe 20 millimeter
or so on this area, whoops, 20 millimeter. 20 millimeter also.
27. Add fillet: Let's see how to add, fill it on your
sketch so it means to add rounded corners. So first things to do, Let's go on the sketch mode. And silica is a top
view just like this. I can create a rectangle
directly from the center, create a rectangle, activate defined rectangle from center
and that center to value. I can work with 16
millimeter by 40 millimeter. So far I've shown
you can add wounded kroner directly after extrusion. So I can finish my work, create an extrusion like 20. And just with my poll tool, I can select one of these
edge and I can add wounded Kroner at my convenience and
touring a specific value. But you can also do this
work directly on sketches. So let's just come back. It'll be four here. So if I come back to my sketch
to add rounded corners, you can click here,
create wounded kernel. You need to sit in the first
segment like this one. So second segment like this one, and be fraught to click
on the second segment, you need to enter the value. So click on the first segment. And when you arrive
on the Saigon, don't click and
tells you a value of validates your value
with another click. If I want six millimeter, I can just step six
millimeter and validate. Now, let's go on this array. Let's do the same thing. Left-click. And I can apply six millimeter. Left-click and apply
six millimeter. Let's click and apply
six millimeter. And thanks to that, I can
do the same type of work, but directly on my sketch. It is something useful too low. And if I just come
back on these areas, so not only, not only for this, it is good for lots
of things. So e.g. you can just create some seem
to craft to pass like that. And 12 a bit to our render, you want to add rounded corners. Click on these tools
and you can activate, like I can activate ten. Here, can activate ten, but be careful sometime you
will keep a line like this, these little strange,
it is little strange why we have exactly
this line staging here. In this case, just
use trim away, left-click and remove this one. I'm going to show you
that you can change. Also see options when
you use these tools. Because you can also
work with the chamfer. So first let's
select everything. I can finish my sketch, select everything, and
just press Delete that. If you want to work
with Trump first, let's change the work
plane sketch mode. Just silly. So why walk plane
and select the front view? I can zoom a little
bit and just create a line like this here
with a value of before. To do this, I'm just going to
show you some vesicle just created a rectangle and
to add your chamfer, click on the tools. Activate chunk for
mode this time. And thanks to that, you can go left-click on the frost
line, Left-click, left-click on the second line, and you can add your chamfer. You can enter different
you mentioned if you need. So this is how to add chamfer. Let's press Escape. I would like to create a square. And for this, I'm going
to create a line first. From this point to this point with 30 millimeter press Escape, create a second line. This point to this point we saw two millimeter and then
add a chamfer here. I can select my
rented Kronos tools, activate chamfer
mode, Left-click here and work with
six millimeter. But after I need to erase with tremor way this
part and this part. Next step is to add an offset. Lets see again of set curves. Create a frame of selection. And we can try to offset here
with maybe two millimeter. Just close the past credit to segment here and
create a segment here. I can finish my sketch and
then create an extrusion on this direction and tells
the values that they want. Let's take 20 millimeter
and that's it. So it is same. You
can add a chump fell after 90 is possible. You just need to click on
pool and you select e.g. in edge and you can
change the mode for chamfer will
show you just after. So we can do this on the
sketch or you can do this directly after if you need.
28. Add chamfers: Chamfer. Chamfer, we can find
these features. It is exactly like Rousseau
sends that to create, feel it, but this time it
just a little bit different. So the first things to do, Let's create a sketch. Select the Sketch
mode, activate. So top view and create a
rectangle from the center. So define rectangle from center. Crack the first print. Let's increase a little
bit this time like 80 millimeter on by 48. Finish the sketch and create an extrusion dressed like this. I can create an extrusion
with a value of 40 millimeter dress here. I just sometimes, I
would like to create maybe another
element on the top. Create a sketch just like that, and create a rectangle
again, form center. Top view, and credit to
small rectangle with 20 by 20 and create an extrusion
or so with 16 millimeter. So now let's see how
to crack chamfer. You need to use one more
time your pool tools. And if you click
on any lines, e.g. this edge, now you can
find the option shampoo. You can also sleep
disruption here, Chamfer, something on
terrorists t. And if I just continually tell you beat is you have chamfer options
and you actually you can e.g. a digit chunk for what you need. You have to reverse the Trump
throw up so chamfer, stop. Share. When you go and fill it,
you don't have option, but when you click on
chamfer, you have options. Now, aim is to just
go left-click here, left-click, and you
can enter a value. But something I'm
protons is shelf e.g. just to play a trump firm
with proportionality, you can create a jump for
a wizard proportionality, so it means two-dimension. Click on the underlying
first just here. Now I have still the
Chamfer option activated. And if I start to go
left-click first after, you can find three arrows. This is the first arrows, but we have also these arrows. So it means I can work
on neon this direction. I can walk only on
this direction. As you can see,
this is why it is useful because you can
create two-dimension here. You can then tell the dimension and can create your first ten. And the second I can enter. Why not 20 millimeter? We can walk with two-dimension
at the same time. I'm going to show you again. Let's come back
before just here. And just here. Yes. So now let's select this
edge, press control C, it exists Edge press control this edge and press
control this edge. You can activate a chamfer
on multiple edges. Now I can go left-click. Oops, it's not really
good, it is fillets. So now I can change
for chamfer and I can go left-click here
and after to stop. This is the same. I can e.g. work with
my first value here. And I can work with the other
arrow for a second value. So you can create a chamfer
wizard proportionality, and then you can activate T. And T is the same. I can click here, Control, click here, click
here, and click here. And I can create a
Trump fall exact. Just lets your second example. I'd like to give
concrete example because it is
extremely important. In my opinion. I can
select this one, press, Delete, and
create a sketch. Let's walk with a
different workplace, work. Left-click outside, select
a new sketch work plane. We can work on the work plane and walk into the front view. Just a creditor lines. I would like to create
an element in U so I can create my
first-line, e.g. on the left. I'm not going
to use construction line. It's going to be okay. So two millimeter,
20 millimeter. Think it's not enough. Let's increase and just hear. Yes, 40 millimeter. And do the same thing
on the right here. Certainly millimeter
and 40 millimeter. Let's create an offset. Offset curve. Left-click select all the edges. And now we can try
to offset that. Just apply. Yes,
four millimeter. I can just grab
the line to close this part and create a second
line to close this part. Next step is to
finish your sketch. Create an extrusion
on this direction. I can work with 20
millimeter validate. And now I want to add chamfer. I would like first
to add chamfer on this edge press
Control and this edge. I can Solexa to activate
the chamfer features. I can just go left-click. This time they just apply a basic value on the two
sides with two millimeter. Just like that. I can also repeat the process on this line, control this line. And I can apply like
two millimeter. Next step is to apply your trunk firm with
two different value. Click on this line,
click on this line, and just left-click first, and then select the
first direction. This direction, with
a specific value, electricity supply ten cities, a second direction like this
and enter no specific value. Just apply to in this direction. Address. Want to show you
that you can use scratch chamfer is to value. In this example, you
didn't apply on this. Little strange. So let's do this
again. Click here. And first direction will be ten millimeter and
the second direction will be two millimeter. And I can just validate to
crisis type of element.
29. Create shells: Let's see how to create shells. We have this features, shares, clicks a face to remove
to create a shell and dimensions of the
shell thickness. So first things to do, Let's create two new demand. And I can go on
this area sigma z, plane, top view and
credit to sketch. So let's say it's
a principle first, let's create a rectangle. Great to sketch. Let's grab the rectangle
from the center of print with just two value. Let's work with 16
millimeter by millimeter. Next step is to finish the sketch and
create an extrusion. I can extrude on this direction. Let's apply 30 millimeter. So the aim is to create
like a cavity inside and we can just keep a
sickness on each sides. So first activate shelves and you just need to click the face to be used for shells. If I click on this
one, left-click. Now you can find this cavity. And after you enter the
sickness on this area can tap four millimeter or can
increase eight millimeter. I can just step 1 mm. And I can just
validate trust exists. The things that you
will be able to do using these features. If I just come back, you can apply on multiple path. I can click here and I
can do the same thing with a specific value
just like this. I can also e.g. decreasing. I can click here, use my pool tools and if I
reduce trust on this area, I can also apply my
Shen truss here. It is definitely a very
interesting feature. You just need to
validate CS1 at the end. If you have some carryover. It is also possible
it's going to work. If I apply a fill it, silica might pull tools. Let's apply your fillets, e.g. on this area with
four millimeter. I can apply on this area
with four millimeter. Also here, four millimeter, and also here four millimeter. If I apply my shell
on this area, it's going to be
exactly the same. I can click on this
face and take a glance. I will have this render. If I just come back a little bit and now applies a
shell dress here, we'll have this render. If you select
multiple phases, e.g. you seek this phase and you press control your
sleep this phase. You can also create like you can also cross
every sing at the same time. So it is possible to apply
this one on multiple faces. I can click here, I
can press Control, I can click here also, and I can open this area. You can click on multiple faces. It's also possible. Now let's see a second example. And in this second example we will create first revolution. So let's come back on the solid
mode, right-click Delete. I can use my sketch mode, change the axes for the y-axis, front view, and
credit to sketch. Let's grab something
like a vase. I can crowd my first-line
with certain millimeter. I can press Escape. Use the spline tool, Left-click and just
create a shape that I want to mud to
modularize my vase. I can press Enter. I'm going to finish to
create a solid same. So I can create a line here, and I can create a line here. I have my profile
on this work plane. I can finish my sketch,
gradual revolution. As I explained before,
silica poor tool. Activate revolution. Civic froms to z is to rotate, so it means this one. And then Solexa sketch this one 360 degrees
with full pool. Perfect. And now if I just need
to add the sickness insider and to open the solid, it is perfect to
use this feature. So select shelf features. Left-click on the top face. And thanks to that, you can open the vase and you just need
to enter the value. If I enter form intimate, I will have this render, I think 1 mm will be create. In this example, I can finish
my work and click outside.
30. Split body: Let's explain split buddy. It is possible to split up by d and indifferent situation. It will be interesting
to use this. Let's just create
a first example. Let's use the sketch tools and work on a
different work plane. Let's work on the wire. Walk plain, silly. Front view. I would like to create
some sink like a plate. And from this I can
create a revolution. So first, I create
the base with e.g. let's increase the turbid
may be 40 millimeter. Then I can come back
in this direction. You can make
something like this. And you can just come back
here and come back here. Add affiliate with
rounded corners features, left-click here,
and just work with, I think, two millimeter. And that's it. So after hours, the next step
is to finish the sketch. Crato revolution, using support tools,
activate revolution. Select an axis to
rotate this one. Select the face, this
1.360 degrees, like this. After I can apply
social features, left-click on this face to open. And about dimension. I think I can work
with two millimeter, but 2 mm too much on this example because I
have this wounded kernels. So let's do this again. I'm going to apply 1 mm. Let's walk with one and
dress click on this face. And yes, I think it's going
to work properly with 1 mm. So the things that
I would like to do, It's to divide my
solids into parts. Just divide into parts. And the best things to do, it's to use these
features split by dy. First we need to select the object that
you want to split. So it means this solid. You can also select
the construction tree. Click a phase plane on edge
loop to use as a character. Here needs to have, I need to have a work plane. And as you can see, I
don't have any work plans, so I need to come back and
go on these features plane. You can create a new work
plane from a reference, and I can use x
reference in the middle. Now let's repeat the features split by D. Select this object. Then you can select, you can select the
work plane, this one. And now I separated
into entities, as you can see, solid one
and solid number two. If you want to
revise one of them, you can click here. And e.g. you can choose to
erase this part and only obtain this
render like that. But if you want to
keep the two Padlet, just come back and
let's do this again. So first Solexa, but, oops, let's come back
again. Yes, here. So silicones are split by D. Click on somebody,
then you can separate with this planar and
just validate here. And if you use your move tool, we can select one of the solids, drag and move on the direction. And I separated in two elements. So it was a great example. Let's make a second example. If I want to create a
table with four fits, it's going to be great. Let's first remove this plane, delete and create a sketch. Uses Sketch mode, select. So z plane. And on the sidewalk plane, we can create a rectangle
directly from the center. Let's see the top view. So create a rectangle like this. Let's work with 100
millimeter by 100 millimeter. Can tap 100 millimeter
tabulation 100 millimeter. Let's finish the sketch and
create an extrusion like this with just a value
of six millimeter. And now I want to
create my sketch for the feet of the table. Click on this face to sketch. And let's grab the first
circle on this area. Here. Maybe you can create
a construction line, but it will be, it will be
first went fast like this. You don't need to
create symmetries. Let's grab the first foot
with eight millimeter. Let just use a grid
eight millimeter. Eight millimeter, and just eight millimeter,
just like that. Because we trotted the
sketch directly on the face. I if I have created
an extrusion, I will stay on the same solids. If I want to create an extrusion
and have different part, I will have to separate to separate the work plane of the
face and to let an offset. The first possibility. But the second possibility
is just to create a sketch on the face,
finish the sketch. And you can create
two next version. So you can click
here, press Control, click on the four
different faces, and create an extrusion
on this direction. Let's work with 80
millimeter exact. So after I have just one Solids and I
have the possibility to use split by d to separate the feet of
the top of the table. And it's facet is
convenient here. I don't need to create to work plane or you apply split by dy. I can click on the target. It will be this one here. And now I need to select, I need to select a phase plane on edge loop to use as a cartel. And I will select this face at the intersection just like that. And now, as you can see
on the construction tree, we have now five solids. So it means the phospholipids and we have the first fit foot. So second foods are soft food. And the answer here, since the first Saigon sell for, and this is the
top of the table, I don't need to remove
anything in this example. So just validate can come
back with my selection tool. Now I separated every sink. And if you want, you can rename your foot number one. Here. It will be food number of two foot, three foot four. And she'd see the
top of the table. And let's rename
for top like this. And it is great because now
you have separate element, I have separative element. And the things that I can do
if I'm using my move tools, I can click on the
top element and e.g. I. Can drag and move and you can really see the separation. So this is how you can
split body every time. If you create something
directly you link on the face. After you still have the possibility to
split the body and to separate in different
different buddy.
31. Split face: Let's see how to split. So to split we can
add this speech, these features,
splits, selector, face or edge, then select
an object to split it with. Concretely, you can
split using nilly man, but you can also just
create new edges. So the first thing
that I'm going to do it just to create. I can create to
something like a cube. I can select my sidewalk plane, go onto top view one more time. Let's create a rectangle
because it is definitely, it is definitely the best to
seize or different features. So let's apply to value one
more time, 60 millimeter. I can reduce 40 millimeter
and finish your sketch. So next step is to
create an extrusion. And I can create
an extrusion with 40 millimeter just like that. So if I zoom little bit and not directly applies
a split features, you can click on the
face to split here. So e.g. if I click on this face, as you can see, you have
silica UV cut-off branch. You have silicon
perpendicular cutoff print. Silly to cutoff print
or silica cartel phase. It's so click on
the face to split. If you are the face cruisin, you can click on the face. So here let's select
just UV cut-off point. And m is just to select
one of these edge. And then you can create to
cut at your convenience. And you can talk to value. If I want to create two
curtains on my door, I can tap 13 millimeter here, and I can press tabulation. And on this direction it
will be 20 millimeter. And I can press Enter and I created a new cut on this area. And now you have four element. So this is a type of
things that you can do. If I sit exist face again, I can activate again
the same thing. And this time just divide
with this type of value. After you have this one. Silica result, click on
imprinted curves to remove them. So it means if I don't want
to have all these segments, it is possible to remove. If I want to remove this
one, remove this one. It is possible the aim is to add different type of subdivision. And let's continue. I'm going to select this face and click here, hit the target. You can also use
pit edge and e.g. you can click here and you
can divide in multiple edges. I'm going to show you just after our electrodes come
back here, select, Oops. Interests come back. Yes, like that. So if
I select this face, I can use the tool again, click on the face and
activate what you want. If you select
perpendicular to a point, you can select just the first and you will just create
two line perpendicular. I can click here or just
click again on the face, click again on perpendicular. And if I click on this one, can just create one more
time perpendicular edges. So last thing that I'm
going to show you, if you click on this face, you can also select
to curtail point. So it means I can
select this point, still exists print and
I can create something lazy so you can apply
trust to point. Don't forget set if
you use this soon, don't forget to snap or
you will be in trouble. And now I have all these faces. This is why it is, it is useful. And after, if I click here, I can use my move tool credit to an extrusion just like this. Don't forget that. I'm going to click
on my poll tool. Yes, I wasn't my move tool
and I can drag and move here. I can also click
outside drag and move here because I
created subdivision. If we just come back
at the beginning, you can come back with a lot of undue action when at the moment where we
add just the cube. Just like this. If e.g. you create some sin crossing your user sketch mode and you walk with the y-axis,
just like that. And you change the location
of the creed you position. So grid just here. E.g. you select your spleen tool and you are applies
a front view. You can create something
like z is just here. I can validate. I think
something is wrong. Yes. Let's press Enter.
Yes, it's better. If I create something like
this and just sketch, I can create an
extrusion to create a soft phase only on these
edges, just like that. If you apply split here
and you select e.g. this phase, just like that. And you click on this time, select the cutoff face. I can click on this face. And now if I just validate, I can click outside or
click on my selection tool. And I remove this top
face right-click remove. You can find this type of
cut just on this area. And Sam, I can click
here with my pool tools. And I can create
an extrusion so we can crowdsource this
type of curves. If I just come back a
little before this livers. And with my solids
and my soft phase, if you use this split buddy, by the way, I forgot to tell you that you
can e.g. click here. And when you cut silica cutter, you can see this face. And then you can e.g. remove this one
with these tools. And you can remove this
one just like that, and then remove the shelf face, right-click Delete, create
something like this. It is also a possibility. Let's continue and create
just another example. Select every sin press Delete. I think it's not
working properly. Let's choose the selection tool. Select every sink,
right-click and delete. Just cry to New Sketch, Sketch mode, z axes, and activate the top view. Credit again, a rectangle
from the center. I can click here. Defined rectangle from center. And credit 62 by 40. No way, I was shocked face. If I just use split. And I click on the face, click on one of these tool. I could create subdivisions
in directly on my surface. And if I just come
back to this one, to this one, if I just come back to silica to cutoff print. If I just come back
on split edge, yes, split edge. You can e.g. click here and you
can divide it. I can click on this one. Yes. I can divide with
a number of cont, take your glands,
you can divide or I can also just come back. Click here, click on
this edge and you can divide with a number of
container can apply e.g. for and he's not going
to work properly. I think maybe if I moving
if I'm pulling this, this one and just come
back to my split tool, click on this one. This one, and just click here. It's not working properly. Click on this edge. Yes, to split and
you have to count. I can select for just validate. And the fact is yes, now I divided in four edges. As you can see, I
split this edge is in four different way here. And just useful if e.g. you wanted after to pull
only an edge like this, and you can pull only this one. The best things to
do it to click on this edge, activate
extrude edge. And now I can extrude
only this edge. As you can see. I can pick out side click here and
extrude uneasy speech. Just exactly. So you have multiple things
that you can do. And it is something
interesting also to know.
32. Combine objects: Combine object. Let's see these features
combined object. You can manage split object. So first things to do, Let's craft two elements. The first element, sketch mode, Let's select the z plane top
view and create a sketch. I can use my
rectangle tool first, defined from the center and
create my first element. We 60 millimeter by millimeter. It's going to be
my first element. Then I can add rounded corner
on this part to this part. Let's activate ten. This part to this part, Let's activate ten also. Create another element in the middle here I can
create a rectangle. You can find these two prints. This sprint, the sprint, and create another rectangle, but not from the center. Let's do this again and create another
rectangle, 20 by ten. With my fill it, I can
create a small fillets here, like two, two millimeter, two millimeter, and
two millimeter. Let's finish this element and the sketch create an extrusion. And let's work with
eight millimeter exists. And you can remove the self
phase, right-click dig it. So this is my first element. So now let's create
a second element, sketch mode and
activate a plane. I'm going to work
also on the z plane. So click on Z. I think
it's not the best. Let's click outside
and click here, activates z plane and
sittings a top view. On this area. Let's create a second. Solids. Create a rectangle one
more time from the center. Define a rectangle
from the center. I can arrive around this
area and apply to value. Let's apply 20. Yes, let's apply 28 by eight
millimeter, just like that. And after to do this work, yes, I've taught
to do this work. I can also apply a small
curves with fill it. So CO2, CO, Let's apply for and here to here,
Let's apply for. Finish the sketch,
create an extrusion. Let's extrude with a value
of 40 millimeter like that. Perfect. Now let's click on
this element and move the second solids exists. And you can drag and move. You can just first
pull little bit, e.g. on this area, but not on this. Alright, It's not extremely
useful on this area. You can select the front
view and drag and move. I can drag and move
with a value of yes. Let's work with 13
millimeter to show you. Yes, perfect. You can rename. This is my solid number one. Solid number one. And here I can rename
solid number two. So after, Let's use combine. If I use combine first, you need to select options. So guns, this option
panel's properties panels. First thing this make buddy
you can match when done. Manager, newly created region when exiting tools
so you can match, keeps the curator object
or make or region. So it means here it
is an intersection. If I keep US keep
curtailed by default. First I select the target
objects, this one, and after I have two options, options to merge, all
the options to cut. If I select Merge, I click on this
object like that. And now if I just
validate outside, I have just one element and
I just created one element. As, as explained, we have
split body so you can create separate when you combine
objects with merge, you can just add one entity and now I
have just one solids. Now let's come back later, before when I add my two solids. City exists tool again. And this time Activate,
select Quetta. Click here. First,
silica target objects. So this one, then
Solexa character, it will be this one
just solid number two. After to do this work, you have the options
to remove a region. So it means I can remove
e.g. this region. I can remove this region, but it's not going to work properly because
IF keep character, but I can also do is
activate or click here. Let's do this again.
I'm going to come back to the liver where I add this element.
Click on combat. These activate every sink, just click on the target, but this one, click
on character, click to select Dakota
objects, this one. And now I can chart like
this as you can see, if you arrive at
silica-rich on to remove, you can remove, I think
here in this example, I want to remove
this one valid data. I would say I have
just one Solids and I remove this element like that. But it depends if you keep
the character on the right, if you keep so curtail, let's activate again
first, let's come back. Yes, just at this livers and click on the tool again,
Combine, keep character. First, silicosis target object, say go and select character, and we can click here, but now we have
cubes a character. So it means if I validate, now you have three solid. So this is the first. This is a sigma bond and
this is a cern because I keep the character if I use
my move tool, silicone, second solids, you
can find this one, seeks a soft solids, and you can find this one. So this is why we can use KitKat so we can keep all the
different elements. And then you can also have
more options if I just come back at some moment
to add my two solids. You can also apply
make or origin e.g. and you use combine
your syllabus, this one character, you
can select this one. And this is the
same. You deviate, you divide in Swiss solids. But then you can select
a region to remove. Can be the region inside
this, in this way, Jones who hate can be this one again, but I can remove it. So this one trust exists. And less things to show you
if I just come back around. Yes, it's slivers previously. Activate. Oops, let's just
come back at this moment. Silly combine, match when done. And activate this one. Then if you click here and
you remove this one here, It's not extremely useful
metro and done you need to validate
if you click Plus. You can also keep this 1.2 element will be met
when it will be done. So take a glance,
I can validate and it will be merged
in just one entity. So I don't keep
this entity here. I just match every sing if you activate merge where, when done. So it is just Boolean operation in different graphic
design software, 3D modelling software,
CAD software, we can find Boolean operation. Here. The name is not
Boolean operation, but it is exactly the same. Combine, divide, subtract. It is Boolean operation.
33. Create shapes: Create shapes. You have the possibility
to create simple shapes. And here you can find sphere and you can
find also cylinder. It is not possible to add
directly something basic, like a cube or something
more like this. But you can just create a sphere or you can just
create a cylinder. To do this, the
first things to do, you need to work on the
walk planes that you want. And you can change, you can click here Solexa
work prints that you want. Let's walk on the
sidewalk plane. And after just click
on one of these tool, if I click on this fair tool, first, you have the
options for options, add carrots, and
let's click on Add. I can select my center point here and just go left-click
and credit to sphere. You have the diameter. You can enter our audiometer
if I want 20 millimeter, I can tap 20 millimeter,
just like that. After you can find you have the feeling
to have an atmosphere, it just that your
plane is located here. So if you just click
on the 3D mode, you can find all
your sphere laces. So this is a type of
things that you can do. You can also do exactly the
same thing with a cylinder. Let's just come back and
credit cylinder also, I can click on my cylinder tool. I can go into center, e.g. left-click and credit
just the first base. And after you can enter to value first with the
number of degrees. And at the same time a value for the size
of your cylinder. And after to go left-click, you can one more time, add another value
for the diameter. I can take ten
millimeter diameter, the exact chakra
to the cylinder, but on this direction, because they had 150
degrees dress here. If I want a cylinder
with this value, let just come back. I can click here and I
can go left-click again. And if I just press
stipulation here, so I can change my
value in degrees. And after now I have
zero degrees and I can create something
like this after. It depends also about what
planes that you choose. Depends about the
workplace that you choose. So I can e.g. come back, select a different
work plane, activate. So why work plane? Click on the cylinder tool. I can start again
from the center, going this direction,
20 millimeter zero. And now I can have cylinder directly
located on this view. And I can just click outside. I'll just press
Escape and validate. After you can also, you have something
like cat here. So it means if I
just click here, I can use my selection tool, just click here and
create a sphere. I can position the sphere
directly on this area. And about the sphere
here and directly you will have the sphere
perfectly on the top. Why? Because I
selected this face. So if I click on the sphere, directly is a sphere
will be located here. Now if I just click
on my sphere tool here and I select some sink
like on this direction. One of the best things
to do, it's e.g. I. Click on the sphere. I need to come back on one of the work plane to snap
to the work plane. And I can click outside. And ceilings are what
plains that I want can be this type of work plane. I can drag and move phrase on per year just on this direction. Use my selection tool and
click on the sphere again. And if I go into the center, I can create a small sphere
on the top like that. But as you can see, now, automatically, I created
this element just like that. If I just come back little bit, select my sphere tool
change for kids. I can go into the
center, just go here. And I can press Enter. And now if I use e.g. my 3D mode, nothing will happen because I just apply on cut and it's not possible to
directly remove that. Sometime this tour
is not extremely convenient about AD and cut. Things are best things
to do it just when you want to add some sync bicycle. So I can select this one, press Delete, and
create a cylinder. Again, I can select one
of my sketch tools. I can walk with the
y-axis just like this. Click on front view and
just go left-click. Let's apply 20 millimeter, eight millimeter and validate. When you have
something like that, you can use your move tool. Just click on the body
and you can drag and move on Zoloft or Dragon move on the right at
your convenience. You can also create
some rotation working on different axes also. But be careful because
at the same time you can create some modifications. So here I can just
turn like that, but I will have something
a little strange. So sometime you need
to be careful when you use these different tools. You will be able also
to create repetition. Just using the move
tools, crafts, patterns. And if I click on
this one, just go on, right, I will be able to
activate or repetition. I just come back and click on my move tools, create patterns. And if I grant the right, Let's do this again. Move towards, I fear I'm
going to see the solid here. It's better. Credit patterns. Just go on the right
and now it's okay, I can select the number of cones and the distance also establish. And even if I will show
you this just after, and I can create also
repetition of this cylinder. But definitely a thing. We don't use this to merge them. Most of the time we will
only work with sketches.
34. Extrude edges: Extra edges, it is
possible to extrude edges. We can have a features
when we use the pool tool. So first let's create an
example siloxanes sketch mode. Let's work with the z axis
and I can use a top view. Let's create a rectangle just to crayon rectangle defined
from the center. And let's apply one
more time to value. I can apply 60 millimeter and I can apply 40 millimeter,
finish the sketch. So now as you can see, we have a short phase. We have the possibility to only extrude edge from this G0 phase. If I go on this area, I can find extra edge drugs are selected edge to
create a short phase. So acidic support tool
click e.g. on this edge. And you can go e.g. in this direction and
enter a specific value. I can enter 20 millimeter. If I click here, I can do the same thing. I can extrude and enter e.g. 20 millimeter. You can also extrude two
edges at the same time. If I click on this edge control, and if I click on this edge, it is also possible to extrudes the two edges
at the same time, but you need to pick
the right direction. Because if you say
x is direction, if you said exists
direction is going to walk also using so normal. And I can extrude with
a specific value. I can also click here, extrude on this direction. Let's take an example
about what you can do. I can start e.g. with this surface and I
can select all the edges. This one, this one, this one. And this one. Then I can extrude
using these arrows. I can go in this direction. Let's take 20 millimeter. Now if I select
again all the edges, this one, this one, this one, and this one. Let's do this. Yes, perfect. And I click on this arrow. I can extrude on this
direction as you can see. But if you want,
you want to have some little bitter but
surrender. I can e.g. firsts it exists
one in this one, then extrude on this
direction like 20 millimeter. And then I can select
this one and this one. And I can extrude like e.g. in this direction
with 30 millimeter. And I can create this
type of features. If now I select every sink
and I use my, my pool tools. And I can add sickness,
as you can see, can just apply a
very small value around inside it can be 1 mm. And I can convert to a solid. So now I have a solid and I
created this type of work. Let's your second example. You can also use
this if you want to modiolus different element, I can press Delete
credit to sketch. Let's work on the
work plane first. Click on the front view. Like this. Let's create a first-line. I can create a
first-line on the right, like certain millimeter
and continue here like 44. Press Escape. Do the same thing on
this Iraq and crop construction light butt
heads is very fast. Critical structure nine is
useful to her own time. If it's same time, you can just grab
something like this. It is not a problem. And I just want to use my
center sweep print arc. I can zoom a little bit. This point to this point
cracked and knock. And create a circle in the
middle here. And let's apply. So T4. Let's finish the sketch. So now I have this element again criterion extrusion on here. Let's apply 16 millimeter and then remove the
Shah face. If e.g. I, e.g. I want to modernize
things that I can do is to click on this one. And I can extrude face, so I can click on the face
first, change the mode. You have extra edge. If you just click on edge, you can also find extra H. And now I can e.g. go
in this direction. I can enter a value
of 100 exists. After to do this work, I can click, whoops, after to do this work
with my pool tool, I can also drag and move. First, it's better to de-select
and drag and move again. And I can add volume. And let's apply eight. Just like this. You can also use these
different way to modiolus. It's not only to work with
soft phase, to pull the edge. I can click on this edge, press Control, click on this
edge also, just like this. Now I select to
normal is this one. And I can extend like sati
or 20 millimeter like this. And then I can add some volume. So first is better, you
deselect everything. You can click here,
control-click here. And I can create an extrusion
depending of what I want. Let's create an extrusion
with dressed two millimeter. You can modiolus different
things, just extruding edges. There's something also in
protons that you need to know. And if you click
on this one, e.g. you can also extrude
support with a shocker. It's not very useful
for what I want to do, but sometime you can also
do this type of things. And I could continue. I can take this edge, select where to extend. Can extend on this
direction with 20. Then I can add volume, click outside at little volume, which is two here. And now I can add, click on this edge
change for beaver. And I can add a beaver
dressed like that. Can also why node or the
beaver address here. You can click outside this one. Let's apply for and I
can click on this one. Let's apply for. I just want to show you
that just extruded faces. You can mobilize something, address want to show
you, is this one.
35. Copy edges: Copy edges, you have the
possibility to copy edges. It is also something
useful is that you can do, let's first create a
sketch, sketch mode. Let's work on the z-axis, w. One more time. Let's scratch again a
rectangle from the center. Let's apply one
more time to value. Let's work with a t
millimeter by 60 millimeter. Finish the sketch and
create an extrusion. Let's work with 60
millimeter and validate. The first thing that I'm
going to show you as, as explained just before, it is possible to
extract the niche. So when you click
on the Pull tool, you just select an
edge, e.g. this one. And then you can
activate extra edge. And I can do something like
this on the direction. Let's do this again. Yes, on this direction. Then I can go in this direction. I can go in this direction. I can go again on
this direction. So this is some things that
you can do that finally, if you use this tool, so it means you
change for copy edge. In this type of process,
it will look same. So it means you can do this. You can also do this, and you can also do this. And you will create
multiple shore phase. So this is why if you just want to make
this type of example, it will be same if you work
with different things. So now where it
can be different, it can be different if e.g. you want to add like
subdivision on the face. And Jacobi edges
can be interesting. I can click on this edge first, then activate Copy edge
and take a glance. I can go left-click
and drag and move edge on the distance
on this face, I want to position the edge. I have 60 millimeter
at 40 millimeter. I can drag and move
at 40 millimeter. Now I can e.g. take
this part and I can drag and mover edge
here and position. Why not add 20 millimeter? If I want to work on this, on this area, can e.g. text here. And left-click drag and move an element
e.g. ten millimeter. You can just crush
subdivision like this, adding different ages on faces. And now if I use my pool tools, I can only pull this one
on z direction like that. I can e.g. pool this one
because I added subdivision. But take a glance, I can also add the agents on this area. Aim is to select
pool and select e.g. this edge, this one. And I can drag and move, oops, I need to transfer mode. And I can drag and move in
this direction and arrive exactly 60 millimeter
exert here. And I think eventually
it won't be perfect, but the distance, because I didn't apply the
right distance. So it's not a
really good example because I want to
work with precision. Let's show something different. I can drag and move, click outside, slick
my pool tools. And here I can drag and move. I can also share an edge. If I want to delete,
I can delete. So this is just the n. So m is to mobilize in different way to
create subdivision. I can click on these tools
every time move Tools, Pro Tools, I can select
one of these edge. If e.g. you select two edges, I can see it exists
one and this one. And I activate Copy edge. It is also possible
to drag and move two edges at the same
time, just like that. And if you select four edges at the same
time like this one, this one, this
one, and this one. They could glands you can
reduce and you can create two. Like it is literally
like your offset, but we don't walk
on the sketches. And now I have an element and
I can drag and move here, or I can create
two all like this. So this is why
sometimes it is useful. Let's do a second example. I'm going to select everything, just create a sketch
and select so z plane, top view, crappy rectangle
from the center. Rectangle from the
center exists. Let's apply for t by 30. The things that I can do, it's to apply your
soul feel at home. This one to this one
from the limiter. Four millimeter. Four millimeter
from the midterm. Now I can finish my sketch. I can create an extrusion, but you can also directly
apply what you want. So if you select poorer, I can select all the edges. All the edges with control. If you select the face, just click again on the face. Yes, perfect. And now if I use my cookie edge, I can drag and move
inside just like this. It is useful or if
you just want to crack like the
sickness on this area. And now if I want, I
can only extrude, oops. Now if I want, I can only
extrude these elements. Don't forget to click outside, and I can only extrude
this part with a value. It can be ten millimeter
and nose the face. On this area, I can
keep this phase and target moved to
obtain this render. But I can also click
on this face and just right-click Delete and
just obtain this render. One more time. It is different tools that you can use if you want to modify something to crack this
type of filaments, you can have multiple way. You can create sketches. You can craft one sketches and then applies these features. You can also create a sketch. Then you can work on shell. Every time you can have multiple way to crush
the same scene.
36. Pivot edges: Pivot edges. Let's see how to pivot
edges one more time. So m is to mobilize and what you want
using these features. So first let's use
a sketch mode. Let's work on the z-axis
also top Work Plane. And create a rectangle
to create like a cube first and defined
from the center. Let's see Again one of this
example where I can put maybe 60 millimeter by 40 millimeter
and finish the sketch. Create an extrusion. Just click here. Create an extrusion. And I can enter a value
like 80 millimeter. So now from this
I'm going to change later my view and just
walk around this area. Let's choose a pivot features. You need to select a pool tools, select one of the
edge that you want to move, e.g. this edge. And after you can find pivot edge drugs are
selected edge in the direction of the
light seed pool. Pool arrow two pivots.
So I can click here. And where do I can work
on this direction? As you can see, where do I
can walk on this direction? Exact. Some single source that
you can do is after you can make all the
adjustments every time. If I just come back, you can teach here
anticoagulants. I can drag and move on this direction and
make some scene lexis. After I can continue, I can e.g. just go here, select this edge and I can
one more time drag and move on this direction. Let's drag and move on this
direction, just like that. Then I can take the
edge drag and move again on this direction. So it is something
that you can do. You can compete with
the other tools. I mean, I can click
on pool silica, e.g. this edge, just like that
and activate Copy H, zoom little bit and credit. Oops. Let's do this again. Copy edge features. And I can drag and move
another edge, e.g. on this direction here. And then I can click on
Pivot edge and e.g. I. Can drag and move inside. Here. I can take this edge and I can drag
and move on this area. Maybe drag and
move on this area. Just like that. I can take this edge loops. Let's click outside. I can take this edge, e.g. I. Can redo it just like this. If you select two edges at
the same time, like this one. And this one is also possible
to pivot edges just here. Now the thing that I'm
going to do it just to come back and select another tool. You can make this
different tools, slugs or pool tool
click on this edge. And just to activate, I'm going to use PVA again, is just p vote like this. I can create a
sketch on this face. Sketch mode. Let's create two electrons, grabs something
like for a circle, I can go on my, on this view creates a first-year
curve like 16 millimeter. I can use my grid like six millimeter and just
here like six millimeter. Just finished my sketch. I can run more time. Click here, activate pivot. And I can change
legs that I can use this one pivot and I can
change here a little bit. And maybe I can change
on this direction. Except if I need, I can cry to all dress craft
something on this direction, depends on what I want to do. Can have multiple options. And I can click on this one and I can go in this
direction or this direction. Think about your sketch to us, not really good about
what I want to do. I'm going to come back
here just as a sliver, even if it's not very important, most important thing is to
understand what we need to do. So I can click on this edge. Pivot, pivot on this direction. P vote on this direction, yes, just like this. I can click also on this edge, pivot on this direction. And now let's click on
this face to sketch. It's going to be better. Credit e.g. a big circle
around this area, finished sketch to an
extrusion. Just like this. Let's continue. I can
use my poor tools. Select this edge. This one controls exist
edge you can mix with e.g. so extra edge. And I can extrude on this
direction like 20 millimeter. And I've taught to do this work, use my pivot edge. So select this edge, exists edge and use pivot. I can put here pivot and drag
and move on this direction, which is not too specific value. Just like this. I can then use my pool tools
to just add little value. I can work with two
millimeter translates that the aim is just to show
you that one more time you, we can modularize
different things. Just using these
different tools. Just using these
different tools, you can mix between
these different tools. Can click on this one
and one more time. I can drag and move in this
direction or this direction. Just like that.
37. Fill edges: Let's see how to fill edges. We can find these features. Here we have Phil
fields are selected, enrichen our edges with neighboring are
simplified geometry. So the things that
I'm going to do first is to try to sketch, select the top view. And just to create
a rectangle from the center and define
rectangle from center. Let's apply just to value like 40 millimeter by millimeter. At the same time, let's create a second rectangle from the
center or around this area. Let's click Center and
create a second rectangle, like 22 by six. And also I'm going to
create a circle on these are real like
ten millimeter. Let's finish the sketch. First extrusion and just
apply four millimeter. So things that I'm going
to do it to remove this, your face and delete. So when you have something
like this, and finally, you need to, you need to edit and you want to fill
this array is possible. You have multiple options
for sure you can e.g. x to the n, It is one of the
best things to do. You have also the
possibility to create like your face or your
face on this area. Use the fill tool and just click on the different
edges to close the face. So it means I can click here. I can press Shift
click here, here, and here sometime it's not extremely convenient.
Let's do this again. This, this edge, this
edge shift, this edge, and this edge shift
if you continue, but if you don't continue press Control it
would be better. And I've taught to do this
work, validate, complete. And thanks to that
I created or edge. And if I just want to
create an extrusion, it is possible
with my pool tool, but I can trust e.g. add like two millimeter
and vetted that because I close this
path just like that. It works also when you
have any circular edge. If I use my fill tool again, I can click here and validate
and take your glands. I created a new phase. I can go on my construction tree and now I have a steel phase. If I just click here
against your face, did it the same? I can feel this edge
just like that. Validate. And after the
ponding of what I want to do, I can use my pool tools, move in this direction
or just stay like this. Let's see a second example. Remove just every sink and
create a shocked face first, civics or Sketch mode, rectangle defines a
rectangular from the center. Let's go out for tea millimeter one more time by 30 millimeter. Let's extrude edges. As I explained before, to extrude edges, you can
click on one of these edge. You need to sit exam
mode, extrude edge. And I can go in this
direction just like that. Or let supply 16 millimeter. Can click on this edge. Oops, let's do this again. Click outside first. Deacons this edge. And I can extrude 16
millimeter again, you need to have something close because if you use feed tools, you sit exists one
control, this one, and this one, and you just validate or it's
going to worker. So I have n, if it's not totally close,
it's going to work on. So I'm just going to come back. And if you click here, this one controls this one. And you just validate here, it's not going to
work because you are only two edges and no
sink at the intersection. But if you click on
this one control, you click on this one control
you click on this one. It's going to, well,
you can apply, feel, validate and you can close this. Let's select everything. Click on the Pull tool. Like that. I can add a sickness. It's not going to work
properly because I need to walk maybe first on this area, yes, it's better
like two millimeter. And if I click here, if I just click on this face, I can extrude like
two millimeter. Also exempt. I could continue, I
can use my filters. C exists one controls this one. And this one. If I validate shades not going to work properly
or you have too much shame. And so sometime it depends
on different situations. Sometime you can close. It is pretty simple. Sometime it is little
bit more complicated. If you have something
with your face, if I just come back around this area and I select
again this one, control, this one,
control this one. And I use my field tools. I can fill this area
because I had the surface here and the other
surface here and also shocked face on this area.
38. Project face: Project of phase. Let's see how you
can project to face. You can find these features. And the first thing
that I'm going to do it to create a sketch and directly use the top view credit to sketch on the sidewalk plane, crashed a rectangular defined from the center and let's center to value 60 millimeter
by 40 min meter. Finish the sketch,
and then crowd to extrusion like ten millimeter. So after all the things
that I'm going to do, it's to use projectors
sketch so I can create to sketch on note on
this work plane. So first, let's click
on Sketch mode. We can just click on this face, but after credit to offset. If I'm applying move grid, I can drag and move. Let's move with 20 millimeter. And now we can find
this grid on the top. Let's first select the top view. I'm going to use one of
these tools like e.g. the spleen tool. And just go left-click and create
some single disease. And it can come back
and just around this area and just
create these curves. Now if I decide to
finish my sketch, I have the possibility
to create a projection of the sketch directly
on this face. And for this you can use project maybe here it's
not extremely useful. But in the second example, you will see that it
can be really useful. And click here. And directly you can create
a projection on the face. You can validate here you
have also select Z direction. So it means some time you can drag and move the
direction if e.g. you have something
on the order size so you can move so direction. And she just selects
a transient phase. But if I sit here, I will ask for examples of
projects shown on the back. And if I click here, I will add a projection just on the tangent face on the top. And I can validate. If I select my shelf face, I can press Delete. And now I have this filament. And if I use my pool
tools just like that, I can create e.g. I. Can create an extrusion, even if I can dress
graduate caravans. This. So this is why I'm going to show you a second example. Click on the solid
and press Delete. Let's use the sketch mode again. Let's work with
X2, Y2 walk plane. Just like that. Yes, sir. No network answer. Why you are platelets
walk on the work plane. So pH here is z plane, it's going to be bitter. And just to walk
on the top view, credit first circle,
you can use this one. Sweep, OK. And I can create first print for this one to
this one for t milimeter. And then I can just
create a line. So create a first line just on this direction,
ten millimeter. Just come back here
and come back here. Let's finish the
sketch and then click here and create an extrusion
on this direction. Let's apply 60 millimeter. So now the fact is, I'm going to show you something. Let's use the sketch mode. And in this sketch mode, Let's work with the y-axis. And credit to offset. I can use for this move creed and credit
to offset on this direction. Let's apply e.g. for
t milimeter exact. Or maybe it's a little too much. I can read you a little
bit with trust to validate and just positions
agreed on the on the front. If I tried to sketch, I'm going just to use
the rectangle tool. Activate defined
rectangle from center. You can select a print here on this area and apply like
20 by six millimeter. Whoops, let's do this again. Let's select this view, created a rectangle
around this area. And let's work with 20 by six
millimeter finished sketch. So one of the problems
that I can add is I can make the choice to create an extrusion or to try
to make something here. Whoops, just like that. But take your glands so we'll
arrive on this direction. And it's not extremely, it's not the best, not
extremely convenient. Some things that I can just do it z I click to
create a projection. So Solexa project features. Click on this one and
automatically it is perfect because you can perfectly follows the curve
of the cylinder. You can perfectly
follow the curve of the cylinder like that. Now, I've taught
to do this work, I can validate, select
my last surface, right-click Delete if
I don't need anymore. And now I can work
with this face. And if I need, I can use my pool tools
and just cried e.g. something inside. Followings or curve here
will perfectly following the curve if I'm just using my rectangle as before
and create an extrusion. I won't follow perfectly
the curve of the cylinder. So this is why we need to use projection in this type of case. If I just come back, I can
also create an extrusion on this direction and I will follow perfectly the curve
as you can see. Just like that.
And after awhile, note to complete, I
can use my pool tools. And just click here, click here, click here. Click here. I can create a beavers
just like that. And every time I will follow perfectly Zach curve
of the cylinder. So this is why it is
extremely useful to create a projection like this.
39. Move objects: Move object. Let's explain how to move up
G to using the Move tool. So first things to do, Let's create two shapes
and create a sketch first, use the Rectangle tool. We can work on the
sidewalk plane on top view and create a
rectangle like this. Let's grab the rectangle
defined from center. It will be perfect
with two values, 60 millimeter by 40 millimeter. Let's create two construction
axes. Once here. Let's say go around
here and just go right-click on the first set as mirror line and right-click
and just say gone. And we can also press Escape
first right-click Set as mirror line m is just to create a circle
around this area, I can create my
first circle with eight millimeter and position my circle with the
dimension tool, this sprint to this line. And just exchange. I can apply a six
millimeter like this. But something is wrong because
this is going to move. So when its legacies
are best things to do it just to apply
fixed constraint. And you can fix this
one and fix this one. I know it's going to be better. And you can double-click here, apply six, and it's
going to work properly. I think it makes example
16 is not really good. Let's change for eight. And with the dimension tool Z, sprint to directly this line, double-click eight millimeter. Perfect. Let's finish the sketch. Just create a small extrusion. Let's work with 60
mm, six millimeter. I can remove my curves. So it means my
construction line and remove socio phase, delete. Let's apply also a
small beavers here. I can add a fill it. Let's work six millimeter. Here I can apply six
millimeter and perfect. So now the next step is
to use my move tools. So if I want to create
rotation just to move, it is useful. Again, click here. And you need to select the solids because you can
also click on the face. And if you click on the face, you will just create
like an extrusion. You will just move
the face. If e.g. I. Click on this edge and
I'm using the Move tool. It is possible also, but you use the edges. So here I can use
my tool to use, to E2, move the face or to
move the edges material. So some simple CBER. You can also click on a print
and you can drag and move. Let's hear. If it's not going
to work properly in this. In this case, let's
sit exists face and I can also create a
rotation just like that. So the first thing
that you can do it is with smooth tools, you can apply this one on
faces, edges of point. Now let us come back at the
beginning on this area. If you want to apply
your modification to your solid mud, click on Solid. And I can work on
different axes, so it means x axis. If I move, I can
enter a distance. If I want 16 millimeter, I can tap 60
millimeter like that. Let's click again
on the move tool. Click on the solid sleep, e.g. is a top view. And if I want to move in this
direction, it is possible. Let supply 40 millimeter. Use my move tool again,
click on the solid. You can also create
rotation on different axes. I can click here and create
a rotation like 90 degrees. Using my x-axis. Just like that. You can also change the
transformation point. If you go in this area, you select e.g. your solids. You can find here
you can also use move along a trajectory. You can also move radially, but axes, you have
different features. So if I just click
here, I can select e.g. axes and he's going to
follow just x2 axis. Something in proton is to
change the n sharp point. Gentlemen sharp point. So if I click on my solid again, I have the possibility
to click on onshore and I can drag
and moves on shop rent, and position in another area. So it means if I go here
and I create a rotation as stealing my solid mode and criteria rotation
on this axis, I'm going to turn
around my center point. Now if I change the
sand dock points, civic move solids and I
position the center of print, you can drag and move. Oops. Let's do this again. Move solids and takes up branch can drag and move
on the kernel like this one. And now if I using my blue axis, I can create a rotation around this center point.
As you can see. This is why it is useful. You, you can make a lot
of scene using this tool. I can copy past
CDX or solid first copy then passed like Z. So I have my second solid
and this second solids, I can use my move
tools and e.g. I. Can drag and move. Here. I am not center with my axes because I made
a lot of modification. That as you can see, I have now another element just like that. If I want to create a
rotation or so on this axis, let's create a rotation here. So this is the things that
you can do using this.
40. Duplicate objects: Let's explain how to
duplicate object, how you can duplicate a buddy when you add something in
your construction tree. So first let's create an
element selector sketch mode. Let's work just with a
different work plane. I can use this work plane. So why you OK plane? So click here. While you
walk plane, just like this. And I can select specific
or view or just, let's just come back, come into work plane. Let's click here and
think it's not perfectly. Let's walk again. Stress here. Perfect. So after to do this work, let's scrap to sketch with a rectangle and this
rectangle from center. And let's just create
something like this. About two-dimension net
supply, two-dimension. I think I have not
just snapping options. Let's supply like 20
millimeter by 28. I can create a sweep out from the center
of this point to this point, craft my arc, and then just cut this part with my tools so I can
select and directly. So trim tools, remove this part. It is a circle tools and
create something like this. Perfect. And after
to do this work, we're going to create some
more and create a rectangle. Select again. So right view and create
a rectangular Lexis. Start from this sprint
and activate e.g. 14 millimeter, not
1410 millimeter by. Let's apply certain millimeter. Just cut this area. Dress here and activate the fill it to create a rounded corner just here with four millimeter. Now I created this element, I can finish my sketch, just create an extrusion
on this direction. Let's just apply a value
of 24 millimeter here, just same time it is the
occasion to create an element. At the same time, I
can create a sketch. Credit to sketch directly
apply a sketch on this face. And credit to offset a
little bit on the right, can create an offset e.g. here, and select this view. Let's create a rectangle. And we can use the grid in this example, just
cracked 123456. So I can arrive at 12. I think. I'm not exactly in
the right position. You need to create your
rectangle just exactly here. At this position on this line. Let's walk with 121 more time. It's not truly good. Let's select the
rectangle again. Yes, Now it's better
and I can create a rectangular lexis after, Let's finish your sketch and
just create an extrusion. I can click here and create an extrusion
on this direction. Perfect. It's okay for us to address, to create this small
element y naught to try to also fill it on this area, Let's activate a value
of four millimeter. It's okay for that. I have this element, I have
a solely the shop face. I can go right-click
delete the surface. If I need to repeat
this element, you can use repetition, but it's not the
best because you won't have different solids. You will have just a
repetition features, just copy and past. When you go into the
top-left corner, you have passed here. So first you need
to copy an element. So the first thing is to
do click on the solid. And now you have these options. You can also cut if you need. But in this example, the best is to apply
is to apply copy. And now I can just
click on past. And I have my second solid
exactly on the same location. If I'm using so move
tools, I select e.g. one of these views, a side
view I can drag and move, might know my duplicated
solids with a value. Let's work with 60
millimeter like that. If I want to copy, pass
these two elements, I can click on the first solid
press control the second. One more time I
can activate Copy. And the things that I
can do, it just passed. So now I have two new
solids still selected. Now I can select this
element and drag and move on this direction and activate
160 millimeter, e.g. or I think it's too much. Just apply 100 millimeter. Let's make something like this. So this is how you
can copy and past. It is the best because
you have some thing clean on your merge you
have now each time you have a solid and
you just copy and past solid using these features. You can also cut and copy, but it's going to be
literally the same. You can e.g. click on this one. You can go and cut. Those element is located here. If e.g. I. Go and
I sleep, e.g. CS1. Here you have this element
and you just passed, you just click on past
you as its element again on Zoom. Just like this. Just an interesting features. If you want to duplicate just
one element, it is great. If you want to duplicate more, so repetition will
be probably better.
41. Scale objects: Scale, object scale, or a buddy, it is possible you can resize. So it means you can
increase the size or you can reduce the size. Let's first create a sketch using Sketch mode and
just change the view. Select a new sketch plane
and work on the y-axis. Front view. And let's just create a line from this
point we can go on. So right, with a value
of 60 millimeter, we can come back with four
millimeter, 56 millimeter. Then 56 millimeter, again. Just four millimeter here. After I can click on this sprint and we're
finished the sketch. Let's create an extrusion. I can click here. Create an extrusion
on this direction. Let's apply your value
of 60 millimeter exists. And I've taught to do this work. Let's create a new sketch
on this face first, top view, and create a circle. You can search the
center of print, activate a value
of 20 millimeter, finish the sketch, and
just cry to an extrusion. Let's do the same thing here. Click on this face. And Sketch mode. I can select this
top view, side view. And with my circle
tool I'm going to center and 20 millimeter sucker. Finish the sketch. And extroversion or
so this direction to create a URL
and just validate. So I created this part if I need to change the dimension
because finally, I don't want to have 60
mm by 60 millimeter, but I don't want to change
every scene it is possible. Settings support
tools here so you can go and pull and
best things to do it. You can click on the solid mode and you have pooled
different faces. So I need to click
on the sole leader. And cities are poor tools and to have access to
these different options. And you can find the options
scaled by the clicks. A point about which you want to scale tool
selected buddies. And I can click here, and I can select a
print and it will be my transformation point
to skeletal body. If I see e.g. this cone
of print dress here, I can go in this direction
or this direction. And I'm just going to scare to re-size depending of this
transformation point, you can also enter our value. If I want to double, I can enter a value of two
and I can press Enter. And now I will have
different dimension. If I select my misery of tools, you can find misery and
you can select e.g. liner segment. And now you realize that
we have 120 millimeter. It is logical because
at the beginning I add 60 millimeter and a scale with a value of two
to have 120 millimeter. It was just to check. Let's continue again. If I select again my scale tool, you can change the
transformation point. So you need each time to
select the corner. So e.g. it can be this corner. It can be this corona virus. You were to select a print. Anyway, anywhere. If e.g. I. Click on this corner, I can do the same thing and
click on the scale tool. Here. I can also, if I go in this area, can still exists this
middle print here. As you can see, n,
If I go left-click, It's not extremely
convenient because I'd just pull a face with
the best things to do. It's to click on the solid. It is better. Activate scared buddy and you sittings of
points that you want. I can select this middle point, and now I can scan
everything at the same time. Let's decrease the
size with maybe here can apply zero fiverr, and I can validate 0.5. If I just come back
to my mesial panels, Mezirow, I can
click on this line. And now I have 60 millimeter. It's logical because
I increase the size. And with my new size, 120 millimeter, I
had a value of one. So if I take 0.5, I can come back
to 60 millimeter. So this is just about how
you can scale a buddy. How you can scale an element. Now seem extremly,
particularly about yet.
42. Create repetitions: Let's see how to
create a repetition. To create repetition, you
can use your move tool and activate repetition
with a patterns. First things to do,
Let's create a sketch. Let's work on so
tough work plane. And just create a
rectangle from the center. It is the best. In this example, let's work with 26 by 22. I want to add this darker
in the middle click here. Let's grab two soccer with 20 millimeter. I've
talked to do this work. I can create an
extrusion 20 millimeter and removes the shelf face. Right-click remove. The next step is if I want
to duplicate multiple times, just duplicate once you
can use copy paste. But if you want to
duplicate multiple times, the best things
to do select e.g. is a top view. Activate
the move tools and you need to make two things. Activate the solids that
you want to repeat. So click on the solid
and then click on create patterns here on the
options, create patterns. And now what was the
first things to do? It's to go right-click. You can drag and move on a direction to enter the
values that you want. So I can enter why
not 200 millimeter? And now he's going to ask
so number of repetition. So here just to, it's like to duplicate just once
your elements. If you want more, you
can actually trap cat for press Enter. And now I have a count of four. If I want more, I can
apply six just like this. At any moment you
have possibility to you as a possibility, e.g. to here, change
the space between, if you change the space between
each element by default. So global size will change. Also, know if I
have 60 millimeter, 1 mm and it's only when
everything is okay. You can come back and you did that if you want when
everything is okay, you can go left click outside
and you can validate shall, no ones are left
construction tree, you can find the
patterns and by default, he will divide the different
elements into components. I have six components inside my pattern in
my construction tree. If I want to work on the
Nadar direction, I can e.g. select all my patterns
here on my move tools, create patterns again and work with a top view and
change the direction. This time I can go
in this direction. Let's work with 200
millimeter, press Enter. And now I need to apply. So let's work with four
millimeter presenter laces. And I can just validate and I
created another repetition. Now we are going
to see how you can work with a circular repetition. So acidic everything right-click
here, you can delete. Also, critical for our sketch. Click on the Sketch mode, crowd to circle in the middle. Work with the top Work Plane. Create a circle here,
like 20 millimeter. Finish the sketch and create an extrusion. Just like this. Let's go to next vision
with 60 millimeter. Now let's try to sketch again. Work one more time with the work plane and
click on the top view. Let's create a second
circle like here around this area
with a value of ten. You can until space
dimension from this sprint to the center print, we have 13 millimeter. It will be perfect for
my example and validate Credit small extrusion
with just 40 millimeter. The things that I
would like to do, It's to repeat this element
around the main element. So I have my first solids
and I would like to repeat the small solid
around the bigger solids. Silica is a top view again. And you need to use
your move tools, activate the solids
that you want to repeat this one, craft patterns. One of the problems that we have here is if you turn like this, you're just going to turn
to turn on the same. Just run your cylinder because
the center point is here. So it's not really good
things that you need to do. Just come back. It's to activate pattern but
change your center point. You can drag and
move this one and change the center point
on a different part. Positions or center
point just here. And now it's going to work. Don't forget to have activity, create patterns and to have
your solid activity or so. I know if I turn like this, take your glands, you
can create a repetition. It's a little strange because. Depending on what
you want to do, I can advise you if
you want to enrich 360 degrees when you have also seen just stops
or left-click. And now he's going to ask
exactly what you want. The first thing is,
if I just want four, I can tip for you if I
want ten. Again, tip ten. Second thing is here you have the space between
your different elements. So if by default IF
sati millimeter, but if I want to
extend the space of 40 millimeter between the
center point and the body, center point of this body, it is possible you can extend. The last point is so degrees. So here it's a,
it's a great space for a count of ten
for 360 degrees. If e.g. I. Tip 50, I will reduce automatically
to have c1 e e.g. like change for 12
automatically I will have sorted egress and then I can validate and obtain this render. But if you want to, you can work with less
than 260 degrees. I'm going to come back
just at this moment. So let's do this again. Sittings a top view. Activate this solids,
create patterns. Dragon moves the sun top 0.2 position here and
create a repetition. If you want to work
with less degrees, you can make something
a little different. He is 260 degrees, e.g. here it's 180 degrees. Let's walk with 180
degrees and stop. And now I can only have
repetition on this area. I can then tell the count, Let's walk with six and sheds. A little strange
because you have always this element
on this area. So sometimes it's not
extremely convenient. I'm going to try again. Let's do this, create patterns, and let's try something
a little different. And here I need to
turn, turn, turn. Definitively is a
pattern is more convenient to work with. Total number of degrees. Here, can walk with 100 degrees. But if I increase for, I'm going to have
something like this. Most of the time you will have
to repeat on also any men. But if you repeat legs
that you have a patterns, you have different components. As you can see, if you
want to remove one, you can go right-click and
you can delete one of these. It is possible to
delete some component. So some things that you
can do it to repeat, I can apply like ten, like this. I can validate, but I can also select this component
on this area. And if I just go right-click
and press Delete here, everything will be deleted. But if e.g. acetic specific
component, like this one, I can go right-click Delete. I can only delete this one. Here. I can go
right-click and delete, only delete this
one, right-click, delete this 1 h again,
right-click Delete. And this one, you can also
create some symbolizes.
43. Create helix: Let's see how to craft a leaks. It will be useful to credit a leaks if you just want to
create this type of shape, but also if you
want to create to Sweden, first things to do, Let's create a sketch and I need to work on one of
these work plane. And we will change
the work plan. So click here and
work directly on X2, Y2, OK plane, like this. Credit to self-care,
you need to select the top view and little
on the left of z, axes don't crowd the circle exactly at the intersection
or it's not going to work. So glitter on the
left and credit to small circle like a
two millimeter here, who can enter dimension from
this point to this sprint. And let's work with, I think eight millimeter. Next step is to
finish the sketch. So now I have this element at the intersection and we
can find a z axes here. Click on the poll tools,
activate reverse. You need to select an
axis to rotate too bad. So access to rotate will be, this is the taxis. And now you need to click on the face and on the option before to click on your face, you have revolve. It leaks now, activate
revolving leaks. Click on this face. And you can find this
small yellow arrow. And if you drag and move, you can turn around the z-axis. So this is why it's extremely important to note not position your circle at the intersection or it's not going
to work properly. And you can drag
and move like this. You can also enter
specific value, but each time when you stop, It's going to come back to zero. So now if I add 20,
I can apply 20, but it's going to continue
with another extrusion around. So a leaks. Here
we have a pitch. You can also change that. If I want to work with eight
millimeter, I can change. And now we have a
cut here because we didn't make this interest once. So this is why we
have this part and this part I'm going
to show you again. Just come back. First. Let's click on revolution. So click on Revolution first. You can still exist axes. Whoops. If you deselect everything, de-select
everything first. Let's come back on polar. Silica revolve. Select an axis, the Z axis, then silicic one or
more faces to revolve, the faces will be this one. And I need to activate
revolving leaks. And now I can enter some value. I can enter 60 millimeter. I can then tell the peach. And now I created an
extrusion in a leaks with 16 millimeter and eight for the peach to
obtain this render. Just like that. Now if you want to create
a sweet they dress, come back, select everything, and press Delete credit. The first sketch. First sketch will
be on the z-axis. Credit to soccer dress here. This circle will have
maybe as 20 millimeter. I can press escape, finish the sketch, and create an extrusion
on this direction. Let's work with 60 millimeter. I would like to create too
sweet on this cylinder to do this work first credit to
sketch at the intersection. And I can work on the
whitewashed plane like this. On the front view, you need to, you can start on this
area and creditor line. So line will be from this
point to this sprint. The sprint to sprint. And I can continue in this
direction and this direction. So crowdsourcing like
this, I've taught, depending of the
renders that you want, you can extend more
or extend less. You can change the size of this element depending
of the rent, the results that you want. And maybe I can
extend a little bit. And I think it's nice. Lexis, finish the sketch. So now the next step is to
activate pool and revolve. Select the next cease
to rotate about. The y-axis will be the cylinder. So click on the cylinder. Now activate revolving leaks and you need to
select this phase. You need to select this face. So click on this face. And now you can create
two Revolution. And here you can
enter some value. Or it can be, Why not ten? The eight will be 60. I can tap 60 and
just click here. And now I can
obtain this render. If I needed, I could
maybe decrease the 84, maybe something like four. But you need to do this before. We don't have a view
in the real-time. So sometime it is little
difficult for that. I can apply for, if I click on here, Let's apply 60 to go on the top. And now I will
obtain this render. One of the problems that we
have if I just validate here, automatically share
it was great because automatically we
remove materials. I'm going to show you
again here you have Add Chart by default
here it's okay, but if it's not
working properly, just activate cut to be
sure to create your Sweden. So let's, I'm going
to show you again. Click on tool. Select Revolve, select z-axis. So it means click
on the cylinder. Then select the face. You can also select the
face first and activate revolving leaks to be
sure you can apply cat. And you until the age
of eight will be 60 and teach before It's work with for some time you can
change the type pair on girls to have something a little different
at the beginning, at the end, I'm not
going to do this here and work with 16 millimeter
to go on the top if you want. If you don't want
to go on the top, you can enter a different value. It can be on nephropathy
or what you want. And no, it's okay. It's perfect to create a suite. And the C-Suite can
depends or sold by the size of your sketch
at the intersection. And also the pH.
44. Extrusions with surface: Credit extrusion with surfaces. We're going to see how we
can work with surfaces. So frostings to do, we can
create extrusion also, but this time not to
create too solid, but just to create surfaces. Let's use a sketch mode. Create a rectangle,
select so top Work Plane, and create a rectangle
defined from the center. I can click on this sprint. Activate for t by 30 Lexus
and I can finish my sketch. So by default, I will
have a shocked face, as you can see on the left. If I'm using my tools and just select face-like
that automatically, I will be redirected to
these tools extrude edge. And I can just
extrude an edge on a direction and enter the values that I won't just press 20. If I want to extrude
two edges are more at the same time it is
possible I can click here, I can press Control
click here also. And I can extrude
these two edges at the same time
and enter a value. I can apply ten if I want
to extrude this one, I can click here. You can also extrude on this direction depending
of what you want to do. I can select this
edge again and e.g. extrude on this direction. So every time when you
use your selection tool, automatically, if
you select an edge, you will be irradiated
to these tools. And you can create
this type of extrusion and it's going to work for
all types of sketches. You can use your
sketch mode again, select again top
plane, acidic to gain. Maybe, yes, I'm going to
walk on the top Work Plane. Just click outside Silicon, click here, and select
the top view again. If you just create two basic, basic extrusion of circle
to create a cylinder, you can finish your work. Click only on the edge, not on the surface, just on the edge. And you can drag and move
and create an extrusion. And here, as you can see, we have just a short phase. If I just click on this part and press Delete on my keyboard, I can remove the face
dress here. Here. Perfect. But it's going to
work also if you don't have a close sketch. So it means, let's work
on the different axes. Sketch mode, y-axis, Solexa, front view, and this time use one of these
tool. It can be. So spleen tools, I can zoom
little bit and just grab the spleen with left-click,
left-click, left-click. I can continue and press Enter. So now I created the spleen. If you need, you
can press Escape. You can click on the
spleen and you can make some adjustment on
the different print. As I've explained just before. Let's close the sketch. Again. Create an extrusion
only of this edge. We have a curve, as you
can see on the left. And if I use my pool tools, click on the curve. I can just create
an extrusion on this direction or
this direction. Let's work on this direction. And now I created a still
face from this edge. You can take your
glands on the left. Now we have a short phase. So it is something
extremely useful. You can just fall
from an Azure credit, this type of curve surface. After you can extend, you can click here and
you will come back with these tools extrude edge. I can click here and I
can go in this direction. Or if I just click on this edge, I can also walk
perpendicular interests like this, following the normal. It is also a possibility
you can modiolus at your convenience using
different extrusion. Let's get to know DOCTYPE of your face like the
sketch mode again. And let's work with the x axis. This time, I can
select my side view. And let's create
a line of credit, a first-line on left
to run this area. I can start home my son
document and credit something we
certainly millimeter and something with
30 millimeter. So next step is to add a fillet. Click on Create wounded Kroner or left-click
here, left-click here. And I would like to create
a nice curved surface. I can apply 16 millimeter. Now I can finish my sketch and just cracked and
extrusion. Click on pool. And in this type of k is
because we apply your fillets. If I just click here, I can
only extrude this part. You need to select everything. You can create a frame
of selection like this. And now we can extrude
at the same time all the curve with the
values that they want. And let's work with
30 millimeter. I know I have a nice curves. If you want to convert yourself face to solidities possible, just click on the
different faces. And we support tool. You can add sickness. You go left-click whether on this direction or
this direction. Let's go a little bit outside. Activate 1 mm to apply
lethal six minus two. These ruins each phase. And now, as you can see, we have a solid.
45. Revolutions with surface: Let's see, Revolution
with surfaces. So how you can
create a revolution, but to create surface this time. So the first thing
that I'm going to do is to create a sketch. And let's work with a
different work plane. Click and activates
the way work plane. Select. From view. I would like to create
something like a plate. First things to do,
I use my line tool and create a first-line
on the right. And let's work with
40 millimeter. Then I can extend here. You can enter it
tells the values that you won't create
something like this. And just come back on this
part and on this part. Let's work also with affiliate. So click this one, this one, and let's apply just
like two millimeter. Finish the sketch. So as
we have seen previously, to create a revolution
for solid, first, you just need to click on
revolve, select x2 axis. It's going to be this axis, settings or face and this face, and you create a
revolution 360 degrees. Now if I want to create
a revolution only, only for surfaces, I need to knock Solexa
profile, but only edges. So click on, revolve,
select Axes. Again, this time is going to be so z axes and select one or more faces or
edges to revolve. I can click here, press Control, click here, and fries
on per-click here. Because if you select all the edges just like
that, it is possible. But if you activate revolve, going to close and you will have a shocked face and solids. But if e.g. you don't click
here on this one, you just only click on this
part and activate revolve. Now it's not going to be closed. And I can create
something like this. But it's not extremely
good because I have this one on this area. So this is why when you
create your sketch, it is better to make
something different. Let's come back on
the Sketch mode with the history panel. Let's create two different
sketch pick on this line. The first line, let's work with 30 millimeter and Crato
Nadar line e.g. exists. I can press Escape. Let's add a few, let this time from this
point to this sprint. And just remove this part. So I need to not create anything here and not create
anything on this axis. Also, just let open,
finish the sketch. Click on revolve options, ceilings or axis, the Z axis. Now you need to
select the edges. Click on this one, controls
this one and this one. And now if I create two rotations through
and read 60 degrees, I will have this render and
I can validate trust exists. If I need to add sickness, it is possible you can
select all the surface. And we support tools. You can go left-click and
go on this direction. On this direction,
Let's just apply 1 mm. And after you will convert
your self phase to a solid, you have different way to
create this type of scenes. You can just close the clothes. You can just close the sketch, create a solid first and
then activate shell. Or you can do the
opposite process. So first you create
a revolution with your faces and after you add
a sickness using Kaltura. Let's do a second example. This is example using
creatine surveys. So first-cut to sketch again, select Y-axis NCLEX from view. Let's create a first-line
from this point to this part. Let's do this again. Credit to line. This sprint with a sprinter certain millimeter press Escape. I can use my tools as a spleen tools and create
a line just like this. And it is an protons
you can press Enter. It is a proton to
not close the path. So don't create a line here
and don't try to line here, just let open your
sketch, finish. And credit revolution revolve. Axis will be z axes. If you want to let space or Orleans or
modality is possible, you just need to
create to offset of your sketch with this axis. And now revolve. And I can select this
part, this part. And I can turn like this, or I think I missed
something wrong. I'm not on the right axis. So let's do this again. Let's deselect everything. First, pull tool, revolve. So two axis will be z. And then we can click on
this edge and click on this edge risk control
and full pool, like SAT. If you don't want
to close totally, you can lead to open or so e.g. you can just click
on this one and you can make like 180 degrees. So after up to you to
choose what you want, I can close just like that. Let's do this again. Axes and 200, 360 degrees. And it is the same thing. If you want to add
little sickness, click on every scene. You can select every scene like this and you can
use your pool tools. Operation fail because
you just type this part, little strange, It's going to work properly select everything. So first click here,
acidic to every sink. And you can drag and move
literally inside or outside. Let's walk outside two
millimeter validate. And I created my face
with a sickness. Perfect.
46. Sweeps with surface: Create sweeps with your faces. To create sweep with surfaces, Let's first create a sketch. And let's take again the
example of the pipe. So click on the Sketch mode and select one of
these swap planes, recede work plane, top view. So to create the pipe, I can use my circle tool. And it's grad 20 millimeter
and finish the sketch. The second things is to create a password to create to
pass user sketch mode, I need to go into
the intersections. So change, click
outside, activate, directly, select a
new sketch plane, and let's work with
a whitewashed plane. Front view. The next step
is to create a line. I can create a first-line. Let's work with 40
millimeter sigma bond with 40 millimeter and
asserted with 40 millimeter. And press Escape. Let's add a click from this one to this one
with 20 millimeter. And this one to this one
which is again 20 millimeter. Perfect. Let's finish the sketch. So I created my base and
at the same time I have, I have just surpass
to use a sweeps. Let's click on Pro Tools. Activate sweeps. If I don't want to
create a shocked face, I just need to sitting
so tragic Tory, risk control, just like that. And then I can click
here, sittings of phase. And you just need
to follow the path. Now if I want to work
with your faces, I can repeat the same process, but this time I will sit edge. So first I said exists one. First click on Sweep. Click the syllabus or
trajectory with control. Or you can also create
a frame of selection. And now when you
click on select, you can select a face
or edge to sweep. And this time we
will see links to H. And if I click here,
it's okay, perfect. I created us. Your face. Can validate After it's not really good to have
the passenger nadir. So delete the curve, right-click and
delete took care of. It is the same. If now I want to just add little sickness. I can select everything
with a frame of selection. And with my pool tools, I can click here and drag
and move with a value. Let's supply e.g. two
millimeter, validate. Click outside and perfect. So now we have a solid. One of the program may
have just some scene here. And if I just click
on this one, yes, I can extend, but
it's not extremely good on this element. One of the problems
that we have in here, we have a short phase. As you can see just here. I can delete this, your face on this area. And now if I select everything, drag and move, and then reply
to millimeter, press Enter. Now it's better. And then
you have all on this area. And then you have also
all on this area. Perfect. Let's see a second example. Select everything
and press Delete. I would like to create
two curves your face. So to create my
curves your face, select the Sketch mode. And we're going to work with two sketches on to
Work Plane different, two different worlds plane. Select the crosswalk plane
will be on the y-axis. So click on y-axis and
select the front view. Let's create two
line. I can apply a curve line with one
of these tools to best things is to use the
footprint arc credit for post-print credit too
sick and print at around. Let's apply 100 millimeter. And just go left-click on this
direction and let's work. We're wrong. Yes, Just credit
to small curve like this. Finish our sketch. Now let's create another curve
at the intersection. You need to start your point every time at the
intersection here. It's not going to work properly. So next step, create a sketch and walk this
time on the x-axis, as you can see, the side view. So it means is that if
you are right view and do exactly the same thing but with a different, little different. Lend. Click on the
three-point arc settings. First print. Let's increase a
little bit with 160. And credit also curve
e.g. just like this. And finish the work. So now I have two curves
and I have an intersection. I can create a shocked
face because e.g. you click here. You can drag and move,
criticize your face. But it's not exactly
perfectly what they want. Me, what I want, I want to
use so to, so to profile. So select directly sweep. So trajectory will be this one. And click on the selection tool to select some edge to extrude exists and know whether you can drag and move and poorer if you don't want
to go at the end. Let's undo this action. Or you can click here to
arrive at the end of the path. And Decker glands now where
we have a perfect shelves. And it will work also if you
do the opposite process. So let us comeback
at this moment. And just, just to change the
process, invert silica pool. You can work with sweep again. So trajectories this
time will be this one. Edge, this time
will be this one. It's going to be
exactly the same. And I can finish after you can remove the curves,
right-click Delete. If I need to add sickness,
it's simple gestures, your pool tools, and you
can extrude on z direction. On this direction, it's work
with a small value, 1 mm. And oops, let's do this again. Yes, just 1 mm. And now I convert my
soft phase to a solid.
47. Lofts with surface: Loved with surfaces,
how you can craft, love, to craft your faces. And for this, we will
reuse these features. But first, let's create
a different sketches. Uses Sketch mode. And the first things to do, it's to change the work plane. Let's work on the x-axis. Still exist view. And with the spleen tool
you can just zoom little bit and just scratch a
curve here and press Enter. Then finish the sketch Crato. Second Sketch. Sketch mode. You can click on
the x-axis again and change the position of
the work plane. We use. E.g. I. Can create an offset
of 20 millimeter. Go on this view and credit to sketch again with
the spline tool. And this time I can make
some scene just like that. Press Enter and
finish the sketch. And let's create
another sketch again. Click on Sketch mode. We can work one more
time on the x-axis, but this time create an offset. On this direction. Let's work with 13 millimeter. Let's work with this
view and create another sketch using 1 kt
times the spleen tool. And let's just work here. If I finish my sketch, you can find three
different sketches and we can credit to link
using these features. Click on the Blend tools and the aim is to
select the profile. I can select this first curve, press Control and
the second curve, anticoagulants, we can
create something like this. Now if I want to work
with the sweep profile, I repeat the same thing so I can click on the first curve. Controls are Saigon,
controls the Sara. And I can create this one. After I'm going to show
you is that you can add a guide notice in this example, but in the second example, complete and I
created these curves, your face with three
different edges. One more time if you need, you can use your pool tools. And at sickness
with an extrusion, if I apply 1 mm, I can add a sickness. So let's see the second example. More difficult to understand, but extremity useful
to add guides. First things to do. Let's work on Swiss sketches, on sweaty found work plane. Sketch. First sketch will be on the z plane and
silica is a top view. Let's create a knack
with cent of print. Ok, click on the center. I'm going to write,
let supply 40 millimeter and credit
your alpha structure. Finish the sketch. Now let's
create a second sketches. Sketch mode. Click outside and
change a walk planes. This times the rock
plane will be the y walk plane at the anterior
section like that. And click on the front view. One more time. I can use these
tools the same tools sweep arc and do
exactly the same. But on this rock plane
with 40 millimeter, it is I'm proton to respect exactly the same size and to
have this intersection here. Now let's crowdsource guide. So to crowdsource guide, I can use my sketch mode and welcome to the
last work plane. So x, y plane truss here. I can select this view. One of the problems that I have. If I click on my line tool, here, it's going to work. But if I create a
first line just here, now I don't find theodolite. So some things that you can do, if I just come back
a little before, it's to use this one. You can use this one
project to Sketch and click on this line
and press Control. Click on this line also. And if I just click out, I think it's not
it's not perfect. I'm going to come back. Yeah. So best things to do. It's clicky a project to sketch craft a
frame of selection. And thanks to that, you
can create a projection with also edges like this. I need to check because something is wrong
one more times. So I'm going to come back here. And credit to sketch again. Let's see X or walk plane. Go and design credit to sketch. Let's delete this x, y plane. It's not working properly to
use my project to sketch. I think I'm going to
click on these curves. Yes, just here. And yes, now I can find these curves. I think it's nice. And if I use my tools
just like this, I can find this one. So if I use my align tools, I can create a line. And I need to work
with 40 millimeter. Here. I need to come
back here and I will arrive to the intersection. The intersection is yes, I think at a thing. So intersexual is not at 40. Something is little strange. I need to come back here
with my work plane. And I have the projection on the sketch on this direction, yes, you have the
sketching plane. This is nice, but I need to create another projection also. And project to sketch. Click on this curve. You
have different curves. This one and this one. If I click here, yes, now it's going to work properly. So better to use inside
your curve select, OK, it's going to be better. And you can click on the first, repeat the process on OK, and now it's okay, you have
this line and this line. I can walk properly now. And Crato liner, click on
this first 20 millimeter, 20 millimeter and just
activate a phyllite. Click on the affiliate tools, this one, this one. And I can apply eight millimeter
and finish the sketch. The problems that I have, these two construction lines. So I need to remove
some construction line. I have different prints. If I just click here, I can press Delete, but it's not working properly, so you need to come back. Just add this livers
and click on this line. If you delete, it's
not going to work. If you click here, you can remove that. It's going to be better. Now it's better. I can finish my sketch. So at the end of this work, you need to have this render these three different sketches each time at the intersection. If I'm using my love features,
the first things to do, if I click here control
and I click here, you can find just
credit to curve. And if I validate, I created this
type of interface. But me, it's those things
that I would like to do is to use this guy to
have something better. So let's come back and let's come back at this livers and click on Zoloft features. Click on this one for us Control key click
on this second one. And the last step is to
add a guide, solid guide. And you need to
click on this part. Tariffs, press
control, this part. This part. And now it is perfect because I
can follow my guide. So I create a loft from
this sketch to the sketch, but also following this path. And if I just valid data can
often this perfect sheriffs. At the end you can remove tariffs, right-click and delete. Like every time you
want to add thickness, just use your Pro Tools, select your profile and
you can go inside or go outside and enter the
values that I want. Let's go outside and 1
mm and just press Enter. And now I can
convert to a solid.
48. Hole on surface: Let's see how to create to our own Shah face crowd
to all on your face. And I'm going to show
you that you need to respect a process. So first things to do. Let's take again this example with two sketches and
credit a first sketch. First sketch will
be on the y-axis. And Solexa front view. Just use your three points are
creative frost point here, credit to seek and print
with 100 millimeter. And just create two
arc around this area. And finish the sketch. Let's create a
second sketch now. So click on the Sketch mode. Chances are what
plane for x-y plane. And select this side view activator Again the same
tools and create something with 160 millimeter and
credit to arc like this. So after to do this work, I need to create my curved
surface to create this curve. See your face, as I
explained before, the best things to do is
to use the swipe tool. So click on select files or trajectory to
really be this one. And then with the
selection tool, pick the reference, this one, and I can just extrude Lexis. Perfect. So now if I want to create
two URL on this surface, let's create a sketch. Here is a sketch mode. And walk on to cede work plane. Change with position. And just go on the top. Oops. Yes, just going
to touch can credit to offset lysis and
select the top view. Let's just create some
sink like soccer. Let's first start
with a rectangle. Rectangle. I think I can create a rectangle
from the center. And let's select
this one and create a rectangle with the
dimensions that you want. It's not extremity
and protons here. If I want to create
an extrusion, I should think that I could
take this one and credit to the extrusion with
my pool tool and just cross but nothing happened. It's not going to be good. If I just click on this
surface again and I apply cut, I try with my full
tool to create an extrusion that it's not
possible, nothing upon. As you can see,
I'm just creating my solely an intersection
of this your face. So let's come back. So there
is a way to just create two. Here. The way is
to use projection. So click on projection, select one or more faces
are lines to project. It will be this one. And automatically this element will be projected on my face. I know I can validate. If I want, I can
remove this your face. So right-click Delete. And the things that I need
to do it just to click on this one and press
Delete on the keyboard. And now I can open and others
something perfect, exact. Let's use second
example with a circle. Click on the Sketch mode z plane again and create an offset and drag and move
in this direction. N60 W. Let's create a shocker. I can select this
center print with certain millimeter perfect
signaling things to do. It's to validate. You have a second shot phase,
so this is the same. It's not possible to
create an extrusion here, nothing will happen.
As you can see. The aim is to create
a projection. Click on project, select
this one automatically. It will be projected onto
the normal on this surface. Validate. You can remove the
soccer if you won't delete. And now I can just click here, press Delete on my keyboard
and credit to all. It's perfect. So this is just a
way to respect. If you want to create this
type of scene on the surface, it's possible but
use the projection. Now if I click here
and I use my move tool after if I need a crude or
I can create an extrusion. Here is not extremely useful
because in this case, I can dress credit
my extrusion first and then I can create my
two sketches to create 2 h. But I'm just going to add ether sickness and crowds,
this type of things.
49. Fill hole on surface: Let's see how we can
feel all on short faces. So first, let's create, again the same process to
create two all on your faces. And after I will show
you how you can see. It is simple. After, Let's see again, a great example to
work with loft. So first select a
sketch and use z plane. First create a sketch
and use sweep arc. Crato not from the center
with 40 millimeter exists. Finish the sketch. Let's do the same thing on a different work
plane, sketch mode. Let's work this
time on work plane, this plane, perfect front view. And apply exactly the same
tools just like this. Click here, 40 millimeter
and close, surpass. Finish the sketch.
So now we have two sketches each time
we have an intersection and I just need to create
a guide to follow. So let's work with
the last work plane, sketch mode and ceilings
or Luftwaffe planes, which means the x
y plane exists. And the things that I
need to do it to create a projection and froze
this activate project to sketch and CDX the first arc and validate you can repeat the process project
to sketch and silica, so sick and actress like that. So thanks to that, I have these two delimitation and I
can create first-line here, the second line here, and just activate affiliate
from this line to this line with six millimeter
and finish the sketch. Before to finish the
sketch, just come back. You need to remove
with the trim tool this line and this
line you need to click twice here and
finish the sketch. Now let's use the lock feature. So click on loved, click on this line
for us control. Click on this line also. I need to add the guides with silica guides and
click on this one, controls this one and this one. So thanks to that, I created this perfect curves
and I can invalidate. I can just remove
the curves here. Right-click Delete. Now, I have a shocked face. If I want to create two URL
on this path, and this path, again, create a sketch, sketch mode, walking
in the middle. So it means on the
XY plane just here. Let's select a view, side view and just
create a circle. You can create a
sharp curve, e.g. around this proud with like
eight millimeter the effect. And I can finish my sketch. So now I can create
two projection to credit to all onshore Faces. Click on Project, and
click on this one. And it is great because automatically I can have a
projection on the two sides. So on this side and
also on this side, perfect, I can validate. And the things that I can do
is to remove the shelf face. I don't need anymore
right-click Delete. And if I want to open here, I need to click on this face and press Delete on my keyboard. And I can do the
same thing here. Click on this face and press
Delete on my keyboard. And now I have something
open and it is perfect. This is that I want to do. So now if you want to
repeat this process and you want to feel
are just pretty simple, you just need to use
one of these tool. And you can use field. If you apply fill,
I can click here, left-click, and I can
just fill this part. Or I can use this left-click and I can fill
this part just like that. Here. I forgot to validate it. So click on the line and
validate, and it's perfect. We can just come back
with our perfect curves. Here. It's pretty simple and it just another example
about the field tools. You can walk also with
short faces with this. And you just need to
click here, validate. And you just need to click
here and validate. If e.g. I. Just come back just here at this leavers with my 2 h and I'm using one
of these tools. So it means, so Blend
tool, Zoloft tool. If I click on this one, just select to guide here. Or if I just click on this one and click on
this one, you can e.g. just create something into
my dog is just to show you. But it's not extremely convenient because it's
not working properly. Here. If I press Control here, it's not working properly
because we don't have yes, it's worked now, it's better. And you can create
also something like this and this area. So yes, just perfect. And now if I just come back at a moment
where I add two hearts, so it means Let's come
back, Let's come back. Let's come back. Yes. Just here as a moment
where I add the 2 h, it is same if I want
to add sickness, I can just use my pool tools. Just click here and add little
sickness on the direction. Let's work with e.g.
two millimeter. And I can obtain
this random perfect.
50. Construction planes: Let's explain the
construction plane. So you have the possibility to create new construction plane. So the first thing that
we're going to do, it's to create a sketch. And as, as explained before, you can select one
of these axis. And each time you can select New Sketch Plane to
change x2 work plane. Here I can start with
some work plane, select the top view and
create a rectangle, activate from the center. Let's grab this first rectangle. I can apply for T2
by 24 millimeter. Finish the sketch. And the next step is to create
an extrusion just exist. Let's apply value
of ten millimeter. So I've taught to do this well, as I explained in
different example, you can craft or so new. It can create a sketch not
to new construction plane, but just to sketch on the face, we'll just click on the face. And if you go and
sketch mode directly, you will have your work
plane on the face. This is something
interesting to know. And if you click here,
this is the same. You can just change what plane. And you can also create an
offset on your element. You can create an
offset just like this. Now if you need to create
new construction plane. So it means to create, to name the bound on the
construction plane. You have the
possibility to click here and create two new plane based on the selected object. I can click here first, and you need to
select a reference. And e.g. I. Can create a new
reference just here. Now I have a new
plane on this area. And if I want, I can just click
outside validate. And I can create two new sketch. New sketch can be e.g. on this construction plane. So I can click here and
select the front view. After to do this work, I can create a sketch
directly on this plane. And I can use my rectangle tool creditor rectangle
from this point, let's apply to value like 18
millimeter by 18 millimeter. And credit also noch. So I can click on the Arc tool here and credit to knock
forms the middle point. And just remove this
line just like that. So now I can finish my sketch. And if I click here, I can create an exclusion
of this your face. And I can work with 24
millimeter and I can validate. And I use this new
construction plane after I will explain
why it can be also extremly useful to create
a new construction plane. If I just click here
construction plane, I can again select a
reference to create a plane. And if you click here
you have build plane. And you can also position your plane not only on the face, you can position
your plane, e.g. in this area. And when you
have a curved surface, you can drag and move. And I can go left-click here. E.g. I. Created something
new just on this era. If I go left-click,
just like this, automatically you
have your work plane, but it's not possible to directly positions
the work plane here. If you want to position
the work plane directly on this area, it's not extremely convenient. You need to click on the face to create
your new work plane. If I just click here, I can go press Escape, click again on the work plane. And if I go left-click and
now it's going to work. It was just before I
was using build plane, but it's not
extremely convenient. So now I can just position the new work plane on
this area. Each time. If you click here, you
create a new work plans. So be careful comeback on your selection tool
and right-click, you can just delete
the work plane. And if I go in this area, I can click on the plane and create a sketch
using my sketch mode, just like this silly phrase
on pearls from view. And I can create a sketch. Let's zoom little bit. Rectangular form. So center and you find
from the center I can go in this area and
credit something like 28 by four millimeter
on this area and validate. So now I have this
new work plane and you have also the sketch. And if I go inside,
I can create, as you can see, I can credit to all in Zoom
either just like this. Something interesting to know is when you click
on the face or so. So you can just create a sketch. And if I just activate here, select new sketch plane. I can e.g. dragon move
and select e.g. I. Can see lead to this
phase just here. And if I go directly on silicon new sketch plane and
I click on this face, I can also position and
Nadar work plane here. So you can mix with these
different possibility. You can credit directly on
the face of what plane, or you can create an
independent plane. If I just click here again, and I select e.g. this one, I can also position another work
plane on this area. And if I click here, I can create again
a new block print. So be careful you need to go
out with the selection tool. Let's go right-click and delete. So to manage your work plan, you just need to
click on this area. If you just go right-click, you can rename a plane or
you can delete a plane. You can also this
activates a view of this plane if you want,
at your convenience. I can phrase on Peruvian Emma, right-click Rename
plain number one, but you can type anything
that you want here can go right-click Rename,
Plane number two. And here I can go
right-click Rename and plain number
three, just like this. And after I'm going
to explain that it's possible to create access. And thanks to this axis, you will be able to
position walk plane.
51. Construction planes with references: Credit construction
plane using references, you have these possibilities. So it means you can
add different axes. And thanks to that, you can
create construction plane using axes, using print, also. First things to do, Let's
create a sketch I can use. So why Work Plane and walk on the front view.
Credit to sketch. So first things to do like
just change CDX or whitewashed plane from view and
create symmetry line, activate construction
line in the middle and just go right-click
set as mirror line. So first things to do, it's
to create a line on the left. And we can work with a
value of 30 millimeter, come back with ten millimeter. Here. We can continue
with just 20 millimeter. And I can go here, we can just reduce a little bit. Just like that and
you can close. Let's press Escape and
finish the sketch. Now the next step is to
create an extrusion. Let's create an extrusion
on z direction. And I can apply a value
of 30 millimeter. I'm going to continue on the top click here,
create a sketch. Let's select the rectangle
tool defined rectangle from center. Activate, top view. Oops, let's do this again. Create a rectangle. Activate. So top view. And just click here. Rectangle from center. And I can work with
eight millimeter, eight millimeter and
finish the sketch. Credit to an extrusion
or let's work with ten millimeter and
let's create two. My last element. Click on this face again, create a sketch and use the circle tool top
view and create a small circle on the top
with just four millimeter. Finish the sketch and create
an extrusion with 20. After to do this work, as I explained just before, you can use create
two new planar. First you can remove the curve. It is not extremely and protons. So you can create a plane, position this plane directly on location. Let's
click outside. Let's choose the selection
tool, activator plane. And I can position my plane here or position minute
prop plane here. I can also position or new
work plane on this part. Let's e.g. creating new
work plane on this area. Let's e.g. credit to Newark. Playing on this area, you can activate axis
two and axis from the selected lines
or h. If I zoom, when you have something
like a circle, you can just click here and automatically you will
have a line in the middle. If I select one of
these axes, e.g. this one, I can
go left-click and automatically we can
create a new line here, left-click, I can
create two new lines. I can create two lines
are so in this direction. So you can create
multiple lines. You can also create
new or Regina. I personally, I don't
use these too much, but you can use origins and e.g. you can position
your new origin to another location and
automatically on the left. Now in your construction tree, you can find plane, you can find axes, and you can find a new origin. Let's go right-click
on origin and delete. Now, when I add this element, if I click on my plane
tools, I can e.g. select one of the axes and just create some
scene on the axes. So if I click here, it is
like to use this face, but I'm using this access to craft a new work plain. If e.g. I. Select a point, I can zoom in a bit. Here we have a point. If I click on this
print automatically, I'm going to have
a new work plane perpendicular to this point. It just come back. If I click here again
and I click e.g. on this line, I'm going
to have a new work plane, just perpendicular here
and perpendicular here. So this is why it can be a
useful some time to create. Axes are to create or
you can also use print. Let's select again
construction plane. And you can select a reference
to create two plane. If I select this point, I can just click here. And if I just send time, I click here, or if I just same time,
Let's do this again. I'm going to click e.g. on. I think it's better to
click on this line. I can press Shift, click here. And I can create
two new work plane, one on this area, in one of these area, something and terrorists,
things that we can do. I'm going to remove all
these different plane so I can delete, are these planes that
I have created first. So delete all this work plane with right-click and delete. I can just keep my axes. When you create a new work plane and you activate build plane, you can this time
select two points. So e.g. I. Can select this point, or I can select this axis. But if you click here, you can select multiple things like e.g. I. Can select this point. And automatically
you can find in dotted line a new element. And if e.g. I. Select
two nodal point, I press Shift and
select this point. You can find an axes with a
new datum plane like that. And to validate the plane, just go left-click on
the dotted line here. And we have created a new plane. Here it is too much interests
come back at deceivers, click on the selection tool, and now we have created
this new work plane. As you can see, this
is why it is useful. I'm going to come back
and select some sink like if I want to create
to what plane in reminder, I can just click on
this line and I can crack rock plane
directly in the nadir. So I can click this one. Just click here, and I can create a new work
plane on this area. One more time. I can use the plane. Let's look e.g. this line. And if I just click
yes, it exists line. If I press Shift, I
can select this line. Integral glands is going
to define an intersection here with two type of work plane and I can
select what I want. So it means in this case I would like to see it exists one. So click on the dotted line and just go and draw
selection tool. And I created a new work
plane on this area. I just wanted to show you that you have multiple possibility. Each time you click on plane, you go directly on build plane. And here you can see
leaked, Just edges. You can select Print, you can select multiple things. I can also click on this edge and then
press Shift click here, and I can create a no
doubt type of work plane. I can also press shift
here and take a glance. I can position and nodal
plane on this area. So you have multiple
possibility, even if honestly we don't
use these too much, too much using axes. So most of the time
we just need to craft plane directly
on the face. But it is something
important to know. If never you have
something complex, you can use these two tools. So first you can create
taxis and say Go and you can create a plane
from axes of print.
52. Construction tree part 1: Let's explain the construction
construction tree. What is this? It
is infrastructure. And each time when
you create something, you will have an element
in the construction tree. So let's see how you can
manage your construction tree. So first things to do here, it's your design and
it just your project, it is just your document. And inside this
document you can have multi-paradigm and you
can now have faces. You can have shocked face, you can have object, you can have solids. You can have what plane, you can have these
different things. So first things to do,
Let's scratch, uh, first element uses Sketch mode
and work on the z axis w, and create a rectangle. Click on the Rectangle tool. Define a rectangle from
center and activate to value. Let's walk with 60
millimeter by millimeter. I can then create an
extrusion with my pool tools. And I can click here krypton extrusion with four millimeter. Let's create two
nodal plane here. Click on this face to sketch
directly on this face. So first, we can click here
and create a rectangle. Oh crap to circle. I'm going to create four different also, I can use my top view. We can just use e.g. the grid and create 2 million
meant just like that. I can craft to another
element just here. With eight millimeter. I'm just using the main
element of my grid. Here. It's pretty fast. Proton, these two C's
of construction tree. I can finish my sketch. Create an extrusion. Pressing control and Crato
and extrusion just inside. Now, as you can see on the left, we have created
this first solid. And let's create a second
solid on the right. Answer, right? Craft a new sketch and we can
work on a different plane. So first click outside
and select X2, Y1 plane, this one, and select from view, just go on the right. Credit. Let's create like a plate. So frost crack two
liner just here. You can create a line with
a value of 40 millimeter. Then I can come back here. We use e.g. around
26 and we can go in this area and
just close the pass. Next step is to
finish the sketch. Create an extrusion or
not one extra junk. Create a revolution. Activate directly pull tools. Select Revolve. You need for us to select this axis and then
to select this face. And you can create an
extrusion just like this. If you want to finish total, it's better just to
click on full pool. Perfect. Now I created the
second element. And if I need I can
apply just Shen. Go left-click inside and
walk with a value of two. I think maybe it's little to
affiliates, little too big. Let's craft to modification
with some tools. And I can click on my second
solids and drag and move on. Alright, so now we
have two solids. So first things to do if you
want to rename your element, you can select your first,
your main document. Right-click. And I
can go on Rename. Can just tape project. If I want to rename my solid, again, I can go
right-click Rename. And this is the
proton number one. And right-click here, rename. This is the part number two. I have two different
part, perfect. Now, each time when you
add different things, you will have also
this element on the construction tree. If e.g. you add a new
construction plane, unlike plane and I define a new construction plane
here automatically, I will have this one on
this area. Let's continue. I can click on this face and I created a
second construction plane. If I want to create an axes, I can click on Axis and
Crato new axis on this area. Again, on this area. Each time, if you create a
new sketch and you add e.g. construction line, if I just press Escape to go on
my selection tool, click on this face and
create a new sketch. On paper icon in the top view, I decide to create a
construction line, credit to construction line from this point to this
print, press Escape, and credit to second
construction line from this point to this
print press Escape. Automatically you will
have also this element. After to finish your sketch. I have a new folder with jobs. Every time it is a same, you can change the name of your work plane,
right-click Rename. And I can take plain number one. And I can click here,
right-click Rename. And I can tap plan number two. This is the same for axes if
you need right-click Rename. And axes number one and
right-click Rename. Axis number two. And this is x2 curves. This is a curve, so it
means my construction line. And if I click inside, you can find the two
construction lines of first and the signal. If you go right-click,
it is the same. You can also rename
your construction line. I'm not going to do this because after you are not going
to rename every symbol, you can rename or you can also delete something and protons. If you want to add an element, you just need to click here. And I can just hide
my part number one. If I click here, I can just
hide my part number two. If I go on this
area, I don't see, I can just add my two
plane just like this. So each time it's pretty easy you can just either an element or recuperates your
view of an element. You can also hide all
your project and share. I don't see anything
I can reactivate. If I click on the
path one right-click, I will show you I've done that. You can also move to
components and you can rename, you can delete
something I'm protons, you can look also
if I click on lock. So part one is locked. So it means if I
click on this one, I want to use my tools, my move tools or
anything like this. It's not possible to use
the tools because you have log elements sometime
it can be useful. So just remember, you
just go right-click and you can look at any
moment you can unlock. You have also options
to go right-click. And you have check geometry. I can click on Check geometry
if everything is okay, you will have no
geometry problems where phones and most of the time
you won't have any problems. But sometime it
can have problems. In this case, you will
have the notification. If I go right-click, you can also invert
the visibility. If I decide to remove
the view of subpath one, I can go right-click inverse
visibility, just like that. And I can recuperate, I can go right-click again. And inverse visibility. You have also an option. It is always visible and you can have your element
always visible. You can see its
little different. We have just two line. Instead to have
this check element. At any moment you can go right-click while you
can just click here. And Rick Pierrot, the view. So this is how fast
you can manage your construction tree
with basic things. Each time when you add
something you will have inside your project.
53. Construction tree part 2: Let's continue with
construction tree. I'm going to show you that also. If you create initial
phase like e.g. you just pick on this line. You can use a pool tools and you can just apply extra edge. And if I drag and move on this direction with the
values that they want, I can just create a surface. It is a same here. I
can click on this line, drag and move on this direction. And I created one more time, a new shop phase. It is exactly like Park
Zoo problem number one. She has is a problem number two. And I can also adjust your face. I can go right-click
it is a semi can rename if I need your face. Number one. And here I can rename short
phase number two. Legs. It's something important after
you can create component. With a concrete example. After I will explain, you will see in details how it's extremely useful
to create components. But first here let's
see the basics. The basic of components is at any moment you can just go
right-click on the element. You can move an element
to a new component. If you click on your project, you go right-click, you can
create your new component. I'm going to show you
is a two element. So first, if I create a new
component, I can click here. Now you have z
component number one. I can just rename my component, rename and just tip path what
you will understand after why it is useful to create
a component and incisors. This component, I have
absolutely no sink. I can drag and move
my path number one, left-click, drag and
move incisor component. And now as you can see on
the construction tree, I have part number one and
inside I have my buddy. If I want to compete with my two surfaces because
it is one entity, I can click, we shift
on the two soft phase, left-click, drag
and move inside. So part number one, now insides with part one, I have my buddy and I haven't
sold it to show faces. Let's do this. Let's do the same thing
with the part number two, but this time I'm not
going to go on Project right-click and create a
new composer component. I'm just going to go on
right-click on the back too. And you can directly
move to a new component, mu, move to a new component. And thanks to that now I have
my path number two. Adjust. You can expand or extend or
you can just close this. And by default my
pattern number two is inside the pattern number
one. It's not really good. So you can go left-click, go little, I would like this. And you can remove the path
or just go left-click, go inside the project is better. And now you have the
pattern number two out to have something better. But to render, you can also position in a plane any axes in curves inside part dragon moves of plane where one inside. So part number one, it is possible, as you can see. Now, let's remove the
plane number one, right-click Delete. So plan to right-click
Delete and all this element. You can also press
Shift and right-click and you can delete a different
element at the same time. So now I have two
different pounds of pattern number one
and number two. Let's go also in
the pan number one, Solexa to shore face
and right-click Delete. Just like this. Now I have two paths.
Path number one with somebody one and pan
number two with two. Each time you can also hide
or you can reach peer review. If you go right-click on
the component directly, you can use expand just to
see what you have inside. Or you can go right-click. If you are e.g. empty component, you will be able to
delete empty component. Something very interesting
is you have open component. So why? Now why it is useful
to use component? It is useful because
inside a project, you can add different paths. E.g. you can create a first part after you can craft
nut and bolt, you can create two
different paths for an assembly inside
the same document. And after, if you
want to export in different file or if you want to expand to a different part
of the same document, you need to create components. Let's take a look. Let's again go right-click on
the part number one and open components. And now we have a new we have a new document with only
the part number one. If I just come back
to my project, I can go right-click on the path to create a new component, not create two new component. Let us come back.
Right-click open component. And now, as you can see, we have the project with
the two components. And we have also this one only
with the first component, and this one only with
the second component. Why it is useful if I click on my project and I want
to export my work here, I will export all the elements, so I will go on file. I will go and save us. I can select the Save As Type. I can select what I want. Here. If I just
validate we save, I will export or save my work
with also element inside. So it means also project
with a part one to part two. Here I can e.g.
exposure project. Just click on Project, save. Now if I just want to export in a separate file only this one, I can click on the button
and bell one, perfect. And I can go and file
directly exploitation. So save, as I can select by default I'm using
this n span mechanical, but as I explained before, you can select this
different type of file. I can just apply like part one or any things that
you want you can, I can type square. What I want, an exponential
path number one. I can select the
part number two. And now I can go and find. And if I select Save As
I can save or export my work in a different
file with part number two. So this is why it's extremely
useful because e.g. you can create a document. You can add different element for an SMB and it's
things that you want. And after you want to add
this on separate file. And this is why you need
to create component. It's not possible
to do this work. If you work on the body, if you go right-click on buddy, you won't have the ability
to export on Nissl body. So this is why you need to
create a component first. Then you need to go right-click. You need to open component
after to append components, you can click on this one and you just
need to go on export. You can also use export options and you have these different
possibilities. Even if it's not, you don't have a lot of things. It's great if you want
to use ultimaker Cura, that if you just want to
export, it's not really good. We just start PDF STL, so I can advise you to go
to File, select, Save As. And it is better because now
you have all these options. You can export OBJ file, you can export in JPEG, or if you want, you
can export in STL.
54. Add colors: Let's see how to add colors. It is possible to improve, render your element
adding colors. So the first thing
that we are queens to do it to create a path. So select the Sketch
mode, activate directly. So what plane? And create a rectangle, defined rectangle from center. And I can go left click here
and work with two value. Let's activate 60 millimeter
and by 40 millimeter. So 16 millimeter by millimeter. Let's create two
construction lines. So first construction line from this point to this sprint, and a second construction line from this point to this point. Oops, let's do this again. A signal and construction line from this point to this point. Right-click Set as
mirror or line, right-click Set as mirror lines. So next step is to
create a circular. We can dress chromatophores, Shakira around this area and signaling shocker
around this area. Let's just walk with a value. It's not really good
for first-year curve. You can work with a
value of six millimeter. And the second cell
courteous six millimeter, but not the same position
activate dimension, this point to this line. You can go on the left
and walk with six. This point to directly this line and walk with six or
so activator dementia, this sprint to this line. Let's work again
with six millimeter. And this point to this
line and dress here, this line is better and
work with six millimeter. I have already six. It's perfect. After
to do this work, I think I'm in trouble
on this article. It's not really good. I'm going to remove that. Remove that. I don't know why. I have some sink a little
strange and credit to line trust from this
point to this point. Perfect. I've taught to do this
work, finish the sketch, and create an extrusion
Translate Z is, let's work with a value
of four millimeter. Next step is to add a liter affiliate on these different edges.
So press Shift. You can select these
different edges. Shift also. Shift or shift control. Click on this edge, control, click on this edge. Control click on this edge, and control click on this edge. The next step is to
click here on the first, and you cannot do diverse. Let's work on so
we six millimeter. I can obtain this render. Now as a next step, if I
want to apply color first, let's remove our ISO curves delete and remove this
your face delete. You have, you can apply
a direct pure color. So we do on the face
with her on the street. You want to apply
on all just solid. You can directly
click on the solid, but with your selection tool, if you click here, but you
won't have the option. One of the best things to do, It's to click on
one of the face. And you have now is
this options color. Or you can just go right-click
on one of the face. And you have also
the options color. Now you need to
sit exact target. So the target will be the face or the target will be somebody. Let's select firms you buddy, I want to apply
your color on trust like e.g. yellow color. I can click here and activate
my yellow color, our body. Let's do this again. I'm going to show you. You can come back, select one of the phase. You have these options color and you can apply
to body of phase. And here you have
also more collapse. It means you have a new panels. And thanks to that,
you can choose exactly the color that you want. If I wanted something
like you're in red, I can apply the Red Cross. Click on, Okay, and I can
apply on all my buddy. If you want to change the
color of all your buddies, you can come back with
your story panels, but you can also click on one
of the face, right-click. And you can go on these options color
and you have removed, but the color of the right, so I can remove all the
colors of my budget. So now what's happening if
you want to apply color only on a specific
face, different faces. I can select this face. And I can go
right-click Collapse. And now I need to
change the target to its target will be the face. And I can select one
of these basic colors. Let's walk with a blue. It's not really real about the cola and just activate blue. And now you apply my blue
color only on this face. If I want to have a
different color here, I can click on this face color. And let's select something
different, like green. And now I have one color here and I have no
dark color here. As you can see, you can also apply the same color
on selected faces. I can select this one, press Control, select this one. This one, this one also faces
around control and control. Perfect. I can zoom and control
it, so perfect. Now you go right-click and
you absorptions color. And I can apply the
color that I want directly on all the
faces selected. You can also reduce the
opacity if you want. You have also randomized color. If you want to see
the final color, randomizing, Let's
click on Macros. And silica is a closet I want. Let's work with red. Click on, Okay, and now we have the red color on all
the edges around. This is how you can
apply some Carlos. If you select e.g. or the feces with a frame of selection and you just
go right-click Carlos. You can one more time or remove. So collapse of all the faces. But if e.g. you click just on one face and you go and color. You can remove the color
only on this z-space. But if you select the frame
of selection of everything, you go right-click colors and you can remove face color of all the faces
at the same time. So this is how it can work. Don't forget that you can go
into the display panels and you can increase the value
you have shaded and unshaded. So let's do this again,
select everything. Right-click prolapse. Let's work with some
scene in gray legs that are maybe I can select the dark gray silly to
every sink right-click. And select this gray color. Exactly effect if I
select one of these face, again, walking graphics
and shading, e.g. I. Can also click on one of these
phase and rendering style. You have metallic plastic
and more options. I can select Finish and
y-naught ICT Gloss. If I want to make metallic, metallic elements, I can
also select metallic here. But sometime I don't like
to merge the n n shaded. I think surrender is bit to
unjust in the shaded options. I can click here thicker glands to have something metallic. Let's make a little different,
gray, little darker. Select every single
again, right-click Color. Let's see like Moses gray color and validate dressed like that. And yes, you can definitely improve your render
using this feature.
55. Add textures: Let's see how to add texture. As you can see, we
can add clause, but it is also possible
to add texture. Let's just create
a different path every time it's
great because you can repeat different processes. And after you can repeat, repeat, and improve yourself
with the different tools. So let's click on
the Sketch mode and work on the z plane. So top view again. And let's grab something by
Z curve with a rectangle, defined rectangle
from center point. And let's supply just 40
millimeter by millimeter. Finish the sketch. Let's
create an extrusion, extrude. Let's work with a value of
20 millimeter like that. And apply your shell to
create the Cavatina reminder, click on the shell,
select this face. But, but as a value, 1 mm will be perfect. And I would like to
create like Enders. And for this, I need to
use my selection tool. Click on this face to sketch. Let's work on the side view
credit to know the rectangle, click on the Rectangle tool defined rectangle from center, we can position the base
of the rectangle around this area with two value ten millimeter by
four millimeter. Let's apply liter wounded
counter with these options, crowdfunded corona, this part to this part when millimeter 1 mm, 1 mm, and just 1 mm. So next step is to finish the sketch and
create an extrusion. Click on this face greater
than extrusion crystallizes. So perfect. We have now our solids, we have created this part. And I would like to add texture, Let's see again to add a color. So two other colors,
as, as explained, you can click on one of these face using
your selection tool, on your patent pool tools. If you go right-click, I'm going to do this again. Click on this face. I think it's not extremely good. Let's press Escape. Just click here and right-click. Sometime. You need to, yes. I'm going to press Escape. Come back to my design mode. And when I click here, I have some signature
strength for I'm going to select all the faces, right-click and
activate my color. Let's apply on also
faces at the same time, if I want a brown color, I can click on prone. And our n I have
now is this color on all my element,
just like this. So now if I want to
apply a texture, I'm going to come back and select every single
game I can create a frame of selections
or process is the same, but we just need to add texture. So right-click color. And instead, to use
randomized color, here are these basic colors. You need to continue
with more Carlos. Here you have a little option, you just to stay over, over, over just to style and you can change overall
transparent for opec. So if I just come back
on colo more colors, you can drag and move
the panels on the right. And you can find
texture, texture. So it says basic color. And notice this texture, when you click on texture, you won't have any scene. You need to import a texture so you can download the
texture where you want from an image library
from any seam you want. And then you click on add. And I am going to show
you two examples. The first example
is a wood texture. So I can click on wood texture. Then I can just, you need to share
you have no texture, so this is why nothing happened. You need to change no texture
for D foods and those, that texture will appears
and if you apply, okay, now we can add the
texture on just here. If we don't have a lot of advanced option
to a digit texture, but just things that you
can do if you're sick, every sink, you go right-click again and
you go and close. And you select more colors. Some things that you can do. It too. When you go and texture, it's to scale your texture. And you can also
create offset run. It's going to create two offset. One of the problem is we
don't have the preview. We don't have the preview. So this is why it's
a little difficult. But I can scale my texture, e.g. I can scale with four, and here I can
scale it with fall. Just click on, Okay, and I validated and now
I have so much bigger. Now if I want to reduce, let's click on every
single one of the problem. We don't have the preview, so it's a little
difficult to know and I can select
my color, texture. And this time I'm going
to reduce like 0.2. Here. Let's reduce like 0.2. Also. I can validate
just like that and those are the texture will be repeated in just a way
to improve literacy, render texture I'm not the most important
in deserts park, mechanical m is just when provably towards
your render if you want. Let's do the same thing
with the metallic texture. If I select everything again, Right-click color, I
can remove everything, or I can just go on
more columns. Again. You can add another texture. I can click on, Add,
click on metals. Or you can also, with
exactly the same process, adds texture or neon, one phase or multiple faces. Now you have the second element and I need also to
activate on diffuse. And just click on, Okay, Just like that. And now I apply this
texture on dress here. As you can see, it's
not extremely good. I can select everything. I think it did this texture,
right-click texture, mock Carlos, texts troponin
or if you want to remove one, you just need to
click on the texture. I can e.g. remove this one and shades because
it's 0.2 and 0.2 also, it was scared for this texture. If I apply one-by-one, validate and knows the render
will be little better. But you can also create
to offset if you need. As I explained,
texture is not the best in design spec mechanical. Let me just improved
little bit your render, but you don't have advanced
options to edit your texture, to track and move your texture towards a preview in real-time. At any moment you can come back, you can select everything. You can go right-click and
you can see the color. You can also remove
all the color. And if you go right-click
again, Color, Monte Carlo texture, this image will stay
directly on these panels. If you click on this one at
any moment, you can remove. If you have multiple
texture here, you can also remove it. Just click on remove
and validate.
56. Edit visual style: Let's see how to change
the visual style. And so you have the possibility to edit the visual styles. And for this, you
will have to go and display and you have
different options. First things to do, Let's
create a path you can use design mode first,
create a sketch. We need to change
the work plane. Let's activate x2, y walk
plane and craft to sketch. The next step is to
use a line tool. Click on the front
view and create a first line just here
with 30 millimeter, come back with ten millimeter. Ten millimeter again,
ten millimeter, ten millimeter, and ten
millimeter Andreas here. And we can make
something like that. Let's validate with n edges. I finish the sketch and Crato
Revolution use revolve. You can select this axis, and then you can
select this face to creative evolution as,
as explained before. Next step is to, I can add literals. Affiliate, I can use
my tool, poor tools. Dress here, I can
select this one. And let's work with 1 mm. I can see it exists one, Let's work with 1 mm ceilings. This one, it's walkways, 1 mm. I can also work here in Zero
Dark direction with 1 mm, and I can also work
here with 1 mm. So perfect, I have this element. Now. Next step is to, I'm going to create two orange when my daughter, I forgot. So I can click here to
sketch civic top view and create a circle from this point with like 12
millimeter validate. All dressed like this. I trotted my part. I can directly go into the display panels and you
have multiple options. The first things to do
relates a digital color. So I can select everything, Right-click and just
click on color. I can select every
sink right-click. Here. I don't have any sing
because in the design mode, I'm on the pool option. Let's click on Select
and select every sink. Right-click. Now I can
have access to color, and let's select,
Let's hit equals. I can select this gray
color just like that. If I just come back to display, the first thing that
you can do is to click here and you have orthographic and perspective. It is nice. Want to export your work in JPEG image file to chant
for perspective, we can have a better
render just like this. So we can change a
terrific When you walk, is this generally better
to walk in orthographic, but for our render, you can
change for perspective. If you click here,
you have shaded mode. You can use NN shut that you will see the
difference because now it's little longer when
you draft your dragon move. Honestly, I think
it's not perfect, so resists mode most of the
time prefer to keep shaded. You can use also wireframe. You can use also
either online or you can use also iden line removes. If you need to export
your work in wireframe, you can use one of these. So now let us come back. I'm going to come back with my history panel scoops,
address comeback here. It's better. And I can click on Display. Oops, let's continue. Yes, just like that. Sometime you would add
some little strain if you just come back
on the display mode. Share you have intense and I can just come
back on shaded. Let's walk in perspective. If really you are in trouble
to Rick parents this view, sometimes it is little strange. Just save your work and reopen a design spec mechanical
and re-open your paths. And so now it's okay, I can come back on shaded e.g. and you have more options. If you click on
any of this phase, you can go here. You can apply e.g. metallic on all your materials, on all your paths metallics. And if you click again
on one of these face, you can work with plastic. You can work with brush. You can work with
also add shade. And you can work with finishing. If I sit it plastic, e.g. I. Can go here. You have different
type of finishing, matte, low gloss, medium
gloss or I gloss. It is e.g. for plastic. But if you select e.g. Metallica can change. So acidic one of these
face just chance option for metallic. And here I will have finished Matt Lu gloss medium
gloves, eight gloves. If I just select Matt, I
will have this window. If I just change for a gloss, I can click here, finish. I gloss. And you can find
different with flicked. And definitely it is
great if you want to create an element, a metallic element, it
is perfect just here. But, but you have
also more options. So here you can make
the choice to activate the view of the tangent or not to view of the tangent, e.g. if I, this activity
can be great. You can do is activate
multiple things here. So phase you can do
is activate solid. You can do is
activate silhouette. Or again you can do
is activate soft. You can do is activate almost
every sink dress here. Should do is activate every
scene you will have render without any edges in E point.
And it seems like this. You can also go on the right. You have should display. I will show you have
a world origin. I can just remove
this one. So e.g. vertices, I can
change the display, but here it's for many things. So you have vertices e.g. I. Can just drag and
move and remove laces. I think it's more important to move here on these
different element. And now take your
glands or you have a perfect render of my element. If I just continue at any
moment, I can come back. If I want to recuperate
tangent, I can click here. And I can recuperate tangent
if I want to recuperate the different elemental
extract phase solid after it depends
of what you create. It depends if you have
created your faces. If you have solid, it depends
about what you create. I can recuperate silhouette. First set internals,
first set open, I can recuperate, also sings. Don't forget that at any moment you can select everything. If you go right-click,
you can change the color. Let's activate more color again. Let's work with something more in yellow, arrange, validate. And now I can have also this
window, just like this.
57. Divide window: Split windows divide Windows. Display panels. You can split the windows, you have different
options split, and you can work with
just one viewport, but also to orange on
terror if you put two vertical view port
four viewports. So the first things to do, Let's create two part, come back on the sketch mode
and create a rectangle. Let's work with the top view. Define a rectangle
from the center, and just create some
simple quiz to value. I can tap 60 millimeter
by four millimeter. I've taught to do this work. Let's finish the sketch. Next version. Click here. Let's grab like a cube, not perfect cube, but just
create something like this. And let's add also feed it using tools that can
create affiliate e.g. in this direction
and y naught on this direction or
so, just like that. So I created this path. Now if I go into display panels, I can click on display. And I can have
different options. I can use split and by default
we have one view port. It also the
possibility to create a new window here with
exactly the same design. If first digest come back
and I click here when you prototype can apply
to horizontal viewport, you can apply to
vertical viewports. And you can apply for viewports. Why it is interesting
because now I can navigate on each frame, inside each view,
I can never get. So e.g. on this area, I can sit in front of you and I can position my
element just here. On this area. On the right, I can
select the top view, zoom little bit, and other view of my object
just with a top view. Here, e.g. I can see leaked. So right view and I can
activate right click here. And on this area can activate two different
view like e.g. orthographic view. If I create any
modification, e.g. on orthographic view, and
I'm using my design mode, I can come back
acidic support tools. And I can go left-click
and the change will be displayed on all the
different views. Sometimes useful because
you would like to see how it will change
on something different. And this is why you need to separate indifferent
Windows ever NIF, honestly, we don't
use this a lot. It is also useful if you create a different type inside the same document.
If you are e.g. multiple components, I can
come back first with one view. So let's come back on
display, split one viewport. Here it is my solid much
so the things that I can do it scrapped and other
things that can go and design. Let's create a sphere and
just go on this area. Can click on my sphere
to sketch mode. And just go left-click here. I think it's
extremely convenient. I'm going to work on this area. Let's use design sphere. I can create a sphere
around this area, perfect. And now I have a
seagull and solids. If I want, I can
continue with why not two cylinder going to
write and create a cylinder, trust on this area exists. And I can press escape. And let's create to know those things with
the sketch mode. Credit, e.g. Reno dot type of
rectangle on this area. And if I use my design, I can press Escape. Use my pool Tools, click here and extrude that. You have for different solids. I can separate this solid e.g. two component moved
to new component, this one move to new component, this one move to new component, and this one move
to new components. So you have four
different component inside the same document. And I can change your
display with the display features split for viewport. And I can try to phrase on
parent these areas elite mall. First part on this, RER can select more, e.g. second part, this
one on this area can silica more like this part. And on this area can
slick mole this area. So thanks to that, you
can have a view of all the different component with four different windows here. And this is why it
is interesting. Just to change this disposition, you just talk about why
it can be interesting. At any moment, you can
just come back one viewport and you can display
at your convenience.
58. Edit camera: Camera. It is possible
to use a camera. I'm going to show you it is not a feature so
that we use a lot, but just some basic
about camera. So the first things to do, you need to enter
in display mode. Here you can activate a camera. As you can see, I
have this element, this is a solid, this is a part that
I have created and I can directly click
on camera options. Now, on the left you can find a general camera options with an active view produces
active viewport number one. And you can change
the active viewport. You have different
type of options. If you want to see your camera, you can just click
here and show camera. You need to select the
viewport that you want, the pounding of the few
products that you want. You can have different
types of view. So it sees a view with
this type of viewport. But you have also other options. I can click here
viewport number one. I can just click against on this aerial
view port number two. And you will have
different type of display. And I can change again
with Viewport number. Sweet, best things to do, Yes, Just click here. This is a view port number
suite is almost the same. Let's just come back with a
new product, zero just here. Now you have different
type of window, but you can just come
back on new window. I'm going to show you
again, just click here, activate Zoom camera, and you can select the
viewport that you want. Let's see, X is viewport. After to do this work,
what is anti-racist? If I zoom out on this direction? First thing that you can
realize is we are working in orthographic view because we
have like a cube like this. This is a view for orthographic. If I'm changing for perspective, we can have something different. As you can see after if your
guns are right on this view, depending of the user to choose, camera will be indifferent. So this is a first
things to understand. I've taught what is
M to use camera. It draws us sometime you can
create two little effect. If you want to
introduce your models, you can click here and
you have flight scroll. If I go left click, you can have this type
of effect translate. This can go here and
obtain this type of Zoom. It just some things that
you can just send time. If you have different point, you have a point here, I'm
going to change a position. Let's position my element, yes, Just on this area here
I can change also, let's work with a
different view. And you can find
this point, e.g. if I go out of the camera and
not go out of the camera, why if you just change
for design mode? Can you use your move tool? And e.g. you have the possibility
to click on some print. I can click on camera here, select again a viewport. And with this viewport now, so if you problem number
one, there can be reasons. Alright? If I use my move tools
and click on this print, I can change the position of my camera just like
this. As you can see. I've done depending
of what Atreus had changed to tell
you the position, I can crop rotation
and take a glance, I can create a rotation. And those of you is here. I can zoom in using
my scroll wheel here, can turn to change the position of the
camera, just like that. And we walk in perspective. If I just go right-click, we can totally change the
perspective just here. So when you use your move tool, you select a point
inside your camera. You can zoom in and zoom
out just like this. Depending of what you want. You can change at any moment for orthographic and you can just
come back and it is a same. You can drag and move shear. And at the same time
you can pull on this direction or you can
pull this on this direction. Personally, I'm not going to
enter too much in details. Not a lot of things about this camera and D's
and spark mechanical, which is just an
optional features. If you want to create a really terrific you can use this tool. But Athena, it is not an
extremely convenient options. Camera mode. At any moment, if you want, you can just come
back on the display panel. One of the best things to do, it you just create two new
window you can come back here, and it is generally the best
to recuperate your models.
59. Add measures: And measles. It is possible to add mesial
directly on your models. You have also other options. We don't use this solid, but sometime if you want
to check something, you can use this
mesial museum work. So when you go here, you can find on the
right measures first basic things that you can
do it to use these tools. And you can add
some Israel where the offline withdrawal
between two print. And when you click here,
first things to do. If I created this bottom table. If e.g. I want to see the
wide of this protein table, I can just click on one of
these lines, like this line. And automatically I will have information on the right here. I'm going between adjacent
surface is zero degrees, line length 100 centimeter. Sharing this example, I was
working in centimeters. So this is why I observed
value in centimeter. If you walk in millimeter, you will have some value in millimeters, you're
walking material, you would add the value in meter independence about
your sings in the property. If I click here, I can find 80 centimeter. So I know that this food has
a size of 80 centimeter. We have also angle adjacent with 90 degrees or she I
ever wouldn't bro, I just want to click here
and I know that this would unbound Aztlan land
ten centimeter. If I click on one of these face, you can also have x2
value in Zomato square. So perimeter we have 24
centimeter and we have an area of 2017 meter square. If you select e.g. multiple element, like
I click on this one, this line and control I click on this line and
control I click on this line. You can have override
overall length. And why it is interesting
because in this example, if I want to have
my total current, lender can just click here, click here, and click here. And I will have over length. You can also check me Xian between two lines or two print. If I click on this line first, I can press Control. Click on this line, say gone. And now we can find
the minimum distance between axes and minimum
distance between object. So between these
two, these two axes, we have exactly two
centimeter and we have n between objects when hundred 80 degress
it is parallel. As you can see,
we have overrided late overall anal entities at the end of this object to
the end of this object. So it means at the
end of the solids. You can also work with
two different print. If I want to dimension from
this point to this point, I can click on this one, press Control and then
click on this one. And I have distance
between this point to this 0.48 centimeter. So this is a type of
things that we can do after our next, next step is younger. So more things like if you
click on one of these face, you can also activate
to mass property. Each time you will add the
volume center of volume. It's not going to
take the face here, it's going to take the solid. So if I click on one
of these element, I will ask directly, is a solid selected
with the volume soft faces and more
advanced things. After you can see the normal, when you click on the face, you will see is a normal
from the extrusion. Click here, click
here, click here. Each time you have
the direction of the normal Maxine,
extremely difficult. You can also add different
type of view like you create. You can also click on curvature. Here it's more Click on
the face of nature on a curve to display cure vitriol. And you can just click
on something like this, or you can just
click on the edge. It's not something that
we use a lot after you have the scale
and the density, I'm not going to enter
too much in detail here. You can have also multiple
view like stripe, Stripe you, you can select
deviation view like this. You have root, so
it's like a trial. You have multiple
things on personally, we don't use this a lot. Most important things is definitely to
understand some easier, sometimes a mass properties. After it's here, it's
more advanced options that we don't really use a lot. But if you want, you can try.
60. Create square: In this training, we're
going to create a square, squares that we can use for a corner to reinforce an object. And we're going to work on the different sketches and
CD found features again. So first things to do, Let's create our first sketch. And I need to change
the work plane. Just click here,
select x2, y plane. I can activate the front view
and just create two line. I can use my line tool
credit first-line on this direction with a
value of 60 millimeter. You can press Escape
credit sig online. You can click here and walk with a value of 60 millimeter
also and press Escape. After the next step is
to use offset curves. Click on this line. You can click on Control
on this line again. Let's do this.
Click on this line. I can press Control. Click on this line also. I can create my offset. So offset will have a
value of two millimeter. And then close with line tool, you can just close this line. And I can zoom here on
trust closest line. Also. Finish the sketch and
create an extrusion. Click on the face, credit to an extrusion
on this direction with a Pro Tools activator value
of 60 millimeter like that. Now, let's select this face
to sketch on this face. Creating a sketch
activates a top view. And we're going to create
a construction line. Click on construction
line critic, construction line in Zoom aider, and right-click Set
as mirror line. So thanks to that, I can
just create a circle. I can also create, if I wanted even better credit
to know the liner. Here, I can create
an order line yes, on this direction, but they
have already the symmetry of the ozone and right-click
Set mirror line. If I click on my
circle equivalents, you can create two
soccer and repeat this Shakur on all
the different area. I'm about to show value. Let's apply a value
of eight millimeter. Legs out. I need to change position. I can click here, I can drag and move. Let's enter dimension,
this sprint to the slide. Double-click eight millimeter
and validate dimension. This print to this line. Double-click eight millimeter. Perfect. So the next step is
to finish the sketch. Credit to an extrusion
of different Shakira, press control and left-click, you can go inside
dressed like this. Now let's repeat this process
directly on this face. Click on this face. To sketch. You need to
be on the right here. I can select this view and activate to
construction line again. So create your first
construction line, crowd to Segal and
construction line and each time
activator symmetry, right-click Set as mirror line, right-click set as mirror line. Let's create our first circle. This circle will be repeated on audiences size,
tip eight millimeter. And perfect dimension for this point to this line
and glands are left eight millimeter and enter
dimension again from this sprint to directly
yes, this line. And eight millimeter also I
have already it's perfect. Finished the sketch. Create an extrusion or so. I can just click
here, press Control, click here, click here, and click here, and
create an extrusion. I'm going to come back
yes, with this view. Perfect. I don't need any Moses
different construction line. Click on the curve,
right-click, Delete. Perfect. So now it's the next step
is to add a chamfer. I can click on this
one, press Control, click on this one, and activates the
options here, Chamfer. And thanks to that,
with the left-click, you can drag and move on
the direction like this. But that zero value, it's not going to be a big, big value. Let's walk with four millimeter. Just like that. I'm going to repeat
this process here. Click on this segment control, click on this segment,
activate chamfer. And let's work with a
value tab four millimeter. Perfect. And that's it for this grant. The things that I can do each to improve the TLB to render, I can just change the color. Select everything is
a solid right-click. Are just turn. You can also create a
frame of selection. Here. Your selection tool, it's better create a
frame of selection. And just right-click
color molecules. Let's create some
sinking yellow, orange I can work with around I think this
value, it will be great. And after just validate, now I cannot turn this color. If I want to have
a better render. I can also use the
display options. Here you have
multiple possibility. Let's work with perspective. First and second scene, you can apply an
enchanted if you need. Let's work with shaded. If I click on one of
these phase change for metallic and I can
change also finish, I gloss. And thanks to that, I
can open this window. Here. If you want. You can just remove
or regions like this.
61. Create part: In this training we're
going to credit part. So this part will have a
base or rectangular base, and then we will create
a circular element. The first things to do,
Let's crowdsource base. And let's use a sketch mode. Let's work on the
top Work Plane and create a rectangle
from the center. Rectangle tool defined
rectangle from the center. And I need to apply two values. The first value will be
100 millimeter tabulation, and the second value
will be 100 mm. So I can finish my sketch, create my first extrusion
with left-click, and I can try them move with
a value of ten millimeter. Now it's the next step is to
create cylindrical element. For this cylindrical element, I need to work on a
different sketches. Create a sketch. Chanzeaux work plane. So left-click outside and I'm going to work on
so whitewashed plane. So I need to click here, select a new sketch work plane, activates the work plane
and acidic Xue from view. Let's use the line
tool and create a first-line on this
direction, as you can see. But eventually dementia and
it will be 25 millimeter. We can continue in
this direction, certainly millimeter
that tourists come back ten millimeter. Let's continue with
25 millimeter. Ten millimeter again. And just 20 millimeter here, come back on this area. And this area. If you need to check
the dimension, just use dimension tool. So here we have 20, here we have 25, and
here we have 30. If I use my dimension tool, here we have five, here we have ten,
here we have ten. And dressed on this area, we have 25, but I will
be over constraint. So it's not useful
to put this here 75, but I will be
over-constrained also. After I finish the sketch,
creditor, revolution, gradual revolution, activate the revolve tools
inside support tools. For us, you need to select two axes and signaled
to select this face. And Conrad Shaw,
revolution perfect here. So next step is to guns at top. Click on this face, create a new sketch. Activate. So top view, let's create two
Orleans reminder. So create two new circle with just six millimeter finish the sketch and create
an extrusion inside. To create a reminder. Just like this. After I need also to craft the sound arrives on this face
on each corner. So click on this face to sketch. Activate. So W and create a
first soccer on this area. I think you can activate construction line,
it will be better. So create a first
construction line just here, courtesy gone
construction line here. And each time you press escape. And with your selection tool, right-click set as me or line, right-click Set as mirror line. Let's grab the first circle
on this corner and it will be repeated on each,
on each kernels. Let's work with 12 millimeter. And position your circle from the center
point to this line. 14 millimeter dimension again, from this point to this
point to this line. And 14 millimeter. Right location for my point. As the next step is to
finish your sketch. Credit to an extrusion insider. Press Control a, to select all the different soccer and go inside and create an extrusion. You can select the curves,
right-click Delete, addressed need to improve my render with different type of film that citizens
or poor tools. First things to do is to
select all these kroner. You can press Control this
one and this one are. So the next step is to increase
like this with a value. And I can enter a specific value as the value will be like
sodium it off my circle. So it means 12 millimeter
on each sides, perfect. And activators. So you can use your Pro Tools. Just on this line. You can press Control
is this line, this line, this line, and this one also. But you can also, on the last element, if you drag and move
on to direction, you can obtain this
render a bunch of value. It's not be a lot. You can just enter a
value of At the 1.51, 0.5 millimeter and
just press Enter. And thanks to data,
can have this result. So it's okay for that, okay, for this part I can just
to activate to cool off. So select e.g. with your
selection tool, everything. Right-click, activate
the color options. Let's select one of these color. Why not to see this gray color? And activates the
display panels? I can change graphic for
an enchanted forest, or I can just stay with shady. I would like to make
something metallic again. I can stick my elementary
change for metallic. And so colo, if I
sit exists one, you have finish medium
gloss or Anglos, a tray with eight gloves. And I finish with this work, show and I can remove
world origins. I can go see our
perspective also. Perfect.
62. Create wrench: In this training,
we're going to credit a wrench credit range. First things to do. It's going to create
a main sketch, just one main sketch to
realize this French, activate top view and
try to sketch one. So after on the Sketch mode, the first things to do, It's to credit directly
a construction line. This construction line when
go on the left area here. And I can extend in
millimeter, about this size. It will be 100 millimeter on
this direction and create a second construction
line just on this direction with
also 100 millimeter. I need to redo again. I'm not totally sure, but yes, 100 millimeter. After all, it's great to
first shocker to tidy up this extremity credit
first-year curve just like that
about this circuit, it will be 40
millimeter and create a second circle at this extremity with
also 40 millimeter. So next step is to
activate a construction, to activate a symmetry. You can press escape to come
back to your selection tool, right-click on this line, set as mirror line. After. Let's use zoo line tools. And we can create two
line on trust and z direction can just
create a line just here. And I can enter a specific value dimension for my construction
line to this point. We have ten millimeter it later, too much change with a
value of eight millimeter. I need to trim and
use my trim tools. Click on this line, we can click here also. Click on this line, click here also we have the symmetries, so it is perfect. I don't need this one anymore. I can delete this part and
I can delete this part. If I just go in this area, I would like to create little
bit more like a polygon, not a perfect polygon, but I don't want to create
a circle or a rectangle. So it's not possible to create a polygon with this
advanced sketch options. It just crashed to construction
line with symmetry. Create a first in the
middle, just like this. Credit. Second construction
line in some aider. And setters mirror line,
right-click, Right-click. And I need to create a frost
line on this direction, just like this, as you can see, an image of value. First, it will be
just six millimeter. And I can press Escape. I can enter a dimension from this point to this
line that change for 12 millimeter crowd
to gain a line just here and work with one
more time, six millimeter. And I need to change
the position. So Dimension, click on
this line to this line. And I can walk also
with 12 millimeter. Perfect. I can press escape. With my line tool. I can just link
these two points. Just like that. I can
just press Escape. If I need, I can remove my first construction line and my Saigon construction line. Now let's work on this area. I can create Sui line, first-line around this area or Simone line around this area. And certain line
around this area, I need to apply constraints. This is why I didn't apply
directly 90 degrees. First two perpendicular
constraint from this line to this line, from this line to this line. Um, I need to check
normally it's okay. This line to this
line, it's okay. If I just press Escape so
I can drag and move here. And you can, you can
find the constraint. One of the best things to do. It's probably to
enter in dimension on this area can go left
click, enter a dimension. Let's walk with 20 millimeter. And I can just go, just come back, go left-click. And whoops, let us come back. Press Escape. Yes, like that. And now I can drag and
move all this part. I think about doing
clinician, It's nice. Position my elements here with the trim tool so
I can cut this part, this part and this
part. Perfect. Maybe it's just little too big. I can press Escape. I wanted to put 20 millimeter, but finally I think 20
millimeter will be later on, but I'm going to
move my element. Let us come back. I
have this constraint. Interests come back before. Next. I'm just going
to go here and until our value of 18
millimeter, it's better. And I can reuse my trim
towards cut, cut and cut. So now it's perfect. I can finish my sketch. And in just once one sketch
we can create this range. So next step is to
create an extrusion. I can click here and just
create an extrusion. And this direction above
X2 value eight millimeter. And just validate legs out here. If you want to improve, you can why not apply
little filleted dependent, but what you want to do
if you want to apply a small fillets here,
small fillets here, we can improve
liters this range, but we can definitely
also stay like that. Let's just apply your color. Click on every single, select every single frost
wherever shocked face on the left, right-click Delete. And with my selection tool, I can select all the faces. Right-click color. And let's activate one
more time this gray color, it will be perfect. Display panels that change. I can apply perspective
one more time. Sure. Move world origins. And I can't speak to every sink. And incisal display truss change from metallic, likes that.
63. Create support: In this training, let's
create two super hot, it will be a metal
support with three. Extremely interesting to
see things too that we can, again see how to create a
suite using elites feature. So first things to do. Let's create a first
sketch. So Sketch mode. And we can work on zoo or
basic rock plane and z axes. Activate the top view. I can use my circle tool. Click on this print and it will be 20 millimeter diameter. Finish the sketch and
create an extrusion. Extrusion on this
direction exists, a bad zoo extrusion. We'll have a value of
100 millimeter lenses. So now I want to
create my sweet. So to create a sweet, create a sketch, you need
to change the work plane, click outside and define
a different work plane. I can walk away, walk plane just here. Front view, let's
zoom a little bit. We can create a frost
line just here. And I can just go
in this direction. And we can make something
like this here. Just come back and
just come back. Here you have two
millimeter and I just create an
element like this. Let's zoom little outside. Yes, perfect. The next step is to
finish the sketch. So after to do
this work with us, this element, we have this
element at the intersection. M is to use a poor features. And you have revolve
about the y-axis. I'm going to click on
this one under cylinder. And I'm going to
click on this one. So it means this phase and
activate revolve aches. And I can work with the
pitch just like this. Maybe I can try with 20
and I can work with eight. So that's eight. I'm going to enter
100, just like this. And now I can see my pitch. I think it's not bad, but about value may be
six, will be better. If I work with four, maybe I can try just here. I think you're 104
will be the best. Let's do this again. I can come back. So let's apply for 100. Yes, I think it's
I think it's nice, but little, too much. I can come back. We don't observe you are
really in real time. I think six will be the best. And let's take 100, 188 of my cylinder. Now I can go left click outside. And I created these three. Just like that. The next step is to
create another circle. First, I need to check
something in my display panel. I need to change that. I'm working on
orthographic view, sit exist circle and create a sketch directly on this face. Sketch mode. I can activate my
top view, self-care, trust on this area
120 millimeter. Finish the sketch and create an extrusion with a
value of 20 millimeter. So perfect, I have
my first part. So now I need to credit second element at
the intersection. So create a new sketch. Let's work with the
different work plane. It's going to be
whitewashed plane. So you need to click on X2, Y1, plain new work
plane, this one. And select the front view. I've taught to do this work, let's apply a symmetry. Create a construction line just in Zoom, either like this. You can go right-click
Set as mural line. If I zoom literally
beta can create a line just on this
direction on the left. And we can create a
line with a value of 80 millimeter, just like this. And I can pull on
this direction with a value of with a value
of 100 millimeter. Just like that, I can
credit to offset, offset tool press Control, click here, Control,
click on this one. And credit to offset. The value of offset
will be six millimeter. And I just need to close a pass closest point to this
point and finish my sketch. Let's create an extrusion. Just click here and
extrude on this direction. First. On this direction, we
can work with a value of 60 millimeter.
Just like this. And let's do the same
thing on the left. I think I want you to
put 16 millimeter, but it's little too much. Let's walk with 40
millimeter, just like this. And frothy millimeter on
this direction or so. Let just cracked or on this area crossing these two faces. Click here, create a sketch. Activate, side view. Create a shocker. We can use the circle tool, not exactly in the middle. You can drag and move little
bit darker just here. And let's work with a
value of 26 millimeter. And with the dimension mode, you can click on this point, you can click here and you can
just lead to little space. Not too loud. You can lead to space
of six millimeter. And then finish the sketch,
create an extrusion. Click on this
circle and extrude. Whoops, it's not going
to work properly. I need to click on
this clip first, click on this circle and just
drag and move like this. But as you can see,
it's not working properly. We're having trouble. If I just click here, I need to apply cut. And even if I apply cut, it's not going to work properly. I made some mistake. I need to create
a little offset. So let us come back
with the work plane. They just come back
at this moment with the work plane creditor
little upset with move grid and drag and move
towards a grid just before. And let's repeat this process. So first things to do, Let's work on this area. Practice circle again. So we have put 26 millimeter
and enter dimension, this print to this line. And double-click six millimeter. I can finish my sketch now it's going to
work properly and I can create my two
holes on this direction. Perfect. So last thing that
I'm going to do, It's to dress credit. Liter, liter chamfer
with a pool tools. I can just click on this one. Control click on this one, and I can activate chamfer
dragon move little bit. Not too loud, just
two millimeter. Perfect. And finish the sketch. And it's okay,
we're finished for this element one more time. You can add a color. First. You have the curves here. Right-click. Remove the curves. Each time if you need to
create two components, you can create a
component selection tool. Let's select everything. Right-click color. One more time. I can use more color
and apply a gray color. Let's select this gray. Just validate.
Again, like before. Use so display panel you can
change at your convenience. You can also select
one of these face. One more time. I can work on perspective when Martina can
work on metallic. And if I want to
change the Phoenician, I can change the finishing that shaded and removes
the world origin.
64. Create storage: In this training, let's
create a storage. It's going to be a
storage with two Enders. It is interesting
because we will use different features to
create the storage. So first things to
do, it's too acidic. So top view and
credit first sketch. And in this first sketch, we will work with a soccer. So create a frost
soccer truss here. And we can increase the size
of the circle in millimeter. And let's work with a
value of 2,200 millimeter. So it's going to be
my first circular, 200 millimeter
finish the sketch. Now, the next step is to create two single day demand with a sketch or locating in a different position
with the offset. So first things to do,
click on Sketch mode again. Left-click outside
craft new sketch. And we can walk
also on this axis, but I need to credit to offset. And we can drag and
move on this direction. Drag and move in this direction. And position. A badge will position. We can move, move, move
here as you can see, and we can tap, swim
dread millimeter exact. After. To do this work, Let's create a rectangle, select the rectangle
tool top view, and create a rectangle
defined from the center. Click on this sprint. And we can extend,
extend, extend. And it's not going to be a
perfect, a perfect square. It's just going to
be a rectangle, and I just need to
enter two values. The first value will
be 400 millimeter. So you can enter 400
millimeter tabulation. 300 millimeter
exists. After all, Let's finish the sketch. I'm going to use
my law features. So it means it's a
blend features here. I can select this first phase, I can press control and
select the second phase. And thanks to that, I can obtain this result
just like that. The next step is to
click N validate. After. To do this work, I can click on the
face on the top. And we have the possibility
to create two Shen. I'm going to use this, but increase value here. Let's work with a six. I think 66 not going to be
enough for what I want to do. So I need to increase that. We can walk with 12. 12 can be interesting. I can just work with
ten millimeter. Let's walk with ten millimeter. It's perfect. I can finish
my work, just validate. Now, the next step is
to add two Enders. To Enders. I'm going to
create a sketch and create an element with a pass as
the first things to do, each, to go directly on a
side view credit to sketch. I need to walk with a different
work plane. Click here. We can select another work plan. Click on the XY plane, and just credit to offset. You can move the grid. Moves a grid, e.g. on
the left, just here. And I need to move the grid with exactly 200
millimeter like that. And after to do this work, I can select my side view and
I need to create a circle. Select the sweep Arc tool. Click on this print and you
can go on the right and enter to value about zero value, which it will be, I can extend it to
beat 120 millimeter. Left-click and drag
something like this. Perfect. Let's
finish the sketch. I need to create an
audio element because after I will work with
the Swift features, click on this face to sketch. Um, some problems
that they have. A need to Rick periods is view. So to recap, periods is view. You can project to sketch, and you can click on this curve. So now it's better. I can walk on my top
view just like this. And create a sketch. I can zoom a little
bit, create a circle. I can start from this print. Zoom little bit. I think I'm not
perfectly in the center. So best things to do, each, to create a first-line can create a line from this
point to this sprint. And then you can serve the
sand of pointers here. And you can create a circular. Then remove this element. And I can finish my sketch. F tells the next step
is to use Zoom Tool, select directly
the sweep feature. Let's zoom little bit. So the trajectory
will be this one. And then you need to
select the circle. And you can click here. And crowd lender
trusts like that. I can finish my sketch. I have this curves, drugs go right-click and delete. One of the problems. I have it. I can maybe split this one and position
on the right. I can repeat this process. If you split by dy, I'll click a target
object, this one. And silica is a character. You can select this
face, this one. And thanks to that, I can
recuperate this intimate. So this is a great
example to see different features here
we use the split Budget, sweeps, body sweep features, and also Zoloft features. So now you have this
solid number one and I can copy and past. So directly. Click on this solid. Let's first, let's validate with my selection
tool inspector. Click on this one. Copy and past, nor you
have another element. Select the front
view and drag and move on the right track and
move on to the radius here. About the dimension. I need to zoom little bit. Normally I need to enter
exactly 390 degrees. Just like that. I'm going to zoom a little bit. I think I'm not
perfectly on this area. Let's click on the top view. And I can choose
decrease little bit. Like yes, swim Jared,
89.5389, 0.50. And I can validate. Oops, let's do this again. 390, print, 50. Fun. It's not working properly. I'm going to click on this one. Acidic my solid again and try to little offset, trust to 1.51, 0.5 and stress
validate. Yes, perfect. And that's okay. So now we have created these two different
genders, as you can see. So now I'm going
to improve liter. So generally render
using my poor tools. And we can click on this one. You can see this one. And you can press Control. And you can see Xist
one also controls this one and controls this
one is different edges. And if you drag and
move like this, take your glands, we can
add some single wounded. Let's zoom. I wou I think it's
not working properly. I'm I'm not going to do is also elemental just send
time on this one, this one, and this
one and this one. And let's click here
and drag and move. And we can enter
a specific value. We can increase,
you can increase. Let's work with a value
of 60 millimeter, 16 millimeter and just validate those are
render is is really, really bad term because we can add sheriffs interest here. Perfect. For the rest I finished.
So kids are different. Runs will be about if e.g. you are the materials
you cannot do materials to have
some seem great. Well, I'm just going
to add, Carlos. I can keep this sweet
different solids if I need it. It's
not a problem. I can just go rename
and just step one. And this is going to
be my first thunder. I can tip number two. And here right-click
part number. Sweet. I followed. But every time you can
rename here dressed example, but as, as explained, you can make any things that you want on your construction tree. Let's select everything. Right-click Carlos. And in this example, election returns video Carlos, let's make some seeing, maybe not in blue. I can select every sink. Right-click, cut off. Let's just go and mock Carlos. Just make some sync with
this type of color validate. And it took it buds of you, as I explained before, you have all these
different view here. So you can e.g. remove some element
like tangent. You can remove your soft
face, you have solids. You have also silhouette, also step of things that
you can remove the other. So in telnet and here
you have also open, you can just drag
and move outside. Every show, I can remove
the world origin.
65. Create hanger: This training, let's
create two angles. So anger for dress, for clauses. So very interesting, we
need to work on sketches. The first things to
do, create a sketch. And we need to work
on the work plane. So click on Change
and sittings away, walk plane ends up
front view. First. The first things to do, each to create a
construction line, we can cost to create a
construction line in the middle. So just here, create a
construction line, this print. And we can increase
on this direction. We have a number of millimeter. We can walk, walk,
walk and walk. And we can increase with 100 millimeter is going to be
my first construction line. I can create a second
construction line on this direction. And this direction we will
have 150 millimeter exists. Another construction line, or
I can go in this direction, but it's not extremely useful
because I just need to go right-click on this
construction line and set as mirror line. I've taught one tells this
to construction line. I can create a first-line
just on this area, create a frost line just here. From this point to this point. Perfect. After the second things is to create an older
construction line. You can click here
and you can drag and move on this area and you
can enter specific value. A value would be 30 millimeter
and you can press Escape. Let's use sweep Arcturus, sweep Arc tool, and
select the center point. You can go on the
right and enter into value and you can create
a circle just like this. I think about position
on the circle. I'm liter, liter far maybe I can do this again,
dimension tool. Here you have normally sati, but I'm going to make adjustment with 20% will be better,
but it's a renter. And let's walk again with
this tool. Click here. And Gonzo, right? Can just enter a value
of 60 millimeter. And we can turn just like that. After to do this work, we can create a line, truss here, critical
line and we can extend with a specific value. So value will be sorted
millimeter and then we can just recuperate this
part just places. And after I can make
adjustment, select credit, wounding kroner feature,
select this line to this line, and we can activate a radius. But the radius 50
millimeter exists. I can also create maybe a
small curves on this area, but I will remove the cost
construction line after Salma can activate to value
five millimeter. And just click here
and click here. 15 millimeter. Perfect. We can remove all the
construction line. Just go right-click, delete this construction
line, right-click, delete this one, and right-click
and delete this one. So next step is to add a fill it with my wounded kroner
from here to here. Let's increase a little bit with a value of 20 millimeter. And it's perfect for base of
this element of this anger. Finished the sketch, was the next step is to
create an extrusion, but on the two sides. So first I can use my poor tools and just go in
this direction like that. A badger value, it will
be your bed to evaluate will be six millimeter here. And let's repeat the
process on this direction with six millimeter or so. Just like that. After I need to create an
element on the top. So first things to do, Let's create a new sketch. We can work on the z
axis on this swap plane. And credit to offset. You can move, move,
move, move, move. Not exactly on top. You can, you can continue
after crowd phrase on per 160 millimeter here
and activate the top view. Let's create a circle after I
will use the sweep feature. So for scratches
circle with a value, let's work with
eight millimeter. Finish the sketch. And I need to credit the past. So to crowds opacity, create another sketch,
this time on the y-axis. So why walk planes
selects a front view. And I can start my sketch
directly from this part. Click on the Line Tool,
create a first-line. Can increase. This first line will
have like 20 millimeter. And after I can create to knock. But I think it's not 20
mm, little too short. Let's do this again. And let's work with a yes. So two millimeter. The next step is to use a three-point arc credit
for sprint. You e.g. you go in this direction, you can craft a second print and you can create
an arc like this. But the aim is to try to
find something convenient. I think, sure it's
nice and reduce. I think it's a little too big. Maybe I can redo, it's
about zero radius. Let's redo it's little bit
sati millimeter tabulation, 270 degrees tabulation. Let's try to do this. I think it's little bit again, 270 degrees millimeter radius. If I just press Escape, maybe I can make some adjustment.
Yes, trust like that. Maybe I can drag and move. I can put a little
bit on the direction. Yes, I think it's nice
after the next step is to add a rounded corner from
this line to this line, I need to make some adjustment. Budget dimension around
16 will be perfect. And I can just finish the
sketch and we look down. This render applies
us with features. I have multiple scenes here, the curves that we have,
right-click and delete. Oops, don't delete this one to address these features
that I wanted to remove. Yes, it's okay. I can press Delete
settings or poor tools. Activate sweep features. First you need to sleep
the trajectories, this one, you can press shift this one and this one,
or it's too easy. So again, this one, control and control, yes, it's better not shift control. Click here, select, and
click on the profile. And after I can continue
on this direction, alright, It's not going
to work properly. I'm going to do this again. Let's select tool, activates the sweep features
trajectory, this one. And I can press
control the effect. And now if I click here, I can select the face, this one. Full program. Now it's better. And I can just finish and validate a bunch of
curves or right-click, Delete, just put this
element on the top. Ceilings are saying on solid, move tools front of you and decreases in and change the value you
can drag and move, just go lethal inside
like this, it's perfect. And I can validate. We can keep our
element in two-body. I think it's a bit tough for the simple reason we can
apply different color fast. So first I can stick this
solid with my selection tool. Right-click, and I can
apply color and I will apply directly on
the solid molecules. Let's work with brown
color like e.g. this one validate and now I
can select the second solid. Right-click. Color and shape will be something
more with metals. So I can click on this
one just like this. A figure, It's not enough dark. Let's click here
again, right-click. Color or let's see, Lex
is great, it's better. To finish my work one more time. I can go into
display panels and I can change e.g. perspective. I can change and Shadi
depending of what they want. And if I click on one of
these face, it is the same. Hey, I can make some sink
like plastic. Just like that. If I click on one
of these faces, a second solid, and I can
apply metallic solids. So on the first you can
apply plastic on the signal, you can apply metallic.
66. Create vase: In this phase, we will work in different sketches and
for different sketches. And then we will
use this feature, the feature to be able to create the model for
us things to do. Let's grab the first sketch. So first sketch we
need to work on to z plane crashed to sketch. So top view. The first sketch
will be a shocker. Applies the circle tool, just go on this center
point and craft a shocker. But the size of this circuit, let's work with 40 millimeter
and finish the sketch. We need now to create a second
sketch with offset plane. So first create a sketch again. Click outside and activate, select New Sketch Plane. And you can credit to offset and drag and move
on this direction. Let's drag and move
with 60 millimeter. Let's create another sketch. Select. So top view. This time we will work
with a rectangle. Click on the Rectangle tool. Define rectangle from center and credit to square
with two value. A budget value we can work with 80 millimeter
by millimeter, eight millimeter,
and a t millimeter. Like this. I can
finish my sketch. We need to create another
sketch with offset walk plane. Sketch mode. Click outside. Credit to offset
of the work plane. If you want to credit to
offset from zoo rectangle, you can click here. Click on this face, it's better. And now you can
credit to offset. The offset will
be one more time. Let's walk with 40
millimeter truss here. I'm not 40 mm, 16 millimeter. Let's do this again. 60 millimeter. And I'm going to
create a circle on this view circle tool. And create a circle with a smaller value,
only 22 millimeter. And finish the sketch. Now I need to credit
my last sketch. Click on Sketch mode. Click on this work plane first and credit
to offset again. Move green. And
this time we will move only with 40 millimeter. That activates the top view. And I need to create
another rectangle. Click on the Rectangle
tool defined from center. And let's create two
smaller rectangle with just two value. Budget dimension, 28 by 28
millimeter. Finish the sketch. So now it's perfect. I have my first sketches on
fraud, different levers. I can use these features,
blend features. It is like a love feature. I prefer the word
loft and click here. You need to select the different sketches
in the right order. So click on the
first phase control, seconds of phase control, such your face control
Francois phase. Here you have a
rotational brand planned, periodic blend, and you
have a good segment. We're not going to
activate any things, just keep the basic parameter. The next step is to complete. And thanks to that, I can
create this vase with different type of sketches
using these features. Now I need to create, to share. So to create two shell as, as explained before, just
use the shell features. Click on the face on the top. And now we can
apply a value 1 mm. Maybe I can walk
with two millimeter. Let supply to and click
to validate your feature. Now as a next step is to
just to play your color. We're finished for the
creation of this vase. Just you can select one of these face or you
can select every sink. I think it is better. So select, use your
selection tool, select every sink and
right-click again. Hello. We have multiple options. I think I can work with
something like in gray, but you can work in multiple colloquium on
to work with orange. You can work with orange. If I sell it again, every sink right-click color. You can also change the opacity. So it means you can decrease the opacity and
transparency inside. Let's select a racing color
on trust Rick periods, maximum of opacity first
and right-click color. Let's walk mall
with a gray color. Let's change the display, activate and
unshaded, I can walk also with the
perspective view exists. If I just come back
to shaded option, select just one of these face, I can apply metallic plastic. Let's apply metallic and then
finish and I gloss is that. I can also work with
transparent sometime it can be useful if
I create a vase. This one more time
you can click here. You have also multiple options. You can remove the tension, just shocked face solids here it's not going to
change a lot of sin, but sometime it can be useful. So it's okay for the
creation of these ways.
67. Create book: In this training, we're
going to create a book. So the most important things
is to create a sketch, to create a base. For this, I can use
the sketch mode. And let's change the work plane, activate silicon
new sketch plane, and welcome the y-axis. First things to do, Let's go into front view and Krebs obeys. I'm going to directly
create a construction line. So click directly on construction line and create a construction line
in the middle. So next step is to go right-click to set
as mirror or lines, or right-click Set
as mirror line. After. To do this work from this part, I would like to create a path of circle and I can use
a sweep Arc tool. But before to do this work, let's create a first-line. I can zoom out and create a
first-line from this area. And I need to extend. If it is in millimeter or
let's increase the size and let's work with
116 millimeter. Just press escape. The next step is to
enter a dimension between this line and
the construction line. Here we have just
six millimeter. It's not enough. So I need to increase
with 20 millimeter. Perfect nose. The next step is to
use the sweep up to credit first point
here and go in this area. And you can just create
two clusters of circle. And you can just close the path. After I can create an offset, lets use the offset tool
and click on this line and you can drag and move
inside and above X2 value. Let's work with 4 mm. So you can create an offset with four millimeter
with your line tool just close paths from this
point to this sprint. And you can still exist
print to just this print. Perfect. After the next step I can
press escape and just click on my construction line and right-click Delete
reconstruction night. I think you can also
use dress process cabs. A construction line is here,
right-click and delete. So normally you need to
create this type of sketch. And after I can
create an extrusion, so finish your sketch. Click on the profile and create an extrusion
and this direction. But the dimension, let's
work with 240 millimeter. 240 millimeter. So perfect. We have already this bass notes. The next step is to
create another sketch, this time on this face. So click on this face to sketch. Let's zoom little bit. And just things that
I'm going to do each to create a rectangle directly. Click on the Rectangle tool, start from this point. It will start from this sprint. You can start from this point of first
rectangle on the left. Here we have 120 millimeter. You can redo it with
116 millimeter. And let's repeat the
same thing on the right. And 116 millimeter. Press Escape and delete
with a trim away tool. And this line exists. And now I have this new profile. Finish the sketch,
critique and extrusion. So click on the profile, create an extrusion
on this direction. And if I go out to the maximum, I will have 160
millimetre just here. Let's do this again. I'm going to show you, go on this view,
zoom little bit. And here we can have 160 mm. So I'm going to redo it
with 156, 156 millimeter. The next step is to
go with this tool. You have a dimension tool. When you click on the dimension tool,
something interesting, you can pick up a line, I can pick this line. And after if I
click on this line, I can drag and move
again something. And it's interesting because
I can enter a title. So I'll go here
and double-click. I can tap just title. And if I double-click here, I can change with
a different size. If I want fries on per eight, I can tap eight. Let's step eight and
just press enter. I think it's too small. Let's tap 20 and increase. You can also change the
font family, this area. Let's work with a different font family.
Let's see leaked. I can continue. Let's e.g. this font family. I don't like too much. Let's continue. Yes, this font-family,
it's better. I can extend a little
bit on this direction, but it's not going
to change a lot, but I can increase my size. And here I can reduce also. If you want to move,
you can take an element and you can drag and
move on this direction. Perfect. So now I can validate
and as you can see, we have this title element. Now is the next step is
I click on project here and you click on slick one or more faces or
line to project. If I just click here
and just go on, Validate and just continue
with my move tool. Whoops, let's click
here and drag and move. It isn't going to work properly. Because first I need
to create a sketch. So click on the Sketch mode, select this face like this. And now I can create
two projection. I'm just going to come
back just before. Yes, Let's come back
at the moment where I apply my tighter,
just like this. And let's do this again,
uses Sketch mode. Click on this face. Just like that. The data is literally bigger when you click on
the Sketch tool. And you have possibility to
click project to sketch. You can click here and automatically you will
have a projection. I can finish my sketch and
now you can find them. Here. We have the title. We have this annotation and some things that I
can do it to delete. Now I finish my book. I have a notation plane
right-click Delete. I can just add some Carlos. So first I can select everything with my selection
tool or right-click, and I can apply a color. Let's work with basic color. So red color for
every scene first. And then I can apply
different color on faces. So click on this face, press Control,
click on this face. Let's turn on again, control click on this face. Click on these three phases
first, and right-click, Color and activates or waste
quota. Just like this. One of the problem is I observe y square law on also element. If I go right-click color
because I was on buddy, I need to change for
phase and activate wise. So now it's going to be nice. And I can repeat the process
for all these faces. So sittings of frost
later controls the signal just sounds of four
and the fifth liters. Right-click again colo and activate a wise color like that. Thanks to that, It's great
for all the base or you have the red color and for the rest of paper
and also the title, I have the waste color. Like every time you
understand the process, you can improve the render. You just need to go on display. You can change
perspective October ethic after in this example, it's not most 3D modelling, so it's not very improtant onto to change if I want to have something metallic or plastic because it is little different.
68. Pipe modeling part 1: In this training,
let's create two type. We are going to
create elbow pipe. So it means with a curls and we're having to
walk on sweet element. And then we will combine
element in just one. So the first things to do we
will use the sweep feature. This is a reason for
which I need to create to sketch first on the z axis
and ceilings with Tokyo. After, let's use a shocker tool, let's create a soccer. But the value, it's going
to be 40 millimeter. And finish the sketch. Now at the intersection, I need to create
an another sketch. Select Sketch mode again, and just change the work plane. Click here. Chances are what plane? And we can work with x2, y-axis, just like this. Nclex or front view. Let's create a first-line and sit exists line increase,
increases size. This it will be 80 millimeter. And we can go in
this direction with 90 degrees, 80 millimeter. Also, I can press Escape, just add a curves with my tool and just use Socratic
are indeed corner tools. We need to create a curve
with at least 40 millimeter. 40 millimeter will be perfect. Cut. Just this line. I've taught to do this
work for you to sketch, we can use Swift features. Pull tool first, activate sweep. You need first to select the trajectories was a tragic
story will be this one. You need to click control
this one and this one. And now if you go on
your selection tool, you can select the face that you want to use to follow the path. So click on this face. And after just use full pool and you can
follow like this here. So it is something
extremely, extremely useful. You can also, if we can make something
a little different. So it means I can just
extrude another edge. So I can click here
and click on the edge. And thanks to that,
I will work with the surface just like that. And I think it's
going to be better on because after I
can add sickness, then on the curves, Delete. So now I have the base but
I need to add sickness. So acidic, all the shore face, User Pool tools
and left-click we can extrude outside or inside. Let's walk inside and activate value of six millimeter. Lexis. This is my first, this is my first element. One of the problems
that I have here, if I make an extrusion, It's not extremely, it's
not extremely good. Let's click here.
Click here. Here. I can create an extrusion. Yes, trust more inside with six and I can press
Enter validate. Yes, Now it's better.
I am my shelf phase. This phase where I click
Delete to only keep the solid. Now click on this face created node or Sketch, Sketch mode. Nclex, the side view. And we're going to create
two new element with a first self-care translates
this second circle, I would say the second circle, we have bigger R value and your sequence will have a
value of 70 millimeter. I can finish my
sketch just here. I think I made a
little mistake because here I'm going to create
an extrusion on this part. If I remove this one, I think it's not going to
be extremely convenient. So let us come back and create a modification
of the work plane. Activate, move grid, just move little beetle need
20 millimeter, that it will be better and
I can repeat the process, select the side view,
credit isochore. So first from the
center point until this area and create
two Sig on soccer with a value of 70 millimeter. Let's create an extrusion. Create an extrusion here. But the value, let's work with eight millimeter, like this. Perfect. Now I need to create different
odds on this face. Click on the face
to sketch again. Let's activate the side view. So first things to do, It's to craft to
construction line. You will understand why. So click on the
construction line, start from this point and
just go in this direction. You just need to enter
exactly 45 degrees and create a second construction
line for this print and enter 45 degrees. If I go right-click here, set as me or online, right-click here, and set
as me or lying or so. Let's click outside,
right-click Set as mirror line. With my circle tool, I can create a circle. I can start to round this print and just create a
circle with ten millimeter. But let's walk more
from this point. Let's create two little upset. I think it's ten millimeter. I need to see on the other side, if it will be great. And I think tends to merge. Let's work with
eight millimeter. And thanks to that, I can repeat this process on this part. Here. The important point is to create to know doc
construction line. I can click here
and credit to know doc construction line
just on this area. With my circle tool, I can create to know
the asha Code of eight millimeter dress here. Perfect. Now the
next step is to, here you can find element and I need to credit
that dimension. If I use this
construction that you can check that from this part to this part we
have exactly 25.46. So if I create another
construction line, I can go here and I can tap 25, print for T six, just legs up. Automatically. I repeat
the process on this area. And I can credit first-year
characters here. And I can have on each
direction eight millimeter. It's a little difficult
to understand, but it's in proton to apply different symmetry lines, lines. I've taught to do this
work, It's perfect. I can finish my sketch. I have multiple curves. Just go right-click
and delete two curves. Now let's create two
different parts. I need to select a directory here you
have a shocked face. It's not useful. Just delete, right-click delete, and select all the faces. Are the circles on the face. Let's create an extrusion. You can go inside like this Cretan extrusion
and just validate. So it is perfect.
69. Pipe modeling part 2: Let's continue with secretion
of this pipe and pipe. So now I have this new
element and I'm going to put this element
along this face. So just use the Move Tool
selected to sit on solids, go on the front view and
just move with our tools. To just arrive on the face. Budget dimension, I
need to move with 20 millimeter, exactly
20 millimeter. Now let's copy and paste. Click on this solids, activate, Copy, and
then activate past. So now I have a new solids and I can move this solids
also in this direction. Credit rotation with 90 degrees. And move with these tools. Move this with this
arrow just directly. You can arrive at 84 millimeter. Now it's the next step is to
select another type of view. Share can walk on
this front view and drag and move
on this direction. I will apply exactly salty, sweet millimeter legs out. And I'm going to check
if so T3 is great, but yes, so T3 is perfect. Let's do this again. So this way, it's okay for that. Why I created different
solids because it wants to be able to create this part and then move
this part on this area, because it will be very difficult to repeat
this feature just here. We'll have to do exactly the
same work so it can be long. So this is why I work with
three different band, but now I can combine the object settings
or combine tools. And I can select this one. Then I can click on selling body to merge this
one and this one. And now I have just only one
solutes, as you can see. Perfect. This is my pipe. I can press escape and just increasingly
turned my render. Here. Maybe I could position the
circle a little outside, little more on this edge. It's not a problem you have. Understand how to works. Let's use support tools. And click here. And let's work with
a specific value. And I need to do this again. Let's zoom Nutella root. Yes, perfect. I can work with
swimming limiter. And I can click here also. I can work with just
1 mm like this. I can repeat this process and
this area here only 1 mm. And let's apply swimmingly
meter on this one. So it's looking
for this creation. Last step is to
apply your render. So like every time I can
use my display panel, first let's add a
color selection tool. Select everything. Right-click color. In this example one more time. So gray color, light, metallic gray color
will be the best. So I can use mouth activate like this type of gray colors
is one and validate. Just like this. I can continue
with the display panel. Let's change for perspective. I can remove the
world origin first. And that can change graphic
and enchanted if I need. If I click on one of these
phase change for metallic, one more time I can use finish
here, your prime metallic. But finally, I can work
with a plastic elbow pipe, so I can walk with plastic, which is great also. And if I click on this phase, finish, this Medium Gloss,
I think it's great. Factions graphy,
come back on shaded. Don't forget that you can
split the review if you need split for view Viewport. Let's look to again. Can e.g. work more on a view
like this here can work more on font
view, on this RER. Let's work with a
different view. It can be a side view. And on this area can walk
like more isometric view. So you can work
on multiple view. When you separate, you split your main window in
different windows. Ladies.
70. Spatula modeling part 1: In this training we're
going to create a spatula. It is interesting
because we will work on different features of phase, but we will work also unloved
and different things. So first things to do
to create this spatula. It's to create a sketch. Ceilings are top Work Plane
and activate this view. And credit. First, create two symmetry line. Click on symmetry line
just in the miter, right-click Set as
mirror line and create a first-line from this point when we can extend
on this direction. Budget dimension, it will
be 40 millimeter like that. And after I'm going
to extend also on this direction,
entering two values. So I need to enter
exactly to value. The first value will
be 100 millimeter. And I can press tabulation and
I can work with the anger. So angle will be 110 degrees. After I can continue to line, just come back here until red axis and I can press Escape. I would like to add
little rounded corner. Select the rounded corner
of tools. Dress here. Click on this line, click on this line
and we can work with just two small value
of four millimeter. And I can repeat the
process also on this area. But they have already
my symmetry lines, which is perfect. I can just go right-click and
delete this symmetry lines. Now I can turn this. Next step is to finish the
sketch just like that. And I have a shocked
face. It is perfect. This is just that I want now. I just want to have a Sha face. So now I would like to
create something on the down direction and it's important to
follow this step, click on the Sketch mode and
work on a different axis. We can walk on the x-axis here. And we need to use this
view and to critique the line a little bit on the
top I can create two line. Drugs go in this direction and cry to construction
nine first, on this area we can extend, you can check where we are. Just here. I can just extend with a
value of 30 millimeter. And now we look
turn this result. But one of the problems that
I have I need to create to offset of my planer.
Just like that. I'm going to come back because
it's not extremely good. Just come back before
the construction line and credit to offset
with move creed. Credit to offset
on this direction. About two value of upset, I'm going to give you
a specific value. You can drag and move
on this direction and enter a specific
value of 30 millimeter. And now I can walk here. I can select my top view. So credit to
construction line again, construction line
from this sprint with certain
millimeter like that. I think certainly, definitely
is little too much. I wanted to create sati. But finally, I'm going to
change it on my plane. 20 will be better. And I've taught to do this work. You can set as
construction line. You can set a symmetry
line right-click Set as mirror line creates a line
just on this direction. And not a lot of glands here. We have ten millimeter. Ten millimeter. It's not enough. We can extend a little bit. Let's walk with a 20 millimeter. So I can walk here
and 20 millimeter. And I can press escape. Perfect. Finish the sketch. So after we have this line
just position on this area, I can remove my curves
with Delete. Whoops. I will remove the curves after, because first I need
to create to loft, use the love features and click on this line
first press Control. Click on this line, also, just like that. And I can click on
this line also. And thanks to that, I can create this new phase with
just an inclination. Perfect. If I click on these curves,
right-click Delete. Now I can delete this element. Now, the next step is
to use again Zoloft. For this, let's repeat this type of feature credit to sketch. The sketch will
start on directly, so x, y plane but Creighton offset create enough
said dress here. About the value observed
set here we create an extension with
first sati millimeter, so we can repeat and arrive at 60 millimeter, just like that. And I need to create
another line. Click on this View. Smaller line, just
adjust same leavers. Click on the line tool. I'm not going to create
two line of symmetry here. It's not extremely useful. I can just create some sink
like yeah, we'll have 20. Yes, I'm going to
create ten millimeter. Perfect. So ten millimeter on this
side, first, press Escape. And ten millimeter on the
other side, like this. And I can press escape,
finish the sketch. So now I need to create to
loft again silica blend. And I have this element is
this edge, but I can delete. It's not useful. No ceilings or blend feature. Click on this line control and click also on this
line and this line. And just validate. Oops, let's do this again. Click on this line,
this line and this line, and just validate. Now I can remove this element
with delete. Perfect. So I created this first part. It was little long, but it's M proton to respect
this process. Now let's add just two
liter per liter sickness. Click on Support Tool, click on this one. Control click on this one. This one we can create small extrusion with a very
small value addressed 1 mm. Just like this.
71. Spatula modeling part 2: Let's continue with the
creation of this spatula. So it's things that
I'm going to do each to crunch through ender, to crush the end of the
first things to do. It's to create a new sketch. And let's position to
sketch first on this face. And just create a small offset. Click on the offset tool. You can drag and move
until 20 millimeter. And I can position
directly on this side, you create a rectangle acidic. The Rectangle Tool defines this rectangle from the center, defined rectangle from center. And you can click on
the center point here. After to do this work,
Let's craton element. Not too too big. We can enter to value.
As you can see. The first value will be 26, and the second value
will be 16 millimeter. 26 by 16 millimeter. At the same time,
I'm going to add rented kroner directly
on my sketch. So let's zoom little bit. Click on Arun did coronal seal
exists line to this line. Let's work with four millimeter. This line to this line, 4 mm, this line to this line
from millimeter and knees, this line to this line from millimeter, finish the sketch. Credit to an extrusion. So click on this part. Credit to an extrusion about the value of the
extrusion and need to work with almost 200 mm. So I'm going to click here and just work with yes,
200 millimeter. Perfect. So now I created a new solids. The next step is to
click on this face, create a sketch,
select the top view, zoom little bit on this area. You can just create a
construction line around, runs this part can create a
construction line and apply your distance with
a dimension tool from this line to this line. Let's walk with 20 millimeter. It will be perfect for
what I want to do. The next step is to create, to save on construction line
just here with a new hall. Features right-click
Set as Mirror Online. Use your line tool,
create a first-line. Here. It's well squeeze
six millimeter. And it's continued
to nodal line on this direction with
exactly 30 millimeter. And just come back here. One more time, I can
add wounded Kronos. So click on these
features craft. When did Cornell's? And I can apply for millimeter and I have
my symmetry lines, so it's perfect for me
tomato and validate. All in Zoom either just
here and validate. So now the next step is to
drag and move this solid. First, remove the curves
Texas solid element, and use the Move tool. Select front view, and
drag and move the element. You can drag and move
inside the distance. You can just arrived when
you arrived, just here. Just pull little
bit on the left. Just put a little bit on the
left and it will be perfect. Just like that. Maybe it's a little too much. I'm going to do this again. So I had this position, I can dry and move here you
have exactly 20 millimeter. We can apply 20
millimeter, exactly. Perfect. Now, crowd
just one element with these two solids
applies to combine tools. Click as a base
will be this one, and click on Plus. We can see ender and now
we have just one solids. If I just click on
this area can lead to improve with phyllite. Click on Support Tool, click on this line, and let's apply a fill
light on this direction. Four millimeter. Let's do
the same thing on this area. You can tap four millimeter. If I arrived here, I can also apply your
little ticker glands will be better but to render. And I'm not going to
arrive on this area. I think I can extend little bit. It depends of what
you want to have. So yes, I think I can extend a little bit. I can click here. Let's walk with ten millimeter. And I can go in this area. Let's repeat the same
thing, ten millimeter. So it's perfect. If you want, you can continue your feelings. We can also try to create
some similarities, but definitely, I think
it was perfect here. Let's go also on this area. You can select this
face and you can drag and move here with
four millimeter. Can select this edge and
drag and move here also with four millimeter is. Why not here to make
something like that, but I don't like too much, so I'm going to stay here. Perfect. We're finished the
creation of the spatula. So next step is to apply colors. Because I have just one solid. I will separate two
types of color. Selection. First, create
a frame of selection with the selection tool
and create a frame of selection on all this area. I think it's not
enough. You can see leaked or this area
just like that. And she I would like
to I would like to have some sink like gray metals. So right-click first color. Select Mock color. Let's work with this type
of gray color. Validate. Perfect. And for x2 Enders, I can change the Cloud so
I can click on this view, creates a frame of selection. Just here. Are just a frame
of selection, yes, only on the ender. Right-click again, color. Let's make some sink would then enter, activate, basic collapse. Let's work with a brand color. Ma Carlos. And let's see leaked yet, just something like this. Perfect. After the ponding of
what we want to do, we can make something
here made wood, or we can just keep
this metallic. It depends about
what we want to do. Let's finish with a render. Go directly on the
display panels. One more time. I can
try different options. If I select this face, I can just change first. I can change for
perspective everything. If I select this face metallic. Just one of the problem is
I will have metallic on also element select t is
just one of the problem. If I go directly
on the side view, on the front view, and I select all this
element like that. Yes, Just here. And I work with metallic. Metallic will be applied on
the two on also element. If I don't want to have this, I just need to separate. So ender and this
one, and this part. It's possible and
you can come back on solid modes designer. And if I need, I can use split buddy. And I can select this one, use the split tools here. And I can separate
into element separate. Notice here's my solid one
and this is my solid tube. Now on my solid number one. So it means this one can
use my selection tool. First. Click on this solid
one, right-click Carlos. First I can select again. So carlos, like this
type of Carlos. And if I need now I
can edit my elements. Display. If I click
on this part, I can change for metallic, so I can just use my selection tool or
it's not truly good, Click on this face, just change for metallic. And if I click on this
part, just change e.g. plastic. But sometime it is
not extremely convenient. You really need to separate
the two element of here. Maybe I can adjust, put this part in Braun. Maybe it will be bitter
and right-click Collapse and remove corals overall and recuperate this in
Brian. Just like this.
72. Towel handle modeling part 1: In this training,
we're going to create a tool will enter toward enter an order extremly
interesting Antares team training to see different features. So first things to do
we're going to credit the left part is that we
will fix on the world. And for this, I can
create a new sketch, select directly new
SketchUp plane, and I can walk on the y-axis. So now the next step
is to grunts or left. I can use this tool construction
line and go on the left. We can enter a specific value on the left and walk
with 300 millimeter. 300 millimeter. I've taught to do this
work. Let's crack to know does construction
line here. And we can drag and
move on this direction. We're going to move with here we have just frothy
millimeter we can extend because we need
to have some simulator longer and 60 millimeter. Perfect. I can also create another construction
line on this area. Net scratch also 60 millimeter. Now let's apply symmetries. Can press Escape first, right-click on this line
set as mirror line, right-click on this line
set as mirror line. Next step is to create a
first-line on this area. We can go here and
create a first-line with 40 millimeter escape. Create two sig online
home this part and 40 millimeter exists. And now we can just go on
this direction just here. And zoom is to create
some synergies, but I think something is wrong. She has this line
is not enough long. This line is little too long. I don't like too much. I'm going to come back,
click on this line, delete, and let's create a no
dark construction line but little smaller. Not 60. 60 is
definitely to match. 40 will be enough. So let's do this again. Right-click set as me. So it's okay now let's
create a new line just here. So let's reduce to directly
certainly millimeter. Let's create a second line here with 40 millimeter and I can just close the
past, perfect. I can press escape, use directly my
tangent arc tool. And I'm not my tangent cartoon crowdfunded crony of tools. And we can apply a small
value, six millimeter here. And just on this area. Let's work. I think I can create
six millimeter. Let's see about yes, I think it's not enough six
millimeter on this area. Let's use this tool again. Dress here to here. Let's apply 20. Yes, it's better. Now let's create
the first circle. Click on this circle tool and create a frost
circle around this area. Here, just Faso example, we will create a big
circle in the middle just after with a value
like 40 millimeter. So just on this area, if I click on this construction line from
this point to this point, I have exactly 40 millimeter. So this is why I need to create a new dog
constructor in line at 20 and practice sector
at 20 millimeter. We can apply 16 millimeter
here and 60 millimeter here. So next step is to
remove this part, to remove the circle in
the middle, press Delete. So I've taught to do this
work, finish the sketch, create an extrusion just on, just on this direction
onto back. It's better. You will understand why. So credit to an extrusion with ten millimeter on
the back exists. Let's come back on
this face to sketch. I will crash your sketch after. So let us come back as the
things that I need to do. It's to use these curves. Right-click Delete, uses of
phase, right-click Delete. Copy past, click on this solids and activate
cookie is then passed. And then the second solids we can credit to offset
with the move tools, sea legs, the front view first, and craton offset
on this direction. Offset will have to be
exactly 600 millimeter. Yes, 600 millimeter. Just like this. Here to here. 600 millimeter. You have these two parts. I can rename it if I
want path number one. And here I can rename
part number two. After the next step will be to use directly
the sweep feature. So we'll create a
circle on this area. Then on a different sketch, we will have to create a pass. And then we'll be able to follow the path to create a
2-bit, to create a tube. And it's extra
ammonium proton to respect these different
center point axes. Because thanks to that,
it's so much simpler.
73. Towel handle modeling part 2: Let's continue with
this tall Enter. So the next step is to
create, to sketch directly. So first let's create the
base of the Swift features. Click on this face, sketch mode, select
directly the front view. Let's zoom little bit
credit to soccer. Sit exist sprint receptor
will be 40 millimeter. I can finish my
sketch and extremely important to create
another sketch. Click here, we need to
work on the z-axis. So cities are z-axis,
perfect and activate. The top view I
need to create to, to create two little line
perfectly in the middle. So the model will be here. You can find the two-point
and credit first-line. We can extend, extend, extend, and we need at least to
apply 200 millimeter. The next step is to come back on this direction and
continue, continue, continue, activate
600 millimeter, and then come back. Normally we arrive perfectly in the middle here like that. And I can press escape to have a better render
because we will try to choose activate a
small rounded corners from this line to this line. I think we can work
with 40 millimeter. And I can walk out of here
with a value of 40 millimeter. Finish the sketch. The next step is to
apply the sweep feature. Tools. Activate sweep. We need for us to
select the trajectory. So click on all these
line with Control. Click on these different lines. Effect. Then with this one, select, you can select one or more face and it just going
to be this face. And now if I click Full pool, I can create this
render, just accept. But one of the
problems that we have, It's not extremely convenient
because if I extrude here, I'm going to have this render. So you need to change
sweep and you can just only applier H. And if
you just apply the edge, it is definitely better. And I can click
here and validate. I can see my charles
right-click Delete. And this shocked face, I need to convert to a
solid just to apply. So pull tools and we can convert to a solids
but just go inside. You can enter. I'm going to show you again. You can click here
and you can just go inside and you just drag and move little
bit and that's it. We have a solid, it's perfect. I've taught to do this work, I need to create a second tumor. So to create a single tube, they're just create
a new sketch again, select another type
of work plane. We can walk on the x-y
plane truss here is a side view and
we need to create two circles about superposition. If you just create a
construction line, you can realize that from this point to this point
we have 180 degrees. So I can create a
construction line in the middle, 90 degrees. With my circle tool. I can start from this
point and I need to enter dimension 40 millimeter, and I can finish my sketch. Now, the next step is
to create an extrusion. I can click on the profile and just extrude on this direction. And we can apply 300
millimeter, exactly like that. Now, let's select the top view. And I need to repeat the
process on this direction. So I can click here and create an extrusion 300 millimeter. This is why it is important to respect directly
the center axis. Because after I t is so much simpler to create your design. I know it's okay. I
have this first tool, but you have this single
tube and everything is nice. I have a curves here,
right-click and delete. The next step is to just
change the display. So first I can
select everything. So select every sink with a frame of selection using
your selection tool, click on every
single right-click, and color can be
one of these color. One more time a finger
can apply gray, but why not to try
with white-collar? One of the problem when you
apply is a waste color. If we don't, we don't observe
feeling to really avocados, he saves a problem
to have y Scala, Even if I click on this face and a change first perspective. And now you apply
plastic, definitely, I don't see too much my element. Let's work better with a
metallic, metallic color. Designer. And select everything
again, right-click. And I can walk again
with a gray color. I think it's not enough. These gray color is nice enough. Let's select again,
right-click colo, more colors. Let's make something
a little darker. It is now a bitter, and I can use my
display mode again. Hence it is exactly the
same change shed heat, e.g. click on one of these
phase lead, just apply. Metallic and a bunch
of Phoenician, yes, this type of finish, and I think it will be great. So this is another
example about what you can do in Jesus
back mechanical. You can create different
type put paths for printing after a few need. You can also just using
a 3D modeling software. It is also useful.
74. Potting table modeling part 1: In this training
we're going to create two potting table
putting table creation. So first thing is to
do, it is interesting. If we want, we can just go on file and we can find
design spark options, finer design spark options. And if we walk from unit, you need settings for this
document, we can change. And in this example we will
change for centimeter, it will be better. And I can just validate. So I've taught to do this work. Let's create two for
Sketch, Sketch mode. Just select the top view and
credit to construction line. So create a first construction
line on just on this area. Exert best things to do. It's 20 on directly
specific dimension for my construction lines. So just to add a symmetry, I don't need to apply a specific dimension
just created for us construction line just to say gone on this area and we can go right-click
Set as mirror line, right-click, set
them as mural lines. So next step is to create a rectangle and define
rectangles from center. And I can create
something like this. And we are working
in centimeters. So I need to increase
work with two values. The first value for
this particular table will be 100 millimeter, and the second value
will be 60 millimeter, 100 by 16 millimeter. Some things that you can
do that we didn't see is when you click
on this element, you can convert to a construction
line if you need a van, if I'm going to stay like this. The next step is to
craft your feet. So click on the rectangle tool. First rectangle here. With 6 cm by 6 cm. Automatically, you can have exactly the same on each side. You can just check this
with dimension six. And here you can check six. Next step is to trim, trim away. I can see leaked. I can see this line, this line. And something is wrong. If I just trim this one. I have coincident constraint. So one of the best things
to do it just to come back, I'm just going to
come back here. Dressed at these levels and
convert to construction. It's going to be
better so I can create a frame of selection
just like this. If I go right-click, I can convert to constriction. So I can click here. And construction click
here and construction. Click here, and construction
and dress click here. And construction. I think definitely
it will be better if I create my rectangle. I can enter two specific value
one more time, six by six. If I press Escape, I can select this
construction line or remove, remove and perfect. Finish the sketch first, Crato and extrusion
of each element. You can press Control and
credit to an extrusion on this direction with a
value of 80 centimeter. So now I have four solids. It is every time
my different foot, I can remove the curves. Right-click Delete. Next step is to
create a new sketch. And the signal sketch
will be on this arrow. You can click on this face. Sketch mode. Select the layer
view. Just like this. As you can see, a rectangle, you can create a rectangle
from this point you can snap. And we need to enter two values. The first value will be 48, just to snap here. And the second value will
be just four centimeter, 48 by four centimeter. Finish the sketch. Let's create an extrusion. Just like this. I can create an extrusion here. But if I create an extrusion, I will be directly on this area. One of the things that I can do, it's that if e.g. I. Remove this one, I can only click here, create an extrusion
with six centimeter. Now I created a new
solids and I can recuperate your view of the
different solids like SAT. But I can create a new
solid, it's better, we'll work with
different products. So next step is to copy
past acidic this one first and copy and past. I've taught to do this
work on the side view. I can zoom a little bit and drag and move
on this direction. So I can move little bit and drag and move on this direction. So select first this solids. Cdc is this one. I need to select
the right solids. Yeah, it's this one.
And copy and paste. I feel I didn't copies.
Alright, solid. So I'm going to come back
first and still exists solid. Copy first and then passed. Now I can click here, drag and move on this direction. It's not really good
because I'm using support tools that
use the move tool. It's better and drag and
move in this direction. Dimension. I can move not exactly 48. It's little too much. I can drag and move with
38 centimeter like that. So now I have this
element and this element. So I need to click
on this one and I need to click on this
one, these two element. And this is the
same things to do. Cookie first, En Zen past. Let's select e.g. the top view. And then drag and move these
two element and Z direction. And I need to enter a value
of 94, 94 centimeter. Just like that. After the next step, I would like to create different wouldn't burn on the top here. It seems that I'm going to do
each to click on this area, just create a sketch. So first I can click
on the Sketch mode, activates the top view
and just create a sketch. Let's use the rectangle
tool defined rectangle from center and craft to print crowds the
first point in Omega. And we need to enter
two dimension. The first dimension
will be shear. We have exactly
48 centimeter and I would like to have
sweet wooden broad. So let's apply a 15 centimeter. 15 centimeter exists. 15 is literal, is not enough. I want it to make protein. So let's do this again. Let's snap on this center point with a rectangle
from the center. The first value will be the first value
will be snapped to 100 centimeter and we need to apply for a t centimeter.
Yes, trust legacies. Finish the sketch. After it is the
same you can do is activate two different solids. First, and you can only use this one to crack
directly or new solid, I can create an extrusion
with only two centimeter. Activate a little chamfer
or just to feel it. I can click on my poll tool. Just go on this area. Let's apply your little
late on this direction. I think I can apply 0.5. And on this direction or so, 0.50, 0.5 by 0.5. After to do this work, Let's Rick pay rate. So view of the
different solid now. And I have my wooden brown exactly shear ammeter in trouble because I didn't
have this one and this one. If I extrude, it's not
going to be a really good. So I need to come back and make some sing, not extremely good. And so one of the
problems is if I'm here, I won't be able to snap. So let's just come back. At this moment. Solexa shocked face, delete, and actress come
back literally before. Select, just come back here. At this moment. If you don't want to have
this type of trouble, it is a problem in deans
as a spark mechanical, you need to cry too upset. So let's move the grid and move with just two values
that you want. Just move a little bit. Let's apply ten centimeter. Repeat this process. So use the top hue rectangle
defined from the center. I can snap to this point. Activator gains a
value of 100 by 14. So I can tap 14, tabulation 100. So now if I credit my extrusion, I can be sure to not correct to link into extrude every sink. I can finish my sketch. And now if I just click here, I can apply my value
of two centimeter. I think it's the best to
walk like this because sometime it can be literal or you can be lethal in trouble. If you use the Fraass process. And 0.5 and 0.5. And validate. Let's position
this elements so Leader, activate the side view. And with the move tool, I can just drag and move on this direction
with a value of ten. And this is a semi
can copy passed. Again. You can click here,
copy and past. And after I can drag and move on the right with 17 centimeter. So this is why it is I'm proton
towards the right value. And I can copy and past
with again 17 millimeter. Let's do this again. 17. Entrust, validate
this Swiss solids. I'm going one more
time to duplicate. Click on the three
element at the same time. Copy and past, and drag
and move on to top. We can move with a value of 38 centimeter and then move
little bit on the right. When I'm moving,
I'm going to move, I think quiz nine centimeter. Let's take a glance. I think it's not bad. And share if I use my tool, my dimension tool, from
this point to this point. Let's go and Neisseria,
it's better mesial, from this point to this point, we have exactly 1.5 centimeter. Click here and click
here with control, a sweet centimeter,
exactly three centimeter. What does it mean? It
means that on this solids, if I come back to my design
murder and use my move tools, share I need to copy
and past first. So copy past and I need
to drag and move here. And the first, if I drag and move via
fraught in centimeter, I need to add three, so I will move home 17
centimeter like that. Then what I need to check
if everything is okay, I'm not perfectly in the center. So this is why we control. I can select this four element and just move a little
bit on the left. I think I need to move home
1 cm term, but not exactly. I think 0.70, 50.75
to be in the center. It's all good from
this cross paths. So we have a lot of
different solid, but it's great because each
part will be separate. T, key concern notation, plane, right-click and delete.
75. Potting table modeling part 2: Let's continue with
this potting table. So the things that
I'm going to do each to create element on the top, click on this face
and create a sketch. One of the problem is, one more time I'm going to
cry to offset little offset. Not a lot, but credit to offset
with just ten centimeter. Just like that. And activate the top view. If you want to let
them all, you can, but definitely ten centimeter
will be totally enough. Silica is a top view
and just create two rectangular form this
Carmel just not on the, on this area with
affiliate snap just here. And credit first element, you can go on, right or so snap here. The first value will
be 100 centimeter, and the second value
will be four centimetre. Like that. I've taught to do this work, I can create an extrusion. Finished your
sketch, click here, and just drag and move to create an extrusion with a value
of eight centimeter. Let's create a new sketch. Click on the Sketch mode. And we can work on
this face again. Drag and move on this direction. This time we will work
with 20 millimeter offset and CDX or top view
creditor Nadar rectangle. You can directly and go at this corner and crept another
rectangle and t here. So I need to apply
exactly 60 cm by 4 cm. So 60 centimeter, five
centimeter and just validate. I can do the same thing on
the right criteria rectangle. I just same time. I need to check something,
yes, stress here. So I need to click on this one. I could also create
two symmetry lines. It's not a problem. I can
just repeat the process. And this is the same 60
centimeter tabulation, four centimeter. And finish the sketch. So now I can create
my first extrusion and z direction with eight centimeter and create a second extrusion and this direction with
eight centimeter. So now I just need to add the right position
with these different element. So select this first solid, go on the side view. And with the move tools, we can drag and move with
the offset of 20 centimeter. Let's do the same thing
with this solids. Drag and move. You can take 20 centimeter. And with this solid,
drag and move, and you can take 20 centimeter, ten centimeter, just
ten centimeter. Let's apply your chamfer. Click on this line
and press Control. Click on this line. Tools, activate chamfer and drag and move in this direction with a value of four centimeter. I just need to
create two element to reinforce my wooden broad. So it means one element
here on the back. And when daily mantras
here on the back. One of the first things to do, It's to click on
this face to sketch. Don't pass directly
Israeli mount one not time-critical little offset of zero grid, it will be better. Let's quiet to offset
with trust six. Select this view and
create a rectangle. Define from the center,
the center point, and work with two
value, 48 centimeter. It will be the first
protease centimeter. Hence then tabulation,
ten centimeter. Perfect. Now I can finish my sketch, create a small extrusion with
a value of two centimeter. And I can just
position my element. I can select this
view, front view. And with my move tools, I can just position here. Now it's four
centimeter depending on where you have
met your extrusion. And I can do exactly the
same type of process here. You can also click on the solid. On this one. Could be passed. So copy your solid,
pass your solid, drag and move on this direction
with a value of eight. And you can just extend
the end of the solids. So you can click on this one
and you can just extend. So if you use your pool tools, you can pull this face
on this direction. The value will be
things we're value will be 8.8, 0.70, 58.75. I'm going to check. And yes, it looks nice. But one of the problem, if I cried my extrusion
again, I'm in trouble. So I need to come back here. Select this solids mover. And it is something, something that's really good and bad design spark mechanical, it can apply to centimeter. And first make this extrusion. Click here again. Pro Tools. Drag and move with as I explain, dragging move. Yes, 8.70, 58.75. Let's repeat the same
thing on the other side. Extrude 8.75. If I just click
here maybe a little too much I can check
with this view. And I think I'm a
little too much. I can reduce. Let's try with 20 because
I created a little offset. I can try legs out. Let's continue again. Zero point, 0.10. And let's do this again. I think it's too much again. And I can continue
zero-point ten again. Sit exists view and I think
I need to continue 0.05. Let's try again and
select this view. Yes, I think it's okay now, the next step is to drag
and move this last solids. And I can see league. I can see there's a
front view like that. Use my move tools
and drag and move in this direction with a
value of two centimeter. So now it's okay for secretion
of this putting taper. So M in this training
it was to create multiple solids and to show you how you can just
create one element. Then use the move tools and drag and move two
different paths. It can be a little bit long, but it is also something interesting if you want
to create furnitures. And it seems like that. Let's apply just
to return color, like cut off for wood. In Brian, I can select
all my element. My selection tool exists. And then just go right-click. Color, more colors. And let's work with
this type of crime. Carlos, validate here, perfect. I can just finished my work with display panels that change
for perspective here. Why not shaded? But I don't like to match every time I think
shaded it just the best. And if you click on
one of these face, you can change your
different option. I can just stay
more with plastic, not metallic. Just like that.
76. Bench modeling part 1: In this training we're
going to create a bench. So credit to bench,
step-by-step. And first things to do. It's to change the unit. Because to work in millimeter, it's not extremely convenient. So go and file, designs, pack options, and let change for only this document type in
metric length, centimeter. So first things to do, it's to create a first sketch. Click on the Sketch mode. And I can just go on this area, create a new sketch work plain directly on the side
view so I can select x, y plane like that. And let's create also upset. So credit to offset you can
use for this moves a grid. And you can drag and
move on to the left. Here. We're going to
drag and move with a value of 60 centimeter. Perfect. So now I have this
element just here. So let's start to create
our first element. I can use one of these tools. And the first things to do each to create a construction line. So create a construction line directly from the
center and just hear about this
construction line. I can go right-click Set
as mirror line here again until so dimension from
this construction line I have just 4.9 centimeter. Let change this construction
line with 40 centimeter. Except after I can create
another construction line, I can click here
and go on the left. I have my symmetry,
so it's perfect. And I can work with a
value of 20 centimetre. So now I can use my line tool and I need to create
a first-line here, just following the
construction line. And second line on this area, we just need to enter two
value here with the degress, just snap on this area and
just enter or degrees. If I use here, I can work with
100 degrees and I can just with 100 degrees snap on this
direction for t 0.85. Perfect. Now the next step To continue, I think I didn't snap perfectly with I need to make
some modification. Yes, I need to snap truss here. It's better. Now is the next step is
to create a line again. Or I can use also
the offset tool. And if I click on this line, click on this line, I
can credit to offset. I can credit to offset
on this direction or create an offset
on this direction. In this example,
we will go inside and work with a value
of four centimeter. I need to create two lines. Select the Line Tool
to line just here, and credit to seek online. So here it's okay. And let's create two carat
cut just on this part. And as far as the
rest, it will be nice. Just finish the sketch and create a first extrusion
on this direction. And this extrusion will be
four centimeter and validate. So now perfect, I have
this first element. Next step is to move this
element to copy and past. So click on tariffs
for us to delete. Click on this first
solid and copy and past SEN with
the move tools, you can select the Form View and just drag and move
on this direction. But the value, Let's walk with 120 centimeter, just like that. So 120 cemetery mentor from this part to this part
and I can validate, knows the next step is
to click on this face. In this example,
I'm not going to work with a lot of paths. We will link so different
paths together. I can click on this
face to sketch, activate my top view
and create a rectangle from this one to this coronal. So this corner to this corner. I can finish my sketch
credit to next version. You need to click here,
but don't forget to click on this face and
click on this face again. And crypto next version. Just like this, a bad zoo value, it will be a bunch of value. It will be two centimeter
tricyclics out. But then we'd have some
things that are wrong. And this array, it's not
extremely convenient. So I need to warn differently. Just come back, click
onion this face first and create an extrusion. I can work with two centimeter or you
play as two centimeter. Now from this one I can
click on this face, on this side and extrude with four centimeter and
now it will be better. Yes. I can go in this
area and just click on this face and
extrude with a value of four centimeter or so. Willing to make little
adjustments are. So here we have an element. I can also credit maybe
a small extrusion, but if you click on this phase, you will pull every scene here. So there's things
that I can do is to click here credit to sketch, and draw squared to
offset with my grid. And I can drag and
move little bit on this area with like
two centimeter. Just go on my phone view
and create a rectangle. We can just arrived
on this corner print. And we can dress to arrive
to this corner point, earth's crust exact,
and finish the sketch. So next step we
have this element. If we create an extrusion, we can directly snap with a value of two
centimeter and validate. And now it's perfect. I can do the same thing here. I can click on this
face to sketch. Then walk is a little upset
with my move grid tools. I can move with two centimeter. Select directly this view. With my rectangle tool, I can snap directly to this corner point and snap
directly to this corner point. Next step is to finish
the sketch and click here and drag and move
on this direction, you can enter a
two centimeter and automatically it will be
linked to the new solids. It's okay, we have first base.
77. Bench modeling part 2: Let's continue with this bench. We're going to work on different sites for us
to crowdsource sites. I need to save this phase
and credit to sketch. I can select my view. The next step is
to create first, you can craft first-line here at intersection
as you can see. And you can drag and
move on this direction. Drag and move in
this direction and enter to specific value. First value will be 46, and I need to enter or anger. Anger will be just
95, just like that. After I can create another line. Also on this direction, I'm going to come back here
with a specific value. Let's enter four centimeter. So next step is to create a nodal line on
this direction with also exactly four centimeter you can tap and you
can come back here. I've taught to do this.
Well, let's pick this, this element or so. And credit first rectangle. Here. This rectangle will have
a value of 24 centimeter. Tabulation 20 centimeter. I can continue create
another rectangle. I'll just quote to line two line will be enough
credit to first-line. You can just extend here, press Escape, and
create two sig online. You can, you need to
enter a dimension. First. I can create a second line. Here. I need to enter a dimension between this
line and this line. And it's going to be
four centimeter exact. I need to make some correction. Just click on one
of these tools. We have this tool trim away. We can erase this
part, erase this part, erase this part, this
part. And this part. I figured it's not bad. I just need to make some improvement using
my wounded Kronos Crato, rounded corners on this area. Not too loud dress, too small value with two
centimeter on this area. So two centimeter. I can apply two centimeter. And here I can apply also two
centimeter radius. Perfect. Now is the next step is to sweat gravity this
element, It's nice. I can just finished my
sketch here and create an extrusion to crowds the extrusion just this
activates the solid part here. And craton next
region inside with a value of four
centimeter like that. Now we can reactivate
these solids, that effect. And I need to pull this
one copy and pass. We're still exists solely
it's copy and past. On phone view. I can use my move tools and drag and move on to
write one more time, I can apply 120
centimeter and validate. Let's create a need to
credit your back just here. To crowdsource back one of
the best things to do we need to create an
extrusion one more time. And we can create a sketch. Just click here. Create a sketch. Sketch. We can, We can lead
to little offset. So it means I can create a
first-line on this area. I can press Escape and create a second
line around this area. First with 90 degrees or
not 90 degrees exactly, or something parallel,
just like this. If I press Escape, you can find e.g. this line and third dimension from this line to this line. And I can enter a
specific dimension. Websockets things. I think it's not bad, Let's just apply. So T5 user Line Tool create a first-line and link this point and create
a second line, line and Lindsey's point. Let's finish the sketch. So I created this new
element and I can extrude this direction just to
crack just only one part. And I need to extrude
and TLS use offset. So let's do this again. I need to go here and select this face and
create an extrusion. Move tours. I can use first my phone view and create an extrusion
on this direction. It's not working properly. I need to select the face again, series of front
view, drag and move. And it's not working
properly again because it just extrude this area only. If I click on this one, drag and move,
select these tools. It's not extremely convenient. I'm going to come back,
finish my sketch. And if I use my full tool, yes, I wasn't the move tool, so this is why it was
not working properly. So let's come back with pool. Activate a different view. So first I can click
here and create an extrusion religious to play
first to a specific value. Like e.g. AT first, I think it's not
extremely convenient because one of the
best things to do, It's to seize the dimension. It will be pretty simple. So select Tunisia Tools. Click from this
line to this line. And with control,
and thanks to that, I can use my misery
of tools and enter or dimension 116 degrees. So now if I come back to my design mode,
select support tools. I know that I will
have to pull with 116 degrees, 116 centimeter. Perfect.
78. Bench modeling part 3: Let's continue with the
creation of this bench. So things that we're
going to do is to create different interferon
to extrusion on this face to improve
the render of the bench. So first things to do,
Let's select this face, just create a sketch and
activate directly is a top view. It is an proton to not go directly on this
area if you want, you can create a construction
line directly here. And you can create a first
construction line to be sure, to not be outside of this part. And you can create a
second construction line just on this area, on this direction, vertically. Create a first rectangle, defined rectangle from center. You can create a first
rectangle just here. And a bad value. We just need to let the space of two centimeter and just snap to this guide
and snap to this guy. So next step is to create two nodal construction line
directly in the middle. And right-click on the
construction line set as Miro. And thanks to that, I can create a new rectangle directly
around this area. The aim is to let little space. You can use a
construction line, e.g. just here. And you can create
an odor construction line. Just let a space
can let like six. So six after I can put 66. Yes, So about z dimension, share Kan Zen I've 262. Yes, I think it is the best. I need to repeat a
little bit more. We're going to change that. I'm going to click
on these tools and credit first element with just four centimeter
and create a rectangle. Rectangle directly here. And create this rectangle with a value of two
centimeter by 116. So two centimeter, 116. Now I can create another
construction line. I can go fries on
parents this area and just let her know Doug
space-like four centimeter. Click on the
rectangle tool again. Go directly here. And crap to no direct Tonga
with 116 by two centimeter. Validate. And I'm sure you have some space
or you have a space. If I use my line tool again, that can lead to like
four centimeter again. And use these tools can go
here to the left and repeat exactly the same process with two centimeter
tabulation 116. And validate your labs or
two things on each sides. The things that I
can do it finish the sketch and
create an extrusion. I need to select this face. I need to press
control this phase, this phase and this phase, this phase, this
phase, and this phase. And then credit to an
extrusion and Z direction to create a cavity to craft car. And I can validate did it to a different construction
line with corrupts, Delete. Now I can click on this face. En Zen, create a scheduled. So try to sketch dress here. You can see the coin of
this view, front view. I can do the same type of work. So it means credit first
construction line or this direction credit signal and construction line
on this direction. Credit to rectangular form. The nadir defined
rectangle from center with two centimeter
by 116 centimeter. Then sees the same I can let little space but I
think I won't have, I won't be able to let the same space
because here e.g. I. Will be at four, then two zen force and to set
won't be very convenient. I'm just going to
let different space with three to three, then two, then three, then two. Yes, it will be
perfect if I work. If I walk like this, I'm going to read
two different space. Zoom little bit. Let say I have exactly
70 centimeter. Let's apply your space, or 2.52, 0.5 would be the best applied
to 0.5 criteria rectangle. You need to go on this area. First, I forgot to set
my construction line, credit construction line in the center extremity
and protons. And right-click Set
as mirror line. And now I can create a rectangle
here from this corner. So just apply to value 2.5,
tabulation 116 centimeter. Perfect. Let's grab another
construction line. Let's apply your space 2.5. Press Escape,
create a rectangle. You can start from this point, going xu left snap. And you can tell the two
value 2.5 tabulation 116. And let's repeat
the same process. Activate an ER doc construction
line or on this area 2.5. Then press Escape,
create a rectangle, defines the rectangle
address here, and activate to value
2.5, tabulation 116. And just validate perfect. Finish the sketch and
click on all the faces. Click on the seven
faces at the same time. Sheatsley turn on the bag,
but it's not a problem. I'm going to create
an extrusion dress here and just validate. I'm just going to, if I click
on this face, take again, if I click here and I use my
pool tools, I can extend. And this is what I'm going to do to have a bit to our render. I can extend with 1 cm. Yes, Just like that.
Let's take a glance. Yes, I think it will
be it will be better. Maybe extend little
bit tomorrow again. And just click here, extend with another 1 cm. And at the end of the top, I can extend a little bit. Oops. Let's do this again. Click here, click
on this face and extend little bit 1 cm, perfect. Click on Zach curves,
right-click, Delete.
79. Bench modeling part 4: Let's continue with this bench
modelling, bench creation. We have also based just apply, it'll finish and I'm going
to create a sketch again. Click a sketch on this face
and credit a little offset. You can craft a little offset
of the grid just here. Not a lot, but you
can just get to know the offset of two centimeter. Directly activates
the front view with the rectangle tool. Create a rectangle
directly from this corner. You can zoom, snap to this corner and just
go on the right. You can zoom also and
just snapped to zero.com. Now, finish the sketch
and just click here, create two new extrusion
on this direction. Activate two centimeter, and
we can have this render. It is great because now I
want to apply your fillets. So it means I can
click on this edge and just drag and move like
this to create affiliate. About the value of
this filleted going, it's going to be two. So I can apply to
just like that. If I just click here
on this area can also walk on this direction and
add liter wounded element. I need to see my specific value. Let us come back, just go here, click on this one. And I can go in this
direction or so. But to budget value,
it will be just 0.5. So ME just to have
something lethal wounded. Yes, it's better. Just like this. I've
taught to do this work. Let's also click on this area. Click on this face
first control. Click on this edge
control and controller. We can just click on
one of these tools. And it's going to be. So Paul tools. I can walk one more time
with wound corners. And I can work like this. The budget value,
you can take 1 cm. And let's do the same
thing on your part. So click on this line control, click on this line, this
line, and this line. And we can drag and move 1 cm. So it's okay for the
creation of this bench. We have just made
everything on one solid. We could also make the choice
to create multiple paths. In this example, it
was just one Soviets. I can go right-click and
rename the IP bench, e.g. if I want something in metals, I can apply your color. Select every sync with your selection tool,
select everything. Right-click Kronos
and let's work with miraculous metal but small like not totally
black, dark gray. Validate. Or maybe I can try with something
totally black color. More colors, black validate. Here. If I just go on the right, I can use my display panels. That change with a
perspective view. It is definitely better. Can see my front view first. And move little bit, zoom, remove origin for the display, and click on one of these face. I can change for metallic, and I can change it
so far finishing, let's put high gloss finish. That is perfect for the
creation of this bench. It was a little long, but something
detail difficulties to create this type
of patterns here. It's not extremely convenient
in design spec mechanical, we don't have advanced
features to just repeat the process with
something extremely easy. So this is why it can be a
little complicated to create this type of pattern in these
and unspoken mechanical. But we can do this. We
can use a symmetry, we can use different way.
80. Project create part 1: We can start to crack
this first 3D models, first 3D models step-by-step
using the software. So the first things
to do when we arrive here is to
select the work plane. So we have these different axes and two Solexa work plane. I can just directly
enters the sketch mode. And thanks to that, I can
enter directly on the sketch. And I can choose directly my work plane with
acidic new sketch plane. And directly we can start
with resin block plane. So click on Visit work plain. I need to have a view
on this work plane. So click here and directly
you can observe right view. So next step is to
start the first sketch. So to start with first sketch, we can choose one
of these tools, and let's choose
the rectangle tool. With the rectangle tool, I can create a rectangle. Here we have the sun dot print. And I can go left-click and create a rectangle
entering to value. The first value will
be 40 millimeter. I can type 40 millimeter, press tabulation
on the keyboard. And I can tap a second, sings 60 millimeter
and press Enter. And now I have 40 millimeter
on by 60 millimeter. You can check, you can use your dimension tool
and you can shake. We have protein
millimeters here and you need to have 16
millimeter on this area. At the same time, if you
add dimension exists, you will apply like constraints. And it won't be possible
to drag and move a point because you have 60
millimeter by millimeter. Now, the second
thing that I'm going to do It's to directly
credit to an extrusion. Directly create an extrusion
and just finish my sketch. Here. You can finish the
sketch on this area. To finish the sketch, we just need to click
on End sketch editing. And thanks to Zach, this
is my first surf phase. And I can create an
extrusion with my pool tools and just go left-click
and create an extrusion. The value of extrusion, you can type something two
millimeter and just validate. So this is our first part. The second important
things to do, It's to add another
element here. So we need to work on click on this face and we can create two new work plane on this face. So click on the face
first with a pool tool, always your selection tool, it's going to walk also,
inactivate sketch mode. And directly, as you can see, we have a new work plane
directly on this face. So next step is to use
this view. Click here. And I need to click
on the circle tool. Thanks to my, with
my circle tool, I can zoom a little bit, select this point on
the top-left corner, and credit to soccer
with four millimeter. Then I can zoom, need to fill
out and finish my sketch. I need to create an extrusion. To create an extrusion
of this one, you need to click here. You can press Control and
you can click here also. And you can create an
extrusion just like that. But the value of extrusion, you need to tap 16 millimeter. And thanks to that, you
will obtain this render for the creation of this
first part of the inch. Let's repeat this process. Silicon, your selection tool. Click on this face
and credit to sketch. After we have a new
sketch work plane again on this part,
silicosis view. And you can zoom little
bit and create a circle. You can start from
the center point here you have the
snapping option because on this area you can find properties snap to
grid, snap to anger. I'm just going to tap
directly something to print six millimeter,
2.6 millimeter. Press Enter. And I created this soccer
with 2.6 millimeter. Finish the sketch. So m is to create an extrusion. This is why I can click here
and create an extrusion. Left-click with my pool
tools and credit to all on this direction and just validate it start
to be interesting. And the next step is to add
different r's on this face. So silica is a face
with the Bowl Tool. Always your selection tool, it's going to work. And after a credit to sketch, to position the sketch perfectly on this face and activate. So top view, you can click here. You can also activate
the plain view. It's something very convenient. Let's work with symmetry to
craft an axis of symmetries. It is possible to use a construction line
on these panels. And just left-click and create a construction line on this area in the middle on the x-axis. And the next step is to go right-click on the
line and you can activate set as mirror
line like this. Why it is restricted?
Because now I'm going to create
the first circle on this area and it's going to be repeated on the other sides. Let's create a
circle with a value. Here we can enter
different type of value. Let's walk with
eight millimeter. Create another circle
around this area. First eight millimeter. And now I want to position
perfectly my self-care. You can use a dimension tool and click on the center
point of the circle, click on this line
and drag and move on the top to apply a value. Let's step eight
millimeter and validate. And let's repeat the same
thing, dimension tool, click on this one,
but this time, not this line is the order line. Left-click. And you
can drag and move on the right and change
for eight millimeter. Let's do the same thing here. Dimension tool. Click on this sprint,
click on this line, drag and move, and
apply eight millimeter. Press Enter, and click on
the dimension tool again, click on this print. And now you need to click
on this line, dress here. And you can drag and move
and tap eight millimeter. So now it's perfect. The next step is to
finish the sketch. I can keep my construction
line first, finish the sketch. Just need to create
an extrusion. Click on the pull tools and
ceilings of first phase here. You can press Control to
select the second phase, state control and left-click to select these different faces. And now always left-click. You can drag and move on this direction to credit
to all, as you can see. Perfect. I can validate, I
have my curves. This is just my construction
line I don't need anymore. So right-click in the
construction tree on the curves, Delete. And now I have my first solids. I can just change the
name of this solid. One of the first things
that I'm going to do just to play your lethal beaver. Take a glance, webs this, this part click here, and you can go left-click
and you can apply a beaver. But two dimension of the beaver. Let's step eight millimeter, just like that here. And let's repeat the
same thing here. But because of the steel keeps the symmetries even if I don't
have my construction line. So it's okay, I have
the same thing here. Perfect. Let's just rename
this first solid. Right-click on the
construction tree, rename. And it's going to be my part
number one and validate.
81. Project create part 2: Let's continue with the
creation of this inch. So now the next step is to add the same thing on the
left, so same part. And after to do this
work will be able to create different,
different extrusion. To be able after two positions
are two paths together. The first things to do is
to select the pan number 1.2 copy pass to duplicate
cylinders of part one. Here you have options cookie, and after to copy, you just click on past. And now I have my second part. You go right-click
first, rename. And you can change
for part number two. Perfect. After to do this work. So n is two sittings a path
to use your move tool. And you can activate e.g. the top view here. And you can go left-click
drag and move on the left. You can enter a specific value. In this example, let's enter 60 millimeter for the offset, press Enter and Crato rotation directly from
this center point and just drag and move here with the
blue axis and 180 degrees. And I can just validate. Perfect. Now it's aim
is to create a sketch. To create my sketch, I need to click on Sketch mode. And let's work with click
on the work plane here. And credit to offset. The credit to offset you
need to click on Move grid. And thanks to that,
you can have access to this element and you can
drag and move on the top. Move little bit, you don't
need to until specific value, just drag and move
little bit on the top. If you want to enter
a specific value, you can also am going
to show you again, you can click here. Let's step 20 millimeter
and press Enter. I can now be on my top view. And I'm going to create
different rectangles. I have 60 millimeter eight. And this is a reason for
which I'm going to divide by five and upturn
12 millimeter. You can create e.g. a. Construction line
to create a symmetry, but it's not going to be
perfect for what I want to do, the best things to do, just to click on the Rectangle tool, you can snap here. You can create two first
element with ten millimeter by 12 millimeter.
Just like this. Crypto second rectangle,
you need to go in this area and you drag and move. You click here and
you follow the axes, and you can repeat
the same thing. So 12 millimeter by ten
millimeter dressed like this, 10.12 and validate, repeat the same thing
on this, on this area. So dress, go here,
drag and move. And you can apply
ten by 12 like this. Then you go here and
you drag and move, and you snap this edge
and left-click ten by 12. So ten millimeter,
12 millimeter eight. And you can go in this area and normally you will
perfectly match with a value of
ten by 1210 by 12. Perfect. It is perfect. You
just need to snip, snap on the edge
of the cylinder. And each time you
create 55 rectangle, 12th by ten millimeter. You will understand why. Now we can finish the sketch. Just like this. M is two. This phase is to
select this one, press Control this one, and this one, and
create an extrusion. You can just turn a
little bit and you can create an extrusion
just on this direction. And automatically he
will remove materials. Perfect. And you're
dressed, validate. And now you can
click on this one, Control click on this one, and you can repeat the same
thing with your poll tool. You just go left-click, drag and move inside. And thanks to xij can
create an extrusion. I'm going to show you
again, left-click, drag and move inside and you
can create an extrusion. Perfect. Thanks to that, we will be able to have two left boundary, right part and just to create an assembly at the
end, just like this. And in the construction tree
we have the designer here. I can rename and I can
change for Moodle. And inside my models
here you can rename just to see each time you will
have something at the end. You have the path one and we
have the part number two.
82. Project create part 3: Let's continue, well, going
to create another path. But first before to do this, I'm going to click on my
path number one here. And just credit modification, acidic the move tools. And on the red axis you can drag and move
on this direction. Drag and move on this direction. But the value I can select, e.g. my front view dress here. And here T is maybe
liter to merge, but it's not
extremely important, but it's not extremely and
proton to badger value, I'm going to come back. So you are here, you select
e.g. the front view. You can zoom little bit
and you drag and move on. Right? Just here, can drag and
move, drag and move. And I'm going to enter
a value of t will be too much 25 and validate. No, thanks to that, I can create my new paths around this area. Click on the Sketch mode, and you can walk on the Y-axis, click on the y-axis
and select this view. Perfect. And I'm going to
create a new circle. The circle will have to be
2.6 millimeter like this one. You can just follow this line, goes here and create a
circle with 2.6 millimeter. Perfect. Now the next step is to finish the sketch and click on this
one, create an extrusion. Go on this direction. I need to have the
same size is at four, so two parts of my engine, so it means 60
millimeter and validate. Perfect. The next step is to click on this one and credit to
an extrusion or so. But the extrusion won't
be exactly the same. So the best things to do, It's to click on this face, Crato new sketch
again, like that. Select directly front view, zoom literally beat
and create a soccer. You can select this point and try to chapter
four millimeter. Finish the sketch
and extrusion again, click here on these two elements with control and credit
to an extrusion. About a value, it
can be just 1 mm. You can enter a little bit more, but when millimeter,
maybe I can extend. It will be two millimeter,
just like this. And I can just close just here. Let's apply your little Diva. You can click on this edge and you can
apply your little groups. So click on Pull tool,
select this one. Here you have the option, it is ruined corner options and we can create
like affiliate. And I can drag and
move little bit. As you can see, a
bunch of value, it will be 1 mm on
just step 1 mm. Just like that. Let's change, rename this
part. Go right-click. This is my new solids. Right-click, Rename hen. It's going to be the part
number, fact number three. And after to do this work, I can just drag and
move a little bit. Click on the move tools and settings or pan number
three and move little bit. You can drag and move with 20 millimeter on this direction. Perfect. So at this level, we have
created this suite and we will work with exactly
four different parts.
83. Project create part 4: Let's continue. I need to create a new part. I need to create a new part
because here this part will arrive inside this tube
and inside this tube. So these two cylinders, and I will have to close on this area so I need
to repeat my process. So the first thing is to do
it's to create a new sketch. And I need to walk
again on the y-axis. But I think if I
walk on the y-axis, I need to create to offset. So I can click here a credit to offset,
activate, Move grid. And directly if you
move the grid or you can just go here you
have x 60 millimeter. But I would like to
create another offset, 20 millimeter or more. And this is why I will apply a t millimeter just like
this from this base. And now I have my new
work plane just here. So m is to walk on
this plane view exert. I think I don't like too much to have this type of view
I'm going to change. I prefer to click here and I've just typed
of view, it's better. Notes, the next step is to zoom and to create
a new circular. Go left-click here and extend. Extend. You need to apply
for millimeter exactly. Finish the sketch and
create an extrusion. Click here, you can
extrude with a value. Let's apply a value of two
millimeter and press Enter. Like on the order of proud. Here we applied a
little diverse. Let's do exactly the
same thing on this part. Click on this face first. Whoops, not on the face, click on the edge and just go left-click and apply
a value of 1 mm. You can enter one and
just press Enter. Next is the next step is
to go on your models. Here we have different paths and the last pounds or solid, just go right-click and
you can just rename. And tip. Number four. Number four exists. So as you can see,
where might some sing with a nice structure, you need to respect step-by-step
every time design proton to start to speak your
different center point. It is also very end
proton to a credit, e.g. different like this. And to have a nice structure
in your construction tree. Then if everything is okay, we have the possibility to
link the different paths. So just to sleep for
examples of part1 into the path to an adult. So the pan number three
and band number four, just to create one element.
84. Project assembly parts: After that, we can
create an assembly. But to be able to
create an assembly, the first thing that
we're going to do each to convert the part. So we have these
different paths. If we want to export the work, we will export all the
work of all the models in just one time with
exploitation options here. I ever saw the possibility
to go right-click on the part and move to component, move to new component. And if I click here, now this is a prime number one
inside the new components. So you have my buddy inside
the pattern number one. This is a component, Let's sittings abandoned bulk to right-click move to
new component or so. Nclex upon number
three, right-click, move to new component and
select the part number four, Right-click also move
to new component. Now I have four different
component in my model. So part one, here, inside I have somebody, so about two inside I
have the body and sweet. And so Path4 and inside you
have every time somebody. Why it is useful,
because if you just go right-click on
one of this part, you will have the
possibility e.g. you can also rename
again this element. You can also activate a
component if you need, you can click on the
components and just activate. I will show you
in just after why it is useful to create paths, because you can export only one part if you
don't have parts. If you just have, if you don't have component, you have only e.g. this part as a solid when
you export your work, you can just export also models, but if you divided in different, in different components here, you will be able, e.g. to expire to export
only component one. So part one and part two, the paths we are
against the platform. But first let's
focus on assembly. To focus on the assembly. The first thing that
I'm going to do is to select the part number, part number two here. And apply my move tools. So I can just click on my move tools and
select the top view. If I zoom little bit, I can drag and move
on this direction. I can drag and move,
drag and move, drag and move with a specific
value, a specific value. And in this example, I'm going to tap 22 share. I'm going to tap, I need to
be perfectly in the center. And yes, I need to
tap 22 millimeter and just validate like that here. So I can click outside them and then I can take
those off part. So this is a prime number one, and I can go left-click, I can click on the red arrow and drag and
move on this direction. And two perfectly
be on this area. I need to take 25 millimeter and just press Enter
and just validate. Perfect. Now, next step is to select
the number of sweet. This one, I can select
my top view again. You can drag and move
inside on this direction. And I can drag and move with
a value of 80 millimeter, 80 millimeter, and
press Enter or click outside like that. And I can select my last part. So zoom here, select
the path number four. And I can drag and move
on this direction. I can use this arrow,
drag and move. And here it will be a
value of 20 millimeter. And I can read it,
and that's it. So everything is nice to add the different
parts together. So it means we add
the right measures. Everything was okay. And if everything is okay, you will obtain this result,
this perfect result. If you want e.g. a. Presentation, you can
why not select this part and at any moment you
can create a rotation. But if you do this, change the transformation print. If you do this, you need to take this one and you need to drag and move your
transformation print and probably to move in
the middle here. So you need to move your
transformation point yes, in reminder here. And now if you move this, it's going to be so much better. You can craft to rotation
at your convenience. Just like that. If you want to 90 degrees, you can come back. You go here. And let's create two rotation. If I want 90 degrees, I can take 90 degrees
and just press onto. But it's just an options in just an option
of presentation. Interests come back. Let us come back. Yes, I do. At this moment with
my history panels. And just validate.
85. Project add color: The next step is to add a color. So we are going to
enhance liters or render, improved it towards the
render, adding a color. So to add the color, you need to change. You can work with the
display mile mode first. So click on display and you
can find different options. The first thing that
you can do when you use this, it is graphics. And by default, we
can you shed it, but you can also
have an unshaded. You can use wire frame, you can use either in
lines, are lines removed. So you have these
different options. It is greater. Want to see your models with different
type of friends. Now, let's come back on shaded. You can also click here and you have orthographic
of perspective. Let's apply perspective.
To change the color, to change the color, you
have different options. You can e.g. click on the path. And if you are, you can click on
the face. If e.g. you just click on a face here, you have a little options,
this little options, and you can click on this area and you have a co-op panels. You can apply this on the
face or on the budget. If I just click phase and
I'll activate e.g. a. Yellow color. I put a yellow color
only on this area. And I'm going to show you again, I can click on this
face and just go here. You can go and face. I'm can go and remove. And let's select a
different color like red. And I can obtain this random. Why I have some
little strange lag, the color is not
really good because the activity parties
apart number four. But if e.g. I. Shan't path number two, you can go right-click and
you can activate component. And in this case, you will see the Render. Things are best things to do. Well, I'm just going
to click on this face, go here and remove
color override. Best things to do, It's
to click on Zoom odors, right-click and
activate component. Thanks to that, you can
activate also models. So you can activate on
the face or on the body. If I just click on this face, I can go here color
and I silly kilo. Now I'm going to
have my right color. As you can see, if I
just click here again, cooler and I applied
buddies this time, I click on red color. I will apply this red color
on our body selected. So the body is selected
is my path number one. Because I would
just want to have the same color everywhere. I'm just going to click here. Colo. Just go a little outside. The best things to do. It's to select
everything you can, e.g. create a frame of
selection with left-click. Select all the faces and
right-click, click on Color. And let's activate
something like in yellow. You can have more colors here, and I can choose
one of these color. Let's work with this type
of coolant will be great. And I can just
validate. Yes, perfect. After to do this one, you can change
liters the preview. So one more time you
have an n shattered, but sometime it's
not extremely good. Let's keep shedding. You have also more options directly on this area
to this activate, to activate this option, just click on one face. And here you can change. You can change Autauga
trophy perfective, and now you have
rendering style. It means you can say e.g. a, metallic or plastic and
you have a Phoenician. If you select metallic, you will obtain this render. And so much better for
me to activate metallic. Things that I'm going to do
is to select everything. If I click here plastic, I will have a plastic
renders is not that I want, so I can select everything, goes here and activate
metallic, exert. The last step. You can also select every sink and you
have option finish. By default it is Medium Gloss. You can increase
if you want with eyeglass dressed
like that thing, add gloss will be great
for what I want to do. And this is how definitely
you can improve your render. You can also go on the
right, show obstruents. And if you don't want to
have this world origins, you can do is activate world
origins, just like this. And you can turn your
render. Perfect.
86. Project export model: The last step is to
export your work. So you have the possibility
to export your work. And we can come back
on this murder. And the first thing
that you can do It's to export all your models. So here you have
the models activity to save and export first read one file if you
just want to export as a digital design
spark mechanical, fine, you click on Save As, and you select on your computer where you want to
export your work. And here you have
different options. So by default you have designed, design spark mechanical file. And when you click on Save, you can save your
models and you will be able to reopen at any
moment on this software. I've taught you have also
a type of exploitation. You can go and file save as and when you click on Save
as you can also export. And you have these different
types of possibility. Those things that
we use the most in 3D modelling CAD software. It will be OBJ, or we can use STLs. So thanks to that, in
any type of software, CAD software, 3D
modeling software, we can open STL folder
or we can STL file, or we can open an OBJ file. You can export e.g. in OBJ. And I can export Save. I can also go on File Save As. And I can export OBJ, I can export STL, e.g. you have also options here. And if you click on the options, you will go and
design spark options. You have STL file options. And if you need to
change the unit, if you need to change
liters, the restoration, it is possible each time
you select a file option like RBG and you can
edit some parameter, even if honestly, most of the time we'll use
the basic parameter. Here, I can export STL validate. You can also have more options. Again, Save As or you can explore like SketchUp,
you have SQP. So SketchUp file, you can
also export to an image file. So you have JPEG, PNG through just want
to overview in JPEG, you can export in JPEG file, or you can select the
size, image size here, you can change and you
can validate and save. You can also find a fine
fat fast expectation on the right you have
export options and directly you can export in STL. If it is for printing you
correct something for printing, you can directly
be redirected to ultimaker Cura to manage. So printing of your models. And why it is useful
to create path now, because you can export
only a component. So we have created
different components. So here we have part one, part two, part three, part four. It is four components. Why it is useful?
Because if e.g. you have just, just
my budget like this, and I go right-click, it is not possible to create
two new window resist, but whistle component,
it is possible. So go right-click
on the path one and you have the options
open component. And now I have a new
window with this part. And let's come back on. So models, right-click
open component. Let's come back. Click on Zoom models, right-click and open component, and just click here on models, right-click and open component. So now why it is great
because I have my models here and now I have a new window with
my pattern number one. So it means I can
export only this part. And I can go and file. Just select, Export. Save as I can export
all these element e.g. in stl, OBJ, or
let's work with STN. And it's going to be my path. Number one STL folder. And just activate save. This is my brand number
to just go under File. And Save As path number two. Perfect. This is my
number of sweet File. Save As, and just rename button number of sweet
each time in STL file. Path number four,
legs This File save As and just activate perfect
number four and validate. And now it is perfect because if I go and file, just show you, if I click on Save as
you can find in STL, I have my models with all the
paths are also components. And I have all sorts
of Fraass component, but 1 s component, but to sub-component pass three and force
component platform. So it is perfect
and we can have, we can separate all these
element in different, different components
in different folder. So this is why it
is useful to on your main models to
separate in components. So it's okay, We have
finished for this work. So it was extremely concrete
example about how you can start a 3D models using
these as Spark mechanical, step-by-step, creating
different sketches. Use the basic tool of extrusion. And after step-by-step, you
can create different path, manage your
construction tree, ado, Carlos, and z, and you
can export your work.
 Nicolas Forgue, Welcome awesome students !