Transcripts
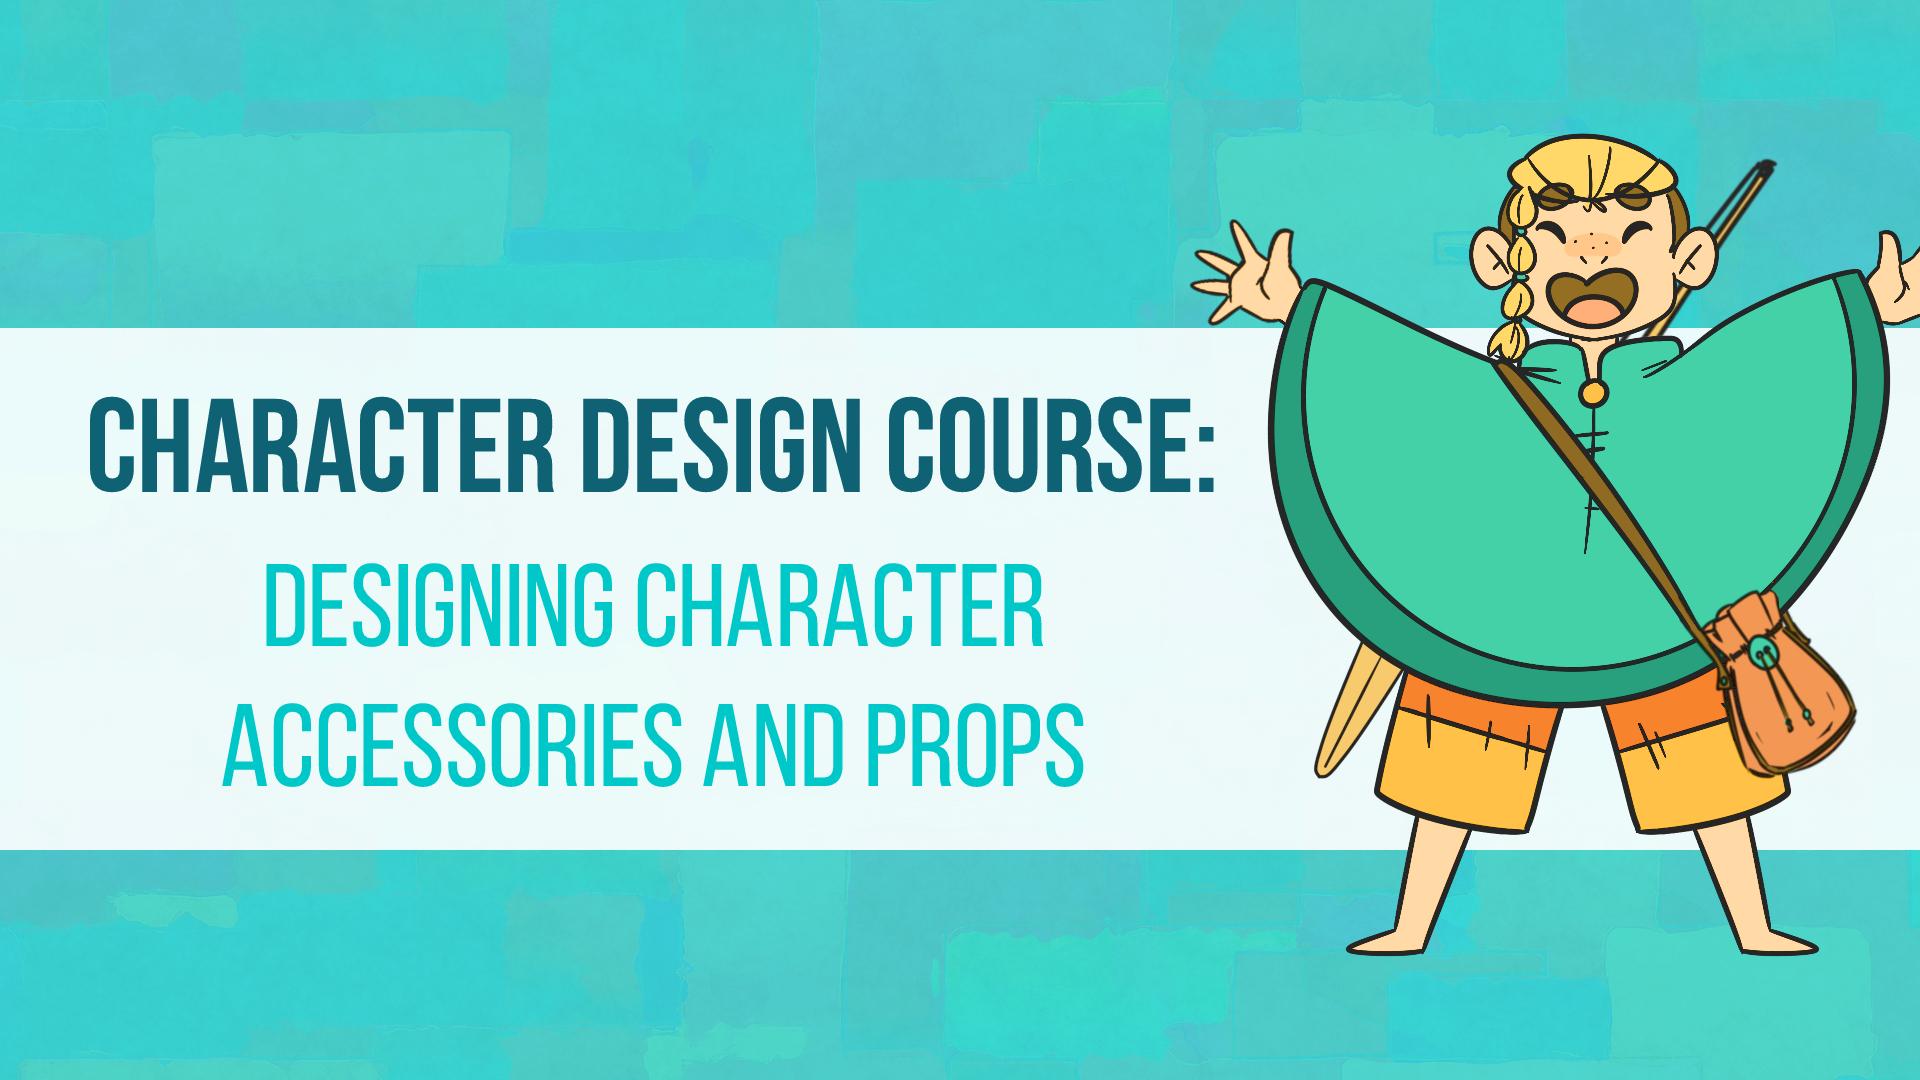
1. Intro: Hi, and welcome. It's time to bring your
characters to the spotlight. Think about your
favorite characters. What truly makes them memorable? Maybe a wizard's wend, a superhero ca, or even
a specific emblem. In this class, we'll cover all these essential
character design elements. We'll brainstorm and sketch a bunch of props
and accessories, as well as refine the
designs and add some color. By the end of this class, you'll have the skills
to create props that compliment your characters
and improve their narratives. We'll kick off things with
a quick fun assignment. Then move on to finding
the perfect references. And finally, dive right
into sketching your props. Throughout the
course, I'll be doing live demos to show you
each step of the process, and you'll get
templates as well as helpful resources to
make you improve faster. Plus, I'll be here every step
of the way to guide you. Are you ready to give your characters an
extra layer of theft, Join now, and I'll see
you in the next video.
2. Assignment 1 Don't Skip This!: Hello and welcome. Before we start learning, let's do a quick
assignment first. It's very simple and you don't
need to draw anything yet. For now, all I want
you to do is to write a small list of accessories
and props for your character. It doesn't need to be a lot. We don't want to overdo it. We want our character
to be unique. But also easy to
draw over and over. Write a list of five props. This might sound like
a lot right now, but we'll shorten this list
as we go through the videos. We want to have a few
options available so that if even some options end up
not working as we hoped, there are other
solutions available. Think about your character, their personality,
and their story. Then think about accessories
that you think fit them. Write them down
and keep that list nearby because we'll be using
it in the following videos. Don't worry about
references yet, since we'll be working
on that later as well. This is it for now,
take your time, listing some props
and accessories, and I'll do the same
in the next video. I'll see you there and
we can work together.
3. DEMO: Brainstorming Accessories And Props: Well, hello again. Welcome back. I'm going to do the
first assignment that we saw previously, which is brainstorming
and listing a few accessories and
props for our characters. I'm going to I have my
character, Johnna here, who's a child, he lives in a fishing village
and likes to fish. It's kind of his job, let's say, he fishes because he likes it, but also to help b at home. He also has this
gang of friends, and they consider
themselves adventurers. So I'm going to list a few accessories based
on those information. For example, the first thing
I thought about related to the adventurous side of
him was that he would probably like to have and
carry around wooden sword. He's ready for
adventures at any time. Next, of course, a
fishing pole right. He fishes. He probably
goes out every day to fish for a bit in the
mornings and then go play. Still related to fishing, maybe a fishing net
could also work. Something that he could just get into the river and swoop
something up from time to time. That could also be
fun, a fun accessory. Maybe a at a fishing
at if that exists. L et's say a fishing head. H have been in the
sun for a long time, so a head could be useful. For my last item, I would say a pouch. A pouch so you can
keep valuables that he finds outside like a really cool stone or
something like that. I'm going to say
a leather pouch. I'm going to be a bit
more specific here. We are in the fantasy
setting here, something like middle
ages, medieval. A leather pouch could work. This is it. These are
my items for Jona. If you have more ideas, you can also annotate more
accessories or probs. Just be careful so
you don't feel too overwhelmed by having
too many accessories. Then there's more
things to choose from. Once you have that list, you can go to the next sudo
with me where we're going to talk about references
for those items. I will see you right there.
4. Finding References For Our Props: And welcome back. When never
planning a new character, it's good to first gather good references of
what we have in mind. This is true for every
aspect of our character. There looks, outfits,
possible color schemes, and of course, props
and accessories. In the previous videos, we talked about making
a small list of accessories or props that will make sense for
our character to wear. The next step is to look for references for each
item on our list. You can find these
references from many places. You can go online
to websites such as Pinters, right
on a search bar, what you're looking
for, and then you can save whatever you're
interested in into a board. You can also go to free
stock photo websites such as Splash and Pixabay,
and do the same. Whenever you find
something you like, just unload the photo to
your computer or phone. Another good option is to go to your favorite
clothing stores, websites and see what
you can find there. But you don't need to limit yourself to whatever
you find online. You can add an extra
personal touch to your character by using your
own stuff as reference. I'm sure you could
find a special item or accessory at home that would perfectly fit
your character. If you do, be sure to take a few photos of it so
you can draw it later. Finally, if you find
anything interesting while out on a stroll,
take photos of it. Everything counts
for inspiration, so try together as many
references as you can. Even if you're not using
them for this character, in particular, they might be
useful in other projects. Now, once you find a few
references for each item, it's time together everything together in a small moodboard. I have a template right here
for you to download and use. Just fill it out with
all your references and then keep it so you can
use it throughout the class. This is what mine looks like. As you can see, there's nothing
too complicated about it, just a few references dedicated to each
accessory or prop. I think my character could use. This is it for this video. Take your time, gathering your references and
feeling your moodboard. I'll see you in the next video.
5. How To Sketch Props And Accessories: Hello, and welcome back. We got everything we
need to start drawing. That's our next
step, sketching out our props and
brainstorming a bits, trying to figure out what
works best and what doesn't. We made a list of
possible accessories and props that might have
made sense at first. But when drawing them and trying to fit them
in your character, It's possible they
don't work as well. So Let's go through our list and references and sketch
a few options. It's good to have your
character nearby, so you can draw everything
in the same style and can test right away if what you're drawing fits the
character or not. Also, when sketching your props, you don't need to
draw exactly what you see in the reference. You can take some
liberties to make the item more unique
and personal. Sketch different things and also multiple options
for one object. Let's try to go for two sketches for each
item on your list. You can do more if you want and then choose your
favorite sketches, so you don't have so
many options at the end. This is it for now, follow me to the next video
where I'll show you how I'd go about sketching and brainstorming the props
for my character.
6. DEMO: Sketching Our Props & Accessories: Hello and welcome back. We talked about
references and making a moodboard for the props and accessories that
we talked about. Now it's time to draw
those props to draw. Now to sketch out some of those props and explore
them a bit more. I have here my moodboard. I gave you this template, so you can download it
and use it if you want. Just gather a few references for your items for the items
you have on your list, and then we're
going to draw them. I'm going to create here
a new layer on top. Grab my pencil brush right here and I'm going
to start sketching. The first item on our list
is the wooden sword I have here this image that I really like because
it's quite simple, but it's not just a piece
of wood, so I like it. I think Jonah would like
something like this as well. The thing I'm not sure about yet is if Jonah would
Jonah's father, for example, or someone else
make this word for him, or would this be something
that he made himself? If he made he made it himself, I would say that he would just have a piece of wood he found. And just gather it just a few pieces of
wood and there a sword. These are both my ideas, a very simple some
pieces of wood put together and
there's a sword, or if someone would make
a wooden sword for him. These are my two options. We're going to be
doing two sketches a list for each item. Next on the list, we have the fishing pole, And I found this image. I think these are miniatures, but I really like the simplicity of the fishing pole. It
does the job, right. It has the reeling
wheel right there. I mean, it's fun but simple at the same time and something
I think Jona could wear. He doesn't need something very detailed and professional right. It also fits the fantasy
setting, I think. As you can see I'm being very
loose with the sketches. We don't need to add
too many details now. We're just exploring our
options here, there we go. This is something
similar to this one. And I also thought about
doing just a stick. Just a stick with a line
attached with and the hook. Really simple. This one
could even be made by him. Again, I'm always going
back and forth with would this item be done by Jona or
an adult so he could use it. Those are my options for now. The fishing pole is done, let's see what's next,
the phishing net. Let me just check
check fishing net. I found this reference here. I only have one reference
for the fishing net. I like this one because
it has a small handle. Something that you would use on your hand and
nearby yourself, so you could get inside the
river and swop something up. It could be used in Jone's case for more than
catching some fishes. He could try and find some
kind of treasure in the river. I think I can imagine that. So very simple, just
this big round handle. The handle, I forgot how
you call it this hoop for the net and a
net, and that's it. Then I thought
about that he could also use one of those big ones. He could bring it on his back. You would have then this
big stick coming out of it. I don't know. I'm not sure what would be more
practical for him, but I do like both options. Something very simple. The nets can be really simple. We don't really need to add
too many details to them. Fishing net, the check. Next, we have the phishing head, and I do have here two options. I think this one, I
really like this one, and I think it would work
best for the setting. But I also find the other one quite
interesting with those. It would protect him
from the sum a bit more. But I would have to adapt it
to a more fantasy setting. Nevertheless, let's catch
them out very quickly. This is one of them.
Now the other head. Pieces of fabric
going to the sides. I think we can even make a mix
of both of these together. We have the head right, we have those
buttons to the side, and it could be
attached to those, something like this, or maybe
we just have the front one. I don't know. I think we could work with
something like that. Mixing both of the heads.
I think that could work. This is the good thing about
having the references and brainstorming your ideas is that then you can explore
those ideas together. You're looking at
the references, but thinking about
your character as well and trying to fit
everything together. As you can see, I had
these two options, and then had this idea of mixing them together,
and that could work. This phase of sketching
is very important because you're exploring every
single option you have. It's really cool.
I think it's fun. Now the last item is the pouch. Again, I have two options. I really like this idea
of the leather pouch, those medieval leather
pouches right. I do like this kind of design. However, I do have a problem
because this kind of pouch would be attached to a
belt or something like that. However, if we do
that in Joasge case, we couldn't see
the pouch, right. It would be beneath the poncho, which is, well,
it wouldn't work. Why would I be making an accessory that you
couldn't see to be useless. Nevertheless, I do like
the kind of design. I'm just not sure. It could work. Also,
it's a bit smaller. He's a child, and
I'm sure he will find a bunch of treasure around. Let's see something like this. This is closed, but it's
bigger than the other one. Then we have strap. That would mean that Jona
could wear it like this. In that case, we could see it. I think this design works best, but I can probably pick
something from here, like have this big
button in here. Maybe I don't know. We'll see. It's an option, but
I'm definitely leaning into the one with the
strap and bigger one. As you can see, these
are my sketches. They are very, very loose. They do not have a
whole lot of detail. Of course, they're not in the
right sizes. That is fine. We're just exploring our options and getting familiar
with objects as well. That's also important.
You're going to be drawing these objects a lot. This is also a good
opportunity for you to see if it's something that takes
too long for you to draw. If it's something that
you like to draw, that's also important obviously. Those might be factors when
choosing the final items, which we'll be talking
about in the next video. Just follow me to the next video and I will see you right there.
7. Choosing The Right Accessories: Hi, and welcome back. We have our sketches, and now it's time to
choose a final sketch. We're going to check and see which sketches go better
with our character. We're not going to add all
five props to the character. That will make our
character way too busy, but also we to take
too much work to draw those every or
almost every time. Yes, some props might not be needed every time you
draw your character. Can be situational.
But most of the time, when it comes to accessories, they'll be almost
always present. First, pick your two favorite
props or accessories. If it's too difficult
to pick just two, you can choose a
maximum of three. Now grab your character
if you haven't yet and have fun placing
your sketches on them. Try different placements
and positions. Take this way and that and see what are the
sketches that work better. Remember that we drew two
sketches for each item. Test in both and then choose the one you think works the
best on your character. Take your time and try
different options. You can also follow me to
the next video where I'll be choosing and testing my props and accessories on
my own character. I'll see you right there.
8. DEMO: Testing Props & Accessories: Hello again artist
and welcome back. As I said before, now it's time to test our props
and accessories. We chose five, at
least five props, but we're not going
to use all of them because it will
be a bit too much. Your character will
be a bit too busy. What I'm going to be doing now is test the
ones that I have, the sketches, and then choose what I want
my character to use. I have here my character
in different views. And I'm just going
to select the items, try them out in my character. First, let's see the sword, and we can, of course,
test each option. This might be a bit
too big for him right. Something like this
would be better I would say he would
wear this on his belt. That's what makes
the most sense, or something like
this, which can work. Now, if we would go with the actual wooden sword
or something handmade, I'm not too sure. I like this look better
than this one. For example. So I'm going to just so I don't
have too much stuff here, I'm going to eliminate
this one already, Woop, and we choose
this wooden sword. Let's see the next
one, the fishing pole. This is all just picking stuff, moving to one side
and the other and trying to decide where I
would want those things. I would imagine the wooden pole the fishing pole
to be on his back. Now it's a matter of deciding if I would want something
very dimentary, something a bit more
professional, let's say, But I'm leaning this time, I'm leaning into this one, something simple, because I also prefer to have
stuff with less detail. According to my style, I rather use having stuff with
not a lot of detail, something simple, but that
you can recognize what it is. I'm leaning forward this one. It combines better with the
character itself, I think. Let's go for the pouch. First of all, it will be
smaller right and once again, it would be on his belt. If it's here, can see it right. You will only see a bit of
it, which isn't terrible, but I think it will be more fun if we had
something like this. Of course, this is very rough but let's just this
one is behind. Okay, something like this. That's fine. It
could work, I think. Now the head right, we have two different heads. Let's choose this one first. It will be something like this, but I do have a bit of
a problem with this. Because he has this very
distinct hairstyle. If I do this, if I add a
hat destroys the hairstyle. You wouldn't see the
hairstyle as much, and I think that one of his most unique details is the hair. I really
like the hair. I'm not too sure I
want to keep a hat. Going to use this one, which is the mix of both
that I really like. This one hides even
more the hair. No hat for John. Situation here might
be a bit weird. Maybe you wouldn't imagine him carrying the
sword all the time, so I might keep it and I don't need to draw it
every single time. Now for the fishing net, I'm also a bit divided because we already have
a fishing accessory, fishing prop, and I'm not sure if I want to add
that many stuff. This could be an option. We have the one to
the smaller one, which is again a problem. If I want to keep both of these, a third thing here would be
a bit too much, I think. I'm also not too sure
about it either. I think I'm going to go
with the fishing pole, the sword and the pouch. I think those really
relate to the character. He fishes. Of course, he walks around with
a fishing pole, having a pouch to keep weird or curious things that he finds when he's out
is also a good idea, since he's a very adventurous. He's looking for stuff around
some treasure and the sword related to the part where he wants to be an adventurer
and the night, he plays with his friends. Yeah, I think I'm
moving the net, and I managed to reduce
those five items to three, just as some stuff,
choose your accessories, and then you can follow
me to the next video.
9. Finishing Touches & Coloring: Hello, and welcome back. We have our props and
accessories chosen. The sketches are also done. All we have to do now is finish the drawings
and add colors. The first part is quite simple. Just go over your sketch
lines with a new brush, drawing cleaner lines
this time around, so it looks similar
to our character. This is now the time
to fix anything that needs fixing in your
accessories and props. Add or remove anything
you find important. Once that's done, all we
have to do is add colors. This part can be trickier. However, we already
have our character. So we can follow
their color scheme. A good way to do this
is by picking one of our characters colors and maybe changing their tone
or saturation a bit, so it stands out from the rest. If your accessories have
more than one color, you can look up at the main
color of your character. Then go to the color wheel and look for its
complimentary colors. Will certainly work with
your character colors. Another color harmony you
can use is the analogous. Again, pick one of your
characters colors and then go to the color wheel and check which colors are adjacent to it. Use those for your accessories. There are many different
color harmonies to use. But these are the easiest
to use and combine. Of course, if you're drawing a very specific prop with a
very specific color scheme, then use those colors. Take your time and if you want, test different colors
for your accessories. In the next video, I'll be finishing and
coloring my drawings as well, so you can draw along with
10. DEMO: Finishing Touches & Coloring: Hello, and welcome back. We are here and ready for the final stage
or almost the final stage. But when it comes to drawing, it is the final stage now. I have the accessories
that shows. What we're going to do now
is clean up everything and do a final drawing of
each of our accessories, and then color them. Let's do this. I'm
going to start by making another bit more
detailed and cleaner sketch. Choosing a darker color, trying to not forget None of the elements,
something like this. I want to draw them in a way
where I can see most of it, some perspective, so I can understand the object
I have here. No. Something like this.
That's good for now. I don't need to have a
whole lot of titil here. Jona has a very simple design, so I don't really need it for the accessories to have
a lot of detail either. Maybe there's a wire thing that keeps the line close
to the fishing pole, and then the hook. Something like this.
Now for the sword, I'm not changing much
in the sword, I think. I like how it looks. I think it looks very childish, let's say, but polished, like someone made some
with some skill made it, but left it very simple
for a child to play with. My sketches are the, and now I'm going to
hide the first one. Lower the opacity here, and now create a
new layer on top. Grab black color and
then grab my pan brush, and I'm going to
draw the final line of these accessories. I'm going to finish my drawing. Just going over my
lines, take your time, do not rush this part.
It's very important. Poch the new layer. Each item is in one layer. I don't want it to be perfect because if this is a fishing
pole made from a stick, sticks are not perfect. They are not very regular
shape most of the time. I'm happy to have something a bit band and
weird fishing pole. Now finally, the sword. For the sword to make
things a bit quicker. I'm going to draw half
of the sword like this. This. Then first, I'm going
to move it to another layer. There we go. I'm going
to copy this layer. Copy this layer and then apply a free transform and
then flip horizontally. Now, press shift and
move it and there we go. I have my sword and
now all I have to do is whatever needs fixing. I'm first going to merge
these two layers together. Now let's um in and erase the things
we don't need and then connect whatever
needs connecting and I think they're
pretty much done. There we go, very
simple designs. All I'm missing is colors. For the colors in my case, these two are wood, so it's going to be
a lot of brown here. The pouch, if it's
a little pouch, it's mostly the same as well. I can add a bit of color, perhaps a bit of the yellow or the orange or maybe the
blue so it contrasts, we'll see we'll start
with the brown. I'm going to add here. I'm going to start with the
sword this time. I'm going to crab first, as we talked about before. The method I'm using is I'm going to pick colors
from my character and then change
their tone a bit. I think I'm going to go
to the yellows a bit. Let's see. If I like this. Something like this.
I think it can work. Let me grab that brown again and then go perhaps for something. A bit darker, my paint pocket, something like this, perhaps. I'm not sure about
this color here. There's things around. Yes, this is it. This is
what I'm looking for. Maybe just a bit darker. Yes. Yeah, I think this is
it. I think this can work. Now for the fishing pole, I think I'm going
to do the same. I'm going to add a layer below the lines for
the fishing pole. And add the colors. I don't want to have a whole
lot of colors right. It's not too much a gray for the hook and this
little bit here. I think I'm going
to grab the orange perhaps for this part here. Maybe even the green to add
the splash of color here. I think this is nice. Now for the pouch,
add a new layer for the colors,
something like this. Keeping those art toones, but a bit more polar. The button can be this color, the orange here and
the same thing. Go for something less saturated
and I like this color, but I'll have to check if
it's a it's too unsaturated. We need a bit more color
here. That's too much. That might work better.
I do like this. I think this is going to be our color scheme for the
pouch. I really like this. This is it. They all have
a very similar color. Yeah, I think this is it.
My drawings are finished, my accessories are finished. Follow me to the next video.
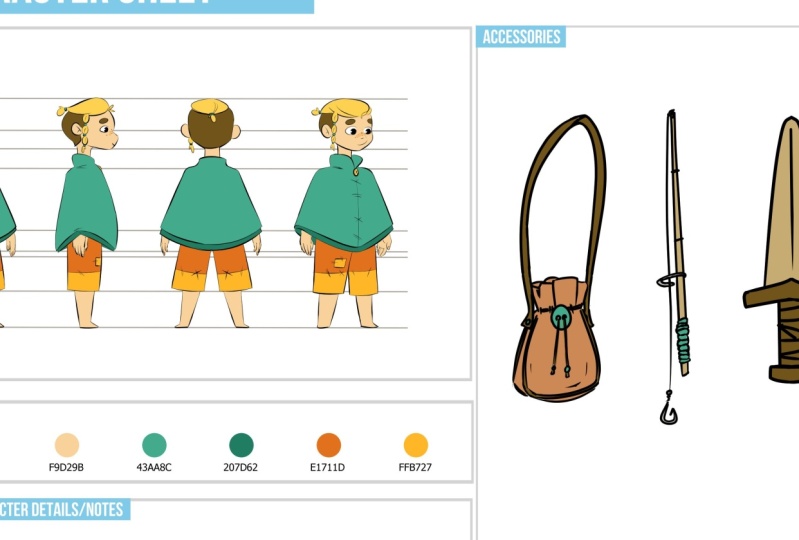
11. Adding The Props To The Character Sheet: Hi, and welcome back. We are done without drawings. Now it's time to add these accessories and props
to the character sheet. This way, you'll always
have a place to look at whenever you need to check
what your character uses. The character sheet
is the place where you put all your characters
visual information, a turnaround, the color scheme, some tra information, and notes, and now they're accessories. I'll give you a template
so you can download it with places for
each of these themes. All you have to do is add
them to the templates. I like to keep a space for all
my characters accessories, but not only the drawings. I like to add their colors as
well with respective codes. I never get the colors wrong. As a bonus, you can also draw the props in
different perspectives. So you can have even
more references. But in short, All we're
doing now is moving our drawings into
the character sheet along with colors
and their codes. This part is a bit
less creative, but not less important. Try to add as many details and information as you can
into your character sheet, so you don't ever miss anything about your
character when drawing them. This is it for this video. Follow me to the next one where
you can see me organizing or reorganizing my
character sheet with this new
information and props. I will see you there.
12. DEMO: Adding The Props To The Character Sheet: Hello, and welcome
Back. So this is it. This is the final step of our character accessories
and props creation, which is adding everything
to the character sheet. This is a template
that I showed in the previous video and don't forget to download it if
you want to use this one. Of course, you can do your
own. You're free to do that. Otherwise, you can use the
one that I made for you. I already have here
my turnaround, the one I've been using so far, the color palette all organized
here for my character. Then a bit of
details about John. Now I have here
the free space for the accessories and
the color palette. What I'm going to
do now is grab each of these and move them
to the other side. I'm also going to merge these two layers
and move it here. Then I'm going to grab the fishing pole and
do the same thing. Move it here. Going to make
it a bit bigger perhaps, looks a bit too
small there we go. My also do the
same for the pole. It's a bit too small, right. Don't you think, make
it a bit bigger. Now finally, this four. Just organizing things
and moving things around. Nothing too
complicated right now. These are done. Find my circles, there we go and copy them. I'm even going to grab this one specifically since I do have this color on my accessories
or props in this case. There we go. One here. Now let's copy it. We have one, two, three
colors for the pouch. I'm going to make three
colors right here. Let's go right ahead
and copy the colors. There we go and
now want this one. This one, right here. This one is done,
we have the colors. First, I'm going to lay out
the colors and then and the cos. We actually we have
three colors as well. We have this one here. We
do have the green again, and then I have to zoom in here. To grab the gray. Let's not forget about the gray. We can barely see
it, but it is there. Now let's grab two colors, copy paste, and
then move it here. The sword only has two colors. One is this, and then a
darker brown. This is it. Now all I have to do
is add the codes. I'm going to grab the color here and then double
click the color. Now I'm going to
copy the hex code. We can close it,
grab the text tool, and then paste it. Again, copy paste,
grab the code, copy paste, grab the
code, and on and on. As I said, this part here
is not very creative, but it will be helpful
in the future. My character sheet is complete. We have our character
with a turnaround. We have the character color
palette with each code, we never forget
and never get the color wrong. A few information. We remember our
character, I guess, and the main points
of our character. The accessories we drew
throughout this class. Finally, the color
palette for each prop and accessory along with
respective codes. You have all information about your character that you can use as reference
whenever you draw them. I hope you have
fun. Don't go yet. Follow me to the next video, where are we going to be talking about your last assignment. I will see you right there.
13. Final Assignment Time!: Hello again and welcome back. We've gone through everything
you need to know to create andro accessories and
props for your character. Now it's time for your
final assignment. If you've been doing
everything until now, that is great and
amazing of you. If not, that's okay. And this assignment
will be especially helpful and maybe
less overwhelming. Your final assignments,
I want you to draw one prop or accessory
for your character. Draw it from start to finish,
including the columns. Then add it to the
character sheet just like we did
throughout the class. Once you're done,
post your work. I can't wait to see your
characters and your drawings. Before you go, follow me to the next video for a few
final words on this class, so I will see you soon.
14. Before You Go! Conclusion: Hi again, artist. Congratulations on
finishing this class. I hope you had fun
and learned a lot. Also, thank you for joining. It's been a pleasure guiding
you through each step, and I'm excited to see how your character
designs have evolved. If you've enjoyed this class
and found it valuable, I would greatly appreciate it if you could leave a review. Your feedback helps
me improve and helps other students find the right courses
for their needs. Keep practicing, stay creative, and remember, keep on drawing.
 Patricia Caldeira, Illustrator | Digital Artist | Designer