Transcripts
1. Introduction: Book design might
not be the most visually stimulating
editorial workflow, but it is certainly one
of the most satisfying. It requires an incredible amount of attention to
detail, precision, and a solid understanding
of in design time saving features like
grab fin and change, scripts, nasty styles,
text variables, and more. We will start by diving
into the anatomy of books, breaking down all the
typical components that you would
find in the front, body, and back matter. Then I will show you
beautifully designed books and explain what makes
their design successful. For our book project,
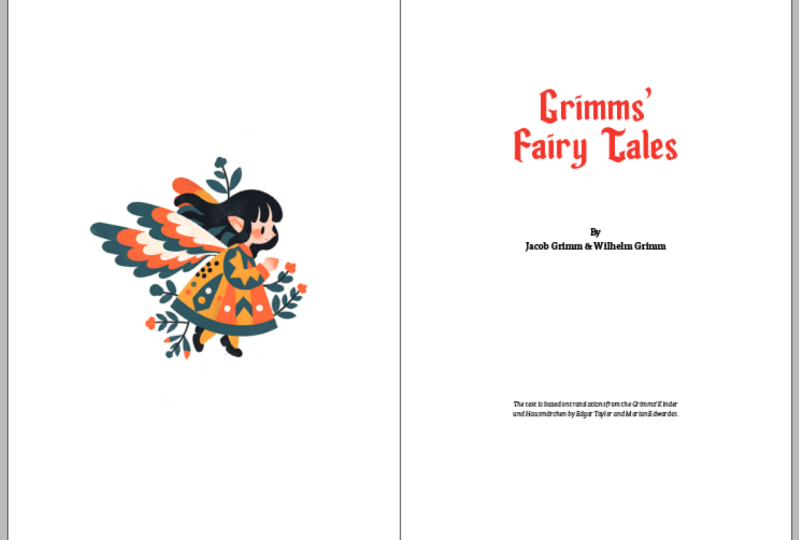
we will begin with a raw unformatted copy
of fairy tales by the Green Brothers and work
through fixing errors and formatting issues
across the hundreds of pages in the document. As we refine the body matter, we will add captions to unique illustrations
generated with Mjourney and incorporate decorative drop caps
for each story. We will also explore
the benefits and challenges of working
in a single long in design document versus using multiple shorter documents
combined in a book file. We will also cover useful
features like footnotes, notes and cross references. Next, we will focus on the
front and back matter, generating a table of contents, an index of illustrations, and even an appendix of
commonly used words. We will design the
book cover directly in design and explore how
to improve the chances, readers will pick up the book from the shelves of bookstores. Towards the end of the project, we will see how to properly use pre flight and
export the book for both print and as various EPAA formats for
digital reading devices. Additionally, we will touch on advanced text handling
workflows that improve collaboration
with writers and editors, comparing link document files with more professional
tools like Adobe Incopy and also using
features like track changes. And as a cherry on top, we will learn how to create
custom Java scripts with hat GPT to streamline
our in design workflow. By the end of this project, I'm sure you will feel confident designing books and
other log format documents.
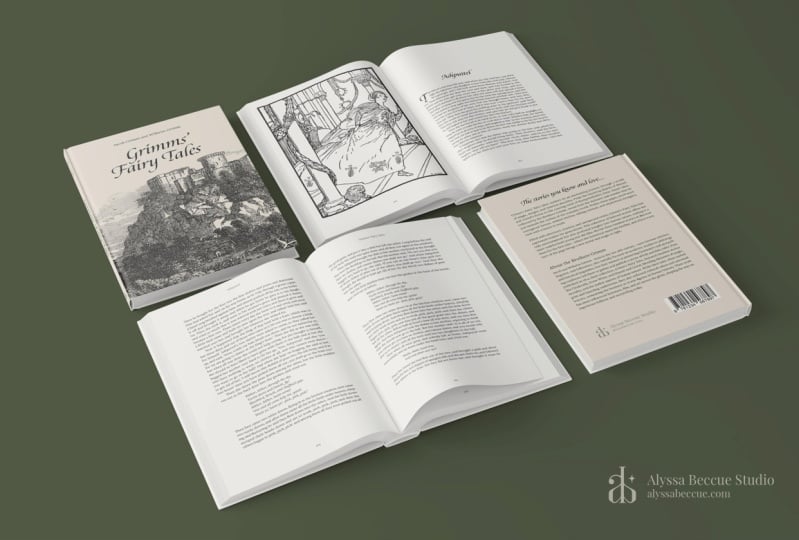
2. Book anatomy and standard formats: Before we get started
with this project, I just wanted to give a quick mention about this
guide that I put together, which can help you
to learn about the parts of a book block. So it's generally divided
into three main sections, the front matter, body
matter, and back matter. The body matter is
what we will be mainly working on
in this project. So that's where you
have all the stories or chapters or sections, but it would also normally
include the footnotes, notes, and even the
prologue and epilogue. While in the front
matter, almost always, you would have at
least the title page, then the table of contents. And then you could have a lot of additional things like preface, forward, acknowledgments, accolades, introductions,
so on and so forth. And you can read about all
of these in this guide. And then within this project, we will actually be also creating things that would normally go to the back
matter of the book, like an index and additionally the index
of illustrations. But it is worth
mentioning that it really depends on the type of book that you work on that how many of these different sections or elements you would end up
having in your final design. But in general, if you're
interested in book design, you should definitely
familiarize yourself with all
of these terms. And similarly, it is also
important to be familiar with the commonly used or
standard book sizes and their aspect ratios. And for this project, I will
be using the octavo format, which is the six
by 9 " page size or 150 by 230 millimeters. If you want to see some
great physical examples of all the different
parts of a book, make sure to watch
the next video. However, if you are eager to get started with the project, you can skip that and just jump straight to the
document setup lesson.
3. Inspiration - Books: This video, I wanted
to go through a few books that could
be interesting to use as a reference and to learn a
little bit about the terms and techniques that
book designers use. And a really interesting book called the book cover
is all about making a book and industrial bookbinding techniques
is a good example that a book can be very
different to your usual setup. So you can see this actually opens up in a very unique way. And the way this works is
actually it has two parts. This part is in English, and then the same thing is
there on the back in Spanish. So I can start here, and I would get
the same contents, but in Spanish
instead of English. So that's already quite
a unique solution. But we also have a really
cool combination of colors. A very high contrast
between this dark, brownish color and the orange. The orange, I'm pretty
sure is a pantone color. And here in the
interior front flap, we already have
something interesting. This is what we
would call a Clopon, which is usually
a brief statement about the book's production, including information
about the typeface, paper, printing process, and maybe acknowledgments
related to the design. So since this is obviously a
book about creating books, or designing books,
it's very specific. So it says where the
manuscript was developed, they use Google Docs for the info graphics were
drawn in Illustrator. The layout was
done in in design. This is the typeface
that they used, the color profile they used, and so on and so forth. So lots of additional
information here. You can also see that they use 14 signatures with
12 pages each, and the binding or the stitching is actually made visible. So I'm just going to try to
show this. It's revealed. That's again, one of the ideas of this book that you want to be able to see how the
book binding was created. And then generally, the
design of the book is also interesting or
the aspect ratio of this book because it has these very tall
vertical layouts. So a spread two pages together creates almost
something like an A four. So an actual page is almost like just a half of an A four size. And many of the pages
are actually inverted. So we have a darker
background and white text, which is also unusual, but it works quite
well in this case. Even though sometimes it might
be a little bit too long to read text that
is set like this. Here we only have these very
short paragraphs and more like infographics explaining
how the books are made. Now, we have our folios, the page numbers at
the very bottom. We also have the book
title here in the footer, and we don't actually
have running head. At least I don't think there is one and no header
content at all. And in terms of the font, it seems like they use that single font family Weibo
which has a lot of variety. So it looks very
different here on the heading compared
to the deck, this intro paragraph,
and then the body copy. And another cool thing I like
in this book is how they use also this different
direction of the text. So if I turn this
around, we can see it. That is like a chapter which starts in a
different orientation. And if I want to find the
next chapter quickly, it's actually quite easy because I just have to look for
the same orientation. In general, it's just a
very unique book format. But now let's look at something a little bit more traditional. Here's a book by Scott
Belsky, making ideas happen. Really, really cool book. And first of all, we have our
dust jacket or case wrap, which we can take off. And then, by the way,
it's a good example to show this on these hardcover
books like this one. You would obviously
have your front and back cover and the spine. But then we also have
the wrap or jacket, where we also have
the front cover, the spine, and the back cover. But then we also have
the interior back flap and the interior front flap. In this case, in the
interior front flap, we have an introduction
to the book. On the back cover, we
have the accolades, which is praise or endorsements
by critics or authors. And then on the
interior back flap, we have a short
biography of the author. Now, if you put this away, then let's take a look at the actual hardcover and
the contents of the book. So the front matter starts
with the half title. This is the page
that only contains the title of the book without the subtitle or author's name. Then we have the title page, which also has a tagline overcoming the obstacles
between vision and reality, the author's name and
the publisher's name. Then we have dedication. This is a brief message
where the author dedicates the book to someone
or a group of people. And then here on the left or
reversal side of the spread, we have the copyright page, which can include
legal information. The edition, the publisher, the ISBN code is also here. And usually this is
where it's mentioned, who did the cover art. And we can also see the
font used was Jensen Mt. Now moving further in, we have a lovely
table of contents, where we have this front
section which would be still considered part of the
front matter of the book, and then the actual
body matter starts here where we have
the first part, then we have the chapters, and within the chapters, we have the sections, and that's basically
how it continues. And it's really
nicely formatted. It's very clear and
quick and easy to find the hierarchy between
the different elements, so the parts, the chapters, and the sections or subchapters. And then at the end of
the table of contents, it's also very clearly indicated that this would be the
back matter of the book, which contains
additional information that follows the main content. There can be references here, indexes and other
supplementary material. Now we have another
half title here. And then we move into
the front matter, and then it just carries on. We have a really
nicely formatted text justified with hyphenation, no space between the
paragraphs, first line indent. And by the way, if we
go back a little bit, you can see in this case, even at the beginning
of this section, we still have a
first line indent. So that's an option that you can decide
whether you need or not. I normally would have
this not indented. When there is already
something that begins, there is no need
for an additional indent most of the time. Like within this box, we can see here, they didn't use an indent
or first line indent. They only use the
first line indent for the rest of the paragraphs. Like the way the headings or the titles are write aligned, and we get a lot of
negative space around it. So it really stands out. It's a really easy thing to find whenever you
go through the book. And I also like the way the first three words
are capitalized, also set in bold and set in a different, more
condensed font. That really stands out and it's a great entry point to help us get started reading
this part of the book. Terms of the header, we have
the title of the book here, and then we have a running head, which refers to the section or the chapter that we are in. And you can see my
little scribbles here. I made some notes when
I was going through it. Then we have a
consistent left indent on certain sections
like these that can be conversations or
something that needs to be highlighted or isolated
from the rest of the text. And if we jump to the
back of this book, we can also see a great
example of an index where we can see these
organized sections. So we would have the
first level entries or parent entries, like action. And within that, we
have a couple of child or second
level index entries. And of course, wherever these
are mentioned in the book, we will see the
page titles for it. And if a topic is discussed
over a couple of pages, they would just
have a dash there. So, for instance,
the meetings is discussed from the 78th
to the 81st pages.
4. Inspiration - More books: Now let's look at
a beautiful book, again, a hardcover book I
already took the sleeve off. We can see a great example
of a lovely finish here. We actually have a
quote from the book. So instead of the title being
here, the text is there. We don't actually see any
reference to the title or the author on this inside part of the case, which
is interesting. But there is a little hint
to this being the June, obviously, the
desert and the moon. And then if we go in here, we have the end paper here with the
illustration of the worm, and then we go in
to the front meta, some additional novels
by the same author. Then we have the title
page and already mentioning who wrote the
foreword for this book, and we have, again, the copyright page here on the
left, there's the forward. And we can see that
the page numbers or the folio is set in Roman
numerals in the front matter, and that continues
until we get to obviously the table of contents normally doesn't show
the page number. Then we have a half
title page again, and then the actual
body matter starts, and now we have the Arabic
numerals in the folio. So you can just turn
over a couple of pages, and we can also see a
commonly used technique. So within a chapter, you can still have some
division in the copy. Of course, if there is a
quotation from something, in this case, it's a quote
from someone's diary. Princess Eruln's diary. But yeah, what I wanted
to show is we can still have some breaks
within the text, which indicates a subsection in the chapter or sometimes
referred to as chapter break. Let me just see if
I can find one. I saw one earlier on
one of these pages. Let me just see. Yeah,
there we have one. So again, after this
short pause or break, we again have no
first line indent, but then all the
other paragraphs would have the
first line indent. Yeah, again, it's
a beautiful book, and we can also find at the end a couple of
interesting things. So we have an
appendix or glossary. In this case, it's terms that are unique to this story
that we can find here. The terms themselves
are all set in bold to separate them and to
make it easier to find them. And then there's
also a little break to separate the
different letters. So we have all the
terms starting with B, then a little break then the one starting with C and
so on and so forth. Now here's a small book
HegatyO creativity. There are no rules. Great, little read,
highly recommended. I love how it has
this red and yellow, really strong colors
already at the front. Then we turn into
black and white. We can see a picture
of the author, and then we have a half title. And then we get into
this very unique setup where we have words separated
between the spreads. So if we read this
there or empty page, no single letter
on each page ruse. So that is once again, the title of the book, but it was written
over so many pages. So you could consider
this, I don't know, a quarter title or even less than that
because it took actually a couple of spreads to have this half title
section covered. A really cool and unique thing. And this is something that
I wanted to emphasize here that whenever
you design a book, just like with
everything in design, it is very important to
give your book a character, so make it memorable. So make people relate not only to the contents
of the book, but the actual physical
object itself. And this book has a lot of
character, for instance. So we have pages with scribbles over it,
really feels personal. It's almost like the author
was scribbling here. We have some crazy
solutions and ideas here. Let me just find
another funny page. There's also, again, I think, like, pages where normally, you wouldn't set
texts like this, even if it's set so big
because you want to avoid the creep where it's
hard to read the text. But in this case, we are
breaking the rules, so why not? And it's really cool.
I really like it. And yeah, just in general, this book has a
lot of character, and it's really charming and something that
we would remember. Now, similarly to
this, this book also is just an
amazing thing to hold, has an amazing feel to it. We have the embossed text, and it's just really richly decorated and very
elegantly designed. I love how the actual
page edges are all black. But of course, the pages
themselves are set in white. So even though the inside of the book is more traditional, there's not much
uniqueness here. The actual cover really
gives it unique experience. It's a great material
to hold as well. And one additional thing
I wanted to show just briefly because it's something I mentioned throughout
the project. It's especially
important when you're choosing your body
copy for your book. It's the typographic color
and the text block density. So for instance, here we have
the Treasure Island book. And if we get into
the body matter, we can see like this
spread, for instance, feels a little bit more dense compared to some of the other
books we've seen so far. And that can be because of the smaller font size
that we have here, but also it can be
because we have narrower margins on
all of the edges. So this book has a bit
higher textblock density. And this is the
term that describes the overall compactness or
looseness of the textblock. And like I said, font size, line spacing or letting, letter spacing or tracking, and margins influence
this mainly. But then we also have
typographic color, which refers to
the overall shade or appearance of the
text on the page. And again, this is
something that is influenced by the margins, line spacing, word spacing, and the density of the text. But I normally say that the typographic color really depends on the font
that is chosen. So in this case, again, it feels like it's
a darker shade. So we're not talking
about actual color like black or I
don't know, yellow. We're talking about more
like shades of color. So this book has a darker
typographic color. And then we have a book by
John Cleese about creativity, which again, has a
very different feel, much larger font size. And because the book
itself is quite small, there's not much text
that fits on a spread, but we also have a
lot of inner margin here and generally a
lot of leading as well. So this book has a very
low text block density, and because of that and also because of the font
that was chosen here, it also have a higher or
brighter typographic color. And both of these terms refer to the visual
weight of the book, which is really a crucial part
of the reading experience. And I'm going to talk
about this in more detail. Once we are choosing fonts
in our book project. I just wanted to make
sure that you see some examples of this in action. Maybe just one last
reference to negative space. That's also something
that's crucial. You have to always use this to create pause within
the experience, but also to make it easier to find certain sections in a page. So in case of this book, all the titles or headings
are set the same way. So always have the same amount of negative space on the top. And then maybe just one
final mention since I have this book in my hand is how nice this complimentary color
pairing is between the end paper and the cloth
covering of the hardcover. So, yeah, that's, again,
a beautiful pairing of colors that we have here.
5. Setting up the document: First step of every
project has to be the creation of
a new document. You probably already know this, but it's under the
file menu menu, and there's document there. Within this dialogue box, I always recommend to turn the preview option on so you can see the document you are creating already
in the background. So if I change
value, for instance, the width, I can see straightaway updating
in the background. And for this project,
I would like you to use inches as the units. It's just easier to set
up the size in this. So this is the octavo format, the six by 9 " document size. You are welcome to use
another size if you want, but this will work very
well for this project. And if you want to follow along, I recommend using
the same values. Now, it's important
that the orientation has to be in portray. Facing pages, you
have to turn on. Also, primary text frame is
crucial for this project, so make sure you have that on. And we only need one
page to start with. But the start page number, I would recommend to
set to number two. So this way, we will
be starting with the spread instead
of a single page. Don't need columns. And to begin with, we don't
need to change the margins, but we will refine these later. And since we won't be having any full page images or any images that will be going
all the way to the edges, we also won't need to use bleed. And also the slug, I will only
be using it for the cover, but we will come back to that
much later in the project. So for now, this is the good
starting point that we want. And of course, we can
already give this name. So I will call this
grim book body. And since I already
have one by that name, I will also just put the
word tutorial in there. You don't have to type that. It's just only in my case. And I'm going to also
save this as a preset. It's recommended to do that
if you work with books often. So I'm just going to
call this Octa book. Hand safe preset. So that's going to
be available in the future from the
saved category. All right. So now that we
have everything ready, we can just create
this new document. And as you can see,
I rearrange my panel slightly or customize
them for this project. I like to keep the
pages panel open, and I will probably keep it a little bit narrower,
something like that. But if you haven't changed
the setting already, I would recommend to right click somewhere around here where the pages show up and choose
view pages horizontally. So this way, you will be
able to see more pages in a smaller or narrower panel because we will have a lot
of pages in this project. And besides this,
we will be using the paragraph styles
most of the time. Then we will need a
few character styles and also object styles, so it's worth having
those open, too. Any additional panels that we will need, we can open later. But I know, for instance, we will be using scripts. So from the window
menu utilities, you can already open this up. This can be tugged in
here on the right, just so we can easily access it. When I click on this, I will be able to see what's inside. Another panel that we will
be using is the text wrap, so I'm just going to drop
that in here as well. And then any
additional panels that we will work with,
we can add there. But if you want to also
save your workspace, whenever you work on books, you can just turn this into one. So you go up here
on the top right, you choose new workspace, and then I'm just
going to call it book design. Let's click Okay. So now we can feel
much more comfortable since we can see we
are working on a book. Now, first of all, since we use the primary text frame feature, we can already see
that showing up here. And if I jump to
my parent pages, I can also see that these
text frames are created here. And if we go to the view menu, under Extras, we can
choose show text threads, and that's going to tell us that there is already a
connection between the verso and rectal sides of our spread or
left and right side. And the reason why we are
using this, of course, is because we will be
importing a lot of text, so hundreds of pages
worth of text, and using a primary text frame automatically sets up the
smart text reflow for us, which by the way, is
indicated here on the left. So that little icon there represents that this is
our primary text flow and is going to work on this page because we also
see the icon right here. Now one important thing
that we need to change is the margins and the size of the text frame,
because for a book, it's actually better to have more empty space
around the edges, especially on the outer edges
and on the bottom edge. And before I go into
changing the margins, I just wanted to also mention
an important setting. It's in the preferences
from the in design menu. If you are on a PC, would
be under edit preferences. And this particular option
is inside the type category. So if you go there, you will
find a smart text reflow you can see here there is an option to delete empty
pages automatically. That is actually very useful. So I would recommend to turn it on if you don't already
have it enabled. And once you've
done that, you can come back to the parent page. And here, what I would
like to do now is to fix the margins
because for books, we need more margins, especially on the outages
and on the bottom. That's just simply how
books work better. So whether it's printed
or in an eBook format, I always recommend to
follow the standards or at least do something similar to what has worked for centuries.
6. Using the Van De Graaf canon for defining margins: And there is actually a very
old traditional technique called fundagraph cannon, which can help you to
define the margins. Now, to be able to do this, all you have to do is to use the line tool and draw
a couple of lines, starting from the
bottom left corner, all the way to the top right. And of course, we will
need to see these lines. So let's just add the
stroke color to it. Then let's draw another one from the bottom left
to the top right. Once again, I'm just going to change the color on that one. And then when we click away, if we increase the stroke
size and then draw, then we don't have to
do this every time. So I can just draw
another one from the bottom left corner
to the top right corner of this page and do this
also on the right side. And the lines should snap to
the points within the page. And so far, these four lines or guides created a
symmetrical structure. However, at this point, all we have to do is to find the intersection of these two lines here
on the right side. And if this doesn't
work perfectly, just zoom a little bit closer. Holding down the Shift key, you can make sure
that this line is going to be straight
and just drag it all the way up to the
top edge of the page. And then from that point, we want to draw one more
line, the last line. So from up here, we want to draw down to this other intersection
point on the left page. And by the way, if
you're zoomed out, you can always go back, use
your direct selection tool. And select the point
that you created, align it if it wasn't
perfectly aligned. But now that we have
these lines in place, I can select my text frame
and I can start adjusting it. So the top left corner would have to go in
this point here, and then the right side of
this needs to go there. So again, that point
need to align with this diagonal that we
created along the spread. And then the bottom edge has
to come all the way up here. So the corner has to
align with that point. Now you can see that compared to the default margins that
we have in in design, this is a much
smaller area within which the text would flow
based on the fundograph canon. Now, again, I'm not saying
that we have to follow this, but it's a good guide for us. So this is actually quite
close to what we need, and I can use the frame as a comparison because now I can go in and
adjust the margins. And just to make things simpler, I'm going to hide these lines. So let's just hide them. The layers panel, I
could do that quickly. Now notice that I still
have my pages selected, the pattern pages
when I go to the at menu and choose
margins and columns. I still have the
measurements set to inches, but I'm going to turn off
the chain at this point, and I'm going to change
the top margin to 1 ". I'm going to make the
outside margin also 1 ". Notice how that came closer to what we have set
already for the frame, but still allows for a little bit wider space for the text. Now for the inside, I want to have 0.75 ". Again, that is close to the original text frame
that we set up here. It's actually slightly wider. And then the bottom, I'm going to set to 1.5 ". So that's the largest margin, but it's still not as wide or tall as what we created
with the cannon technique. These are the values
that I recommend to use. And of course, if this is
something that you like, you can save this into your document template
that we created earlier, just so you don't have
to remember these values next time whenever you
start a book project. I'm going to click Okay,
and at this point, all we have to do
is to quickly align our frame and resize
it to the margins. Do the same thing, of course, here on the left side as well. So let's drag that in place. And now we have a good
looking book format. So comfortable space
around all the edges and generally just a good sense of proportion between
inner and outer edges and between the top
and bottom edges. So one more time, if I go back
to turn back these lines, we can see that we
are quite close. So this points
supposed to be there. This point is
supposed to be there, and this point is supposed
to be somewhere around here. But again, like I said,
we use this method or technique to go in
the right direction, but we don't have
to stick to it. We can refine and update
it according to our needs. The reason why I like to have my frame size is
slightly wider and taller is because it's going to allow to fit more
copy on a spread, which will result in
less pages in the end, and that's always a good thing because we are saving
cost on print. And in case of a PDF, we are reducing the file size. But now that we use these lines, we can actually delete them. You can save them if
you want for later. I'm just going to delete them just so they
are not in the way. We will come back to
the parent page later. I just wanted to show you one additional
thing since we will be using the baseline
grid for this project. This is something that we
can reveal already here. So view grids and guides
show baseline grid. The reason why I use those specific values
for the margins, especially the top and
the bottom margin, is because it's also going
to align to the baseline. So you can see that these lines perfectly
match the margins, so they fit very well. And in case you are wondering, the baseline grid
is something you can find in the preferences that was Command or Control K on the keyboard to
get to it quickly. And then on the grids, this is the default
setting for baseline grid. So it has the following
values that you can see here. And in case you are using
different margin sizes, you might want to change
this feature from relative to top of
page to top margin, which might help to align it. But I can just keep
it on top of page, and it's still
going to work fine. In case you want to keep
the baseline grid on, but you feel like it's a
little bit too intrusive, you can always change its color. For instance, light gray could work quite nicely
if I click okay. It will update straightaway.
7. Importing the text: Now that we have our
book template ready, we can move back to the actual first page
of this document, and it's time to
import the text. But before we do that, I just wanted to mention a
couple of things. First, I wanted to
show you this website gutenberg.org is the URL. This is where I
downloaded the book from, which we will be using
for this project. And it's a huge resource. As you can see, there's
over 70,000 free eBooks. Now, if I search for Grim Tales, the first one that comes up is the one that we'll be using. I notice here that we
have actually a lot of options to choose from
what we want to download. We have the read online options, so we can see it on the web. There's a couple of
different ePub options. There's Kindle or
older Kindle option. And then there is
also the plain text, which we will actually be
using for this project. But I wanted to show you how this book looks like
in the browser. So as you can see, it's
already formatted. It has an interactive
table of contents, and we have a nicely
formatted text here. Of course, this
works on a browser, and if we adjust it, the text will flow according to the page width or browser but the most important
thing I wanted to show here is that
there is already a formatting for the poems
and the rest of the copy. The story titles are already separated and formatted
differently from the body copy, and then we could
just scroll through. And it's pretty
much the same thing repeating throughout
the whole thing. And there's quite a lot of
text in here, as you can see. I already downloaded
these files for you, but if you wish to practice going through this project
with a different book, maybe after you've done this one with the
GrimsFairy tales, you are more than
welcome to come to the Gutenberg website and
download your favorite book. However, within the
project folder, you will find a couple
of different variations. So you will have a Word
file and EPOp file, and you will have two rich
text format documents. These are the RTF files, one called original and
one called corrected. The reason I have all of
these various options is just to be able to show you
what happens in each case. So if I go back to in Design and I have this
text frame selected, I can press Command
or Control D on the keyboard to access
the file place command. That's something
you can find here. So I'm just going to press
the keyboard shortcat and then from my files copy, I'm going to select
first the Word file and notice that there is an option here,
Showimport options. You want to keep that turned on. And then when you press Open, it's going to give you
a couple of options. Out of which probably the
most important one is what do you want to do with
the styles that are defined within
the Word file? So here by default, it says it's going to import all the styles automatically. And in case there is something already defined
in your in design file, it's going to use that over the ones that are coming
in from the Word file. But you can also choose
to redefine the in design styles with
the imported styles. Or if you choose auto rename, then you might end up getting
duplicate styles like body, body copy, and so
on and so forth. If you need even more control, you can even choose
customized style Import, which will give you the
style mapping dialogue where you can actually see already a preview
of all the styles defined in the Word file
that will be imported. In case you have any conflicts, it's also going
to tell you that. But right now because
we don't have any defined styles
yet in this document, there's not going
to be any conflict, and I don't have to worry about. There's a lot of other options here like the table
of contents text, whether you want to include that while you are importing
the copy or not. So that can actually
be ignored and left out during the
placement process. And if you wish to remove
all styles and formatting, you can even choose
this option right here. I'm just going to keep the
preserved styles option on and I click Okay, just so we can see what happens. Straightaway, we run
into a problem here. Depending on the formatting
of the Word file, you can get issues
like this when text doesn't render correctly. And one thing that I would
like to point out is that even if you
undo this last step, all the styles that came in with this import and even swatches, like, as you can see here, we have word names
within the swatches. They will all stay
in the document. Have to actually do
one additional undo, which I'm just doing Commando
Control Z on the keyboard to assure that you don't have any leftovers from this import. So you can check
your stay panels. You can check your swatches. If there is nothing that
was not there by default, that means that you
went back enough in the steps to get
rid of all of that. And unless you have a very professionally
prepared word file, that is set to the
specifications that in design can work with, I would always
recommend to work with a plain text format
that you can mold, shape, and refine to the exact specifications
that you want to use. And that's what we
are going to do here. It might take longer, but it's going to
teach you a couple of very useful techniques. Having said that, I
want to just remind you that if you want
to skip this stage, you still have the
option to choose the corrected RTF file because the original plain text
file that comes from the Gutenberg website actually
has quite a lot of issues. Most important problem
with it is that it has line breaks at
the end of each line. So as you can see here, when I change the
width of the document, maybe if I go a bit further
down, you can see it better. It doesn't update, and if
I move it further down, you can see how the lines
are getting messed up. While with the corrected version that I also have available, you have a perfect wrapping, so the text moves
around as expected. And it also has a lot of
other things tied up. Like it doesn't have
all the empty lines, multiple empty lines that we would have in
the original file. I also went ahead and
removed a table of contents and a couple of additional texts
that we didn't need. But I still think that
it's probably better to work with the original
file because like I said, we will learn a couple of
valuable lessons on the way. However, I just wanted to give you a shortcut in
case you want to skip this or in case you get stuck
refining the original text, you can just jump ahead in a way and use this text instead. So I'm going to choose
original, but like I said, you can always come to the corrected version
if you want to, and I'm going to click Open. And since we had the
Show Import options on, we still have all
the same options here as before with
the Word file. I'm not going to change
anything on this. I'm just going to click Okay. And as you can see, we already have the
first page filled in, but it's going to
take a little bit longer for all of
the texts to come in because in designing is going to generate hundreds of pages, and that is why I like to have the pages panel always open because it's going to give us a much better idea of
what we are dealing with. So at the bottom, we can
see we have 524 pages. And if I increase the
width of the pages panel, we can see them a little better. So we can scroll
through and see, yes, we definitely have a lot
of pages at the moment, but it's going to reduce
once we refine the format. So this is what we
will have to work with for the rest
of the project. But before we move into
refining the text, there's a few things
I wanted to do here. That's actually this
part here we don't need, so I can just delete this. And this section here, the GrimsFairy tales,
up to this point, we can just cut and put in a separate text frame
using the type tool, drop it on your pasteboard
here on the left. And we will come
back to this later. We can just keep
it here for now. And then the table of contents and all the empty spaces
before it, we can delete. And then this bit here, we can also delete. We will have that
in the front meta. We want the text frame to essentially start with
the first story title, which is the Golden Bird. At the very end of the document, you can jump to by clicking
on this icon here, as spread. That's a quick way to do it. There's actually also
one additional thing that we can put onto
the pasteboard. It actually starts a
little bit further up. We have all of this additional
copy that we can remove. So once you find this bit, the end of project, this is what you
need to click in. And then to make it easier to select all the remaining texts, press Commando Control
V on the keyboard. Which will open up
the story editor, and there you will be able to
make this selection faster. So just select that line. Maybe even you can go
up a little bit higher, all the empty spaces, scroll down all the
way to the bottom. So all of this is just like copyright information
and the source, the Guttenberg
website, which we can delete and then just delete
one more line break. And this section here is, again, not part of the story. It's actually going to go to
the back matter of the book, so we can just cut this out
and delete the empty lines, close the story editor by
pressing Command and Control Y, and then just like
at the beginning, we can set up an
empty frame here on the pasteboard and
just paste that copy in and make it big
enough to hold the text. Yeah, something like that. So this is about the
author's Brother's Grim. So now we have the copy ready, and we have exactly 500
pages and 250 spreads. So that's a nice round number
to start working with. And I wonder how much
is going to end up once we get to the end
of the formatting.
8. Dividing up the book into smaller sections (if necessary): At this point, you
might be wondering, is it a smart choice to have all these pages in a
single in design file? And the answer is,
in this case, yes, because within the body matter where we have all the stories, it's going to be easier to move back and forth
between the stories and refine the copy compared to having them in individual
in design files. So in case we decided to separate each of the stories into separate in design files, that would lead to around 64. I think there's 64 or
65 stories in this that would be a lot of files. Now having said that, in
case you feel like in design is sluggish because you have so many pages
in this document. So if your computer can't handle working with
such a big file, what you can do is
to separate it. Maybe every hundred pages, you can move to a separate file. And I'm just going
to show you this. So if I go all the
way to the end, so 501 in this case, and then come up to maybe 401 or 400 to keep
the spreads together, we can right click
on all of this. And by the way, the way I made the selection is by
holding down the Shift so I selected the one at
the end and then Shift clicked on this 400th page. And then right click,
choose move pages. And instead of current document, you will have to
have a new document prepared into which you
will be able to move these. So I'm just going
to cancel out of this and I create
a new document. And since I already
have my template saved, which by the way, I updated with the margins
that we are working with, I can just create quickly. And then here, now that I
have my untitled document, I can jump back to
the previous one. Again, I'm just going
to jump to page 400. That's Commando Control J. And then having
that page selected, I can come all the
way to the bottom, shift click on the last page, then right click, move pages. And instead of current document, we will choose untitled
seven, in this case. And since there is
nothing in the document, it doesn't really matter where it's going to be placed in. And we could delete these pages, but because we
have an auto flow, it's automatically going
to be regenerated, so we don't have to
worry about that. Let's just click Okay. And if we switch to the
untitled document, can see that only the text from the last hundred
pages came in. However, there is
one issue here. We just cut in the
middle of a story. That's obviously something
you want to avoid. So I'm just going
to undo this step. So coming back here to our original 500
pages long document, we just have to look for one of the pages that's going to
work well like this one. So that's 402. That's
a start of a story. So select from that point down move pages again into
the untitled document. Let's click Okay,
and you just have to remember which was the text
that you already moved. One good technique
that you can do is to highlight the text
and change it to red. So that's the one that's
already in the other one, just as a note for yourself. And then going into
the untitle document. But you might notice, depending on how the text is formatted, there may be some
additional text still managed to come through
that you didn't want. And the easiest way to fix that is by pressing
Commando Control Y, the story editor, and
then we can see that the King of the Golden Mountain is the one we wanted
to start with. So there's just a little
bit of extra text, probably one
additional paragraph. We can just delete from here, and then now we have
the right formatting. And for some reason, this first page here
is not connected. So I'm just going to
click on the output, connect onto the right, and now the text flows to the left. And if we've done
everything correctly, this document now should have all that last hundred
pages separated, and we could save this and
come back to it later. And of course, you can repeat the same steps until you have, in this case, five separate
in design documents. Not going to do
this. Like I said, I feel like my computer
can handle working with this entire book
without dividing it up. But I just thought it's important to mention
this technique in case your computer won't be able to handle this
project otherwise. So I'm just going to
undo a couple of steps here until the formatting goes back to the
way I wanted it, and I'm just going to save this file just so I
have it as an example, but we won't need
that, so I close it and I just jump back to the
beginning of this document. And in the next video,
we can finally start fixing the issues with
this imported text.
9. Finding poems with Find/Change GREP: You might recall me
mentioning that we have quite a lot of
issues with this text. The first and most
significant one is that we have lots of line breaks
where there shouldn't be. And the way we can preview these or keep track of them is by going to the type menu and
choose show hidden characters, and then if I zoom a
little bit closer, we can already see the line
breaks showing up here. We also have quite a lot of unnecessary line breaks like
these two line breaks here. And then if I go further down, we will have between stories, lots of line breaks,
necessarily. So we have four there. We have two here. So these
will all need to be tidied up. But one thing that I wanted
to point out also is that if I double click inside
the text is that currently, all the text is actually not using my basic
paragraph formatting. That is because even though we were importing from
a Word document, even an RTF file would transfer its formatting and it would force it on in design. So what I recommend to do
is to press Command or Control A while you have
your text frame selected. That's going to
select all the copy. And then from the
Paragraph Styles panel, you can click on this icon
to remove any overrides. So that's going to
reformat the text, and that's actually
going to reduce slightly the amount of
pages that we have already, and it will reset the text
to in designs default, Mini and P 12 points size. So that's already one
thing that we fixed here. Now, to get rid of empty lines, we could use a query from
the fine change feature. This is from the edit menu, and you will find it
here. Fine change. The shortcut I always use is Commando Control F.
So if you go here, first thing you can do is
to go to the drop down. And from amongst the default queries that you can find here, one that is very useful, it's called multiple
return to single return. So if you choose that, it's
just a very simple grab code. So it would find
two line breaks, and it would change
it to a single break. So if I choose find next, it's going to already identify
that we have three here. Or we can go to
the next instance, and that is going to be
between two paragraphs, or we can go to the next one and notice that
between paragraphs, we have currently
two line breaks, while between the original
lines in the text file, we have individual line breaks. And here's the
problem. If you use this query, at this point, you will lose track of where the original paragraphs were, and even the story titles might merge into the
rest of the text, and it would become impossible to identify where things are. So instead of making
things easier, you would end up actually making things worse for yourself. So I'm just going to go
through this quickly just to show you that
it does a good job, and it would work
perfectly if that was the only issue
with this document. But right now we have a lot more problems that
we will have to fix. Like here, you can
see it actually has done a really good job
highlighting that. And by the way, there's a
useful keyboard shortcat. If you have any text selected, you can't use the space
bar to pan around. You have to use instead
the option or old key. So whenever text is selected, there is an alternative
keyboard shortcut, which still allows you to pan around without
affecting the text. So, like I said, we
are not going to touch these multiple line
breaks at this point. Instead, we will start by separating and styling
the poems first. So there's a couple
of poems in the book, like this one right here, no care, no sorrow,
so on and so forth. So that I want to be highlighted and separated
from the rest of the copy. The reason to start
with this is because a poem we have line breaks
between the lines. So essentially, each line of the poem is going to
act like a paragraph, which is very easy to cause conflicts with these other lines where we will have to get rid of these line breaks in
between sentences. So like, all of these
will have to be removed, but I don't want
these to be affected. So we isolate the poems
first. That's our first step. And of course, we won't be doing this by going through
the whole copy. Instead, we will be
using Fine change with a smart grab definition. But before we can do that, I am going to create a
new paragraph style. So I click away from everything, alter option, click on the plus sign in the
Paragraph Styles panel. We'll make sure that we
already get the dialogue box, and we can just type in poem. And it shouldn't have
any formatting options. It's based on no
paragraph style, and I don't need anything
else checked here. The only option I want right now is the paragraph shading, which I want to turn on, and let's just set this
to Magenta for now. That's just a way
to highlight it. So you don't want to add
this to the CC library, nothing else needs to change.
Let's just click Okay. So there's our poem
style already created. And maybe just one thing
that I can amend here, if I right click and edit the style definition is to
set up a first shortcut. I'm going to use
option or Old one. So within the shortcut area, you can assign that
and click Okay. And that's the shortcut
we will also see up here. So that's just going to make
it easier to apply it in case we miss some instances
throughout the story. So now we can use Commando
Control on the keyboard. I actually went ahead
and created a query already called POAM which
looks quite complicated, and obviously, it would be
hard to copy from my screen. So I prepared a separate
PDF in the exercise FIs folder where you can find any grab that I use
throughout this project. And it also explains exactly what every
element of it is doing. So in case you are
interested how it works, you will be able to learn
all its components. So what I would like you to
do is to open up that PDF, copy the grab that
I'm using here, and paste it in the
find wall area, but make sure that you are
using the grab feature. So not texts, you are
looking for grab then what you want to also make sure is that under change format, you want to click on
this icon here and you want to target
the poem style. So that's the paragraph
side that we created. This essentially means
that it's going to find all instances of poems with this grab expression and then is going to
apply that style. So it's not going to actually
change the text itself, it's just going to assign that paragraph style formatting. If I start doing Fine Next, it's going to show me all the instances within
the copy and hopefully, it's going to find most of it. But I have already seen
a few that it skipped. So I am just going to say, change all for this. I found 92 replacements. We can click Okay, click Done, and we can just check maybe
on the previous pages. Yeah, I can see one here
that wasn't targeted. So I'm going to use again another grab expression
slightly different. I'm going to just see if it finds any that hasn't
been already highlighted. Seems to be finding the same. I'm just going to assign the
poem style to this as well, and I'm going to say change all. So I found an additional
55 replacements. And then just to be sure I
have one more with this one, it's a much longer expression. I'm just going to again, see what it's finding. Most of the instances
are already updated. Again, this should
be using the poem, and I'm just going
to say change all. So 33 additional
replacements has been made. Now, if at this point, you go through after
applying these and you still find a few
that wasn't updated, you can just highlight
them and use the keyboard shortcut that we created
old or option one, and I can just
manually apply them. Now, it's quite a lot of
texts to go through and fix, so I wouldn't expect
you to do this. Unless you want to really
have a perfect final result, you can go through
this at this point. You can also do this later. So for now, I'm just going to go through and maybe find a
few of these instances, apply style there
manually as well, and then feel like we
are pretty much done. So I can see most of the poems
are already highlighted.
10. Finding remaining poems manually with the Story Editor: To be honest, the
easiest way to go through the whole copy is
to use the story editor. So that's Command or Control Y. And then here you will be
able to see on the left side whether the basic paragraph is being used or the
poem style is used. So we can just
quickly skim through it and we can see
which one is which. You can also just use
the up and down arrow, and that's basically just
scans through the whole thing, and we can potentially find maybe a few instances that
didn't get the styling. Let me just go a little
bit faster than this. So that's poem, poem.
That's correct. Poem there, yes. This one is using poem. That one is using poem, poem. Yeah. We can just use the
mouse scroll up and down. Here is one where I
can again just use the keyboard shortcut to
apply it. That's correct. This is actually not
correct right here, so we can reassign the
basic paragraph on it, and then we can go down.
The poem is there. So this would still take
time to go through and thoroughly check if
everything is correct or not. But using those grab expressions should give you a
very close result. Like, I would say, 95% of the poems should be
already highlighted. Yeah, there's some stories
where there's no poems at all. While others have these
short poems in them, there are some instances where
there's just single lines. Like this one here, we
actually need all of these to be poems and then
scrolling down a bit more. We actually found one more here where it hasn't
been assigned yet. Let's go a bit further down. There's another one
which the grab couldn't find and there is
actually this one, the little red riding hood, which would have a couple of conversational lines that can trip those graph expressions up, and as we can see, it turned them into poems, but these are
actually not poems. So we can just highlight
all of this and reassign the basic
paragraph on them. Again, there's no poems here. So that's all basic paragraphs, and these also are
just basic paragraphs. So we can fix it quickly. And that's why I like to use the story editor because
we can do this very quick. So these both are poems. That's also a poem. By the way, you can
just click inside the line because that's
a whole paragraph. It's going to automatically
apply the style on the whole. You don't have to
highlight it all the time. Let's see, there's another one
here that wasn't assigned, and then these are
actually not poems. So I can highlight all of these and say basic paragraph
going further down. Again, I think we are pretty
much find from here on. So these are poems, poems. That's looking good. That's one I found again. Let's
just fix that. And I'm just going to go
through the whole document to make sure that I don't
have anything missed out. You can do this
in your own time, and then in the next video, we can move on fixing the additional issues
with our copy.
11. Fixing copy: To save you time, if you don't want to look for all the poems, I actually saved a version of this file called Green
Book Body 01 Poems fixed. This is also in the
exercise file folder. This would have everything
perfectly assigned. So if you want to just make sure that you are
using the right fam, I think, you can open this up. If you are a perfectionist
like myself, you want to make sure there's
no mistakes in your copy, and you can just follow
along working with this. Now what we need to do
here is to finally get rid of all of these unnecessary
broken sentences. So mid sentences, we have these line breaks which
we need to get rid of. And I prepared the
query for this as well. Once again, you have
the code saved in the PDF where all
the grab expressions are listed for this project. I saved it called remove
unnecessary line breaks. And it's a very simple
code, actually. But what's very important is that we want
to make sure that it's not going to make
changes to the poems. And I'm going to explain why. But the way we can do this is by specifying that we only want to find this if the formatting
is set to basic paragraph. So if I select that
and click Okay, that's going to be edited there. So if I choose Fine next, you can see it's finding all of those line breaks perfectly. And what it's also
doing is that it's going to skip that
empty line break, which is there to show where the division between
the two paragraphs is. So it's going to skip that. And it should go
through everything, and I'm not going to go
all the way to the poem. Instead, I'm just going
to say change all, and it should find
7,580 replacements. So I'm just going to click
Okay, and then done. It might take a while for
the page numbers to update, and you also might need
to wait a little bit. But from close to 500 pages, now we went down to 284, which is much better, of course. And if I go just a
little bit further down, I can find the second
story, Hansen Luck where, as you can see, our poem or the first poem in the book
is actually kept intact. And what I mean by
that is that it didn't remove these
line breaks at the end of each line because the same grab expression
that I created, if not limited to the basic
paragraph formatting, would actually put these all
into a single paragraph. So the separate
lines of the poem would end up being
all merged together. And I can just show
you this quickly if I go back into find change. I can remove this limitation, the fine format limitation. And if I say find next, notice how it found
that line break. And if I would say,
change at this point, see how it merged the
two lines together. I go find next, change, and find next, change. And yeah, so we end up having all of these
merge together, and even the lines between the poem and the rest of the copy
would be removed. So that's clearly not something
that I want to do here. And also, by the way,
make sure that you don't run this expression
twice because then, again, you would end up losing all the paragraph breaks that are necessary to
divide the paragraphs. So I'm just going to go back and undo these last
couple of changes. I want my poem to
be back to normal. So if I just quickly go through, I should see all of the poems still in the
original formatting. But the good news is that the text is now looking
so much healthier, so we don't have all the
unnecessary line breaks there. Now what we need to do next
is to fix the story titles. Now, at this point,
we can actually use that query that
I showed earlier, which removes the
empty lines because now we fix most of the problems
that we had originally. So we can go back
to Fine change and choose the multiple return
to single return option. So we can just go to Fine Next, and I can see many of these. So let's just say change all. 221 replacements were made. Let's click Done, and we should be able to
see how this looks. Yep. So now the only
thing, of course, is that the titles or story titles are merged a little bit together with
the other paragraphs. At least visibly, they
are closer to each other, but they are still
independent paragraphs, which is perfectly fine for now. We also don't have empty lines before and after the poems, which, again, is useful.
We don't want that. So, yeah, it's looking
much better already. Now, what we want to
do next is to create a placeholder style
for our body copy. So I'm just going to create a new style while having
nothing selected, and I'm just going
to call this body. And we can also create a new
style for the story title. So I'm just going to
call it story title. And again, we can use
the find change feature where we want to go into the text and find what
we can keep empty. We can also make the
change to empty, and we just want to use
the Fine format function. To find any text that is currently using the basic
paragraph and click Okay, and then we want
to change that to body copy or the body style. Now, this is going to change everything apart from the poems. So if we say change all, it's going to do
97 replacements. Let's just say done. And in case you get a red
highlight on the text, you might want to
go back and edit the body copy style and make sure that it's not
based on the poem. So you can just say you
want it to be based on no paragraph style
or you want it to be based on the basic
paragraph, whichever you prefer. I'm actually going to choose the no paragraph style option. Because we use the
shading for the poem, that's actually something that
we have to take off here. So let's just turn that off. So that was that highlight
that showed up there. So if we go back to general, now it should say nothing here. The shading seems like
it's still applied here, but it's actually turned off, so you don't have to
worry about that. We click Okay, now it
should look like this. And if I go into
the story editor, Command or Control Y, now all of these
paragraphs should say body on the left side,
which is perfect. The only issue is that
the story titles are also using the body
paragraph style, but this is something
that we can fix now. For this, we will be using
another fine change query. Again, we are using
the grab option, and I've saved this already, so I can just come
back to it quickly. But again, you have the
code saved in the PDF. Notice that there is one additional option here
at the bottom that I added, and this is to change
the title case. So not only we will be applying the story title
paragraph style to these all capital letter
instances or lines. But we will also be reformatting
them to title case. So we will be removing
the all capital letters, and we will have the accurate
title case formatting. But just so you can
see how this works, I'm going to set that
up from scratch. So first, make sure
you copy paste this code in the
fine wat section. The change to should
be completely empty, and then you want to go to
this icon, the change format. First of all, we
want to make sure we assign the story title
paragraph style. And then we can go to the
change case category. And here we want to
choose title case. So from uppercase, we are converting the
text to title case. It's an extremely
useful feature, and this actually was
recently edited in design. So before it was not possible to do this
through fine change, now you can do it,
which is brilliant. And this is a great example
of showing that you can even run multiple
formatting changes. So not only we are applying our placeholder paragraph style to these instances of text, but also we are
converting the case. So the fine what is in place, and we can just test this out. If I say fine next, it finds the first story title. Then it jumps to
the second story, which is Hans in Luck. The third one, fourth one, traveling musicians, Old Sultan, and so on and so forth. So it seems like perfectly
highlighting all of this text. So now I can just
say change all, and it should say 63
replacements were made. So that's perfect.
Let's click Okay. Then let's click Done and then zoom a little bit closer
here onto the text. And now this text looks very
similar to the body copy, but don't forget if we check
this in the story editor, we should be able to see that
the highlighted text right there is now using the dedicated story
title paragraph style. And we could keep
scrolling down, and then we will see the next
one and so on and so forth. At this point, if
you're still finding some empty lines
like this one here, you can run that
query one more time. Remember, it is a default
or standard query, the multiple return to
single return option. We can just say find next, and it actually only
finds a few of these. And instead of searching
in the whole document, I want to search
within this story. So I change the search area to story and let's do find
next. Yeah, that's the one. I can just remove the
formatting change, and let's just see, Okay, actually, that's the
only instance of this. So let's change all
one replacements was made. Let's say done. And now we are good to go. We fixed most of the issues. There's only a couple of additional things that
we have to do before we can move on to actually
properly formatting our text.
12. Using a custom JavaScript for formatting the first paragraph in each story: So far, we managed to rely on the fine change feature
using grab codes to identify the paragraph
styles that we wanted to assign or the ones
that we wanted to avoid. But here is a tricky one. So you can see that we have the story title
already assigned here. The easiest way to see this is if we go back to
the story editor. So story title right there, then the body copy until we
reach the next story title. Hansen Lock, the second story. Then again, we see the body
copy, and so on and so forth. Now, of course, we have in
between the poems as well, the other style that we use so far and that
we introduced. But for the formatting
of this book, I will need the first
instance of the body copy in each of the stories to have its own dedicated
paragraph style. Is because in the first
paragraph of every story, I want to use drop caps. So these large initial letters. And for that reason, we
need to separate them, but it would be a very
tricky thing to do. So essentially, we
would want to find every first instance of the body copy throughout
the whole story. And the easiest way to refer
to it is every instance of the body copy that is preceded by the story title
paragraph style. This is actually
something that goes beyond what you can
do with fine change. So it actually already
goes over that limit. And this is when in design
scripts come to the rescue. I'm actually show
you how I created a brand new script
specifically for this task. So it's not a script that exists or that I copy it
from someone else. I created this by
using Chet GPT. So let me show you how this
works because I find this fascinating for someone like myself who doesn't know
much about coding, especially nothing about
Java script that I managed to create a little script that works perfectly
well in in design. It's just mind blowing, really, and it only took me
around half an hour. So what I have done in Chat
GPT is that I simply asked, Can you find text that is the first instance of a
paragraph style in a story? And then hat GPT is
saying, unfortunately, the built in grab find
and change won't work, but you can use
scripting instead. And it starts
writing the script. At first, it was very simple. Then I started going back
and forth, testing it out. There were a few issues
in the beginning, but then it started
to work well. I even uploaded an error message that I got in design when I was running the
script at first, and it's crazy that HGPT
even understands this, although it's just an image, but it recognizes the text, and according to that, it updated the script. So like I said, it's a couple of back and forth
until I came up with the final script or hGPT
created the final script for and this is
actually something that you can find in the
Exercise Files folder. It's called assign
body first dot JS. So that's the JavaScript file. And what you need to
do to be able to use this is to copy it into the folder where in design is holding all the user scripts. And the way you can
find this is to go to the scripts panel,
which is Window, utilities scripts, and then
go to the user folder, right click and choose
Reveal in Finder. And so that's where
you need to copy and paste this
JavaScript file into. And you don't even have
to restart in design. I will immediately show
up here in the scripts, and you can start using it. Now, to see the script itself, you can see it here
in dream Weeaver. So it's not that long, but it is extremely useful. And I'm going to show
you how it works. But before I do, I would like to also create a new
paragraph style. Again, this is just going to be a placeholder style that we
can properly format later on. For now, I just want to be able to see where it is applied. So I'm going to duplicate the existing body
paragraph style. So right duplicate style. And let's give this
body first name. It can actually be based
on the body style. So that's a useful feature here because these
two will be very, very similar with
some minor changes on the first instance where
we introduced the drop cap, but all other aspects pretty
much can be matching. So that's why based on
is a useful option here. So that's all we had to do, and maybe just so we can see when this style is going
to be applied in our text, I'm going to add the paragraph shading option and maybe change it
to yellow this time. So let's click Okay. That's
all we had to do there. And now let's test
out the script. So I'm going to
double click on it. And here we get a nice
little dialogue box where we can choose the
preceding paragraph style. So that's the one before the paragraph that
we want to target. So this is going to
be the story title. Then the target style is the one that we want
to make changes to. That's the next body
paragraph style. And then the new
style that we want to apply is called body first. So we are converting
every first instance of the body paragraph styles to
body first paragraph style. Only do this whenever the body is preceded
by the story title. And this is important
because otherwise, we would be also targeting any instances right
after a poem. So after a poem paragraph style, we could still have
a first instance of a body paragraph style. But that's why we need
these three to be selected. And look, I even
included an option to update all without
showing messages, which means that it won't
stop after every change. So we can just run this
as like a batch process, like fine change all.
It's similar to that. If I click Okay, so it's
extremely fast as you can see, and it even tells me that the total replacements
are 62. Brilliant. We can click Okay,
and I can already see the first instance
is in the perfect place. So that's the first
paragraph within this story. Then we go to the next
story, hunts in Luck. Again, first paragraph
is highlighted, meaning that is the body
first paragraph style. Then I can see after the poem, it's not applied,
which is perfect. Again, after a poem,
it's not applied. Only in the next story, again, the first paragraph is now using this new
paragraph style. And so on and so forth, again, I can see the traveling
musicians, although the title, the story title is here at
the bottom of the column, I can see that the next
paragraph is highlighted. So we've done it. It
works perfectly well, and it saved us a lot
of time and headache. And what I mainly want you
to remember and learn from this is that with AI
tools like Ched GPT, now you can actually create your own script fairly
quickly and easily, once again, without knowing
anything about code. Just having a problem
that you can't solve in in design and something that you have to
deal with often, and it's just waste
a lot of time. From now on, all you have
to do is to just ask your friendly AI
assistant to create a new script for you that
you can use in in design.
13. Choosing typeface for body copy: We arrived at a crucial
point in our book project. We have to make a decision on what font shall we use
for the body copy. Now, obviously, this is one of the most important
decisions you have to make because this
will affect readability, legibility, and
just a general feel of how the reading experience
is going to be like. Fund that you decide to use for the body copy is going to be around 95% of the contents
of the entire book, and there are many considerations
to take into account to ensure that you choose the
right fund for your project. I'm going to walk
you some of these, but if you are interested
to learn more about typography and how it can
improve your projects, I recommend to check out our graphic design theory
typography course. But we cover working with text in general in
much more depth. First of all, let's just check what font we have right
here on the screen. So this is Minion Pro, and this is actually already a very good choice
for book text. So if I zoom a
little bit closer, we can see that this is actually a really
comfortable text to read, especially if I turn off
all the hidden characters. So yeah, this already
feels quite good, even without any formatting
applied to this yet. So we don't have justification. We didn't fix the hyphens. We don't have indents yet. There's a lot of
tweaks we will be doing to this text to
make it more readable. But for now, it's
already looking quite. Now here's the three
main goals or aims you want to achieve when
choosing your body copy. First is readability, how comfortable it
is to read the text. I'm not even talking
about legibility, because that's usually
not an issue with books. So we would put strange
colored text on against strange colored
background where the colors are clashing
and things like that. But we definitely need to pay
attention to readability, which is more about the how
comfortable it is to read the text or whether
it's going to get tiring to read the text
after an hour or two. So we're assessing the level
of comfort of reading text. And then second requirement
or goal is versatility. So we want to have a variety within the font family
that we will be choosing. And to be honest, for body copy, we don't need that
many variations, and we don't actually
need a huge font family which has all the different variations
that we can think of. For body copy, we probably need around six to ten
different styles, out of which we most likely will end up using only two or three. In terms of versatility, we have a fairly easy choice. We just don't want to
pick any fonts that has only a single style because
that's going to be limiting. And at this point,
let me just jump to Adobe fonts because a couple of things are easiest
to show here. So if I go to the Browse O, we will be able to
see some fonts. But more importantly, we will be able to see the filters
on the left side. Now, I don't really like
looking for fonts by tags. Like to use the classification
and properties. These are much more
professional ways of assessing or choosing fonts. So one thing that is
almost certain is that I would like to use a Serif
font for my body copy. And the reason for that is
because those small strokes, the serifs help guide the eyed along multiple
lines of text. And although we think
of Serif fonts, usually more useful actually also work really well on screen, so they can actually be
used for ePubs, as well. So I'm just going to
stick to Serif font. And instead of seeing images, I'm going to turn off this feature here and I'm
going to choose list. And what I just by
choosing Serif, we can see a few
fonts that could work well for books like IVR
is looking quite nice. But let's just narrow
this down further. So we already talked
about versatility, which can easily be
set by increasing the number of fonts in the
family to minimum five. And we don't have to
limit the maximum value, but if you want, you can
also drag this down. I'm just going to keep that
all the way on the top. And again, we can
see now we have 379 font families left
based on this criteria. Now, in terms of the additional properties that we have here, for body copy, most likely you would want to choose always
the one in the middle. So the extremes are never
good for body copy. For instance, like
with contrast, you don't want to have too much contrast within
the characters. So if I just select that,
you can immediately tell that these one really
work well for body copy. And instead of getting started, I'm just going to
put some text in here so we can see how it looks. Maybe let's just pick
another text like that one. Yeah this first one
still could work. But when the text
is much smaller, we can do also here, resize the text, I can get tiring to read the text
with too much contrast. So we want to use
a medium contrast. And similarly, we want the
width of the characters or set width to also be an
average or normal size, so not too white characters. Once again, if I choose
white characters, that's definitely not
convenient to read. And the same way, it is
also not convenient to read very narrow condensed
characters like these. Of course, that would
help with economy, meaning that we could
fit more text on a page if you are using
narrower set width. And that's actually our
third main criteria. We want to work with a fund that improves the economy
of our design, meaning we want to
save cost on paper, so we don't want
to end up having an extra hundred pages
in our book just because we chose a wider set so let me choose again,
the middle ground. And similarly to
these two attributes, the, again, we want to keep
it somewhere in the middle. We definitely don't want to have low excite because that really reduces
readability of the text. So we want to keep it either medium excite or
taller or higher excite. Either of these two options could work well for body copy. However, you don't
want to end up having your height too close to the cap height because
then it will be hard to differentiate
the capital letters, which can result in difficulty of finding where
sentences start. So again, the middle ground
is the best for body copy. Now, we definitely want to have italics in our font family. So let's just make
sure that is included. We also want to make
sure that the font is going to have both capital
and lower case characters. So that's the standard option, so we don't want caps only. And the other features
here are less relevant. So we can just check how
many fonts we are left with. So 101 font families. That's still a lot of options. And let's just
increase the text size and take a look at this. And some of these
look really good. However, now we are seeing the Italic version of
each of these fonts. That is unfortunately not something we can change
here in the preview. So as soon as you
turn on Italics here, it's going to actually preview the Italic version of them. So normally, I just
actually take this off. So from 101, we go
up only to 109. That means that there's
only eight font families that would not include
italics out of the by specifying that we need at least five different weights or styles in the font family, most of them would already
have italics in it. So we can see some
really good fonts here. Somehow, we still
ended up having a decorative or
stylized font here, which, of course, we
don't want to use. But like I said, this is
a good starting point to already narrow down
our search and keep in mind the three main
things that we talked about readability, versatility
and economy.
14. Testing and comparing typefaces: Now jumping back into in design, I prepared this file that
you can also open up. It's called Font test. This is just to see variations
of body copy side by side, so we can compare
them really well. And by the way, this is
a preview of roughly how our page is going to turn out once we have all the
styling in place. So first of all,
on the left side, here we have Tisa P in the middle, we
have Meriwether, and on the right, we
have Mini and Pro, which we've already seen before. I chose to put these three
side by side because there are certain aspects I can demonstrate really
well with these. One of which is the economy
that we already talked about, which you can already see here, even though all of these are set to the same font
size, nine point. So you can see 9.9
point and nine point, and the leading is
set to 11 points. They still have quite
a big variation on how much text can
fit on the same page. So if I just make
this bigger again, we can see that this text actually didn't even
fit on the page. That one and that
one fit nicely. This probably actually fits more text than the
one on the left. So minium Pro in terms of economy is
definitely the winner, but not necessarily
in readability. So if we go into our settings for the text that we have here, I can change the
first definition of this and maybe reduce the size down to eight points and also maybe the leading
down to ten points. So once again, this
is the font in the middle called Merriweather. Even with one point
smaller text size, it just about fits
in this text frame. So you can see it ends
up on the word though, which is the same on the
left and on the right. We can do the same thing on the text on the right,
the Minion Pro. We can just increase
the size on that. So instead of nine points, we can go up to ten, and maybe we can set the leading
to 12, let's click Okay. Again, even though we
increase the size there, the text still fits on the page. What I wanted to demonstrate
here is that certain fonts, even though might
look very similar, based on the properties of
the characters in the font, like the set width and
also the tracking, you might need to
adjust the font size slightly to get a
similar density of text. And that's actually a very
crucial aspect of book design, the text block density, which generally describes
the overall looseness or compactness of
the text block. High density text blocks can
feel very crowded and again, tiring on the eyes, while a lower density block
can feel more open and airy. To alter the block density, the main things that
you normally want to use besides the font size and the right font that
you choose to work with is to adjust the
leading and the tracking. I can just show an example
of this quickly here. If I select some
of the text right there and I use more leading. It's obviously quite extreme. Maybe if we just use
the settings in here, so I just go into the middle one and inside the basic
character formats, we can start increasing
the leading. And the reason why
it's not changing is because it's already aligned
to the baseline grid. I'm just going to turn that off under the indented spacing, so we don't want to
align it right now. So let's just try it again. So increasing the leading
there in the background, we can already see it updating. So when we compare
the two together now, we definitely have
a higher density on the left and a
lower density here. And just like with
everything else, you want to balance things out. So you don't want your
text to be too dense, but you also don't want too
much space between lines or between the characters because that can also reduce
the readability. So you don't want to get
to the other extreme when there's just too much negative space between the text. We've adjusted the vertical
spacing with leading. But I can show you
also a similar thing happens when we do tracking. I'm just using
older option right arrow to increase the
tracking like that. Again, it spreads
out the text more, and we have much less of the original text
fitting on the page. And it's interesting
to see that even just by adjusting
leading and tracking it already feels a bit like now these fonts got bigger compared
to how they were before. So it's almost as if we
increase the font size just by reducing the
density of the text block. And while we are doing
this, we are also affecting one additional thing which we
call as typographic color, which refers to the
overall shade or appearance of the
text on the page. So by introducing
more white space between the characters and
also between the lines, we are increasing the brightness of our typographic color. And this is a term, again, that doesn't actually refer to the color like red and black. It just simply
refers to the shade we perceive when we
look at the text block. So whether it's more
darker or brighter. And both in terms of typographic color and text block density, the middle ground is the best. So you don't want it to be too extremely dark and condensed. So essentially, you don't
want to be on either of the extremes that we
already described here. But just to be able to
see the other extreme, I'm going to make this text
more condensed on the left, so I just reduce the leading and I will
also reduce the tracking so clearly, that is,
again, another extreme. So we have extremely
condensed block on the left, and we have a dark
typographic color. While here, we have a much more airy and
loose text block with a brighter
typographic color, and then we have the middle
ground on the right. So to summarize,
besides choosing the right font family that you can apply to your body copy, you also have these additional
decisions that you make, how you are going to format it. And I highly recommend to
spend some time exploring different fonts which you
can apply in this test file, look at them side by side. Also keep tweaking
these attributes like leading and tracking
to see how the text behaves before you
make a final decision on which font family you end
up using in your project.
15. Formatting the body copy: Based on all the
considerations that we covered so far
about the body copy, I made the decision to
use the font Tisa Pro, which is an Adobe font
family that you can install. And this is something I'm
going to apply on my text. So I'm going to right
click on the body copy, and I'm going to choose
this font family here. So I'm just going to
type in Tisa Pro. Let's select that. And we can see how that
looks in the back. Of course, we want
it to be smaller. So I will use nine points, and I'm going to do
not 10.8 leading, which would be 120% compared to the size
of the characters. I'm going to use a slightly
more spaced out leading. So I'll go just
slightly up 11 points. And you can see
that small change actually makes quite a
big difference there. So if we zoom closer, I can maybe show it on this side where we don't
have that highlight. So if I go back to body and we just adjust
this one aspect. So auto adding looks like that, and then just slightly more 0.2 extra points already
feels much better. If you want, you can go
even up to 12 points, and that's going to have a
much more open text block, so further reducing the density. I let you decide
which one you prefer. For now, I'm going to keep it on 11 points because I have
economy in mind as well. I don't want to end up
having too many pages, but notice how we already reduced the page
number down to 177. So if I just go back
a couple of steps, before we did this, we
had 100 extra pages. That's because we had
a larger font size. So after these few changes, we got down to 177 pages. So that is looking
already much better. Now one of the important
things I want to make sure we have
is justification. So if we go into the body
style, again, the body, we want to choose
the indens spacing instead of left to be justify. And while we are
here, I also want to add a first line indent. This is in inches
because we have the document units
set to inches. But if you want, of
course, you can type in millimeters as
well or points. But for now, I'm just
going to use 0.25 inch. I think that's already a
good amount of indent. So we can just say, Okay. But remember how we set our body first style to be connected to the body
style or be based on it. And the indent is actually something I don't want
in the body first. We will have drop caps
in there instead. So I'm just going to
go in body first, and I'm going to overrule
or override this by saying, I don't want the
indent right here. So this is obviously
only going to affect the first paragraphs in
each story, not the others. And I just noticed that even my story title is
having an indent on it, which means that by accident that also is based
on the body copy. So I'm just going
to update this. I'm going to edit story title. And yeah, it is based on the
body, which it shouldn't be. I'm just going to say based on the basic paragraph because we will be using a completely
different font on this one, not the Tisa pro family. It doesn't have to be
connected in any way. And we will come
back to this later. I just wanted to
fix that aspect. But now, this is looking good. When you introduce
justification, there's a couple of
additional refinements you have to pay attention
to first of all, you want to make sure that
you have hyphenation allowed. Otherwise, you will end up
having rivers within the text. And by rivers, we mean the spaces that are lined
up on top of each other and that feel like
creating division between the text or like
a crack inside the text. Of course, that's
not an issue right here because our text
frame is quite wide, and we already have
hyphenation on. But just to demonstrate
this to you, if I go into the
body copy style and I remove hyphenation for
now, let's just click Okay. And so that was before,
and that is after, and it's already slightly worse. But if I just reduce
the frame width, we will already start to see more of these rivers
appearing in the text. So yeah, we can see definitely more of it showing up,
there's one there. There's another one right here. And there's also some here. So, yeah, that's definitely
something you want to avoid. And that is why we have
more wider text frame, and also that's why
we have hyphens. But there's a couple of important
settings that I like to change for both justification
and hyphenation, which again, we can do from
within the body copy style. So let's just go
first to hyphenation. So here are a couple of
settings that we can adjust. Firstly, I want to increase this value up to
seven from five, so I don't want to hyphenate words that are less
than seven characters. The default option was that
in design can already start hyphenating words that
are made of five letters. Then I also want to restrict
that it shouldn't start hyphenating after the first
two letters of the word. I want this to be set to four. Similarly, I also don't want the last two letters or
words to be separated. I want at least three letters
to move to the next line. And then hyphen limit and hyphenation zone
actually work together. It means that within 0.5
" of vertical space, we would allow to
show three hyphens. So it can happen that hyphens might end up being quite
close to each other. Again, I'm going to
reduce that down to two. And then besides all
of these settings, you can also use this
slide to improve the spacing or to
have fewer hyphens. So by moving it
further to the right, you will end up
having less hyphens, but the spacing might not be as good between
the characters. Or if you want to make
sure that there is definitely no rivers
in your copy, you would want to go
towards better spacing. I generally keep
this in the middle. So once you have
these settings on, I think it does a good
job with the hyphenation. Right now on my
screen, I can only spot one hyphenation
right there. But besides this, I
also want to make tweaks to the
justification settings. And again, this is
just to improve the overall spacing of the
characters in the lines. So the first thing I want
to do is to change the word spacing to 120% maximum value. The letter spacing,
I want to set a minimum 2% and a maximum 2%. And the glyph scaling, I
normally would set to 98% minimum and 102% maximum value. What this actually means
is that I even allow a slight horizontal
distortion of my characters
whenever in design is struggling to get a good
balance within a line. And I also allowed a slight tweak to the
tracking or letter spacing. But it is such a
small amount that it would actually be
impossible to see these. But these subtle changes will actually make a
big difference to the overall flow and readability of the text throughout the book. So let me just click Okay, and after these changes, we can see if I go
back and then forward, we can see the whole
page like this. So this is before the adjustments to the
hyphenation and justification, and this is after. Again, before and after. It's a very subtle improvement, but believe me, it's there if you know what
you're looking for.
16. Refining the body copy: There is one additional
thing that we have to pay attention to when it
comes to hyphenation, and that is the optical
margin alignment, which is a feature that will allow us to have
these hyphens go beyond the edge of the text frame and not just hyphens, but
also punctuation. So if I come to a page where
I can see some hyphens, I can't actually
find any right now. We did such a good job here. That it's almost completely
impossible to find a hyphen. There is actually
one right there, so let me just zoom
a little bit closer. So this is the
themselves separated. And we also have a couple of other punctuation
here like the period, the comma further up,
and the semicolon. So yeah, once we apply the
optical margin alignment, we will see these update. But we have to remember that
this feature is something that we can only apply
through an object style. Now first, let's create
the object style without having
anything selected. I click here on the
plus sign within the Object Styles panel or Option clicking on it will bring up the
dialogue box as well, and we can just type in text. And then from the left side, we want to find
story options and just simply choose
optical margin alignment. You don't really have to change this value that can
stay the way it is. Let's click Okay. And I'm just going to remember
we were on page 22. Because I have to go now to the parent page and
select both text frames, both left and right,
and then choose the text object style and make sure that
there are no overrides. So let's click on
clear overrides. Now, by applying these, I also introduce the stroke around the frames,
which I didn't want. I'm just going to
edit the style and go back and make sure I have all
of these things turned off. And if we have the preview on, we will see the updating. So we want to go to
the stroke options, and we want to make sure that
there is no color assigned. And you also actually want
to make sure that there is no paragraph style assigned
through this object style, so you want to turn that off. You can actually turn off
most of these other options, but I'm just going
to click Okay. I think the rest of the settings won't make
a difference for us. So coming back to
our actual pages, you might want to select both sides of the frames
on the first spread, and you want to make
sure that you remove the overwrites, so
clear overwrites. So if we go back to our text, we can see hyphenations are now outside of the text frame. So again, it's a
very subtle thing. We can see maybe
also on this side, punctuation like comma and
full stop at the end of the line can also end up
outside of the text frame, also here on the first line. And there's actually one
additional thing that I just remembered to go back and
adjust for the hyphenation. So we go back here. We also don't want to
hyphenate last words. That means last word
of a paragraph, and we also don't want to
hyphenate across columns, which would mean in this
case, between pages. So that's definitely
something I want to avoid. So now that's updated. We obviously have our body first paragraph
based on the body. So both of these should update, but we can just double check. If I right click on
Edit body first, yeah, it's still
based on that one. So that's going to inherit
everything that we set up. So we can just double
check hyphenation. Yeah, all the
settings are there. And for justification as well, everything that we worked on is carried on to the child style, which is our body first style. One additional but crucial thing that we have to make
sure that we turn on is the baseline grid to make sure that the
text aligns to it. So I just turned it back on, but this is something
you can find in the view menu grids and
then show baseline grid. There's also a keyboard shortcut assigned to it if you
want to use that. So when I zoom in closer, I can see that currently the body copy is not
aligned to this. And the way we can
make sure it does. We go back in here
and under indents and space we want the aligned to
grid to be set to all lines. So once we do that,
that's going to again, affect the document quite a lot. Can click Okay.
And at the moment, none of the other styles will
align to the baseline grid. So the poems and the story titles won't
be aligning to it, but everything else will. So we can find a
spread like this where we have only body copy, and it definitely
looks much neater. For now, I'm not going to
do any more changes to the body copy style because we already fixed most of
the important things. There's further refinements
we can do to it later, but that's going to look better once we have all the
other styles set up. So in the next video, we
can move on to refining and formatting the variant
of our body copy, the body first paragraph style.
17. Drop caps techniques: Now the main difference between the first paragraph in the body copy compared to the
rest we already introduced, we removed the
first line in dent, which is only necessary
between the paragraphs. It's not necessary here at the top because that's
the starting paragraph. But instead of that, we will be introducing the
drop cap feature. Now, first of all, I want to remove this highlight
from body first, so I just go inside it and
the paragraph shading, we can set it back to none
and turn it off as well. The reason why I set it back to none because
this way it's not going to show up here
in the style settings. It's actually something
we can also do for the body style because remember there also we
used it in the beginning. So if I just turn it
back on and then set it to none and then turn
it off once again, it's not going to show up at
all in the style settings. So we can double check
now like I said, it's not going to show up. So even if you are introducing
features temporarily, it's good to completely
remove them, not just turning them off. Otherwise, it just takes up unnecessary space in
the style settings, and it can get confusing when you have a lot of
settings applied. So right now, the only
override compared to the body style is that we don't
have a first line indent, so that's set to
zero to eliminate that but we want to go into
drop caps and nasty styles, and we want to increase this
up to maybe three lines. Later, we can increase
this further. But for now, I think that
is looking quite good. And if you want to
keep things simple, that's really all
that you need to do. But let me show you a couple of stylistic choices that
you can have here. First of all, you can
have a different font applied to the drop cap, which would differentiate
it even more, and it would introduce
some flavor and style to our so what we want to do here is to create a new
character style for this. This is going to be used
specifically for the drop cap, so I'm just going
to choose that. I would like to see
a preview of this. I'm just going to
turn on preview. And the font that
I would like to use for this is called kick. It's an interesting name. Again, it's an Adobe font. You can download this
if you want to use it. Now, it has two
styles, I believe, but I will only use
the brush style, and I'll click Okay.
And there you go. This is a very nice font, highly decorative.
Might be hard to read. So in terms of legibility
is not the best choice, but we can maybe just increase the size of it a
little bit even more. Obviously, five
might be a little bit extreme, maybe four lines. Yeah, that is looking better, and we can just click Okay, and to see how this
looks on other pages, we can just find the
next instance of it. That's an S. Let's
just go a bit further. There's a T. It looks cool, and that one's there, yeah, another A, A, These are the most common
ones to start a story. There's an O, which would
be in once upon a time, but here it's just says once in the summertime there's
another Oh, so and so forth. So, yeah, it's not bad. Of course, you can
be much more subtle and choosing a font
that is more legible. But instead of using a font, I'm actually going to
use images because I wanted to make this book
even more like a fairy tale. I actually went
ahead and generated a whole alphabet of decorative
letters in mid journey. Now, I just wanted to
show this to you that it actually takes quite long to experiment and get all the alphabet right
in the beginning, I had all kinds of
different variations here from which I ended up using this style because I really
liked how this looks, and I feel like
it's still legible enough but has a lot
of flavor to it. And then it took a while
to get this consistent. I just used that first
version as a style reference. And basically, I was using the prompt decorative initial
letter for a fairy tale, red ery letter with white floral ornaments
on white background. So that's why I used, and
to keep it consistent, I was using more of the
style references later on. And in mid journey,
you can even run batch processes up to
ten prompts at a time. So using the same prompt by just changing the letters
in between them. So that saves some time, but it still took a while
to get all of these ready. And I have them prepared for you in the decorative initial. Inside the exercise file folder, so you can go through
them and check them. And there's actually
one thing that I haven't done for all of these yet because I wanted to show it to you here in this lesson. So if I just double
click on Letter B, for instance, notice how its background is not
completely white. That can be easily
fixed by pressing Commando Control L in Photoshop to bring up
the levels dialog box, and then use the
white eyedropper or the White point eyedropper and just simply click
on the background. And immediately that's fixed. We can click Okay,
save this and close. So that's something that
you can do for all of the letters if you are
generating them yourself. But for this alphabet, I already went
ahead and did this by the time you are going
to go through the files. So let's jump back
to in design and starting with this
first letter here, what I'm going to do is
to place this image. So I'm going to just place
it on the page somewhere. I select that file, open, and then click and drag. For now, I'm just going to
keep it around that size, maybe slightly bigger like that. And what I want is to cut
this Commando Control X, double click inside the text
before the first character, and then press
Commando Control V. So this is going to
be an inline text. And the most important
thing here that you have to remember
is that it's not going to replace that
original character that started the paragraph. So you don't want to end up
having two as in this case. What you can do is to
delete this or even better, you can set a conditional
formatting on it, which you can use to hide all of these letters throughout the document without
deleting them. So the way we can do this is by getting the conditional
text panel open, which you will find
in the window menu, type and tables,
conditional text. So let's get that open here. And first, every text by default is set to
be unconditional. But in this case, I would like
to create new conditions. So this first letter, I'm going to assign to the
condition normal drop cap. Then I click Okay, and
that's already eddied, but it hasn't been applied
to my selected text yet. I have to tick this
little option here, and if I click away from it, that little zig zag underline represents the condition on it. And because the image we
placed inside the text frame, it became an inline text, meaning I can also highlight
it just like text, and I can set another
condition to it. I'm just going to call
it image drop cap, and then it's going to
have a red VV underline. This is obviously something
you can change if you want, I'm just going to go with
the default settings. And just like before,
I have to make sure the little tick is
also assigned to it. So now we can see the two
conditions that we created. And the great thing
about this is that if I turn off the
image drop cap, notice how immediately
it switches or transitions the normal
drop cap in place. So simply by just toggling
these conditions, I can go back and forth
between the two and what's important is that
you don't want to have both of these
on at the same time. So if you turn off
the image drop cap, obviously, that only gives
you the normal drop cap. But if I want to have
the image drop cap, I would have to turn off
the normal drop cap. So it's either one or the other. And by the way, if
you don't want to see the indicators of
conditional text, that's something
that you can hide, or in case you keep the indicator
set to show, of course, if you are looking at your document in preview
mode by pressing W, they won't be visible again. One additional subtle
change that I would recommend to
implement if you are going down this route
is that when you are assigning the condition
to your normal character, so not the image character, you should also
include the space right after that
character to be included. So I would also
assign that to be in the normal drop
cap condition. And the reason for that is
that if I now turn this off, the word certain goes straight
to the edge of the image, which by looking at
this in preview, gives a much better result. So this was before and
this is the result after. And that's a great
thing that you can also set conditions to spaces, not just the actual text. Now, setting the conditions is
actually something you will have to do for every
story individually. I don't think there is an
easy way to automate this. And that is why I said, this
is an optional feature. If you want to do it and you want to do it
throughout the book, it's going to give
you some extra work. So not only you will have
to place in the images, but you also will have to
set up these conditions.
18. Refining image drop caps: Before moving on,
I also wanted to tweak this slightly because if you are using an
image like this, you probably want to use
text wrap together with it. First, I'm just going to
drag it down a little bit, so it sinks into
the text and aligns more to the top edge
of the first line, maybe something like that. Now, if I have this
image frame selected, I can assign the text wrap quickly from the control
bar here on the top. So wrap around bounding
box like that. But if you alter option, click on this icon, it will
bring up the tax wrap panel, and we can probably turn off
the chain here and maybe increase the right offset a little bit,
something like that. It can be maybe a little
bit less like that, and perhaps we can also increase the bottom offset
just a little bit more in case the text underneath gets too close to our drop cap. Now, I'm happy with
the settings here, so I can drop my tax wrap
panel back where it was. Perhaps we'll move this
ever so slightly down. So let's take a look at
this from a distance. Yeah, that's looking good. However, there's
a little bit too much negative space underneath. So I'm going to fix that by going in, selecting the image, and then holding down
Command or Control shift to increase the size
of it. Like that. Let's drag it down again, and probably we can get rid
of this text wrap underneath. That's just gets in the way. Yeah, that's looking better. Let's just drag it down
a little bit even more, make it slightly bigger. That. So it's taking up
actually five lines space, which is still okay, and now
it looks much more balanced. I like the way this looks. And I just wanted to
show you quickly how you can repeat this
for the next story. So the easiest thing to do would be to highlight
this in the text. So you can either go here
and highlight it like that, or if you're not certain you're selecting
the right thing, just press Command or
Control Y to go into the story editor and then highlight your
anchored object there. By the way, notice that
there is a little icon here, meaning that there is
some conditional text being hidden at there
in that position. But we don't have to
worry about that. Just copy the anchored
or inline image and then go to the next story, which is hunts in Luck. Put your cursory in
there just before the first character
and then paste. And the great thing is that it already has the
same formatting. It also has the text
wrap assigned to it. However, if that's
something that you want to control on multiple
instances at the same time, I would advise to also save
this as an object style. So having this selected, we can go into the
object styles, alter option, click
on the new style and call this drop cap image. And just double check
on the text wrap, it should have the right offset and it has the text
wrap feature assigned. So we can just click Okay, and then while this
frame is selected, also make sure that option is assigned, so
it's linked to it. And since we set this up, let's make sure that
it's also assigned here at the first
instance. All right. So now these two are done, we just have to update this with the other
letter that we need here. So in this case, it starts with S. So let's have
this frame selected, press Command or Control D, and then find S from our folder and we can just
update it looking good. And then we just have to also remember to set up
the conditions. So I just go back to type and
tables, conditional text. It probably would make
sense to keep this here on the right while
we are working with this. So I'm just going to
highlight S here, which is a normal drop. And immediately it disappeared
because we have it hidden. And then we also want
to highlight the image, which is an image drop cap, and that actually already
is applied because we copied the original instance which had a condition
already applied to it. So that's something you
don't have to worry about. You just have to
worry about hiding the duplicate initial letter by assigning the
normal drop cap, which we've already done here, so all is good. This is looking good. Maybe one additional
thing that you can do once you have your
instance in place is to crop. The edges a little bit in. So for certain
characters like S, which is a little bit narrower, we can crop it just
slightly like that, and then it looks
already much better. Now, let's just do this paste
in again in another one. So the third story, things will get faster
the more we do it. So just paste in the original A. Then having this selected, we go into Finder,
and this time, we need a So let's just select the T and then drop it in here. You can do fireplace or Drag and Drop,
whichever you prefer. I just noticed that here I haven't updated the
background yet. That's actually a
stylistic option. You can keep it colored
like this if you want, but I'm going to go in Photoshop
and update this quickly. That's option or
old Double click. We'll open it up in Photoshop. Command or Control L for levels, and then set the white point, click Okay, save, close, and then come back and it
should update here also. But in case it doesn't update, just double click on
the little icon here, which you will see
in normal view. And now it's looking great. Let's not forget to assign the condition normal drop
cap to the first letter. And in this case, I don't think we need to crop the edges. This is looking already
nice and balanced. And that is all I
wanted to do for the body first paragraph style. And in the next video,
we can move on to format the story title style.
19. Formatting the story title (heading): Time to finally format
our story title, which is also going
to give a lot of character to our design. So here is the first
instance on this page, and we have already our
style defined story title, which essentially is the
heading in this document. So I'm just going
to right click on that and start editing it. I want to change, first
of all, the font. Now, the font I am
going to use is, again, another Adobe font that you
can download and synchronize. It's called Fairy Tale JF. So that's the one right there. If I click into the next frame, we can already see
it updating here. Now for the size, I
probably want this to be bigger like around 30 points. Maybe we can tweak this later, but I quite like
the way that looks. The leading for it, I will
probably reduce down to 30 points when there's some story titles
that are quite long. They will end up
being in two lines. I don't want them to be
spread out too much. I want to keep them fairly
close to each other. And I would like this to
be centered, for sure. So I go into indensed spacing, change the alignment to center. Is looking quite nice. And I also want to
have space after this. So I'm just going
to increase that probably around this much space. If I click Okay, we can
check this in normal view. That's actually two lines because we are using
the baseline grid. That's how it's
going to look like. And at this point, you
can decide whether you want to keep
this text in black, or perhaps you want to repeat the color that we
have on the drop cap, so this red color. And in case you want to do that, what I would recommend to do is to use the eyedropper tool, that's E on the keyboard. And then hold down the shift key while clicking on this image. Let's just sample a
color from here maybe. So it's a very vibrant red. We can save this into the swatches by clicking
on the plus sign, and we can even name this. So instead of using the
name with color value, we can just type in grim red. I think that's a fitting one, especially because we have
a little red riding code amongst these stories
and also a couple of other stories
that references red. So for now, we can
just use it like that, but also additionally
important to change this from RGB to CMYK. And since I'm using CMYK values, I probably want to even
these numbers out a bit. Instead of 92, I will
probably keep these both 90. So that's probably
a better color there that we can work with. And we can click Okay. So now that we created that swatch, we can actually go into
our swatches and select all these watches
without having anything selected in our document
and delete them. Actually a faster
way is to go to the panel menu and choose
Select All unused. Just make sure to don't delete the green red and delete them. I notice that we have the
magenta here because we are using that on the poems
at the moment, the shading. I'm not going to
delete that just yet, but we have our color
saved nicely so we can go into the story title
paragraph style. And on the character color, we can choose green red. Let's click Okay and just
go back a little bit. That is looking really
nice. I love this font. I think it's really
good. It works really well for fairy tales. But now there's one additional
thing I wanted to do, and this is going to become
more important once we start putting in the images or
illustrations for the stories. And that is to keep the
beginning of a new story always on the right side
or on the rectal page, because the format that I
want to use is to always have the illustration just when the story starts
on the left side. So there is a very simple
and easy way to do this. Again, we have to go back
into our style formatting. And under keep options, there is a way to restrict
where this text can appear. I want this text to appear
always on the next odd page. So if we do that, see
how immediately it moves the text here on the right side and keeps
that left side empty. And the great thing
about this is that all of the
stories will always consistently start on the rectal or right
side of our spread. Let's just see the
next one as well. Yeah, that works perfectly. Now, here's another
stylistic choice that is completely up to you whether
you introduce this or not. I just want to show
you how you can do this technically in
case you wish to do it. So in some books, they would start the title, not all the way on the top
edge of the tax frame, but it would actually start
a little bit further down, giving some negative
space on the top. Again, a more dramatic way
to introduce the story. So instead of starting
straight on the top, gives it a little
bit of a pause, like visual pause
before it starts. So what we need is some
space before this paragraph. Now, to actually achieve this, we have to be tricky because the default feature that
you would normally use for this won't work here because there is no copy
before this text. So that's the first
one within the text. So if I were to go in here
and edit the story title, and the one that you
would normally want to use is the space before. So if I just
increase that up to, let's just say 1 ", you see, it's not affecting
this instance of the text. But if I go to the next
story, for example, even there, it's
not going to move it because there's literally
nothing before it. So that's actually not something that we can use in this case. I'm just going to go back edit story title and
remove that setting. So that's not working. Instead, like I said, we have
to be a little bit tricky and use the paragraph
rules feature instead. Want to use the rule above. So let's just turn that on. And we want to change
the offset of this. If you start increasing it, holding down the Shift
key is going to keep up further away from
the text like that. And if you turn on
the keep in frame, that's going to make sure
that that rule will always be inside the frame and aligned to the top edge of
the text frame. But of course, we don't actually want to see that line there, so all we have to do is
to set the color to none. So it's an invisible line, but we can still control
how much space we want before this paragraph probably
that's already enough. So we have one, two,
three, four, five, six lines down by
using 1.25 " offset. And then we can click Okay, and we can check this without
having the baseline grid. You can see it in
full screen as well, just to better judge
how this looks. And, yeah, I quite like that dramatic pause
at the beginning. I feel like it works well, and it really visually
distinguishes always when a story starts compared
to the rest of the pages. And that is all we have
to do to our story title. In the next video,
we will be creating a new style for story
subtitles or subheadings.
20. Formatting the story subtitle (sub-heading): The entire book, there's
actually only two stories where there will be story
subtitles or subheadings. And one of these
instances is here, the Adventures of
Chanticlear and Partlet. The first title is right here, and it actually starts
with number one, how they went to the
mountains to eat nuts. And then if we go a bit further into the story, we
will find number two. And number three.
Once we format this, I will show you where the
other story is in the book. And I'm going to create
a brand new style, so it won't be based on anything that we
already have here. I will just alter option click here to create
the style first. I don't want it to be
based on anything, so I'm going to choose
basic paragraph. And it already picked up
a couple of things here, so I can just say reset to base. And let's just call
this story subtitle. And the first thing I want
to apply is that it should be also using the same
font as the body copy. But this time, I am going to use probably bold or extra bold. We'll see which
one works better, and we want to increase
this maybe up to 15 points. We also want the
alignment to be center. And for now, I think
that is enough. We can refine this later. Let's just click Okay and apply it here on
this first line. So I'm just going to
move the story subtitle down here and we can click
on. See how it looks. By the way, in the
paragraph size panel, I like to lay out my styles in the same order as they
appear within the book. So I would normally put
the story title on top, then the story subtitle. Then comes the body
first, actually. That's the next one, then
the body, and then the poem. So that just makes a
little bit more sense to see them in this order. But now, coming back here, you can actually decide to remove that number
one if you want, but that's how it was
in the original book. So I'm going to keep that there. And what I'm going to do is to just change the case of this, which we can override
by going into the type settings and
go to change case. And I want this to be
title case. Looks good. Maybe even sentence
case, if you want. Let's just go back
again. Sentence case. Yeah, I feel like
that looks better, since we already have a title
case on the main title, here I feel like
that looks better. And this is probably
a little bit too big. So if I zoom out, now looking at these two
next to each other, I feel like we have a little bit of competition going
on between these two. So I don't want this
to be so intense. I'm just going to go back
to subtitle editing, and let's just reduce it
probably down to 13 points. That will be enough. Yeah,
that's looking good. But just like with the title, I want to have a
little bit more space, so I increase the spacing after, and that is probably enough. I will click Okay,
and we just need to apply this to the
other instances now. So let's move to the next
one, which is right here. Can select it, and by the way, you can do a quick apply. Whenever you have
texts like that, you press Commando
Control Enter, and then you can just
choose story subtitle. And then we also have
to make sure that this is changed to the same
case that we used before. So sentence case, and
I just noticed that we also have to introduce the
space before option for this. So I will come back
to story subtitle, and we need to have Idense
spacing space before. Probably a little bit more there twice as much
as space after. I feel like that
is looking good. By the way, I just noticed that names are also set
to lowercase now. So we have to just fix
that manually like that. Mr. Also should be, and this should be K.
Yeah, it's looking better. Now let's go back up here and check how our
spacing looks like. Now, since we introduced the
space before for this text, and we already have
space after this one, it might feel a little bit too much empty or
negative space there. So in this case, I
would probably have a separate version for the first instance of a story
subtitle within a story. So that can be a
variant of this. Right click on the
story subtitle and choose duplicate style. Of course, it should be
based on the original, and I'm just going
to call it first. Just like with the body copy, we have a first instance
of this as well, and in this case, I want to
remove the space before. So that way, we are not
duplicating the space, and if I select this and
switch it onto that, that's already
looking much better. Let's go back to the next page, and this is looking nice. And then we can do the
third one as well. Let's just choose the
story subtitle for that. Let's just also update
this to sentence case. So we go type, change case, sentence case, and then just
manually fix the names. Another name right there. Alright, that's looking good. And now you might
want to consider having these sub stories or subtitles also only appear
on the top of a text frame. So instead of showing up
somewhere in the bottom, like in these cases, we can go into the story
subtitle. Edit that. And then from keep options, we can say start
paragraph in next column. So we are not as strict
as with the story title, which always starts
on the next ot page. Here, we just simply say next column, and then
we can click Okay. But because the two variants of the story subtitle
are connected, we have to make sure that the first instance doesn't
have this feature in it. So we go into keep options
and we turn it off there. So we can allow that
to appear anywhere. So now if you click
Okay, this is how it looks so that is
also why it's good to have these two variants
to differentiate the first instance to the second and the third
and so on and so forth. So now they are
looking quite good. They are starting
on separate pages, but they are not
starting further down like a new
story would start. So that's also why
it's good to have that negative space
here on the top. Again, it visually
differentiates the hierarchy between
this page, for instance, and this one but there's still something that I don't
like about this text, and that's the way the words are divided or the text is
divided between the lines. So in this case, for instance, I would put a soft break, which is shift enter here. So it would have the names on
the top and then that text. So it's a little
bit more balanced. Let's just see this first one. This is actually fine because
it fits in a single line. And then let's just
check the third one. Okay, again, we can probably
separate it right there.
21. Refining the story subtitles: Now you can also
choose to separate the number into a
new line like this. Number three, and just to see
how this would look like. I'm using soft breaks there. Another soft break. That's probably even better. I like the numbers
to be separate, and perhaps these numbers
can actually have that color assigned to them that we are using on the titles. And this is actually
something that we can do with a nested character style for which I'm going to just create
the character style here, so create new style. Let's give this a name. I'm going to call it grim red, and I'm just going
to make sure it's based on nothing that
we already have here. We choose the grim red color
for it and click Okay. And now that's created, we can go back to our
story subtitle. Edit that. And under drop caps
and nested styles, we can choose to have a
new nesty style, edit, the cream red, and we want it to go through
the first words. And that works perfectly. However, it seems like it
also affected the font that's used it brought
in the drop cap font. So I just have to go back to that character
style to fix that. It's strange because it seems
like it's not using that, but still in here, it was added. So we just have to delete these, keep those cells
empty, and update. Now it's going to
use the same font as the rest of the
story subtitle. If I zoom back a bit, that's number one, number
two, and number three. Works perfectly.
Looking really good. And while we're here, I just also noticed that because this story had this subtitle, it also didn't pick up
on the first paragraph, which should be the body first. So I'm just going to
update this quickly. And this brings us
to another issue. What happens if our
text is starting with a quotation mark so what
will happen to the drop cap? Do we need a quotation
drop cap as well? And the answer is yes, you should have the quotation
mark as part of the text. So I am going to have a variant of the letter T
where this is necessary, which will be amongst
the image files. I'm not going to worry
about it right now, but that's just something that
you have to keep in mind. And also, when you are setting the conditions and you want
to hide these characters, you will have to hide both
the T and the quotation mark. Then obviously it's up to you whether you want to
have these drop caps to show up in each of these sub stories or
just in the first one. And in case you make
a decision that only the first substory
should have that drop cap, you should still have a
variant of your body first, which still doesn't have
the first line in dent, but it just doesn't
have the drop cap. So to show this to you, I would come here and
say, for the body first, I want to duplicate
and I'm going to call this body First in sub story. And for this one, I'm going to remove the drop cap,
set it down to one. Also, don't change
the character style, and I want to have no indent,
which is already fine. Can click Okay, and
then I can just assign that here. There you go. So this is how it
would look like. And the same thing here, this first paragraph
should be that. And if you recall, I mentioned
that there are actually two stories throughout the
book with sub stories in it. The first one we already done, and the next one is the
wedding of misses Fox. The easiest way to find it is to search for text, find change, the wedding of Miss and it should find it
already. There it is. And here we have
an issue because the story title has been
applied to the first story, which is the subst but we can
just update this quickly. So that's the story
subtitle first, jumps back there, we have another problem here because here we
don't have numbers. So again, for this, we
might need another variant, but let's just see the
rest of this story. So we go to the second story. Let's do again story subtitle. This is not the first anymore because that's the second story. And the salad, that's
already another story. So this fairy tale has
only two subs stories, and now it's up to you
whether you want to do this as an actual
style that you set up, or you will just do it
as a manual override. You can actually highlight the text and change
it back to black. And in some cases,
that's perfectly fine. So if there's only two
instances of formatting, you might not need to
save it as a style. You can just do that manual
override to keep it black.
22. Formatting the poems: We arrive to one of our
final paragraph styles that we need to refine
and that's the poem. So remember, we
highlighted these in this pink or magenta color, but that's something
that we will fix now. First of all, we need
to right click on the poem style to open
up the settings for it, and we want to make sure
this shading is removed. So not only the tick
has to be turned off, but also we want to
set the color to none and then turn
off the shading. This way, it's not going to
be visible in the format. What we want also is to
change the font to Tisa pro. So the same font we are
using for the body copy. We want the size also to be nine and the
leading to be 11. Yeah, that is looking good. But we want to make sure that
visually looks different. So I will set this
to medium italic. Looks quite good. We can
also maybe try light italic. That perhaps is even better, but we just have to check from a distance to make
sure that it is going to work fine and it's still going to be legible
enough from a distance. So I want to go into
indent and spacing, and I want to make sure that
there is a left indent here. So let's just push
this quite far in. Maybe 075 should be good. And then we want to
have space before, probably around
zero, one, 25 inch. But we also want to
make sure that there is no space between the paragraphs. So that feature here is
a really useful one. We want this to be set to 0 ". And this is looking
really nice already. We can click Okay and just zoom back and check
the spread from a distance. I feel like that
is looking good, but there's one small tweak
that I would also do. For Italic formatting, I normally like to also introduce a little
bit more track. So we can go into the
poem, right click, edit, and on the basic
character formatting, I want to go into tracking, and let's just do 25. Yeah, that might be a
little bit too much, maybe ten or 20. Maybe we can type
in manually or 15. I think 15 is going
to be enough. Yeah, that is looking good. So if I turn off the preview, we can see before and after. Just a very subtle adjustment, but it helps to make this
more legible and readable. So let's click Okay, and let's just look at
another instance. Yeah, this is looking
very nice as well. Let's go to another instance
right there, looking good. And by the way,
this is not using the baseline grid because I feel like that might be a
little bit too restrictive, and it actually helps to differentiate this more
from the body copy. So by having it
almost floating in midair makes it completely different and elevated in a way. Now, remember our script
that we created for changing the body copies first instances throughout
the whole book. There's actually one
additional thing that we could consider doing. Normally we would only use
a first line indent on a paragraph when there is another paragraph
right above it. But in this case,
where we have a poem, there's actually a big
empty or negative space above this paragraph. So there's literally no point of having this
indent right here. That's something that I would
normally call an overkill, so it's completely unnecessary. And remember that
we already set up a paragraph style called
Body First in sub story, which actually has
the same setup, so it's just normally
the body copy, but without the indent on it. So we could actually apply that after every instance of poem. But instead of doing this manually throughout
the whole book, let's try to run the
script that we created. So we go to Window menu
utilities and choose scripts. And if you remember, it was
called Assign Body First. Make sure that nothing
is selected in the text. We can double click on
this and in this case, we want to look for the poem. That's the preceding
paragraph style. The target paragraph style
should be a body paragraph, the one right there,
and we want to change that to the body
first in sub story. Then I want to run this as a batch process throughout
the whole document, so I'm going to have this tick
on, and then I click Okay. And see, we got 94
instances of that. So that means that there are 94 poems throughout
the whole book. Let's click Okay, and we should see this already updated
throughout the book. So there is a small poem here. Yeah. There's no
intent after it, then we can check
on another page. Let's just find another poem. Of course, when I I won't find
it, but there's one here. Yeah, that's looking perfect. Let's move to the next one. Again, looking great,
no intent there. And I believe that the
script did a good job, so I'm not going to go
through the whole book. I'm going to trust
that the script did a good job fixing this. There's one last thing
that we have to make sure that we assign on the poem, and that is the feature
to make sure that poems are not separated
between pages. So let's see if we can
find an instance for this. I'm just going to use the fine change that's
Commando Control F, and we want to find not
text, but a formatting. So in this case, we
are looking for poems, paragraph style, and
then go find next, and then we can just
quickly skim through. There is already one here that might be spread
across two pages, but now it's actually
starting on top of that page. Let's go find next. Yeah, these are not
divided, not divided. Let me move this to the side. No divided. Okay, that's
again, close to the top. And by the way, we can already see something that we will
fix here later a ido. We will fix that soon. Uh, yeah. I actually don't
Oh, there is one here. Again, I think that's
a single line, yeah. So that's fine. Yeah, these are looking okay. But here I just
noticed one issue. For some reason, there is no space between this
paragraph and this. And I honestly can't tell why it's happening here and here, but not in the other instances. So everything else
seems to be fine. So in some cases like this, I would just go and
add a soft break in there just to create
some additional space, which will be very similar to the other spaces
that we have here. Again, I'm 100% sure
why this is happening. I'm just going to
do a quick test if I move this text down a bit. Yeah, it's not because
of the baseline grid, and I can also check in here. There is actually no
more break there. And this is using the poem
without any overrides, and this is using the body first in substory
without any overrides. So, yeah, I can't
really think of any reasons for this to
be close to each other. It shouldn't be like this, but for some reason, it is. So I'm just going to
add the soft break there as well like that, and that should fix
these two instances. But what I wanted to
look for is an instance where the poem is
divided between pages. And I don't seem to find
any instances of that. However, it would
still be good to be cautious and set this feature up just in case it
would ever happen. Like, for instance, here, I'm just going to make
this text frame slightly taller and then
the text gets separated. So we can see the first line of that poem went
to the left side. So to fix this, we go
into poem, edit it. And under the keep options, we want to make sure the keep
with previous is turned on. So that means all the
similar styled text or the text that's using the same paragraph style
will be kept together. So keep with previous, and then we can just click Okay, so that fixes it, and we can just set this back
to where it was. And that's all we needed to do to the poem paragraph style. Now we can again concentrate on further refinements
on the body copy.
23. Improvements to the body copy: Even though we spent
already quite a lot of time refining the body copy, there's still quite a lot
that we can do to improve it. Firstly, I just wanted to
show this in case you decide to use an actual font
for your drop caps. Like this one is a good
example where we have the text extremely closely wrapped
next to the drop cap, which is an I in this case. So the quick fix for this is to put the cursor right
between these two letters, the first and the
second, and hold an alter option key and
then press right arrow. So you are adding kerning to increase the
offset of spacing, and that's a nice
way of fixing it. That unfortunately is
something that you have to do individually wherever you
feel like it's an issue. And also, you don't
really have to worry about this in
case you decide to go down the route of using
images for your drop caps. It's a very subtle thing again, but you can see the
difference before and after, even in this full page format. But there are much
more serious issues that we still have
with our body copy, like the fact that we have
orphans and videos allowed. So here we have, for instance, the last line of the paragraph separated from the
rest of the paragraph. And we also have
the first line of a paragraph separated from
the rest of the paragraph. So both orphans and
videos, we can see there. This is actually something
that we can fix very easily by going back to the body
style, edit that. And then under the keep options, we want to say keep lines together at the start
and end of paragraphs. And normally two lines
should be enough. Otherwise, it can get too
restrictive and it ends up creating lots of
empty space on pages. But you can see simply just
by doing this, if I go back, there is that instance
and that instance, which is also fixed, but also this will
be fixed after. So no orphans, no widows
anymore. So that was easy. Now, let me find
another issue that we normally refer to as runs
like this word here, a single word at the
end of a paragraph. So that's something that
also doesn't look too good. And in case you already done the other projects
in this course, you would know what to do, but I'm just going to show anyway, going to create a
new character style. Which I am just going
to call no break. It shouldn't be based on anything and it shouldn't
have any settings. So no character color
should be assigned to it. All I want is from the
basic character formats to have the no break option
turned on. Then I click Okay. And this feature is like a glue. It makes sure that anything that you use with this is going
to be kept together, so it can't be separated between lines or columns or frames. So once we have that setup, we can go inside our
body copy, right, click on that and
go into grab style. Create a new grab style with the no break character style. And for the text, we want to type in the
following code curly brackets, 15, curly brackets, dollar sign. Then we click away. And after typing this, something
strange happens. It seems like my
text disappeared. So the code is in already, which means that I
want the last line of a paragraph to be minimum
15 characters long. That's what this code does. But the problem here, it seems is that in
the character style, even though I tried not to include any additional features
apart from the no break, it ended up using the
color non option as well. So when you remove a color and
you specify it to be none, that actually ends
up in the style. So a good practice
to do whenever you create a new
character style once you already have other styles in the document is always
to reset it back to base and then assign the feature you want in
this case, the no break. And once we do that, see, it's already looking
much better. So let's click Okay and
then zoom back a bit. And as we go through
the document, we will see that there's no
short last lines anymore. So that's another issue, the issue of runs, also fixed. Now let's concentrate on
another typical problem, and that is to end up having Is at the end of a
paragraph or a A. That would be the first
word within a sentence. These, again, are not ideal
to have at the end of a line. It's aesthetically
not that pleasing, and it's up to you whether you want to introduce
this or not, but I always like to do
this for books for this, we will again be using
the no break feature, and we'll set this up as a new grab style
in the body copy. So we're going to edit
body copy, grab style, and we want to create
a new grab style, which will also be using the
no break character style. And all you need to type
in here is space, I space, then the pipe icon
or vertical bar, which is shift backslash, then space again, A and space. So if you click AA, it should already work. But I just realized that
we also have to factor in the instances when there is a quotation mark next
to the characters. So we have to add that
in there as well. So another vertical bar, which is like O or
dividing these criteria. So we want to have also
an instance where we have space quotation mark I
followed by a space. And if you just click away, it already is going to fix that. But we should do
the same for the A, preceded by a quotation mark. So we make sure that
there's a space there, then vertical bar or pipe space quotation mark
A, followed by a space. And then click Away. Now it should fix all of
these four instances. So we can click Okay, and we shouldn't be seeing this problem anymore
in the document, but a good way of testing out a new grab style that
you introduced is to temporarily turn off
the no break feature within the no break
character style. So if I just turn that off, we can see that one coming back. Turning the no break back
on again, it fixes it. So once again before the
text will go back up there, and then if I do no break, it's going to go down, and we can find another
instance of this. Once again, this one is
without the quotation mark. So if I turn back the no
break like we had it before, just turn it back on completely it's going to fix that problem. So yes, we can see this is working throughout
the whole document. So we've done a good
job with that grab.
24. Final GREP for body copy: There's actually one
additional grab style that I would like to introduce, and that's for highlighting any word that is in
capital letters. I believe there's only one story in this book where it
appears or maybe two. So in Rumpel Steelskin, there's a couple of instances. So we can see Tom, Jami, John, and Rumpel Steelskin obviously, also capitalize, but there's
also additional ones here. So here, the character is
trying to guess the name of Rumpel Steelskin and that's
what we want to change. So for this, I am
going to create a new character style without
having anything selected. Let's just do that alter
option, click on that. And even though I didn't
have anything selected, it's still picked up
the based on option. So we just say none, and I'm going to change the
character style to highlight. That's what normally
I would call this. And then we want to
change the font style, probably just simply to italic. Let's see if we find
it. Scroll down a bit. It should be here, probably
a bit further down. I would just type
in the whole thing. It's easier Italic right there. Okay? Let's click
Okay. And what we want to do is to go
inside the body copy. Edit body copy, grab style, and new grab style. This time we want to use the
highlight character style. And what we want to type
in here is backslash B, which is the word boundary, then square brackets, A Z, close square bracket, meaning all capital letters
we are looking for. Then we had a plus sign that
this is repeated one or more times and then we have another
word boundary backslash B. If I click away, this
should already work, but for some reason, we
can't see any changes. So let me just go back to my
highlight character style, and just temporarily, I'm going to assign the red
color. I was right. It was actually already working. We just didn't choose
a font style that's actually part of the
Tisa Pro family. So to avoid this happening, it's probably best
to choose Tisa Pro, and then it's going to revert
to a font that's available. So the name for the Italic style is actually regular Italic. So we have to make sure we are accurately
choosing the name. So to avoid this happening, always make sure to include both the font family
and the font style. You just have to remember to use this highlight
style only on text, which is already set in Tap. Otherwise, there will
be a clashing override on the font itself. Now that we fix this problem, we can go into character color, and we can go back to black, which should be the
color used here. And if you feel like
the regular italic is not different enough or doesn't have enough contrast from the rest of the body copy, you can, of course, change
this to either light italic, which I believe we've
seen already earlier. Yeah, that's looking quite good. Or we can make this
medium italic, which will make it bolder. Whichever you prefer,
I actually feel like the light italic is more subtle because we already
have the text capitalized. It doesn't have to
be even bolder. That's almost like shouting. So I'm just going to
keep it like this. But maybe I'm going to increase the tracking by ten points. Let's see how that looks. Yeah, that's quite nice. Maybe it can go up to 15. That's probably even better.
And we can click Okay. Now, if you don't want
these capitalized words to be hyphenated, like in this case, we
have one instance. We can also include the no break feature
within highlight. So we can go back there, and then we remember
that's under here, the basic character formats, and once we include no break, now it's going to
reformat that text. And that is looking really good. The only instance
where it might not be perfect is where it says
Mr. Rumpel steel scheme, but that's just simply how
it was in the original text. So this wasn't
capitalized however, that doesn't mean that we
can't apply this manually. So we can just
highlight that text and say that should
also be highlight, which will use the
same formatting as on the rest of the name. We can just double
check if we can see this anywhere else in the text. It's probably not going to happen again
throughout the book. As I said, I believe this might be the only
story when we have capitalized words we can use the fine change to look
throughout the whole document. Again, instead of finding text, we can just look for
the character style highlight to see
where it occurs. Let's just go through quickly. And there is actually
a big problem here. I just noticed that it
applied this style on all the words where we have a single eye so that is
a problem because that, of course, is a capital letter that makes up an entire word. That's how we define
our grap code. So we have to make
sure this is fixed. I'm just going to say done. It's great that I check this. So I can just zoom a
little bit closer to make sure we can see this.
It's a very subtle thing. It would have been horrible to end up having the book
formatted like this. So we have to go
into the body copy. Edit, grab styles, and this
code needs to be updated. So that plus sign,
just so you know, is the repeat one or
more times option. But we can be more
specific than that. So between the word
boundaries and after specifying that we are looking for all the capital letters, so we will use curly brackets, open and close, then
put number two there. So that means we need at least two capital
letters next to each other. Then we will put a comma, which means that there
is no upper limit, so it can be two or more. Now we can click away, and let's just keep an eye
on these eyes in the text, and they are fixed now. Let's click Okay. We can go
back to our fine change, and let's look for the next
instance of this style. Yeah, that works
perfectly there. That was actually
capitalized in the text, and this is a good way
of highlighting it. Again, we have little red cap, little red riding
hood. That's perfect. And then we can go
through the text again as a home and then there
are the names here, and I believe that's all
the instances we have. So this is also another good
practice to get into using the Fine change command
wherever you applied a change to a formatting or you introduced
a new formatting, especially if you are
using grab styles to make sure that the
styling is only applied wherever it was necessary
and it doesn't generate any unexpected conflicts
like the one we've just seen with the eyes
throughout the book.
25. Setting up the illustrations: Now it's finally time to turn our attention to the
illustrations in the book. So we've dealt with a lot
of formatting on the text. I'm sure you are bored of
looking at text by now. So it would be a nice change of pace to work with
some illustrations. And I'm on the first spread, and here we have an empty
text frame on the left side. And what I'm going to do is
to create an empty frame. This will be using
for the image, so it's a placeholder, and I make it exactly the same size as our text frame, right? There. Now, you don't
have to worry about removing the text frame
from behind this. But if you want to do that, you can delete it. It's not going to
affect anything. I'm just going to
put this up here, aligning it to the
baseline grid. And now that we have
this frame selected, we can press Commando Control D, and from the exercise
file folder, under illustrations,
you should be able to find at least
these ten images. At the time of
recording this course, I only have ten of the stories
created as illustrations. But by the time you
watch this course, you might have all of
the additional ones, if I have time to work on them. But for this first story, we need the golden bird image, and let's just place this. Now, it came in already nicely. What we can do is to have this fill the frame
proportionally, make sure it's there, and it's looking really nice. That's exactly how
I imagined it. We will have the
caption below it, so there's enough
space for that. And in case you want
to have round corners, you can set that up here with
this little yellow square. Just click on it and
drag the corners in. Potentially, we can
have corners like that. It's completely up to you
whether you want this or not. And by the way, if
you use corners, you can also change
the style of them. There's a couple of
different options here like the inverse rounded
corners quite nice. Perhaps that's something that I will end up using
for this project. To make it easier to
change this later on, if I change my mind, I'm going to save this
as an object style. So having this frame selected, I will come down here and
create a new object style, and I'll call it image.
Let's just click Okay. Now we can assign it,
and now it's connected. So on this first spread, we didn't really have
to worry about placing this image because
it's always going to be next to the first story. However, as we go
further into the book, we might have problems along the way if we don't
tie them together. For instance, if we
decide to change the font size and we end up having more pages
than we needed before, then most likely the
text and image won't stay connected to each other and they might get separated. So what I'm going
to do here is to come back to my image
frame, copy this. Jump back to the next story, and then I'm going to paste
here on the left side. So whenever you choose
paste in place, it should always place it
exactly in the same position. Notice how I actually changed
my keyboard shortcuts. The default paste shortcut
commando Control V is usually assigned to this option while I
swap them around. So most of the time, like 90% of the time, I want to paste in place
instead of just simply paste. So that's what I recommend
using for you as well, and that's something
you can change in the edit keyboard
shortcut section. But without wasting
any time on that, I would like to show
you what happens here if we don't have these two
connected to each other. So like I said,
what happens if we change the size
of the body copy, for instance, if I go in here and maybe instead
of nine points, we decide to use ten points. Now, so far, we don't
see a big difference. However, there is actually
text behind this image. So if you have a keen eye, you probably spotted
that already. But that was not the main problem because
there's still not enough text here on
the left side to push this story
to the next page. So I'm just going to go back and change the size one more time. So let's just go
up to 13 points, and that should be
enough, right there. Now this image is separated, so they are not
connected to each other, and that's why that's
going to happen. So let me go back
one and two steps, go back to the way we had
our text formatted before. And the first thing
that I want to do to make sure that
this image is not going to overlap any text is that we will set up
a text wrap on it. So having the image selected, I'm going to use this wrap
around bounding box option, or you can also use the
jump object if you want. And don't forget to update the image object
style based on this. So let's right click on that
and choose redefine style. Now, just to test this again, if I go back to change my body copy to 12
points like before, where before it came up
underneath the image, now it jumps onto
the right side. But the image still
gets separated. So it's still something
that we have to fix. So I'm going to undo
that last step. And now that we have
the text wrap ready, the next thing we need
to do is to anchor this just before
the story title. So what we can do is to grab this little icon right here
on the top right corner, the BlueField square and drag that just before the first
letter in the story. Right there. Now, I also
have an indication, this dashline showing where the anchored object is anchored, too, but this is not something
that you see by default. You have to go to the view menu, and on the extras,
you can find this. So this is the anchored
object control. I like to keep this on, and I suggest for you as
well to keep it on. And simply just by doing this, it would work perfectly. Unless there's some text
showing up here on this page. So if the previous story flows a bit further and actually
some text is left here, then there would be a problem. And the reason for that
is because this is a very specific scenario where we have an anchored object that is currently
not in line image. It's just simply anchored like this outside of the text frame, where we are planning
to use text wrap. However, in case of
a primary tax flow, that text wrap is
going to be ignored. So the primary tax flow is
overriding the text wrap. It automatically ignores it. So let me just
demonstrate this to you. I'm just going to copy this
couple of paragraphs here at the end and just paste
it in once and twice. And immediately, we
can see the issue. The text is going
over the image. Now, just to show you, if I
select the image, by the way, if you hold on Commando Control
click on top of a frame, you can switch between
the two frames. So we have text frame and the image frame on
top of each other. So if I select the image, and I know that's selected right now because I
see the dash line, I can double check in the
text wrap options that even though it has a wrap around
bounding box enabled, the text is still
showing up there. And I also wanted to
show you that if I have the text frame selected and
I press Commando Control B, the ignore text wrap feature for the text frame
options is not turned on. So that normally is a way of ignoring text wrap by
using this feature. But once again, that's not the reason why the
text wrap is ignored. In this case, it is because
it's a primary tax flow. So that is always prioritized over an anchored
images text wrap. I have to admit this
is quite confusing, and it took a while for me as well to wrap my
head around this. No pun intended there. But there is a
solution to fix this. First, I'm just going to get
rid of all of that text, so I don't end up
having duplicates and I come back here and I just double check that the anchoring
is still in place. However, I'm going to
remove this anchoring now. I right click on it and choose
anchored object release. Okay, no connection. Now I'm going to cut this image, go up one page. And then I'm going
to paste it here on the left side and notice how the text wrap is showing
up straightaway. However, just
temporarily for now, I'm going to turn the text
wrap off because what I want to do is to anchor it
right after this paragraph. So I'm going to press
Enter. There is a new line. We can set this two
basic paragraph. Then I'm going to
select the image. Cut it out, double click
inside here, and paste. And that's all we had
to do because there is obviously not enough space
here for the image to show up, it automatically went
to the next frame. Now, the only time
this image would still get separated
from this text on the right side if there was
no text here in this side. So for instance, if I
delete all of this text, let's just delete a
little bit even more. Notice how now it moves back
and on the next spread, there is an empty
space for the image. So to avoid this, we have
to be clever once again. And we have to assign a
paragraph style for the image. So we already have an
object style for it. And by the way, I'm
just going to make sure that there is no overwrite, so I clear all overrts and it should put
back the text wrap. So now we can create
that paragraph style. I'm going to make sure
that nothing is selected, and I alter option, click on the new
paragraph style option. I don't want this to
be based on anything, and I want the style
name to be image, or you can call it inline image, whichever makes sense to you. And you want to go
to the keep options, and you want to say start
paragraph on next even page. So it will make
sure that it always shows up on the next even page, which is the verso or
left side of the spread. So that's perfect.
Let's click Okay. And now what we need to do
is to go into story Editor. So that's Command or Control Y. And once this window comes up, we can see the
little anchor icon. So this is our inline image,
which I can highlight. And right now, we can see it's using the basic
paragraph formatting. But as soon as I apply
the image style to it, it's going to update here. So that's the only
content in this line, and it's now using the
image paragraph style, which will force
this image to only show up always on the
left side of the spread. So there is no way this
will be separated from the corresponding story that
starts on the right side. So let's just do a
quick test on this. If I change the body
copy once again, let's do something
extreme 15 points. After a little bit of weight, we can see that our image and the story is
perfectly linked. By the way, we need
to update this image. It's still the golden bird. I'm going to select
it, press Command D, and then get the
hunts in Luck image. So let's just paste that in. So, yes, the text and the
image is perfectly linked, even when there is no text
on the previous page. So that is automatically and the image comes
onto the next spread. So now we can set our body
copy back to nine points. It's always good to do
these little tests and see how everything is reformatted throughout
the whole book. And this is why having
the pages panel always open is a
good idea because I can immediately see how we have this spread kept together, and there's our other one
as well kept together. Just to practice this setup, I'm going to do this
for another story. Let's just move on to
the traveling musicians. This is the fourth
story in the book. So first of all, we will need to copy our image
frame, select this, copy, and then come on this page or actually go
to the spread before this. And then there in the copy, we will just create a new line, set that to image, and then paste the image in. And then we can just update it, have this image selected, press Command D, and then we need the traveling
musicians. Space that in. And by the way, whenever
the image comes in and you feel like a detail is a little
bit too close to the edge, you can just hover
over it and then use the content grabber to
drag it left and right. You can hold down the Shift gate to make sure it doesn't go up and down and is
looking much better. And by the way, this is
the reason I chose to keep the frame size of the image
exactly the same size as the text frame because by
making it taller or wider than the actual text frame
can cause problems with the way the flow works and the way inline
images move around. Now you will have to place
in the images one by one. But once you have
all of this setup, it shouldn't take you more than probably 20 minutes altogether, even if you want to
do all the stories. But you can just keep some of the pages empty
because in many books, there's no illustrations
for every story. In this case, it's completely up to you whether you want to do all the images or just a few of them until you understand
how this feature works.
26. Adding captions to the illustrations: Now that we have some of
these illustrations in place, I would like to show you
how to set up the captions. But first, I wanted to also show you that I already prepared some metadata for each of
these in Adobe Bridge. This is the application
I find it easiest to amend the IPTC
metadata elements. However, you can also use
Photoshop for this if you want. But these are the
elements that are used. So I actually have a
little description here in the headline area. I have the story
title in the title. I like to keep
these two separate because I might decide
to use one or the other, or maybe both of them together. And the reason I chose the title and the headline
is because some of these images are
the original images created in mid journey, and they actually have
their original prompt and details in the description
metadata field. So I didn't want
to override that. So that's why I ended up using the headline instead
of description. But let's jump back
into in design and first set up how we want
the captions to work. So if we go to the object
menu on the captions, we can choose captions setup. And then here we first just
want to keep things simple. And I want this to
show the headline, which is the main description of what we see in the
images or illustrations. So that's all I
want to see here. But if I wanted to,
I could include some text before and after. And, of course, we can use
a paragraph style for this. For now, I'm just going to
keep it on no paragraph style. We can update this later. And a useful feature
that I like to turn on is this group
caption with image. This will make sure that the two won't get disconnected
by accident, and the default
alignment and offset, I will also keep the way it is. So I'm just going to click Okay, and let's just test this out. By selecting the image, we can go to the object menu. And then from the captions, we can generate a live
caption or a static caption. I'm going to explain what's the difference between the two. For now, I'm just going
to choose static caption, and we can see that showing up straightaway
here at the bottom. So this is not bad,
but of course, we need a little bit more space between the caption
and the image. So I'm just going to undo this last step when the
static caption was generated. And having the image selected, I go back to caption
setup first, and I'm going to increase
the space between them. Maybe zero, 25 "
should be enough. At this point, I will also
define a paragraph style. So let's just create
one for the caption. I don't need this to be
connected to the body copy. I'm just going to say no
paragraph style reset to base. Let's click Okay. The
headline is still there, below image, grouping is
on, we can click Okay. And now we can go back to object captions and generate
static caption for now. Yeah, that is
looking much better. Now we can go into
the caption style, and let's just format this. Of course, I will use the
same font. This a pro. Most likely, I will keep it regular and the size
can be less than 12. It can actually be probably the same size as the body copy. But this one I'm going to
set to center alignment, and perhaps we can use italic, like light italic
or regular italic. Let's see which
one looks better. Yeah, I feel like light
Italic looks quite nice. Let's just zoom a
little bit closer. Yeah, I quite like the way
this looks. Very subtle. It doesn't have to be too
strong because the image is the main thing on that page that we want our readers
to pay attention to. Now, the good thing about
using a style, of course, is that we will be able
to update them throughout the whole book later on
if we change our mind. Now, unfortunately, one
disadvantage of working with captions is that
you won't be able to easily update
their definition. So for instance, if I wanted to go back into the caption setup by having this instance selected here by changing
things like alignment. If I want it to be above the image or below or
changing the offset, even changing what I want to
include from the metadata, this is actually something that won't be able to update on an existing caption that
you already created, whether that's a static
or a live caption. So you will have to regenerate them if you want to use
that updated version. And the way you do
that when you group the caption together with the image is that first
you have to ungroup them. That's Command or Control
Shift G. You have to then select that
caption and delete, then select the image again. And instead of going through
the menus on the top, you can also just right click, go to captions and
generate static caption. And as you can see, now it's showing up on top of the image. So the caption
setup is preserved, but it's not going to update on already existing captions
in your document. Now besides this, we also have one other issue that
we have to deal with, and that's the fact that
we can't actually generate captions on anchored
or inline images. So just to show this to you, here on the second image, if I right click and
choose captions, I can't actually generate any captions because this is
already anchored or inline. Now to avoid this,
what you have to do is to just do things
in the right order. First, you need to
place in the image, generate the caption, and then place it inside
the text flow. So let me demonstrate
this to you. I'm going to delete this image. So it's completely gone, and I'm going to paste in the original image
that we used before. I will replace this using Commando Control D with
Hans in Luck image. Then I'm going to generate the caption, right
click captions, generate static caption, and the caption comes in
perfectly at the bottom, exactly how I wanted it, and it's grouped
together with the image. Now I can cut this, go to the previous page, paste, and then temporarily, I'm just going to double click on this group to
select the image, turn off the text wrap just
while we do the anchoring. Now I can click away, click back on the
group, and actually, we need to also have an empty
line edit here where we can then select the
group and anchor it in. Now we can double
click in that line and we can assign the
image paragraph style. Now, that style you might
remember is going to push the image down to
the next even page. But what will happen is that the image will
show up outside of the original frame because
in design in the background, change this from an inline image to a custom positioned
anchored object. This is to allow this group to still show up on this page. Otherwise, if it was
still set to inline, it wouldn't fit in the text
frame because right now this group is larger
than the text frame. So we have the image and the caption that needs
to stay in here. We have to do really is just to reposition this to be
in the right place. And to be honest, instead of manually adjusting it
and moving it around, it would be more professional to adjust the anchoring options. So I'm just going to
drag it out here again, right click on it and choose
anchored object options. And then instead of having the reference point being
on the bottom right, I'm going to set top left. And then the X offset
should be zero, and also the Y offset
should be zero. So this means that the top
left corner of the image is aligned to the top left
corner of the text frame. So this is perfect. We can click Okay, and we
can just test again if our primary tax flow
is still working fine and the image is going to still
be connected to the text. I will do my usual body
copy size increase test, and we can jump
to the page where the images, still connected. We also have this other
spread still connected. So, yeah, it works
perfectly fine. We can undo this change. And there's actually just two minor things we
have to still fix. One is to add the
text wrap back. So I'm going to select
this text frame, choose wrap around bounding box, and then finally, I will have
the whole group selected. Go back to the anchored
object options and notice how it's a
little bit further down from the top
edge of the frame. And that is because
the Y relative to is set to baseline
instead of cap height. So as soon as I do that, I can click Okay, and
now we can check. It is almost perfect. There's a tiny little difference between the edge
there and there, but that should be fine. I don't think anyone
will notice that, especially because we won't have that edge visible here on the right side thanks to the big negative space that we introduced above
the story title. It is quite of a
complex and long winded workflow if you want to introduce captions
on your images. So it further complicates the steps that we
have to go through. But all of these
exercises are great for us to understand
how in design works and what happens when we have
conflicting tasks that we have to somehow harmonize and
do it in the same project.
27. Live vs Static captions: Let me show you what's
the advantage of using a live caption over
a static caption. Again, what I'm
going to do here is to delete this
image and bring in our original template from the first page
without its caption. I'll just paste this
here on the left side, and I might need to
remove one line break here to make sure that the text comes back
the way it was. That was that additional
line break for setting up the image
as an inline object. But now, what I want to do
is to go to this image, right click and then choose captions, generate live caption. It should look very similar to how the
previous one was working. But the main difference here is that this caption
will be able to update whenever the metadata
of this image changes. So just to show this to you, if we go back to bridge
and I select that image, I can change the
headline slightly. So instead of a silver cage, I'm just going to type bronze
and I will type this in capitals just so we can see it and I change this
accept the changes, come back to in design. And here you would
expect this to automatically show
up in the copy but it just simply tells
us that there are some changes that were
made to this image. So first, we have to make sure the image is selected and double click on the little
exclamation mark that's going to fix the linking, and that will result in the
live caption to update. So we can see that
happening there. While if I go back
to the first page, the static caption
will not update. It just stays whatever
it was originally. However, it's worth
mentioning that even if you just change the
metadata of an image, it still has to be updated, so I'm just going to double
click on that as well. So the images now linked correctly to the updated
version of the image, but still the caption
is not updated. Now, let's see what
happens if we go to this live caption version
and we do the same setup. So we place it into
our text flow. I'm going to cut this out, go to the previous page, drop it in, and then
go inside the group, turn off text wrap for now. Then select the whole thing, add a line break here
on the right side, then anchoring this into there, and then double click inside
that line and choose image, which will push it down to
the next spread like before. Then here we just
have to select this. Right click, choose
anchored object options, and we want the reference
point on the top, the offsets to be zero and the line to
be set to cap height. Now let's click Okay. And this is where the live
caption will become extremely useful
because what we can do here is to double
click on this group, having the image selected, I can press Commando Control D, and I can actually
replace the image with the right illustration that we need here, the
traveling musicians. And as soon as I place that in, we can see that the live caption is updated here at the bottom. However, there is one
other issue here. Live captions generate
in a way that they can only take up the space
that they originally had, so they can't flow automatically
within the text frame. So even if I go in and select this text frame right
there and drag it down, it's not going to
make any changes because the live caption
behaves like a tax variable, which cannot be
divided between lines. So it's just going to
end up compressing it into the available space. If the text frame
was wider like this, it's going to start
improving straightaway. But because the text is much more here than a single line, it would really need a lot of space for it to become legible. Now, I'm going to go
back a few steps, and this is why I wouldn't
recommend using live captions, even though there is
some advantage to it. I just don't like
the fact that it is obviously stretched instead of being rendered properly. So I came back to this point, and I'm going to now
use the static caption. However, I just want to warn you that whenever you
use this feature, you have to always be careful not to have
any style selected, especially not the no
break style selected. It happened to me a couple
of times in the past. I just want to demonstrate
this again to you because it can really give you a lot of headache if this ever occurs. So I'm going to choose no break, and I'm going to go
to the captions, choose generate static
caption. And there you go. It seems like the text
doesn't even appear, but what actually is
happening here is that it automatically assigned the
selected character style, not just the paragraph
style that we defined in the caption setup. And basically, the no break
character style means that it won't allow this text to
wrap into multiple lines. So it will try to keep
it in a single line, and it actually won't
even show it at all. What you want to do to avoid this happening is to deselect everything and then click on no character style and
basic paragraph styles. Then select your
image, right click, choose captions and
generate static caption. And Via now it's
working perfectly. So even though we
have multiple lines in this description, it worked really well. And now we just have to do that dance of moving
this into the text flow, like before, we are
going to cut this out, put it on this page. Then double click, remove the text wrap from the
image temporarily. Then click away,
select the group, actually create the empty
line here on the right side, then select the group,
anchor it in there. Double click inside
line and choose image. And then we can go
down to the next page. And we can fix the alignment
of this image here. And at this point,
you can either drag this in place or you can go into the anchored object options and just reset the
reference point, set this to zero and zero, and set the Y relative
to cap height. And that's all you needed to do. Just around ten to
15 steps that you have to follow exactly in the right order to
get things right. Unfortunately, that's
the case within design. Sometimes you have to dance
around the limitations and restrictions to get the
result that you are after.
28. Setting up the Parent page: We finally got to a point
that I feel like we could set up our parent
page formatting, so we can go back there and we can start with the page number. Let's just create a text frame for this here at the bottom. Most likely we will place
it in the middle of the page or at least the middle of the
existing text frame. So I'm just going
to come down here and we can align these
two frames to each other. If they don't want to
snap to each other, you can have a guide edit here and also on the other side. Just add that, and then we can now align
them to each other. So that's going to be for
our folio or page number, and we will have the
same on the right side. So I'm just going to
set up guides there as well for our margins, and this should be
aligned to there. I'm just going to double
click inside here, and I will use the type
insert special character, marker current page number. It's a very easy one to find. You can remember it's also easy keyboard
shortcut if you want. Once you place that in, you can assign one of our
paragraph styles to it. Probably we can use the story subtitle that is actually already in red
the way that was set up. That could work quite well. For this, we might
change this later. F now, I'm just
going to duplicate this old or option shift
drag to the right side. And we can check how this
looks on the pages. All right? There is already one issue here, the caption and the
folio is clashing. They are overlapping each other. So I'm just going to drag this down probably all the way there. Let's just drag this
one down as well. There. Now let's take a look. Yeah, it's looking much better. Number three, we can see
the pages in full screen. We can just go
through them quickly. Yeah, all of these page
numbers are looking nice. I quite like the fact
that they are red. They are creating a
good little framing in the composition for us. So, yeah, I like this. And now on the top in
the header section, I would like to
have a running head that's going to show us
which story we are reading. So even on pages where we
don't see the title anymore, we will still know which
story it corresponds to. And then we also want to show the title of the book
that would make sense. So what we need to do is to come back to the parent page and then duplicate that folio frame, which we can drag up here, and then let's just zoom
a little bit closer. We can remove the
page number marker. And instead, we are going to
place in a text variable, which you can find
from the type menu, text variables, insert variable. Now, here on the left side, we probably want to have
the running header. So let's just add that. And then we want to go back into the text variables area
and choose define. And then when you find
the running header, just click on Edit, and you have to link this to the paragraph style that you are using for the story titles, which is going to be right here. So story title, and then we
can click Okay and done, and then we can jump
to one of our pages. And we can see how this works. So, for instance, this
one is the Willow wren, and the bear, and then here
we have the frog prints. Then we have cat and mouse in partnership and so on and
so forth, it continues. And this feature would be fine unless we have
images on the left side. So here there is still corresponding running
head to the story. But if I go back here, notice that even though this is the traveling
musicians story, the running head is still showing the previous
story title. Now, to avoid this happening, what I suggest to do is to have an alternative
parent page design, which we'll be using for the spreads wherever
a story begins. So let's create this by
right clicking on A parent and choose duplicate
parent spread A parent. And then on this one, we can just delete
the running heather. And in case you want to connect these two parents to each other, you can do that by
right clicking on this and choose parent
options for B parent. And then you could say, this
should be based on a parent. But I'm not going to do that
because it's fairly easy. In this case, we
literally will have these two parent
pages to work with. What I'm going to do is
to change their names. So the original one, I'm
going to rename to be body. Instead of parent, that's
the body copy pages. And then this one can
be called the title. That's the title page. Now, if you go through the
document on the first spread, we don't have to worry about this causing issues
because there is actually no instance of
story title on this page, but you can still apply the new parent page
to this if you want. So all you have to do
is to select the spread and hold an alter option
key and click on B title. And we can see this updating
here on the thumbnails, and also we can
see that there is no placeholder here
on the top anymore. You can jump to the next page, and again, having it
selected, the whole spread, I just der option,
click on B title, and it will do its formatting, and now it looks good. But of course, on the next page, we still have the running
cater and then here as well. And then we just have
to keep going through the whole document and update
these pages accordingly. Now, one major downside of this workflow is that
the parent pages will be staying always on the exact page numbers
where you assign them to, so they won't be able
to flow with the copy. They are not connected
or anchored, like the way we
set up the images anchored to the
beginning of each story. There's unfortunately
no way of fixing this. The only proper solution to avoid this happening
would be to break up the entire body of the book into individual in design
files for each of the stories, which I'm going to show you
at the end of the workflow. So you will see
all the advantages of doing things that way. But for now, while we are stuck with a single in
design document, let's try to work around
the limitations once again. It's all about being creative of how we use the available tools. So instead of relying on multiple versions
of the parent page, I'm going to show you
another technique. I will actually
delete the B title. So let's just go in
and delete this one. And I'm going to make sure that the A parent or A body is
applied to every page. I'm just going to say
apply parent to pages, and I choose all pages. So that should put back
everything the way it was before, meaning that we have, again, this text showing up here, which shouldn't be
visible on this page. So the rest of the
story is fine, like here as well. But once there is an
image on the left side, it still shows the
previous story title. So here is the fix
that you can do. Use the empty frame tool or the rectangle tool
is probably even better and just make a frame
over this section here, then set the stroke to none
and the fill to paper. Which basically just means that we are hiding the text in here. So I'm just going to
drag this down a bit, make sure it fits. And also on this side, I just like to use the margins. So if I move this down, the text is still under
it, the running cad, but I'm going to keep
this cover on top of it, and to make sure that this travels together with the text. So even if I end up having
more text before this spread, it should still be
connected to it. We just simply have to anchor. And since this is just an empty
frame, no text inside it, we can anchor it right here at the beginning of this line. And now if I change
my body copy, again, just the size of it, we can test how this
is going to work. Increase this again
to 15 points. So our text is reflowing
in the document. We can go down to the spread just before the
spread with the image. And we still have
the title there. But on the next page, we have this nice little cover that is traveling
with the story title, so it's hiding the running head on the page where we
don't want to see it. So it almost becomes like a
conditional running head, but with this clever work
around that we created. Now, the only problem is
that you will have to place this into every story
title in the document. But I'm going to show you
a quick way of doing that. First, I'm just going to undo the change on the
body copy size. Remember that this is
an anchored object that will show up in
the story editor view. So there is our anchored object. That's that empty frame. If I copy this and go to
another page like this, I can just click in
there and paste, and there is already our
frame perfectly connected. Now, to save even more time, you can use the
find change option, and you can say you are looking
for the paragraph style, not character style, but paragraph style
called story title. Click Okay, and then
just say fine next. Click at the
beginning and paste. Then find next. Click at the beginning and
paste. Then find next. Click at the
beginning and paste. Let me just move this
up a little bit here, maybe zoom out so we
can see it better. Find next, click at the
beginning and paste. Then double click
inside the text to make sure it moves onto
the next instance. Again, paste and so
on and so forth. It will still take
some time to do this, but it's much faster. Simply just copy pasting these elements in and
using the fine change, you can very quickly jump between the story
title instances. Now, one last element
that I wanted to include on the parent page is the title of the
book for which I can just use the same text frame that we have here on the left. I'm going to drag this here on the right, double click inside, remove the running heather, and I'm just going to
type in GrimsFairy tales. It actually worked out quite nicely that style
that we used before, having the name in red
and the rest in black. Of course, you can
change this later. Again, I was a bit lazy not
creating new styles for this. I'm just using the
story subtitle, but it actually
looks quite nice. Let's just see how it
turns out on the pages. Yeah, it looks good. Looks good. I feel like that's
quite nice for now. Like I said, because
it's set up as a paragraph style and using
the parent page design, it's a very quick thing that we can update later
on if we want to. And one final note that I wanted to mention
since we are talking about the parent page setup
and hiding the running head. Here, I'm just going to paste in that box that
we created earlier. But notice that we have an
extremely long story title. That's the only one that
is too long for it to render properly on the
running head area. Similarly to the live caption, the text variables will also be squashed into the text
frame that they have. They won't be able
to render properly. And there's only two ways
that we can fix this. One is by updating that
style that we use for this. So I believe it was
the story subtitle. If we edit that and reduce
the size maybe down to, let's just say nine,
that's already good. And to be honest,
that's probably big enough to be up here. Or alternatively, what you
can also do is to override this particular instance of the running head that comes
from the parent page. You do that by
Command or Control, Shift clicking on
this text frame, then double click and
select all the text, then right click and choose
convert variable to text, and immediately that's
going to fix it. So we can see that
now the text is there and it keeps
the original size, but now it fits into two lines. Would probably go for
the option of creating a dedicated style for
our running head, which will be smaller in size. So right now it is using
the story subtitle. If we go back to
the parent page, we can see that's
the one it's using. I'm just going to create
a duplicate for this, and it can be based
on the subtitle. But what I'm going to call
this is running head. And this is where I will
be using this only, and I will reduce the
size down to nine points. And maybe instead of bold, we can just have it medium. Let's click Okay, and then I'm just going
to apply it here, running head, and
probably we can also use the running head
here on the right side. Now, let's go back
to that page where we had that extremely
long title, and now it looks perfect. So the story of the youth who went forth to learn
what fear was, and now we don't have
issue rendering that. And there won't be
anything longer than this throughout the book.
29. Using Sections to separate stories into independent documents: We got really far with
our book design project. We worked on the
formatting of the text. We dealt with the images
and the captions. We also set up the parent page, and we can see that things are coming together
really nicely. At the moment, I ended
up having 260 pages. That's mainly thanks
to the fact that we start every story
on a new spread, having that empty place ready
for the images to go in. And by getting this far, we can already see that
there's definitely advantages of keeping all the
texts in a single document. Because we can easily
jump back and forth, make global changes
very quickly, and also see it
straightaway updating. However, in design
can really slow down when you have this many pages
open all at the same time. And depending on your computer, you might already be struggling
to see the updates live. So I really feel
like it's time to see how things would work out if we were to use independent in design files for each of
the stories in this book. And that way, you
will be able to make a more informed
decision whether you prefer to work with a single
file or multiple files. This is the workflow when we start using the in
design book format. Now, I already prepared some of the stories
which you will be able to find as independent
documents in design files. You can see the first story, the golden bird
has three spreads, and that is nicely separated
as one in design document. Then we have the second
story, hunts in Luck. That's the same length,
again, three spreads. And then we also have
the traveling musicians, which is two spreads long. And then I also have Rapunzel. Can see that's
again, two spreads. But I wanted to show you what's the easiest and fastest way to separate a long document into these smaller chunks
or separate documents. So I'm just going
to jump back here, and I will go to page 100. That's Commando Control
J on the keyboard, and there I prepared
another story with the image and also the nice decorative drop
cap that we have. So again, this is just
four pages or two spreads. I'm going to scroll down a
bit. We can see right here. Now, one of the first things
that we haven't used so far, and that can be useful in such a long document is the
feature called sections. So if I want to mark this
story to be a section, all I have to do is to
highlight these pages, hold down the Shift key, select the first
page and the last, and then you can right
click on this and choose numbering and
section options. And in this dialogue box, all you have to choose
is to say start section. If you want the page numbering to change
from this point on, you can adjust that, but I'm just going to keep it on automatic page numbering. For the section marker, we could include the
title of this story just so we can better
reference it later on. It's a very tricky name to
write Rumpel steel skin. Let's just put in all right, and then we can just click Okay. Now, what you will
notice is that there is a little section
marker appearing here. However, even though I
selected these four pages, it didn't end at that point. So the section is going to
continue from this point on. So to make sure to completely isolate it from the
rest of the document, we have to actually select
this page right here, which is the next
story, Clever Gretel. And we have to again right click and choose numbering
and section options. And in this case, again, make sure the start
section is turned on, and I'm just going to type
in the title of the story. Now, these two little triangles here indicate the section. So if I click on this,
notice how it highlights all the pages at the
back of the book. Or if I click on this one, now it properly highlights
only just that story. And of course, every design document by
default would have a section starter marker at the beginning
on the first page. So I can also easily select all the pages up till
the next section, which we defined on
the hundredth page. Sections in general,
I mainly used to quickly and easily select
certain parts of the document, but they could also
be used to inform our table of contents that we will be
talking about later. However, this is not a
requirement to set up a table of contents because simply just by using paragraph styles, you will be able to generate
a perfect table of contents. But like I said, we will
discuss that later. For now, all I wanted to
show you here is how can we then break this four pages
out or not break it, but simply just copy it into
a new in design document. So the best way to do this is to create a new document,
a placeholder first. That's Command or Control
N on the keyboard, and then make sure that you use that preset that we
created earlier on, the Octavo one, which should
have the same settings, I can then just click Create. So there's my untitled document. Now I can jump back to the main document using this little arrow when you
have multiple documents, opening is the easiest way
to navigate through them. I'm just going to
jump back to this, and it should already have
these pages selected. If not, I'm just
going to click on the little section marker, and then right click
and choose move pages. And the main thing
in this dialogue box is you want to check that the destination is set to
the end of the document, but more importantly,
you want to target the untitled document. So that's selected.
And of course, we don't really want to delete these pages
after moving them. So in this global
long format document, we still want to
keep this story. We don't want to
lose it from here. So let's just go and click Okay, and then let's navigate back
to our untitled document, which we have these
four pages brought in, but it still has these empty
pages at the beginning. We can just delete this spread. So highlight that, delete, and then we should
have the whole story. This thumbnail is just not
refreshing at the moment. Maybe if we switch
away, switch pack. Yeah, sometimes that
happens in design that we can't actually see the text
there, but it's all here. So it came in perfectly. We have the parent
page also brought in, which by the way, we
renamed to a Body. That's why I didn't just update the default A parent
in this document. But more importantly, we
brought also all the styles in, so paragraph styles,
character styles, and object styles as well. And yeah, we can
see it looks great. The images came in
perfectly as well. So all is looking good. And we could just now
save this document. However, unfortunately, there is one thing we
have to fix manually, and that's the text variables. That's not something that you
can set up as a template, and it's not going to be carried between documents correctly. So for this, we have to go into the type menu, text
variables, define. And remember, we were
using running Heather. So let's just edit this, and we just have
to make sure it's assigned to story title. So we click Okay and then done, we don't actually have to
do anything else because it's already set up on
the parent page design, and it should be coming
up here on the top. Now, because we have only
this story in this document, there won't be an issue
here on the first page. So even if I remove
that blank frame that we added in
an earlier lesson, that's not going to be
causing any problems.
30. Creating a Book file: Now notice that the page
numbering starts on number two for each of these
documents that we created. But this is the
great thing about using a book file
is that these will all be able to continue
from one story to the next. So in design, we'll be able
to automatically update these page numbers depending how we put the stories together. And this is what I would
like to show you now. So let's just make sure
we save this story. I already have this folder here, and I know that this story is the 25th in the original order. So I'm just going to type in
the difficult name again. Hopefully, I spelled
it correctly. Let's just save it as a
normal in design document. Now we can actually even
close these documents, so they don't have to be open. I'm just going to
close each of them, and we will have our original
large document open. Now we can go to the file
menu and choose new book. So this is the
historical moment that we actually create a book file, even though this
is a book project, it took quite long to
get to this point. Now, I'm going to put the book not inside the same
folder where these are. Probably it's better
to put it outside in the main folder that we
have for this project, but we can also place
it in there for now. We can always move it later. So I'm just going to call
it grim fairy tales. And let's just click Save. And the interesting thing about the book file is that it's not an actual document
that we can see. It's just simply appears
as a panel in design. And what we need to
do here is to use the plus sign to add documents. And we can actually select all
of these that I generated, and we can just say open. And it's going to put them in the same order as we
see them in the folder. However, we will be able
to change their order easily by simply just dragging
them up or down here. So I can move that
down or back up again. And that's one of the big
advantages of working with a book file that you get to do that instead of going
into this long document, trying to find where a story
starts, where it ends, and then extremely carefully
moving them up and down in the pages panel to make
sure that they go in the right place or using the
move pages option as well, because, of course, that's
not only between documents, but as you've seen,
you can use it to move pages within the
document as well. That's essentially so much
easier doing it this way. However, we can see one
issue here straightaway, and that is the fact that the page numbers seems
to be overlapping. So all of these documents
that originally had their start page number at two is still on page number two. So that's not the way
we wanted this to work. So I'm going to double
click on Hans In Luck, which will automatically
open this file. And I'm just going to drop this here above the page
span off and now so we can keep track
of our document and the pages within each
of these documents. And notice that here we have
our little section marker. If I double click on that, it actually says start
page numbering at two. However, now that this
is part of a book file, we want to make
sure that this is changed to automatic
page numbering. Once you select that
and you click Okay, it will automatically recognize that this document
is part of a book, so it should continue
from page number eight. Which is correct.
So that's how long the Golden bird story was
ended up to seven pages long, and then this is now correct. The little gray
circle, by the way, indicates an open document. So this one currently is open. Unfortunately, I don't know of a way of quickly updating
all the documents, so like batch
updating all of them. You actually can select a
document here and then go to the panel menu and choose
document numbering options. So not book page
numbering options. You want the document
numbering options. And that's actually
just going to do exactly the same thing,
what we have done before, it opens the document, gets us this dialogue box, and then we can just
choose the same option and click Okay, and
now it's updated. So it doesn't really
save much time. It would be amazing if you
could just select all and say change numbering preference. What you can do is to
select multiple files and double click to open
both at the same time. So now I can just come here, change automatic numbering, and also this other one should
be automatic numbering. And once we have
them all set up, now we can see that all the
page numbers are correct. So at this point, I
normally would recommend to save each of these files and you can close
them if you want. We can see the little
circles disappearing. I can close that,
save and close. And then also don't forget
to save the book file. So any changes you've done here, maybe you move
things up and down. You can also save
that, save the book.
31. Syncing documents within the Book: Now we arrive to one of the other most
important advantages of working with a book file, and that's the fact that
you can synchronize almost every aspect of these documents
between each other. So, of course, having everything in a
single document makes things easier in that sense that we already have
everything in one place. While now that we broke up the original book into these
separate story documents, you might be wondering
what happens if you, for instance, change
the story title style. So let's try this out.
I'm just going to open up maybe the first book, and I will come to
the story title, and I'm going to
change the color because that's probably the
easiest thing to track. So I will change it to
blue instead of red. Right? That's a nice contrast, by the way, instead of
having everything in red. This looks quite nice. But what happens if I
open up another book? So automatically, there
is no change here. However, if I click on
this icon to synchronize the styles and swatches with the style source, this
is going to update. And this little icon here indicates the style
source document. So that's like your
master document in terms of styles for the book. So that one is already updated. Perhaps you want to also
save it just to make sure that is going to be
registered, that change. And then if we click on
the synchronized option, notice how we see
the color updating, and I don't really need to
see this dialogue box again. So I just say don't show again, click Okay, and we can just check if I open
up another document. At first, it's not going
to show the changes. But again, if we click on
the synchronize option, it's going to update just
like the other document. However, if you want to
update multiple files, just simply select the ones
that you want to target. And even without
those being open, if you click on synchronize, it should work for
those as well. So if I open Rapunzel, and the other one, we can see
that they've been updated. So when you use the
synchronized option, you need to make sure that you select the documents that
you want to synchronize, and it doesn't
matter whether they are currently open or not. So let's try this again if I come back to my
original document. And by the way, this panel is a great way to jump
between the documents. You can just double click
on them to quickly access. So I came back to the style
source, which is this one, and I'm going to update
the story title, set it back to the red color
that we had there before. So I'm going to
choose our grim red, and let's click Okay. That's updated nicely. And now we can save
this document, select all the other ones,
and then synchronize. And then let's just go back to them and we can see
that one is red, red, red, and red. It's important to mention and to know what is actually
getting synchronized. So if we go to the panel menu, the book panels menu, there is a synchronized
options feature. If you click on that,
you will see what are the default elements
that are synchronized. And the only option
that is not turned on by default is the parent pages. I recommend to have
this turned on, as well as long as
you want to make sure that the parent
pages are consistent. But the reason why
this is off by default is because
you might have completely different
parent page designs between your chapters
of your book. So this really depends on the project you work
on case by case, you can decide whether you
want to synchronize this. And similarly, you can also decide whether it is necessary for you to synchronize certain other things
like table styles, cell styles, and so
on and so forth. So you, of course, don't
want to create conflicts. The more automation you
allow for in design, the more things can
go wrong in general. One good news here
is that notice how tax variables are also
synchronized by default. So you don't actually have to do that change manually each time in case you are amending
the definitions of your tax variables
like the running cat. We only had to do that when we were breaking out
some pages from our large document and separating them into these
individual documents. But now that they are all
part of the same book, they will be able to update according to our style
source document. So if I come back to this again, if I, for instance, define a new text variable, which I can do from
the type menu, text variables, define. If I create something
new here, that's again, something that can be
synchronized throughout the whole book between all of these documents that we created. Also important to mention that
in design by default would consider these documents
within the book chapters. And within an in design file, you can actually only
have a single chapter. So even if you have a long
document like this one, where we have all
the pages together, you can actually define multiple chapters within
that single file. You can create sections,
but not chapters. So you can consider the sections feature in a way replacement for the way a book file would work when it is divided
into separate documents. Since we are talking
about sections, I just wanted to show
you that there is actually a section
marker option as well. So if I go to my parent page and I'm just going to create
a duplicate frame here, which I can use for
the section marker, I can bring this in by
putting my cursor here, go to type menu, insert special character marker,
section marker. That's a variable
that's going to update. And if I come to
my section that I defined and I named
Rumpul Steelskin, notice how that's
automatically generated. Remember when we
were struggling with the running cad showing
up here on the left side, showing the previous story, that wouldn't be an issue if
we are using section markers instead of a running cad relying on the first instance
of a paragraph style. But obviously, the requirement
for this to work is that you need to set up sections
for all of the stories, and each of those sections
would have to be named correctly so they can then
show up here in the header.
32. Additional advantages of a Book file: Before we move on, I
also wanted to make it clear what are the
additional advantages of having separated
document files like these or how they can
make our life easier. Well, first of
all, there will be less restrictions
on how we place in our starting image because obviously they will always show up on
the first page. So we won't actually need
to anchor them anymore. Right now, this is still
anchored in the story. So if I go into
the story editor, we can see the
anchored object there, just right in front
of the story title. So that is actually
not necessary anymore. I can just right click here and choose anchored object release. But because we had
an extra line break, we actually have to delete that. So here on the right side, I'm just going to go down one step and delete the empty line. Otherwise, that would push the
story to the next ot page. That's the way our keep
options is currently set up, and even that is not a
requirement when we are working in an independent
document format like this. But now that the image is not anchored or locked into that
format that we had before, it also means that we are not restricted in its size anymore. So I could easily make a
larger illustration if I wanted to that expands beyond
the original text frame. So what I'm going to do here is ungroup this image
from its caption. That's command or Control Shift G. Going to delete the
caption as well for now, and I'm going to just double click on a corner point of this, and we can see that
the actual image was wider than what fits
into the text frame. Now, I could decide
to make this even bigger if I wanted to
utilize the page even more, maybe drag it up
all the way here, and that's a good solution of covering up the
text up there. And then I can just go in
and generate the caption. But here is one of
the other issues of separating a document at
a later point and using an untitled document template to fill in the information in that the caption setup is also not carried onto
the Empty document, similarly to the text variables
not being carried on. And that's actually
something that's also not synchronized
between books. If you remember
synchronized options, didn't include caption setup. So you just have to be
very careful about this. If you are using
captions throughout the book and you want to have separate documents
created for it, then instead of using the file new document feature for each of the new stories, instead, you would want to use the
template feature because an in design template file
can record the caption setup. Anything else that wouldn't be synchronized when
you are moving pages between documents or
when you're using the synchronized
feature in a book file. Now, let me just show you how
I would set up my template. I would go into object
captions caption setup. And if you remember,
we were using the headline metadata feature, and we were using the
caption paragraph style, and we also chose to group the caption
together with the image. So we can click Okay. This
one here can be deleted. I select this image again just to test this out,
go to captions, generate static caption,
and that is looking good, but we actually had more space between this and the image. And just so I can check
how much space that was, I'll come back to my
original document. So it's 0.25 inch. I'm just going to jump
back again to this one. Undo this last step and go
back again to caption setup, and I'm just going to change
the 0.25 I N. That's inches. Let's click Okay, and
then let's test it again, captions, generate
static caption. And now that all of
this has been set up, we could delete all of the
pages and elements from this document and then
save it as a template. So we can just go to File, Save As, and save it as
an in design template. So I'm going to just do
this quickly as well. What you can do is to
delete everything, the actual content I'm just going to delete all of the text. So the story is
removed from here. We can also delete this image. So we just have a blank
document like that, and then we can just save this as a template file, save as, and I'm going to save
it within my story doc as Green fairy tales. And I will actually type in
here capital letters template and change the file
format to design 2024 template and then save. So the good thing about this is that whenever
you open this file, it's automatically going to turn into an untitled document, which I can demonstrate
to you if I go file, open, choose the template,
and there it is. And most importantly, if I go to object captions caption setup, notice how it has that recorded already exactly the settings
that we used before. So even though it's
an untitled document, it already has more features
included than what would be carried over when you're moving pages from your source
document into this. Just one final note here, in case you have a very
repetitive structure in between the stories that you have in the
separate documents, you might even be
able to set up either data merge or XML Import to automatically populate the
images and the copy to go into their relevant places and automate the generation
of each of the stories. So if you haven't started with a long document where
everything's been set up already and you are doing things from scratch story by story, this type of
automation potentially could work for certain
projects like this one both the data Match and XML Import is something
that we cover in a lot more detail in
the catalog project.
33. Setting up the Table of Contents: Now it's time to talk about another extremely
useful feature, the table of contents. And I'm going to show
you how to set this up. Either you are using a single document or you
are using a book format. And we will also see how
to use multiple table of contents for the
same book project, where a second table
of contents could be for listing all the illustrations
throughout the book, which in book design, we would normally refer to as
the index of illustrations. But first, let's start with the normal table
of contents that will list all the
stories in the book. And this is normally
something we would place before the actual contents
in the front matter. So for this, I'm going
to add some pages. I'll choose Insert
pages feature, and I will say I want it at
the start of the document. Let's just create
two pages for now, and I'm going to use the no parent option
for this for now. We can obviously
update that later. So let's just click
Okay. Now, this is definitely useful to have
as a separate section. So I'm going to
already come back to this other spread
and right click, choose numbering and
section options, start a new section. I'm not going to change
the number to one because I still want these
pages to start as a spread. So I'm going to
just keep it like this and I will click Okay. But then I get a warning
message that I already have a page number two
in the other section, and this is going to cause
a conflict later on. But I'm aware of this. So thank you in design
for reminding me. I am just going to come back to this section now
and I'm going to right click and choose
numbering and section options. And I'm going to actually change the style of the numbers here. Two Roman numerals, and
then let's click Okay. So now there shouldn't
be a conflict because in our front
matter of the book, we have a different page
numbering option set up, so they won't be conflicting
with each other. And now that we have
this new blank section and blank spread
that we created, I just noticed that
the margins are not synchronized because we said we don't want to use
any parent page, but this is something we can
quickly fix by holding down Alter option key and clicking
on the parent page name. So immediately, everything
is coming but notice how it also removed the right
side of this spread, and that is because it also applied the primary text flow or the smart tax flow
feature for which our preference was to
delete any empty pages. But we don't have
to worry about this because this will be generated automatically once we place
in the table of contents. So I'm just going to
save these changes for now because things
are looking good. Even this new formatting of our page number is already visible here at the
bottom, which is great. And now, what I want to do
is to go to the layout menu. And actually create the table of contents. So
let's click on this. And this is quite a big dialogue box with
lots of options, especially when you turn
on the more options, so it gives you
even more options. But I will try to
explain this and make it as simple as possible to
understand what's happening. So first of all, we can decide what we want
the title to be. So I'm just going to type
in table of contents. That's actually just a static
text that's going to be placed at the top of the
table of contents element. The most important
thing here is to decide which paragraph styles we want to track from
this document. And of course, we definitely want to track our story title. So I'm just going to
drop that in here. Then we want to also
track our story subtitle first and
our story subtitle. However, by default, these will all be created as new levels. So level one, level
two, and Level three. You can change the
levels down here, so we can make the two story
variants the same level. So they should be
both level two. And before you generate this, one feature you have to be very careful about is this one. You want to decide
what style you want to use for these entries
within the table of contents. So of course, we can
use something that we already used in the book, but most of the time, it is better to use
something different. I will just set it for the
TOC body text for now. So instead of same style, I'm going to use that
or you can even just choose the basic
paragraph option for now. This is actually something
you have to choose for each of the entries. So let's just change
it for all of them. Basic paragraph
should be fine now. And then if we click Okay, we just have to click in this empty frame
here on the page, and it should generate the
table of contents for us. Now notice how it automatically shifted
everything to the right side. That is because
it ended up using the story title for the main text that
appears on the top, and that is actually
a happy accident. I didn't even plan to do that, but it works quite nicely. It also generated an
additional spread thanks to the Smart
text reflow feature, and things are
looking quite good. So we can see all
of our stories, the page numbers, and we can
also see those sub stories. The only issue there is
because we were using the soft break between the
numbers and the story title. It's not looking that
great at the moment, but we can fix this later. What's more important is
that we most likely want to use the same font that we are
using throughout the book. So to be able to apply the
same font, most likely, it's easiest if we duplicate
our body paragraph style. So let's just create that and
we can call it TOC entry. For now, I'm just
going to call it that. We can then decide to create level one and level two
entry slightly differently. But I would like to
base this on the body. So that way, most of those features will
be carried on here. The only thing I want to
remove is the indent, so that's not necessary. And I probably want to include the space between
these paragraphs. So I will choose 0.1 inch for
now. Let's just click Okay. And then to update the
table of contents, you have to go into
the layout menu again, choose table of contents, and then you want to
select the first entry, change this from basic
paragraph to TOC entry. Then the next one as well, TOC entry, and then the
third one as well, the same. Again, you can't select multiple entries at the same
time to change their values. You have to do this one by one. But that's all I wanted
to change for now. So let's just click Okay again. And it should automatically update the table of
contents for us. We can just say, I don't need
to see this message again. Let's click Okay, and
this is looking much nicer apart from
these sub stories. And yeah, we can see we
needed more pages now, so it's just generated
the additional pages, and that is looking good. Now, one additional thing that
I would prefer to have is to have these page numbers lined up nicely
next to each other. And probably the
best thing to do, especially because we have this very long title right here, to have them lined
up all the way to the right edge of the frame. And to do this, we
just have to go back to the table of
contents settings. And again, for each entry,
we have to repeat this. So between entry and number option right now is
set to a tab character. Now, if you highlight
this and delete it, you can replace it
from this little drop down with the right indent tab. And that's the code
for it, carrot Y. You can just copy that and
put it in these other ones, or you can just replace
the T with a Y. It's even easier.
And then once again, we can click Okay,
and that will update, and that is looking much nicer. So yeah, that I like. Now, if you want these to be
a bit closer to the titles, we could try to
drag this table of contents frame a
bit to the left, and then we can see whether
it's going to update on these other pages because we are not doing this
on the parent page. It's going to be considered
a local override. But we can just move
this in the center of the page and we can remember the settings or the size that
we want to use for this, and then we can apply
that on the other pages. So for instance, in this case, I can set the wits to
3.75, something like that. And then we can just
make sure that it's aligned to the right
edge of the margin. It's looking quite
good. And then we can just do the
same thing here. So 3.75, we can even copy this value to make it easier for the other frames.
Let's do it like that. Copy this value. We can then
drag this to the right. Then this one, again, we do the same size and
drag it to the right, and then we can move down
and also copy it in here. So most likely we won't
need more pages than this. So this is usually all
that we had to do here.
34. Refining the Table of Contents: However, notice that already because this text is too long, it's going to cause
a problem there. It again, behaves
like a text variable, which is getting stretched if
there is not enough space. But you have to remember that we used actually quite a lot of features for our original
body paragraph style. So it might not be a smart idea to carry all of those over to this new style
because it could inherit things that we
definitely don't need here. So I mean, if I go in here, we actually have
grab styles in here, which is not necessary
for a table of contents. Under indense spacing, we have
less justify, which again, we probably don't need align
to grid using baseline grid, not really necessary
for table of contents. So what I actually
recommend most of the time is to just
remember the font that you used and maybe the
leading and then go to the general options and
choose reset to base. And probably even just say you
want to base everything on the basic paragraph then just set up the values
that are important. In this case, this pro, nine points and leading
we can just keep it on the default or we can
set it to 11 points. And without doing anything else, if I just click
Okay, this is going to fix one thing already. Here, we can see that
the page number could actually fit underneath
this long title. Because I didn't include the space between
the paragraphs, now, all of the entries
actually fit on two pages. At this point, if I
want the table of contents to start on the
left side of this spread, we could also fix
that by creating a new style for this text. So I'm just going
to highlight it here and create a new style. I'm going to double click on it, and I will type in TOC title. And we can just check if there is anything here
we want to remove. Most importantly, I want to
remove the keep options. So I will say anywhere, and that should
already look good. Perhaps just one additional
thing for the TOC title, I'm just going to
keep this together. I'll go back without
having anything selected. I would like this not to
have that paragraph rule, so I will turn that off, so it can start on top
of the page as well. And now just to make sure
that this is actually registered within the
table of contents, not just a manual
over right here. I'm going to say the title
should be using the TOC title. So when I click Okay, I
shouldn't see any updates here, but I can just try
this out by going to layout update
table of contents, and it should render it
perfectly like that. Now, one thing that we can
also do is to drag this down here just so it starts on the same height as
the other page. It's probably a little bit
more organized that way. And if you are not happy about the line breaking
here on the right, you can decide to
increase the text frame. Of course, that's going
to be a quick fix. And now we just
have to deal with the sub story problem that we
have here on the left side. Now, first of all, for this, we could create a
new paragraph style just to make them look
also visually different. So we can go in and create a new style based on
the original TOC entry, and I'll just call it
level two, entry level. Two. We can base this
on the original one. And then what I want to
change here is to set this to maybe the same regular
italic or light italic. Not sure which one
will look better. Let's just go with light Italic. And then we can just
go back to table of contents and choose the
story subtitle first, which should be TOC
entry level two. And this one as well, that variant should be
TOC entry level two. Let's click Okay, and now
they update it nicely. But one additional
thing that would be good and the advantage of having a dedicated style for this is to have them indented
slightly to the right, which would allow, again,
a visual clue that these belong to this
main story here. So if I go back here, I can just edit that level two, and let's include
the left indent. Can decide how much we want. Probably 025 will be enough.
So let's click Okay. And then the easiest way to make sure that these numbers don't
show up in the table of contents is to create a
dedicated style for those or just simply remove the style from them
within the document. So if I go to these
pages, that's page 59. Let's just fix this quickly. We have that number, and I think this was
actually already done as a manual override. So it's using the story
subtitle first at the moment. But I'm going to create a
duplicate style for this, and I'm just going to call
it story subtitle number. That will make sense.
Based on story subtitle, yeah, that's good.
Let's click Okay. Now, we just have to
make sure that we apply this on all of these
other instances. You could use Fine
change for this. I'm just going to do this
quickly manually like that one. And I think we
just have to go in because I see it moving
to the left side. We have to update this to use the keep options and
start in next column. Let's click Okay. I think that's how it was set up before. So that's fine. That's fine. And then this one should also be the story subtitle number. Yeah, it's fine. And I just remember there is actually one additional
story in the book, the wedding of misses Fox, which also has these
subtitles, which, by the way, is already showing up fine here in the
table of contents. Luckily, there's
no actual number in there that we divide, so we didn't have to update it. It's just good to remember where these special cases
are within the book. And then if we come back to the table of contents and select the frame and choose layout
update table of contents, we would expect these to be fixed here on the
left side as well. But as expected, there is
still something wrong, and I know exactly
what's wrong here. So if we jump back to 59, remember what I've done here. Again, I tried to save time, but I actually messed things up that I created this
new paragraph style, the one called story
subtitle number, where I specify that every
time this number shows up, it needs to be on the
top of the next frame. And it works fine here for
number two and number three. But if I apply this
actually on number one, it's going to push this
onto the next page. So what happens is that
we have the title, and then there is no copy. So to fix this, what we need is another style
that we have to define. Or alternatively, if you don't want to set up
additional styles, an easier way is to just select that text and go to
the paragraph styles, drop down and choose
break link to style. So this is something
I sometimes use, although I prefer to have
styles for everything, sometimes it can just get
a little bit complicated. Now you see having
this selected, there is no style assigned. And if I press
Command or Control Y, we can see within
the story editor, we can see for number one, it says no paragraph style. So that is actually
what I wanted. I'm going to close this. And I'm just going to
double check that this text here should still have
a paragraph style. Oh, yeah, there is
another issue here. We created a soft break between
this line and number one. So that doesn't allow these to work as two
separate paragraphs. So I'm just going to remove
that and add a no more break. And then highlight this and
choose story subtitle first, which now because we separated
the number and the text doesn't actually need
that nested style that we originally created
for the first word, so I'm just going
to delete that. Just click Okay.
So this is fine. That is also fine because it doesn't
have any style on it. Now let's move on
to the next page. So this text right here
should be story subtitle. And then this number up
here can be assigned to the story subtitle
number that we created because this one is starting on the
top of a page. Or you can also just say
break link to style. However, since I already set that up, I'm going
to keep it there. And once again,
these here should be set to story subtitle
paragraph style, and then that one up there is
already set as the number. However, remember that again, here we have that soft break, so that needs to be removed. Press enter to separate them. And then this text
here should be set to story subtitle paragraph style. So it moves back, which
also we need to update. So I go back into that style, and first, I want to remove the nested style that
we don't need anymore. But also, I want to
remove the keep options. So this doesn't need to
go to the next column because the number is
going to do that already. So I can just say anywhere, click Okay, and then we
can go back up here. Then potentially you
might need to do some additional refinements to the styles that you are using. But if you've done
everything correctly, it should already work. Again, the last instance, we have to make sure we
separate with a paragraph break and then this first one assigned to story
subtitle number, while the title itself is simply story subtitle and perhaps one final fix
here in the layout. For the story subtitle number, we can reduce the spacing, so we don't need that much
spacing between the two, probably something like that. Let's click Okay.
And I'm just going to double check for
the story subtitle, I believe we didn't
use the grid. Yeah, it doesn't say grid, but it has a space
before assigned to it, which again, can be reduced
down to something like that. And now the number and the title is closer to each
other as it should be. Yeah, I feel like
that is looking good.
35. Fixing issues within the Table of Contents: Just want to bring it
to your attention that when you start messing
with your styles, and especially when you are
using the based on feature, you might end up causing
trouble along the way, like that nice red
color that we had on these here on the top
and the bottom in the footer and the
header is now gone because those were all
based on these styles, or they probably were just
simply using these style. So if I just go in
there, I remember that we set up running
head style for these, and yet this running head, if I choose is actually based
on the story subtitles. So if I want the color back
I have to overwrite that. So that's going to be
included in here as a difference. Now that's setup. And we can also check
here in the parent page that these are also using
the story subtitle. So if I want them to be red, I could do either
a local override or I could create a folio style, and that's probably the
best thing to do here. So I'm going to create a duplicate from
this story subtitle, and I'm just going
to call it folio, and all I have to change
here is this to be red. So let's click Okay and make
sure that it's selected. All right, so now it's assigned. And if I jump back to
the page where we were, now we can just double check
that the text flow is fine, and then we can jump
back to our first page. The easiest way to do that is by using this first
predicon here, and let's select this text frame zoom a little bit closer. And let's hope everything
is working fine. So lay out update
table of contents. And it looks good. It, of course, won't
fit in one line, so it has to break this up. The second line. Maybe if we just reduce
the indent here, it might actually be
able to fit this in. Or actually, there is one
thing that I remembered. We used the soft break
between these lines, and that is why it's
not fitting in here. That's again, something that you have to make a decision on. So if I go back to these pages, however, these are
rendered on the page. That's how they
are going to show up on the table of contents. So if I remove the soft break and allow it to work like this, it's going to render better
within the table of contents. However, things like the name, for instance, you
definitely don't want to separate at
the end of the line. So for that, you
can actually apply the no break character style. So that should keep
them together at least. And that's a cool
technique, by the way, that even without
using a soft break, I managed to keep
these together, and potentially you could use even more text whatever we had originally
together like this, if I say no break on those, they will actually flow
into the next line. And if I come back
to the table of contents and update this, so keep an eye on this
second entry or sub entry. If I go into update
the table of contents, you see now it can
render in a single line here because here it is not breaking up into
multiple lines. So the no break feature
doesn't have effect on it, while a soft break
is actually carried into the table of contents
entry generation. So I'm going to jump to page 62. And fix this as
well accordingly. So we get rid of the soft break. Instead, I'm going to
select all of this together here and say no break. And that should fix it. If I go back to the
beginning of the document, select this table of
contents and update. By the way, it's
useful to set up a keyboard shortcut
for updating table of contents and even
this feature if you are working with this because it will
save you some time. So let's just click on that. And yeah, even that one fits together with the
intent, it looks fine. Perhaps one stylistic
change that I would do here is to maybe have a
little bit of space before and after
the sub entries. And that's something
that we can do because we define this as a
separate paragraph style, the TOC entry level two. So if I go back and edit that, we can find in the intense spacing the space
before and after. So we can just add a little
bit there before and after, but not to have so much
space in between them, I will also specify that the space between
them should be zero. And yeah, I feel like
that should be enough. Maybe if I just say 0.02
" between the lines, that's just a very subtle space between them as
well, which I allow. So let's click Okay. And now
let's take a look at this. So both of these sub stories
also updated nicely, and the ones we have on the
left side updated nicely. So this is looking really nice. And notice that even
the page numbers are slightly different for the sub stories because they are using the formatting
of this text. However, that is something
that we can keep consistent throughout all
these numbers if we wanted to. And that's by using
a character style. So I'm going to set
this character style up just so I can show
you how it works. I'm going to click
on the plus sign, and I will call this
one TOC numbers. And first, just to
show you how it works, I'm going to set
the character color to red, and then
I'll click Okay. And then if we go back into the table of contents settings, we can find the option
for the numbers, which is right here, page number that can be stylized
with a character style. So if I choose TOC
numbers for all of them, so all of our levels or entries, and I click Okay, they
should all update to red. And if you want
to make sure that these will look
exactly the same, you just have to specify that within the TOC numbers
character style. What font you want
these to generate as. So I'm going to type
in TSA P. I believe we used regular nine leading 11. And if I click Okay, I believe they already updated, yeah, before and after. I just a bit hard to see, but you can see it
updating there. And these are also
updating here. So the character
stack can override whatever is defined in
the paragraph style. That's why it's a very
useful feature to remember.
36. Transferring the Table of Contents into the Book file: One final thing I
wanted to mention here is that you
can even style what you want to have in between the entry and the page number. So normally in books, you would have the dot dot
dot connecting the two, especially when they are so
far away from each other. That's a useful feature to have. So the way to do
this is to select this frame go to layout
table of contents, and then there is this part
between entry and number, and notice how you can assign another
character style here. Which we haven't created
yet, but no problem. We can just say new
character style, which will lead us to create
a new definition here. So I'm going to call
this one dot leader, and it doesn't have to
be based on anything, so I will just say none. And we will come
back to this later. I'm just going to click Okay. So that's the style that
will be assigned to this. And this will only be used to
refine how those dots look. But to actually
reveal those dots, we have to update our TOC
numbers paragraph style. I show you how this works. So if I click Okay, I can go to TOC entry. And let's edit that. So remember that between
the entry and the number, we have a right indent tab. That means if I go to
the tabs settings, I can just click anywhere
here on the ruler, and then within the leader, I specify the character I want to use as the
leader character. And then if I just press
tab on the keyboard, I can see this updating already. So that's all I needed
thanks to the fact that we have this tab setting within the Paragraph
Styles panel. We didn't have to
do anything else. And of course, you could use anything else here,
like question mark. If I put that in, then we will see question marks and
so on and so forth. And even have a
combination of characters, and then that's the one that's going to be
used as a pattern, filling in the extra
space that we have there. But I'm going to stick to the more traditional way of setting things up and I'll
use the period sign. Then I click Okay. And this is when that character
style comes into play that we created for the dot leader because you can see this is a
little bit too heavy. So if I now define
my dot leader to be smaller than what it
is in the entry style. So I'm going to set this
up maybe to six points. Once I click away, it should
automatically update. But I just realized
that it's only appearing here for
these sub entries, so level two entries. I'm just going to check. Yeah, those are
the ones changing. And that is because
we only assign this dot leader to a
specific entry type. So before I make any
additional changes, I will just come
back to the table of contents settings and I make sure that the dot leader is
assigned for all of these. Something I forgot to do. It's quite a complex
dialogue box, so it's easy to miss
certain elements like that. But I really want to display the way that normally you
would work in in design, going back and forth, fixing things because that's
how a designer works, and I really wanted to
record that in this course. So now we can see
these looking better. So they are smaller, but it still feels a
little bit strange, and that is because they are just too close to each
other, those dots. So we will be just increasing
the tracking on them maybe to 25 or maybe even 50. I feel like 50 is
looking quite good. And there's one additional
thing I would do to refine my table of
contents aesthetic, and that is to go back to the other character
style that we created for our TOC numbers. By the way, the dot leader, I will actually also
call TOC dot leader, just so it's easier to find these and we can put
them next to each other. You can even group
styles together because we are ending up
having quite a lot of styles. It might make sense to select them and then group
them together, right click and choose
new group four styles. And I'm going to call this TOC. And the same thing
we could do for these three right click
new group for styles, and I call it also TOC. I'm just going to
double click on Object styles to
hide it for now, so we can see this
together in a better way. Yeah. These are all the styles
that we have right now. So going back to the TOC
numbers character style, under the open type features, I want to change the characters
used for the numbers. So in this particular case, I feel like the tabular
lining works better, where each of the digits will take up exactly the
same amount of space. So notice how if I go back to ignore this open type
feature, it will look nice. I just won't line up perfectly. And for table of contents, this feature is usually better. We probably also want
to reduce the size now. This is a little bit too big, maybe eight points
is going to work. And perhaps we can just adjust
the tracking a little bit. We can move them closer
to each other, maybe -25, or -50, might be a
little bit too close, but it's up to you
which one you prefer. Let's just look
at this close up. And also, if we look
at it from a distance, maybe it's a little bit too
close to each other now, but you can tell that even between the two digits
and the three digits, this is looking so
much better already. Finally, remember,
there was an option called Table of Contents styles, which I wanted to come back to. If we go to the layout menu, I can see the table of
contents styles here. I currently don't have any
styles in this document, and there is because we
haven't saved this one yet. But having this selected, if I go to table of contents, I can just say save
style and I can call this one grim let's just click
Okay and click Okay again. And what this means
is that if we create a new empty document
for which I just used that template that we
created earlier and I go to layout table of contents styles Notice that there is
a load option here. So I can just load that style
based on that other file where we created the table of contents and see immediately
it shows up here. So I can just say Okay and then go to select
this text frame here, choose table of contents,
and click Okay. So it's already showing the settings and just
click on this text frame. It should already load this in. But in this case, notice
that I already placed in this new document into our
book file at the beginning. Because it's part of
that book already, I can just go back
to the layout menu, table of contents,
and simply select the feature include
book documents. So once I click on that, I can click Okay,
and there you go. The beautiful formatting that we worked on has
been carried over into this variant where we have all the stories broken
up into separate files. And this is a great way to demonstrate that there are
certain features like table of contents that will work
across multiple documents as long as they are linked together in an in
design book file.
37. Creating an Index of Illustrations: Now to create an index
of illustrations, you can use the same table of contents techniques that
we've already covered, and I'm going to show you this here in this book file format. So I'm going to create a
separate table of contents just right underneath the other
one that we already used. Now, one unfortunate thing
that I have to mention straightaway is that even though it would be
amazing to have this, in design just doesn't
have an option to duplicate an existing
table of contents style. So if you want to use
the same formatting, you will have to recreate
it based on this one, because simply there's no
duplicate option here. So you can just simply
create a new one. I'm going to call this
one grim Illustrations. And I'm quickly
going to set this up without worrying about the
formatting at this point. I'm just going to look
for the captions. That's the one that I
would like to include. That's all I will need here. Then the entry style, I will use our TOC entry style. Between entry and
number should be the carat Y, which is
the writing Dn tab. The style for page number
should be the TOC numbers. The style for the space
between the entry and the number should be
the TOC dot leader, and include book
documents in this case, should be also on because we are working in a book format. And then I feel like the only thing I forgot
is that for the title, I would like to
use the TOC title, and it should actually be
called Index of Illustrations. Now, let's click Okay. And once that's generated, we
can just say, Okay, let's select this one here, and we can go to Layout
table of contents, and then click Okay. And then instead of
using this frame, I'm actually going to
just delete this because I realized we have to
place this in separately. So I will just go
to layout table of contents and then make sure I have the gremillustration
selected out of the two styles
that we have here. And I click Okay, and then
have the margins open, so I can create the
frame, place it in, and there you go, we
can see those captions being carried into this new
table of contents format. So, of course, this
doesn't look that good because we have
quite long captions. So one thing you could
do here is to maybe have a write indent to limit the text not to go too
close to the numbers, and that way, it would
separate a bit better. Maybe you could have also space between these
entries a bit more, but I'm not going to
spend more time on that. I just wanted to show
you that there is a way of using multiple
table of contents, even within a book file, simply just by creating a separate table
of contents style. And if you want to match the style of the two table
of contents designs, it's actually quite quick
and easy just simply relying on the styles that you already defined
for the first one.
38. Footnote, Endnotes and Cross-References: Besides table of contents, you might also need
to use footnotes and notes or cross
references in your books. And I would like to show
you how to set these up. These are fairly
simple to work with. So for instance, in this book, there's actually only
one footnote instance, and that's for the
golden goose story, which I have on the 201st page. So right here, there is a word dumbling which then
is referenced here. This is supposed
to be a footnote that explains that this
word means simpleton. This was obviously
just coming in from that original text file, but we will be removing
this from here. I'm going to actually
delete this whole line or paragraph and the empty spaces until we have
nothing left there. And then we also want to
remove this from here. Then all we have to do is to
double click on this word, and the easiest way to
access the footnote option is to right click and
choose Inset footnote. Or you can, of course, go to the type menu and choose insert footnote
from there as well. Now, once you've
done this, in design automatically moves you to
the bottom of the page, and there I'm just
going to paste in the text simpleton that I copied or cut from
the original text. Now, the way this
looks is that we have a little rule above this. We have a number
for the footnote, and then we have
the footnote index, which is next to the original
word which it references. To change settings for how
the footnotes are formatted, you have to go to
the type menu and choose document
footnote options. And then here you
will be able to find things like the style
of the numbering. So we can change this from
numbers to stars or asterisks. Then we can also decide where we want to start
the numbering from. So, for instance, if we have
ABCD, the capital letters, we can say we want to start
from the third that will be C in the footnote reference
number within the text. Now I'm going to reset this
back to the default option. I wanted to start on one, and notice how we also have
an option here for restarting numbering every page,
spread, or section. And this is where sections
are again useful. If you have a very long
document like this, you can separate each of
the stories in this case, two sections, and that way, you will be able to restart the footnotes for
each of the stories. And that will be all automated. But for now, I'm just
going to turn this off since I know
that there won't be much footnotes
necessary for this then we have more options
for refining the formatting, including the position of
this reference number, so it can be the
default superscript. It can also be subscript, which goes below the baseline, or it can just simply
be a normal number. We can also assign a
character style to this, so I can choose a green red, for instance, I can put
it back to superscript. That looks quite nice. And then the footnote formatting itself can also use
a paragraph style. In this case, probably I will use something like the poem. I think that is going to work. And then there would
be by default, a tab space between the
entries within the footnote. This is again, something
that we can change. And then under the
layout options, there's even more settings
that you can use to specify how you want the footnote section
to be generated, like whether you want
to have a rule or not, how long you want
that rule to be, how much space you
want to add between footnotes and how much space you want before the
first footnote. For now, I'm just
going to click Okay, and let's just take a look
at the bottom of the page. So if I scroll down a bit, we can see how this
looks at the moment. And the main limitation
here is that the footnote has to be in the same text
frame as your main story, so you won't be able to
separate it like the caption being in a separate text
frame underneath the image. Here, footnote is always going to be in the
same text frame. Work around that
limitation when you have a text frame that
doesn't run further down on the page would be
that we could just extend this text frame down here wherever there is a
footnote appearing. And then we just have to go into the type document footnotes
options to adjust the space. So in the layout,
we can increase the minimum space before
the first footnote, and we can try to align
this with the margin. I'm just going to make sure
that the margins are visible. I go back into these
settings and in the layout, we can just reduce this a bit. I feel like, yeah, we
just reached it now. So if I go any higher,
it would go above it. Yeah. So we needed
this much space, and I feel like maybe the
rule can be a bit longer, so we can just extend it a
little bit, like around there. And perhaps instead of a
strong line like this, we could have a wavy line or maybe one of
these other type of lines like dash line or even the Japanese dots,
whichever you prefer. And just to see how
this is going to work when we have more footnotes, I'm going to add
another footnote here. Perhaps this word w down a tree, we can add a footnote for. So let's right click on that and then choose
Insert Footnote. And then we can just type in
another word for cutting. Like this, then we can just check if the number is
correctly rendered here. Yeah, that's looking good, and we can see that
obviously we have less and less space for the
actual copy on this page. So the footnotes are taking up the bottom part
of this text frame. So each time we are
adding a new footnote, we might need to adjust this
text frame further down to assure that the text
is still going all the way to the bottom
margin of the page. And at the moment,
with the space that I defined between the
footnotes and the text, we probably only have space
for two footnotes per page. But if I adjust this, we could potentially fit one
more here or maybe even two, depending, of course,
also on the length of the footnotes in case they
end up being multiline text. I also wanted to just show
that within the story editor, we get a side by side view of the referenced word
and the footnote. So we can see this is number
one, there is number two, and you can even
close or open this by clicking on these
little blue squares. Now, similarly to footnotes, we can also generate end
nodes for a document. There can only be one location for end nodes per document. And unfortunately,
they don't actually work throughout a book file. So you can use it
still within a book, but it will have to be
edited within each of the chapters or story
files in our case. But in this case, where I
have the large document open, if I decide to add a footnote, for instance, for
this word here, clever, I can right
click on this. And similarly to
inserting footnote, I just choose Insert endnote. Is going to be generated
straight away at the very end of the document in a new text frame where I can specify
what this means. I'm just going to type in Smart, and then that's how this looks. And just like with footnotes, we can also specify the exact styling we want
to use for the end nodes. So we go through type
menu, choose this option, and there's a lot
of ways you can customize how you want
to create these notes. Finally, there's
one more feature that is similar to
endnotes and footnotes, which is called cross reference. This is something you will be able to access through a panel. If you go to the Window menu under the type and
tables category, you will find it there. I already have it placed
here on the right. And essentially, with this, you can guide your readers from one part of your
document to another. So in this case, for instance, we have this story about a cat, and if we want the
readers to easily find another story about a cat,
we can direct them there. Now, in this case, I wouldn't recommend highlighting
the word cat because then it will be replaced by the cross reference text. So I would normally
just put the cursor right after the word that
you want to reference. You can even hit space
just to make space for it. And then if you click here in the plus sign to create
a new cross reference, it's going to bring
up the dialogue box and it will automatically put in something there in the text that obviously
we will update. So first, you can decide which document you
want to reference, and that already shows
that you can use this across a book file
if you wanted to. But in this case, I'm
just using the same book, and I am looking
for something that is using the story
title paragraph style. And this is also important. You can only cross
reference entries or text in your document that
is using a paragraph style. So I highlighted this, and now it filtered through all of these instances
throughout the book. And I actually want to reference the traveling musicians because there is a cat amongst them. Now, once I've selected that, we can see that the original
text was set the cat, and then in quotation marks the traveling
musicians on page 19 is the text that's
currently being generated by this cross reference
format that we have here. But notice how you
can change this. So there's lots of other
options that you can choose. You can just say page number or if you want to be
even more specific, you can click on
the edit icon here, and then we could actually
type this in manually, maybe put everything
in brackets and say another story about a cat, and then brackets closed. And then if you want
it, we could even use a character style just to separate this text
from the body copy. We can maybe use the green
bread that we used before. And if I click Save is going to be edded right there
within the text. But of course, this
is going to be a template that will be used for all your cross references. So you probably don't want
to include the word cat. So you can just
say another story and then update it like this. Maybe we could just
say another story about this character, and that would apply to
other stories as well, so this could work
more as a template. But of course, you don't
have to be so specific because once you have
this highlighted in red, and there is the page number, it is quite obvious that
this is a reference. Of course, this would work
as a hyperlink once we save this as an interactive
file format like an interactive PDF. Let's just click Okay, once
we leave the dialogue box, we can actually see this
in the story editor. Similarly to footnotes
and end notes. This is also showing up as
a separate little indicator that there is the
cross reference starting right here
and ending there. In case we wanted to
move this around, we could easily
just highlight it and then drag and drop
it somewhere else. Maybe we just drop it
here next to the mouse. And then it moves down
in the copy as well. One final note that cross references will be
listed here in this panel, so it will be an easy
way to track them. And this number will indicate on which page is this cross
reference placed on. And the little green
sign means that the destination of the
reference is still active, so it hasn't been
deleted yet or hasn't been updated to a
different paragraph style. I wanted to make sure that
we cover these features because they could be very
useful for certain projects. In our case, for this book, I don't think we really
need to use them apart from that one single footnote that we had in one
of these stories. But in the next lesson, I'm going to cover a very interesting feature
called Index, which could actually be
useful for this book.
39. Creating an Index: This time we will look at the feature called
index in design. And then index, if
you're not familiar with the concept is often
used in books, usually at the very end
to help readers locate specific terms or words that
appear throughout the book. So if there is an important term that is mentioned
throughout the book, this way, readers will
be able to find very quickly all the instances
of that specific term. The good news is the index
feature actually works across documents as long as
you are using a book file. So that's what I'm
going to show you here. I'm using one of these
separate stories, the first one golden
bird from my book file. And I'm going to open
the panel, first of all. This is from the Window menu, Type and Tables index, and I'm going to place it up here just so we
can see it better. And I will also place my scripts up here because we will
be using this as well. First, I will show you
how in Design expects you to do the indexing
of your document, which is very time consuming, especially if you
want to be thorough. But then I will also show you a much more effective technique using another custom
script that I created. So I'm just going to go
closer to the text here and find something that we
want to use in our index. So let's just say
a clock is here, or maybe we could use the feather as a word that
could be interesting. So if I want this to
be part of my index, I will have to first go in the index once I have that
word selected and click on the plus sign that's
already going to include this as a
level one topic. And for now, I'm
just going to say, Okay, I don't want to do
any additional settings. Notice how here I now have a list of all the
letters in the alphabet, and the feather is
edited under F, and I can see the
instance of this that I selected is on
page number three. Now, if I go to the
end of this document, I can click on this
other icon here, the Generate Index option, which we have lots of
additional options. I'm not going to go
through all of these. Perhaps just mentioned
that we could include the book
documents for this index, which is probably a good idea to turn on at the beginning, especially if you are
working inside a book file. And then let's click Okay, and I'm just going to click and drag to create a
text frame for this. Now, this is how our
index looks like without any additional formatting,
and that's great. My main problem with this is that in design
won't automatically find all the other instances of the word feather
within this document. That is actually something is expected from you
to do manually. And of course, the
fastest way to do that would be
with fine change. So if I press Commando
Control F, I could say, I am looking for
the word feather, and then we can
just say Fine next. And there we have already
another instance. We can go find next, and we will see that this
is actually referenced I think three times
throughout this document. So if I go backwards,
once again, there was one, two, three. It's all on the same page. So you can decide to
ignore the fact that there is three of them
because the index would just say
page number three. But if you want to
be very specific, you could actually indicate
all three of these instances. But each time you
would have to add them to the reference here on the right when the
text is highlighted. So I'm just going to
show this quickly. I have that word highlighted. If I say plus, Fada, click Okay. Now there will be two
entries on the same page. And if I go back to the
end of the document, I don't even have to
select this frame, I can just click on this
option to generate the index, and as long as the replace
existing index is turned on, I can just click Okay, and it will tell me that
it's been updated. I will say don't show
again, click Okay, and it actually won't show two number three because
it's on the same page, even though we have
two instances. But as soon as one of these
move to another page in case the text is reformatted in a way that is going to be
moving to page number four, for instance, then this will be automatically
updating as well, or at least once you
manually update the index. Now, I guess you can already
see that this could be a very painstakingly
slow technique to go through one by one, especially if you want to
reference a lot of things. So this is why I created
a script for this, and it could be
extremely useful. It's called Auto index, and you will find it in the project files in
the scripts folder. All you have to do
is to place it into the script folder that
in design is using. So if you haven't seen
me doing this already, you have to open up
the scripts panel, which is from the Window
menu utilities script. And then right click on the user category and
choose Reveal in Finder. And that's where you
have to just simply copy and paste that Java script into, and I'm going to show
you how this works. So if I double click on this, it's going to ask me if I want
to specify a parent topic, which is optional,
you don't have to. But in this case, I'm
going to type in animals. Then I can specify
level two topics, which in this case, I know in this story there is
definitely a bird. There is also a fox, and I'm using commerce
between these entries. And I believe there is also a
dog and maybe even a horse. So I'm just going to
include that as well. Now notice that
we have an option to update the index
automatically. This means it won't generate another index if there's
already one in your document. But because I deleted that, this is going to create
a brand new one. And then if you use the
case sensitive option, that means that it
will be able to find these words
throughout the story, even if they are using
different cases. So for instance, if they
are sentence case with a B, this will still be able to find them and reference
them in the index. So having all of these options on, they can just click Okay, and after a while, the script should
give us a message, and it will even tell us that it found 26 instances of bird, 29 instances for fox, zero instances for dog. I intentionally
made that mistake. Just to show you that it's
going to still listed here and 14 instances for horse. And I can click Okay, and it
actually created the index on a new page because there was no index
already to update. So it created on this new page. And notice that our
feather topic is still included because that was defined before I use the script. But if I zoom closer, notice how nicely this is
formatted thanks to the fact that we have a parent
topic animals. And then within that, it is
listing all these animals, the bird, fox and the
horse in this story. And as you can see, the bird is mentioned on all the pages, while the fox and the
horse are mentioned more towards the
end of the story. Now, I will let you play
around with this feature and decide whether you want to
include it in your project. I feel like it's quite good
to have it at the end, and it's completely up to you how many terms or topics
you wish to include. But there's one
additional thing I wanted to just mention
quickly that you can actually import topics quickly by creating a text
frame in design. It could be anywhere
within the document. And then if you just
type in a few words, let's just say King
Prince Princess. We can have Taylor, the usual suspects or
characters in these stories. We can probably also have boy. Now that I have these
listed separate lines, I can just select them all. And then there is a
hidden keyboard shortcut, which works with
the index feature. It's Command Option Shift on
Mac or Control Old shift on PC and open or left square
bracket key on the keyboard. And if you do that, you will notice that this
will be edited here. So under K, we have
King, under P, we have now prince and princess, and under we have Taylor. Now, this, of course, will only add the topics to our index, but it won't actually find
them throughout the story. For that, you should use my Trustee script
that I created. And once you have a lot
of topics in your index, it's probably worth
turning on the show find field option from
the panel menu drop down. That way you will be able
to search for things. So instead of me
going through it, I could just type in Taylor.
And so on and so forth. And once again, because
this document is part of a book that we
created earlier, within the index panel, you have the option to let this index work across
the whole book. So once you take that, it's going to make sure
that you will be able to reference not just this
particular document, but also the other documents
that make up this book. And in case you are creating an index for a book that is
separated into documents, I would recommend to create a separate dedicated
document for it, which can be at the
end in the end matter.
40. Frontispiece, Title page and Preface: Returning back to
the front matter of our book in front of
the table of contents, normally we would have the title page and
the frontispiece. So for this, I am going
to create a new spread. Now, once again, if
you are working on the book version where you have separate
documents for everything, this could easily be
a separate document. You can decide to just have
a front matter document, which would hold a
table of contents, the index of Illustrations, the title page, frontispiece,
and so on and so forth. But since I'm working on the large document format,
which includes everything, I'm just going to use this section which we created
for the table of contents, and I'm going to create
a new spread just inside this just in front
of the table of contents. So I'm going to right click
and say Insert pages. And I want this to be
before the page number two. And I would like
to have two pages, and it can use the same
parent page style, so we can click Okay. There it is just before
the table of contents. But immediately, what happens
is that I lose one of those empty pages because of the Smart text
reflow feature, which is eager to
delete any empty pages. I'm just going to undo this step and I'll show
you how to turn this off. If you go to the in design
menu preferences type, or on PC Edit preferences type, you just have to turn this
option off temporarily. So let's do that.
Let's click Okay, and then do this again, right, click Insert pages 2 before page or at start of document is
probably even easier. Let's click Okay. So now, you'll see that even though
we have the SmarttexRflow, still active is not going
to delete anything, so we can work here normally. Now on the left side, I actually
won't need a text frame, so I'm going to
delete that frame. And this is what's going to be our frontispiece,
the illustration, just next to the title page, which is going to be on
the rectal or right side. So let's just bring in
the illustration first. And I wanted to show you the options that you
have for this in bridge. You will find these
in the Link folder, frontispiece, subfolder. These were all generated
in mid journey. I quite like all of these, so it's a hard choice
which one shall we use. I think I'm going to go with this one because
I like the angle. It really feels like
this fairy is flying, but I might change the direction of it once we have
it on the spread. So let's just place
it in here for now. It's a nice square
format as well, which works nicely
in this layout. So once I have it selected, I can choose the flip horizontal option
here in the control. That's just generally
a better way of using the
illustration because it leads the eye onto the
right side of the spread, and we can, of course, still decide to rotate
this around a bit, resize it later if we wanted to. But for now, I feel like
that is looking quite nice. On the right side, we
can use the text frame. And for this, I actually
have another document prepared a text file called Grim tales Title
page and preface. So once you open this up, you will see this is the
section that we need. So the preface we will
use on another spread. So let's just copy this
and come back into in design and paste it in right
here on the right side. Now, for the title, it would make sense to use the story title paragraph style. For the rest of the
copy that we have here, we could potentially
use the story subtitle. So let's just see
how that looks. Is looking a little bit too heavy on this additional text. Maybe for this one, we can
use the caption style, which might be a
little bit too small, but now we can just adapt these. Maybe we can just drag this text frame further in
a bit, something like that. Actually, I'm going to make this bigger, select the title. And I'm using Command or
Control shift period, which is going to increase this. So yeah, something like that, and then old up and down arrows, we can add more leading. I will probably have the
fairy tales and a new line, and I will probably also
reduce the urning here. This postrophe can come a
little bit closer like that. And the names, I think,
are looking good. However, we could
potentially use end here, and then this text can
be a little bit larger. Again, I'm using
the same shortcut, a a bit more leading there. And I'm just going to use
both left and right indent on this paragraph to have it
a little bit narrower, maybe the same from the
right side as well. Yeah, that keeps
it nice and tidy, and it actually creates
a nice rectangular shape as well, which is good. We can potentially
have more space here. So I'm going to
select this paragraph and include the space
before feature, move it down, and
also we can move down the authors a bit further. This can probably go
even further down. Something like that is looking
quite good and balanced. Maybe this can have a little bit less space in front of it, which I remember from the story title was set up
with the paragraph rules. Now, to access that without creating a new paragraph style for this single instance
of this variation, I'm just going to go to the additional options for
text up here on top right. That's where we can
find paragraph rules, and I'm just going
to turn that off. If we have a preview, that should push
the text up a bit, and now we can just
fine tune this by using the frame and maybe
drag it up here. Yeah, I feel like
that is looking good. Now, this text here
on the top is not necessary on this page,
so I can remove that. It's command Shift
or Control, Shift, click on it to override
it and delete it. And you can further refine
the text a bit by having maybe the two names Jacob Grimm and Wilhelm
Grimm side by side, but in two lines. So I'll just show you this
quickly how I would do it. I would first create
a paragraph break between the word
B and the names, then select the names, remove the space before
option from them completely, or maybe we can have a little
bit more space like this. And then I'm going to
use this feature from the paragraph formatting
controls called split three. So this is going to create three columns specifically
for this paragraph. So you don't have to have
three columns within the whole text frame just
specifically for this bit here. And then it's just a matter of dividing the text correctly. So first of all, we can put a column break just before the
end percent, the end side. That's the return key
on the numeric keypad. If you press that, that's
going to be a column break, and then you can put another one just before Wilhelm's name. And that already got
formatted into two lines. But we can do the same thing
here with Jacob's name. So I'm just going to press Shift Enter to
create a soft break. And then what we can do is to increase the size
of the percent. That's command shift or
control shift, period. And then to get them
closer to each other, I just select that
whole paragraph, and I'm going to use
left and right in Den. So I'm going to increase left indent first and then
the write in then. But I also realize that there
is a gutter already set up between these
columns which we can reduce so at the moment, that was a little bit too high. We can even set it to zero. But this gutter is
actually for real columns, not split columned text. So to find the gutter
for this feature, you have to alter option, click on this icon here
next to the split option, and that is going to open up the span columns dialog
box, which by the way, you can also access from
the same hidden menu for these additional
typographic features. So there are span
columns as well there. And the inside gutter
is the one we need. If you turn on the preview, we can actually see how
this is going to change. So if we set it to zero, it should be able to accept a bit more in
then from the left side, and let's just maybe set up 0.6 for left and 0.6 for
the right as well. That might be a
little bit too much. So maybe we can go
down to 0.4 and 0.4. I actually realized that
whenever we use this feature, instead of using left
and right indent, we could just use the
outside gutter option. So I'm just going to
click Okay for now and I remove our left indent, and I will also add the soft break for
Wilhelm Grimm's name, split it into two lines, and then make sure we
select all the text, then come back to the
span columns dialog box and then start increasing
the outside gutter, we can drag these two names closer to the percent
in the middle. Feel like that is
looking quite nice. Now, at this point,
I just realized that we push this text down too far so we can reduce the space in front of that
to bring it back. But of course,
sometimes when you work with spacing
back and forth, it might actually be easier to separate certain texts
into a new text frame. So that's what I'm going to do here just to show it to you. I'm going to use the type tool. Going to create
another text frame and just paste
this text in here. So this text doesn't actually need to be
part of the tax flow. Even this one here, we can actually remove from
the main tax flow. So if you click twice on that, it's going to be removed, and we can delete this
additional text frame as well. And this text frame that
we had originally on this page doesn't
actually have to be part of the main tax flow. So what we can do is to
copy or even cut all of this text that we created and actually delete that text
frame that we have here. And just create
another new frame for it and paste in that
additional text. And like I said, even
this can be separated. So instead of relying on the space before
and after feature, we can just have
separate text frames for each of these
three elements, the title, the authors, and then this information
text at the bottom. So now, it's a little bit easier to push
things up and down. Feel like these two can be
more here in the middle. Maybe both can come down a bit, and that is looking
quite nice and balanced. I feel like these can go
a little bit even closer. So let's just go back there, increase the outer margin or outer gutter, do
something like that. All right. So we are done with the title page that's on the right side and the
frontispiece on the left. After this comes the
table of contents. And after this, I am going to actually
add another spread, so I will right click and
choose Insert pages 2, after the current page, which is number five, Yeah. And for this, I definitely want to use the Smart text reflow or primary text frame because we will be bringing in
a little bit more text. This is also in that same
text file under preface. This is what you want to select. Maybe also the word
preface can be selected. This text I actually
generated with chat GPT, so there might be
some errors in it, but I'm not going to worry
about that too much. I will just drop it in here, and this should generate the
necessary amount of pages. And after that, the first
story should appear. So let's just change
the style of this. For the preface text
here on the top, I think I'm just going to
use the story subtitle. Yeah, that looks good. It shouldn't be as
significant as a story title. And then I would like to
select the rest of the copy. Now, in these cases,
when the text is already split between
multiple spreads, it's easier to use
the story editor. That's Command or Control
Y. Let's just select that. Let's make this wider, and then we should
be able to scroll down and then be able
to select all of this. Then we can actually use
the body copy for this. So let's do body. And then if you see
a little plus sign next to the paragraph size name, it means there's
some overrides here, which we can clear by
clicking on this icon. So let's just clear it, and
that is looking much better. The first paragraph shouldn't
have a first line in then, so I'm going to
remove that manually, and I can see that we have additional line breaks between the paragraphs which
we can eliminate. There's only a few of them, so I'm not going to worry about using fine change for this. It should be quick and easy. So let's just delete this. And I believe there's
only a few more. Yeah, there's one more there, one more and one
more down there. Okay. Now, we can also
adapt this style slightly. If you want to introduce
space between the paragraphs, maybe that's something
that you can do just to differentiate it a little bit further from the
rest of the book. But I'm going to
keep it like this. Maybe just drag this frame down a bit to
something like that. Or potentially we could also just add a column break here. So to get the text starting
on the right side, and then we can
move it down here. I feel like that's even better. I'm careful to make sure
that I don't break up a paragraph because in the
beginning of the book, that's really not necessary. I feel like this is looking
much better already. There's our table of contents. There's our title page. And this means that
the front matter of our book is ready. So if I just zoom out a bit, we can see this is
the front matter, and then after this is where
the body matter is starting. I just noticed that here
is an empty spread. That is because we turned off the delete empty pages option. I'm just going to
delete this manually, and I will actually go back
to the settings and bring that feature back on just so I don't have to deal with
that in the future. So once again,
let's just look at a full screen preview
of our front matter. This is looking lovely. Maybe one tiny little
thing here that I would do is to have
the ensign in red. I will just use the
green red on that. So let's take a
look at this again. I feel like that just gives
a little bit more balance to this spread and separates
the two names better. So once again, we have
the table of contents, and then the preface,
which is looking great, and then we move into the actual contents
or the body matter. But now that we have
the front matter, let's have some fun creating
the cover for this book.
41. Setting up the cover document: Finally, after so much work
we put into this project, it's time to create the cover, and that's obviously a very important
element of the book, because that's what
the customers will see when they pick up the
book from the bookshelf. And if a cover design is not enticing or
interesting enough, they might not even notice
the book in the first place. Now in my graphic
design theory series in the print design course, I have a dedicated section
about book design, where I talk about all the different considerations
that you have to make when it comes
to creating your cover. And one of the many
considerations is whether you want to use a
dust jacket or case wrap, or you just want to have the print on the
actual hardcover. Of course, it's also
another question whether the book will be
hard or soft cover. But in this case, for a book that's almost 300 pages long, I feel like it definitely makes sense to have it in hardcover. Also, I feel like
it just suits more the style of this
book or the theme. So we will be working
on the front cover, the back cover, and
the spine design. But in case you decide that your book should
have a case wrap, then you could also include an interior back flap
and the front flap, where you could put
information about the author and maybe some
additional information if you want to fit it in there. I just wanted to
show this example of some sketches that were created
for a book cover project, the Halloween Tree in this case. This was created by one of our very talented pro member
student, Gene Bowman, and you can see how much
planning goes into finding the best layout for the
illustration and the title, the authors, and the blurb that goes on the
back of the cover, and how best to fit
all of this together. We won't be doing sketches
like this for this project, mainly because I already
have the illustration ready, and the illustration
is actually coming from the Illustrator
Fast Track course. Once again, this is something
you will be able to find in the project file folders
under Links cover art. There you will find
the Illustrator file called cover art.ai. And just to show you, this is the original
sketch I created, and that's the final version, which we actually work on in the Illustrator
Fast Track course. Where similarly to this course, we go through every single
step that is required to turn a sketch into a fully realized and detailed
vector artwork like that, what you can see
on the right side. But this is already ready
for us to work with. So I'm going to use this. But first, we have
to prepare a place for and I would advise to
create a separate document, even if you are working in
the single long document file because the book cover
is almost always sent to the printers
in a separate file, and we will be using
different specifications in the PDF as well. Now, you can decide whether
you want to create the cover in Adobe Illustrator
or in design. I wouldn't use Photoshop
only if it's very necessary. Maybe you could prepare
the illustration in Photoshop and then place it into in design or Illustrator. But these two tools,
so once again, in design and Illustrator, I find better to be used
for the book cover. But since this is an
in design course, let's just do the
book cover in here. So I'm going to create
a new document. I will use the same document preset or template that
we created earlier. And this time, I also would
like to have facing pages. I actually want two pages created or we could
even have three pages. For now, let's just do two. We don't need the
primary text frame. We can add that ourselves. The sizing should
already be good. The margins we can
actually keep the same. We might change that later, but I definitely
want to use bleed. So let's just set up
3 millimeters bleed. If you don't see millimeters, you can change it up here
in the units section. We could also include slug. Let's just have
maybe 13 millimeter slug on all sides
of the document. And if you turn on preview, you should be able
to see this in the background. That
is looking good. So that's all I
wanted to do here. Let's click Create. So this is going to
be the front cover, the back cover, but we need
the spine in the middle. For this, first, I'm going
to turn off a feature, which you can do by
right clicking on one of your page thumbnails. So this is the one allow
document pages to shuffle. Turn this off, and
this will allow you to attach multiple
pages together. So instead of being limited to only having two
of them attached, you can have a third one, which is going to go in the middle. So I'm just going to create a new page and then drag
that in between these two. Now, if you don't want to
see that spine detail there, you can actually turn off
the facing pages option. So if you go into the document
set up from the file menu, you can turn off facing pages. Click Okay. And then now these three pages
are in a way equal. There is no set
division between them. That's just a very minor thing. It's not really going to
affect anything technically. So now what we need to do is to select this
page in the middle, and then we can
select the page tool. This is a tool that we
very rarely use in design, but in this case, it
can be very useful. If you start dragging
the edge of the page, you can make it narrower. But you will notice that
because of our margins, we won't actually be able to make it any narrower than this. So if I let it go here, for some reason, it still snaps back to its original size, that is because you
have to also hold down the alter option
key to make sure it actually resizes the page. But what I actually prefer to do whenever I have
a page selected, instead of using the
page tool is to be more specific and set the
width up here on the top. If you set the
reference point for your book to the
top left corner, it's not going to detach itself from the left side
or the left page. So we can just change
the width here, and I think we probably
need 30 millimeters, but then we get an error message that the margins are too wide. First we have to go
into the layout menu, margins and columns, and let's just eliminate
margins on this page. We'll link them together
and set it to zero. Let's click Okay. So
now we should be able to set this to maybe
30 millimeters. That's probably a
realistic width for all the pages that we
will need in this book. But this can be adjusted
once the printers come back to you with the estimate of the thickness of the book. So that's again, something that they will be able to tell better once you tell them how
many pages you now, again, using the page tool,
we can just attach these two pages together or
these three pages together. And if we zoom out a bit, we can take a better
look at what we created. Now, what is important and
we shouldn't forget is that these lines that
we see here in in design won't actually be
visible for the printers. So once this is exported as a PDF, these won't be visible. So we have to indicate
them somehow, and that is why we
created the slug. So I'm going to use the line
tool I'm just going to draw a line from this division line here between the two pages, and I'm going to drag this up. You can overlap a little
bit the bleed if you want. But what we want to do
with this is to make sure it's set to
registration color, which prints on all plates, meaning that it will not
just simply be using black, but all the colors. So that's definitely
the best option to use for something that
is indicating a fold. So this is going to
be our fold line. And normally what
we would use for this is the dash line or dots. Again, you can discuss
this with your printer, which one they prefer. I'm just going to
go for dash line, and it probably should be a
little bit thinner, like 0.5. That's probably still a
little bit too thick. Let's just do 0.25 points,
something like that. It's probably
looking quite good. Maybe I'm going to use this
other dashed option that just has a little bit more
space in between the dashes, and then what we want
to do is to copy this and make sure it's aligned to that other line
that we have here. I'm just going to actually
drag it down first here. Make sure it's aligned, and then we can drag it up, holding down the Shift key, drag it all the way
up here, right there. And then we should
just also have this copy all the way
down at the bottom. Having that selected,
you can even turn it into a group just to make
it easier to select them. Command or Control G, and then let's just drag it down all the way to
the bottom here. So align it to the
edge of the slug. So it's hardly visible, but it's there, and it's going to show
up in the final PDF. Now, we don't have to create bleed marks because those can be added automatically
using the design options.
42. Adding the front cover illustration: Now it's time to add
our illustration. So I'm going to press
Commando Control D. I go to the cover art and select
the Illustrator file. So let's just bring this in. And I'm going to place it
here on the right side, which is the front cover, and then I'm going to align
it to the center of the page. But of course, this book
is not called Little Red, so we should remove
that text from there. And the way we can do that
is by Alter option double clicking on this illustration to open it up in
Adobe Illustrator. And here you will be able
to find this in the layers. There is a single object. You just have to turn off. And by the way, you could also have your own version
of this illustration. Where you remove the silhouette of the wolf and maybe
just have the eyes, which is very mysterious. We can even remove the
wolf completely and just have little red
riding hood and the trees, which is quite nice as well. But I'm going to keep everything
in apart from the title, and I'm going to save this. And then if we go
back into in design, we just need to
update the changes, so I can double click on this little
exclamation mark here, and then it should be updated. So now it doesn't have any text. Now at this point, we can
decide whether we want to have a color behind
this illustration, and that's one of the advantages of working with a vector art that we can easily place
something behind it. But at this point,
I would advise to also start using
the layer spanol. Now, I haven't actually
used layer so far in this project because
for the rest of the book, it wasn't really
necessary to do it. But here on the cover, I feel
like it would make sense. So I'm going to call
this one images where I already have
this illustration, and then I'm going to
create another layer, which is going to be the text. Then a third layer, which I will actually drag
all the way to the bottom, and I'm going to call
that one background. So now that we have
these all in place, and now that I have the
background layer selected, I can maybe lock
the images layer so I don't accidentally
move that art around. So having background
layer selected, I can use the frame tool. And I'm going to make sure that this goes all the way from the top left corner of the bleed to the bottom
right corner of the bleed. And then we can
give this a color. I'm going to import
that red color that we used in the
other document, which we can do from the
swatches panel or from this swatch drop down by
choosing load swatches, select that in design document. And that should bring
in our green red. And also that additional
color that we use there. I'm just going to
choose green red, and we can check how this looks. Of course, this is a
little bit too much red because we have
red on top of red. So even though that's the color that we use
throughout the book, I feel like here we need a
little bit more contrast. So what we can do is to
keep this frame selected, but go to the window menu and choose color. The color again. And then from the drop down, we can go into C and YK. And here we can start
playing around with the colors and see what's
going to work best. We can also press W
on the keyboard just so we can preview the
whole book better. And I feel like yellow
is a nice color. It's a very strong color. We can make it even
brighter or softer. That. We drag the
yellow all the way up, it's going to be a
very vivid yellow. If we drag the magenta
all the way down, it's almost like a neon yellow almost getting closer to
greenish color there. We can also introduce the black if we want
to make it darker. But I feel like
that's not going to let the illustration
stand out enough. So I feel like we
have to either decide between a softer
yellow like this, could be even more softer. This is actually quite
nice and subtle. I could go all the
way down this way, maybe have a little bit
more magenta in there. It's really a stylistic choice that you can decide on your own. You don't have to use the
colors I'm going to use. But I wanted to show besides yellow a nice
complimentary color that we could introduce here is this bluish green
turquoise color, which could also
work really well. So if we make it
very primary blue, that might be a little bit
overkill, I feel like. Again, it's a little
bit more subtle if we reduce the intensity
of the blue. We could even go towards purple. The purples are very nice. That could work
well for the story. Just make sure
it's not too dark. So we can go towards
this site here, and then a little
bit to the left. So there's lots of
options we could choose from quite like
this type of color. I feel like it
works really well. It helps the illustration
to stand out. All the details
are looking good, and it's a nice
complimentary color. Now I would normally also check that there's no fractions here, so all of these numbers
are looking good, and then we can save this
into our swatches panel. So we can close
this and then go to the swatches and
add this new color, and then we can actually click here on the
Swatches panel, choose select all unused. And delete. Maybe
the green red I'm going to keep here just in case we want to use
it somewhere else, I'm going to delete the rest. And then we can just double
check that this frame that we created for the backdrop goes all the way to the edges. And yeah, it does. And
now we can go back to the layers panel and the background layer as
well because from now on, we will be working
on the text layer.
43. Adding copy to the front cover: And let's just bring in quickly the text that we
already added here. So this text frame, we can just copy paste to
bring it into this document. And if you don't see the text, that's probably because
you have one of the formatting options still on this that is preventing
it to show up. So if we turn this
into a new style, I'm just going to call it title, and then remove the overrides. We can go inside it and check if there is any
options that we don't need. Like the paragraph rules, we actually have that
turned off, keep options. That's the one that is
causing the problem. So I'm going to set
that to anywhere. Now it should come up perfectly. We can move this
here on the page. But of course, this
red is not going to look good on the background
that we created. So if you wish to use red text, I would advise to either use
white as your background, which we can test
very quickly by going here and just turning
off the background, which of course is a
very effective option. It has the extreme contrast
of black, white and red. However, if you prefer the color that you chose
for your background, I would just advise to change the color of the text to white. So if we go to text, we can just choose paper, and that actually
looks really nice. Now, in this case, I
think we can probably fit this text like this. Maybe we can just use curing to get these words a little
bit closer to each other. I quite like the way this fits here between the
ears of the wolf. Or if you want to
keep it separate, you can also probably put the text in one line on the top. I'm going to keep it like this, and I will actually overlap
the text a bit more, maybe somewhere around there. And then we can bring in our
other texts, the authors, which we can bring in and
place below the illustration. But in this case,
I am going to just simplify this by having
them all in one line. If we select all of this, we can just set
it back no split, and then we will just remove all the unnecessary line
breaks or soft breaks, which we actually
had quite a lot of. So I'm going to go
into story Editor. It's just easier to do it there. Let's remove
everything like that. And the percent should be actually the same size here
as the rest of the text. So I'm going to make sure the whole text is set
to maybe 12 points, or it could be a little bit more like 15 points in this case, and I think all of this
should be set to white. Again, that is looking good. Let's take a look at
this from a distance. Actually, this I will
place here on the top, and I will remove the word B. And I will spread the text frame out all the way to the edges of the page just to make sure that is going to be
centered perfectly. And I will select the title and maybe even the illustration, so temporarily turn
off the log and just align it a bit more
to the text on the top. Just eyeball it. You don't have to
be exactly perfect. I feel like it looks good. Maybe the image can come
down ever so slightly. I feel like the
text is actually a little bit too close
to the top edge. So I'm going to sag everything and drag
it down like that. The illustration potentially
can be slightly smaller. So I'm using Command Option
Shift on Mac or control all shift on PC and drag the image towards
its center point, and then we can drag
this up a little bit. I quite like how the title and the trees interact
a bit with each other. And then I'm going to use the same format that we
have on the authors. And I will create another text
frame here at the bottom. And for this, I'm going
to bring in the tag line that you can find in another file that I
prepared for you. This is the Grim
Tales cover copy. So you just have to open that and you will be able
to find this here. So let's just drop that in here. And when you are pasting, you probably want to use
Command or Control Shift V to paste in without the
original formatting coming in from that document. So let's just take a little
bit closer look at this, timeless tales of magic,
morality and mystery. I would probably break
this up into two lines, say timeless tales of magic,
morality, and mystery. I really like how these
three words are all starting with M. And if you wanted
to emphasize that, you could actually
use a different font for these letters. Like we could use the fairy tale one that is used on the title, and we just have to
check whether it pairs well with the
rest of the copy. I feel like it's a
bit of an overkill, so I'm not going to push that. I will go back to the original. One other way to
emphasize it would be to use black on it, which would be interesting. That's actually
something I quite like. So I'm going to temporarily
have this turned on. Let's just add these three. And by the way, I would do this probably with a character style to be able to easily change
it if I change my mind. And yeah, when I look at it, it doesn't really work well. It's just a little bit
of an overkill again, so I'm going to change
it back to white. I feel like that is much nicer. Yeah. Now, I will just move
these down a little bit more, have the author separate
a little bit more on the top or authors,
in this case. And I think it's time to save this file before
in design crashes. So I'm going to save this in a completely separate
document, like I said before. This is going to be
the grim book cover. So I will just use
that as my filename, and it's an in design
document file. Let's just save.
44. Designing the spine and back cover: And now we can move
on to the spine for which we can just use the
same formatting of the text. Both of these frames we
will be able to work with. But to be able to see
the spine better, we can also right click on the spread and choose
page attributes, rotate spread view, 90
degrees counter clockwise. That should give us the
angle that you should use. That's like a standard. We would want to have the text written like this on the spine. So let's make this
a little bit wider. Text frame, it could potentially go all
the way to the edges, at least edges of the page. It doesn't have to go all
the way to the bleed. And we can align the text frame completely
to the spine itself, so we will be able
to center it well. Now, this text is already
centered horizontally, but we also want to center it vertically within the frame, and that is something
that you can very easily do by pressing
Commando Control B to access the text
frame options and just set the vertical
justification to center. Once you've done that,
you can select this text, make it smaller, to make sure that we can fit the
authors in there as well. And I am going to now
select this copy. Cut it, can delete that
frame, come back here. And then probably I
would add a shift tab, which is a right in then tab
and then paste this text in. And then holding down
old or option key, starting to drag the
corners or the edges in until I find a good placement
for the two copies. Something like that looks good. If you feel like the baseline
is not in the center still, you can select individually the text like this one here and use or option shift up
arrow to nudge it up a bit. So that's called baseline shift. We can do the same thing for
this text, maybe just once. And then in between the
title and the authors, you could have a glyph that you add here
if you wanted to. If you wanted to
see the character set of a font,
like in this case, the fairy tale, we could go to the type menu
and choose glyphs. This is actually a
very limited font, so there won't be that much
options to choose from. I actually feel like the
asterisk is quite nice. So let's just add that
in and see how it looks. Yeah, that looks really good. Now remember we have already
a right in then tab here. So if I put another tab, I could push this a
little bit further to the right and also just select that asterisk and use option or Alt Shift down a row until
it's centered perfectly. We could also increase
its size if we wanted to, but I feel like it looks
quite nice. The way it is. And then if I go
to the type menu, I can choose tabs, and then here I can just specify where I want
this step to be. So I can align it exactly
in the middle right there. That looks good. So
let's close this one and then zoom back. I really like the
way this looks. So now we can remove
the rotation. You can just right click
on that little icon there and choose clear rotation. And let's just take a look at
what we've achieved so far. I think it's looking quite nice. So now we can concentrate
on the back cover. So for that, I'm going
to create a text frame, and I will actually use the original margins that we have inside the book as well. And a copy for this is the blurb that I thought
can be used here. But you have the option to use the author's bio if you prefer that, it's
completely up to you. Probably you won't
be able to fit both of them because there's
just not much space. But once you paste in this text, we can just quickly assign the same font that we
used inside the book, which is Tisa Pro. I will use regular. The size can probably
be 12 points. We can increase
the leading a bit, can have this text justified with the last line
aligned to left. Text size actually can
be a little bit less, and we can make
sure that we have hyphenation turned
on. Avoid the rivers. Instead of a line break
between the paragraphs, I'm going to choose the
space between option, maybe 4 millimeters like that. And you can decide whether
you prefer the black text here or the inverted text,
which would be white. It's not a fortunate color
to use for longer text. In case of two paragraphs,
it's still okay. I wouldn't advise to use white text on dark
background most of the time. But in this case, I feel
like it's still okay. There's actually
more space here. So if you wanted to, you could include some information
about the authors. But instead, I'm just
going to bring in this barcode that I generated. This is something you
will definitely need to have on the back of the book. So that would normally be
placed here at the bottom. I will align it to the margin
and the center point like that can be probably a bit
smaller. Something like that. Perhaps you could have a little illustration done here as well, but I feel like this is
already looking good. I'm happy the way
this turned out. So it's now time to save
the document again. And then in the next lesson, we will see how to export
this properly as a PDF, ready for print, and
then we will also obviously export the rest of
the book in a separate PDF.
45. Using Preflight and Exporting PDF for print: It's time to do our final checks before we create our PDFs. One of the first and
most important things to do is to do a spell check, which we can do
from the edit menu, spelling, check spelling
or Commando Control I. It's a very handy
keyboard shortcut. And once you do that, of course, it's going to find
strange words like Grims which actually you
can add to the dictionary. So in design won't trip
up on that anymore. If I say start, it's actually not finding
any other issues, so that's already
a good news here. Now one thing you want
to check is that you haven't used any non
printing layers. So if you go to the text layer, for instance, it is
definitely printing, and I'm just going to show you that if I turn this option off, click Okay, the
name of the layer will be set in
italic characters. So that's a way in design is indicating that it's
not a printing layer. So that's just
something you want to make sure is removed. And then after the spell check, it's best to go into
the preflight panel, which can help you to check for lots of other
things automatically. So click on that little arrow on the task bar and choose
preflight panel. Within this, you can
choose between profiles. There's the basic
working profile, which is already
good, and I actually don't have any errors
at the moment. But if you want to
define your own profile, this is something you can
do from the panel menu. So choose defined profiles, and then you can click on Plus and create a new one based
on the basic profile. I'm just going to
call it book project. Then one useful feature
here that you definitely want to use is the
links category. Make sure links missing or
modified will be flagged. You can have these additional
options turned on as well. Then you want to go into
images and objects, and you probably want to turn on the image resolution
also to be checked. And this, of course, can
be specified as well. What's the minimum resolution that you will require
for this project. Since we are working
with a vector illustration here on the front, that's not going to
be a big problem, at least for the cover but
for the rest of the book, that's definitely
going to be important. I also want the non
proportional scaling of placed objects
feature turned on. So this is going to check
if you by accident, distorted any of the images, and then you can even have
things like bleed or trim hazard when you have something placed too close to
the edges, again, won't really be an issue for us, but there is no harm having
it then in the text category, you can see by
default overset text is going to be flagged. Missing fonts will
be flagged as well. But then there's a lot of additional options here
that might be useful. I'm not going to go through
all of these for now. I'm just going to save these
changes to my profile, click Okay, and
just double check. I still don't have any
errors, which is good. I'm going to drop the preflight
panel here on the right. Just so we can easily
access it later. And then let's save this
document again and then go to the file menu
and choose Export. And before I continue, I just noticed one thing
here in the background. From the corner of my eye, I noticed that there is no
optical margin alignment, and the hyphens are showing
up within the text frame. So that's just something
I'm going to very quickly fix by creating
an object style for this frame here
and then go inside it and then go into story options and
turn that option on. Was just a final
little refinement that I wanted to
introduce there. Okay, let's just zoom back. Yeah, it's a very subtle thing, but it looks better already. So we can go back to exporting. That's Commando Control E. And the format we want to
use is Adobe PDF print. Go to save it in
the files folder, so you can save it in
your project folder and just say, save. And within the settings here, I would advise to use
the PDF X 42010 format, but you should double
check with your printer whether this is something
that they can use or not. Sometimes they
might ask you to go back a little bit, maybe 2001. However, I'm just going to
use this format for now. And for the cover, you should definitely
save this PDF as spreads, so you don't want your
pages to be divided. And then you want to go
to marks and bleeds. And you want to make sure that the crop marks is turned on, but also the bleed marks. And both the document bleed settings and slug area
should be included. And then that's actually
all that we have to do. So we don't have to worry about any of the
additional options. We can just say export. And then you can open up
the PDF that you exported in acrobat and you can have
a final check on everything. And if you are happy with this, this file is ready. So now we can move on to the actual contents of the
book, for which first, I'm going to show you
how I would export the book that has
all the pages in it. So since we already set
up the preflight profile, we could just choose this
from here on the left, and we just wait
a little bit for in design to check for errors, and it actually
found two errors. So I'm going to go to
the preflight panel. And we can see that there's image resolution
requirement issues. So this is too low
resolution, it seems. So this is actually something
we can see more info on when we open up this
area here at the bottom. So the current
effective resolution of this image is 190 PPI. That's definitely quite low. We can go to this other image, and we can check that as well. Also the same issue, 190 PPI. So ideally, these should
be increased in size. And normally, what I would do
is to go into Photoshop and upsample these images that
will improve the quality. Or optionally, you
could use plugins or AI tools like magnific. But I'm just going
to ignore this. And since there's
no other issues, I am going to go ahead
and export this file. But don't forget you also
need to do spell check. So we can just go in
the same option again. And then you will
see some issues like this where in design feels like this word should be capitalized because there's no other words in front of it. So that should be the first
word of the sentence. However, we have our initial
letter here as a drop cap, but there is an image, which obviously in design
doesn't recognize, but this can be skipped, and I feel like that's
going to be an issue for all of the story
but within the stories, we shouldn't see
any other issues, apart from maybe similar
capitalization issues like this. Then there's also repeated
words like this many, many years, which in design, we would like to change to
a single instance of many. So I'm not saying
you will have to go through the whole book
like this in this case, because this copy already
went through proofreading. Many times, I believe, so you don't actually have
to worry about that here. But whenever you work on a book, of course, this should be
a very important step. And now we can just
go to File Export, and then choose PDF print again. I'm just going to call it Green Book without the
cover in the file name. And now we use the same
standard as before. But importantly, I will switch to pages instead of spreads. And in the marks and bleeds, we don't actually
need the bleed marks. And also, since we don't
have bleed in the document, we can turn that option off. The slug can also be removed, and we can just keep
the crop marks on. So then we can just say export. This is actually going to take quite a while because
it is a big file. Here on the top right corner, we can see the background tasks, and in my case, it's actually doing
quite a good job quickly exporting this. So finished it quickly, and we can check how
this looks in acrobat. So this PDF is looking good as well as the previous
one with the cover, and I'm just going
to jump back to Indesign to show the
final variation. So for this, I'm going to
have this book file open. In case you don't have
your book file open, just go to File Menu
and choose Open. And remember, this is going
to open up as a panel. And from this panel, you have the option
to print the book, or you can go to the panel menu and choose export book to PDF. But just like before, I would advise to pre fly
the book first. Also synchronize the
book is a good idea. Just double check that
the source document is still the one that you wanted to use as the master for all the
settings and styles. And then when
everything is ready, just say export book to PDF. I'm just going to
type in version two just so I can see
which one is which. And this time again, I want to use pages. The settings should be
exactly the same as before, so we can just export this. And then in this case, we only have 28 pages because I didn't add
all the stories, but it should look very
similar to the previous result because even though these were independent
documents, of course, in designs book feature, we'll be able to
automatically stitch them together and create the
final PDF accordingly. Now, in case you are interested, how to export the
work as an EPUB, that's something that we
will take a quick look at in the next lesson.
46. Exporting the book as Fixed Layout and Reflowable ePub: Would take a long time to cover all the considerations
you would need to take for an ePub file. It could deserve its
own dedicated course, and this is something maybe
I will go into more depth later once I have time to
expand on this course. But for now, I'm
going to show you the most important
things you need to do in order you want to create a reflowable ePub
and also a fixed layout ePub. So first of all,
you want to come back to your cover design. And you want to export this, but in a way that you will
only export the last page, and you can actually export
it as a JPEG this time. So if you choose JPAG, just call it green book cover. It should be fine and then save. And in this case, you
want to make sure you are using 300 PPI resolution, and we only want page
number four, in this case, and export it as pages, and the quality we
want to be maximum, the color space can stay in RGB, since we are
exporting for screen, and the rest of the
options should be fine. We don't actually need
bleed settings here, so that can be turned off. And once we export this, the file will be ready. And then we can jump back to one of our versions of the book. I'm going to use the
long document format, which has all the stories in it. And I'm just going to
jump to my table of contents because there is an important option
here you want to check. In the layout menu under
table of contents, you want to make sure the make text anchor in source
paragraph is turned on. This is specifically necessary for EPOPs you have that on, you just want to make sure it's updated in the
table of contents, and then go to the file
menu and choose Export. And the format first
we will use is the EPUB reflowable
then click Save. And then EPApVersion 3.0 is what I would
recommend to use, which should be supported
by most EPOPRader devices. And for the cover, I would
just say choose image, and this is where
we need to locate the file we just saved. Which is this JPEG.
Let's open that. And here you could
include the information for the cover design. You can have the title and
the author here as well. I'm going to skip that. And for the navigation, you want to use the
multi level TOC style and the one obviously we
defined within the document. The content order should be based on the page
layout, of course, and then there's quite a lot
of additional option here, which you can specify. Like I said, I am not going to go into too
much depth on this. Instead, I'm just
going to show you how this looks like
in its current form. So if I just click Okay,
once the file is exported, it should open up in either
the Books app if you are on Mac or in another ePub reader
application on Windows. And there's a cover. It's looking really nice. Let's just double click on it, and then we have the first page. And here I can already
see some issues with the reflowable format that
things got separated. So for this version, it's actually better
to keep things in the same text frame so they don't get pushed onto
the next spread. So that's one thing
that we would have to fix here straightaway. Make sure they are
all kept together, and then the table of
contents is looking good. These are all hyperlinks. We could jump to maybe hunts
in Luck. Which we load in. The image is coming in, okay? The caption is a little bit lost here at the
end of the last word. The poems are not
looking perfect. They are a bit too close to the paragraphs following them. The drop cap is actually
looking fairly good, although it's not
perfectly aligned. Let's see if we stretch this
page a bit. What happens? The image is pushed
onto the previous page, which I expect it
could be the case. But we can just see
how it's going to work if we continue
to change the signs. And yeah, in general, you would want to
see how it looks in a single page format
or in a spread format, but to be honest,
most people would read ePubs in a
single page format. So this is what we
want to check mainly, and things are looking much better when we
look at it this way. And like I said before, because this is a
reflowable book, it means that it's
going to always adapt itself to the
available screen space, so it can update itself and even render itself in completely
different ways than the way you set it there will be always some inconsistencies which you will have to fix and refine, and that's a separate
workflow on its own. So once you have your
work prepared for print, for ePub, you have to make
additional decisions, and I would normally
recommend to save a separate in design file, which you can refine and
adjust for the EPOP format. Now let's jump
back to in design. And before we save this
as a fixed layout EPUB, I just wanted to warn you
that you have to make sure that the document
starts on page number one. And you might remember that at the beginning of the project, when we created this document, I specified that the start page number should
be number two. So this is something we
have to override now. If I say one, this is going to change
all of the pages throughout the document until we actually insert a
page at the beginning. So I want at the start of
the document a new page. Maybe we don't use any
parent page for this. Let's click Okay. So this should fix all the other
pages in the document, and they should be set up the
way we originally intended. And now that we have this setup, we can decide to include just a very simple text
here at the front. If we wanted to,
maybe I'm just going to use this and drop it in here. By the way, this is already
a separate duplicate file, which I saved specifically
for exporting the ePub. So it's not the original one that I would be using for print. I don't want to mess that up. I'm just going to copy Grimm's fairy tales and
drop it in here without changing the
formatting and maybe just increase the size on this a bit or something like that. Just we have something
on this page. It's not completely empty. Okay. Now we can go
back to File Export, and then let's choose the
fixed layout EPUB this time, I will include in the finnme as well that this is
the fixed version, maybe ePub fixed and save. And then for this, I want to also choose an image which actually
is already there. So that's the same JPEG
that we used before. I want to use that multi
level table of contents, the one that we specified
in the document, and that's pretty much
all we need here. Maybe it's worth mentioning
that under viewing apps, you can specify what
app is going to be used to automatically
open the exported ePub, but we can now just click
Okay, and fingers crossed. Everything is going
to work nicely. So we can see our book opening up with that new page
that we just created, and we can see everything in the format that we wanted
to create this book. And the great thing
about a fixed format EPOP is that it's not
going to refloat the text, so it's going to retain exactly the same formatting
as you had originally. The text is still
selectable, which is great. And, of course, search
should also work. So if I'm looking for
something like Ponzo, we should be able to
find it on page 65, actually jumped here first
in the table of contents, which by the way, should
still be working as well. But I'm going to jump on the
actual page where it is, and then we can go
through the stories. And I just wanted
to show that if I'm adjusting the size of the app, it's not going to make any
changes to the format, it's just sticking to its
original aspect ratio and the layout of the pages
as we created them in design. A lot to consider when
you are creating ePubs. The fixed format, of course, will closely resemble
the formatting that you used in in design, while the reflowable
format is giving more freedom for the users
to specify the text size, even adjust the font that
is used in the copy. And generally, it's just
a more widely used format compared to the
fixed layout ePubs.
47. Advanced Text Handling workflows - Linked text file and plugins: I left this topic to be discussed till the
end of this project, the more advanced text
handling workflows, because this is
something I didn't want to confuse you in the beginning. The most common workflow, if you are a single
designer working on a book is the way
we were working. However, there are ways to collaborate when
you are working on the design and maybe editors or proofreaders
are working on the copy, and there is a synergy or sync between the work that you
do and what they are doing. So there's actually a solution in in design first that
I'm going to show you. Then besides this
feature in in design, we also have the
dedicated application called Adobe in Copy, which I will show you how it works in combination
with in design. And finally, we
will also look at two plugins that's worth remembering when it comes to more advanced text
handling workflows. Starting in design when I
just have a blank document, the same template
that we used before. And before we import any text, this is actually a
preference that we have to change to be able to
use this feature. So we have to go to in design
preferences file handling. If you are on PC, go to Edit
preferences file handling, and this is the feature. Create links when
placing text and spreadsheet files that you
have to make sure you turn on. Now, once you turn
this on, what this means is that in
design is going to in your in design file to that original text
file that you used, which will work similarly to how images are handled by
default in design. So if the source image updates, in design will tell you that you have to update that link, and once it's updated, it can refresh it within
your in design document. Now, in terms of copy, whether it's a text file
or spreadsheet file, it means that the
actual original copy can be updated in
that document file, which was used in the beginning
when you import the text. And in design, we'll
be able to update your already formatted copy within the in design file
according to those changes. So let's see how this
works in action. I'm just going to click Okay, and then select
this text frame and press Commando Control D
for the place command, and then you can decide
whether you want to use the original RTF file, the corrected RTF file, or the docx file. It should work
with all of these. I'm going to use
this RTF file that I already corrected where
the copy is fixed. I will say open, and I'm not going to
change anything here. I'm just going to say Okay. And the auto flowing of
the text should take some time because we will
again have lots of pages here. And I'm just going to
scroll through them. Yeah, this is looking fine. I'm not going to worry about
the formatting right now. I am just going to save
this file as a test. So I'll just call it test, maybe make a note, linked copy, and then save it. And I'm going to
go to that file, the corrected file, open
it up in text editor. And all I'm going to do
here is to maybe add a few paragraph breaks after the first story
title, Golden Bird. And perhaps I changed
this to bold. So the first title. Going
to save these changes. I'll jump back into in design, and after a little bit of pause, it's going to show
these warning signs, which I just have
to double click on, and it should automatically
update the copy, and not only the extra
line breaks will come in, but even the change of the formatting will
be synchronized. Now, it's important
to mention that this is a one way connection where the changes that
you make in in design won't be carried over
into the text file. So in case I am also
working on the copy, I'm not just the design and
the formatting of the copy, those changes won't be reflected
in the linked copy file. This is just a limitation
you have to be aware of. And in case this is the setup
that you decide to use, then probably the
best thing for you, the designer is not to
mess with the copy at all. You are just formatting it, but any changes that's
required in the copy will have to be done through
the original text file. And vice versa, whoever is
working on the text file, most likely shouldn't mess around with the
formatting because that's something that you are
handling within in design. I just wanted to show that
within the Links panel, just like having
an image linked, now we can also see the original
text file being linked. And, of course, within a
single in design document, you can have multiple
text files linked, and we can also easily
open these up directly from in design if we wanted to simply just by double
clicking on them. But in case you want to a
round trip workflow where the changes that you
do in in design can also make changes in the
original document file, not just the other way around. Then for this, I recommend
the following solutions, words flow by
software or Dox flow. Dox flow works with Google
documents and spreadsheets, while Wordflow is working with Microsoft Word
and Excel files. And without going into too
much detail, essentially, this just fixes that problem or limitation so if you are making
any changes in in design, the original source file will also be updated and vice versa, so you get a perfect
round trip solution. But these tools, unfortunately,
are quite pricey. You can't even buy them. You have to subscribe to them, so you get a 12
month subscription, or you can choose
to have six months. Of course, they have a trial, so if you want to try them out, that's something that
you can consider. But like I said,
because it's pricey, it's definitely something you should only invest in if you're 100% sure that this is going to improve the way
that you work.
48. Advanced Text Handling workflows - Adobe InCopy and Track Changes: Now we arrive to my
favorite solution, which is actually
using in design with InCopy, which is, again, a much more
professional workflow, and this is really how
Adobe wants you to work if you are working with
a proof reader or editor. And for this, I'm going
to switch back to the formatted
version of the book, and I'm going to go
to the edit menu and choose InCopy export. And you can choose whether
you want to only export the stories or only the graphics or all the graphics
and stories together. I'm going to actually
choose this option, which is the ultimate
export for InCopy, and I can use the same
file name because it should save it as a
different file format. And before it can export it, we have to give
ourselves a name. So I will just use my name because that will be
referenced in copy, and it will help us
to see who is working on the same document
at the same time. So I'm going to use my name, and of course, I can choose
a color if I wanted to, but I don't mind being the gold user so I
will then click Okay, and it just tells us we
have to save this document before we can export this
for InCopy, which is fine. I'm going to save it. And then I'm going to switch
over to Adobe InCopy, which by the way, is part
of Adobe Creative Cloud. So if you have a
CC subscription, you should be able to install
this on your computer. I'm going to go to File open. And then within the
project files folder, you will notice that
I have actually quite a lot of additional
files generated. ICML files, so these
are the encopy files. And because we had a
very lengthy document, in design automatically broke up our project into these
individual files. So let's just open
the first one. And now, again, we need
to choose a user name. I'm just going to type
in my son's name. As if he is the proof reader,
and let's click Okay. And then once I found
the actual file that has all the copy in it, I can switch between different
views here in Incopy. We have the galley view,
we have the story view, and then we have
the layout view, which should look very
similar to in design. However, here, the tax flow will change similarly
to a reflowable ePub. You can just skim
through this just so we can see how it looks. Of course, it won't look
as good as in design. But to be honest, here,
most of the time, the people who use InCopy
would work in the story mode, and that can be adjusted and updated to whatever way
they prefer to work in. But essentially,
this is very similar to the story editor
within in design. So it's much easier to
work with the copy. There's no distractions,
and they can see the paragraph styles
on the left if they want to refer to it and just to see an interaction between the Incop user and the in design user I'm going to do something similar to
what we've done before. I am going to create maybe a
line break here in the copy, and I'm going to change
something actually in the copy. So instead of eldest, I'm going to type in youngest. And let's just save
these changes. And now jumping back
into in design, Notice that on our text frame, there's a little icon up here
with an excamation mark. So currently, the text is still saying
Gardener's eldest son, and there's no extra
line break there. But as soon as I
update the content, this should update here as well. By the way, I just want to
show you that there's also an error message that refers
to this modified link. So this is that actual
link to the Incopy file. And there's a couple of ways
we can fix the synching. We can either right
click here and choose inp update content, which by the way, has a
keyboard shortcut, as well. Or you can go to
your Links panel and then find the issue there, and simply double clicking on that should update the changes. So we can see straightaway
that the line break came in, but also the copy is now
changed to youngest. Now, let's see what happens if I want to make changes
to the copy here. For instance, I want to
change this to eldest. It doesn't actually
let me to do that. And let's just see
what happens if I want to delete something
else from the copy. Again, I'm pressing
delete, nothing happens. And that is because the story
is currently open in copy. When I keep my mouse in
position, it actually says, Isaac is currently
editing this file, so I won't be able to
make changes to the copy. I can make changes to the
styling the flow of the copy. So for instance, I can
select this text frame and I can adjust it and any
additional thing that you would want to do
with your layout or the formatting of the you
just can't change the copy, so that's almost like
in a locked state. Even this little icon here,
although it's hard to see, is essentially trying to tell me that there is someone
working on this right now. And if you go to the Window menu under editorial assignments, where you can find all the
connected in copy files, out of which we can see that this one right now
is being edited. The great thing
about breaking up your document into separate
in design files and use a book format is that it would
be much easier to manage each of those
independent documents as independent incopy files. So you could even have a whole
team of proof readers or editors who are working
separately on those copy files, while you can still work
on additional stories that you haven't formatted or
edited yet within in design, and no one is going
to be blocking each other from actually
getting work done. This is definitely
a big drawback of a single in design file for a long format
document like this, especially if you are
not the only person who is going to work on it. So that's definitely a
consideration you have to make before you commit
to a project like this, depending whether
you are going to work alone or in a team. So I just want to show you, to be able to make changes to the copy directly
within in design, first, whoever was editing
has to sign out of in copy. And in this case, I already
did that in the background. So the icon here changed. It says available. From the same panel assignments, I have to use this icon to
check out the selection. That means it's me
who's editing it now, and now I can come
back in the copy and I can adjust everything
the way I've done before. So I can change this back to
eldest son, for instance. For the copy user to be able
to access this copy again, you just have to make
sure you sign out here, so you click on that icon and
you will just get a warning that you can't reverse this
change with the edit undo. I'm just going to say, Okay. And then all the changes
that I've done here will be now reflected
in the InCopy file. So if we just jump back there
and open that same file, we can see that the youngest son is showing up here again. Finally, there's one
additional feature that can be also useful when you
collaborate with someone, whether they are using
copy or the same in design file that you are working from is the Track Changes panel, where, first of all, you would
have to select the text or story that you want to
enable for tracking. So this is what you
want to choose, enable tracking in all stories. But besides that,
you have to also choose track changes
in current story. And then if you are
changing one word, let's say the eldest back
to youngest, by default, you won't really
see anything update until you check this
in the story editor, where we can see what
was the original copy there and what did
I change it to? And this is when the
Track Changes panel will also show the user
who made the change, the time that they
changed this text, and what was the actual change. In this case, I edit text, and then I also at the same
time deleted some text. The great thing
about track changes is that it can be used to approve or accept these
changes or reject them. And of course, track
changes is something that will be also visible in incopy. So that's a completely
synchronized feature between the two applications. I know in many
professional workflows where they actually
don't use incopy, they just rely on
the track changes, and whoever is
working on the file actually works within in
design, make their changes. But they make sure
that they are tracking the changes for all the
stories in their documents. And that's all I wanted
to cover in this project. I hope you found it insightful and useful. We covered a lot. This definitely has been the longest project I ever recorded and the
most complex one. But I had a lot of fun
going through this. And just with all the other
projects in this course, I highly recommend to
practice the features and the workflows and
techniques that we covered on other examples. So feel free to explore and further refine and
mold this project, if you want, and finalize anything that we
haven't had time for. But then using whatever
you have learned here, you can apply it to other books. I'm going to have a couple of additional book copies already downloaded for you to work from, like Dracula, ikingTales and
around the World in 80 days. But in case you don't like
these specific books, you can just go on
the Gutenberg website and download the copy for
whichever book you like.
49. Conclusion : Well done for
finishing this course. I hope you had just
as much fun going through it as I
had recording it. And, of course, don't forget
about the class project. Because remember,
practice makes perfect. I can't wait to see your work
so make sure to submit it. And in case you like this course and you would like to
learn more from me, then there's plenty of other courses that
you can find here. Go and check them out now. I can't wait to meet
you in the next one.
 Martin Perhiniak, Graphic Designer, Illustrator & Educator