Transcripts
1. Welcome and Introduction : Hi, everyone, and welcome to my brand new Skillshare class. In this class, we will dive into the wonderfully air world of scary and
frightening doodles, focusing on creating haunting
eyes and terrifying faces. This is not your
usual art class. Here, we will be exploring the
darker side of creativity, bringing to life characters and features that will
give you chills. We'll be painting
and illustrating a wide variety of creepy, horror inspired portrait from unsettling facial expression to surreal disturbing
eyes arrangement that seem to watch
you from every angle. Some of the project
like this includes lots of eyes on the hair
as well as on the face. Here we have got lots of eyes entangled on the
hair. Same here. This time, the eyes are a
little bit red and much more. We starting by going over
the BC art supplies, you will need to do some
supply tasting so you can get comfortable before jumping
into the main project. Then then we'll practice different kind of eye
designs, realistic, stylized, distorted and surreal before
moving on to here variation, and finally, combining
this element into full R portraits. This class will include
both ink illustration and watercolor painting
for certain projects. You will learn how
to add color to enhance the creepy
factor and create depth, atmosphere, and
emotion in your work. I'll also be hearing
my personal tips for achieving that
unsettling uncanny look, how to arrange multiple eyes in ways that feel organic
yet disturbing, and how to make your
creepy characters both artistic and memorable. Whether you are into
horror illustration, surreal art or just want to experiment with something
totally different. This class will give you a fun. This class will give you a fun and slightly spooky challenge. Hi, my name is Wishal
and I am an artist, passionate about exploring
different styles from playful and hmsical
to dark and haunting. You can check out more of my work on my skill set profile, my Instagram, and
my YouTube channel, where I see a variety
of creative project. So sharpen your
pencil and prepare your paints and get ready for a class full of
terrifying faces, horrifying eyes, and inspiring
chilling creativity. Let's jump right into
the class project.
2. Class project : For this class project, I did a precat for you to
upload any or all of the horrifying and
terrifying eyes and hair doodles we'll be
creating together. You can sear your exact
worson from the lessons. You can create your
own unique combination based on the
technique practiced, or you can experiment
with different medium. For example, try ink instead
of watercolor or use unusual color to see which
effect you like best. All the projects in the
class are in real time, so I recommend you to join along with me so that
you can paint it easily. So why upload your project? I truly value and enjoy
seeing your work. It helps me understand what
you have learned and explode. Searing your project
will also inspire other students in the class
and give them new ideas. And it's a great way to
track your own progress. I encourage you to
upload your work. No matter what stage it's in, every project adds to
our creative community, and I'll be genuinely excited
to see what you have made. Here are some of the
doodles that I tried on my own that did not
turn out that good, but you can also experiment with your own creativity and see what you can make on your own. And you can say that in
the project section. And you can go
beyond the lesson, upload extra practice sheets
of the faces here, style, or I or try your own experimental doodles
using the same techniques, and you can combine
elements from different lesson into
something entirely new.
3. List of Supplies : List of supplies for this class, you will need a pencil, an eraser, masking tape
to secure the paper. For this class, I'll be using a wide varieties of
paint and fine liners. If you have only a micron
pen, that will do the work. Apart from this micron paint, I'll be using brass paints. These are few of the paints
that I got from Jikkuratake. This white paint to add the
highlights for the eyes, here's another brass pin, sketch pin to fill larger areas. Here's another red sketch pin. Instead of this, you can
even use a ball paint. You can also use
red brass paint. If you prefer, you
can use ink also. Here I have got plaguing, and this is the white ink. Also, you can use watercolors. So here I have got a
simple set of watercolor. If you're using watercolor,
you will need brasses. Here I have got a small
brush and a large breast. Apart from this, you can also experiment with different
paints that you have. Tissue paper to avoid
smudging of pencil mark, as well as to keep it under your pump to avoid
smudging of color, paper clip to secure the paper. So these are the basic supplies that you will need
for this class. A big rust to remove
the eraser dust. You don't need all the supplies, only a micron pen
will do the work, but it will take a
little bit more time. That's all. See you
in the next video.
4. Testing the supplies : Welcome to this
section. In this video, we will test out of
various supplies we have and how many types of lines
we can create with them. Here I have 0.4 MM
sakura fine liner. With this, I can
create varieties of the line to get thicker
line, I just have to. To get a thicker line, I
have to just go over it again and again till I'm satisfied with the
thickness of the line. Here, I have got
this breast pain. The good thing with
this breast pin is that I can get a wide variety
of the lines with it. By wearing the presser and
the angle of the pain, I could get from thin to
thick line as well as. If I apply more presser
and change the angle, I will get lines like this. Whatever supply you have,
experiment with it, apply different
presser and change the angle to see what type
of lines you can get. This kind of line provide much more natural feel
to your painting, so I prefer to use this much
of line wherever I can. Here's another pin.
This is of gray color. This is also somewhat
like brass pints. I'll not be using this a lot. Just, for example, here are a few varieties of line
that I can draw with it. Mostly, I'll be using
the micron pain, and I have one or two breast
pain from the zikurataki. Now moving on here I have
Jikkuraak white pain. So I'll be mainly using it to add the highlight
for the eyes. So this is white in color, so it is not visible
on this paper. I have to apply many
layers of it to get the desired effect
for the highlights. Here's another fine liner pen. As compared to the micron
pen, it is more thinner. So here are the line compared
with the micron pen. So I'll be using a little bit of it to add fine line details. Lastly, here's
another breast paint from the ikura take
that I'll be using. So as you can see, the
line obtained with it is thick as well
as dark in color. Also, by wearing the freezer, I can get more thicker lines. Once again, I can get
a wide variety of lines with it just by
wearing the freezer, as well as the angle of the pin. Now moving on to
the sketch pins. So basically, I'll be
using this sketch paint to fill the colors for large areas. With a sketch pin, you cannot
get much thinner lines. So that's a drawback
for the sketch pint. Now, here's another
sketch pin, the red one. So to get a thicker line, this tree apply the sketch pin. Lastly, here's a breast
pin, a red bras pin. Once again, I can
a wide variety of lines with it just by
wearing the freezer, as well as the angle of the pin. Now let's experiment with
some of the watercolor. The main advantage you
can get with them. One of the advantages
that you can get with the watercolor is that by
wearing the amount of water, you can get a wide variety of the pigmentation
of the color. Here we have got
light red color. Also, as you can see,
I'm using thin bras, so the lines are small, we just by wearing the angle, I can get a little bit
more thicker lines. Doing the same with the bras this time, using
the black color. For bigger areas, using this small brush
will cost a lot of time. So for that, I'll be
using this bigger brush. Also, with this thicker brush, I can get more thicker
lines with it. Also, I'll be using
this type of lines to fill large areas for the eyes, for the large areas
for the hair. The thing with the watercolor is by diluting the watercolor, we will get less pigmentation. We will get lighter
shade of the color. To get a darker
intensity of the color, I'll be using a little
bit of the ink. In the case of the ink, the
intensity, it's very dark. Mostly, I'll be using
the micron paint and I have one or
two breast paints from the Jikurataki also, these inks are waterproof. You are welcome to use
whatever you have, experiment with the
supplies you have to get a wide varieties
of the thickness and the thinness of the line, as well as various texture
that you can obtain with the paints and with the paints or the watercolor brushes
or the brushes you have. Also, these inks are waterproof. So I don't have to be much
causes when I'll be using this ink as compared to when
I am using the watercolor. Now, let's try out the
whiting from the Dkuratak. So it's not visible
with the white paper, but when applying it but when applying on
top of the dark in, it is clearly visible and
the intensity is quite good. Also, you can clearly see it is visible on top of the red also. So these are all
the supplies that I have that I'll be
using for this class. If you have ink paints, you
can use ink paint also. I do have one of the ink paint, but I lost them. So these are the supplies that I have that I'll be
using for this class.
5. Sketching eyes: Let's talk about the
eyes that we'll be creating for our scary peoples. So eyes are very simple. Today, we are going to skip
some simple, spooky eyes. So drawing eyes is very easy, starting with almond for
the shape of the eye, then a circle for the iris, and another smaller
circle for the pupil. That's a simple
sketch for the eye. Here's another
sketch. This time, we are aiming for eyeball. So two circle, one for the iris, another for the pupil. A little bit of
sading for the pupil and a little bit of
highlight for the iris. Here's another one, combining
the bow two this time. This time, I have
made it more round, and the iris, as well as the pupil is
comparatively bigger. Let's draw you more
example of the eyes. Just by wearing the almond C, you can come up with different unique combination for the eye. Here. For this one, let's go with smaller I. For these sketches, we
are keeping it simple, no need for complex setting
or intricate detail. The goal here is to
create eyes that give off a slightly unsettling feeling
perfect for those horror themed character that
we'll be creating a smaller circle for the iris and here's another
one for the pupil. This time, let's
go with bigger I, a big circle for the iris, another smaller
circle for the pupil. So all these three
eyes are bigger. Now let's make flat eyes. This time, this is
an elliptical shape. So you don't have to draw
both the IRs and the pupil. You can only create
one single dot for the e to represent the pupil to represent
the pupil of the eye, to create more eerie look. Now let's add more
detail for the eye. Adding the eyelashes
for this eye and adding a little bit
of dark circle below a bit to give a bit more weary and a little
bit of a scary look. Here's another example. Adding
dark circles behind it, add few more lines
just below the eyes, as well as on top of it. This time, I'm adding more lines to a bit
more weary look. Now, let's draw a set of eyes. Now let's experiment
a little bit more with different variation
for the spooky eyes. Once again, once again, I'm making the eyes
a little bit bigger. For this one. Let's
create a big e, a big pupil, and a
big Iris for that. For this pair of
eye, I'll be adding dark circle below it to
create more Ry look, adding the Iris and
the pupil for the eye, leaving a little
bit of a space for the highlight in the pupil. Now let's add the Now
let's add the lines below and above it to create the spooky
look for the eyes. You can add more or less
lines, whatever you prefer. So experiment with
different lines to create different
look for the eyes. Now for this one, let's
make it a little bit of feminine by adding the elases, creating the elases for it, adding it above and below. So this eye is looking upward. So just by wearing the angle by wearing
the angle of the iris, you can make your
eye look up down, left, right, or
wherever you prefer. Let's experiment with
another set of line. This time we are
going this time we are going with the
elliptical C for the eyes. Combining both the element of eye lasses as well as
dark circles below it. And we are done with this one. Now let's experiment
with eyeballs. So these are once
again, meager eye This time, the SP is
totally circular, adding the few lines above and below it to create
more spooky look. You don't have to create
the eyes in the normal way. You can experiment with
various angles for the eye. You can make it crooked or you can make it a
little bit jig jag. So here's two example of a
little bit of varied eyes. Now, to make it more spooky, increase the number of
eyeballs inside the eye, as well as you can
paint the eyes black. I'm going for a little
bit of detailed eye. So here I'm going for a
little bit of detailed line. That's why I'm adding Sclera on the right and the
left side of the eyes. Here's another two example of a little bit of crooked eyes. These are not the normal
eyes that we generally draw. Now let's reverse this eye to get another
variation of the eye. Let's create a little bit of
more spooky eyes for this. For this, instead
of the white part of the eyes, we'll
be covering it. We'll be filling it
with a complete black. As I mentioned earlier, filling this white
part with the black. As I mentioned earlier, to make it more spooky, increasing the number of iris in the pupil inside the eye. So here we have got two
iris inside the eye. You can leave it white or you
can add black color or red. Now let's experiment a
little bit more with a few with a little bit more variation for
this type of eyes. Here we have got three
irises inside the eye. You can leave it white or you can add black colour or red. So here's another example. This time, I'll be replacing
the white with a black. So sketching with
a pencil to get a little bit to get a little bit of darker
color for the eyes. So these are the
pencil sketches. Mainly, I'll be directly
creating the eyes using the pen. So let's dive in with the pen. Starting with a simple eye. So here I am using the sakura
pen to create the eyes. Now, let's make it
a little bit of a spooky by failing the black. And Here's another example. This time, I'm creating
two irises for the eye and filling the
white part with the black. So you can experiment
more with the pin. You can experiment
with various colors to create various kinds of eye. You can create half
irises or full irises. You can make the
irises big or small. O. Here's another example. This time, I'm adding dark
circle me and I is circular. Adding more details in
the form of small lines. So adding more details to the eyes take a
little bit of time, but it creates more
spoke look for the eyes. Let's do for you more example
for the eyes with the pain. This time, I'm only
creating the pupil, not the iris. Here's
another example. This time, I'm doing
both pupil and iris. For this third one, we
have the normal eye. Let's fill it with a color. So for this one, I'm covering the entire white
section of the eye with a red. Here, once again, I'm adding
the red for the white part. For this one, we are coloring
the iris with the red. Now let's experiment with different supplies
that we have to get a feel of the eyes
that we can create with them, starting with
the brass pain. So with this Sakura breast pain, I can get a wide variety of the lines just by wearing
the placer as well as angle. So with this simple pain, I can get thin and thick lines. So that is clearly
visible in here. The eye that I created with
this brass pin is much more natural as compared to the one that I created with
Sakura marker. Now, here's another example. This time, I'm using. This time, I'm using
a thinner fine liner. So I'll be trying more
supplies to get a fill for the type of lines and
type of eyes I can create. I would like to give a few suggestions
that you can use to create more spooky
and horrifying eyes. Let's talk about
wearing the eye save. Not all the hippy
eyes need to be perfectly round
or almond shaped, as you have seen
earlier in A example. So experiment with jagged, uneven or droopy save. This distortion can make your sketches look more unnerving and add
more air effect. As for the pupils, the
side and the seep of the pupils can drastically
change the expiration. Try small pinpoint pupils for sinister poses look or leave the pupils entirely
black or blank to give eyes a
hollow, soles vibe. You can also play
with asymmetry, making one eyes
slightly bigger or setting them up at
slightly different angle. Now let's experiment
with few vertical eyes. This time I'm using a
sakura pigment micron pane. Let's talk about
making it a little bit more spoke by adding
veins or crack. Drawing tiny veins
or crack extending from edges of the eyes can
add a lot of creepiness. It suggests that the
character is strained, injured, or or
passively, even undead. These details are quick to add, but can gritty enhance
the unsettling feeling. You can also play with
different eye expressions. So you are welcome to play with various different kinds of
eye, seats, sizes, color, experiment on your own to
get a feel of the supplies you have and what type of eyes you can create
easily with them. The more detail you add,
the more time it take, but the result is
worth the time. And with these, we are
done with this section. In the next section,
we'll be inking the eyes.
6. Inking and coloring the eyes: Welcome to the second
part of the eyes. In this video, we'll be
taking our pencil sketches and going over them with the ink paints to bring
them to life. For this first example, I'm using a sakura micron pen. As you can see, simply adding
ink over the pencil lines instantly makes the eye sharper
clearer and more defined. I start by outlining
the seep of the eye, then fill in the
pupil while leaving a small white highlight untouched for that
realistic sign. Around the iris,
I add fine lines along its circumference to
give depth and texture. The fine detail around the iris helps make the eye appear
more three dimensional. Now moving on to the third eye, let's experiment with
thicker outlines to add more depth and diamenson. Generally, I make the edges thinner and the center thicker, but you can make the edges thicker and the center thinner. So experiment with the thickness and the thinness of the
edges in the center. I feel the pupil, again,
preserving the highlight. Remember, you don't have to
use the exact same pen as me. Feel free to use other ink, breast paints or even watercolor to see what works best for you. Adding more character
to this e by creating fine lines near
the edges of the iris. So yeah, let's add some fine lines near
the edges of the Iris. You can vary the sizes
and thickness of the fine lines to make the
Iris more three dimensional. And with these, we are
done with our third I. For this fourth thigh, we have a smaller iris in the pupil, much more smaller as compared
to all the other 31. I decided to thicken both
the upper and the lower outlines to create more
contrast for this eye. Since I'm using this micron pen, it means I have to go over the
same lines multiple times. If you use a pin
with a larger nip, this will be much faster. To make this scarier, I decided to add small veins radiating from the
edges of the eye. You can add as many as you can add as many or
as few you like, depending on how unsettling
you want the result to be. Now let's move on
to the fifth eye. Now, let's start with filling
the black part of the eye. This one has a
partly covered iris and a larger overall eyeball. To fill this pupil
much more faster, you can use breastpin or sketch
pin or even watercolors. Adding much more finer lines to add much more details to it. Adding some more lines to
give more depth to the eye. And with these, we are
done with our fifth eyes. And we are done with the
first row of the eyes, moving on to the second row, the slanted eyes, going
over the pencil sketch, I decided to add
the eyeless for it. So you can experiment
with the eye Liss, too. You can make it more broader,
thicker, longer, salter. So whatever you prefer. I'm not adding
eyebrows for the eyes. If you prefer you
can experiment with different sips and sizes and
thickness for the eyebrows. So yeah, feel free to experiment
with various sips sizes and now I'm using
Zikkuraake brass pain. Going over the
pencil sketch with this Zikura brass paint. The difference is
immediately noticeable. The lines are crisper, darker and more dynamic. By wearing the freezer, I can easily switch between
thin and thick lines, which adds more variety
compared to the micron pines. Now continuing with this
third row of the eyes, this row has more
realistic eyes and with more dynamic braser with
this ZikGuratake pen, I can create more three dimensional and more
horrifying eyes. So yeah, let's make it more realistic and
more terrifying. Adding wrinkles and
dark circles below the eyes to make it more scary. And as you can see, I have already added eyelas. So yeah, feel free
to add eyelass and experiment with
various thickness and sizes for the eyelases. Find which pair of ILSs suits better for your
painting and stick with it. Continuing with going over
the pencil sketch for the IRS of this second
pair on the third row. The whole rich and the pupil is clearly visible for
this pair of the eye. Let's make it more weary to make it look more
exhausted and weary. I am adding much more
wrinkle lines and yeah, this looks more exhausted. As you can see, I am
wearing the freezer with the pin to create thicker
and thinner lines. Experiment with your breast
pain and see what it can create by wearing the
freezer or changing the angles. Let's add some very tiny veins around the edges of the eyes to make it look more
exhausted and tired. Moving on to the third
pair of eye for this row. Here I am trying to maintain the uniformity of the
outline of the eyes, not wearing the freezer for
the outlines of the eyes. If you prefer, you can
make it thinner near the edges and thicker
near the center. So whatever you prefer,
this eye is looking upward. Just by changing the placement
of iris in the pupil, you can change the place
where the eye is looking. So this one is looking upward. And if I place the iris in the pupil on the
downward right side, it would look downward
and so much more. So just by changing the
placement for the iris in pupil, you can play with wherever
the eye is looking. And with these, we are done with experimenting with
ikura breast pain. Let's try another pain. This time, once again, I'm
using another Jikuratake pain. For this eye, we have
got circular eyes, very tiny pupil and the iris. And as you can see, I am not going all over
the pencil sketch, but I am creating
some jig jag lines, adding some more wrinkles on top and below to make it
look more exhausting. And we are done with this pair. Now moving on to the
other pair where we have a slanted I and cat like I. For this eye, I'm experimenting
a little bit by making it thicker near the edges
and thinner near the center. Moving on to the
other three eyes, doing the same, going
over the pencil sketch. And let's completely go over the pencil sketch
with this pane. I just facing just opposite
of the one that we did earlier and with these we
are done with this row. Now moving on to the other
row where we have eyes with many more eves
in the pupils. So let's first start with
going over the outlines, and then we will
decide to color it, whether red or blue or black or whatever
color you prefer. But mostly, I'll be
using black and red. I'm using micron pain
in this row because I need greater accuracy
and this paint with smaller knees provide
much more accuracy as compared to the other
urataki bras pains. I'm filling the pupil
for this eye with black. And if you prefer, you can
use red to fill the pupil, but this time I'm
only using black. Moving on to this fourth
eye and going over the outline of the Iris and adding a little bit
of black for the pupil. And finally, outlining the fourth and the final
eye on this row. So I use micron paint mostly because it
gives more pre season, but it takes much more time because the nave
is much smaller. Fill larger areas, I try to use breast paint or
watercolor or ink. But sometimes when much
more accuracy is required, I had to use the
sakura micron paints. So that's why I'm
using the paint here. But if you prefer, you can use the other ink pain
or watercolor to fill the Iris or the white part of the
eyes much more quickly. As you can see, just by filling the white areas with
this black color, the eyes look much more
menacing and frightening. Instead of this black,
you can use red. That will also
create a relo as you can see that we have done
here on the next row. Now let's use another color. I'm going in with
the red breast pain to fill the white of the eyes, carefully adding it
near the iris so as not to merge the
colors together. For this eye with three iris, you can experiment with a
combination of red and black, but I decided only to fill
the iris with the red. Now, moving on to the last I. So I am using Kura
take breast pain here, and let's fill the entire
I with the black color. Carefully going near the
Iris so as not to merge the colores inside the iris and the pupil going over
the outline carefully. And now let's fill the
entire I with a black color. Carefully filling the
black slowly and steadily. And we are done with
inking all our eyes. So these are just
some basic example. You can experiment a lot
with various kinds of eyes. See you in the next video
where we will draw the hairs.
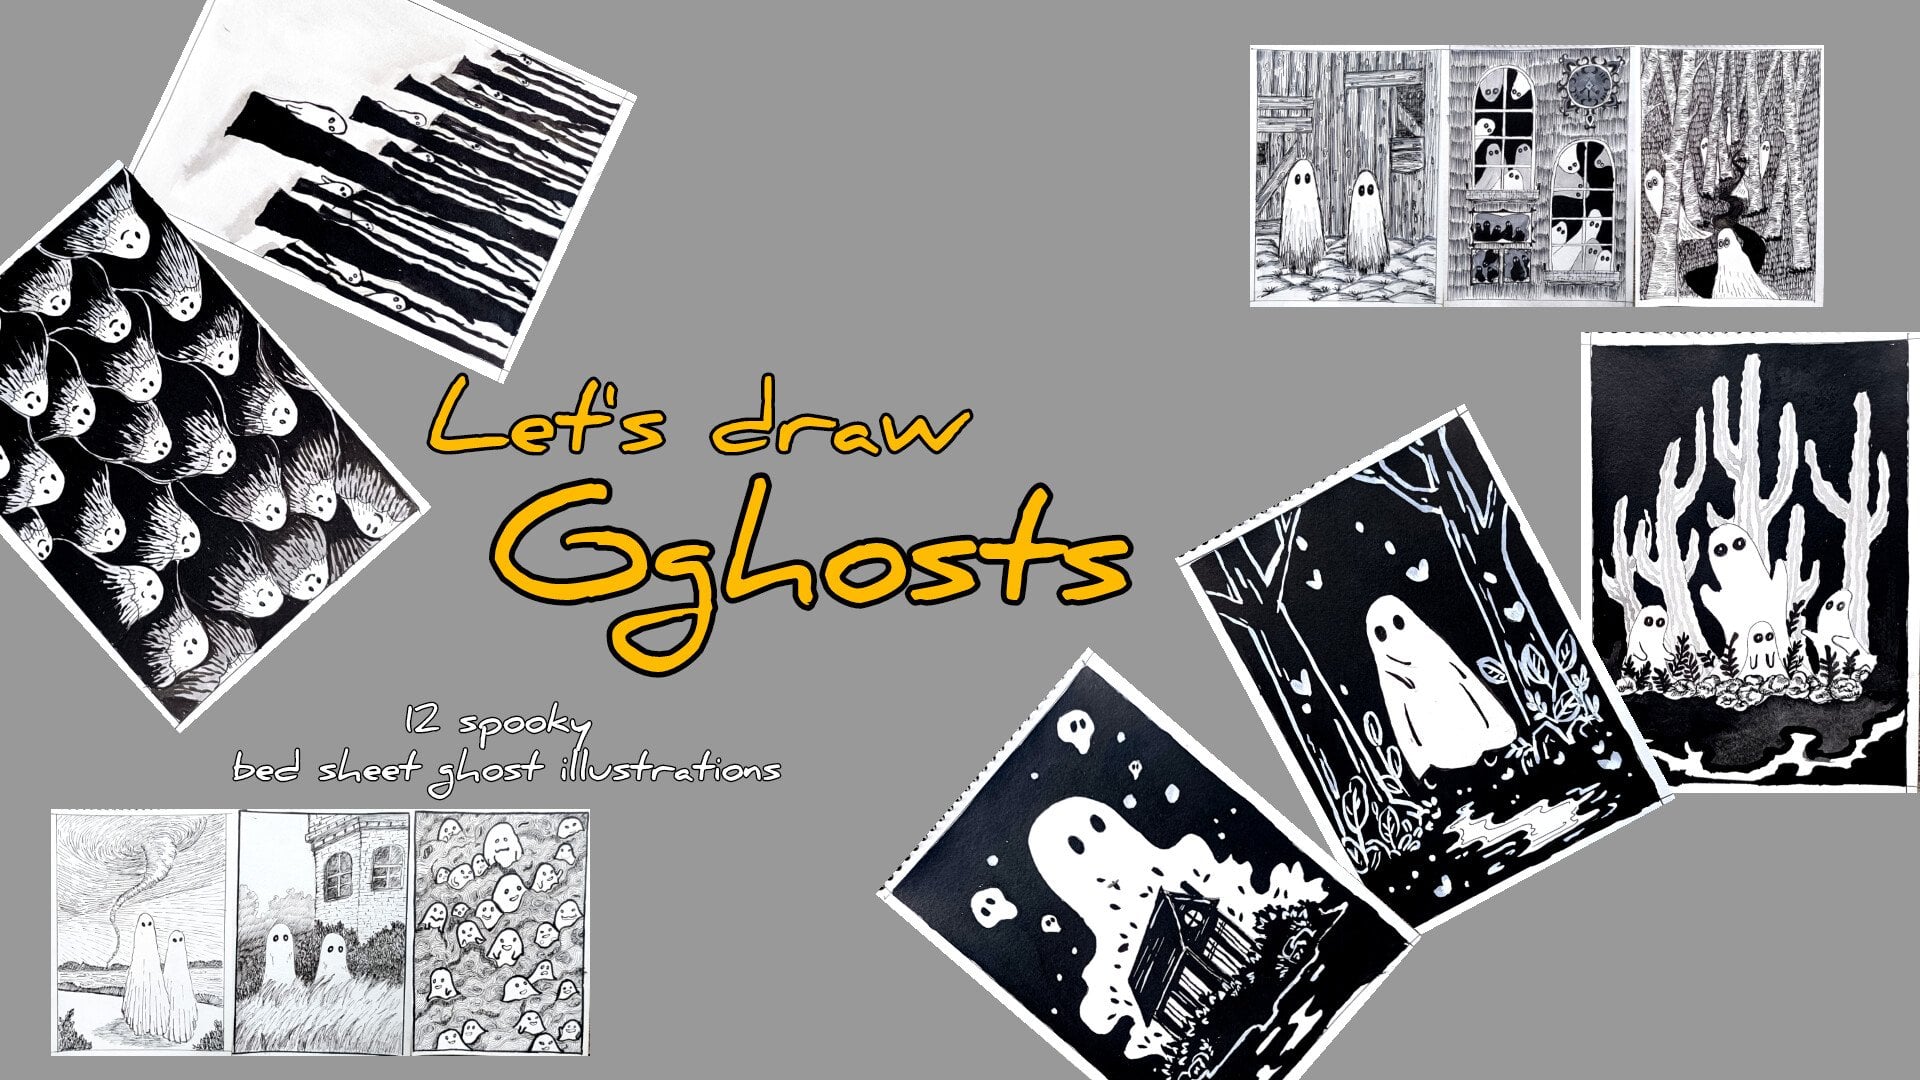
7. Doodling hair: Now let's practice and create some exciting and
horrifying hair. For the first portion of this
hair demonstration video, we'll be creating very
simple and easy hair style. Let's start with
creating four faces. On top of that, we'll be adding very simple yet scary and frightening hairs. So here I have drawn
oval set for the faces. Now let's draw the
hair, starting with very simple
variation of the hair. So this is our first simple
variation of the hair. This is more doodle lines, seven or eight lines to
create a very simple hair. Now moving on to the
second one this time, I'm creating much longer lines. You can play with
the thickness of the lines as well as you
can play with the side. The thicker the lines, the more denser the
hair will appear. The thinner the line,
the less denser, the less denser it will appear. Now let's make it a
little bit of curly, just like we do in the doodles, creating two points for the here and the lines coming
in and out of them. This is one of the
very simple hair style that we'll be using
in our main project, just connecting two dots using
straight and curved lines. And with these, we are done with this third example for
the simpler variation of the hair. Moving on
to the fourth one. For this one, let's create rough hair in the form
of jig jag lines. So I'm just creating
jig jag lines to create the hair for
this fourth example. So these are the simpler
examples for our main paintings, we'll be adding more
details as well as more density to the hairs. And with these, we are done
with the fourth example. Now, let's combine the hair
patterns with the eyes. For this one, let's
start with the eyeballs. So as we created here
in the above example, creating random hatching
lines coming out from the eyeballs in a bunch
of eight to ten lines. With this kind of hair style, you can experiment with
cross hatching also. In case of cross hatching, you will just have to cross the lines thus
creating more denser. Look for the hairs. But I'll be showing you the example of cross
hatching very soon. Let's skip this simple
one and just use hatching technique to create
the structure for this one. And with these, we are done with a hatching technique
for the eyes. Now moving on to
the second example. This time we have proper
eyes, and to create the here, I'm just going to surround the eyes with some
straight and curve lines, creating some jiggy
patterns using this straight and curb line
to surround the eyeballs, eyeballs and the eyes, and this is just
yet another example of very simple hair structure or hair style that
we'll be using. If you want to add
more volume to it, you can just increase the
thickness of the lines. This is somewhat similar
to the one we did earlier. Just instead of the eyeballs, here we have proper eyes. And with these, we are
almost done with the lines. Now, let's add the pupils. Now let me show
you how you'll be using this hair style
in your main project. So here's the example
of hatching one. And here we have got the
example of the next one, and here's another example of the hatching and the
one we did earlier. So this is how we will be using this type of hair style
in our main projects. Now let's move on to
our seventh hair style. Now, let's create a few more
simpler pattern for the hair. Starting with drawing
simple seeps for the eye. And now creating
random comparatively longer lines to
surround the eyes. These lines are straight, but they curve when it comes
in contact with the eyes. Surrounding all the eyes
with this long and elongated random lines bending the lines when it comes in
contact with the eyes, adding few more eyes
wherever required. And now let's add the eyeballs. And with these, we are done
with our seventh example. Let's move on to the eighth one. For the eighth
one, I am starting with random circular
C for the eyeballs. And now let's add the
pupil inside the eyeballs. Leaving a little bit of white
piece for the highlights. Now let's add some more
details in the form of small fine lines on the
circumference of the pupil. Instead of this
small fine lines, you can create veins
also for the eyeballs, and you can color the eyeballs
using black or red colour. But here I am keeping
things simple only creating fine lines to add more detail
and depth to the eyeballs. And finally, moving on
to the last eyeball and creating small fine lines
surrounding the pupil. And with this, we are
done with the eyeballs. Now let's create the hair
surrounding the eyeballs. For this, I'm starting
with creating random dots here and there, and now let's join these
random dots in curved paths. This is similar to the one
we did in the third example. But this time, we have
incorporated Is among the heirs. Just follow the
simple guidelines connecting the point from one point to other point in long and elongated,
but curved lines. And now let's connect rest of the dots using these
long and curved lines. To add more depth and dimension
and volume to the here, you can use thicker paints or you can use brass
paints to create dynamic lines by wearing the preser and thus creating
thinner and thicker line. Also, you can place the dot much closer to each other and
then connecting the dots. Thus, it will create a sense of much more volume and
dimension to the here. Now let's finish
this eighth example, adding some more
curved and long lines along the sides of the hair, and we are almost done
with our eighth example. Now, let's create some here that have more volume
and diamensono it. For this, we'll be creating here that are very
small in size, that is jig jag lines and that are very
close to each other. As you can see, the
lines are very small, but they are very
close to each other. It's similar to the one we
did in the first example. But here we are adding
much more volume to it. And thus the here are
very close to each other. Adding small eyes in
between the here, and later on, we'll be adding
the eyeballs inside it. The problem with this
kind of here is that the ice does not become
that much clearly visible. So either you have to use color or you have to make the
ice a little bit bigger, or the third option is to use very thicker panes
to draw the eyes. Let's add some more lines
near the bottom of the here to get more dimension
and volume to it. Finally, adding the eyeballs. As you can see, the eyes are
not that clearly visible, but the hair is dark and have much more dimension
and volume to it. Now, let's create completely
different kind of hair. Here, we have got pon tails. So starting with
basic shapes for the eyes and adjoining
them in the middle. So for this simple example, I'll be creating
eight to ten eye like structure on both sides and connecting them
in the middle. And then we'll be connecting both the sides together using small fine lines. Now let's add the lines connecting both the
sides of the eyes. To make it more bold, you can go over the outlines and make it more thicker so that the whole painting will not
be that much confusing. So I'm going over all the
lines and thickening it. Instead of this fine liner, you can use the brass pins to get thicker and
thinner lines. And now let's add the fine
lines in between the edges. Adding few more fine
lines for the last three, and with these, we are done with example of
the ponytail hair. Now, let me show you how I incorporated this kind of hair
style in our main project. So here's the example
of dense hair, and now let me show you the example in which we
incorporated the ponytails. So here we have got four
heads with ponytails, and on each ponytails we
even have got the eyes. Now, moving on to the
final two example. For this, I am expanding the type of here that we created in the fourth
example, the one above it. So criss cross and random lines, and in between that, I'll be adding some eyeballs or eyes. So just create some
random and jig Jag lines make it more denser wherever you want to add more volume to it. Here I am adding more volume
to the center of the head, and you can add volume on the top part or
bottom wherever you prefer. Now, adding some
small random balls to represent the eyeballs. Now let's add pupil
inside these eyeballs, adding small black
dots for the pupils. And now let's add
more volume to it in form of more
random jig jag lines coming out of the center. It's clear that it's an
expansion of the fourth example. And let's add some
more volumes to it. Instead of the eyeballs,
you can use proper eye, and you can also play with
big and small side of the eyeballs thus creating
more interesting varieties. And we are done with
our 11th example. Now, let me show you
how I incorporated this example in
our main project. So here we have got an example. As you can see, I
have played with the seep inside of the eyeball, as well as for the
second example, I painted the eyes black. Moving on to the final example. For this, we'll be
creating unruly hairs. So let's create
some unruly hairs. So just random seeps, but instead of single lines, we are doubling the lines, thus creating a little bit of more dimension and volume to it, and we'll be doing the same for the main portion
of the hair. This is just for the side lines. You can increase the number of the unruly hairs that is
coming from both the sides, or you can make it
smaller, longer, thicker, and even straights. Now now for the center, I'm starting with some
elongated long random lines, but on top of it, I'll
be adding unruly hairs. To create those unruly hairs, I'll do the same that I
did for the side lines, two or three lines to create a little bit more depth and
dimension to the unruly hair. As you can see here, I'm just creating two
or three thick lines to represent the unruly hairs. And now let's add
eyes for the hair. For this time, I am going
in with simple shapes of the eyes and adding pupil
and iris inside it. To add more volume
and thickness to it, you can increase the
number of random lines and unruly hairs that will make
it more dense and thick. But for this example, I'm keeping it a
little bit moderate. And yeah, let's
add more eyeballs. Adding a few more unruly hair here and there,
surrounding the eyes, and with these, we are almost
done with this example. Since the eyes are
not that clear, I decided to add black for the white sexon of the
eyes, as you can see, by adding the black for the
white sexon of the eyes, the here and the eyes become
much more contrasting, and you can feel the depth and dimension for this
here and the eyes. Adding few more random
here here and there. And with these, we are
done with our 12 example. Now let me show you how I incorporated this kind of
hairstyle in our main project. So here's the example in
which I created unruly hair, but I did not
incorporate the eyes, and with these, we are done with this hair
demonstration section. See you in the next video with our first project.
Happy painting.
8. Simple faces: In this section,
we'll be painting some simple faces since I'm
keeping this class simple, so I'll be drawing simple faces. For this, I'll be using egg
like zip to draw the fishes. We'll be using very
simple seeps for the face like this egg like
seep for the feas and then we'll be using horizontal
and vertical lines to divide the feces
into various sections. The first section for the eye, the second section for the nose, and the third for the mouth. Starting with another egg sip, a straight line to divide
the space into two part, another horizontal line for
the placement of the eyes, one for the nose, and here's
another one for the lip. Basically, I'll be dividing
the face into three parts. These parts can be equal or unequal depending upon the
kind of face I'm drawing, I'll be experimenting and playing with is
proposing for the face. Now let's draw faces looking
at different angles. Just by wearing this vertical
line into different angle, you can create phases
looking at various angles. You can clearly see just
by making the angle of the straight line a little
bit towards the left. The face is facing towards the
left and looking downward. So we can just change the
angle of the straight line and the horizontal line thus making
the face facing forward, downward, upward, and
other directions. Now let's try
something different. Now let's play with the
distancing of the lines. Here, instead of an oval side, I'm making it more rounder. The eyes are far apart, and the nose and the
mouth is much closer. Now let's make it thinner. Again, starting with
the vertical line, an elliptical sap for the face. The eyes are much closer. The nose is far
away from the eyes, but it is comparatively
closer to the mouth. Now let's draw a
face looking upward, starting with this vertical
line in an angled form, horizontal line for the eyes. Now encircling these horizontal
and vertical lines to get a rough C for our face.
Sketching out the eyes. Moving on to sketching out
the face looking downward, starting with the
intersecting lines. Now let's encircle this phase. You can make the intersection
appear at top of the face, thus making the eyes on top
or you can do the vice versa, making the intersection at
lower part of the face, thus creating es at the
bottom part of the face. So these are the
basic seats that I'll be using to
create the faces. We are not aiming for
some fancy faces, so we'll only creating
simple faces. Allowing these guidelines, you
can create the faces easy. The guidelines that I'm using to create this feces
are not uniform. I'll be wearing
it depending upon the position and the s
and sizes of the face. Just by wearing the
horizontal intersexon and the lines that create
the mouth and the nose, you can create variety of feces. Experiment with
different kinds of faces with different
placement of the eyes, make it closer up or down, as well as play with the
placement of the nose and the mouth and find out
what suits you best. And yeah, this all
video is in real time, so I would recommend you to join along with me so that
you can practice a lot. So these are the few of the
sketches that will help to create phases easily
in various angle. Now let's sketch out a few
more faces. This time. I'll be wearing the
proportion a lot. So starting with drawing
four ovals for the faces. For these four faces, we'll be experimenting a little bit
further with the eyes, nose, mouth, and the
faces and its placement. Now let's add the vertical
and horizontal guideline to add the placement of the
eyes nose in the mouth. For the second one, I
decided for the second one, I decided to add the
eyes on the top. Now for the third one, let's add the eyes at the lower
part of the face. And for this fourth one,
let's do something different. How about we place
the horizontal line of intersection at
somewhere at the middle. But we will make the eyes
appear somewhat far away. Now let's add the eyes, nose and the mouth for
all these faces. For our first phase,
let's keep it simple. The eyes, nose,
and the mouth are in the right place
for the second one, adding the eyes on the top of
the head for the third one, the eyes are at somewhat
lower portion of the face. And for this one, let's add the eyes farther
apart from each other. And yeah, with this, we are done with
four simple faces and the placement of
eyes nose in the mouth. So This is the basic shape of the feces that
we'll be using. I'll be adding the eyebrows
for our main paintings. But yeah, this is simple facial characteristics
that I'll be using. Now, let's add more
characteristic to our faces by going
over with the paint. Starting with this
first one. You don't have to follow the exact sketch. Make adjustment
wherever you prefer. For our main project,
we'll be adding more characteristic
features to other feces, making the eyes, nose, and the mouth more sharp
and more detailed. But since we are doing
this simple demonstration, here we are just making simpler see for the eyes,
nose, and the mouth. Circular C for the eyes, I'll save for the nose and
simple saves for the mouth. And the placement of the ears is just a
little below the eyes. And now let's do the inking
of all the pencil sketches. I'm using sakura micron pen, since this provides
much more pre season and easy to control. If you prefer, you can
practice with different tubs. If you prefer, you can practice with different supply tools, you can use sketch pens, bras pins or watercolor brushes. So yeah, let's do a lot
of practice together. While I'm going over the pencil sketch with this fine liner, let's talk about a
few of the point that you can use to create more spooky faces
for your paintings. You can focus on the distortion. Slightly distorting
the physical feature can instantly make the face look unsettling and thus creating spooky look
for your faces. For example,
elongating the mouth, enlarging the eyes or
making the nose barely visible can create an
unnatural creepy vibe. The key is to make
the proportion just off enough to make the
viewer uncomfortable. To create more spooky
and horrifying faces, you can make the eyes look more hollow and you can play
with the sunken teeth or no teeth or you can make
the nose fractured or facing towards right or left or as I said earlier, no nose. And yeah, you can add more wrinkles as well
as some facial ma, as well as some facial
scars and tattoos, also. So yeah, feel free
to experiment with various facial expression and some facial accessories also. Some more point that
you can keep in mind while doing the
practice along with me. So here, the seep of the
feces is somewhat an egg zip. You can make the faces more elongated or
more elliptical also. You can make the face
somehat bandaged or you can have the faces look
very old, young, as well. And for the mouth, you can make the smile very long or you can add TT smile that will make it look more
horrifying and scary. Apart from this, the
use of various kinds of supplies will create different kind of
texture for the faces. The use of Kura taki brass paints will
create dynamic lines, thinner and thicker lines, and the use of this
sakura micron paint will create precise lines. So play with that,
too, the dynamic lines and straight and uniform lines. Here, we have only got the
straight and uniform lines, but I have used the
micron brass part, if I had used the brass paints, the lines would have been
much more dynamic and that would have created
much more characters and depth to the faces. Apart from the scaring
and frightening faces, we will have
different accessories that will create much more horrifying and
scaring effect like the different kinds of
hair, the atmosphere, the background, the clothe
that the character is wearing, as well as some designs and various elements that
we'll be adding to create a sense of depth dimension and
create an environment that will make the figure appear much more
horrifying and terrifying. So we will be combining all the things that we have
learned in our main project, the faces, the eyes, the hairs, and adding
various elements to it. This will be interesting
to see what we can create along with the watercolor
and the ink llustrations. And here we are almost
done with adding the ink outline
for all the feces. If you prefer, you can add more characteristic
feature to the feces. You can add more details to the eyes, nose,
and the mouth, but I'm keeping this simple, and with these, we are
done with the faces. See you in the day one
of our projects. I
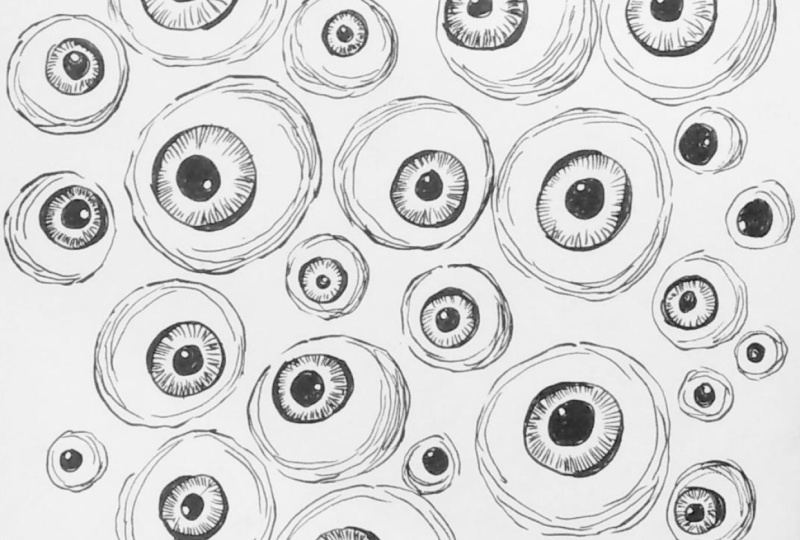
9. Floating eyeballs extra project: Welcome to the bonus video. Here we'll be creating
multiple eyeballs of various CP and sides and we'll be trying to create three D effect
with the eyeballs. So here I have
already started with creating dynamic lines
for the eyeballs. So let's create somewhat
circular C for the eyeballs, and I'll be wearing the and
the sides of the eyeball, feel free to create larger
and smaller eyeballs and the number of the
eyeballs depends upon you. And I'll be filling the entire
peach with the eyeball. So I'll be creating lots of eyeballs and wearing
the same sizes. And one thing I
would like you to recommend that create
larger eyeballs for. And in between them, you
can add the smaller ones, also, the whole
video is real time. So I would just to
join along with me. Et's continue with adding the lines for the
outlines of the eyeballs. And I am using this brain Zikkurataki brastpin to
create dynamic lines. By varied lines, I mean
lines of varied thickness. Here we are creating here we are creating
the dynamic lines, but I'm not wearing the
thickness that much. And if you want more uniform
and consistent line, you can use the fine liner
or the ballpoint pink, and always ensure the
pin or the supplies that you are using does
not bleed that much. And to avoid smudging
of the color, ensure that the ink
has dried up or use a tissue paper under your palm to avoid smudging of the ink. Let's add some smaller eyeballs. If you prefer, you can add more eyeballs that lies
below other eyeballs, and that will be
really fascinating, but it will take more time. The thing with this
kind of doodles is there the number of eyeballs, the more time it will take. Also, the smaller the size, the more time it will
take to add details. So it's a fine balance between
the numbers and the sizes, as the more the number, the smaller the details, the larger and the more
time it will take. And since we'll be creating
and adding extensive details, this project will
take more time. Around 20 or 25 minutes. We have got only a few more eyes to add to fill the entire peak. I have left a little bit of space on the bottom left side. If you prefer, you can
add more eyeballs there. And yeah, I am satisfied with the number of eyeballs
that we have created, and we have a wide variety of the eyeballs of various sizes. And as you can
clearly see the size is not totally circular, but a little bit skewed. So yeah, we are done with the basic outlining
for all the eyeballs. Now, let's add the pupils
and the Irises inside them, as well as let's encircle
them so as to create a three dimensional look and gab and provide
it with depth. And so for more
precision and accuracy, I am going in with
the fine liner. It's at the Irises
inside the eyeballs. So once again, you can vary
the sizes of the eyeballs. By wearing the sizes
of the eye mean, the proportion in between
the side of the eyeball and the pupil is
comparatively two is 21, but you can change
that composition or proportion that you can
create much larger irises that accompany almost all the
spaces inside the eyeball or you can create even much
smaller Irises very tiny. Also, the number
of the Irises and the pupil inside the eyeballs, you can vary that I'm only
creating a single Irises, but if you prefer, you
can add multiple one. A One more thing that you can control is the
placement of the Irises. So you don't have to add the
Irises exactly the center. You can add them on
different sides. Here I have created
a larger one, larger Iris, and here we
have got a smaller one. Also, this Rs is facing
towards the upward. This is at the center. This two isn't at center. This one is facing downward. So yeah, feel free to add
them in different direction, different places,
and different sizes. And with these, we
are almost done with all the Irises, the last one. Now we'll be adding
pupils inside the Irises, as well as adding
fine lines details alongside Let's fill
this entire pupil with the black while leaving a little bit of white
for the highlight. Now, the details I was
talking about is to create these fine lines alongside the circumference or
the sides of the iris. And the other details I was talking about was to
create lines that encircles the eyeball
so as to create it more so as to give it
more depth and dimension. And this is how we'll be
creating most of the eyes. Now let me show you other kind of eye that we'll be creating. For this, I am not adding
or creating any irises, only the pupil, and a little bit of white
for the highlight. Now, let's encircle it. For this, we are not
adding the fine line. For this, we are not
adding the fine lines alongside as there is no iris. Here's another example
with only the pupil, a little bit of white
for the highlight and encircling it on the left side to
create a little bit of three dimensional
or three D look. So just by encircling
the eyeballs, we can make it look a little bit three D and
give it more volumes. So let's do a bigger one, a little bit of white
for the highlight. So it would be very easy. It would be easier if you create a very small circle and then fill the black for
the rest of the area. And now let's add
the fine details. Now, let's continue with adding the fine lines
throughout the irises. One more thing that
you can do with these fine lines is to make
it a little bit dynamic. Here I have ritted
uniform lines. Instead of that,
you can make it. Instead of that, you can
make the lines smaller and bigger or change the density that some parts have more lines, others have less lines. So yeah, experiment and
see what fits best. Now let's do the
coloring for this one, filling the entirety of
the pupil with the black. So to speed this process up, you can use the brass paint or the sketch pin
or the watercolor. Here I am sticking
with the micron pen, but to make it faster, please feel free to use other supplies. Lines as the lines that we are creating with the fine
liner is very thin, so it takes much more time
to fill the entire space. Continue on with adding the fine lines
alongside the Iris. For the eyes, you can
create veins alongside the eyeballs to make it to give it more creepy
and haunting look. Apart from that, you can add the multiple pupils that
I discussed earlier. So this will mean time
consuming process. So let's be patient
and add the lines, the fine line details and
the inking for the pupils. While I am doing
this, let's talk about the other projects
that we'll be attempting. So we'll have a total
of 14 projects, and our main focus will
be on the eyes and here. So we'll be creating
different kinds of eyes and different kind of here. And as you have seen, we have practice various
kinds of eyes pupils and different seeds for that as well as
different kinds of here. So we'll be experimenting a
lot with the various feces, eyes, and the hair. As for the nose and the mouth, we're keeping it simple. Generally, I'll be
creating two dots for the nose or an Als for the nose, and as for the mouth, two
lines will do the work. As for the CP and the
sizes of the face, we'll be keeping
that simple too. We'll be using the intersecting
lines to create the face, vertical lines for the
placement of the nose and the mouth and two
horizontal lines, one for the placement
of the eyes and other for the
nose or the mouth. We'll be creating a
like cap for the head, and as for the clothes, we'll be keeping that simple to. Only for the two
or three project, we'll be creating
the whole body. But for the rest of them, we'll only creating up to
the neck or up to the bus. And as for the details
for the cloth, only the two will have details, other will be very simple. Et's talk about the additional
things that you can add. You can add creepy or
scary looking tattoos. You can create some pattern or designs on the face
or on the body. And as for the nose, you can make it long, crooked or no nose at all. For the mouth, you can create stitched mouth or very long, smiling mouth, but
long and creepy. But with long and creepy tips, or you can create
no mouth at all. So these are the few options
for the nose and the mouth. Seem goes for the ear. You can create some
crooked and long ear. You can add piercings, eyeball or ear
rings for the ear. You can cover the entire
ear with the hair. And as for the
hands and the feet, for only one project, we'll
be creating multiple hands. For the rest of the
project will be either creating two hands
or no hands at all. So if you prefer you can add multiple hands or
no hands at all. And as for the rest of the body, Only two project I
believe have legs, so others don't
have legs as well be only creating up to the
neck or up to the bus. But if you prefer, you can add multiple legs like spiders. So yeah, feel free
to experiment a lot. You can just use the
basic guidelines from the project and add various
elements on your own. So experiment a lot and feel
free to share your work. Also, for the background, I'm keeping things simple. For two or three projects, we have the background completely
covered with the here. For others, we have
nothing at all. So for the background,
you can create patterns, designs or you can
add various kind of creepy eyes or insects
or some creatures, or you can just add simple
colours for the background. So once again, experiment a bit with the kind of
background you want to create. As for the paper in the PS, I'm using this sketch pad, we have got E five
side paper in here. The thickness of the
paper is 250 GSM. So if you want to add so if you want to practice
using the watercolor, it's advisable to
use paper of density more than 250 or
at least 250 GSM to prevent the
bleeding of the color. And since this
sketch pad is small, it would be very
comfortable for me to rotate the piece
to add finer details. Also with a small
size of the paper, we will be able to create the
project much more faster. Let's continue with adding
on more details for the pupils and the iris by
adding black for the pupil, a little white circle
for the highlight and little fine lines
alongside the sides of the Iris and more
fine lines that encircles the eyeball to
give it more three D look. Also, as you can
see, I have made the circumference of the
irises a little bit dynamic. By dynamic, I mean
that some part of the circumference of the irises are much thicker as
compared to the other. Generally, I add more thickness to the two or three sides of the irises to make it look more dynamic and give it
more depth perception. Now let's have a closer
look at another eyeball. So this time, I'm creating
a medium eyeball, starting with adding the
black for the pupil. You can jump from
one eye to eye. That is you can add the
black for all the pupil at once and then add details
for the Isis later on. And at the third stage
or at the third step, you can add the fine lines that encircles the whole eyeball,
the circular lines. So yeah, feel free to add colors and ink the
way it is easier for you. Some of the suggestions
that I would like you to give for the
rest of the project, feel free to use different
kind of supply to make the process much more
faster and quicker. For precision and accuracy, use fine liner for
dynamic lines, use bras paints and
to fill larger areas, use watercolor, gauze or
acrylic or other brush paints. Also, there are some
mistakes that I made while doing the project.
I'll mention them. So try to avoid those mistakes and feel free to let
me know if you have any questions or doubt in the Also for most of the project, we'll have many repetitive
and tiny manu details that will take a lot of time. So to avoid getting bored, listen to some music or listen to an audio
book or you can do that or you can do the repetitive process while talking to someone on the phone. So it will act as therapeutic
engine like experience. And yeah, let's continue with adding the details for all
the eyeballs and completes. For this project, the number
one mistake that I made is using this fine liner
paint to fill the pupil. As this fine liner paint
takes a lot of time, please use sketch pain
or breast pain or watercolor to fill
the black and use the breast paints to create the dynamic lines
that I am creating in here that surrounds the iris. This This will save
a lot of time. Instead of these 22
minute long video, you can create the same
project in 15 to 17 minutes. Always keep your
supplies at hand and see which supply can
make the process much faster and with more accuracy and crispiness to the project. And now I think we have
only 15 Is to complete. Let's be patent and
complete all the Is. For this project, you can add black color for the
background or red color, or you can create some kind of pattern and design
in the background. Yeah, that will
take a lot of time, but the result will be amazing. Feel free to experiment with the background
of this project, or you can create chain
like structure in the background that connect
each eyes to each other. One more thing I would
like to recommend. For some of the project, you
can create or add wings, like the project we have with
the full body portraits, you can create folded wings or long wings or bat like wings, so that will make the project
more scary and frightening. Apart from that, you can also add horns for the
top of the head, and you can also give long
nings to the fingers. Since the whole process
was repetitive, I decided to add the fine
line details on my own. And yeah, let's add the final touches for
the rest of the eyes. Adding fine details to some of the eyes that were
not up to the marks. Like increasing the thickness of the eyeballs or the Iris or the pupil or increasing the number of encircling
lines alongside the eyeballs. Take a look at your project
and add the fine details or remove some of the details
that you don't see fit. Adding some more fine lines alongside the edges of the Iris. And here, I think I am
satisfied with this project. So see you in the
next project with our Day one and the first
project. Happy painting.
10. Girl with three eyes: Welcome to our first project. For this project,
we'll be drawing a very simple doodle of a girl with lots of
eyes in her hair. Starting with basic intersecting
lines for the face, I made this vertical
line a little bit slanted as the girl will be
facing towards the left side. Now let's add the eyes. I decided to create
larger eyes Now, adding a small face in the shape of litter and tiny mouth. Let's add few more eyes
on the top of her head. If you prefer, you can
add few more eyes, but I'll be adding
only two or three. Now, let's draw
the Now let's draw her neck and basic
guidelines for her hair. So her hair will be
completely covering the entire bottom part
of the page and Yeah. So this is just a basic
cuff sketch for her hair, and we'll be adding
normal ice in her hair. So now let's create small
ice throughout her hair. So instead of creating small
eyes with a pencil sketch, I decided to do it directly with the pin
as it will take a lot of time to erase it and then doing it once
again with the pin. So I'll be using this
sakura micron pen to directly draw the eyes. Here I have already
started going over the pencil outline
for the freeze. And now let's do the eyes. Adding more finer details to the eyes in the
form of wrinkles. And if you prefer, you can add more smaller hair
coming out from her head, but I'll be keeping it
a little bit simple, only a little bit of hair
is falling from her head. And yeah, we are almost done with the hair that is
covering her top of the head. And now let's create some tiny
eyes throughout her hair. So just small
elliptical shapes for the eyes and we'll be adding later on the
pupils and the ears. And I'll be keeping this a bit simple and only focusing on the pupil and a little bit
of white for the highlight. If you prefer, you
can if you prefer, you can add circular eyes, but for me, I am going in with a elliptical
seat for the eyes. I'm switching in between
small eyes and bigger ones. So if you prefer, you can create only small
eyes or on big eyes or a combination of both small eyes and bigger eyes along
with circular eyes. Since this is the first project, I'll be only using
the black color. And if you prefer, you can use red color for the
eyes and the hires. So it all depends
upon your choice. And we are almost done for the addition of
eyes for this side. Let's add a few more eyes, and then we will switch
over to the other side. Some tiny eyes for the
upper part of her head. And now let's create
eyes for the other side. Doing the scene that
we did earlier, some random, small and bigger
eyes throughout her hair. Try to cover her
ears with her hair. If you prefer, you can lit a little bit of ear to be
seen through her hair. Now continuing with
adding some more eyes. Um these eyes are
very easy to draw and adding some more
eyes here and there, and we are almost done with
adding the eyes for her hair. Now let's add some more ice wherever required or wherever. The density of the
ice is very less, and we are done with
the eyes for her hair. Now, let's do the original
eyes, the circular ones. Adding a little bit of dark
circle below her eyes. Adding few more dark
circle above her eye. As for the nose and going over
the outline for her face. Now let's sketch out
the guideline for her neck and the
rest of her hair. So only a little
portion of her neck and her chest is visible. The rest is covered by her hair. Adding a few more smaller
eyes here and there. I'm now adding a
few larger eyes. And finally, the lips, add details to her lips, all three small curved
lines for her lips. And now let's add more
details to the eyes, adding pupils and coloring
it with a black color. Adding pupils with the black and leaving a little bit of
white for the highlight. I'll be doing the same
for all the eyes. Okay. So this process is
a little bit repetitive. Enjoy the process and add a
lot of eyeballs for the eyes. Since this project is
a very simple one, you can add more
details with the eye. You can create eye veins. You can create
veins for the eyes, or you can add more
details to the eye in the form of small finer lines
for the pupil and the Iris. Since I have not created a differentiation in
between the pupil and Iris, you can create differentiation
in between them and then add finer details for the iris. And as I said earlier, you can use the color
to add more depth to the painting so it all
depends upon your choice. But since we are keeping
this project very simple, so I'll be only
adding the pupil and a little bit of white spice for the highlights for the eyes. Continuing on with adding
more people for the eyes. And what else you
can do to make it more horrifying and terrifying is to create some backdrop. So in the background,
you can create some frightening or
scary scenes or you can create some spiders
or bats flying around. Or you can create background of different colors
like red, black, or some splattered
or different kind of atmosphere for
the background. So to add more details and
dimension to the painting, And we are almost done with
this left side for her hair, adding few more
eyeballs for the eyes. And now let's finish the
right side of her hair. Since I'm using
this micron pain, there is not that much
differentiation between the lines. So you can use bras pain that
will create dynamic lines, and that will be really helpful. So by dynamic lines, I mean thick and thin lines. With the micron
pain, you can only get lines of same consistency. But with the brass
pains or ink pains, you will get lines of
various varieties. And we are almost done with ice. Let's add few more
ice here and there, wherever the densities of the
ice is a little bit vacant. Adding few more tiny eyes for
the right side of her hair. And now let's create her hair. For her hair, I am just creating long and elongated
curve lines coming out from the top of
her head and Okay. Now, let's continue with
drawing the hair for her head. Long and elongated line comes
in contact with the eyes. I just disappears below it and comes out again
from the other side. So I'm using these long
and elongated lines to define the outline
for her hair. And if you prefer,
you can create a distinct or definite
outline for her hair, but I'll be using this
long and elongated line to create the outline
for her hair. Continuing on with reading more long and elongated
line for her hair. Once again, this process
is very repetitive. You have to be a
little bit careful when adding the lines
in between the eyes. But otherwise, this
process is very easy. So curving her lines a
little bit near the ice will create a little bit of more
depth to the painting, and it will change
the flow of her hair. So I'll be changing the flow of her hair
two or three times. So I'll be changing the
flow of her here for two or three places near her neck and near the
bottom of her hair. So, yeah, let's continue
with adding more long and elongated curved
lines for her hair. So other ideas that you can
implement with this doodle, instead of this long
and elongated lines, you can create very
small but denser lines that will create more volumetric
hair for this painting, and you can attempt other kind of eyes that we have
discussed in the hairs video. So these are some of the ideas that you can
implement with this hair. And apart from this, you can also use dark dark
black color instead of lines. Completely fill the hair. So that will be also a
different ideas for the hair. Carefully adding the
lines in between the eyes for this side. Continuing on with adding more long and elongated
curve lines for her hair. Curving the lines a
little bit near the eyes. And now I am changing the
direction of hair a little bit, continuing on with adding more long and elongated
curve lines for her hair. If you prefer, you can add
color for her face and neck, also for her chest,
a red colored Thirt or black colored Tsirt. It all depends upon you. If you prefer you can use
colors for the background also. And we are almost done
with the side of the hair. Carefully adding the lines
in between the eyes. So here I'm changing
the direction of her hair near her
neck a little bit. Instead of going
directly downward, I am bending the hair a
little bit toward her neck, carefully adding the lines
in between the eyes, curving the lines a
little bit near the eyes. Adding the lines near
the bottom of her hair, adding a little bit more
lines near her neck so as to create a little bit
more volume for the hair. Have more volume for her hair, you can pace the lines much
more closer to each other, and to make it less denser, you can place the
lines farther apart. Carefully adding the lines
along the neck and the chest. Since this is the place
where both sides of the hair comes in
contact with each other, I'll be making this side a little bit more
denser and I'll be using a lot of lines to create distinction
in between both sides. By a lot of lines, I mean, I'll be going over
the same lines twice or thrice so that there will be a distinction between
both sides of the hair. Let's do the same
for the right side, the long and elongated
curved line for her hair. Starting with the
top of her hair, for the top for here, I'm creating some small
lines in the form of curved lines and carefully
adding it in between the eyes And now let's add here throughout the right
side of her head. Adding the hair near
and neck and the chest. So here we are creating some
straight lines and now, once again, elongated and
curved lines for her hair. So small lines in between
the eyes for her hair. And more lines in between
both sides of her hair. So I prefer to create
lines in between the eyes and then fill the rest of the space in between them. So it helps me to guide
the flow of her hair. So you can choose this method, or you can just add or you can just keep on
adding here as the way you like it and adding
here in between the eyes So we're almost done with
this section of the hair. Now for the outer section of
the right side of her hair. So I'm using this line as
the outline of her here, and then let's add here in between this outline and
the rest of her head. Small lines for the here
in between the eyes. A few more lines in
between these eyes. And now let's create a little bit of variation
in the flow of our hair. And so these hairs are facing a little bit
towards the right side. So let's create a gap
in between the hair. And now let's feel
this empty spaces with some more curved
and elongated lines. Adding some more lines
in between the eyes to make it a little
bit more denser. And we are almost done with
this section of her hair. And we are almost
done with the hair. Now moving a little
bit upward to add some more hairs and to train the flow of her
hair a little bit more. So here I am changing
the flow of her hair a little bit in the form
of an elliptical seep. And it's a final outline. And now let's feel the final
line with some more hair. And now let's add the rise
in the pupil for her eyes. Using the eraser to erase the earlier outlines
of the pencil. Now let's feel the black
color for the Iris and the people living a little bit of white for the
highlight, for the eyes. And we are done
with the left eye, moving on to the right eye, filling the ist of the
pupil with the black color. And with these, we are done
with our first project. See you in the next project.
11. Girl with thorny hair : Welcome to the day two
and the second project. This will be another fairly simple project, and let's start, starting with the vertical
and horizontal line to draw the guidelines
for the face, dividing it into three parts, for nose and the mouth, and now let's define the
outer C for the face. So this phase will be a
little bit of egg like s and defining the
head for the face. And now let's add the eyes and
the eyebrows for the face. So for this phase, I decided to create
some bigger eyes and the eyes are farther
apart from the center, two dots for the nose, and three line for the lips. Defining the outline
for her hair. So this is just a
basic rough outline. We'll be adding further
more details when I'll be using the pain to draw
the rest of the painting. Here's the rough
guideline for her neck. H and now continuing on with
the guideline for her hair. So both side of her hair comes
in contact in the center. And now let's ink her face. I am using micron pen. If you prefer you can use the
brass pens or watercolor. But for consistency
and uniformity, I'm using the micron
pen, and, yeah, let's go over the
pencil outlines, starting with her face, defining the s for her face
with a micron pen. Defining the eyebrows and
long eyes for her face. So for this phase, I decided
to create some larger eyes, larger and droopy eyes, adding longer and elongated
IVs and pupil for this face. And creating some finer
details for is in the form of some finer lines and going over the
iris once again to create more dark
and denser iris. Now let's add eyelass adding the eyelass
on the upper side. So more elases to
make it more bolder. So these are a little
bit more defined eyes. And if you prefer you can add one more eyes on the center. But I'm keeping it simple
two dots for the nose and now going over the outline of the
pencil for her lips. And with these, we are done with her face, now for her neck. So let's create longer
neck for this painting. And let's go over the
outline for the hair. And now let's create
Is for her hair. So for the Is, this time, I'll be using two or
three pupils and IDs. So multiple Is and the shape and the size
of the eyes are random. Some are big and
others will be small. And this time, I'll be adding thods in her hair to
make it more distinct, as compared to the
one we need in the first day of
the class project. And that's why I'm creating a little bit more and
bolder eyes for her hair. Also, the last time, we added a lot of ice
and they were very tiny. That's why it took
a lot of time. But here we are creating
a little bit bigger ice, and that will save us
a little bit of time. So the smaller the ice, the more time that we take, the bigger the ice, we
don't have to waste that much time for
the finer details. Adding some more
ice here and there. So if you prefer, you can use circular eyes
instead of these. But yeah, I'm using
this elongated eyes. And now let's move
on to the here. Let's start with the thorn. So these are the
guidelines for the thorns. I'll I'll be using
darker intensity of the micron paint to create distinction in between
the eyes and the thorn. And I'll be feeling the long and elongated lines
in between the thorns. And now let's move
on to the other side and create some more guidelines for the thorns and the hair. So I'm just creating some
long and elongated lines and intersecting them with each
other and with the eyes. So these are just
some random lines, and I'll be going over them
once again to darken it. So these are just random lines. So if you prefer you can use brass paints to create darker
and more intensified lines. But since I'm keeping
this project simple, I'm using this micron paint to have more precision and consistency throughout
the painting, adding a few more
lines for the thorns, and we are almost done with it. Now let's erase the
pencil outlines. Now I'm going in with a
breast pain to create intense outline for the thorns. So yeah, going over all the
outlines of the sakura pain, and let's cover all
the outlines with this so if you
prefer you can use the other breast
pain or you can use the watercolor black
color to create a more bolder and intensified
outlines for the thorns. But I am using this as it provides much more pre
season and control. Going over the outlines on
the other side of her hair. I'll be creating very
simple thorns for her hair, and I'll be filling the lines in between the
thorns for her hair. You can see how much
difference it makes with the use of different
kinds of supplies. The lines from the
sakura micron and the lines created from this
pain is totally different. The intensity and
the darkness of the color varies widely with the micron pain
and this brass pain. Now let me show you how I'll
be creating the thorns, some small tiny rectangles
for the thorns. And now let's go over the
outlines of the eyes to create more denser and different
seating look for the eyes. Since the outlines with the
micron pin is not that bold, so I decided to use this pin to create much more bolder
outlines for the eyes. And on the edges of the eyes, I'm adding a little
bit of plaque. So I'll be going
over all the eyes for her hair with this pin. Adding a little bit
of black sketching on the sides of the eye. And with these, we are almost done with the left
side of our hair. Go over a few more sakura micron outlines with this breast pain, going over the final outline on the left side with
the breast pain. Now moving on to the right side, doing the same, going over
the earlier outlines. So if you prefer, you can
use directly the bras pain. You don't have to start
with the micron pain. Feel free to practice
with different kinds of supplies that you
have and choose the best going over the outlines of the biggest eye on this side. Adding a little bit more black
near the edges of the eye, and we are almost done with
the right side of the eyes. We have got only three
or four more eyes. Now we have only one
eye, and with this, we are done with going over
the outlines for the eyes. Now, let's do the
same for her face, starting with going
over the outlines for her neck and now going over
the outlines for her face. Going over the outline for
here and the eyebrows. Defining the lips
a little bit more. Let's make the eyebrows a
little bit more bolder, adding more details for
the Iris and the pupil. And with these, we are
done with the face. Now let's add the thorns. So some small and very tiny
rectangles for the thorns. So this will be a very
repetitive process. And yeah, let's add a lot
of thorns for her hair. So tiny and small
triangles for the thorns. And let's cover all the
outlines with these thorns. Instead of this triangle shape, you can use some
other shapes like small semicircle arcs or
upside down semicircle. And you can experiment
on your own. Let's add more
thorns for her hair. So these are tiny details
and this took a lot of time. So be patient and keep on
adding the thorns for her hair. These projects are
very simple to do, but this takes a bit of time because of tiny
details like this, and there is no other way to do it faster because these are tiny details and you'll
have to repeat it continuously till you
get the desired effect. And if you prefer you don't
have to add the thorn, you can keep it as it is. But since we created the
hair in the last project, I decided to make it a little bit different than the last one. Now moving on to the right side, adding the thorn for her hair, doing the same small
rectangles for the thorns. Instead of the black, you can use green colours, using dark green and light green brass paints to create
the thorns for her hair, and then using golden
colour or ochre color for her hair and
red for her eyes. So that will be a real
interesting doodle. But we are keeping this project simple and only using
the black color. So that's why we are only using this breast pain and
the micron pain. Continuing on with adding more thorns throughout her hair. Adding the thorns
carefully near the eyes. And we are almost done with the addition of
thorns for her hair. After that, we will move
on to the eyes or create elongated lines for her hair to give it more
depth and volume. Also, if you prefer, you can use red or black color for the eyes, but I'll be keeping it
simple and we'll be only using the black color for the pupil and
the iris this time. And we are done with adding
the thorn for the hair. And now let's add the iris and the pupil
for the eyes on her hair. Not that much detailed
Iris and people. So we are going with
simpler version of the Iris and pupils. And instead of single IRs pupil we'll be adding
multiple ones. So by multiple, I means two. And if you prefer you
can add even thing, but more than that, and it
will be really chaotic. So let's keep it
simple one and two, pupil for the eyes. I'm using the micron pin, and if you prefer you can use the brass paint to make
the process much faster. But for precision and
uniformity of the pupils, I'm using this micron pain. With this micron pin,
I have to go over the pupils three or four times so as to
make it more darker. And with these, we are done
with upper sexonf here. Now moving on to
the lower sections. As you can see, it is once
again repetitive process, and I'll and I have to go
over the lines six or seven times to get more denser and
darker tones for the pupil. Creating small pupils for the small eyes and comparatively bigger pupils
for the larger eyes. So I would advise you to
use so I would advise you to use brass paints
or skage pines for creating the pupils. It was my mistake that I used this micron paint to create the pupils as it is
taking much more time. If I had used the breast
paint or the skege pen, it would have been
much more faster. But I'm sticking with
the micron pain, and I'll finish it
using the micron pain. So just to show you that even
if you have only one pain, you can create the
doodles quite easily. It may take a bit
more time, but yeah, you can create the doodles
with having only single pain. And with these we are done with the left side of her hair, moving on to the right side, creating random
pupils for her eye, one or two for each eye and small pupils for
the small eyes and comparatively larger pupils
for the larger eyes. The pupils are facing
in different directions and they are not
close to each other. They are a little bit farther
apart from each other. So here, as you can see, the one is on the top
right side and the other is on the top left side. Here we are creating smaller
pupil for the smaller eye, and we have got only four
more eyes to add pupils to, and then we will move
on to the heirs. Once again, this process
is very repetitive. And since I am using
the macron pain, this is taking much more time. So yeah, use the breast pain, sketch pin or other supplies that you have to make
the process much faster. So we have got two more
eyes to add pupils to, and a small pupil
for the small eye, finally moving on
to the last one. So let's create a bigger
pupil for this one, adding more black to make it
more bolder and we are done. Now let's add the hair. So I'll be creating
lines in between the thorns following the
contour of the thorn. So I'm using the micron pine since it has much more
precision and accuracy, and apart from that, and
the lines it's creating is much more lighter as compared to the lines we created
using the brass pine. So that's create a little
bit of contrasting effect for the hair
and the thorn. So that's why I'm
using the brass pine. Instead of this micron pin, if I have used the bras pain, the distinction
between the thorn and the hair would not
have been that clear. So I'm sticking with the bras pain to create the hair and following
the contour of the thorn to fill the rest of the empty spaces for the
eyes and in between them. As you can see, I'm
curving the lines to follow the contour of
the thorns for her hair. If you prefer, you can place the lines much more
closer to each other, thus creating more
thicker and denser hair. And if you prefer you
can keep it much more farther apart to
create lighter hairs. Adding the lines near her neck. Now, filling lines for
this section of the thorn. Moving on to the lower
section of her hair, following the contour
of the thorn and filling the lines in between
the eyes and the thorns. Filling the lines for
this triangular sp and let's fill rest of the empty spaces
with this micron pane. Once again, continuing on with following the
contour of the thorn and adding these
lines for the hair. So once again, I
would like to suggest that instead of
creating these lines, you can completely fill it
with red colour or black color to create much more denser and
thicker look for her hair. Now, let's define the
outline for her neck and then let's feel the hair. Defining the outline for the
bottom section of her hair. And now let's continue with feeling the hair in
between the thorn. Since it was all
very repetitive, I did the lines on my own. You will have to do
the hair on your own. You have got the gist
of it, how to do it. And with these, we are done
with our second project. See you in the third project.
12. Sleepy girl with open eyes: Welcome to the third day
and the third project. So this is yet
another simple one. But this time, this will
be a full spread page. That is, we'll be covering the entire page
with the doodles. So let's start with drawing
the guidelines for the phase. So I'm directly
starting with drawing the seep of the face. If you prefer you can use
guidelines to draw the face. But it's quite simple one. So now, let's add the horizontal and
vertical lines for the placement of eyes,
nose, and the mouth. So let's draw the eyes. This time, the eyes will
be closed, and, yeah. Now, let's draw the hairs. So her hair is covering the
upper part of her head, and now let's draw the
guideline for the neck. So we are done with the
basic outline for the face. Now, let's do the Is. So for the eyes,
I'm starting with the breast paint to draw out
the guidelines for the eyes. And unlike the first
and the second project, where I only focused
on the pupils, this time we'll be
drawing proper eyes. That is the eyes with
both pupil and the IRs. So let's cover the whole
page with the eyes. So we are creating the
elliptical sep eye. If you prefer you can use the circular sep or
only the eyeballs. I'm not wearing the side
of the eyes that much. I am keeping it a
little bit constant. If you prefer you can wear it, making it smaller and larger or a combination of both
the smaller and larger. So I'll not be covering the
entire piece with the eyes, but only a small portion of it. If you prefer you
can add more eyes, but since this is yet
another simple project, I'll not be adding
that much eyes, as the number of
eyes will increase the time to complete the
project will increase, too. So let's add a few more eyes, and then we will
then we will jump on to adding the hairs and
going over the outlines. And we are done with the eyes. Now let's go over the
outlines for the face. So as I said
earlier, closed eye. So let's add the eye lasses for her eye and upside down
triangles for her nose. Three lines or two
lines for her mouth. Now let's add her ears and going over the
outline of the face. Now let's do her neck. And yeah, we are
done with her face. Adding few more eyes where
the number of eyes were less. Yeah, we are done
with basic outlining. Let's store the eyebrows
for this project, a little bit of dust
line for her eyes and Yeah, we are done with the
basic outlining for our face. Now, moving on to the eyes. Let's add the Iris, and later on we'll be adding
the pupil inside the Iris. So instead of half or
three fourths of the Iris, I decided to do a
complete circular Iris. So that is all of
the Iris is visible. Instead of making the
entire Iris visible, you can make it
only half the Iris is visible or only the
three fourths is visible. So the choice depends upon you. And now let's add more circles for the iris
for the rest of the eyes. And we are almost done
with adding the Iris. If you prefer
instead of one Iris, you can add two or three,
and you can color it even. But since I'm keeping
the project simple, we are only adding single IRs. And we're almost done
with adding the Iris. Now let's move on
to her head and add the banks for her hair. So her banks are covering
the upper part of her head, and for her banks, I'm using this breast paint
to create the outline for it. And later on, I'll be using the sakura micron
paint to do the hair. Since the saca micron pain is much lighter in intensity as
compared to the breast pain, that it will create much more distinction
in between the eyes, hairs, and the banks. So now let's erase the
pencil outlines, and, yeah, I'm using bras to remove the dust of the eraser so as to
avoid smudging of the ink. And now let's add the hair
using the micron pain. So as you can clearly
see the use of micron pain and the
use of breast pain, the difference is obviously
clear that the intensity of the breast pain is quite dark as compared to that
of the micron pain. Now, let's define the rest
of her body, and, yeah. Let's add here for
the rest of the page. So this will be quite
time consuming to make it more to make it more easy
for us to draw the hair. I'm starting with creating some random dots here and there, and then I'll be
joining the dots with each other using the
simple straight lines, thus dividing the whole page into different
sections of the he. So I have created some random dots which are
farther apart from each other. If you prefer you
can make it much more closer to each
other for a denser look, or you can place
them far apart for a lighter or less denser effect. So yeah, let's connect the dots with the elongated
and curved lines for here. So once again, this will be a time consuming process and it will be repetitive connecting the dots with each other through elongated and curved line this
to create reasons that to create flow of her here in different directions and to create variety for her here. And yeah, let's continue with adding the here
throughout the entire page. You don't have to follow the exact steps and you don't have to just go over the dots. If you prefer you can
avoid the dots completely, but the dots will
make it easier for you to draw as it will
act as guidepost. And yeah, the choice
is yours to follow along with the dots
or do it on your own. But try to create
variation in the flow of her hair and create
some regions with much more denser intensity of her hair and regions
with less density. That's to create
variations with her hair. And now let's move on to the rest of the peach
with adding her hair. So apart from these, we'll be adding much
more detailed lines on top of it to divide the
hair in different sections. For that, we'll be using
darker sets of the pain. That is we'll be using
either brush paint or using the same micron paint and going it over those extra lines twice or
thrice so as to darken it. And instead of that, you can even use sketch
paints or watercolors. And yeah, let's move on to the other sections and add
the hair for that section. So adding a little bit
of curve for this here. Now, let's feel this
section completely with the long and elongated
curved lines. Bending the lines
a little bit near the eyes so as to maintain
the flow of her hair. And now, starting from the downward portion of this
section to add the here. Now, let's fill the entire
section with the here. And we are almost done
with this section. So once again, I would
like to remind you that these processes are
much time consuming. So I fast forwarded it
and I did all on my own, it took me around 15 minutes. And as you can see, I
have created some regions where the flow of hair
is completely changed. And now let's add the
pupil for the IRs and eyes and let's create the different
sections for her hair. So I'm going in with
this brass paint to create different section
as well as adding the as well as adding the
pupils inside the eyes. So using the dark
paint to create different sections for her hair and joining those
different section using eyes as their
center points. Darkening the lines a little bit more for the different
sections of her here, adding the pupils
inside the iris and leaving a little bit of white for the highlights of the eyes. And now let's continue
on with adding the lines that divides her
here in various sections. So you don't have to
follow the exact steps. You can create other kind of sections with
the breast pains. You can even add thorns like
we did in earlier section or you can create different kind of patterns with the hair, like thinner and thicker
lines that we practice in the hair section for
that you have to place the lines much more
closer to each other, just to create a
sense of volume. And for the edges and for
the edges of the eyes, I am adding a little bit
more black near them. So to create a little bit
of more contrasting effect, between the eyes, the lines and the differentiating
sections using the black. So we'll be dividing the
whole page into a lot of different sections
for her he to create to create and so the different section of her hair as well as
the flow for her here. If you prefer, you can
divide it into less section and you can also divide it
into much more sections. The choice is yours. And now let's continue dividing the whole page into
different sections. Adding a little bit
of more dark color near the edges of the eye. Adding the pupil while
leaving a little bit of white for the highlights
for the pupil. Intersecting some of the lines. It's not necessary that you don't have to
intersect the line, so intersect the lines
with each other, that's to create a
natural flow of the lines and to make it more
interesting and varied. So don't try to avoid
intersecting of the lines. Whenever the lines
intersect, do so. Adding on the pupils for each eye and leaving
a little bit of white space for the
highlights for the pupil. Going over the outlines of the eyes to make it more bolder and differentiate in between
the hair lines and the eye, doing the same for this eye, adding a little bit of more black for the edges of the eye, and adding the pupil. And with this, we are done with this top left side of her hair. Now moving on to the bottom left side to completely finish
this side of her hair. Adding the pupils for
the last two eyes. Now outlining the last this
and adding the pupil for it. And with this, we're done with
the left side of her hair. Now moving on to the right side, doing the same repetitive thing, connecting the eyes with random
elongated curved lines to create a flow of her hair
and outlining the eyes with this breastpin as well as
using this dark breast pin to create the pupil
inside the iris and leaving a little bit of white
space for the highlights. Don't avoid intersection of lines so as to
create more variety. And yeah, let's
continue with adding the lines and going over the outline and
adding the pupils. A few of the suggestions
that you can keep in mind, you can use color for
her hair and you can also use different
varieties of yes. Instead of this normal eyes, you can use the
eyeballs in her hair, and instead of one
pupil or Iris, you can use multiple ones, or you can completely cover
the eyes with black color. And instead of closed eye, you can create open
eyes for her face. And instead of two eyes, you can have four or five
eyes. The choice is yours. And instead of covering
the entire page, you can only cover the
lower section of the page. And yeah, let's continue
with the rest of the page by adding more lines and connecting
it with the eyes. So we are almost done with
the upper part of the page. Only a few eyes remains, and yeah, let's continue. Now, let's connect
the lines and go over the outlines with
the breast pain. And we are almost done
with the upper section. On this side, let's move
on to the lower sections, doing the same repetitive thing, going over the outlines
and creating the pupils inside the eyes and leaving a little bit of white
space for the highlights. Only a few of the eyes remains, and then we will be done
with this third project. So only three more eyes remains. And after finishing
these three eyes, we will add a few more lines
where the space is empty, and then we will go over
the outline of her face and here a little bit more to create a little bit
of intense look. So we have got only
one I remaining, and let's do the last I, adding the pupil, going
over the outlines, and we are done. Now let's add some more
random lines here and there, wherever the space is empty and intersect
some of the lines. Adding a line here as the space was completely
empty. A line here. So add the lines
wherever the spaces are empty and you don't have
to join it with the eyes. And yeah, we are almost done
with her hair and adding some more lines here and there to finish this
portion of her hair. So now let's go over her banks
for the top of her head. So adding a few of
darker lines to redefine the banks and going over
her eyes to darken it, doing the same for her
ears and the face. With these, we are almost
done with this third project, adding a few more lines
for her top of her head. And yeah, let's add
one more line here. O line here, and let's
go over her nose and we are almost done
with this project. Let's see. Did I miss anything? And we are done with
the third project. Adding the final touches
here and there and see you in the next
project. Happy painting.
13. Boy with freaky hair and three eyes: Welcome to the D four
and the fourth project. So this one will
be quite easy too. Let's start with drawing the
guidelines for the face, horizontal line for the e, and let's go over the
outline for the face. Now, a rough guideline
for the here. And let's draw the
nick for this boy and et's draw the eyes.
For this painting, we'll be having three
eyes on the top of head and another one in
place of the mouth. Sketch out the ears. Moving on, let's create
the rest of its body. So instead of only the neck, I decided to add a
little bit of chest, and for the rest of the body, I'm going in with a half coat. So yeah, let's draw the coat. Drawing out the
guideline for the coat and let's complete the ate, and we will move on to
the here and the rest of the pace and sketching out the guideline
for the other side. And here, we are almost
done with the clothing. Let's go over the
outlines with the pen, starting with going over the
outlines with sakura icon. Now, let's add the here, starting with Sakunaicron
to add the heirs. So his hair will be random
and heap of jig jags. So we are not aiming for the curve here that we
practiced in the here section, but jig Jag here, the one we practice as the
fourth example, and we'll be adding
random Is in his here. Let's continue with adding more curvy lines to define
the outline for his hair. So I'm defining the
outline for his hair, and later on, I'll be adding
more details for his hair. And with these, we
are almost done with outlining for the
left side of his hair, moving on to the right side,
adding a little bit of curve seeps for the
outline of his hair. Continue with adding
more curvy lines to define the outline
for his hair. Instead of this sakura micron, you could have used
the breast pins to create more dynamic lines, but I'm using the micron pane. And with this, we are done with the outlining of his hair. Now let's do the
same for his face, starting with
outlining the ears. And now let's define the face. So starting with the
upper section of his face and some hatching for
the sides of his face. And now let's define
his jaw line. So we have got the basic seep
of his face nailed down. And now let's draw the outline
and the guidelines for his three eyes that sits
on top of his head. Adding another concentric
circles inside the bigger circle and another
circle for the pupil. So this is a little
different I and Now, let's draw the fourth eye
in the form of his mouth. So we have got four
eyes in his face, three circular ones, and
fourth one is the normal eye. But instead of the
white section, we'll only having a
complete black eye. So now let's fill the entire
eye with a black ink. And we are done with
the fourth eye. So now, adding some curve veins like structure on the
sides of the eye. And now we are done
with the pace. Now, moving back to the here, adding more curve lines for the here to make it more
denser and unruly. So creating random lines for the here to make
it more unruly, adding details for the here. And yeah, let's
continue with here, adding more unruly
hairs in the form of jig jag and random lines. So we are done with this
portion of the hair. Now moving on to the
upper part of the hair, more random and curvy
lines for the hair. So I'm keeping the density lower if you prefer you can add more lines to make the density of the hair
much more heavier. So these are random jag lines a little bit time consuming, but yeah, let's completely
feel the top of his hair, top of his head with
this random hair, and then we will move on
to the rest of his body, adding nose and details for his clothing and adding
eyes on top of his hair. So instead of normal eyes, we'll be having black eyes. And yeah, let's continue with adding more unruly hair
for the rest of his head. So we are almost done with
the half part of his head. Now moving on to the other half, adding more unruly hairs. Instead of these unruly hairs, you could have chosen different styles that we have discussed in
the hair section. So feel free to experiment
with various other styles for the hair and see which
suits best for your painting, and you can even use
colors for your hair. And we are almost
done with adding the unruly hair for his head. We are done add few more
lines here and there, wherever the density is
lighter. We are done with this. So now, moving on
to adding the eyes. So I'm starting with
the pupil and later on we'll be defining the sip
of pupil for the eyes. So I'm drawing semicircle. So I'm drawing circle with a little bit of
white for the highlight. And yeah, let's add more circles for the pupil
and two points for highlight, one a small center and another a small semicircle
for the highlight and adding it at random places and adding it a little bit
closer to each other. If you prefer you can add it much farther apart
from each other, but I'm adding them close
to each other so as to get much more
thicker consistency of the eyes for his hair. And yeah, we are almost done
with the addition of pupils. And now let's draw
the rest of the eye. So instead of the white porton, we'll be adding the black. So let's define the seek
of the eye with the ink. Let's continue
defining the outline and the seep of the eye
with a black color. So I'm curving the edges of the eyes towards the
right or the left, so you can keep it straight
or you can experiment with making it more curvier or
elongated or even rounder. Experiment and see
what fits best. Let's continue with adding the eyes for the
rest of the pupils. Instead of this black color, you could even use
the red color, and you can also use
some other color, but I find it red and
black much better options. This is a little
bit time consuming with this sakura micron pin. If you want it to make
it much more faster, you can use sketch pin, breast pin or watercolor. But I'm sticking with the
micron pin this time. Let's continue with the
rest of the eyes. Mm hmm. As for three eyes on
the top of his head, I choose circular eyes. You can choose the normal eyes or you can choose eyes with multiple pupils and ones or
you can add no eyes at all. You can cover the
head with hairs and you can even cover the
head with a piece of cloth, experiment and see
what you like. And as for his mouth, I choose a piece of eye, and instead of
instead of this eye, you can create big canine
or larger monstrous teeth, or you can experiment
with other kind of mouth or no mouth at all. And we are almost done
with the addition of eyes on the top and
on the left side, only the right side remains. So four or five more eyes, and then we will
move on to adding the details for his cloth
and the rest of the face. We have to add nose, a small tiny nose for his face and more details for his cloth. And we are done with eyes. So if you prefer, you can add few more
eyes here and there. But I'm satisfied with this moving back to the
eyes on top of his head, filling the regions in between the iris and the
people with the black. Adding the black for the third and the final eye
on top of his head. And with these, we are
done with three eyes, adding a tiny nose. So with these, we are done
with a piece and the here. Now let's move on to the neck
and the rest of his body, adding some hatching lines to create shadows for his head. And now let's add details for his jacket or coat
that he's wearing, going over the outlines. So earlier I decided to
cover the entire page, but then I decided, Okay, let's keep it simple and
only do the chest portion. We are not covering the
entire page, only this much. If you prefer, you can extend the painting
to the full page, but I am but I am keeping it simple and only
drawing up to the chest, adding straight line as
a design for underset. And now let's darken
it a little bit. You can keep it as
it is done with it, but I decided to add further
details to his clothing, so random straight
lines for his coat. To make it more denser, you just have to place the lines much more
closer to each other. And going over the outline
of the jacket once more and darkening it with a layer
of sakura micron pen. Now going over the jacket
outline to make it more darker, adding more black for the
sadoregions beside the neck, adding the black
on the other side. And yeah, going over the inside of the jacket
with another line, adding another line for
the inside of coat. Darkening the
button on the coat. Let's darken this side also. Going over the outline of the jacket and we are done with the
outlining of the coat. Adding some more
details to the ears, and let's finish this project with straight line as
a design for the coat. Yeah, we are almost done
with this fourth project. See you in the next
project. Happy painting.
14. Boy with black eyes: Welcome to the day fifth
and the fifth project. So this one is going to
be quite challenging, but this one will be
very fun to paint. Now let's directly start, starting with a little
bit slanted vertical line for the alignment of
nose and the face. Now let's encircle this line
with the seep of the face. Horizontal line a horizontal line for the placement
of the eyes. Since this painting will
be wearing a jacket. So instead of the neck, I'm drawing out the guideline for the jacket and the coat. So yeah, the guideline
for the arm. Now let's draw the eyes. So this time, I am making
some big and round eyes. Sketching out the
guideline for a tiny nose, and now let's draw
a little mouth. Let's draw a rough guideline for the ears and moving
on to the hair. For this painting, the hair
is partitioned in the middle. So let's do that. And now let's complete the rest of the
outline of the hair. So these, we are done with a rough outline for the face
and the rest of the body. Now let's go with the
paint to add more details. For this painting hair, I'll be adding round
and circular eyes, and for the clothe, I'll be adding a little bit
of black but normal eyes. My little bit, I mean
seven or eight eyes, but the side of the eyes will be comparatively larger
as we are doing here. Adding randomly the
circular seeps for the eyeballs for his hair. Now, let's add more
details to the hair. So I'll be inserting these eyeballs with this
kind of small tiny lines. Now let's define the outline for the hair on top of his head. So I am making the outline
in this sap if you prefer, you can make adjustment. And now, adding the details
alongside the eyeballs. So yeah, small jig jag
lines on one side, or you can add it
on both the sides. But for the starting,
just add it on one side. The size of the line decreases as we move
away from the eyeballs. This project is divided
into two sections. So this is the first
section in which we will be mainly focusing on the
eyes and the face. And in the second
section of this video, we'll be focusing on
the clothe and adding the finer and final details. So we are almost done with adding details
alongside the eyeballs. Now, let's make the ears
more detailed and defined. And we are done with the ear. So I have only sewn one ear. If you prefer you
can add a little bit of second here that is
sewing on the other side. Now, the hair that is
covering his forehead, I'm starting with doing some
vertical and long lines. So yeah, we'll be adding
the hair in this same. So you can consider it
so you can consider it as we are doing hatching in
small specific portions. So we'll be doing the hatching type of here
for this whole head. Simple straight or a little bit of curved lines
alongside the hair. And now let's do the outlining
for the rest of the here, starting with the left side. And yeah, let's define
the seat of the pace. And we are done with defining
the set of the pace. Now, let's add mode
here for this side. We are using the
hatching technique, just simple straight or a little bit of curved
lines alongside the here. To make it more denser, just increase the number of the lines and to
make it lighter, just decrease the
number of lines. And let's fill
this entire region with this hatching technique. And yeah, the choice of
pain depend upon you. I'm going with saconamcron, and for darker tone
or darker regions, you can use the other breast
paints or sketch pins. So we will be
filling the hair in small sections so as to create some different
regions throughout his hair, that it will produce
a result that his hair is in
different sections. Now, moving upward, doing
the hatching technique in little bit curved fashion for the hair on top of his head. Now, we'll be
filling the entirety of his head with this
kind of hatching. So yeah, be patient and create small tiny lines and place
them closer to each other. Once again, this is a little
bit time consuming process. To make it a bit faster, you can use different kind of tools or you can instead of creating this kind
of hatched hair, you can just entirely fill the hair with black color
that will do the work also. But I'm continuing with
doing the hatching to create a very distinct and
different kind of hair for this fifth project. And with these, we are almost done with the half office here. Let's continue with
the other side. Try to curb the hair wherever
the eyeballs are present. And yeah, let's continue. So here the hair was
a little bit lacking, so I decided to increase
a little bit of his head, and now I'm filling
the entire area with elongated lines in the
form of hatching technique. Gradually filling
this right side of his head with hatched line. Gradually feeling the right side of his head with
the hatched hair. So whenever you are adding the hatching line
near the eyeballs, be a little bit careful so as to avoid touching
it or crossing it. Encircling the eyeballs
that are near his hair. And yeah, let's completely fill this side with
the hatched lines. And we are almost
done with this side. Only a little bit left alongside the ear and a little
bit near his neck. Now adding the hatching line
below his ear for the hairs. Now, encircling the eyeballs
that are near his hair. And yeah, let's completely fill this side with
hatched lines. Instead of this
hatching technique, you can even use cross
hatching technique to make it even more denser. And now we are almost
done with the hairs, a little bit more,
and we'll be done. I say we are done
with this hair. So I find it very interesting and fascinating
this type of hair. So now let's add the Now let's add details to the eye to make it more scary
and frightening. So I'm starting with
adding a little bit of concentric circles
alongside the eyeball to make it much more terrifying. So these are concentric circles, but they are not
complete circles. Let's do the eyebrows. So I am just going over
the same line again and again to get a darker
consistency of the ink. And if you prefer, you can use the sketch
pen and brass pen to make it directly much more
bolder and darker. Going back with the
eyeballs to make it more frightening by adding two or three concentric
circles alongside the circumference in the
form of das and dot lines. And yeah, only two or three
more eyeballs remains. To make it a little
bit different, you can even add eye
veins and And with this, we are almost done with the here and this section of the video. See you in the next
video in which we will completely cover this
horrifying creature.
15. Boy with black eyes final details : Welcome to the second part
of the day fifth project. So far, we have created
the here as well as did the outline of the
piece and laid the groundwork for the eyes. Now we'll be adding the eyes
and finishing this project. So let's add the pupils
inside the eye recess. So I'm continuing from
where I left off, adding a little bit
more concentric circle alongside the circumference of the iris to make it a little bit more
detailed and defined, darkening the eyebrows
a little bit more. I have not created eyebrow on the other side as his here is covering
most part of his face. But if you prefer you can add eyebrow on the other side also. Add some more final touches to the Irises wherever required. And yeah, I think I am
almost satisfied with the type of irises
that I have created and the number of
concentric circles. Now I'll be adding the
dark pupils inside it. So I have decided to
add a single pupil. If you prefer, you can add
two or three pupils or you can use color like red or
black to completely fill it. So, yeah, we are leaving
this as it is for now. Now let's add details
for the clothing, Smuffler or the scarf that
he's wearing around his neck. Now moving on to his face, going over the outline over the eyes the tiny nose and the mouth. So we are done with outlining his mouth and the
scarf and the muffler. Let's add the eyes. I'm starting with making
it a little bit darker. So yeah, you can use bras
pin to make it much faster, but I'm using the micron pen to show you that you can create much more terrifying and
horrifying feature just by using a simple micron pen or a simple pen will
do the same work. But it will take a little
bit more time, but yeah, adding a little bit of dark
circles alongside his eye. Now, let's create
tiny black pupils for the center of his eyes. So for his eyes, I am adding
fine details in the form of very small and fine
dot dot kind of line alongside his pupils into
concentric semicircles. So adding this in this way makes it much
more detailed and defined and add another touch of frightenss and spookiness. And with these, we
are done with making some terrifying and
really detailed eyes. Let who want to, adding details and definition through the clothes
he's wearing, starting with the scar or
the muffler around his neck. For this, I'll be using
the hatching technique. So yeah, let's do this. For the muffler, I'll be creating the hatching
technique in this way, dash, dash dash and for this, I'll be doing five or six
line in vertical and followed by five or six line in horizontal
in alternative fashion. So yeah, let's do this
starting with this first row. And then we'll be
continuing with rows by rows or rose and column. Whatever will be easy. So yeah, let's continue adding the hatching lines to
cover his muffler. And if you prefer you can create other kind of pattern designs
or doodles for the muffler, or instead of the
muffler or scarf, you can just create his neck. But I was trying to create a little bit of different
painting for this project. So I choose to go with
the hatching to match it with the hatched hair style. And you can see the
difference And with these, we are almost done with the scarf or the muffler he's
wearing around his neck. Now, let's draw the rest of
his cloth and add details to it for the clothes I said earlier that I'll be adding
a little bit of ice. My little bit, I mean
seven or eight eyes, but the ice will be
a little bit longer. So yeah, let's draw the
guideline for sicky eyes. And yeah, I'm just
glazing it randomly, but they are all facing seen direction that they are facing in vertical direction. And now let's add the veins
on both sides of the eyes. So let's darken the
veins a little bit, and we'll be covering
the entirety of the and we'll be covering the entirety of the
eyes with black ink. Let's continue with
adding veins alongside the edges of the
eyes and darken it. Instead of the veins, you can create different
pattern if you prefer, and you don't have to create
the same kind of eye. You can use different kind
of eye or increase or decrease the number of
pupils, use colors. So feel free to experiment
and try different things, and let's see what we can
create by using this simple and get a little bit scary
and terrifying pattern with these kinds of eyes. And now we have to do
three or four more. Let's talk about some
of the suggestion that you can implement
with this painting. So I'm keeping the
background simple. You can create some
pattern style or designs for the background or you can paint it using
different color. And apart from these, I have only created
the chest of his, you can create the
rest of his body. Instead of using small paper, you can create it on
a much larger paper and create his rest of his body, hand slings and experiment with some more spooky and
frightening things on his hand or leg. So yeah. Let me know if you
experiment and please see it on the project section. Now, let's add the tiny
pupils for the eyes. So tiny pupils in form
of small circular dot. Now, let's encircle all our
pupils with the iris and fine let's paint it using
the black color to paint it. Instead of this black, you
can use other color red, blue, but I am using this. I'll be using only
the black color. And as I said earlier, the design and the
choice is yours, so experiment and
see what fits best. And yeah, let's continue and fill all the eyes
with a black colour. So while we are doing it, let's talk about a few
more chins that you can make to make it a
little bit more scary. So for the face, you can do some piercing around his nose and eyes and ears. You can create tattoos or a little bit designs around
his eyes or around his neck. Also, also, you can create a
Al you can create fog like background and feel free to use other art medium to create some more scary and
frightening scenes. So we'll be slowly and gradually filling all the
ice with a black color. And yeah, let's
continue with filling it completely with black. Let's talk about some
of the mistakes that I made during this painting. First one is the density
of the hatched line along the muffler around his
neck is a little bit varied. It is darker on one side and a little bit lighter
on the other side. So pay close
attention to do that. And the next thing is the
eyeballs that we created. In the first I decided
that small lines that encircles it will
be much more pronounced, but it is not that defined, only a single line or you can see only a only a little
bit of it can be seen, but if you choose, you can surround it
completely to create much more darker and
differentiating look for that. And then the third
thing I would like to recommend is you can make the ears look more scary or frightening by
adding piercing to it. And yeah, let me
know if you have any more faults that you
can find in this painting, and I'll try to make it much
better in next painting. So we are almost done with all the eyes only
this one remains. So let's feel it
completely with the black, and then we will finish the
ice on top of his hair. And with these, we are
done with all the eyes. Now, let's add a little bit
of sados around his neck, doing a little bit of hatching, and let's move on to the
eyes on top of his head. So let's create pupils with a little bit of
white for the highlight. So just small circles, and let's encircle that
circle till we get a little bit of highlighted
portion for the reflection. So this will mark the end
of our fifth project, and then we will move
on to sixth project, which will be somewhat
similar to this, but a little bit different too. So yeah, let's add a
few more pupils for the last remaining
three or four eyeballs and we'll be done with
this fifth project. Adding the last eyeball
and with these, we are done with
our fifth project.
16. Man with eyes on his spikey hair: Welcome to the sixth day
and the sixth project, so this will be a
little bit different. Let's start drawing out the
guidelines for the pace, starting with vertical line to draw the guideline for
the length of the pace and another set of vertical line as the first one was a
little bit on the left, let's encircle our face with an egg like
see for the face. So you are welcome to play with the placement of the vertical
and horizontal line, and that will change
the placement of eyes, nose, and the mouth. So we are done with the
basic p of the face, adding the guidelines
for the ears, adding the guidelines
for the ears. And now let's add the neck. So this project will
be a little bit simpler than the
one we did earlier. And for this here, we'll be having spikes. The spikes will be
much easier to paint. Just consider it as adding
petals to the flower. So let's start with drawing out the guidelines
for the placement of the spikes on top of his head. And by spikes, I mean he spikes. So these vertical
lines will help to place the spikes much
more comfortably. And yeah, so this is the area that will
be filled with he. And yeah, just
consider it adds just consider it as adding
petals to the flower. So in the scene of the
petals of the flower, let's add here spikes. Yeah, inside this
enclosed outline, let's add the petals or here's in the seep
of the flour petals. So I'll be adding ten to
14 spikes of his hair. You can add more or less or you can use any other hairstyle, any other different hairstyle. And for the center
of this hair spikes, I'll be adding a single
I, single simple I. If you prefer you can add different kind of
eye or eyeballs. And for his face, I'll be
having a pair of not a pair, but four pair of eyes and a
lot of eyes for his neck. So this face will have
multiple eyes on his face. Then each here, the
spikes will contain a single eye and a lot
of eyes on his neck. So yeah, man with multiple eyes. And flower like spikes. So we are almost done with
the basic pencil sketching. And as you can see that I have made a little bit of mistakes on the size of spikes on the
right versus the left. So when you are sketching out the
guidelines for the spike, please ensure that both
sides are somewhat equal. Now, let's draw the
guidelines for the eyes. So starting with the
first set of eyes, the normal eyes, and drawing out the
guideline for the face. So I'm using the two
vertical lines that I drew earlier as the
guidelines to place the nose. Now let's add spare of
another three eyes. So that is six more eyes
alongside the main two eyes. Moving on to the neck,
adding few more eyes. By few more, I mean
eight or ten eyes. Or if you prefer you
can add more than that. Instead of this normal eyes, you can add the eyeballs or
leave it simply as it is. And finally, a single e for
the center of his head. And with these, we are done
with our basic pencil sketch. Now, let's add the eyes for
the center of the he spikes. CP will follow the
contour of the he spikes. So let's add the here. Once again, you are free to add different kinds
of hair or you can go with a single eye then followed by eyeball or mice that is a pattern of eyeballs
and the eyes and yeah, experiment with different
kind of eyes and eyeballs here and
see what fits best. So I'll be continuing I'll be continuing with the same kind
of eyes for this project. So the main theme
of this project is the same simple
single kind of eyes. And we are done with adding the guidelines for the eye
inside here is spikes. Now let's do the inking. This time I'm using
the bras pin, starting with inking
out the guidelines of the eyes inside the here spikes. So yeah, this will be
normal and simple eyes. Now, let's add the
pupil inside the IRs. Going over the guideline of the here spikes
with the bras pin. So let's first cover all the hair spikes
and then later on, we'll be adding the eyes
inside the here spikes. So I'm not keeping
the lines straight. I'm making it a
little bit rough, so to get a good
texture of the hair. And if you prefer you can
make it straight and spiky, but I'll be making it
a little bit of rough. The choice is yours once again. And with these, we are
done with the right side, moving on to the left side, going over the pencil outlines
to create the spikes. So as you can clearly see there is a little bit of
difference between the spikes of hair on both the sides
and the symmetry of the hair is a
little bit wrong. So try to correct this
mistake on your own painting. I did not read at zen
until the last moment, so that's why I made
a mistake in here. But if you will be paying much more attention to your
painting in the beginning, you want me making a
mistake like this. Now outlining the hears. And finally, let's
outline the face. So I am very carefully and slowly going over the
pencil outline so as to not too smudge the ink
because I am using breast pain and the
ink is much more volatile with the breast
pain as compared to the earlier ones while we
are using the micron pane. So I'll be adding
the hair in this fw. So in small fine lines
in the form of sading. Now let's do the outline for all the eyes inside
the hair spikes. And we are done with this right side, moving
on to the left side, carefully at the eyes on
inside all the hair spikes. Make sure that our
ink has dried. Otherwise, you will
smerge the inks. And we are done with
the basic outlines. Now, moving on to outlining the eyes inside the
face, the center eye. Let's do the eyebrows. So I'm keeping the eyebrows pretty simple and single line. Now, the main eyes,
the main two eyes. So these are very tiny one. By tiny, I mean long
and elongated ones and adding some lines below it to make it look
tired or exhausted. Adding the eyes below
the main two eyes. Now, let's go over the
outlines on the other side, and we are done with our four pair of eyes going
over the outline of the nose. And finally, let's do the lips. And we are done with
the eyes on the face. Now, let's do the
eyes on the neck. So just vary the set pin side
of the eyes a little bit. We are done with the right side. Let's add the eyes
on the left side. If you prefer you can
cover the entire neck with the eyes or you can cover
the neck with more hair, or you can create beard or the muffler or scarf that
we did in the last video. Now let's add
details for the ear. And let's add more details to the pair of eyes
below the main eyes, adding few lines below it to create a sense of more
depth and dimension. Now let's do the he spikes. So I'm going over the outline of the face for the
first layer of hair. So just consider it as sating. When we use pencil
to do the sading, we are doing the
same with the hair, carefully adding it
on the other side. Try to maintain the sep
of the face while doing the sading type of hair can be considered
as an example of hatching technique and
the lines placement is much more closer
to each other. Move your painting so that
it will be easier for you to create the
hair in this manner. Carefully adding
the seeding near here and we are almost done with the first layer of here and also defining the outline for the upper part of the face. Now let's make it more
define the upper eye. So yeah, adding some wrinkles in form of encircling
lines for the eye on top. Now carefully erase
the pencil outlines. Ensure that the ink
has dried up before using the eraser so as to avoid smudging of
the ink colors. Gradually apply freezer
with the eraser so as to not remove the
ink from the paper. And now let's remove the dust, use dust so as to avoid
smudging of the ink. And now let's paint here and add the eyeballs to finish
this simple project. Now I'm going in with a sacro
micron to create the hair, as it is much easier to handle. While I was using dust pin, it was a little
bit challenging as the ink takes a little
bit of time to get dry. That's why I decided
to use the micron pen. Adding the eyeballs and the iris for all the eyes
inside the spikes. Yeah, it's very simple to concentric circle one
circle for the iris, another for the pupil and
filling the pupil with the black while leaving a little bit of white
for the highlights. And we have got a
few more eyes left. Eyes and the people for rest
of the eyes on the spikes. And we are done with all
eyes for the spikes. Now moving on to the
eyes for the face. For the centered, I I
decided to add two pupils. So yeah, if you prefer you
can keep a single line, but here I added two. Now let's add the main two eyes. These two eyes are
not clearly visible. Only half portion of the iris
in the pupil is visible. And yeah, let's
add the pupil and iris for the rest
of the six eyes, and the pupil and the
Iris are facing in different directions
for all the six eyes. Let's add here for the spikes. So just some long
criss cross lines for the hair in the
form of batching. Slowly but gradually adding the hair for all
the hair spikes. If you prefer you can add other colors instead
of the black, you can use the red
or instead of it, you can use simply black ink or blank sketchpin or water
color to completely fill it. Instead of creating this kind of pattern or this kind of
texture for the hair, you can just completely cover
it with a single colour. So we are done with
two hair spikes. Let's add the hair for
the third hair spikes. So once again, this is a little bit time consuming process, but the results are somewhat
distinct and different from all the other
kind of paintings. So yeah, let's do this. This is much simple
but time consuming. Ater on in our project, I'll make another piece
with multiple eyes, but they will be but
they will be placed in much more different direction
and different kind of eyes. So yeah, stay tuned
for the projects, and let's finish this
fourth here spikes. Carefully adding it near the
edges of the hair spikes. And let's do the fifth one. It is easier to paint
if you move your paper. That's why whenever there
is a possibility I move the paper so that it will
be easier for me to paint. Finish this fifth one. Now moving on to the sixth one. Small and tiny fine line
for the hair spikes. Carefully adding
it near the eye. Carefully adding the here
near the edges of the spikes. And we are almost done
with our sixth here spike. Let's do the seventh hair spike. And after that, we'll move on to the rest
of the hair spikes. Apart from this, what
else you can do to make it more scary and terrifying. Instead of this small mouth, you can make a very big and
frightening, scary smile. You can add long
and large teeth. You can create some
tattoo patterns, or you can cover the main
two eyes with clothes. You can create a completely
blank face with a single eye. And we are done with the
side of the hair spikes. So let's move on
to the other side. Since this process is
repetitive and time consuming, but I have done all the other
spikes in the same manner. Now let's finish this painting by doing the eyes for the neck. Adding finer details in form
of lines below the eyes to make it more to make it
more distinct and volumetric. So let's add some more
lines below and above the eyes in the form of
simple curved lines. Finally, let's add
pupils and the Iris. And if you want, you can make it pace on the same direction or
in different direction, you can keep it in the
middle or pace it in different corner of the eye or instead of single
pupil and Iris, you can create
multiple pupil and Iris like the one we did
in the center of the head. And with these, we are almost
done with all the eyes, only two remains and adding
the final pupil and the Iris. And with this, we are
done with our project. See you in the next project with something different.
Happy painting.
17. Sad melancholic boy: Hi, and welcome to the T seven
and the seventh project. For today's Vino we have got a little bit different
kind of noodle. So let's start with drawing out the basic
guideline for the phase. So starting with a vertical
and horizontal line for the guideline for the pace now let's draw the outline for the guideline for the here. Now let's draw some big eyes. So we have got big down
eyes for this one and a little nose and a sad
expression for his face. Let's switch out the
guideline for the neck. This seventh project is
divided into two sexon. This is the first sexon
in which we will draw the basic guideline and do
a little bit of inking. And in the next one,
we'll be finishing it, drawing out the collar for the cloth And now
let's at the here, starting with the
outline for the here. For the eyes on top of his head, I am going in with big
and small eyeballs. Let's draw a variety of big and small eyeballs and place them relatively
closer to each other. The choice is your instead
of this down eyeballs, you can choose different sames
and the placement, also, you can make it much more closer to each other or
much more farther away. Let's add few more eyeballs
in between, and we are done. Now let's start the
inking process. So I'll be making this boy. So I'll be making this boy
look tired and exhausted. So let's add a lot of dark circles above
when below his eyes, starting with the upper part. Now let's draw the pupils. I'll not be drawing the Iris. I'll be directly
drawing the pupils, so two black holes with a little bit of
white for the highlights. Going over the
outline for the nose. And now let's add
lots of dark circles. So this will make it look more weary and
exhausted or tired. Let's draw the face a sad
excretion or upset expression. Now, let's go over the
outline for the face. Now, let's go over the
outline for the face. So as you can see, these
are the dynamic lines, there is not uniformity in it, a little bit of variation
in the width of the lines, going over the
outline for the neck. And now let's add a little
bit of veins going over the outline of the clothe And we are done with the
basic outlining of the face. We'll be adding more
details later on, but for now, it's done now. Let's do the heirs and the eyes, starting with outlining
the Cp of the eyeballs. So I'll be making
concentric circles for the eyeballs and I'll be trying to make it
more three dimensional. So yeah, let's do our best. And to get more
precision and control, I'm using the
sakura micron pine. If you're comfortable with the breast pain,
continue with that. But I'm going in with
the micron pain to get better and uniform
circles for the eyeballs. So let's add lots of
small and being eyeballs. So I'm concentrating
more smaller eyeballs near the central
region of the head. But if you prefer,
you can distribute it thoroughly
throughout the head. Adding few more eyeballs
here and there. Instead of the eyeballs,
as I said earlier, you can choose
different kind of eyes or you can just simply make
different kind of hair. Don't need to add eyeballs. Yeah, experiment and
see what fills best. Now we are almost done with
the seats for the eyeballs. Now, let se the pencil outlines. So I'm trying to create an expression of sad and
gloomy looking face. That's why I made it look a
little bit upset or sad and his eyes are pointing towards right in a menacing or sad way. So yeah, play with expression. You can make you can make
his lips curve upward, get scary smile or you can make his mouth a lot bigger
with lots of jagged teeth, or you can create a scar
face for his mouth. So yeah, the options
are endless. Now let's continue with
the micron paint to add the pupil inside
the eyeballs, and I am placing the eyeballs, and I am placing
the pupil inside the eyeballs in
different positions, trying to make look more three D and in
different directions. And to create three dimensional
look for the eyeballs, I'll be adding some
curved lines alongside the sides of the eyeballs
to make it appear a little bit tilted or to
make it appear looking at different direction or make it appear that it is
popped out from here. So yeah, I'll try my best to explain it while
I'll be doing that. So stay tuned with me and try
to follow along with me as the whole video is in
real time and with these, we are done with adding the
pupils inside the eyeballs. Now, let's do the rough
guideline for the hair. For this portrait, we are creating rough and unruly hairs, and we'll be using a
combination of both the paints, sakura micron to
get lighter sets of hair and brass paints to get a bit heavier and darker sets. So let's keep on creating
some unruly hairs in the form of the carved
or jig jag lines. Instead of this
curve jig jag lines, you can create hatching lines that we used earlier
in the fifth project. That will be also interesting. But I'll be sticking with this curve and unruly
hair for this project. And, let's continue
with defining the outline for he
throughout the page. We are just creating
noodles like seeps to represent his hair. So two lines,
basically two lines, two parallel and following lines to create the
outlines for his hair. And this will be a little
bit time consuming process as we have to cover a lot
of area for the hair. And if you are using
the breast pain, it will be a bit faster, but it will lack the tiny
details that we can create with using the micron pain with much precision and uniformity. So right now, I am entirely focusing on creating the
hair on the outside, but later on we'll be adding a little bit dense hair for the inside or the central
part of his head. Moving on to adding some more hair near his
forehead to cover it. And if you prefer, you can cover some part of his eyes with curly
and unruly hair, but I am keeping his eyes
look menncing in this way, and I am not covering it. Since it was a
repetitive process, I decided to do the curly
hair on my own for this side. And now let's
continue with adding more curly and noodles like
here for the other side. So it took me around five
to 7 minutes to do it and experiment and
do it on your own. You can pause the video
while you are doing it. Yeah, let's increase
the intensity of his hair wherever required, especially near the
central region of his forehead and
adding much more hair, near the right
side to finish it. So this is what we will be
covering in this section, and in the next
section of this video, we will be adding
more details to the head and the face
as well as the neck. So this is all we will do
cover in this section, and we are about to be done with addition of
curly hair forehead. So as you can see, we have got a rough look for his hair
and rest of his face. And you can imagine how it
will appear when we will add much more darker color to it and much more
details to it. And you can use colors also. So see you in the next video.
18. Sad melancholic boy final details : So let's continue where we
left off with the first part. Now let's add some darker
tones for his hair. For this, I am using the Kuratake breast pain with much more varied
intense inclines, um, much more varied
intense lines. What I mean by
that is we will be getting much more dynamic
lines of varying thickness. The intensity or the blackness
of the color will be relatively much more darker as compared to the one we
did with micron pain. And it will create some
interesting pattern for the hair as a combination
of lighter and darker sets, as you can can see in here. And we'll be adding
a little bit more of the inprain near the central
region of his forehead and try to add it carefully in between the eyeball
so as to avoid the color getting on top or on top of the
outlines of the eyeballs. Also, as I mentioned in the
earlier section of the video, that I'll try to make
it look a little bit three dimensional
the eyeballs. And you can see that I have
covered some section of the eyeballs with the hair so that it will look that it's
popped out from the hair. So yeah, try to cover some
section or some part of the eyeballs in such a way that it looks that it
is covered by the hair. And we are done
with this side now. Let's move on to the right side. And yeah, let's keep on adding the darker side of the
black with this breast pin. Instead of this black,
you can use the red or how about yellow color. So we can make it blond or
orange and yeah, even green. So yeah, that choice is yours, and we are continuing with
adding the black for his hair. Carefully adding it in
between the smaller eyeballs. So this is our first attempt of covering the
sacra micron pen, and later on we'll be adding a little bit more breast pain to make that a little
bit more distinct. Now going back with
the micron pain to redefine the outlines of
the hair a little bit. As with the breast
pain, the outlines has become not that defined. So yeah, let's define the outlines for both
the eyes and hair. And I am using this time
to also do the eyeballs, adding a little bit of lines, curved and concentric lines along one side of
the eyeballs to make it look more three D.
Some of the eyeballs, I will be making it
comparatively weaker and others somewhat smaller and most of
them will be of normal size, a circle and a little bit
of white for the highlight. The problem with
using the micron pen is that it takes
a bit more time. If you prefer you
can continue with the breast pin to
do the eyeballs, but I'm sticking
with the micron pen. It provides much more accuracy. So let's color all
the eyeballs black. And also, you can instead of doing all the eyeballs black, you can do some blacks, the others with Rod and
instead of one eyeballs, you can add two or three. You can even add veins for the eyeballs to make
it more scary or weary. And we are done
with this eyeball, moving on to the
adjacent eyeball, a small portion for
highlight of the eyeball and filling the rest
with the dark plaque. So this is another time
consuming process, and there is no
other way to do it. In case of the doodles, some of the tiny and
minute processes takes a lot of time
and you have to do it so many times so that total accumulated
time becomes a lot. But this tiny and minute details that sets the thing apart. We are continuing with doing this tiny and minute eyeballs
throughout his top of head. And that's why I choose
this small drawing pad. If I have to use
bigger page or like A four or sketching pad, the same thing would have
turned to more than an hour, but the more details we add, the more time it take and
the tinier the details, more precision it requires. Also, the use of different supplies
plays a vital role too. So choose carefully and let's just finish adding all
the eyeballs for his head, and let's finish it quickly. We have got a few
more eyeballs to do, and then B moving on to adding
more details to his face, his neck, and the clothe By cloth I mean only we can see the collar of
his shirt or test, whatever he is wearing. If you prefer you
can add his chest or you can just create
some skeleton like chest. We got a few more
eyeballs to do. To make it look more three D, as I said earlier, cover
some sections of the eyeball or add some lines on one side of the eyeball to make it look
in different direction. Let me show you what I mean. Here I'm covering some section of the eyeballs with the hair. So it looks that the hair is covering the three
diamonds the eyeball. Let's do the same here
with the smaller eyeballs, covering a little bit of
the eyeballs with the hair. And for accuracy and pre season, I'm using micron pin. You cannot do it properly
with the breast pin. But if you want to try, just attempt covering few
eyeballs with the breastpin and if it's doable,
then stick with that. Otherwise, use preseason with micron pin or any
other ballpoint pain. Also, I'm defining
the outlines of the hairs a little bit
more with the micron pain. As with the use of breast pine, the outlines does not become the outlines
become a little bit hazy. So let's define the outlines
much more precisely and uniformly for all
the unruly hairs, and let's make it a
little bit more denser. Let's make the hair for the center of his forehead
a little bit darker. And now moving on to the
other side, doing the same, increasing the intensity
of the hair a little bit, as well as redefining the
outlines of his hairs. Adding a little bit more urns
and definition to the sap. Add the lines wherever required for the
outlines of his hair, and I think we are done with it. Now, let's finish this
project with adding more details to the rest
of his face and the neck. Let's start with his neck. Let's create a reason of
Sadok below his chin, so a triangular portion
with completely black. Let's leave a little
bit of white lines to create much more contrast and a little bit of black for his shoulder bone and some
black for the collar. And now let's add
some hatching lines to sew some more
shadows below his face. And we are almost done and a few final touches
wherever required. And, yeah, I think we
are done with this one. Adding few more lines
for the eyeballs to make it look more thred or make it look more
weary or tired. So just add a few more
final touches wherever you think that's required
and don't overdo it. If you overdo it, all the
things will become unclear. And with this, we are
done with our project. See you in the next video.
19. Twin girls of terror: Welcome to the day E
and the AD project. So this will be a
little bit different. And this is the biggest
of all project, as it contains a
background as well as it has a lot of tiny details in
the form of lots of eyes. So let's start with drawing out the basic
guidelines for this. So starting with two slanted horizontal
lines for the hats. This picture will
contain two twins wearing hats and facing
towards the page. So yeah, let's do the outline
for the hats quickly, and then we will do the
guidelines for the face. And since the girls are
facing towards the page, so we won't have to draw
much more detailed faces. So let's draw the face. Just this tiny sp for the faces. And now let's add the
guidelines for the here and these small
seeds for the here. Only a little portion of
the twins face is visible. That's why on small
see for the face and now continuing on with drawing out the
guidelines for the here. So here we'll be covering
most of the beach. So yeah. Adding more definition to the seep of the feast. And now let's draw the
soldiers for both the fins. And we are done with
the rough seeps and the guidelines for the body
of both the twin girls. Now, let's quickly ink it. So this is the easy part. The hard part will be to do
all the doodling around it, as the girl's hair
will be covered with ice and seen
for the background. So that will take a lot of
times as it will contain lot of tiny and minute eyes as
well as some bigger ones. And so let's continue with the outlining for
the face and here. And later on we'll be
adding more details for the background eyes and
the rest of the painting. So to make it much more
quicker and faster, you can use color or you can
don't add the background, or you can use different style or different
options for the eyes. Since I'll be adding
a lot of ice, you can add less ice or different kind of ice
or instead of normal ice, you can use bigger eyeballs
or as I said earlier, don't add the backgrounds. You can make the phase much more detailed or make it
phase towards us. But since the whole project is much more detailed
and time consuming, I decided to not add more
details to the phase. Also, this project is
divided into two sections. This is the first section, and in the next section, we'll be adding final touches
and more details to it. So we are done with
the basic outlining for both the twins. Now, let's do the background. So I'm dividing the whole
page into rough two sections, and then we will add
some curving lines to so that the edge of the
background is far away. The aim of the curvy lines is to create an edge like background which is far away and which intersects at the middle
of both the twins. I was not able to
properly explain it, but you will see what I'm trying to express
through the painting. Now, adding the eyes. So for this, I'm drawing
the normal eyes. You can use different
kind of eyes or eyeballs or don't add the
background at all, simple lines, simple curvy
lines filled to the work too. But I am going to do the
eyeballs along with the eyes, so I'll be wearing the seat
and sizes of the eyeballs, bigger and smaller ones. So let's do the eyes for
the left side first, and then we will do
it on the right side. Try to maintain the perspective that the eyes that are nearer to the girls bigger and the eyes which are farther away
are getting smaller. That it looks that it's three
dimensional and there is some edge or center just at
the middle of both the girls. So I am making the eyes
a little bit tilted in that direction that it's going towards the center of the page. And we are done with adding
the eyes for this side, and we will move on
to the other side, trying to do the same thing, adding the eyes in such a perspective manner
that it looks that the eyes are coming from the right side and
going to the center. That is add smaller
eyes for the center, and as we move further
away from the center, make it a little bit bigger. And add the eyes in slanted Imagine that you are following some
curvil lines or some slanted light that
is going directly towards the center and at the
eyes on those lines. And we are almost done with adding the eyes for
the right side. After adding this eyes, we'll be filling this
entire empty bite space with curvy lines, and for the whites of the eyes, we'll be adding black. So what I mean is there will be black for the entirety
of the eyes and a little white for the Iris
followed by black for the pupils and a little bit of white highlight for the pupil. Are done with the eyes. If you prefer you can add few more eyes. I'm
satisfied with it. Now let's draw the
curvy lines following the perspective as well
as going over the eyes. So when you go over the lines, make the lines curve in
the seep of the eyes and make it merge at the
center and from the center, take it towards the right side, following the scene perspective, that it's coming out from the center or that
from both the sides, the lines are merging
at the center. Make the lines parallel to each other and make it curve
along the sides of the eyes. Also vary the sweep and sizes of the lines a little bit
and the direction too. But keep this thing
constant that the lines are coming from the outer edges
of the piece to the center. Or you can think it in a different way that it's coming out from the centered towards
the edges of the page. So for the top and
the middle part, it will be a little
bit straight, but as we move downward, the lines will become
much more slanted. I'm using the micron pen to get thinner and consistent line. If you want more dynamic
and varied lines, you can use the bras pins, or you don't have
to use the lines. You can just completely fill the entirety of the
background with colors. You can use black, red, or other watercolor or
ink color that you have. This will be a little
bit time consuming, not a little bit but a lot, and we will be
doing it together. So let's continue with adding on the curved lines
along the eyeballs, merging it at the center, and making a little bit of distinction in between the
sets of line we are creating. This will be time consuming process, so listen to some music or audiobook and do it on your own. I'll be showing you how
I did it for just now. And and I did the rest on my own. It took me around 15
minutes to do the rest. And as you can see, it's
follow a perspective line that the lines are coming from the
outer edges to the center. And yeah, I hope you will do it. And now let's add eyeballs
for the hairs of the twins. So instead of these eyeballs, you can use the aisles, but I am trying to
create a little bit of distinction in between the background and
the foreground. So we are creating
some random eyeballs. By differentiating the sizes, making some of the
eyeballs bigger and other smaller and adding it
randomly throughout the hair. We are done with
adding eyeballs for both the twins and now, I'll show you how
we'll be adding here. Same curvy lines for the here as we did for
the background, but this will be in
the sip of eyes, and we will be completely engulfing the eyeballs
with this kind of see. And we'll not leaving the
space for the white portion. We'll be only focusing
on the eyeballs. So the white triangular
see on both side of the eyeball will be completely
filled with the lines. You will understand what I
mean when I'll be filling the entirety of the
eyes with the lines. So let's do the sip of the eyes. Let's do the sip of the
eyes with the micron pen. And with these, we are done with the left side, moving
on to the right side, doing the same, defining the Cp of the eyes,
doing the seam, going over the outlines of the eyeballs with the
Cp of I and later on, as I said earlier, we'll be
covering the entirety of the sides of the eyeballs with the lines just like we
did with the background. This will be yet another
time consuming process, but the result will be worth it. We have got few more eyes to do, and we are almost done with it. So let me show you what
I mean by covering the entirety of the eyeballs. So as you can see,
as you can see, we have covered all
the white regions near the eyeballs with the
white and following the scene, contour and the Sp as we
did for the background. Add more volume to the hair in the form of the curvy lines. Adding it near the eyeballs and not leaving a little
bit of space beside it. So just encircle the eyeballs
with the curvy lines, and later on we'll
be adding more lines that will be following
the contours of the rest of the eyeballs. As you can see, we'll be adding the lines in this form and fill the entirety of her
hair in this manner. So just changing the directions of the lines a little bit, but following the
contour of the eyes. This will create some regions of a little bit dark color because of the change in directions
of the flow of the hair. Let's do the same for
all the eyeballs. And then we will fill the
entire region with more lines. Adding the line for
the rest of the e. For this part, let's add
the lines for the eyeballs. And later on, we will add further lines for the
rest of the here. Just covering the sides of
the eyeballs with the lines, and we will be done with it. You can even cover some
sections of the eyeball to make it look that here is covering
some part of the eyeball. And we have got a
single eye wall left, and we are done
with this section. See you in the next section, we will be finishing
this project.
20. Twin girls of terror final details: Welcome to the second
part of this project. So let's continue
where we left off. So let's add more details to the hair in the form
of curved lines and changing the direction
a little bit so that we get some regions of
darker contrasting hairs. And yeah, let's follow
the seep of the eyes and fill the entirety of the twins hair with
this kind of hair. So this two is, again, a time consuming process. You can opt out by
using different kind of pattern or you can completely
cover the hair with red, black or other color. And to make it even more detail, you can add more eyeballs throughout the hair,
some tiny eyeballs. And instead of one pupils, you can create three or four
pupils inside the eyeballs. I'll be sticking with one
pupil inside the eyeball, and the choice is yours. So please experiment
as much as you can, and please share it on
the project section. Let's create a little
bit longer lines near the bottom of her here. As we move from top to bottom, I'll be increasing the length of the lines and I'll be changing the directions
a little bit more. So that will create
some more regions with a little bit of darker
variations alongside her hair, and to make the
distinction in between the background and here
much more pronounced, I'll be adding a little bit of darker tones for the here to
make it distinct later on. So don't worry about
as you can see, just by adding a few more lines over the outline of the here, you can clearly see
the distinction between the background
and the here. Let's add more lines
to fill the here. He since we are doing this for the
hair of this girl, you can use different kind
of hair for the other girls. Like, you can use
hatching or you can create curly hairs for her, and apart from that, we have created the same
kind of eyes for her. But instead of covering the entirety of the eye
region with the hair, you can leave it as it is just like we did
in the background, experiment a little bit with the other girl that
is on the other side. We have got a little
bit more hairs to do, and we will be done
with this first one. After this one, we have
got three things to do, the background eyes, the
girl on the right side, and the hat, and we
will be done with it. Since this is the
biggest project, so have pasan and keep
on adding the lines. And let's finish it. You can add much more details by going over some of the lines. Now, let's make the here
concentrated at this point. Let's darken the outline
for the here a little bit by going over the outlines
two or three times. Now, let's darken the
soldier a little bit. And here we are done with
here for the first gun. Now, let's complete her hat. I'm just going to completely fill this part of the
hat with the black. If you prefer you
can add ice for it too and you can create some
pattern or design with it. Same goes for the top and the
circular part of the hat. I design, add some creation
or pattern or ice, but let's keep it simple and adding black
for the rest of it. And now we are done
with the black. And now let's move on
to the second girl, doing the same for doing
the same for the hack. Adding black for the
entirety of this region. Instead of using the micron pin, you can use the breast pain. So what happens when
I'm using the pain? So this happens sometimes
when I'm drawing, so my brain completely sets off, and instead of
applying my brain to use breast pain to make
the process become faster, I just stick with
what I'm using. So be conscious what you
are doing and change your tools to make the things
appear or happen fast. So let's define the
outline much more clearly to get a definite
and clear distinction between the background
and the girls. So I'm going over the
outline of the hats and adding few more layer
of the sakura micron pen, make it clearly distinct from the background and the
rest of the girl's body, doing the same for
the other hat. Instead of keeping it white, you can add the
colors to the hat. And with these, we are done
with outlining both the head. Now let's outline the
face structure more. Adding a little
bit of definition to the shape of the face and defining the outlines
much more clearly. Doing the same for the soldiers, we are done with the
outlining section. Let's move back to
the background. We'll be adding eyeballs, iris and covering the entirety of the white sexon of
the eyes with black. So once again, it's my mistake that I use the
macron paint to do it, use the sketch pen
or brass paint, and the process will be much
more faster and quicker. So I'll be doing the same for rest of the
of the background, adding the Rs and the pupil and filling the entirety of the
eyes with the black ink. And So you have to be a little bit careful
while adding the iris and the pupil for the
smaller eyes as they are very small and it
will be not that much clear the distinction in between the iris
and the eyeballs. So be careful with
the smaller ones. And instead of doing the
eyes separately one by one, you can do it in batches like doing the iris and
eyeballs for all the eyes and then filling the
entirety of the ice with the black instead of what
I'm doing here one by one. So let's do this.
Adding the iris and the pupils for
all the eyes and then adding the entirety of the eyes and then covering the entirety of the ice
with the black colour. Okay. It takes more time as the intensity of the
micron pain is not that dark, and to make it and
to get it darker, we have to do we have to
go we have to go over the same lines twice or thrice to get much
more intense look. So continuing on with adding the Iris and the
pupil for all eyes. We are almost done with adding eyeballs for the background. Now let's add the Now let's add the iris and the
eyeballs for the foreground. And for the foreground, we are not going to add Iris, we'll be adding the pupils. So black circle with white in the middle
for the highlights. This was the project that took most time for me and
I got born with it. So I took breaks in between and listen to the music
while I was doing it. And I was also contemplating on the mistakes I did
with this drawing. And it did not turn out
the way I expected. So the background in the
forgown becomes a little bit muddy because I did not create that much
distinction with it. So if you have any ideas and to make it much more brighter
or much more distinct, let me know in the comments. We don't have that many
eyeballs for the hair, only a few, so this
will be a little bit faster as compared
to the background. We are done with the pupils. We have to do the same
for the other side. But for now, let's add
the black for the eyes. Slowly, slowly and gradually
filling the entirety of the white regions
of the eyes with the black sakura micron ink. And this will take time. Let's be patient and cover all the eyes with the
black for the background. So we are almost done with the figure of the girl
on the left side. We will be doing the same with the girl on the right side. So this will be exact copy of the girl on the right
and the girl on the left. So you can say I was
trying to create a symmetric horrifying and terrifying picture
with this painting, but it did not turn out
the way I expected, and it's taking a lot of time. So I decided to do it on my own. So I filled the entirety
of the side with the black ink and did the
same for the other side, added the eyeballs and
the he for the girl, as well as created the eyeballs and the pupils for the eyes. What I have got left is adding the black for the
rest of the eyes. The truth, it took me
around half hour to do all the eyes and details
for the other side. We present and do it. And if you get
bored, take a break, listen to the music or
audio book or do something, but try to complete
this project. And if you are too much bored or if you think that
it's too much hassle, just avoid this project and
jump on to the next one. So let's continue with
adding blacks for the eyes. Once again, let's time skip a little bit and add blacks to the
rest of the eyes. This time, it took me
around five to 6 minutes to add blacks for all the eyes, and with these, we are
done with our project. See you in the next video. Now, all that is left is adding some final
touches here and there, defining the seat and defining the seat and more details
to the here and see wherever there is
inconsistency that you can make it better. Try to amend that mistake, and we are done
with this project, see you in the next video.
21. Floating head ponytails : And come to the D nine
and the ninth project. So this will be yet
another long one. Let's start with drawing out
the guidelines for the head. So we have got four heads
with eight pony tails. And this is yet
another leny one. So it's divided into two parts. And yeah, it will take a bit more time as compared
to the other ones. But yeah, this will
be fun to practice. So let's continue with adding the pony
tails for the heads. So you can play with a
seat and side of the head. You can play with the
sides of the head, make it more small or
little bit larger. And yeah, instead of two
ponytails, you can create one. But I'm going to create
eight pony tails, two for each, so
a total of eight. Let's continue with drawing out the guidelines for
the pony tails. Make adjustments
where you see fit, and this head was a
little bit misplaced. I made a little bit adjustment for the placement of the head, and now I'll I'll be adding
the hairs for the heads. So simple hatching
lines for the hairs, and this will be taking
a little bit of time, but the result will be worth it. We will be concentrating
more for the center of the head to create
partisans of the hair. And we'll be using hatching
technique to create the hair for the top of the
head and for the ponytails, we'll be using tiny eyes and the hair that we created
in the last project. So we'll be creating here
the ponytail in that manner. So this is the demonstration
of how we creating the hair for all the four heads. So these are floating heads. If you prefer you can
even create the bodies, that will become too
much work to do, so I am only creating the heads. You can even add
eyes to the heads, but let's keep it simple as
it's difficult on its own. Now, let me show
you how we'll be creating the details
for the ponytails. In the seep of eyes, we'll be creating the ponytail. So consecutive small eye
like seeps for the hair, and we'll be adding
tiny iris inside it. We'll not be adding the
pupil only the iris, only the white portion of
the eyes will be visible and dressed will be covering
with simple and small lines. The sides and the width of
the ponytails, you can vary, and I'll be keeping this
ponytail a bit sorter, and the one on the top right side will be the longest ponytail
that I'll be creating. Let me show you how I'll
be adding the Iris only. So only small circles
for the iris and will be filling the rest of the
area with small lines. So you can see that we'll
be using the hatching for almost all of the project. But the details it's
a little bit tiny, so that will take a little bit more effort compared to all
the other project, and that would take time. Also, you'll have to use
ballpoint paint or fine liner. As creating this
much details with breast paint will be
very challenging. At the end for the ponytail. So for the end of the ponytails, I'll be creating
here in this manner. Once again, I'm using
the hatching technique. And so you have got the rough idea I'll be creating the hair
and the pony tails. Let's do all the heads. Let me show you the
other pony tail. So let's do the other side. But before that, we'll have to define the sweep and
side of this here so that I can avoid overlapping
of two or more ponytails. While I'm sketching out the
guideline for the pony tails. Let's do the pony
tails for all so to avoid the overlapping of
pony tails with each other. As it's clear that one of the ponytail lies
behind this head, so let's create ponytails
a little bit carefully. So instead of creating the
ponytail for the first head, I am creating the ponytail for the second
head, and later on, I'll be creating
the ponytail for the first head that
lies behind this. And since this head lies a
little bit below the top head, you can see this head lies at the bottom
of all the forehead. So not all part of the
ponytail will be visible. So we'll be creating
ponytail up to the end of the beach and the rest will
not be seen, not be drawn. So yeah. Let's create the ponytails for
this first one, starting with the end
of the hair and we'll be moving upward so as to avoid overlapping
of the ponytails. Also, not all part of this
ponytail will be visible as some of the sections
of this bony tail is covered by the second head. If you want, you can
avoid this overlapping completely by placing
all the heads separately away from each other. Now, let's add the hair
for the top of her head. Let's start with creating
the partition for her hair, using the hatching technique. So while using this
hatching technique, I create a little bit of tensor region near the center of the partition of the hair. If you prefer, you can create
different kind of hair, and you don't need to create
the partition of the hair. You can simply use
the hatching to completely cover
the entire head. The process is bit lengthy
and the time consuming. The more layer you add,
the more darker it gets and the more volume it and
the more volume it gains. I'll keep on jumping from
one head to other head as the process is a little
bit tiring and boring. So add the line
at your own piece and try avoid getting bored. Here I am continuing with adding the tiny Irises for all the
sections of the ponytail, and later on, I'll be adding very tiny and minute lines to completely cover
the ponytail. So let me show you a
little bit closer how I'll be adding tiny my new
lines for the pony tail, adding it just beside the iris on both sides
of the ponytail. Initially, I thought
that it will be much more clear and distinct, but as you can see it, it's not that distinct. So I would suggest
you to use colors. So instead of the white Irises, you can cad red irises, and that will create a much more clear distinction or instead of using the black
for here, you can use red. That will be more
distinct and more clear. So continue adding the Irises for all the pony tails sections. I'm doing it from one side and then moving
onto the other side. And now let's add
tiny little lines to cover the rest of the
sections of the ponytail. Let's complete this and the other head in this section of the video
and in the other section, we'll be adding the lines and the here for the
other two heads. Slowly and gradually
adding the lines. Adding lines for
the smaller saxons does not take that much time, but since the sexons are small, we have to be a little bit more careful and precise
with creation of the lines so as to avoid merging of the lines with the other
ponytails or the other head. Now let's make this
area a little bit more darker where the head ends
and the ponytail begins. And yeah, if you want to make your head much more darker
or much more defined, add more lines to it. And with this, we
are done with our first flying head
with the ponytails, moving to the second, adding more volumes by adding
more lines for the head. Now, doing the same
with the ponytail, adding Iris for all the
sections of the ponytails. If you want, you can add hit another black dot inside
this Iris for the pupil, but that will make it
even more unclear. So just add only the Irises et's add few more sections for the ponytail till the
end of the speech. Doing the same for the
other side of the ponytail, adding iris for all the different sections
of the ponytail, and then V adding the lines. So what else you
can experiment with this project is background. You can create some
dynamic backgrounds with some lines or
designs or patterns. And let's stop with adding this much Irises and detail
to the project in this video. See you in the next video.
22. Floating head ponytails final details : Welcome to the second part
of the ninth project, and let's continue
where we left off. So in the last section, we only did the Irises, but I added the lines on my own. And as you can see that I did
the same for the head to, adding lines for the head and creating ponytails
for the other two heads. It took me around 15 minutes. Let's do the head
portion for the fourth, starting in the same manner, dividing creating
the partition of the head by using the
hatching technique, and the more lines we add, the more volume or more
darker the head gets. So let's add some lines. By some, I mean, a lot of
lines for this fourth head. So you can experiment
in a different manner. Like, for each head, use different supply
or for each head, use different pattern or
different kind of eyes or eyeballs or just keep
it plain simple. It's a single and simple head and the others with
some twist and turn. For all the heads, you can add necks to make
it a bit more terrifying. And also, you can create mouth
at the back of the head. So in Japanese folklore
culture, the Yoki, there is a Yoki female Yoki who got mouth at the
back of her head. I think it's called Roku Okubi
and she is a female Yoki, which has two mouth, one which it does
not eat normally, and the other is demonic mouth that eats a lot at nighttime. I might be re misremembering
the name of the Yuki, but I believe it's Dokurokubi
or no, no, it's FukaochiOa. The Yuki is called FukaochiOa Andy Ona Ona refers to woman in
Japanese language. So yeah, let's continue
with adding Irises for the fourth This is the longest ponytails of all the ponytails
we have created, and we'll have to add
a lot of ess for it. So how about for the
next class I do on Japanese folklore and
Japanese creature Yo kais And I'll try to do a better job with the next class because some of the paintings in here are a little bit longer
and too much repetitive. Continue with adding lots of tiny irises throughout the different section
of the ponytails. No, we're done with this
side of the ponytail, doing the same for
the other side. Small circular irises throughout all the sections
of the ponytail. And we will have two more pony tails to
go for the third head, and then we'll be adding
lines to finish it. What else can we
do with this kind of painting to make
it more interesting? You can add horns on top of the heads to make it
look more demonic. And as I said earlier, you can add mouth as in
Japanese folklore creature, Fukatocia and apart from that, you can add big
eyeballs at the back of the hair or you can great different kinds of
patterns with the hair. As I remember that
Yuki Fukaocia here she can use her here
to hold chopstick or bring food for
so on and so forth. So you can create
tentacles like here. You can even add claws at
the back of the ponytails. So we have got endless
opsonsEperiment a lot, and please come up with something interesting
and share it with us what you have created on your own and how
terrifying or scary it is. Here we are continuing
with adding small tiny minute
lines alongside the Irises of all the
sections of the ponytails. And yes, you can clearly see by adding some by adding
a few tiny lines, how dark the ponytails becomes, the ponytail on the right with only the irises and compare it to the
ponytails with the lines, how clear the distinction
in between them. And that clear
distinction is making the ponytails Irises
seem rebellent. It's a fine balance
scheme that we play with creating
this kind of doodle. And we are almost done
with this left ponytail, and then we'll move on
to the light pony tail. And then we have got
two more ponytails around six or 7 minutes, I hope. And with this, we are done
with this left ponytail. Let's add some more
lines to make it a little bit more head like because it was a
little bit softer, I think. Now let's add lines for this. Tilt your page or
paper or sketchpad, whatever you are
using so to make it a little bit more
comfortable for you. Otherwise, since the process
is so much repetitive, you will get bored and won't
complete this project. So use whatever you
have got to finish it. If it's simply too
boring for you, just avoid this project. This time, I am doing the ponytail
of one section, and then I'll do it on
the other sections. And with this, we're done with
this side of the ponytail, let's do it on the other side. Tiny minute lines, four or five on each side of the Irises. I think if you even
cover the irises, it will not create that
much of distinction. It will create a
bit of distinction, but not that great distinction. So we are halfway
through this side. We have got onlyten
or 15 remaining. No more than 15, I think, so let's be peace and add lines. Now, we have got
three more sections of the ponytail lift, and with these, we are
done with the fourth, the longest and the
largest ponytails. We have got only two
more pony tail left of the third head. So let's start with adding the Irises for all the
sections of the ponytail, and then we will decide how we'll be adding
the tiny heirs, like structure for the
rest of the sections. So let's start with adding the Irises on one
side of this section, and then we'll be adding and that we'll be adding
on the other side. Irises left for this section, and we will move on
to the other section. Now moving on to
the other section with adding the
Irises, and later on, we'll be adding
the tiny lines for all the sections of the
ponytail in one go. So let's add the Irises for this last pony tail of
this third flying head. Only a few remains. So be patient and keep on
creating small circular irises. Let's define the end of the pony teals with
more hatching. Same goes for this side. Now, let's add the lines. And as for adding the lines, I did it on my own, and it took me around
six or 7 minutes, so I first piece in ten
was able to complete it. Now, let's add the final touches for all the flying heads. Add a few more lines wherever the consistency of the hair
is not to your liking. And if there is any pencil marks or pencil
guidelines visible, erase it. With these were done with yet another long and
lengthy project. So I hope you stayed along
with me and finished it. And, yeah, we have completed
yet another project. See you in the next painting.
23. Girl with 6 hands: Welcome to the Day teen
and the teens project. For this project, we have a
totally different doodle. So let's start with drawing out the basic guidelines
for the phase. So I'm starting with an
elliptical s for the phase. And for this project, we'll
have a full body illustration of ghostly woman with eyes
that revolves around her head, and she has multiple hands. So this will be a quite
interesting project. And now let's continue with drawing out the
guideline for her body. For the top of her body, I drew a somewhat polygonal seep in the form of a rectangle. And for the rest of her body, let's go with a
cylindrical seep that is a little bit
broader at the bottom. These are the guidelines
for her hand and we'll have multiple
hands for this project. So this is the basic guideline, and now let's draw out
the guidelines for here. I decided to create
some long and wavy. So I decided to create some long and wavy hair for this project. Very long hair that reach up
to the bottom of the page. Again, I would
like to remind you the whole project
is in real time. So I would recommend you
to join along with me, and you are free to make
changes wherever you see fit. And with this, we are done with the basic guidelines
for our project. Now, let's add more details, starting with the breath, starting with defining a
little bit more volume to here on the right side. The idea is to create here in such a way that it
acts like a clop too. And I'll be adding
multiple eyes on her here as well as I'll be using
hatching technique to incorporate eyes on these. Now let's draw three
pairs of hand, and we'll be intersecting
few hands with each other. And for the top two hands, I'll be adding two candles. So these two normal hands
are holding each other. So the right hand is
holding the left hand. Now let's draw a guideline for the eyes that will
encircle her head. So I'll be creating
eyeballs that will be encircling around her head in the form of elliptical curve. Now let's add eyes for the face. So if you prefer,
you can add eyes, but I'll be going with eyeballs. So these are the general two
eyeballs and a little mouth. So for final and
uniform details, I am using the micron
fine line ten. And I'm going over the
orbit that I created in an elliptical path to add eyeballs in the form
of circular balls. So instead of the
circular balls, you can add normal eyes. You don't have to add eyes. The choice is yours, but I decided to make it somewhat different
from all the project. So I'm creating an aura or an orbit of eyes that surrounds this portrait or this project. Now our two main
eyes on the face. Let's darken the eyeballs
a little bit to make it a little bit distinct from all the eyes that
revolves around her head. Going over the outline
of the seep of the face, little mouth, adding
a little mouth. Now, let's do her neck. Now, let's go over the
outline of the hair. I'm not creating a straight and uniform outline for the hair, but I'm but I'm
making it a little bit ununiformO you can
see a little bit curvy. And I'll be using
hatching technique to create some very dense hair, and among those, I'll be
adding a lot of eyeballs. No, I'll not be adding eyeballs, but I'll be adding normal eyes. And now greeting here in such a way that it
acts like a cloak. Let's create her left hand. So we'll not be adding
that much detailed finger. So this hand that I created will be grabbing
the other hand, and I'll be adding
bangles on each hand. So we'll be creating a
total of six pairs of hand. And if you prefer you can
create even more hands or it's also an option that
you don't create any hand, create big enough hair that
it cover most of her body, and it appears that her hand
is covered under the hair. So yeah, the choice is yours. Now, let's create another
hand on this side. So I'm directly creating
the hand using the pen. But if you prefer
you can start with basic pencil guidelines or outline and then go
over it with the pen. Here I made a little
bit of mistake that I drew the hair
earlier with pain, so it will be a little bit problematic to erase the lines. But if I'll apply a lot of
presser with the pencil, I'll be able to erase the
hairs outline a little bit. And these we are done with
creating a pair of hands. Adding the fourth hand that is being held
by the first hand. So just a little bit
detailed for the fingers. Not that much detailed
finger, but, yeah, what just somewhat
recognizable hand. Now, let's add the
final pair of the hand. So these two hands will be
crossing each other and will be holding two candles. And instead of these candles, you can add anything or
whatever you prefer. So we are creating fists
that will be holding the candles and the outlines of the hair that we did earlier, we'll be trying to
erase it or lighten it a little bit by rubbing the eraser a lot so that it
may lighten the paint marks. And I would recommend you to use pencil to draw out the basic
outline for the hands, and that will also make it easier for you
to avoid mistakes. I am just guessing the placement of hand and drawing
directly on the people. Avoid this if you are
not confident enough, so With these, we are done
with our six pairs of hand. We'll be adding a single
bangle on each hand, so a total of six bangles. If you prefer, as
I said earlier, you can create even more hands or also there is
even more options. You can create some wings. Now, let's add the candles
on the top two hands. And with these, we are done
with our six pair of hands. Now let's do the
rest of her body, the outline for the hair. And now let's add the
pupil inside the eyeballs. If you want, you can add
a little bit of veins and more details in the form
of some dark circles. Now let's add
eyeballs for each and every eyeballs that
encircle around her head. So tiny details in the form of black pupils and a little bit of white for the highlights.
Apart from this. As I said earlier, you can add
a little bit of eye veins, and dark circle is not
possible in this case, but you can add multiple pupils. But we cases when adding
multiple pupils at it will be a little bit difficult
as the size of the eyeballs is
comparatively small. And now we have erased
the pencil outlines. Adding a little
bit of fine lines along the circumference
of the eyeballs, very little and minute lines alongside the outer
edges of the eyeballs. The use of this fine
liner pen helps the process a little
bit, not a little bit, but a lot because it would be very hard to create this kind of small and minute fine lines using the bras pins
or sketch pins, as it will be very difficult and challenging to
create those kind of these kinds of line using those big brushes
and sketch pins. So for this project, I would recommend you to use the fine liner pen
or ballpoint pen. And with these, we
are done with this ring encircling her head. Now, let's add a lot
of eyes for her here. So here we are creating
general sp for the eye. If you prefer, you
can add eyeballs. The same we use for
her real eye and the ring of eyes that
surrounds her head. But here to make it a little bit different and distinct,
I decided, why not? Let's create the general sps for the eye with the
pupils and the Iris. But since the Sp will be
a little bit smaller, I will only be adding pupil with a little bit of
white for the highlights. And make adjustment wherever you see fit with the
hands placement. As I did not use the pencil
outlines to mark it earlier, I directly drew the
hands on the papers. So I made a little
bit of mistakes with the size and
width of the hands. And if you will use
the pencils to create the guidelines and
sketch earlier, you will be avoiding
those kinds of mistakes. And we are almost
done with adding numerous eyeballs
throughout her hair. One more thing that you can do is to vary
the sizes of these eyes throughout her hair to
make it more distinct. Also, what I said earlier
about creating wings. So that will be
something interesting if you decided to add the wings. So since the space
is not that much, you can create folded wings behind her back and
also you can create a little bit of
gloomy backgrounds or giant eyes behind her. Or you can add
colorful background. The choice is your so experiment a little bit and and
feel free to sear it. Now, let's create here. So we'll be using
hatching technique, very small fine lines very
closer to each other to create look of dense
and dark hair. Instead of using this hatching technique to create the hair, you can use breastpin
or sketch pin to completely fill the hair
with a single color, black, red, or any other color. You can use the
orange, red, green, or whatever other watercolor or sketch pin or
breastpin you have. Experiment with the type of hair and the kind of color you
want to apply for it. But for this project, we'll be only using
this micron pen, the fine liner pen,
and lb and I decided to create the hatching
lines for her hair. So we'll be feeling
the entirety of her hair with these
hatching lines, and it will take a bit of time. So be patient and create small
fine lines for her hair. One more kind of
hairstyle that will suit this project will be
wavy and unruly hairs. That will be also a unique
addition to this project. Please experiment a lot with the project
you are creating. You don't have to
copy the exact scene, project that I'm making, add your touches to your
paintings and express it the way you feel that it will make it more
creepy and terrifying. Be careful while adding this small and fine hatched
line near the eyes. As the siges of the eyes
are tiny and minute, it may lead to less distinction between
the hair and eyes. So be causes around the eyes and curve the lines a little
bit to accompany the eyes. And now we can clearly see the eyes surrounded
by this hatched line when we'll be adding
but when we'll be adding the eyeballs
inside the eyes, the distinction will be
not that much clear. The same thing will
happen that happened in the last project with
the floating head girl. So if you prefer, you don't have to add the
eyeballs inside these eyes, keep it as it is
only white eyes. And we're almost done with
this side of her hair. And yeah, let's be patient and fill the entirety of her hair
with these hatched lines. One more suggestion
I would like to recommend is to use
different seds of paint. By different seed, I'm in different color like one
line with the red color, one line with the blue color, and one line with
the black color. And that will be a really unique and fascinating
combination of her hair. Also, to make it more smoothly, you can start going over the outlines with
the hashed line and later on adding the hashed line inside
the rest of the outline. It will avoid the overlapping of the boundaries of the hair, so that's only a recommendation. And we are almost at
the bottom of the hair. And yeah, let's finish
this side of her hair. And since the process of
creating the hair it seem, I decided to create the hair
on her other side on my own, and it took around
five to 7 minutes. Now, let's add the bangles. Simple bangles in the form of semicircle on each of her hand, a total of six bangles
for each hand. If you prefer, you can
add multiple bangles or no bangles or some kind of
design or tattoos on her hand. So adding the bangles
is quite easy. We'll have to darken the
bangles a little bit so to make it clearly distinct from the rest of the
hair and the body. Adding the color for her clothes or gowns that she is wearing. If you will add
colour to her cloth, it will make it
more interesting. Now let's add the eyeballs
for each and every eye. Single black balls
for the pupil. Leaving a little bit
of white space inside the single black balls
for the highlights. As I stated earlier,
the choice is yours. As you can clearly see that distinction in
between the hair and the eyes is not that clearly evident when I add the eyeballs. If the sizes of the eyeballs
were comparatively bigger, that distinction in
between the hair and the eyes would have
been much more great. But since the
eyeballs and eyes are comparatively smaller and of the same size as
the hatched line, the distinction in between them becomes a little bit unclear. And we have got a few more
eyeball to add for eyes, and we will be done
with our tenth project. We are done with these eyeballs. If you have made any
mistakes or if you want to add few more details,
feel free to know that. Now, let's apply a lot of
pressure with the eraser to lighten the marks of
the pin for her hand. I'm applying a lot of preset
with the eraser to lighten the earlier paint mark that we use for the
guidelines of our hair. We are almost done
with this project, going over the outlines of the hand a little
bit to darken it. And with these, we are done
with our tenth project. Now let's add some final
touches and adjustment to the project and see you in the next project,
happy painting.
24. Girl with song vertical slanted eyes: Welcome to the 11th
and the 11th project. So we have a simple
and very easy project, a simple phase with lots of eyes and hairs with multiple pupils. So let's start with the
guidelines for the fees. So I'm starting with a circle for the rough sieve of her face. So you can use compass or any other tools to
draw the circle. I am drawing on my own, and it's not perfect circle,
but it will do the work. Now guidelines for the
nose and the mouth, which will not be drawing, but I'll be using
these guidelines as perspective point to
draw out the eyes, and it will help in the
placement of the eyes. Yeah, now let's draw
the rest of her mouth. By mouth, I mean the
rest of her face. And now let's add the eyes. So I am adding Is
in this manner. If you prefer, you can add
the eyes in horizontal way, but I'll be adding the Is
in this straight manner. So as you can see, I use the difference line for
the nose in the mouth to adjust the eyes in such a perspective
way that it's follow the guidelines and the
contour of the face. The sizes of the eyes
are dependent upon you. You can make it much
bigger or much smaller. Instead of this kind of eye, you can create or
add eyeballs only, and you can even add
the nose and the mouth. Now let's draw out the
guidelines for her hair. So I decided to create this kind of mushroom cut hair
for her hairstyle. And I'll be creating
very simple hair so that it would not
take that much time. Here's an outline for the ear. If you prefer you
can cover the ear, but I'll be making her visible. You can add some earrings
and piercing for her ear. It's optimal, and we're almost done with the
outline for the hair. Make some final adjustment for
the placement of her hair. And, yeah, we are
basically done with the outlines or the sketching
for the eyes and the face. So her hair will be covering
some section of the eyes. Let's add colors, starting with the fine liner
to go over the outline. I'm going over the outline of her hair with the fine liner. Later on, I'll be adding brush paint on top of it
to darken these lines. And now let's go over
the outline of her ear. So here I made a
little bit mistake. The side of the ear
is comparatively smaller as compared to
the rest of the fees, so pay attention to
your painting and make the ear a little bit
longer and more defined. And we are done with the basic outlining
of the fees in here. Now, let's add the eyes. So try to follow the
contour of her fees while adding the eyes
and make the eyes a little bit curvier and bend it a little bit when following
the contour of the fees. The sizes of the eyes are comparatively larger
to the normal eyes. So if you prefer,
as I said earlier, make it smaller or
even more bigger. The choice is yours, and you don't have to
create the same eyes. You can create different eyes at more depth and detail to it, you can add ins and you
can create tart circles. I'm creating a little bit of bondary around
some of the eyes, and I'll be using breast
pain to darken there. Let's add some more outlines for the eyes on the
sides of her hair. So for these eyes, I'll be adding multiple pupils. And instead of the
whites of the eyes, I'll be adding black. So same kind of hair and
a little bit curvier. I forgot to add the eyes on
the other side of her hair, which I'll be doing it later on. Now let's erase all
the pencil switch, and we will add
more details using the breast pin and color the
eyes with black and red. Now let's add the
lines for her hair. So I'll be following the
contour of her head to add this long and elongated
curvy lines for her hair. Instead of this fine liner, you can use the breast
pins or keg pins or even watercolor
brushes to create some dynamic kind of
lines for her hair. But I'll be creating these
curved and long lines, and to make it more denser, as I said earlier, you will
just have to place the lines closer to each other
and to make it lighter, just place them farther apart. Also, since we'll be
using color for the eyes, you don't have to create
this kind of hair. You can just color the hair with any
color of your liking. And if you'll use
the watercolor, the process will be much
faster and more uniform. So let's team the direction
of the lines a little bit and completely fill this side of her hair with
this kind of line. We are almost done. Just
add few more lines, and we are done with
this side of the hair. And yeah, the pattern is
fascinating and interesting. Let's do the same
for the other side, following the
contour of her head, adding the lines in a
little bit carved manner. I'm trying to maintain a constant uniform distance
in between the lines. As I said earlier,
the closer the lines, the denser, the here will look. The farther apart they are,
the lighter they will. But I'm trying to maintain the same
distance for her here, here to make it a
little bit uniform. And now let's add a
little bit of curve for here and feel the
entirety of the side. We have got only a little bit of lines to add to
finish this side. And for the insides here, I'll be adding straight lines. And we are done. As I said earlier, I forgot
to add the eyes this side. Now, let's add the eyes. The side is comparatively similar to the eyes on her face. And yeah, we are done with it. Now. Adding straight lines, somewhat straight lines for
the insides of her hair. And these lines are
comparatively much more closer to each other than the lines on the outer sides of her hair. Darken the outlines of
the eyes a little bit to make it more distinct and separate from the
rest of her hair. And one more reason is that I'm placing the lines much
more closer to each other to make it a little
bit different and clearly distinct
from her outside here. And to make it much
more distinct, I'll be adding the bras
pane to act as outline or boundary in between both inside and outside here
of this hair style. And we are almost done with
addition of this street, small lines for this side. Now let's do the same
for the other side. The mistake is apparently
very much visible. The side of the
ear is very small, as compared to the face. Please make your ears much
more larger and more defined. This process is a little bit time consuming
as the other processes. So we will continue with adding the straight lines and being
careful around the eyes. And now we have
only a little bit of the straight lines left. A Let's feel the entirety
of this side of her hair, and then we will proceed
with adding further details, colors, and complete
this project. Now I have turned
the page a little bit so that it will become easier for me to
add these lines. So it's one of the benefit
of using small sketchpad. And if you are
using the same kind of sketchpad or drawing paper, then feel free to rotate
it so that adding of lines or creating of anything will become much
more effortlessly. Um now let's do the inking. So I'm going in with the
jig Gura take Bras pin. So let's start with going over
the outlines of the eyes. I'll be creating dynamic lines. By dynamic, I mean lines
of varied thickness. So somewhere the thickness
of the lines of these eyes will be a little bit more thicker as compared
to the other places. So generally on the edges
and near the center, I'll make the lines
a bit thicker. And for the other places, I'll make it comparatively
less thicker. And now we will do the outlining of all the eyes for her face. So I am using this black
for doing the outlining. Instead of this black,
you can use the red, and for the interior, you can use black as I'll be using red for the
interior of the eyes. So what I mean is to add the
color in white versa manner, red for the outlines and
black for the interior. So I am connecting some
of the eyes with each other and others are
not that connected. So once again, the
choice is your. If you want, you can connect all the eyes or if
you do not want, then you can draw them separately or outline
them separately. Now we are done with the
last IO, one more remaining. And with this, we are done with all the eyes for her face. Now let's do the
eyes on her hair. So once again, I am creating dynamic lines of varied
thickness and thinness. Now, let's go over the
outline of her face. So for the face, I'm creating the lines which are a little bit thinner as compared to the eyes, moving onto the other side to do the outlining for the
rest of the eyes. And finally, outlining
the last eye on her hair, going over the outline of her neck carefully
over the chin. And now let's do the
outlining for her hair. So with the use
of the breastpin, the outlines and the
distinction in between the fine liner pen and the breastpins much more
ilegar and distinct. So the various region, the upper hair or the outer region of the hair and inner region of the hair, as well as her face are now completely distinct
from each other. That's the main
benefit of using lines of various thickness and
different contrasting values. For this side, I am making the lines a
little bit more thicker. There's one mistake that I made. Both sides of the hair
is a little bit skewed. By skewed, I mean this side has hair a little bit up
as compared to the other, which has the hair
a little bit down. And now let's do the
pupils and Irises. Since I use the ink paint, there is a chance
that it might spread. So I'm using the tissue paper
to avoid smudging of ink. Once it dries, the
smudging will not happen, but now it's a little bit wet. So to avoid smudging, I'm using the tissue paper. Creating all the irises
with using the fine liner. Later on, I'll be using the breast paint to
do the outlining. Now moving on to the
eyes on her hair, adding multiple by multiple, I mean two irises for each eye. So I'm not creating
circular irises, but only a section
of the irises means three fourths of the
iris is visible. And now we will add the pupil. But before adding the pupil, let's darken the irises a
little bit and add the pupils. For this, I'm using
this breast pin, another brapin from Zikuratage. With this, I can create much more uniform line as
compared to the breast pin. I'll be doing the
outlining of the iris, as well as creating the pupil with a little bit of
white for the highlight. It is much faster as
compared to the fine liner, but a little slower as compared
to using the brass paint. The flow of ink with this brat paint is
also mentioned by. So if I apply more presser, the flow of ink
will be much more, but I'll lose a little
bit of precision. So I'm only applying mild presser with it
to get crisp lines We have got three or four Irises and pupils too and we will
be done with the face. And then we will
move on to the here creating two irises and pupils. So for the phase,
most of the eyes are facing in same direction. If you want, you can make it
pace in different direction. What I mean by same direction
is that the highlights on each side of the pupil
is on the left side. So if you want to make it
pace in different direction, change the direction
of the highlight. Now we are done with the piece. Let's move on to the hair. First, I'm going over
the outline of the iris and then adding the
pupils inside the iris. Also for the eyes in this hair, I'll be covering the whole
white part with the black. So like this, now let's feel the entirety of the
white with the black, carefully adding it in
between the pupils and eres, so as to avoid the smudging of the colors as well as bleeding
of the colours. Since we are using
the breast paints, there is a chance
that it might bleed, so be very cautious or careful. And if you're not that
comfortable with it, you can use fine liner. Moving on to the other
side, doing the same, going over the
outline of the Iris, and then adding the
pupil inside it. So we have got two
more eyes to do. So let's go over the
outline of the Is, and then let's add
the pupil inside it. Carefully adding the
black for this reason while trying to avoid smudging as well as
bleeding of the ink. Now, moving on to the last I, going over the
outline of the Iris. And now let's add
the pupil as well as the black for the
entirety of the last I. And we are done
with all the eyes. There is one mistake that I did. The first eye on
top of her head on the left side is a little
bit less darkened so. So be careful while
doing the outlining, make the outline
much more uniform. Now, let's add the
color for the eyes. This time, I'm using
the red sketchin to fill the entirety of the
white region with a red. And be careful while
using the sketch pin, check it on a rough paper that if the color
is bleeding or not, also try to avoid
smudging of the color. Sometimes the ink
and the color from the sketch pin or
the watercolor gets mixed after a
little bit of time. It's very advisable
and recommended to use it on a tissue paper or a rough paper beforehand and check whether the
color mixes or blends. Once again, I'm using
tissue paper below my palm to avoid
smudging of the ink. And we have got two
more eyes to fill. Also for the part in
between the pupil and the iris that is white for
her hair, you can add red. That's optimal. And with
this, we are done with eyes. Now, let's complete her ear. So adding details. And with this, we are done with this project. See
you in the next one.
25. Angry girl with big red eyes: Welcome to the date 12th
and the 12th project. So this project will be
the first in which we will be using a little bit
of different supplies. So I'll be using a little
bit of watercolor, and in the next project, we'll be mainly focusing
on watercolor. I have already
started drawing out the basic guidelines
for the phase. This project will only
consist of a single phase. I'll not be creating any body. So let's do the
guidelines for the phase. Once again, you can play
with the intersections of the line so that you can add the eyes at
different positions. Same goes for the
nose and the mouth. For this phase, I'll be creating two very large eyes and three or four eyes
at the top of our head. Apart from these,
I'll be creating two earrings in the s of eyes. And as for the
colors of the eyes, I'll be using red. Just sketch out
the guidelines for the eye, two big circles. As for the nose,
I'll be keeping it simple, two small dots. And for this, I decided to make a little
bit bigger mouth. Let's create the ears. So if you prefer you can hide
the ears behind her hair. Now, let's do the
outlining for her hair. For this project,
we'll be creating very simple ships for the
hair, simple and pin here. Now, adding the eyes that lies behind the
pangs of her hair. So some of the hairs that is
covering her forehead is a little bit longer and it
covers some part of the eyes, adding the pupils for the eyes. And yeah, we are deftly done with the basic
pencil sketch. Now let's do the inking. So I'm directly starting with breast pain
to do the inking. If you want more pre
season and uniformity, you can use the micron
fine liner paints. But I'm going with
a brass paint, so to make this project
a little bit faster. So as you can see,
we are creating enough taxia for her hair, you are free to experiment with different kinds
of hair style. Now, let's create
the outlines for her face by going over
the pencil outline. And we are creating some
dynamic lines in here. The ears are outlined. Two tiny dots for the nose, you can create or make more
detailed nose for her face. And now let's do the neck. So I'll be keeping it simple, so I'll be only
sketching out the neck. If you prefer, you can
add the rest of her body. Now, let's do the top
of her head, the hair. These are just basic
rough guidelines. Later on, I'll be adding
colors on top of it, and simple color, I'll
be using only black. If you prefer you can add or use red instead
of this black. Now let's go over the outline of the round circular eyeballs. So we have got some big
eyes for this project. And let's go over the
outlines of the hidden eyes. So in the beginning, I
decided to create four, but now I'm only doing the
outlines for the three eyes, adding the pupils
inside the eyeballs, so very tiny pupils. And I'll be adding a little bit of white for the highlight. Now, let's do the
outlining for the mouth, and let's create small tongue, covering the rest of the mouth with the black and later on, I'll be adding red for the small tongue that
we have created. And we are done with
the basic outlining. Let's add more details for the ears and the final ear
rings in the seep of eyes. So instead of the eyes, you can create the eyeballs of same size as that of her eyes. And yeah, let's add a few
more lines for her here. We're almost done
with basic outlining. Now we will add the colors. Before coloring, let's remove the basic pencil outlines
that we did earlier. So applying mild presser
with the eraser to remove the earlier sketched
out pencil outlines. So if or when you are using
ink lines or ink pens, there is a chance
that when you apply high presser or more
pressure with the eraser, the lines will get a
little bit less dark. So apply less pressure with
the eraser while erasing it. As you can see, the intensity for the mouth has
decreased a little bit. So I'm going over the fine
liner to add more black, adding more finer details
for her eyes in the form of semicircular lines,
encircling her ears. This is to create
some terrifying and exhausted look for her face. Instead of this circular lines, you can add the
fine lines that we practiced in our
earlier sketches. Adding a little bit of tiny
highlight for her pupil. Now, doing the same
for this pupil, a little bit of
white for highlight and filling the entirety of
the pupil with the black. And with these, we are done with the fine liner for the
eyes. Now let's paint. You can use ink or
whatever supplies you have like watercolor or
other kinds of ink. Operas paints, I'll be using the ink as
well as watercolor. So now let's start
with the hair. So I'm going in with the black watercolor to add the hair. I'll be completely covering
her head with this black and I'm applying very
thick consistency of the black to create the hair. But I'm not adding that
much water to the bras, so as to get a rough
texture for her hair. If I'll add more water to it, I'll get a very fluid
consistency of the watercolor. But since we are aiming
for a rough texture and a little bit of white of the
paper to remain untouched, so I'm going with a
thick consistency and high pigmentation of the black
color with the watercolor. So you'll have to
be a little bit careful while adding
the watercolor. Now, let's add watercolor
for the front of her head. So you'll have to be
a little bit careful while adding the
watercolor near her head. As we have got three
head and eyes. Also, there are
details in the form of ears and the sides
and see of her face. So be caseous while using it also makes sure
that the ink that you used or the breast pan or the fine liner that you
are using is waterproof, as there is a chance
that it might bleed or mix with the
watercolor that we are using or the water from
the watercolor may get mixed up with the ink
illustration outline. So it's recommended to try the
color or the supplies that you'll be using on a rough paper before applying
it on your main project. Also, the one mistake that I did is using this small brush. Since I'm using
this small brush, it will take more time. If I would have
used bigger brush, the process would have
been much faster. But I'm sticking with
the smaller brush to create rough
texture for her hair. As the smaller the brush, the more control and
precision you will get. The larger the brush, the more water content
it will carry, but the larger the brush, the more water content it will carry and the faster
the process will need, but you will have
less control over the pigmentation of the
color that you'll be using. So carefully adding
the black for her hair that is in
front of her head. And with this, we're almost
done with half of our hair. So let's talk about some of the suggestions and
recommendations that you can use. The first one instead of
using this smaller brush, you can use much larger brush, the process will be much
smoother and more fast. Other than that, you can use the other ink supplies or watercolor supplies
that you have, you can use sketchpins,
watercolor, gauze, acrylic pins and other
supplies that you have got. Then you can play
with the sap side of her hair as well
as the coloring. Instead of keeping it simple
with only the black color, you can experiment with a combination of different
color for her hair, and the same goes for her eyes. Instead of this
big circular eyes, you can create other kind of eyes and the mouth and the nose. For the mouth, you
can create much larger and scary
looking mouth or a stitched mouth or no mouth at all. Same
goes for the nose. Instead of this very
simple and tiny nose, you can create some ugly or
long nose or no nose at all, or you can create a hole
in place of the nose. So experiment on your own and come up with very unique
and terrifying creation As for the rest of her body, I only created the head, you can create the
rest of her body, up to her torso, or
even up to her legs. So for that, you'll have to use a bigger paper or you have to decrease the
size of her face. And for the background,
you can keep it simple with simple color in
the background or you can add some pattern or designs or some eye related
stuffs behind her. Experiment and see what bits best for your painting or the project that
you are creating. And we are almost
done with the hair, adding some very
thick lines with paris water for rough
texture for her hair. And, yeah, we are
done with the hair. If you want, you can add more blacks for her hair
to make it more dense, but I am satisfied with it. And now let's do the eyes for I, I am starting with the red, and I'll only be
using the red for the two eyes and the
three eyes on the top, as well as the two earrings
that she is wearing. While using different color, especially dark colors
like we are using here, the black and the red, these
are of higher intensity. Always carefully was
your bras so as to avoid bleeding and merging
of the colors together. So always ensure
that your bra is wasted properly before dipping
it into another color. Careful carefully adding
the red beside the here as well as the pupil encircle
the pupil carefully. As the intensity of
the red is high, there is a chance that it will overlay on
top of the black. So be careful around
what with this, we are done with this
side of the red. Now I am applying a bit
thicker consistency of the red to create a little
bit of contrast using the same red for the
tongue and adding a little bit more red just below the hair that
is covering her eye. Now let's add the red for the earrings that
she is wearing. So the red is of
the same intensity that we used, darker intensity. Now, adding the red for the final three eyes that
lies behind the hair. Carefully adding the red
in between the blacks and avoid mixing
of the two colors. And with this, we are done
with the red for all the eyes. Now, let's add the final details in the form of pupils and the ears for the top three
eyes and the two earrings. So I'm starting with the pupil
for the center of her eye. I'm not adding any white for the highlight as the background is completely covered in red. If you have any white marker
or super thick white color, you can use that to create a
little bit of highlight for these pupils going over the edges of the eyes to
create a little bit of veins. Now, let's add the pupil for both the earrings
that she is wearing. And finally, let's add
the details for her ear. And one more thing
to keep in mind, while using the color
on top of each other, ensure that the
watercolor has dried. Otherwise, it will be very
hard to apply the ink pin or the breast paint on top of it as the colors will merge and
bleed into each other. And with this, we are done
with our 12th project.
26. Watercolor portrait of a scary girl: Welcome to the date 13
and the 13 project. This is your first
watercolor project. And this is quite difficult and different from all
the other projects. Let's start with drawing out
the guideline for her face. For this, I'm starting with the horizontal and
vertical lines to draw out the BC guideline
and the placement of her eyes nose in the mouth. The two lines represent the eyes and the placement
of the mouth and the vertical lines is for the placement of
her nose as well as alignment of her face. Now, let's add the
guidelines for her eyes. For this project,
I'll be creating bigger eyes and eye on the
center of her forehead. Since I'll be
making bigger eyes, so let's add a little bit
detail for her dark circles. Now doing the outlining and
a rough sketch for her hair. For this, I'll be creating
a bit softer here, but I'll be creating curvy
and curly hair for her. So we have got a thin neck. For this project, we'll be
creating the full body. So let's draw out the guideline
for her rest of the body. Both of her hands
will be covered. So this is the rough guideline
for the clothes she will be wearing as well as her
face alongside the hair. Adding a little bit more detail for the face and the eyes. So instead of a circular eye, we are creating a little bit
of skewed but larger eyes. Now let's do the outline. For this, I'm using
the breast pin. Instead of using the fine liner, I'm using the breast
pain as the outlines created with this breastpin'
much more dark and intense. Going over the outline
of the center eye, the center I on the middle
of her forehead is circular. If you prefer you can make it in the same seat as of
the other two eyes. Now let's go over the
outline for her face. If you want, you can
add ears on both sides, but her hairs are covering
her ear for this project. Lightly erasing
the pencil marks. Since I use the breast paint, the intensity of the ink
was much more pronounced, since you can clearly see. The use of eraser has lightened the ink
mark a little bit. So I'll go over the
outlines once more. Now, the outline for her
he just over her forehead. Do the outlining for
the rest of her body. So I'm doing the pattern
outline for her neck. Et's add a little bit of
sados just below her neck. More details for her eyes, more details for her eye in
the form of dark circles in the form of curvy lines just
below and above her eye. Now adding the eyes, the iris in the pupil. Let's add few more
lines to make it more weary and tired looking, as well as a little bit angry. So with the addition
of this kind of line, you can make the expression
a whole lot different. Adding tiny eyebrows. If you want, you can play with the sap side thickness of the eyebrows in various
different expressions. Adding the pupil for the
center eye oh very tiny mouth. And yeah, let's do her hair. So for this, we are
creating the curvy and the curly lines for her hair. So just consider that
drawing noodles. So we are doing the outer
regions for her hair and adding a little bit of noodles like seep for the rest of her hair. You can make it more
intense or more dense by adding lots
of curvy lines, but we will be
keeping it moderate. I'll be keeping it moderate, so I'll not be adding
that much line for this since we'll be covering
it with colours. Like the other project, this two is in two different section. For the first section, I'll
be only doing the inking, so you can consider it one to be ink illustration verson
and other to be watercolor. So if you want, you can let it only remain as
ink illustration, or if you want further, you can add watercolor or
other different color, bras paints, et cetera to make
it colorful illustration. Continue on with adding
curvy and curly hair. So let's go over the outline
for the rest of her body. Let's add details for
the rest of her clothes. For her clothes, too, we'll
be adding lots of eyes. But instead of this
kind of bigger eyes, we'll be making
different kind of eyes. But here, I'll be
definitely using eyeballs and a little bit of different kind
of bigger eyes. Not this much bigger, smaller. First time starting with the eyeballs for the
center of her clone. So I'm making the eyeballs
a little bit dynamic. So lines are the lines I
am creating to encircle the pupil is dynamic that is of varied
thickness and thinness. If you want more
precision and accuracy, you can use the fine
liner sakura micron or ballpoint pen. For this project,
I decided why not use this breast pain
since I did not use it. Let's add a few more
hairs here and there, as I was not satisfied with
the intensity of her hair. Also adding more hairs on the right side as we
did not finish it. Adding a little bit more
here near the neck, so to make it more denser
or have more volume. So adding more lines to make the hairs more
fluffy or more curly. Adding two dots for her nose. If you want, you can add
nose of different kind, or you can not add
any nose at all. Let's do the rest
of her clothes. So as I said earlier, both her hands will
be covered inside her cloth or the
gowns she's wearing. And you can let the project
be up to only her chest, but I'll be sketching
out more clothes. I was not satisfied
with the hair, so I decided, Let's
add more here. So I am increasing
the intensity of the lines to make it more dense. Once again, the choice is yours. Experiment with
different kind of hair, use hatching,
crosshatching, or other kind of hair that
we did in earlier project, or you can come up with your
own unique own creation. Let's do the rest
of her clothes. Once again, I am not creating
uniform or straight line. I am creating a little bit of jig jag line or not
that uniform lines. Doing the outlining
for her hands. If you want, you can
create sleeve lace trays for her hands that her
hands are visible. But to make it a
little bit simpler, I decided to cover her hand with the clothes she's wearing. And now let's
continue with adding the eyeballs for the
center of her clothes. So I added this a
little bit off center. First, in the beginning, I thought that I'll be
adding a lot more eyes, but then I gave up the ideas. So don't add the eyes off
center from the cloth. Let's add more lines below and above the
eyeballs to make it more three dimensional or to add
more depth to the eyeballs. You can even add a lot of veins to make
it more realistic. Also, the fine lines that
we practiced earlier will also make it look more three
dimensional and realistic. I made the highlights
for the pupil a little bit comparatively
little bit bigger. So if you prefer you can
make it much smaller as the rest of the eyeballs
we have practiced. But for this one,
I decided why not make the highlights
a bit larger. And we are done with
the basic outlines, we'll be adding much
more details in the form of other kinds of
eyes for this girl. Let's do the basic SPs with
the fine liner for the eyes, and then we will
add more details. So I'm starting
with the eyeballs, and then I'll encircle the eyeballs and
proper sip of the eye. Since these eyeballs
are much smaller, I decided to use the fine liner. If you prefer, you
can continue on with the breast pain or ink pain. But I decided, why not use
the fine liner this time, since the eyeballs
are much smaller. I'll not be adding a lot
of eyeballs for the cloth. If you prefer you can increase
the number of eyeballs, you can play with the set sides and the placement
of the eyeballs. Also, instead of eyeballs, you can add nothing at all, or you can create
different kind of pattern designs for the clothes, or you can create garland
or different kinds of accessories with her clothes. So the choice is once more
yours and yours only. Let's continue with the eyeballs that I'm creating
for this project. We have got only a few
more eyeballs to add, and then we will
add more details to the eyeballs in the form of
proper sweep of the eyes, but with a full proper
rise in the pupil. So let's do the proper
sip of the eyes. But instead of the
white of the eyes, we'll be completely
covering it with the black. Once again, I'm continuing
with a fine liner, as the seep of the eyes
are comparatively smaller. And with this fine liner, I will get much more
accurate and uniform lines. Also, this fine liner is
completely waterproof, so there is no chance of
smudging of the colours when I'll be adding
the watercolors later on on top of it. So make adjustment to the eyeballs and the pupils
wherever you see fit, make them much more
bolder or smaller or increase the size
of the eyeballs. So once again, this process is a little bit time consuming. Instead of using the fine liner, you can continue with the bras paint or instead
of adding the black now, you can add it later on after adding the watercolors
that I'll be using. So for the watercolor, I'll be using red for her head and the
rest of her clothe, I'll be using a
little bit of black alongside with a darker
variation of the red. Also for the center
eyes, I'll be using red. And for the other two main eyes, I'll be using a
little bit of red, not a little bit,
but I'll completely covering the white section
of her eyes with the red. So, yeah, we will have fun with buttercolurs in the
next section of this video. But for now, we are
continuing with addition of the black for the corns
and the edges of the eyes. So let's talk about
a little bit about the background and more options
that you can play with. So the first option
is you can cover the entire peach with the
hair or not the entire peach, but you can make the
hair bit more longer, not bit more longer, but hole. So what I mean to say
you can make the hair. Very long. So covering the entirety of the bottom part of the peach with the hair. Then the next option is
you can create some kind of pattern for the background, or you can create very long and slim yes in the background, like we did in the
last project that is vertical eyes with the red in place of the
white of the eyes. Apart from these, you can create different
colored background, since we are using
watercolor for this project. So feel free to play with
different kind of backgrounds. Like we did in the tens project, you can create multiple hands. Also, you can play
with the mouth. For most of the project we
have created small mouth. You can make the mouth
very large or no mouth or mouth with very danger
and horrific canine. By canine, I mean,
teeth experiment a lot and create something really horrifying
and terrifying. We have got only three
more eye remaining, and that may well be mostly done with this
part of the video. So let's do the
remaining two eyes. And with these, we are
done with the eyes. If you prefer you can add few more eyes wherever
there is less yes, but I'm satisfied with it. Let's add a little more contrast to the whole cloth by adding the breast pain to
darken the outlines of the clothes as compared to the hairs and the
rest of her face. So I'm using the Jig orthakibas
for this since it has the most intense lines of all the art supplies material for ink illustration
that I have got. So carefully adding it for
the top near her neck. And let's create
the dynamic lines for the center of her clothe. The highlighted portion for this was comparatively
much bigger, so I decided to make
it a little bit smaller and we are done with
this section of the video. And so you can see that we have completed
the ink illustration. See you in the next
video with watercolors.
27. Watercolor portrait of a girl final details : Let's continue
where we left off. So we have done the
ink illustrated part. Now, let's do the watercoloring. So I'm starting with the black for the center part
of our clothe, so I'll be completely covering this region
with the black. The choice is yours once again. Instead of this black, you
can use any other color. And there is no need for
you to use the watercolor. You can use dustpan,
sketch pens or you can just let the ink Illustration
be ink Illustration. I'm using a tiny
watercolor brush to get much more uniformity and precision with the
outlining of the eyeballs. If you prefer you can
use different kind of bra or whatever you are
more comfortable with. So let's field the
entirety of this region with a black Okay. I have not added that much
water with the black color, so to maintain the intensity
of the black color, as you can clearly see, it's of the same intensity
as that of the breast pain, and it's much more darker than the ones we created
with the fine liner. So let's fill the entirety of the scent part of our
cloth with the black. Also, you can do black, red and black or black and the rest to grade or
as I said earlier, you can create pattern, texture, and different kind of styles. Et's continue with
adding the color. Carefully adding it and encircling the eyeballs
with the black. Since I'm using a
very small breast, it's taking a lot more time. If you will use larger breast, the process will be
done very fastly. As for the watercolor, I'm
using sneer watercolor, and right now I have
got only eight colors, but I can create any colors with the combination of all the eight colors that
we have got here. Only a little bit remains to finish this center
part of our clothing, carefully adding it and encircling the eyeballs
with the black. And with these, we are done with the black for the
center part for now. Let's add the final touches and do the outlining
much more clearly. And let's wait for the
watercolor to dry. So always ensure that the paper is dried before
using the other colour to avoid the smuging as well as blending and bleeding of the
colours with each other. And the paper has dried. Now, let's go in with the red. Also, always clean your
breast to make sure that there is no pigment that
is stuck to your breast, as it will create blending
and smudging of the colors. Now I'm going in
with the red for the white part of the eyes, carefully adding it and surrounding the
iris in the pupil. Let's add the rate
for the central eye. And these we are done with
the rate for the eyes. I'll be using the same rate for the eyeball in the center
part. So let's do that. So now let's add the red
for the center part. If you want, you can let it remain the color it
is in that is white. But I decided, why
not? Let's add red. And I'm not completely feeling the entirety of the
white part with the red, but I am letting a little bit of the white remains untouched. So the choice is
yours once again, if you want, you can cover the entirety of the white regions. But I decided why not let a little bit of white
remains untouched. Also, I have decreased
the intensity of the red a little bit. And I was not satisfied with it, so I decided to add
the color properly. Now let's do her here. So for this hair, I have added a little
bit less water as compared for
the central part. Now, starting with going over
the outlines of her hair, by outlines, I mean, the noodles like curvy hairs. We have to be a little
bit careful while adding the watercolor near the
face as to avoid smudging, blending, and bleeding
of the colours. So let's completely cover
her here with the red. Instead of this red,
you can use the black, the yellow or other
different colours. But I decided a theme of red
and black for this project, so I'll be sticking with
the red and black only. M. So I'll be jumping from here
and there depending upon which part is dry
and which part is wet. Feel free to add the color the way you
prefer depending upon the watercolor
paper you are using and how fast or how
slow it gets dried. Also, it's advisable to use
also it's recommended to use watercolor paper
preferably watercolor of density more than 250 GSM. Otherwise, your paper will bleed and that will be not
good for your project. The paper I'm using
is of 280 GSM. It's not watercolor paper, but it's not watercolor paper, but no bleeding occurs
with this paper. I am satisfied with the paper, so let's continue with adding the red for the
rest of our here. Carefully doing the curvy
here for the outlines of her head and adding a few more curving here
wherever I think it's required, like I did for the
top of her head. And we are done with
this left part, adding the right
for the right part. One mistake that I made with this project when
I was starting, I was not sure that I'll
be using watercolor, so I picked the
smallest watercolor that I was available
to me at that time, and it was this smaller New
Year student watercolor, and it has got a
very tiny brass. So I should have
gone back and bought a big watercolor brass
or other watercolor set, but I decided, why not stick with it and
complete the project. And that was a mistake as
it's sticking much more time. If I was using bigger bras, I would have completed
this project much earlier, since the watercolor brush is small and it's carrying
very less pigment, so it's taking much more time. So use the brush wisely, or you can use the sketch pin. That will be also faster, and the bras pin will
do the work faster as compared to the
watercolor that I am using with
this small brush. Only a few of the
hair strand is left. So let's do those, and we are almost done with the hair at
the red wherever required. And here, I say we
are done with here. Now, let's do the
rest of our clothes. Since it was taking
a lot of time, I bought the larger brush. So let's do it
much more quickly. So I'll mating the seam red. And since this brush
car more pigment, it will be comparatively faster, but I'll have to be careful as the eyes in here are small. So I'll have to do the
outlining of those. By outlining, I mean, I have to encircle those eyes to avoid overlapping of the
colors as the intensity of this watercolor is very high. It might lead to
overlying of the colors. That is it will cover the
black from the markers. Not marker but dt paints, so I have to be a bit careful while adding
it near the eyes. So we are done with this and only the rest of
her cloth remains. So carefully adding the red
for the rest of her clothes. Also, be careful
around the watercolor, the black watercolor to avoid bleeding and smudging
of the colors. So if I mistakenly use a
bit more water with this, the black from the
center of the cloth will get mixed and bleed
into the red. Ensure that the paper
is dried and be careful while adding
it near the black. Also, it would be
advisable for you to use lighter colours earlier and then and then add
the darker color, here I made a mistake with a plaque that I used it earlier. I should have used the red earlier and
then I did the black. Continuing on with
the other side, being very careful and causes around the eyeballs
and the eyes. And as you can clearly see, it's much more
faster as compared to when I was using
the small brush, and so experiment with your
supply and see what fits best and what is much
more faster and quicker. Also, precision and accuracy should be taken into
consideration also. Only a little bit of
her clothes remains. So yeah, let's continue with
adding the red for the rest. The problem with
using this bras, this larger breast
is the intensity of the color has reduced a bit. While I was using
this smaller breast, the intensity of the red
was much more darker. But here with this
large breast pain, the intensity is
not that uniform, and the red is a
little bit less darker than that of the one we used
for her eyes and the head, but it's not that noticeable. If you are more cautious, you can create shadows and highlights with the color
by adding a little bit of black to darken the red wherever there is folding of the clothes or wherever
there is eyes. So a little bit of darker
variation of the red to create sados and we are done with
the red for the clothes. Oh. The upper part
of her clothes, I'll have to add red for that. But I'll be adding it later on. Let's do the face for the face. I'm using a
combination of yellow alongside the red to create
the color for her face. So let's do the face
carefully adding it. Since the intensity of
the red was a bit larger, I had to add a little bit
more water and yellow to make it of the same color for the skin to bring
out the skin color. Experiment on the rough page first and then apply
it on the paper. So what I mean by that is
color mixing should be attempted on the rough page first and then on
your actual painting. If I had made mistake with
the mixing of the colors, the whole project
would have been tuned. Let's head back with
the rate for this part, and I was not satisfied
with the central eyeballs, so I decided to add more to
it to increase the intensity and to cover the white portion
which I left untouched. And with these, we are
done with this project. See you in the next
project. Happy meeting.
28. Seven floating heads with Red eyes: Welcome to the day 14, the 14th and the final project. So this will be a very
long and detailed one. Now, let's start with the
basic guidelines for the pace. For this one, we'll be
drawing seven faces. If you prefer you can
add more faces or less faces or you can cover the
entire pages with the faces. So here I'm adding
except for the faces, and later on, I'll be adding guidelines to add the
eyes, nose, and the mouth. I am overlaying some faces
on top of each other so as to create some complex
precal structures. So now let's do the
intersecting lines for the guidelines for the
eyes, nose, and the mouth. To keep this thing simple, I'm only using two
intersecting lines for the guidelines of the
eyes and the mouth. Yeah, we are done with the
basic intersecting lines. And now let's do the outline. For this, I'm starting with a pine liner sakura micron pen. So let's do the outlining. The reason that I
use this micron pen instead of the brass paints or any other material
is that it will provide much more accuracy for the finer details as the
sizes of the eyes as well as the mouth will be
completively smaller as compared to all
the other projects that we have created so far. Here I'm basically
starting with using the horizontal line
to create the eyes. That is I'm using that line as a reference line
to place the eyes. And I'll not me
adding detailed nose, but on an AC for the noses. And as you can clearly see, all the faces are facing
in different directions. So are even upside down too. So yeah, experiment with different kind of facial expression and
different placement. And as I said earlier, you can increase the number
of faces and entirely fill the whole page with
different kind of faces in different positions. And we are continuing with going over the outline for the phases. So let's do the outlining carefully while keeping in mind which phase
lies above or below. So this phase lies on top
of the other two phases, and this phase lies
below the first one. Before the subject,
we'll be creating hatching lines for
the entire page, and that will take
a lot of time. Also among here, I'll be
adding multiple eyes. As for the coloring of the eyes, I'll be using a
sketchment of red colour. Now let's add the
nose and the mouth. For the nose, I am
just creating very small As and for the mouth, two lines in the sip of ellipse. The outline for the faeces
wherever you have not added. And yeah, we are almost done with creating the
noses and the mouth. We will add the
eyebrows later on. Now, let me so how
we'll be adding the hair for this project. So these are the basic guidelines
or the basic lines that will be used to follow the shape and structure as
well as the flow of the hair. We'll be creating
very small lines. We'll be creating
very small lines, the hatching lines for the hair, and these are the guidelines for the s and the directions
of those hatching lines. If you prefer you
don't have to do these lines as this will
be completely covered. But I'm doing this
just to show you the directions for the placement of the hatching
lines for the hair, and it's clearly went that the directions will be
completely all over the page. It's a sty effort, so I would recommend
you not to do it or use pencils to do it. And we are done
with basic lines. Now let me show you I'll
be adding the here. So since I said
that this will be very long and lengthy project, the heirs will take
the most time. We'll be creating hires in this form for all
the entire page. Hatching lines and changing
the direction a little bit. Also, we'll be covering some
section or some portions of the faces that lies
behind the other faces. By that, I mean, the faces that lies
below the upper faces, we'll be covering some
section of those faces. Here you can see
that I have covered a little part of
this phase as it lies below the first phase. And for the other phases, too, if the lies just
below other faces, I'll add a little bit of here and cover some
section of it. Now let me show you a closer
look of how I'm creating the hair for all the faces
and the entire pages. Very small hatching lines, Ogg jag lines to create hair, and we'll be filling the
entire page with it. This process will
take a lot of time. And some of the suggestions
that you can use, the first one is the first
one will be very interesting, as I said earlier, completely filling the entire pair
with lots of faces. The second suggestion is, instead of creating
this kind of hair, you can create other baby
or curly hair that will be amazing or apart from this
kind of simple faces, you can create very detail faces with multiple eyes or no eyes, or you can create tattoos
or pattern for the faces. You can add long canine teeth, as well as some very
creepy stitched faces or faces by faces, I mean mouth. For every faces, you
can create ears with piercing or you can create
very creepy looking noses, long, elongated and croud noses. So these are some of the sution that you can apply for the face. And as for the here,
as for the here, as I said earlier, the curly
hair will do the work. And not only that, you can create some
kind of pattern and design for the background
instead of adding the hair. And apart from this hair, I'll be adding multiple
eyes throughout the page, and I'll be using red colour
to fill all the eyes, the eyes on the faces, as well as the eyes that will be covering the entire page. I'll be adding close to 50 or 60 eyes
throughout the page, and the size of the eyes will be comparatively larger or
somewhat similar to the faces. This will be a firing, lending and long project, and I'll skip some part of it. I'll record it on my own. So stay pasent and if you're
following along with me, stick with the kind
of drawing I'm making or do experiment and come up with your
own unique creation. Adding the lines for the
middle of the faces. And with these, we are done with the here near the fishes. Now let's add the here throughout
the rest of the pages. But before filling the
entire page with the here, let's add the eyes for the page. So as I said earlier, you can clearly see the sizes
of the eyes are a little bit larger than the eyes
we added for the face, but some of the eyes
are of the same sizes. So we have created few
eyes and let me show you how we'll be surrounding the
eyes with these hatch lines. So we'll be surrounding the eyes with these hatched lines, and we'll be a little bit careful and cosyus
around the eyes so as to avoid overlapping of the eyes on top of the hair. And you can use the guidelines
that we created earlier to add the eyes or you can add the eyes on your own
throughout the whole pages. Also for the seep and
the sizes of the eyes, you can add different
kind of yes or eyeballs or you don't have
to add any yes at all. Just cover the entire
peach with this kind of hair or totally
different kind of hair. Also, instead of using the
fine liner to create the hair, you can use colours, watercolor or brass pin or sketch pin to fill
the entire peach with different kind of doodles or completely cover it
with a single colour. Slowly and gradually filling
the entire page with these lines and be patient, listen to some
music or audiobook, or just do it when you are talking to
someone on the phone. So this will act as therapeutic
or gen like practice. So stay tuned and let's add
all here for the pages. Also, to make it more denser, just increase the
number of lines and place them much
closer to each other. Let's add one more eyes here and adding more lines near the eyes. Surrounding the
eyes with the hair. And as you can see, I'm changing the direction of the flow
of the hairs a little bit. So use the guidelines we
created earlier to change the direction a little bit and sing lines can be
used to add the eyes. Let's add a few more eyes. How about we complete
this section, and then we will move on
to the other sections. So to make things
easier for you, start with the upper part and then move to the lower part, so as to avoid
smudging of the ink. Since I am using
the fine under pin, the ink get quickly dried, but if you are
using other pints, make sure that the ink dries fast as to avoid
smudging of the color. And to prevent that you can use tissue paper
below your palm. And, yeah, we are almost done
with this upper section. Only a little bit of he remains. So let's add the he carefully alongside
the edges of the cage. And with this, we are done with the top right section
for the hair. And since this was a very long, lengthy and repetitive process, I did the rest of
the piece on my own, and it took me around 25
to 30 minutes to cover the entire pages with the small eyes as well as the hatching
lines for the hair. We have only got a little bit of space left to fill the hair, and then we will move on to adding the colors for the eyes, as well as adding the
irises and the pupils. And final touches, we have not added the eyebrows
for all the faces, we'll be adding the eyebrows, and some of the nodes for
the faces are missing. So let's move on to the face, starting with adding
the eyebrows. So small lines on
top of the eyes are a little bit darker to create a little bit
contrast between them. Oh, yeah, let's add
eyebrows for all the faces. You can make the
eyebrows a little bit crooked or change
the sp and sides of the eyebrows to have every
face a different expression. We have got only three more
face to add eyebrows to. And yeah, let's add the eyebrows
for the last two faces. I have done very
simple eyebrows. You can make it more
complex and detailed. Now, let's add the
pupils and the Iriss. So two circles for the
pupil and the iris. I'm not coloring the pupil
completely with the black, but only a little bit
of black for the pupil. And yeah, let's add the eyes
for the rest of the faces. I'm not creating a whole e by whole I means a
complete circular, a complete circular
iris and eyeball, but only three fourths
of the eyes is visible and they are on
the center of the eye. If you prefer you can make them see in different direction, but we are getting
things simple. Now, let's gently erase all the tensil outlines
for the faces. Applying mild pressure
with the eraser so as to avoid lifting
of the ink color. So I forgot to add nose
for the three faces, which I'll be adding now, small AC for the noses. And I forgot to add
nose for this one, so feel free to add a small
l for the nose for this one. And now let's continue with adding the eyeballs and
the irises for the rest of her eyes that are entangled among the
hairs of all the faces. So small circle. So I'm only
creating a pupil for this, not the irises, so only a small circle with a
white for the highlights. So let's add pupils
for all the faces. And as I said earlier, multiple times that I'll be
using red for all the eyes, as well as the
lips of the faces. If you prefer you can use
different color or use completely black to fill the
white spaces of the eyes, but I'll be using the red, and I'll be using
red sketch pin. If you have bras pin, that
will do the work too. But you can also use the
watercolor or gauze. Whatever supply you have,
feel free to use that. Oh when we are done with the half of the eyes, we have only got the right
side to add the eyeballs to. As you can clearly see
when we add the eyeballs, the distinction in between
the eyes and the hair becomes a little bit
hazy or unclear, but when we'll be adding
the right for the eyes, the distinction will be
once again much clear. The same thing happened with
the earlier project where we created small eyes and use
the hatching for the hair. So be careful around
the sep and sizes of the eyes and the hair so as to avoid confusion
in between them. Even at this stage,
if you prefer, you can cover all the eyes with hatching lines to
create a uniform here, but you are sticking with, but I am sticking with
this kind of eyes that around the faces and is entangled in
between the hair. And here with these, we are done with the eyeballs
for all the eyes. Let's add the colours. So I'm using the red sketch
pin for all the faces. For all the eyes, I'll be adding the red
surrounding the eyeballs. So this will take a little
bit of time and patience as the eyes are very minute. So let's continue with adding
the red for all the eyes. Instead of using this
red for the eyes, you can cover the entire
hair with the red. And that will create
some unique texture and pattern for the hair that is
right along with the black. Yeah, feel free to
experiment with that, adding the red on
top of all the hair. Also, if you prefer, you can use the watercolor to add
color for the faces. By color for the faces, I mean a skin tone for the face, or you can create some patterns, tattoos and a little bit different facial expressions
for all the faces. Et's rotate the piece
to make it easier for us to add the colors
for the remaining eyes. Carefully and patently adding the right for the
remaining eyes. Also, instead of the
hatching lines for the here, you can create some snake like pattern to create that
snake like pattern, you can create
curly and wavy hair and make them very long
and large like noodles. And that will create some snake like structure for
the here and you can add snake like faces to the end of those here that will
create medusa like here, and that will be really
scary and fascinating. And we have got only a
few more eyes to paint. Let's paint the remaining
seven or eight eyes. Adding the red for the
last eye and with these, we are done with the
eyes on her hair. Now let's add the right for the rest of the eyes on
the pieces of the girls. We'll have to be a
little bit more careful around the pupil
and the ibises as the sizes of these eyes are comparatively smaller
than the eyes that we painted for the hair. Later on, we'll be adding
the red for the lips. Let's add the red for the lips. Only a small simple line of the sketch pin
will do the work. Adding the read
for the last lips. And with these, we are done with the red and the final project. Happy painting. See you in the last video with the
conclusion of this class.
29. Thanks and conclusion : Thank you so much for
joining me in this class. I hope you enjoyed
exploring the world of dark and scary doodles and that you learned something
new and exciting technique for drawing terrifying faces, airy eyes, and
haunting hair designs. Before we wrap up,
I love to hear. Before we wrap up, I did
love to hear from you. Your feedback, suggestions,
and review mean a lot to me. They help me to improve future classes and also
inspire other students. Don't forget to upload
your class project, whether it's one of
the exercises we did together or your own
spooky doodle experiment. I absolutely love seeing your
creativity come to life, and your projects also encourage and inspire other students
in the community. If you enjoy this class, make sure to check out my
other Skillshare classes for more art, inspiration
and technique. I hope you continue to
experiment, practice, and and most importantly,
have fun with your art. Thank you once again for
being a part of this class. I can't wait to
see your project, and I look forward to hearing your thought and the reviews. Until next time, keep doodling, stay creative and let your imaging and let your
imagination run wild.
 Vishal Munshi