Transcripts
1. Introduction: You may be full of enthusiasm when you start a daily art practice. However, how do you encourage yourself to keep going way beyond day 18 or 38? Hi. I'm [inaudible] , and I'm a top teacher here on Skillshare. I illustrate for packaging gifts and fabric. I've done many 30, 100 and 365-day projects, and I've now filled over 20 sketchbooks, so I understand what controls, guides and motivates us to keep pursuing a now habit. In this class, I want you to see the true value in taking just 10 minutes of your day to make and assess art for yourself. Using some of my very first sketches, you'll see how simple the setup can be. There is a handy multi-tool you can utilize during your daily art adventure. As part of a new 14-day challenge, we will rummage around our homes for objects to sketch and create a plan for ourselves. I will outline how the power of intention can support the six minutes of sketching you wanted to take. We will develop ways to respond positively to those uncomfortable feelings and be mindful of the language we use to describe our art. This class is about showing up for your art every day to improve your skill set, by getting out of your own way to support your talents and creativity. Whether you are just getting started or a seasoned artist, by the end of this class, you will have 14 days worth of practice, with a better understanding of the tools you like to use and ways of working. My hope is you'll start creating from a place of fun rather than fear, as you move into a growth mindset saying, these 14 days will be the start of an investment, not just of your time, but also for your creative soul as you seek out new opportunities to grow as an artist. I can't wait to see you in the classroom, so please join me there.
2. Your Project: Thank you so much for joining me in this class. You probably know the theory of practicing something over and over will help on your skills. I don't think it's enough to just hear me say that. Please note this class is not specifically about drawing technique. It's about setting up good habits to support and suit your particular art practice. What I will be spotlighting is the mindset, that is your attitudes and behaviors when managing a daily art practice. Your project is to spend six minutes every day for 14 days sketching objects that you have found in your home using print paper, basic pens, pencils, and paint. At the end of the six minute session, I would like you to stick your work on a wall.Then I urge you to take a short break. Upon returning, we will make some notes as we assess and consider the sketches using a carrying critique method, we could take four minutes or less. So that's 10 minutes a day in total. I would love it if you could post your progress over the 14 days, use the projects and resources tab to upload your project. I would love to see a plan of what you'd like to sketch over the 14 days. Upload, at least 10-14 days worth of sketches you created. Include some quick sentences about how you're feeling with your progress and any issues that might have arisen. A short overview of the entire 14 days with highlights and perhaps low points. It's okay to be honest. I'm not here to judge. I'm here to support you. This is what your 14 day itinerary will look like. Please be very mindful to start very simply. But if you feel that six minutes is too short, please extend it to eight or 10 minutes, but also make room in your plan for this. On the right here are the project resources where I have downloadable PDFs for you, it includes a handy guide of household objects worth considering for sketching, your 14 day itinerary, the carrying critique plan and some motivational quotes. If you like to share what sketches you create them, please use hashtag ohnmarskillshare14day so I can track your progress on Instagram. However, I urge you to post within the classroom for full feedback. I know many of us are probably working solo from home. We've not many creative people around. So we have to find ways of cheering ourselves on and finding those optimistic moments when we are happy with our art.
3. My 30 Day Examples & Context: I think it would be really helpful for you to understand where I was with my art when I started a daily practice. I had been a stay at home mom for eight years looking after my two kids, and it wasn't until my youngest started school that I actually found a little bit more time to support my creativity. I started taking online courses, including a few here on Skillshare. It was always like I had to go back to basics. I know it's difficult for you to comprehend, but I think it's worth knowing that even I had to work from the bottom up. I actually had to go all the way back to the beginning of my Instagram account to find some of these pieces from September 2014. The first image I ever shared was of a freshly picked pear. If we expand and have a look at the other sketches that are in this set, you can see that they are drawn using a black pen, which is the pentel brush pen, or just pen and Indian ink. Also worth noting is I was using standard cheap printer or copier paper. I had already decided I wanted to be a great food illustrator. So in order to increase my chances, I had to start on a series of food images. The vegetables in the top row would have been from a weekly vegetable box and the fruits were from the local market and the biscuits we're most likely from my kid's treat box. All these items were easy to get hold of and to sketch. I know what you're thinking. They do not look spectacular, but they served a really important purpose in determining my emerging illustration style and also my desire to expand my portfolio. This next set I actually forgot I had completed. It was 30 days of packaging and it echoes what I said earlier, I really love hand lettering with a bit of a retro vibe. So I thought let's combine the two. Hand lettering, again done in pen and ink. Yes, you can see blotches and some of the angles and proportions are really wonky, and some of the lettering doesn't even sit properly on the packaging. But it taught me so much about which details were important, parts I could leave out and it would still create a good drawing. Also a great excuse to buy lots of chocolate in order to draw the packaging. I wanted to share with you my reasons for starting out with a daily art practice because it serves as my motivation and has a bearing on the intention part of this class which I will cover in depth in a later video. You have to remember that I had had little creative time whilst I was bringing up my kids, so for eight years I had been out of the loop and I had to train myself and encourage myself to draw again. But it meant I had something to post on social media. The last point I wanted to make was, over all these first set of art challenges really started the ball rolling in terms of producing a larger body of work. This forward momentum also laid the foundations of my present day art habits. Also from the very beginning I wanted to be known as an illustrator of food, so it stands to reason that I would draw food to begin with in order to support my portfolio. I started my Instagram account in September 2014, with no concept of how social media worked. My account was actually set to private for the first few months and I just wanted to share my art and my life with a few friends that I had because I was working from home. But it meant I had something to post on social media. The last point I wanted to make was over all, these first set of art challenges really started the ball rolling in terms of producing a larger body of work. These are the first few examples of my 100 day project which I started near the beginning of my watercolor practice in April 2015. I really didn't want to make things too challenging for myself because I still had a limited time to work before picking up my daughter from school. Furthermore, I didn't want to have any excuses saying I haven't got anything to paint. If you take a look, we have everything from seasonal flowers from my garden or from daily walks, there's jam jars, books, pot plants, items from my bathroom, my bedroom, and even some of my kid's stuff. I felt I could learn equally from each and every one of these items. I want to point out a few things that really helped me get started on my 100 day project, and these points I will be utilizing throughout the class. First of all, keeping it simple is key. Try to start basic and work your way up from there. We're talking basic materials, basic tools, and also basic subject matter. Carrying on from that, perceiving that everything around you from my bathroom into my kitchen, things like tinned fish, flowers from my garden could be used as subject matter. As they were found in my home, I literally had no excuse to say I couldn't find anything to draw. Thirdly, I did choose items that I was naturally attracted to like packaging or vintage tea cups, and that kept my interest alive because I was always looking for the next vintage type item. Fourth point is, please remember, I was also a beginner at watercolor at one time. I'm self taught. So I really had to keep my expectations low and most days I would be quietly surprised because I had filled another page of my sketchbook. Now let's take a look at 365 days of paint, which I started in January 2016. I was actually quite ill with pneumonia during the first months of that year. But I still found ways to fit in a sketchbook page during my more lucid periods. As I saw it, I had already laid down the foundations and had become familiar with my paints. So now I was able to explore and extend that knowledge. There is quite a lot of geometrics, but also fruit, florals, animals, even a few thank you messages when I hit certain Instagram milestones. I wasn't always pleased with how some of these turned out. Obviously, I've chosen to show you some of my favorite parts of the 360 day project, but that didn't deter me from showing up the next day. There is much to be proud of. I really enjoyed this daily challenge. Although I did complete 365 days in my sketchbook, I was actually two weeks late but I didn't beat myself up about it because I still had a huge body of work and a huge body of experience now. I had extra skills and extra techniques like combining pen and watercolor or ink line and watercolor. What you can see here are the gems or ideas of concepts and ways of working. As I moved forward, I can even see the beginnings of Skillshare classes that I would like to make. At the time of filming in February 2020, I'm undertaking another 30-day challenge. If we were to view each challenge as a major steppingstone, we can see that it laid foundations of what I'm able to achieve today. In this top row here, it's 30 days of masking fluid. I'm working smarter by planning. I am confident with watercolors, but I'm willing to explore further by adding masking fluid to the mix. You can see the progression as we travel up from 2014, 2015, 2016, and now to 2020. I could not have done this without a fairly persistent art practice where I would be getting my paints out almost every day whether I felt like it or not, just mocking about. I know you won't want to be practicing for six years, so what I have tried to do is condense what I know about turning up for a daily art practice into a 14-day challenge for you to try out.
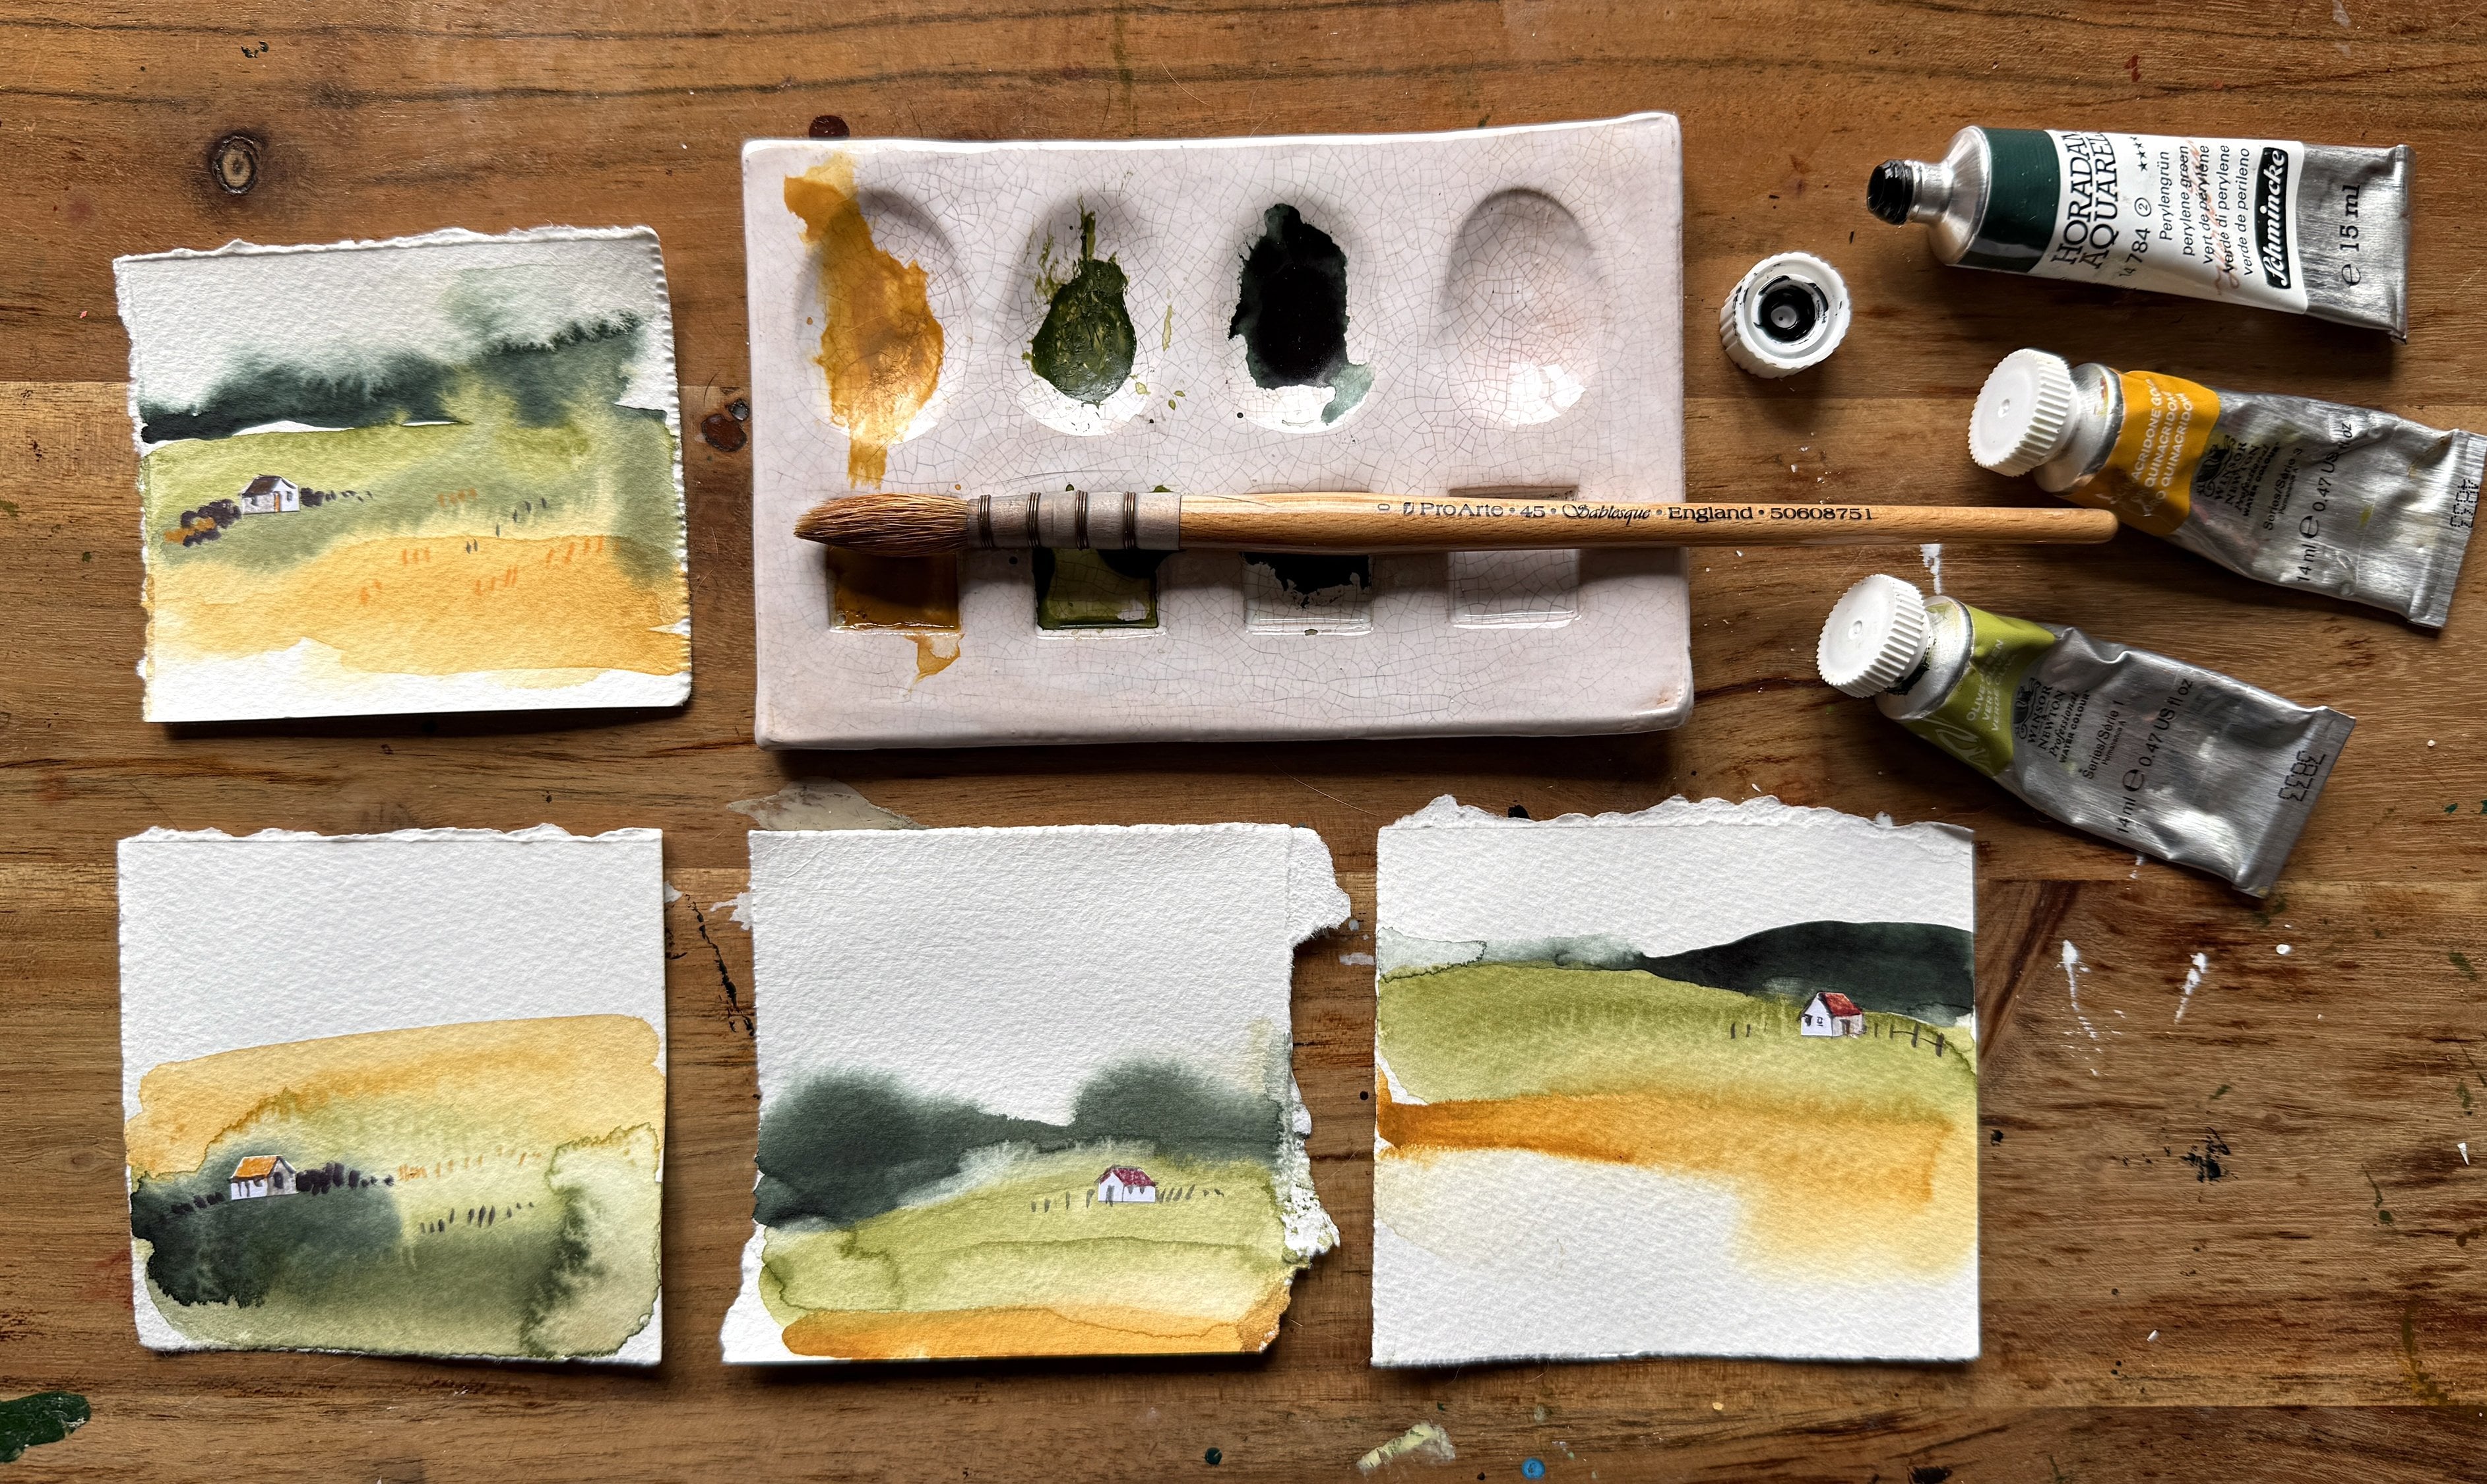
4. Materials & Household items: First off, in my list of materials is printer paper. Yes, that is right. You heard me correctly. I use basic bog standard printer paper from the supermarket, from your stationary store. The reason I love using this super smooth printer paper is because I am less inclined to feel precious. If I make a mistake or if I'm just warming up, I can throw it away and I don't feel like I'm wasting money. Next up is very basic, pens. We've got just biros there, pencils, and even felt-tips which I have nabbed from my daughter. Nabbed means to borrow. The reason I am using basic materials is because I don't want you to feel that you have to go out and buy expensive stuff. I want you to be able to use whatever you've got around the house. We can still create art using blueberry pencils that my daughter has in her set. Now, moving on, I am going to introduce some other materials which you don't have to use. I've just got some basic ink, one color, that's all you need, and a basic brush. Also, I will most likely use just one color, probably the black or the blue within a standard watercolor set, and you need a basic brush for that. I don't even need a watercolor brush. This is just white nylon brush. Furthermore, you will need some Post-it Notes. This is optional because we want to write notes and observations about our sketches. We can just note them down, stick it next to our sketch, or you can write directly onto the paper that you've sketched on. Either masking tape or sticky Blu Tack. I don't know what you would use in other parts of the world, but it would just stick up your sketch onto the wall. One thing you definitely need is a timer, so I can use my watch, but you can use an iPhone, anything. I will be using three minutes because I want to challenge myself. We'll talk a lot more about this in a later video, but you can have yours at five minutes or six minutes. Lastly, of course, you will need some subject matter. Got things like headphones, gouache, and just a little bulldog clip. In this next section, I am going to talk more about finding various objects around your home, which make excellent subject matter for sketching. I want you go around your house with a notebook and take a look at literally everything you have on your bookshelves, in your drawers, in your cupboards, anywhere where you might store little knick-knacks. I want you to take a notebook around and write down anything that you think is going to be interesting for you to draw, even if it's just a paperclip. Write it all down, everything. Let's take a closer look at some of the things I've got on my bedroom bookshelf. This cute little wooden figurine, I think would be relatively easy to draw. The shape, it's very simple. Decorative wooden owls, I have tried to paint this. This could be definitely on my list. This wooden elephant, I know I've painted this and I had trouble with it when I did. But I'm wondering if I sketched it, would it be more beneficial? Something else I've got in the corner of my bedroom is my makeup bag. I've got all sorts in there. We've got brushes, different textures happening there, straight lines, which I don't like to do. Moisturizers or different shape bottles, and these would be really, really interesting for me to draw, if challenging. So don't dismiss stuff like this. Go around your bedroom and find all sorts of small items that you think you could potentially draw. We've actually got two timers in the bathroom. My son has ADHD and we have to set the timer so that he knows when to get out of the shower and get ready for school. This is basically a cube, but I don't like doing straight lines. This would definitely be a challenge. In fact, either of these would be a challenge for me to draw, so that could be a possible. Let's take a look at some of the ornamental things I've got on my dining room bookshelf. Such a pretty little bowl there. Okay, I don't remember putting this in there. I think this is actually my daughter's stranger things key ring, but I think that could potentially be something that I can draw. A door key, I'm not even sure which door that fits, but interesting nevertheless. I just want to grab this cat. I love this cat. I must have picked it up in a thrift store. The eyes are just so mesmerizing, so I'm going to try and draw her if I can. Another thing I suggest is opening up all the drawers and cupboards of the different rooms that you've got. In this one of my kitchen, I've got lemon squeezer, can opener, tea infuser, potato peeler. I know these don't look like the most interesting objects in terms of increasing your creative capability and your drawing ability. Take this corkscrew. I don't think I've ever actually drawn one, so this is definitely a possible for me. I think it would be truly interesting to make it part of the 14-day challenge. I love this little grouping I've got in my living room. I painted this in the past, but I'd never sketched it, and I think it might be a better idea to use this as an example than that weird shell from the bathroom. I love vintage clocks. It just reminds me of my granddad. It doesn't work, but again, lovely shapes, lovely retro feel. There's quite a lot of lovely little things on my window, so here in my office. This cup I have painted before, but sketching I think would help me in future with other kitchen food-related items, so I might do that. Also, I just noticed, I don't why it's on the window silver. It's a little metal tin. I did wonder where it got to. It's full of my nibs for my dip pens. That's a lovely bit of retro packaging there. This is a reoccurring image in my designs and also watercolor. So I'm not sure whether I'll sketch that. Here we go, another retro clock. Maybe, we'll see. These are drawers I've got in my office. The top one has things like stapler, the highlighted pens, glue stick, washing tape. I used this to hold back some of my sketchbook pages. I've never actually drawn one. I'm thinking actually help me improve my drawing because it's relatively geometric, and I don't like geometric, so that's a possible. Just go through all your drawers. Ear plugs, just like that, I could potentially just sketch it like that. That could be really interesting for me because of the way it's all wound up there. Other things I've got in my office is this little desk tidy of pens and brushes. Just grabbing a few of these brushes. Just sketching these could be really great for me. Look at all the different textures, and perhaps I could include the lettering and do it from a different perspective. That could be really helpful. I actually conducted small questionnaire before I started putting together this class. One of the things that seem to come up as an issue was finding things to draw, and the reason I'm asking you to find things from around the house is because there's always going to be something. I am absolutely certain you can find 14 items that you like the look of, that you think will hold your interest for six minutes. So please be open to this idea.
5. First Steps Habit Forming: If you've taken a few of my other classes on Skillshare, you'll notice that some of them have 14 day challenges attached. You're probably wondering, why do I pick 14 days? What's my rationale behind it? Fourteen days is a really easy number to complete something, and it is a vital first step in habit-forming. Whether you're wanting to be a better character, illustrator or you want to become more familiar with Gouache. It's all very well when you start a project and you feel that buzz, but what happens when your attention starts to wane? What is going to keep you going through the tricky days and the challenging times. Perhaps you don't want to create hour after a two hour commute after work. We have to work within the lifestyle and make our habit work for us. It takes more than willpower to form a daily routine or habit. Habits arise through the process of triggering actions and eventual rewards. It helps be intentional about your actions and rewards. Otherwise, it may well lead to self-sabotage rather than fulfillment. Almost every habit that you have, good or bad, is the result of many small decisions over time. I think for many of us, including myself, when I become obsessed with achieving a result, I want it to happen quickly, and the only thing I think about is how to get to that goal. For example, filling up a sketchbook of amazing art. However, you may forget, or undervalue. The process of filling up that sketchbook is just as important, whether or not you achieve it. The desire to achieve results quickly fools you into thinking that a sketchbook with colorful pages is the real prize. But from my own experience of filling over 20 sketchbooks, I've realized it's actually about the daily processes that you follow and not the ultimate product. As you saw in a previous video, I started with black and white sketches based around food and packaging. In the beginning, my sketches were not the best by any stretch of the imagination, but I was a beginner. I was learning, and I knew I could build up my level of ability to the standard that I wanted by drawing day-by-day, week-by-week, say the behavior needed to be consistent. I really want to emphasize, especially if you have tried a number of times to complete a 30 day project. It's best to start simple. You might think it's too simple, but if you were to perhaps start within your comfort zone on your first day and then venture out into the groan zone. Here, you'll get a feel for what it is like to work beyond your skill level. When you have to deal with the unfamiliar and uncertainty. You may have to enter and exit the groan zone many times over and over and at your own pace, in order to take more steps, and then you'll be making sketches in the growth zone, which you can see is much further out again. This is where the real exploration can take place and you can feel courageous and bold as you create. Laying down the foundations like this is not a quick method and the path will not be linear. There are no magic number of days that you will need to complete in order to form a habit of a daily art practice. There are many popular views that habit-forming takes 21 days, 28 days, 60 days, 80 days, but the truth is, there is a wide range in the amount of time it takes depending on each individual. What I'm presenting in this 14 day challenge is a bit of an experiment, to help you get past a few of your blocks and your resistance to putting together a consistent practice. I'd like to think that the 14 days is a trial period after which, you'll be armed with a bit more knowledge, and from the lessons learned, it's likely that you'll find it easier to stick to a routine over the next 14 days, which almost takes you to 30 days and then you can work from there. Do you see what I'm getting at? Let's have a look at this diagram. By starting with 14 days, rather than jumping straight into a full-on 30 day project, it may be easier to grasp and comprehend and come to terms with it in our heads. Every time you increase your daily practice by seven days, and then 14, then 30, then 60. You're also increasing your understanding of how you work best, your own strengths and weaknesses. I want you to appreciate where you are right now and then later on, you can be your own cheerleader and access some reserves that will help see you through. Let's think of these 14 days as a stepping stone. You can start with really small steps, but you strides will get bigger, and then there could well be giant leaps, much later on in your path. The 14 days could also be the first rung for you on the ladder, and as we climb, we can build in systems that will help us overcome aspects such as limiting beliefs and compensate for the times when we may be bored. When the 14 days expires, you'll be much better at making choices that will support a consistent practice. You'll have a much better understanding of what works for you. I'm only here to guide you, you'll be the one making notes and observations about your art, which pens do you like using and if you like drawing straight sided objects. What works for you and doesn't work for you, will be unique. After the initial 14 days, you'll be much more clued up about your own creative routine and how it fits within your lifestyle, and this will inform you and become part of the strategy that could be used for much longer term projects.
6. Your Adventure : What we're trying to do here is called deliberate practice and it's exactly that. The act of practicing deliberately, intentionally, with a plan, and with purpose. I absolutely do not want you to feel overwhelmed, that's why we're starting with 14 days. Another way I want to present this challenge to you is think of it as an adventure, think of it as a journey that you are going to make, we are going to explore, and we are going to see some new things. I'd like to introduce the idea of a daily art practice as your path through the period of growth. I'm going to call it the growth mindset adventure. Please take a look. Just as we're familiar with the phrase, a journey of a thousand miles begins with the first step, I want you to view your art practice as a fascinating way to explore and expand your creative horizons. This foray into the growth mindset land will not be without these ups and downs, but think of the view you will see when you are at the top. Some of you may have tracked in familiar landscape to this, some of you may look on with a sense of excitement, some of you may be a little bit reluctant, even for those of you who may have undertaken this trek many times, we know there are many paths to choose from and none of them are linear. Let's take a closer look starting off on our path of perseverance. As you can see, it's already curving, and on the left we have the forest of frustration. This is when we feel like what's coming out of our pen or the end of our brush just isn't what we imagined in our heads. Then the path sneaks over to the right and we shall pass the plains of procrastination. I know we have all been there, I procrastinate by watching Netflix, I scroll through my social media, and I even run for eight kilometers, so I don't have to do what I need to do. Let's stick to the path. Far off in the distance, you'll see the plateau of panic. As you watch the late class videos, you will hear the panic in my voice. It is actually very common for me to have little moments of panic when I create, and that is absolutely normal. When you hear me holding my breath or trying to make myself breathe in deeply, it's really difficult to bypass the desert of disappointment when what you've created isn't quite what you had in your head. However, we are going to turn a corner and we're going to get to the estuary of enjoyment. Some of you may find it hard to believe, but trust me, taking the path that we have just being down whilst we're cultivating in our habit, we will actually start to find little pockets of enjoyment. The surprising site before us will be the foothills of fulfillment. This is going to be the beginning of the countless rewards you will get for taking the time to evolve your creativity. We will begin to appreciate and delight in the act of creating art. What is that we see on the left? It is the pretty dell of delight with its satisfying results and pleasing progress. Even at this stage, even for me, there could be a deviation, a detour from the path. I am certainly mindful of monotony and the tedious things that could crop up in that sense of weariness, even though we are close to our intended destination. If you have navigated this path, then you have a better understanding of the growth mindset that would have had to take place in order to reach that summit. I want you to feel a real sense of pride in accomplishment, because I know myself, it is not an easy journey on some days. You'll be called upon to muster up a ton of courage and be brave whatever you may find along your path. There are risks and hazards, but the end result is ultimately worth it. I want to go over the main points of what a growth mindset means as defined by Carol Dweck in her book, Changing The Way You Think To Fulfill Your Potential. A fixed mindset is when people believe their basic qualities like their intelligence or talent, or simply fixed traits. They spend their time documenting their intelligence or talent instead of developing them. They also believe that their talent aligned create success without effort. She thinks people with a growth mindset believe that their most basic abilities can be developed through dedication and hard work. Brains and talent are just the starting point, this view creates a love of learning and a resilience that is essential for great accomplishment. Those with growth mindsets tend to achieve more than those with a more fixed mindset, because they worry less about looking smart, and they put more energy into learning. One point worth noting is we all have our own fixed mindset triggers. When we face challenges, receive criticism, or fare poorly compared to others, we can easily fall into insecurity or defensiveness. This is something that I have been working on over the last six or seven years. On some days, it's more challenging than others, but at least I am aware when I am in that fixed mindset zone and when it's taking place, I am able to study it and make it work in my favor.
7. Your Mindset Multi-tool: But I'm not going to throw you out in the wilderness just like that. There are a few tools that help you along the way. I want you to know that we are going to travel light because we're only going to carry what we need, the stuff that supports us in creating the artistic life that we want. While we're on this journey, we're going to try very hard to lighten the load and let go of any need or at least reduce some of the emotional baggage that we may be carrying with us. You know what I'm talking about. The negative self-talk, the monkey mind, thinking art isn't good enough. I totally appreciate that this is part of all of us. But we don't necessarily need to burden ourselves with some of this extra weight. This is where the mindset multi-tool comes in. I want to lessen the need to carry everything around with us because it's so darn heavy. We are going to be fine with a lot less than you realize, and it will give you the freedom to travel swiftly. Although these tool is very small, it is very powerful. The fact that it can fit in our pocket means we are able to carry it everywhere with us. All the handy parts can be pulled out at anytime and is part of the assets we have at our disposal to support us while we build up this art habit. I will discuss each tool as a complete my 14 day challenge. So you can make more sense of their purpose. In the following videos, I will be putting all of these tools in context as I sketch. You will be able to understand the valuable role they play. Some of them may crop up and come to your aid more than others. Things like vulnerability, making the time for your art, having the intention to create, and seeing everything as learning and progress. I hope you'll see every day, but things like adapting and finding the fun will come a little bit later on when you have settled more into your practice and finding the experience comfortable.
8. Time: Perception & Planning: When I decided to retrain as an illustrator in 2013, my daughter was still in preschool, which meant I only had three hours. In that time, I had to do the laundry or the shopping as well as find time for practicing my art. I completely understand why many of you feel stressed and agonize over finding quiet times in your lives for an art practice. In this section, I really hope to offer you some really helpful tips for doing this. I totally get that we all lead busy lifestyles. Some of us have small kids or perhaps we have health issues, long demanding hours before we have time for ourselves. For this challenge, I do ask you to clear 10 minutes a day in order to create the sketches and assess them. This may seem like a tall order, but I'd like you to view these 10 minutes as an essential part of the habit forming process. Before I started this class, I sent out a questionnaire and of those that answered, over two-thirds of them had issues around making the time for their art. These are some of the things that they made comments about. Sometimes I spent time thinking about what to paint or draw than actually painting or drawing. I want to help break down the time we spent on the 14th day challenge like this. If you spend 10 minutes a day, that is 17 minutes over a week, or alternatively 1 hour, 10 minutes a week and 1 hour, 10 minutes over the two weeks obviously is 2 hours and 20 minutes. Please note that the 2 hours and 20 minutes is spread out over 14 days. That is probably the equivalent amount of time I have spent watching stranger things in one sitting. For now, I want you to quickly think, how could you fit 1 hour, 10 minutes into your first week. Could it be in the morning before your kids are up or perhaps after you've had dinner, could you sketch at your office at lunchtime for 10 minutes? Hold those thoughts in your head and we'll come back to those in a moment. Quite a few people mentioned in the questionnaire that they felt guilty about spending their time on art when they could be doing something more important, perhaps. They may have stopped seeing the value of a daily practice after 10 days in some cases. I don't want you to think that the physical body of work, the 14 sheets of paper is the prize, it's what they represent. The merit lies in the minutes spent. The usefulness is in the actions you took to create the 14 sketches. Another way to look at it is you have 14 sketches you didn't have before. You've gained an extra 140 minutes worth of experience over those two weeks. That equates to two-and-a-half hours of creative growth. You would have improved your art skills, improved your time management skills and there would have been opportunities to discover more about your strengths and weaknesses. So all of this time creating is immensely valuable. You have to go through the process and see all of your sketches as part of a much longer journey you're undertaking. I understand that making art a regular practice can be very difficult. In the beginning, anything new is often slow and you probably feel very vulnerable. But if you can't get past the notion of taking a risk or thinking that you might fail, you'll find it tricky to develop the artistic skills to implement the ideas or vision you have in your head. The time you spend practicing fundamentals is never going to be wasted time. They would inform decisions we make in the next sketch, the next painting and even inform a painting that is two months in the future. The new discoveries you make, which I'm sure there will be many, will become part of your artistic voice and sustain your creative life. A major emphasis of this class is starting small and working your way up from when you have the foundations in place. The important details I want to point out here is we are only starting with sketches. I'm only asking you to produce line sketches and they will be rough. They will not be immaculate finished pieces. They will be outlines and they are not meant to be realistic depictions with shading. This class doesn't specifically teach drawing. But from this point onwards, you can seek to build upon new skills and as you do so, you can increase the time spent. However, for this challenge, we are working with the most minimal amount of time, just six minutes in order to sketch. In that time, I'm sure you will be able to get enough done. This is part of your challenge. I'm actually going to challenge myself by putting three minutes on my timer and doing it twice. You can do this too, if you like. After a few days, you'll start to realize which lines are going to be the most important and you'll become more intentional with them. Your muscle memory will start to develop and you will feel more efficient and comfortable with the short amount of time. Then, once you realize you can create and assess with 10 minutes of your schedule over the coming weeks and months, you can progress in defining 15 and then 20 or even 30 minutes of your day for an art practice. I'm sure your sketches will evolve and advance a you'll try out more elaborate techniques. But for now, let's stick to 10 minutes. Your 10 minutes a day needs a time and place to live in your life. Having a rough plan will pay huge dividends going forward. Now, at least today before you embark on your 14 day adventure, dig out the list of items that you jotted down when you went around your house. Now, we are going to put these in a plan. This is what your plan could look like. This is available as a downloadable PDF, which you may like to use or you can think of your own plan, but it should follow roughly this layout. We're going to write a rough plan because we want to set ourselves up for success. We don't want to be delivering everyday thinking, what are we going to paint. We are going to spend 20 minutes writing down what we want to draw, which time of the day we're going to do it and which medium we are going to use. I actually think the most important aspect is this column here. It is creating the time for your six minutes when you are going to practice your sketches. As you can see, most of my time slots are after the school run and I want you to be able to fill this column in using your lifestyle. Maybe you work in an office, maybe you have a three hour commute, I don't know, but find a time that will work for you. Now, the next column is the item that you're going to use. I do recommend starting off with something easy. Even for me, I'm starting off with a small bowl because I want to become comfortable in this practice and then with each passing day, make it a little bit more trickier. After that, I'm going to try a tin opener and then a timer. But the timer has the straight side so I'm giving myself two days grace to get used to the idea of doing it. The third column will be which medium you are going to use. I've got a variety here of biro, pencil, colored pencil, brush, gel pen, ink. Again, I would start easy and then work your way down. Some days you might find, actually I really like working with that colored pencil and you can change this up. This is a rough plan, you've got that list where you went round and if you're anything like me, you had about 40 items on that and you might want to change it up. Actually, I don't think I'm going to do the wooden figure. I'd rather do a pop plan a little succulents that day and that's absolutely fine. The main thing is having some sort of plan before your 14 day start. This bit of advanced preparation will give you confidence and provide a framework for your two weeks. It will also help with intention part of this challenge, which we will talk about in the next video. Another really great tip that I want to share with you is to prepare a bag to put everything in. This is just a basic zip up pouch. In here, we've got a few small items that we could draw, especially if you're going away for the weekend take a few things with you. Don't try and pack something like that in. Also in here, we've got a selection of pens that we may want to use, as well as the printer paper. Even if you're not getting away, it means that if you've got all these items in a bag and let's say you put them on a bookcase, you know where it is every day you put it back, when it comes to your practice, they are going to be there and you have no excuses. You won't say, oh, I can't find a particular pen because it's going to be in here. I want to show you I use this in real life. This is what I would call my urban sketching bag. Although I don't open sketch very much, I do sometimes. It's big enough to fit in my normal watercolors. I don't have a smaller set. It also fits my usual size sketchbook. What else have we got in here? I've got the fountain pen that I usually use, a few water brushes, cartridges for the fountain pen, even paper for dabbing the brushes off. It means that, oh, I have fun going to a cafe. I don't have to spend 10 minutes trying to find that thing. It all fits in here and I know exactly where it lives. The other pouch that I have actually contains my [inaudible] and the brushes that I'll need. If I were to take this away, any of these actually, I can take them to a cafe, I can work in different rooms of the house without having to be and rummage around trying to find everything. I have taken pouches like this filled with my little sketch book and pens to soft play thrill or if I've gone over and stayed with my parents, I just take this with me so I keep it as simple as possible and it gives me less excuses to say, oh, I didn't bring this with me. We are trying to minimize excuses and maximize success.
9. Intention: Part 1: You've probably heard of the power of intention and this will be our focus for days one and two as we ease into our daily practice. The attitudes we hold before, during, and after we create is key to helping us on this 14 day journey. I've often found that a tiny shift in my understanding is all that's needed to change my perspective. I'd really like to share some things with you in this part of the class. I want to quickly explain the difference between intention and goals. Goal setting let's us see the future and understand what we want, a desired outcome. However, the flip side of goal-setting is it creates an emphasis on what we don't have and I absolutely don't want you to be creating from a mindset of lack. As an example, lack of skills or lack of talent, because for those who set goals and if you fail to achieve them, it can sometimes lead to a sense of failure, which I absolutely don't want you to feel either. So I'd like you to consider setting intentions before and during your sketching practice. Writing down something such as, "Practice not perfect," can make you more effective and should be included as part of any daily routine to allow you to focus on the sketch of the day. Intentions gives you purpose as well as the inspiration and motivation to achieve a rewarding sketch practice and experience. I'm going to give you a few pointers on how we can do this. Even before you gather your art materials, I want you to take a few deep breaths and literally give yourself space from whatever you were doing before. Say you'd been stuck in traffic or you just returned from a grocery shop. Creating this space mentally and physically will help enormously. Take a look at your planner, mindset I was going to draw a ceramic bowl using a biro. Then in your mind's eye, see yourself holding that pen and creating the lines from a place of ease and relaxation. Tell yourself that the six minutes is just for you and your art. Now, at the top of your sheet of paper, write down your intention for those six minutes. It doesn't have to be profound, but it will serve as reminder for when you've possibly started a slide into panic, it would bring you back to the present. It's almost like pacing ourselves with patience and providing the arena in which to just be with your pen and your paper. Think of it as drawing within your special bubble of creation. You notice many times throughout the class, at the beginning of each day, I will write down, "I am phrases." They are very powerful words as it is in the present tense because that is where I want you to be in the present when you create your six minutes worth of art. I've included a list of motivational words and quotes that you could use to help with your practice and these are available as part of the downloadable PDFs in the resources section. Now, let's take a look at what I created on the first two days of my 14 days.
10. Intention: Day 1 & 2: I've got my timer ready, three minutes on there. I have my bowl ready. Remember, I want to set myself up for success, especially on this first day, because I'm a little bit nervous and apprehensive. I'm going to keep it at this angle using a bit of blue tack to keep it in that position while I draw. Prop that there. Sorry, that's the shadow of the bowl making that. I am literally going to use a biro. This is my daughter's. It's a bog standard black biro. Let's see what happens. First of all, the lip of the bowl is like an oval. I'm going to try and just start with the outlines, trying to keep it as simple as possible without getting too bogged down with shadows or highlights or even the pattern at the moment or. See, I was going to say, I've gone wrong there, but I'm going to watch my language and say, I need to rearrange the line, slightly. It's roughly like that. I can just see the bottom of the bowl peeping there. Now, that's pretty much it. There's just some lovely bowl patterning in there. There's actually a blue rim, which I could put in like that. If I put in the basic black floral shapes in there, they're really big and bold. I realized as I continue to draw the outlines of the florals in that, it was not matching what I was actually seeing. But I decided that was absolutely fine. Not to sweat the small stuff because I didn't need to be perfect. I'm going to add the little, stamens are they? Or the very decorative versions of this. This is a tendency I have. I want to add too much detail and there's no need for it. I would be mindful of this in future. Now what? I'm happy with that now. Let's change the bowl so that I can see more of the inside, if I do it here. This is more of a round shape coming, although it's still slightly elliptical. I can't see the base at all. It does more of this. I'm gripping this pen really hard. Oh, I can just hear my alarm going off. Let me set it for another three minutes and carry on with this. I might actually be able to do another bowl on top. I was simply using line as a starting point on day 1. My aim was to study this bowl in its most basic form. I thought of this first sketch as a way to connect with my intention, not to seek perfection. By the second version, it focused my hand to make more meaningful line and cut out some of the non-essentials, given that I had a limited time. I'm guessing I've got about a minute and a half left. I'm now going to choose this angle straight on. Now, you can see a lovely silhouette of the bowl at this angle. Might be a little bit too deep there. Let's change the line there. When we focus our mental energy on something, we're able to give more of our brainpower to it. My why, my reason here was simply to ease myself into this challenge by using intention to my advantage. It meant I had already started to let go of a fairly powerful need for precise lines. Oh, that's my alarm going off, but I'm so close to finishing. I'm going to just carry on. Please excuse that noise because I'm so intent on finishing this. I'm going to give myself literally 20 seconds, 15, 14, 13, 9, 8. Right. We've got three pretty versions of this bowl. I'm going to come back to this in 10 or 20 minutes. I will explain to you why we need to do this in a later video. Now, let's see what I created in day 2. My intention for day 2 was to be confident and bold. I knew in advance, because I had my plan that I was going to be sketching a tin opener. It has a lot of straight sides, a lot of angles, and I don't cope well with that. I knew that in advance. I am already feeling nervous because there's a lot of straight lines. I don't paint or illustrate mechanical things very often. I don't think I'm going to do this side, maybe I could. It would really test me. Give it a go. I'm going to start easy and just do it from overhead I think, to begin with. Let's set my timer. No, already I've got the wrong angle. Not wrong. It's just tricky. My realistic expectation was, I would find this item very demanding. What's happening here is I'm going into day 2 with an awareness that I am performing this sketch, not with thoughts of tank. This is going to be too hard for me, I'm entering that bubble of creation I described earlier, telling myself, "Let's be confident. It is challenging, but we can be bold and we can achieve things." I'm trying to look at the relationships. All these angles. Obviously, this line isn't parallel with this line. Let's pop that in. It was my expectation, my belief that this can opener would prove tricky for me. I didn't expect it to be easy right away, but I was prepared to follow through. I think I'm there. I'm there with this handle. I tried very hard not to have a predetermined path. I had a vision of completing two sketches in one sitting, and that was pretty much it. When you feel disappointed with outcomes, it's usually because the reality didn't align with your expectations. Expectations actually narrows down your possibilities. With intentions, it's actually your choice to be open to possibilities. I'm going to work with a little bit of foreshortening. Hopefully, you can see the angle that I'm working with in the corner. All right. Start off with the the edge of one of the handles as much smoother. I am learning to be confident and bold here. My intention is helping me. I've decided already that actually some straight lines and some curves is actually my happy place. Somehow fatter, there we go. Then it goes into a straight edge there, and a straight edge there. I am dealing with foreshortening. I think I've gone a bit narrow somewhere. There, maybe it's more like that. It doesn't matter. Let's just carry on. For many of us, including myself, expectations have become personal barriers. The expectations of ourselves can be insane and hinder our progress, not just with sketching or other creative pursuits, but life in general. Having intentions allows us to adapt to events while we create quickly and efficiently. During this class, I'm not even pretending to be good at drawing. I'm just trying to get on the learning curve like you. Using intention as one of our tools helps us to evaluate when the frustration sets in. So we can still advance and make positive gains with our art. That's my alarm going off. Okay. I think that's pretty good considering I'm just going to finish off that line there. It does something like that. This is day 2s efforts. I'm really pleased to have managed two versions of this can opener. It will be really interesting to see when we get to the assessment stage, how I feel about these. We're going to talk about that real soon. But first, I'm going to have some timeout.
11. Always Take a Break : After you've spent your six minutes sketching, I want you to leave the space where you created you art. Reason being you are probably in a state of high motion and there is a fair charge, your body is going into mild panic mode with low-level anxiety causing a release of stress hormones, so take a break. Simply spending five minutes or now, doing something completely different is so useful. It's great to get up and move around and have a stretch to release any tension. If you can get outside, it's even better. Perhaps you might want to go and read a book, or simply, you have to tie to the kitchen, water your plants, and the act of physically and mentally distancing yourself from your sketch, will provide a much more stable and clearer head when you come back and we look and assessing it. There could be a dozen thoughts going round your head and the physical sensations too, as the result of hunching over and holding your body tight like I did. Also the narrative in your head needs room to calm down. Things like, "Oh, this is looking rubbish. I don't even know why I started because it's not working out." We need to create a clear boundary from that. If we were to go in straight away and assess that sketch when we're in that frame of mind, you will be doing yourself a great disservice. The most important part is when you finally look at your project again, you actually feel refreshed and relieved. You can look at it with fresh eyes and remember what was so important about this practice in the first place. Let's take a quick look at the wider picture of taking regular breaks as a creative. Your brain need downtime in order to remain creative and generate its most innovative ideas. Even sketching for six minutes requires a lot of mental capacity. There's evidence that shows that skipping regular breaks actually lead to further stress and cause creative block over time. I have been there so I understand this notion. The brain is built to detect and respond to change. So too much time spent on a single task can actually hinder your performance. Those brief mental breaks can actually help you to stay focused on your task and help you to do your best work. So a few minutes walking your neighborhood can increase the blood flow to the brain, which is great for boosting those creative insights. Charles Dickens actually used to take long walks around London when he was writing. Allowing your mind to wander allows your brain to shift the gear during that downtime. Even then, it is trying to solve problems as you sip that cup of tea.
12. Caring Critique: Part 1: When I was back in our college, which was a long time ago, we used to have critiques where all the students had to pin up their work or display it on the wall and the whole class would gather around and with the tutor, we'd go around one-by-one discussing everybody's pieces. It was utterly nerve-wrecking and a dreaded part of finishing a project. Often the two tutors practiced tough love by being brutally honest with their opinions. However, this is not what we want to do here, we are going to do this in a gentle fashion. Trust me, it is not going to be traumatic. In the first part of this section on critiquing our work, we will focus on the language we use when we describe our art, both during its creation on this point in the class on-wards, and when we assess them. It's been proven that positive language can literally change your brain, so hearing and using positive language can make you feel great physically, mentally, and emotionally. On the flip side, negative language can block the brain's natural distress mechanisms. We often define ourselves by the mental chatter that goes on constantly inside our heads. Oh, I'm a total failure or I'm hopeless at this, or I'll never be able to whatever. If these are common thoughts for you, as it is for me on occasions, then it's likely that you've unconsciously being sabotaging your success, simply by the way you speak, and I'm sure you would never speak to a friend like that or your child, so we shouldn't do it to ourselves. The feelings of success and mindfulness actually come from the realization, that's our thoughts come and go of their own accord, they simply drift in and out of our heads. But please know. You are not your thoughts, you can watch your thoughts appear in your mind and watch them again as they disappear, like a soap bubble bursting. It is your choice whether to act on them or not. In terms of expressing yourself, in terms of what you think you cannot do, re-frame your language in ways that express a forward movement. This partially fits in with the intention video you watched earlier. I'm also going to talk a little bit about the shoulds. I know it's tricky but we need to shelve the shoulds as they serve no useful purpose. I completely get it's easier said than done. Here's another aspect that I'm working on myself. The word should sounds harmless enough, but what often lies beneath it, are expectations and rules we've set ourselves. Rather than use the word should, which carries a judgment, perhaps use could and insert alternative option. Instead of saying, "I can't paint that tree," say, "I create lovely trees." Instead of, "I can't draw very well," say, "I choose to be happy with my drawings." Instead of, "I won't be able to sketch this," say, "I can sketch with ease and calm." Instead of saying, "I need this sketch to look good," say, "I am enjoying creating appealing art." Another idea I'd like you to be mindful of is using labels to describe yourself as an artist. Labels create subconscious mental boundaries that confines you, labeling yourself as feeble with water colors or pathetic with paint, or even, I'm terrible at drawing faces only reinforces that undesired statement. It is better to say, "I'm not very happy with my watercolors, but I'm willing to practice every day," or, "I've never prioritized drawing faces, but I have now decided to start making time to improve them." The last point I'd like you to consider is to rephrase problems as opportunities. We all have problems when we create art, I know I do, and what differentiates the most successful artists is how they approach each problem. Let say you spilled an extra blob of ink where it wasn't intended. You could think, oh, what a wonderful opportunity to incorporate it into my sketch. If you've got a pile of sketches that didn't turn out as expected, you could think that was a great opportunity to learn about areas where I'm weak and it can inform me about my future focus and where I can practice.
13. Caring Critique: Part 2: Whenever we have done anything, it is important to give yourself some praise because, everyone needs to feel good about themselves. It's really important that you give yourself positive feedback as it's part of recognizing when you've done a good job. I want this carrying critique to build your confidence. I'm going to run through a really simple guide to help you assess your daily sketches. I know many of us have desire to produce amazing pieces of art every time, but that is simply impossible. We can only build upon what has gone before. If you are new to a daily practice, I want you to be particularly mindful that you are only at the beginning. Remember, it is a journey and it's an adventure of self-discovery. Please trust and know that your Day 1 will be different to your Day 9. It's a daily practice through a process. Our main focus has to be on improvement. Within this assessment arena, I'd like us to be thinking about what we're doing well or what we want to improve by examining our motives and results, it can reveal the ways we can take our next steps. When we own our outcomes, we naturally begin to ask ourselves what we could have done differently or better. This will raise our curiosity about what we could achieve tomorrow, which is a great place to create from. We will tackle this assessment in two parts. Remember to use positive and growth mindset language when we're thinking through and writing are nodes. Neutralizing the thoughts when you create and making an insightful assessment is important. It's far too easy to go straight into the disapproval and scold ourselves over our efforts, but this will not serve you. Instead, we have to turn down the dial on our harsh inner critic. In the first part, we will be giving ourselves points out of 10 for the following, with zero being not at all, and ten being absolutely yes, for the experience we have on each day that we sketched. Either using post-it notes or simply spare space on your sketch paper, make a note of these. How much did I enjoy this practice today? How confident did I feel afterwards? How much progress did I make today? Then, let's take a broader view of what we produce that day. Again, you can either write it on a post-it note or directly onto your sketch. Ask yourself, what went well? What could I improve on next time? Which part surprised me about that sketch? Where he's one of my weaknesses? Also, what's the favorite part of this sketch and what is my takeaway from today? Now using these tools, let's take a look at how I evaluated engage my sketches from the first few days. I have blue attacked my first day sketch up onto the wall. I've tidied up the kitchen a little bit. I can come back to this with fresh eyes. First of all, on a scale of 1-10, we need to look at how much did you enjoy this piece. I enjoyed this very much because it was a pretty bold. I would say that was an eight out of 10 for me. How confident do I feel? It is a little bit messy, but I was trying to challenge myself in order to get three bowls sorted within the six minutes. I would say, I did a pretty good job considering progress. I haven't got the previous day's exercise to go back on. But in terms of knowing more about the bowl, because I don't normally draw with Byron, not stuff like this anyway. Now, the second part of the care and critique is, which line or area is my favorite and also what could be improved for tomorrow and what is my takeaway. First of all, my favorite part is this bit here. The inside is just a beautiful frame. I haven't had to, compared to this one where there's too much going on. This reads really well. I'm just going to write that down. Things that I could improve on. I know I was trying to do that really quickly, bit sloppy. I think if I used a different medium, I wouldn't have been trying to protein every single statement. I'm going to say, less detail because I didn't need all of that. My takeaway, is probably related to less detail. I don't need to include everything and I haven't put all the dots around there, but I didn't need to have that much in order to read as a decorative bowl with a bit of an oriental vibe. I could have spent longer getting the shape of the silhouette of the bowl. I have to say, I think I did better than I expected for Day 2 with the tin opener. I had actually written, be confident and bold. For me, this is me being bold by choosing this for Day 2, I could have let myself draw something easier. Did I enjoy this? I did. I actually enjoyed it a lot more than I thought I would so, I might actually give that nine out of 10. How confident did I feel? It really boosted my confidence. I had said all along, I tell myself, I don't like straight lines. I didn't like mechanical things, but I think I did pretty good job. Oh, can I say it's eight and half out of 10? In terms of progress compared to yesterday, oh my gosh. The difference. I don't know if it's because of the medium I'm using, but I can't believe I managed to do two sketches in six minutes. In terms of progress, I think that's probably a nine. That's pretty brilliant for me. Second part, which line is my favorite part or which area? I really love this line here. I think I drew this one first and then I changed my mind. I had obviously observed very well and this is so smooth, I did it in one go. I'm going to write that in. What could I improve on next time? This is proportionally. This is a little bit too fat, I think. Proportions, could be a little bit better, but I'm really not that fast. My takeaway is, I'm going to write less preconceived ideas. The simple act of writing a few things is really powerful. You may not think that writing six out of 10 for enjoyment on Day 6 is important, but it actually serves to inform us on several levels. This will also lessen the mental chatter because you've moved it out of your head and onto that post-it note. This in some ways is like transferring some of that angst and doubts and feeling of failure into a more rational space. From here, because you've written them down, you can be more subjective. It's vital to acknowledge and then identify how you might avoid a certain mishap. This information will prepare you for more successes the next day and the day after that and the days after that.
14. Repetition: Part 1: A common question that I'm asked is, how can I print my art? What can I do to make my art better? Although this question comes in many forms, my response is usually the same. Practice until you do what you want to do well, and that means having the technical abilities to execute your ideas. But it's not just practice. I'd like to put forward a much better tool that I'm going to call repetition over resistance. This is what the Cambridge University dictionary says about practice. It is the act of doing something regularly or repeatedly to improve your skill at doing it. One part of this that is important is the failure. I know you probably don't want to hear about it, but it is an essential part of the repetition over resistance process. As much as no one would like to admit it failure, the thing that many of us avoid as much as possible is essential within this creative process. Here's a diagram where repetition and failure are actually your friends. You sketch and you may fail. You find out why you failed and you will practice what you failed in and you slowly grow. This goes around in a cycle. So having built up skills over many years doesn't mean you won't ever make bad work or have a messy disaster. For me, experimentation and failure is part of the creative process. It is part of this cycle that I have to repeat over and over again almost every day. This cycle actually supports and stretches us because with each failed attempt, you will notice improvements. I urge you not to let resistance to some failed attempts block you from the rewards of repetition. My own experience of teaching myself to paint over the last few years has taught me this, practice ineffectively and you'll be putting in huge amounts of effort for very little reward. If you take a skill like watercolors and practice it regularly. Repeating the same strokes, mixing certain colors deliberately and with focus, you will become proficient a lot faster. You saw me set my timer for two lots of three minutes. You'll see in some of the videos I complete two sketches in that time, sometimes three, sometimes four. With each time that I sketch that [inaudible] , I'm learning more and more. It's the same as saying, if I drew something three times, that's actually three amounts of information that I have provided for myself that I didn't know before. I'm building and building upon what I learned in the previous times. This learning is actually happening in such a short space of time. By building up your skills over a period of time, you will be able to create much more visually complex work. As an illustrator, by improving my skills, little by little over the years, it's become a lot easier to communicate my ideas visually. These next set of drawings I want to show you, were not part of any 30-day or a 100-day project. I specifically wanted to show you the context for why I still repeat sketches over and over in a professional capacity, I'm not under the impression that I'm the finished article because even I still have to draw repeatedly or regularly in order to improve or at least maintain my proficiency. The first set of sketches I want to show you was for a Japanese company. They wanted me to draw fruit for some paper products. As you can see already, I tend to draw lots of different versions that would have been lemon. This was orange, lots and lots of different versions so that they can pick and choose. I have found that this way of working serves in my interests and also theirs. I don't see that I am losing anything by creating more and I am able to produce these sketches really quickly. I'm just going to show you a few more and then I'll show you how they ended up being new. Even with these bottles, I drew two of them. It wasn't just the one. Then, they picked and choose. These are the products that they ended up on. There's also some paper plates that went with them. You can see this lemon here. This one here, is actually this lemon. This strawberry here is the story on the product there. It is really important for me to be able to showcase that I am able to provide a lot of value by providing a lot of choice to the client. The next series of sketches I want to show you is pizza. They only wanted seven images, but I think I created about 20 here, variety of pizza images using my Pentel brush pen. I really loved drawing food, that's why I'm known as a food illustrator. For me, there is no issue in creating about 20 sketches. In the end, what they created with them was just a sniff and scratch stickers. There's only seven here. For me, doubt these are going be licensed, I've gained an incredible amount of knowledge putting these together and maybe I can use it for other purposes for my portfolio in the future. That's a win-win situation. This is a cookery book that I produced over a 100 illustrations for. I did the same as what you've seen in the previous sketches. I did several versions. However, the artichoke proved to be incredibly tricky. The author had a vision of how it should look, and in the end, I created three different versions of it. That artichoke was bit of a nightmare. That was the first version. This was the second version and it went through to a third version. You can see just for that one artichoke, I've created about ten here. This was finally the one that she decided on in the end before I took it to the color artwork. From your perspective, it might seem frustrating, but for me, I just want to be a better food Illustrator, a better illustrator in general. I just keep going and it's a win-win for me. I improve my art and I get paid for it.
15. Repetition: Day 3 & 4: As I've mentioned from the very beginnings of this class, I don't like painting objects with straight sides. There tends to be a wonkiness about it. I took a really close look at this timer. It normally lives in the bathroom. I chose to draw it from the side first off, using my daughter's felt tip. As you can see, it is a very tentative start. When I am unsure, that's when the fluffy lines come in. Even though I know that this felt tip is permanent, there's nothing I can do once that line is down. I know why I wasn't enjoying this moment, that's for sure. I think I may have been too optimistic about putting this as my day 3. I might just sketch one-and-a-half version. I finish this off in the second half of my six minutes. The second version, you can see the differentiation in the line already. I told you that first one, the lines were fluffy. But the second one, I'm using one direct line. That's already, I can see an improvement. I must have thought that I had enough time to create a third version. I'm really glad that I did because it meant I had even more opportunity to learn. I realized that the angle of this timer has got a raised foot, lets say. I had chosen the angle wrong, so I corrected myself. I think by this stage, I was getting a much better feel for the components and where the style sits. You can see the difference between that first version and this third one, it does look like it's in the middle of that timer. That was day 3. Let's see how I felt about it during the assessment. Leaving on to day 3, the timer that my son uses. In terms of enjoyment, I didn't really enjoy it that much. There were too many lines for me and I was trying to work out which was which. You can see that I'm very indecisive. In terms of enjoyment, I think I was down to a six. Confidence, it wasn't really there. I just found it too tricky because there was just too many angles. It might have to be like a six-and-a-half out of 10. In terms of progress, compared to the [inaudible] , it wasn't happening, and that's absolutely fine. I'm not going to beat myself up about it. Compared to yesterday, I think I'm going to go back down to a seven out of 10, which is absolutely fine. My favorite part is probably the fact that I did progress within the six minutes. This, this, and then this, and then this took place in the space of six minutes. I obviously learned quite a lot by the time I got to this third one. My improvements, if we're going to talk next about improvements, you can see it happening already. I learned so much that I improved, I think for me, fairly dramatically. I'm going to put down lots of learning here. My takeaway is, you can learn a lot in six minutes. I'm going to write that up here. Moving on to day 4, this, I realized, was the key to my garage. I'm looking at it very closely. Again, there is straight sides and I'm using a biro, which I don't draw with that often. Immediately I go into that mode, which wants me to include every single freaking detail. There's no need. I don't feel that I did myself any favors here. You saw in that point there. I didn't know how much time I took to fill in that little part of the key. Looking at it from a different angle, I spent a lot of time getting the teeth of that key correct, of where it goes into the lock. I know when I started the second sketch I wanted to make a better go of it and not faff so much, but I just couldn't seem to stop myself. There was something about working in a biro that made me want to include the fiddly details instead of trying to capture the essence. But I still had time on my watch so I kept going. The line work where its intricate, you can see that I've gone over, and over, and over again and I'm overworking it. This is a trait I return to when I'm unsure. The part where you hold the key in between your thumb and your forefinger, that's absolutely fine. I'm pleased with all of them. There's time to do a fourth one. You can see I've just blocked in. It's probably a good thing. I didn't worry too much about that teeth, again, because I would've gone way overboard yet again. I've decided to use a purple biro. I think you saw in the video that when I use a very thin pen, that is when I start to make a lot of lines that aren't needed, I start to faff. In terms of enjoyment, let's go back to this. I did enjoy doing this very much. I would actually love to do a project where I just draw 20 keys, all different vintage ornate version. This has given me an idea, so in terms of enjoyment. In terms of confidence, I think I did a pretty good job considering I was faffing so much. I'm going to say it was a seven out of 10. Progress, if I look from this one, to this one, to this one, you can see that I'm trying to add less detail. I just thought, you know what? There's enough information there. Progress, I think, again, is probably a seven-and-a-half. I'm going to put eight out of 10. Now, before we move on to the favorite part, I just want to quickly talk about my takeaway, my personal takeaway from this piece. I'm glad I did include the teeth, but I spent so long doing that that I didn't need to. That's something to be mindful of for me in the future. My favorite part is actually face this, I love this line. There is something really lovely about this section of the key. It's just so simple and direct. I think I included the information that was needed. That's fantastic. In terms of improvement, I think I need to be mindful of using pens that have very thin nibs because I'll end up just faffing about like this. As I progress, I'm going to see if I can use a few different materials. I might go back to my plan and see what else I've got and change it up.
16. Vulnerability: Part 1: Vulnerability is also known as embracing the discomfort or trying to lean into the unease. It's about having a degree of mental toughness to see the hard work through to the end. I know for many of us, it's a mental barrier where we're wrestling with ourselves and where you're trying to move forward despite all the doubts that are going around your head. This is quite possibly the hardest aspect to deal with, but let's try and discuss it here. As artists, we are told a thick skin is an essential part of the artistic process. Maybe you're thinking that others have painted this before and have done a much better job. It may be that you believe your sketch sucks and nobody is really interested on social media. If you've ever experienced this or something similar, let me tell you, you're not alone. For me, this is something I'm coming to terms with and I'm better at dealing with than I used to be when I started many years ago. It's pretty common for me when I'm in the middle of painting that a weird sensation will creep up and my breath will start to hitch and I know this is start of my fear. The dictionary definition of vulnerability is the quality or state of being exposed to the possibility of being attacked or harmed, either physically or emotionally. You may find this definition a little dramatic, but as artists showing up in creating, we reveal a little part of ourselves to the world. In her TED-Ed Talk, Brene Brown discussed this relationship between fear, courage, and vulnerability. As humans we most like the fear that by displaying our vulnerability to others, we risk losing their respect or love. As Matisse said, "creativity requires courage." The word courage comes from the Latin word cor, which means heart. Our art does come from the heart. That's why we feel so protective over it. We literally want to shield ourselves and our arty hearts from harm. I'm afraid there is nowhere on our mindset map to navigate around on mobility. You have to wade through it. It's messy. It can be ugly, and sometimes the self-doubts just pile up. I have had to accept these feelings and experiences are normal and are actually a well-known part of the creative process. The fear is there trying to protect us from venturing too far in case we are put in danger, and the self-doubt is there as backup, adding to the mix which keeps you small. If you let these burden you, they will slow you down on your creative path. This is where we can change our mindset. Having vulnerability as a tool when creating any art means pushing through the discomfort until we believe in the worthiness of our art. I've learned from my own dealings with deep anxiety and insecurity about creating art and illustrations that we need to stop defining our value by what we do. Our sketches, yours and mine have value simply because we created them. Being vulnerable will always be scary. There will always be insecurities around our art work because we're sharing part of who we are with the world. It feels exposed, and if our art doesn't turn out as we hope, we feel uneasy and disappointed. This is why we have a caring critique, so we are gentle rather than harsh and overly judgmental. Although I'm not dreadfully keen on how the key or the timer looks, I choose to believe they were still successful. I still learned many valuable lessons. When I'm grouping that pen type is because I'm in an uncomfortable place, but I push through,I take a deep breath. I have learned you can overcome your fears a bit like putting big girl's pants on, and looking fear in the eye for what it is. It's simply that trying to keep you safe. It's advisable to put your anxieties, fears, judgments, and negative self-talk in the backseat of the car because you are the driver. You are in the driver's seat and please tell them to be quiet too.
17. Vulnerability: Day 5 & 6: I wasn't deciding in advance what my intention was going to be that day, I just took it day-by-day. On day 5, I wrote down, "don't panic, breath," because I noticed in previous days this was something that I had been doing often and I needed to relax and enjoy being present with my sketch. Today, we are going to draw this wooden elephant which lives in my bedroom. There's a lot of details in there. It's hand curved, different angles all of which slightly scares me. Partly because I don't do animals very often but I have to try. Again, I have one of my daughters pencil, it's blueberry colored apparently, so let's give this a go. I don't often draw in colored pencil so I just take a breath because I've just read, don't panic, breathe. Let's do as my intention said for the day because many of few seconds and I'm already getting myself into bit of a tease, and there's no need for it. These elephant was already proving quite tough for me but I do feel that the best fuel for creativity is a little bit of discomfort. The easiest way to turn out the same work over and over is to get comfortable with your abilities and techniques even if you are drawing something that is unfamiliar like this wooden elephant. At least I am seeking out new problems that is going to challenge my skills. In harnessing your uncertainty, you can feel your brilliance. The reason why I have to practice because when I first start off, as you can see, I think it's more like that, I am tentative. I'm not certain of the angles, I don't often use colored pencil. I'm not trying to make excuses. All I'm saying is, if I were to do this using this colored pencil for ten days in a row, I would definitely improve. I don't generally paint or draw carvings either. That's his ear there. I'm going to really try and quicken my pace now because I'm going to see if I can move things along. Then negative space toes goes up like that. That's going into his hip and his bottom and I can just see his tail there. These are only ever going to be rough sketches on printed paper. It is the act of doing and it will always be where the majority of the discomfort takes place and where you have to be present. This in turn will help you to grow and pretty much take more leaps of faith, bigger and bigger leaps of faith, discovering more about yourself and the brilliant adventure that you on. I knew I was going to do that with wooden elephant, that's why I wrote, "don't panic, breath," because I don't draw animals. I don't really draw decorative items. Let's put this up. In terms of enjoyment, I love the flowing lines of this elephant. It's a beautifully curved item, so I would say I enjoyed eight out of 10, and confidence. I think I did a lot better than I thought I would. I didn't give myself enough credit, so confidence, I would say it was nine out of 10 and I'm going to talk a little bit more about this. Progress. Well, considering I had tried to paint this years ago and I haven't even attempted to do anything with it since, I think my personal progress might be up there, so nine out of 10. My takeaway from this, I've just mentioned is I don't give myself enough credit. Go to, was to, start off, apprehensive, but there was no need for me to do that because I really love the flowing lines. That is my favorite part, the flowing lines of the trunk, the back and this line here is wow, I love it. It's so much more confident than I thought I could do. What I want to say next in terms of improving for the next time is, I need to be more open and less apprehensive. I don't want my go-to emotion when I'm face to something that I've tried to do in the past is to be stressed and to go into it panic-stricken. This is one of my favorite pieces so far. Day 6, we are going to attempt this little Burmese wooden figuring. Fairly simple geometric shapes but it'll be interesting to see how far I get. Today we are going to use a brown pen, it's Uni-ball signo and it's a nip like that. This is actually one of my pens. I'm fairly familiar with that it would help me to stop with the [inaudible] and maybe I can draw with a single line. If you're wondering, Mon is one of the ethnic minorities in Burma, where I originally came from and it is small ethnic minority that my granddad came from, which borders Thailand. I'm a little bit Mon myself. As I drew in the body of the figure, I realized it was probably a little bit too fat. What I could have done was looked at the negative space between the two figures. I was a little bit worried about the base that they are standing on as you can see as I put in the other figure. It is a little bit skew with, so I made a note of this for next time because I still had another three minutes. I think overall by using this pen I was keeping the lines singular but the panic was rising because I wasn't able to get the distance between the two figures right. I know it shouldn't matter but that's where my thought process was certainly going. I managed to get to, I thought I'd get three done because I felt they were relatively simple but I guess no. I think my line work is getting better but when I'm in a rush, you can see that it's starting to deteriorate but we'll discuss that some more. Starting off with the enjoyment factor, these were such cute little characters. I think for me it was seven out of 10 today. Confidence. How confident did I feel throughout doing this? I think the first three minutes, I didn't get the decorations in but I managed to put those in on the second attempt. It meant that I was working faster. I still didn't include everything, so I think a seven as well. In terms of progress, there is a lot more detail in the second version when I did it for the later three minutes, including being able to add up the lettering. I had spent three minutes longer looking at it by this stage, so I was able to add those details. I would say progress is 7-and-a-half out of 10. My favorite area is this face. I love this little smile and I don't do characters, but I think she's got such a happy jolly little face. What could I improve on next time? I realized once I was doing this area here, I could have looked at the negative space to gauge the distance between them so that's something that I can take away as well. Another takeaway, I like doing things from an angle. In some ways I think if I look at things straight on, that's probably the easiest option but I think this gives me a lot more interest. That's something to consider for next time.
18. Progress: Part 1: I'm calling this section progress, not perfection, even though it doesn't look like it. By this stage, we are trying to focus on how your journey may be changing. It is now day seven, so it's worth going back to the very beginning to see if you can see improvement. Sometimes I'm surprised at what I previously thought wasn't my best work, upon close re-inspection turns out to be pretty good, so looking back is a good practice to compare new and old works. If you look at the 14 day itinerary, you'll see that this time to reflect has been built in hopefully the post-it notes or the notes you left on your sketches, are giving you a fair idea of where you feel you've settled at this halfway point. It is a good idea to give yourself a pat on the back as well. If you get used to the idea of producing a lot of art, you've been using the repetition tool as well, then you'll have a much larger body of work to compare. You'll be able to pick out your best pieces and discover why they're successful. If you've been making art for a while, you'll be well aware that not all your artworks are equally successful. This is sometimes called the progress mode, it's when you start working but acknowledge that you final creation won't necessarily be a masterpiece. However, it will offer you many opportunities to learn and make progress as an artist. This is the phase where most of the learning takes place, it's when you experiment that you are allowed to make mistakes in order to learn. In this mode, there should be no pressure to achieve something awesome. You are actually free to create something new and break outside of your comfort zone. It does not need to be good, but it does need to explore some new boundaries for you or perhaps some techniques, this is what will help you move a step forward and become a better artist. This next bit may sound tough for some of you, but I'd really like you to see that every mark line and blob you make, even if it was unintentional as progress, just see them as teeny tiny steps in your progress. I know that sounds weird, but the fact is you've been spending those six minutes making lines, marks, and blob, which is translating into an extra two or three sketches. That's two or three sketches that you didn't have yesterday, and if you add those up in the first week you'll have 14 to 21 more sketches than you had the week before. As you are seeing from my own daily sketches in this class, I think I'm okay at drawing anything beyond food I get by. In the past, I've heard people say, I can't draw, what they really mean is I can't draw things that look realistic. Surprisingly, most people see drawing as a skill with two levels, I can't at zero and I can very well at ten. How can you possibly jump over that huge gap between zero and ten? It is the same with any skill. If you practice long and hard enough, with time it gets more automatic for you. I want to say a few more things about this skills gap, because I was once a beginner, and I too wanted to make art that was way beyond my skill level at the time. Remember, that's why I started my 30-day projects. If progress has been slower than expected, please don't give up as it always has potential, even if your work isn't quite where you feel it could or should be, it simply means you have to walk a little further along that path of perseverance. It will happen. You will see progress of your technical skills and the medium you've chosen. These two diagrams have formed my perfectionism class. I wanted to show these here as I wouldn't want you to fall into the trap of thinking that your progress on day to day would be linear. You will rarely start out perfectly, but if you keep making small changes consistently and improving, then you will give yourself the chance of achieving the results you want. Progress is often made in fits and starts. You may make awesome progress for a couple of weeks, but the next few days after that, you may feel blocked. The perception of poor progresses is often only a mental for many of us. It may not seem it, but we typically learn the most when we struggle with a certain task. To the less experienced, this does not feel like progress, nevertheless, progress is still gained even if it is not immediately found. The secret to seeing progress is not by attaching yourself solely to a single step or a place in your journey, remember progress is different for each of us.
19. Progress: Day 7 & 8: We're halfway through. I have my promiear blue Guache here, and it has [inaudible] in it here where I've squeezed it oddly. I'm going to see if I can try and communicate that. I'm going to do it from various angles. Also today, I'm going to use my pen, towel brush pen, which I really used to love using. I must admit I've not held it for illustration purposes in quite a few week, so let's see where we're at with this. I'm going to choose this angle. Takes a bit of getting used to the brush pen because you can use it very lightly to produce some of the line work that you're seeing now, but also press harder to produce much heavier weight lines. This one side of the tube of paint is almost straight and it does slightly flare out at the bottom until you get to the very base, and then it starts off here then does this if I'm looking at it closely. Another reason that I like using the brush pen was it meant that I couldn't add every single detail if you saw me before when I had the biro because it's a very fine nib pen point. I tended to faff and I wanted to add almost every little detail. Please be assured we all have different ways of working, and you might not like the brush pen. You might actually prefer the biro. What I'm going to do with this class is find ways that suit your lifestyle and your preferences. We are all unique individuals and artists and creatives. Find what works for you. Use these 14 days to make progress in that area so that you keep on producing work that excites you, deciding what information, who serve your progress, say a new material you've realized you like using in all seven days high-insight so that you actually work best in the mornings who helped create further mindfulness in the coming days and support even further progress. Small wins can be massive motivators, but we rarely recognize them. I understand that progress is hard to measure, especially in a project like this. Most of us probably make advances large and small every day, but we may fail to notice them. So I urge you to take an extra five minutes after day 7 to take a good look at the more you see experienced and seek out any signs of progress, the more creatively productive you'll be in the long run. When you give yourself permission to progress, not perfect, you'll be putting yourself in a much better position. Day 7, I really, really enjoy this, partly because I was doing it using my brush pen and I loved my brush pen. I use it probably my favorite tool. So maybe I had an advantage there. If we write down, how much did I enjoy it? I think it was a good or nine out of 10. Confidence I knew that I was probably going to be okay because it was the brush pen and just using the medium gave me the extra confidence, but also looking at some of the line work and I was able to add descriptive line. So I'm going to add a solid nine out of 10 there and progress. I've managed to sketch four tubes of paint. It meant that I was able to work really quickly. That was six minutes worth, which I'm really proud of. That might even be a nine and half out of 10. My favorite part may be trying to include the dink. I don't know what else to call it wherever I've squeezed it, and adding the contours there and the weight of the line changes. That's part of why I love the brush pen. I could improve next time foreshortening. I think I'm always going to have issues with foreshortening. It's something that I'm completely aware of, and my takeaway from today is I like using a brush pen for a reason, so there's no need for me to discredit what I can do with that. Another takeaway is looking at the line work between this and this, obviously a brush pen, I can change the weight of the line quite easily by pressing down. I said, even on Day 4, when I use a thin pen, I faff, when I use a thicker pen, I think, oh my goodness, this is going to be a definite line. I have to make this line count. It'd be interesting to see if I could do a set of keys and the decorative figures, again in brush pen. How did they turn out? Day 8, I have decided to sketch the humble bombed on clip. I'll use these with my sketchbooks to hold back pages. As I've mentioned before, I do not like straight lines, hence my intention for the day. Don't see them as a threat and just try to have fun and keep breathing. I'm back to using the biro. Make sure I set my timer. Let's go. Straight lines, oh my friends. There's nothing to fear. They do not pose a threat they're here to help me. If you've watched my other class, you'll know that I'm a recovering perfectionist. Perfection has been a problem for me for many years. It's based around unrealistic expectations I have of myself. I don't realize I'm doing it. I have to say it wasn't until I watched back this recording of Day 8 that I realized I'm using a biro yet again. Part of me does want that realistic bulldog clips. I know I've told you don't go for realism. That's not the intention, but a part of my brain is still aiming for that. So I'm going to take this on board over the rest of the week because biro is not my strength. For me wanting a bit of perfection is an endless productivity loop. The urge to get things right just never seems to go away. That urge to redo and revise, go over those lines again and again until everything looks just right. I know I'm trying to avoid it, but its like I can't stop myself. I'm second-guessing myself and doubting myself. I'm looking at all this to show, and I'm trying to correct myself and looking at the folds. Perfectionism can also stop you from finishing important meaningful work like a 14 day challenge. I want you to know that lack of perfection does not mean lack of quality. These 14 days are still remarkably important. Whatever your sketches look like. My Sketches are not neat. They're really messy as you can see. Wanted you to stop trying to be perfect. You will be surprised at how much progress and how much work you can actually get done. You will be a lot more productive and happier and relaxed. I have to admit for Day 8, I thought that I would have done a better job. I clearly have an issue with drawing in biro. If I want to use a single line, it's not happening. The proportions also were throwing me. I'm going to talk a little bit more about that in a minute, but let's fill this out. Did I enjoy it? It was okay. Seven, my confidence, I have to say went down again. It really threw me the fact that I got the proportion wrong. I just wasn't feeling it overall. So confidence, back down to six. I think the second one I did is the best one of the lot. I know was rushing this third one. If we were to compare these two, can I see the progress? I know that I'm obviously observing the line. I'm trying to make this part parallel, and this section here is actually my favorite part. Getting back to this, I think progress, we got eight out of ten. Drawing with a biro what we talked about from Day 6 and also Day 4. If I hold this up again, this and this is biro. I will not be sketching in biro in the future.
20. Learning & Adapting: Part 1: Keeping an open mind is really important when we're going through our 14 days. By using some of the notes you've written so far about what you've enjoyed most or perhaps which mediums you prefer to use, you can begin to combine and modify these findings in the remaining days. There are very few successful people who got to where they are by simply doing the same thing over and over again. Being adaptable means being open to finding diverse and unexpected solutions to problems and challenges. So that we're looking [inaudible] line or the out of proportion shampoo bottle, has as much to teach us as the lines that you are pleased with. These unexpected and unplanned chance additions to our sketches are valuable. I'm not asking you to embrace them or to like them, simply observe and learn from them. I hope you'll be receptive to these little changes that you're starting to see and be willing to adapt if you feel it will be a positive benefit to your art practice. Actively seeking out new ways of doing things will help your confidence and creativity by adjusting your style of working or approach. As your art and attitudes evolve, you will be able to create more considered art moving forwards. Over the 14 days, I would not be surprised if you improvise and adapt a few things to suit your own needs, perhaps you will start to favor one pen over another. By learning how we can be more adaptable within our art, we can also become better equipped to respond when we're faced with those creative challenges. This will also create an atmosphere of resilience. So when I think I've added an incline to the wrong place, I am able to do this through acceptance, knowing that wonky lines will happen. Then I am able to adapt to that new line and then carry on. Being able to adapt when we make our art, is like using a muscle. We can exercise our adaptability muscles by dealing with unexpected results or splotches gracefully and calmly and doing something new with it. This part of the mindset tool goes hand in hand with the progress and reframing I talked about earlier in the class. Extracting positives from sketches or projects that don't go as planned, can be hard. However, being able to find the silver lining in all the work you do is a brilliant example of adaptability skills in action. As it requires you to reset and reframe your focus. So you take a step back and view things less critically, but more objectively. The more you engage in this process, the more you feel optimistic about what you've created and the easier it will be to change tack and overcome these all challenges for the next day and the days after that. Let's quickly go over the main points that I introduced in this class video. The first is always be open. There will always be some unexpected results and see them as ways that you can learn even more. They actually give you further insights, which is a positive. That's one of the other points I want to make. Always find the positives and the silver linings, there is bound to be one if you can reframe and seek them out, they will be there.
21. Learning & Adapting: Day 9 & 10: According to my plan, it is the tip of my pen and ink. Let's get those ready. I realize this cat is actually very long and thin, so I'm going to turn the page over like this. Let's get going. I'm going to look at this cat straight on, just going to concentrate on the line work. At a later day, I could come back and think more about shading, but not for this part of my practice. If I went beyond day 14, it's something that I consider. At the moment I'm just trying to familiarize myself with this. I have to say, as soon as I started drawing this cat in the inked, I realized that I had desperately misjudge the proportions. The head of this cat is much, much bigger and the body is so much longer. It really threw me and I was really doubting if I should continue with this practice. I have this urge to stop the video and start again. But I don't now, we're trying to be honest here. I think I roll proportionally. He's just a bit too wide. I've got another three minutes to play about. After this, I'm sure I'll have a better understanding. Now that I'm becoming familiar with using ink and also the contours and different parts of this cat's features. I was able to adapt. What I had learned before I told you I didn't feel like got the proportions just ride. I know physically I felt a little bit more relaxed because I had more information to work from. In the end I decided I wanted to concentrate on that lovely cat's face because that was the favorite part for me. I can tell the difference when I view this video back that by the time I got to this third phase, I was definitely enjoying it. I wanted to keep on painting and painting that face over and over. I'm saying this with hindsight after watching this video several times. I wish I'd had the foresight to just paint that face because that was what was drawing me to this ceramic figurine in the first place. If I done six minutes of cats faces, I do wonder where it would have ended up. Going to day 9, completely different medium to day 8 by rho thick brush. Well, it wasn't thick. But look at the weight of the line. Compare that to that. I am obviously. Sorry, I'm getting ahead of myself. Let's have a look how much funded I have. I had loads of fun. I would say that was a definite nine out of ten. Confidence, I liked drawing these curvy lines, although the proportion of the head was a little bit high. I think I painted it faster because I was able to go down and put in a head down here my confidence and using a medium. Let's not forget, I don't draw like this with ink and a paintbrush. I'd say it was about eight out of ten. In terms of progress, I don't draw decorative objects. I don't illustrate that critical objects that often. I would say I had progress in terms of the mindset saying," I don't do this, I don't do that." I can draw these type of things and I think I will, so I've made a decision. I need to get hold of more kids staff possibly for my dad's. I want to take this a little bit further. Progress for me, it again is probably an eight out of ten. My favorite part of this piece is this line, this very, I had a lot of ink on my brush and I love how confident and bold that line is. My takeaway is, let's use a brush more often to do line work. Goodness. Why have I never considered it before? I think in the following days that's going to crop up. By the time I got to day 10, I wanted to try that brown uniform again. I chose this succulent because it was organic, I have a better relationship with. I felt really comfortable drawing the succulents lives on my kitchen window seal. Even though I had said before, find nimbs means [inaudible] , I really enjoyed putting this succulent together, looking at the relationship with all the leaves. It just felt different. That informs me in some ways that I shouldn't do man-made items in a thin pen. By the time I had got to the second succulent, It was just flowing really naturally. I know I was enjoying myself and loved looking at the succulent. I really think I could do a 30 day project of just house plants, not just in pen but in all different materials actually, because I have got quite a few. All of what we're trying to learn here is developing our competence as we practice resilience in learning, being able to persevere through setbacks, like my previous attempt with this brown universal. I tried to incorporate an opportunity to experience a different way of handling this pen in order to get different results. I felt optimistic enough to try again. Let's say it felt like I built a bridge in my head that allowed me to take a different approach. Day ten was the gel pen. This is something I don't do very often. I don't grow plants very often flowers maybe, this was a new venture for me. If we note down how much fun I had, I had a lot of fun with this, especially when I started looking down on this succulent. I would say that was an eight out of ten and confidence I had learned from the previous days where I said I gave myself a hard time. It was day 5 when I did the elephant, where I went into it, expecting it to be difficult. I learnt from there and I thought, what I'm just going to enjoy doing this. I actually wrote down I'm succeeding. Having that shift where I just thought, let's just see how far I can get with this. In terms of confidence, I would say that's probably an 8.5 out of ten and progress. But the fact that I managed to get pretty much every is it called a leaf on a succulent. I don't know what it's called. My succulent did look like this. I know that I'm not trying to make my sketch look like the item, the progress for me, the shift in my mindset, the fact that I am now leaning towards, let's just have some fun here is definite progress. I think that's a nine out of ten. I think my favorite part is actually this bit here. I know that sounds really silly. I like the fact that I've included little bits of soil and it gives it context. It says, I'm inside a pot, a lot more than this one here, which doesn't have enough information, doesn't provide that information. That's my favorite part. What could I improve on next time? I think I did a pretty good job here overall. My takeaway definitely is coming at it from a place of can I say almost peace. I was at peace with the fact that I was going to draw something I had never drawn before. I've painted a few succulents, but not this particular variety. That's a good place for me to create from so I'm going to try and remember that.
22. Fun: Part 1: The idea of having fun when you are practicing at consistent art practice can be a hard one to grasp especially in the early days. For some of you, this could be a hugely per fave, and quite possibly a massive stretch. It may not happen until beyond day 14, but I hope it happens for you much sooner. The element of fun when you're learning which is what you're doing here with your practice has a positive effect on motivation levels. Learning during these 14 days won't be a one-off event, some days you'll learn more about yourself and your art than others. Then you probably [inaudible] some point way beyond these two weeks. In order to reach these foothills of fun, it requires repetition and dedication. So if the experience is fun, you will stay curious and keep coming back for more. If having a persistent art practice isn't fun, it won't be effective and you probably give up, and I don't want that to happen for you. Think about your experiences growing up and in school. At what time did you almost significant growth and progress take place?The answer is probably when you were playing, you were relaxed and content and open to new ideas. You probably use a lot of imagination to take you to where you needed to go. You most likely stretched yourself in ways that were best for you, and you felt safe knowing that the destination was going to be a good one. Fun is a relative term of course, what's fun for me may not be fun for you, although I do hold firm in my belief that having fun with this 14 day process will aid your practice. The power of playfulness cannot be underrated. For fun to translate into a happy and successful art habit, it needs to be part of your learning culture to keep yourself engaged and motivated. By including fun as one of the mindset tools, we can lean into our individual strengths and choose the most effective way to tackle problems that arise when we sketch and learn something new. Finally, looking forward to the enjoyable elements, the fund elements will also support further lifelong learning as an artist. We can achieve this when we feel fulfilled and capable of learning more. Because when we enjoy and love what we do, like I do, I think it shows and it becomes a natural and spontaneous organic activity. When we're inspired or passionate about something, the art practice feels fun and rewarding, we're willing to go the extra mile to learn even more about art practice. Of course, I want you to have fun with your art every day because having fun is such an important element that aids on learning, and it helps us to lean into our individual strengths. Once we know what they are, we just want to grab them and insert more of that into our art practice. If we know that we're going to have fun, we look forward to an anticipate each day's practice. If you have been able to overcome those obstacles, you know that fun movie waiting on the other side. Like me, you feel your art practice is like playtime. It's so enjoyable and relaxing. That is just the best feeling when producing art is an absolute dream.
23. Fun: Days 11, 12, 13 & 14: It's very shiny.I've tried to capture in watercolor, and I didn't think I did a very good job. I'm going to try today to use my brush pen because there's definitely less details I feel the need to add, which could help me with an object for me, fairly complex.If I've mentioned it before, I don't like drawing mechanical things very much.There is a lot of interconnected circular shapes that I was trying to grapple with here. As you can see, even though I really love using my brush pen, the line work is not very steady. I think I was getting a little bit flustered, especially when I started to add the details like all the clock phase and the handles, I really wanted to give this a go.I had tried to paint this clock before very early on in my world color practice when I didn't know what I was doing and it was very tight. It has some sentimental value, so I wanted to make a good job of it. I was probably putting extra pressure myself without needing to, going on to this second clock. Now, the line seem a lot more confident.I can tell just from the way that the more definitive that I've leaned into this practice a lot more. You'd see a different quality happening here.I know I was having fun with the second one because I was in a much happier place. I had observed the clock for much longer and I knew that my pen would create a certain line and now is able to put it down a lot more precisely, uncomfortably. That adds to the element of fun when I'm feeling comfortable with myself.For day 11 was my lovely vintage claw. I wrote down, I am enjoying this time and I was, I was back to my beloved brush pen, but it's an object that I don't often draw. Again, I have this urge to create as a pace where it is just vintage clocks. I would really love that actually, if we carry on with this, how much fun did I have, I definitely had a lot of fun. I love drawing these curved lines and putting the weight on that line. I would say that as a nine. How confident was I? You know, that I like to use the brush pen anyway, but I don't often create pieces like this.Confidence was good and progress. We've got two clocks that I created, three minutes, each, from this one to this one.I learned that I didn't need to draw the outline of the hands and I stuck in line work in the end, that served its purpose really well. I just - information I was able to portray changed up in those three minutes.That served me well, I would say that's a nine out of 10 too. For day 12 of my practice, I decided on this really lovely Kilner bottle.It used to have homemade slow gene in it. My thought for the day, my intention was I release all preconceptions. I love vintage stuff anyway, and I was really looking forward to putting this down on paper. However, I think the first heard of who I had was I got the angle of that bottle slightly wrong and that threw me a little bit. But once I started getting to the mechanical part of that bottle, if that's what I can call it, where the top is held in place with that metal wire. It's tough. I thought I wanted to describe it as -Once I had that framework, I was much happier and I didn't mind too much that the neck of the bottle was probably a little bit too fat and squat it what? It needed to be a little bit more refined, but never mind.I went on and decided I was only going to concentrate on the top of that bottle for the second version.That is where my interest was, that's where I was drawn to the most. I actually had a lot of fun, even though I don't like mechanical type stuff. I was able to find the fun in this and I think I did quite a good job here. Overall, I was really happy with what I decided on that day. Day 12 was a funny one because I very -very rarely use pencil.I think day two was a normal pencil. Day five was the elephant. I'm really surprised at how much I enjoyed it, especially as it was my daughter's pencil, is not even like professional artist's pencil. In terms of how much fun I had, and I would say that was an eight and a half. Confidence wise, this part here, I made a judgment call between I think that the first three minutes and the second three minutes that I was going to concentrate on that. I'm really glad I did because I've focused on now, I really looked at it so much harder. This was straight on view and this is a side view so I could see more of what was happening and that really helps. Confidence wise, that was nine out of ten on progress.I think proportionally this is squat, this first one. If I had carried on with this it would have been much better proportion. I knew after three minutes that I needed to elongate it slightly. I would say the progress was pretty good there.I would say 8.5 out of 10.Favorite part was definitely, I think this little section here, as a lovely bit of line work happening there.I don't know why.I just see that and it makes me smile. What can be improved next time? Inner, I'm wondering if I could do a series of illustrations and colored pencils.I'm not sure, but I think it's something that I have not considered for play until now. My takeaway definitely is, it's okay to sketch the bits that you're interested in.This was what I was most interested in and that's what I focused on. In future, if I only want to draw a part of something because that's my favorite.I think now we absolutely fine.For day 13. I wrote down, I'm letting go of the need to be perfect because it is something that I grappled with now and again, and I just needed to remind myself.This jug that I've decided on, I picked up in a three store.I love it.This is my piece of fun. As you can tell, I have a thing for vintage items and I specifically wanted to choose this because I thought it would give me a lot of pleasure. I purposely chose the pen-tel brush pen because I realized I have been using it over the years and I didn't know this until I did it as part of a 14 day challenge.The reason I use it is because I don't have the need to include every single detail.I have a tendency to want to, but the brush pen does not allow me to. I've struck a nice balance between giving enough information to the viewer to show that this is a vintage cut glass jug, a milk jug.And it also fulfills my needs for a little bit of perfection.The fake cut glass, this is just molded glass.I don't need to add every single geometric detail that's there. As we go on to the second jug, you'll see that the pen is starting to run out a little bit at this stage, and I could have quite easily replaced it with another cartridge, but I have decided to just go with it, and some people including myself actually like this effect because it just adds another dimension to your sketches and the parts where I'm adding the cut glass. I think he actually, because it's a lighter line, he actually gives a much better result and it's more pleasing for me anyway, because I wasn't trying to add every single geometric detail. That was a win-win for me.I love this little jug so much. I think you get the impression I've got a thing about vintage things, especially kitchen items. In terms of fun, I have loads of fun doing this. It might've even been 10 out of 10 actually. I want you to sometimes consider your progress overall from day-to-day.I was able to draw two of everything. At least sometimes three or four.Don't worry, if you haven't been able to draw more than one item. I'm a little bit further along the road and I do this for a living, progress for me is I was trying to add every detail in here, the little marks within the glass and by the time I got to here, not only was the cartridge would be running out, I just thought, you know what, I've only got time to do this and it still works beautifully.I think it actually works better. Progress day is a solid nine out of 10. Oh, I missed out confidence. Confidence again, from this one to this one, it was really great. I think I must have drawn this in a lot faster as well, just jugging from the pen work and the contouring of that jug is a lot better proportionally as well. This is just a bit too shallow there. I felt really great using the brush pen again, my preferred weapon of choice. That might be 10 out of 10. I would love to be able to take this item and turn it into an illustration. That's how confident and how much fun I had with that. My favorite part is probably this, I must have filled that section in maybe 20 seconds. That might've been all I had left. My takeaway, I think the more I am interested in an object, the more fun I have and it also gives me a better indication of where my illustrations could lead me. What you like, isn't necessarily what I like. This is part of what makes me unique and what would make you unique as well. Today, is the turn of my iPhone earphones, which I don't use and we are going to be using just one color paint. I think I'll use the blue and try and do this as quickly as possible. I am trying to just do the line work. I'm sorry, if you can hear scratching in the background, it is my cat Ruby. I just wanted to point out again that I don't normally work this way, I am used to watercolor but I never use just line work and one color with a nylon paintbrush. I was really enjoying this initial start. I could feel an excitement building. Then we have jumble. It's actually going to be quite easy using paint because I'm not going to have to draw two lines. Let's just try and follow that in and it does something like this, which is going to be fun. Let's carry on. By the time I got to this stage, I was thinking, oh my gosh, I am just going to go for it. The tangle of wires was just going to be thrilling. It meant that I could just do a massive scribble like I was five years old again because I actually want to get to the bit where I just go round and round. That was really exciting. In the middle, I think I'm pretty much going to make it all up. It's really difficult to describe how I was anticipating. I wanted to hurry up as fast as I could to get the earpieces painted so that I could literally go round and round and do the wire part because I knew I was going to have so much fun and it was give me a thrill, really. That's that bit at the end, that is all that's going to represent the bit that slots in now. In my normal everyday artistic life, I don't let myself go free like that, so that was really important to witness. Never considered painting just like this even though it's watercolor. I'm really enjoying working like this, so I might do some more in the future. I'm still concentrating very much on online but this is a new approach for me and I'm really enjoying it. I can only describe this feeling that I felt. It was like a tingling mixed with just complete glean from a childhood where I loved making a mess on paper just like this and it just transported me back, and I was so so happy. I never even thought to do earphones, but wow, this is super. That is such a great setup. I'm going to leave it there. Day 14, was almost like a revelation to me. I had never used watercolor and a brush to produce line work like this before. It's following on from what I realized on Day 9, that maybe I didn't need to stick to pens and I am more familiar with watercolors, so I really really enjoyed this. Hold on. Let's put this down here. How much fun did I have? That was like 11 out of 10. As soon as I started playing about is like, wow, this could really go somewhere and progress. Well, this was a huge amount of progress for me because I've never even considered it. It was like a spark had gone off in my head. I wasn't even trying to create the earpieces. They're not even accurate, which was maybe something that I was trying to do on Days 3 and 4 with the key. I wasn't bogged down with all the little details. This helped me not sweat the small stuff. That might have to be another 11 out of 10. In terms of confidence, the fact that I've now gone through this process, I hope that you see that I have issues with certain mediums, I have issues with proportion, and there some of you, you might look at this one and think, holy heck, that's an absolute mess. But what I saw, the wound up earphones and what I'm able to produce because I wasn't thinking about every single line, I just thought it go something a bit like this. It's given me the confidence to try this again and to know that I can achieve really great results and there's so much energy in this too. You can tell when the way I'm talking about this. I'm so excited. Each day, this has completely unrehearsed. When I wrote down that I wanted to use some watercolor brush, I did not know that I will be creating this piece, well I didn't think it was going to turn out like this. That's for sure. It's like some switch has turned on in my head and I have this unbelievable urge to create more pieces like this. I really hope that at some point in your 14 days, you feel this excitement, this surge of enthusiasm as well. I really would love to hear your thoughts on the process.
24. Beyond Day 14 : Further Adventures: When I've started putting this class together, I'd already decided I would undertake the 14 day challenge myself and see what would happen. I could never have foreseen that by day 14 I would stumble upon a untapped medium. I think you could hear the excitement in my voice when I painted those earphones. I'm not saying everybody will feel compelled to carry on after the 14 days. Perhaps, you're just here as a starting point for further explorations like I have. Was there a particular piece that you created that charmed you? Was it the medium of the object? How would you feel, if you could capture those feelings of delight and take it to the next level? Does it fill you with excitement, with glee, with joy. By showing you the avenue that I went down, and please trust me this is completely spontaneous. I literally couldn't wait to use what I had discovered. It seemed like if I didn't take this opportunity, seize this feeling of almost euphoria because I discovered something new. I was going to just miss the boat slightly. All this that you see in this video happened in one afternoon. I'm thinking what it would have been like if I just stuck to one medium like this. If I just painted, not painted, drew let's say, in watercolor everyday, wonder what 30 day project, or a 14 day project would have looked like. Oh I like that. That's a little bit wonky, but it doesn't matter. Now moving on to the water pen, which judging from the size of that nib it just probably my daughter's as well. Well, it was mine but she has borrowed it for a number of years. I'm thinking back to some of the other days of practice that I did when I was using the biro. I kept saying, I'm faffing too much. I think for me that the smaller the nib, the more a faff, so this is perfect for me. I'm working a lot faster. 14 days down the line, I've got more experience as well. This is something that I've discovered. I definitely prefer working with a medium like this over a small tipped biro, so that's really been useful for me, definitely. I was really pleased with the way it turned out. It was probably about a five minute practice. I seem to have gained so much more confidence between day 14 and now. It was like I found my happy place, and I just wanted to take it further and further which you are going to see in the next videos. If you remember, at the very beginning of this class, I went round the house and one of the items I said was really good to draw would be makeup stuff. It just seem to flow. I think once you are in a groove, and you can feel things are just working with you, you don't feel that inner critic having little digs at you. I don't how else to describe it and I really hope that, at some point in your 14 days or little bit afterwards, you are going to face a similar situation. When you know that you have done the foundations, you've taken part in the groundwork. You've placed yourself in a better position to create from. If you follow my work, you'll see that I've never done this work before. Obviously is watercolor, but I'm just using in a completely different way, and it solves the problem of not needing to faff. I'm just doing it free hand, I haven't done this in pencil, some of it is a little bit wonky, but I'm just letting it go. I'm even able to put in the lettering, which is pretty fantastic. This whole sequence was actually six minutes long, and you are seeing a much speeded up version. Just letting you know this is just printer paper again. I honestly don't think before I started my own 14 day challenge, that I could have conceived creating a series of objects like this, and be completely unphased by it. Every time I put down a stroke, I make a mark, I do a blotchy line, it informs me further and further. I don't want you to ever feel that you have wasted your time because this was one of the best uses of my time in recent weeks. That's my opinion of my work. What you saw at the beginning, the graphics for the mindset mark, came from this. I was just going to create it in Photoshop. They really didn't take long, each one only took about two or three minutes. I thought this is an amazing resource for me, I have to use this, and that's how I created the Multi-tool as well. It was just so spontaneous and that is a sign for me, that I am in the right direction, I'm in the right zone. So overall, my 14 day sketches were invaluable. I have no regrets that some of them were a little bit scruffy looking, compared to what you may know from my watercolor sketchbook. I want to say something here about not having a fixed outcome in mind. I didn't set out to think up a style for the mindset map, it happened incredibly organically and magically. Can I say that? I was just astounded that it just took shape within an afternoon, and when we are presented with an opportunity like this, we have to grab it with both hands. I just couldn't believe that this idea seemed to come out of nowhere. I had to trust, I was going to put trust as one of the Multi-tool tools, but I think that comes much further down the line with a little bit more practice. This is now my fifth year of creating in a sketch book, and so I trust my abilities. Going back to my main point, I could not have foreseen this amazing creation unless I had undertaken my 14 days. So I hope with your 14 days, you are going to find some amazing and beautiful, wondrous sites, and really capture that excitement that I felt too. One thing I'm asked a lot is, what do you do with all these sketches after you've done them? As you saw in some of the earlier videos, I just keep them. Sometimes they end up in a collection for art licensing or greetings card. But I would say a good 80 percent just stay where they are. You don't always need to turn it into something. I know that what you see got turned into illustration graphic for a skill share class, but it would have been absolutely fine if I just kept it as it was because I got so much enjoyment for it. I would love for you to just enjoy the act of creating than thinking, I always have to create for a purpose. The purpose is to discover more about your creativity, and discover more about your potential as an artist.
25. Final Thoughts: I really do wish there was some sort of fast track or a secret passage through growth mindset land. I have looked, but there isn't. Even though it's a well trodden path and having experienced it myself many times, we will inevitably meet similar obstacles and hurdles many times over, and we have to overcome them. After your 14 days of discovery, I hope you've gathered mortals to add to your own toolbox for maintaining an art practice. One that fits in with your lifestyle or needs. I hope I have helped in some small way for you to create a win-win situation where there is room in your life for your family, work, and your art. I hope you will never feel guilty for taking the time to improve on your creativity. Probably like me, some of your sketches over the 14 days would have been very rough and ready. It absolutely doesn't matter. I'd like to view these initial sketches as supporting work towards the next series of sketches. I'd really hope over your 14 days, your attitude towards the value of these exploratory sketches have shifted slightly. You can see the value in the time you've taken for your daily practice in the form of heightened understanding of how you like to create art. I'm certain you will appreciate the awareness of your unique strengths. Knowing your strengths can infuse your creative work with a greater sense of purpose, which will help guide you through the challenging times. Let's be clear, it's not always going to be your best work. Quite frankly, some of my sketchbook pages were just a series of lines and dots on Sundays. It's about doing the best you can on a consistent basis. Once I stopped focusing on results and simply kept a consistent schedule. I let go the need to make a stunning sketchbook piece every day. I hope you understand that the key to maintaining an art practice doesn't depend on your skills, abilities, talents, or even your intelligence. What you need to succeed is grit, the tenacity to commit to long-term projects like a persistent art practice despite all the challenges that you and I face on a daily basis. No one will make you successful unless you work on it. Focus on yourself. See each day you paint or draw as beneficial growth opportunities. You never know where they might lead. Also, as artists, we need to develop a sense of optimism as we need to be free to take risks and free to fail, because we will all have failures. That is part of life. But that doesn't make us a failure as a person or a creative being. No one is perfect. It's about time you cut yourself some slack and focus on progress instead of perfection. Instead of striving for a perfect peace, aim for incremental improvements over many pieces. Stop questioning yourself and get your best work out there. True creatives are always honing their crafts, looking to learn more or improve skills. When you work towards continued improvement, you set yourself up for success. If you want to create something remarkable, learn to embrace who you are, celebrate your strengths, and don't let your weaknesses overshadow your best work. If you would like to take your art beyond the 14 days, here are some of my top tips for extending your practice. Take your new venture in segments. Find out what you need to learn first in order to move forward. For example, take some of your insights on these 14 days, and list them in order of interest or which ones you were the most passionate about, and just like in this class, create a rough plan. You could create another 14-day project around tackling some of them, like gouache for the first two weeks and then pastel for the next two weeks after that. Using the information from the last two weeks, will inform you even further about your personal and unique preferences, so be open to everything. Write these all down in a notebook or keep a journal. One last point I'd like to make is don't try to learn everything at once. Instead, work at mastering one skill at a time and eventually you'll get the bigger picture. If you decide to take further adventures, maybe your glimpse, the archipelago of astonishment or the ridge of resistance, or maybe this one post social media, or even the glacier of glory. Here? [inaudible] you need to get up now I need to sit down. We'll just deal with you a moment. Move it this way a little bit. Now you need to be [inaudible] I'll come to you m do you one take. When I was back in our college, we had critiques where all the students had to pin up their work or display it on the walls. The whole class would gather around with the tutor. My first crit was with a guy called Bruce. The project was about communication, so I used Alfred Hitchcock films. Have you heard of Alfred Hitchcock? I think so. I made this really elaborate 3D pop-up pieces to represent psycho, vertigo and rear window. I was trying to explain to the class the concept behind it, and I could see Bruce rolling his eyes and he probably thought, "God, I don't want to deal with this student. But at the end, when I finished, he said, "This student needs a round of applause." The whole class had to give me a round of applause because he actually said, my 3D pop-up piece was pretty amazing. That was probably the least traumatic critique in the whole three years of college.
 Ohn Mar Win, Illustrator Artist Educator