Transcripts
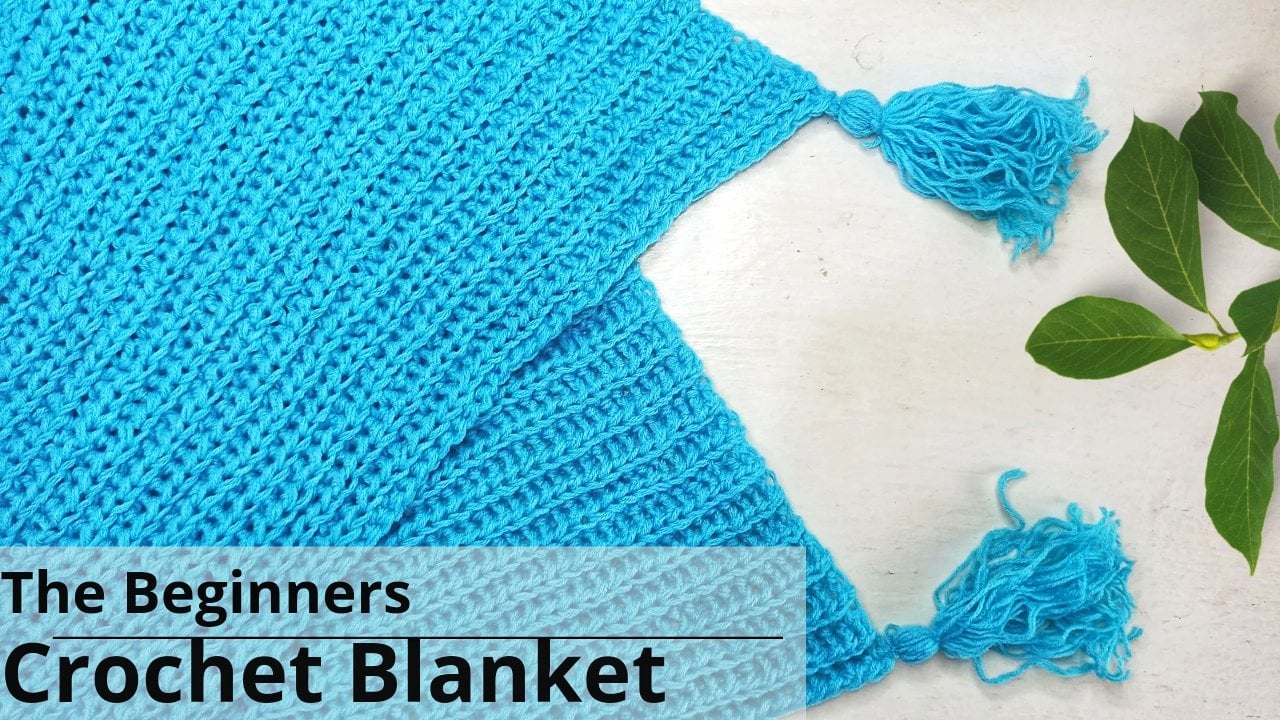
1. Introduction: Hi there makers. Eleanor here of silane crochet. And then today's class, I will be walking you
through how to make this beautiful mosaic
crochet blanket. Mosaic has been rumored
to be super difficult. But I promise you, once we work our
first three rows, it's going to be so easy. All you need is that graph. Know how to do that single
crochet and know how to work a double crochet
and these are all beginner friendly
stitches are crochet. Blanket will be finalized
by a double border, which gives it that
beautiful finished touch. And mosaic blanket is
only one-sided because the other side is
just two stripes. And I will show you how we can bring this to life in
any size that you want. If you want a baby
blanket or trustee throw, then gone and click
on Enroll and let me walk you through how to make yourself crushing
will say blanket.
2. Materials: So to work on our
crocheting was a blanket. We're going to need to
color Yan's of your choice. For the, for my blanket, I used a pink and
peach and a great. So for the demonstration, I'm
using this blue and gray. And then you're going to need to size crusher
crochet hooks, a five millimeter crochet hook, and a six millimeter
crochet hook. Also with scissors. I do not know where
I've left my scissors. I'm going to find that later. And not forgetting
that crochet pattern in that PDF that we have
attached to this class, you're going to
find a printable. So we want to make
sure you print this off before it gets
started on the class. So now then let's start working
on that mosaic blanket.
3. Foundation chain: For the body of a blanket, we'll be using the five
millimeter crochet hook. So you want to pick which
color you want to begin with. It really doesn't matter. So for the sake
of this, I'm just going to begin with my blue. And you want to start by
making that slipknot. To make a slipknot, I'm
just going to grab my yarn, the short tail, onto
my two fingers, wrap around like that. Bring my five
millimeter crochet, hook it underneath
and hook that you can pull through and just
tighten that up like that. So when we look at a chart, it's going to tell you that this is the blanket is worked in multiples of eight plus three. So depending on how long you
want your blanket to beat, just chain in multiples of eight plus three for the blanket, for the actual blanket, I change to a 152 plus three, which ended up being a 155. So for this, for the
sake of this tutorial, I'm just going to
chain multiple face. I'm going to change
16 plus three. So to make that
change your desk, my yarn over, pull
through that loop. Yarn over, pull
through that loop. And I'm going to repeat this for a total of 16 times plus three. So I ended up changing 27, which I change
multiples of 83 times. So I drink 24 plus
three, making it 27. So I'm sure that by now you have changed the number of chains that's required for
your foundation chain. If you haven't, I'm going
to stop this for now. And I'm gonna let you guys chain the number of
genes that you need. Remember if you're trying
to make this size that I made, you want
to change a 155? If you want us to be
bigger or smaller, you can just make sure
you're chaining in multiples of eight plus three.
4. Mosaic Blanket Foundation Row : So for row one, we're gonna be working
into the back bumps. If I change the bug
bumps or when you turn that chain around or you're going to see the
funny-looking side. So we're going to be
pulling onto those loops. But that appeared at the center. Because as we're working the
board that will now make sure we have a clear
agenda to work into. It's gonna make sense
once we're done and we're working out double border. So you want to turn around and into that second
chain from the hook. When I go into
that back loop and place a single crochet
into that second. Insert your hook.
Yeah, I'm pulled up, pull up the yarn, yarn
over and pull through O2. And that's your single crochet. So you're gonna be placing single crochets through
the entire row. Just as I'm doing right here. You're going to repeat this all the way to the end of the rope. So I'm going to finish
off this row off camera we're doing is placing
your single crochets. I have reached the
end of that row, so now I'm just gonna
do a chain of 110. So a general one does
not count as a stitch. And now for the rest of the second row, with
the second row, we're gonna be working
the back bumps except for the first stitch
and the last stitch. So in that first
stitch you're going to place a normal single crochet. Just like that. And for the rest are
gonna be going into the backup bumps of that chain. Placing our single
crucial the buck loops, placing our single crochets. When you hold your
chain like this, you're going to see
those back v's. That's where you want to place your single crochet
into those boundaries. Just like that. Let me go on doing
this and I'll meet you at the end so I can show you how we
finish off the room. So I've written
it into that room and into that last stitch. Instead of going into the
BCG group, I will enter, I'll make a normal single
crochet just like that. So I don't have my scissors. But once you get here, you're just going to chain one like that and
cut off that yet. So I might be using a knife to cut this
because I have lost, I have misplaced my scissors, but I'll find means
of cutting the urine. So right here you just
want to cut off that yet you can cut it off
as close as you can to the hook because
we've finished that row. So go ahead and cut that
and just around here. And we'll get started
on our mosaic pattern.
5. How to read a mosaic chart: I'm going to quickly
teach you how to read a mosaic chart. As we're reading was each
chunk we start from the right, going to the left, and from the bottom and
work our way upwards. So if you look closely
at the chart right here, this has a little demonstration. You're going to have a mixture of clear boxes just like that. Boxes with an x and
boxes that have C, which means single crochet, the estimates and
normal single crochet, the x means a drop
down double crochet. Then blank boxes, which
can be the great white, means a buck loop,
single crochet. So this single crochet, their normal single crochets
are always the first and the last one as we
did in that second row. So what we've done, what we've done right here is
this row and that row. So if you're going
to notice this row, it's full of blank boxes. Which means it was just, it was just this one's just that first row of
them are crushes. The second rule was enormous and we're crushing
the beginning, followed by back loop
single crochets. And we finished with a
normal single crochet. So from here on we're
gonna be starting on Wall Street when I work. But when we look at the graph, it's going to show as row to be starting in row
two on the graph, but rather through on
our actual project. So this is when now the mosaic pattern is
going to start to show, because you're going
to see that on row two on the mosaic pattern, we're going to start
having these x's. So what we're working
on say, Todd, is every row we change
colors except for the first two rows because we're making that foundation
of our crochet blanket. But starting from row
two on the chart, which is rotating on a blanket or gonna be changing colors. So go ahead and drop
your next color, which is the gray for me. And we're gonna get started
on row two on the graph.
6. Mosaic chart row 1: So you just want to
make a slipknot. And I like to leave as
literally on as I can at the end because I really
hate having to cut the yarn. So you just going to
chain one just like that. And then you want to connect
to that first stitch. And remember, it's going to be a normal single crochet
just like that. I'm going to make a
normal single crochet. Just like that right there. And then into the
next 123 stitches, I'm gonna be placing back
loop single crochets. So that's 123. And then into the next one,
which is this one right here. The fourth, I'm going to
have to, there's an x, which means we're
going to have to place a drop-down double crochet, two, double crochet,
we yarn over. And then to drop down,
we're gonna be going into that first robot
single crochet. So you're going to notice
that there's that stitch that's sticking out since we're
working to the bug loops. So we're going to go
into the front of it and place our double crochet. Just like That's what
that double crochet has placed that stitch back there. So after that X, we're going
to notice that we have two more stitches to do single crochets before we do another drop-down
double crochet. So we're going to place two
back loop single crochets, followed by a drop-down
double crochet. And then we're working one
more loop, single crochet. If you follow that graph, followed by a drop-down
double crochet, right there, followed by
two more single crochets. Backlog single crochets. He dropped down
double crochet and come back loop single crochets and a drop-down double crochet. That's all, that's all
you're going to keep doing following that graph. When you see the X,
be sure to place a drop-down double
crochet, and so on. So you're going to see that
for this row is going to be a drop-down
double crochet, two, but groups in the crochets
top-down double crochet, one buck loops, nuclear, she dropped down, double-click, and then the sequence is
gonna go on just like that. So you go on repeating
that uniform. And I will meet you at
the end of your row.
7. Mosaic chart row 2: So we're ending row two on the graph should have been
a normal single crochet, just like I did right here. So now we're going to begin
on row three on the graph. Going back to your
primary color, which is a blue for me, we're gonna begin with a
normal single crochet. And then our graph tells
us to work to back loop single crochets before we begin on our dropdown
double crochet. Then that drop-down
double crochet is I'm to that previous blue row. Just like that. And then that's going to be
followed by one mole, buck lub dub, lub,
single crochet. And then it dropped
down double crochet. And then I'm going to work, we're going to work
two single crochets, followed by drop-down
double crochet. Two backflips, single crochets, followed by drop-down,
double crochet. We're right here. Two more
bankruptcy in the crochets. Dropped, dropped
down double crochet. And then while working one
back loop, single crochet. And then it dropped down. Double crochet. This row is similar
to the first row, where we'll be working two single crochets and then drop down double crochets to buckle up single crochet, drop-down, double
crochet, one back-up, single crochet, drop-down
on double crush it. And you're going to repeat that toolbar groups and
with Russia is dropped down to bubble
up single crochets, top-down, dropped down, one back-up single
crochet and dropped down. And you're going to repeat
that for the entire row. So I'm going to finish
this off camera being making sure that for
that last stitch, you're working in
normal single crochet.
8. Mosaic chart row 3: So beginning row
three on the graph, I'm going to place our
normal single crochet. Actually there are four, sorry. So when you get makes
them a teacher trick, when you are not sure where
you are on the graph. Remember, this first two
rows are all single crochet. We're working from
right to left to know, to know where you
are on the graph. You can see since we
go from right to left, you're going to be counting
the tassels on your left. So far we've got three
castles on the left, which means we have worked
from one to three rows. So it does equal 0. So since we've got 3 thousand
siemens with what Dr, third row, we're gonna be
starting on our fourth, so we're on the fourth row. So we've already placed
that single crochet. Now we're going to work on but groups single crochet followed by a drop-down, double crochet. I've placed that back
loop single crochet. And I'm coming in with that
drop-down double crochet. And now I'm gonna be working three backlog single
crochets in between. And then it dropped
down double crochet. This is actually a favorite
of mine because it's just repetition of
three but groups and recruit sheets
and then a drop-down, three big groups and
necrosis and I dropped down if that's what we're gonna be doing for
the entire row. So that's three back
loop single crochets, followed by a drug group, a drop-down, double crochet, three back loop single crochets. And then I dropped
down double crochet. So you're going to repeat
this for the rest of the row, 3-bit groups in the crochets. And then I dropped
down double crochet. Just like that. So
let me finish off camera and I'll meet you at once. You're
done with that row.
9. Mosaic chart row 4: Beginning when row
five on our graph, we're going to begin by that single crochet with our blue yarn or whatever
color you're using. And then we're beginning with
a drop-down double crochet. So by now, the graph is
trying to start to show, but it's still not
quite showing. After that drove
down double crochet, It's gonna be followed by two
back loop single crochets. Then they dropped
down double crochet, and then two single crochets. And then they dropped
down double crochet. And then one bucket
of single crochet. And then it dropped
down double crochet. And then I'm going to repeat again to buck loop
single crochets. Then a drop-down double crochet, followed by two buck
loop single crochets, a drop-down double crochet, and then one back
loop single crochet and a drop-down double crochet. I'm going to assume that was
a little too fast for you. So you just want to
pause the video and repeat doing that for the
rest of the row five. Remembering to end your role without normal single crochet. So I'm going to
finish off my room and I'll meet you so that we can get started with row six.
10. Mosaic chart row 5: Beginning row six, we're going
to start with, as usual, normal single crochet, followed by two but groups,
single crochets. Normal single crochet. And it's gonna be followed
by two single crochets. And then they dropped
down double crochet. And then we have one back loop, single crochet
followed by drop-down. And then if you
look at your chart because I almost have
this memorized now, it's going to tell it to do
to backup single crochets, a drop-down double crochet, and then two single crochets. Then I dropped down double crochet and then one
bathroom single crochet. And they dropped
down double crochet. And we're repeating that
pattern again to back loops. Single crochets drop-down to public single crochets
dropped down, one bug loop, single
crochet and dropped down. So you're going to
repeat this for the entirety of the
rest of the row. You're going to
finish off row six. Pause the video,
pause the lesson, and I'll meet you in the next lesson to get
started on row seven.
11. Row 7 on mosaic chart: So row seven, as usual, we begin by a normal
single crochet, which I have already done. And then it's going
to be followed by one back loop, single crochet. And then it dropped
down double crochet. And we're back to one
of my favorite rules where we place three
double crochets, backroom single
crochets in between. And then it dropped
down double crochets. And by now you can see that our mosaic pattern
is starting to show. Replacing three buck
loop single crochets, followed by a drop-down
double crochet, three buck loop single crochets, followed by a drop-down
double crochet. And you're repeating that
for the entire row seven. So you go and do that. Backup single crochets and
the drop-down double crochet. Repeat that and I'll
meet you at the end.
12. Row 8 on mosaic chart: So to begin row eight, you're going to do that
normal single crochet that I have already done. And then it's gonna
be followed by a drop-down double crochet, followed by two back
loop single crochets. He dropped down double crochet, two buck loop single crochets. He dropped down double
crochet, one buck loop, single crochet, a
dropdown, double crochet. And that pattern is being
repeated to back loop. Single crochets.
And I dropped down double crochets to buck loops
and appreciates drop-down, one buck loop and a dropdown. And as you go, you're
going to see that our pattern is actually
now starting to form.
13. Row 9 on mosaic chart: So after 17 rows, and this is what your
work should look like. You can properly see
another pattern. It's for me. Like
I said, after 17, Rose was going to
come back to row two are going to be repeating
words true to through 17. So when you connect to your
green or whatever color, primary color you have. And begin row two with
that single crochet. Just going to pack
loop single crochet into three stitches, 23. And then there'll be followed by that drop-down double crochet. And we're just
completing the pattern. So it's going to work perfectly. So you just wanted to do that by two single crochets and
drip down double crochet. One loop, single crochet, a triptan, double crochet. And repeat that whole pattern. All right, now you should know that the next we're going
to be dropping down here and then we're
going to be placing true drop-down double
crochets here. You'll get the hang
of the pattern. You won't even be needing
the graph anymore. It's just gonna be in your head. You go on and repeat this
repeating road to through 17 for the number of
rows that's required. For what I would advice is, make sure you work
the number of rows equivalent to the number of changes you made
love, we changed 155. So we're kind of going 55 rows, just have that perfect square. So go on and keep on working. And then I'll meet you in the
next class so that we can now work the border of
our crochet blanket.
14. working the double border: In this case, I
might say, great. And you're just going
to grab a larger book. So in this case is six. You're gonna go
one size, larger. And then assuming this is a different color, I
would suggest, great. They can mingle with this. You're going to
connect Joey on to the center of your work anyway. But the cheater has
often been watching. They've been connecting
to the center. And then into that same stitch
you're gonna go in with your first slip stitch and you still want to make it loose. And then you're
going to slip stitch into every stitch around. This is also how I worked mine, but I did use the same
color as I was working. However, it did
pose a challenge, especially on the double
crochet row since I was using the blue
yarn for the border. So sometimes I
couldn't see properly. But, you know. So
that's why I'm saying it would be best to use
a contrasting color. So after you reach a corner
placing your slip stitches, I changed one and turned. Turning now this side, I was placing a slip
stitch into the side. Single crochet, whereas
the ones I want slip stitch for each
single crochet row on the double crochet rows. When you reach the
double crochet rows, you will know please, to slip stitches and a double
crochet and then one slip stitch in the next row. And you want to
automate like that. I'm just gonna go on placing
these slip stitches. Just like that.
You're gonna do this, go all the way around, back up until you can
pay once you reach it. Once you reach the top, gloomy, you are going to slip stitch into that first lips
to meet chain one. And we're going to go back to the five millimeter
crochet hook. You're going to chain one your ANOVA and then
into the slip stitches, you're going to have
tissues and this side stitches on the back soon to the flat stitches
you're gonna go into both and place a double crochet. And you're gonna keep on
going through both loops. Placing double crochets
all the way around. You're going to go
all around your work once you reach backup, slip stitch to join chain
one into the same stage, if you're doing towards this is go back around placing
double crochets. Once you reach the
coordinates, however, you're going to place
a double crochet chain to the same stitch double
crochet and then turn. That's going to help
you turn without it making your workforce
at the corners. You're going to do
that for the numbers.
15. Outro: So congratulations on completing your very own crochet blanket. I hope you absolutely love
it as much as I love mine. I will see you in
the next class.
 Charity Limbithu, Modern Crochet Designer