Transcripts
1. 1. Introduction: Hi there and welcome
back to class. Today's Thursday, and Thursday means
another crochet class. In today's class, we've got this super easy beginner
friendly crochet purse that is made from two very simple stitches
that you already know, which are the single crochet
and the double crochet. We'll be using a slip
stitch here and there, just to close it up and
see him up the ends. This is an absolute
beginner friendly project. And to achieve this
crochet purse, we will be using a
worsted weight yarn, five millimeter crochet hook, a four millimeter crochet
hook, that button, and a yarn needle or a tapestry
needle or whatever it is. Then of this class, you
should be able to be making this progress in whatever color you want or whatever
style you want. So go ahead and click on Enroll. Let me see.
2. 2. Materials: The materials that
we'll be using in this crochet purse class
or a worsted weight yarn. A five millimeter crochet, hook, a button, and a yarn needle.
3. 3. Stitches: The stitches for this
crochet class will be chain, single crochet, double crochet. And they slip stitch.
4. 4. Foundation chain: To begin working when
all purse you're going to grab your five
millimeter crochet hook. And there was a young
and make a slipknot. After you've made that slipknot, you want to make a chain
of multiples of two. But if you want to make
the chain the size, of course that we
make in this class, then be sure to chain 24. And that's true for if
you have not changed 24, Be sure to pause the video and finish off your chaining and then you can meet us right back. So to get started, we will be working into the
buck bumps of odd chain. So you're just going
to take that chain, turn it upside down, and we'll be working into
these back loops or chain, into that second chain from
the hook into the bump, bump, go in with
a single crochet, and then into the next chain. Pump gorilla with
a double crochet, yarn over, insert
your hook in there. Pull the yarn
through, yarn over, pull through two loops and
over without the two groups. And then in the next stitch, you go back to a single crochet, insert your hook, yarn
over, pull through two. So for the rest of them
are, we're just going to be alternating between
a double crochet. And they single crochet. That's a double crochet. Followed by single crochet. Double crochet, followed
by a single crochet. So since we started
with a single crochet, we're going to be ending
with another single crochet. So you're gonna keep doing
this double crochet, single crochet, double crochet. And I'll meet you towards
the end of the world.
5. 5. Crochet bag: So now I have to chase left
to reach the end of my room. And I'm working my last
single crochet we've reached the end are just
going to make a chain of one in turn. So this is what
the right side of our work should look alike. And now into that first chain, go in with a single crochet. Where you placed
a single crochet. Also going to place
a single crochet on top of the double crochet,
which is this one. You also place a double crochet. And this was a single
crochet in there. We will go with another
single crochet. This was a double crochet
and do that shall do this all the way to
the end of through steel alternating
between single crochet and a double crochet. So let me just get to the end of my rope and I'll meet you so I can help you get
started on row three. Be sure to keep count. As a stitch goes on, you can see that the stitches
are starting to form. It shows on either side, but you can pick which
side looks better for you For your preference sake. So let me finish off road to and I will meet
you right back. I just finished proved
to start with three. I've already made a chain of
one into that first stitch, gonna go in with
a single crochet, then proceed double crochet
and back to a single crochet. And then a double crochet. Single crochet. And that's what
we're going to keep doing for the rest of the row, for the rest of the work. So as you can see, that pattern is
starting to form. It's all starting
to come together. So you're going to
continue doing this for a total of 33 rows. So this is row three. You want to do this for
a total of 33 rows. So after this we're going
to have 30 more rows to do. And that's what we're
going to keep doing. You get to the end. You chain one, turn, move back. You get to the end of
chain 12. Just like that. So when you're done
with your 33 rows, I will meet you right back.
6. 6. Cleaning up: So at the end of our 33 rows, this is what your work
should be looking like. Go ahead and count 25 from down here coming up.
Let me just show you. I'm going to count the stitches. If you look closely
at the stitch, you're going to
see a little bump. This does is it makes it
really hard to count. But make sure your little strand is on the left side of you. So when you see this set
of little bump there, a little bumpy segments. Each bumpy segments
counts for two stitches. For example, this little bumpy
area is a segment of two. But if that's also a
little hard for you, and then you can just kind
of put the stitches apart. And you'll be able
to tell that this is a row and this is another row. But the easiest ways I
recommend counting as you go, but others, when we lay it flat, you're going to see that
there's little clusters of clusters and each
row represents two. So for example, this
first-class stage two rows, this is true Rose. They look like pumps. I'm not sure if you're able
to see this on camera, but it shows in person. For example, this right here
I'm committing to rows each. So you want to leave
stitch markers both sides on the road, 25. And then I've loved them
at the beginning as well. But you just want to put
this on the 25th root. But then before that, we're going to go
around the work placing single crochets all
around our entire purse. So go ahead. First of all, put a stitch markers
and the 25th row so you don't miss
that on both sides. And meet me back so that we can grow around placing
or single crochets.
7. 7. SC around: So row 34 would be a
roof single crochets, just going to single
crochet in there and unto every
stitch of the room. So go on single crochet or the way to the
end of the road. And I will meet you
once you get there. So once you reached
the last row, you just want to place
two single crochets into that last row, which will also count as, which will help us turn. And then you're just going to place a single crochet
into the sites, into the side
chain, one species. Just like so. And once you
get to that stitch marker, you want to just take it out, please that single crochet
and replace stitch marker. And then you want to have continued
policing single crochet. When you get to this
end or this corner, you're just going to place
twist stitch markers and turn this edge should be
easy to work into it. Because remember
we're working through the backbone of our chain, which makes the other chain
stuck stand out better. So it's gonna be easy for you to work your
single crochets. And then once you
get to the last one, you're going to place to
invest and policing or crushes into their side chain one rows should get
to the stitch marker. You take it out, please
and single crochet, replace it and come
all the way back up where we will slip stitch into that first
single crochet would meet this or I'm going to go with the marrow and I'll meet you. Alright? Make sure you do
not fast enough your urine.
8. 8.Button up: So after you've gone
all the way around, this is what it should
be looking like. I ended right here. Placing that single
crochet. As you can see. Now, you just want
to take the work and for different to half. Because remember we do have
an odd number of rows. After you fold it into
help you wanna find that stitch that's at
the very center. I'll take this one for me. And you want to put a stitch
marker to that stitch. Just like that. Now, we're going to do is bring your work from
the bottom unfolded, resting the bottom edges where the stitch markers
light just like that. And close the top because
this is what they look like. But wanted to turn in where
we want our button to be. Right here with the
sticks market is, is where you want to
place your patent. So bring your button and
just rest it right there. So right lane on a
crippling our needle. And put your yarn and then you see where the
button is right here, because it'd be so
good on this side, since this would be the outside of our work and
this is the inside. So this is where
the bathroom was. So just hold on to that place. The other side.
You want to place your button at the
very same place. Then flip your needle
from the bottom, lift from the other side of the soil button
from to your purse.
9. 9. Weaving in ends : After you've reached
into the stitch, before the stitch marker, we are going to fold our
work just like that so that you're aligning the corners or the corner with
that stitch marker. Right here has been to that
corner from the bottom. That stitch marker and
then insert your hook, that stitch markers
and slip stitch into the second stitch and you will slip stitch
if you're not comfortable with this method, can always use your
needle so you're gonna do their needle is close all
the way down to here. When you get to the bottom,
you can fast enough. Then you're going to
connect your yarn to the bottom corner,
to the top corner. And you also closed all the way down here and you'll
cut off the unasked for me. I would just slip stitch
with my former me to hook up to don't hear
chain running cut, connect up here and close with the substituents
all the way down here. And then I'll meet you
once I have done with it. So I have just finished
doing all of that. And this is what
we're looking at, like suggest to him
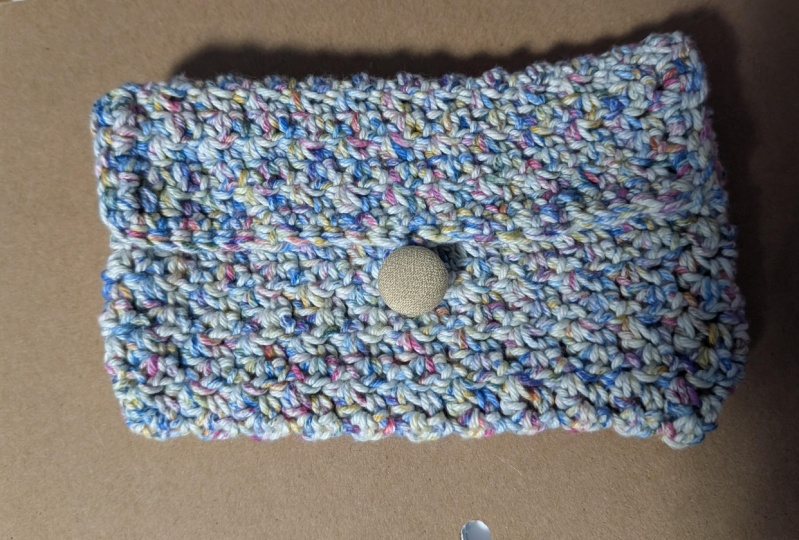
that work inside out. Just like that. So we can cut off or weaving those ends later. Stretch up those ends properly. When you close your purse, should come down just
like that button. It's going to go through there. Just like that. Then
stretch it out real nice. Just like so this is what
it should look like. Isn't that cute?
Personally, I'm in love. And in this pose you can keep your crochet hooks if you want. Well, you can be you can put
your money in there already. If you don't have a case or somewhere to store
your crochet hooks, you can really just
use this to store. Those were some money or I
don't know anything, really. The person is relaxed
and you've earned it. Go ahead and we run those as you can tell it there
I'm reciting again. We run those ends and your purse is one
done. Just like that.
10. 10. Outro: Congrats makers, you're all
done with your crochet purse. Go on. Make your breaths. Use whatever color, urine
you want on materials. You don't have to use a button. You can be creative and
do something different. Be sure to post a picture of your project in
the projects area. And if you have
any questions that need prospects
relation information, be sure to raise that up so
that we can discuss this. And to next class.
See you in a bit.
 Charity Limbithu, Modern Crochet Designer