Transcripts
1. 1. Introduction: Hi there, My loves
Eleanor charity here of silane cruciate and
welcome to another course. If you're new than
welcome to today's quiz. Today, we're going
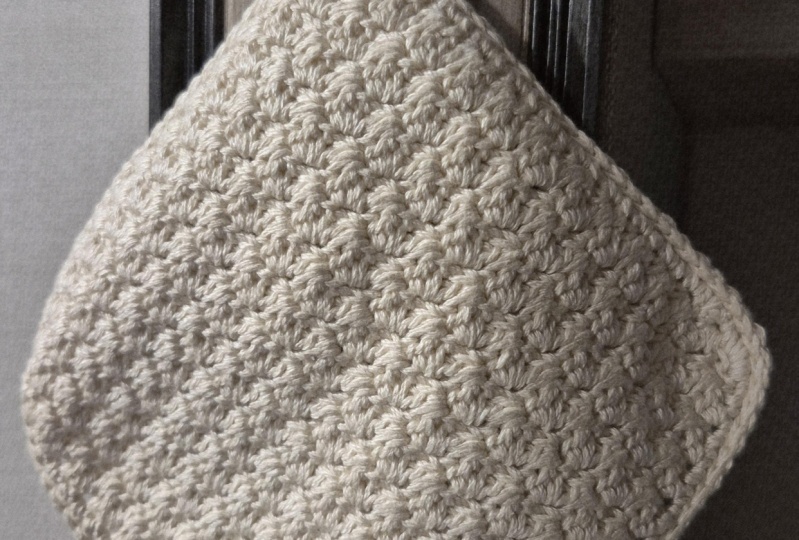
to be crochet in this beginner friendly
stitch and washcloth. It is a beginner friendly
pattern that is perfect for gifting or for spicing
up your bathroom decor. If you are excited to
make this washcloth, then be sure to click on that Enroll button and
join us in this class. At the end of this course, you should be able to make
a slipknot, single crochet, and then double
crochet together with some added skills
like the slipknot, chain and weaving in the ends. At the end. This is Dan. Dan said, What are
you waiting for? Grab that crochet hook, grab your yarn and
enrolling class.
2. 2. Materials: The materials that you need. A full 0.5 millimeter
crochet hook, some yarn, yarn needle, scissors,
and a measuring tape.
3. 4. Row 1: To begin, make your slipknot. And to make a slipknot, I'm going to do
this much slower. I like to bring my yarn and
hold the base of it like so, wrap it around my
fingers and make a little criss-cross
just like that. Then bring my crochet hook underneath through
that and just loop it. If that's too hard, you could
always do it like this. Two fingers like that. Bring it underneath. You've made a
little bow like so, and then bring the
yarn from underneath, from the center and
pull the longer tail. And you've got
yourself a slipknot. So with the pattern
of this washcloth, we're going to be
changing in multiples of two since we are
doing this stitch. And so I am going to
make a chain of 32. So to change us yarn over
and pull through that loop. So let me start again from the beginning with you
and make that slipknot. And then you just want to ANOVA and pull the
yarn through the loop, yarn over and pull the
yarn through the loop. And you want to do this for a total of 30 to stitch chains. Or you can make
this as long as you want or as short as you want. As for me, I would like
to have mine at Chase. So I am going to continue
making 32 chains. And I will meet you one-up
once I've got my 32 chains. So after you have
made your chain, you want to go back and count again just to make sure you've caught yourself those 32 chains. Because you really
do want to make sure you have yourself
and even number. And before going further, just grip yourself
to stitch markers. They can be of the same
color or different colors. It really does not matter. So I like to have a clean
edge or a foundation chain. So to do so, I like to turn my
chain the other way around and work into
those back bumps. So when I turned my chin around, if you see these little bumps
poking out of the chains, that is where we're going to
be working, our stitches. So you just want to find the
second shape from the hook, which is this one right here. Turn that around, find the bump, which is this one right here. And you want to go
in there and place a single crochet, social place, a single crochet hook.
Pull through there. We've got two loops on our hook, yarn over and pull through two. So since it can be very easy for beginners to mess up the
first and the last stitches. That's why we need
this stitch markers. So into that first stitch, first single crochet we made, we are going to place
a stitch marker. We're now going to skip that next chain and then enter the second
chain after that one. You want to place
a single crochet, just as we did earlier. And into that very same chain, you're going to place
a double crochet. So to do a double crochet, we ANOVA and this sort
of hook yarn through. Now we've got three loops
on our hook, yarn over. Pull through 22 loops on our hook yarn over
and pull through two. We are going to skip
the next chain, find the next one, and repeat what we did earlier. A single crochet. Urine over that same stitch. Please. Double crochet. Skip that next chain
into the next chain. Still working in the buck bumps. And we're going to repeat
that single crochet and a double crochet. Skip that next cheap, find the next one. And this is what we're gonna
be doing for the entire row. Single crochet and a double
crochet into that same chain. Skip the next one. And place a single question
to double crochet, skip the next chain
and you get the idea. We are going to do this, repeat doing this
for the entire row. So far this is what
we're looking like. And also that stitch has
not started to show yet. So you just want to continue
skipping your chain. Placing a single crochet in the double cream
to the same genes. Skip one single crochet, double crochet, skip one single
crochet, double crochet. And I will meet
you and we've got polymer chains at the end. So if your stitch
come from correct, you should have two
chains at the very end. So we're going to skip
that next chain as usual, and then enter the last one. We're just going to place one single crochet,
just like so. Serum and bookcases stitch
marker in the last one. What could it be
removing it very soon. But this is just for you
to keep track off the first and the last single
crochet use or stitches. So this is the end of our one. And so far this is what
our work is looking like.
4. 5. Row 2: To begin row two and every
other row following here, we are going to chain 1.10. So the first single crochet will be placed in
the first stitch, which is where I'll
stitch markers. So we're just going to remove
that stitch marker for now. Place a single crochet. And after you've placed
that single crochet, you want to return
that stitch marker. By the way, if you do not have a problem with listening
the first stitch, you can always leave
out the stitch markers. And then if that same stitch,
you weren't too, please. Double crochet. Now this is the part that I really
want you to pay attention to. When we hold our work like this, you're going to see our
stitches or disease. So if you notice you have a bigger feet and the smaller v, a bigger V and the smaller the big V's are where we
placed the double crochet. The smaller ones are where
we had our single crochet. So we are only going to be
working into the smaller v. So we're going to be
skipping the big one and then going into
the smaller one. Or you can just skip the first stitch and then
into the second one. And if that second stitch, we will place a single crochet
into that same stitch, go back with a double crochet. Skip that next stitch. This movie or stitch, single crochet into
the same stitch. Go back in with a
double crochet. Skip that next stitch right
into the single crochet, into the same stitch. You are going in with
a double crochet, skipping that next stitch. Single crochet and
double crochet into that very same stitch. You want to repeat this all the way to the
end of the row. However, we're gonna be adding them all
slightly different. So I will be meeting new one. We reached that
very last stitch. Continue doing this. Let me just show
you one more time. Skip that next stitch. And then into the next one, your one single crochet
and into the same stitch. Double crochet, one more time. Single crochet and
double crochet. Don't forget to skip one stitch, single crochet and into the
same stitch, double crochet. So let me just get to the
end and now we'll meet you so that we can work into
that last stitch together. So now we have reached
the end of the row. And now into that last stitch, we are just going to
place a single crochet. Remember to replace
that stitch marker if you keep skipping
that last stitch. To begin row three, we're going to be
changing on as usual. I'm just going to leave
the work down to show you what role should
be looking like. If your stitch
count was correct, you should have two
chains at the very end. So we're going to skip
that next chain as usual. And then the last one, we're just going to place one single crochet,
just like so. So remember cases stitch, marker and the last one. We're going to be
removing it very soon. But this is just for you
to keep track off the first the last single
crochets or stitches. So this is the end of our one. And so far this is what
our work is looking like.
5. 6. Row 3-28: To begin row three, chain one. And turn into that
very first stitch, pleasure single crochet
into that same stitch. A double crochet. Skip that next stitch. Single crochet. And double crochet skip that next stitch and are
going to single crochet. Double crochet. And that's what you're
going to be doing for the entire row and
the entire work. So remember this is
as work in row three. And we're going to continue on doing this all the way up to about 28 or depending on
how long you want it to be. But I was going for 10 ". So I am going to stop at 01:28. If you have racial
28 and you do not have the 10 " and you
would like the 10 ", then be sure to just continue working until you've
caught yourself some 10 ". So I'm just going to
continue doing this. And once I get to
the end of the row, I'm going to chain run and turn and repeat everything
we've been doing. So I will meet you once I
have got our desired 28 rows. What we're doing is repeating this chaining one,
going back-and-forth. Don't forget to skip a stage. And we're placing a
single crochet and a double crochet into the very same stitch.
So let me meet. You went back once
I've got those 10 " or that training eight rows
that I'm carrying your back.
6. 7. Single crochet around the edges: So this is what we have
and I have those 10 ", as you can see, those
10 " or 28 rows. So remember, if 10 " is
not 28 rows for you, that's absolutely fine since
our tension is different. So when you get to
the end of that rope, you don't want to cut the yarn. We're just going to
chamberlain and turns. So what would, the next step now is cleaning up the edges. So we're gonna be going
around the edges here, all the way around back here. Placing single crochets. After the single crochet is we're going to
make a chain of ten to make that little hook so we can hang our wash cloth. And then we're going to
go around another world placing slip stitches. So the end result of this
is something like this. This was rather a bit smaller. I mentioned that 9 ", so it's just an inch smaller. But at the end, we're trying
to make this little hook. And if as you can see that
it has cleanup borders, this has, so we're trying
to make this on this. So I'm just going
to set this aside. I've already done my chain one, and now I'm going to go on the side and place
a single crochet. So you're just gonna
have to eyeball this and place your
single crochets. The sides. Just as I'm doing. Great to be out next
single crochet, and so on. So I'm going to continue placing the single crochet as
I'm doing on this side. So if I'm just going to
hold up my work, like so. You can see these little
spaces right here. This little spaces that you
can make up to be rows. Those would be all
single crochets. All of those. That's going to be where we place our
single crochets. If it's gonna be hard
for you to notice, just make sure you have yourself 28 single crochets for each and every row on this side since we watching them one
to start a new row. So just go for 28 single
crushes on this side. On this side, as for
this side, we take 32. We're gonna be having
a total of 31 since the first single
crochet does not count or the first
chain does not count. So let me just get to the
end and I will meet you once we're placing our single
crochet into that 28th stitch. So I've got one more stitch, which is this corner
right here to place that single crochet
into that last one. We're going to be placing
three single crochets in order to make that
little curved corner. That's my first. This is my second and third. So you're gonna notice
that it starts to turn into that second one. I'm just going to place a stitch marker so that I can always know that
that's my corner. You want to grab that
other stitch marker into that very first single
crochet that you meet. I can tell it that this
is the one for me. This is gonna make sense once we come back all the way around. So remember how the foundation chain we started working
into the buck bumps. Yeah, we did that
so that it's easier for us to place the
single crochets. The throne images fixed my yard. So if I hold my work like this, you can almost
tell those chains. And this is from the
foundation chain into every stitch is
where we're going to be placing our single crochets. And you're going to
have a total of 31. That's if you change the T2. If you change the D3, I mean, if you say 34, you're going
to have a total of 33. So you're just gonna
have one less stitch and the foundation chain. So I'm going to continue
placing my single crochets. And once we get to the
end or the last one, we're also going
to place three and then work our way up
placing one into each row. If you have eight
rows, you're also going to have 28 stitches. Once you get to the
top one right here, you're going to place three single crochets in that corner to turn and then
you're going to place one and you're going to come
all the way to the last one. And once we get there, I
will meet you right here. So that we can now
finish off by making that little chain and green path around with
this slip stitch Row.
7. 8. Slip stitch around the edges: So I have just gone around
placing my single crochets. And as you can see,
the borders are much cleaner than
they were at first. So reaching now we're
gonna make a chain of ten. You could just pause
if I was a bit fast. But we're gonna change
ten and slip stitch into that stage where we have our
stitch marker to connect. And then for the
rest of the row, we're just gonna work slip stitches going all
the way around. And to do a slip stitch, you're just going to
insert your hook into both loops of this
previous single crochets. Pull through. You've got two loops and
continue to insert your hook. Hook that end product
through, and pull it through. Insert your hook yarn, pull it through and
pull it through. Just like so. Just like that. You're gonna do that
in every single stage. And the corners. We will not have to
place three anymore. We're just placing
one slip stitch into every stitch all the way around and wants
should get to the end. And we're about to
get to the chain. I will meet you there
so that I can show you how we're going to
work. Go for the chin. So I've made my way around and I am back. For the next part. You want to make sure
you have your needle and your scissors close because we are almost at the end of our Kushi wash cloth. So into the tensions with according to slip
stitch our way up. I like to go into those 22 loops at the top, just like soap. But anyway, really
doesn't matter. You're going to have a total of ten slip stitches for
the top part as well. So to make it easier for you, you can just go into it
normally as you normally would. So that's 3,456,789.10. And then to secure this, we're just going to
place unless slip stitch into that very first slip
stitch that we made. A thorough chain one. And you want to leave
a bit of a tail, snip it right off and
pull that through. Just like that.
8. 9. Outro: So as you can see from the
first one that I made, the little hook
was nice and snug. So to do that with this one, we're just going to take
that yarn and wrap it around a few times or until you have something
nice and tight. So I'm just going
to wrap it around until about five times and make a little note
just to secure it. Just like so. So this is what it
should look alike, but obviously we're not done. We need to weave this in. That's where we need
our yarn needle. Just going to put your urine in and we're gonna leave
it to the side. So I disliked to go
in like so like so. And just mesh or weave my way through with
the yarn needle. Once I feel like I have enough. I just pulling the eye, obviously not all of it is in. So you're just going
to pull a bit, and this is going to run
quite a bit heavier scissors and just put it through. So now you cannot see
that tail anymore. And just like that, you've got yourself
and wash cloth. That was very simple. This stitch, like
I said earlier, is called the subset stitch. I forgot to leave. This one is I'm just going to show you
how we do it one more time. Enter it through. They are neutral and you're
just were not believe you're new to us through just like so. As you can see, one is smaller than the other
and a good way it does. But not as much. If you want to block your work, you can do so and that
is absolutely fine. But remember, you're
going to be using this to clean yourself. So blocking, blocking, it doesn't
matter. And there we go. You have quite
itself a washcloth.
9. 3. Stitch Library: The stitches that
we'll be using in this class are the slipknot, a chain, a slip stitch, single crochet, and
a double crochet.
 Charity Limbithu, Modern Crochet Designer