Transcripts
1. 1. Introduction: Hi, that make us
Alina charity here, the makeup designer behind
incident crunchy dark club. Over the years, I have
learned how to crochet, right crochet patterns
with a hope of YouTube. It has been a very,
very bumpy road. So I know the struggles that come with learning
how to crochet. I know how frustrating
it is to not know if this sram can
go with this hook. What does this mean? What does this ditch?
What is the stitch? Can I do this stitch
as a beginner? So I have put together
some few tips how to keep your cushy projects straight because I will have my taste
struggled with that. As I begin, I'll
always have cricket. So in this class, I want to show you
how you can keep your cushy protect street
which ditches you. I think beginner
should be focusing on. I have also attached a PDF document that's going
to help you understand better the weights of
the different types of crochet hooks in which
shot, which crochet hooks? In that the end of this class, there's a little
surprise project that I want you guys to do that you'd have going on to your
next level of crocheting. At the end of this class, you should be comfortable
with multiple stitches and you should be on your way
to crush any other sweater. As you know, the cod season
is about to be depending on which time you're coming
across this cushy class. So why don't you
go ahead and click on Enroll and let me
see you in class.
2. 2. Best crochet hooks for beginners: So when it comes to the
recommended materials, I'm going to recommend
that you have access to this set
of crochet hooks. They're very smaller ones. These crochet hooks right here. Cool for a fingering
weight yarn or thread. If you have seen people
using thread to crochet, it requires patients that calls for these very
small crochet hooks. Otherwise, this side
Costco, thicker yarn. Personally I like to use the file is my
favorite crochet hook. But as a beginner, I'm
going to recommend that we be using a 5.5, 0.5, since we're gonna
be using a champion, but later we'll get
on to that later. Besides the crochet hooks, you want to have access
to stitch markers. As a beginner, these are
very crucial that you have. Make sure you have
access to these. If your set of crochet
hooks that you got did not come with these,
then you can, I'm going to provide a link to where you can get
yourself some hooks, scissors, measuring
tape, and a yarn needle. This neonatal is after
we're done crushing, we're gonna be moving in R n so that it looks
all nice and neat. That's where these
thick plastic needles coming some call it
a dawning need to. I just like to call
it a yarn needle. So this is the whole set. Scissors, crochet
hooks, stitch markers, tape measure, and a yarn needle. So now that you know what you
need to have for beginner, the Crochet said that you
need to have a beginner. Let's get onto the next step.
3. 3. Best Yarn For Beginners: The yarn. So the yarn
that I would recommend, I mean, this was a ball of yarn, I just finished using it. But for the sake of this
class, for the demonstration, I'm gonna be demonstrating
using a chunky on, as you know, there are
multiple weights or yarn. And in that document that
I have linked for you, it's going to
explain all of them. This is a chunky on. There is a worsted weight
yarn which is quite smaller than this
and that usually crossword five
millimeter crochet hook. As for this chunk here. And you might be
using a 5.5 wave in a six millimeter crochet hook. And this is the one
that I recommend for you as a beginner
because that means it's going to be
easier for you to see the stitches since been
under so much bigger. So make sure that you have
access to a chunkier. And if you didn't have chunkier, you can just take two
strands with worsted weight. And you're going to have
yourself a chunkier.
4. 4. How to hold the yarn and crochet hook: The next step I'm gonna
be showing you how to hold your yarn and your hook. I'm right-handed, which
means I like to hold my crochet hook in my right hand and my yarn is
usually my left hand. That's absolutely up to use your left hand and then you just got to do what we're doing here, just in the opposite direction. So for this, I have
decided to use that 5.5 millimeter crochet hook. If you don't have a five-point
five, you have a six. And access to this chunkier, then be sure to use that. It's absolutely fine. The Smiths multiple method of holding your yarn and your hook. The two very common one
known or the folk method where most people hold
their yard my disk. So when you see them work in the projects,
don't mind this step. I'm going to teach you how to make a slipknot, produce them. When you see them making I'm
working that cushy projects. They're usually
hotel yarn like this and start to crochet. This is usually called the fork. The knife and fork style. Remember some people, usually
myself who like to hold the pen on the crochet hook
like a pen just like this. And then you'll see them chain
and we're working there, crochet projects,
jazz like that. So whichever you're
comfortable with, be sure to use that method. So as you can see, when I
switched my way of holding the hook by affording the
hard switches as well, but that's absolutely fine. Some people will still hold
their urine like this. And chain like soap. I like to just hold
my yarn like this. Chamber. This is, I probably think
I'm the only one who does this because this is just
what I am comfortable with. So I'm going to say this again. Make sure you hold your hook in whatever way you're
comfortable with. So I'm just going to
take this apart so that we can now get started
on to the next phase, which is how to
make that slipknot. And then we should
actually start to crochet.
5. 5. How to make a slip knot: So how to make a slipknot? There are multiple ways of learning how to
make a slipknot. I'm going to teach you issue
that I have come to know. There is only one way that
I personally like to do it. And I'll show you how. So the first one that I
see most people are using, they would take that
short strand of yarn and later on
their finger like so, they'll take the longer end, wrap it around their
fingers like so. And now they will take
this short strand and bring it over the
other one, just like that. And then they will
take the other one and pull it now
all the way over. Moving this finger
in the middle and just tighten that grip. Just like that. So let me show you that again. They'll take that
urine just like that. These two fingers. So I'm gonna hold my
thumb and pin this, download this, and
then they'll wrap it around just like that. So I'm going to use my pinky to secure this longest route. Then they'll take that
shorter strand of yarn and pull it over the other
strand, just like that. Keeping this in place, they would then I can
take this strand and then pulling this drug now
underneath, just like so. They were then removed from
this fan power of nine. Pull it up and they'll pull
onto this short I want, but now I have to hook
in here like this, pulled onto the shorter stride. And there you go. You have that slipknot. But this is complicated. So let me show you what I
personally just like to do. I like to just take my
hug my yard like this. I'm just making an x. So I take that shortest
ramping shared like this and then I
became x. Just like that. Grab that hook,
inserted underneath, loop onto that yarn
and pull it down. Just like that. Let me show you that again. You take that short
strand of yarn, wrap it around your fingers. So my family securing
this right here. My family securing this
spread right here. And then I like to just
bring it across, like so. So my pinky is not
going to secure this. My friend is going to hold
on to that longest drought. And then I'll grab that crochet
hook inserted underneath, loop that yarn, pull
it through like that. And then I'm going to pull these two strands that pull onto that long gone
to secure that loop. And there you go, you have
made yourself a slipknot. So if it's too tight,
you're just going to pull up the shortcut
to loosen it. If you want it tied up
your poor the longer end to tighten it. Chest legs.
6. 6. How to make a chain: So now that we
have our slipknot, we want to go on and start
learning how to make a chain. So before you start
making that change, and I make sure that the yarn is able to move on the hook. You don't want it
to be too loose. Bone is too tight. You won't be able to move
properly as you can see, you want to pull into
that looks at it, and just make sure that you and is able
to freely move in, but it's not too loose
and that crochet hook. So now you're not
grab on to that yarn. The longest route of Yan. And I'd just like
to pull it like this and hold on to with my
thumb and middle finger. I like to hold on to
that smaller strand so that we can
start making cheap. So go ahead and do this. If you have another way that
you're comfortable with, be sure to also do that. But right now I'm
using about fork, knife and fork method
of coding by crochet, hook my finger to
hold up my yarn. So now that you've
got yourself in that position to make
your first shape, you just want to wrap around the hook around with
this shot right here, like so let's do that again. You don't want to, I like to
have my yarn about this way. Eat up my crochet
hook because you don't want it to be all the way down at the base like this. I mean, you can if you want, but I find it easier when the
is somewhere around here, then Nick with my hook. So once it's here, I like to just
roughly on the hook, like so so now that
urine is going to be trapped at the neck of that hug and then I like to
pull it through the eye. So this is why I
kept saying you want to make sure it's not too tight. So let me get closer up to make it that's
your first shape. To make your second you want to secure it at the
neck and pull it through wrapper around the neck and pull it through her out
to secure it up the leg. Pull it through.
And just like that, we have made 2344 chance. I'm going to show you how
we kept chains in a bit. But I want you to just practice. Pull it through. And I picked up secure, we got the neck,
pull it through. So I'm just going to show you if you were
to hold your yarn, in fact, cancelled method,
how you would do this? You're stupid and same thing. I hope your yarn around
secured at the neck through. So you want to make sure that your attention is not too tight. So that the chains are not too tight because you don't want
to make very tight jeans. You want to make them
as loose as possible, not to lose, but easy enough for your crochet hook
to work into a gap. Because from here remember, we're gonna be going back in
working out little project. So far. This is what my chain
is looking like. So let me just show
you how you're able to count your chains.
7. 7. How to count a chain: So this is the correct, the right side of the chain. And this is the back
bump of a chain. You can already tell
the differences. The right side of the
chain looks like you are braiding hair or
hybrid a hair braided. Whereas the other side, it's less Nieto, as you can see. So we're gonna be
using the right side. So to counter chain. To count your chain,
you're going to be saved these little v's. This is where my
crushing hug was. I've just taken it
out. Let me just replace it so that we
don't confuse each other. So this right here is a chimp, it forms a V is a V-shape. If you can see this
right here is a shape. This right here is a cheat. And this right here is it chain? They just form these
kind of v's as it were, or little breeds like so this is a chain.
This is a chain. So if you were to count, you would be counting these V. So that would be 12344. This was a fourth, 5678910, and so on and so forth. And if we go all the way down, you're gonna see that
this view right here. This was the very first
chain that you made. I want you to take
everything apart and start again by
making a chain of 21. So I'm gonna have you
make a chain of 21. Take the whole thing
apart, quote from King. And then start again for making a slipknot and making
a chain of 21.
8. 8. How to single crochet: So after making a chain of 21, this is what my project
is looking like. So now, if you have come
across a crochet pattern, they usually tell you
if you're working, assuming your meat
walking a single crochet, which I will show
you what that is usually so into the
second chain from the hook on to the third chain from the hook onto the
fourth chin from the hub. You will rarely see into the
first chain from the hook. And that's because
if you went into the first chain from the hook, which is this one, your
work would just come apart. Let me show you if I was to
go into there and pull it. Can you see that? You can didn't work? You can't work anything. It just doesn't make sense. So let me just replace
that CI and I just ruined. So they usually say it
into the second chain. Because this first chain right here is going to
become Tim as support. Or they say a turning chain. So to allow you to, to turn properly and start working
into the second one. The third, usually if you're
working a single crochet, which is what I'm
about to show you now how we do a single crochet. They would tell you to work into the second chain because
it's a smaller crochet hook, it's a smallest stitch. It doesn't call
for much spacing. Let's start by working a single crochet into that
second chain from the hook, which is this one because
this is at first chain. And this is the second sheet. We're going to go in and
place a single crochet. So to place a single crochet, you just want to insert your
hook into that v, v space. So take your yard,
insert your hook, insert it into that v space. But Jeff like so. And then secure that
yarn on your hook. Like I have done so. And you want to pull it
through just like that. So let's do that again together. I want to find that second
chain from the hook. Take your hook,
insert it into that. I'm just going into that
one loop right there. Like this. Some people will go into
the two loops like this. That's absolutely fine. As long as you're
going into that chain. So insert it right
in there and then pull the yarn, pull it through. So now you're going to have
two loops on your hook. Yarn over. Pull through two. So let me take everything apart and show you
one more time. You are going to insert
your hook into that stitch, which is the second
shade from the hook. Yarn over. Pull through. You've got two loops on
your hook. Yarn over. When you wrap your yarn, I like the yarn up your hook
around the young like this. It's called yarn over. Pull through. Just like that. Now I want you to grab your
first stitch marker and place it on top of this that
you can see right here. This is going to show
you that this was a stitch or this was
your first stitch. So that when you're counting how many single crochets
room that you've made. You won't miss out the first. It's easy to miss out
the first and the last, especially for beginners. So you want to make
sure you utilize it will stitch markers. And now to go on
working the rest, you're going to do
what we just did. Insert your hook into
that next group, pull it through to
looks like your hook. Yarn over. Pull through to find the next
treat, this one right here. Insert your hook, loop, pull it through, yarn over. Pull through two. That's your second stitch. Find the third. Insert your hook loop, pull it through yarn over. To find your next
chain, and repeat that. Insert your hook. Yarn, pull it
through, yarn over, pull through two
fragrant next chain and set your hook, loop. Pull it through, yarn
over, pull through two. And so far, this is what your single crochets
should be look alike. I want you to continue
and I'll meet you towards the end so that I can show you how we can finish off and not miss out any stitches.
9. 9. Finishing single crochet row: So I have got three chains left at the end, so that's 12.3. So we're gonna be doing
the very same thing. Placing single crochets into those last stitches
are those last chance. And this is the last
one right here. Into that last one, you
don't want to miss it. You can see after that it's
just that slipknot we made the last V or decent looking v. That's gonna
be your last chain. So insert your hook yarn over, pull through two yarn
over, pull through again. And that's your last stitch. So I'm gonna grab
your stitch marker again and mark that last one. So far. This is
what your project. First row of single
crochet as looking like. Remember I told you to chain 21. And then because one chain was
used as the turning chain, we should have 20 stitches
or 20 single crochet across. So I want you to hold
your work just like this. You can see those V's since
we know how to come to cheap. I want you to count
from this stitch marker to this stitch marker. You should have a
total of 20 stitches. I'm just going to cut
mine with your camera and then I'll let you can't
yours out away from camera. So that's 1 234-567-8910, 1112, 1314, 1516, 1718, 1920. Why do we have 21? Why do we have 21? This means those are mistake. I'd probably change
22 instead of 21. And this is why it's very
good that you should double count your shape before you
begin working your projects. So they all this means is when I was changing
my chain of 21, I added an extra one. I think it's that part where I started to teach you how
to do the first gene. And then I went back and
added another chain. That's what I added the 22nd. So you should have a total of 20 since the first one was
used as a turning chain. So I want to show
you how to start a second row using the
single crochet stitch.
10. 10. How to start a new crochet row: So to begin a second
group of single crochet, you want to change one? So remember to
check, we just ran over and pull through
just like that. So that's your chain one. And then you want
to turn them into that first stitch from the previous row or where
your stitch market is. That's where you're
going to be placing your single crochet. So you just want to
remove it for now. And make sure you
note where you remove that stitch and then into
that hole down here. Where that first which
was just want to insert your hook and make
a single crochet. Just like that.
After you're done, be sure to replace
that stitch marker. And then from here
I'm following this. You're going to
find these stitches right here in the spaces. That's where we're going
to be inserting our hook. Me call second single
crochet, chest like so. So you won't have
continued to do this all the way to
the end of the road. So just to explain again, when you hold your
work like this, you're going to see the spaces in-between these little bumps. Because this little bump
was your previous row single crochet into that space. The next one would be
this one right here. You want to go in there
with your single crochet. Go in there with
your single crochet. Just like that. So you want to do
this all the way to the end of the rope. And I'm gonna go and do this
and to approaching the end of the row so that I can show you how we can
finish their work. So far, this is what that would work. Should
be looking like. Well, those two rows and this
is the other side of it. I have got two stitches left. This one right here, and the one with the
stitch market is. So into this. I'll go one single crochet. Then remove that stitch marker. And then where that stitch
marker was going with my very last single crochet. And then you can just
replace it so you do not get lost when we're going
back on our third row. So this is your second row. To be killed another room, remember you just chain one. Turn your work. And then into that
stage where that stitch markets or just
send armies this. And go ahead and place
your first single crochet. Just like that. And then you'll put up container just as we did in that second row. Placing your single crochets in those bumps in the
middle are in-between. And then let me meet
you at the end of the room once again, so that I can show you
how we end the row again. And then I'll let you guys
continue on by yourselves. So here I am. Two stitches left. Then into that last ditch, remove that stitch marker. Place my last single
crochet chain, 1.10. So assuming you did not have
your stitch marker there, I will now show you
how you're going to identify your first stitch. This was watching, this first V was the chain that
you just made. The next week is
your first sketch. So that next v is
where you want to place your stitch Internet. Go ahead and place your stitch, and then you can replace
that stitch marker. So I want you to
continue doing this for a total of however
many rows you want. And then when we come back, I'm gonna help you see how you can count the rows
that you worked. But otherwise, I'm gonna
keep on making this tool, this little bundle of
you and I have left is out of and I'll
meet you again so that I can show you
how we can count the stitches, all the rows. And then I'll show you
how we can cut off the yarn and how we can
move into the ends so that we have a nice chunk of a dishwasher club or whatever
predict that you've made.
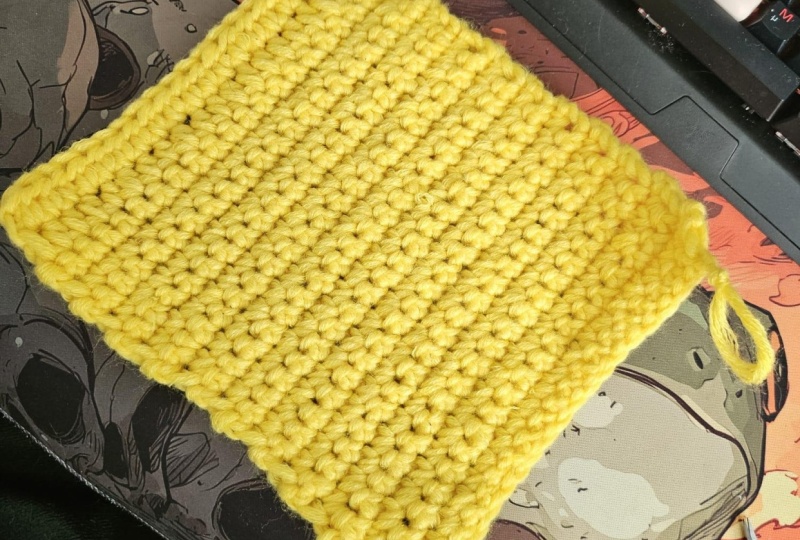
11. 11. How to count rows: So now after nine rows, this is what my single
crocheting rows and look-a-like to count
the rules. This ticket. I have got nine rules,
so that's 12,345,678.9. The single crochets
are quite small. So then we try and
turn it around the other way so I can count since it's easier to
see in this side. The right side is where
if you're right handed, this little starting tail shouldn't be on your right side. So that's one row. This entire row is 12,345,678.9. So this is how we work
the single crochets. And if you take a look, because of the
stitch markers that we're placing on the ends. It's helped our work
to be absolutely straight on the edges,
just like that. So we're done with
a single crochet. And now let's move on to
a half double crochet. If you want, you can continue
working more rows until the length of it matches
how wide this is. So this is where
your mission take transit. As you can see. It measures about
eight-and-a-half inches. So you can continue working
until it's also 8.5 " long. So far it's just
about 3.3 " long. So far, this is how long
is it going to continue? Going to have another
April and 5 " long. And it can be we'll put
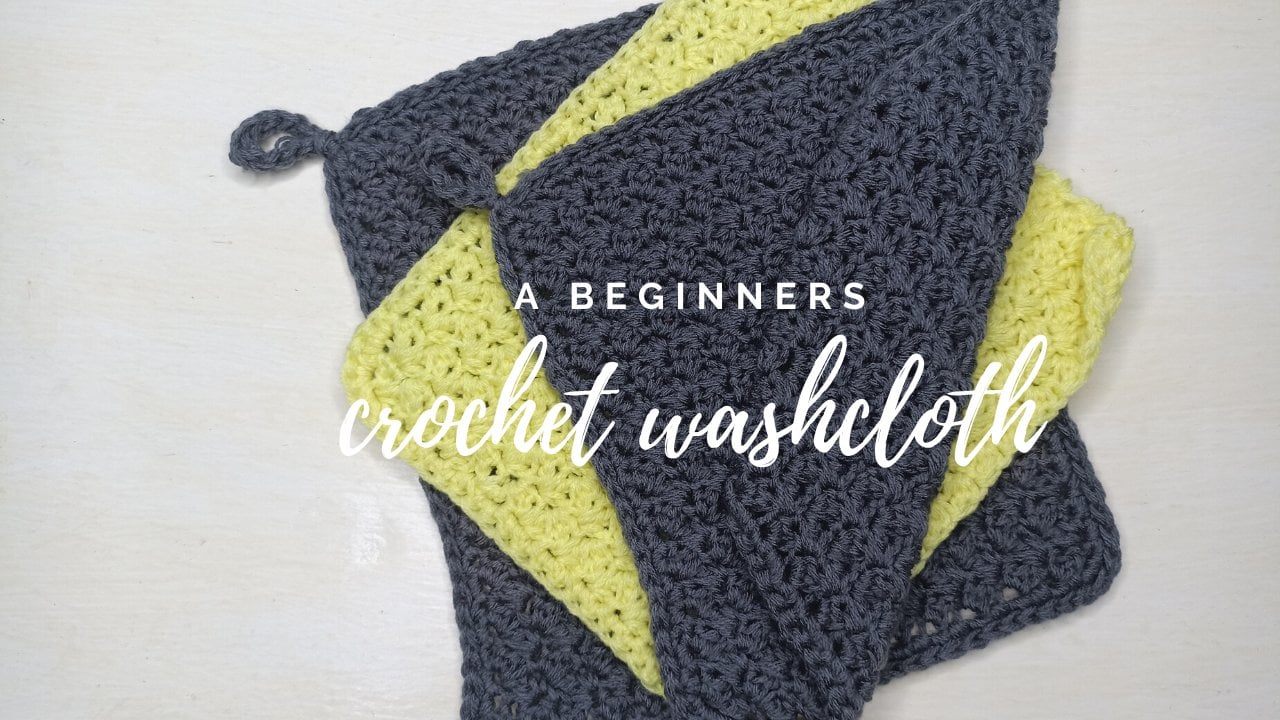
holder or placemat, my table mag, your very first crochet project or a washcloth. So I'm just going to put this
aside and we're gonna get started on working
on next stitch, which is going to be the
half double crochet.
12. 12. How to start a half double crochet stitch: Stitch marker. Place it in. Just like that. Like I said, I like to chin want to
return to begin in Europe. Other patterns to reaching to, this is what it would look like. But again, personally I see
that it tends to confuse me. I have found that
you tend to have a Meta edge if you change one. So we're going to turn one. And to remove that
stitch marker. First stitch, we're gonna
be going that space. So what I mean, I
don't like this. Can you see those side v's? These v's. That's what we're going to
be inserting our stitch. You can see these
fees right here. That's where we'll be
inserting that alcohol crochet hook workstation
into that first V. This one right here is
where we'll be placing our first half double crochet. So bringing back that stitch
marker, mark that stitch. So we don't lose
it on my way back. And then we'll continue Interact extra half double crochet, half double crochet,
double crochet. And you're going to
have double crochet all the way until the
end of the world. So I'm just going to
speed it up a bit since I have already reached
the end of my room. Got two more
stitches into there. And then I'm going to be
removing that stitch marker, that last fee and set that
hook and pull through. So as you can see, the half double crochet
has a lot more length. The single crochet does. However, it does use
slightly more urine than the single crochet dance. So I'm going to show you
how we begin to shed roof of your half double
crochet just like that. Chain one and tap
into that first fee. Right there, please. Your first half double crochet, stitch marker and
police it in there. And then you're going to
continue policing cough double crochets
into every stage. And then that last one. Kinsmen, turn first to the
police, your first stitch. Just like that. So,
um, for my work, I'm not going to loan rules just like we did for that
single crochet. And then I'll show you,
I just want to show you the difference in size. So let me walk. I know something I
I'll meet you so that I can show you what it
looks like at the end.
13. 13. How to half double crochet: So to work the half
double crochet, we're going to start
as we've been doing slipknot and then
making a chain. So this time I just want
you to change your life. This time the foundation, she'll be quite
smaller. I've got 11. So now personally, I like to skip one shape and
then go into the next. But when you watch other
tutorials on YouTube, other patterns though to skip two stitches and then go into the next one to start
your half double crochet. But I spent me even
at the end of a row, I like to just chain one and
turn in this course the same for if I'm doing a double
crochet or something like that. So I'm going to show
you how I do it. But when you watch other tutorials and
they're telling you to skip to the chase
and going to the third. That's absolutely fine. So for the sake of this class, you could skip that first shape. The next word, go in with
a half double crochet. So remember a single crochet, we just went in and did so. This time a half double crochet requires us to yarn
over before we can continue your yarn over just like soap into that second
chain from the hook. Insert your hook yarn
and pull it through. So now you've got 123
loops on your hook. Yarn over. Pull through all of them. Just like that. Insert your stitch into the
next loop that you are, then pull it through loops
on your hook, yarn over. You're pulling
through all of them. Over to that chain. Through loops on my hook
and pull through all three. So let's not forget placed in back stitch marker into
that first stitch. So it's this first V that
we can see right here. And now I'm just going
to continue leasing. Have double crochets, fixing a yarn to
more stitches left. So remember that last
v looking stitches, that last one, the last
stitch of the row into there. You're also just going to
place half double crochet.
14. 14. How to measure the finished swatch: So after nine rows of working, this is what our work is. Nothing of the half
double crochet is. So let me just measure. Have gotten 4.5 " of half double crochets
after nine months. Whereas with a single crochets, we got 3 " from the
same, same yarn, same crochet, hook,
different stitches as you can see when I look
at them side-by-side, they have double
crochet works at rest. At the same time it
uses way more yarn. As you can see, this
is what it looks like. Most people like to
use this to work sweaters or cry begins. All projects. If they want the
project work up quite fast other than the
single crochet, this one is a
little more softer, has more, it's slightly
a bit more loose, if I would say, well, this
one is a bit more stiff. And I'm sure you're
going to notice as little as you work, the stitches sullied
by side-by-side. This is what they look like. This is the half single
crochet close by. And this is the halftone
crochet close by. So this is what they
look like, both of them. So I mentioned that I would like to show you how
we can weave in the ends. I don't know what came over me. I take this apart. So let's, let me show you now
how we weave in the ends.
15. 15. How to weave in ends: When you're done working and you want to fast
enough, you're young. As streaming. This was it. I'm not
going to cut it off. So I'm just for the
sake of demonstration, when you're done, you just
want to make it uniform. Then you would cut
off around here. After you cut off, then you just pull the yarn and you tighten it
at the tip, just like that. And then once you're done and you're trying to
weave in the ends, you want to just take the yarn and insert it through
the eye of the needle, just like I have
done right here. And then you're just going
to act like you're sewing it into the project,
but you're not. So I'm just going to go
through the top bumps of my work with my needle up with my yard needle,
just like that. And as you do that, you just got to pull the yarn through the tail of the yarn
through just like that. And you're almost Cadmus,
see where it was. Just going to continue
doing that for the rest of the work until you can't see it. If this is true visible for you, you can repeat the same thing. On this side, right now. On this side, see, it's a little
harder if the tail, the head is quite
short leg brightness because I'm scared
it right for now. So you can just take it
will work it up the sides. Just like I'm doing
it right now. After you're done, you just want to read through and pulls that. You'd have to be looking for
it for you to see it? I did. Of course, there's a bit
of yellow left here. That's where you can
always use your scissors. But otherwise, you'd have to be looking for the artist said, otherwise, swap most invisible would pretty much invisible. So yes, that is how
you even your end. If you are going to visit
other option where you can just cut the unmarried
close to the end, but you risk having to
work come on ducts. We want to cut it off
as far as possible. But a little option
is to just leave it as I just showed
you how to do that. So there you go. These are your very
first beginner, friendly crochet stitches with a single crochet,
half double crochet. In this class you have
learned how to shade, how to start, how
to make a slipknot, how to cheat, and how to work a single crochet as the
one as a double crochet. Go ahead and make another
chain of 20 like we did here. And work another 20 rolls
and then send a picture or post a picture if the discussion areas to show
us your little project. After this.
16. 16. Outro: Congrats, You are done by
the end of this class. Now your cluster
both making a chain. You're comfortable with
making the slipknot. You're comfortable with
the single crochet, and you're also comfortable
with the half double crochet. So be sure to skim through
our other classes to know and see what other projects
that you might try to attempt after you're comfortable
with these few stitches. If you can't find anything
that's easier for you, you can always find the link
to our website www.com, where you can also attempt other beginner friendly
crochet projects. Until next time. I will see you.
 Charity Limbithu, Modern Crochet Designer