Transcripts
1. Introduction: Hello everyone. I'm
excited to announce this new blender course
where we'll be creating this low poly cyber punk scene. We will cover all aspects
of the pipeline from gray boxing to
modeling materials, lighting, and rendering. This is an ideal project
for anyone who is serious about learning blender to
become a creative professional. The great thing is
that when we're ready to advance past this
low poly style, the key methods and
theories still apply. Plus by the end of
it, you'll have a really cool new
portfolio piece draw me in a first section, we'll be blocking out the
scene and scoping the project.
2. Blockout Basics: In this series of videos, we'll be creating a low poly
cyberpunk style environment as seen here in first video, we'll be covering
an introduction to low poly theory gathering reference material to establish an art style composition
and color palette. We'll be creating a project
folder for us to work in. We'll be blocking
out the environment using primitives to
create a gray box. We'll place our camera
in lights and we'll add further detail to our
gray box using blenders, annotations to start out with. Let's take a look at what we
mean when we say low poly. This is an art style use in video games in
the early years of computer graphics as a result of performance imitations B. But the style of
senior resurgence in recent years and is very popular among indie game developers and beginner to advance
three D artists. The key principle involve simple textures in
our case will be using solid materials
with uniform colors. A low poly, evenly
distributed geometry, so the polygon count should be consistent
across the scene. And flat shading to improve form shadows and add
contrast to the render, some artists choose to
use smooth shading. However, while the math, this course is to learn blunder, it's also important to take time considering
the art direction. When working on a
scene like this, studios and clients will
require you to follow a brief, to work consistently their team, and bring their
visions to reality. I've used this software
called Pureref to create this image board from various artists that
will inspire my project. Most cyberpunk art seems to have this blue, purple color scheme. So I've created a color
palette that reflects this. You can see here, here
is my project folder. I've created my blender files
will be in the root folder. Freeze Access, and every time I make a significant
change to the project, I'll click Save As and press
plus button to increment the file in case I'd like to go back and restore
from the previous point. After deleting the cube, I'm going to begin blocking out the key parts of the scene
using primitive objects. None of the geometry
we're adding in this stage will be present
in the final scene. However, it will be used
to assist us in planning our composition and seeing the scale of buildings
as we're modeling them. In the next video, we'll start modeling the
road and buildings. We can replace those
temporary objects with the final versions. Grade boxing is a process that's done by game
designers to ensure a prototype game environment
fits the gameplay and feel of the game before spending time on the final
models and textures. In our case, it allows us to experiment with different
building shapes. It is vital in this stage to
scale your scene accurately, but a fault and blender. Each grid square equals 1 meter. You can use this as a
guide to figure out how large an object is
entering an orthographic view. Using the gimbal in the
top right may also be useful when seeing the
building's absolute scale from the top and sights. At this point, I'd like
to position my camera. This can be done using
multiple methods. Firstly, I'm going to
try just moving it manually using the widget. I'm going to choose
this one here, because it allows us to both rotate and move
in three D space. I'm going to change
the pivot point up here from global to local because it's easier
to do with the setting. But make sure you change it back to global once you're finished. You can say, I'm
just going to use Skimball to place it in
an area that looks good. It's important to
preview where the camera is looking every now and then
using this button up here, or you can press zero on your number pad as a
shortcut to stamp to it. But this is a bit
of a boring view. The second method is if you
just position your view using the viewport camera like this, using
the middle mass. I'm just viewport camera here. We can use tool a line
active camera view. A line active camera to view. Or you can press control
number pad zero to do that, it just snaps the camera
to where we're looking. Once we're in here,
I can start moving this around just using
movement controls here. In pressing said to place the camera somewhere,
that looks good. The third method is if we press open up this
end panel right here and go down to view where it
says Lock camera to view. If we enable this option, and then go into our
Camera view where we move around using
the viewport camera, our scene camera will snap to. It's just like a quick
way to place it, but I tend not to
use this option. I'm just going to
disable it here. Make sure you turn it off
once you're finished. A line in your camera.
I typically use a combination of all three
methods when placing a camera. However, in this
project, I'd like to use an isometric
viewpoint to do this. If we slap that camera here
and go to the camera tab, I'm going to change the type from perspective
to orthographic, and it will change a
few of our settings. Whilst I'm here,
I'm going to go to the output tab and I'm
going to manually enter in a square resolution
because I found square aspect ratios are better suited to
portfolio renders. I'm just going to give
this, say 1920 by 1920. If I go into our camera view, you can see it's got no perspective and all
these lines are aligned. To get this isometric view, I'm going to manually enter the rotation values into the transform field
in this end panel. What I mean by that, I've got the camera
selected right now. I'm going to go up to
where it says item. And this rotation here is
just from playing around, I'm going to set the x
rotation to 45 degrees. I'm going to set the
Y rotation to zero, and I'm going to
set the z rotation to 45 degrees as well. You can see this gives it this downward angle that you might see in some
isometric games. And then if I go back
into camera view, I can just move it around. If I press G, I can just move it around
freestyle in places, so it's looking
towards the center if we want to expand the view, because right now it's only
capturing this small area. We go down to the camera
tab and I'm going to change this orthographic scale from seven because
that's quite small. I'm just going to
make it a little bit higher, maybe
something like this. Another thing I'm noticing is that I'm seeing too
much roof here. I want to lower the
camera down a bit so we can see some more of
the sites To do that, I'm just going to change
this rotation right here, 45-60 Alternatively, if your camera type was
still in perspective, then instead you changed this
focal length right here. You can see this changes the
field of view that we got. But I'm going to set it back
to an orthographic view. We'll go into more detail on lighting in a future
part of this course. But for now, you
may choose to add some basic lights
to the scene to help plan out where
the light sources and shadows are going to be. Don't worry about following
along with this if you're unfamiliar with lighting and blenders, Not an important step. Lastly, I would like to add further details to the scene
using blenders annotations. This can be accessed
through the bus on the left of the
screen right here, and holding down will show some other
brush types as well. I'd like to use either the
line or the polygon tool. The settings for
annotations can be found in the panel on the right
side of the viewpot. If we go down to view
down to the very bottom, you can see there's a drop
down for annotations. This allows us to
add different layers which can have different colors, thicknesses, and opacities. You could use different
layers for masking out different types
of annotations. For example, I'm going to call
this one building details. I'll set this to
green. I can increase the thickness a little bit
using the default hall. I'm going to go
around here and I can start drawing on the side of the building to create a sign. Make sure we change the
placement from here from three cursor to the surface and that will allow us to
paint on the side of objects. You can see here, I'm
having some problems where it's trying to
draw on the spot light, that's a bit line, but I
can just rub that out by holding down on the antion stool and going down to the eraser. Here we go on, I'm happy with this layer. I can then go into this one. I'm going to name this
one road markings. You can see here,
I'm trying to use these markings to break up some of this empty
space down here. Add a bit of contrast. I'm going to create
another layer, and I'm just going
to call this props. I'll set the colors to red. This is going to be objects
that are placed in the scene. So this will be things
like lamp posts. I want some electronic
parts up here. This right here will
be a prop up sign. This might be like transformers, water towers, things like that. And over here I want
like a balcony area where there may be
some people eating. We spend some time familiarizing yourself with the tools we've covered in this video to finish
off your great box scene. Once you're satisfied,
we can move on to the next step will be
organizing a project hierarchy, because up here
it's quite messy. We've just got random things in different folders we can start modeling some of the
streets and buildings.
3. Organizing Workflow: Welcome back. In
this second video, we'll be organizing the Outliner Before starting the project, we'll be modeling the basic road layout and
some of the buildings, and we'll be using
some modifiers to speed up the process. On large scale
projects like this, it's easy to be overwhelmed
by the number of objects. So for this reason, it's important that
we stay organized. Everyone likes to lay out their blender files differently, so there's no right or
wrong answer when it comes to how you
organize your scene. But I'm going to show you a
workflow that works for me. So expand this Outliner panel right here and open
this window across. You can see that our objects in the scene are grouped into
different collections. These acts are a lot like
folders in any file structure. You can see this is a set up
that I've created before. I'm categorizing all
the different objects in the scene into these
different collections. What I tend to do is I have
one for work in progress. I call this WIP and this is where the bulk of our modeling is going to be. I'll have another one, and
I'll call this 1 gray box. I'm going to place all the blockout objects that
we've created here. So that will be these
ones I'm selecting. Now, I'm going to place this
into the gray collection. This allows us to
collapse them as well. They're not always
shown in taking up space in the outliner. One advantage of using
collections aside from organizing is that if we press this little
eye button here, we can hide the
collection from view. Quick way to navigate
the scene and hide and display parts that
you need at a time. Collections can also be created
within other collections. For example, if I right click on this gray box
collection and press New, we have like a sub folder
of this collection. I can call this
one Buildings And select all the buildings in the gray box that's these ones. Move these into the
buildings collection. You can do this by pressing M on your keyboard or you can just drag them up
to the collection. Now I can further categorize which objects I'm hiding
and displaying at the time. Lastly, you can give each of these different collections
a separate color. For example, I'm
going to right click on this gray box collection. I can choose one
of these colors. If I set this to green,
then it's easier to find a large outliner because I'm us looking
for the green one. I'm going to quickly set
up my outliner in a way that's organized for
me if you'd like to follow along the
same way I'm doing. I'm just going to
leave it up on screen for a couple seconds so you can pause it or lay it out
your own way. It's up to you. Once you're happy with
the layout of the scene, we can proceed as I
start modeling my road. I'm going to hide this building collection that I created right here to allow me to see it
more clearly in edit mode. If I select this
plane in edit mode, I'm going to press
control R. This will allow us to
add a loop going along one side of the plane. I'm going to place one
here and I'm going to place another one here to
create this intersection. Now if I select both of these edge loops,
all four of these, and hit control B, I can bevel this to create
my road thickness. Once that's done, I can play
around with this a bit more. I want this one to
be a little bit thicker than this
one going across. I'm just going to select this
loop right here and move this on the x axis to make
the road a bit thicker. What I can do now is select all these planes which have
buildings on top of them. So that will be this
face and this face. I can extrude them up a little bit and this is going to be
the curve for the pavement, you'll notice that lining it up so it's just
above ankle height. From my skeleton reference, I know how big this is going to be in relation to a person. Once that's done, I can then
select some of these edges. I'm going to select this one, this corner, this
one, and this one. And I'm going to bevel this
again using control B. If I drag outwards I can use a screw wheel to add
in some more cuts. Now remember this is low poly, so we don't want to go
too crazy with this, needs to be consistent
to the art style. I'm just going to give it
maybe two or three cuts. It looks something like this. And this will make
up the corners of our curves because this is just a low poly
sen. And we're not too worried about
topology in this course. I won't cover this
in too much detail, but we're just going to fix the topology on the
ground a little bit here because the bevels
have made it messy. I'm going to select this
vertex and this one, and I'm going to
press J to join. I do the same with
this one and this one. Now if I select all these
vertices in the middle, I can hit X to
dissolve vertices. I'm also going to dissolve these two on the edge because we don't need those ones and that's just cleared up the
face a little bit. For us, we tend to avoid using en guns
in most situations, but for a scene like this, we're not too bothered about it. I would like to have a slight inst on top of these planes. I'm going to select
these three faces right here and I'm
going to press eye to inset them and this will kind of be like
the inside of the curb. This section here is
going to be the curb. And this section
here is going to be like the tarmac on top. I'm going to extrude this on the z axis just to bring
it down a tiny bit. Make sure you press C so you can see that blue arrows to make sure it's moving
straight downwards. Just like this, very
subtle at this point. I'd also like to change
the shading mode that we're seeing in the
viewport because it's kind of hard to see the form of the object with
blenders. Default shader So I'm just going to go up to these Viewport shading
panels up here. I'm going to change this
from studio to mat cap. And I'm going to click on this pool and select
the red one right here. This is my favorite.
Another thing I'm going to do is go down to
where it says cavity. I'm going to enable
this and I'm going to change the type from
screen to both. And it will give us a bit of
ambient occlusion so that we can better make out this curve right here on
the side of the road. I'm happy with the floor
plane that we've got for now. So I'm going to go up and
enable the buildings again, so I can see the gray box. And these are some very
crude models I created, but they're very similar to the buildings I'm actually
going to use in the scene. The way I'm going to create the buildings is I'm going to go up here to this, a
button right here. If we hold down on
this, we've got a bunch of other primitives.
We can choose a spot. I'm just going to
stick with the cube. And if I click on this
bottom plane right here, make sure it's snapped to
this plane, drag outwards. And then I can create
a new primitive here, but I'm going to
rename this building back or something like that,
it doesn't matter too much. And hide the gray box again, this is going to be a new
one of the buildings. If I'm going to edit mode, I'm going to change back up to the arrow tool right now and I'm going to edit mode to
make some changes to this. The first thing
I'm going to do is delete the bottom face
because we don't need this. Some cuts to the scene to better define the
outlines of the windows. I might have one up
here at the very top. Just up here. Maybe I have to bring back the bridge
so I can see a bit better. Just bring back the buildings. Yeah, I might add another cut right here just
above the bridge. A last one all the
way down here. This will be another, almost like a skirting board running around the
outside of the building. Once that's done, I'm going
to select some of these. I'm going to clip to select
the loops and control bevel, scroll down so there's
nothing in between. I'm going to also select the bottom faces
right down here, because I want to
select this as well. What I'm going to do with
these is extrude them outwards just to add a little bit of contour
into the building, I suppose rather than just using the typical
extrude tool like this, we're going to need
to move them all out depending on the direction that the face is
pointing towards. That's called the normal. If we hold out, we can see we've got
several options here. The one we want to use is
extrude faces along normals. And you can see that means that each face goes outwards
instead of inwards. So I can use this just to
add a bit of definition. This may be, in my opinion, this improves the look of
the building quite a lot. It makes it look
a lot less flat. Now note that when I
created this new building, I just placed it on top of the gray box that
already existed. Sometimes you might turn your gray box into
the new building. In this case, I just
added a new one, so I'm going to
delete the old one because I don't need it anymore. Just adds confusion so you
can see if I hide this one, that building has gone from
the buildings collection. Now one other thing
I'd like to do is contour these buildings a bit so that each story is
moving outward slightly. I'm going to select
the following faces. These ones right here, basically all the
front facing ones. And I'm going to move
these out on the x axis to about here,
once that's done. And then I'm going to set
these top ones right here. I move them a bit further
out on the x axis like this. It creates this effect
like the street solve the buildings are looming over the street and
this can add a bit of atmosphere and maybe make
it feel quite crowded, which is the effect
I'm going for now. That's the part
where I'd like to add the windows to the building. One way we could do this is
in traditional modeling. Maybe we could add
some cuts down here in set some of
the faces like this. But a much quicker way
to do it that I would prefer is by using modifiers. For example, I'm going to go up here and I'm
going to create a cube using the same
tool in object mode. I'm just going to draw
shape on like this, it doesn't have to
be too precise. And I'm going to draw inwards into the mesh that's
going to cut in a window. If I go into edit mode now, I can slip this front face and bring it out just so there, just so there isn't
any clipping. I think I'm in
local orientation, which is why my axis acting. So make sure you change
back from local to global. So I'm just going to move
this out a little bit. The modifier I'm going to
use is a Boolean modifier. If I now slip building and
go to the modifiers tap, I can go to add
modifier boolean. And using this pipette, I'm going to click
on the window. Now if I hide the
window by pressing H, you can see it's all hole into. I'm going to unhide
it. If I go down here to the viewport display, under this panel right here
under the object properties. And I'm going to go down
to the viewport display, I'm going to change the
display from textured to wire. This basically means we
don't have a solid view. We can see through the booting object the benefit of using a modifier rather than
editing it into the mesh. Once we've placed
it, if we wanted to move the window around,
we can do that. We can just move it around and you can see how the modifier updates the building
object real time. Now to create the other windows, we can either duplicate this
one or copy and paste it. So I press shift D and move
it along the y axis a bit. And then set up another
bollin on a building, or what I'd rather do is use another modifier
called the array. If we go down to the
modifiers tab right here, I'm going to search
for an array modifier. And you can see it's already
chosen the right axis. It's going along the
relative offset, which just means it's going to be one alongside the other one. And we can change the factor, which will be like the
distance between them. So I'm going to set
that about here maybe. And I can change
the count as well. So we've just got a few more windows, something like that. Looks good to me and I'm happy with this once this
is done in edit mode, because I want it to be
part the same object and they're going
to be just below. I'm going to duplicate these. I'm going to press A
to select everything. Duplicate this, and I'm going
to move it down a bit on the Z Xs and move it
backwards on the X Xs. This will form our
bottom line of Windows. I move it in about this far, maybe I think the top ones
are a bit too far in, so I'm going to island select
this and move it outwards. And you can see how the modifier updates the building real time. If these Y frame displays
are a bit cluttery, you can just hide
them in the outliner and bring them back
when you need to. Sometimes I'd like to create a new collection
just for cutters. I'm going to rename
this one Cutters. And this is where I put
all my Boolean objects in. I make the cutters
collection red, so it's easy to find
using these techniques, I'm going to dress up the rest
of the buildings as well. In this case, I'm just
going to use the gray boxes that already exist because they're in a perfect
shape, we need them. I'm just going to
slip this phase. Move it back a little bit. Do some slight tweaking,
this face right here. I'm going to move
back on a white axis so it rests above the pavement. This one, these edges as well, because I don't want any angles. I'm just going to move these
ones back on the y axis. So that's also on a
pavement like that. The topology isn't
great in this case, but because we're
using flat shading, and it's a fairly simple scene, it's not going to cause
us too many problems. It will just take a
lot of time to fix. Happy with this, I'm going to go through and create the
rest of the windows and do some other detailing to these buildings to give
them a bit more character. I'm playing through the stu, recording and you'll
see that I end up duplicating this window object that I created
quite a few times. Because I want the
windows to look similar across all the buildings since they're on the
scene of street, I end up duplicating
that object. Also, you'll notice some
part along the way, I give up naming the
window buildings. I know what they are, I know
what collection they're in. I'm not too strict
on naming correctly, depending on what
building you're on. It just takes up too much time. I'm using the same extrusion
tool that we're using before the extrude long normals to add some more definition to the
rest of these buildings here. You can see at this
point I want to move the side of the building
over on the y axis slightly. I go into edit mode
on the road and just select all the S. I want
to move to the side. I was thinking of
having the staircase pull on the side
of this building. I set up some windows
so I could do that, maybe any future video, and I added a doorway
ready for that to happen. I changed a bit from
the annotations that I did in previous video. I was thinking of having
a sign at the top and in some more
buildings down below, but I thought I could
have a long vertical sign instead and just some small windows at the
top of the tower. You can see I'm adding like three or 4 billion
modifiers to this building. So don't be scared to
add multiple billion modifiers to each building. Put as many as you need. You can see I'm
making lots of use of this extrude
along normals tool. If you have any weird
artifacts from doing this, you can always offset even. Here's the finished result.
Now that we've covered the basics of modeling the buildings and
street in the scene, we can go into a bit more detail and work on some of the props, which will be explained
in the next video.
4. Creating 3D Props: Welcome back to the third
video in this course. In this video, now
that we've got our basic scene blocked out, we're going to start populating the scene with some prop assets. We're going to be
covering what is a prop and how they're
used in the scene. We're going to talk
about instancing. We're going to go through two to three modeling
examples of props. And we're going to start
placing them into the scene. Due to the time that we have,
I'm not going to go into full detail on all of the
props I'll be making, but I'll show you
the basic principles with a few that can be
applied to the rest. I'll show you the main tools that I'm using to create them. At the end of the video, I'll
show you a fat recording. Leave me modeling the rest
of the props in the seam. So I'm going to
start out with like a dust bin and some bin
bags to go on, onside it. So we've got like some rubbish
collected on the pavement. If I hold shift
right mouse to place my cursor here, I
can add a circle. So I'm going to press shift A, go to mesh and add a circle. Remember this is low poly, so I'm going to change
the vertices from 32 down to something like 12 and we're going
to see how this looks. Even this might be
too high for us. And then I'm also
going to hold shift to fine tune and decrease
the radius a little bit. The scales right can use my
character for reference. It might make it a bit
thicker than this. It's important to name
this object as well. I'm going to rename it
from circle to have been. And I'm going to move it up into the work in Progress collection. Once this is finished, I'm
going to go into edit mode. We don't need to fill
the bottom face, but I'm going to by pressing and then I'm
going to extrude up. I'm happy with the
height of the bin. Once this is done, I'm going to press to scale it out a bit. At the top now I'm
seeing it's too big. With everything selected and my pivot point set
to the three cursor, I can scale this down. It's about waist
height. I'm going to set my pivot point back to the medium point
in case it causes any problems later this I
can now select the top face. I'm going to extrude
out again upwards. If I select this
outer ring right now, I can extrude along normals
to create the lid of the bin. With this face, I can scale
it in and move it up. I'm happy with the
overall shape of the bin. You may want to
add some vertical grooves running around the side, but for me, I'm comfortable
with this level of detail, but that might be
a nice challenge. Next, I'm going to create
the handle for the bin lid. If I go into edit mode
and at this top face, I'm going to press Shift
and cursor to select it, and this will give us the
place to create the bin lid. Back in object mode, I'm
going to press shift A to create the plane
in edit mode, I can now scare this down to create the basic
shape of the handle. Now if I hit control to add a cut in the middle
level this out, add another bevel in between. I can move this face upwards and maybe scale these two
on the outside as well. It's important to scale
it along the x axis. If this handle, we need to add some thickness,
I'm going to do that. I'm going to add a
thickness modifier. It's called the
Solidify modifier. I'm going to change
the offset to one, enable even thickness. Going to play around
with the thickness and scaling in add. I'm happy with the handle,
this is looking good to. If you want to add a
little bit more detail, we can hide the modifier. In edit mode, I can select the following edges and
give a slight level. Then when I enable it again, it will just give us some
curvature to the handle, which you may think
looks quite nice. Once I'm happy with
this, I'm going to apply this modifier and I'm going to join it to the rest of the bin by shift
clicking the bin, pressing control J, using similar techniques to that
which I've just shown you. Try creating a barrel, maybe with a fire pit inside, which is something you might find in your cyberpunk
scene as well. Creating a cylinder using the same process that we
did before for the bin and creating some grooves around the outside which the
stealing outwards. For the top, I use
the knife tool to add some polygons
to the top face, filled it in, using
control to triangulate it. Then I moved some of the parts up using proportional editing. In the top, I added some
basic cylinder objects, cut them down the middle, walked them and combine
them to make the fire fuel. In the top, I'm now
going to create a bag black bin bag using completely
different techniques. Once again, I'm
going to place my cursor down here on the floor. Instead I'm going to
create an icosphere. To edit mode and just
scale this down a bit. I can even move this up just so it's a bit
easier to work. With this done, I'm going
to go up to sculpted mode. Don't worry if you
haven't been in sculpting mode much, We'll
cover it more later. But the main things I'm going
to change dynamic topology. I'm going to enable this
tick box right here and set the detailing from relative to constant detail and increase it to something
like ten or even 12. Don't worry about
being too hypolyx. We'll reduce it later. I can paint and
change the shapes. Be more bag shape. I'm just going to
paint over the mesh to get some basic
resolution going on. Add some bumpiness to it, and then we can play around with some of the other brush types. The main ones will
be using this one, the basic draw brush, and also this grab brush
right here that we can use to change the
shape of the bin bag. I'm going to flatten
the bottom out. Using this flattened
brush right here, you can always isolate the
object pressing forward slash. And then I'm going to come
in with the smooth brush to iron out some of these weird creases
that I don't like. You can then come in
with this crushed brush, then add some grooves
going along the side. Maybe change the size of
your brush a bit smaller. You can add the cloth like
groups going around the side. Once we're happy with
the shape of this, we can go back into
the layout tab and I'm going to add
decimate and modify to this. If we reduce the ratio, you can see it reduces
the poly count at the bin bag procedurally. Which means that if we're
not happy with the value, if it's either two high poly or two low poly, we
can always change it later. I'm going to reduce the
value a little bit. Once that's done, I'm going to add a knot at the
top of the bin bag. I'm just going to add a
basic cylinder with five. Select all the bottom ones and press M to merge at center, and this will create
the knot at the top. Once again, I'm going
to select these. I might apply the
decimate modified. Before I do this,
I'm going to join it together. Name it a bin bag. And I'm going to move this up to the working progress collection. Using these techniques, you
may want to create a few of these slightly different
shapes and sizes and then we can stack these around the
bins and barrels later on. I'm just going to move this down so it's on the floor plane. For another prop, I was thinking about making a
metal road barrier. I'm going to place
myredcursor here. I'm going to use a few
different techniques, traditional modeling,
that we've done before. To do this, we're going
to need to enable an extra objects add on
that allows us to place a single vertex that we can
then extrude out to extrude out the shape and silhouette of the metal paria just
as single edges. And we're going to
convert this to a curved object to
give it thickness. First we need to
enable this add on. It shifts with blenders, you don't need to
install anything. We go to Edit Preferences, and under the Add Ons tab we can search up for extra objects. You can see I've
enabled it here. All we need to do is click this tick box and save
your preferences. If you want to keep this,
we're going to close that. Now if I press
shift A under mesh, I can go down and
add a single vertex. It's important to make sure
you're in vertex mode, otherwise you won't be able
to extrude anything out. I'm going to move
this up a little bit and I'm going to extrude up, it's just above waist height
with my character model, using these two verses. I'm going to extrude out on the x axis to
around about here. I'm not being too precise, be a little bit longer in
order for this to work. This has to be a
single line of edges, so there can't be
any faces in here. I'm just going to press X and I'm going to delete only faces. Now with all these
vertices selected. Device select, and
I'm going to hit Control shift to Bbl vertices. This is different
to hitting control B. I can increase the number of cuts till
uncomfortable with it. I'm going to keep a
random part here. This line of edges is going to make the outer ring
of this barrier. If I select this
edge right here, just by clicking
these two vertices, I'm going to duplicate these
and make them a separate object by pressing P and
separating them by selection. If I go back into object
mode and select this edge, I'm going to go into edit mode, select everything right
click, and subdivide it. Once I'm happy with
the number of cuts, I'm going to extrude this down. I'm going to use vertex snapping to align it to the bottom edge. I'm going to select
everything and I'm going to delete the faces. Only faces. Now the way we can convert
this into a curve is if I search up using the
three menu convert to curve, I'm just going to
search up curve. We can see that if we
go into edit mode, we're now given
curve points instead of vertices and edges and faces. If we go down to this curve tab, and there are a couple
settings we need to change to give it
some thickness under geometry we can change the depth and it's all
give it some roundedness. And we can also change
the resolution. This is a bit high
for my art starts. I'm going to set this to maybe just one or
probably two or zero. I'll set it to zero. I'm not happy with how these edges are
looking at the top. I didn't mean to include those. I'm just going to box, let
this top line right here. I'm going to press X
and delete segments and they're going to do
a same to the bottom. So that we've just got
these vertical bars. Before turning this outer
frame into a curve as well. I'm going to create
the stands because I'm going to extrude these out from the vertices right down here. If I select this object, go into edit mode and
select these two vertices. I'm going to duplicate
these by pressing Shift D and separate them again. Now back into object mode, I'm going to there's new
object, it's a bit hard. We can go into the
Outliner in edit mode. I'm going to once again extrude down until I make
the floor plan. I can use face
snapping for that. I'm just going to move it on the y axis to around about here. Maybe that'll do for me. I need to delete these edges
now, face connecting them. That leaves us with
these two for the stand. Copy this over to
the other side. I'm just going to go and add
a mirror modifier quickly, which should be going across the y axis. And I'm
going to apply this. If you're not quite
happy with the angle, you can go back into edit mode, select everything,
and scale it on the y axis. I think
I'm happy with this. Once this is finished, we can convert all of these
to curve objects. To finish off the model, I'm going to start
off with this frame. I'm going to type into
the three men you convert curve and go down and change the same settings
under geometry. These faces here
are very subtle, but if I zoom into the end, you can see there's
a hollowed out end. The way you can fix that
is just by pressing fill caps over here,
enabling fill caps. Once this is all finished, if we select everything
on this model, we can convert it
back to a mesh. Again, I'm just going
to type in mesh to the three menu
Convert to Mesh. And I'm going to join everything together again by
hitting Control. Now we can name this, move this up to the Work in
Progress Collection. We've covered a range of different modeling
techniques in this video. I'd now challenge you to
put this to practice and create another few assets on your own to
populate the scene. Right now I'm making
this lamppost and that's just using basic
cylinders for the base. And then I use the
curve that we use for the road blockade
to create the arch. The top light was just done
using basic poly modeling. Once you're happy of all
these props that we've made, we're going to start
placing them in the scene. I'd recommend turning on
face snapping for this. And that just means
that as long as the origin point is at the
very bottom, at ground level, wherever we place
it, it will snap to when we're
duplicating objects. We want to use old to instant. You can see how I'm pressing old and what that means is
that any change we do, so one of these objects
will affect the other instead of shift D, which just duplicates and
creates new object data. This will be really important
later on when we add materials because
there'll be add materials to this lamppost. I want to also add it to the other one in the same places. So I'm just going to go around a scene now and instance
some of my props. In the next video, we'll be
covering modular assets. But in the meantime, make sure that you've got
enough of these props modeled and placed
around a scene until we're comfortable with it.
5. Creating Modular Assets: Hello and welcome back. In this part we're going to
be covering modular assets. And we'll be talking a bit
about the differences between modular assets and props
that we made last time. We'll create a couple
examples to show you what I mean when I'm talking
about modular assets. Once we finish, we can
start placing them into the scene and
then we're going to do a bit of housekeeping and
tidyo because there are three other things
we need to add to the scene and fix up. I'd like to think
the main distinction is that modular assets, they're usually part
of something else, so they'd be part of a
building or maybe a window, something that you can also edit and scale different parts of. So you might want to change
the size of a window or door. Or in this case I might
make a staircase. I might want to increase
the height of the staircase and it can fit onto any building and we can change the height. Whereas a like these bins and lamp posts were
made last time, you can just dot
these anywhere around a scene and any work
fine on their room. As I said, I'm going to start creating the staircase here
on the side of this building. But she'll reach
up to this door. So I'm going to place
my curtain down and use this tool right here
to add a cube object. And I can drag it out so it
seems like a decent size. Looks sensible to me, may
be a little bit thicker. We're going to add, I
can bring this face down on the y axis. Now here we're going to
use the array modifier to create multiple of
these going upwards. I'm going to go to
the modifiers tab. We're going to search for array. You can see it's already created one going
along this axis. This is using the
relative offset, I can decrease this amount so the stairs
overlap a tiny bit. This is the factor
on the x axis. If I want to change the height as well so that they go up one, I'm going to use
the z axis as well. Going to increase the
height about here. Remember we can use our
human for reference. If I just instance this
place, this one right here, I can see how big the
stairs are going to look out that maybe I
want them pretty steep. And now if I increase the count, I can keep making
knees taller until it reaches the top below that. And I might need to
move this. There we go. Well, I'm happy with the
height in this case. I'm going to apply
the ray modifier. But if you wanted to
instances and create another staircase where you'd
have different heights, different heights of the stairs, then you wouldn't
want to apply this. I'll quickly apply
this. If I go in, I can select this face and just bring it out a bit
on the x axis, so creates a nice platform
to stand on below the door. Now I want to make
some metal frame going around the outside
of the staircase just to keep the
stairs together. But I want to create
it as a separate object while still using this geometry as like a helping hand for I'm just
going to select some edges. I'm going to select
these two edges. This one might be a bit more
easy to tell what I'm doing. Once I've shown, I'm going to
press Shift D to Duplicate, and then I'm going to
press as its own object. If I go back into object
mode and select these edges, now might be a bit
hard to select them. These ones I can go
back into edit mode and just move everything up a bit
on the z axis. There we go. Once that's done, I can extrude everything down on the Z axis, just going slightly past,
something like that. If I set this edge in this face and join this edge in this edge, and join them up by pressing, I can move this
one back a little bit till it's roughly even. You can see the
effect I'm going for. It's not going to be
perfectly accurate, but for a small
project like this, I can't spend too much
time on these details. Once this is done, I'm going to extrude it out along normals. We could also use a
thickness modifier for this. Extruding a long normals
works quicker If we're going to edit mode and set everything going to press, here we go and drag
it out a little bit. This will be the
thickness of the metal. Make sure offset even this might look a bit weird around
the corners if you don't offset even
should be turned on. So make sure to select everything and
recalculate normals by pressing shift because this has given us some
shading problems. But we'll talk about this later. I just realized my method for joining this face up
wasn't quite right. Instead of restarting
it, I'm just going to select all these parts
down here by going into wire frame mode and move this on x axis
till it looks right. Once again, I'm just
eyeballing this. I'm not trying to
be too accurate because remember how far away the camera is
from the staircase? That should be close enough
for us and I'm going to add a railing to the side
of these stairs. I'm going to tool again for
this. I'll just select it. We're going to just drag
out to a railing shape. This should be somewhere
between the hips and the chest on a character
roundabout there, and then drag out
of this square. This is a pretty rough
way of doing it. You might find a way it's a bit more accurate
and better practice once this is done using
the rain modifier. Again, down to a rain modifier, we're going to create
two or three of Up the staircase. Make sure
you get the height consistent across them like this
looks pretty good to me. Apply this ray and modifier. I'm going to select
this one right here, this railing post, and I'm going to duplicate it on the X axis to create this side. Then, with face
snapping enabled, I'm going to duplicate it
again on the shift z axis. I need to move it first.
It's already on this side. I'm going to move
on a shift axis and snap it to this corner here to create the
actual railing. The rail that goes on top of these posts can
use a few tricks. I'm going to select
all the faces on the top of these
in edit mode. Once again, I'm going to duplicate these and create
them as a separate object. I've selected all these,
I'm going to press shifted D and then to put
them as their own object. Then if I go back into mode, I can select all these
edges and join them up. Fill this corner here. I'm
going to use edge snapping, so you can just extrude it out x axis. I can fill in this one. Now I can just press,
say, to select everything and extrude
it up the axis. See how this looks. You can always select this ring going, run the outside, and use
extrude along normals. Again to give it
some more thickness. If we like, make
sure to take off even because sometimes it's nice to have the top rail
thicker than all the rest. The nice thing about using
these posts to create the top railing is that it gives us the flat depressions right here, which is a bit realistic. I'm going to shift to
duplicate a couple of these and just move them
further down the railing. We've got a few
other shorter ones. With all this done, I'm
going to slit everything. All these parts right here. Move from the way just
to see if anything is left behind that
looks like it's good. And I'm going to save my file. One important thing to do when you're making big
changes like this, because I'm about to
create this as one object. We're going to go
up to file save as wherever your location is that you saved
that you see here, I've named the file, Low
Poly Cyberpunk seen 001. If I go over and press
this plus and minus, you can change that as a
shorthand wave of increment in the file plus,
change this to two. Now I want to hit Save, as this is version two of our file. Whereas if I go
file open recent, you can see number one comes up. If we want to revert back to an old file before
we made this change, we can do that that way
on sled everything. I'm going to hit control J and I'm going to
rename this object. You can always hit two. To rename, I'll call
this Fire Stairs. One quick other change
I'd like to make is just this face right here. And move this on X little bit. It was popping out too
much once this is done. Like one example
of where you might use modular assets
in your scene. It's like an instance,
this just move it around. Maybe you rotate it by, rotate it by another
90 degrees scale on the Y, X minus one. And this is just
basically flipping it. Now I can move this in to make
it as if it's underneath. I want to move it back a little
bit more so we can place these all throughout the scene and they fit in quite well. But for a small scene like
this, don't go overboard. Mod assets are usually
used for levels in games. So the level designers or set designers can place lots
of different assets, environmental assets,
around the level without having to create lots of different models using the
techniques we've just used. And now I'm going to try and
create some ladders as well. I'm just trying to think
about where I'd be placing these. It
doesn't matter too much. I can just add some up here. We want to think about modular assets, we
can move them around. Once we've finished
for this one, I'm going to create
single vertex. Remember if the extra objects add on that we
enabled last video, I'm going to go down
to single vertex, add single vertex in edit mode. I'm just going to extrude
this out a little bit, downwards to the bottom,
something like this. And maybe subdivide it as well. Now what we can do is add ray modifier array
relative offset. We want to change the
axis from X to Z. I'm just going to type
in zero on the x axis, I'm going to the z axis. Down, you can see the
effects is having. I'm going to set this
to one or minus one, sorry, you can increase the count to make the
length of the ladder. This right here, it
is just going to be one of the sides
of the ladder. I might go into edit mode
and create another one. Just strike that out
so we can see it. Once again, I'm going
to track this human up so we can use it for scales. Pretty good to me.
Now, using this, this is going to be the
middle of the ladder. I think it might be a
little bit too short. I'm just going to increase
the length of tiny bit. Now if I select
these two vertices, I'm going to shift D
to duplicate them. I'm going to fill them into,
it's like one separate edge. And I'm going to
press P again to create this is a
separate object. This line in the middle
is a separate object to these parts, the
outer parts right here. That means that we can
add a curvature to this. I'm going to turn on, I'm going to convert it
to a curve objects. If I just press three
here and typing a curve, I can convert it to a curve. And then remember if we
go down to geometry, stuff we did last video
may be the death. We can change the
depth and resolution. Make this look like one of the bars going
across the ladder. Then we can do the same to
this, some curvature to this. I might actually remove the array modifier from this
isn't seem very useful. I'm going to go here
and just remove that. Instead, I'll just extrude
these vertices down to the ground because it's just add an extra
geometry instead, I think it'd be better just to keep the array on
this piece right here. We can add one right here. I can drag down on Zaxis. This is probably a bit more
useful of this set up. I'll drag that
down here and then increase the count it
touches the floor. Then what I can do this vertex, I'm just going to drag this up a bit because I found the ladders, I found some reference
images right here. And it's really important to use this when working on
these modular assets. And you can see it's
this curvature going up. I imagine when you climb it up you can rest
your hands on. I'm going to extrude
both of these vertices up out along the Y axis. If I select these two vertices, I can hit control shift to babble them and add
a bit curvature. Something like this.
Looks good to me. I'm also going to select this
vertex, vertex snapping. I'm going to extrude it
down on the Z axis to here. Just so asymmetrical.
There you go. So I'm going to convert
this to a curve that's in this example is
a bit more simple. Have a go creating this ladder. And once we're
finished, we can start placing around the
scene by instancing these beams right
here. This one. And I'm just going to move
out a little bit on the way Xs, something like this. Because we're more likely to change the length
of the ladder, you might not want
to duplicate it. I'm going to select these
20 to instance them. And we can move this
around the scene. Not quite sure where
to place this one. Maybe just down by this
building right here. I'm just using basic snapping tools that we
should have covered before. Something like that. You can see that adding
these ladders and fire stairs add a
bit more verticality to the scene that
wasn't there before. Using a combination
of the techniques we've used in both of
these modular assets, I'm going to challenge you
to create some railings to cover some of the other
rooftops in this scene. So we're going to have
some going across the bridge and maybe some on top of both of these roofs right here. See if you can ever go.
6. Creating a Low Poly Car: Hello everyone and welcome back. In this part we're
going to create a low poly cyberpunk
car that we're going to play somewhere here in
our scene to start out with, I composed a reference
board of images from various artists that I found online and that I want to
take inspiration from. Remember that because we're
making this low poly, we want to keep
details to a minimum. And I'm going to try
and add a lot of hard jagged surfaces
like this as opposed to some of these smooth surfaces here that we find. But I still like some
of the details from the vehicles with
this reference board. I went into Photoshop and
I drew out this sketch, which just helps me understand the form of the
model and block out the proportions before I go into three D because it allows
me to play around more. I've also added some
details here like the mirror and the headlights, but I imagine some
of these details will change later on
when we start modeling, I was thinking about some of the cyberpunk twists
we could add to this to fit the style from
the rest of the scene. And I was thinking maybe we
could add some mechanism here that rotates the wheels so they fly like in the second
batch of the future film. And once it's finished,
I'll also end up adding a bunch of cables going around the car if it still feels empty. But once we've got
this basic design, I'm going to open up
blender and start modeling. To start out with, I'm
going to add a cube using this on screen
tool right here. So I'll just drag this out and roughly match
the proportions to this little amateur that I've got, something like that may be. Then if I go back
into edit mode, I can select everything and just move it up a bit so there's
a little bit of clearance. I might be changing this later. Now I've got the rough shape. I can see that I might need to scale it on the X
axis in a little bit. May get it on the
Y axis as well. If this done, I'm going to add a couple loops across
the model like this, start matching it in place. I've got my reference image on my second monitor right now. I'm looking across
at both of them. Before I go any
further, I'm going to add a mirror modify
to this so that I only have to work on one side of the vehicle. I want
to work on this side. I'm going to hit Control our, Add a look in this way and just select all
these Urbces here. In delete them, it should
be hollow on the inside. Now if I go to the mod
fast panel in Adam mirror, as long as we haven't
moved this origin here, it should be across
the other side. It's important to note though that sometimes if we extrude up, we have extra gerometry
here in the middle. To get rid of this, I'm just
going to delete these faces to create this inset here on the front and
around the bottom, I'm going to use the knife tool. If I hit Kate, I can drag
in from here and then down. When I pull these, just to
make them a bit more accurate, I'm going to select this
vertex snapping mode. I'm just going to align
this on the x axis. Then actually we can select
all of these because they're a vertical and I'm going to scale them on the
Z axis by zero. Now I'm just going to go
through and connect some of these to topology. More sensible D, I think. I'm going to select this
text and bubble this out. I'm going to hit control
shift to bubble it. And that'll give me a
nice curve right here. I can change this
mode from offset 2% short be profile
that I've got here. To insert some of these
pieces right here. I'm going to hold out
and extrude faces along normals and make sure you
change tick offset even. And I'm going to use
this to give a bit of depth to the front. You may even want to consider selecting all of these
loops right here. Embbling these just just
move it out a little bit. But in this case, I
think that might add a few too many
polygons to the model. I'm going to do the
same with the Windows. I s this face right here. I'm going to insert this
a little bit with tipped, actually I might add
a loop along here. You can see now that I've got the rough shape of
the car sorted. And I'm adding a
couple more details like the headlights and the outline for the will to cut out the actual hole
where the bill's gonna be. I'm gonna use a
bullion operation, which I'll show you
how to do right now. You can see this shape here that I've forgot
for the world guards, I suppose you call them. It's just an outline of faces if isolate the object right
here, as you can see, it's just an outline of faces
around the outside which I've mirrored across
to make sure you turn on clipping on
the mirror modifier. And I've added a
solidified modifier in ward to give it
some thickness. So I'm going to do this, I'm
going to duplicate it as its own object
shifted to duplicate, and I'm going to hide
the original on it. And now if I apply
these modifiers, I can go in and just to
delete some of these faces on the inside and fill
in the gaps between, connect these
vertices right here just to get rid of
any weird engons. As long as the object is
manifold, it should work. I'm going to select
both objects, go into it mode, select everything and
do shift to recalculate normals because this
sometimes give us artifacts. When doing bullion, I'm going
to add a bull modifier to the main cup object, and if I hide this one,
you can see it cuts out a perfect hole for
the Wls quickly. Yeah, apply this Boolean, but I'd recommend doing a safe as an increment in the
file before you do this, because you can't turn back
once you apply the modifier. In this case, I found that
if I apply the modifier, now it gives us these
little holes in the middle. And that's because
it probably wants to do the mirror
operation first. If we apply the Boolean
operation right now, it will ignore the
mirror operation and the object
won't be manifold, meaning that it's got this
hollow part on the inside. In this case, I'm probably just going to apply the
mirror modifier, then apply the Boolean modifier because I'm done
shaping the body. Anyway, what I'm
going to do here is a detail you might
notice on my drawing. Thought I'd sweep one of these
sides down a little bit, so that could be like
maybe a heads up display or a little
screen on the inside. I'm not actually quite sure if I'm happy with these windows. I think I made the rooms
a little too thin. So I'm going to go through
and redo this right now, an extra layer of thickness. I'm just going to
insert them again. This probably isn't
the best topology, but it will work for me for now. This car is looking
much better to me. Now I'm going to start adding a few more details
to the car now. First of I'm going to add back the word outlines
just by pressing Opt H and I'll delete bullion ones because I
don't need those anymore. I'm going to add a few more details using
the tools that we've already covered in this course and see if you can follow along. Another detail that I'm
going to add to the car is some cables running from this part down to
this panel here and also to connect
the wind mirrors up. I'm just going to do that by
adding some single vertices. You see how I've placed
my cursor on this face. If I go into object mode, I'm going to do shift mesh in single vertex and then I can start shaping this
before we turn into a curve. I think that concludes the
modeling for this car. Once everything's finished and I've checked around
it a couple times, I'm going to slide
everything and move it down. I might just snap
it to the floor. Just Ty ball, it doesn't
need to be too precise. Then I'm going to hit number pad zero to
go back into my pew. And I'm just going to place it somewhere that makes sense. What we could even do is
duplicate this by pressing old D. Move this over here
under the bridge. And I'm going to rotate it on
the Z axis by 180 degrees. It looks like there's another
one going the other way. I'm fairly happy with that. Good luck in your modeling. Try and be a bit
more creative to me. Let's see what
results we can get.
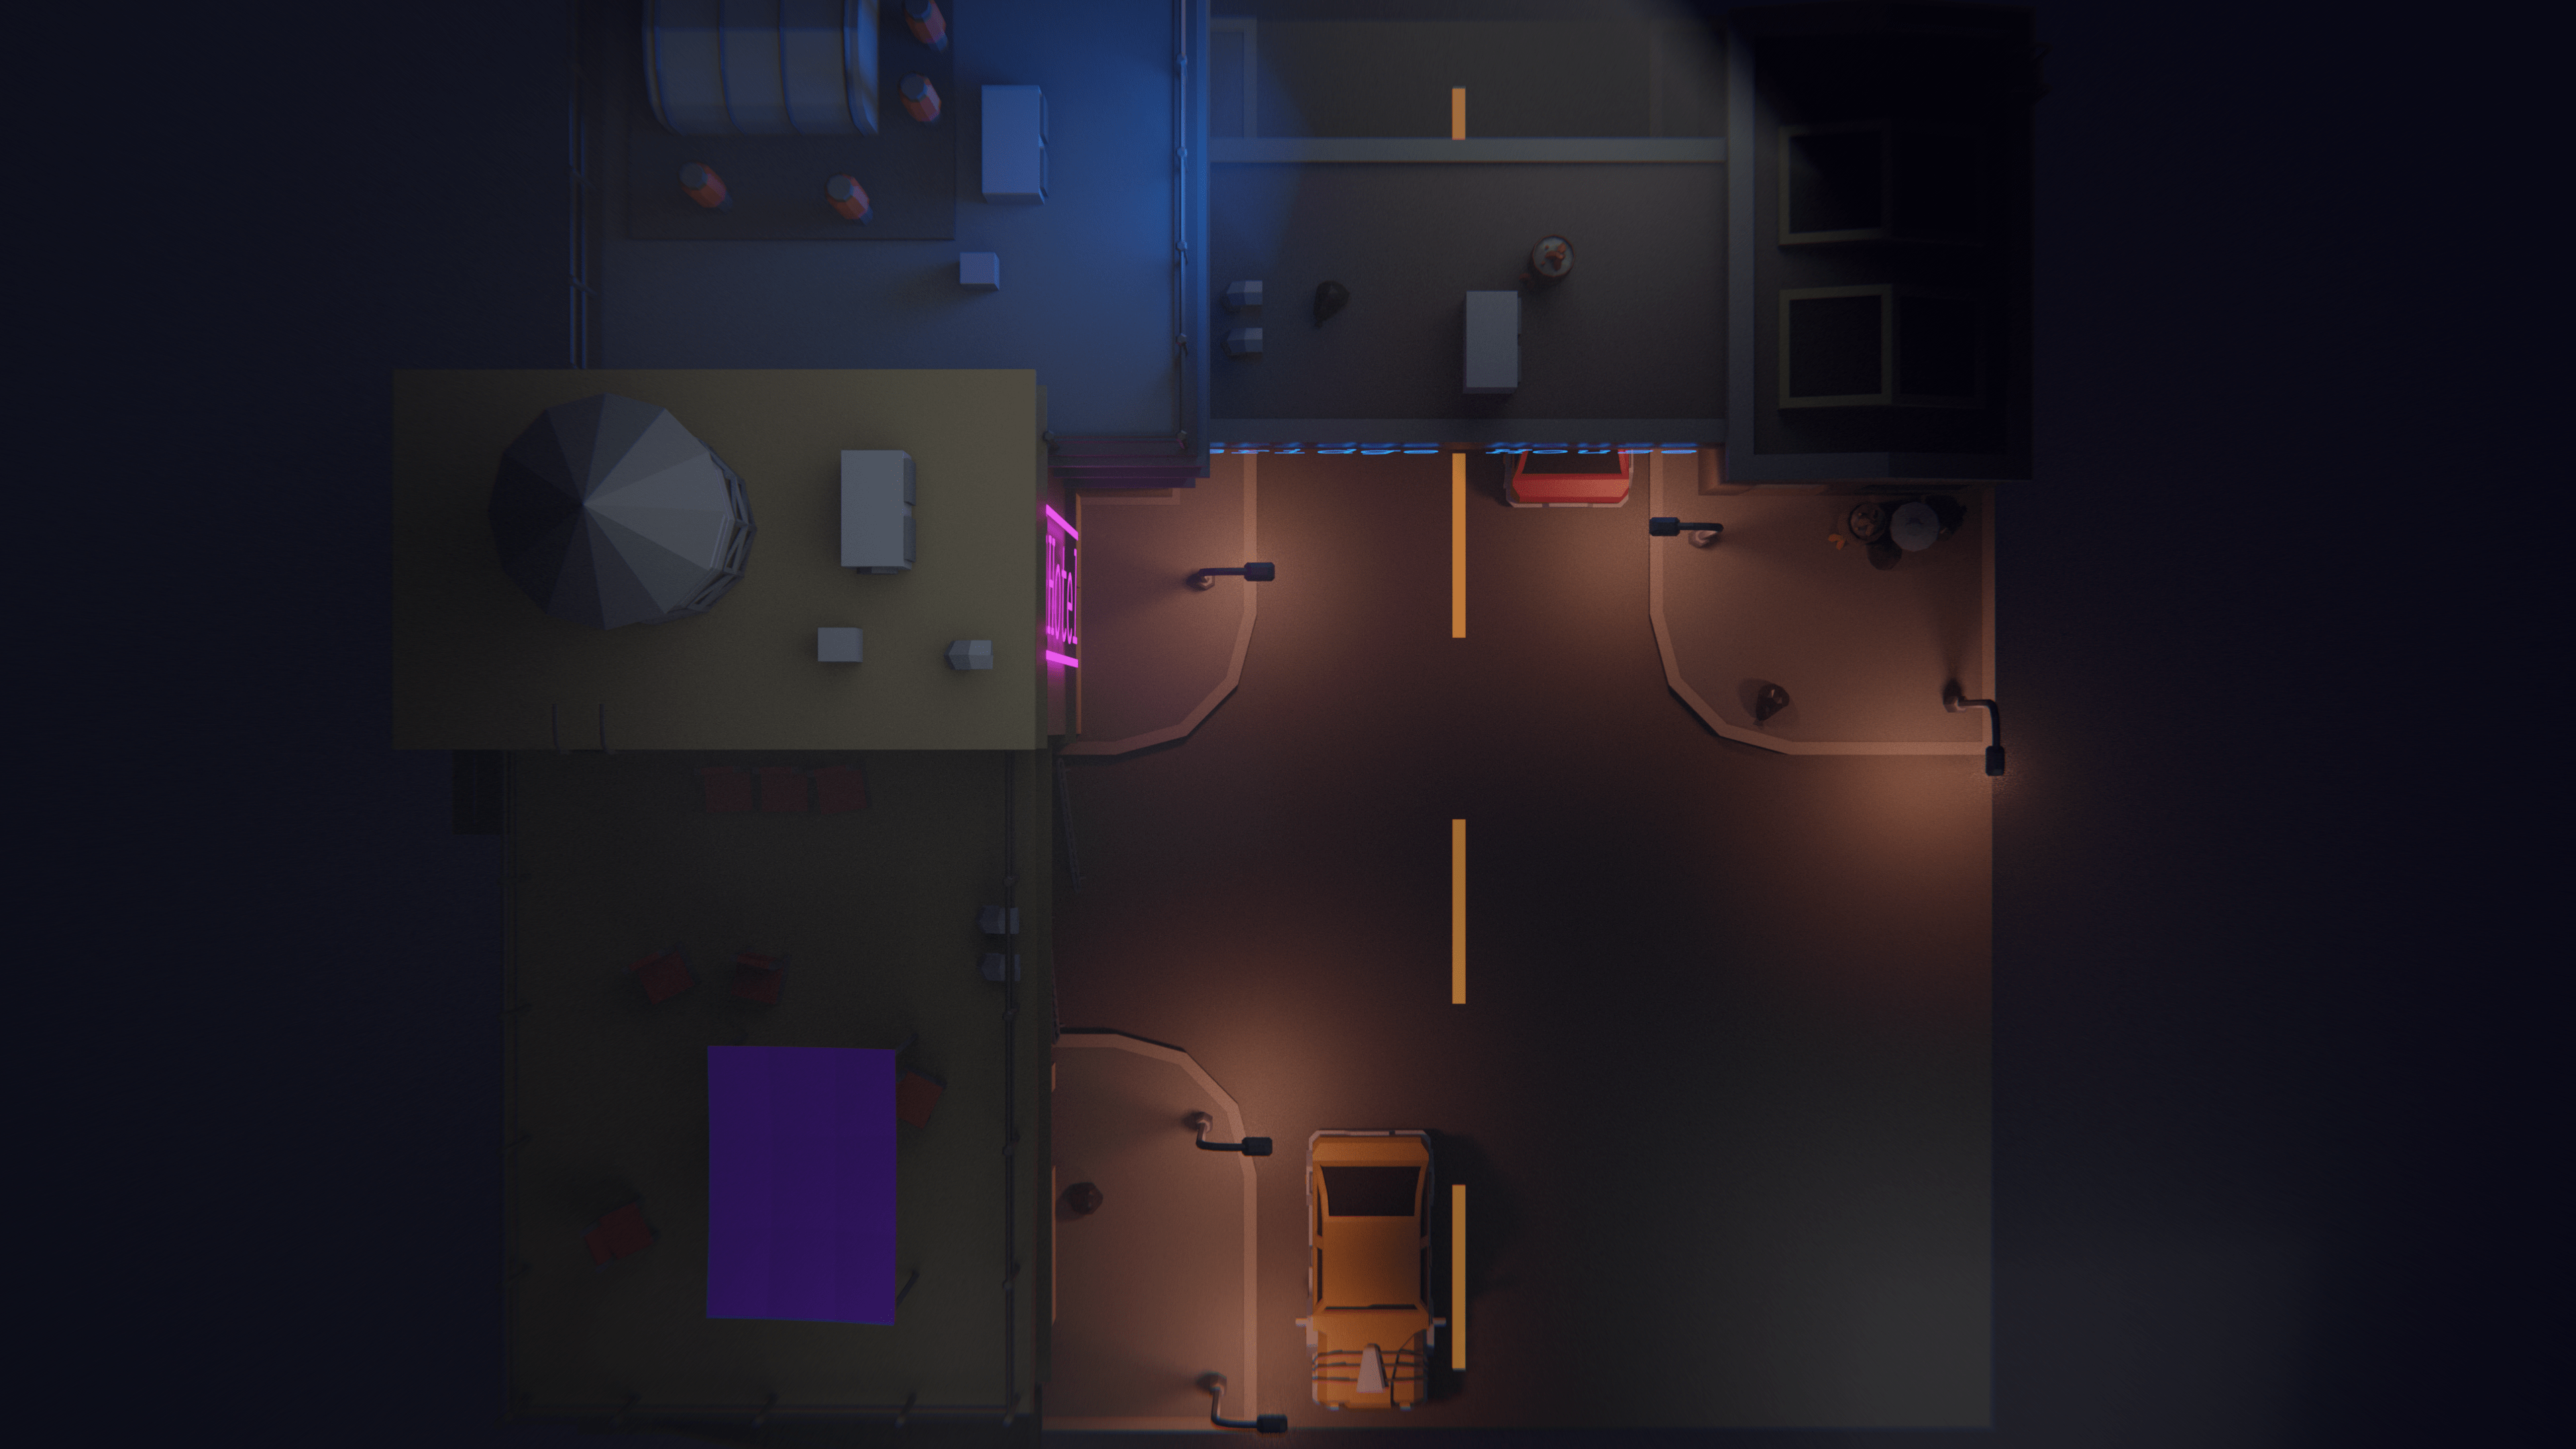
7. Adding Materials: Welcome back. In this video, we're going to be adding
materials to the scene. Now, we're going to do this by creating a different
material for each color and then selecting
the faces on the models. We want to apply
those materials to. Note that this
probably isn't the most performant
way of doing this, especially if it's
for a low poly game. For a simple scene like
this, this should be more than adequate to start out with. Let's go into Rendered
mode or Material mode. I'm going to go into
the Material Preview. This shows us the
color of our objects. By default, everything
will be white. To change the color,
I'm going to start off of the floor because
it's quite simple. If I just click on the
floor here and then go to the Materials tab down
here in a Properties panel, I can create a new material. And I'm going to call this
mode over here by changing the base color to a
slightly more gray tone. You can see the result. Now, to create the
curve, I want this to be a slightly lighter
shade of grace. I'm going to create
a new material, and I'm going to
rename this curve. And now we need to
select the faces that we want to apply
this material to. I'm going to go into edit
mode in face select mode. And I'm going to
select this ring, this ring right here. And this loop by selection. Double check that
I got everything. I'm going to hit
the sign button. You can see everything has
become white because it's been given the second
material slot here. I'm going to change the base
color to be still gray, but slightly lighter than
the road to set it back. Now I'm going to create
another material again, and I'm going to call this
pavement because I want these sections here to be
slightly lighter than the road. Once again, I'm going to
select the faces in edit mode, the three guns right here. And I'm going to hit
the assigned button. Make sure that your
clicking imagery, you want to asign them
too, that's my mistake. I need to click on Pavement
and then click once again. If we're going to object
modes, we can see it better, can change the shade. It's important to note
here that although my color pallet is
very purple and blue, this is going to be achieved
through lighting later on. And the actual surfaces that appear purple and blue in these images
are actually gray. They're just lit by
these colored lights. We'll cover lighting later on. Another nice thing about working with
materials in blender, as well as assigning, you can also select any
faces of particular color. Let's say I've just got
this model and I wanted to select all the faces
that are part of the curb. I can click the curb
slot. Press select. It will automatically select those faces With the floor done, I'm going to now start adding some materials to the buildings. I'm going to start off with
this piece right here. We can just go into
edit mode and add a material slot. Call
this building wall. One note that I've got a
naming convention here, but for a simple
scene like this, it doesn't really
matter because when you look down this list of materials right here,
you can see the color. In a preview, we're going to change the base
color of this water. Still gray, but just going
to make it slightly browny. Just by moving this
little color icon towards the orange
part of the spectrum. I'm going to select these faces. Sometimes if you press
C on your keyboard, you can use a circular
selection mode and it's makes it a bit quicker. And I'm going to assign
these to a gray material. However, rather than adding another material slot and
create a new material, just creates a new
material slot. This is an empty slot
right here. And assign it. Then we can select the
material from the dropdwn. I'm going to put the
curve material on this. We can see it's got the
same gray that we created before that's used
down there on a curve. This is really nice because it means that we're
not having to create new colors from scratch every time we want
to color is seen. It also means that our color palette is a bit
more consistent. Looks like I've missed
one of these faces. I'm going to this just by
assigning it to the color slot. However, if we change
this shade of gray, not only does it update the
material on this building, but it also changes the shade
of gray curb on the ground. I've got the material slot
of the building selected. If I change this to
like a red color, you can see it
updates the curve at the same time. Just
be cautious of this. If I wanted to create, this is a separate
material slot, but retained the base color, I can go down on this
two icon and I can click this and you can see
it puts a 001 on the end. This is a way to know that
it's a separate material, but it's derived from the curb. And you can see in the drop down that these are two
separate ones. Now if I change the
base color of curb 001, might make it
slightly more browny. And I'm going to rename
it Building Curb One. We can see that it's separate
from the curb down there. The problem that we're
having now is that where we use a Boolean modifier
to create these windows, it's assigning a
white material to both the actual window face and this part around
the wall right here. This is not desirable.
One way we could fix this is by applying Boolean
modifier on a building, and then going in and changing
the colors of these faces. This means that we can't change the position of the
windows later on, it's a destructive workflow. However, the way that
Booleans work in blended by default is assigning these faces whatever material is on the Boolean
that we're using, that's this object right here. Change this material
to the curb. Just to show you an example, you can see that it
creates the inside on this material to
the curb material even though it
hasn't got it there. But if I go back
onto the cutter, I'm going to change this to the building walls,
seamless transition there. Then I'm going to create
a new material and I'm going to call this dark window, set this very dark blue. Maybe if I go to edit
mode right here, I'm going to select this face. We've got an array
modifier on this cutter. We'll copy it to all
the other instances. And I'm going to
go down and assign this the dark window material, and this has the desired effect. I'd like to create an
admissive material for some of these windows though,
as if the lights are on. I don't want to be
applied to all of them. I'm going to apply
the array modifier on this series of windows. Maybe I'll go into isolate view. I could
select it better. I might have these
two windows lit. I'm going to go down to
the materials tap and I'm going to add a window material, assign these places,
never go back. You can see that it's updated. But the way to make this
actually glow is by going down on this principle as opposed
to surface settings. And we're going to add
an emission color. We're going to drive
this, set this to orange, yellow color, and
we're going to change the emission strength
to be a bit higher. This is acting like a light
source in our S. Now, it's a bit difficult
to see in this view, but if we go up to Rendered, you can see the
effect it's having. This will look better when we
add something called Bloom or a fog glow to post processing and blender
using the composite. This will be something
we cover later on. Just note that you
add your color to the glow here and you change
the emission strength, which is how strong the
light source is going to be. One last thing that
you might want to tweak is the roughness
of these materials. If this right here, this is easiest to
see in rendered mode. If I go up on the surface
panel to the roughness slider, I can increase and
decrease this, so medicine this material here. And you can see that when
I decrease the roughness, that makes it a bit more glossy. For this low poly art style, I find a middle value of 0.5. Works best. You can play around with this slider for
each of the materials, using these techniques
demonstrated, try and add materials to
the rest of your scene. You can see as I'm
working away here, I'm trying to balance of tonal values and even saturation
to fit my composition. I have to go playing around with an experiment with
these materials. And then in the next
part we'll be adding some neon signs to the side of this building and
maybe above this bridge. As well as adding
some other models to populate the rest of the scene because it's feeling
a bit empty, especially on these
rooftops and on the road. And then we'll also touch on lighting and
rendering. Good luck.
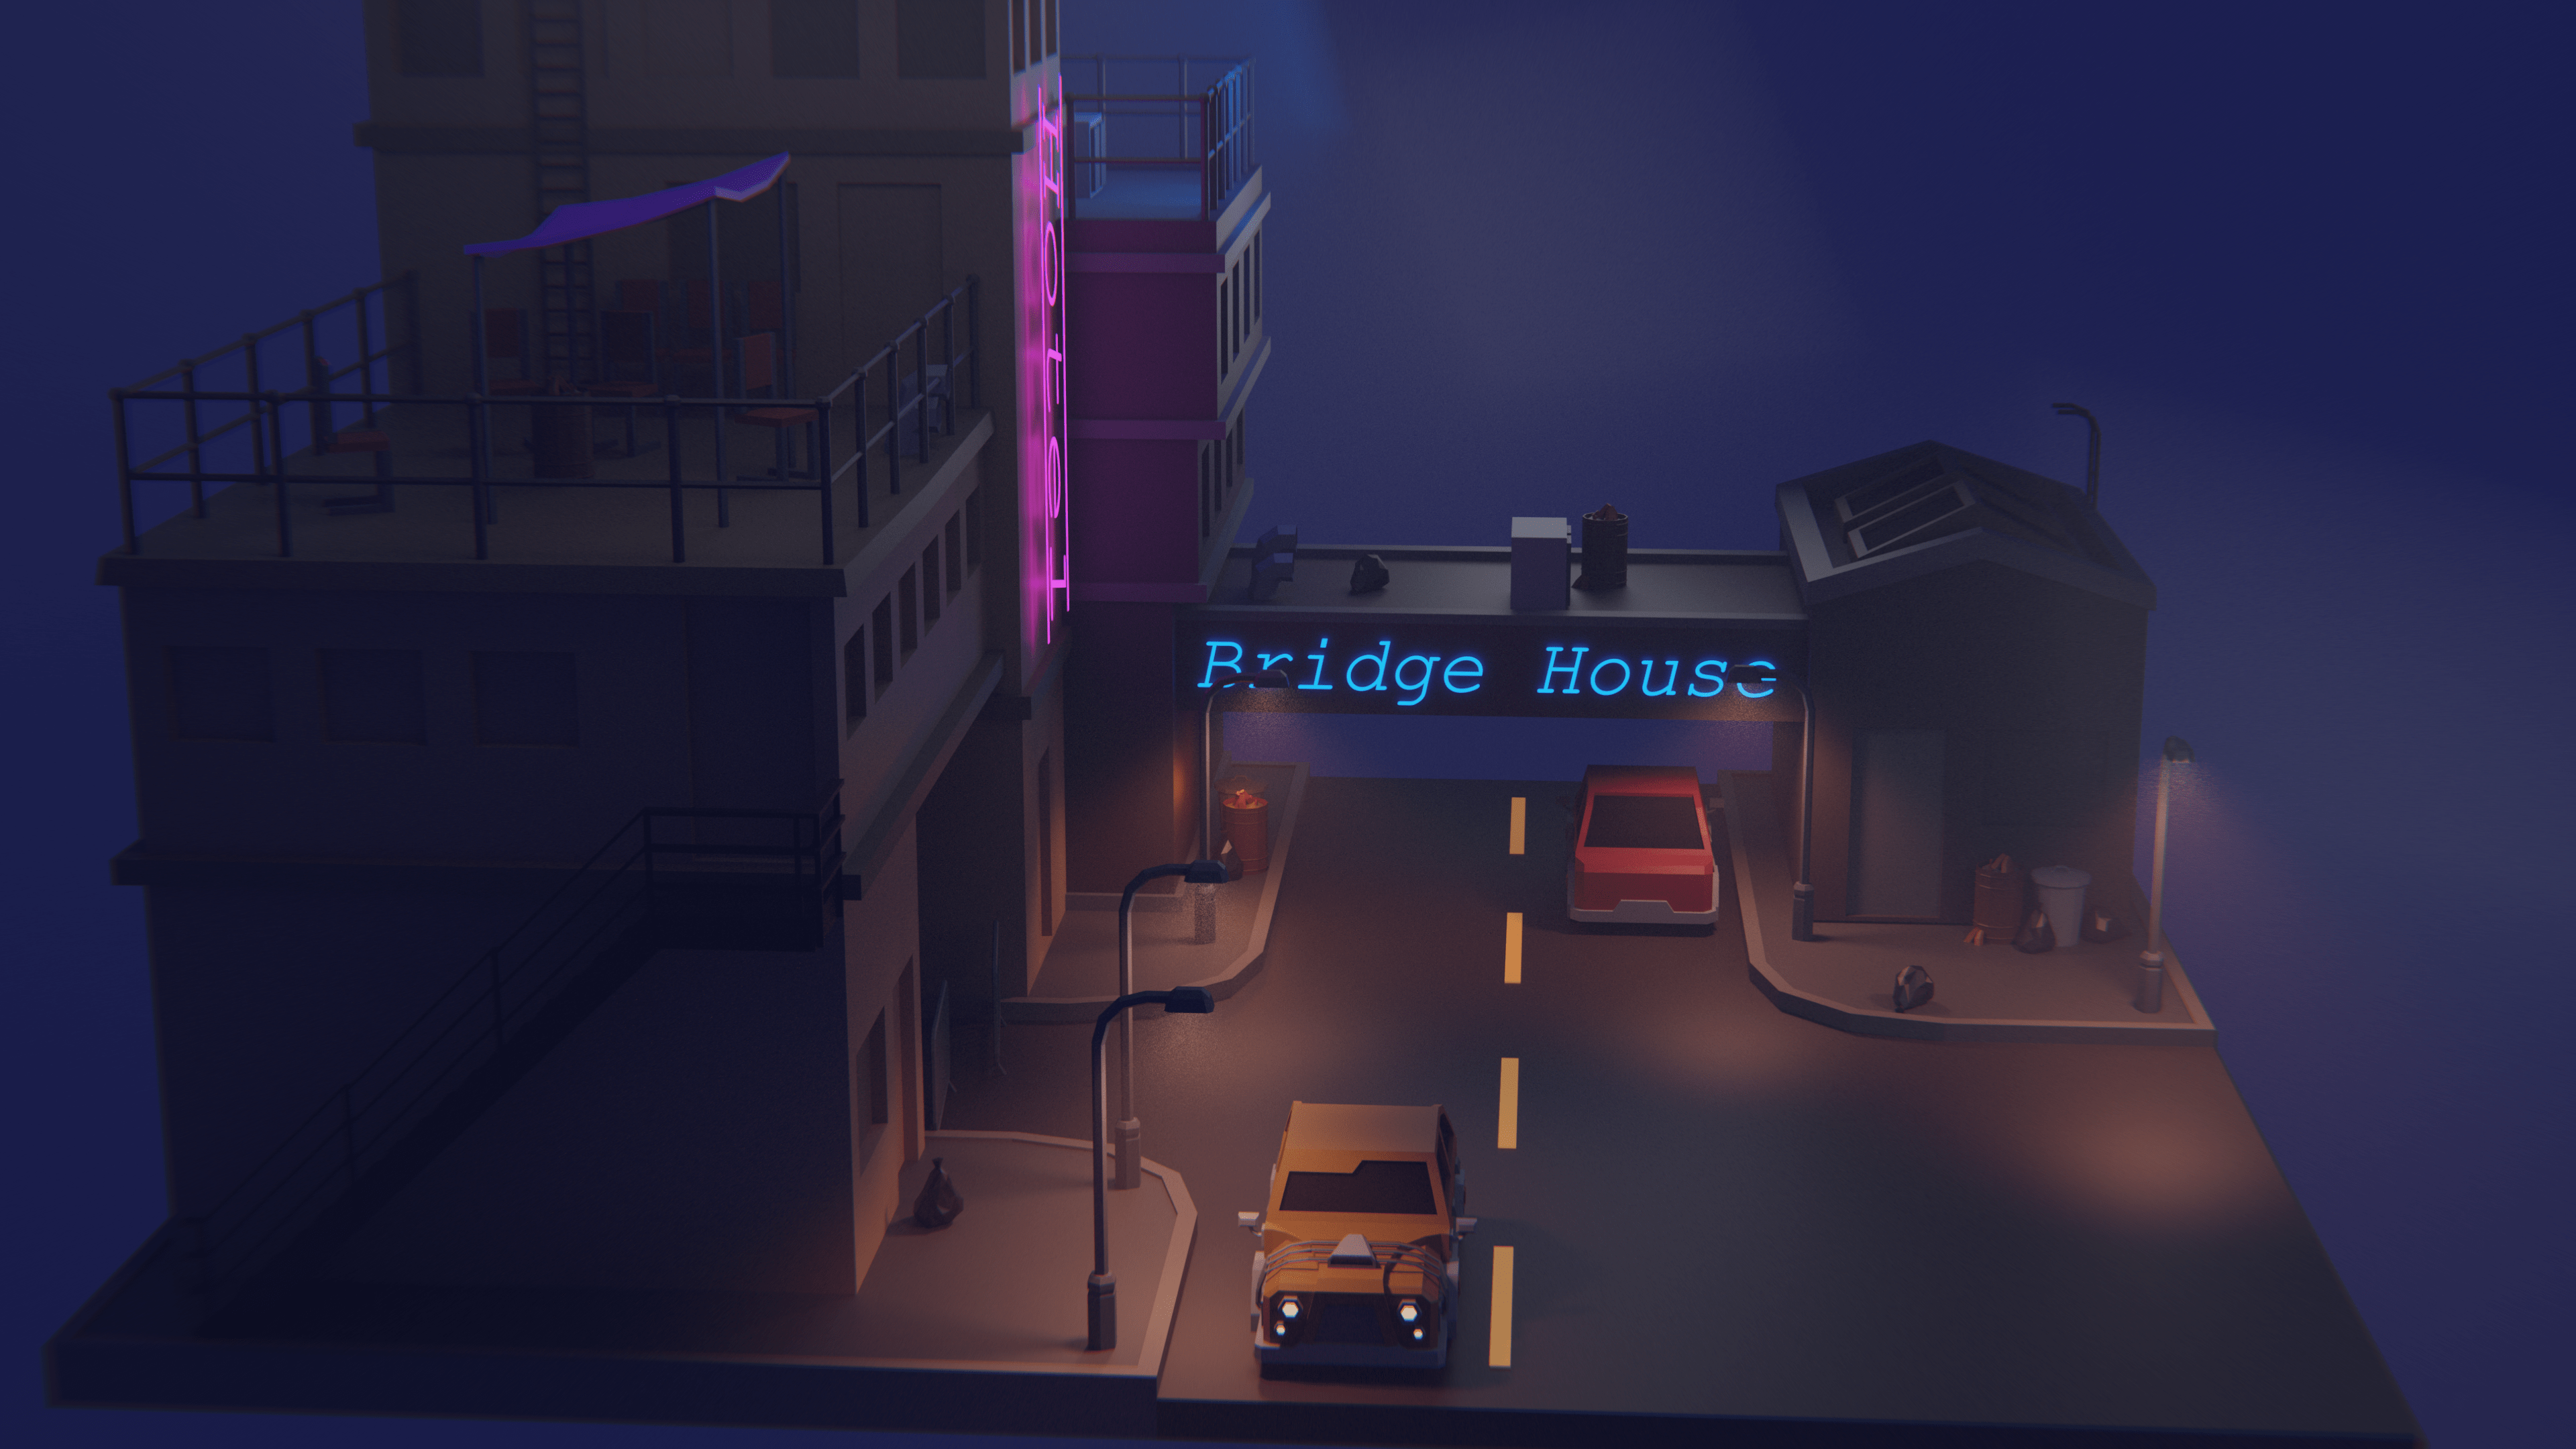
8. Adding Neon Signs: Welcome back. In this part
we're going to be adding some neon signs to the scene and play around
with the curve editor. Once that's finished, we'll do a bit of housekeeping and add some other assets to the scene that we haven't had
time to model yet. To start out with,
we're going to need to add a object to the scene. I'm going to press
Shift, Click on Text. And down here under this tab
of the Properties panel, you can see we have a
fonts that drop down. If we go down here,
we can click on this folder icon to select a font from your
Windows computer. Might end up
changing this later. We're looking for something
that looks cyberpunk. I'm thinking we could
use this one for now. I'm going to press open font and you can see it's updated. You can position this like any object in blunder, so
you can move it about. In object mode, I'm going
to press to move it up. And then rotate it
on the y axis by -90 it's going down
the building member. You can also scale
this up by pressing in object mode to change
what the text says, you click Tab and then you can use backspace and type
in whatever you want. Now I'm just going to
call this sine one. I'll probably end
up changing this. I think better name is put there impressed tab to go
back into object mode again. I'm going to scale this up
and move this in place. Need to come up with a
better name for that sine. This is using the white
material from now, just the default
material and blunder. But if you go down to
the Materials tab, you can create a new one. I'll call this neon sine one. You can go down and
change the Mhm color. I had a bit of brightness
in there and I might make this a
pinky purple color. And then we can change the
emission strength as well. Now we go up into rendered mode. We should see this update. It's about finding the
right level of emission. We can also copy this if you hover over this
color and hit control C, we can copy this into the
base color like that. After thinking about what
this sound is going to be, I decided to make it a hotel. I'm going to go into edit mode. Delete this and type in a hotel. Then if we go back
to object mode, just going to move it back. I think it would be cool to have a couple just neon lines running down here on either
side of the hotel sign. I'm going to place
my cursor can just press Shift to place my
cursor where this object is. I'm going to create a plane. Rotate it on the white
axis by 90 degrees. And I can just play
around in edit mode to position it where I
want s this edge. I can just drag this downwards. This is quite a hacky
way of doing it, but it works for what we need. Then back in Edmde, I can
just slide everything and duplicate it and just move
it across to the top, scale these in a bit as well. The line then just
a subtle detail like that adds quite a bit
of character to the scene. I'm going to make sure I give this neon material,
Neon sign one. Then once that's done,
I'm going to sign, I'm going to duplicate it. Resin, shifty. I'm going to have this one going
across the bridge. I need to rotate it till
it's in the right place. I haven't thought about
much to name this. I'm just going to call
this Bridge House. That could be the
name of the district or restaurant, hotel. I'm not quite sure. I'm going to change this material here. I'm going to flip the little
three and I'm going to change this to neon sign
two just to stay organized. And I'm going to make this
slightly more blue color. Make sure to change both
the base color and the Em. I don't think the base
color mats too much, it's mainly the MS Exchange. So make it more
of the blue color and a copy in to base colors. Now we go back to camera. This makes the scene feel
a lot more lived in. Feel free to add some
more neon signs. I'm quite happy with
how that looks for now. I think it's time to carry on adding some more
models to the scene. I'm going to start off by adding some broad markings
to the ground here. My very simple way of
doing this is just coming over here to
the add objects. I'm going to add a cube
and I'll just drag on the cubes to the
ground that this says, it's just slightly
raised above the ground. Maybe move it a little bit
and add an array modifier along the Y axis just like this. So I've got a few more
markings running down and that just adds a slight bit of contrast to the ground out. I'm going to change the color.
I'm going to try a yellow. I'm now thinking, because
this is a Sip punk scene, we could even try giving it an missive material just
to see how it looks. Might not like the
result, but we can try, I suppose we'll see how it
looks once it's rendered. I just realized I forgot to add some
headlights to the car. I'm going to go in edit mode on this object here that contains
the headlights. I'm going to select these faces right here
on the Materials tab. I'm going to add a new
material slot and I'll create a new one where I'll call this the headlights and signs we go, we'll tweak the intensity
of all the lights later on. When it comes to
rendering, I'm now going to show you a sped
up time lapse of me adding some more details
to the roof using the same techniques
that we've used before. Course, I'll start out by adding some green structures above the little shed on the
other side of the bridge. And then adding a fire barrel on top of the bridge just to break up some of
that empty space. This water tower on top that added to the very
top of the hotel, I thought would be
a nice addition to create this support structure
below the water tower. You can see I've
created dissylinder that I've subdivided
around the middle. I'm going to add a
wire frame modifier to this, which is here. Just change the
thickness a little bit. I'd like some diagonal
supports going across as well. The way I'm going
to do that is by selecting all these faces going around and
I'm going to hit control to triangulate some of these might not
match up around here. You can change some of
these modes method. Let's try fixed alternate. This should be quite consistent. So if we look back in object
mode now and unicolate, I'm quite happy with
how that looks, especially from a distance. Just go easy on the polycount. I might need to make
it a little bit thicker that fits the
width of the railings. You can see here some details to the top of the roof
next to the water tower. Just added some boxy
bits of electronics and some air ducts coming out just to break up some
of that empty space. On top you can see on
this a little balcony, rooftop, here it is, Cyberpunk. I decided to add some random
electronic machinery. I put some Teslicorsres. Well, because I thought
those look quite cool. You can see instance the box from the top
rooftop down there as well. Just the same model
just recycled across the scene over here. I wanted to add some party
going on on balcony. I added tables and chairs
and a little umbrella. And I also copied the same
barrel model up there as well. It looks like they were
using that as a fire. Make sure to rotate
some of these chairs slightly just so that everything
is not quite the same, especially if it's
placed by someone. You don't want all chairs
to be aligned perfectly. You can see the legs there. I'm just convert they're all
edges that I extruded down from the top and I'm
convert curve object. I'm just going through
making some more changes. That's where I'm adding the ducks and I'm
going to copy some of those assets I just created down on top of the
bridge as well. You can see you really
speed up your workflow by recycling these assets. Shorts to randomize which
windows are let as well. I think that concludes all the
modeling for this project. Next time we'll be tackling
lighting and rendering, which means we'll be playing around with the
intensity of some of these lights and setting
up our rendering settings. And also which sky
background to use, because by default
we've just got the standard gray
background inside blender.
9. Adding Lights and Tweaking Render Settings: Hello and welcome back. In this part, we're
going to be adding some lights to the scene and tweaking some of
our render settings to get a final exported image. First things first, if we
go up into rendered mode, we do this by holding
down the zeke and going up to Rendered or up here. And then we go up to
this table right here, we can see our current
rendering engine is V. Now this is a rendering
engine that was brought out to Blender
a few years ago. And it's really good for
real time visualization. It's interactive. We
don't have to wait for a render to compile before
we can see our scene. For if we change this to cycles, this is a ray tracing rendering engine
and as you can see, it's much more high quality and the lighting
is more realistic. This is because
many rays of light are cast out from each pixel to calculate light bouncers based on how light works
in the real world. At the expense of cost
and a little bit longer. You can see one thing
you might notice, we've got a bunch of these
artifacts on screen. These are sometimes
called fireflies. And you can also see
there's a little bit of noise grain here
and that's basically where the sample count
isn't quite high enough for what we need. You can also check noise
here in the Viewport and render it gives us
some smoother results. You may also see
this number here for both render and
Viewport there separately. Usually you have
your render settings higher than the viewport, which is just used to
visualize the scene. You can see our maximum
samples here is 1024. That's basically the
number of rays of light casting outside
of each pixel. And when we move our scene here, you can see up in the top left, it's calculating each sample, so it goes 5678, and you can see that
as that number goes up out of this value, the renders get in
more high quality. One annoying thing you
might notice is that the window cutters that we use to
show in the solid objects, because when we hit them before, it doesn't work
in rendered mode. So we're going to
have to bring those back and hide them
on the render level. If I just let all these windows here and door cutters as well, just let them all and
I'm going to add them to a separate collection to make
it easier to handle them. So I'm just going to press
M and I'll put them in door cutters and I
can press the number of high period key to jump to this collection In the
outline of the vigus, press the button it jumps down
and shows where they are. We've got the two buttons here. We've got the hide button, this little e which just
hides in Ini viewpoint. We've also got this
camera button. And what the camera
button does is it hides the object in random mode. In our final render, anything inside this collection
won't show. You can also do it on
individual object level. If I just select this one
right here, then hide that. You can see you can do
individual objects, but we put them in
this collection just so we can do
them all at once. It's a little bit
faster to work with. Now we go into Rendered mode. We can actually see the windows cut into the buildings,
which is quite a mess. Now if you remember, when we
first created this scene, and I added a bunch
of these lights here just to block it out and see where my light sources
are going to come from. However, I'm going to
completely relight this sea. I'm just going to delete
all those because also I've changed my mind about where certain lights are
going to come from. If we now go into rendered mode, see, this is looking a
little bit different. It's looking a bit darker, so we might need to add
some more lights to it. The first thing
I'm going to do is let these neon signs right here. And if we go down to
the Materials tab, we can change the
emissive strength because when we set the emission before we're in a
different rendering mode, and the intensity of
lights looks a bit different depending on what rendering engine you're using. I might increase
this one a tiny bit, just so it's a little
bit brighter and we get more of a reflection
off this building. I'm also going to tweak the
intensity of the windows. We've just hidden the window
cutters. The door cutters. I'm going to bring these back. I just click on
anyone. There you go. And if I go up to
the lit window, I'm going to increase the
emission strength a little bit so that the windows are
brighter while I'm here. I'm also going to decrease the brightness of
the dark window because they're looking
a little bit too bright. Right now, it doesn't
look like they're dark. I'm just going to drag the color down and I might increase
the roughness as well. See how this looks, just so
it looks a bit more diffuse, as if there really is
nothing going on inside there. I'm happy with that. The next thing I'd like to do is change the brightness
of the background. You can see here by default
in Blender we've just got this gray background when we render where you can
change that is by going up to this world type right here in a
Properties panel. Can see we've got a dropdown of the different
worlds in our scene. We can select, I'm just going to edit the default
one for now because I don't want to change anything much like
the material editor. If we go down to the surface, you can see here we've got the color and let's
play around this. I might make it a slightly
more midnight blue tone. Something like this,
maybe even brighter, can play around with
different intensities. I think something
that might work, although my scene is
actually quite bright now. Because I've given it a
very blue and purple tones. It has the effect of moonlight. And this is a technique
a lot of filmmakers and game artists use when they want to film
a nighttime scene, but also be able
to see everything. The next thing I'm
going to do is add some natural light
sources to the scene. If I zoom in a bit, first thing I'm seeing is this bridge, how sign look like. It's
out a bit too much. I'm just going to move this
further back on the y axis, it's closer to the
building it's attached to. That looks a little
bit better to me, and we're getting more glow of the bricks behind it as well. I'm going to add some lights
underneath these lampposts because the emissive material I put under there
isn't strong enough. I'm just going to place Mac
Cursor under like this. And I'm going to go shift
A to add a light object. We start off of a point light. There are different
light types that we usually change that down here
in the properties panel, you can see we've got point, sun, spot and area. The one I'm going
to use for this one is going to be a spotlight. Let me do it now.
And you can see it's already pointing downwards. If you want to change
it, you can rotate it just using the arch blender. Or you can use this
little gizmo bile down here to point at
another part of the scene. I want it still
pointing downwards. For now, the first
thing we're going to need to do is increase
the intensity of the light because ten watts is a little bit too low for us. Let's try something like that.
And I'm going to see how this looks from
this view up here. And I might also increase
the radius as well, maybe not the radius, spot size at the angle. I can increase this a
little bit, it's wider. Increase the blend because I don't want a sharp
line. There we go. It might give this a slightly
more yellow orange tone. Make it a little bit warmer,
something like that. Looks nice, especially on
the yellow paint of the car. With that, I'm going to
instance this by pressing up along to the other lamppost, just assuming a little bit,
making sure I'm align them. Probably haven't done the most perfect job
of placing these, but as long as it's
roughly in the middle of the lamppost, I'll do fine. I should have probably added this light object underneath the lamppost and in instance, both of them to place
them across the scene. But I've really done it
now. That's a final one. I'm using an AMD
graphics card currently. If you've got an in
video graphics card, you can use tracing, a real time tracing in
cycles using your RTX card. If you are an invideo user, that might be a good
thing to look into. There we go, that's the
last light done instance. I can change the color. If I wanted to make it slightly different shade of orange,
we can always do that. I might actually make
it slightly more pinker tone because it valefits color scheme for the
scene I'm doing, play around with this,
I'm not quite sure. I'm quite happy with that and increase the intensity
a little bit. Another light sourcing I'd
like to use is the sun lamp. If I place my, cuts it here, I'm going to press Shift A and
add a sun light over here. And just move this up a little
bit, it's off the ground. What you can do with this is
create a bunch of lights. Instead of spreading out and diverging from
a point like this, all the rays of light move from whichever direction
sunlight is pointing. In this case, it's
going downwards. But if I rotate it here, just by a position
in this gimbal, you can see I can angle where
the lights coming from. If I have this direction, this, there you go. I can tweak the color I have
like I'm not quite sure, just slightly yellow, greenish tone. Strength is quite low. So we can increase
this, this will have the effect of sunlight. But if we set this to -0.5 I think is a good value,
then it does the opposite. You can actually make
lights go negative and blender and they start darkening the scene rather
than lighting them. You have to type, you won't
be able to use it slightly. You have to type it in manually. So you can see if I set
this to something like -100 it's darkening the
scene than adding light in, which isn't the way it
is intended to be used. But I think if I
set it to something -0.5 it gives us a really nice subtle darkening to shadows coming
from this angle. And this helps us with our
form a little bit because it's creating a distinction between this plane and this plane
of each of the buildings. I think this effect can be quite nice if you use it subtly. Whilst we're here,
I'm going to quickly change the color
settings for the scene, what we call the
color management. So if I go across
this render tab here and go down to the
color management tab, what I'm noticing
is that the scene looks a little bit flat overall. And I want to add a
little bit more contrast. We'll treat this later
again using a composite. But for now we've got some
of these settings here. We can see that the view
transformers on film, the color range we want
to use in this scene. You can see here under look, we've got a bunch of
different presets. That blender comes with
different exposures and gammas. I'm going to play around with adding a little
bit more contrast. I'm going to try to add
a medium high contrast. Maybe a little bit too high, maybe just a medium contrast. You can play around with
these different signs that just makes a scene glow a
little bit more, which I like. The other types of flights
and blender that we haven't covered are the
plane and the point light. And these are probably
the most simple. I'm just going to quickly
change my render set into V just because it's a little bit quick and I can show you what I mean if I now zoom in. Just click on this barrel here. I'm going to add a
point light above, I think, where my cursor was. So we just shift, click here and add
a point light. It looks like this is casting
out from inside the barrel. I might increase the
intensity a little bit. I make this more
of an orange tone, so it looks like fire,
something like that. And this has the effect of the barrel gloweuse'se
this timbers right here. Yeah, point light just diverges all the rays of
light out from a point. You can change the size of the point right
here with radius. And you can see that's shown
by this little round gizmo. You want this to be quite small if it's going to be
inside this barrel. I'm just going to
undo to put it back. The plain light is
also fairly simple. Sometimes we use this just to shine light over a
whole part of the scene. It's a little bit, we're not necessarily the
most realistic, but I'm going to
press shift A and add an area light.
Shine this on here. And you can scale this in
its local and white axis. This, you might need to increase the
intensity a little bit. I suppose you can use
these schismos as well. If I drive this power
up a little bit, you can see I'm
just shining some light onto this rooftop. We're not necessarily sure what this light source could be. It could be another
building. But sometimes it's just nice to light
up to be parts of your scene because
it's look a little bit too dark now that I've added the contrast and the
negative sunlight. So I'm just going
to create a couple of these area lights. Remember if you're
scaling them up, you're going to also
need to increase the intensity as well because
starts looking quite low. I'm going to change my render
engine back to cycles now. Second, see look in
final render that looks a little bit
more lively to me. And I'm going to also
add an area light here just because
where the lampost starts leaving this patch
of road exposed here. In general, larger light sources tend to make the light
a little bit more soft. So using the point
light, you can see the shadows coming off. I don't know if we'll be
able to see an example here. Yeah, this car, you can see when it's coming off,
this point light, which is very small compared to the object and it's far away, the shadow line is
quite sharp here. Whereas with these
huge soft shadows, the huge soft light sources, you can see the
shadows very soft. And it doesn't look
like the light source is as close as harsh on it. Which is quite nice because I'm just trying to add
some subtle tones here for this light source might mean for the
alittle bit closer. And I'm just going to increase the intensity
a little bit. You can change the
color as well, but for now I'm just
trying to brighten it something like
that. Works nice. I think I'm going to add some more light to
the rooftop as well. The very last thing to do now is I want to make the background transparent because I don't like this blue color that we've got. We'll add a different color
to it in a composite. In the next part, that might
just be a solid black color. We go up here to the camera
tab and then down to film. We just need to take
this transparent option. You can see it gives this alpha checkerboard pattern
using these techniques. Make sure you're happy
with the lighting in your scene and then we can finish off in a final render in the next video. Good luck.
10. Final Video - Compositing: Hello everyone and welcome back. Now we're not going
to waste any time because we haven't got
long left of this project. So we're going to
jump straight up from the layout to the
compositing tab. I'm going to click
Use Nodes up here. Those of you who
are familiar with Blender's nodes will
most likely have used the shader editor to create materials for
objects in Blender. However, in the Compositor, we're going to stack a
series of these nodes together to create effects
over our final render. And do some slight tweaking to things like color and exposure. Now first off, it's
nice that we could have a preview render of our work in a background of
this editor so that we can see the result of the
effects we've placed over it. To do that, we're going to add a background image to this. We go up to the view tab here. This is an panel much
like in three DB port. We press to bring this up, we might need to do a
render of the image first in order for it to
show in the compositor. To do that, I'm just
going to hit F 12 on my keyboard and it will
bring up a render window. Now we just need to wait
for this render to finish. My sample count
here is quite high. It's on about 4,000 Just while we're working
in a compositor, I'm going to change my render
sample count much lower. I'll set this only to about 50. That'll
probably do for now. And I'm going to hit F 12. To render, we need to
add a viewer node. So this is a composite node. This is the final
output of the render. But if we're previewing it in this backdrop, we
need to add a viewer. So to do that, we press Shift A, like adding anything in Bender. We go down to output and
we choose a viewer node. Now you can see this changes the backdrop to a black color. And if we drag the output
from this image into here, we can see background. And we're going to need
to press Fit or reset. You can always zoom in
a little bit as well, it's to zoom out, but I'm
quite happy with this. Before we go any further, the first thing
I'm going to do is something we didn't
really have enough time to do in the last video, and that's adding some
fog to the scene. Now, there are a couple
different methods of doing this. The first one is something
called volumetric fog, which is very realistic
because the light bouncers are calculated by the
rendering engine. Cycles. Rendering engine. If we go up to the wall tab
right here and under volume, I'm going to click on
this and I'm going to select the principled volume. We go this one, if I hold z and go up to render, I can
preview how it's going. Now the reason this might be looking strange is
because it's very dense right now and it's this density value
that we might change. So I'm going to
set this to 0.001 might still look a
little bit foggy. If I leave this to
render for a bit, you can see that the background
is now appear in black. And some of the
light coming in from the sun and from the windows is scattering here almost into like a haze or a cloud,
which is very nice. And this looks even better
in perspective mode, I found because from
orthographic mode, the whole scene
looks quite flat. You can also change
this density, this might be a
little bit too low, so I can try changing
this to 0.005 and this looks very foggy, which is quite nice for
these cyberpunk scenes. Just be aware that
adding volume to your scenes tend to increase the amount of
artifacts you've got, these rendering artifacts or these little fireflies
that we call. I'd recommend
setting your sample count quite high if
you're going to do this. As mentioned before,
this volumetric fog doesn't look the best
in orthographic mode. But just in case,
I'm going to try rendering this out now
to see how it looks. You can see here one bounce side is that the area
lights that have placed around here to illuminate these buildings are actually
glowing through the fog. Because as soon as the ray of light leaves this area light, it's really bouncing through the volume and back
at the camera. That's something to be aware of. Sometimes it might be best
to just use sun lamps, which don't do this,
or you can just move your area lights further
away from the scene. Another method for adding
fog to your scene is not quite as realistic as
the one we've just shown, but it's still quite
a useful tool anyway. First off, I'm going to go to the layouts tab and I'm going to get rid of the
volume that I've just added. So I'm going to click on
this and then remove. I find that this only really works best in perspective mode. It might be worst if you place your camera down a street
level like this for renders, but for now I'm just
going to keep it up here. And I'm going to go down
to the camera tab and change this type from
orthographic to perspective. This should not work
in a compositing tab. These are the channels
of the render that we've got available to us. We need to add another one. Currently, we've just
got the image output and the alpha, you can
see this background. We made the background
transparent in a previous video. I'm going to go through
on this tab right here, the view layers properties. The 11 is missed
and you can see it. This adds a new output to
the render layers here. If I hit 12 to render this and then get
rid of this window, we now drag this mist
into the viewer. We can see that we've
got this depth map. White areas are completely
included by mist. The closer an object
gets to the camera, it will appear more black. This is what we call a
mask in compositing, and it's basically a black
and white image that goes 0-1 where zero is black and
one is white, or vice versa. This is indicated by a gray
output in the compositor. Unlike this yellow
one, which is an RGB, for the color of the image instead of this mist directly
plugging into the viewer. Or the output of the image.
We're going to use this as a mask to blend between this
image color right here. This is the one that's
going to be visible. And then we're going to be using this mask to blend between this and another color,
the color of the fog. I sometimes like to add a little bit of blur
in there as well, but that's quite advanced
stuff for this video and bear in mind you
don't need to follow along unless you actually
want to add fog. I can't imagine I'll have it in my final scene
because I think it looks nice enough as it
is with this view node. I'm going to just drag
this out a bit so I've got more room to work with now. First node we're going
to add is a mixed node. This is found under color and it's a little
mixed node right here. So I'm going to drag
this in and notice that our image goes into slot one. Slot two is just a color. Now we could drag another image into this
color to replace it instead. Right now it's just white. And that's going to take
up the whole screen. And then we can reduce this
by using the factors we set to 0.5 Then it's
going to mix 50, 50 type in 0.5 It's
going to mix 50, 50 between the output image
result and the color white. And that's going to plug
out into our viewers. You can see how nodes
work from left to right. The input of one node
is used to calculate the output instead of just
using this 0.5 factor, instead I'm going to
drag in the miss. Remember, this mismap here
goes from black to white, 0-1 If I plug this in, using this mask to
determine how much of this scene should be white and how much should be this color. Now by default, I'm not
quite happy of how it's splendid because I think this is way too foggy for our scene. So I'm going to add something
called a color ramp node. If a press shift A
go down to converter and add color ramp,
I can add this. I'm just going to hover over this gray line here to add
it between those two nodes. And drag it down Cycle
a bit more to work with by moving these pins about. This is a bit like a
gradient in Photoshop. By moving these pins about, we can control the drop
off that mis goes through. Now these look quite strange. What I might end up doing is just slept in this
white one here. And decreasing this, the brightness of this
from white to black. Not quite completely,
but just a little bit so that our fog is
a bit more subtle. You can see there's
still some fog there, but it's not quite as obvious. Another thing I'm going to do is change the color of this. It's just white, but you might want to make it a
little bit darker, adding some temperate colors. If you're adding like a desert and you've got a dust storm, you might want to add
orange colors to your mist. Likewise, if it's very cold, then you'd add blue colors. Since this cyber punk, I think these kind of colors work quite nice for the mist, but you can play around
with different results. That's a very basic set up for adding fog in
the compositor. But like I said, I don't think I'll keep missing
my final results. I'm just going to delete
these nodes right here and have the image as the
result for the render. Now that might seem like a
lot of work for something that I'm not actually going
to include in my final scene, but I imagine a lot of you
might want to add fog. And also it's quite
a simple exercise to understand the compositor. I think it was when I started
doing fog that really helped me understand
how this window works. Now aside from that,
we're going to add some fog glow to the scene. So if I press shift A
and go down to filter, we want to add some glare. So I'm going to drag this
on this orange line, on this yellow line that
connects between them. And you can see
it's already making the windows glow
quite intensely. We're going to change this
mode from streaks to fog glow, and now you can see it
is a bit more subtle. This has the same
effect that Bloom has if you've ever worked
in EV rendering engine. You can play around with some of these
settings on the node, but I'm quite happy with how it looks by an alpha default. Another thing I'm going to do is tweak the color
balancing of the scene. I'm going to press
Shift A under Color. I'm going to choose
the color balance node and drag this on between
the glare and the view. Or you can put it
before if you want. I can't imagine
there's too much of a difference in this node. The lift is used to
control shadows. The gamma, overall midtones, and again are the
highlights of the scene. I'm going to tweak some
of these settings. First off, want to make my
shadows a little bit darker. So I'm going to go
in the lift, but these are the darker
bits of the scene. You can see that if I drag
these down a little bit, maybe a little bit too extreme, I find you have to
be very subtle with this node that adds some
quite nice contrast. Then you're going to come
in with my highlights. Just can never forget
if you need to brighten or darken might be
a little bit too extreme. Just something like this, it's already looking
quite contrasted. I'm going to drag my
highlights down a little bit just to make the scene
feel a bit more dark. You can also use the
temperature here. Shadows, I might make
these blue and it has a styled approach that's too extreme drag to the center to make it a
little bit les saturated. I'm quite happy with how that's looking from my highlights. I'm going to drag this more
into the yellow spectrum. The yellow part of the
spectrum, something like that, looks quite good to me, it
might be too extreme of this. If you do, you go overboard. You can tweak these
to extreme amounts. I can track this all
the way up here. Then instead of trying to fine tune it
towards the middle, I can just drag the overall
factor down until it's zero, which is basically the
wrought input for the node. But I'm just going to
leave it how I set it up with most of the composites and Done, the last
thing I'd like to. A nice background. So I'm going to go up to
the layout tab. I going to change this camera
back from perspective to orthographic because we've
finished showing off the fog. So I'm going to set list orthographic and 'n
to composite in tab. Do another render by hitting
12 for this background, I'd like a nice gradient in
the shape of a vignette, so the corners are darker
and the middle is brighter. To do this, we can use
lens distortion node. I'm going to press
shift A under, we can find lens distortion. Remember, you can
always go up here and type in the node you
want under the search, if you can't find it
under the list below. So I'm going to add
a lens distortion. This is going to plug
into a mixed node, so once again I'm going to press shift A and just search for mix and it's going
to drive the factor. So I'm going to
drag the output of this mix up into the
view speaking preview. Currently it's just blending
between white and white. I'm going to change these colors to something else
just temporarily. But why not do purple and blue make this purple
slightly darker though? Then you need to set the
distortion to a value, currently it's on zero, but
can increase this to one. And you can see this is creating the effect of the vignette we'd like to see
around the outside. I've zoomed in a little bit on my background image so
I can see it better. But I'm going to press
Fit for now because I'd like to see the borders
of my square enda. Once I've got this mix, I'm
going to then plug this into a blur node so I can
just search for this. Add this on the end, and guan, I'm going to set the
x value to about 500, Y value to about 400 between
these values later on, we even want to increase in
further try 600 on each, and that makes the effect
a lot more subtle. Once you've got this,
we need to combine our render on top of this background
and we're going to do that using the alpha mask. We're going to add a mixed node between the blur
node and the viewer. I' going to drag the output for the image render
layer into this slot. And I'm going to drag the alpha
render layer, the factor. You can see that
now we're blending our rendered image
over this backdrop. Might want to tweak
these colors. I think I made in
a bit too bright. It's going to decrease
the value of the blue here. You can play
around with these. Having realized that this
we're using the input from the render layer instead of the output of the glare and color balancing
that we did earlier. I'm just going to quickly
reorder these nodes. I'm going to place
everything here first, so they're going to
add the background first just by switching
this to the output. And then adding this to
the input of the glare. We can see the glare again,
the color balancing, and also because we're
doing the color balancing, after adding the background, the tone and saturation is
a bit more synchronous. Our compositing is now finished and we can up the
sample count a little bit. In the renders tab from
54,096 a very high number. If we go back to layout, there's one last thing I probably should
have done earlier. I'm going to go into material
mode quickly and just select some of these
edges on the floor plane. Just the outer ones.
I'm going to extrude these downwards that if I go
back into the camera view, I find this little
lip in the edge just looks a bit nicer for
an orthographic render. Once this is finished, we can hit 12 to do our final render. We're just going
to quickly go back to the composite in tab though, and make sure that not only is this output plugged
into the viewer node, that it needs to be plugged into the composite node
for our final render. So I'm just going to
drag this over here. That's it. Just plug
the output into here. Now we should be good
to render. Here we are. My render is finally finished.
It took me quite a while. It took me a good few
minutes because I had such a high sample count that I'm really happy
with the result. Now to save this image, you just go up here to
the Image button and then click on Safe As and find somewhere on your computer. Thank you for following
along this course. We've covered some
quite advanced and intermediate topics. Despite the simple scene, I'm hoping you can take
the skills you've learned from this project into your
future blender career.
 Eldamar Studio