Transcripts
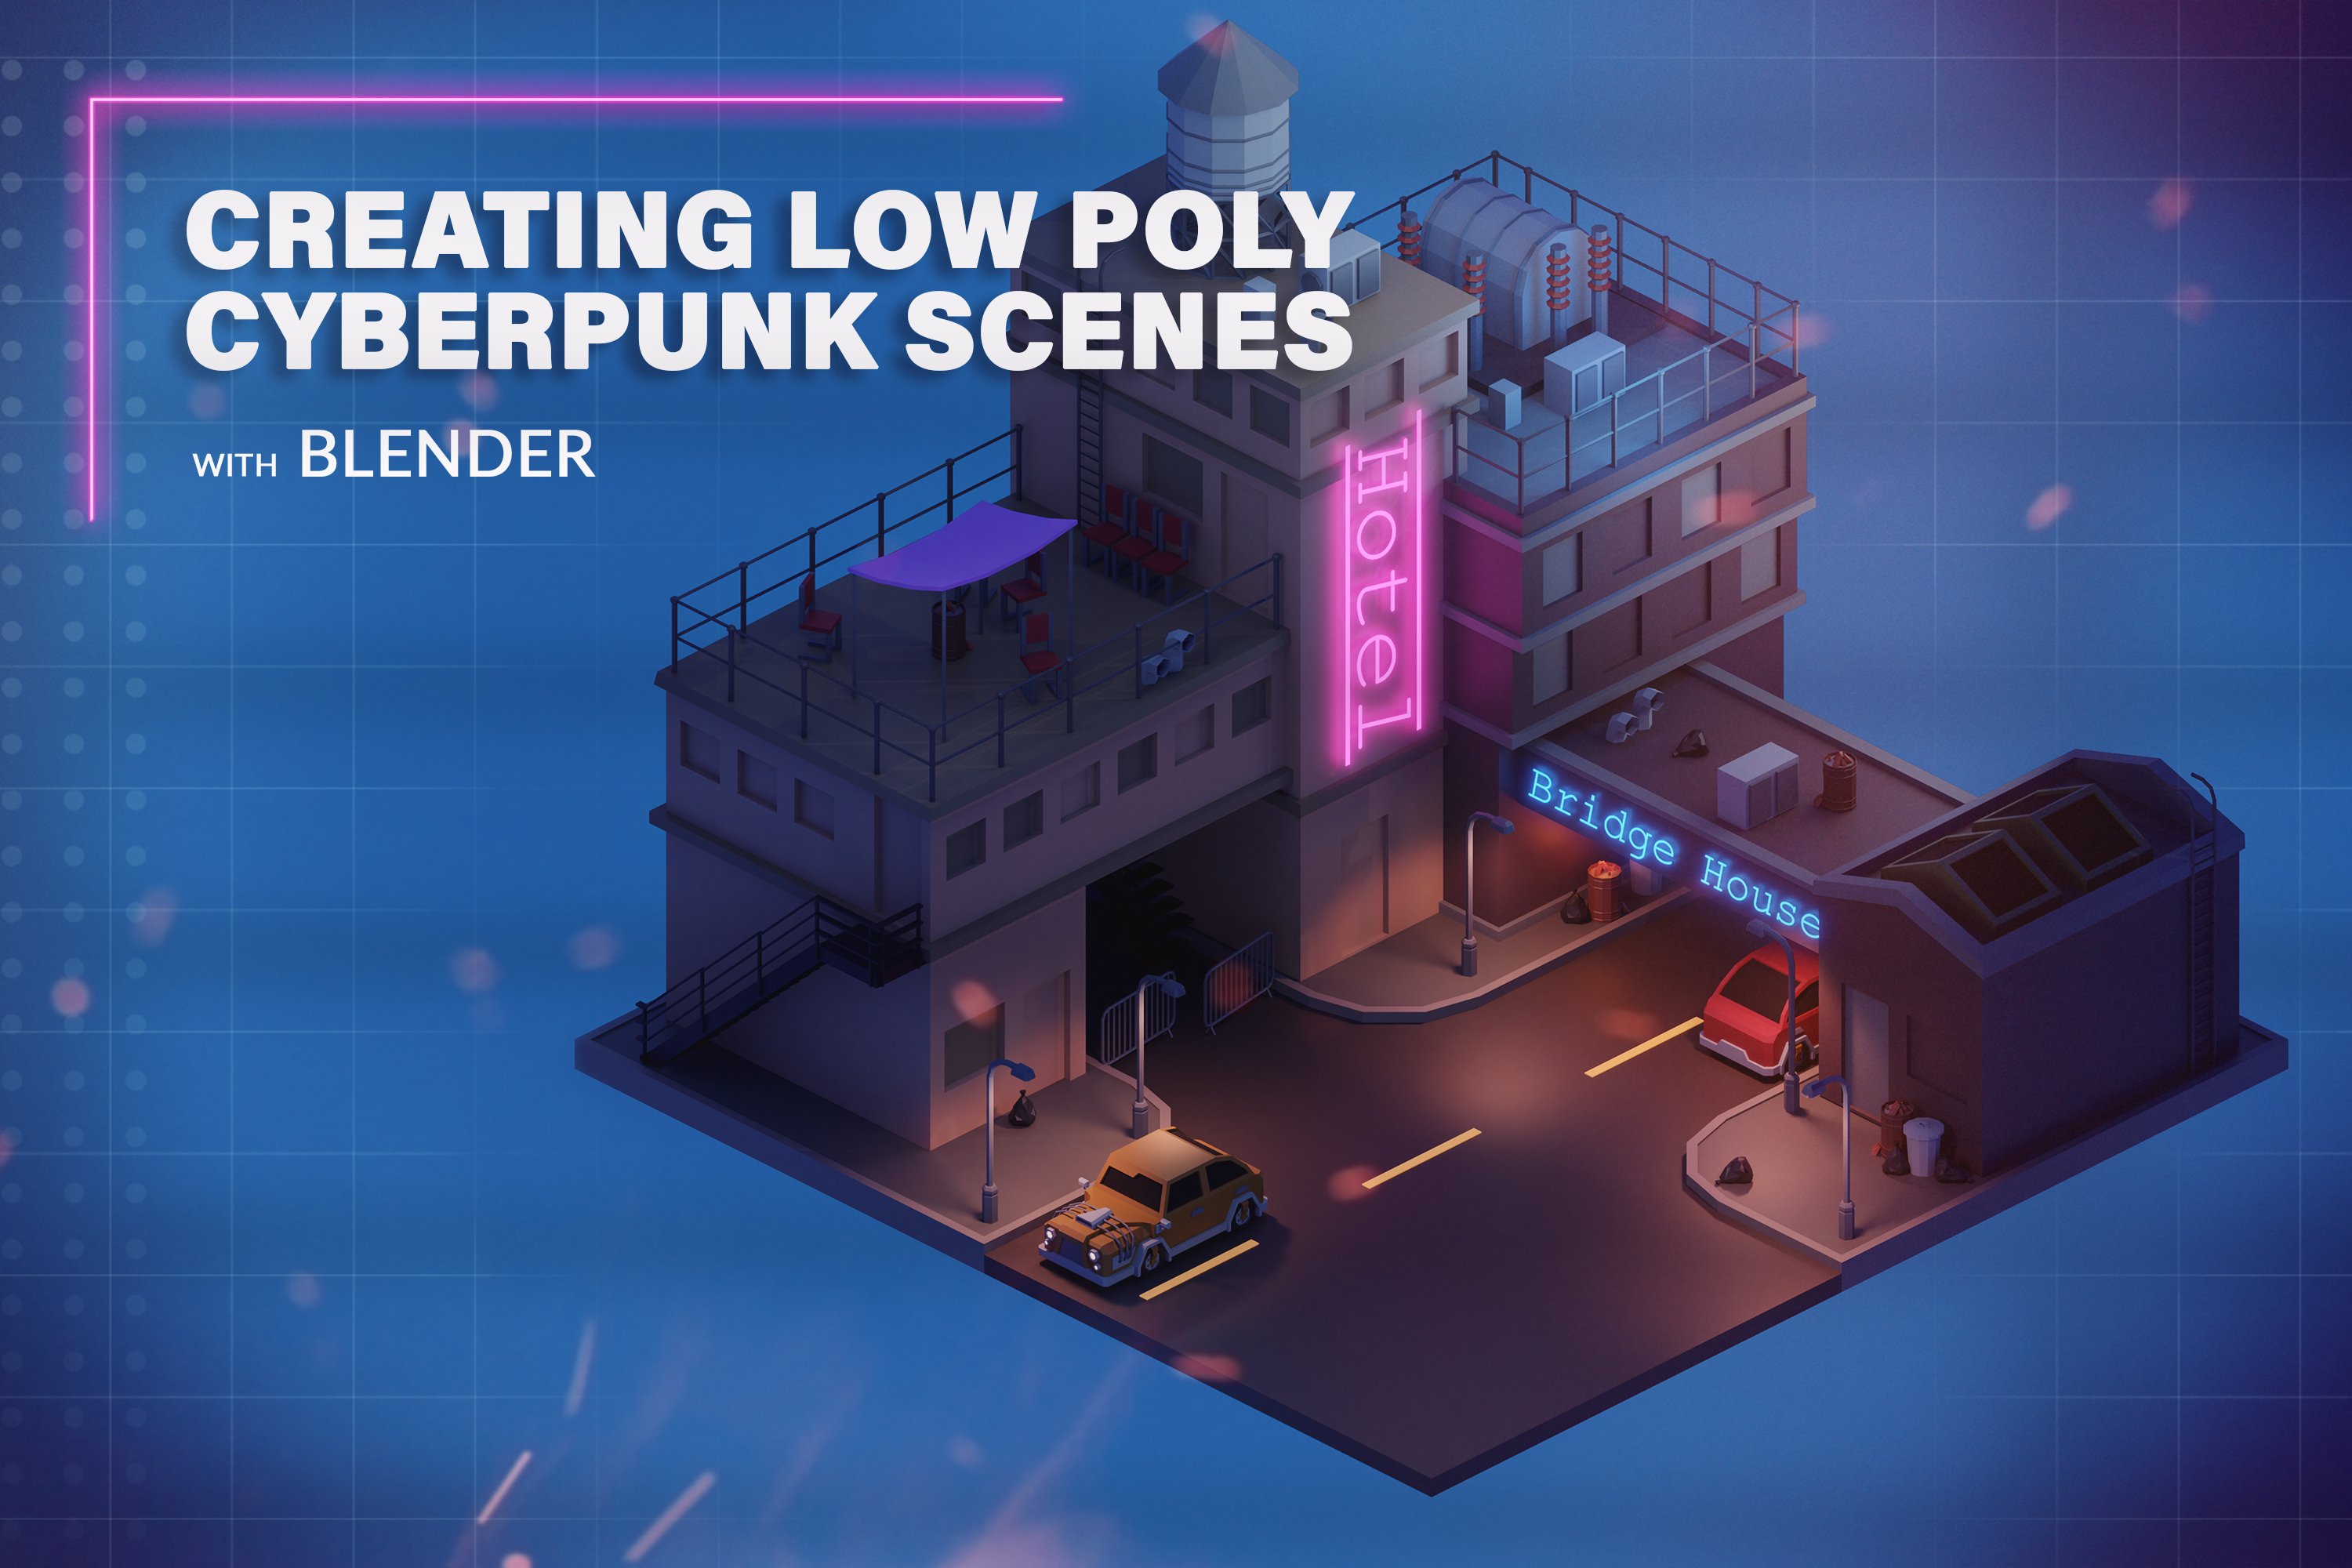
1. Introduction: Hello everyone and welcome to this new low poly
modeling course. As beginner and
intermediate users, we'll be learning even more
techniques and starting to use parts of blender which have been
hidden to us before. Despite the simple
low poly art style, we'll be experimenting with new different modeling techniques
and the advantages and disadvantages of
certain workflows that are key to becoming
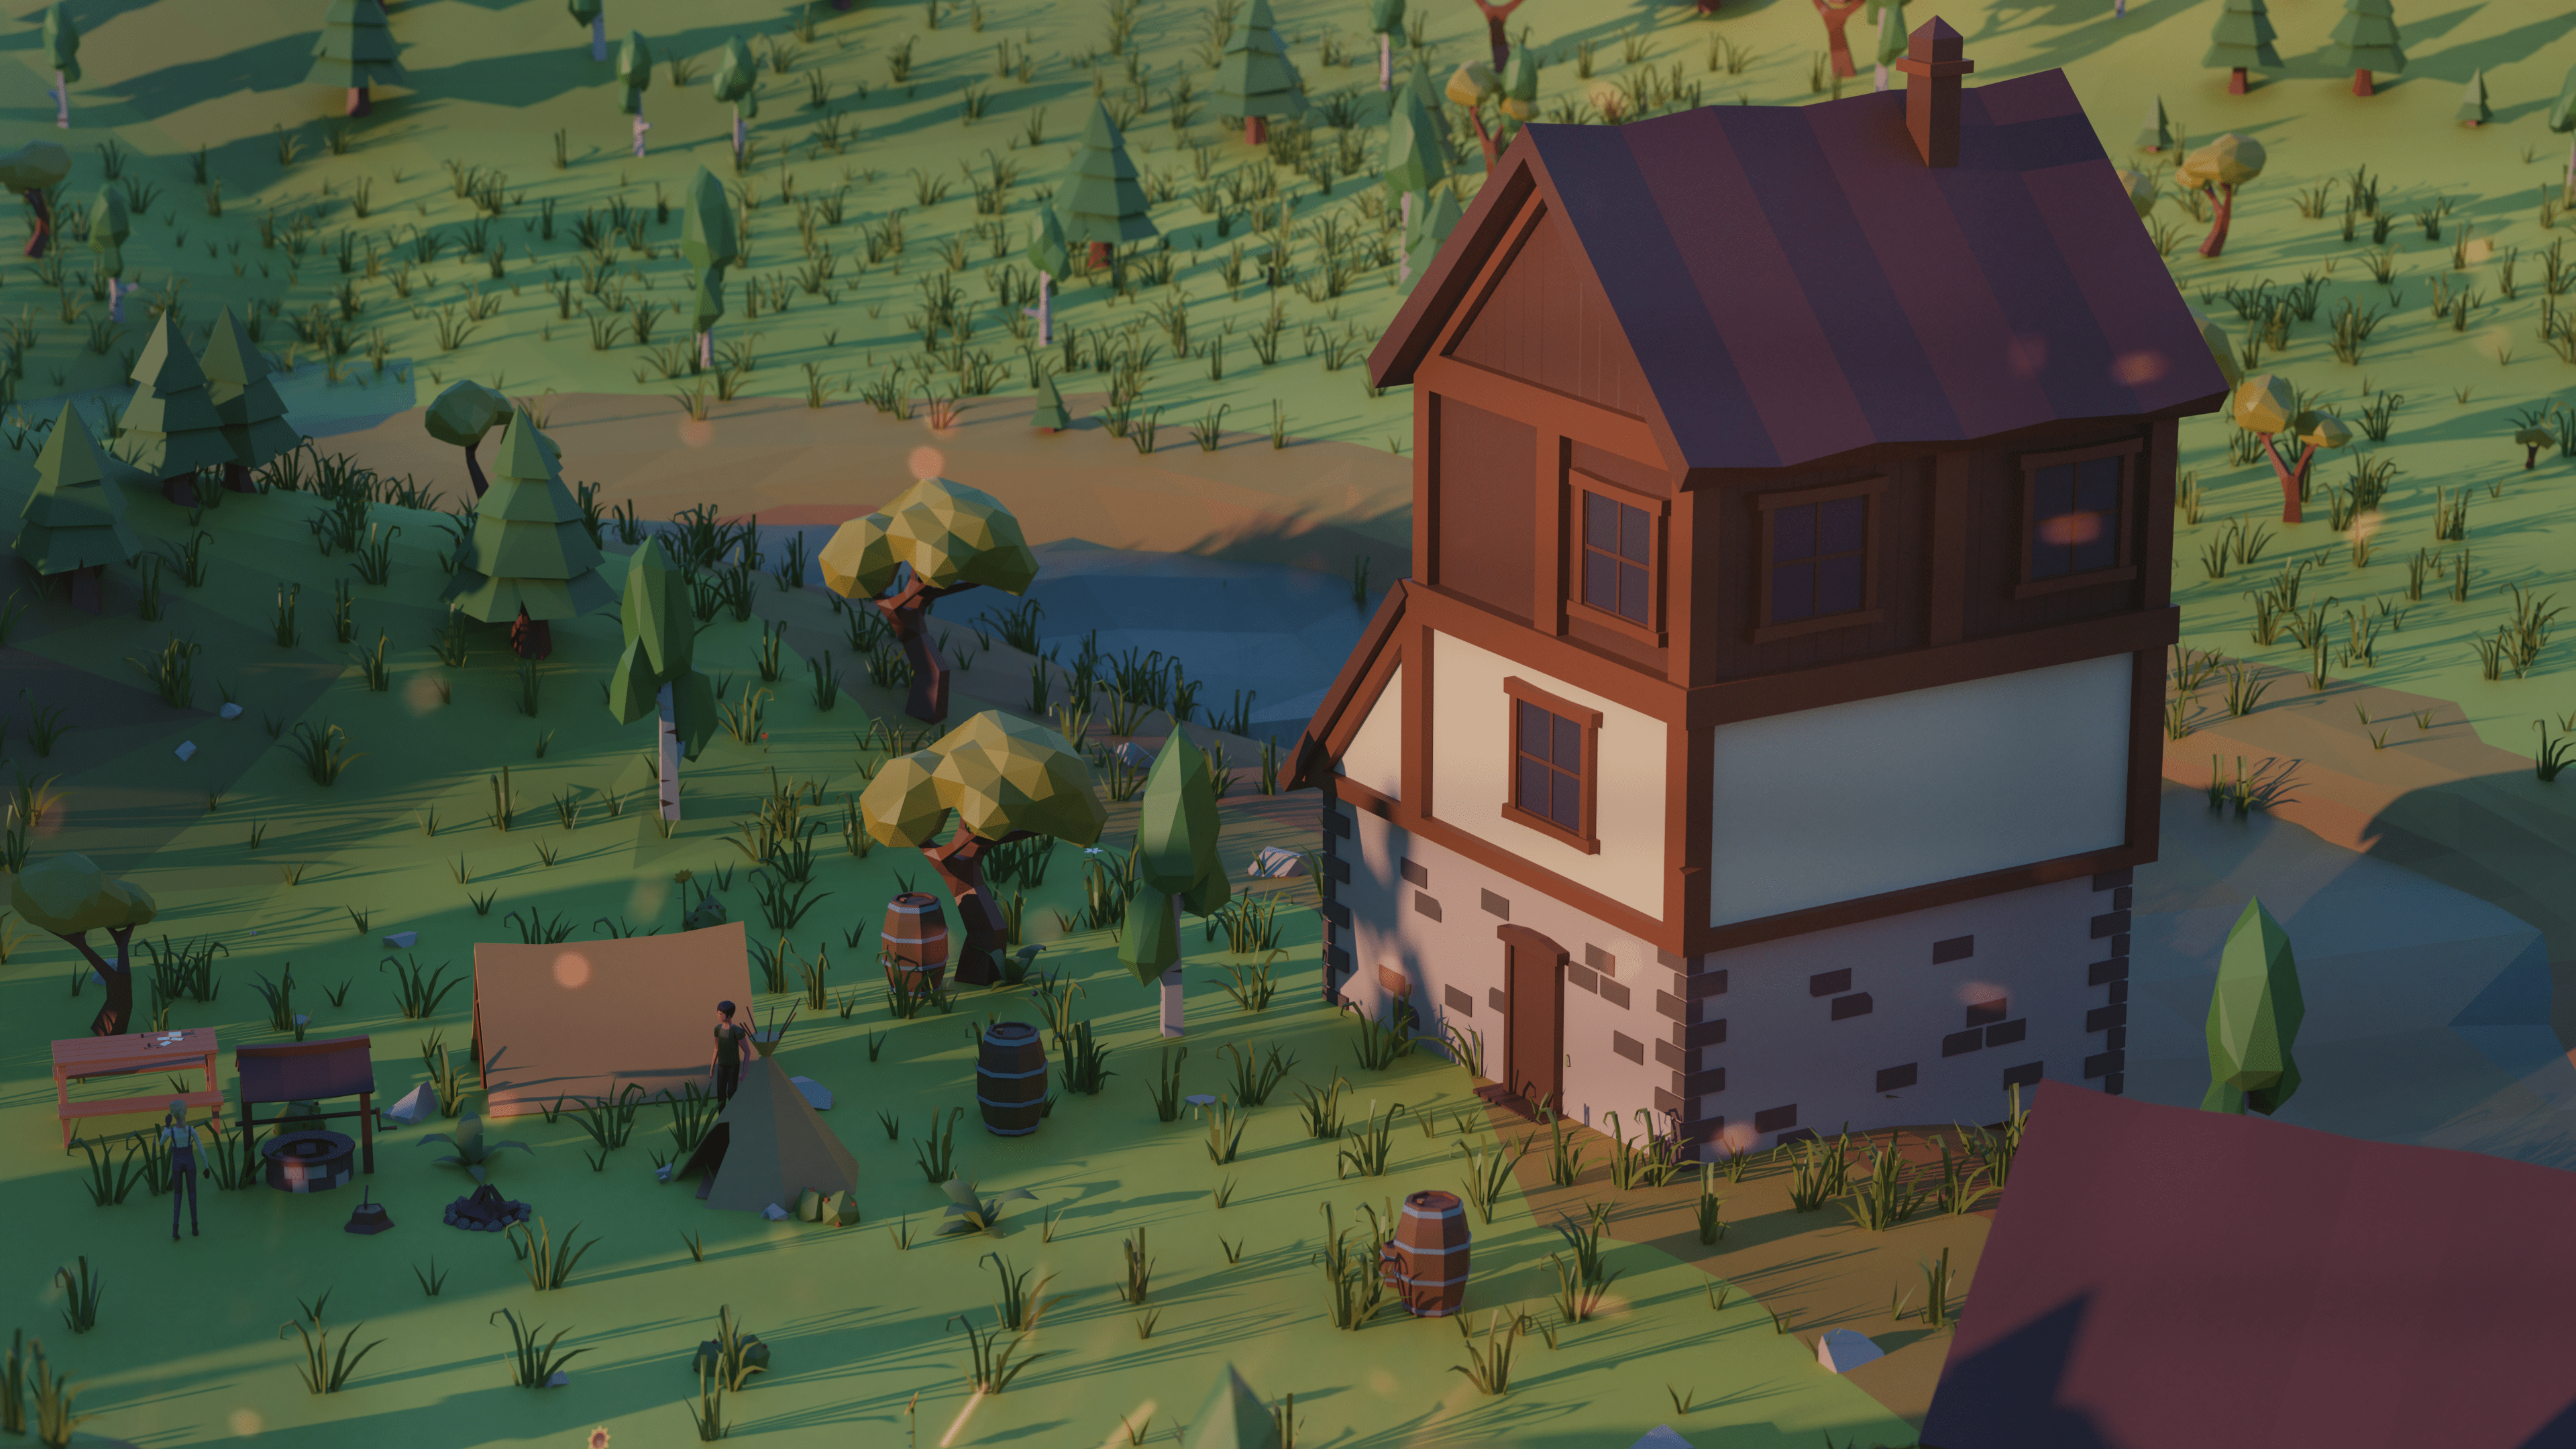
an efficient artist. The Asset Pac we'll be creating will be a
diverse mix of trees, foliage, rocks,
buildings, characters, and landscape scenery,
where we'll be using procedural shaders
and geometry notes to edit our terrain
all inside Blender. I'm really excited
to get started, so let's make a start
in the next video.
2. Setting Up Your Scene and Project Folder Hierarchy: Hello everyone and welcome to the first proper
video of this course. Now in this video,
we'll be setting up our scene ready so we
can start modeling. We're going to
talk briefly about different low poly styles and
create a reference board. And at the end of the video, we'll do something practical. We'll create the sky and sun. Before we start, let's
quickly sort out our project folder and the hierarchy of in
the scene itself. Now to start out
with, I'm just going to delete all these objects that come with the default start up file because we don't
need these anymore. And you can see my collections. So these are just ones
we've got by default. I think I might have changed
these for my start up file, but I'm just going to create and color code these collections. I typically like to have a yellow work in
Brokress collection and this is where I include all the objects I'm
editing at the time. The set up will include our lighting and camera,
things like that. The archive is for anything that I don't want
to use anymore, but I want to keep in the file just in case we need
to refer back to it, restore some of our
previous save points. And you can see
I've also created a collection just for
each category of props. So once we finish modeling
them in the WIP collection, we just moved them into there and we can drag those out
from our final scene. Just to quickly talk about the folder structure I'm
using for this course. Most of the work
we're doing will be inside the
blender file itself, so we don't need many
external folders for textures or other assets
that we're bringing in. So I'm just going to
quickly go file save as I'm just going to
put this in a folder. You can see here I've got this low poly environment scene folder and
I'm going to name this low poly environment
period 001 like this. And each time I want
to increment the file, so I say make a
significant change, I'm going to come down and
press this plus button. And you can see it
jumps up to two. Just remember that for
when you want to make a significant change to
the scene in this course, I'll quickly hit Save as
before. Anything else? Just note that my current
blender version is 3.41 You can see that
down in the bottom right. Let's just have a
quick think about what we mean when
we say low poly. There are quite a few different styles and it's
important that we stick to the same style across all the
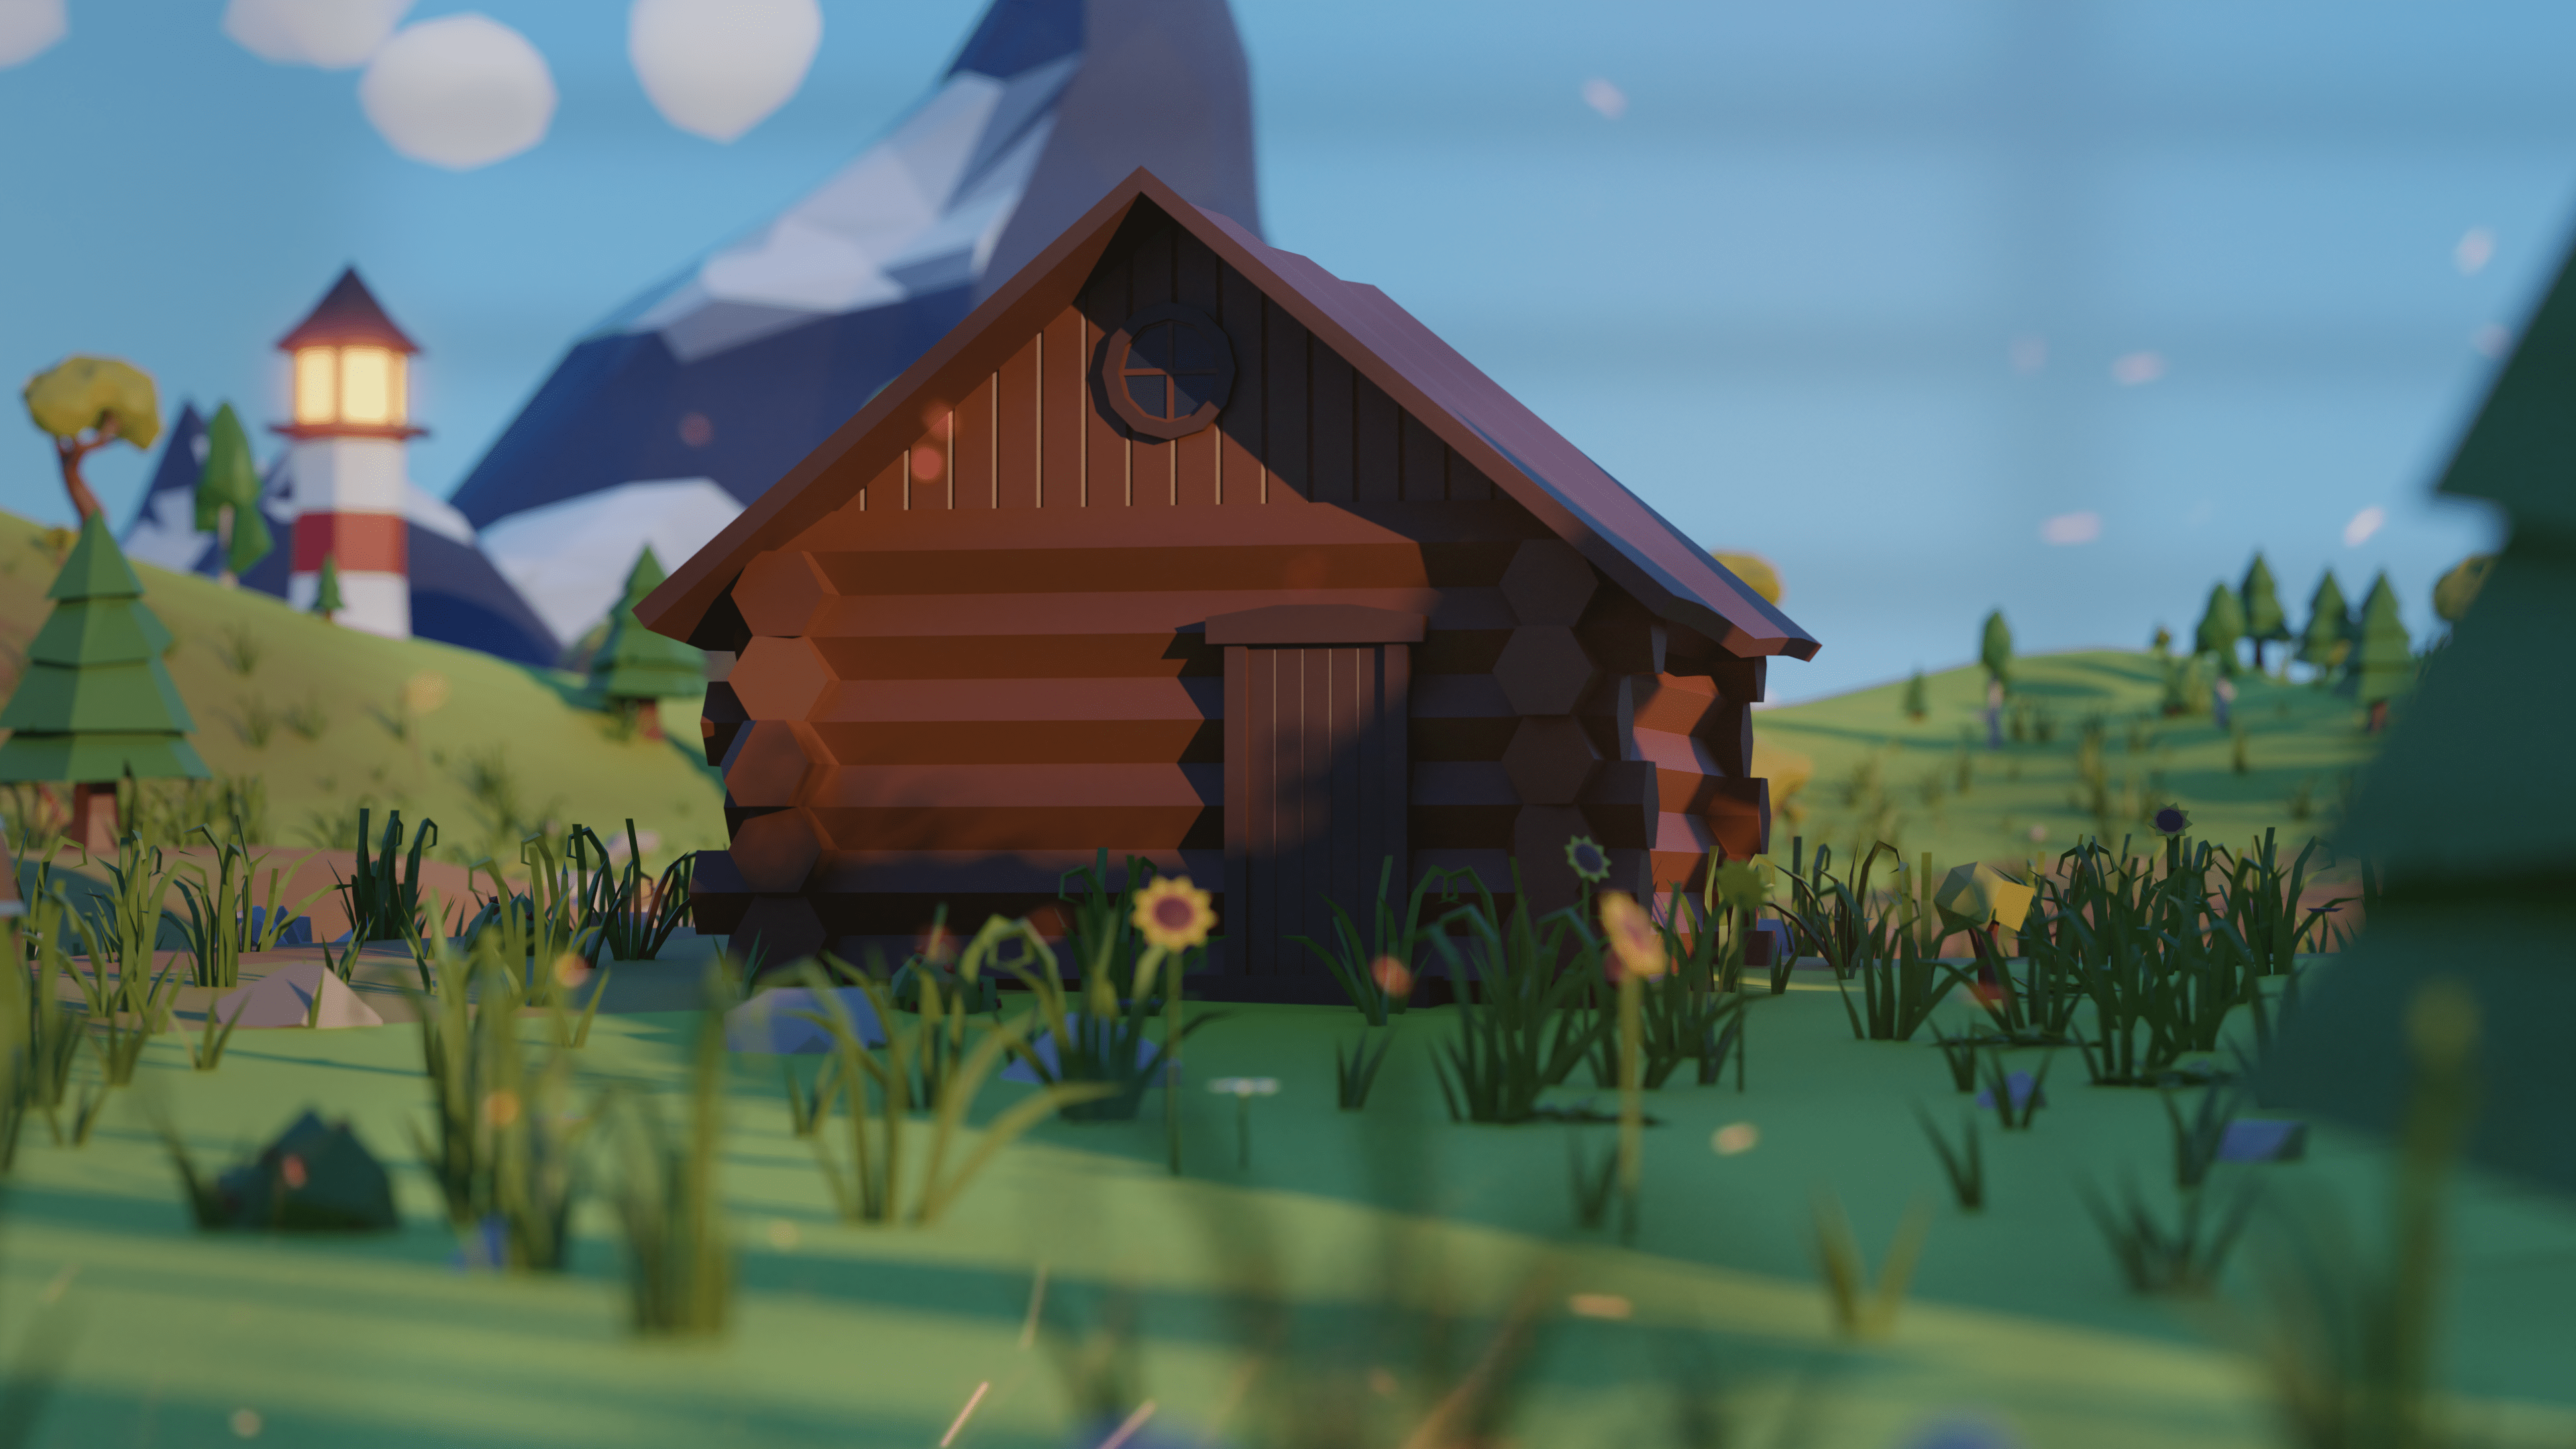
assets in our scene. The style will be going for in this course, It's flat shaded. You can see here is a reference
board of artwork that I like created this in
the program Pureref. Usually whenever I'm modeling, I'll keep this on my
second monitor and I'll be constantly glancing over at these reference images here. The first thing you'll notice is that they're flat shaded. These assets don't have
smooth shading on them, so we've got these
nice jagged angles that really show the form
of the object quite well. Another thing you'll
notice is that there are no textures will be showing the colors
of these surfaces just through the
material base color, which is quite a simple
way of doing it, may not be the most
optimized for games, in which case you might want
to use a color palette. Or some people will use
vertex colors to show color. But using the
materials in blender will do us fine for the
scope of this course. The last thing you'll
notice is that aside from some things
like the water, all the materials
in the scene will have a diffuse surface with a constant roughness
value probably about 0.5 And the same
metallic objects, any metal in this
environment pack will just have as a
gray diffuse material. With our project set
up and ready to go, we can now do
something practical. We'll create the
sky and sunlight for our scene to start out with. I'm just going to go up
here to the shading tab. I would like to create
my sky procedurally, but if you'd rather,
you can always import a HDRI to skip this step. But I just find that using a HDRI like this with
realistic lighting, will look a bit odd
in a low poly scene, this is a shade of
window down here. And we're going
to quickly change this from object to world. And we can see that we've
got our nodes here. These will only change the
output of your world if in this tab you've got this used
No button blue right here. You can create a new world by
pressing this button or you can just added the
default one like I'm going to do to see our world
in this window right here. We're going to need to change our shading model if you hold down the Z key right
now, Material preview. But we can go up to rendered
mode and this makes it gray because that's
the background color that we're inputting into
the world output node. By changing the color of this, we can change it to
like a nice blue color. But this is going to be
consistent across the whole sky and I want to have
it slightly lighter across the horizon and
darker at the top. To do that, we're going to
need to use a gradient node and a color ramp node to assign the colors
to that gradient. I'm just going to
start out here, I'm going to press Shift A and search for a gradient node, or a gradient texture
as it's called. And plug this into the color. You can see everything
turns black. But we just need to
navigate around and you can see this
whole side is black. And it tapers from very dark
value to a light value. It is good. This
is what we want. But of course, you'll
notice that it's sideways and we want to flip it, so it's facing upwards. To do that, we're going to
need to use a mapping set up. These nodes are very simple
and they'll just plug into the vector input of
this gradient texture and show it how
to orient itself. To start out with, we need
to input texture coordinates node, this one right here. And we're going to
need a mapping node. This texture coordinate node generates the initial inputs. And then this mapping allows us to move, rotate and scale it. I'm going to plug the vector, the mapping node
into the gradient texture and I'll plug the generated into the mapping node. You can also use object, I don't think there's
any difference. By changing the y
rotation to 90 degrees, our sky is now facing upwards. For the last thing,
we just need to run this gradient testure
through a color ramp. So I'm going to press Shift
a Search for color ramp. Drag this on this yellow line right here that connects
the two color values. This is just from black
to white right now, but with this key selected, I can go down and
change the color, make it a bit brighter. It will be the color
of the horizon line. Then I can select the top one and make this a
much deeper blue. You can always pan up
to see how it's going to look happy of this radiation that looks a bit more natural than just
having a consistent value. To me, this looks like a sky now layout, we can
add a sunlight. I'm going to press Shift A, go down to the lights
and add a Sunlight. We don't really
see the effect of this until we've got another
object in the scene. We can always change it later once we've started modeling. Now I'm just going to
add a monkey head. This is one of the primitive
objects in Blender. And of course, it just changed my air shading
model to rendered. This is already
looking pretty good. Remember that you can move your sun around and use this
little yellow light right here to show which part of the surface you want to be lit. I'm quite happy with this. I think we can
start modeling now. I'll move this sun up into
the set up collection. Just quickly change the color. Actually this is
white right now. Just make it slightly
yellow, orange tone. I can delete the
Susan monkey head. This is the end of
the first section. In the second section, we'll start looking at
some of the models.
3. Creating Low Poly Rocks - Part 1: Hello everyone and welcome to the second section
of the course. In this first modeling video, we're going to be doing
something quite simple. We'll be creating
some different rocks using various techniques
to use in our final scene. The first technique
is quite simple, but a lot of blender
users don't realize this modeling technique
is available in a software to start out with. We just need to add an object. I'm going to press
Shift A and add a cube. We can change the size and origin later on once
we finish editing it. Now in edit mode
by pressing Tab, make sure you have
everything selected. Right here, you can
see this button here will usually
be the knife tool you need to press to have this tool bar up on the side.
Make sure you've got that. If you hold down on this,
you can drag down to the bisect tool now have
everything selected. You can drag a line
onto the object. You can use this arrow to slide it up and
down on its normal. This acts like a two D
plan in three D space. And we need to change
them to the settings, so see the Cl in it looks like it's in this
case sometimes it's outer. Depending on which
way you draw it. I'm going to click in and
I'm also going to tick fill here by using lots of
these bisect tools. Using the same tool addive, we can just drag on multiple onto this object to make
a rock shape right here, you notice that this
one didn't quite fails because I didn't
select the whole object. After I'm just
going to control Z. Select everything by pressing A and I can start
drawing on lines. Again, this make sure
you fill each time. I'm not being too precise here, keep forgetting to
select them all. I'm just going to create
the rough shape of my rock. Try to create
something interesting, slightly organic shape,
not entirely predictable. Just let this. And something like this looks quite jagged, this would be nice in a forest
or maybe a mountain scene. Not so happy with this rock, I'm going to select everything. I'm going to press Tab
to go into object mode, and I'm going to recalculate
the origin to the center of the center of mass of
this new object because it might have changed when
we were cutting parts away. To do that I'm just
going to write click, go down to Set origin and choose center of mass,
surface or volume. Once this is done,
you can see now this actually looks like it's in
the middle of the object. So when I rotate it, it's
a bit more believable. I'm just going to press Shift
and selection decursor. This is now in the
center of our scene. When I'm working on
this asset library, I'm going to try and
space everything out. I'll have all my rocks
going along this line. Then I might have some
trees going along here and various other
assets the same way. First, I'm just going to scale
it down in edit mode bit, because I'm assuming
that each of these squares are
going to be a meter. And I want this rock to be a little bit smaller than that. Now using these techniques, I'm going to create
another rock right here. To do that, I'll just open
up the panel using the key. Go to the view tab and I'm going to
change the y location of my cursor to 1 meter. Now if I had another cube
here, scale this down a bit, I can start bisecting
here to make another rock using the
same techniques as before. You get quite quick, doing this is a very efficient method. In this case, I
accidentally filled the L, supposed to clear the
outer just like this. I'm quite happy with how this is looking and tried to get a
variation of size as well. So have some large rocks
in some small rocks, and make the smaller rocks
a little bit more simple. We don't want the polygons, we don't want as high polycount as the slightly bigger
rocks like this. I'm quite happy with
how these are looking. The nice thing about
this is that we get faces that have
more than three sides. I found a lot of
people's low poly work tends to just be
consistent of triangles. And it looks a bit boring
sometimes. I'm happy with this. I'm going to reset the
origin the same way. Reset it to the surface. And I'm just going to
press shift a selection to cursor to put it back
where it was meant to be. I want to make it
time a bit smaller. So I'm just going
to scale it down in object mode and in control a. To apply the scale. What I'm
now thinking is I've got these two rocks that are similar shape and size. I
want to create a couple. I'll be using this
technique just like I can have in piles or
clumps, rounder ground. Because these are
going to be smaller, the density of polygons
is going to be fewer. I won't have as many bisects. You'll see what I mean when
I start modeling Again, I'm just going to
slide my cursor along to 3 meters or 2 meters. Just place it right
there. And I'm going to add another cube. Just scale it down
a little bit here. Using the same technique, I'm going to try to aim for a lot of fewer bisects
than I had before. Really only enough to make
it distinguishable from a cube that you may find it easier to start out with a different
primitive object. Once again, I'm
just going to reset the origin to the
center of mass. Move it back to the cursor
just because I like having a pivot point where
the object origin is, But this isn't essential. Move my cursor along again, just so I've got
about four or five of these. Move it to 3 meters. This time I'm going to add
a UVs and start bisecting. The reason I'm using this
is that I don't end up sticking with any of these
faces that come with the cube. For example, this top face here, I believe, is pretty much
untouched from the start. It just means it's not going
to be cube like at all. I think I'm going for some quite sharp jagged rocks
in this scene. We're getting there, I'm like
a look at this one again, just going to go
through the same steps, set origin to volume or surface, and then shift this,
place it on the cursor. Here we go. I've got a good
selection of rocks now. I might create some more
using techniques later on, but for now this
should be good enough. We're going to move on to the next method for creating rocks. I'm just going to
place my cursor here. I want this array of
rocks to be going along from this
position right here. I'm just going to
increase the cursor x application to 1 meter. At this time I'm going to cube object scale
it down a little bit. I'll add a subdivision modifier appear on the modifiers tab. Going to add a subdivision
surface modifier increase a few times and we're going
to start a sculpting this. Now quickly apply modifier and go up to the sculpting tab. For this I'd like to turn
non dynamic topology just so I don't have to worry about polycount wasn't going. Maybe you can use to change your brush size and play
around with some of these different
brushes as well like the creased brush and
the flattened brush. However, we can use
a decimate modifier to remove some of the geometry that we've got to make
it more low poly. So a lot of the details that you sculpt on are
going to be lost. Don't be too precious with it, just trying to get
the basis down. You can see him using
this flattened brush a lot to try and adjust
the fall off here, because this is
too smooth for me. I'll try constancy. If this looks good,
looks a bit better. This flattened brushes
really looking nice. And now I'm going
to come in with this multiplane scrape brush. Just get some nice
corners on here. This is looking very organic. This looks almost
quite wind swept, something you could
find in a desert or a canyon. I'm liking
the look of that. So once finished
sculpted in this, I'm going to go back into
the layout tab at the top. Going to press, we're going
to add a decimate modifier. We should see it to generate. You see that if I
drag this issue back, it starts procedurally
reducing the polycount. It does quite a
nice drop of this. You can change these
modes at the top. Unsubdivided is usually
used as it says, unsubdivide something that's had a subsurface modifier
being applied to it. So we can see how that looks Probably won't do anything for us right now just on
collapse or plan as well. And this does it by angle, so it will create rocks similar
to what we've got here. It doesn't always
aim for triangles. It will create lots of flat planar engons as
well, which is quite nice. It creates a similar
result actually to the rocks we've just made fan. You get a few artifacts when
using this mode sometimes. So I'm not the biggest fan of
it, it's still quite nice. I'm just going to use
a collapse mode for these rocks and drag this
down a little bit more. Now, we don't actually
need to apply these modifiers until we're absolutely finished with them. If we're going to be working
entirely in blended, we never actually need to
apply these modifiers. So I'm just going
to leave this here. And I'm going to slide my cursor along again on the y axis by 1 meter and start
sculpt in another rock. Using the same technique,
I'm just going to add primitive object, just a cube, and subdivide
it a little bit. Here we go, Subdivision
surface, and scale it down. Apply the modifier, because I'm probably going to use this to create the next series
of rocks as well. I don't have to do all that
process at start again. I'm going to press shift D, Y and then type in 1 meter. There's a short cut
and blender shift R, which just repeats
the previous action because I duplicated it
and move it as an action. Whenever I press shift, it
will just keep arraying the. I only want about
four or five for now. Here again, I'm going to start sculpting some of these ones to create progressively more
simple and smaller rocks. Then you'll be using very similar sculpting brushes
to what we used before. I find that I naturally get
more sloppy as I go on. So once I've created a
couple different rocks, then I start to not give as
much care to what I'm doing. That's why I always
like to start off with the really detailed ones
that need a lot of care, and then eventually
the smaller ones that will just be
a few polygons. You don't need to be too
careful with this one. I haven't even bothered
enabling dynamic topology. We'll see how it looks. Back in the layout
tab, I'm going to add decimate
modified to this, drag the ratio back like
how that's looking. I'm quite happy
with that. I'm just going to drag it a little bit further and scale it down in mode because it's got to be a little bit smaller
than the previous rock. I might play with
some of these scales, just make sure that if you scale something in object mode, hit control A and apply
the scale. There we go. It's going to do the same
with the remaining rocks. These ones are going
to be very small. I'm not going to add
many details because any details that I do
add will probably get taken out with the
modifier that we've got. Remember that if you
would rather not sculpts, you can always go into edit mode and use proportional editing. We use this at the top here. It's currently on
the smooth falloff, I can just select a vertex or lots of vertices and just
drag them around like this. If you prefer polymdeling
to sculpt in like me, you may be better off with this workflow that I'm going to add another
decimate modifier. It's going to be very
low poly at this point. I'm quite happy with that.
Lastly, for this one, which will be pretty much
about the same size, in this case, I might not
even bother scraps in X. It's just going to
be round anyway. I'm going to really
reduce the size here. Make sure I turn off this
proportional editing and added decimate
modifier to it. I like the look of that.
You can imagine this just being like a little pebble or stone that we find in
the forest somewhere. Now, because these are triangles like this one right here. If I were to select this
vertex and move it around, we're going to start getting
some shading issues because these are ends triangles. It's plan, you see this
face is completely flat. If you move it off to
the side like this, it'd be quite difficult
to flatten out Again, I'm just going to
leave this how it is, because these ones
are all triangles. There are no flat
planar engions in them. We can apply the modify, just move around some
of these vertices. We're not going to
get any shading issues or lose any details. Just to fix a couple
of these things that I don't like that's
looking good to me. That looks like we've got a good collection
of rocks right there.
4. Creating Low Poly Rocks - Part 2: Another type of rock I'd like to make is some little
paving slabs. I'm just going to
move my cursor back and move to the x axis on two. I'm going to create
a cylinder for this, add mesh cylinder and
just scale it down. And I'm going to
use the bicectal to create some of these
edges going around. I don't want it to be as high poly as the actual cylinder, I don't want this many
vertices going around. This will be quite nice
for a forest floor. Once again, I'm going to
go into edit mode and use this Bicectal try and work quite quickly here for about seven or eight
different cuts around the outside to
give it its shape. We still want some
polygons there. I like cars is looking. Just going to skull
this down a little bit. Reset the origin as
well and place it. The center pivot point
is on the cursor. I've got that paving slab. I might just quickly create another one of these,
but this time, instead of recreating
it from scratch, I'm just going to duplicate
it on the y axis by one. And I'm going to come
on with the knife tool. We'll be using this tool to fix up some of these rocks as well. Just add some little
chipping and details that we like to do that. I'm going to go into edit
mode and I'm going to press K and I'm going to start
drawing some damage on here, just some little
cracks like this. Doesn't need to be too precise. Then I'm going to come in and dissolve some of these edges. And join these vertices together can create some quite natural weathering our objects
that we've got right here. I'm going to have this one look, one of these looks slightly
more damaging than the other. I'm going to go in this time we're just going to
bisect something. Think might look quite nice actually just get the
right angle. There you go. I like how that's looking. Now if you go in here, this face right here isn't
perfectly plain. Now it's actually
quite distorted. But blender makes
the faces flat. If it's on like a quadrin engon, that's an important
thing to note here. We could just drag this vertex
along the edge right here. It's not perfectly precise. We'll also be going to use
flat shading for this. But if you want to make sure some of these faces
always look right, you can come down here and enable smooth
normals right here. Make sure you click
and shade smooth. You'll just need to drag this
angle down a little bit. 1015 degrees will be good. For now, we won't
notice any difference. It'll be a bit more
clear on this one. If I quickly shade this one
smooth and enable to smooth, you can see the
blender blends this bottom two faces to look
like one right here. Whereas if I drag this down, it looks like about ten
degrees or 12 degrees, it starts to separate
it into two. That might be useful
in some places. Right here on this
rock, I'm going to go into edit
mode and I'm going to use a knife tool just to
create a couple of chips. This, I'm going to dissolve
this edge in the middle, and I'm going to join these
two together by pressing J. That looks quite natural to me. I might just edge, slide
some of these around though, because I want to
make the gap bigger. Yeah, it looks a bit
more natural to me. I'm going to do the
same on this rock, especially if you've got a pile of boulders next to each other. It looks like they've been
falling into each other and chipping away at each
other over the years. It's a nice little touch. I'm quite happy with that. Once I've got this
collection of rocks, we're going to need to rename
them and organize them. Currently, they're
just sitting in my archive folder
here because that's just a collection I had
selected when they added these objects. But
we don't want that. I'm not going to put
them in a work in progress collection because
we pretty much finished them. I'm going to move them down
to a rocks collection. It doesn't look like I've
got one under scenery. I'm going to create a new
collection and call this rocks. Then I'm going to move
all these down into that collection I haven't named. I'm going to call
this one jagged rock. It's important to stick to
the naming convention here. I'm using a camel case, which means I've
got up a letter for the start of each word and no spaces or
underscores between. And this is ideally
how I'd want to do it, especially if
you're important to game engines like
Unity or Unreal. A lot of those won't want spaces in the names
of your objects. I'm just going to call
this jagged rock one. I'm actually going to select this and hit control
C to copy it. Once I've renamed that one, it just makes it easier to
rename some of the other ones. I'm going to come up here,
hit control jagged rock two jagged rock 3.4 It
doesn't take too long to do. Ideally you'd name them
as you're working. This one right here,
I'm going to call this smooth rock or round rock. Copy this, this will
be round rock one. To quickly rename
them, you don't have to go up here
to the outline. You can just click
on the object, hit F two on your keyboard and type in the new
name that you like. It saves us quite a
bit of time here. You could put all these
in separate collections, have a round rock collection and a jagged rock collection. But I'm quite happy with this number of
objects right here. I'd rather just be able
to see them all at once. Call this one stepping stone 1.2 I've only got two of
these stepping stones, If we're going to have
a big line of them, you might some of
these repetitions. But what we can do for some of these is like I copy these ones, we're just going to shift, move them and rotate them on
the y axes by 180 degrees. I just place these
ones upside down. It looks as if they're
completely different objects. That's important to
note, but I'm just going to delete these
new ones for now. I think we've done a good
job of categorizing them. One last thing to do is
add a material to these. I'm going to go up
to Rendered mode. Currently, they'll
be white by default, so I'm just going
to select one of these under this Material tab right here. I'm going
to create a new one. I'll just call this gray rock. I'll try to use this material across all of these
objects right here. I'll just give this like
a slightly brown value, something that can always
change this later in the scene. That's one nice thing about
using these materials. I'm happy with how
that's looking. We want to assign this material
to all the other rocks, but selecting them and going through and selecting
the gray rock material, every single rock can
be quite laborious. Instead, we're just
going to select them, make sure we only the rock
objects that we need. And we have our yellow
selection in blender. We've got all these selected, but then we've also got
like our primary selection. This is the yellow
one right here. All the rest of orange. Now we're going to
hit control L. I'm going to link materials. You can see that
that just copies the same material slots
that we've got on this object to every other one. Remember, just
because we're using the same gray rock material
across every single rock, that means that we can change
the colors right here. It affects every
rock in the scene. But you could create a separate gray rock that
you could create like a black rock here and
have that as a volcanic one and have that as
just a select few rocks. But for now I'm
just going to give them all the same base color, so increases a little
bit. There we go. We can always create some
more rocks later on, but for now I think that's going to cover it for the forests, plains, and the
desert that we need. Desert like an ocean or a beach. I can see these rocks
fitting quite well. In the next video,
we'll start looking at modeling trees using slightly more complex
modeling tools.
5. Creating Low Poly Trees - Part 1: Hello everyone and welcome back. Last video we created this
group of rocks right here. This time we're going
to create some trees. I'm aiming for about four
different varieties of trees. And we'll do a couple different variations
within those types. There are about two or three different techniques
that we can use. First off, it's
important to outline the differences between
different types of trees I want in the scene, and I just got to think about the climate we're going
for in this environment. There are two main
types of trees. There are coniferous trees, and these tend to be like your fir trees or your pine trees. These have needles on
them instead of leaves, and they're very narrow
and pointy at the top, they're like a Christmas tree. These don't change color
depending on the season. If you're going for a full
or an autumn environment, then you wouldn't
make orange leaves on a coniferous tree. On the other side, we've
got deciduous trees. These tend to have
a broader grouping, and the leaves are flatter and clump up together
differently. So we'll have to consider
this when we start modeling. Examples include maple
trees, oak trees, apple trees, those kind of
forest trees that you see. It would be a good
idea to load up your reference
board with pictures of not only real world trees, but also low poly trees
from other artists. Just have a bit of inspiration
when you start modeling. To start out with,
I'm going to create a pine tree over here
in the view tab. Just going to slide my cursor
along on the x location. I'll type in 3 meters. I'm going to start off with a profile of about
five vertices. Shift a, a mesh
cylinder right here. I'm going to slide
this down from 32 vertices just down to 56. I'd like to do five because
it's a bit more odd scale this down in edit mode will be like the
trunk of the tree. We want this thinner at the
bottom than it is at the top. I'm just going to select
these five vertices here, drag them up a little
bit on the x axis, and then select the bottom ones. And scale those out
if you want to. You can also hit control
to add another loop going around here and slightly
change the profile. I'd rather stick with a low
poly count and maybe do this later because I'm not sure
if I want to do that yet. I'm just going to select
this top ring right here. And I'm going to
extrude this out instead of dragging up and
dragging down on the Z axis. Then I can scale this
out a little bit. You can see this is going to be the first ring of
leaves going around. Once this is skirt
out about there, then I can extrude upwards, scale in on the z axes and repeat this process
maybe three or four times, depending on how tall
you want your tree to be and how much detail you want. I'll just scale this
ring out again. Now what you might like
is a slight taper, just going to decrease
this ring as well. We want a nice curve
going outwards like this. The height of these sections gets more elongated at the top. I mean, he, once I
finish modeling this, this one will go even
further up than last time. It's going to be
about here when I extrude it up. I'm
quite happy with this. I'll hit M on my keyboard to merge these
invertices at the center. I'm also going to hit the period key on my keyboard and change
this to three decursor. Just thought I can
scale it up a bit because tree is a
little bit too short. This is going to
be about 3 meters to what it looks like just by using these
grids to align it. That means our
character to the head height will be up to about here. Might just decrease
the thickness of this trunk pan in
this ring right here. Changing my mode back
to medium point. And I'm going to see
how this ring looks. I'm quite happy with that,
I think I'll keep it. The next thing we
need to do is add a bit of distortion
in here because this is too perfect and
you're never going to see a tree like
this in row life. I'm going to go
back in edit mode with this top vertex selected. I'm just going to enable
proportional editing up here and drag some of these, increase the size of this
circle using the mouse will. I'm just going to move it
around a little bit like this, creates some nice unevenness. Next thing is if we
select this vertex, actually if we select
this vertices right here, I'm just going to select
this ring and hit control to invert and then hide. I can select one
of these vertices right here with
proportional editing, instead of using smooth offset, I'm going to go down
and switch it to a random mode if I press and on the axis and increase
the size a little bit. You can see that when
I move up and down, instead of moving
everything with a smooth fall off
it just randomly, which can be quicker
than doing it manually, I'll just move these
anywhere like this. And then if I old H I can
bring everything back again. Yount to go too extreme of this. But a little bit can
look quite nice. You're just going to play around with this a
little bit more. I might not even isolate
the ring that I move in. I quite like the look of
moving everything on a tree, especially the stump.
I'll do the same here. Then you can just press to
turn off proportional editon. Come in here to some of these furs bit because they
don't quite look right to me. Let's do the same
with the bottom ring because I think this needs
a little bit more detail. You can go through and manually change some of these rings. A personal touch to it.
I'm quite happy with that. I think our tree is
looking good here. Now, one last knee you can do in edit mode is come
in with the knife to. I'm going to hit
K on my keyboard. I'm just going to click here
to insert these vertices, get in nice shape like this. Press Enter, And then I'm going to dissolve
this edge right here by pressing X
and dissolve edges. And then connect
these two vertices together by pressing
J on the keyboard. That just creates this nice
little notch at the bottom. I'll repeat this a couple
times throughout this tree, just using the knife tool. Here we go. I don't have
to have too many of these. Before we move on to coloring the tree, we finished
modeling it. It's important talk about shading in more detail
than we did last time. I'm going to hold z and drag to solid mode Up here under
this lid drops down here. I'm going to change
from Studio to Mac. If I go under here, I
can select from one of these different
configurations. Might try this one or this one here that
shows the normals. That one looks quite cool to me. It allows you to more easily see which direction
the face is pointing. Right now, this entire
face right here is the same color. That's
because it's play. Now the whole face is flat, even though it's what
we call an Eng on, it's consistent of
multiple vertices. They're all aligned perfectly,
which is great for us. If I move this vertex out here, then this face is
no longer planar. It's connecting all
these vertices together. You're breaking them down
into a bunch of triangles. This is easier to see if
we triangulate the mesh. Just for demonstration,
I'm going to select everything in
a mesh by pressing a, and I'm going to hit control on a keyboard to triangulate. And you can see now it's turned everything in to triangles. This is no longer shaded flat and that's
because one blender calculates an engonehting
controls the to undo, one blender calculates an gone, it takes the average normal
or the average direction. Every single one of
those triangles on the face is pointing
and it evens it out, which is quite a helpful
shading model for us. And we can see the same on
these rocks right here. I'm just going to
select this vertex right here and move it out. If I select everything by
hitting A and control, you can see this now breaks this up into something that looks quite different to
what we had before. That's quite important. Mormon modeling, we
need to make sure that if we want a flat
face like this, all the vertices
have to be planar. We've actually broken
this a tiny bit though, because when I did that proportional
editing to the trees, although the effect
is very slight, some of these faces like this one you can see
is a little bit wonky. They're not perfectly
flat anymore. I'm just going to
triangulate the mesh again. We can see that
back in edit mode, control a just a control. A control. Now if I go into object mode, especially with this
normal matcpon, you can see there's actually
a line running here and this end gone is broken up
into two different triangles. I'm just going to see this, one way we can get
around this issue is by using the shading. Again, it's easier to
demonstrate what I mean on this tree than the
rocks in the last video. The reason I'm bringing this up is because although Blender automatically faces these
goes the same direction, some game engines and rendering engines like Unity or Unreal might not do
that by default. If you're exporting this mesh, it looks fine in blender. In the game engine, it will automatically triangulate
all the end goons. And we'll have some
weird shading here, so you can't always trust
how it looks in blender. If you'd like to export
this to a game engine, my best recommendation would
be to shade it smooth. So just right click
it, do shade smooth. Then in edit mode, I'm going
to sletch all these edges. I'm going to hit Control and I'm going to go down to Mark Sharpe. It's got the blue lines
and basically what Yeah, the blue lines are the
edges of all the face sets. Now, if I turned down all to smooth right here
on 180 degrees, this should be fine
when you export it and then when you
export it as an FBX, go to file export FBX. And make sure that in geometry right here, we're
going to change this. Moving from normals
only to edge. But don't worry about
this too much for now. We'll talk about exporting
later in the course. I apologize for
that boring theory, but it's just
important to get it out of the way now before we finish modeling
everything and then we'll have to go back and
make all those changes. We're going to create
my second variation of this pine tree right here. First thing I'm going to,
saying I've added this under the Rocks collection which
isn't the best practice. So I'm just going to create a new collection
here under Scenery. I'll rename this trees. I'll drag this
cylinder, rename this. Pine tree, much like the rocks, I want to have the
biggest variation of the tree down this end, and then smaller ones are
going along the y axis. So I have like a
little baby tree here, a medium size one
and a large one. This tree is a little bit too small for what I want those. I'm just going to move this by about 3 meters on the y axis. I'm going to create
a new cylinder from scratch with a base of about six this time instead of five
because I want to add a little bit
more detail to it. So I'm going to add
a cylinder again. I'll try and speed model this
one because it's usually the same techniques that
we've covered before. Scale this base down, it's got to be slightly thicker. I can line it up using
an orthographic mode by hitting the pad one. I'm going to try and be
very quick with this. It's important to note
that I've got the origin of the object right here where the cursor is in this model, the actual base of the tree or the very bottom of the
trunk is below the surface. Just means place
it on a terrain, you're not likely to see the clipping of the
bottom of the trunk. This will be a bit more
apparent when we start actually placing these
items on the landscape. I'm just going to continue
modeling this now and it's got to be a little bit bigger than a
previous version. I'm going to go for
about four or five different sections
instead of three. Make this a lot wider
at the basis time. Make quite nice
Christmas trees this way I'll just measure this at the center and then make any adjustments
that I'd like. I'm just going to track this
section down a little bit because I think
it's too high up. You can always use X
ray mode by holding and go to wire frame up
here at the top. Go back into solid view, we can turn on our
little wire frame option that allows us to C
three of the object. Once again, I'm just
going to quickly come in with proportional
editing on smooth, but I can also do is rotate. If I slip this
vertex right here, I'm going to rotate and
get some nice serves. This way can look very Gothic, Tim Burton like if you go
quite exaggerated with this, but I don't be too exaggerated. So that's good. And I'm going to come in with the random mode. So I just change this from
smooth in circulation to random and move this all
on the Zx a little bit. You can see how you can pump out quite a few
trees by doing this, if you just spend one
evening making a few trees, you can build an asset
library quite quickly. And then I'm just going
to come in and break up some of these Fetcs are tool together that
looks perfect for me. And once again I'm just
going to come in with this knife tool tied a few
of these deliberations, the leaves, I'm going to let these vary in size
a little bit as well. It's probably the
most time consuming part of modeling this, but I think the
result is worth it. This one is a bit too high up, so I'm just going to hold
double tap to drag it down, but make sure you do
along these edges wise. If I just eyeball it, then it might end up not looking flat. That's we're talking
about before. That's not a big
difference anymore, but using the shading mode. Just one more and then
once I'm done with that, I'm going to come in and dissolve all these
edges at the bottom. And work in by process here. Dissolve these edges.
And then I can connect all these up by hitting J. I like how this
one's coming along. Probably prefer this
to the previous one that's looking good for us. Now once we've got
this one, actually I'll just slightly decrease
the size of the trunk scale. This in a little bit is
looking a little bit too wide. I can see our player
standing next to this a lot better than before. So I'm just going to
create another cylinder. This one's going
to be very small. I'll try how it looks with
just about three or four. I'll try four. It's
going to be tinier one. And in object mode, I'm
going to drag this on the y axis out about here, which is about five metres. I'll scale these in a bit,
just do the same as before. But this time I'm
not going to have this little section here running around just to make the
polycpncause this sync. This is going to be
a very tiny one. Here we go, I'll
just do a couple of different segments
for this one because it really is tiny. Look at that. I'm going to come in again with
proportional editing on random to see how this looks. I'm quite happy with that. So I'm just going to flatten out this base and add one of these cards
just for consistency. Tool can be a bit
clumsy to work with sometimes. There we go. So I'd say that's three quite decent truths
we've made now. And also the poly
counts very low, so this would be perfect for our art style to decrease the
size of this trunk again. Now it's time for materials. I'm going to leave this Matt move right
here. I'll leave it on. But I'm just going to drag up to the rented tab so we can
see how it's going to look. A default material
should just be like a tree stump color. I'll call this brown
one. Very creative. I'm just going to track this
into the orange part of the spectrum may make it a
little bit darker as well. We can always change this later. Remember I'll just add this
to the other trees as well. Now once that's done,
actually we can select all these in object
mode right here. I'm going to add
another material slot. I'll create this, I'll
call this dark leaves one and change the color of this to be
slightly more green. One thing a lot of
people do when they're creating vegetation is they'll
drag out to a green add, and it's almost blue,
it looks quite sickly. In reality, plants and
leaves tend to be slightly more on the yellow side of the spectrum and a little
bit more of a yellowy green. Just drag this out here and increase the
value a little bit, slightly more yellow than what
you'd expect to mask this. It's easier. Rather than selecting all the faces,
I want to be green. It's easier just to
select the bottom face. Hit control number pad plus
to grow the selection. If you don't have number pad, you can also find that up here. If you go to select and
then select more or less, just like I'm going to hit control to
invert my selection. And then quickly creates a new material slot
because it looks like this is a
different object to the one I had last selected. I'm going to select
from the drop down dark leaves and hit a sign. Once that's on, you can
change it, tell you like. I'll do the same with
this tree as well. Creates a new material slot. It didn't mean to
create a new on the, I'll create a new
material slot and clip this from drop down sign. Then for the last
one we'll do the same. We just got to work. Not hard to see how
quick it took me to add those materials rather that looks like our pine
trees are done. We've just got to make sure to name them. Sensible as well. I'm going to call
this one pine tree one, because it's the smallest. I call the middle one, pine
tree two, pine tree three.
6. Creating Low Poly Trees - Part 2: Now that our pine
trees are finished, I'm going to show you a
different technique that we can use for some of
our deciduous trees. I'm going to move
my cursor along a bit here on a use type, going to change
the x location to about 6 meters this time around. I'm going to add just a single vertex here
and we're going to use something called the skin modifier
to add thickness. To do that, I'm going
to press Shift A and going to create
a cube Edit mode. If we go to select mode, select everything, hit M
and merge at the center. That's just a really quick
way to add a single vertex. Once that's done, we're going
to extrude this upwards. We can just create the trunk
of the tree like this. It's nice to add some
little spiraling, some curvature
carried to the tree. If you want to add
some more segments, you can either
select two vertices and subdivide them like this. Or you can just select
the vertex and hit control shift bevel vertex.
Can't really see anything. Before we've got
the modifier on, I'm just going to go up
to the modifiers tab and add our skin modifier. As you can see, it creates like a quad mesh going
around what we've got. Whenever I extrude
it out, it's cool, it's almost like it turns into an organic figure rather than just a straight
line of vertices. Can I also just drag
down a little bit? It's going a little bit
below the origin point. That's nice. Right about here. I'm going to fork
this off into 21. Nice thing about a
skin modifier is it handles intersections
really well. You can see here, this
joint actually gives us a really good quadropology
you wouldn't expect to have. I don't see it.
Another way of making this again, it looks so nice. Problem with this is
that the thickness is all even across this trunk. Right now where we fix that is just by selecting
any verses you want. And we're going to hit Control, a drag in and out. Sing up here to edit mesh tools that might
be under item or tool. Let's try drag in and
out, and here we go. This is the value of change
in the radius right here, when it's set to one, it will be this thickness right here at the bottom of the trunk,
which is perfect for us. If I hit control and
slide in and out, you can see this value changing. I'm just going to
skeleton a little bit. It's thicker at the bottom of the trunk and
thinner as we go up, especially after a
joint like this. I'm just going to move
these around a little bit. Still not 100% sure what
shape I'm going for. I think I'd making
this like an oak tree. I'm just going to
scare it in like this. Give it a nice figure. Mayb, you can just
hit extrudes quickly. Drag out new branches
like this and then scale in those branches. That's pretty good to me. Maybe we don't want
to go to nuts with the pod count Still try
and keep it reasonable. What we could even do
is merge these ends, the tips of the branches. If you want to make these sharp, you could just type in here zero for the radius
on both the X and y. But just think about how
this merges together. Once we apply this
skin modifier, we just need to
check that the ends mergethn't have four separate vertices
in the same location. You're just going
to type in zero. I'll do that once I
finish modeling them. This will connect the
very nicely to the leaves that begin to create using some different
methods over here. I'm just going to change this
to the lasso select mode. If I shift click, I can just drag all these first
as right here, make sure I don't miss any. I got that one
selected by accident. Then I can just a value right up here to zero called the sharp. Great. That's the largest tree
that we've got right here. I'm going to now create
another 11 quick way before we added a cube. And then merged all
the diversities to the center to get
the single vertex. If we enable the
extra objects add on, we can go down here under me. If we then go down
to single vertex and we can add a single vertex. Got this and forgot how to
enable it, just go to Edit, Preferences, add ons, and
type in extra objects. And just make sure
you've got this Ted, I'll just move this on the Yx, make sure I'm in object mode. It moves the origin as well. Let's move this on the Y axis
to about the same point. There's this medium
tree right here. And I'm going to try
and be really quick. Few just extrude out some of
these at the skin modifier. This has got to be a little bit shorter than the one before. So I'm just going to
select everything here, this with A and increase
the L, decrease of fitness. I'm going to have the
diversion point be a bit lower down than
the previous one. I like the way that's
coming together. This can be quite therapeutic. I found I'm just going to quickly change my shading
mode right here because it's hard to see things when
I'm in shaded view. As nice as it is to look at,
it's not very practical. So I'm just going
to change back to solid instead of
normal right here. I'm going to go on a
Mac cap and choose this little red clay
looking one right here. And then under these
settings again, I'm also going to enable cavity and its from screen to both. It's just a lot more helpful
to me when I'm modeling, but that's my
personal preference. You can use whichever shading configuration you like most. I'm just going to set all these tips and
set the weight to zero a Once that's done, just going to do very same thing again for the final time. To add a single vertex, Just track this
down a little bit. Add the skin modifier
the way this is looking. That's great, I just
track these zero. Once that's done, we just
need to add the leaves. I'm going to add the leaves
as separate objects. With my cursor where
this one is right here. I'm going to show you a
method for creating these, these using a technique that not many people
are aware is in Blender once again as a separate object going to press shift A instead
of adding a mesh. We're going to go down
here where it says metal balls and we're
going to add a ball. These can be very fun to
work with in Blender. If I just go into edit mode, I'm going to s this
red ring right here, this green ring in the center. Maybe scale this in. You can see how this
changes the size. If I just press, I'm
going to shift to duplicate this and place
another one next to this. And you can see how
they join together. So this green one right here is a bit like working with
water droplets, I suppose. The green one
controls how much it connects to the other
nearby metaballs, how much it distorts
itself to be closer to it. And the red one controls
the size of it. This is just like the scale. This is how connected
it's going to be. So you can see if I slip both the green ones
and make very big, it's almost as if they want to be separate but they're
still conjoined. Yeah, these can be very
fun to work close. I'm just going to di
the outer one for now. I'll move this in place
up here somewhere. Just like this we can
use to model the leaves. Just make sure you change
the scaling of some of these scaling is
a bit different. I'll shift, duplicate
this one again. Join these branches, make
sure they're connected. Because we don't want
these sharp ends to show. I want these to be clouded by
the leaves. Where possible. This doesn't look
very nice to me. I'll scout this one quite
a bit. See how this looks. This is a very quick
way to make objects. You could also use this
for creating rocks, but it's not my preference. I'm a big fan of doing
it that way right here. I'm just going to decrease
the size of the green one so that it morphs more into the shape of this
cluster of leaves right here, because this is very round. Once again, I'm just going to duplicate another
metaball right here. Scale it down a little bit and decrease the size
of the green one. You see how this makes
the shape a little bit weird, but that's
what I'm going for. Yes, meta balls in blender. I love working with meta
balls once you learn to make it look right
and I'm not going to cover all of the space above
the tree, just some of it. It's still got its own
unique sort of shape. Something like that. I like
the way that's looking. If we go down here
to the metabal tab, you can see we've
got this resolution so we can increase the size of the san bittle
bit higher res. I like that looking then. This is a metabal
object right now. But I can convert this to a mesh object just by right clicking and doing convert to mesh
like any mession blender. You can see this
polygylittle bit weird. I'm going to add a
decimate modifier to this would be used before
just trying to look for where it is
decimate modifier and I can drag in
the collapse ratio. Like this, get something
a bit more low poly, It's looking very good to me. I like that. That's how
we use metal balls. And then we can also
shade this as flat. Shade flat, then just come in and use
proportional editing to fix up some of these parts. I'm not quite happy
with how they look that's got a
random mode on it. I'm just going to change this to smooth just to flatten
out some parts of it. I prefer the way that's looking.
That looks quite fancy. I'm sure I was aiming
for an oak tree. I'm not quite sure if this that ended up looking much
like an oak tree, but I came out nonetheless.
I'm happy with that. I'm going to use
the same process to create the leaves for
these trees as well, just to keep these
as separate objects. This would be like the leaves
and the trunk for now. While I'm modeling it, there might be some
changes I want to make. It's easier to keep it as two separate objects. I'm
going to select this trunk. I'm going to press Shift A
shift, then cursor selected. If I add the object
where the cursor is, it just basically centers origin to the same
as this object. Once again, shift a
metabasI'mjt scale these in a little bit to create the shape of
this tree, right? Tree leaves go down and
increase. You put resolution. Yeah, looking great. Just try and change the
silhouette a little bit. The tree leaves have
got a different shape. We've got very few,
amount of varieties here. We've just got three
different growth stages. I want to make them
all very diverse. I like how this cluster of
trees is separate from that. Coming off this branch
has a bit of character. I've got proportional
editing turned on, so I think that's been
tripping me a little, but make sure you turn
off that if you're not using it go. Once that's done, I'm going
to convert this to a mesh. Again, actually, I might
increase the resolution before I do that. There we go. Convert this to a
mesh and then add my decimate modifier.
Shade this flag. That's looking quite
nice. Once again, I'm going to leave this
modifier here unapplied. And that just means I won't
make any changes to it later. I can do so without committing a permanent
change to the project. Just going to come and do some
proportional Edison again, I like to flatten the top. It's almost like it's
tapering inwards. I like the way that looks, looks almost like a
acacia tree here. I'm not sure why I like it. There we go. Just track this
out a little bit because looks like it's showing
the inside branch let go. Perfect. So now we
just need to do the little one place
shift S place. My cursor just select you
once again, addmtable. Get very efficient
at doing this. Convert this to a mesh and
add my decimate modifier again. And shade smooth. Shade flat, sorry,
not smooth, perfect. I'm just going to
set everything, Move it down a little bit. That's these trees
done. Whether these look like oak trees or
not is a bit debatable. E, I'm going to call
them oak trees, so I'll just let
this trunk right here call this oak three. Copy and paste the
oak word right here so it's easy
to re these ones. 2.1 for the leaves, I'm just going to call this oak leaves three and then two
on one. There you go. Just quickly rename all please. If you want the leaves to
follow around where you move, the trunk can just
quickly parent them as well. The leaves in the end. Trunk control object. Probably join them together
as an object later on. Anyway, we can just
do this for now. I was working on them, there's
no harm in doing that now. We also need to add materials. I'm just going to get to
shading mode, the same trunk. Once again, we can use that, a little linking trick as well. So I set all the trunks and now I can select this
tree right here. I'm going to hit control
L and link materials just copies a little
brown, doesn't it? It's also got this dark
leaves material slot here. But I don't think anything's
actually assigned to it. Now for the tree leaves, I'm going to create
a new material, actually base it off
the dark leaves. I'm just going to
select the dark leaves. And then I'm going to hit
this little seven button here just to turn it
into a new version. Instead, I call this leaves might meet them a little
bit more yellow color, a little bit brighter or darker. You play around with the color. See what it looks
the most, right? Just change it till
you be happy with it. Then I'll add the same material to the other leaves as well. So just let these two first. This one, it's number three, it's got this yellow outline. And then just hit control
L and Think materials. And then we've quickly copied the materials to
the other trees. There we go, That
side oak modeled.
7. Creating Low Poly Trees - Part 3: Another tree I'd like to make here is a silver birch tree. One characteristic
I like a lot of these trees you see is
that they've got a small, very tall but thin trunk and end branches coming out from that. I'm going to reset
my cursor again. Just press shift cursor
selected to place it here. And then I'll just drag
it out on the x axis. A little bit about here, we're doing 9 meters. I'm going to use the
same technique as before to create the trunks, I'm going to press
Shift. Just add a cube. In this case, I forgot about
adding a single birth. To merge this at center
and I'm just going to extrude upwards on
axis to about here. It's probably going
to be one of the tall trees, That's it. And then I'm going to
add skin modifier. Again, to go back
down here, modifier, add our skin or control a to scale it in a little bit
at the top and at the bottom. Then along this I'm going to
subdivide it a few times. I'll hit subdivide right here, actually just before this, scale this in a little bit here and control A. There we go. I'm going to go into
this at L x ray mode, so I can see the
vertices in the middle. I'm going to click
and subdivide. I'll add in maybe
three or four cuts. These are going to be branches
that extrude out like this, just like this. You can see how this is
a very different type of trunk than what
we've got before. This is quite an organic curly one like the look of this one. Turn off the tray mode
to create the can use. That's a little bit
simpler than metaballs. I'm going to press
Shift right click to place my Custer here at
the end of these branches. Then I'm going to add, I'll do an add. An acosahedron increases
subdivisions up to three. So we've got a little
bit more geometry. I'll just scale this in a bit. Slate, this vertex at
the top right here. I'm going to turn
on proportional editing and drag this up. Let's give it a bit
more of an egg shape. You can just go in and freestyle it a little
bit more as well. Once that style, we're
going to duplicate this and just add this
to all these branches. Maybe drag it inwards. So more of the tree right
here we've got as you know, is one to move this vertex. I want the proportional
editing to only apply to the region that
the vertex is connected to. I don't want it to also move this cluster
of leaves up there. And the way we can
do that is just by checking connected only. This fixes the problem. Let me go, I'm liking
to look at these trees. Depend it looks quite nice when you merge it
with the trunk as well that you can play
around and experiment. Trying to add your own
characteristics to your trees. If you don't like what
I'm doing to mine, we're just going to
duplicate this and then add a larger one at the top that connects all the other clusters together
a little bit like this. Then what we can do is, first off, we need to
join these together. Because if we just add
decimate modifier to this, decimates the, these
segments connected to. So if I drag this all the way down to the very
lowest I can do, you can see it still
keeps them separate. Yeah, mesh these together. But actually now I'm
thinking I quite like how it looks when it's separated.
Definitely like that. Look. Stick with it. But we'll show how
to do it anyway. Just going to quickly hide
this decimate modifier or actually and delete it. Instead, we're going
to add a remesh. This is very useful
for sculpting. I think that's probably
the time I use it most. And it's a Vauxhall remeasure. It creates a bunch of
cubes in three D space. If you've got different objects that collide in the same space, rather than using a
Boolean modifier, it brings them
together and you get a nice seams between
them as well. And you also have
a quadripology. This is better than
using a Bulean modifier. I was going to add
a remesh and then add the decimate modifier. After this unsubdivide, the
effect is quite similar. Actually, you can choose
whatever looks best for you. So I'm just going to add
another one of these leaves. I'm just noticing now my
cursor is at the wrong spot. My cursor is where I
added that first object. I'm just going to place
my cursor here to the origin of the
trunk by pressing Shift cursor to selected. And then with the leaves
selected right here. I'm going to right click
and do set origin to three decursortrigin
three decursor. It looks like it
changed the geometry probably because of this
re measure that I've got when I changed the origin point then
it disrupts that. But don't worry, it
looks okay to me still. Then I'm just going
to sl this trunk and move this down a little
bit below the cursor. That's something I
just noticed now. It's great. With this set up, I'm just going to do
the same thing again. I'm going to quickly add
a mesh single vertex. I'll drag this out on the Y
Xs by about two this time, say a little bit
closer together. I probably won't create three variations just
because I'm worried about time and I'm also not sure if I want another birch tree. Once that's done, I'll go into a vertex mode and we're going
to extrude it up again, portion editing on right now. I'll drag this up to
around about here. I was just thinking about where the top is
of the other tree. Yeah, around about here.
Add my skin modifier again and just scale it inwards. Little bit thinner. There we go. I might only subdivide
this a couple times, this time just like that. That the way that's
looking this time, I might even leave
this branch coming off as it is without any leaves connected to it. I'll see how it looks. I can decide later. And also, it looks like I messed up my, my origin when I
was moving this. That's something I need to
be a bit more careful about. Just going to move my cursor
on the y axis by 2 meters. And then right click set origin to three decursor to fix this. That's corrected it. I might be fussing about this
a little bit too much, but when it comes to actually
placing these objects, it will really
become problematic. If the origin isn't
in the right space, that little orange dot right
there should always be in the correct
spot. That's done. I'm going to add
the leaves again, come down icosphereedit mode. I'm just going to
use my proportional editing to place this wanting a bit more
lazy of this one, but I think with the decimate modifier
I'm not going to notice any of the small
details that I had. So just ske this in that that now add my remeasure
and decimate modify right here that locate to me that's just a
really quick way to create these
birch trees as well. That's another variation. Our forest is coming
along quite nicely. Going to quickly
rename these and add materials so called the silver
and silver birch leaves. Silver birch leaves. I'll
do the same for the other one. There you go. Once again I'll just
apparently to the trunks. Just let that so that we can
move them and as follow. Now for the materials
I'm going to put a slightly different
material on this. I'm not going to
use a brown one. I can create a new
material here and I call this silver birch trunk. I might make it play around
the different colors. I was debating whether
to make it slightly blue or not, but I'm not sure. I'll just leave it
around about this color. I'll put the same on here and I'll create
new leaves as well. Just because we
might want to vary the color of the leaves rather
than using the same ones. I call the silver birch
leaves happy with that color. I just use the control
L link materials trick again to add them
to this birch as well. Remember, if you're going
for like an autumn time, I find these trees look
really nice if you give them like a red, orangey color. But I'm going for like a spring, summer season, so it doesn't
really feel appropriate. I might still do it though,
just because it looks nice. We'll see, and I've given
a nice silver color. Now what we can do to
go into edit mode, I'm going to save as
increment this file because it involves me
applying this skin modifier. So if I want to make changes
then I can't go back. I'm just going to put the file, precious little button
here to increment A 003. Both of these, I'm just going
to do it one at a time. I apply this modifier and then edit mode to delete some of this actual
go that it's given us. Be it's given us
quite a few loops. We don't need hit X and then dissolve edges.
That's the point. Naturally we might need to go through and encourage some of this because it's this increase in a polycount
beyond what we need. Just like that. Then if I can select these
faces right here, I'll, I'll give
them silver bush. This will be like a more
black color right here. I've got my reference material
up on the other screen. I'm seeing what I want to create and I like the
look that's having. I'm just going to go through and at some of these details. Because these silver birch
trees almost look stripy, it increases the polycant
tiny bit. But it's worth it. You could use
textures to do this, but I didn't really
see the point of that. Sometimes you can create these details, use
natural geometry, and just give them separate
materials out of its ness. Once that's done,
I'm going to put it into a scene for
the other trunk, and then I think it will
be finished for this tree. We're going to apply
the modifier again. Click Play. Get rid of
some of these extra loops. We go through this properly
at some point now, I'll just delete
these ones and then I'll add some details with
the tool, the knife tool. And what I'm doing here that you might have not just a quick way, if I'm in vertex mode. Edge mode, when I create
my knife selection, quickly select into
vertex mode gives you the right geometry that you
need to apply the material. I'll show you what I mean
the next time I do it. I've got a knife tool once I've finished my selection
and I can just hit a sign. I don't need to reselect the faces again like
I was doing before. Just another little tip to
speed up time. There we go. I'm happy with how
that's looking. Just to playground
these colors again, maybe that's a little bit
too bright or too dark. You can see actually I
prefer those colors there. Three different
types of trees done. We've covered a lot in doing
this, a lot of new features. So I'd recommend taking
a break and then coming back to it and see if you can create another type of tree. Maybe you want to
create like a tree with berries on it or a cherry
blossom or something. You can be quite
creative with that. I hope you've learned
a lot and taken notes and we'll carry
on in the next video.
8. Creating Low Poly Foliage - Part 1: Hello everyone and welcome back. In this part we're going to be creating some shrubs and grass, add a bit more
vegetation to the scene. Now starting out,
I'm going to move my cursor to place
it about here. I'll just slide this along
one on the x axis to ten and move it back on the Y axis to zero so
it's in the right spot. Now I'm going to press
shift A and add a plane. The first piece of vegetation we're going to create is
going to be like a fern. We'll start out by
creating a leaf, one or two different sizes, and then we can move
those around and rotate them in edit mode
to create the whole bush. Now if I scale this down, so I'm going to
scale this down on the y axis just to
increase the length. And then move it along
the Y axis as well. Just so the origin
point is back here, but not quite past
the edge point. Once we've done that,
I'm going to cut this down the middle by
hitting control R. I'm going to add a couple cuts along
this axis as well, along the Y axis,
just like this. Lastly, I'm going to delete
all these vertices on this side by hitting
X, delete vertices. And then I'm going to
add a mirror modifier. This just means
that we only have to work with one
side of the mesh. I'm going to quickly
change my shading mode now because when
everything is white, it's a bit diff, in Ed mode. Again, I'm going to select this vertex and move
it into water center. In fact, I'm actually
going to shift, select the one in the middle
and then press M and merge at Las just to bring
it all together. You can see how I'm making the shape of the leaf like this. This one here at the end, I'm not actually going to merge. I'll do something
else that later. Once this is done,
I'm going to select these vertices in the middle and drag them up a little bit. I'll drag all of these up and then I want the
middle one to be the highest because this
is where the leaf is as thickest point. Then once that's
done, I can just select all these edges
running around the outside, extrude these on the x axes, and then just drag them
in towards the center. In this case, I need to enable clipping up here on the
mirror modifier and then just reposition
them on the x axes back and forth until they
are lined in the middle. Once this is done, make sure
merge is ticked as well. I'm just going to apply
this mirror modifier and then I can dissolve this line of edges running
through the middle. I'll shift to let this again
hit X and then dissolve. I go into my Y frame mode. You can see that I've
created a triangular, a ray running through this leaf. And that just reduces
the polycount a little bit and adds
some thickness. Now to sort out the
topology over here, we've got a couple of
these flat quads right here that's causing
some shading issues. I'm just going to shift, select these two verses here
and press G to join them. And then do the same
with these ones. Then I can solve this edge. We've got a pretty decent
polycount for this leaf. Now you might want to enable smooth shading and use this auto smooth
option right here. Put this on 180 degrees and then I'm just going to
click these edges around. Select these edges, the sharp. Before we start
assembling the bush, I'm just going to duplicate
this a couple of times. Press shift D, and then move it on the x
axis a little bit. This is going to be
a tiny bit smaller, so I'm just going to select
this ring running around the middle and
dissolve these edges. Then I'm just going to scale
the rest of the leaf down. Just select some
of this geometry and move it back on a y axis. Scale it down a little
bit in object mode. And then apply those transforms, because this will be a slightly
shorter leaf at the base. Once that's done, I'm going to create some more
variations as well. So I'll just drag this
one out on the x axis. This time I'm going to
go to a knife mode. And using the same technique
that we've done before, I'm just going to
create a little cuts into the state of the
leaf, just like this. And I'm going to join these back together because I've used
this sharp shading right here. Instead of the tit move, people need to mark these edges the sharp once they're done. Just like that. I'm going to go through and create a
couple more of these. In this case, we're having
some shading issues. It looks like
probably because of the way this is trying to
be rendered as an end. There are a couple ways
that could fix this. One way is to join up this
vertex to this one right here just changes the way that this angle
is being made up. It might be best, actually when we're
creating these cuts, to add some of these cuts just to particularly define how
it's going to triangulate. In this case, I think
that one works well. I'm going to join
together and end this together. I'm happy with that. I'm just going to create one
cut on this leaf right here, make quite a large one, deletes. You get quite quick
at doing this. Once we've got all our
leaves ready to go, we can start actually
creating the bush right here. I'm just going to start
out by rotating this up on the x axis using
proportional editing. Right here, I've got
this one turned on. I'm going to go into edit mode and just try dragging
this vertex right here, make sure it enables
proportional editing and just drag it down, maybe rotate it as well. See how that looks. Might need to join up these vertices right here just to fix any issues that we're getting That
clicking Okay, to me looks like our thickness has proven
to be a bit of a problem. I don't see any artifacts here. Once we've got that leaf and
then going to duplicate it, just rotate it on the z axis, make sure it's proportional. Editing this, then I can
start manipulating this. Just work in object
mode for now. And then we'll combine it all
to a single object later. This is a fun part and try to add a tiny bit of variation for each
individual leaf. Unfortunately, it looks like
I'm going to have to go in and fix some of
these issues manually. But that's okay if these cuts are proven to be too problematic for you can
always get rid of them, but I think it's
worth it in the end. Or you could make the cuts once you've deformed
all the leaves, that means having to
do it all at the end, which will take longer once
I've got these big ones. And I'm going to take the smaller leaf right
here and move this inwards the center and
quickly deform it. I'm switching between this mode here at the top, constantly, you can remember press
the button to toggle it and try to get some
variation in as well. Because our origin points down there in the center for
all of these objects. If I scale them, they'll always scale out
from the center, which is quite
handy there we go. I'm quite happy with that little cluster firm right there. Just go through correct some
of these errors right here. The proportions of this leaf look a little bit strange to me. You can always go
through and fix. Some of you can
also mark the edges running down the leaf sharp if you're getting too
many shading issues, just like this. But I prefer the way it looks
with the softer leaves. Let's put down to personal
preference anyway, once we've got all these, we can select them all
and combine them. I'm just going to hit control J. Then It looks like the origin
is already down there. We want it to be, but
just in case I'm going to reset the origins
of the three decursor. There's our firm. The
next piece of vegetation we'll be creating will
be a tall grass cluster. So I'm just going to move my cursor along once
again with this on the y axis like
a couple of meters. I'm going to create a cylinder. This time shift a
mesh and cylinder and I'm going to set the vertices
from 32 down to three. Now I can scale this down a
little bit so it's smaller. Just drag this face at
the top up a little bit. Once that's done, we're going to create several
different blades of grass, so I'm just going to
duplicate this one on the Y axis and then press
Shift R Copper tapes. We've got a few of these, we can start editing this top one. I'm just going to add
some loop carts going along about three or four. We can scale this top
face in a single vertex. Actually just going to press
M and then merge by center. Then we can select
all these ones and start scaling
these in as well, so it's going to be
quite a sharp one. Then once again we
can just come in with portional editing and distort
it a little bit here. Make sure to rotate it as well
as move it just like that. Just add some randomness and
do the same with this one. I'll merge these top
ones at the center. I can start playing with the
other loops running down. Remember I'm on smooth
interpolation mode right here. This
might not work best. I'm going to try some level
ones, we can try spherical. Not quite sure how
I like this one. Looks a bit better for rotating. I'll use that for this one. We can already see
the difference. Tried to make them a little
bit distinct from each other, we don't want them
being exactly the same. Now for this one at
the top, this is going to have a flat top. I'm going to add these
loop cuts like always. This vertex right here, it's going to be
merged with this one. And then I'm going to
join these two vertices together by pressing J. I can just move this vertex in a little bit to thin it out. Then it looks like this
one's been trimmed, the top, it's been eaten
by an animal or something. Now, I can just move some
of these loops around a little bit as well.
Be creative with this. For one of these ones, I want
to make it really curly. Add a bit of character.
I'm going to add some loops in here. Then I'm going to keep
rotating and extruding this. Remember each extrude are to
rotate and try and scale it in a little bit as
I go on just this, until eventually I'll just
merge them at the center. That creates quite a
nice character there. I'm just going to look around here because it
doesn't really do much. For the last one,
I'm just going to move this down. This will
be a very short one. I'm going to select everything
and scale on the shift Zx, scale on the X and Y Xs. I'll just add in
one loop down here, and then I can merge
to the top center. Just move bit here
somewhere. There we go. So you can see how
quick we've just created all these
different blades of grass. So we can start moving
them towards the center. Not on the exact center but
just around it like this. Create some of them moving
outwards, like the fern. They'll start from the center
and then move outwards. I'm just quickly thinking now, I don't like how some of these leaves are clicking
towards the center. I'm just going to select
this early frac here. I can press L on Island select. And I'm going to
move it this way. Looks a little bit better
in the center there. Maybe do the same as
this leaf right here. I prefer the way that's looking. It's the back of the grass. Keep moving thelesso add
the more to the center. I'm reading this curly one right here around me of Tim Burton. I was like adding some of these Gothic cartoon styles
to my low poly work. I think it looks quite nice. And once again, I can play
off the scale a little bit. I'm just going to make this one, this one shorter, rotate
out a little bit. You might not know
from looking at this cluster that we're re using some of these
plates of grass, but we can get away
with that. There we go. I'm quite happy with
that. Once again we can just select all of these and combine them as the same object. Once again, I'm just
going to quickly reset the origin to the
three decursor. For both of these, I'll just
select them both and hit control A to apply scale just in case I mess that up
while editing them. Next up, this will be
the last push we make. It is just going to
be a tiny cluster of grass and there'll be more of
these than this larger one. I'm just going to move my cursor along here on the y axis again, put this to three, then I can actually probably recycle some of these blaser
grass that we've created. So I'm just going to
islands like this one right here and duplicate it over and then hit to separate
it as its new object. In edit mode, I'm
not even going to bother going to object mode
and setting the origin. I'm just going to move this
around maybe three or four of these to create metal tuft of grass and then with my origin to the three cursor just because it's down there, I can scale some of these in a bit so they're
all the same size. There we go. Alright,
look at that once again. This is its own object. I'm
just going hit quickly. Apply the scale and set the
origin to the three. Cursor. There we go. Now
note that if you're using these assets, it's
a little bit different. With low poly work, you can get away with using a few
more polygons for foliage. But this is not how you would do this for realistic
games these days, the grass would be a series
of images, image planes. So look more,
something like this. Just a quick demonstration. And then what we'd do is
we'd have a grass texture. So it would literally
just be the silhouette of grass like this on these planes,
which will be two sided. And then from a distance it
kind of looks like grass. But that is beyond the
scope of the course. So we're just going
to be sticking to this method for an now,
which I think looks better. Anyway, creating our
foliage like this is also a bit more consistent
with our art style. Once we've finished these,
we just need to give them materials and put them
in the right collection. I'm going to quickly drag
up into rendered mode, We can just select all these, I'll give them the same shade of green. So just create a new one. C, this shrub green. And select a color for them, it's a little bit darker,
would ideally match the color of the grass that
we're using on the landscape. And again, we can just select both these two
and the last one. Hit control L to link materials, I'm going to select
all of these, they're currently in
the trees collections. I'm just going to
create a new battery, we can put them in the
foliage collection. These, instead of dragging
them up to the foliage, we can also just hit M in the viewport and
nclconfoliage collection. I'll just quickly rename these. Now, there we have it, Our asset pack already
coming on quite well. We've got a good mix of foliage
here and rocks already. We'll continue in
the next video.
9. Creating Low Poly Foliage - Part 2: Well over one and welcome back. In this video we're going to be creating some more
complex foliage. So we'll have some fruits and
berries in there and well, let's try making a
pumpkin as well. So once again, I'm just
going to place my cursor. I'll move it along on the X axis to 11 and on the Y axis to zero, just so it's not a
good spot for us. And I'm actually going to
start out by making a pumpkin. This might be good for
a Halloween theme, but if you don't like that, you could replace it with any other wild vegetable you like. I'm just going to start
off here by adding a U Vs. You might need
to change the segment. I think it's 32.16 by default, but I like having 12
segments and six rings. Once that's created,
I'm going to go into edit mode and scale
this down a little bit. Now we can scale
the top vertex and the bottom vertex in towards
the center, on the z axis. I'm just going to press
and Z to scale in. We can use a little bit
of proportional editing here set to smooth
to help us out. Just to flatten it a little
bit because pumpkins aren't usually perfectly round,
I like to look at that. And I'm just going to play around with these loops as well. Turn off proportional editing,
I'd like to look at that. Once that's done, I'm just
going to come in here, turn my proportion adjustin back on and just a sorted
a tiny bit so it's not a perfect shape because no pumpkin in the real world is going to look this perfect. That looks a little
bit better to me if you don't like
how the faces look. You can see on the
inside right here, the geometries are weirdly dense and the faces
are very thin. We can just add a
decimate modifier to it and drag back the
ratio a tiny bit. I'd like to look at that
personally. There's our pumpkin. And to create the stem, I'm just going to
place my cursor. Actually I'll apply
this decimate modifier. And I'll just place my
cursor up here because to selected I'm going to add a cylinder with just
three vertices. Scale it down a little bit. If I set this top face, I can just drag it
up and extrude it, make sure proportional
editing is off it, it's just catching me. I rotated it as well. We try playing around with
the size for the stalk, You might want to
make it a bit thicker at the bottom and
thinner at the top. Scale this out a tiny bit. So we're happy with that then just to get rid of this face at the bottom because that's
never going to be seen, this tiny optimization
right there. Next up is my technique
for creating IV. We can also use this to
surround the pumpkin, making it like it's
the rest of the plant. This uses the same
techniques that we've covered before
in this course, that the leaves might be a
little bit more complicated. First off, I'm just
going to quickly select this object right here because the origin is where I want it. I'm going to press Shift
S, cursor selected, and I'm just going
to join the stalk to the pumpkin because I'm
happy with how that is. Now I'm going to
add a single vertex that's using the extra objects add on that we added previously. I've got my single
vertex here as a new object in vertex mode. I'm just going to move this on. The Z X, I can press
to extrude and then drag around the
object just like this. You can imagine this being all the different strands of B, all the different roots
around in pumpkin. I'm just going to go down and add skin modified that we used before we can hit control
A to reduce the thickness. I've just noticed
now the origin isn't at D on the bottom
of the pumpkin. I'm just going to let
this go into edit mode. I'll go in this
orthographic mode here. This orthographic mode,
I'll just drag everything up so it sits nicely
on the ground plane, just a slight bit below. So it's clipping down.
I can start shaping this IV just like before. You can use this x ray
mode here if you're struggling to see where
the actual vertices are. Might also be an
S idea to connect the stems at the
top of the pumpkin. But I'm going to have mine sad just because that's the
way I've modeled it. We're going to hit
control shift B just to smoothly
bubble this out. Get rid of those sharp edges. Don't worry too much about
polycount adding geometry because we're most
likely going to put a decimate modifier on
this after I'm just going to go back into
turn off the x ray mode. Right here, I can
start scaling in the tips to reduce the
thickness at the end. I prefer the way this looks. Just remember, I'm just beveling this one using control shift B. Once I'm happy with
that, we can work a decimate modifier on
this to see how it looks. Just going to move some
of these vertices away. There we go, I, this decimate modifier and
reduce the ratio a little bit. We don't look into triangular, but this will always
save us a few polygons. I'm quite happy with how that
looks V. We can, of course, create lots of these IV
patches that aren't connected to pumpkin, but we
can do that later. Maybe create a couple of
variations of these and we can just place these
on the forest floor, put some leaves on them
to create the As I'm going to start out by adding
a plane to press shift a, a plane and we can scale
this down a little bit. In edit mode, I'm just going
to move this object up. I'm keeping the origin here. If you can just see me changing the shape of this on the x axes, not quite sure what shape of
the leaf I'm going to do. I've got some reference for pumpkin images on
my second monitor. I think I'm going to
stylize it a tiny bit. Cuts in here like
this. I'm going to merge these two vertical. Select these two vertices, then select the middle
one, so it's white. And I'm going to hit M
and merge it at last. Or center will also work. I can just start
shaping this leaf. This, I'm quite happy with how
that's looking right here. I'm just going to
delete these vertices. Actually, put modifier on it. It's a bit lazy, but it
saves us sometime in the nibble clipping that would be the, that
outliner of the leaf. Just change the size. Then
to add thickness to this, I'm going to add a
solidified modifier. We can start playing the round. Let me select these
firsts right here, just to keep it in a
tiny bit at the top, I like Carlos looking, I'm going to shade this
smooth right here. And turn on not too smooth. Put this all the
way up once again, we're just going to mark
all the sharp edges. We'll quickly apply
this modifier and we can just select
all the sharp edges on the mesh and hit control
E like we did before. To mark sharp, there's a
little shortcut because selecting all these
edges manually can be quite time consuming. Instead, go into edit
mode, clear our selection, and then we're going to go
select and select sharp edges. This does a pretty good job of automatically setting them. You can see here, it does
it based on an angle. Right here's 30% I'm just going to decrease this slightly so
it gets to top ones as well. Just that once selected, I can hit control
and mark Sharp. And that does a pretty good job. Of course, if you're
not worried about exporting this to a
game engine later, most people probably aren't. Then you could, of course, just drag to smooth down
to the same value, down to 14% they're
down to 14 degrees, but I think this gives
slightly nicer control. Once we've got this leaf, we can start placing
this around the V. We're just going
to quickly move it back so that origin
points in a nice spot. Then we can just start
placing this, this, make sure it intersects nicely, just in case we want to make
any changes to this leaf. I'm actually going to old, I'm going to instance
instead of duplicate. I never know if I want to change the shape of it right here. If I wanted to scale it, we'll just move around
some of the geometry. It updates all the other leaves. Remember to alt D instead
of shift D T. This, I'm creating this pumpkin. But of course, you can
go wild with this. Try to experiment
and see if there are any other similar
plants you like making or any other
types of leaves. I like the way
this is coming on. I don't have had too
much drmetrycae. I want it to be in
line with the rest of the assets we've
created Right now, this pumpkin starts
to look a little bit too dense compared to
the rest of the foliage. It's okay, but I've just
got to keep that in mind. What I'm happy with this, we can start working on the
next object right here. So I'm actually, I'm going
to scale everything here. I'll slip everything, I change my origin
points to the cursor. Some of these have got
their own origin points. If I scale it out, you
can see it's going to go below the ground
a little bit too much. I'm just going to
press the period key on the main keyboard and
go to three de cursor. All scale it out
from the cursor so I can just change the size
till it fits a bit better. That looks quite nice for me. Another thing you might
want to do is just add a couple more
pumpkins to this cluster, so you can just duplicate this one or instance, scale it down. And put another
decimated modifier on it to reduce the poly
count a tiny bit. But I'm going to stick
with just the one because I don't want to add too much repetition Only
once that's done, I'm going to slide
the cursor along and start working
on the next one. This next one here
is very simple. I'm going to create
a berry bush. So I'll start out
by adding an cursor which is found break down here
and the mesh dropped down. And I'm going to change the subdivisions
down to one just to make it a little bit more
low poly in edit mode. I'll scale this in
just like that. I'm happy with that. Once again, we could just go around with
proportional editing to make the shape a bit less
consistent like this. You can even go into
sculpting mode, if that's the way
you prefer to work. I might try that out.
You can experiment, but yeah, just use
proportional editing. I got a couple of these sell
duplicate this one now. And scale this down a tiny bit. Just I want a couple
different clusters of these blushes
next to each other. I'm just going to
rotate them so they don't look the same.
That's very important. Once that's done, I'm
just going to go into edit mode and rotate it and move it up so the origin looks like it's
in about the right place, which looks pretty good to me. I'm going to quickly
scale this up. I'll apply that scalp there. Once we've got
this, we can start adding some more objects. Now we can go down
to core again. Next time I'm going to go
into edit mode, scale it in, make sure this is a
separate object by the way, and we're just going to
do these around bush. Just like this satisfying. If you wanted to add
some more randomness, you could of course scale and rotate these bushes as well. I might quickly scale them, but we don't go into
too much detail. Just make some of them slightly
bigger than the others. We go, once that's done, I'm going to whack a decimate
modifier on this just to break up the evenness
of these cosph. I'm going to go down to decimate and just drag this
down a little bit. These should be very low
poly, something like that. As long as they're not
flat, that'll work. They look a bit sharp as well, which is definitely a style. It looks almost like
a prickly thorn bush. Yeah. Once this is finished,
we'll give it like a red material so you
can tell it's berries. And imagine you're
using this in a game. You're creating some
little low poly game. A play could go up to this click on it to eat the berries
and then they disappear. So you'd create another
version of this bush like this that hasn't got the berries on it and that will
just replace it. So that's an example of how
you can use this in a game. Any'serry bush finished for the next other little
bit of foliage. I'm just going to
create another patch of ivy here at this time without the pumpkin on it
because that you want a pumpkin all
throughout your forest. I'm just going to move my
curs or along the y axis to two the origins here. Once again, I'm going
to press shift A to add a single vertex
under me, single vertex. I can start extruding this out. Let this just create the
rough shape of the IP patch. We'll put the skin
modifier on it again. Instead of adding the manually, we can try linking the data from this object
right here in object mode. I'm just going to click
this IP patch right here. It control L and copy modifiers right under it looks like that's copied the skin modifier. I'm just going to quickly
this decimate right here because it doesn't look like
skin modifier is working. Let me try going into
edit mode and selecting everything going up
here to item and it looks like we just need
to hold control a and drag our skin modifier isn't giving us any
thickness right here. So it s like we
just need to press this little button
here to add skin data and we can go into edit mode and control a to scale
everything down. As usual, I find it
best to work with this in top view if I just
press the Z up here, A gamble or you can press seven on the number pad to toggle top. If I go through, I'm
just going to start shaping this now and turn
off proportional editing. Remember you can
select the joint right here and it control shift B
to be able to smooth it out. That's a really important
shortcut to remember, I'll just extrude this
out a little bit more. We can add some
layering as well. I'll just move this
up a little bit on the z axis because it's not
going to be perfectly flat. This, we've got the tips right here that they'll
be digging downwards, looking for something
to attach to. That way this is coming along that once again
just going to set all the ends control to reduce the size, not
going to completely shrink. I'll just racking
down about here. And then I'll set all these ones with the joints that
connect to the ends. And I'll scat these down
a tiny bit as well. And then I can play
around with the size of the other ones, how
that's looking. We can also see how it's looking with the
decimate modifier on it. Just by changing this ratio, we still want it
to be triangular. It quickly turn effect, right? Yeah, we still want
it to be triangular but not too distorted like this. How that's think, that's a
good enough level about that. You can always add a subsurface modifier up here between them. Increase the count, sometimes just makes the
result a little bit less square for the same pot.
I like the way that looks. I don't want to spend
too much time working on it because I'm sure
you can experiment. I'm just going to
copy the leaves over, so I'll slap this
leaf right here, And I'm just going to
duplicate this over. Let's get it down a little
bit like we've done before. I'm just going to start tossing
this around the objects. You can use a particle
system to do this, but for such a small object, it'll be quicker just
to place them by hand. And it also gives us Nasa
control scale, the Syn a bit. Remember if you double tap R, you can freely rotate. It puts you in this
little roll mode that's useful for adding
random rotation to the leaves quite quickly rotate. Some of them are bots as well. This can probably be one of the hardest things
to do on the object. Make sure we change
the scale of them. Just not all the same, they're all point in the same direction. Let's set this. You may not like my design for
leaves right here. May want to go through
a different type. Maybe make it a little bit more rounded or add some
more polygons. But remember I'm instancing
them instead of duplicating. So you can always change the shape of the
leaves if you like, because this is
something that we're likely to want to change later. I'm actually going to put a copy of this in an
archive collection. Just speak and go back
to it. There you go. I don't want to
spend too much time adding details I'm sure you know but will look nice. I spend some time
adding these leaves. I'm just going to select
all of these right here. You can hold on this and
go to the last two tool or use to cycle through a
different selection modes. I like the last tool, it's
easier to box select. I'll select all of
these right here. I'm going to quickly
duplicate them with Shift D. Then I'm going to press M to move them to
the archive collection. I'll make sure this collection
is hidden right here, because I don't want this to
be shown, I just hide that. And click the camera just in
case it tries to render it. Now I'm going to join all
these objects together. So I've got the
berries. I'll add a material to this now because it's easier to do it
as a separate object. So drag up into rendered
mode or material mode, I'll go down and add the berries
material, make some red. I'll add a green to this one. We could re, use the same green that
we use for the grass. I might actually do that
just to save some material. Slots can make it a
little bit more simple. When choosing one, I'll
choose shrub green. But I do want to make it a bit darker because I'm feeling late. These looking to green
and too light for us, I find the vegetation on the forest floor is
usually a bit darker than the leaves you'll find
in trees in the canopy. Yeah, you can treat these
values for a long time. Right here, I'm going to
add the same material to the vine that start leaves as the wrong one.
Add the shrub green. Then for the leaves, I'm
going to create a new one. And I'll just, I'll
call this shrub leave, Give it a slightly
lighter green, slightly more yellow as well. Maybe this says a little bit of contrast the way
that's looking. I'll add the same material
to these ones as well, because at all instances
it should copy it to all the other
leaves on the object. There we go, That's
the right one. Now, in the pumpkin, we just need to add orange material to be
quite a unique one. That looks nice to
me for the stalk. We can probably re, use one
of the other materials. I'm just going to go through, select these sites right here and assign
them to this slot. And then you can try
how some of these look. I'll just put the silver birch trunk dark on it because
it looks close enough. But you can create a new
material if you prefer. So anyway, once that's all done, I'm going to select all of
these using the lasso tool. And then just shift
the pumpkin to make sure that this is the
primary selection and hit control J to
join them together. It looks like we need to apply
these modifiers actually. So I'll just quickly
apply the modifier and then we can join them all
together. There we go. We might need to turn on
this alto Smb option. I'll quickly go
through and edit mode. I'll just island select the, the pumpkin and the stork. We've just got these three
groups selected right here, the Iv pumpkin and the stork. Going to quickly go to
edge mode right here, pressing to select sharp edges, decrease this go one
degree, control mark sharp. And it looks like
that also helps with some of these
triangles right here. It makes them look
like cause instead, which is less pumpkins. Done, this one will probably
be a bit more simple. You're just going to
slide the berries, then the bush, and
hit control J. It looks like we need to
apply the decimate modifier. Actually, there we go. Usually what gets me is not
apply and modifiers control. For these ones, we're
going to do the same. Just quickly apply
the skin modifier subdivision and decimate. Then we'll just slid
everything and combine it. I'm just doing the same thing
we did for the pumpkin. I'm putting an auto
smooth dragon up 180. Then in edit mode, I'm going to quickly
hide the leaves just by selecting the ivy
and inverting my selection. And then hiding it looks like a miss a leaf
when ahead of them, but don't worry about that. Then I'm going to go
select sharp edges. Strike this fat that
looks right to me. Control, mark sharp. And then I just need to
add everything together. Again, add this leaf to this
object right here. Control. And it looks like
everything is connected. So we just need
to quickly rename these objects and
then we finish. So I call this pumpkin
berry, bush and ivy. Now this ivy of course, scatter this along the forest floor. This you create
multiple of them, even create different versions of this ivy floor if you're
finding it's repetitive, but I find this way
looks quite nice. And you could also use it to coat rocks and the cliff
side and things like this, or even have them
dangling down trees. You can get quite creative with these pieces
of ivy right here, and they're already in
the foliage collection. In the next video,
we'll be adding some flowers and
we'll see you then.
10. Creating Low Poly Flowers: Hello everyone and welcome back. In this video, we're going
to be creating some flowers. I'm going to start off by
placing my cursor again, I've got to the view. We've
done this a few times, right? No, I'm just going to reset
my cursor to the new spot. I'm going to start off
modeling a daisy because it's quite a simple one and I got
a nice technique for this. I'm going to press
shift eight to add a cylinder and set the
number of vertices to three. Then in edit mode we
can start scaling it down so we've got
the right thickness. I'm just going to move this
face down a tiny bit so it's further below the
origin point about here. And I can track this one up to make it how
high I like it. Once that's done, I'm going
to add a couple cuts in here. The hit control R, and
the use of scroll wheel, just to add a couple cuts. And I'll move these, they're displayed on the
C axis just like this. Now to add some leaves to this, I'm going to use the knife tool. I'm making an
assertion right here, just below this edge. And then connected touch
with the other side. We should have a face like
this triangular face. I'm going to hold ol and
extrude along normals to bring this leaf out,
so around about here. And then I can scale it
on the shift z axis. That's on X and Y axis. Just by holding down shift z, I'll extrude it out again
on this normal axis here. In this case it can just
press and it does it. Then I have to alter
extrude along normals. I'll just merge this at center, I'll select this vertex one. Scale them on the z axis by zero and then just move them up using vertex snapping
to align them to this vertex just so the
top face there is flat. Once I've got that leaf, you can repeat it on some of
the other segments, a stem if you like, but I'll just stick with
the one for now. To create the actual
top of the flower, we're going to create
another cylinder. I'll place my cursor up here, select all of these, and then press Shift
cursor to selected. So cursors in the middle. While I'm here, I'm just
going to quickly delete the top and bottom face because those aren't going to
be visible as a new object. I'm going to press shift
A again, add a cylinder. This time I'm going to have
five Fticstead of three. Now I can scale this down, the middle part of
the flower, you can just shape it around
how you like it at this. And then we want a
little low poly bump in the middle of the flower
going upwards and make more sense once it's done. So I'm going to
press to inset and then just hit M to
merge in the center. The vertex select mode, I can just let this and
drag it up a little bit. You can see it creates
the nest little bump. Now to create these petals
going around the outside, I'm going to select
all of these faces. Just st the outer ring of this. Ideally here we'd be able
to extrude long normals. Again, I'm going to and
extrude long normals, but you can see
that this drags out the faces whilst
keeping them connected. And there's no option down here to enable individual faces, so I'm just going to control Z, this go back and
then this time we're going to hold Lt and go
on individual faces. And you can see this extrudes out all the faces on
their own normals. So I can drag the petals out
until they're far enough. Something like this, we can
always change it later. I've got my reference images and daisies on my other monitor. So I'm looking at those
wells doing this. I want happy with
how far out that is. I'm going to extrude it out
again, ol individual faces. This time I'm just
going to select each of these faces and merge
them at center. If you've got lots of petals, you could just do merge by distance and
increase the amount. What we might want to do now is go into Edgemode right here, and change the size of the loops that we've
got going around. So I'm just going to
shift select all of these and scale them up. But once again, this all
scales out from the center. That's because our current
pivot point is the median. And if we put superior
key on a keyboard, we can change that individual
elements right here. And this time when I scale, you see it all scales on the center of mass
of each selection. You see the point
it's scaling by. I'll scale this
out a little bit, then I'll move my pivot point back up to the medium point just to scale
it to the center, because I think it's
too far out for me. Whenever you scale or hit
something in blunder, always be aware of what
your pivot point is. This can often catch you off
guard if you accidentally said it to individual origins and then forget about it later. Anyway, I'm now going
to do some tweak into the topology of this. I like this top being flat. I'd like the bottom of the
petals to just be sharp. Look a bit, a little
bit more rounded. There are quite a
few ways to do that. What I'm currently thinking
is just adding in a loop down the middle of each of
these petals like this. I slit these edges right here, I can just merge at center to sharpen out the
bottom of the pedal. It just means we've
got two triangles down here instead of cos. I can do the same
with the middle. I'm just going to set this
face right here in facet mode. And hit to merge at the center. And then I can just drag this
vertex down a little bit so that it intersects nicely
with the stem that we've. Now the last thing to do
is just select some of these right here
and move them up. You can snap them. I've got snapping
enabled to read it. You can either snap them on a z axis to these parts
of the petals like this. It maybe come in, select
all these faces right here, and scaled them on a z axis by zero just to
flatten the top out. And I found that
looks quite nice because there's not as
much contrast on petals. Alternatively, you could set all these outer vertices right here and bring these up to
change the shape of it down. That's how daisy finished. Nwi'm going to
create a flower that looks like a rose or a tulip. I'm just going to
reset my cursor. The stem, it's got the origin, but we want to just
cursor to selected. While here, I'll quickly
join this top to the stem. And I'm just going to
move my cursor along 1 meter on the y axis. I'll start off creating a
stem like we did last time. I had a cylinder with
three vertices down. Just change the
height a little bit. This one's going
to go straight up. I'm not going to have
a crooked extend this time because I'll have some leaf sciring around
it. Cuss ready here. I'm just going to
quickly press shift A to create a plane scale.
This down a little bit. I've done this in the same
object, but that's okay. I can just rotate this to create the shape of a leaf right here. To have to be too precise. You can see here,
I'm just extruding this free hand and
remember you can hit G, and G again to slide it down
at the bottom right here. I'm just going to scale
this in towards the center, so that intersects
Nestle the stem. And then I can change
the scale of these as well, just like this. I think that looks quite
nice once I'm happy with it. I'm just going to these
three faces right here and extrude along normals to give some thickness
to the leaf. And I'll extrude up this way, might have a tiny bit of correction to do
down here though. I'm just going to set this
face easier to see in Y frame. I'm going to hit and again
to bring it upwards. Here's a little trick that
a lot of people don't know. If you hit G and G again, you can always bring it upwards, but it's difficult to bring back again direction
that I moved it in. The way you can do that
is if you hit G. And G start dragging up like this
and then hold the old key, it brings up these yellow
lines and I can start sliding it out past
where it originally was. In this direction. I've got short cuts down
here on my screen. Casts keys if you want
to see that again, I'm dragging it up and then I'm hitting Alt and I can
drag it out again. That's just a little
handy trick right there. I might actually merge this at the center and I'll do the same at the bottom one. I'll merge at the center, all along the back of the leaf. Just reduce the
polycount a little bit. In fact, this one right
here, I'll just merge of this vertex like this. And we've got quite a nice leaf. Now I can duplicate this. We shift are on
the z axis by 180. And I'm just going
to move it back so it's facing the
opposite direction. Like this. Maybe have one
higher than the other. I think that looks
quite nice to me. Now, it looks like we've
got a slight problem here. I'm just going to select
the stem right here, island the stem by
pressing it and hide. It looks like just
going to need to s this vertex and merge
it to the top one. Because it's causing
some, it was a quad and it was
causing some issues. So just always look out for
the little errors like that, but that's looking fine to me. Now we can start
working on the top. There are a lot of
ways to do this. I'm not quite sure how
I want it to look. I'll just move, stem
up a little bit. Delete the faces again because these aren't going
to be visible. But actually I might
keep the top face. I'll just delete the bottom one. This top face right here. I'm going to extrude it,
scale it up like this, and then extrude it up again. Then we've created
petals for our tulip. If you want, you can always extrude this down and then merge in the center to give it
a nice vertex like this. Of course, if you wanted more
edges around this tulip, then you could increase
the count of the cylinder from three to something
like 56 or seven. I find odd numbers
usually work better. You could also add
some thorns to the side if you wanted
to be creative. But I'm just concerned
about polycount. I want to be consistent
with the rest of my models and I don't think I've gone into that level
of detail before. Once that's done,
I'm going to move my cursor one more time. On the axis two, I'm going to create a
sunflower this time, which I think will look
quite nice in an open field. Once again, I'm
just going to add a cylinder. Move three s. Stan is going to be a
bit thicker this time, so I'll just drag these furtices up to about a meter or so. Drag these ones down just
so that they don't clear the ground and then we can
start working on the top. I'm going to create my flower as a separate object
before quickly. Once again, I'm just
going to delete the top and bottom faces. Then place my cursor on here, shift as cursor just selected
because I'm going to create a new object and I'm
going to add a cylinder. As for the count, I'm
thinking about eight to nine. I'll try nine because the petals are going
to be a bit smaller. And I'll scale this
down in edit mode until I've got the right
width of the flower. And then I'll just scale it
down as the axis like this. Now can select these outer faces right here, the same
as we did before. And there's lot daisy
we're just going to hit and then extrude
individual faces like this. And then we'll merge
each of these together. One way we can do that, rather than going through and
merging the manually, is move our pivot point down
to individual origins again. And we're just going to
scale by zero, like this. Now of course we've
got four vertices in the same location for each
of the ends of these petals. I'm just going to
select everything, hit them and do
merge by distance. And you can see at
the bottom we've got rid of 27 vertices, which sounds about right for us. If I go to face select Merge can select this face right here. Just in set a tiny, we've got our middle and I'm just going to insert this again and this
time merge it at the center. Just drag this vertex
up a little bit, then we can select the outer
ring of petals right here. I'm just going to
use the lasso tool and move it up a little bit. I like how that looks. Maybe I might move
them down and snap on. On the level of vertices
we'll see as to the bottom. I think it might look
weird and too sharp if we merge all of these
vertices at the center. Instead, I'm just going to
select this face right here int and drag it
down a little bit. And then I'll merge this a
face at the center like that. And now we can rotate
this sunflower, it's in the right position. Maybe just rotate it on
the Y axis a little bit. Although in general practice we want forward facing things. The sunflowers facing
a direction you want it facing on the
negative Y axis, like this. If you're modeling a character, you'd have the face
coming this way. It just makes sense
to me to do that. Just rotate it like this,
make sure that the stems in about the right spot. I'm
quite happy with that. Now, once again, I'm
just going to add some segments to this stem. I might just add three. I
think it'd be nice if we add some leaves using
the same method that we did over
there in the daisy. I'm just going to come
in with the knife tool, extrude along normals or in
extrude individual faces. I'll extrude this
loop right here. Or extrude it, I'll scale
it up on a shift Z axis. Then I can merge these
vertices together that center. Just snap it up to the
others right there. That looks pretty good
to me. I'll just move this vertex up a little
bit so the faces flatter. Then we can repeat this
a couple of times to create some more leaves
going around some flower. I'll just add a couple
more here quickly. You get faster at doing
this, see if you can erase. This can be quite good practice for the shortcuts and blender. Actually, you can get quite
fast by doing it this way. And we just merge
this at the center, track the vertex up a little. That's all I leaves
done. It looks a bit weird pointing
forward, isn't it? But I'm not too worried
about that for now. I'm still happy with
the flower fact. I might just quickly rotate
this on the z axis by 60, so that flowers not
facing forward. And then I'll just quick hit control A to apply the rotation. I'll join all these
objects together. So I'll join the
top of the flow to the stem right here. Control J. That's a one object
and that's one object. Now I can quickly rename these, they're already under
the foliage collection. I call that one daisy. I call this one a tulip
about that, right? And I call this one a sunflower. Perfect. Now we can
start on materials, So I'll just drop down
to the material preview. And we're just looking for some material we
can use for the stem. I think we should be able to
use shrub green for stems. I'll just quickly add
this material to all of these using the Lincoln
method like we did before. The control L link materials. Now we can create the, the materials for the petals and at the pollen in the middle, I'll create a new
material slot here. Just call this daisy pollen. I hope I've felt
pollen right again. And get this a nice yellow. Then we can select these
faces in the middle to sign this to that
nice golden colors, quite nice, a bit
more saturated. Now we can start
with the leaves. To do this, I'm just
going to select the outer vertices right
here and hit Control a number pad plus to grow my selection and then
convert to face mode. It's a slightly quicker
way of doing it. We could have just
inverted the selection, I suppose the grow if you don't have
a number pad that can also be found under select. And then Sl more and less, I'll add this to a
new material slot. Call this daisy petal. And then I'm going
to assign this. Don't worry about the color for now because I'm going
to change this later using a lot cool trick in the shade and node
editor for the tulip. Just add a new material,
slot, tulip, petal. And I'll just quickly assign
this to these faces again, I'll set this and grab
my selection and assign, there we go, that's
working for the sunflower. I'll do the same. Just
quickly add a material slot. I'll have the center, so I'll just call
this flower seeds. Of course it would
be good if you can re some other materials in the scene that have got a
similar color but I don't think there's anything else
that's got the same brown. I want maybe we could use a pumpkin store called the
Brown on this birch tree. I'm not worried
about performance. I'll just create
another material that color and then
quickly assign it. I'll just use a circle the
select tool there you can press to use that
and then enter once we're finished. It's
slightly lighter. Go this outer layer right here. I'm going to have a
little bit of radiation. So I'll create a
new material slot. I'll call this flower orange. Like another orange colors. Sign this. Then the outer bone called the sunflower yellow give it quite a
bright yellow color. I need to assign this
to the right faces. I'm thinking if I just
slip both of these, maybe able to control, maybe. I'm just trying to think
of a quick way selecting, I'll slip this back face
right here and then groom my selection a couple
times. Dest this bit. Just practice trying
to be quicker with selecting the things
rather than do it face by face. The quicksin, that's
quite a nice color to it. I'm happy with how this
some flowers looking. Anyway, back to the
materials for these petals. I was going to create
a way to randomize the color for each version
of the flower right here. If I instance or duplicate this flower
and just move it aside, this one could be blue and
then this one could be pink. We won't have to change
the color manually. Blender will do it for us. We're going to switch up
here to the shader tab. We're in the sky right now. We're playing around
with this a little bit earlier in the course when
we're creating the sky. Just going to change from
build back to object. And I'm going to hit
number pad period to focus in on this daisy right here and then strike up to the rendered all
the materials tabs, we can see our materials. This is quite a simple
set up we're going to do, but very robust one
at the same time, starting off, we're just going to add some inputs
to the base color. First off, we're
going to need color, which is under converter, and plug this into
the base color. Currently it's from
black to white, but we'll change that later. Before we do anything else.
It might be worth instancing a bunch of these flowers just so we got some copies
of them right here. I'll do the tulips
as well because it's hard to see how the
random list is working. And got one just like this. We've got a mini meadow,
I'd like to look at that. Remember where the original
ones were, of course. Then under this color amp
right here next to the color, we're going to add an input
and then object info. And we're going to
plug in the random into this factor right here. You can see that what it's doing now is mapping each one of these flowers with value
from black to white. So every object
in the scene will get a random value
from black to white. And it is being passed
through the color ramp. And of course, we can
change the color ramp to affect what percentage
of the flowers, we've got a certain color. If I drag this black par
up to 75% right here, you can see that under
my position is about 75% 0.75 And it's coloring about
34 of the flowers black, which looks right compared to the rest which
are white and gray. This can be very cool just to
play around with like this. I find this quite satisfying. And you could also use this to animate the change of
the color of the petals. Let's see, doing a season
time lapse just than I do. But anyway, we want to have a selection of static
colors that we've chosen. So I'm going to go down from linear and we're going to
change this to constant. Now we can some of these around, so I'll drag the white one down. And you can see
now it's snapping. It's either black or white. There's no radiation between
as opposed to this ease mode where the flowers that lay in the middle are interpolating. Set this to constant. Then we can add a few
more keys to this. Change the color
of some of these, the colors that you
want for your flowers. So I want some blue
ones like this. Like the white one might want
some green flowers as well. Maybe not green. That
looks a bit strange. You could do like
some pink ones, this and you can play
around with this forever. That's kind of cool. These blue ones maybe. Or red endless possibilities. And another nice thing
about this is so you wanted to change the
amount of color of flower. You just drag it to
the center and make it take up more area or
this colorant right here. Right now, I'm going to have about 50% of the
flowers that I've got being red because it's taken up all this area and it's
a bit like a pie chart. You can just go down here
in a shade editor and real time change the amount
of each flower in C. I found this a very
cool thing to do. I'm going to quickly copy and paste this node
set up right here. I'll copy the object info and color ramp control
C on my keyboard. If I just click on one of
these tuls right here, I've got the tulip
petal material selected. I can paste this in. Just hit control V.
Let's paste these nodes. And then connect up
the color again. But for the tus, I might want different colors to the daisies. I might give them like a
yellow color like that. Really to look at
that. That's nice. I can't really see any pink ones just to the til I can see some. We'll just change the slider. Right here. There we go. I
like the pink ones as well. I might change this
color slightly, just creating more
till I get a pink one, but it doesn't look like
it's going to happen. There we go. I'll make
this an orange one or Yes, can be very fun to
play around with. I've created all of these different tulips and daisies that I've forgot
where the original ones are. I'll just set one
until I find one sees this daisy
0.006 right here, because we've duplicated it. I think that's my original
right there, the daisy. So I'll just shift select all the other ones and
delete them for now. But you can keep them
there if you like them. They look quite pretty.
Here's my original tulip, so I'll just delete
all the other ones. These are just three examples of flowers that I'd like to add, and I really think they
bring a lot of character. But of course, if you've
got the bit time, then just go around experiment to see if you can
create another kind of flower and give it this
random material as well. We've covered quite a
lot of content now, we've learned a few cool
modeling tips this video. And we've gone over a
bit of the Shade Editor. Great work if you've
got this flow. And of course, we'll
continue in the next video.
11. Creating Low Poly Underwater Plants: Hello everyone and welcome back. In this video, we're going to be creating some
underwater sea life, like fish, seaweed, and coral. I'm going to start out with, I think if I go to the view tab, the location for the
cursors currently on told me I'm going to change this to 13 and reset the other two. Sirius Our cursors right there. We'll start off by
creating some seaweed. Now note that I've got
some reference images on my other screen
that I'm looking at. Whilst doing this, maybe
look at a couple types of seaweed that you like
before you start modeling, I'm going to press Shift
A and add a cylinder. I'm going to change
the vertices to three, then I can just scale
it down a little bit. And edit mode, I'm going to
move my shading as solid, so I can see a bit better.
Sounds very simple. I'm just going to
scale it in again, Select these bottom
three vertices right here and merge at the center. Once I've got the rest of this, I can shift a duplicate and just move it up a
little bit on a z axis. And then hit shift R to repeat this process
a couple times. Then we can start rotating them, moving and submit the shape
a little bit more organic. I wanted to swirl like
this to the side. I've got individual
origins on here. It looks like I'm going to
press period key and move up to medium point.
You can shape it. Another way you can do this
is use proportional editing. So I'll just island this
one nonproportional editing and make sure that I've
disabled connected only. We can just moving
rotator like this. These are the tools you can use. Then once I've got this
going to duplicate this in object mode and just rotate it, it's spurt from one of
these joints right here. And then in edit mode, I could just delete
a couple of these just that we can create
quietness, short sewed. You can even scale some of these down if you
want them to be a bit smaller variation
to it like that. I might scale the
top segment down a little bit. You can
play around with this. I'm just going to duplicate
this segment right here, shift D, and in edit mode I los through this one,
so it comes out again. No, once's got all of these, you can just let them all
link and join them together. I'm just going to quickly
go through and change some of the scaling to make it look
a little bit more natural. I'm happy with that. I would advise that you create a
couple of variations of this. I haven't really got that
many variations here, but for the sake of this course, we'll just stick with this one. I'm going to quickly
hit control A to apply the rotation scale,
just in case. I don't remember if I change
those in object mode. Actually, it might
scale up a little bit, so it's bigger like
that. There we go. One thing I'm noticing
here is that some of these normals look like
they're not quite right. So we're going to
go into edit mode, select everything
and do shift to recalculate the normals. And
you can see that fixes that. To show you what I mean, I'm going to quickly
undo this step. So we've got our incorrect
normals back again. If you want to preview
the normals and that's the direction the face is
pointing towards member. We can go up here under the view shading and
enable backface cling. I can see that you only see
the triangles behind it. If you imported this
into a game engine like Unity or Unreal, this
is how it would display. By default, it's quite important that we
recalculate our normals. We can quickly check some of the other models
while we're here, but I think we're all looking. Okay, so I'm just going to go back on this
because I don't think we've covered normals
in much detail before. So if I just say, well,
backface culling, another option that can be a little bit better for previewing your model is to come
under this viewpoint, overlays, drop down, and
enable face orientation. And this shades any
incorrect normals red, which makes them quite
easy to see here. I'm actually noticing
now these paving stones were incorrect this whole time. I'm going to select both of
these objects and I can go into edit mode on
both of them at once and slit
everything to do shift. And you can see that
just recalculates the normals on the outside. If you're doing the
interior of a room, then you'd click this
inside option because you always want the blue
stuff facing the right way. Alternatively, if
you want to bring up an options panel for this, you can do Olt that gives
you some more options. You can just flip the normals individually if you'd
rather do that. Anyway, back to our seaweed, I'm going to go back
into edit mode, shift to recalculate normals, and then I'm going to disable this face orientation,
Not necessarily. When we're working to
create some seaweed, we could use the same technique we used to create
this grass over here. But rather than
redoing all that, I'm going to go under, put this to increment, it allows me to move it on
gridplane right here. So I'm going to
move it on the axis over here or duplicate it then on the ship
axis over here. And then put my snapping back
to vertex and disable it. I don't forget, I want this to be swaying
upwards a little bit more. So I'm just going to select
some of these right here. Make sure I change it.
Spactic connected. I can move these first around. So it looks like
it's swaying upwards more. Irritate this. I want to uncurve this one, don't think it really looks
at right for seaweed. In fact, I'll just delete it. Another thing I'm
going to do to this is just spread everything out. When I was creating this
little grass tough right here, I had everything emerging
from the center, which I don't think
looks the best. So I'm just going to
move everything to spread out a little
bit more like this. And I think that looks like
some pretty good seaweed. So here's an example
of how you can just reuse assets that you've already created to build more ones already that looks
pretty distinct. You can see if this
was underwater, it wouldn't look like it's
the same grass model. Reuse. As long as we
change it enough. There we go, there's
another seaweed. Remember that when we're placing these down on the sea bed, it might be nice to add some of these rocks over here
that we created as well. So I'm going to move
my Custer along again from the x
axis to 14 meters. We've got quite a
few assets now, so it's really looking big. And I've got a cool way of making coral that
I'm going to show you. So we'll press shift
eight out a cylinder. I'd advise about five or
six versites for this one, depending on what actual
polycount you want. We'll scale this
down a little bit and we're going to scale
in the bottom one. And then gradually have it
getting bigger as it goes up. So you'll see what I mean
when I'm doing this, just using basic
tools just like this. And then at the very top
p, I'm going to int it, move it up a little bit,
and then I'm just going to extrude downwards along normals. In this case,
anything you need to Ske a bit, it looks like that. And then what we can
do is just going to frame all of these and we can
just move and rotate them. Rather, go into object mode, I can rotate this and
start duplicating these. Integrate more of them. It'll be scale some of them
up a little bit. We go into edit mode again, frame this whole bit here and
we can extrude it upwards. It looks like in this case I act any instance instead
of duplicating, which isn't what I wanted to do, so I'm just going to undo that. On this object right here, I'm going to hit Holt
L, I'm going to hit L, I'm going to hit Control
L. I'm going to go to the vertex data tab and press this little button up here
just to make it unique. And I can edit it
and it's on its own. I'm just going to duplicate, just extrude this up to this, but it's a tiny bit taller. And then we can just keep
playing around with this, changing the size
of them as we go. This one looks quite nice. It looks like I've got some
pretty big ones at the top. We're going to scale this one on its local axis to
make it thinner, to assume this one member. If you scale it and
then hit shift, and then again you can
scat on local axis. We can go up here
and enable this one, this little gimble here, and change the orientation local. This might be a
bit easier to do. I prefer using short cuts
to add some smaller ones. I'm just going to duplicate
this again, Rotate it, I can just delete
the whole bottom bit because we don't need
that. And then scale. The rest of it gets a
little bit repetitive, but we're almost finished with foliage and we've
covered quite a lot. Perfect. I'm quite
happy with that. Once I've got everything,
I'm just going to select everything and join it all
together by hitting control J. And then I'm just
going to double check the rigen is on the cursor because right now I
think it's over there. So I'm going to click, go
down to set origin And three cursor and it's quite a nice coral
that we've created. I'm just going to
move my cursor along. Actually skirt up a
little bit first, make it bigger and
then apply the scale. It's just going to move my
cursor along one on the Yaxs. Here we've got
another quick design. This time we're going to
use the same technique that we use to
create these trees. I'm going to be quite
quick of this one. Shift a mesh and add
a single vertex. This is all stuff
we've done before. I'll go down to the modifiers and give it a skin modifier. And then in edit
mode vertelection, we could just start
extruding up to create the shape of It member, select everything and hit
control A to reduce the size. So there's nothing
special with this one. It's just another
cool way of doing it. They're a bit more
familiar with just thinking about the kind of
coral I want to create. Usually when I'm doing
these tree branches, I'd only have like
a double fork. So I wouldn't split a vertex into three
different directions. I'd only have it
going out twice. But with coral, I think it's
a little bit different. You can get away with extrude out like this and it looks cool. I'm going to do some
of that in this case. And then select all
the ones and hit control A to reduce the size.
I'm quite happy with that. Now we can add a subsurface
modified to this right here. I think that looks quite nice. And then decimate to
reduce the polycount. And that just means
it's not quite as blocky as it was before. I'm quite happy with
that. I've seen similar designs where people, let's put icospheres on
the ends of all of this. It's quite a nice style.
I'm just going to add icosphere here in Ode. Reduce the subdivisions you can get creative adding
some of these to the ends. But personally I'm not
a large fan of that, so I'm just going to
keep this as it is. I'm going to move this
down a little bit. Just select all the
vertices and move it down sits below
the origin point. Then I reset the origin to the three cursor and
apply the scale. Perfect. This next one is a little
bit more complicated, but I think it looks quite nice. And you can also use the same technique
to create crystals. So if you're making like
an underground cave, this will be quite cool. So I'm going to move my cursor along on the y axis to two. Before we actually start model, I'm going to have to
create a couple variations first and then we can
start dotting them on. To start out with, I'm just
going to create the base for the coral. Just follow with me. I'm going to add
cosph, actually, no. I'm going to use metaballs. Shift D and then we can
go down to metaballs. Just add a couple
of these. It looks like amount of
geometry is too low. So I'm going to
change the resolution down here just to reduce this. So we've got a
little bit more geo perfect and we can just shave. I'm happy with that. And
then once that's done, we can always convert this to a mesh and start sculpting it. So I'm going to increase or
decrease the resolution, rather it's a little
bit more geometry. Then I'm going to hit three
and just type in mesh to convert this to a mesh in
sculpt mode right here. Number pad period to jump to the selection just like
this, you can zoom in. And I'm going to start sculpting it just to break up some of these blobby patterns that you get when working
with metabals. I like this really bubbly
look right here. There we go. That's perfect. Then
in layout mode, I'm just going to ad a
decimate modifies to this. Likes to take polycount down, drag it, and that
looks nice to me. I'm going to shade
this flat so it matches everything
else in the scene. Perfect. Allow that. Now we're going to create
some actual pieces of coral that will stick to it. So like I said, we'll create two or three
variations of this. We'll add a cylinder. This one's going to have five vertices. So we'll scale this
down a little bit. Don't worry about moving it for now, unless you're
struggling to see. I might just hide
this base right here, so hide this by present
H. There we go. And then I can scale
the bottom ones in and move this
up a little bit. Then what we're going
to do is extrude up and merge this at the center. That's one variation.
And then we're going to create another one
with just four vertices. Instead, add another
cylinder here. We could have also added
a cube to do that. I suppose I scale this in, make it a little bit thinner
because it's smaller, these top Tes do the same process and
merge it at the center. Once that's done, we could just move to the side and
move both of them. Actually, we could create
some more of these, but I think we'll just see
how we get on with what we've got right now now to
place these onto the rot. We could of course,
just move them like this and then
rotate by hand, but that can be a
little bit frustrating. Another way to do it
is using snapping. We'll use some
alignment method here. We'll try this one. We'll try
a line rotation to target. We're going to snap. We're
going to change this from closest to the median. We'll try these
settings. We might have to change if
they don't work. That just means that I can
hover it over anything. It's on vertex, I need
to change this to face. You can see that when I
hover my cursor over a face, it moves the origin
point to that location. It rotates the object to
match the normal of the face. Just a lot faster
doing it by hand. But I'm just going to quickly disable this decimate
modifier here. By hitting a V button makes it easier to place these objects, it
would be more natural. I'm noticing that this
is a little bit too big. So I'm just going to
control this actually. I'll slip both of these with individual origins
and I'll just scale them down a little bit
and then apply the scale. I can start placing these when
I'm adding more of these, making sure to duplicate instead of instances
we want to duplicate. I can just place some
of these around. Don't have to be too special
with it, it's nice origin. This would be more apparent
when we're placing some of the foliage on uneven
terrain as well. Because my origin
point is raised a little bit from the
bottom of the cylinder, we don't get any visible
clipping issues. So that's per good,
that's a big one's done. We're going to do the same
move, the smaller one. Move this, this try and clump
it up in little groups. I like the way this look in. Just try not to clip them into each other like
that one was doing. Alright, is this too
snappy for you can add another subsurface modifier to the rock just while as
we're placing these. But I think this is good enough, a perfect and that
looks really detailed. We're just going to
move this one up and then what we can do
is select some of these, just scale them down
so that the scaling isn't quite as even
you could even scale some of them
on certain axis. I'm going to go up here and
enable this gimble and set my orientation to local and I can make
this one taller by scaling out on the z axes. I think that looks quite nice. There's some variation in there. Of course, if you wanted
to just do it using this rather typing
rather than typing, you can just select this
little gimble in the center. I'm usually more of a
shortcut base person. But I do understand
that some people like to use these gimbles. Now, it's a lot like other
software. There we go. You can do this all day, but
here's a little example. And then once we've
got all of these, I'm going to bring back
the decimate modified. And we can just
select everything, make sure that the base is a primary selection
and hit control J. We actually might
apply this modified. Before we do that,
I'm just going to Everything by pressing
shift D and then press M to move it into the archive collection in case
we need to go back for it. We've got everything
that we've just created. Make sure that collection is hidden so we don't
act any work on that. I'm going to apply
the decimate modify, and we're just going
to hit control J to measure it altogether. I want the origin to be in the middle of
the actual objects. I'm just going to move it in edit mode so the origin looks
like it's more centered. Make sure we turn off snapping. Reset these settings just in case it messes with us later. That looks quite good to know. I'm quite happy with that one. Yeah, that's all
the coral finished. I was just going to
quickly create a fish just in case you wanted to animate this swimming
through the water. It's a cool little introduction to creating animals
and characters. So I'm just going
to reset my curve. So once again, so then we can finish off the
section by modeling the fish. I'm going to disable this gimble right here because I
don't like to use it. Or go back to the selection
tool and wasn't here. Just quickly scale this
up and apply the scale. There we go to add the fish. I'm going to start
off by adding a cube. This is just my design. But if you want to go for
a different type, then there'll be some quite
good experimentation. So I'm going to scale
this out on the y axis, starting off of the, up here. And add a couple cuts
going along this. We'll just add a bit
of form to the body, so now we can select the front. This is going to be like
the nose of the fish. And we can scale this
down a little bit. I might join these
two beats together. Merge at the center then. Yeah, we'll join these
ones together as well. Merge at the center. I'm just thinking about the
shape of it now, how this is going
to come through I might end up doing is adding some cuts right along the body. So I'm just going
to hit control. Yeah, going along that. And then we can
scale this out on the z axis and join these furtices up to the
front, right, hitting J. There we go, can start
shaping it once again. I've got some reference,
reference images on my upper screen
that I'm looking at. I's doing this. I wouldn't advise working entirely
off what's in your head. I like that. I'm going to do is
cut tell source. Let these two faces
right here extrude out. If I'm going to
merge these firsts right here at the center, we could work with mirror
modifier to speed things up, but for now we're
almost finished. I think I'll just
carry on like this. See I can scale
this in at center. And once I've got these
two faces right here, I'll extrude this out. Scale this on the Z X like this. And then we just
got to think about how to join this up together. I think I'm going to
connect this vertex to this one in J, this Sing on the other side. And then join these
ones together as well. Now we can try
selecting these edges and just moving them
on the wax like that. Yeah, I like how that looks.
I'll stick with that. But I'll solve these two edges right here in the middle because they're not really
adding anything. Then we got a very basic
model just to polycount. Further, we could
probably delete this loop of edges
in the middle. It's looking a little
bit more abstract, now I like it. And then we could
add a couple fins. In this case, I'm just
going to add a cube nine times out of 109 times out of ten when they add an
object. It's just a cube. Like move this up because this
is going to be a top thin and then merge these ones
together at the center. Do the same on the
slide. There we go. I kind of like how
that's looking. I'd recommend that
you experiment this. If you've got another
design you want to create a little top thin, I'm just going to
quickly isolate this and delete the bottom ad, because this isn't going to
be seen. Just like that. Remember the number
pad key to isolate, And then I can actually
duplicate this one. So I'm going to press Shift D and escape, just to
leave it where it is, because I want the
origin point in the middle and I
want to edit mode. I can move the whole
thing downwards and this will create the little fins on the side of the fish. You can go into wireframe
mode to see it fell, or you can of course use
this little x ray mode up here, right here. I want to move these
two vertices inwards. But rather than eyeballing, I'm going to use little
logic Meletol trick. I'm going to hit G to move
it along this edge and then hit Alt to drag it out
further. There we go. I'll go back into
the solid view. And I'm going to quick
add a mirror modifier to this just to copy
across the other side. That will work because our
origin points in the middle. That's why I moved
it in edit mode. So I can add mirror modifier. Axis is right.
I'll quickly apply this thins in the
body control J. Now I'm just going to move everything so I'm more happy with where the
origin points is. There's our little fish
just got down a little bit. That's our sea left. This is already quite a big asset pack we've got coming together now. I'm very happy with
this going to quickly go through and add
some materials. Think we're going to
go for some slightly darker green ones
for the seaweed. I'll start off this
one right here. I'm just going to use
this little button here. Click on the ten to
creates its own material. And I can see we've got the 001. I'll call this seaweed. For the coral, I'm not quite sure what color I'm
going to go of this. We could even copy the same. Colors that we
added to the daisy and the tulip. I might do that. I'm going to go to the
material and just search. Here we go, daisy petal. And I'm going to hit
this button here. The two button again, just to create it as
its own material. And I call this coral. Make sure to add this to
the other ones as well. I'll just just select them, Make sure this one's
yellow and then hit a control L to
link materials. But we want the base of
this to be different. I don't want to base be
the same color, is it? So I'm just going to
island select the base. Add a new material up here and see if we've got
any similar ones. We could add gray rock. I want to make it a
little bit darker. I'm just going to
select a gray rock right here and a sin. I'm going to create this material by
pressing that button. I'll just call
dark gray rock and reduce the value a little bit. We can add some little
colors to our fish here. Another pad period
to zoom in on this. I'll create fish, Maine, and fish secondary materials. Of course, if you've got
multiple types of fish, then give them their
own separate names. A figure, a way out of
working that suits you. And I'm just going to
change the base color. Not quite sure what
color will go for. I think I'll just make
it like a kind of blue silk color so
it looks quite nice. And then for the fish secondary, I'm just going to assign this
to these parts right there. Maybe add the tail as well, so can just do basltsing these Asics and hitting
control number pad plus to grow mas selection and assign it to this
material right here. So this is just silver,
not got any blue. Whereas this one
is slightly more saturate, It's got
some blue in there. And I think that looks
quite nice for a fish. Now, if you went up
to the shaders tab. So currently these are using the same materials as
the daisies and tulips, or in this case,
just the daisies. So you're going to go up to the shading tab and we can just move around
these sliders again. And of course,
change the colors to make them a little
bit more distinct. They'll be more
underwater color. So I might start off just by, you know, changing the
saturation like that. Quite sure what colors I want
to go for thinking coral. So it will be like
bright orange. Yeah, you can
experiment with this. Maybe duplicate some of
them just so you can see. There you go. And looks
like that's all I see. I finished. I'm just going
to go up to the layout tab now and quickly name these. These are all in the foliage
collection right now, but I think I'll move
them to a separate one. I'm just going to slid all
these objects right here. Make sure we get a
seaweed as well. I'm just going to hit M and I'll create a new
collection Sea Life. Now I can jump to these ones. Haven't got the most
creative names of them, so I'll just call them
coral one, Coral two. Remember I'm hitting two. Jame, these interview
pot coral three. And I'll name these
ones Seabed 1.2 If you want to sound
fancy then you could find like a real life species. Name it after that.
Call this one fish. We've got a big thing,
it's already looking nice. So now would be a
good time just to check your normals right here. Maybe you can enable
face orientations. These things looking fine. Sometimes this leaf here looks a little bit odd. We
can see some red. I think that's
just because these faces are so close together. There's some clipping.
This is the case, our normals are all right,
the simple face orientations. We could just also
change the scale of the assets so everything's
looking right, relative scale much quickly. Just scale these phones up, there we go, and apply that. I think everything else
I'm pretty happy with, so I'm going to
leave it at that. Congratulations.
Following this far, we've covered a lot of content and some new
modeling techniques, and we're going to
use those later on. Of course, in the next section we're going to be creating
some landscapes and clouds using some
terrain editors and placing the objects that we've just created into the scene.
12. Creating Low Poly Landscape: Hello everyone and welcome
back to the next section of the course where we'll be
modeling the landscapes. To start out with,
I'm just going to press Shift S and move my cursor to the world origin and collapse some of
these collections here, because I might
hide some of these so it looks like my foliage isn't in the
scenery collection. I'm just going to move this
under the scenery collection. And same with the
sea life as well. What that means is
that we can just hide the root scenery collection and all these trees and everything that we've model
just be hidden for now. Whilst we're working
on the landscape, there are lots of
different methods we can use to create the landscape. I'm looking at three
different sort of biomes. So we'll do like an
open meadow or field. We'll do a forest, and we'll
do a beach or an ocean side, because these types
of landscapes best match the assets
that we've created. Let's go up to the Landscape
Collection right here, so that our object will
be added under it. And I'm going to press
Shift A to add a plane, we need to think about how large our landscape needs to be. I'm going to scale
this, assuming each one of these little
grids is a meter. I'll scale this
out to about 200. If this is too big, yes, it might be a
little bit too big. I can reduce this, I'll just scale it to 100. And I believe this will
be about 200 meters by 200 meters. But I'm correct. Once we've got this,
we're going to right click and subdivide. We can go down here to the
number of cuts. Any increases. Fortunately, this
only goes up to ten. So we might have to
repeat this operation a couple times to get
enough geometry. I can zoom in a bit and going
to see that each one of these squares is taken up
about the same size as a tree. I might subdivide it just
once more about that. I'm quite happy with
that. The first method we'll be using is
proportional editing. This can be really,
really quick for creating landscapes and I'm just going to go into edit mode right here. And if I go up and enable
proportional editing, make sure you play around
with these dropdowns random, it can also come
in quite useful. I'm going to select one of
these vertices right here. I'm just going to move
it up on the Z axis. If I use my scroll to
increase the size, you can see you can drag
up hills like this. If I zoom in, this is how it's going to
look at head level. It's quite a nice way to do
things. It's very quick. You can select multiple
vertices at once. You don't just have
to select one. I can select some
vertices like this, and it will all move them
up by the same amount. That's where this method
really comes in useful. Try not to create lots
of identical hills like this because
it looks pretty obvious. Use this technique. I'm going to play around
with some of these offsets. Let's try the
inverse square one. See how this slopes get some different shapes
member you can drag downwards as
well as upwards. But what I'm just trying to
do here is put some hills on a horizon line so that if we're at head level
and we look out, we're not going to see the
edge of this landscape. It will make it all seamless. There we go, like
this. Random is also a really good one if you want to roughen up the terrain. However, it's quite useful
if you just use it subtly. And now you can see the
ground slightly uneven, but I'm just going to
undo that for now. I'll roughen up the
terrain nearer scale, this random mode right here. If you want a nicer result, spend a bit more time than me. Anyway, that's one method
for editing this landscape. What we can now do as well
is going to sculpting mode. Up here on the top, we can actually just paint
on the landscape, which you may prefer
working this way. You can also smooth it out. If you've added a
bit too much detail, you can come in and just use the smooth brush right
here on the side. The only downside if using this is that you
can see if I sculpt, let's say I use this drag brush just to show you the
grab brush over here. I sculpt and pull it sideways
and then go in top view. We've distorted the natural
grid that we had before. I'll wire frame, we're just moving things up on a Zaxs
using proportional editing. Everything is kept in a
nice, neat grid like this. When your sculpting, you have
to be a bit more careful, but you can always come
in and smoothing it out to even your geometry
out a little bit. I'd like to use a combination
of both of these methods. I won't just stick to
one in sculpton mode. You can play around with
some of the other brushes. Fan grab brush, like I said, just try and move it
upwards if you can. This can be quite nice and it gives you a little
bit more control. Allows you to make
more interesting shaped hills and mountains. The crease brush can be really
good for creating valleys. There's running
between two hills. Remember to change
your brush size. This is nicer if you've
got a drawing tablet. But I'm just using my mouse for now so we could create
some rivers like this. There you go. I'll go
back into the layout tab so we can see it now
in terms of shading. I like the flat
shading, but this looks really strange when
it's got its grid on it. So ideally, we'd like
to triangulate this. We can do that using either
a triangulate modifier or we can just add a
decimate modifier, which we used before. This will also reduce the polycount of the scene
quite a bit as well. That's a bonus value
in this range. Looks the right, that's looking. Let's quick go into
Y frame modes. We can see it. Maybe we should try some of the different modes that
looks like collapse. Probably the best one
is going to work. Just be really careful. Slow down your
computer. There you go. Because this is done
in object mode, now we can go back and
change the shape of the landscape using our high poly version
that we subdivided. And then object mode, the modifier will bring
it back down again. That's quite a nice
way of working. This is actually quite
a good example to show us how the decimate
modifier works. You can see that the flat
areas like this are decimated, or the geometries
reduce more than intricate areas with detail
like these hills over here. If we didn't want that,
we could just use this a random mode. And you've got to
be very subtle with this because it always
looks worse up close. I can just let one
of these vertices have a very large area. Now you can see
that because this has actually got density to it, the geometry is changing at the decimate modifier
will preserve it as well. You can click this little triangulate option if you
prefer how that looks. I'm just going to go
back into solid mode to see how it is like this. It looks quite subtle.
I'm happy with that. I think I'll stick with the
triangulate mode as well. Using these techniques,
I'm not going to actually create a
landscape that I want. One area of interest will
be an ocean or a lake. So I might make that over here. I'm just going to sculpt this. I'll go over to
the sculpting tab. And I should just be able
to paint on quickly. Disable the decimate
modifiers I'm working because I can
slowing things down. Say I can just paint on
bay area running here. This is very similar to zbrush. If you've ever used zbrush, you can hold shift and that's a short cut for
the smooth brush. You don't have to
switch between them, you can just hold shift
and it will smooth things out for you, which
is very helpful. Similarly, if you
hold control inverts what the brush is
doing right now. This is painting on to the mesh, is bringing it outwards
using the draw brush. But if I hold control then it'll do the opposite and subtract. Sculpted in is an
area of blended, has received a lot
of attention in the past few years which
is nice. There you go. I just sculpted up
this side right here. Now it's looking at
this is giving us a nice platform to
place our assets on. We'll most likely be editing this landscape throughout
the rest of the course. We'll be making changes to this. It's not like we're stuck
with what we've got for now, so I don't worry too much
about getting it perfect. One thing I'm noticing, I might want the horizon
line just a tiny bit higher so that I can have a bit more
verticality in it. Because at the moment it's
looking very flat and boring. So I'll go back
to sculpting mode right here and cannot
disable this decimate. I'm just going to
add a little bit of detail right the outside, just raise the horizon
line a little bit. I'm using this
standard draw brush because if I paint over
existing work that I've done, it doesn't distort it and
lose the detail like this, River Africated right here. If I paint over it, it raises it without overwriting the
detail that I've added. That's looking a
little bit better. And now I'm going to try
painting on just around here to make the close landscape a little
bit more interesting. Some hillsides,
maybe a little cliff over here that's looking. We can add some proper
cliff models later on, so don't worry too
much about that. It's looking a little
bit better to me now. There we go. There we go. Have a look at back
in the layout mode with the decimate modifier on something that this is
looking really good to me. I think I'm quite happy
with how this is. Decimate modifier is
a little bit buggy. Sometimes you get some
weird triangles over here. If you thought about
that, maybe at the end it might
be worth applying this modifier and then come in and tidying up some
of this geometry. It's not a perfect solution, but it does a pretty good job. Don't worry about the placement
of these props right now, because these won't appear
in the final render. They're just there
while we're modeling this scenery
collection right here. So just hide that if you want
to get rid of it, remember, But when we're working
on the scenery, we'll hide the
landscapes collection. Once I'm here, I'll
quickly rename this, I'll just call it ground. And then we're going
to create some clouds, which shouldn't take too long. I'll do this under
the scenery as well. I'll bring this collection back and I'll have a
cloud collection. This really shouldn't
take us long. We're going to add
some Metablls. Come down here, We've
used these before, so let's just go into edit mode. Sca them up and
create some of these. Remember to change the size of the green inner circle,
right here. There we go. Andy got proportional editing, so I'm just going to enable
this and set it back to smooth so it doesn't mess with me next
time I try to use it. There we go. That's my little
method for creating clouds. Then once you're happy with it, we can convert this to a mesh, come into the sculpting mode and just make it look circle. Just smooth it out like this to use the grab brush
that's looking nice, make sure the botos
looking okay. Perfect, back in layout mode, we can give this notorial as well. We'll do
that later though. And let's decimate modified to this to make it
look more low poly. And we'll add some
ash shade into this later on so it doesn't
appear completely solid. That's the basic method
for creating clouds. Might just quickly run through this again to
create another one, then we can move on, get
quite fast at doing this. Try and create some
clusters as well like this, because not all
cloud is going to be a single object like that. Some clusters of lots
of different clouds can work out quite nice. Convert this to a
mesh, sculpt it, that looks quite nicely.
They've got a flat bottom. I put the des mat
modifier on this. Let's see how these
look from below. We got to rendered mode.
I'm quite happy with that. These look like clouds
to me, but like I said, we'll add a better
material to them later on. We've covered some quite
useful techniques here. I'm hoping these techniques
will be useful to you. So, yeah, spent some
time perfecting this, make sure it's
looking really nice, and then we'll move on.
13. Creating Low Poly Mountains and Cliffs - Part 1: Hello everyone and welcome back. In this part, we're
going to be creating some mountains and cliffs. So some more fatcy
terrain to add to the level aside from this
landscape that we created here. To start out with, let's
create a cliff place. My cursor here, so I can shift and right click
to place my cursor. And I'm going to add a plane. Then I'll scale this outer
bunch something like this. What I might do is hide
the scenery collection. So if I just move this outside to the work in progress
and I can quickly hide the scenery and I'll get rid of all those objects and then I
can also hide the landscape. With this, I'm going
to go into edit mode. And then using K to
enable the knife tool, actually I might press
seven on my number pad. All go up here to
the top of you, just so I can see it from above. And I'm going to trace the outline for the cliff
face that I want for mine. I want to create a
little protrusion coming out separate to it, almost like what you'd find
in a Mesa Canyon in Utah. I've got some reference on my screen and I like
the look of this. I'm just going to draw
the outline right here. Of course, it might
be nice to create lots of variations of
these, not just one. I've got something quite
here that I'm happy with. This looks like a nice cliff. And then I'll just press
Enter to confirm this. Now what we can do
is select these faces that we've just created, these Gns, and extrude
them up a bit. It might be nice to have
some kind of layering going on rather than just going
straight up vertical like this. So we can scale
these in, but you see that protracted
tortal center. So you might want to change your pivot point down here
to individual origins, and this will scale inwards
on either part of the cliff. You can also use old, but it doesn't really
work of the top face. You might want to
extrude up first. And then if I select these
rings of edges right here, I can hit Alts to
scale in and out. This actually looks really nice. Even this right here could
be a cliff if you wanted to. I'm going to add a little
bit more detail to mine. I'm going to select these faces and extrude them
up a little bit. Just scale them in like this, same thing we're done before. Maybe one last time. You can also delete
the top face right here, X to delete the face. And then if you strings
of edges you can use old it will actually skeleton
rub and moving up and down. It's a slightly annoying
thing about blender. Once that's finished,
I can start in in some of these faces together I'll join because I want some different
layers going on. I'll just select these
edges right here, press F, and then I'll
select the rest of this, press F. And then I'll
extrude this section up and create the O cliff. Just let this got the basic
shape of this cliff face. But I'm just going
to go in select some of these edge loops, just program of the scaling, change the shape
of them slightly because I might
not be happy with how it looks a bit
thinner at the top. And I'll do the same
for this a little bit. It almost looks like
layers of sediment rock. I suppose we can
also come in with a proportional editing
if you like this. Let some of these fats
is moving around, make it a bit less, even if
you're going to do this, rather than having a
messy end on the top. I would recommend
filling in some of these just right here. I'll hit Control
Arts out of a loop. Going around here with
proportional editing turned off. It's almost like we're doing retopology here, just
going through Cretin. Anything that looks odd to us, you can hit J and
it will just create a new face that goes
between the existing edges. Just like this. Okay, So I've tied it up,
mesh a little bit. I'm going do the
same up here now that looks a little bit
more tightly to me. A tool that I sometimes like to use is a randomized transform. So I'm just going
to hit control A to select everything or just A
to select everything, sorry. And I'm going to hit F three and I'm going to search randomized. And then we go
randomized transform. And then we can just
drag the amount up here. And this will do this to every vertex you've
got selected. Just drag the amount until
you're happier quickly. Tidy up this gee try on top, then if we wanted to
take this further, we could also put a
decimate modifier on it because it's still
looking very quad light. Let's add a decimate
modifier and see how this looks when we drag down the ratio a little
bit to low poly. So I'm going to add a
subsurface modifier here. First I'll just
drag this one up, that's looking a little
bit better to me, just getting some problems with the subsurface modifier and
the face at the bottom. And I think that's
just caused by these two faces here
that we've got. If I delete those faces, you can see this looks a little
bit better. There we go. I suppose one problem
that comes with this is the subdivision takes out
a lot of detail to the mesh. So I would recommend
coming in here again with proportional editing
and just changing the shape to make it a little
bit less round and boring. I add some character to it and you can always tap back into object mode to see
how us will look. I'm quite happy with
how that looks, so I'm just going to let
everything actually, I'll let this bottom ring of edges right here on both parts. I'll just using proportional
editing the stretches. I'll just drag this
down, the origin point. So that we can place this
on a rough landscape and it looks okay. Now
we've finished this. I'm just going to rename
it cliffs once again. Maybe create multiple
variations of this if you like. And I'll move this down to
the Landscapes Collection and bring it back
so we can see it. I can just place this
off in a distance somewhere on the horizon. Line in rendered mode makes the scene look a little bit more
interesting, doesn't it? Then of course you
could duplicate this or instances and move it around, skated out, so you've
got different sizes. Rotate it on the z axis, and it already looks like we've
got some variety in here, which isn't actually the case. That's one way of creating
cliffs and now a mountain. This will be a little
bit more simple. I'm just going to
press shift A to add a plane just like before. Scale this out, I'll just move this up here rather
than hiding everything. Then if I go into edit mode, we can right click and
subdivide this a few times. Remember it maxes out to ten, so you have to
right click and do subdivide again if you want to increase even more. Here we go. I'm going to do is
I'm going to go up to either the linear
or the sharp mode. We'll rag both of them.
We're just going to drag up the profile of mountains that we want. Great ness and sharp. Just let that now
switch to sharp mode, make it a little bit
more interesting. Remember we're doing
a low poly style, so it might be nice to
make it cartoonish. You see what looks best for you? Of course, we can take this
into sculpt mode as well. Let's go across to
the sculpting tab. We can smooth some parts out. Use the snake hook tool, which I believe is down here. You can just drag parts up like this creates a nice
swelling effect, if that's the style you're going for that like others
looks actually. Or the move brush and this
crease brush right here. So you can use this to create a nice screws running along
the side of the mountains, it looks almost wind
swept over here. You can get quite creative
with this, with those details. I'll go back into
the layout mode and I'll put a decimate
modifier on this. Once again, once again
I'll just move this down. Don't need to worry about
having accurate scaling here. It's going to be off
in the distance. Doesn't have to look right. Let's see how this looks
from where we are. This is where I'm
thinking of having the camera in the scene. And that looks quite nice
off in the distance. You can imagine
it once we've got materials with snow on
top will look quite nice. I'll just create a
couple of these and rotate them around on
axis just like this. That's one nice way to add
details to your landscapes. These mountains, I got a bit carried away place in using the sea and I forgot
to name them. So I'm just going to
select these right here. I'll drag these both into the landscapes collection
and I'll just rename this mountain one and mountain two and sing
the cliff looks like. I've already done that again. I'm happy with that. We're
going to quickly save this. Then in the next video, we'll be adding
some color to this. But we won't just be selecting faces and adding
colors that way. We'll do some
procedural materials, take some time, have fun
creating some mountains, and clear whatever scenery
you like to the background. And we'll continue
in the next video.
14. Creating Low Poly Mountains and Cliffs - Part 2: Hello everyone and welcome back. In this video, we're
going to be adding some materials to the landscape. So I'm going to start
out by bringing my scenery pack just because
it's nice to be able to see. So I'll add this, and I
forgot to rename the clouds, so I'm just going
to quickly call this clouds one and clouds two. And I might bring these a little bit closer to the ground. I'll just put them
down here somewhere. They're easier to
see right here. I'm just going to one of these
objects I can focus in on. And we're going to move
up to the shader tab to add a material to
this ground right here. If I hold and go down to either Material
Preview or Rendered, I'm just going to go
to Material Preview across the Materials tab. I'm going to create
a new material, I'll call this ground now. We can start out by
giving this like a solid green base color. This would be the
color of the grass. But I want to make something a little bit more
complex than this. What I would like is
for this shader to automatically mask any up
facing surfaces to be green. For the grass and the size of cliffs or the
hillsides like this, it will be like a
brown or a gray color. So this would be soil or rocks. The way we do that is
using a couple nodes. We need to use a geometry nodes. This is under input. We had a geometry right here. Here we drag out the normal
and we add a separate color, Separate color in
older versions of blender called separate RGB. I believe I'm just going
to move this over here. What this does is it
gets to the normal. Remember the normal
is the direction that a face is pointing towards in three D. And it just
outputs it as RGB. By plugging in these
to the base color. We can just preview them here so we can see it looks like the red bonds pointing in
this direction. The white areas, bits that
are going to be seen here. The green one looks like
it's face in this direction. So you can see it's like the
positive white direction. And the blue one, which
is the one we want, is all up facing surfaces. This is difficult
to see right now because most of our
landscape is flat. If I rotate it, you can see
this starts to become black. This right here isn't a shadow. This is part of this
node right here. I'm just going to controls
to bring this back. You can see this hillside
is slightly darker. The surrounding
which is nice and this will be more apparent
once I add a color ramp node, I'll search for color ramp and I'm going to drag
this between the two. Then what we can do is
drag black one over here, over towards the right, and that will start masking away parts that we
want to be dolled. This will have a
brown color to it. If you wanted to, you could start changing
the color of this. We could make this
like a brown color, but I'd like to have a black and white
color amp like this, which then feeds into
another color amp just in case we wanted to use this one
for masking in the future. I also find it gives us a
little bit more refinement. You'll see what I
mean when I add it. So let's add another
color out right here. And this is going to be colored. I'll make this a brown color. Looking at the tree
trunks of reference, you can always
change the slate to remember for the white. Yeah, if you wanted like a snowy forest would
look quite nice. Already looks quite snowy, but I want to have grass land. I'm just going to change
the color of this. Maybe bring the value
down a little bit. I can look at the foliage I've
already got for reference, this is looking quite
nice to me. There we go. Remember, this will only
work as you and blender. If you were to export this to a game engine like
Unity or Unreal, you need to recreate this
shade in the engine. That's easy to do.
In most cases. I'm noticing my computer started to slow down
a tiny bit here, so just be careful
when you're initiated. Editor, make sure
to save regularly. You can also apply
the decimate modifier that we've got on
the landscape here. I've got the decimate modifier. The actual geometry
here is quite complex. This might be what's causing
me some performance issues, but I'll keep it there just for now and then we can track this. That's quite satisfying to do. That's our basic setter. Now we can copy this
and use this on the mountains and cliffs
that we created before. I'm just going to sl all of these nodes box selecting them. Then I'm going to hit Control with my curse in
the Shade editor. Then I'll click on this
Cliff side right here. Creates a new material that name these pretty
sure I have named. Then in here I can
paste these nodes into this material, feed
it to the base color. You can see because this is
a very vertical surface, it's got like a really
rich brown color to it. I'm not quite sure
if I like that. So I can come in here because this is a different material. I can change these colors and it won't affect the rest
of the landscape. My computer has really
started to slow down here. I'll just select this one.
Saturate it, darken tiny bit. Just. The color turn. More happy. There we go. I want to have a little bit
more grass on top. So I'm just going to
move these about. That looks nice.
Those are clips. Now, I'm just going
to past the same node set up into the mountain. So I'll create
mountain material. I believe I have instances, the material should be
copied across both of them. In here I can just hit
control beds past the nodes in and drag this up
to the base color. Nice thing about
this set up is that if you place objects in your
scene, you can rotate them. And the grass, if you were to select
those places manually, it wouldn't change
when you rotate it. But right now you can see I can rotate this mountain and it automatically corrects the
grass, which is really nice. If we were to have some
smaller rocks in the scene, let's say we wanted moss
or snow grown on the top. We can rotate them and it would
automatically correct it, which is very nice here. I want to have a little bit of snow on
top of the mountains. I'm just going to play
around with these colors. I might actually delete this color ramp and add a
new one between the two. I'll just change these colors. I quite like these
cartoony mountains. I'm going to with a slight
blue purple tone like this, Almost feels like a
Bob Ross painting. I can track this slider to
adjust the amount of snow that I want on top of this
mountain till it looks nice. I'm quite happy
with that, but it's a little bit too high contrast. I might even try a
muddy color like this. But I'm happy with this. You can play around a bit as
much as you like. Of course, I'm just using the material preview
at the moment, if I hold Z down, like we got to render
to see how this looks. This is currently
using the EV engine, which I probably won't
use in my final renders. I prefer cycles because I
think it looks a lot nicer. But remember this V engines is a lot faster just
for looking around. You've seen like this. One
thing I'm noticing is I don't like these shadows the
clouds are casting. I'm going to come down
here on the material, it doesn't look like I've
got material on this cloud. So I'm going to
quickly create one, create a cloud material. I'll assign this to the
other clouds as well. It doesn't look like
I've done that already. And we're just going to come
here to the shadow mode, which is currently on opaque. We're going to
change this to none. And that stops the
shadow from casting. Then if we go back into cycles, so maybe we change
our rendering engine up here under the camera tap. Cycles has a different
way of disabling shadows. So we're just going
to go down to this little object
tab right here. And then I believe
it's under visibility, you ray visibility and shadows,
we can just disable that. You can see what I mean
when I say this looks a lot nicer in fair cycles mode, you just have to wait for it
to render and do its job, but already our sines are
coming together quite well. I like the way this is looking now for the clouds themselves, they look a bit blocky and I want to give some
actual volume to them. So I'm going to select
this cloud right here. I'm just going to
drag up this node and instead of the surface, and
I'm going to disable this. And you can see it turns black
because we've got nothing going into the surface
on a material out. I'm going to add
something called a principle follume right here. And I'll plug this into
the volume socket. And this makes our clouds
look black, like a cloud of. So I'm just going to
change the color. It's like some gray
valley right now. I'm going to lighten
this a little bit, so we've got nice white clouds. Another little hack out found probably isn't the
best way of doing it, but if you just want to brighten it and make
them always look white, no matter the direction
the sun's coming from, you can increase the
emission strength like this. Not that high, but it just means that your clouds
are always bright, which looks quite nice. Then of course, you can at instances scale them
up just moving around. You seen, I'm happy with
the way that's looking. This probably won't work as well in V, so that, that's nice. Cycles, clouds using the volume. If I go up here and change
this from cycles to V, yeah, it doesn't look
like it's working at all. If you're using V, I'd recommend because it
just gives them boxes. I would still
recommend just using the principled into the surface. Like I said, I'm going to stick with cycles for my rendering. So I'll go up, change my
rendering engine here to cycles. I'll still try and
cover some like the way of doing things
in V for the people who, who want to stick with that
rendering engine cycles. There we go. I'm just
going to drag this into the volume and get
rid of the surface, decrease the intensity
a little bit. This is quite bright. 0.40 0.5 perfect. Then we can go back
to the layout tab. Some of these shades might slow down your computer a little bit. Even if you're in
material preview, I'd recommend sticking
in solid view walls. You still can. And also I'm noticing that the landscape's
a little bit too rough, a little bit too glossy. So I'm just going to go to
the material tab right here, and I'll increase the
roughness a little bit. That looks slightly
better to me. We can see here some
of these trees look weirdly shiny. But
I'm okay with it. I'm happy with how
that's looking. So in the next
part, we'll create some water using the
similar technique that we just have
done in this video. For the shaders,
we'll be creating some water to fill
in this little lake. We're already tackling some
quite advanced concepts in the shaded editor right now, so don't worry if it's
not all going in the. I don't expect to
remember everything, just have fun with it and
over time you'll pick up quite a good understanding of how the shaded editor works.
15. Creating Low Poly Water: Hello over one and welcome back. The scenes already starts
to feel quite sick now, but in this video
we're going to add some water to this little
river and lake over here. I'm going to start
out by going into solid mode just so things
run a little bit faster. I'm okay where my cursor is, but I might actually
just quickly shift S and cursor to selected at the same origin as
the landscape object. Now going to add a plane scale this out in edit
mode by about 100. There we go. It looks like
I've got proportional edition. I'm just going to turn
that off before it messes things up over here. Now that we've got our plane, this is all act as the water. And I'm just going
to move this down in object mode so it's at
the level we want it. We can always change this later, so let's just have
it there for now. And so yeah, we're
going to go down to this modified tab
and we're going to add a subdivision surface and increase the level was up to about six because I think
that's the maximum we can do. And this is looking good. If we go into wireframe
mode right now and hide this floor,
you can't see it. And that's because of something
called optimal display. So if we disable that, now we can see the
true wire frame, Marine wireframe mode,
which is quite helpful. And we're going to
change this from Tmall Clark to Simple, which basically means it won't
smooth out the end result, it will just subdivide it. An advantage of this is that we can always change the level rather than doing it in edit
mode like we've done before. I'm going to go back
into solid view and bring back the
rest of the landscape. And going to add a
displaced modifier to this because it's
perfectly flat right now, we want to add some relief. Looking for a dip
goes right here. You can see it
already brings it up. What this modifier
does is it moves everything up in its
normal direction. So you can see here
that we've got the strength that
we can change this. Let's just keep it
at one for now. Currently it's moving everything up by about the same amount, but we need to change that
by adding a texture so we can use one of the procedural textures that come with Blender. And to do that we
can select one from, I'll drop down, we can just press this new
button right here. And then if we press
either this button or we can go down to
the Textures tab, We're going to press this Sp. You see it's opened
up this window, which we haven't used before. This can be used in many ways. So if you wanted to
import a terrain map, like using Google Maps data
or something like that, you'd import an image,
a bitmap image. We're just going to use some
of the procedural noises that come with blender because they work well for
what we're doing. I'm going to choose
distorted noise. And there are a few sessions
in here I'd like to change. I've figured out my settings just from playing
around earlier, but I do encourage you
to experiment with all the different noise maps
and see what you can create. What I'm going to do is go down to colors
right here and just decrease the contrast
a little bit because right now we don't
want all those black areas. I want to have it a little bit more blending going
on like that. That looks quite
nice. It's a bit more subtle I found. So
let's stick with that. And you can see our water is looking a little bit
more interesting. Now, you can always add smooth shading if you wanted
it to look more smooth. But then you might
need to increase the strength because otherwise you won't really be
able to see the waves. You can also add another
subdivision surface after this, but keep it So Catal clock
this time instead of simple, that looks quite nice if you
want this realistic water. I want to keep with the
low poly perfinose. I'm just going to
get rid of this subsurface and make it flat. Here we go. I think I'm happy
with that strength level. Another thing to take note of, everything looks really
square right now. We've got a bunch
of square faces. You can add a triangulate modifier if you don't like this, but I like the look
of the square faces, the quads I'm going
to get rid of. This is an option that
Sara, if you need it. Yeah, we've created this. Now we need to add
material to it. I'm going to go up to
the shading tab and this will be the first time
we've used transmission. For this, selected are
going to go down add a material, call this water. We can just go up into
rendered mode and select a nice blue
color like this. We can always change it later. And then to make it transparent, we can increase the
transmission like this, and it becomes almost like
glass. You can see through it. I might also suggest changing in this alpha slider here.
Don't go all the way. That maybe put this down to about 50 or 60% about here, just so we
can see through it. And then we can play around with the amount of transmission we like as well as the
roughness waters. I think it might
look nice if it's really glossy, but not too much. Let's also see what the
transmission roughness does. You can experiment with this. That's the surface of the water. If we want to be able
to see below it, we need to add a volume. So I'm going to
press Shift A and search for principled volume. And then I'm going to drag
this into the volume input, but I find the density
is way too high, so I'm going to set this to
0.01 needs to be very low. You might not even see
the effect of it there. You can change this
value how you like it. And sometimes it
might be asked to copy the base color from the principled BSDF into
the principled volume. The volume will do is that when our camera is close
to it like this, it will mean the
deeper parts are more murky and it's
harder to see them, and then the shallow
parts are more visible. And you can see that quite well just going
around the bank here. I'm just going to play around of the roughness value
until I'm happy. I want it a little bit more rough, just like
that. There we go. If you're using V, this
probably won't work. So what you might need to
do is go into edit mode. Right here, I'm just
going to select everything and I'm going to extrude down on a Z
axis to about here. And then just select everything and shift to recalculate
the normals. So let's change the
rendering engine to V and see how this looks. There's no transparency
right now, so we might need to go down
in a material settings and change this blend mode
from opaque to alpha blend. And it is looking a
little bit better, we can see this now. But still I think it's always
going to look nicer cycles than it will do in V. I'm just going to change up,
We've got this water, and just before we finish up, it'd be nice if we could
find a way to animate it, because currently it's
just stuck like that, and it'll be a bit boring
for a video or an animation. Let's just go back into layout mode so we can see
it a bit better. The way we animate this, we won't go into
too much detail. Just enough for what we need to get this moving is
going to press shift A, and I'm going to add an empty, and we can choose any
of these that we like. I'm just going to go
for plane. There we go. Let's move this just over to the lake so it makes
a bit more sense. Then what we can do is on
this displayed modifier here, we change the coordinates
from local to object, and then using this pat, we can select the empty. Now the texture will move
around wherever this is. If I move this on
the x and y axes, I just slide it around, which is very cool, but you
have to be quite subtle. I'm holding down
Shift was doing this. It moves it slower.
Yeah, these waves move quite fast. I'm
happy with that. We just need to
quickly animate this for a basic animation.
Very basic. We're just going to go to this
animation tab right here. And I'm going to
number pad period, just to jump to the
location of this empty. I'm going to go to
frame zero right here. And I'm going to press
the key frame location. You can see this gives us a
little yellow dot right here. Now if I slide this to
the end of the animation right here to frame
250, I can move this. Let's just move
it to about here. And then hit and set
the location again. Now we jump to the beginning of the animation and press play. You can see the waves moving, but right now they
start off slow. Then they move really fast in the middle of the animation. And then they should start
to slow out at the end. Don't worry about this too much. Allow this is just down to the interpolation
mode that we've got. So I'm just going to select all these key frames right here. We'll press A to select
everything we're going to press, which is a shortcut to
change the interpolation. And I think it's on
bezier by default. But we're going to set
this to linear easier. It's marked by
these little green lines between the key frames. And now everything
should play smoothly. So if the waves are moving a little bit too fast
for you or too slow, you can just let these
key frames right here, it looks like my
computer is struggling. So we can just let these
keyframes and move them forward. It doesn't matter if
it's past the end point. This black line right here at 02:50 means this is
when my animation ends. And we can change
that down here. So this should last about
10 seconds right now. And we should see that
because I've moved this key frame further
along past the end point, the waves now move a
little bit slower. So I keep playing
around with this until you're happy
with how it looks. This is a very basic way
of setting up water, but I think it looks quite nice. Let's just move this
along even further. So I'm going to
quickly save this and then go back into layout mode. And if I go up into rendered
mode, see how this looks, it's going to be very
noisy for me because my computers are struggling
to render in cycles. I can just quickly change
this EV and see how it looks. I don't think that
looks too bad. It looks quite similar to how we make water in
a low body game. Now that we've
finished our water, in the next part we can start placing some of these trees and plants that we've made around the scene using a
particle system.
16. Using Geometry Nodes To Populate a 3D Environment: Hello everyone and welcome back. In this part, we're going to
start actually populating this environment with these
assets we created earlier. And to do that
we're going to use something called geometry nodes. Now another method that
a lot of people like to use is the particle
system in Blender. But this is becoming
quite outdated and a lot of people are
switching to geometry nodes, which is a more
robust system from my experience and allows
us to do more things. We'll start off by going up here to the Geometry nodes tab, which operates similar to the shader editor
or the compositor, which we might have used before. But I actually found it's
more sinful to learn, especially if you've got a
background in game engines. I find it's quite similar
to unreal blueprints. It'll start out here by
slept in the ground. This Lund s get right here. Me personally, I'm
going to apply this decimate modifier just so things run a
little bit quicker. Because it means it's
not having to compute the base mesh before
it's got decimate. But I can always append
an older version from a previous file
that I've saved if I need to because I've
backed up my project. So I'm just going to go here
and apply this modifier. Perfect. Now what we
can do is right here, we can click Add New, and you can see it's called
Geometry Nodes by default. I'm just going to rename this, and I'm going to, I'll
call this object spawner. You can always rename
it something else, whatever you like, You call
it foliage or something. And this acts a bit
like a modifier. So each one of these
modifiers will place a collection of objects
onto the board. So this first one
right here we're going to use will be used
to place grass. And then we'll create another one that will be
used to place trees, rocks. Basically all these assets
we've created here, if we wanted to edit the grass, change the amount
of grass that's on the landscape or
paint where it is, then we're just going
to edit this version. It will make sense later anyway, to start out we're just
going to navigate down here. I find mind moves about really slow and I
zoom in and out. So I'm just going to keep
it at this distance. The first thing we're
going to need to do is select a bunch of points
on this landscape. And we expand this window so
we can see it a bit clearer. We're going to select a bunch of points on this
landscape randomly, and then we're going
to use that data to tell Bender where we
want to place our grass. So we're going to go
down and we're going to press Shift to add. And we're going to search for
distribute points on face. We distribute points on faces. I'm just going to drag this down here so that it
connects between them. And what this done
is it's hidden the original mesh,
we can't see it. And it's replaced it with
a bunch of point data. So we can see currently
the density is very high. So I'm just going to
reduce this because we've got way too many
there right now. I think even 0.2 or
0.3 will be too high. I'm just going to
leave it like this because this has replaced
the original mesh. We actually can't see
it, so we're going to need to add in that
geometry data back. The way we do that is using
the joint geometry node. Going to press shift A here and search for joint geometry. Then I can place this here. And this connection type
right here allows us to just drag in as
many lines as we want. It looks like in
this editor, right? The green is used to show
meshes or geometry data. Much like in how
the shade editor, you have separate colors to convey whether
it's a float value or colored data vectors. Now we've got these points on this landscape and it's also keeping the landscape geometry, we need to add the objects
onto these points. So we're going to press Shift, and we're going to search,
for instance, on points. And just drag this between the distribute
points on faces and a joint geometry node by hovering over this
connection right here. A little tip, something
I struggled with at the start is dragging
away from these. You can also hold bolt or
control and then right click between and it just draws this little knife that you
can use to break connections. But this is fine for now
go instance on points. Then I'm just going to move this about so you can
see it a bit clearly. We probably don't
need this in here. The instance inputs where we're going to drag in the
objects that we want to do. I'm going to start
off the grass. In order to do that,
I'm just going to expand this out here and get rid of the
archive collection. Here we go. We're in
scenery right now. I'm going to go down to foliage. And within the foliage I'm going to create
a new collection. And I'm just going
to call this grass. And this is going to contain the small grass and
the tool grass. I've only got two objects, you might have more variations
than me, which is good. But I've only got these two. So I've created Do collection
and now we can drag this grass collection down into the Geometry nodes editor. You can see it's got this
collection info right here. And now I can drag the geometry
into the instance input. And you can see this is placed the grass all around the mesh, which is very nice. One thing I'll notice is that everything is offset
a little bit. And this is the distance
between the grass right here. I think my objects, these two down here, it's very difficult
to see they're offset from the world
origin and that's okay. We just need to do
reset children. And separate children as well. It looks like it's updated and that's looking great to me. Now, when I was modeling these
grass pieces right here, it doesn't look like too careful applying the rotations because they're all slanted. So I'm just going to select both of these here
in the outliner. I'm going to hit control
A and apply rotation. And it looks like that's fixed. It, they're all
facing up right now. Perfect. So I'm going to click
back on the landscape now. The next thing I'd
like to do is add some random rotation to
these tufts of grass. Because as it is, it
looks like they're all pointing the same way. And that's not very good. Just track this window
up a little bit. I'll try and keep my node set
up on screen at all times, but I'll zoom in so you
can see the values that I'm typing in and I'm
going to pick instance. You see this already fixes us because currently is only
showing the tall ones, not the small bits of
grass. We do pick instance. This means that this block
of nodes right here, right here will apply
to every bit of grass we're instancing instead
of the entire collection. So it'll pick an object from the collection and then
work on this node. What I'm going to
do is randomize this z rotation right here. And the way we can do that is by searching for random value. You can see the type
is set to float. That's perfect,
that's what we need. Then I'm going to plug this into a combined XYZ float factor. And you're going to plug the
output of this vector into the rotation because we only
want to alter the z value. And we do that with
this one right here on a combined X, Y, Z. This is how we rotate them.
You can see it's doing it to every single piece of graphs. Right now we want to drag
in the random values. I'm just going to
let the value out of the random value node,
put this into the Z, and then we can increase the maximum until we get
a result we like there may be a perfect number that
makes it perfectly random. I'd like to think it's 360 because I'm thinking
about degrees, but I'm not sure if
that's entirely true. I'm just going to
type it in, We can see it rotates in the
more random direction. So this works fine for us, and I'm quite happy with that. We can also see how it's
looking in rendered mode. It's starting to look
quite cinematic. Actually, I like it, but one thing you might
notice is that the grass is equally covering every
part of the landscape. What we'd like to do, ideally, is paint on to the landscape the bits that we want
to have the grass on. And to do that, we're going
to use vertex painting, but we need to expose
a couple parameters, as it were, to the geometry
node that we've created. This node acts like any other node in blender
that we've got. For example, I'll show
you the subdivision, the Bevel one, because it's got all these
parameters going in. We want to add some of
these to our custom node, right here to our geometry node. We want to add some inputs. I'm going to press the panel
on the Not right here. I'm going to go
down to the Group tab and we can see we've got our inputs and
outputs listed currently. The only one we've
got is geometry, and we can't change that. That's just the object
that the modifiers put on. We don't change that one, but we want to add one for the collection that we're
instancing right now. Grass, this is just default one, but we want to select a collection from this
window right here. One way we can do that,
this little plus here, and then change the data type from geometry to collection. You can see now it's
showing over there, it's called geometry,
but ignore that. But a quick way of doing
it is just dragging this arbitrary group input right here across to
the collections node. And you can see
it's automatically detected what data type it is. And it's named it collection. But I'm just going
to quickly rename this collection to incense. Just expand a little bit. Now we can see it's showing
up and the default is grass. But we can change this to any
other collection we like. I could type in rocks instead. Now it's showing our
rocks, which is quite na, I'm just going to
undo this perfect. Now we need another
parameter for this input. And I'm going to
drag another one and put this into the density of the
points, which is up here. It looks like a density. Now we can change this
value in the node, which I believe we can apply
to other objects as well. So I'm just going to
reset that, the default, but what we want to
do for this one, I'm just going to click
it and rename Weight Map. Then what we do every
time we add this node, we click this button here
just to get rid of the value. Instead, we're going to select a vertex map that we're
going to paint. I'm going to go here to
this tab right here. It's called the vertex data
object data properties. And we're going
to add a new one. I'll just call this grass. If I go into weight paint mode, you see everything turns blue. I'm just going to
press to reduce the size of my cursor and I
can just start painting on. The red parts are going
to be full with grass, like really densely
populated with grass, and the blue bits
aren't going to have any grass on them at all. I'll be very rough of it for now, but I'm just
going to paint on, try and have most of it close to where the camera
is going to because there's no point
rendering a bunch of grass up on the hills we go. And then you can use this little blood
brush right here or this smear tool just to break it up and play around with some of these
brush settings. We're going into too much detail on this if you want to subtract. Instead you can
set the weight to zero and reduce the
strength little bit. And you can just paint on this because we don't want to have
everywhere perfectly red. We go to perfect. I'm
just going to hit control tab to go back
into object mode. And then if I go over
to the modifiers tab, I can select that,
it should show up. Now see we've got
points and in grass and now our grass is only being added to the spots
that we've painted. I want to add another value. Personally, I want to multiply this weight map
by another value, and then that holy our density, because this is way
too dense right now, and we could weight paint it,
these parts aren't as red. But I want to a quick way
just to adjust it overall. So I'm going to
press Shift A and we're going to add a math node. This is another one you might be using quite a lot
in this editor. For one of these
values, I'm going to drag in the weight
map right here. And then the output will
go into the density. We're going to change
this operation here from ad to multiply. Right now it's multiplying it by 0.5 You can change
this to any value, but of course, we
want to add this as a customizable input rather
than hard coding it. So I'm just going
to drag in, and you can see it's called value. I'm just going to
call this density a little bit confusing because
we've got a density there, but this makes sense to me. Then this is now being exposed
in the A node right here. And we can quickly
change the amount. Another thing I'd like
to expose is the seed. Because if we added another
one of these nodes and then we would say adding
the trees or the rocks, it would be placing
them in the same points when it generates this
distribute points on faces. So I'm just going
to drag the seed out into this input right here. And that's fine.
We'll call it seed. And now I can just change
this to any value we like. That's looking good. I'm
quite happy with that. Now let's try duplicating this set up and see if
we can use it on some of the other assets we created as a little practice of
running through it again. So I'm just going
to drag this window down so we don't need
a much work space. Quickly. Save it just in case my computer doesn't
like what I'm doing. And we're going to add
modifier geometry nodes. And once again, we're
going to select the objects corner that we just created this time instead of grass, which is
our default one. I'm just going to click
that and we're going to add rocks that's already looking quite ness, it's a
little bit busy. I'm just going to hit
control tab to go up to weight paint and instead of using this grass
one right here, I'm going to create a rock. The vertex group go back
up to the modifiers panel, looks like that's working fine. We just need to get rid
of this weight map here. We're going to press this
button to reset it to default, and then we're going
to add in the rocks. Now I can start painting. This. Going to change my weight, to increase the
strength a little bit. These ones are going to be a, the river and they can pink in maybe some of them
at the bottom as well. We, it's hard to see underwater. I'll just paint these around this that's looking next to me. If I reduce the
strength, I can just add in some randomness. So we get some in the
rest of this forest, in the cliff, because we want some in the forests as well. Just not as many. I
like to look at that. Let's go back into object mode. There are a few. Too many. Let's just decrease the density. Also decrease the density of the grass because
that's quite a few. If these are too
big, you can change the scale of them right here. So you could add like
input to the scale, even randomized
scale if you like. But this is confined to me and
I'm quite happy with this. Less L looks rendered great. So now we can add some trees to this using
another object born. I'm just going to
collapse these two or call this one grass and rocks just to stay organized and
side another geometry, nodes call this trees and
let's set this to objects. Borer, once again, I'm just going to get rid
of this grass and I'm going to drag in the trees
collection into this. I've added quite a few of them
right now, which is okay, let's just decrease density then let's start painting again. I'm going to go down and
add a new vertex group, set the weight map of the trees. But yeah, now we can go
across to weight paint mode and start painting
some of these as well. We can just do this for every
object that we created. Just place them wherever
you like in the scene. It's quite satisfying, Much better than using
a particle system. We used to have to use
the particles hair mode and it wouldn't place them with the right
rotation and scaling. We'd always have a
bunch of problems, but this geometry node
set up is really good. Once we've got it working,
there we go, Perfect. See it's an object mode
that's looking quite nice. It's already, it looks like
a game more, doesn't it? You can imagine
walking around this. But one thing I'm noticing
is at the top of the trees are detaching from the trunks. And that's a very simple fix, we just need to combine them. I might recommend doing a save
as incrementing this file just because we are making
changes that we can't repair. But I'm just going to go up to the trees collection
or hide this, just we can actually see
what we're working with. Its like we just need to
join this one to this. I might need to
apply my modifiers Before doing so, let's go down, just quickly apply this
decimate and the skin modifier on the trunk that shall do
all these trees right here. Just quickly select the
ply, that's looking fine. Yeah, we can just select
the top one. Enjoy it. If you wanted some of
these trees to be dead, you have no leaves on them. Let's say you making
a winter scene. These ones right here. So not these year round
trees like the pine ones. Some of these you could just have this tree tranconitszone about the leaves as one of the objects, but I'm
not going to do that. I'm making like a nice
summertime scene. All the trees will
have leaves on them. Let's see how it looks now. If I press H to bring
back the landscape, that's looking
pretty good to me. Let's just change the
seed on this one, make sure each of them
has got a random seed. You set any value
that looks good and I just want to decrease
the density a little bit. You can already start taking
some nice screenshots, just go up to rendered mode. It's coming together quite well. You have the clouds
in the background. One thing I'd like to change is the gradiation of
this sky right here. I think a little bit too subtle. So I'm just going to go
out to the shading tab, change from object to world
to drag up to render. And just put my camera on a horizon line so I can
actually see everything. Okay, let this just increase the intensity a little bit so it's brighter at the horizon. And then let's add a point
and just drag it down. It's subtle, but I think it makes a big difference.
That looks nice to me. Another thing is I'd like to change the brightness
of the grass, or make the shade of green
a little bit more intense. Let's just change here
from a world to object. Let's just tweet this color. How colors look make quite a nice winter
scene of this, but I'll stop playing around. A nice color, there we
go. I'm happy with that. If you look at these areas here, below the water and
around the water, you say like a very
bright shade of green. There shouldn't be
grass right here. There should be
some sand or dirt. We'll also paint onto
the drain areas. We want to be masked with
a dirt to start out with. Let's just let all
these nodes right here. I'm going to change from rendered material preview just because it's a bit faster and we can see everything we need to. Yeah, let's just this
landscape make a bit of room and we're going to use
a mix node to distract this. Now we can interpolate between the result of this color
ramp and this white color. Let's just go to
a factor of one. So we can change this color. We'll change this later. Let's just make it
a nice sandy color. Then for the factor,
instead of just using a 50 slider like this, we're going to go
to this tab again. This time instead of
adding a vertex group, will go down to
Color Attributes. We're going to create a new one. I'll just call this sand right here. Leave it
on these settings. That's good for now. And then if we go up here
to vertex paint, we can paint on areas to
this mesh we want to show. Just go to vertex paint again. We might need to go into
solid view to see it better. Now we can just paint on the
white area is going to be about 100% in the darker areas aren't going to
have any influence. Just imagine that we're
painting on sand right now. We can always change it later. Just like this, We
want the bottom of the water to be
completely white. And then let's go back
into material preview. Now we just need to get this
data into the shade editor. The way we can do that is
by using an attribute node. Then we'll run the factor
into this factor here. For the mixed node,
nothing's happening. That's because we haven't chosen which color attribute we want. Let's just type in the name
sand. It's a bit annoying. It works this way. You
have to actually type. We can see this is updated. Yeah, this name here
has to match the sand. I'm beginning to think
I've missed a part. Let's just hide this water. Let's go back into vertex paint. You might need a
stronger strength. Let's just make sure
we're really getting this as we quite smooth
blending between them. If you want it to be a
little bit more harsh, what we can do is add a color
ramp between the attribute and the factor for this mix. I think I'm going to do that. I'll press Shift a Color. You don't have to do
this, but I just find it makes the art start
a bit more consistent. We don't have
everything flat shaded, low poly, and, and we got this smooth blending right here. What we'll do down here
is we'll change this from linear to constant. I'll add a couple of
these on the slider. I'm going to set this
one right here to white because it's on constant,
There's no interpolation. You can see this has already got the effect I've got in mind. This is looking nice.
But this one right here, I'm going to set this
to a gray value. And this will blend between
them just like this, make it look a little
bit more natural. We don't have to be
completely harsh, but I'm quite happy with
how that's looking. This is a nice set
up. Let's just go up into the vertex painting tab and we can refine this
a little bit more. I'm going to decrease the
strength because I want to paint some of these parts
in the mid tone here, don't to be 100% but
that's looking good. Let's go back into object
mode and see how this is. A couple refinements
we need to make. Let's just get some of these
trees out of the water. I'm going to to edit
this in the tree. So we go, let's go up
to the weight paint. I'm going to set my weight to zero and just paint
these out of the water. They don't belong there. Everything else is
looking fine to me. Looking very cinematic. I suppose the next
step to do now is pretty much
everything finished. In terms of editing
our landscape, we could see if there's
any more foliage to add. Maybe add our flowers. I'll let you do this on your
own. Add what you want. I'm just repeating
the same process, but I'll go over to geometry
nodes and st the objects. Brner, which one of
these should I do, like? They're all under
the same collection. I'll just create a new one and let's call this one flowers. I'll just put these ones in. It's the flowers
collection right here. Just quickly turn down dense. It's not a linear process.
I'm always changing things. Something sticks out to my eye and I want to change it there. Got some point I'll go through and paint off the bottom of the water because I
don't want to have this. Where the grasses. Yeah, let's change this collection
right here. Let's just drag in the
flowers. That's fine. And then go down and create
a new weight map for this. Go up to weight paint. Can start painting these on. It's nice if you have
a drawing tablet, but don't worry
too much about it. I'm not using my right now.
I'm just using the mouse. But if I wanted to
make some refinements, I'd probably switch to
use with drawing tablet. We've got quite a
few, some flowers. It's probably
looking like a very busy forest floor right now. But I like it and
it allows us to see everything such as
paint out of this section. We want some area for us
to put a little campsite, maybe a couple of buildings of our cameras to change
the size of your brush. Remember, we've got
a little clearing and we can see our flowers,
huss looking beautiful. Some of these objects
though, might want to place by
hand, like this fern. I'm just going to
instance this ultra D and then shift tab to place
it one we're placing it. We might also, I
should be working in the layout tab instead of
geometry notes such as zooming. And I'll go down
to material views. You can see it better
when I'm moving this. Let's change the
snapping mode from close to active I believe, or center on reports
fan. There we go. We can move these
manually because for some objects you won't want to use the foliage
system we use, We just created this
nasty place them by hand. I like how that's looking and I'm just going to select
all of these objects that we've done by hand
and I'm going to add them to a new collection. Let's just call this manually because I'd like to
keep things tidy. Let's jump to that
in the outliner. There we go. That's okay.
We'll keep it down there. Just quickly tidy everything up. Perfect as scenes looking tidy. It doesn't look like
I've named the water, so I'm just going
to quickly rename this From Plane to Water and believe that's the end of this section. So that's nice. It's good to see these
assets that we've spent so much time making
actually in a scene together. You see them come alive. I'm quite satisfied with that and we'll continue
in the next section.
17. Creating Low Poly Lighthouse: Hey guys, welcome back to the next section of the
course where we'll be creating some manmade structures
to occupy the landscape. We're going to start out
here by adding a lighthouse. So I'm going to place
math red cursor on the other side of
this water right here. And I'm going to press
shift A and add a cylinder. And for the vertices
I'm going to choose six because I'd
like a hexagonal base. Once we've got this, we
can scale up the bottom. So I'm just going
to slit this face. You can always go into Y
free motor forstroller to Z, go back into solid and
just scale this up. You can use these
criteria as reference, so I can tell that
this's going to be a decent few meters wide. And then I'm going
to move the top one up and just scale it up
a little bit as well. Il we're happy with
the height and we can use the trees to gauge
the proportions. So once we've got
this, I'm going to hit the forward slash key
on the number pad. And then we can start
adding some loops to the lighthouse because I want to get some white and red stripes. So I'm going to place
the loop here and I'm actually going to scale
this in quite a little bit. And then by bevel in this using control B, we can
add some cuts in. Remember we're going to use these faces right here
to color the stripes. So make sure you've got enough. I'm here, I'm going to delete
the bottom face because this is just extra
trametry we don't need. Now we've got this. I'm
going to set this top face, extrude it up a
little bit and then scale it out to
create this platform. I'm going to extrude
it once again. I'm going to just press the skate once it's
extruded and then we can scale it out to the right
thickness because I'm thinking of having a walkable platform
going around the outside. Then we can just
build up the shape extruding again. There we go. And then I'm going to insert at the top by pressing
till the thickness is just slightly thinner
than the lighthouse walls. About this, I've got
some reference images on my other monitor that I'm looking at while
it's doing this. Just some designs that
I like to look of. And then I'm going to extrude
this up on the z axis. Let's make the
windows right here. And we'll kind of have to
do the windows in a bit. The ones we've got the top face just going
to exclude this out. Again, press escape scale up. This is all stuff
we've done before and then we can build out
the shape to do the top. I'm just going to
merge in center. Actually I'm going to scale by zero just because we can
still move it around after. And if I hit control R, having those versities at the top will allow
us to add this loop. But we can just scale in and
move it down a little bit. Just add a nice
shape, There we go. And then once
everything selected, I'm going to hit M and merged by a distance that will get rid of those actually versities at the top as well as any other that we might have
accidentally created. So now for these windows, and this is a technique
we'll be using for a lot of the
buildings we're creating. I'm going to select
all these faces. Just select them. And then we're going to press
to inset just like that. And then in the Boston,
we're going to enable individual faces and we can change the thickness
using the sladder. We want to still be
able to see the frames, so I'm going to add a bit of thickness to them,
just like that. And then once we've got this, we can hit o extrude long normals just
to insert the Matai bit. And I'm going to get out
of isolation view now, just so I can see it
a little bit better. Might be a bit too thin
if I were to do this. Again, I might make
these actual windows a bit thicker in comparison to the rest of the tower. I
might quickly do that. Let me see if I can
just slide everything. So I'm going to slid
this top vertex and just keep hitting control number pad plus until I've got everything and get
these vertices as well. All this trometry, see if I can scale this
on the shift Z axis. That seems to work. It looks less like a witch's tower now. Now for materials, I'm going to go down to the materials tab. Let's go into Material View so we can see it
starts out with, I'm just going to add a
red lighthouse material, give this a red color, reduce the saturation,
tiny bits, it's not quite fully red. And do the same, the value. And then we're going to
create another material for white lighthouse. And this time we're
just going to set all the faces that
we want to be white. This walkable
platform, the outside. I'm just going to set
these faces and hit control number pad plus
to grow my selection. If you don't have a number
pad, remember you can always hit three and type
in select more, I believe it's called.
We select more. I'm going to set this and
then add a new material. I call this dark metal because it's one that we might use for other materials
in the scene. Let's, this is a dark
gray, slightly blue color. I'll do the same for the frames. To select the frames,
I'm just going to hide these faces.
Hide these faces. Island, Select this
and then hit a sign. That's just a little way
of doing it. There we go. For these actual windows, I'm going to select them
all and we're going to add a material lighthouse
windows and assign these. Now during daytime, the
actual light might not be on, so we can just like a blue
color, something like that. But if you're doing
a nighttime scene, it might be to actually see
the emission coming off. In which case we can just
give this emission here a color set to like an orange, yellow color,
something like that, the intensity and increase the
emission strength as well. Right here, if I go up
and to Rendered mode, we can see how this will look
like that just as I'm here. This isn't quite
looking how I want. I'm going to play around with this roof a little bit as well. I might actually change the
material, this on here. I'll try giving it
the metal material. See how that looks. I'm
more happy with this. Can just place this a
little bit further away. This has been quite a
nice warm up video, but in the next part
we'll be covering some more complicated concepts
like adding the windows, doors, adding texture
to the side of buildings. We'll see then.
18. Creating Low Poly Buldings - Part 1: Hello everyone and welcome back. In this part, I have a few
different techniques that we can use when making
low poly buildings. So I'm going to show a couple of examples and you
can get creative, have some fun trying to
make some building to occupy this landscape
that we've created. So I'm going to place
my cursor down here. I've got this flat area
next to the river. I'm going to clear out some
of this foliage later, but we'll do that once we've decided where
everything is going. So I've got my cursor
here. I'm going to press shift A and I'm going
to add a plane. This is only a couple
metres wide right now. So I'm just going
to scale this out. We can use these grids and of floors reference
it in the lake. So we're going to scale
this out about here, not using precise
measurements for this, just eyeballing it then. And so we can always
add loot cuts as well, that by hitting control R. And then I might want to
extrude a section out. So at this edge right here,
I can just extrude this out on y axis to about here. Once we're happy with
the shape, we can just slid these faces right here and extrude them up so we've got the right height,
something like that. I want a couple stories to
my building so I can show some different techniques when it comes to texturing the sides. Because we want to
add in some brickwork and maybe some wooden planks
and things like that. You'll see later,
I might have the first one as like
a stone material. Then the next one
would be would, then we'll also try and place some buildings, some
windows around here. And then for the next
story we're just going to have some nice roofs. I'm going to extrude up again. Actually I don't
want this phase, I'm just going to
select these two. I'm going to extrude up just
like this to meet this roof. I'm just going to
add a lot going round and scale
this on the Y axis, going to make sure I've got my point on median, not
individual origins. I'm just going to scell
this on a Y axis by zero. And then for this
part right here, I can just select this edge
right here and move it down. Let's to align it
with this piece. There we go, Lost
quite a nice house. Just move everything about, make sure you've got
your proportions right before we start
editing anything. I'm quite happy with
that. There you go. Select everything, do
merge by distance. Now, these edges,
these ones here, I'm just going to move them so they're more in the center. These edges around the
building are going to be where these wooden bars are. You don't have to include
these if you don't like them, but I think it's
quite a aesthetic. I'm just going to delete some of these edges where I don't
want the bars to be. Don't worry about Engnes
while we're doing this. By the way, that's
not a problem for us. So you just delete
some of these, especially here where
the stone is going to be on this rooftop. So I want to get rid of these. Here we go, I'll let that look, we've got a nice variety
across this building. Then what we can do is
select all these faces that we want to, that'll
be these ones. And the reason I dissolve those edges right here is because when we use
the inset tool, it will insert each of
these individual faces rather than the two separate
faces side by side. I've just selected all of these. And then we can use the same
Inst tool we used last time, just slight this, and then
extrude along normals. Once again, what we might like to do
is select some of these faces like these ones, and just move them
along the y axis a little bit to make
the edges thicker. They look a little bit
spindly like this. Sometimes may be more approximate than me, but
I'm just eyeballing it. In a simple example like this, I don't think we need much precision like
this top one here. I'm just going to
move the top one, not the bottom one. There we go. I like how that looks. Now what we can do is
just select all these faces and we'll hide these.
So we can just work on them. Just select them
manually. Here we go. Make sure we've
got everything. What I'm going to do
here to make sure we can just work on these ones,
I'm going to hit Control. I select all the other faces
and I'm going to hide them. Now what we can do
is start adding some loop cuts along here. I'm going to hit control
R to go into vertex let mode control
R will only work if it's actually a quad like
on this face right here. But for this one it's
technically an end gone. It's got six vertices. So I'm just going
to set the top and bottom one and connect
them like this. In this case you'll just need to subdivide the bottom edge, right click subdivided, and
then we can connect them up. Don't worry about how
these engons will affect the rest of the object. If I press H, just to
show you an example, this vertex right here will already connect up
to everything else. That's one quite
nice thing about hiding, unhiding and blender. It connects everything
up Once you're done. This looks a little
bit slanted to me, so I'm just going to align
it using snapping to this vertex to make sure
it's straight. That's nice. The only other thing
I want to do this is for me, add cuts. I'm going to subdivide
this edge right here, and then I'm going to
select it and drag it all the way down to this vertex. That just means that
when we hit control R, we can actually add vertical
cars because it's a quarter. We try doing it here.
Control R doesn't work. Let's just subdivide these
top bits right here. In this case, we might need
to connect up this one first and do it
one by one there. Okay, perfect. So now we can start adding
some planks to these. I'd like some nice
vertical ones, so I'm just going
to hit Control R and add a few like this, trying to remember the amount, make it consistent
across the whole model, but it doesn't need to
be perfectly precise. Now is when you've
got a little bit of deviation would go
something like that. I think if this
looks a bit plain, we can start adding some
textures to it later. By textures, I don't
mean actual textures, I mean adding windows and miscellaneous bricks,
little details like that. There you go. Yeah, that's
why we subdivided these. We can place these if you want to make sure the cuts you're adding a is consistent. It should appear down here
at the bottom of the screen. When you use the scroll reel, you can see right here it
says number of cuts three. If I use the scroll wheel
that goes up and down, you can make sure it's
consistent. There we go. Now we just need to
select all the vertical, uh, edges right here. So we're just going to
select everything Do merged by distance
because we should have a few vertices
around here doubles. We need to find a quick way to select all the edges
running around. My preferred method is
just to use circle select. You can bring up the
tool bar and just hit till it goes on
circle slip mode, or you can hold it, go down. I just slp them like this. Use shift to slect multiple quicker than clicking
on them individually. There are lots of ways
of selecting them. You can also go into x ray mode and select them, but
this works for me. There we go, to go back to
my last, let's keep it on. By default, we unhired the
rest of this by hitting OltH. We'll see that it's
selected everything else. We can just get rid of that by deselecting this box right here in the reveal hidden panel. Once we've got all these,
we're going to level these. So we're going to hit control B. We just want one
cut between this. Now we only want to include
the edge in the middle. I'm actually going
to undo that step where unhid everything.
There we go. And I'm going to
level it like this. There we go. We can gauge the thickness,
something like that. This will add a few polygons
to the model of course, but I think it's worth
it for the final. Then we want to select the edge in the
middle of all of these. But a quick way of doing that is just to go
to vertex mode, I think we need to
invert the selection. So hit control to invert
selection, that's it. And then we hit one to
go into vertex mode, and then we just
hide all of these. And that will leave us
with only the middle bits. So we'll just press A
to select all of these, and then we can H to
bring everything back. Once we've got this, we can move everything
along. It's normal. I'm going to change
my pivot points to individual origins and then I'm going to change from
local to normal. If we move everything
on the z axis, it should move it inwards. Just I've look around you model
to check this is working. That looks quite
nice in object mode, that's added a few
details to the model. We can come around and fix
this topology right here. If you don't like it right here, we can join these together. And just delete some
of these edges that we don't want right here. I might even join some
of these just like this. Let me make sure I change
this lgomal back to global. There you can do this just in case out me, try
extrude lonomalsjtt. Outset these parts says different line of
thickness quickly work around my model and how this just for some of the edges and this
will also reduce polycount a little bit as
well where it's not needed. I'll just do that for this layer because it'll be the
same for the rest of the model if you wanted to
do the same. There you go. I'm not going to worry
about this part, I'll just subdivide this. This looks like the topology might be a little
bit diffultreI'mjt. Use a knife tool
that looks nice. I've probably spent a
little bit too much time working on this than
I should have done. This is going to give
us nice results. Go to follow along whilst
I'm finishing up now. We can just select these. They're all langnes,
but that's okay. There we go. We can
hit and extrude long normals because we're getting some weird thickness
around the edges right here. We can just make sure
that we take offset even you can see the
difference right here. And then just
change this offset. I think that leads to a
slightly cleaner result. And then leaving
how it was before. Look, we've got a few
bugs around here. We can just go around
and clean that up. Nothing always works
perfectly in blunder. It looks like I've cleaned
it up a little bit. Now if we want to
straighten everything out, we can just select all
of these faces right here and scare the
money. X taxes by zero. That will always work
just to clean things off. I think the reason I'm
having some issues around here is I didn't take the time to fix the topology. Be a bit more careful
with your version and don't same so excited. That's right, we've got
these wooden frames now and I think that does make it a little
bit more interesting. Of course, you could do it
for all the other layers, but there will be
the same process. I'll just select all these
roots right here and we're going to hit to make
this its own object. And then we can go
back into object mode, select this and we're going to extrude it on
its local normal. Extrude low normal until you've got thickness
that you like. You could also use the
thickness modified for this, but I'm just going to do it all in edit
mode. There we go. If we select all of these
faces running outside, I believe o might work.
That's working fine. We're just going to increase the thickness a little bit right here and make sure
we've got offset even. It looks like it's working fine. Let's just check in my frame. I'm happy with
that. There we go. And let's do the same
with this as well. This is clipping into the side of the building a
little bit here. So I'm just going to
move this face out in that's the kids actually quite like this
edge that we've got here. It looks like it's
been properly crafted. Here we go Then to add a bit more detail to this roof, and I'll
just make it plain. We can add some loop
cuts going along. Second might need to dissolve
these two edges right here. Dissolve edges, and
I'm just going to hit control art and add a
few loops in there. I might want this one right here to be a little bit thicker. I'm just going to move
it up just like that. I'll do the same
over here. Then we can just play around
with these cuts, make it a little bit
more inconsistent. And it adds some mass texture
to the top, doesn't it? It looks almost like
a barn roof like corrugated iron.
Quite a nice look. We could do the same with
the bottom ones as well, but just be careful
about moving these up because that will change how it intersects with the house. So I boot careful of that, but I like the way this is looking. And another little
detail we can do right here is place our
cursor at the top, shift a, add planes. Try and be quick with this one because we're taking
up a lot of time. Just rotate this until it
matches the angle and then we can extrude up and it looks almost like a
displaced roofing tile. You can do a lot of
this. It could be like a solar panel or a roofing tile. It could be lots of things.
Just a nice little details. It's gone. There
you go. You could have these different
sizes as well. Just make sure once again,
for every object we want to get in the habit
of recalculating normal. So just going to
select everything. Going to edit mode shift, I'll also do merge by distance. Well, as I'm here it
looks like I've got some issues coming
on with this part. I imagine this is
something I've done. Think this error right
here, I might have accidentally pressed
the fill button. So I just try selecting, yeah, there we go. Looks
like it's fixed it. And of course you can
delete the bottom face because we don't
need to see these. There we go. So these areas
can be quite hard to spot. I think that's just my stupidity in this case. There we go. So as one we can
texture the roof. We can also add
chimneys as well. Of course, just
place your cursor up here, add a little cube. Just move this face up. And of course you
can start detailing the outside. There we go. Moving on now to how we can texture this base
part right here. I'm going to press H to
bring everything back. I'm going to let these going around the outside and we're
just going to work on these. Start out with, I might
just extrude them out. Extrude faces, long normals, not quite sure I'll be
thicker or thinner. I quite like this rough stick
look, having them thinner. Let's isolate this object. Extrude long normals, drag
them in a little bit, make sure we haven't got
any doubles 18 vertices, we just got rid of speak,
a little bit thinner. Make sure we've got
offset even on. Then we can just this
outer ring right here, the vertices. We
don't need these. Just to let them any geometry that we don't need
we can just get rid of. It looks almost
like some medieval Victorian building, doesn't it? To add some brickwork
to the side. I'm just going to
place my cursor here and I'm going
to add a cube, scale this in quite a bit and increase on the
y axis. There we go. And delete the interface
because we don't need this. Once I've got this, I can shift, we can just move this about, duplicate it like this, create a nice little
pattern scale, everything in lots of these. So this is just one
patch right here. I'm going to duplicate
this one and press P. I'm just going to
create a few of these different patches
of bricks right here. This one is just going
to be one on its own. Once we've got these by the way, we can select them and do set origin to center
of mass surface. Another little detail
we can do is just select one of these edges right
here, one of the corners. Or even this vertex right here. We can hit control shift
B, if it's a corner, add a nice little notch
to the side of it, maybe do emerged doubles just to get rid of
that little text. Or we can these corner edges and level
this cut that looks, let's just do that
to a couple of these on this brick here. I'm going to use a Ni
tool and I'm going to create a little corner
using my favorite method. I do this quite a lot. I did this made creating
the foliage as well. If I remember that tool can be a little bit
difficult to use sometimes. I'm still struggling with it,
but it's really powerful. This is all stuff that
we've covered before, so it should be quite
easy to follow along. There you go, sees
these brick patterns, and of course you can just
instance them across the wall, try to make it look interesting. It'll be better if you have more versions of
what I've got here. To do these corners, we
could try placing them, since you can
duplicate this one, move it down a little bit here. For this one right
here, we might want to actually fill the back. So let's just let them both
and fill, there you go. I'm going to set the origin of this to this little
vertex right here. I'm going to let this one on a building cursor to selected. And then move this
object selected, right, clear origin to three decursorn. I can duplicate this one
on the Zxis about here. Just rotate it. Let's rotate it by 90 degrees to create
the rest of the corner. Join these objects together. Then we can just press shift
D on the axis and then hit shift R to repeat that action creates
quite a nice corner. I want it to be a
little bit thicker. I might just set
all these faces, set my transform to normal in my point to
individual origins. And I'm just going
to move the z axis, just make it a
little bit thicker. That's something I should
have done earlier. That's how we get these
nice corner pieces. And then I'm just going
to join these altogether because I've got a consistent height
across this building. Then we can snap to
these corners and rotate it around. There you go. It's quite a nice
detail I think. And of course we can copy this whole brick
passing right here. I'm going to try and
be quick with this. Instead of replacing
it manually, I'm just going to slit
everything, instance it, and then use my snapping mode
set to face projectors to place them here, there. We could just place
them on this wall. We could just across
the whole building. That's it, I'm just rotating this by 180 degrees
and then placing it down here. There we go. And having the origin point at the same depth of
the wall makes it easy to face snap
it. There we go. Now we've already covered quite
a few techniques that I'm sure you can get creative with
when making your building. But this video is already
running quite long. So I think we'll
split this up into a second part where we'll be showing how to make
windows and doors and add in a few more
details to the building. And then maybe do
another example. If we've got time, good luck using these techniques
and we'll continue next time.
19. Creating Low Poly Buldings - Part 2: Welcome back to the next part of modeling these buildings. We're going to start out by adding some doors and windows, because that's quite a
nice thing to start with. So I'm going to place my cursor
here. Shift right click. Remember to place your cursor, and in this case I'm
going to add a cube. And we can just scale
it in a little bit. Scale it under the
x axis as well, just so we've got
the right thickness. Once again, this face
back here, we don't need. So I'm just going to
delete this to save us a few polygons or
a couple polygons, in this case. There we go. We've got the right.
Hey, then what I'm going to do is I'm going
to st top and bottom face. This is just one technique
for creating the windows. I like, by the way, you of course, don't
have to follow this. We've got another star. I'm going quite like a rustic
design of these buildings. I'm going to select everything
and just extrude it along. Normals. Once again
extrude long normals. Then for these faces, I could just sl
everything actually and scare on the y axis out a little bit and drag these faces
outwards on the x axis, in this case, perfect. These should be
separate objects. Now the inner one, I'm just going to create a
lute cart running through the middle and emblevel
this out with two segments. And this will be like the
side of the window frames on. We've got this face right here. I'm just going to extrude this back a little bit like this. Then we can delete these top and bottom edges because
we don't need these. Then I'm going to set
this face right here. Control, I hide and
just work on this one. I want to add a nice little
shape for the window, so I've got some reference
material on my upper monster. I'm keeping an eye
on this right now. I'm going to set this face
right click and subdivide. Then what we can
do is we actually, I'm going to set
all these faces, I'm going to inst them
a little bit this and then extrude them back. There we go. And
then we can unhide the rest of this once again. Because we've got the nice, we hit things, we
hit the rest of it. And then it, we've got these
nice engones on the edge, which might not be
desirable for you, but I like the way it works and I'm happy to
have those engiones, one of your exports. And mesh will be triangulated. Of course, for some things
it might be nice to put a triangulate
modifier on it just in case we get some artifacts. We just added the
triangulate modifier because we're having some issues before with this piece of
wood right here. It might be a good idea to put a triangulate modifier
on this object. Which one is it? There
we go. Just so we can see any issues, they do pop up. Yeah, that's one effort
for creating Windows. If you wanted to add
some more details here, we could add some cuts. Just a couple. There we go. And then let's move this
edge up a little bit, makes it look a little
bit more rustic. Depends which art style
you're going for. This might not be
desirable for you, but I like the way it looks. Just like that. And
then of course, if you wanted to reduce
polycount further, you could dissolve these edges, but I don't want to
be that strict on it. I think we're doing
fine for polycount. So it'll be pretty much the same effort for
the door frame. Now, I'm going to place
my cursor down here. We're going to add, scale
this in, try and be quick. Was working here because it's pretty much the same process. Just make sure you get
the thickness right. Going to go into iframe mode, it looks like it's
going to be about a meter wide. That's good for us. So I'm going to press on
this face right here. And just pretty much
repeat the same steps. But I'd like to add some
planks to this door. So we'll have a little bit
more detailed in the window. And we'll be doing that using pretty much the
same technique that we created these
vertical planks up here. I'm just going to delete this
back face and bottomline. Why not an extrude tool
that might work sometimes. Sometimes if you hit same
thing for extrude long normal, you can do manifold. It won't work in this case I believe because the
outside isn't connected. But if these edges right
here were connected up, I'll just quickly for
demonstration the back connect, this is a manifold mesh. And then at and
extrude manifold, you can see it will cut in automatically and
give us nice results. I'm just going to do
these en back face, there we go, because
I don't need them. But remember that all
can be quite useful. See I'm going to add in
some cuts going along here. In this case, we probably
don't need to hide this face because
it's all vertical. I'm just going to
bevel this a little bit the same technique we used in the last
video control. And then if we select all of these and
bring everything back again, just move it back on x axis to create some little notches. Perfect. Going to add
a little door knob. Just place my cursor there. Shift, add, do. We could just do an
ecosphere scale it down. It doesn't need to be
fancy, just recognizable. You can even shade it smooth
as well if you wanted to. I think that looks okay. And where the door
is actually going to sit on, think about this. I'm just going to add in, well, these vertices right here. Press P to create the
Missourian objects, Select the new object,
select everything to fill. I'm just going to move this forward a little bit
and scale it out. And it will just create an
nice little step for us. And of course, when you're
placing these buildings, you might want to move
them down a little bit. I'll just let everything
in this case, I'll raise the whole door. This can just be one object. Just raise it up a little bit and then I'd select
the rest of the house, All these objects like the roof, the chimney, make sure
we get everything. It might take me a while to it. Now, that's to demonstrate that we could just move it down. And also I'm going to select
this whole house right here, and I'm going to put this in
its own little collection. So right here in
this se collection, I'm going to create a new one. Call this House One. And let's just go through in everything. Let's join these window
objects together. I forgot to add the
details to the door, so let's do that now.
We can experiment. In this case, I might try
making these edges a little bit taller instead of
the same thing we did for these windows.
I'd like to look at that. I'm just going to set everything and move
it into this house. If I hide the collection, it's easier to see which objects are inside what we've moved it in because I don't plan on
exporting any of these meshes. I don't feel like naming
them yet. I might do later. But we'll see because
unlike the rest of the bits of foliage that we're going to
repeat across the scene, a lot of these houses, the parts of the houses are going to be modeled on a case by case basis. So it doesn't make
much sense to me. Yeah, let's just move all to this collection and we can hide and unhide
it when we need to. It makes it easier to select
all the objects as well. Perfect, So we've
got this window. Let's just quickly instance
this a couple times. Well, as we're here, get quite quick at rotating
things by 90 degrees. I found in this case, I might actually put this
window down here and then we'll try creating a circular
one that will go up here. I think that might
look quite nice. There we go. So yes, great. This circular window will be pretty much the same process. I'll try and be quick with
this. I'm going to add a cylinder for the
amount. Let's have 12. Let's see how 12 works for now, just it's nice to divide when we're adding
the window frames, we're going to
select everything. Skeet down, rotate
on the Y by 19. If you're doing
lots of buildings, we've got to work on S. So we go to be as
quick as possible without rushing the result. Might want to take a little bit more time
than what I'm doing. So yeah, let's extrude
this along normals then. With this face selected,
I'm just going to quickly hide everything else
so we can zone in on this. I'm going to join the
top to the bottom. And then the side
ones a cup as well. So hit J on those. If I just select all these
edges and hit control B, so it might be easier to
do once we've unhidden everything just join
a little bit better. I'm debating whether we have a segment in the middle or not. I think we should actually,
instead of beveling, we can just select all these
faces and insert them. This will probably work
out a little bit better. You should have done
this from the start. There we go, Just like this. And then we can
construe them back. And that's quite
another way to create a circle of window has a lot of character to it, this building. Another thing you
could do is if you select everything and unhide, you got to be careful
with doing this. Maybe take off the triangle modify if you're going
to do this building. But we could put on some
proportional editing here, disabled connected only,
and put it on smooth. Then we could just drag
bits of the house around, make it look quite rusty. You can make quite a
nice wanted house doing this, but for this example, I'm just going to leave
it how it is quite like this look to ask us how to create some more of the
details to this building. Looking at this now,
I'm thinking some of you might find creative
ways to turn this into a windmill that looks like quite a nice
farmhouse as well. You can make a cabin
using these techniques. Let's now create a log cabin. I'm going to place
mount cursor here. I'm going to add a cylinder right here and I'm going
to set the count six. Now we can zone in on this. I'm just going to hit forward slash on my number pad
so I can isolate it. It's easier to work with solar. Then let's disable
portion of everything. Get rid of this. I'll just turn on connected. Before I forget, let's
scale everything down on just to make
it thinner like this. And I'm going to rotate this on the Y axis specifically because we want this
flat edge right here, has to be running length ways. Let's rotate on
the Y axis by 90. Can scale it out to help you with the
length and everything. Then I'm going to
duplicate everything. Move this on the y
axis, out to put here. That's looking
nice. And I'm just going to let everything
duplicate it again. But this time press
to create it as its own object and
then I can rotate. I'm just going to quickly
cut it to origin, to center of mass surface. And I'm going to
rotate this shift to Z axis by 90 degrees. You can scale everything
in just like this, so there's a slight overhang. There we go. Yeah, that's a
basis for this log capping. I'm going to st everything here and I'm just
going to move it down. Let's put on vertex
snapping so we can align everything
nicely. Just like that. I'm thinking these
vertices right here, we'll align with this edge running through the
middle of the log. Once we've got everything,
I'm going to quickly save as just in case we choose to use a
different method later. But I'm going to join these
together and I'm going to add an array modifier using yeah, relative offset right here. We're going to type in
zero for the x axis and one for the z axis. I don't think one is
the right number. I think it's 0.230 0.6
666 type, a bunch of 66. There we go, looks
like it's welk for us and we can
increase the count. I'm going to add it
quite high because the actual the walls will
only come up to about here. But then I'm thinking
about the archway as well, because I want to have these logs keep running
under the roof. So let's put that
up to about here. But it depends on
what style we want. Actually now I think
I will just have to the roof as a separate, but we'll figure that out later. So just make sure this is tall enough. I think that
should be fine. And I'm going to
apply this modifier. And what I'd like to do
now is make sure that these logs are each offset by different amounts because right now they're all going the same. So what we can do is slit these faces and just move
them out manually. Let that takes quite a
long amount of time. And I'm lazy, so I'm just
going to select all of these faces control hide. And then I can select
one of these right here. Turn on proportional editing set to random and
disabled connected. Then we can just
move on the x axis, make sure you have a really
large size because otherwise all the randomness will clump
up next to the one you're moving us the scroll wheel
to have a large circle. And just move
something like this go quite extreme
because we can always scale it down proportionally later on, something like that. And then once we
select everything and then change our pivot point
to individual origins, we can scale on the x axes by zero because we've got
individual origins, each one will be flattened
as if it's its own. I'm going to go a little bit
more extreme of this wasn't quite as extreme
as I should have been because they're
still very bunched up. I'm just going to let everything scale x zero and then unhide, we just move everything back, turn off a portion as we
can move everything back. There we go. That's
quite a nice method I found for doing this for
some of these as well. You could select one of these edges and make it
look as if a little bit, if it's chipped in this
quite a nice little detail. This geometry might not be
the most optimized because we've got a lot of
internal faces right here. These faces right on
top of each other. Try and change that, but for
the purposes of this course, I think it should
work fine for us. This will add a few more
polygons to the model, but if you wanted to select one of these faces right here, you could insert it and then almost create
like a bark texture. Merge this at the
center. It looks like it really is
the end of wood. But I'm just going to keep it as flat faces right now because it's more in line with the polygon for the rest of
the scene that we've done. We're just going
to quickly repeat this process for the
rest of these logs. You get quite quick at
doing it, essentially, if you keep playing
around in blender, you'll start finding these
little techniques for doing things that you can
always come back to you later. Remember is the
shortcut to enable and disable proportional
editing for some of these. If you want it to make it look like they're not cut
perfectly straight, you can use the Shear tool, believes this one there
might be worth doing that for some of these don't
just have to diversely, you can do sideways as well. Side a little bit more
randomness, there we go. And we'll do this for
the side ones of course. Make sure you disable
proportional editing when you unhide the
rest of the objects, otherwise it can
mess everything up. I've almost done
that a couple times. That's looking good. Just one more side
to do and then we're finished trying to follow along at the same
time, if you can. I think we're at the
point now where we're focusing on speed inefficiency. We've covered most of the
modeling tools in Blender. It's just about knowing how to use them and when there we go, that's it, there we go. And then to create the top and bottle or rather to finish
the top and bottom, we can just join these
two vertices together. And J to join, delete vertices. And these faces should sit
a level of the ground now. And add the roof. I'm going to place my cursor to the
middle of this object. Shift S cursor to select it. And let's add a plane
scale this out a little bit just so it's
going to overhang slightly. And then we can move this up, add a cut in the middle control
logo. Just drag this up. Doing this is
important, obviously, is to make sure that
the roof touches the logs right here,
there's not a gap. That's good. And we'll
add some thickness to the roof so we won't see
these weird bits over here. If you want to
increase the overhang, you can press G to slide up against these
edges and then hold Alt. And it will allow you
to drag out further, just that roof. Then for the edges right here where these
logs are poking out, I'm just going to select
just move the vertices back in manually or just scale them, make sure you're
on medium points, not individual elements. Scale them on the Y axis by zero, they're at the same point. Then we can just
share them in using the same tool you're using
earlier, this shear tool. It matches the angle
just like this. Then once that's done,
you can of course, delete these faces.
We don't need any. I'm always trying to delete any polygons aren't
going to be visible, we're just keeping the
ones that we need. Although you could criticize all these internal
faces right here. But because of this
overhang that we want, this finos can
stay because we're going to do these faces
at the bottom anyway. Perfect. Then this roof, we can add a couple of blue cuts going along.
That's just like that. Then in this case,
I'm going to use solidified modifier
to add thickness. Let's go down to solidifier. We are, we want this going out instead of inwards,
right about there. Maybe a little bit thinner,
just like we did before. We can select some of these
loops that we've got to make it easier to click this busting right here and then the edges appear on the outside. Let's just drag this down. So we've got a nice overhang as far down as we can really go. That's it. I like
how that looks nice. Start to it right here. Instead of layering these
logs up here diagonally, there's probably a more
authentic way of doing it. I've got some
reference images of an 18th century log cabin
from North America. We'd line up these
logs to make the roof, but in this case, I'm just
going to add a wall of planks. So let's select these
edges right here. And we use the same
technique we used before, so I'm just
going to hit P, And then if I select
this new object, it's a little bit
difficult to select. Let me try to get it, I'll
just hide this quickly. Let me just select everything, extrude it up to this level, and then unhide it
in object mode. That's just going to scale it in and these
vertices right here, let's scale these
into the center. Zero. That's it.
I'm just thinking. Now if we want the planks
speed vertical or horizontal, I think we'll do them vertical. Let's just isolated
on this object. It looks quite nice in
the forest already. See let's isolated
on this object. See if we're able
to add some loops. Does that add one there?
Merged by distance? I'll try and be quick
with this because it's the same method
we've used before. I'm just subdivide the edges. Remember the reason I'm
turning these into quads is because it means we can hit
control to add the loop cuts, which we wouldn't be able
to do on these triangles. Try to be a bit more consistent with the amount of
cuts this time. Let's add seven to each of them. I'm just using scroll wall
seven times and I can see that update down
here in the bottom left. Right down there. I could really annoy some of you just by putting six on some of them. I'm not going to do
that once again, let's just circle these
edges the season. Other quick shortcuts.
Go into circle, select, there we go. And double this out. Go use
my old little method here. We're going to invert
the selection switch to vertex mode, hide. And then I can select
everything that we want. In this case I can just
scale it all on the x axis. There we go. I like
how that looks. If we want to, we could even put one of our
windows down here. We're going to duplicate this. In this case, instead
of instancing, we want to change
it up a little bit. Just going to snap this
down here. Scale it in. I really like how
that's looking. Rotate on the Zaxis
by 180 degrees there. Now we've got a little window and I'll do the
same with the door. We can just duplicate
this whole door. One criticism some of you might have is that these
logs right here, they look a bit weird
when they're hexagonal. It's almost like it's
corrugated of course, and roll out the
men to be round. To fix that you could
increase the amount of vertices that you had
when you add to cylinders, but I think anything
higher than six just makes it a bit too high poly
for what we're doing. But it's a personal preference, some of you might
like it differently. We could also add some of these details to this
roof if you wanted to, but I'm just going
to keep it bare. I hope these techniques
are useful to you. You can make quite a nice
little homestead using some of these buildings and it will continue
in the next video.
20. Creating Low Poly Buldings - Part 3: Hello everyone and welcome back. In this part we're
going to be creating some tent and we'll also be adding materials to
these buildings that we created in the past
videos of this section. I'm going to place
my cursor down here. I'm going to press shift
A to add a cylinder. In this example I'm
thinking of making like a little TP tent
around conical tent. I'm going to increase
the vertices to seven just because I think
it's a bit more inconsistent, it's not quite as uniform
around as having a number. So I'm just going to slip
this bottom face right here, move this up a bit, slightly
below the origin point, and scale this out. This top face right here, we can move this up. I'm actually going
to scale this in quite a bit, just about here. And I'm going to add
another cut just below. And then scale
this in, because I want it to look like
it's been bunched up. It will be easy to see
what I mean later. That's quite a nice opening. And then we can use
the knife tool and cut out entrance for us.
It doesn't need to be. Even I like this
look right here. This face can be deleted. There you go. I'm going to add a solidified
modifier to this. So let's just quickly
isolate this. We can see the inside.
Yeah, I'm going to go here, add a solidify modifier
and even thickness. It's interesting to
see what kind of the geometry we can get
around this entrance. Let's just try reducing, it doesn't need to be very
thick. That looks good to me. And then we're going
to have to do some clean up to start out with. Let's go on the inside, this whole top
section right here. Let's go into Y frame mode. I'm just going to
expand my selection and I'm going to merge
everything at the center. And then this vertex I'm
just going to drag down. I'm not being too
precise with this. That looks good.
These edges here, again, needs to be more in
line with the rest of it. Let's just move, I'm
going to eyeball it. That looks good. I want to fur, probably should have pit a different
face for the entrance. But I'm just going to move
everything down better. So we are. I'm relying on blenders being able to shade these faces properly,
these ones here. But of course, if we were
to triangulate this mesh, then we need to
make sure that all these faces are
actually play now, because I think some
of these might not be. Anyway, that's okay. I
like the look at this TP. Another way we could also
fix this is by cutting in the entrance to the inside of the face rather than
having the edge line up. It would have been easier
for us to do that way, but still I like
this and we've got a nice top as well. For the top. I'm going to place cursor here around this ring shift
S, cursor to selected. And then I'm going
to add a bunch of sticks poking out the top. As if Let's just
go down actually, I might be able to sled all
these faces right here, Shift D to sets as its own. Objected. I can just move this
up a little bit, then I'm going to s the top
and bottom ring of edges. I'm just going to delete
them. There we go. Now I can slid the top vertices. Just move them down using G and then hold Alt
to drag them up. They're poking out a little bit more we can go through
on each individual ones. Make sure the length is
different member of you. Hold G, drag it down,
and then hold Alt, you can drag it up again.
That's quite nice. Lots of ways to add
thickness to this. One way of doing
so is to go into object mode and hit three
to convert this to a curve. Just type in convert. And
then this option right here, if you go, this is
now curve object. We go down to the curve
tab under geometry, we can increase the depth. I'm going to give
it some thickness, something that they don't
have to be too thick, and then reduce the
resolution to zero, which just means there
will be a little sticks sticks of square profile. We can also decrease the viewport resolution.
That's like. It's fine. I suppose we'll see how
many cuts we get along it. Let's make sure we
fill the caps as well. Let's convert this back
into a mesh object. Now, just going to type
and convert to mesh. Then if I isolate this,
go into edit mode. Yeah, it looks like
we're not getting any segments along,
which is good. We can just select all of these vertices at the bottom and just press X
and delete faces, and that'll get rid of any
unnecessary geurometry that's looking like
quite a nice TP tent. Now if this is going to
sit on a flat surface, it might be nice to add
some things to the inside. You could add some little
bags and camping gear. I might just try adding a mat to see how it looks. I'm
going to add a circle. Let's say five vertices. Just going to scale it down
a little bit, fill it in. Let's put a solidify On this solidify, it should
be here somewhere. I'm a little bit blind and add a bit of thickness
there we go. And this could be some sort
of mat on the inside or like some bedding area
just like that. Of course, if you're
going to do is make sure you place it
on a flat surface. Another little detail we could
add is some rocks around the outside to make it look as if it's weighing the tent down. And on the inside as well,
maybe let's just add some icospheres right
here, increase the cuts. Let's just scale this down. You can also do this
with metaballs. I'm just going to see how this looks. You can sculpt this. I'm just going to use
proportional editing for quick quick example like this and then use
remesh or a decimate. I'm going to put
a decimate on it, just like this, same method
we used to create the rocks. I'm just going to instance
this a couple times, right, the outside
and rotate it. That looks good to me. And
on the inside as well, but I'm not sure why there are rocks on the inside of the tent. But it's just a nice
little bit of interest. We can select all these objects. Now, me personally, I'm going to combine them all the same mesh. Can't imagine needing to
separate them anymore. If we need to, we can do that
on a case by case basis, but it's just nice to
have it all as one mesh. Let's make sure we
apply the modifiers on this though. There we go. And we can just select them all. Going to select the TP last
and just hit control J. It looks like need to apply the modifiers on this as well. It because they're instant and they're all the same object, It's not letting us
apply the modifier. I'm just going to quickly
join them together. Something we probably
should have done before and then see if we can
apply this estimate now. Yeah, it looks
like it's working. Yeah, let's just set them all and try to
combine them again. Should work at this
time. That's it. And then we can hit F two
to rename this TP ten. I hope I'm spelling that right. And I'm just going to move
this up to a collection. Let's just create one here. Collection ten looks
like it's called. That's the last
step we need to do is make a frame ten using the similar
method that we do this, TP. It should be a bit
more simple and then we can add materials to
all these buildings. That'll be it for the
buildings in this course. Let's go down, as always, I'm going to place my cursor,
let's do it right here. I'm going to add a
plane for this one. Just set the dimensions, make it slight bit wider, like this is quite good to me. And I'm going to add a
go through the middle. And then we'll raise this up. Let me turn off a portion added. I'm not sure why that's on. Raise this up to the right
height that we want. That looks nice. Another
little detail we can do. We'll put in some rods or some sticks running down and
maybe here to support it, But we can make the side
sag inward a little bit, so let's put some cuts
along inside this. Let's try four and a
couple this way as well. We can always put a mirror on this if we want it
to be symmetrical, but we'll see how
we can make it. I'm just going to drag this one down to make it look like
it's properly sagging down. Let's assume on the other side, maybe I won't use a mirror
modifier just because the slight discrepancies between them make it look a
lot more natural. It's not computer generated. I'm happy with that. We can select these edges right here. I might actually use some
proportional editing for this. Well yeah, let's try turn
on proportional editing and we can just sack this edge down a little bit and do
a same to these ones. I was that looking of jet mode n go through every Be text as well N we can put on auto smooth for this
if we want the to be smooth. Make sure we shade smooth and then shade this edge
flat at the top. It just hit control mark. Sharp mind to smooth
again can be a bit weird. Sometimes that might
look better to you all. We can have the flat
shading per face, which probably is
more in line with the foliage that we've
created and the landscape. But I like how it looks
smooth like this. I might keep it to add some thickness to this tent so that it's not completely flat. I'd like to add a
solidify modifier. So let's do that now. We go to solidify, let's just increase the
thickness a little bit and take even thickness just like that.
That's looking good. So I'll apply this and we might need to correct
some of this edge data. Let's just select these edges right here that it's like
it's not quite catching. I'm talking about
the smoothness here. If you're using flat shading,
don't worry about this. I'm just going to select all these edges that
should be sharp. Control, mark sharp. And that's looking
better. Perfect. I'm going to pres
my cursor up here. Shift S cursor to selected. On this vertex. Actually
I'll select this vertex. And I'm going to press to extrude downwards to the ground. It's going to dig into
the ground a little bit, just like this. There we go. I will select this edge, press P and separate
by selection. This time I'm going to try using a skin modifier to add thickness.
Sometimes doesn't work. I'm add modifier
and select skin. Yeah, it looks like it's
picked up this time. So I'm going to go
into edit mode. If we, remember, we use this
to create the tree trunks, so let's just try to
reinforce that now. We're going to hit
control eight. If you remember to
change the thickness, let's reduce that a little bit. And I'm going to scare
up the bottom one because I want it to
be a bit thicker. Let's go into vertex mode.
Slip the bottom one. Increase it, and then
reduce the top one. Just like that. And
I'm going to slip both of these and move them
back a bit on the x axis. That's good. Let's duplicate this one and add it to the back. But just before we
do that, I want to subdivide this a couple
of times. There we go. Just move some of
these verities. It's not perfectly even. I'm thinking it's going to
be like a natural stick that the campers are
found in a wild. I might even extrude a little
bit out, but I'll do that. Once we've copied it, let's just select everything
shifted D to duplicate. And just move it down on the
x axis to the other side. I'm going to ill this.
Yeah, let's just select one of these vertices and extrude it out to
make a little branch and control a to
reduce the size. That looks nice. There we go. Just let you want to
clean up this topology, we can apply this skin modifier and go in because
it looks like it's added quite a few polygons. Let's try a limited
dissolve first. Because this sometimes works, let's let everything press X and then limited dissolve looks
like it's working for me. If not, you can always change
that angle right here. There are a couple cases
right here I might need to join these vertices together. It's not quite getting them. Just because that angle
is not intense enough. I should have changed the
angle from five degrees, but it's working fine. There we go. There's always
a bit of manual clean up. Going to delete the bottom
face because that's going to be poking through the
ground, We'll never see it. Same with the top one as well. Always make sure we do a bit of clean up after applying some of these modifiers that don't
always do the best job. Then we have our little
a frame tent as well. You can place some mats and
rocks and things like that, maybe a sleeping bag on the
inside. If that's your thing. I'm going to leave
this like it is. The last thing to do is add
materials to these buildings. That's instead we ski and we'll see if we
can do it quickly now. It's something we should
be quite familiar with. After working with materials
on a foliage and landscape, we've done some quite
complex things. So let's quickly go down to material preview just
so we could see them. And let's start
adding some material. So I'm going to use
the same material for both of these
tents right here, let's call it tent fabric. And of course, if
you wanted to have different tents next to each other that are
different colors, like you want a red
one, yellow one, you just create another
version of this material. Or we could use the
random generator that we created for the flowers, if you remember trying
to get that working. But I want to be able
to manually tweak them, so I'm just going to give
it a simple color like this for these sticks. I'm just going to island select them and create a
new material slot. Let's see if we've
got one we can use. I'm not sure if there
are any names properly. Let's just try this brown one. I think that's the
one we used for the trees. That'll
explain to me. So yet's do the same for this. Once sat down I can
join this together. I might just check the modifier. Yeah, let's draw these together. And I'm going to
rename this frame tent and move this to the campaign
collection right down here. Okay, so let's now make these
rocks a different color. Make sure we select them all. That looks good. Let's
create a new slot right now. We'll see if we can use
one of the gray ones. We've really got It
was a while ago. House. I don't remember
which ones they are. Yeah, Gray rock, it
looks like that's what it's called. That's good. It's pretty seenless
with the other ones on the landscape as well. And this Matt at the bottom. Let me just quickly check. There's no geometry. Might need to delete
this face right here. We'll get the floor
there. Just for now. I'm not worried
about it, actually. I will delete it. It's
taken up the polygons, it's not being seen,
that's looking good. We can always have them
later if we need to. We can't find another material
in the list that we like. Yeah, it's just
create a new one. Let's create a new
material slot to sign it. I'll call this one
light brown one. I'm going to use the
color picker right here to get the same hue
from the tree trunk, but we'll just increase the
intensity a little bit. Maybe to saturate, it's
nice. I prefer that look. That's the ten done
now, we just need to do the buildings, so let's let this lock cabin, let's put brown one on this
and do the same for the door. I think should actually let's make this door
a separate color. Sometimes it's nice to try things out, see if
you like it or not. Let's call this brown two. So I'm going to press
this button just to create a new version of it is now a separate
material to the. Let me change this one. It
won't change the existing one. We won't overwrite
it, that's good. Let's do the same
for the top bit. Add a bit of detail, these
window frames right here. I'm going to select
the glass first. I think these are
instances of each other. I'll create a new material,
call this window. This is going to be like
a darker blue color. For night time scenes I might do like what we did with the
lighthouse over there. For night time scenes will
increase the emission, but for daytime scenes it will just be like
this blue color. Now that we've got
these faces selected, we can do control number pad plus to grow our selection and then deselect
the original faces. And that's just a quick way
of selecting the frames. Work fast, not hard. And then let's put on the brown material. The brown one material
to these ones just says a little bit of distinction between them and see how this looks and rendered. I like it. This log
cabin looks nice. We can get some nice reflections coming off the grouse
onto it as well. Now on to the house,
the larger house. Let's try giving it
the rocks material. This one right here, gray rock. And this will be the base. And let's create
another material slot. And this will be a dark
gray rock right here. And we'll add this
to all the bricks. I don't like the bricks are
part of the same object. Let's quickly go down search for dark gray rock and
then I'm going to select all the other ones.
This might take me a while. So there with me, let's
just hide this building. A lot of these are
instances actually. Remember we select
multiple objects, we can link materials, let's unhide the rest
of the building. Now we can see we've got this nice contrast between
the two brick colors. Whilst we're here, we're going to select this building and let's just quickly get the
faces for the wooden parts. Quicker Way to do that
might actually be to just select the inner
faces, these ones. Then we can grow our
selection a couple times. We've got some weird
topology that. I'll correct that in a second. As we've got this, let's
just quickly add this to a new slot and unassign
the middle faces. I might add these to
like a lighter color, create another slot and
assign them to this one. And then let's actually
call this light wall. And this could be some plaster perfect for this material slot. I'm just going to put
the brown one here. We can choose which one.
Let's try this one. For now, let's see what's
wrong with this topology. Here should be an easy fix. I wouldn't say it's too important
to create as like this, but I always like making
sure models are polished. This vertex might just slide up to the top, so I
don't think we need it. There we go. That
looks fine to me. Now for the rest of it,
let's just keep selecting these wooden planks
for these faces. I might do it manually. We can also slide some of these vertices in
towards the end. Just reduce polycana'jtqulect,
these ones. Quick wave donors might
be going into x ray view from the side in face mode. Just box selecting aid. Just box select. We should
only get these bonds. Let's assign is to brand one. It seems like it's working
quite well. I'll do again. But going through and
doing it by hand does also make it easier to spot errors
like the one we just fixed. Annoyingly, some of
these might be gone, so you can't always select them. In some cases like this, I can select one on one side
and then control shift, click the other to
quickly select them. Let's sign them
to this material. See if there's a quick way
to select these planks. Now let's try selecting one and then shift clicking
to the other side. Doesn't look like
it's going to work. If we do it in steps like
this, then yeah, this works. Just have selected
and shift control, click another one
and it just selects all the faces between if they're all quads and they're connected. Let's be careful there.
It doesn't always work. If this doesn't work, you
can try using circle select. You can go in an X ray
mode like we did before. Whatever works for
you. So you're going to add a
brown wood to this. I think that would look good.
I'm just thinking about how the colors on our log cabin
compare to each other. I'm happy with that. And let's
do the same top as well. What I might end up doing is tweaking these colors because I think this brown is a little bit too light and saturated. But we'll get to that
later. I'm going to add brown two to
the roof as well. Maybe you can always
search materials, if you can't find
them in the list, this chimney will be the same. I'll do a combination
of the two. Let's set this one
to brown two and then create a new material
slot for a lighter brown. Like I said, I'm going to
change these colors later. That's the nice thing
about doing it this way. It looks like instance
these windows that lucky for us.
So speed it up. Time. There's lot door knob,
let's see, we got a metal, I think there's a dark metal that we used on the light house. We can probably repeat
that. Looks nice. And let's just go in
and do the windows quickly and then
nothing will be done. This is all the same way I
did it for the log cabin, by the way, put my
window material on it. This is the beauty of instance. So yeah, as I was
saying before, let's go back into ndenmugcause. I'm not quite sure. I'm happy with the color of this brown. So let's just see if I
can darken it a tiny bit. This will affect the trees as well because they're
showing the same material. So if you don't want
to change them both, it might be worth
having a separate one for the trees, It's fine. I'll keep the same
one on both of them. That looks a little
bit better to me. I might also change
the dark brown to be a bit less saturated. See how that looks?
Yeah, that's good here. Let's also change the window
because it's too saturated. I find it's way too easy to make colors very saturated and bunder sessions decrease this. I'm happy with how that looks. Yeah, last detail. I know we're finishing
with these buildings, but one last detail, just
like we do with everything, it can be nice if you
just bevel control shift, be just bevel the corners into buildings like this
or come in with our knife tool and just
make a couple notches. You can add so much character that I think it's
always worth doing. Yeah, that finishes
these buildings. I challenge you to create something much better
than what I've got here. I don't think this building exactly looks the best
or the log cabin, but we've been created it and we've got a three different
layers right here. So that adds character
and you can use, you might want to swap
out these gray bricks for like a red
brick wall instead. You can experiment with this, see good luck using
these techniques. And we'll continue
in the next section.
21. Creating Low Poly Props - Part 1: Hey everyone and welcome
back to the next section. At this point in, of course,
we're almost finished. We've covered a lot of modeling techniques and concepts when it comes to this low poly style. And so in this
section we'll just be creating a series of props to reinforce this knowledge you can use to populate this scene. So let's start out just by
organizing the outline. Because I thin, it's a
little bit messy right now. I'm not sure what all
these objects are, so I'm going to select all
these ones and just put this, let's see what the
house ones go. Inside it. Okay. I
can just just hide house one because it looks
like I've got part Yeah, I've got the door from the log cabin in the wrong collection. I'm going to move this
to a new collection. I'll just call this log
cabin one that if I hide it, then we can start moving some of these objects
into there as well. Should have done this
in the last section, but here we are a log cabin one, and it just makes it
easier to select. Perfect. So we've got
some space out here. We're going to start
out by creating a little barrels. Quite
a simple technique here. We're just going
to add a cylinder. Have as many sizes as you want. I'm going to choose eight and we'll create a couple
of these as well. We can create a small
one next to it. Let's just scale this
down and isolate it. I've got some reference images of barrels on my other screen. It might be worth
having a look at some. I'm going for like an old
classic wooden barrels. Always fun to make. Low body can see here I've created
this cut in the middle. And then we're going
to level this to get the curvature any
outside of the barrel. So just make sure that
everything's scaled properly. We might end up
mirroring it vertically. Here we are, This right here. If we select this and then
hit control beads bavel, we can get the shape like this. Don't want too many cuts.
I'll stick with this. Okay. If you don't like it, you can always scale it
on the shift Z axis. Now for the hoops going around, this barrel under
is going to have four hoops at the top,
two at the bottom. You can always have
more if you like. I'm going to try and get the right thickness.
That looks good to me. Yes. So let's just
select these rings. Add a couple of
loops at the top. It might be easier to
see what I'm doing here. Once I've extruded them out, I just eyeballed the, all the thickness of
some of these loops. But you can of course
put a mirror modifier on it if you want it
to be more precise. As here, once I've got
this is just going to extrude along normals like this. And then I'm going to
expand my selection by one and add some
materials to here. I don't want to
use the brown one that I put on the
other trees because I'm already using on
quite a few assets in the seam just in case
I want to change it. Let's give this a
brown color like this. And then let's create enough one and call this barrel metal. It would be like a gray
blue, not quite saturated. That looks great. And then
at the top and bottom, we can just select these two
faces, insert them a bit. And then extrude long was once again and that
looks pretty good. Now we want to add a
little plug in at the top. We just place our cursor
on top shift add cylinder. Let's just put five sce this down and we can delete the bottom face. It's
never going to be seen. A little tip of this
is if you scale the top out like this to
create that bung shape, add a bit of stylization to it. Let's put the barrel
wood on this. I'm going to copy this
material and call it barrel wood and make
this slightly lighter. Just to differentiate
it, what we could also do is have the top of this barrel of lighter color and then there's a barrel wood. One's personal preference. Yeah, I'm going to
rename this barrel. And I'm going to move this to a little props collection
which will work, contain all the assets
for this section. We've got a couple
of objects here, I'm not quite sure
what the cylinder is, let's just jump to that. It looks like I have a mystic. Couple objects that's part of the bowl. Sls,
rain this together. Let's move this cylinder
back into the house. One collection. My mistake then let's see what
this empty is as well. It looks like this is
one we're using for the water waves, the
water. That's okay. I'm just going to
put this up into the scenery collection
just to keep things tidy. When you're placing
this, it might be a good idea to set the
origin to the bottom. So I'm just going to
select this ring of edges. Cursor to select it and then
set origin to three cursor. You can just snap
it to the ground. The place these
around your scene. You might want to
have a couple outside the house and Beth,
looks good to you. I'm going to do
this really fast. But as an extra challenge to
try creating another barrel, I'll give this 16 and
we're going to make this little bit smaller and
only put two hoops on it. Just to do this, see
outqu you can make it, I suppose might be
net bit of bread. You can make it look
better than mine. I'm going to bubble to make the hoops using the same
techniques as before. And let's put the
same materials on it. Cally we can just re use them. Set the origin and we can place this around a
couple of times as well. Nice. Another little thing we can model right
here is a camp fire. Because we've really
got some tense, it might be nice to
have a little fire pit. The way I'm going to do
that, me personally, I'm just going to
use metaballs to block out the basis for it. I always forget about
these are under metaballst's. Add
a couple of these. We're going to go and
increase the put resolution. Decrease it rather we use this to block out
the shape because I'm thinking of having like a
little pit in the middle. And then to change the size of the green ones as
well as the red ones. I mean, when I say, is this
just reinforcing knowledge that we've used
throughout the course? It's all stuff we've
done before then. Once we've got that,
if you want to, we can go and sculpt it, but I'm going to leave
it like that for now. I think that's okay. Let's convert this
to a mesh then. Let's see what the
topology slide. We might need to put a
decimate on this or remsh, let's try remeshing it first
to a Vauxhall Re mesh. Apply that and then let's put
a decimate modifier on it. Let's make it nice
and low poly perfect. We could also add
a little circle of stones going
around the outside. Let's add some
ospheresjust going in top right now could create some nice little
game assets like this. You could sell these
in a pack maybe. And then I'm just going to
scale some of these down, change of size, use a bit. Portional editing
with connected mode so I don't move
neighboring ones. Let's just distort some of these stones so they're
not perfectly sercal. We could spend a bit more
time on this than me, but I'm just trying
to be quick here. Let's put mate modifier
at see other slopes. Then we could add some sticks, so let's shift a, let's add a cylinder with just three births that
will allow us to do that. Lets it will, let's
scale this down. Disabled portional edit. What I'm going to do
now is move it up in edit mode so that the
origin point stays there. And that would mean
that we can now rotate it around the point. It just makes it
easier to manipulate. I'm instancing a
couple of these, rotating them on the rest axis. If you're taking it into a game engine like Real or Unity, you could have a nice little
particle emitter here. That would be a co,
addition. Maybe we could animate some
smoke coming off. We get creative. That
looks good to me. I might have my camp
fire extinguished. I'm not sure if we'll
have a flame coming off. Yeah, I'm happy with that. So let's draw a news
altogether now. Let's keep it separate
while adding materials. I'm just going to put
were brown two on this. Let's try brown, dark
gray rock for the stones. I'll just call this sot,
something like that. Very similar to the
color of the rocks. Try, give it a
slight tone. Nice. Let's see how this
looks rendered perfect. That will look good
around the tents. Noticing that this grass might be a little
bit too saturated. I'm just going to
quick go out to the shading tab fully saturated. Let's turn down a tiny bit
and reduce the brightness. Doesn't need to be
so bright. See how it looks in rendered view. You can always tweak
these settings. Yeah, that looks better to me. It's tiny bit more
yellowy as well. It's quite green right
now. That looks good. Yeah, I'm always too bright and saturated with my materials. That's one thing. I got barrel. Once this is done, we
can just combine this into the same object, control J. It looks like me to apply
these decimate modifiers, I always forget to
apply these modifiers. There we go. Control J part
archivo point somewhere. Sensible at this time, I'm just going to
move it manually. The way we do that is by turning on transform
origins up here. We can actually just
place it like anything. Let's just to make
sure that it lines up. That looks good to me, that looks like
it's a pretty sent. Let's turn off this,
rename it Camp Fire. Nice. I've got one other idea for an object that
we'll create now, I'll be like a little tree stunt with an axe poking out of it. So that'll be fun. And
then in the next video, we'll do a couple more objects. I'm just going to
place my cursor here. Once again, shift A
to add a cylinder. I'm thinking five vertices, depends how big you want the
trunk to be. Just like that. And then just sculpt
the shape of this. It's going to have like a nice
little taper on, isn't it? That's extrude
distance to ground. Once again what we
could do is lt, one of these vertices
and control shift to bevel and merge by distance, and then we can move
this vertex out. It just makes the shape a
little bit more interesting. You can imagine that roots
are going to be coming out of this rather than being
perfect. There we go. But I do want to keep
the top plane up. I've probably distorted some of these faces running outside, but that's going to be okay. Let's put triangulate modifier in this to see how it
looks. That looks good. I'm happy with that. This it's probably a little
bit too far out. Yeah, that sits pretty well. And let's also do this spot on face because
it's not going to be seen. Great, that's tree stump. I'm going to let this face and just insert it a little bit. Then let's add materials. First, let's put brown one on, this Brown two, Ashley. Then let's create another
one and put brown one. We'll see how this looks. We can always change the colors. If we don't like it right now, I think I'll have
it brighter than. Let's create another
material slot. I'll do this wood, Ashley, I'll call this wood
lights. Sign this. Yeah. Remember if you go back
into object mode when you're actually
changing the color but just have the
material selected, then it's easier to
see because when you've selected a
face in edit mode, it turns a yellow there. Just that if you want to, you can maybe extrude it down a little bit
just to set it back. Could try in setting it,
give it some texture. I don't want to increase
the poly count too much. Let's do it just for this one because I think it
looks really nice. It just looks as if we've got some circling going
around, isn't it? That's the tree stump. Then for the ax, we can
place our cls here. And I'm just going to add
a cube scale this in. I got a picture of
an axe on Monitus. I'm looking at that
right now. You haven't really made any hand props. Would be a nice starting
point. Just get the length. I'm not thinking about
measurement here, I'm just eyeballing it
for the actual blade. I'm just going to select
to this, duplicate it. Let's think about how the
top is going to look. Going to need to be
slightly thicker to bring this face back right there. I just scaled it on the x axis and did it merger by distance. See how we want this
profile to look? There we go. That looks
quite nice to me right now. I'm debating the profile. We keep this rectangular or not. If we want to add an extra loop, I'm debating adding one. Let's try how it
looks to be the. I do think that's a
little bit nicer. Yeah, I might just
bevel these and I'm going to scale these
on the x axis as well, merged by distance mirror. Let's just add a few
cuts in here to get the profile axes have
quite a distinctive shape. And there's usually a bit
that props out right here. Let's just add that.
Now. Let's reset the origin to center of mass surface and add
some materials quickly. Just put brown one or brown two and let's add the dark metal that we created for
the lighthouse. I think just quickly
assigns one to the blade, then let's place it so it's chopping into the axe.
That looks good to me. I'm happy with that. Let's
join these objects together. Just going to quickly
save, before I do that, train these objects together
and I call this tree stump. Whilst I'm here, I haven't
checked the normals, so I'm going to quickly
turn on face orientations. I believe it's one of
these ones right here. Face orientations, I've got add on that allows me
to see this hard ops. If I press out B, then I've
got a little shortcut to change some of these
settings and right here we can see that this
ones are not right. I'm just going to go into edit. Most everything shift
in, that's good. I don't see any here,
incorrect normals, so I'm just going to
disable that up here, remember face orientations and we'll continue in
the next video.
22. Creating Low Poly Props - Part 2: Hello and welcome back. In this part we're
going to start off by creating a, well, we'll be using a lot
of techniques that we've used before except for some radial symmetry
that we're used to create some bricks
going around the outside. Let's get into that now. So I'm going to start off
place my cursor here and we'll add a cylinder just to block
out the rough shape of it. And let's set list to 12 vert. Want a few polygons
to work with. First off, let's just get
the diameter of this right. I think it should
be about a meter. Just over a meter. Let's use
these grids to lend that up. I'm happy with that.
Then let's just scale this in edit mode. Let's move the bottom
face up to around about here at the top. With this, well, we can insert this and just use it like this. We can have this is the outer wall running
around the outside. It will also create like
a little frame structure and a roof on top. But I'd like to create the
outer ring using bricks. We'll get into that. Let's
start off creating the frame. That will probably be simplest. I'm going to press Shift A
to add a E in edit mode. Make sure we're in edit mode. Let's scale this down
and move this on the x or y axes to around
about here. That looks good. It can either be on
the inside or outside. I've got some
reference images here. I'm going to put mine
just about there. Let's make sure we move it down just to sure it's
below the ground. And delete the bottom phase.
We don't need that anymore. Perfect. Now we've
got this phase, we can just drag
this up a little bit till it's tall enough. And skeleton, that looks good. Now what we'll have at the
top here is we'll have two little prongs coming
out to support the roof. I'm going to add a loop
around about here. Let's maybe make this bit tall. Keep changing this.
Let's add the loop. We'll try selecting both
of these at the same. We could mirror it as well, but let's just try
to do it like this. So let's extrude press
skate and you'll find if we scale it on the y
axes instead of moving them, let's just like another
way of moving it, it's a bit more simple
and creates a roof. Let's add a mirror
modifier to this. Just so copies across
the steel side. That'll be down here a modifier. And it looks like it's
already got the right axis. Perfect. Now for the
top of the roof. Oh, this will form
the top of the roof. We've already got a cursor down here, so let's just
press shift A, add a cube scale, this down a little bit, just
like we did before. Let's move this up
and elongate it. I want mine slightly overhanging
the support structure. Let's just place it about here. Then we can delete this face because it's not
going to be visible. That looks good. If you want
to add a bit of detail, we can probably do
this later as well. But let's just add a couple cuts along and then move some of them down so it looks like
it's poking up at the end. This has the effect of looking at the woods
expanded over time in the get maybe it's slightly symmetrical,
slightly asymmetrical. I like that look. Let's
also drag this one down. The weight of the roof as pulled down on the
support that Los. Good, then I'm actually thinking we can add
another cut up here. Let's just think about how
we're going to do this. I probably will add a cut
going along this side, right here, and it can do
everything to the left of it. Make sure I'm using the last
tool, let's follow along. Then we can mirror on the y axis as block.
Just close things up. Now let's create the
actual roof piece. To do this, I'm going to
add a plane and just move this edge on the Y axis
by one by minus one. So in the same spot as a curse, that just means we can
move it up and it's easier to manipulate because we can just rotate it like this. First off, let, let's
think about this. Yeah, let's move this
to the side slightly. We'll add a cut going,
we'll skeleton. So it's further in top part
just scale on the x axis. There we go. We'll
add these cuts. Going along here, we'll just add one and then
bevel it across. Let's give us two side bits
that we can bring outwards. Let's delete this face in the middle and just slept
everything and extrude down. You can see if we rotate this, this is how it's going
to make the sides. I can see already this two wide. Let's just bring these
faces in a little bit. Now I'm going to put my cursor
here and I'm going to add a couple more cubes
that's just follow along. I want to be slightly smaller and I'm going to
delete the faces as well because these might
be visible from below. And I'm just going to join this to the other objects,
it's all the same. Quickly calculate
normals because it looks like some of
these are flipped. If we rotate that now it should
look a little bit better. That looks good. So we'll
add some kind of tiles here. We can add individual
roof tiles, but I'm thinking to stick with the poly count of the rest of the scene
that we've got. Let's just try adding a
plane and see how it looks. We can always change it later. Let's just add another plane. Put a Slidify on this as well.
We go something like that. Like it's being held
up. Here we go. Another thing we can do is add a couple cuts running down. I've added one to
both of the tops. I've got both of these
objects at the same time. I've added a cut going
down on the actual roof. And also along with
these bars across, we can just move these down a little bit and
then level this. I think that looks a
little bit better. Perfect'm. Going to
apply the solidify on this because I'm happy
with how that looks. Join it to the other object, and then let's rotate
it down just like this. See how it looks from
below. That's looking nice. Then for this part, let's think about how we're going
to fix this isolated. So we can see it might be
the case of selecting knees, just pressing GG to move them
out, deleting this face. And then if I select
these two edges, we can scale them in a
little bit. On the x axis. Yeah, that looks like it
joins it nicely together. Then let's copy this
across the other side. So let's add another
mirror modifier on here. It looks like it might
need to be the Y axis, or it might be because
we've got a mirror on it. I'm just going to use
this little pete. This top part, it is a Y axis. Anything else we need to
do? I'm happy with it. I might quickly, We're here, just change the length
of these tiles. I'm moving them on the
local Y axis here, so I'm pressing Y twice As the shortcuts do that.
That's looking good. I'm happy for the top of the
well now we need to have a little rod running between these two supports that the rope is
going to coil on. Let's think about how
we're going to do that. I'm going to place
my cursor down here. I'm going to add a
cylinder and I'd like to use five vertices.
Let's just rotate this. This should all be stuff
we're familiar with, so that's good to me and we'll have some
handle on the end. Let's just place a
cursor right here. We can shift cursor to selected. Let's add a little
cube while I'm here, let's delete this face and
scale this in a little bit. At the bottom, if there's
no rope hanging off it, then the handle will
always hang downwards. But if you're going
to put a rope off, then you can spin in such an angle like
that, it's up to you. So let's just quickly duplicate
this pentagon right here. Just let these edges shift D and then press to set
it as its own object. Let's try to select, have
a hard time selecting it if we can just hide
these ones. There we go. And then let's just st
everything and extrude it out on the x axis and move
it down a little bit. Remember, just in case we
take this into a game engine, I always like to have my
edges intersect in slightly. When there's no face
here, let's just intersect it with this block. Because sometimes it can mess up baked lighting,
but not always. If you're rendering in
bland, it should be fine. Don't worry about it too
much, especially if you're using cycles. Let's fill in. You might want to add a loop
here and scale this out. Just add a little
bit of stylization. It could also come in above
all this, how that looks. This is going to be quite
worn down, isn't it? At a bit of aging right now. I'm just experimenting. I think that makes it look a bit better. I'll come in as well
to the support I supply this mirror modified because I'm happy with that now. And I'm going to use my
little knife tool trick to add some cuts into the
side. Nothing too deep. Just a little bit of detail to add some character
because as well, it's probably going to
be quite old. Let me go. You can imagine where someone's been turning
this handle and they might have scraped
along the side. That looks good to me.
Now we just need to create this stone
bricks right here. There are a few different
ways we can do this. One way might be to
add a radiule array. So we'll add an
array modifier and then use a curve to
direct it round. Yeah, let's get to this. I'm
going to place my cuz here. And just create a couple bricks. Actually, I'll place
yeah, right here. We can line up and I'll
create some bricks that will be roughly the same size as each of these segments here. Because I'm thinking about
12, it's just scaletons. We've got the correct
thickness, that looks good. And some of these
duplicate it in place, one next to it, but this one is going to be
a little bit smaller. Yeah, we've just
got a few of these. Maybe every other one
will be a small one. And then we're going to wrap these round so as to do that. One thing you might want
to do so we don't get gaps between is add some
loop cuts to all these, then just old so they
intersect in the middle. We can get some messy
geometry this way, but I think it's worth
it. That looks good. Yeah. Once again,
we can come in and chip some of these like this, but I might do it
after we've added the modifier so it doesn't
look too repetitive. Great. We're going to
place a cursor here and let's we need like a
path to array it round. Let's just create a circle,
See if this one works. I hope it will be the
right type of path. Then let's go on here
and we're going to add a curve under the
deformed section here. We've got a curve and then we just need to
select the curve. I think there should only
be one in the scene, so we can just set it here. Looks like it is working for us. You see it's wrapping around a couple of things
we might want to do. We could try changing the
diameter of the circle. We just scale it,
but we can also select this in object mode to move it along.
Move it around. By the way, if we select
this, sometimes I think we need to move it on
like the y or x axes. If we can turn on
this option, right? Yeah, that one right there,
this button in the middle. And we can see it update
in real time. That's it. And then let's just
hide this one. I'm only using this as a visual reference
so you can see it. And then we might want to add
an array modifier to this. That looks good, but we'll drag the ray modifier up before the curve and it's just
duck a normal ray. I think we've used these before. It'll just copy the object. Make a couple extra ones. Let's add about three of those and it looks like it's going all the
way around now. Now what we might do is I'm just going to
place my cursor here. Shift S cursor to selected
because I think it's too long. We need to scale it so that
it correctly matches up. Let's just scale
it on the x axis until we've got, there we go. That looks good. Nice. We've got our bricks just quickly
shift to recalculate. It almost looks like
everything's fine. I'm quickly safe. Just in case we need
to go back and revert. I'm going to apply
these modifiers. I'm going to duplicate this, Move it up the z axis. It looks like I didn't
scale it properly. So let's just slt all
these bottom vertices and move them so that they're
at the appropriate level. Looks like that. It looks like the bottom bonds
are already fine. And let's delete these faces because we're not
going to need these. Then for the top
ones, let's select all these vertices and move them down to the
bricks the right height. We can just rotate these. We might need to
place our cursor here to shift as curse to select it because I
don't think that origin matches up to where
we want to spin it. Let's just set the
origin to three D curse. Do the same for the
bottom one as well. At, we can just rotate
this on a Z axis. You can see we shouldn't have the gaps
between the bricks. It looks like they all line up fine and it's quite a
nice way to bile texture. I suppose you could
also use this to texture the side
of the building. If you're doing like
an entire wall, you're going to get quite a few polygons from that perfect. Then if I'm going to press
O H to bring back this, maybe we can scale
it in a little bit. Let's scale out this out a bit, then let's delete these faces. They just extrude it
down a little bit. This could be like
stone bit that sits on top or maybe like
a little wooden thing. Let's just quickly recalculate normals and get rid
of the sextemetry. I don't think that's
meant to be that. Instead, actually we
could bring this up. We'll just have this to
represent the water, make it look like
it's really flooded. Well, let's scale
this in a little bit. I'll separate this as an object. Perfect. I'm quite happy with
that. That's looking good. You'll notice that these
vertices here in the middle, or this glute rather it
has moved down slightly. I can snap it up to
the same level as the other vertices
on the outside but to make it flat like that. But I'm now realizing actually quite like it
because it gives us some weird shading and I just like the angle
that we get here. Yeah, let's go into
material mode now and let's quickly add some
materials to let's try and re, use some of the ones we've
already got in the scene. Let's go down, I imagine we'll just use brown one
foils of this, the two just add
a bit of variety. Add brown one for the top, these parts right here, I think I'll isolate this and
this will be a brown. To use a slightly darker shade, we could set it to
like a stone and maybe add some roofing tiles in
here, but I quite like this. Look. Let's put a dark gray rock and
light gray rock on here. We can alternate between there. Let's just select some of
these. Use an L to island. Select right here. We'll just do every other couple ones that as dark gray you can even give this like a green mossy color if you wanted to. That might look quite nice.
It's looking a bit contrast. I might have a bit too
much contrast here, but I'm okay with it. Looks a, there we go. Let's see how it looks
in rendered view. I think I'm happy with that. I think that looks great.
Go before I forget, let's just add a material to
the water. Let's select it. I think we have really
got the water material, but it's transparent right now, and I don't want to
actually be able to look down at the ground instead. Let's add a new one. I'll just call it matt water. That's turn nice blue color. Look at it in rendered mode, we change the roughness. Even a green color. There we go. We can add a lily
pad to this as well. Let's place makers here. Let's add a plane. And I'm going to isolate this,
look at it from the top. I'll try and be
creative with this. Let's go into Select mode, and we can just
trace the shape of the lily pad and then delete
these two outer faces. We don't need these.
Delete faces. Nice. And move it up slightly. I'm okay with this
being completely flat, but if you want, you could
add solidify modifier to it. But like I said, I think
I'm okay with that. Let's just give this
to green materials, very sharp green. Let's
have a couple of these. Well, maybe the wall hasn't
been used in a while. Let's combine these. Yeah,
I'm happy with everything, so let's combine
everything to one. Let's just quickly go through
and apply these modifiers. I think we've got
a couple mirrors in some of it, just these bits. Maybe It's hard to see sometimes which objects are selected
and which ones aren't. I think I've got them all,
everything control J. And let's call this, well, quickly hide this and delete
this curve that we're using. We don't need that
anymore. There we go. This vast one is going
to be very simple. So let's just add a
cursor here for this. We're going to
create a park bench. Let's add a plane. Just scale. This looks like it's going to be 2
meters long, so that's okay. And then I'll add
some cuts down here as well. Maybe four. And then let's just level this out and delete these faces. Select everything and
extrude this. There we go. So that'll be like
the top bench Island. Select three of these,
we'll go into this mode, shift it D and just
place it down here. This will be like where you sit, that might be too many of them. Let's just have two. I'll
set it as its own object. And then that means
we can quickly put a mirror on it because
the origin here, the same supports the
top on the Yaxsw. We just need to
add some supports. Let's add the cube scald. We're going to use snapping to align this top face right here. Just put it there. I'm
going to keep the top face because we can see it through these cracks in some angles. Let's move this out. We're
going to duplicate this. Move this down on a Z axis
and align it with the bottom. And then we can
scale this out and it's all at light supports for the sides and also hold them
up from the center frame. And to create that,
we might just be able to add a couple
cuts down here. Actually all creates
a separate objects so we can insert it. We'll
see what I mean later. Let's just place my cursor
here somewhere or snap it. Place my cursor here
and create a new cube. And I want to scale it
just slightly thinner, perfect, and delete
the top face. This won't be visible
if I go into this mode. We can just scale
it up on a z axis. I'm going to reset the origin. I shouldn't have
changed that, really reset the origin to
center of mass surface. I'm rotate in it in object mode just in case I want to change the length or the width
later on, it's easier to do. For example, I want to
move this face out. Now I can just move
it on the local axis, double tap Y, it's going to be a bit thicker than
the Scss supporting. There we go, I think I already deleted the face at the
top, so that's all fine. I'm going to add
a mirror on here. Let's just place my cursor where the origin
of this object is. Add a mirror modifier for the x and Y. I've got some images on my screen that I'm looking at
whilst doing it. Let's apply this then. We can just draw everything
is the same object. Apply this mirror
modifier as well. Let's just drain everything up. This has been quite a quick one then let's put
brown one on here. Or maybe light brown we
can see, see how it looks. This up this down a little bit, that looks good
to me and then we can its origin of the decursor. It looks like I'm
missing this piece on the other side, that's
a bit silly of me. So we can just select it. We could separate it as an object and put a proper
mirror on and everything, But I'm sure it'll be fine
if we just don't tell anyone There we go and yeah, that's a little part
bench, there we go. Looks like I'm missing
this piece as well. I'm not quite sure how
I missed that one. That's just duplicate it
and everything's fine. Great. So now for objects on top, I want
to put some things on. Top also was on, I'm
just quickly noticing, I want to move this
in a little bit, slick it a little bit closer so I've broken
symmetry by doing this. But I don't think
anyone will notice. Bad habit though. Should
have first seen how it looks before we combined
everything into the same object. I'm
sure it'll be fine. Then we go, yes, we could add some little
plane cards on here. I'm going to place my cursor, just add a little
cards like this. Then for this one
I'm going to extrude it up because it will be the stack pressed old D.
I shouldn't have done that. To break the connection, we can just press this
little four button here. The object data
tab, I think it is. Your object data properties, and that breaks the instancing. So then we can extrude it up and it won't affect the others. So it looks like that's the deck and these are just other cars. I'm going to move these up slightly so we don't get any Z. Fighting with the table top
quickly, combine these. Let's rename this Ben Chatty
and add the cards to it. Put material on it, See
if we've got a white one. We haven't got one, so let's
just create a new one. We go playing cards
and let's add it. We could also add
some poker chips as well, just thinking. Now let's add a shift A, let's add circles,
five vertices, scale them in a little bit. Just create a few of these that there have been a few players for
some of these stacks. We can increase it a little
bit, that's good to me. And we can give them
some colors as well. Maybe we could put the
tulit material on here. Tulip petal just
got random ones. Actually, we want to come
combine it as a object, so let's scrap that idea. We don't want to have
separate objects. We want it to all be the
same part of the bench. Just call this poke Che. Let's give it a
nice dark red color and we can add some green and black
ones in there as well. Maybe, there we go. Let's make this one
green. That's good to me. That's combined this
the rest of the bench, and I think that's all the
objects time. So there we go. That's pretty much
all the modeling for objects, at least
in this course. So congratulations, if you followed along every
step this far, don't worry if not, but I hope there's some new skills you
can take away from this. In the next section, we'll
be creating characters. We'll create a male
and female character, and then we can
just round it up by placing all these
assets in the scene together and go through the render settings to create
a nice portfolio render. So congratulations, I
hope you've learned a few modeling skills and we'll continue with the characters
in the next section.
23. Creating Low Poly Characters - Part 1: Welcome back to the new
section of the course where we'll be creating
our low poly characters. So I'm going to start
out here just by hiding everything else I'll
do in the same file, just so we've kept
everything in a blend file, but if you like, you can do this in a
separate blend file. So I'm just going to collapse these collections here and I'm going to click on this little restrictions toggle right here. So we've got this little TV and I'm just going to disable
all of the collections that we've currently got because I don't want to be able to see these including the archive
one and set up as well. Why not? So I'm going
to press Shift, that's a shortcut to put your cursor at the center
of the screen. We're going to start
off adding a cube. It'll be like the basis
for the character. We're going to create
a male one and a female one in this course, while I'm here, we may as well create a collection
for these characters. So I'm just going to click
on the Scene collection, create a new one,
call this characters, and then add this cube in. Before we start, let's just quickly discuss the style
that we're going for. We want to target this towards games because we're going to
get in this course as well. Which means it can
then be animated. And if you look at this example, we've got like edge loops that run down the limbs and
across transverse. And we'll have a bunch of cuts here like the elbows and knees, so that it can animate properly. In this part, we'll be
creating the base mesh that we can use for both
male and female characters. So we'll create
derivatives of this mesh. We can also add a
bit of stylization. You see some of these
low poly characters will have like enlarged heads, or in the case of characters, in large proportion to certain
parts of their bodies. But I'm just going to create
like a basic humanoid shape. Talk about proportions
a little bit, and then if you
want to stylize it, you can take it further. Also for the face and hair, We won't be going into
too much detail on that. I suppose we'll see
later we might do what this artist has
done here and just add some eyebrows
and facial hair, but we'll see about that later. Let's start off by transforming
a cube right here, so it's going to edit
mode, Front view, and it can move it
up on the axis by one just so it's flat
with the ground. This doesn't matter. Assume that each one of
these grids is a meter. Let's try and make that
character fit within that range. Let's have got about
here, maybe a male, 16 foot tall, female one would probably be
slightly shorter. You can use these grids
to set your height. Let's just scale
this down a bit. Places where the
torso is going to be. I'm going to add a loop cut
going through the middle. And then I'm going
to delete this face. We'll delete the
vertices of this face. And then that means
that we can just add a mirror modifier to it. Whatever we do to the
side will copy across. I've got the negative Y
axis pointing forwards, which is usually what we do
when creating a character. Although we'll be adding close, the character will be using the base mesh to create a close. That makes sense.
We'll scale them out, maybe put a solidify on it. So it's important that we get this down right from the start. I'm just going to scaling
this if you'd like, you can load in the
background image as well, but I'm just going to
guess at proportions. I might do some annotations here using this little
pen tool right here. You can click on
this and then go down to view annotations. I start drawing head is going to be up to
about here, isn't it? And you can see it's created
a new annotations layer. Usually the head will
take up about a seventh or seventh and a half of all the proportion the
height of the body. That might be about here, so we can make sure our
heads are right size, but obviously it's
low poly is stylized. Don't be too fast about this. Then we can just block out
the shape of the character. My torso, here are my legs. The tips of the fingers
should come down to about the sin midway, the thigh, midway
through the thigh, the fingers should
come down to about here we can start modeling
The nice thing about annotations and
blenders at their three D. Now we can start actually
shaping this to the body. We also need to think about
whether we want our limbs to be hexagonal or octagonal, like the ring running
around the arm. I want it to be hexagonal, so we need to make
sure that we've got six vertices coming off. This can be quite complex to think about and
try and visualize. Just follow along if
you're worried about that. You're going to add some
cuts going along here. Let's add one here, then. I can start shaping
this in as well. Try and have the front wide in the back if you
can, a bit like this. We can also add some
cuts running up and down to get the curve of the spine and the form
of the chest as well. Make sure you take a lot
of time to tweak this, a whole day's work on its own time consuming process
for the top bits. I'm happy with the
shape actually. I might change the scaling. We can always go into y frame mode or use
this little tool here. For a simple object like
this, it can be quite useful. I'm just trying to align this to the annotations that I drew, although it wasn't
that detailed. I'm noticing now that
when we move this in, the vertex was passing through to the other
side of the mesh. So let's make sure we enable this clipping option and then that will lock
everything to the middle. Let's just select everything that's supposed to
be in the middle and try to move it left
and right on the x axis. And that should lock it.
There we go, for this. Part right here, I'm going to bring everything to the middle because that's where the
legs will be extruded out. Now I'm going to add a lot, cut this way down this
side of the character. Direct some of these
out. I'll disable this x ray just so
it's easy to see. Maybe hide notations as well. We can keep it on this
side of the screen. Just enable and disable
it as we need to see it. I'm just worried
about being too high. Poorly here because I've
added quite a few cuts already. This is manageable. We'll try and keep it
low from that one, but I don't think
we'll be adding any more cuts vertically.
This should be enough for us. So that's got this hexagonal form that I was talking about. If we select these
two faces right here, and then extrude these down, that will be like
basis for lens. And we'll do the same up here. We've got these two faces. And if we extrude
them out like this, and then we can either
rotate them like this and then extrude these
ones out to be the arms. So we've got these shoulders, obviously ignore my proportions, or we can just rotate it around this and then
extrude out the arms. It's up to you. I'm
going to do it this way, but let's try and keep
everything in a post. Sometimes if you're modeling
organic characters, it's nice to have the
arms come down like this, but I'm going to do mine
in a post just because it's a bit more simple when working with low
poly characters. And we can start
actually rounding this off so it's
not boxy anymore. Keep it a bit
thicker at the back. For the shoulder
blades, for the chest. I'm actually going to bring
some of these edge loops down a bit so we've got more
geometry to work with. Let's select all of
these faces, inst them. Now you'll notice that
when we inst this, it's got like another
set of faces coming on the inside of the mirror like
this, which isn't ideal. If we press B, we can toggle it, then you can see it like
clears at the center, which is really useful when working with the mirror at all. Then we can just bring this in, select all these faces, move them up a little bit. Then inside view, we can extrude this up to
create the neck, which should be slightly
going forward at an angle, a slight curve to it as well, but because it's a
low poly character, you don't need to add
that much detail. It's okay, great. And then we can start
shaping the rest of this as well. Let's
just move the back in. You've got the Loop tools and add on enabled, which
ships with Blender. You can go to Edit, I believe if you just select a
set of edges like this. First off, let's delete
the edge in the middle. By the way, There we go. We can do the same up here. Let's just delete these
vertices and this edge because it's just confusing and it
makes selecting easier. If I select all of
these, we can use this little relaxed tool and also the space tool just
to make it consistent. So if you've got one
vertex over here, let them all use the space tool and it evens everything out, especially if you repeat it, you can use both of those tools. I'm going to undo
that already Looks good how it was before
I messed it up. There we go. I'm going to add
another blow cut down here. Actually, just thinking about
how it's going to deform. This can actually be
quite therapeutic, so just keep playing
around experiment. Don't be afraid to go back and make changes to what
we've already done, because it's an
intuitive process. You don't expect to get it
right the first time around. Let's see what things look like. I'm struggling to get the
shape of these legs right now. Might add another loop cut. Relax this one. Just try and
shape it a bit more easy. Make sure you're looking
at your reference material as we're
doing this as well. If you found like a
really good example that's got good apology, then you can use it
as a rough guide. We've also got to decide later whether we're using
flat or smooth shading. Smooth shading would
probably be easiest, but I think flat looks
best if you can get these planes in the right spots. Flat will look much
nicer in this art style. Like I say, your
personal choice, I'll probably model it,
see how good it looks, and then decide I'm
going to use flat will smooth because it would be nice if it fit the rest of the art style. It
had flat shading. Said these faces right here will be extruding them out and using them to create the
clothes later on, which will probably
be a bit more fun. You just got to make sure
they deform properly. Let's just to enable
this sanitations layer. Again, make sure we've
got our proportions right. Let's go to this view. We're going need
to make the neck a little bit thinner by look, we can do that by moving it in. Scaling it and moving
it in on the x axis. Let's also just scale
this up a little bit and place it because
is supposed to be. Let's use these tools I was talking about
earlier as well. We can also use a
circle tool as well. If you click a
circle right here, you can see it just
rounds everything off. But you might need to move
everything back in place and scale it down.
It's quite useful. So I'm going to place this
loop right here where the knees are and keep
finding the rest of the legs. This can be a very time
consuming process, if you spend a bit
more time on it than I am right here
for these videos, then sure you can make it look great. Like this vertex here. I've accidentally
dragged it too close to the middle and it's
clipped into the center. So I'm just going to disable
this clipping option temporarily to move
it back again. This looks like I've done the
same with the middle one. Let's just move
that out. Be really careful about this
clipping option. If it's too close, it looks like it's on
1 millimeter here. You can just add an extra zero. Let's drag this in. The reason I've got
these two cuts so close together is for deformation. When we've got the joint here, it's going to need
fertases to the form, but don't worry
about that for now. If you're not experienced
with rigging, we'll cover that later. If you're struggling to block out the form, you need a
bit of help with that. We can always go into
sculpting mode as well. Some people prefer to work organic lease, It's
more natural to them. Let's do that in a second. Just correct this. Turn a clipping back on
and you can go up to the sculpting tab
number pad period to zoom in on it again and we can just start
sculpting it as normal. Let's go back to
our standard brush and then you can hold
shift to smooth, might help if you've got
a pen tablet for this. The grab tools are
useful quite as well. So let's go down to this
one and you just reshape. It doesn't like it's
working for me. There you go. I think it's because I'm trying
to sculpt the other side. We need to sculpt the side that hasn't got
the mirror on it, so this is where the actual
meshes the other side, it is just the mirrored version. Let's just pretend that's
helped a little bit. Sometimes it's easy just to
move things around like this. You don't want your
fingers to aid from using all those
shortcuts in edit mode. Here we go. Just going to
move some of these loops up to form the shulder blades right here. Make sure
we get the curve. The spine is, should
be going like this, Like an S shape,
almost just like this. Shouldn't be completely
straight. Just go easy. If this smooth tool can
have quite strong effects, it might be worth reducing
the strength a little bit. I'm just using my
mouse right here. But of course if
you're using a tablet, you'll have pressure
sensitivity. Another thing you'll
notice about the back, I've got this little dent going inwards, just where
the spine is. That's a nice little detail. Let's go back into the lay out mode because
I want to change things. So you can see this is
taking characters aren't an easy thing to do
very long process, but it's still fun. I always enjoy this. We begin to think I've got too many
polygons up here now. It looks like this next
quite poly, But we'll see. We can always change that later. See if there's an easy fix. I can think of what I
might end up doing. You don't have to follow along
if you're happy with it. But I'll delete. I'll delete everything
that we've got here. To delete, I'm just going to extrude this
vertex in right here. Let me hide our annotations
so we don't have this. In a way, I'm going to join these two edges
together. That's it. And then I'm just going to
create the neck as a hexagon rather than what it was
before. Let's fill this in. Set it, make sure that
we're hitting here. We have the middle
and move this up. Let me use the loop tools now. Space this out, relax it. But I don't think this will work actually, because
we've got the mirror. Let's delete this edge in the middle and see if
it will still work. It doesn't look like it
will, that's annoying. So that's like the
one limitation of it, using it with a mirror. But aside from that is really useful ad or perhaps I'm doing it
wrong, I don't know. Something like this
is why I'm thinking. So it looks like this will
be eight sided 12344 gear. If you really want
to use these tools, you can quickly apply
the mirror modifier. Use the tool and
then go back and add the mirror modifier again. But I won't do that
because I think it's quickly just
to do it manually. Nice looking a bit
better to me now. That's kind of what I
wanted from the start. And I'm having a little
vertex here raised, just I'm thinking this is
where the clavicle will be. At the top of your chest, you've got this little
pointy bit that goes out and I'd like to look
at that. So let's let the Pages right now extrude
out to create a new neck. So like I said, it's
a iterative process. Don't be afraid to go
back and make changes even if you've already
done something unless you're really on a time constraint that looks nice. And just remember the shading model that we're
using right now. It is going to make all
these faces look flat, but if we put a triangulate
modifier on it, you can see how it will look like the final rendered version. So this is another reason to be a bit scared of
using flat shading, but if we're just using
it within blender and we've got the flat
shading, we should be fine. I say I'm probably spending
a bit too much time on this because it won't
be seen with the clothing. I'm a bit of a
perfectionist sometimes, so you haven't noticed already. That looks quite good to me. See, I can spend hours
correct in this, but I'm sure if you
spend as much time on it that I have right here in this video might not
get the best result. I'm not too happy with this. It's okay for what we're doing. There we go. And let's just quickly check up
the portions as well. That looks okay to me. Let me just move up time a bit. Let's do Edd. There we go. Let's start
working on the arms and legs. We've got the most difficult, but now everything after
this should be more fun. We're coming up to the end
of this video now let's just quickly try and finish off
the limbs before we move on. And then in the next part, we create a separate
female and male character. Even if we work on
some parts of one, like we want to take
the hands off one, we can just copy those and
put them onto the other one. Yeah, the arms and legs, it's as simple as just extruding
them downwards like this and making sure they're nice and thin at
the bottom because limbs tend to get
thinner as you go down. Then from the front view, we want to have a
couple more loops. Let's put one here,
and this will bring out the calf just like this. And also having these loops will make our deformations
a bit more organic. That is good to me.
Once we've read it, we can always go through
and make changes. If something's not
working, you only realized after gin
for the first time, something is not going to
work as well as you thought. You can go back
and make changes. We'll talk about that later. Just focus on the
modeling for now. Everything will be
fine, that looks okay. You can always play around
with the thickness. I might be changing this
later, but like I said, I'm going to probably have
thick close in this character, so I don't need to worry
too much about the anatomy. Sometimes polychacism might want to have another loop in here, so there'll be like three.
I might actually do this. Yeah, I think I'll have just
so it deforms properly, then these vertices running through the middle of the joint, you want to add these
slightly closer together. Just think about how
it's going to bend. So these ones will contract closer and these ones
you want to spread out. But yeah, like I
said, we'll discuss this later when it
comes to rigging. And then I'll add
another loop here just to break it up
to play right here. But we still want
to have some loops and we can see to shape
carts a bit more. Definitely helps. If
you know you're an Asm, you get the opportunity
to try to do some life drawing classes. Maybe your school or gives you As classes,
make sure you follow. It's more helpful
than you think. It could be quite fun as well. I'm noticing the legs too long, so let's just scale
this a little bit, make it all bit wider. Maybe just working on
proportions that looks okay. It'll be easier to see once
we've got the head there. Might need to be, might need
to make the legs longer. But I could do this all day. Let's try and get this finished. Move this up to where
the elbow should be. We bring back our annotations. Remember I said that the tips of the fingers
should be going down midway along
the sins, right? Anymore about here maybe. But because we're
drawing in pots, we're going to need to them up should be around
about this point. Let's go back into edit mode. Arms, go about here. The hands might be about here. Let's extrude again. We'll create the arm separately. Let's add some cuts. This would be like the fore
arm will be a bit thicker. Can scale this on ship X axis, this is where the
wrist is going to be. Let's had some more
cuts along here, perhaps some fitness for
the bicep. Just like that. Bring your shoulder out. I don't know why our shoulder
is looking so timplyow looks a
bit better to me. I'm going to let this loop
right here and control bevel. It's another way of adding cuts. You can use the
bevel tool as well. Let's just get this shape so we'll bring the
elbow out a little bit. Here we go and we'll
bring this in. We want to have a
slight curve and it's something one is later when it comes to
rigging as well, because we'll be using
something called K. Don't worry about this. This is all stuff
we'll cover later. But we want to already
have a slight curve in the arm that looks okay, bring these fever along. We keep tweaking this forever, but we've got to move
on at some point. There we go, We're just using
the G to move these ones. There we go, and
those are our limbs. I think that wraps up this video and then we can continue
in the next one. Just going to quickly make a couple changes to this background here
because it's annoying me. There we go, so
you follow along, you don't have to finish. Take your time refining. This is already looking okay, but wants to be a
really high standard. We're done following
along this far and we'll continue
in the next part.
24. Creating Low Poly Characters - Part 2: Everyone, and welcome back to the next part
of this section. In this, we'll be doing
a bit of everything. We'll be adding some hands
and feet to the characters, as well as creating
a copy of these for the male and female version. Let's start out by doing that. Actually, let's just copy this character model and
move it along a bit on the X axis so we can
still se next to the other one just like this. The first thing I'm going
to do is disable mutations. That's under view right here, we just disable this note layer. I'm thinking for these
characters we're going to have like hiking gear or
camping gear I suppose. Because that's a
theme we've gone for like the camp site and being
in the woods and everything. So let's start out by
modeling some feet here. We're going to give them some
boots and we'll copy them across to the other version
as well if we want to do so. Yeah, create as many
characters as you like. I'm just going to do a
male and female one. Let's start out here, think
about the foot topology also, remember we can
hide the other one. So I'm just going
to call this male base because we've
already gone for kind of like a male body type and let's call this
one female base. We'll just hide this so we
can see it inside view. So I'm going to just
let all these vertices right here and then
we can extrude this down and maybe drag it
back a tiny bit. That's it. And then I'm going to
turn on this chromo us, easier to see Now I'm going
to start modeling the ankle, so just follow along here. It will give them a
heel shape as well. So by the heels, that's
going to dig back a bit. And then I'm going to select these edges and extrude
them down the z axis. Scale them on a z axis by zero, and then just move
them up a tiny bit. In fact, what we can
also do is press N, go up to item right here, and change the global
median transform on the zaxis to zero. And that means that each of these versites will
lie completely flat. You can see this
topology right here. Now we can select these edges. Be careful to not accidentally select the wrong
ones in this x ray mode, and we can just extrude
this forward on the Y axis, and then maybe move this edge down a little bit
to shape the foot. When you first look
at this model, trying to think about which
edges you want to pull out and what kind of topology
you want to have for, you know, just by looking at
it can be quite difficult. But I'd honestly say this
just comes to practice. If you're not sure, try different
things, see what works. Okay, I'm going to
shift a little bit, so I'll just move this
one out on the x axis. May move this along as well. Kind of have it going out
wider towards the toes. You can move this on
the shift Z axis. And I'm just thinking
about the plane. So we want to have
the inner toes a little bit further forward
than the ones on the side. It looks like accent. You
move this on the wrong axis. Let's just snap these ones. So if I enable vertex
snapping right here, I could just snap it as the
access to the other ones. Let's have this
nice line running around the side. There we go. I'm just thinking about,
I'm going to join this up. It'd be nice if we could
stick to quads because we've done that for the rest of the model just to
keep it consistent. But I'm not worried too
much about that and I can't help myself going through and clearing up some of these parts. But I promise I'll
try to move on. Yeah, let's just
select this edge right here and we can
do it in top few. Just extrude this out and try and get the shape
of foot that we want. I kind of like that silhouette. So I'm just going to merge
these vertices together. Now, merge at last. There we go. Now we've got to think
about how we're going to join this up. Let's try this. See how this looks. I'm just thinking about where these quads and triangles are going to be. Let's traders off in this edge. Maybe I need to move this
down a little bit as well. That there we go. Yeah, the basics of
the topology I'm going to do for the first
you can follow by topology, of course, I just mean where the actual vertices
and edges are. I don't mean the proportions. Feel free to move this about, you don't have to follow
exactly what I'm doing. This is what I'd recommend. Then another little
detail as well. Like I said, it's going to
be wearing some hiking goos. Let's add a cut down
here slightly below. And we can scale this
out just like that. We can give a different
color later on. If you'd also like you move
the whole thing down a bit. That looks a bit more
convincing friend that try lots of different things that looks
quite good to me and then, yeah, I want this to have this on the
female version as well. I shouldn't have created
the separate ones. I'm just going to quickly
delete the female version. And let's also do
the gloves as well. And then more copyist
across to create the female version because a lot of these things are
going to be in common. That's something I should have thought about from the start. We're here now, so
yeah, let's just slip this loop right here that the hand's going
to come out of. Let's go up a little bit on
as the access, there we go. And for the hand
I'm not going to have four separate fingers and a thumb. I'm just
going to have a thumb. And then create like a
sort of mitten shape which I find works quite well for these low
poly characters. Adding fingers could
be quite difficult, and it also adds a lot of
polygons. You really need them. Creating a first person game, I'd try and avoid it for locally characters that we go do. Now I'm just creating this part right here where the fu is going to come out of. We could have our whole
hand as just one quad. Think we should
try that actually. Going to move this
up a little bit. We can experiment. I might
not stick with one thing. Try lots of different options. Let's just extrude all of
these out and fill herds. And then let's let this loop and extrude this out
to create the fun. Let's just let the whole thing and move it down
a little bit and rotate it. There we go. For this, we need to adapt a little bit more detail
to these fingers. So let's just add a loop right here to see
how that looks. We can start breaking this up into triangles as
well, like this. This is very deformed, so we might want to add
a triangle here. Just press J. See
if you like that. I'm not quite sure if I do. In fact, what I might end up doing is having a cut
running along it. So let's create this
little loop cut. I think it'll be worth
it even though it does add a few extra polygons. This is what I mean
when I say I'm trying lots of different options, I'm not just sticking with any. There we go, Just like
that. Let's dissolve this one because I
think accidentally created one. Always be
careful about that. Now looks a bit better to me. We got a bit of
thickness to it now and a curve it in on
the palmer as well. You don't want to be completely flat. That looks nice to me. Everything will always
look better with smooth shading if you
choose to go for this. I'm just wasting
time right here. But whilst we're
working with quads, it's always called
surface modifier on if you want it
to look smooth. Yeah, we'll carry on
model in the hand now just like this and then
less skeleton on the sides. That looks nice
to me. Then maybe just extrude it
out one more time. Nice little mitting shapes perfect that looking
at my hands. While I'm doing this, of course, and I've got some reference
on the other monitors, always have some other
low poly characters to see how other
artists have done it. There you go. And
I'm just going to move these vertices
inward a little bit so we've got a taper going off and then we
can fill this in. That looks good to me. Fun
might be a bit too long, maybe just needs to make
the actual handle itself figure this. Let's use proportional
editing as well. With her, it's not too detailed, but it will work for us. It doesn't have to
be perfect here, we've got those hands I might quickly scam up a little bit, looking quite small right
now. That's better. Let's add an evolut cut
along here as well. So I'll put about here, make sure it turn off
proportion editing. Go and nest gloves
for the character. It's quickly look around. I'm quite happy with
that. Yeah, maybe we should do the
head as well before we create the
female male version before we start differentiating. This can be probably one of the most difficult parts of the character aside
from the hand. The way I'd go
about this actually is by creating a new measure. Let's add a cube. Scale this down, and place
it in position like this, trying to get the
proportions right then to make it work with the mirror, we'll
need to delete one half. Let's just right click
and subdivide it a couple times. Let's go for three times. And then we just need
to join these Tics up with this square right here. It'll be easier to see once
I've deleted the other half. Let's turn off this
Lowlaxra right here. Be sure, there you go. This can be a bit weird,
you need to have it separately in Y frame, normal mode, just
deleting the other half. What we probably
should have done actually, is smoothing this out. So I'm just going to quickly
undo this poles when we just subdivided it,
subdivided three times. Then we've also got this
little smoothness slider which can be quite useful, so we can use this to
make it more round. This should have
a similar effect of just putting on the
subsurface modifier, creating a cubit for the
subsurface modifier. But we've just done it
slightly differently. There we go, and I'm debating how far forward we
put this thing. Let's turn on
proportional additon, start changing the
shape of it now. Hope this isn't too high poly
for us. That looks good. Yes, I'm going to delete
this vertex in the bottom. Delete all of these vertices on the side that we don't want. Then I'm going to
join these edges up. Let's just select
these ones as well. There should be the same amount, because I've created this with 1234 on this side and four on the other should
be the same up there. And then we're going
to press three and do bridge edge loops. Then this loop
right here, we can, we can G, move it down, move it up a bit.
We can scale it. Let me turn off
proportional editing member to proportional editing, we start rounding this out, make sure you've got
clipping, enable you to accent and move it
either side like this, we don't want to make that
mistake again. Here we go. This is of course, just
my way of doing it. If you've got another way to do it that you
prefer, go ahead. This is just my method that has worked for
me in the past. A lot of this head
won't be visible. It might just be the face that we see in the end, if
we'll have hair on it. Also, notice now the
next way too long. So let's change that. Let's just let everything, move this down a little bit. For them one, we might want to move this out a little bit. Like, I guess Adam's apple around his throat. There we go. Head should be a
little bit thicker at the top compared to the bottom. As exaggerated as this. Something like this.
So there you go. If you don't like
proportional editing, feel free to go
into sculpted mode. I might use that a tiny bit. This grab brush can
be quite helpful. It's a bit like the
move brush in Z brush, if you've ever used
that software. There's our base mesh. You see the polygon counts quite high, but I always like to have a
bit more detail for the face, the rest of the body effect. I'm thinking for this
course we'll have a blank for this character. But if you wanted to, you
can create eye sockets by sleting some of these
faces, like these ones. Then we can insert,
we could try this. See how it looks, actually this looks. You can insert them. Press if you like, and this will create the cheeks
or the eye socket. You can move these back, make sure we've got a
nice bow at the top. You can also use the knife
tool just to draw on topology and then move everything around. So it's not as strange there
lots of ways to do this. We'll experiment and
see if this looks good. Might stuck. What's
do with this vertex? What we could do is merge this one up here.
Merge it at last. Do the same with this one, then bring this vertex
over, merge it here. I'm not really worried
about quatpology anymore. This works for us. That
looks nice actually. Then let's think about
how we're going to do our mouth. You can experiment. I might just throw back
to having a plane face. Yeah, you can use
the inset knife to, for this looks like I'm
going to have to dissolve some of the dissolve edges. It's always worth experimenting. I'll just delete these
vertices and then fell back. Let look. Psych based
characters finish is Mel base. Let's duplicate this,
create the female version, let's hide the Mel one. We might make a little
bit shorter as well, but we'll do that later in case we want to copy
anything across. It'll be nice to keep
the same proportions. Now, I'm just going
to go quickly hide the female version
because I think the Mel might be easier
to add the clothing for. I was just thinking,
we'll have a top on him. Let's put a lot cut here
and another one right here. Scale this one out a little bit. It's like he's
wearing some T shirt. Let's move this in and then we'll do the same
round as ways to add. Think about where
you can put this. There we go. I'm trying to think of it should be
this cut or this cut. I think we'll end up
adding a new one. Let's just put this down here. And then we can maybe
use this relaxed tool, see if it works.
Just scale this out. Let's make sure
we use Os instead of to scale. There we go. We can move this edge loop out. This might be a bit too high at. Let's undo this and just strike this up like a belt
going around him as well. Yeah, let's maybe try this loop. Let's, I'll test this. Move it down. I think that looks a bit better
for where the top is. And I'm just going to go through and make sure that the
bottom of the shirts roughly the right
length all around his body and see fitness.
That looks good to me. We might also give
him a belt later. We'll see that looks good. Now let's just make
his legs thicker. He's got like cargoes
on thicker jeans. Maybe give him a belt
in some pockets. There we go, if you need to. We can always add a
couple more cuts here. We might actually, when
it comes to deforming, because I don't know
if we've got enough cuts for this to bend properly. We'll explain that more when it comes to rigging it later on. Low, there we go, as a male character,
that's the clothing done. Now we'll just go across
to the female version. Let's have this female one here. Let's go into edit mode. The first thing
I'm going to do is just change the
shape of the face. We want it to be a bit
thinner at the bottom. Scale this in this. There we go. Just very subtle. We'll also need to make the
limbs a little bit thinner. Let's select some of these edge loops and just
scale them one by one. We can turn off proportional
addition. There we go. I'll do the same for
the shoulders and neck. There we go. Bring the shoulder a bit closer together as well. There we go. Let's just make sure we're scaling proportionately from the
side as well as the front. Now this can be quite hard
working in both side. In front of you have to
constantly switch between selljust base body before
we start adding close. And we'll probably do it
the same way we did before. We'll just add some cuts along to make it
look like there are seams there we go like this. I'm not even using
proportional dits in here. I'm just going through
each text one by one. Remember before with the Mel, we added another cut along here, so I might do that as well.
Just move this forward. Let's get like the
curve of a splint. Perfect. And then let's go free. Let's make the feet a
little bit smaller. Maybe let's just
slap them all in wide frame mode and
scale them down. I'm going to press Period
right here and set my pillar 0.3 D. Cursor just so it
scales down proportionally. Just make them a little
bit smaller and then move them across on the x axis. Let's make the legs
thinner at the bottom. As always, you can
spend all day on this. Maybe spend a little
bit more time than I am for this
demonstration. A lot of cuts down here, around a middle, but not all
up here at the upper torso. So you can add more loop cuts
or in sets if you need to. I think I'm just
going to stick with this. I might bring
the neck down. We've got some more polygons to work with down
here. There we go. I think that will work
for what we need. Let's make the hand
smaller as well. I think I've got to do that. Let's just slide all of these and scale them
down a little bit. Just a tiny bit and then
move them into place. There we go. You
can use sculptors. Well, let's make
the head smaller. Why not? Let's make the
head smaller as well. We might have to rig them separately if they're
two different. We'll try to use as much
the same rig as we can. Scaling things with a
mirror on can be difficult. Sometimes I find I need to scale it down and
also move it into, towards the center. But
I'm happy with that. I think that looks
okay. As best we'll get with the time that we
have, there we go. For her clothes. I'm
thinking we could try giving overrules because
we can use the knife tool, cut away some straps
onto the base mesh. Let's give that a go. First off, let's select all the
faces that we want to thicken or all the edges. Rather we can start using
the knife tool to draw on. It might come up to about here. I'm just drawing
round. They, I've got a center snap turned on. So if we look at the
bottom, which one of these, because I forget which one
of it is midpoint snaps on. I had the shift key
held down, so we just need to get the
shift, there we go. That's just a thing
with a knife tool, we can cut round as you can see the outline that
I'm going for here. Then we'll cut across to
the middle. There we go. And then let's create
the inner strap as well, although the outer
part of the strap. And then we'll extrude
everything up. It'll be a bit easier to see
what I'm on about later. There we go. So I've
drawn these on actually, we might need to clean
up with the topology. Maybe move these up as well. I might have done this bit
low, a bit too low down. Just try moving this here, don't worry about distorting it. I'm going to join this vertex
up to here, pressing J. And then I'm just going to
join some of these up as well, because we want everything
to be nice quads. As much as we can do this one, I'm not quite sure
where to join us. I think I'll just
disolve this. I'm not quite sure why I
do that one there. Yeah, let's join
these ones up then. We can select all of these. Right here, there we go, F.
Let's just draining this up. Don't worry too
much about keeping everything quads,
but it's ideal. The main reason when we're
doing characters we try to use quads is for subdivision. If you want to add a
subsurface modifier, it can always work
better with Quds Pology. But for this low poly character, we don't worry about
too much selected. All of these, I'm
just going to extrude out along normals to add
some thickness to it. We can see how that looks. The. Just get rid of the bottom one. So let's press X
and dissolve edges. It flows a bit better. It's like it's
actually coming out. This might look a
bit better once we've added materials to this. Now let's just go
through and try and flatten out some parts of
this. Make it look nicer. I might have made this bit
thick when I extruded it out. So we can just move some parts inwards
like this course, you don't have to
follow on the clothing. I'm going for whatever clothes you want to give
looks quite nice. Yeah, this is could practice using a knife tool
while we're here. Let's add another layer
like the neck line. I think this is
something we've got to do on a mal version as well. So we'll have to go
and do the same there. I'm just going to use
the knife tool to create this neck
line. There we go. Let's have a little
inner loop as well. In fact, what we can do is
just control R and then G to move it up because I don't think there's too
much distortion and we can just use
old to bring it in. That's it. I'm using a lot of this GG tool,
it's very useful. There we go. If that's too high, we can move it down as well. Maybe it's a little
bit too high. Might try rounding off this. Let's just move this
up. I'm not quite sure. I like cart loves it looks
very jagged, doesn't it? There we go. And then let's do the same
for the mal version. For this one I might just
control to add a car down here and then S,
and move it down. Probably a bit more receive for the mail version
because we haven't got all the rules and straps going up over the
shoulders. There we go. One thing about me is I
always make my clothes too thick on my lo poly characters
You might have noticed. If you don't like that, try not to follow exactly
what I'm doing. That's a fair
criticism of my work. I think. There we go. While we're here, we can
quickly add some materials. Let's go down to the
materials to call this skin. Just create whichever
skin tone you like. Actually, it will
automatically assign it. Let's just pick a
color for this. Let's make it a pink color. I always find it really
difficult to make skin tones. Let's try how that
looks and then we can, let's do it one
by one, actually, because I want to
change them later. It's easier, rather than
trying to use materials. And it looks like
we've forgotten to fill in the bottom of the boots. Let's just do that
now what I'm doing, always make sure you
pan around your models. Make sure we've got
everything. There we go. So to do that, I'm
just going to s these faces and hit
Grow selection. We need to do the same thing
for the female version. Let's a brown, muddy color
that looks good to me. Now for the jeans trousers, guess just select
all these faces that be easiest to
do it x ray mode. I've got it Now I'm just thinking about outdoors where let's maybe you
give them a green top as well that looks good. Get us green material for this. Create new one's made
this green like a yellow, earthy color, slight shaggy. Make these legs a bit
thsn'tlw like leggings. It's just thicker
around the knees. I might both these edge
lots and just bring them down for the hands. I might actually not have
these as gloves look. Okay, so let's delete these because it just looks like he's wearing
gardening gloves right now. We can just dissolve
this edge loop and it still looks
like a hand to me. I'm happy with that. And then let's circuit the A material, the female version as well. Let's select our skin tone
skin. Let's do the boots. Although I might be
able to set boots already, I'll just copy this. I want to change the color
for the female version, I'll just have to
do the same thing I did to the feet
again, a bed with me. I'm just drawing up these faces. I think I'll also move this
vertex back a little bit. Just a round it off though
Y. This is a good way to practice getting
quit of selection as well, adding these materials. Yes, for the overalls.
Let's do that. Now, A quick way to
mask selection as well, if you find yourself
doing it a lot, is just selecting the
boundaries like this. Select all the bounding loops. Mark this as a seam, which is used for UV unwrapping, but let's not worry about that. If we go into Face select, we can just island slightly over rules and it might be
a little bit quicker. Then let's give this a
material, let's sign this. There we go, the saturation. Maybe I always find it
a bit difficult to pick these colors and then
add a top as well. I'm going to add a seam
here, a seam here. You don't have to
use this method. You can just select the manual, I find it a bit quicker. Sometimes female top, we
can keep this as white. Maybe we'll try and give it a slightly muddy color
that looks alright to me. Gloves as well. I think
I might stick with this method of marking
scenes stream and I want always forget about it. If you've got multiple
different characters, give them names. Don't call the men and female, you can give them names
as well. I like that. Then in the next part we can add some more details in the
face, like give them hair. I think we've already spent a lot of time
on this in this part, but we've made decent progress. Yeah, we'll continue with
this in the next video.
25. Creating Low Poly Characters - Part 3: Hello everyone. So we've got our base meshes finished for both the male and
female character. And now we're going to go
in and just add some hair, you know, last little
detail to the character. Maybe do something with
the faces as well. I give them some eyebrows, but I might keep this
quite simple and not have like an
actual face on there. And then we can start
rigging the character. So let's start out on lots of different
ways to do the hair. One way I'm thinking is well, we're going to sculpt using a dynamic topology and then add a decimate or some kind of
remesh to the sculpted object. So let's start here. I've
got my cursor down here. Shift seeds, put it back. Good to press shift
A, and we'll add a mesh to block out
the shape of it. I'm going to use metal balls. Let's go down. I always
forget whether our metaballs. Let's just scale this down a bit and once again
change the resolution. The resolution is
always too high for me, so let's reduce the
viewport resolution. Try 0.10 0.01 that's
a bit better. Can move this up and scale it down to create the
shape of the hair. Let's create a couple of these. Skull is down and
we can use this to block out like the
rough form of the hair. I'm thinking about giving a
pony tail coming out here. Let's just add this and then
let's get some nice bumpy, a bumpy hair texture. Let's add a few of these, lots of ways of doing hair. By the way we're starting
off of the female, we will probably be a bit more difficult because
we'll probably have shorter hair for
the guy like this. And then once again, we'll sort out later in sculpting mode then I imagine us having like a little fringe that
comes down on this side. I'm just going to give us
something to sculpt later. Yeah, as long as we've
got something like this, this will be a
starting point for us. Perfect, that's done. We can then convert
this to a normal mesh. Just type in three such mesh. I'm going to call
this a female pair. For now, we'll keep this
as a separate object. It's so great. Let's go into sculpt in mode. I'm going to use a
tablet for this, but you don't have to. So just going to move
my keyboard up now. Get my drawing tablet out. You can just use your mouse. It's not like we're going to be sculpted in for very long. Yeah, we'll do a remesh of this, a dynamic apology,
so don't worry about apology too much.
Let's go in here. We're getting used
to the navigation right now on my tablet. Let's use a combination of
like the smoothing brush. Use this one, increase the
strength a little bit. You can also hold shift and the crease brush as well to
add some patterns in there. And of course, most
importantly, the grab brush. We'll use this to get
out the basic shapes. We might end up
adding some small geometry later on as well. A lot of these details is
going to be taken out. Decimate modifier
or we do our re mesh, make it quite bumpy. We want some of these
details to come through. We can also go down to
the modifiers tab and add a decimate modifier just to preview how it's
going to look. It will look a bit like
this right now, Triangulat. Don't suppose we need to just in case we shade this smooth. So it's going to object mode, shade it flat. Let's
shade it flat. And then if we go back into
scalp mode, we can see it. And let's hope that the
decimate modified keeps us. This should decimate
it real time. As we scalt, it can be a bit distracting to work
with. So maybe disabled. If you don't like it, that's it and we want to have
some triangles that we can then
extrude out to create this fringe that's
trying to sort this out. That's looking
quite nice for now. This is dragging up to get
the right shape of it. This can be quite a
weird way of working so you don't always
have to have this flad. All right, let's just use
a smooth tool here to get rid of that dermetre looks like got messed
up a tiny bit. That's part of
decimate modified. Also, if you wanted to
have some nice lines growing across back of the hair, you can use this crease
brush right here, the multiplane scrape,
the crease brush, which I believe is
here, there we go. Might need to reduce the size and increase the strength a bit. And we can create
some nice rows. Going back, here we are. I'm adjusting this
slide right here. I'm holding down shift
so that it moves slower. There we go. I just want to
get the grab brush back now. Just change the shape
of this because I think our hair line
is a bit too high. So here we can also change
the shape of the face. If you don't like it, I
think it's too triangular. Select some of these vertices. We're in mirror mode and
with a proportional addeds, you're just going to
move them in this, maybe with this one back just to correct the
shape of the head. Looks a bit as it is. And we can go into
sculpt in mode, control tab sculpting
mode and just shift to clean it up a tiny
bit if we want to all. But of course if you change the shape of
the head too much, then you're going to have
to fix that hair as well. I'm quite happy with this.
I like the way this looks. If we hide this body, we're
going to have some weird. Jomturonianside. We can either delete some of these
faces or just keep it. I'm going to keep it because it's not too much of a problem. If you're going to export
this to a game engine, always get rid of the
faces you don't need. I'm certainly going to press
H to bring everything back. Oh, sorry. I'm just going to. Oh yeah, I'll do it
in the outline here, but we can actually just
switch back to lay out mode and unhide the female base. Okay, then for the hair
or for the pony tail, I'm going to save this file As, to save As, and just press this little plus
here to increment it. I'm going to apply
this modifier. Then we can start editing
this geometry manually. So let's get rid of some of
these weak spots right here. Just use proportional editing. I'm correct in the face
for a time bit as well. That's like the method we
use in to do the hair, but of course takes some time to make it look better than mine. This isn't perfectly symmetrical as well. Let's put
our cursor here. I'm going to press
shift A to add a mesh. Let's go. Could be one of the few situations
we use, the Taurus. I'm just going to
use the cylinder. Let's give it six vertices. Let's scale everything down. I'm just going to rotate
it in object mode in case we want to rotate it later. For example, here I'm
scaling on the x. That's something we
can only do if it, if we rotate it, it object mode, when I scale on the shift Zx, I'm double tapping Z, just like this scale out and this is going to be like
a little hair band. Then we can add a cut
going around here. And scale this out if
you want to as well. Just to add a bit
more curvature that looks okay to create
the rest of the hair. We could use metabls again, but I'm just going
to press shift A, add a cube right here. Scale this down a bit and we're going to subdivide
this rightfully, increase the cuts to ten and increase the smoothness as
well, just so it's around. We'll just use the move and snake hook brush to create this pony tail because
it's a bit easier. Let's go up to
sculpting, and we'll also put on a dynamic topology. While we're here,
let's go up here. This is like the work
tab for scot mode. If you like to use it
enabled dynamic topology. Let's check that we haven't
got symmetry on here, because sometimes it's enabled as we don't have any symmetry. Now we should just be
able to scot this. I'm using the move brush.
Where's the snake hook? Right here, K. I think the
shortcut is a shortcut. K. We can just drag this down. Maybe our dynamic. Apologies it too high. Let's change the detail size. This is on relative
detail right here. We want this to be
constant detail. Don't worry about this too much. This is all sculpt in stuff
and this low poly course, we're not really
using much sculpt in. But let's try. We need to either increase or
decrease the resolution. Let's try decreasing it. Increasing it,
don't go too high. Let's see how this works.
Slowing to increase it. I'm going to set this to 150. Keep it high poly. Why not? Yeah, we can just sculpt out this shape using the
snake hook brush. Really useful to add
more dimension to this. We can use the smooth
tool, just the shape. So we got like a
nicer wavy pattern going on here and
we add those bumps. There should be an
inflate tool as well. This one I'm more familiar with, brushes, sculpting in blender, but a lot of the
brushes are the same. It's just about finding the
right alternative blenders. Sculpting tools really powerful. I'm starting to
use this more and more using the smooth
brush right here. Then we can use the
scrape brush as well. It gives us a nice planar
surfaces like this. This wavy patterns try to make it thinner towards
the end, flatten. It is a short cut
for the grab brush. There we go. Ah, let's put a decimate modifier
runners as well. Before we forget, say it won't work because
dynamic topologies enabled. I'll just go into object mode, we can see the decimate
and drag this down. I think that it
looks really good. I'm happy with this just to make sure all
joins up right at the top need move some of
these vertices around after. But I'm happy with this result. Apply this modifier as well. Now I'm not going
to bother saving as I'm pretty confident with it. Let's just go and correct a
couple of these vertices. I'm going to move
this one in, just it joins up with the rest of
the measure a bit better. And actually looks like
it comes out now doesn't it can move everything we
need to. That looks good. And then here I'm just doing
some very quick refining, but take a bit more time
than me with this step. You know, just to
make sure each of the vertices fit
together nicely, we want this hair to join
up with a hair band, no intersection like this. Just take your time
on it. I mean, no one's probably
going to notice this, that it's always nice to
be polished, isn't it? I think that will do for now. First see, I'm just going
to join these objects up together and let's
quickly go to Materials. It's good anti materials tab. Let's see how she looks
with blond hairs. Let's call this female hair. Let's give it a yellow color. That's nice. Let's see
what color for this. Create a new one, female
hair band assigned this. Let's see, I like this green, yellow hornsco,
something like that. That may be too
bright. There we go, I always make everything
too saturated, so I'm trying to be like a
bit dull with these colors. There we go. That's
our female hair. Now we need to do,
say from the male, one shouldn't take as long
in the sculpting type. Right? Now, let's go
back to the layout one, actually I'm going to join
this hair up to the base mesh. Actually what I'm saying, we'll do a later
because we want to keep the mirror modifier
on the base mesh. So let's go down to the mel one, hide both of those This time
what we might do instead, because it's shorter
hair, we can just select the faces that we
want to have for the hair. All the ones that are
going to touch it, we're going to press Shift D and to make it its own object. Now we can let dissolve
some of these faces. I'm just going to
move this one though, don't worry because we'll
re mesh everything later. There we go. At that. I'm just going to extrude down a
little side burn here. There we go. To do this, we can add, solidify, modify. There we go, Solidify
supply, this mirror, because we don't want to
be working symetrical anymore and it should
be coming out here. Let's quickly put material on it just so we can see it
as a separate object. These one. So go Mel hair. What color do you think for
this's a dark color movie. Dark brown. This is even
thickness right now, which isn't very nice
what we're doing. Let's start increase the
thickness a little bit, so let's going further then. We can actually use a vertex
group to mask the thickness. We haven't got any vertex
groups on this met right now. Let's go down and
add one thickness. This might be a convoluted
way of doing it, but it's nice and will work out. Now we can actually
see this factor, we need to actually start working on a vertex
group and sit. Let's go up to weight paint. And I believe now
let's said this. We can start painting on in
areas like in red there, let's increase the weight. Yeah, we can start painting on, and red areas should
appear more thick. Now said, I suppose we need
to decrease the factor. There we go. But
we don't want to do that. It's almost
like sculpting. Now, supposing
that we just paint on, we want the thickness to be, this can be cool,
probably not the most useful for what we're
doing in this situation, But it's something nice to show you a cool thing you
can do in blender. Use these vertex groups for modifiers and see it
update real time. Going to try and conto
them a little bit. Then once that's done,
I'm just going to apply this, we've shown that. Now I'll apply this
back to solve the. We go into object mode
and we're just going to use a bit of proportional
editing to fix some of this. You might have made his head
a little bit too wacky. Okay, let's fix this
fringe as well. So one thing we can do
here is select some of these faces and we can
inst them like this. Just move everything back
so into sect of his head, shifted everything a bit nice, heirs looking a
little bit nicer. Now these are just a
couple of techniques for you're creating these
hairstyles that I've played around with before, but try to develop, you know, like your own technique as well. If that's something
you'd like to do, a bit more original than me, that looks okay, then let's make sure we get a nice shape, like a nice silhouette
of his head, making him look a bit
like me right now. This is the best way to scrub
my hair style. There we go. I pretty much just made myself
in blender. There we go. Yeah, you can keep
tweaking this, but we'll move on now and we can move on to reading
just before that. If you wanted to add eyebrows, it might be nice for
a little character as we'll just quickly
go through it because it's nothing difficult there. That's fine. Shift to add a
cube, scale this down a bit. Let's just work on one side, so mirror to cross a
cut in the middle. Just so we can work on the
shape a bit more here. And let's add a mirror modifiers like the original
points right up. So let's just use this mirror object right here
to select this. And let's put the
same hair on it. There we go there eyebrows. Let's move them back a tiny bit. There we go. I'm going
to apply this team, I'll just add control. We've got a mirror
modifier on both of them, so it's just control a
join it to the rest in the face actually going to eyebrows shift
to create it as its own object right here. And then I'm just going to call this, I don't need to name it, let's hide the male, male and let's bring
back the female one. And let's just join this to her. She's got a slightly
different head shape, so we need to move
it back in place. I think her face is a
little bit flatter as well. Now she's got eyebrows as well. Just a little detail. Perfect. I will work. Yeah, this
material. Create new material. Slot female hair and sign. And now she's got a
blondes match at Perfect. I believe that's our
character model finish. We can add, add some more details but I
think we should move on to the reading now because we've pretty much covered everything. Yeah, let's get started. I'm
just going to press Shift to place our cursor back to the center so we can
create our armature. Sometimes it's nice to use a bit of help as
a starting point. So you press Shift, we
can come down here to armature and there's an add
on that comes with blend. I believe it's called Rig that gives you some of these options, this basic human like this. And then we'll just move
these bones around to our character to enable
us to control it. But we're using put
a lot of time ready and I think we've come towards
the end of this video. Sort of that miles start off
in the next video and we won't use one of
these preset things, so don't worry about the Adam. We'll create it from scratch, but that's basically
what we're doing. We're going to create this a
little armature right here, and then we paint on for each bone the vertices that
will be controlled by it. And that means we
animate our character. We'll just be moving around
these bones like this. She ever wanted to move her arm? You rotate this bone. And we can just use like move, rotate, and scale like
anything in blunder. Yeah, we'll be posing
these and that's how you animate a three character if you've never
done that before. So I'm just going to
delete this armature, and we'll create our
own armature from scratch in the next part.
So we'll see you then.
26. Character Rigging Tutorial: Hello everyone and welcome back. So now we can finally
get into rigging. So not waste any time here. Let's start out, I'm
going to work on the female character first just because we've
already got it open. I imagine we can copy the same skeleton
onto the male one, and then just move the
joints around a bit so that they fit
his proportions. So we're going to create
a new object here. I think we showed this a bit in the last video just
to hype it up. So we add a new object on this armature
section right here. And instead of selecting
one of the presets that come with this add
on I've got enabled. We're just going to
add a basic bone and we'll create our
own one from scratch. First off, we can see create this new object
called an armature. And I'm going to rename this, I'm going to call
this Rick female. Later on we'll parent
the body mesh to this. Now let's change a couple
of these sessions. The first thing
you'll notice is that this bone is going to be
inside the character. It's hard to see. Let's
go down to this tab. I believe it is right here.
The Viewport display. I'm going to tick in front, which just means even though
it's inside the character, it will always appear in front. We can also enable
names. Why not? Because we're going to
rename these bones later. Let's go into front view. I'm going to scale this down, make sure we're in
edit mode right now. There's a new mode right here for these objects
called pose mode, which is when we actually
want to animate them and move them around and pose them. We don't want to use that. We want to use Edit Mobile as
we're actually editing it. Let's go on to Front View. First thing I'm
going to do is move this bone up to where
the hips will be. This will be like
the actual hip bone. Let's move it forward
a tiny bit as well. You can always
change this later. Then let's extrude this one up. This will be like the spines. Let's just add a
couple bones here. I'll add one here and one here. For simplicity, this neck bone will be extruding one out
for the neck like this. And then another
one for the head, which means that
the head will be posed about this
point once again, we can always change it later. I don't rod too much might
even move this time. This shouldn't be
perfectly flat by the way. Let's, let's move
it around so it better fits the shape
of the first spine. Of course, the actual
spine is back here, but just for automatic weight, something will cover later. It's usually, I find it, the bones in the
middle of the body. Let's just move this around.
It follows her spine. It should curve like
this. That's all right. Then let's quickly
name these ones. I'm going to hit
two to rename it. You can also do it here, like you have to find
it in the outliner. Or you can go to this
bone tab right here. I'm going to stay on
this tab and I'm just going to rename this hips, spine one, spine
two, spine three. Actually, I'll call this neck. I call this one head perfect. That's all the middle
ones running down. Then we can start extruding out to create the
shoulders and legs. So let's go into the
front view again. I'm going to extrude out,
this will be the shoulder, but we're actually going
to move this bone. We don't want it to be
attached to the spine. We're going to move it. When
we try moving this bone, its head I suppose, still attached to the spine. And we don't want that,
we want to disconnect it. The way we can do that
is by hitting Op, You can either clear parent or you can disconnect the bone. We're going to keep it
disconnected because we still want it to be
parented to spine two. Let's just move this in shape so it's about where
her shoulder is. It will be her shoulder bone. And then we'll
extrude our arm out. You'll notice this black
line right here that shows a hierarchy is because
this spine two right here, let's rename this shoulder. And then a period capital L. We'll talk more about
that in a second. You'll notice this line here means that this bone is
parented to this one. So if we wanted to parent
this bone to spine one, we just hit control And you can either
connect it like this, which will actually
move the head down to the tail of
spine one like a chain. Or you can hit control
and then keep offset. And you can see this line moves. So that is the head. This is, I suppose, the
actual bone itself. And then this is the tail. If you connect it, then the head of this bone will be connected to the
tail of the other. Don't worry about that too much as the reason I put a
capital L at the end. I don't know if it needs to
be capital, but I always do. That's because this is on the
left side of the character. Everything in the
middle doesn't matter because it's just in the middle. But everything with a period L, we need to name it like that. So that later on when we
symmetrize the skeleton, it will copy all
the vertex groups to do vertex groups and it will create a
new set of bones. Do that later. Strewed out here. I'm going to try and put where these cuts are in the middle. Might be easier to see them
in wire frame just like this. Let's extrude out again
to where the wrist is. I remember earlier saying you already want a natural
bend in the arm. I think this is one
we're modeling. I'm just going to
move this back on the y axis so that
if we add K to this, it will know where to put it is something will cover later as well. Don't worry about that. Just put this here.
There's already a slight bend. That's nice. Then we can extrude out a hand. Let's clear parent. Let's move this to where
the thumb should be and I'm going to parent it
to this bone right here. So control, keep off set. And you can see this
line indicates such. Now, let's just move
it down to in place. I always enjoy
Regan and Blender. I think it's quite
fun. There we go. So let's quickly rename these. Remember everything
here should be. Let's rename this upper arm, lower arm, or four arm. Just going to say lower arm. And same with the fun. Now we dodged a bullet by
adding the mitten gloves. Because if we were to do every bone in each of the fingers, that can take a lot of
time to rename them. We don't have to do that.
Continue with the legs. Now she believes all
we've got to do left. Let's just head right here. Let's extrude it
down on a z axis. And we're just going to move this into position and we're
pairing this to the hips. Control, keep offset. This will be where the
actual hip is about. There should be in the
middle of the knee. Then we'll extrude this down. Remember, have a
slight natural curve, You can see it's bent to where
the ankle is going to be. It should be about
there for the foot. You can usually have a little joint here
where the toes are. But because it's such
a low poly model, I think I'm just going
to have one bone. Let's extrude this out. Move the whole thing
down a little bit. Just like that. We can check
everything in the center. That looks fine. Let's
rename everything. Fl shin foot looks like
everything sorted. We might end up going
back. But w, we're here. Let's see if we can actually
get this character to move. Just going to go
into Material View, where not first off, let's select this
character right here. And we need to add a modifier
onto this character. Let's keep the mirror there for now. I don't worry about that. Let's go down, add an armature. Can select this armature
object right here. Can use to select rig female. We'll notice I don't think
anything will move right now. That's because instead of
adding the modifier manually, we're going to use like an
automatic way to do it. Let's get rid of
this. Let's parent to the armature. Hit Control. This is a little shortcut
that blender gives us. It gives us a
usually just parent to an object and it's all right. But we can go down to
armature to form and then with automatic ways this is just Blender
helping us here. It automatically
creates a vertex groups that assigned to each
one of these bones. A vertex group, I think we've, you see this before
in this course. We used to create the
hair in the last video. In fact, I think you can see it masks each one of these bones. Right here, that's a foot, one of these bones. We'll have the vertex
groups right here. You can see which parts of the character are
assigned to them. Then if we move this in
pose mode members mode, short cut is control tab. You can also change it
up here as goose mode. If we rotate it now
the character moves. It's created each of these
vertex groups automatically. To be honest, they look okay. Most of them seem to work fine. Of course, the
hair won't follow, But this can be
quite satisfying. Our characters are
really animated. Now see how usually the
shoulder is a difficult part, but it looks like it's
okay. I'm happy with this. Even the head looks like
it's all right as well. We tend to need to fix the chin. It looks like we're
going to need to fix the eyebrows as well. Actually, don't worry
about the other side, by the way, because
we're going to use tries that this is a
little short cut in blender. Another thing that's helpful
if we name these as such, we can copy this whole
side of the characters. Let's just select everything
here. We're in edit mode. I'm going to change to
last because I like this three to type in, I believe it is symmetries,
amateur symmetrites. It's created our other side and it's automatically
rename these, which is very useful. Let's see if this works now. Might to do something else. Yeah, it looks like it's
because we haven't got the vertex groups named this
mirror modifier right here. Let's also try moving it after. Just to see if that works, let's try switching the
auto back sometimes. Let's put the mirror first. What this mirror
will do, I believe, is create copies of all
of these vertex groups. Well, we need to
create the copies, but if we create an empty
vertex group with shoulder, it will mirror the information
from l across to it. Let's try that now. Let's try the dot l. Let's create
a new vertex group, and let's call it had. Let's see if it mirrors it. Not quite working. This
one's working though. I think it's just the thumb. Let's go through and create
copies of all these groups. Just empty ones. So f each bone. Let's go down in order. So I've got up low arm
as we're going here, so make sure you
name them correctly. The hand. Now we need to add the thumb. There's probably an
automatic way of doing this, but it's quite a
simple character. We've got do this by hand now
we'll probably be quicker. And I believe
that's all of them. You can always fix it
later. If it doesn't work, now we can pose each
of these bones. And we've still got
our mirror modifier. Of course, if your character
is not symmetrical, maybe you've really
applied to mirror modify. Or you want to have
like a pocket or a strap on one side that
isn't on the other, then you might have to do this by hand, but
don't worry about that. There are also lots of rig editorials out
there on the Internet. This is just to
quickly show you. We can, we can say we've done it and
we've tried it before. We might need to do some
manual weight painting here. Cha selected this object, this mesh control tab. Go to weight paint
mode and we can select the vertex groups
that we want to paint here. Let's go to head to
start out with let's just make everything
let's increase our strength and
our weight to one. Everything here should be read. The whole face should be
red, including the jaw. Let's quickly fix that.
We can also isolate the object. Hide the hair. Remember, you don't always
have to weight paint. There are lots of ways to
assign to a vertex group, in this case, for the eyebrows. Let's go back into the
object of isolate. We're going into
object mode, and if we select these
eyebrows right here, and we want to assign
a weight of one, we can use this
weight slider here. Whenever you hit a sign, it will assign this value to the group that
you've selected. With all the vertices
that you've got selected, I'm signing just the eyebrows to the vertex group
with the weight of one. You can also remove them from a group or give them a
weight of zero instead. Let's go back into object mode. And now they should
move with the head, it doesn't look like they are. That might be because
they're also part of another vertex group. Most likely the neck. Remove them from the neck group because it will blend between
the head and the neck. It will try and
reach a compromise. Let's go back into
object mode now. We can see they move with
it while we're here. Let's also just paint away from the neck because
it looks like some of the faces that
assigned from the neck. We can see, although
this is red, it will blend with all
other vertex groups. They've got the vertices
selected. That makes any sense? This is all red on the head because it's also on the neck. We're just going to
need to paint this away with a strength of one
and a weight of zero. We could just paint her
face blue. That's okay. Let's also get rid of some of this chest as well because
too much of that selected. Now we can just go through
the hips are looking okay, but we might need to
add a little bit more. You can use a drawing
tablet for this as well, if you like to select the
hips, there's a hip screw. We go, I believe
actually if we select this armature and then shift select the mesh over I
got this right around. And then control tab up
to the weight paint mode. We can select these
bones right here, I think you can shift control select control
click to select them. It just means you don't have
to choose it from this. You can just pick the bone. Pain, not many people
know that one. It took me a while
to figure that out. I know the advantage of this. You can quickly pose
it around slight here. I'm going to pose
this to move it up. Let's just increase the
strength. Decrease the weight. I'm going to keep
the strength around about here, but
decrease the weight. We can just paint a
weight parts of this because it shouldn't
be moving right now. Unfortunately, we'll
have to repeat this process for
the male character, but I just see as extra
practice can never hurt paint her away. That's deforming it a
little bit more naturally. Now let's also see how
the hips are looking. Let's control this. That's okay. To be honest. I think that's the
forming A, right? Let's see how the knee is
looking. It looks okay to me. I have the strength of one
and the weight of one. I'm just going to paint
this whole thing red. Not the whole thing,
but the base of it. That's to forming a bit better. Now, I like that I'm
going to paint away from this, decrease our weight. Base of the shoe should be blue. That's looking good now. For the most part, maybe a
few tweets we need to make. But I'm happy with that yet. Once again, like everything, spend a bit more time
on this than I am. This is just to show you
hands looking, okay. So the farm, the
number pad period to jump to A if you want
to pivots around it. Let's see how our left sides do. Remember the right side,
not the left side. Everything should copy
across. That's looking good. Just like in object mode,
you can select everything. In pose mode, if you hit opt G and opt it will
just reset everything. Sometimes you need to
spam it's pose this, don't worry about
posing something because if you press Tab
to go into edit mode, we might act because
we've got both selected it's, let's just
select the Armature. And if you go into edit mode, you can see this
is like the rest, I suppose you'd call it
the resting position. This is the pose. And then the and an object mode will display
how it's being posed. You can put it in a nice
position like this, but if you want to edit
the armature again, just hit Tab and everything will be back to normal
just like this. So I'm just going to set
everything and clear. Now we need to copy this
for the Mel version, select this armature, press
shift a D to duplicate, call it rig mal. Now we need to assign this Meld. See if we can remember how
I'm just going to hide these. Bring back the Mel base and Mel, remember we need to select
this mesh and then we need to parent it
to the armature. Let's do that quickly
and hit control. It's a parent with
automatic weights. This female one
still showing up. I think they've been buried
in the outline, haven't they? Unfortunately, because they're like
children of each other. We'll also to hide the female
based under That's okay. I don't think we did actually
make the female shorter. We didn't scale her down at all. Our proportions are okay. Let's just move some of these
because I've already m, whatever I do to one side, I'm going to have to copy
across to the other. Just be a bit more careful with that and everything
should deform. Yeah, we just have to weight
paint it a little bit. That's looking okay and
our shoulders are working a lot better than the female
version, which is nice. Let's just do the same
thing that we did before. I'll try and be quicker this because this stuff
we've already covered. So I'm going to remove this from the neck collection
and I'm going to assign it to the
head collection. Let's just quickly do
our weight painting. If you remember before, when we painted this head to be red, we then had to paint
it blue on the neck. We're painting it
away from the head. We're painting it onto the head, and then we're painting it
away from the neck again. But there's an option to do this for us called
auto normalized, and I believe this should
work. Let's hope it does. We can see currently a little
bit blue here on head. It's like a little bit of
green, I suppose you'd say. It's on scale from
blue to green to red. But if we paint
this onto the head, let's go a weight of one. And paint on the head like this, it should auto normalize and
paint it away from the neck. And you can see now
it's turned blue, which is perfect for us. It saves a lot of time.
This is another thing. I didn't know till
a little bit too late. Let's do the same. This will be useful
for the Fi as well. This mode makes the whole weight painting process so much better. There we go, looks like this. Mel Wonder forms a bit more. Actually, I think the shape of the hips and shoulders
just a bit easier. Again, I'm going to set the weight of one and
the strength of one. I'm just going to paint it
on the base of the foot. This is fully assigned, just like this, Everything
should copy across. Remember when I'm
selecting this bone set, I'm holding control because otherwise you could
just start painting. You control to select
this is weird. Yeah, let's go back
into object mode now. That looks like
the ricking done. Now we just need to
add the hair to it. We can either assign
this to this bone or we can just add it to this
character mesh quickly. Join it up, make sure there
are no modifiers on it. Yeah, let's join this head. Before we do that,
actually this will give us, we'll try mirroring it. Let's apply this
mirror modifier. Want to be happy with it? I'm going to quickly
file save us just in case I want to go back to
the pre mirrored character. There we go. Let's apply
this mirror modifier. This should mirror all our
vertex groups as well. Now that's fine. Let's join this head and
then we just need to s these vertices go down to the vertex groups just in case you think it's already assigned to any vertex groups. I believe here you can go and remove from all
groups and this would We do this button right here,
but to every single group. So have to do it individually. And let's add it to the head
with the weight of one. Now if we try posing him,
the hair should follow. Let's do the same
for the female one. I'm just going to
bring these back. Not sure what this
empty hairs and I think that, that might
be for the water. We'll see there's a hair gone. It's right here.
Play this or modify, then we'll merge the
hair with control J. Control J. Go through
and I'm confident there, it's not assigned to
any vertex groups. Put Ambuls tools here
if you ever need it. Let's assign it to the head
with the weight of 11 thing. You might notice her pony tail, like it won't wiggle
around with her head. You might want to add a couple
bones for her pony tail. When she turns her
head like this, you can have it
dripping downwards. But that's another level of detail would be a challenge
for some of you maybe. But yeah, we've covered
the basics of rigging. The only other thing to do is K, we add inverse kinematics. This is probably beyond
the scope of this course, so just consider it a
little bonus crash course. But we'll add a constraint to some of these bones right here called K Inverse kinematics. Which means instead of
posing it like this, when we animate it, say
we're doing a walk cycle. Instead of having to move
the legs up like this, we can just move the foot and the knee will
automatically bend for us. Let's go into edit mode with this bone
slighted right here. We're just going to extrude up and we're going to
rename this foot. We probably should have done
this before we mirrored it, but this is okay. We
can do it manually. We'll just show you the
left side and then you can figure out the right side as well if you want
to do that as well. But like I said, this
is just a crash course. We want to untick this to form option right here just so it doesn't add any vertex groups. But don't worry about this
because we've already added our vertex groups.
We've got this. Now let's select this
K bone right here. We've got this one selected,
and then we shift on. This should be yellow,
and this one should be orange because this is the one that the constraint
is going to be on. And we press shift,
nothing has happened. That's just me being silly. That's because
we're in edit mode. We need to be in pose mode. For this hold down control
tab, go to pose mode, and luckily our selection
carries across the same from edit
mode to pose mode. Now we try this shift I, it's active bone, and you
can see it turns yellow. And that's because it's
got this constraint on it. It's bones constraint, not
the objects constraint. We should be able to move
this. See what's wrong here. It might be because it's
parented, that's in edit mode. I'm going to be switching
between pose and edit mode. It's yellow, it's edit modive, it's like like turquoise.
Then it's pose mode. And I'm just going to
press P to clear parent. Let's see how this looks. Now we can see it's moving. It's doing what we want. You see this bones bending automatically and we need
to reduce the train. If the chain length is on zero, that just means we can see
that's increase it to two, I believe one, I think
two is the right man. That just means that the
next two bones will move. If it's on zero, it's
effectively infinity. So it will move the
whole character to bend. But yeah, we can see this leg
working now quite nicely, but we can't control the
angle that's going around. And to do that, we need to
add something called a pole. Let's just select this
block right here. Extrude it out on the Yaxs. Let's call this a foot pole. And we're going to to this, you don't have to have
it parented to anything, but I usually like to
parent the poles to the bones just
because it's easier. We're moving about sills. Let's select these
control P, keep offset. And we're just going to move
this out on the Y axis. Then we'll use this as
like the direction, the head right here will be the direction
of the knee points. And we'll see this later. Let's go down for
the pole target. We're going to need to
select this and then just type in type in popo. I probably should have named it leg instead of foot,
but that's okay. And we also need to change
this pole angle right here to an offset
of -90 degrees, it looks like, or
something like that. Just so it's got
the angle right. Let's try moving this now. So you can see we
can move the leg up and then we can
also rotate it around. It's hard to see of
all these bones here. If you don't like
this shape by the, I believe this is octahedral, but we can go up here, changes this from octahedral to bone. And then if we select everything we can think it's control old S. Yeah, control old S. You see it in the bottom
left, right there. It's a decrease of in a send. This looks a bit more
professional to me. It's easier to
animate with. This is how we'd animate our character. Let's do the same for
the arms quickly. We'll try and go through
this as quick as possible. Let's extend the whole thing. There we go. Let's just
extrude upper hand. K C Perkel Pol. Extrude this out. I'm just using this as a starting point. It's clear this actually will be parented to K
control, keep offset. And I just repeating
the same process, but of course the elbow
is going back this way. And I'll rename this poll. Now we need to go to pose mode. Don't make the Sam
mistake I did last time. Try doing an edit mode. Make sure we've
got this selected. Last shift to active bone and that will add
our bone constraint. And we can also select it
from this list right here, but it's quicker
just to do shift I. Let's set the chain length to two and try selecting this pole. A target, we might
need to rotate it or change that angle. Sorry, rotate it, that's fine. Let's just play
under this angle. Sometimes it's more
difficult to find then this, but I think it's just -90 Then we've got our
arms done as well, and it is much
easier to animate. Just move our angle. Here we go. So we can repeat this
for the other side. I think 90 might not
quite be the right angle, so let's just try reducing
this a little bit. Yeah, there we go, -70.1 Something like that. Yeah, that's very quickly
how you set up K, and we can use this to pose the character in
the final renders. I think we'll leave it just like this because we're not animating a proper walk
cycle or anything. We can just pose them in FK. That's what we're doing
here on this side of the character and it's quite nice and rendered
actually, doesn't it? Let's put her foot back
down on the ground. It can also rotate her hand trymkawave our
characters finished. Now let's go back
into rendered mode. We can bring back our Mal one. We got our Mal rig as well. If you want to move
the whole object, just move the actual rigs control tab and reset his poses because we put him
in a bit of an odd spot. Let's just bring his arms
down by his side like that. When it comes to
rendering, we'll put these two in a mass pose. Just start here
looking like idiots. Let's take these arms forward. I'm aware this video
has been quite long, but we've managed to
finish off the characters. So let's finish up quickly,
Robin, continuing anymore? Let's add the scenery back. It looks like I
must have created a characters collection before. Don't need that though,
since we've pretty got one. And let's just move these rigs. We can always use
snapping a face snapping just to snap
them on the ground. The point to snap with
actors, there we go. So we can just place
them on the ground and see how they look. Rendered mode, remember to disable this option here so
you can see them properly. And let's also
bring back my son. I think I hit the
setup collection. Congratulations for
finishing this section. We've got our characters added, very basic, but I think
they look quite nice. Yeah, try and be
adventurous of this. Take it forever. Maybe you
can add more characters. And just to or modify the
existing ones we've got, that's all the modeling
finished in this course. In the next part, we'll
just be talking about placing these assets
in a nice way. We might touch on
the asset editor and we'll go through
render settings so we can get some nice
portfolio images. So nice work and we'll see them.
27. Final Section of the Course - Finalizing Scene: Hello and welcome to the
final section of the course. We're almost finished
in this part. We're just going to place around some of these assets because
when we are modeling them, we just got everything
clumped here in the center, which
might not be ideal. So the first thing I'm
going to do here is set this landscape we got, go down to material preview. Which one of these?
This vertex right here. So I'm going to paint away
some of these flowers. This flower bush right
here, I believe it is. Let's go to weight paint mode. Might bear with me because
I've got this option here. There we go. Yes. I'm just
going to reduce my weight and have the strength of one
and maybe ones too high. Reduce it about here. I'm just going to paint
away the flowers from this area around
where my camera is. There we go. And let's do the same with
the trees as well. Justus, I want to get
rid of some of these. We'll probably do is place
these trees manually. Instead, let's just
clear this area out because where the
houses are, that's it. And then we'll do the
same with the rocks. There shouldn't be that
many rocks around it. And grass, we'll all keep some
of the grass. There we go. Remember we created
these vertex groups of force, That's what I'm using. In fact, this area around here, I might actually just
place all the trees manually. There we go. Well, notice when we first
modeled all this foliage, it's all stacked up here as well, so you
want to get rid of that. Let's see if we, they're all nested within these
collections right here. So I'm just going to hide these ones like this and
should it'll disappear, cleared up a lot of space. We'll leave the clouds though. We can reorganize
this folder structure to whatever works best for you Y that should look more
open and rendered for you. Now just like that, I've noticed as well that this little bush right
here is on its own. Let's go directionally
under trees. This is the final
10% of work we do, our portfolio renders,
but it ends up taking 90% of the time. Looks like this oak, 1.01 trees are separate
because the parentage, let's just apply this decame
and add it to the tree. I think we did this before.
I must have missed it with this tree though skin as well. So I just applied the modifiers
and joined it together. And now that should
work a bit better. Thug And it's like
it's recalculated where some of these
trees placed. So great. So yeah,
I'll hide this tree. And remember to also take this little camera Ac on here because that not only
hides it in the view, but it also hides it
from the final render. So we need to do that as well. And same thing with the
sea life and footage. We haven't placed any of
the sea life assets yet, but we can do that in the
river if you'd like to. There are a few, too
many flowers now. So let's go for and paint some of these flowers away as well. In fact, actually I might
just decrease the density. So under this flowers spawner, it doesn't know like I've
named it good flowers. We can just track
this density down. This is a slider we created before I was lucky
of us to do so. And then let's also as O S
trees, that's wrong one. I want to have a
bit more graphs, so let's increase the
density of graphs. This might be too high, but I think it looks quite nice. So I'm going to place
my camera here, so control all zero to place your camera
if you've got one, if you haven't already
got one in your scene. I'm just going to
select this set up collection so that it will
be added by the fault. I'm going to press shift A
to add a cameras camera. I wish go a bit blind
and forget where it is. Right down here,
Right down a camera. Look. Control zero
there with me. If we haven't used cameras
before in Blender, you can always hit number pad zero to jump to
the active camera. There are a few sessions
that we can change as well. This is really
framed quite nicely. You can hit to activate this free rotation mode
and hold shift as well. You can angle it like that the
way I like to rotate this, go to local orientation, then do x to up and down z to do a dutch
roll and Y to pan. But I'll leave it
on global because I used to double
tap in the axis. Let's go down to this
camera tab right here, we can change some
of these settings. The focal length is on 50
millimeters by de four. You might want to increase
this or decrease this. Sometimes it looks nicer. If you decrease it and then dolly the camera
backwards a little bit, 'let's press G and then double tap Z to
move it backwards. You might need to. I think
I had snapping on then. Yeah, bear with me. And then let's just drag it backwards. It looks like it's
clipping into the ground. But the focal length acts a
bit like a field division, I suppose in like a video
game if you play in FPS, as you'd like to have a
nice high field of vision. So I'm going to stick
with about 74, 75. But if you'd rather work
with a field of vision, then I believe you have
the lens unit right here, you can change it
to field of view. And it says 23.3 Let's
put this back to millimeters and it's
just like a welcome of a real camera here.
It's very useful. Let's just move some
of these assets around to try and
frame it a bit nicely. We could add in some of our own trees if
we want to result. So that's got to render view. I don't think I'm
going to do that. First off, just
move this building. I'm switching between
lots of different things. So let's jump down to where this is in the outline,
if you remember this. Building we didn't
actually organize. I'm just going to right click the selection to select objects and then we
should have everything. I go back into camera mode. Just going to move it
down a bit so the, the floor is clipping
into the building. It's only going to look
good from this camera view. Let's just rotate it like this. Move it back a bit. Here we go. It looks like the
back of this building is intersection of the river. But we're not going to see
that from where our camera is. I wouldn't worry
about that at all. Let's also make sure this
log comes in a neprightlbjs. Then we can rotate
this on a Z axis. And let's just move it
over here like this. You move it up a bit as well. How does this looking
rendered that it's nice? Set the clouds and
move them down. This might want to have
this cloud in front of the mountain slightly
is nice, doesn't it? What's on? What else can we change stretching in the
color of the ground. Because I'm still not
100% happy with it. I desaturated it
before, if I remember. But I think it's a little
bit too desaturated. So this just quickly
change the color, get more of a yellowy color
and increase the brightness. Gas much more vibrant.
Now, isn't it? Remember you can
always switch to V was you're doing this. And I'm now noticing that these greens, I'm happy with it. I was going to say
the grass is a little bit too vibrant as well, but I think this looks nice. Let's go to the sun. It's our sun. We can search for it up here
in the outliner. They will probably be under
the sat up collection. I'm just going to
move it over here so it's easier to manipulate from eye camera view and we can select a nice angle from it. So let's quickly change
our rendering engine to V, just possible doing this.
It doesn't break anything. You can use this
yellow ball to place it or you can just move it
and rotate it manually. Let's see how this looks in cycles and keep
switching between. We're just going to
rotate this down. And I believe I read this
in a book by James Gurney, but one way to add drama to tool structures is to have like a partial shadow
obscure in this. So that's kind of nice.
That's what we've got here with the trees on this hillside in the building. I'm not sure how far
we want it to obscure. That might be a bit
too much actually. Yeah. If you want
something to look tool, sometimes it's nice to
cast a shadow across it and whil're here. Let's go into solid view just so we can see what
we're doing a bit faster, all material view. And then I'm going to
open up a second window. So we're just going to drag from this corner right here upwards. And we're going to
change this from a Properties window to a three D Viewport number pad zero to go to our camera view. And let's just disable the overlay with these
two buttons right here. And then we can put
this in rendered mode. And that means that we can see everything rendered
in the bottom right. But whilst we're actually
working on stuff, it's not going to be rendered. So now let's go in and paint
some of this hillside. Because I'd like to change
it and because we're using like our
procedural node set up, these trees should update. So let's go to what should we do used to do this.
Let's go to edit mode. And bear with me if it is taken to a long, and I'll
keep switching between, let's put this back to V because the shadows are
going to look the same. If this doesn't work,
it doesn't work, it's fine, we don't
have to stick with it. But it might be nice to
try out. There we go. Let's just try dragging this landscape down
a bit so we've got more light coming in because our suns are quite a
lower angle right now. Let's try and figure out
where the sun's coming from. It's this sort of
angle, doesn't it? There we go. That looks nice. And we've got these
nast long shadows coming up from the grass. Just reduce that. Great. And then, yeah, where's our
sun? It's coming from here. I want to have a shadow cast in over this building.
But just the building. Let's see if we can extrude
up like a very thin part of the landscape to cover
this up. Not quite sure. We're experimenting. You
can try different things. I kind of like how that looks. It's a little subtle shadow spending quite a lot
of time on this. Yes, it's what's going
through my head. I'm lining up a shop,
this is just one example, switching between
different things, not just sticking with one idea. As soon as I see
something, Right now I'm thinking, oh,
there's too much grass. So let's go through and
decrease the grass again. It's not a linear process. I'm constantly switching
what I'm doing. Let's try how that looks. Great, so we've got some
nice objects in here. Let's see if there's
anything else we can move about if you like, using your composition lines. I've kind of got things
set up in third, you know, like this
building takes up like the left
third of the frame. Same with this log cabin, we can go through down here
in the camera settings. Let's just thepanerslp. So we can see the
property spanel under Viewport display,
I believe it is. We've got these
composition guides and we can choose different precess
that come with blender. So you can see here, or I was talking
about with the third. And then we can just rotate, it's a little bit more
to line it up better. Rotate it on the z axis. Yeah, we can also try once you've got center
lines right here, we've got these diagonal ones
and golden ratio as well. So these can be quite useful. Another thing is optional if you have it and that's
debt fulfilled. So I'm going to go
up to Rendered mode. I'll change it back
to cycles now, although actually
we can leave it on in V. They've updated it in the past couple
of years and I find that De fulfilled works
a lot better in V. Now, let's go down, raise it again. De fulfilled. Yes, we just
need to enable this option. We can see everything
goes blurry. This F stop right here controls the intensity
of the blurring. Reduce it, everything will
be a bit more blurry. And then we can also
change the length, the part that it's focused on if we want a really
shallow depth of field. You can also use this pepe here to select an object to focus on. Let's this house object. If we want everything
to look really small, we can reduce it like this. And it looks like a miniature
set piece, doesn't it? If you want to increase it, then you can do that as well. Let's see how this looks in
rendered mode right now. Let's go to cycles.
I'm happy with this. Everything's a bit noisy now, but don't worry about
that, any of the setting. Let's talk about color quickly. About like saturation and
contrast and everything. If we go down, I
believe it's under the range of settings
under color management. We might have really
touched on this. Let's just bring my properties panel wing because I'm not used to working
with it like this. It feels a bit odd
to me management, so LGB right now. And we can see that the
view transform is on film. And then we can change our
look to comdiumhi contrasts and make everything pop out a little bit more like
very high contrast. If you're doing something
brightly colored, I like the way this looks. High contrast. This is just quick and dirty
ways of getting it. But we'll go over color
balancing as well in a sec. So let's go back
to the camera tab. Slightly too much
depth of field. Let's just increase
five F stops, try five F stops. I think that's
just because we're going to get it and
these people here, let's move this guy. It looks kind of like she's
not sure telling them off. Maybe let's just remember to move the rig by the way,
not the character mesh. So let's quickly change
our rendering engine to V. Let's rotate him like this. There we go. Let's put them in a nice spot. Didn't
need to press that. There we go, See how that's looking. I'm quite
happy with that. And now we can go place some of these assets manually
because so far, all this foliage is just the
way it's been painted on. But we might want to actually
move some of these about. Let's go to Material View just
so we can quickly edit it. Let's bring back our
foliage collection because it's under scenery. The first thing I'm going to
do is add some paving slabs. These stepping stones. Let's duplicate these.
Do it in the outline. I don't know if it will
hide the duplicate them. I'm not quite sure where they are, whether it will let us. It looks like I've got this
overlay thing on there. It keeps annoying me there. Yeah, as I was the duplicate these and let's move them
to a new collection And I'll just call this
manually placed scenery. I'm not worried too
much about keeping my files organized because
we've pretty much done now. Unless you want to
continue expanding this and add more assets at
this point in our project. Just just whatever works.
I don't want to spend too much time refining
things now that we've got. What else do we want to
add? Add some trees. Let's go under trees right here. Let's have an oak tree. We can just choose, actually
let's have this one. This one and this
little birch tree. I'm going to shift the deed
to duplicate and then move them to the manually
placed scenery collection. Should we hide these again? Perfect. So I'm using this
in the bottom right now. Inge my engine back to V and I'm just going to
use this to place some. Yeah, the defer field
looks really nice. In cycles, in V, sorry. Now I used to not use it because
it didn't look as good, but I'm
quite impressed. Let's put this tree just here, just there's a bit
more foliage actually. In shot we can barely see any of these nice trees that
we made. Here you go. Let's put in here, not quite sure if we want
to know completely. Take up the shot, we can
even move it closer. You kind of have
it looming over. What do we think?
How does that look? Just something subtle in
the top right, isn't it? I'm quite happy
with that. And some of these trees look a bit odd. You on the hill, we've got some trees
facing the same direction. There's not much we can do about that to
actually move them, but if we select this landscape
here, got to the trees. Yeah, When we did this, we exposed a parameter
for the seed, if you remember in
geometry nodes. So we can just change this
in a properties panel and it will regenerate where it's
spawning all these trees, we can just select
one that looks nice. Should have probably
done this before we started adding the extra assets. We can just roll through these, generating quite
a lot of them in front of the camera,
which is nine. So let's just go through
into weight paint mode. Let's put the strength, serial strength for one. Let's just get rid
of all the trees in front of the camera frame. This is too much. That's okay.
That's looking good now. I'm happy with that. Let's
try changing that set now. If you, when you're
like in your accent, you went past it,
don't worry about it. Because you can always just go back to the original number. If you think, oh, I'm
going through now, 23 looks nice. I
might go back to 23. You can think about it like
that. That looks nice. I like this one.
Let's stay with this. That tree is it looks like it's intersection
of the log cabin. Impossible to see, you can
spend all day on this. But once you put one
that you're happy with, then we can move on to rendering and go back
to solid view slide. We finish weight painting now. Yeah, that's how
I line up a shot. Let's change our
rendering engine back to cycles and it will look ten
times better. There we go. I get used to working with D, and as soon as I change
it back to cycles, it looks amazing.
A subtle detail. If we wanted to do
it, we probably should have done it
from the beginning. But it's just another thing
sometimes when you're doing these low poly renders is to
add a little devil modifier. Let's just to show you on
this how, what I mean, let's add a devil
modifier segments. We'll just give you
a slide. Ten, put in solid mode, works quicker. I wonder why it isn't
working pebble in the edges. It might because we've
got it's triangulate, modify or it could be
because clamping the reel. It's disabled clamp overlap and now we haven't got
perfect geometry. But of course if you wanted
to pebble it from the start, you'd do this from
the beginning. What that does is it gives you nice little reflections on the edges of everything
on my cameras. You can see it a bit better.
It's quite nats I find, but it's not quite in line with the art style
that we're going for. And I'm also targeting
this towards games where we wouldn't be likely
to have this babble. But I thought I'd
still show you. Yeah, there we are, Believe
that's everything done. Let's go back into this view. Let's go up to the
composite in tab. Because we can do a tiny
bit of color balancing. Let's quickly take us nodes. We might have done this
in a previous course. Let's also give us a bit
of de noising as well. We can change this later
for the final renders. Let's up the sample count. It looks like it's max
samples are on 14, 96. Right now, that's very
high. We'll reduce this. Let's, let's just put it on 20 for now at F
12 to do a render. F 12 is a short cut. Then once this is
finished, we can change it in the compositor. That's nice. And then let's quickly add color balance.
It's on right here. That's at our backdrop
as well as our backdrop. I need to add a viewer node. To do this, you press shift A. Let's just search
for our viewer. We go and let's put this in. Great. Now if you remember it looks like As on down the As probably because we
got this render open. I might be wrong about this F, let's just put this into solid
view and in the composite. Let's play some
of these. And you can also change the temperature. This will make our
shadows darker and cold. I found I always go a little
bit too extreme with this. It looks like it's
taking its time. It's got a lot to compute. I'm not sure which
resolution I rendered that it looks like
it's only 1920 ben 80. There we go. Like I said, I always go to extreme of this. Let's drag it closer
to the center. We just got to see how
sunny we want this to be. I, it's in the evening. Let's give it a
slightly cool look like a purple blue color. Los, like that. I think
that looks quite nice. One problem that I tend to get with these low poly shrubs, or these bushes right here, is they cast pretty
gross shadows. And sometimes if I'm taking
this into a game engine, I'll just disable shadows on foliage or give them an opacity. Because these ones are already
in a shadow being cast by that landscape that we added behind to the right of the camera where we don't
see any other shadows, just these nice
diffuse reflections. A bit of criticism. Maybe
some work could be done on the character poses because
they look right right now, let's go back to the layout
tab and quickly fix that. Just because we're
so close to the end. It's always worth
doing this last bit, let's just rotate them. It's difficult to do because we haven't got K on this one. Let's just rotating. Go
up to local orientation. You can make it look
as if he's walking. You want to move
the whole thing? You can just move his hips, make sure his foots
on the ground. I'll do that close
enough. Let's just give him a little
bit of character. You make him look not quite as immobile but looks better to me. For her, maybe she's checking
something on her hand. Let's just make her look at her hands to say with
this local orientation, which froze me off sometimes. Just pick whichever one you
like. I'll stick with Global. There we go. I don't think I
added K on this side today. Let's have her hand
slightly turned in. There we go. She's kind of leaning back,
checking something. I'm spending a lot
of time on this, so obviously go through
and refine it on your own. It's just a quick example. I don't want to rotate
her head too much because the Pu cell isn't
lined up properly. It's going off to the side. We haven't got a bone
to make it go down now. Do I want this lighthouse
to be in background or not? Because currently we
haven't got it there. See how it looks? Oh,
yeah, That looks nice. Of course. Let's have it. Because we've made
all these assets. We don't have them
off on the side. Of course, you can
do multiple shots as well if you'd like to. Down here somewhere,
I'll just look nice. And then I know I shouldn't change something
like this so late. Let's change the
angle of the sun. Just the tiniest
bit. That's nice. I know you've done
color balancince, this might throw us off, but I do think the sun's a
little bit too cold, maybe. Let's try making it more
yellow. I think I like that. Yeah, I'm quite happy with that. I'd say that's our
final version. Let's just say make sure that anything you
don't want to be rendered, I'm going to disable
this archive. Yeah, anything that you don't want to be
rendered should have the camera disabled
every time I render. Pretty much always.
Every time I render, I'll accidentally have it there. Let's just just go through the Outliner and
check it and then, yeah, we can increase the sample count to something a little bit higher as sort I render one, Let's set this to, I
don't know, it's 2000. And you can increase
the resolution as well. So it's on 1920 by
1080 right now. Yeah. So I'm going to render this and I'll see you once it's done. There we are. There's
my final render. I've left it on its own
for about 5 minutes there. So let's make sure
we get a nice, really high quality version. And of course, if you
want to save this, just go file and then
save As and select somewhere you want to keep it to be quite a nice portfolio. Remember, maybe render square. If you're going to post this on Arts Station or Instagram, then you can change
this from 1920 by 1080 to like 1920 by 1920. But yeah, that's pretty much it for the course
now. That's everything. So we've covered
a lot of content. I hope you take some
of these skills onto your blender
careers in future. And yeah, congratulations
for following along. I've really enjoyed making
it and thank you very much.
 Eldamar Studio