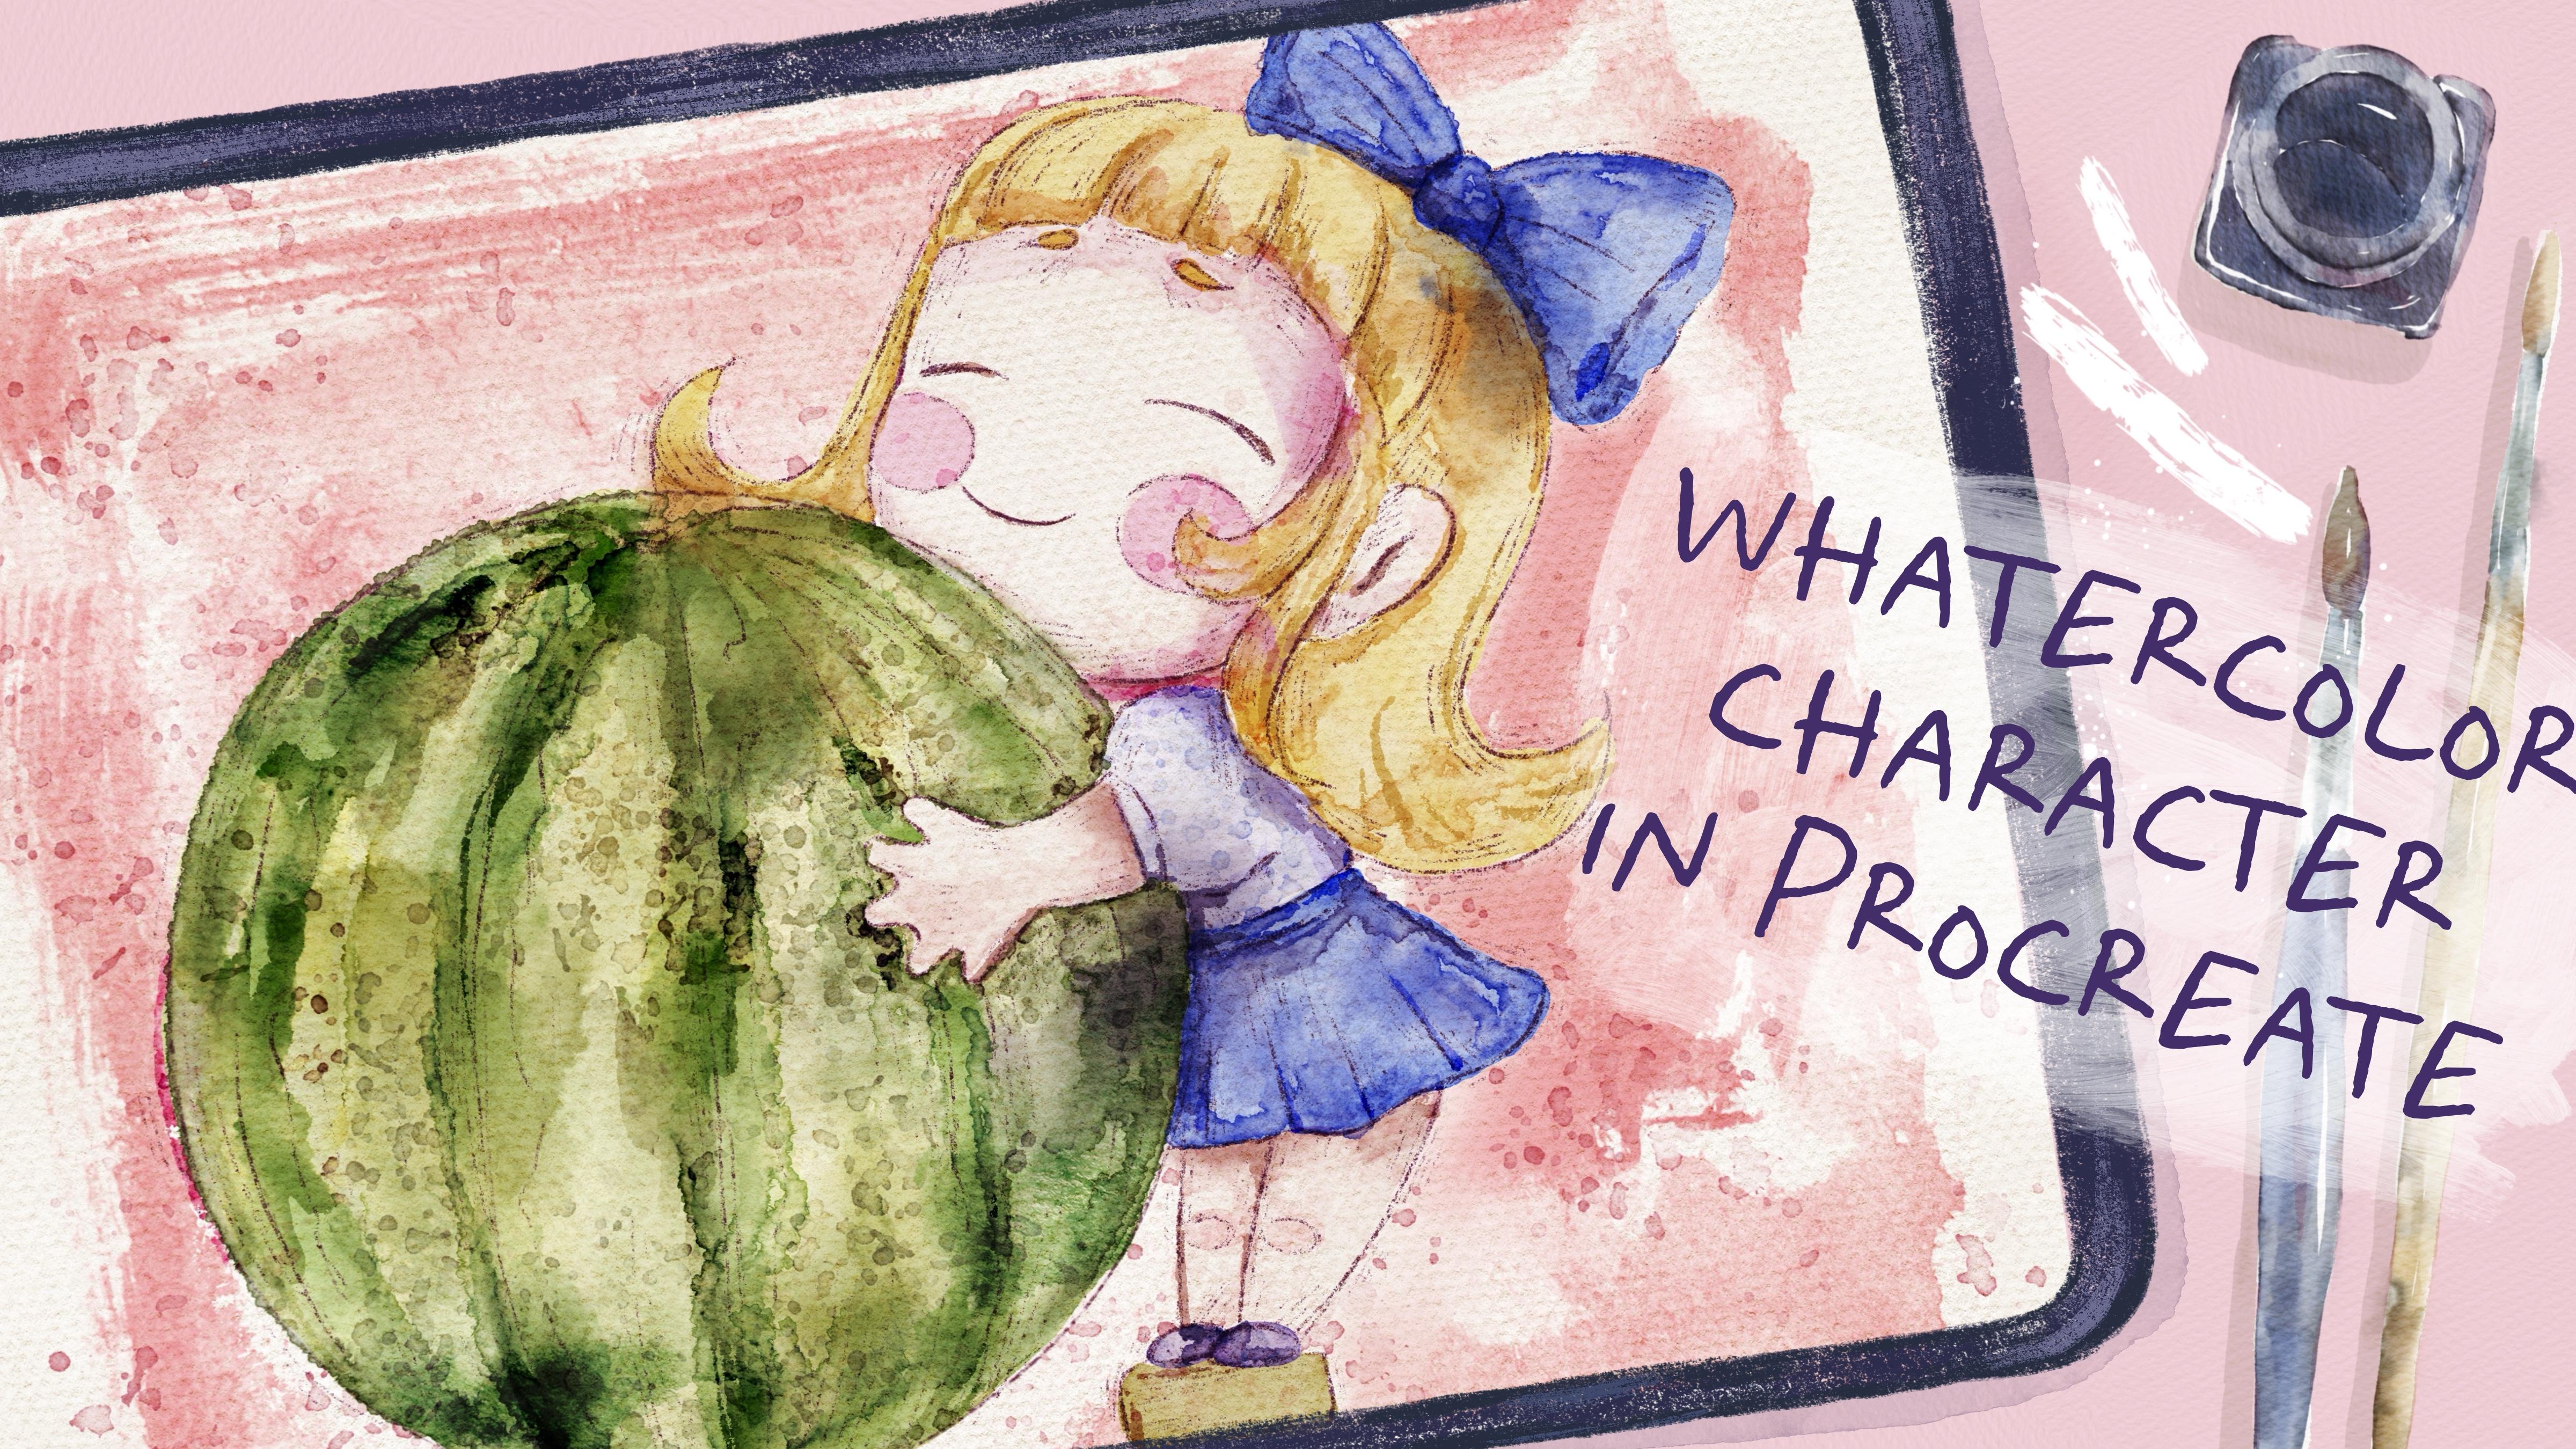
Transcripts
1. Introduction : Hi, guys. I'm Ina
Freelance Illustrator. I have been painted
for 15 years. So I have a bit of
experience in this field. I'm obsessed with watercolor, magical things, and cute stuff. And in my classes, I constantly share the knowledge that I have about the Procreate and how to create beautiful watercolor
illustrations digitally. So welcome back to my class, and let's dive into
cool and a little bit pencil art and create lovely and cute
character illustration. At the end of my class, you will learn more about the
procreate, how to sketch, how to use layers
clip in mask alphog, how to create watercolor
texture paper, and how to add volume and
color variations to your art. And most importantly,
you will learn how to create cute watercolor
character in procreate, using digital watercolor brushes
in a fun and simple way. Today, my class will be
pretty simple and fun. I will show you my whole browses from the start till finish. And first of all,
I will show you where to find all
the freebies and how to import them into the procreate alone with
creating texture paper. Our next step will be
creating sketches. And finally, we will start adding colors, shades,
and highlights. I will show you how to
create character from simple shapes and how to
add more and more details. As a bonus, I will
share with you my own custom brush
set color palette, my own pictures that I created. This class is great for
beginners if you have basic understanding of procreate features and
intermediate levels. Actually, for everyone
who is interested in digital watercolor art and
character illustrations. And one more thing that
I want to mention, your opinion and your feedback
are very important to me. So feel free to tell
me what you think about the class in discussion
or review section, and I will be glad
to reply to you. My dear Art fallas, I can't wait to
start this class, and definitely I can't wait to see what you aplo
to project section. So let's not wait, grab your
iPad with Apple pencil, and let's paint together.
2. About the Class Project: Your class projects
will be next. You can follow my steps and create cute character
illustration, the same that I chose, or think about your own
character that you like, and then paint it using the tips and brushes that
I gave you today. I will use procreate for this class with iPad
and Apple pencil. So if you have it or some other drawing pads or just regular akin
paper and paints, please join my class
and good luck. In today's class, I will paint adorable
character illustration. I will explain you how I create a sketch and give you some
sketch options to choose from. Our main focus will be
on girl illustration. But you also can choose
cute ghost or mouse, and we will combine two mediums together, pencil and watercolor. Once again, you can choose a completely different topic
and draw something new. Dry, experiment, and
enjoy painting process.
3. Where to Find Freebies: In this class, we
will talk about resources and where to find
them. It's pretty simple. Follow the steps, go to
projects and resources section, download freebies,
then go to Files app, and then import all the
freebies into the procreate. Also, it's hard to create watercolor illustration without
watercolor texture paper. We'll fix this issue. Let's talk about it in details. Well, my lovely students, I think we are ready to get
started, and first of all, less open procreate,
and then we need to tap plus and
select screen size. The next step will be my explanation where to
get all the freebies. Let's create a
couple of players. Above the freebies.
When you open my class, please do it in browser. It can be from O Safari. Y browser, because if you
do it as Skillshare app, my freebies might
not be visible. So you download all my freebies, and then you go to
Files app and you can find all the freebies
in downloads folder. After that, my suggestion is to split the screen and
from the right side, we can leave Procreate app, and from the left side, we will have files app. Lx it. After that, we need to drag and drop all the freebies from Files
app into the procreate. Lx. D, and then make
sure that you create a new layer for
every sketch that you transfer from Files
app into the procreate. Like that. And then let's
make it invisible. H one layer, and then drag and drop our second sketch
and the last sketch. Same you're going to do with the swatches that we have
and with the brushes. So drag and drop all the
files into the procreate. Then we can close our files app. Then when we renamed
all the files, let's create one layer above, and let's write paper. All the brushes that you need
and also the paper brush, you have in a brush set. It's called cute character, and we have the paper brush, which is on the top
of the brush library. Here we're going to have a
lot of brushes, and first, let's create the paper, and then I will show you
the brushes that we have. So we chose paper brush. Then we need to
go to Bach color. Maybe you can move
a little bit to the yellowish tone and set the brush to the
maximum and then do xs. The next step is will be duplicated the paper
layer two times. And switch to color burn
for the first layer, and linear burn for
the second layer. I think I want to duplicate
color burn two times, and I will change color burn blending
layer mode to multiply. Then I will lower the
opacity till 60, 50%. Okay, now, we have the
most important step is let's just duplicate
color burn layer two times and merge together two layers where we have color
burn blending layer mode. Lexus. Now we go to linerburn, also duplicate those two layers, and then merge together. Then we go to linerborn blending er mode and move the
opacity deal 50% to. Okay, great, now let's
group all our paper layers. We selected first layer
and then by swiping right, we can select another layers and then press group and
rename and write paper. Great. Then under nes, we have all our sketches, and we need to
decide which sketch we're going to use
for our day class. You might use this lovely mouse. Or you can paint some
ghost illustration. It's pretty simple. Or if you have time and want to paint some character
illustration like human. You can draw this lovely girl. Or again, you can
create your own sketch. But before we jump into
the sketching process, let me show you what
brushes do we have? About the color palette, we have this cute
character color palette. We will not use so
many colors today. That's why the color
palette is not that big. And for example, I
will go to blue color, and I will show you the
brushes that we have. Now, guys, I created a layer that is underneath our
paper layer group. That's very important
to paint under the paper group because
if you draw above, the watercolor texture
might not be visible. Let me show you. The example, we go to Board edge
watercolor brush, this one. If you move it above
paper layer group, you see you lose this
watercolor performance. Here you have the feeling that a watercolor pigment
bleeds into the paper. But when we place it above, It's really hard
to see that they are blending one and
another. That's why. Let's bend under the
paper layer group. Clear. Now let's talk
about the brushes. We have the paper brush
that you already saw. Next, we have HB pencil. This is a pencil that I will use for my
sketching process. It's very cool for
schematic sketching. Then we have six B pencil, which is native procreate brush that I'm going to
use in the end of my class to add
some dining details and add more sketching. Then we have brush. This is also my brush
that I created, and that we're going
to use for adding tiny details in the end
of my painted process, put hard edge watercolor, very lovely watercolor brash
that has pretty dark edges. This brush is
pressure sensitive. So try to experiment and see what style painted style
would be suitable for you. If you press harder, you will have more
transparent pigment. If you press lighter,
you have darker shades. Be sharp stains, the brushes from my loose
watercolor brush set, and I'm going to use it to add some dark edges when
we create the art. Bue water drops. Very lovely brush
if you want to add some watercolor pigment and
show the aicolor texture. We're going to use
it for shades. Bu salty blushes. We're going to use
this brush a lot. Both of blenders, this brush, we're going to use as a blender. Here. Water color stamp,
we're going to use as one of the options to create
the background color. This is another option. We will create more
gentle background shades. And also, you will
have option to add some flowers as a background to those flowers you also
can use for the composition, for example, you can place your character right
on top of the flower, and it will help you
to save some time. So our main brush will be a p
hard edge watercolor brush, but actually we're going to use the rest of the brushes too. I think now you know everything about the brushes that we have, and you know how to
create the paper texture. Now let's jump into
the next part where I will explain you how
I created sketches.
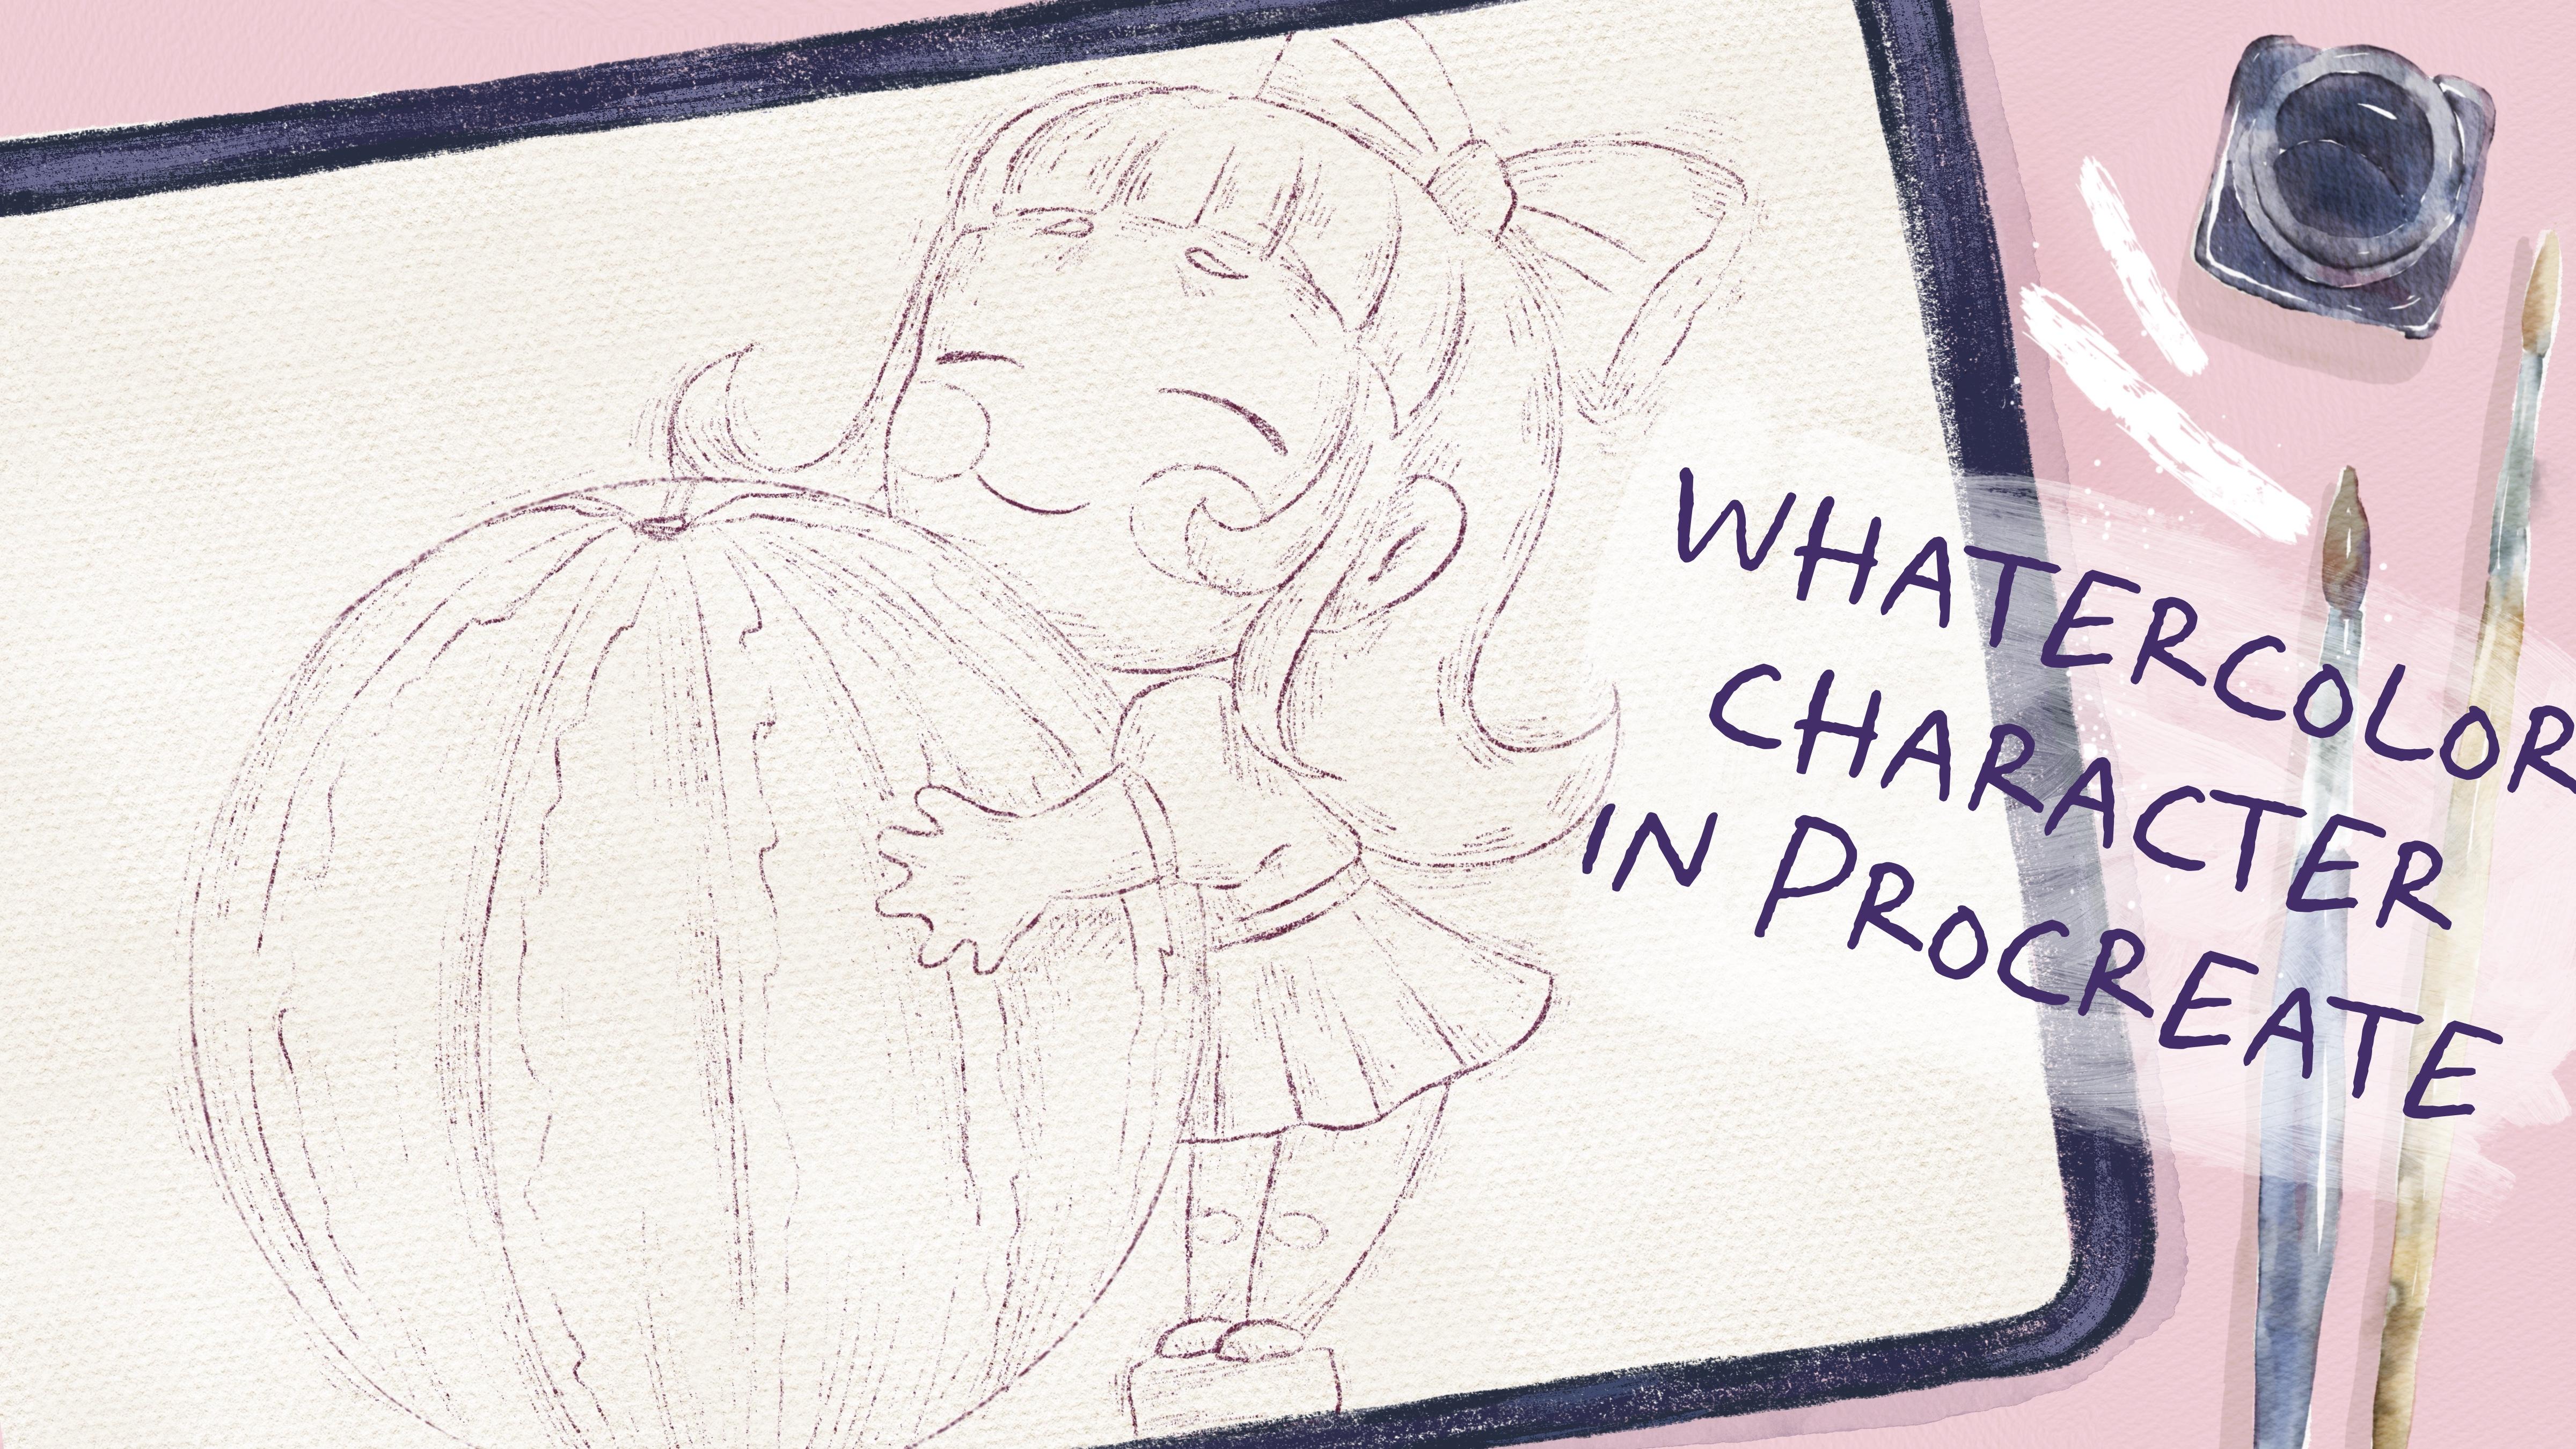
4. How to Create Sketch: Now it's time for sketches. Pencil part is super important. So in the end of my class, you will decide the amount of pencil you want to
keep in your art. Depending on free
time that you have, you can keep adding
more and more details. Well free to follow my steps
or use your own sketches. Again, this part of the class, you're going to talk
about sketches. I will jump to I think
like some reddish color. Again, I will use
Blue HV pencil, which is my main brush
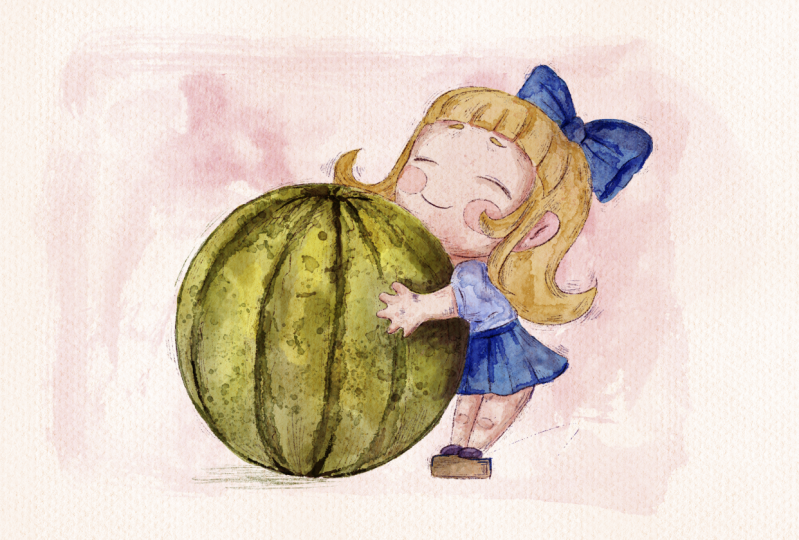
for creating sketches. Guys the final project, I will create the illustration
with this lovely girl, and I've created for you some base that will help you to understand how
I created those sketches. Let's lower the
opacity of our sketch. Then we are still on
our pin here layer. And let me explain
you what I did. As you know from my
previous classes, if you have seen my
previous classes, you know that when
I create sketches, I tried to break the objects
into the simple shapes. And same here, all
three sketches that I created are based on
the same principle. So I created something round as a center for our
illustration, for example, girl is holding this
lovely watermelon, and our ghost is holding the pumpkin and mouse
is holding this snot. So the principle is the same. We have the round ball as a
center of our illustration. Here we have some kind oval, not a ball like this. When we create the first sketch, we're going to draw an oval. Same about the mouse. Let's start with the mouse. I also tend to break the shapes
when I create the mouse. The mouse is two ovals. This is the first one as a head, and the second one is
a body that mouse has. When we tap on the screen and hold the pencil, hold the brush, we can adjust the size and
the direction of the oval. Also we have some tiny
balls. For the ears. Then what I need
to do is to show the direction of mouse face. It's pretty simple because
the mouse is looking right straight into the center. This is the base for our sketch. Then we can lower the opacity of the base and create
one mo volar ove. You might change the color, for example, for the pencil. In this case, it
will be easier for you to recognize what is what. Then little by little, you can start creating
those shapes, play with the shape. You can play with the sizes,
play with directions, and whatever, and Trow
mouse, in any way you like. Like this, like this.
Let's clear it. Now about the ghost, this is
the simplest illustration because we have literally two balls connected to each other. Let's come back to
our purple color. We're going to have some to lower the opacity
of this sketch. We have the oval here, and then we have another oval. As a ghost. We can lower the opacity and again find the direction where the
ghost is looking at, and it's a little bit
tilted to the left side. Here, now you can draw
some tiny details. About the girl, it's a
little bit more complicated. Okay, a girl. Let me lower the
opacity of the sketch too. Here I was following
the same steps that I did with my
previous sketches. I have a lovely ball.
The watermelon. Then we have the head,
which is also ball. And here we have the trickiest part because
human body is not just ovals. And I think as you know, when we were small kids, we tend to paint just
sticks like head, stick, stick, stick,
stick, and stick. This is what our
parents taught us to do in the simplest way
how to draw people. In principle I was using when I was creating this
lovely tb ustration. I decided to draw this girl as a combination of
balls and sticks. The head is the ball. Then I
just need to show the spine, the direction of the spine here. In this area, we have the connection between leg and our spine like some joints. Then we need to show the
direction of the leg like this. This part is joints where those parts are
connected together. Here we have tiny legs. L et me lower the
opacity even more. Then I need to show the
direction of hands, and I shouldn't forget
about shoulders. We can't just draw
stick like this. We need to show that
we have the direction of shoulders that
are coming this way. And then we have
the joints here. Now we have the
direction of our arms. Again, joints here,
and this is palm. Same here, we have the arm, joint, and pal. That's it. Next, I also shouldn't forget about the direction of the face, where the girl is looking at. Here we have our head is
tilted to the left side, and girl is looking up. That's it. This is the
most important part in the sketch because we
need to see the direction. We can't just start
drawing head and arms and legs without understanding
the basic proportions. Again, with chibis, the proportions are
slightly different. It's not the same
proportions that we have when we draw realistic
illustration of. Chip, we have very big head and legs and arms are
a little bit shorter, and also the chubbier. Guys, what I did, I added to the freebies the schematic base, how to create the sketch. Maybe it might be useful
and you'll see what are the main points that you need to follow when you create a B art. Again, I will not
spend too much time on the sketching
process because as I promise this class
should be pretty simple. Of course, if you want
to see more classes how to create illustrations, just tell me in
discussion section. Let's increase capacity
in our Sketch one. Again, this is the base
that I was using when I was creating this art.
You also can use it. For your own art illustrations. And as you see, I use the base, and then on a new layer, I started adding more
and more details. And I really like adding some scross hatchings
and pencil stroke, so I decided to combine watercolor and pencil art
in my today's class too. Okay, let's delete our base. Let's delete our go sketch, our mouse sketch, and
let's keep our girl. So in our next class, we finally going to jump
in the painting process.
5. Painting Process: Final Project: Now we are ready to jump
into painting process. Use the brushes that I
provided among the freebies, or native procreators,
or your own brushes. Don't forget to
paint on the layers that are under the
texture paper. Let's not wait, and I will show you everything
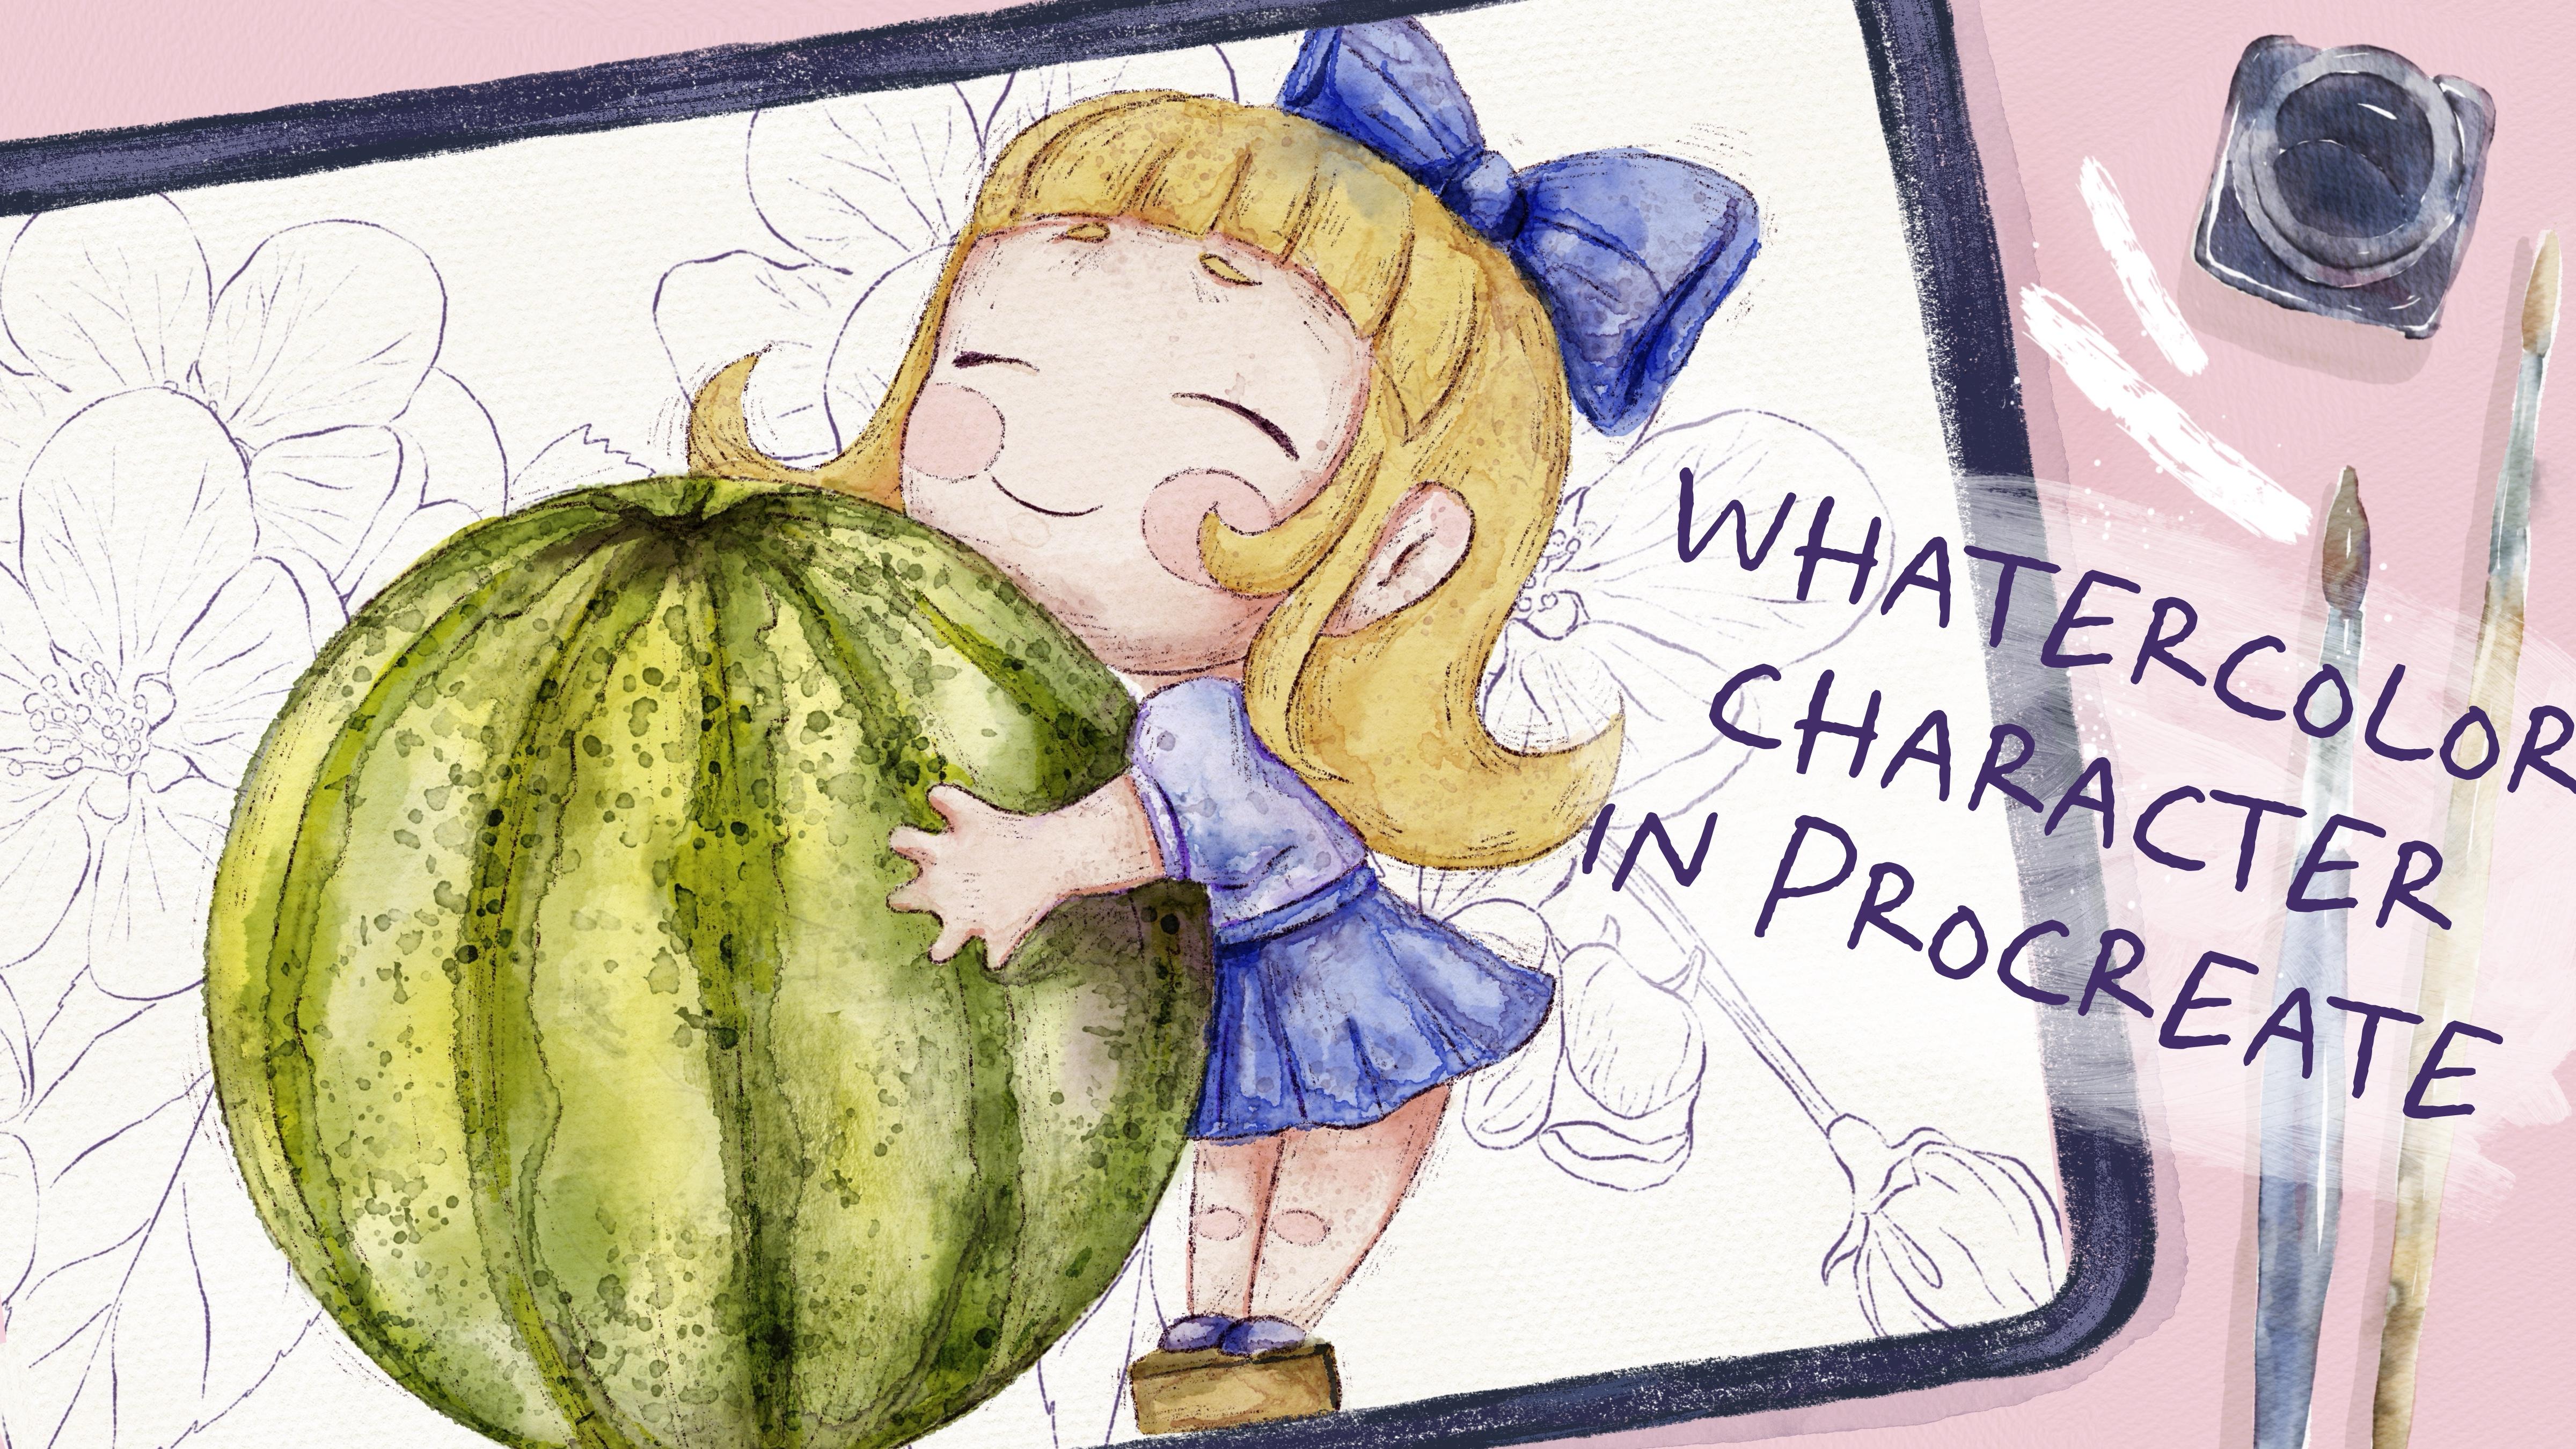
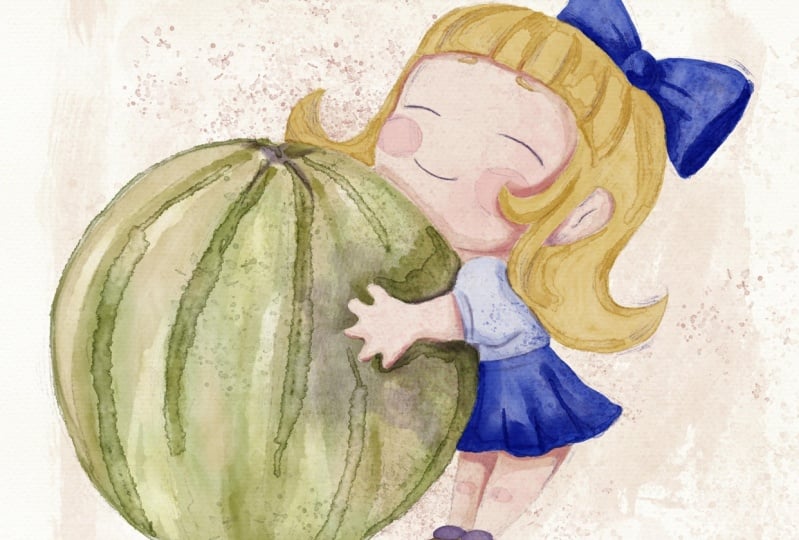
just right now. Now it's time to add
colors to the watermelon. Let's go to the
slime green color. Grab bu hard age,
watercolor brush. Increase the size a little bit, and let's start adding color. Try not to lift your apple
pencil from the screen. But if you do so, it's
not a big problem. We always can use blending tool and blend some overlappins. Blending tool and bland
bland blend the sharpness. It's actually one of
the ways how to add some traditional
watercolor texture. Also, my suggestion, let's
come back to this sketch and change blending
layer mode to multiply. Like that. Great. Now let's
go to basic color, another layer, and
now we need to start adding colors
to our love curl. Grabs this bright blue
color, same brush. In this part, I will show you
a tricky way how to change the color of some part of the dress without
changing the layers. Okay. Let's go to the ribbon. Like that. Now the magic
trick starts here. Let's go and grab
selection tool. Now we need to select
our blues like this. Then we need to go
to huge tration and brightness and you see our
selection is still on. Let's go to curves. Now things to course, we can play with the
intensity of the color. Our next step will be, we will go to hue
saturation and brightness, increase the brightness a
little bit, then desaturated. Now we can play with
u, and if you want, you can change the
color slightly. I will go more to purple shade. And I will increase
the brightness. I want this part to be brighter. That's it. This is
very useful trick. So we are on our basic color, then I will go to this purple color and
I want to paint boots. Now, my suggestion to create
one more layer, new layer, and also we can call
it basic color, and I want to add skin and
hair on the new layer. And guys, why I created new layer and why I want to paint skin and
hair on new layer. Be later I want to add shade, and I want to use
clipping mask and alphog. And facet, it's just
easier to paint it on different layers in order to use different shading colors. Again, I try not to
lift my ple pencil from the screen. Now, skin color. Sir. And time need details
that I forgot to add. Eyebrows. Here. And now checks. Let's go
and grab bright pink color. Also, we can add some
pink color here, and this wooden block. Also some brown color. The Okay. We've done this adding basic
colors to our illustration. And now it's time to jump
in those shading proces.
6. Adding Shades and Highlights : It's almost the end of a class. Now it's time for
our shading process. We will add some
shades and highlights and what color
texture to our art. Okay. So we're going
to go to new layer. It's shade layer. Change bland layer
mode to multiply, and make sure that your
shading layers are on the top of the basic color. But before we start
painting on new layer, I want to come back to the
basic color watermelon layer, and then I want to add
some color variations. So how to do that. Let's go to the selection
tool, grab free hand. And here, I want to st some
part in like some wavy way. And then I will
go to feather and increase the amount till 15 70%. Then I will go to hue
saturation and brightness, and here I would like to
increase the brightness. And I want to add some
color variations. Like that. The
next step we'll be adding some watercolor
texture to our art. For that, we're going
to go to shades layer, grab this mean color, and then go and grab
water drops brush. Here little by little, you can add some texture. Also, I want to
mention that in areas where we have two objects
next to each other, we're going to
have darker shade. Here we have our girl, staying next to watermelon. In these areas, we're
going to have more shadow. Also, if you want to
blend some color, go ahead and grab blending tool and blend as a blending tool, I am using blue soft
blender and bland some of the parts that you think
look a little bit unnatural. Guys, we have some parts in
watermelon like the stripes that are darker from the
rest of watermelon body. Now with this water drop brush, I'm trying to emphasize them. Now I want to add
some highlights. So let's create one layer above
of our basic color layer, and we're going to rename
it and write highlight. We're going to stay with
normal plandlaar mode. From the lime green, we're going to go to the top a little bit to make
the color brighter, and we will go to a
little bit yellowish tone and Sam boa a color drop brush. Tiny bit, I want to
add some highlights. Later, you might go to plandin layer modes and change the plandla mode to
some brighter one, for example, green or add. Now, like a set. Let's go and see what
might be the best choice. Why is also pretty I
will go with luminosit. If you want to
emphasize the color, you can duplicate it and by duplicating, it will
be even brighter. I want to do it.
It's enough for me. It's pretty bright. Then let's come back
to our shades layer, and I want to add some shades
to the outfit of our girl. Same blue color,
blue water drops. Now I want to add water
color texture to the outfit. Also, we can show like some of the colors blits
into another color. Creates very realistic
feeling. Same here. Let's grab pretty
bright blue color, or a little bit darker, whatever you think it's most suitable and add
some color to blue, and then use blending tool
and blend it slightly. Now let's grab this page
color like skin color and do. The second leg should
be a little bit darker because it's hidden
behind the first leg. Same here because girl is
holding the watermelon, so some part will be
a little bit darker. The neck will be in a shadow. This part in a
shadow area next to the hair also will be darker
area under the eyebrows too. But don't make it too. Again, if you want to
exaggerate the shadow, You can use curse. Or, you can just
duplicate the layer, and now the shade
will be even darker. I don't want to do it
because I'm going to add more shades in the process. So I don't want our
picture to be too dark. And then I want to grab
this greenish color. And I want to show
some shade here. On a brick where C stain. So we've done with the first
stage of adding shades. Now let's jump to another way and another
brush of gent shades.
7. Adding Shades and Highlights: Stage 2: A on u shades layer. Let's change the bland
layer mode to multiply. Same mint color. If you want you can add a
little bit darker shade, and let's go and grab
two sharp stains, and now we need to add some
sharpness to the edges. I think we can go with
the dark green color and bland another
part. Like that. You see it creates really very realistic watercolor
edge effect, and you can add some
edge lines here. Don't draw it everywhere because it might look a
little bit unnatural. Like I said, in areas where we have two objects
next to each other, we're going to have
darker parts, like here. I don't blend all the lines. You see from another side, also leave some of the edge
lines because like I said, they might look very realistic. A is part of the wooden
on and probably here too. Let's add some stripes. See a little bit of the
edges I and blending. So thanks to the bleeding, it looks very realistic. I'm going to blend
the color inside. Blending this part two. Okay, that's all watermelon. Now I want to use
the same brush and add water color
texture to our girl. Grab this blue color. And same we're going to do here. And what I want to
do here is I'll go to this purplish shade. And I want to add
some shades here. Oh, you can go with
a purple shade and add some color
here. Blue color. Now let's add some
shades to the skin. H. And now hair, same color, maybe a little bit more orange, and same blend some parts. This brush might be my favorite. Okay, we've done second
stage of agent shades, and let's jump into
final details part.
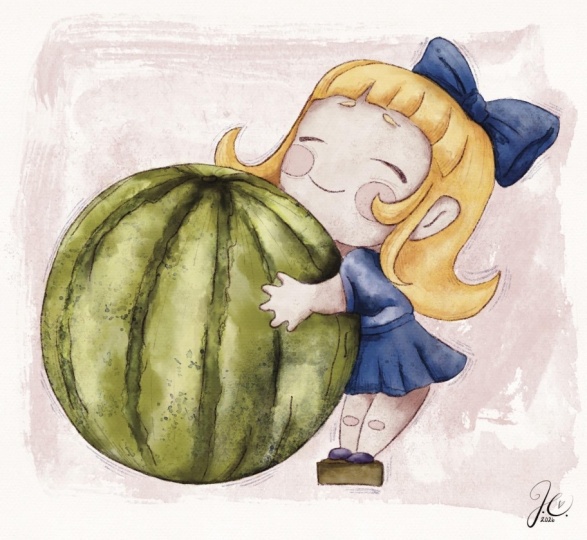
8. Adding Final Details: The last part of cute
character design is adding final details. We will emphasize some parts and add more volume to our art. Okay, guys, now it's time
to add final details. You're going to go
to the details. Layer, then go to multiply, and then I'm going to
duplicate it a few times. And I will go to lower
layer with the details, and I will change the brush to B in And here I'm going
to add some shades. Let's call this purple color, and I want to add some
purple shades to this part. So I want to add
all those details like everywhere in some areas. So here then I'm going
to use blending tool. Then let's go to a
little bit pinky shade, and I want to add some
color to this area. Basic guys, you can adjust the pacity to the
percentage you like. Now I have 85%. This area will be in a shadow. This part will be in a shadow. I think this brush is great for adding some sharp lines like dry brush strokes
and for showing some of the most obvious shades. L. Now, blend into, and I'm going to blend
some of the lines. Again, you can go to curves and adjust the opacity and
brightness, like that. Then I'm going to add some
lines to the watermelon. So part I will add to the
ribbon and in a brick to. And Now, we need to go to
another details layer, and then we will
go to color burn. Then I will go and grab
this greenish color. Same I have put in brush,
increase the size, and I want to add some
dark lines in some areas. Then also, if you think
this is too dark, you can go and play with
bland and layer molds, because I want to
add a little bit of contrast to our art. Go ahead and see what
works perfect for you. And then just chase the
pasity if you want to. Again, blending
tool, as you see, if I placed the details layer
under the shades layer, the look is totally different. It's not that dark, and I think that
works great for me. Now, what I want to add
is some tiny stems. So for that, I'm going to
go to our basic color. And if I want to add some
shade to this layer, I need to remove
the transparency. When I remove the background
color and paper layer, this part is a little
bit transparent. And that means when we need to apply alpha log
or clipping mask, when we draw on this layer, the colors will
be not so bright. That's why I need to
duplicate this layer, and it already looks so good. I will lower the acid to 30%
and then merge together. Then I can merge together
those two shades layer. Then I will duplicate it again, go to lower layer,
go to adjustments, press hue saturation
and brightness, and move the
brightness all way up, and then merge together
with our watermelon. Now this layer is not
transparent anymore. I'll create one molaer above, move the plander mo to multiply
and rename clipping mask. Then I'll clip it,
press clipping mask. Here, I'm going to use some
Stem brushes that I have, for example, watercolor
new step three, and I want to add
it somewhere here. That helps me to create some
also watercolor texture. If you want to exaggerate
it, go to curves. I don't want it to be too dark, so that's why I will
keep it that way. And then merge together. Now let's come back
to our lovely girl, and here I want to do the same. I will dplicate the layer. Wow, she looks very cute, and then I will lower the apacdy yield 60%
and merge together. We'll do the same
with her outfit. Go to lower layer,
lower the placidy, t yield th percent
and merge together. Thank you. Then duplicate it again, go to lower layer. I want to remove
the transparency. Then I go to adjustments,
press, hue saturation, and brightness, and move
brightness all way up till 100%. And then I will merge together. Our outfit layer. Let's create one molaer above, rename it as a clipping mask. And clip it. Again,
don't forget to move the plandlaer
mode to multiply. Let's go to this pink shade
and have the same brush. Then I'm going to stamp it and now try to move it somewhere and see where the shade might go. I think I want to show the
shade from the watermelon. That's why I will place it here. I am at stamp it here
too one more time, and stamp it on her hand
and then merge together. Then we're going to do here,
clipping mask, multiply, I can go slightly
to purple shade, and press it, maybe
here, and a ribbon. Tiny bit. Merge together. We've done with this part. Now
let's go to the part where we're going to add background
and pencil strokes.
9. Adding Pencil and Background : I will show you what are the
ways of adding background, and you might choose
on four options. And in this part, I
will also show you some pencil tricks
that you can add. Again, before we start adding background color and
some pencil strokes, I want to finish by
adding some splashes. So for that, I created
three new layers, and I changed the blended
layer mode to multiply. And then I will go and move my first layer above
our watermelon layer. And then I will go
to another layer. Empty layer, and I will place
it above our hair and skin, and then I will go with
our last flashes layer, and I will place it
above of girl's outfit. And then I need to go
and clip every layer. So I clipped our first layer with girls skin and I
went to another layer, and I also clipped it
to the girls outfit. And the last one, I went to the watermelon and clipped
it to the watermelon. And then I will go and
grab both the slashes. Grab this cream color. And I'm going to
add some splashes. And I'm going to do the
same with another ledge. Go to the splashes that are referring to
the girl's outfit, grab this prop shade, and also add some splashes. And I'm going to do the same
with the skin and hair. Grab pink color. Well be careful with the skin. We don't want to add too
much splashes on her skin. And then merge
everything together. Merge and merge together. Finally, we can jump into
ad and background part. We have two options.
Here, we're going to go and grab
this pitchy color, and I can go and grab
watercolor stem three, and think where I
want to place it. And here. Then if you want, you can duplicate it and
exaggerate the color. First version of the
background is this. Let's go to another background, keep the same color, and I will go with
watercolor background stem. Y And we're going to
use just this stamp. It has a little bit messy L, and I think it looks great. If you want, you can go to curse and make it
lighter, brighter. I decided to make it a
little bit brighter. Like this tram. And also, guys also have another version
for you if you want to, of course, we can go
grab some purple shade, and also we have some bu flower, stem brush, and here, we're going to add some lovely floral
petals as a background. Place it here too.
And like I said, don't forget to remove
the overlapping. Another option is,
let's clear it. We're going to have
one more floral, which is called pu flower one, and you can place
it somewhere here, so and you can create a filing, you might not paint the brick, and you can just create
the feeling that cling a stained right in
the middle of a flower. Maybe she's some kind of
a, something like that. I decided I want to keep this background option because I think it suits to
this cartoon style. Like I said earlier, let
me show you what else you can do if you want to
add some pencil strokes. So let's go and create
one layer above. Go to multiply, and then we
can write pencil strokes. And we will switch
brush to six p pencil. And here, you can be messy. You can add some pencil
strokes that you like. You can draw in one direction or another,
whatever you want. You don't need to be accurate
or to look accurate. So for those people
who really like some pencil art or
maybe who think that maybe it's not enough pencils
that I added to the sketch. So, of course, you
can create more. You can experiment with
the size of the brush. You can add my HB pencil also. It's not so sharp
and not too dark, whatever, like I said, whatever you think
might be suitable. I like to a sel stroke, so I can do it like endlessly. Same you can do with watermelon. I think for watermelon,
you need to go to purple color or green,
whatever you want. But I think green
might look very pale. D. Maybe you want to add more. So, guys set it for
our today's class. I hope you enjoyed
our painting process. And again, you
learned something new about painting in Wicca style, combining with a pencil strokes. And you have some options
how to create lovely, c, durable character as a h as
a ghost and as an animal. And guys in next class, let's sketch together. See you. Tan, this is the end
of our today's class. I hope you enjoyed our
today's painting process, and you learn more about the
procreate, how to sketch, how to use layers clipping mask, how to create watercolor
texture paper, and how to add volume and
color variations to your art. Most importantly,
you learned how to create watercolor and pencil
character in procreate, using digital watercolor brushes
in a fun and simple way. Guys, I will be happy to see all your artworks
in Project section. And I would like to
give my own feedback. And also, reader,
I would appreciate your own opinion about my class, what you think, what you want me to improve, or maybe add. Also, you can share
some suggestions about the future topics that
you want me to cover, and you also can do
it in review section. Let's see each other in
ma class, and next time, we will have class about easy
Sketch and intro create. So let's see each other
in next time. Bye bye.
 Inga Yoon, Digital illustrator and teacher