Transcripts
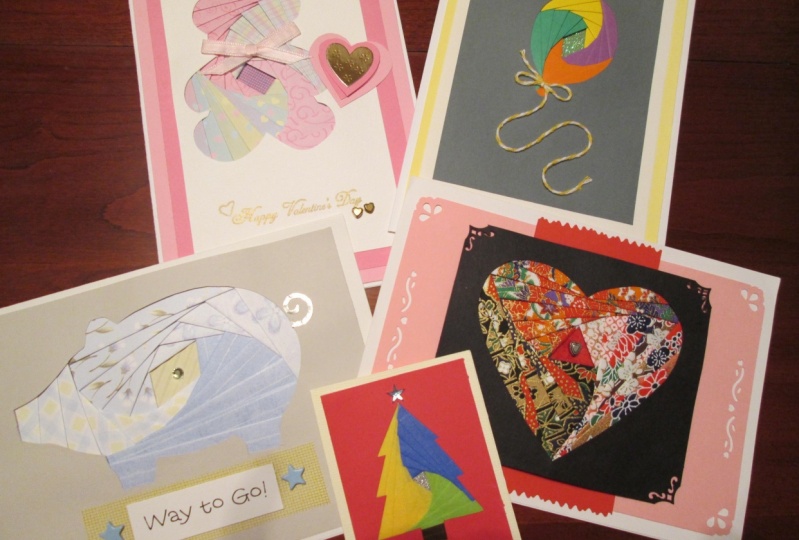
1. Let's Make Some Cards!: Hey everyone, welcome to this cache class. It's all about how to make these beautiful earth folded Christmas cards. And how you can do. I go through the exact step-by-step process of what you need to do to make this beautiful design. There's a template Gambler that you can download and that will really help you out and give you all the basics to go through and create this cod, sir, this is the one that we made in cos. It's really globally. It's got these beautiful designs. I really loved the way it turned out, sir. Ap1 interested, please join the club. I'd love to have you and you can leave a review on t'th completed it and tell me how you felt. Thanks, Lula. Get into it now.
2. You Will Need: It's clause, you will need some cod stock. Mine is 250 GSM mapped paper that you can use. It's just him. Double-sided tape. That's optional. Masking tape. Since those sticky tape, like just regular stick tick gold paint, that's also optional. And the paintbrush to go with it is also emotional. A pencil, a curve, a steel rule. Patent paper can be plain paper if you want, just the paper that you want to go inside the code. And some highlights. This is also optional if you dirt happened, that's fine. So yeah, let's get started.
3. Finding A Template: So I'm just jumping onto the Internet on my computer. And you can see I'm on this website called Iris folding.com. Iris, iris dash folding.com, slash book exclusive. And they've got heaps and heaps and heaps of free hours folding templates that you can choose from. And so you can choose literally anything you wanna make. Doesn't have to be a Christmas tree like I'm going to do. You could make a vase with flowers if you wanted, like this one. Flip flops between 12, literally anything you want. You can also run the Pinterest and just such a virus folding template, Christmas or whatever shape will kind of thinning one element seems a really nice Eastern wants to, sir, I'm just gonna choose one that I like, the Christmas tree and then we'll get going. Okay, so I'm going to choose this image here on Pinterest. And so I'm just going to get the picture and save it to my downloads is fine. And then I'm going to argue that my down. So I've got the image urban. Now what I'm going to do is go print. That's me in the background. And you can make it whatever size you want. I'm just going to keep it on a full-page. Probably not sides there's good. Yet. Just do whatever you like and just print it out. So I'll just print out line and then I'll be back. And yeah, so in lesson two we'll go through how to, how to start cutting it out and getting everything competitive.
4. Preparing the Workspace: Then I have printed out my template. So I wouldn't want to do first before we do anything else is grab some colored highlighters. For these three. Make sure you put three. You could have four if you want, just because this one here is a separate 123. But you can see that those triangle shape in the middle and it spirals out from h one, sorry, each side of the spiral, each kind of direction of the spiral I'm going to do in a different column is going to highlight the number. You can draw a different circle around it like a star around one, circle around and evolve. And then just leave one blank or you can just leave a dot next to one of them if you want to be here and have called highlighted. I'm gonna do so students go in this little line here. And I'll update the template on the resources section so the EAC and easily just print it out like this. And if you want, I'm going to grab my scissors and just cut this out along, following along the outline. Don't worry about the inner lives of the moment and it's gonna incur an outline. So I've got my template cut out now. Cones on the, which is what I want. And I've got my cost OK here, which I'm going to make the actual product cell phone or like out of Sir, what I'm gonna do right now is I'm just going to cut this in half so that it's a nice size for like the cod itself. So I'm just going to OneNote really nicely. So I'll just slide it up and now I'm just going to cut it down. The middle. Key to cutting with a crop nice is that you need to apply less pressure that a couple times because then you weren't kind of fre the paper tumor board and I make to actually mix. So that's just a quick little tip. Put this extra piece aside for the moment on. We will need it soon. Well, at the end. Now and I'm going to do is I'm going to school the other side of the paper that's going to be folded like this. So we're going to score this side. So if you've got like a colored paper or something, make sure it's white face down. The so the inside of the COD is face down. And you'll be good to go to school. What you're gonna do is you're just gonna take you craft knife and just really lightly go a few times. I'm opening a peripheral just kind of pulling the blade across the fatal Just a few times just to mark that point. Current zeta at all, which is what we want. So then when you fold it, it'll kind of form around that crazy you've just made. Despite the fact that you didn't cut it, it'll still felt really nicely. And plainly, sir, you've got a really clean edge here and it looks really professional. So now what I'm gonna do, I'm gonna grab this template, flip it, ergo, whose face down? Onto the cot and just center it wherever you want the tree to be or whatever you're actually making yourself. And then grab some masking tape. Just any old type that you have doesn't have to be masking. Could phages regular seek tape, gotta PCL, put it on the back of your hand or on your cord. So solving, stick it down, really nice. Peel it off and repeat that a couple times just to make sure that it's lost its stickiness. We just wanted to hold the cod in place while we trace it. So it's not very sticky. And body will hold card set of what we want to just tear it into strips and down in different places. Doesn't matter why early. Just so you don't accidentally not that well, you're tracing this lead with the Honda. Try maybe get into like some middle plots where it's kind of a straight line also link that way. You don't have to worry about missing a whole corner. It's called them to the rest of them take that. So now I'm gonna grow a pencil. Myelin, mechanical pencil, just not being mechanical and they would have been MOOC. We're just going to stop tracing around the actual shape of the Christmas tree. You can hold it down with your fingers as you trace and feel free to just move the cod whichever angle feels comfortable. Do not have to have it facing upright the whole time. Just really lightly tracing all the way round and then we'll come back and cut it out. So I've traced it all all the way around. And I'm just gonna gently peel it off making greater table and just fill in these little blank spots that I missed because the tech was on doesn't have to be perfect. Just continue the line so that you know where to come. Okay. So that's my really faint pencil outline. It's not too faint like you can see obviously, but it's going to be faint enough should be ordered arrays later. So make sure you're not pressing too hot because we want to get up for raises. Her every now because that's what place it down a map. Make sure you're using a cutting and a craft knife. You can use it. This is a bit messier and it's not as easy. Just use what you have. This one can be a lot faster. And I'm just gonna start cutting your pulling the knife slowly and gently towards me out the tree all the way around. So once I've done these lines going down this way and these ones going down this way. Who's gonna turn the column misdirection and who towards the, the site just dominates little extra bit SAR is easier to just do all the ones in the same angle at the same time so that, you know, going back and forth constantly. So once I am putting all that, I'm just gonna slide Mun I've been to heal and just pull it up. And you'll see if you've missed any spots really easily because it worked. Pool APA seems to be this one little spot here which I can close up for the gap. And then we get so you can throw this one out or you can keep it because it's thicker, you can keep it to trace for later cards if you want to make more. You don't have to hold onto it if you don't want to. Sorry, we've got a nice and Winder here that we're going to use to create the actual folding design cert. It's gonna put back my dance. And I'm just gonna grab my tree and just sort of back into where it was. Just as I had it before. You can grab some will tape and put down the corners. Now if you want, get folded over anything maxima. So now you can see that we've got the inside of the core rod has the actual template that we're going to use, which is super cool. So in the next lesson we're going to be learning how to actually fold all the way into the middle. I'll show you how to cut out the paper and everything to actually do the artist folding. So we're just gonna go through the entire technique and method of how to do this. Sir. Thanks. Keep on watching.
5. Preparing the Materials: In this lesson, we're going to go through how to cut the paper out in the way that we need to use it for the actual caught itself and the technique of putting the cart altogether. Sir, let's begin with the paper. But there's two aside and start with this one. So I'm just gonna call it ergo. It can be any kind of API one, I'm using origami paper. You can use plain paper, are going paper if you have that patent paper, whatever you have and whatever you think will work nicely on altruism. These really nice, warm turns to give like a lonely Christmas Eve vibe. You can choose green and red, you could choose. Thanking you what really? I'm just folding it up about a centimeter. And I'm just like folding it Arbor itself. Just going through the entire page. And until we reach the end when we've got this kind of stick sort of thing here, that's quite off. So once I've done all that and that made all the faults, and it's gonna unfold it. And you'll see all these lines that we've created. From there. I'm going to grow up Minecraft night and my steel ruler. And I'm just going start on the side that I started folding on. I'm just going to have this flap which is two centimeters that we made 90 degree angle to the table and just slowly my rule of it. And then I'm just gonna do a quick little slice. And we've got this strip. Sir. It's a strip that can be folded in half, but it's still got quite a bit of thickness to it. And these are the steps that we're going to be using to create the entire piece. So you save lots and lots and lots of aids. And what we'll do with them is we'll put them into different color files that we know which is which and get started from there. So I'll just cut them all out. And then you can cut out oils as well. And when we start working on the actual base, sir, if you get to a place that's got it's folded one side, but it's like half showing up on the outside. Hold onto it, make sure you keep it on hand, and that's fine. We'll just make sure that when we're using it, we have this one face, officer, the short edge face up. When you look at it on the other side. This nice, lovely full pace is shine. If that makes sense to kind of rest and see you in a sec. Sir. I'm just like a kind of thick strip left Argo and it's got a bit of a fold on that. But it's not like here's what I'm gonna do is I'm just going to fall down a tiny little bit of it so that we can hold on to it. Similarly to this one, how it's like halfway folded. That's fine. It doesn't matter what it looks like on the back. Sir. We're just going to keep it looking like a very nice job on the front. And then they can be a sacred that it looks at that and back again. So I've grouped them all based on that color. And grabbed my card here. And so we're just going to start making it real.
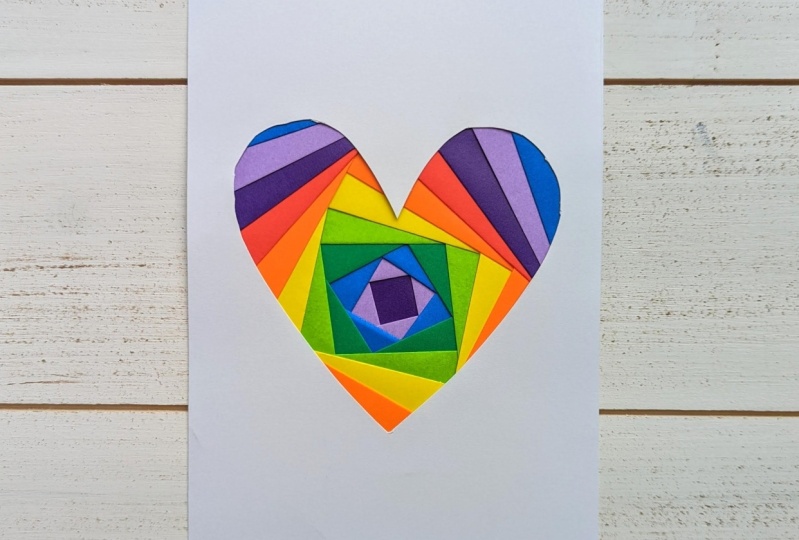
6. Making the Card: Sorry, you can say that this one section is different to one because it's called the either. Sorry, I'm going to actually use a different color for this pace. Scope is like metallic, green and gold kind of piece of paper that I'm going to use that I've already jumped out before for different code. Sorry, I'm just going to start. You can use any scrap a pay what you want. Can be brown or green, could be anyone. So I'm just going to line it up to meet the edges of this and slightly overlap. No place my finger just where I want it to end. And I'm going to fold it up. Sorry, this is gonna create a little foam from the paper. So later I can see where I'm going to cut it. So you can either tear it with your hands when you can cut it with Suez. But I like to just tear it because low-cost or an email and my hearing skills Montenegro and got it gets okay. So I'm just gonna place it about a third of the way up, just underneath the 1A plot. Going to grab some sticky tape. With my state, check what and do is I'm going to go in the middle and peel it across. So it's kinda like felt like cut in half. You can use this as if you want, but it's just a lot easier to tear and I'm just going to do that a few times until like I've got all the pieces that I need some time to play soccer, but the top of my little strip that and I'm gonna repeat that again. So sorry, measuring out the papal, putting my finger here to to market. And you can see you got a little folding the paper towel. And I'm just going to tear it along that line that I've made and place it. Just double-click. Map2 turns up. We might see did. And just pull it down with that. Sometimes it's a bit hard to tell yourself, see, need citizens. So it's good to have them handy just in case. You're just going to go up and down. Do it again. And this one, we gotta be really careful because we want to perfectly clear that we want to make it perfectly fit between this corner and this corner. So it's not overlapping, but it's not undone underneath the actual line there. So you just take it out of care or you want to eat up matter, stick it down. Okay, so this is what it's looking like at the moment. Bit messy. So when we turn around and we just chilling peel off of just the bottom bit here. You can see that it's starting to form a really nice little folded pattern. So that's what the rest of the card's gonna be. Just placing the paper facing down around the different thing. So we're going to follow the template in terms of like numbers. So we're gonna, you're 123456 and alternate, alternating colors as weaker. Make sure when you are placing the paper, John, who are leaving the flaps open-end towards you and the folded edge towards the center of the COD. So as you move around the cod, placing dummy paper, make sure the folded edge is always towards the center of the COD. That'll just ensure that you've got a really nice smooth finish when you're done. So to look really, really nice. Okay. Sir, I'm just going to speed through and do the whole cod. Yeah, I think that's pretty much it. I'll show you the first three going round and then with the speed it along the column that we want for each set, each spiral set. So you can kind of lay them out the way that you think might look good to kinda get an idea of what it might look like. Thinking maybe like this. So I've got the two really vibrant one's hands, Molina, Biggie, maybe this kind of way to really vibrant ones on the top. And the model one, this orange one at the bottom so that it's kinda going up into the center and these kind of pointing down and around. If that makes sense to Sir, I'll start with this orange one. And I'll just make sure that it's perfectly urban laughing everything. We don't want to have any gaps. So see how there's a gap to make sure that eternally covered up. And if you need a couple paper producer, that's fine. Just make sure that everything's covered. Otherwise it'll look a bit messy and not very pretty steep tip or not. Okay, that's fun. Make sure it's really nice. Not making any message here and here, but close to the edge of the page, that's fine. Just make sure make sure you tape it in a way where it's going off the edge of the cloud because we don't wanna have any tape visible. And now I'm going to go into Noah to switch. I want to read this orange. Ones can take up the entire strip or licensing. That's why it's always good to have what's left behind. Make sure you're holding onto these little pieces. Keep them to keep them in the pile where they belonged to. So that will just ensure that you are able to use them later. When we get to these small areas where the streets weren't B as long you can use these ones and save some results of service when we went from number 17 seconds. I'll just keep going through. This one's interesting is as 3-3, 3.3.3, that's fine. Just cover up the entire thing eternity. Turning a little strips, that would be crazy. Who's going to come a little bit at once? Each new piece of paper that you put on is at the very top. So it's always going to be a top layer. You know, placing a B underneath anything or anything like that. Just make sure it's all backed down to this. So just make sure you going in order of the numbers, in order of the columns that you chose, just that spiral live you true, although I've drawn on that. And yeah, I'll see you in the toll done. Sir, I've reached the point where I fill up all the numbers in those nerve number. Let say this is called the iris and that's what we're kind of falling towards. And what you can do is you can either keep the spiral going and have it fold into kinda like a tunnel of twist. Or you can put a nice little piece PayPal or bridge to kind of titled together and give it a nice little finishing touch, sir, I'm just gonna choose the piece of paper that I've already got. Nice sentence. I'm thinking maybe his little flower here in this patent piece. Then just thinking about how I might want to make it look. I think you might look nice just coming out of the top corner, he'll not so pink that it's like obviously part of this group which it is, but that's okay. But not kind of like a different color. We want to keep it in the same family. So that's just the one that we incur with. He can do whatever you like. So I'm just gonna go big piece of tape and this table of the entire thing. So you can see I've taped urban edge. Yeah, like I said, not to do. So we're going to do is I'm gonna grab my little crop and just slice it up really carefully. Cut that little piece. Would not want that to be sticking out too much. So I'm just gonna grab some more sticky tape and distinctive it over the entire thing. Just hold it all down in place and make it look really flat and nice. So we've got this old pig down or flat. And now what I'm gonna do next is I'm going to grab some more of my constant here. So you get the yellow sheet that I made. You could use this for another car or you could use this file, this penicillin gaps do say put the codified, grab this one. We're going to line it up into the center of my move forward here. We've got the two pieces now. I'm just gonna put one aside and hormones are ones that I'm going to use for this. What we are going to do to make sure it fits nicely, it's a little bit. That's fine. I'm just going to trim it again. Just the tiniest little bit. So you can say this trip is literally the smallest thing. Just a tiny little piece off of each side just to make it fit onto the surface, which is gonna grab my double-sided tape. And I'll show you a little trick that you can do to save some resources. I could find and I guess I'm just going to measure out the base of the COD. Sorry. And a double-sided tape and I know it can be expensive. So what we're going to do is cut it through the middle. And now I put one of these sides, side and just do that again through the middle. Let's be really careful not to cut this off because that would be disastrous. Now I've got four pieces of tape out of the one strip, which I think is pretty cool. Site grabbing my little plain cod stock and just kinda put this tape centered, founded at an angle. That's fine. No one's going to see it just around the edges of the cards so that we can pull everything down really nicely. But this gonna peel off the backing. Now, I'm just going to make sure that instance nicely flat lined it up nicely. A trick that you can use here is by pulling up this edge, you can kind of slotted in to keep it all nice and straight. And we're just going to let that folk IS push. And so the inside of the COD is very nice and clean. Now you can see there's a little piece of tape systems can have cut that off. We've got this lovely code that's all clean and naturally inside. No worries about that. Showing now is the fun part. So we get to take off. This has really gently pull off your boss content. You don't want to rip the cod underneath, so be really gentle and this is why it's so important to kind of get the trickiness out of the masking tape to the giddiness really gently. And they guard UCLA I beautiful concert. Now, what we can do is we got this lovely crowd that we can send off to our friends, but there's some finishing touches then I want to do it, sir.
7. Finishing Touches: Meta-graph might go paint. Does this one called Sunset gold. And to paint brush. And I'm just going to dip the tip of the paint brush into the cold pain. And then I'm just going to dot around those two little triangles or paths. Just little dots around the coffin. Martin, nice N1 people have Christmas lights. You can make these super neat or you can make them super random. You could do line-like present angle if you want. It's really up to you. You can personalize, personalized it however you want to. Just have fun with it. Go bit nuts that you won't even have to keep it nice and know if you want to put a little star there on the top of the tree. And beautiful. And now that I've got that, so now that I've done that, I've got this beautiful cards that I'm going to let to dry. And you can give this to anyone on hacking should upset and friends, sync to your loved ones. To really lovely way to say the personalized kinda Merry Christmas. I'm just going to lost finally finishing touch really carefully as a webpage. Like probably should have thought about this for home and that's time. I'm just going to run my eraser of my pencil along the edges of this width is a bit of overlap of the pencil. So I didn't quite cut it exactly where the pencil line moves. And there's a bit of overlap. So this will just clean it up. Make sure you are racing towards the center so you're not tearing up the paper really gently. We don't wanna get too many reads a shavings. If you have a mutable arrays in which I do, and it's just not only right now, we could use that because it's a bit cleaner. You don't have to worry about the little shading bits coming off. What this will do fine. Such given that the blurred get little shaving pieces of and that's a lot.
8. Thanks!: Thank you so much for joining me in this class. I had a really fun time making this copy here. And I can't wait to see what you guys make. Please feel free. If you make something doesn't have to be a Christmas tree or anything, please feel free to drop in student projects below. I'd love to see these payback if you like it. Let me know what you thought. Lever view on this class if you enjoyed it. Thanks so much for watching. I can't wait to see what you've done and I'll see you in the next one.
 Liz Morrell, Graphic Designer and Digital Artist