Transcripts
1. Hello and Welcome!: Hey guys, welcome to this crochet class. My name is Liz. I am a graphic designer and digital illustrated from Melbourne. And in this class we're going to be going through the exact step-by-step process that I use when I'm creating portraits in procreate on the IFAP. Sir, I've gone iPad per question and the Apple pencil first gen along with it, MAN, when I've had with secondhand and it's perfect. So don't worry if you don't have like a really amazing iPad because one's not that great, but it is. It works really well with the program. So and you can use whatever iPad you've got as long as you can get procreate and an Apple pencil or some sort of stylus to fit in a Scotia. Cause we're gonna be going through all the step-by-step processes that I use. An algorithm, basically profane and everything to you. It's all very one-on-one and very easy. Sir. Yeah. For free to join. I'd love to have you and so yeah, please feel free to follow along if you want. On your iPad, you can create the same portrait as making more. And you can choose here an image to a, from whatever you feel it. Yeah, so feel free to join my class. I'd like to have you and I'd love to hear what you think at the end. If you want to leave her, you and let me know what he thought. Also, if you want to oppress your pictures by at the end, and based on what you've done, That would be great. I would love to see and if you want some feedback, please let me know. I can you comment on your project? And yeah, I can't wait to see what we create. Let's get started.
2. Procreate Basics: Ok, so I've just started by creating a new canvas in procreate. It's just my screen size and you just do this in the top right corner with a little plus and it's coarse grain size. So it's a really good quality rating, but that's fine. It's just little dinner. So I'm just gonna go through all the basic tools and stuff that you can use. And that will probably go through while creating the actual outlook later on. If you know about birth rate and you kinda know the basics, you just skip this cause that's fun with this little section. Yes, sir. At the top, we have all the tools that you need. And at the left, IOS or haven't been too. So I'm gonna start by clicking the little wrench and that's the actions panel. You can insert stuff and caught and copy stuff. It's pretty cool. Yeah. So you just like click on any of those little tabs to like do something, which I'm not going to be right now. Then you can also change the canvas around so you can crop it and re-size it. He'll who's like move it around. You can chain the dimensions and suddenly he may get very specific and actually accurate if you want. There's a joint guide has kinda cool. It's just the cyclical squads that help you out. A reference is like a little panel that shows you the whole canvas as you have this at the very top right corner TO before redrawing also in really small. And it will show up the kind of big picture idea of what you're doing. Yeah. Which is kind of cool. Yeah. So that's a reference panel which is handy. You can also put an image in there if you want. You can flip your canvas, you can look at your information if you will. And the statistics that settings is cool because you can see like how long you've been on this goal. So I've been on this for 20 minutes. And I made 272 strikes because I film this foreign, it failed, sir. That's fine. You can share this canvas if you want. You can use whatever kind of format that you choose. There is a video section may can look at the time-lapse. And so it records everything you do on the canvas. And looking at timelapse recording, which is really cool. And then there's this preference section. So you can change the interface minds on Lai, You can have it on doc, want. Kinda like grim night. You try to do it myself because fun. Right-hand interface our minds know, turned on, but I am right-handed. Project, you can project your canvas onto a wall or something or like a monitor, I think, which is kinda cool if you wanted to do that and look at it like a bigger thing and connect the stylus. Yeah, so these are just kind of an older, really basic tools that you can use. This little magic wand here is what your adjustments. So you can I'm blessed stuff. Change col is add things. Yes. So this is a really cool tool panel if you want to like, try new stuff. I don't really use many of these things very often. And you've got the selection tool, which you just draw on the canvas to select whatever you want. And then, so what you can do is if I've drawn this, if I use my selection tool, I can grab it, grab little Hour and I can move it around, which is Hen Yeah. So that's like pretty basic stuff. And I'm just using two fingers to tap to Andrew and then three fingers detector radio, which is pretty handy. You've got your brush size on the left. Yup. So I can have a thicker skin whenever I want. The left one here is it will just go straight to an arousal. And you can change what brush you want and what array z1 off the dopa. You just click on it and then click on it again. Cl, free, easy stuff. This is the opacity down here. So if I wanted like a pretty transparent one and then it'll kind of be like a mako reemerged. Yeah, sorry then to clear the canvas, use use three fingers and kinda like go with it. So we put all the things. And then there's the Layers panel. You just press plus to make a new layer. Which is great because you can link to all stuff on top. So now I want to drill down and then say I wanted to draw something on top of that. Kind of a slightly different color. If I wanted to move just this one, I'll change it or something. I can. So that's the great thing about layers. Just like swipe it to the left. Should you want to delete it? Oh, look at all of duplicated, which is pretty handy. You can tap it again to get these kind of auctions to come up, which is really good. I'm so you've got like, if you wanted to clear it, if you wanted lock it or make it a mosque, lots of different things that you can do. So right now I'm gonna go through the difference between alpha look and clipping mosques just so that you kind of get an idea of what the difference is, because I do use both of them in the actual clause. First, I'll show you what alpha log is, sir, I've got a circle here. And we're going to fill it in by dragging the color from the top right corner into the actual thing and you just let go and I will drop in. Yes, so I've got my circle and say I wanted to draw some yellow lines on top of it. But I only wanted those yellow lines to gird where the circle is. Sorry, I wanted it to be cut off at this edge here. Right? How would I make it do that, sir? I'm going to my layers and I've just drawn on top of my circle so I can actually change and when my yellow line has gone now. But what I can do is I can get rid of it. Alpha lock the brown circles, or you can use two fingers and slide it to the right. Or you can click on the little colloquia when he tapped the thing again. So you'll see the little checkerboard pattern behind it. And that means that as alpha locked. And what that means is that everything you draw, having alpha lock to the layout will only appeal on the pixels that already exist if that makes sense. So you can only edit what's already been drawn before you alpha locked it. Whereas if I wanted to well, actually, so yes, so I've got my lines early on top of where I've drawn previously. But I'm drawing like way off because that's how they not like wavy or anything enter them. But that's like edited the actual shape itself. So what if I wanted to do it where I can draw yellow lines that are only appear on the circle. But I want them to be editable and I want to be able to edit the circle as well. Well, what I do then is I would make a clipping mosque, sorry, clipping mosques are really good because they make sure that you can add things on top and constrain everything. But you don't have to worry about like damaging anything, non-destructive. So there's gonna draw my lines. And then so I've got two different layers there. That's called a U2, which is interesting. But anyway, that's fine. I can call the mosque and a constraint it to the circle blurred. But I'll still be outer like edit the actual circle itself. So if I wanted to say I wanted to change the color of my circle and I didn't like that Brown. I wanted to tweet orange instead, I can still change it without editing the yellow on top. So this is really handy if you're not yet confident about what you're, what you're about to do. I'd probably suggest you use a clipping mask. But if you know exactly what you're gonna do any near that, you can use alpha OK instead, because then you know, you can just edit the actual shape itself and you don't actually make a new layer and thus around about it. So that's the difference between clipping mosques and alpha. Look, they pretty simple once you get the hang of it, it's just basically constraining new pixels to what you've already drawn Boyer and into different ways. So one is just two layers and which is clipping mosques. And one is just on the one layer, which is Outlook. So yeah, I hope that helps and I hope that makes sense. We're gonna go on to lesson two now, which will be really helpful in getting the basic shapes down pat and kind of understanding this whole sort of situation. So yeah, let's go on to lesson two.
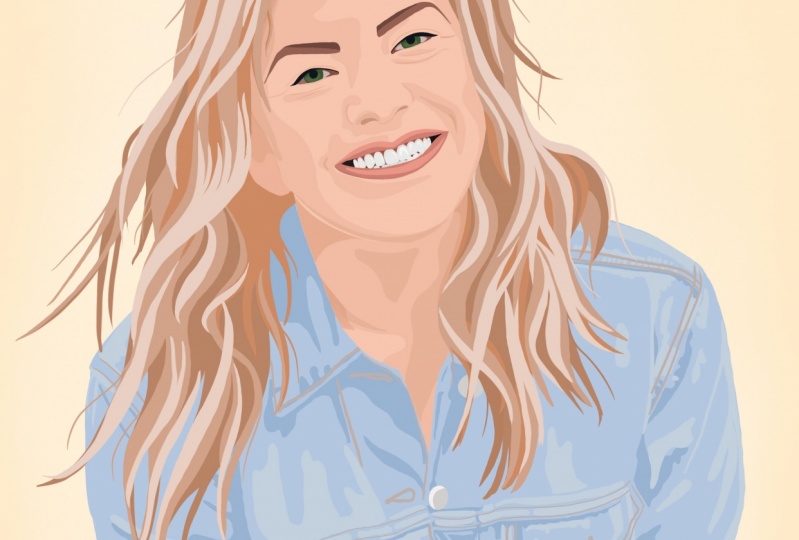
3. Creating the Basic Shapes: I'm just gonna create a new canvas and I'm going to make my new size. So I'm gonna do 2160 by 2700 and then 300 dpi, which is great footprinting. I'm going to inset my further diffusing the actions pencil or the pen that I use is called technical pen. And I'm just kind of up to the streamline to a bit higher so that it's a nice summary, the line that I can create. And here I'm just kind of editing the size. It's just making it smaller so they're not, sir. Yes, sir. You can just use technical pen and you can stream line if you want meiosis, the my favorites up this MOOC data. Yeah, let's get started. So I'm just going to zoom in and I'm going to start looking at the color to use for the skin turn. So you can say that image is kind of like an interesting skin turn just because fighters, they look millions of call UFO like heat and heat contained two colors. So you can't really, sometimes it's difficult to get the right color. So I'm just going to choosing kind of color that I'm interested in. And then editing in the colors panel at the top right corner, if that makes sense, and just kinda testing it on top to see if it kinda matches. And yeah, so I think I'm kind of happy with that one. So I'm just gonna start by outlining the actual her actual face. And I'm overlapping over the head because I knew that later. I'm going to put the hair on top on it above layer. That makes sense. Yeah. And I think I'm going to put the jacket on top too, so I'm just going to kind of make the general outline of the face but not really worrying too much about oh, you know, drawing on the drawing on the further layoffs or I'm doing everything. Make sure you're on layer one. And the wiggins dot outlining around the head. And make sure that she's old. Good. Hey, now I'm just like fixing up a stream line that was a bit too high. And it was kind of making my lines a bit strange. They're just going through streamline is kinda like smoothing, if you will, and just going to outline the whole face. And then once I've got the whole face like outlined, I'm going to go through and do the head sir, turn off the phase line so you can say all the hair on any, and I'm going to try and choose a color. This might take me a little while just to try and find nickel. And once I've got a color that I'm pretty happy with it like a bass will just like a regular color checker for the actual head. I'm just gonna start outlining it just as I did with the face. This really nice and smoothly. Try and get your lines to be curvy but not like wonky if that makes sense. So the streamline is helpful for that. And I'm just going around the entire outline of the hair. And you'll see in a moment I'm going to add some fly away sort of thing. So you can just do with the type or of the actual Brush itself, which is handy. I've just turned off the image layer and the layer on the face. And I'm just kinda like getting rid of these little sections that didn't work out too well. Do match perfectly. Yeah. So you can say that I'm caught the face and the hair, they're a bit too close together and caliph, which is okay, but I'm just going to try and edit them to make it a bit a bit better. Contrast tickets. Just using my arrays at Tool. And I'm just going through all the ends of the hair and kind of smoothing out and just making the little tips are a bit finicky, viscous kinda helps to make it look like a mole wispy like instead of blocking, which I would prefer not to have it look like. They're just go through and if you want to, you can just erase some little bits out of that. And also make sure that all the little corners where you'd actually dropped, just make sure they've always filled in probably because sometimes a darkness, he kind of end up with all these holes in getting around the whole head and just kinda fix up things a little bit too. This one's going to be the jacket. So I've just kinda put it between the hair and the face. And that's only because it's kind of situated between here and the face in the actual drawing. For me, when I was drawing the face, I kinda went out of the lines of the jacket. So I'm gonna put the jacket lines on top of it. Just didn't make sense to you up just allying just all the same. Make sure it's all pretty nice. Fill it all in when he done. And then I'm gonna make a nonetheless underneath that one and make the shot and then another one underneath that one, which is kind of just make sure you get a little gaps where you missed this rulers and on the right layer, make sure you're definitely on the right by it because sometimes it's knowing if he's taught during on the Haley Oh, and you start to build my lab. In the next lesson we're going to go through and start adding details to each section. So stay tuned.
4. Shading the Face: Okay, so in this layer I'm going to stop by adding some shading to the face. So this is just kind of like the basic shading technique that I use. So I make a new layer above. And then I take my cursor on the color palette and girls slightly down and to the right to make it a bit Dhaka. And then I grew through around the face and kind of try and find like the lightest shadows that I can find them in her face. Just kinda trace around all the different shutters that you can see. Doesn't have to be like amazing linkage between noise grew back and edit it. That's the beautiful thing about digital up. And feel free to just like Ruby canvas around wherever you need it to be. I've just drawn onto the eyebrows, which is totally fine. Because you'll put the eyebrows on top of it. Yes. So I'll just speed through edX dual the shutters, sorry, each new shutter color is a new layer on top. So I kind of look from the bottom up, DEI work kind of backwards. Basically I'm doing a lot of shade first on the bottom layout, and then the Docker gets the higher yogurt. I hope that makes sense. You'll kinda see as I go along. So don't worry if you're outside of the lines because we will clipping mask everything. So it's all like constraints to the base shape that we created originally. I guess. You can see once I've finished my first shatters, I'm just gonna make new layer on top. Not clipping mascot yet, who cookie mascot off toiletries and slightly darker color codes panel. And just start kinda outline the Dhaka shutters that you can say. Yeah, it's kinda fairly straightforward, pretty easy. It'll take you a few various probably to kinda get the right shapes. But that's fine. We just added it up later. Okay. Okay. So you can see here I'm just press a little n on the light and I'm just playing fear pasty because I wanted to be closer to the actual skin turn to a more of a CAFO gradient of colors. I don't want it to be true doc and contrast EESA, if he played the opacity, that's really cool to get more close colors to the actual face base layer. But yeah, just keep making new lays and going through and just kinda tracing all the different shapes that you can see in the darkness of the shutters. Why? And once I've got all the shadows that I want to just kind of editing them with their capacity and stuff. I'm just going to select them all. Swipe to the right on the rest of the way that you want to select and then press grip. Group, the group that you get out of it.
5. Facial Features: Sorry, I'm still in the face group and I've just made a new layer on top of all my shading. I can start adding the i is m facial beaches, outlining these pilot. And just filling it in. And I'm going to add the little circle of the pupil and do that for both eyes. Such as tracing roomed. Okay. So the way I draw our eyes is that I will draw the eyelashes and the people, and then I'll make a layer underneath it. So you can just select line nine and then press Nieuwland and we'll make a between there's ones as you can see. And then I work like kind of download, so I'll get the iris. These are just all the basic shapes, so don't worry about adding details yet. Kind of changed her eyes to Brown, which is fine. You can do what I colors you want. This is digital arts. Have fun with it. Now I'm just going and making new ways and new ways and new lies underneath everything. Each color is a new layer from Acer. I will measure it all together at the end, but for now I'm just making it all new lays, nice, kinda get the shape of the different highlights that you can say. So it's gonna draw on here. And then I decided not because it's a bit darker in that section. Sorry, yeah, it just go through and put these little highlights here. And I'm gonna make a new layer underneath that one. Make it darker. And at that little pilot does kinda make sense. And just keep working your way down because and you can see what we're doing and then you can add things. Yeah. Okay. Okay. So these little sections, I'm just gonna alpha lock the actual thing and she's a Dhaka column. And then I'm just gonna add a little shattered inside the TW area. So I used alpha luck just because I'm hearing about it's a lot faster and easier than clipping law speaks to, is a bit easier when you know exactly what you're gonna do for that piece. So I've just turned on my face Layer and I'm seeing that the eyelashes here but funny-looking some soon try and aim and amount of it. Yeah, just try and get like a smooth line. Okay. And then I'm using my eraser tool to just kind of like triples the end of the eyelashes so they don't like really long and yet now I'm just using a new layer above all the I's and I'm just kinda like adding the skin color on top to kind of evened out and make the line of the eyes look a bit more normal. And I'm sounding a bit of a shutter there as well. Just like a really subtle shatter. This just kinda helps define the actual eye shape. Okay, so now I've alpha locked to the actual iris Leo, and I'm go to Dhaka color and I'm just adding in some shatters around the outside. And underneath the lash line with the eyelashes who create shadows all ending up being like this little blob of ydA column section. I'm doing that on the other I2. I'm just going to get more detail. You can add as much detail as you want. So you can see I've matched old delays together now for those pretty happy with how the eyes look. And now I'm just making some eyebrows and don't worry about the color of the eyebrows right now, you can make them whatever color you want, doesn't have to be exactly what you would make them laid out, can always come back and edit them. Just get told. So just drawn the eyebrows and I've decided that they are a bit blocky and text, sorry, sorry, I'm just going to make a new layer above and clipping mascot. Sorry, I'm just going to outline around where I want the shutter that I'm going to add to B. So we just kind of like below and around. I'm scanning like fill that in and then clipping mosque the actual things and we don't feel sad. So it looks a bit crazy, but I'm going to press clipping Mosque and then that'll constrain it to the one blur. And I'm just gonna tend on the impressed D so that it's not so harsh of a shutter. It's kinda like more subtle and nice. So you'd see how faces kinda coming along. Now, I'm gonna go into the math. I think. Just gonna measure everything together there. Sorry to match you just like put your fingers. So your pointer finger, middle finger on the on the group of ladies that you wanna match. And you just like flip them together, kind of like a pinching it. So now I'm just gonna go through and draw the mammals. It's all the same process times making sure that the colors look good. So I'm going to outline the lips and get the basic shape. And then I'll add some more shutters in details in a minute. Okay. So you can say something about when kind of like she's got like an orange losses ion enough, but it's like skin color. So we're going to uptake now. So you're on a layer blurred the entire math that you just drew. We're going to start by adding the highlights of the tape and then working our way down through the different color gradation. Kind of like how we've been doing for everything else. So I'm just altering the color. So it's a bit of a woman Turin instead of like a lot blue, orangeish color. So after I got the highlights, I'm just going to add a little layer and make it slightly Dhaka. And just keep working in this kind of top-down direction. So once I put all the tape and I'm pretty happy with how it's looking. I'm just going to start adding the gums underneath the tape. So it's always a matter of going from the top down to adding a bit more color here. I think it's going to add in the gums. I'm doing all the different colors on the same layer, I think to say that it's a bit easier because it doesn't make a big deal and it's like about fall down and just kinda low. So just adding in all the gums. I've got like a lot of section and then a Docker section and just because hitting the mouth like that would kind of make a shedder. So then for the inside of the math, I'm just kind of adding like this dark brown color just between the teeth. So it kinda shows exactly what the teeth are. Just makes a bit more contrast and imitates like the inside of the mouth. And now I'm just going to add a little color drop. I've just drawn a little outline. And true because Microsoft, but I've just outlined will shape underneath and then filled it in. And you can see that they are on that layer. Yes. So there's a mouth is looking pretty good compared to the hair on the chlorides, on the face is looking very nice in detailed. So don't be afraid to try things. I tried to add little corners of the mouth and didn't really work. It made it look a bit creepy. So I just got rid of everything on that lab. Don't be afraid to just try something new and then just delete it if it doesn't work out. So that's the beauty of digital. Ok. So just merging all of the teeth together and the non-linear magical ellipse together. And just make it all one big lie it because it's good to be organized. Especially when you are happy with the waves tuning out. So if you're not quite sure who's there yet, you feeling a bit if you bet it, don't worry about merging everything so that you can have the chance to go back and edit stuff if you want to. But I'm pretty confidently in the waves 20th male, sir. Just a little shadow because you can't really see her actual nostrils, which is fine, which is just a dark color and this is some shading on the mouth too. So yeah, there's our face. I'm really lucky how it's turning out. And I hope you're looking at two who go on to the next lesson where we will be adding the hair details. And then after that we'll do the jacket and the shite alert.
6. Hair: Okay, so now that I've done everything in the face, I'm gonna stop by working with him for the next section. So I put my base layer that I'm going to use as the base of the cookie Mask. And I'm just going to choose like a lot of color to bake the highlights with terrible. The overlay is you don't need them right now. Yep. So I'm just going to try and find like a nice lotta highlight color. You can do this to just spend a bit of time trying to find what what sphere. Sir. Yep. So I'm just gonna stop by just outlining all the highlights and just filling them in as I girt, it's all very much the same process. So just as we did with the eyes and the teeth and everything, I'm going to start with the lightest color office and then with my way down towards the shadows. So yes, so I'm just gonna go through all the highlights that I can see. I'm just going to highlight, sir. I'm just gonna draw around them and work my way around the portrait. I guess we'll just speed through this so you can watch it. Oh, if it's too quick, you can just go on 2.5. speed and watch it like that so that it's more slower. But it will be split up quite fast. So yeah, just Gertrude and get all the highlights. And then we'll make a new lab alert and we'll get like the midterms, as many layers as you want. It's up to you how many ways you have, but just generally have like maybe four or five. Yeah. So it will go through and do that. So I'm gonna go through and make a new layout. And I'm going to start making the midterms below it. Below the highlight, sorry. But I'm gonna keep the highlights actually on layoffs or this will be helpful in so you can see where you're actually going to put them into lines. So you can create kind of like a great nation, like gradation of color. I think it's culture, if that kinda makes sense artfully. So basically you just making you keeping the highlights on there so you that you know where to put the next color down and then the color down after that. We'll keep we'll keep overlay is on this kind of way. Just so we can see what we're doing and like wherever it's going here. So after you've done all this, keep on. Well, I can okay. And Okay. So basically, you don't really need the base layer to be any color. Specifically. I'm just using the actual base, base layout that I created in the first few videos. That ones just to kinda, basically decide where the clicking to sideway. Oh, sorry. Once you clicking mosque everything, I hope that makes sense. So you can just create a whole new color palette if you want. Eater is. But yeah, I'm just kind of going with the flow rate from this one. Just out of the globe of the darkest color as I've been going down and through. And I'm just adding a bit more Docker calls on a layer above. And then I'm just gonna go and edit, basically just KP. Well, if you don't everything, make sure everything's nicely colored. And not like too many wave colors going on because once you've clipping lost it. So you'll see that I have clipping lost everything to the base hela. Everything will be kind of like a bit strange because you didn't follow the exact clipping mosque gij, if that makes sense, like the bass players guide. So just go through and kinda edit it and make sure it's all kind of watching with clipping mask that you created. And once you're happy with your head, feel free to just jump onto the next lesson and we will start working on BY checking.
7. Shading the Clothing and Finalising!: So if you come Tal, I'm kind of going in terms of what's interesting. Mostly. So I did the face fastened on the hair, and now I'm just doing the boring pop fest. This jacket. Underneath the jacket just like a little shot that's just adding some Little Shadows to kinda make it little bit more 3D. Ti. This is not a very big step that we will be doing. Alright, so Week the jacket, I'm starting with the highlights layoff. But unlike the head portion of this thing, I'm going to actually hold onto that base color that we use. So I'm going to make the highlights best. Leave the kind of mid tones and then stop on the shatters after I've done the highlighted. That makes sense. Because because he has so many different layers and colors and things, it's a lot easier to just kinda keep going from where you started. But with a jacket, it's like one main color that the jacket is, and then you've got highlights and shadows on either side of that, sir. That's what I'm gonna do here. Sorry, I was going through I'm going to do all the highlights now. Just in the same way that we've been doing just on a new layer. And don't worry about like overlapping because we will call the mosque, sir. That overlap then under lap I guess that's even a lead. Yeah. And this is o? Yes. Okay. So once I've got all my highlights and we'll make it a little while underneath the highlights and hold onto the highlights. And I'm going to start drawing the shutters. But the main difference here between now and the hair is that I'm leaving spaces for the midterm color to Until it going. So I'm just adding shatters where it's Dhaka and just holding on to that kind of midterm color, I'm leaving space for it to share through when it's the bottom layer. Carpet goes making sense given. So yeah, just make all your shutters Just make sure you leave room for the midterm color of the base to show up. Okay. Right. Okay. As we speed along, I'm just adding two or three layers of extra shatters. Just get darker spots to be colored in. So you get a bit of depth. So I once you're happy with the actual the jacket itself, he can clipping mask, highlights and shadows lies to the base. You can say that what I was saying before, that the main blue color is shining through shutters and on top of that. And now I'm going to add some finer details, sir buttons. And just like little bits. Yeah, we're just going to do about it. All right, so with the buttons, I'm just alpha lucky at because I know that I'm just gonna add some shutters on top of them just to kinda make 3D. So don't worry about clipping, masking, unless you're really not sure what you can do it as alpha because it's a lot faster and easier. So I just made a layer below that and I am adding a little brown trim slash, kind of sewing the jacket. Okay, so once I've added all those, I can sort of say that it's looking a bit strange. The trim pot that I've added is a bit darker than I expected, so I'm just going to choose a new color up alpha lock that layer with all the trim. And you can whisker, fill color philia on that little tab that comes out. And then we'll just ensure that like it changes all the colors. But I'm just gonna do that a few times just to see if I can get a good color on. I think I end up actually doing here, pass me or something. So just going back and forth, playing around with capacity, just because it's a bit harsh of a contrast. Just play around with it and see what a year you can change the blend modes, which is like normal, multiply or dark in color and stuff. If you want, they just make a slight difference. And yeah, I'm adding in some finer details. Who's from o highlights in the buttons, like the button loops. So I'm really happy with outstanding. Yeah, actually, I think it looks really cute and nice. I'm just going to group everything together now for the jacket. She's background color. You can choose whatever color you want, whatever makes you happy. Just sitting like this cream color and I'm adding a bit of like on the very bottom layer and making a new layer above the image area. And you can just get one of those like airbrushing tools, airbrushing brushes, I guess, and add a bit of like a glow behind. Just playing around with different effects that you can do to make it look more like a portrait who's playing around with the colors. And then so I wanted to add some texture. So what I'm gonna do is I'm gonna go into the value tab of the colors just at the bottom net. And I'm going to change. So here is gonna be 0, saturation is going to be 0 and brightness is going to be 50%. So that's just the top of that. And I'm going to fill that hole layout. So it's a new layer on top of everything. Fill it with the gray, and then I'm gonna add noise to that layer. So there's a bunch of different stuff that you play with it the bottom. Don't worry about that too much. I think I'm just gonna leave it mostly the default. But to get the noise on the actual thing, you just slide your finger across the screen and you can see me changing it at the top there. You just slide across the actual layout with you'll go, Oh, your Apple pencil. So once you happy or sad, I'm just making it a bit bigger. So it's not like so much tiny grain. Nearly half time magnetics on, but its just looks nicer. So I'm just making the grain's a bit bigger. And I'm gonna set it to earn fillet and is looking a bit crazy. So I'm going to turn the opacity down a little bit, but to the point where it's still visible. So this adds like a grainy effect onto your actual drawing. It's quite subtle and it kind of gives it like a paper texture, which I really like, Sir. That's a little extra bonus tip. If you if you like. Yes. So just go through and play with all the different settings that you can do if you're not happy with anything. See if you can change any beings AD can edit anything. If you're not liking your hair or that we can go back and edit it now. So I'm just gonna go and grab my signature. I got this little outlet on my procreate and they'll come back and I'll add it to my thinking us or you can just write your signature there if you want to do what I'm doing in like having a whole big thing, but I'm just putting it there and just like outlining it again to make it a bit notch equality. As each of you want, make it your own. There's the finished artwork. I hope you enjoyed this class. And please feel free if you've been following along or if you want to follow along, you can go back and rewatch it. Please feel free to make your own end tag me on Instagram at Roosevelt creations or you can also put it in the Student Resources, student projects blur. I looked to see it. Yet. Please feel free to shoot me a wick, sir. Yeah, I hope you enjoyed that. And I'll see you later.
8. Conclusion + Thank you!: Thank you so much for watching this class. I hope you enjoyed it and learned something new. If you did, please leave a review and let me know what you thought. I'd love to hear your opinions and your feedback. Yes. So also, if you've follow me along or if you want to follow along now, he re-watch costs many times if you want, I don't mind. Please feel free to make a student project and publish it below. I would love to see what you've done. And I'd love to see how you created things and what kind of personal Sweeney took, sir, please. I would love to see what you create. Yeah, thanks so much for joining my class and I'll see you in the next one.
 Liz Morrell, Graphic Designer and Digital Artist