Transcripts
1. Introduction to Bookbinding: Hello and welcome to this Kushi class. My name is Liz and I'm a digital creative from nobody. In this class, we're going to be learning how to create our own bullet generals from scratch. So this could be a notebook Capulet, gentle, an art journal, a scrap of whatever you want it to be. This class is made for people of any level. But if you've never found a book before, don't worry, because this has been created with the beginner in mind. So you will be in good hands this class. So you don't have touched bookbinding before and you never even considered it. This is a great class for you to learn how to make your own books. And it's actually really easy and fun to do in this class mood been talking all things from paper types and thicknesses to factual planning technique that we'll be using and how to create your uncovers. Use different materials such as fabric, embroidery stuff. So down below, I've included a little template for you in the class resources section. So that's just a A5 dot grid layout that I've created myself. And you can download that and print it out and then you'll have your adopt grid to use. So my main inspiration for studying this class is because I was online and in-store shopping for a Myron bullet gentle and I could not find the Pepe Tuan. I really wanted to specific page thickness because the ones that I've already had had fled through the page. Oh, ghosting had happened where you can see the words on the page. Once you flip the darpa, which is really annoying committee because I really like it to be nice and clean and bright and white. So that was an issue. And I also wanted to specific cloud cover. I wanted to be able to customize it and make it my own. So I just wanted to make this clause having light how to make my earned bullet journal recently. And from beginner to beginner, I hope that we can create our own bullet shells together. If that sounds like something that's up your alley or something that you're excited to do, especially as a lockdown project or just for fun these on the weekend, feel free to enroll in the class. I love to have you join and also post your work at the end once you've finished your bullet journal, I love to see what kind of things you create, whether it's a scrapbook and art journal, bullet journal, notebook or just a daily planner or whatever you want. I'd love to see what you mix. I heard that you're excited. I'm excited too, and we'll get into it and learn how to create our own bullet channels.
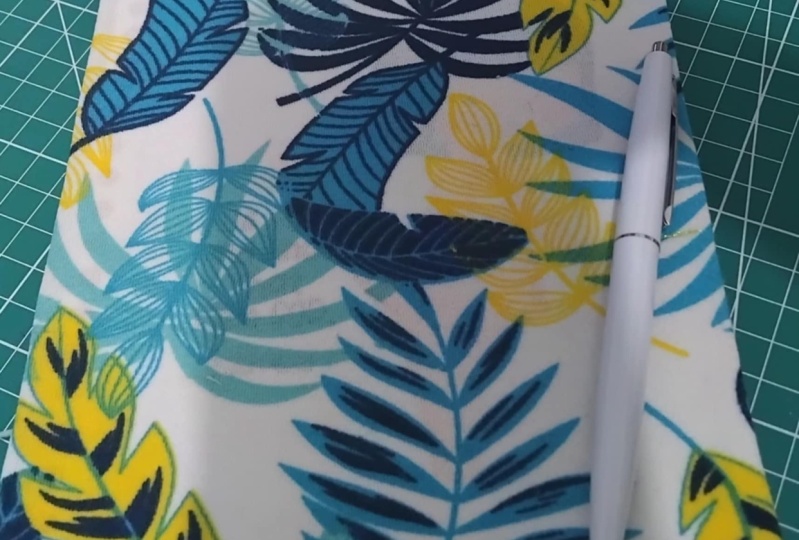
2. Paper Types and Required Materials: Okay, so there's a bunch of different thicknesses of paper that you can use. And in time you can usually find all these different range of thicknesses of paper at your local office shop. And remind definitely has done so. Usually they range between ABG as sandwiches, you standing, copy print a papal, all the way up to like 200, 250, even sometimes 300 GSM, which is a big caught stuff. And yeah, so kinda just depends what you're after. He can't get to your local office shop and pest out a few different thicknesses. They usually have little samples around that you can feel. That's a great way to have a look at what you're interested in getting above a 100 GSM usually weren't have bleeding or gardening or anything. And so those kinds of papers, I usually presentation payments. They're really good for making sure that your paper is smooth, it's bright, it's wide, so they do come in and extra costs compared to the normal copy paper. So just keep that in mind. I'm going to be using a 120 GSM ACO and my bullet journal that we're going to create today. And so it's just a tiny bit thicker than normal copy paper. And it's really good because it doesn't actually ghost of late or anything. And the paper is really smooth and nice. So I got this paper from my local off-the-shelf. So I went back and I ask them to print the template for me, just double-sided and flip on the short edge so that all the mountains are in the same spot. I bought them to put in the nice paper into the printout and they did, sorry if you've never actually found a bullet journal or a notebook or whatever you wanna call it before, I would recommend just making your first one, draft kinda vision on no copy paper and just get used to the whole technique and everything. Because if you mess up and you used really expensive paper, then it's kind of a bit start and stop your wallet specifically, it's up to you. But if you want sludge on fancy paper, I'd probably suggest doing a few tests, attempts at bookbinding class just to make sure that you have full control of what you're doing. And you can kind of think about what you want the final design to look like when you creating the dropped division, sorry, I've printed a dot grid onto my paper. You can use construction paper or like Kraft paper or just copy paper or colored paper or anything you want. And he kinda pay be lacking calcium metal. So yeah, let's just get into the things that you will need to start this project. So you will need paper and a printout or printed paper if you want the dot grid. So you're either you can download the template below and print it out, or you can find one online or just create some ruled paper online on like a wet dog and just add like undisclosed and stuff. It's up to you, whatever you feel like. So paper, a proto thread. Any color you want, mine's going to be white just so it matches the page, but you will be able to see it. So keep that in mind when you're choosing your thread needle, sir. Just any regular sewing needle is fine. It doesn't have to be a specific thickness or anything, a pencil, a ruler, clips of some sort. So I'm using bulldog analytically. They're both perfect and just make sure they're on the larger side. It's just to be holding your actual stack of pages together so you want them to be fairly big so they can open up all the way and clamp down on it as something shop so you can use a needle for this, but I'm using this ROI is blood kin it's cold because the sharp point so that you can punch holes into your actual paper PVA glue ear and a paintbrush and a small bubble to hold the glutes and heavy books or equivalent, sorry if you have like a break or something, you can use that just to put pressure on the book that you buy urbanites 0 for a few hours. This is optional, but you could get some ribbons or a rebuttal to and use them as page Mock as integral, a gentle, you'll need copper for the covers are a thick card stock for cardboard from 0 bucks or something. He's great. I'm using this icon from the pink of packaging from what I think you can use fabric, wallpaper to cover the cardboard covers. So whatever you prefer, I'm going to use Africa's project. You also need a corruption. I are standing knife and a cutting mat and optional you can use a round corner Qatar, I got mine from my local office shop as well as the paper and everything. Sometimes they come with like laminitis and stuff. You can buy them if you want. Otherwise you can just use this as to turn the corner and that basically did make the corners rounded, which is I'm not perfect, but it's completely optional. Yeah, in the next lesson we're going to be preparing a paper for the binding process.
3. Preparing the Paper for Binding: Using the template provided template in the resources section, print your pages. You can choose print on both sides and flip on the short edge, and this will keep your margins consistent. I got mine done at my local print shop on a 120 GSM, 322 pound paper and printed 50 copies double-sided. So the 200 pages when it's finished and says for a five pages per A4 sheet. And this cosine 15 plus 40, it'll probably be around the same few, if not, possibly trigger I'm keeping my pile exactly how I felt it printed and I'm going to use the round corner cottage yell at around each of the corners. You don't have to do this, but I like how it looks. It's up to you. You don't have one of these, but you really want rounded corners. What you can do is use scissors and just trim off the corner, but it will be likely to be somewhat inconsistent, which is up to you whether it's good or bad. All right, so I'm just gonna stop by doing that and making sure that all my paintings are in the exact same order, in exact same orientation and everything. I don't want to mess anything up because the margins of specifically this way. Now that I've got all the corners rounded and that's all nice and clean. I'm going to fall off and then put them into possible four sheets of paper. And that's called a signature. So making sure I pick the pages the same throughout. Don't start with the IRB or anything because we don't have homogenous get messed up, but I'm just going to start folding them. So I'll cut it like this. We have this default, it. Make sure it's nice and even and, and, and keep it in this kind of way. So now come down and hit that kind of makes sense or keeping everything in the same order and everything, and I'm seeing faces. So there's three sheets in their guts. So I've got four sheets of paper basically stuck on top of each other, but folded in half. H separately fall to them. And that's how I'm going to keep it. So I'm just going to keep it with the folded edge towards me. Yeah. Just got H group or fall on top of each other. Anchor flip. Okay, So that's fine. For loss signature. I've got all my secrets just folded now. And that's so once you have them in a big pile, Boltzmann two signatures, you can use your ruler to roll along the top folded edge. So this one here and mark out even spacings on the whole thing. So because it's a four, It's going to be 21 centimeters, which every three centimeters makes for seven marks basically. So that's what I'm gonna do with this one. If you have a different size, just measure it and then divide it into equal chunks. If you need it to be further away from the margins, but all equal in the middle, that's fine too. Or closer to the margins, Eden and then even along the middle. Oh good. And I've got two extra pages because I did print 50 sheets instead of a multiple of four. So I'm going to keep these handy just in case we need them later, which we might just put the binding attaching process of put those away. So we're saying we're actually going to use this one because it has centimeters on edge rather than this one which is a scale ruler for architectural drawings and things on earth and space. On the top one. I'm going to take my pencil and mark out every three centimeters. You can see there that those markings along the side, and I'm going to put this one back on top of my stack. So now I'm going to clip them together so that they're nice and agent and they remain that way. So you can see when I try and push it with my fingers, it goes round edge. Even though it's quite striking out. Say things together, just push it against the wall, which will help everything stays constant. And it gets the table top as well. Take my clips and make it put them together. So I'm just going to take as much time as I need to make it as even as possible because we don't want to mess this part up. This is what will keep all the pages neat and even throughout the whole book once it's done. So this is very important to get as clean. And even as you can see when I click here on the top edge and also here. Moving into lunch. All right, so that's looking pretty even and clean to me. Nice and good. And so now they sure. It's fairly flat on the table. And why don't you take a rule that doesn't actually have a curved edge. So you can see here it's kind of curved. We don't want that. We want something that's just a straight at something like this. We'll just a straight piece of cardboard or something just that doesn't have kept it from the bottom. So I'm going to use this one, line it up against each of these mocks and draw a line along here. And say that I'm just drawing a line along the edge. So that's where we'll park agile. And so you wanna make sure you hit every single one and keep doing it on all of them. And yeah, that's just gonna make sure all of our stitching is clean and precise. Sorry, that's what I thought. So there's a line going down for each individual seating chart and it's all nice and clean and even and everything's looking good. What we want serve now we need to add the holes that were the needle will go through when we actually start stitching sphere, I'm going to use my little bug can thank for that. So I've got my bug Kenya, which has got a sharp edge, punch the holes through. And we want to keep all of these signatures in the exact same order that they're in at the moment, because otherwise that will be missing without order. So right now, it's really nice and clean and even But if we start moving them around, because there's a slight inconsistency in the edges here, it will start getting a bit wrong and looking messy. So we want to keep everything nice and clean by keeping your own the second one. So to do that, I'm going to unclick the pages, but don't actually works with the order or anything. So I'm going to put the folded edge away from me, clean up my space a little bit. So now I'm going to start by grabbing this. Thank you. Draw all the pages are nice and uneven for being a up. I'm actually doing is only a cutting mat because you don't want to punch holes in your table. So I'm just going to hold it flat down. Be super careful with the sharp point. You'll want to hit yourself and just start punching holes through the whole four pages or forever. So hopefully that makes sense. So we've got holes, fields going through it. We've also got homes on the other side, and that'll just make for our natal congruence really easily. So mutate the speck in the same school that was folded my fat edge towards me and I'm just going to put it next to the big pile. So keep doing that. You can keep doing that as well. But also you get chain, grab a cup of tea and just take this time to relax and then punch some hostels and paper. Okay, Sorry, I've got all of my sequences. Punch. So they've all got holes in them. If you can see that, it's nice and straight there. So go grab your paper and start repairing it so you can skip around the class if you want and go back and re-watch segments that you need to re-watch. Make sure your pages are all prepared for binding. And we're gonna get into the next lesson. See you then.
4. Binding the Pages: Okay, now we're ready to start stitching each of the signatures together and making this actually starts to get a read on needle. And I'm going to use, I've got my wingspan of thread. So however much at is, that's totally fun. So you pull off big length of thread, maybe 1.5 meters also. How much you need and we're just going to terminate. You can actually grab a needle and make sure you're very careful and keep up with I only any overlap because you don't want to lose them and then stand on them, which is not fun. So I'm just going to thread this needle now. All right. It is a three going through. And I'm just going to make sure it's sorry, there's two strings coming out of the needle end. And then I'm just gonna tie them together at the bottom. And that's not here. Sorry, I was going to make sure my string is nice. And even, Sorry, this is how much string I've got now, a heap. But if you run a string to array, we will definitely be able to fix that to get started. And put my needle threaded. And I've got my sketches punched. So now I'm going to flip it so that the folded edges away for me, like so. And then I'm going to pull each one so that we maintain the same order. And I'll just keep stacking on top of as we go. So for the first line of stitching, what you're going to want to do is enter your needle through. The first hall. Can be on the left or the right. Doesn't know. Open that up to be super patient with this because the friend might get caught and there's not much you can really do about it. You can write your thread, but for the purposes of this, we're not going to. So I've just come in through the first hall and now I'm going to return back through a second home. Hello, all the way. Nice and tight, but not tight enough to rip the pages or anything. We don't want to put too much pressure on it and then back through. And just keep going all the way to the end. It's pretty simple for the first signature. So I've got a not yeah. Just been so I'm just going to use my needle to pull on this opposite venture, the direction of the knot. And that's just undone that nice space. And keep growing just very gently. And return back to the last hole in our tree. Very patient with Facebook. That's okay. It's a good lesson in self-discipline and patients. So now that I've written him outside spending the last hole, now I'm just gonna like go back the other way. So now that I'm out of this one, we've got a string here and a string here, and the end of the string hill. And I'm just going to group act inside that hole. So that this string on this outside piece as well. That makes sense. It out. Returning back, out to that outside edge, then back in again and again and again. And then so now we're at the last one. What we need to do is return back to the inside through that whole term, want to push them into the hole because that would not be good. And push them. All right, sir. We've got all this bread on the outside and by the same thread on the inside. So now I need to try it. Oh sorry, I'm just going to stick this through underneath this segment. Pull it worse so the way through. And then I'm just gonna retain my needle back through this hole. They put out to the side until omega naught and then we're going to return back to the outside and pull it until you get a little pop. And again, that's what we wanted. So that was a little pump and that's the not just coming out to the outside of it, which is ideal. So we've done the first CHI time for the second signature, and this is where it gets a bit different. So I'm going to, everything pops so that they're nice and even you can see that they're not help. And I'm going to go through into this first hole. That's equivalent to the one that we just came out. And pull it nice and tight so that they're quite close together. If they're fontanelle and just tighten up. And you can get tired as he got behind to return out through the second hall and make sure it's nice and tight. And now instead of just going straight into the third hole, what we're gonna do is done. You've got this string here. We're going to look underneath it and then go back through that second hole that we're in. Really good. Cool. So we've got this thread going up. Yeah, this third company or young looping through this to hold it nice and steady and then my going back through that hole. Now we're going to repeat that on all the holes. So hurt, that makes sense. Thank you. Priya, demonstration for you and then I'll speed it up a bit. And not vary which we don't want. So I'm just going to gently pull it back or not. It can help if you hold it. And then it falls to stop any knots from forming, passing through that section and spread there. And then I'm trying to factorially and make sure you're keeping your friends nice and tight. The current leader, I want to make it too loose and then it starts going pop. So nice and quiet. Third, pull it off. Don't pull on it too hard to write. You're going to start tearing the page. Yeah. Just enough tension to keep it nice and strong. Sorry, I was about to go back into the last hold on this segment job. Now that I've gone through that segment, yeah. I might add the next signature on top of the home. So this one will now be joined to the bottom one. And so we're going to represent that whole the other direction because that's how it ends up working out. You just get my phone. So now that I've done that, I returned back to it. So and I'm just going to read through this whole entire section where I went through it again, the next one. Okay. Now that way here again, we're just going to pass the needle through this little string and then put up. So I'm kind of running out string, which is not ideal, but it's an easy fix it. So I'm just going to notice that I've got about that much left and I'm trying to finish up this stitch. So going back through that signature below it, returning back to work and was and so now that is completed, I'm just going to tie a knot through this section. So I've got to not feel inside. And so we want to make the knob on the outside so that the state when it's finished and just pretending we need go back through and then just pulling it. Now we can just trim this a little bit. I'm just going to close down my base. It doesn't really matter how much. Pull out your old string. I just grab some more and then refreshed it and try not to kick guy. And then I'm going to return back through that hole that I just lift and just continue on as us. So as I was reflecting on this, but a big knot. And it's kind of in the way. But look, I've already threaded through this section here back, so I'm just going to let it hit that and be on the outside and see if it is going to let the not sit on the outside and then I'll just trim this extra piece later on so I can still keep going. It's just my string cut short and help some. Okay, so that's the last stitch now and I'm just writing will serve this last piece here and an eighth. And just returning right to the original signature. And it's basically what you do when you tie it off to make a new thread. So I'm just putting it as far as gracefully. Apps going to pass my needle through here. And then through that link to create a not one of the ways it can just let go and then my cannot cross the barrier, the bottom of the outside spirit going on not to participate until not Fuxi. And then just trim it. Okay, so now that we've got the book bound string, and it's all working pretty good and wants a book, we're going to need to reinforce it. So that's what we're going to be doing in the next lesson. If you haven't already catch up to where our Having finished all of E string. And I'll see you in the next class.
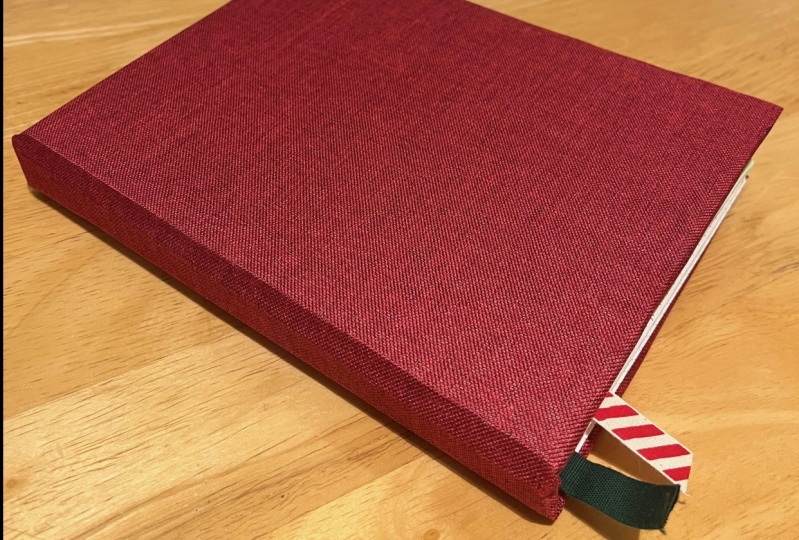
5. Reinforcing the Spine: So now that we have our textbook bound together with string, it's time to reinforce it and glued together basically. So I'm going to use my PVA because it's non-toxic, flexible. It doesn't have an order or anything that's really good for this sort of thing. And I'm just going to put it in this little cup here and use my paintbrush tool. Carter. But first before I do that, I want to click pages together so that they stay in the Merced straight and even formation, I guess, like orientation and everything. So I'm just going to budget cuts the table and make sure everything's surplus, right, and nice. You can also put it against the role. Make sure it's super good. Okay. Good. All right. Sir, let's click together because it's just time to put the glue on. Rolling up my sleeves. Make sure you've got a protective surface side or marketing glue on this cutting up. But if you do my newspaper or something. So they either surfaces just putting a little bit easier to put more in the carpet, it doesn't get dried out. Let's think a bit noisy. That should be plenty for now. Sorry, I'm going to grab my small brush because as much as we put this at the data and you start going up, we want to pray even cart a clear. You don't want it to be too thick because it doesn't need to dry. And I'm gonna do two carts, I think. Yeah. Should be all good. Let's make sure you've got a fairly thick amount on this so that it's nice and strong. Once you're pretty happy with it, I'm just going to wash my brush and wash out left or you can use a hairdryer, try it like that, or you can let it air dry. You can also, if you're going to leave it urban life or for an hour or two, if you need to go out, you can just press it on the some heavy books. So something I'm just gonna leave it as is for now standing up like this. And yeah, we've zoomed to do the second carriage and nth derivative. Okay, sir, I've washed my brush but this first card is mostly dry. Now on dry wet smelling this, I'm just gonna book second cart on the globe. Just kind of spreading it evenly. Don't worry about getting it down the side a that will be able to cover that. I'm cool. I'm saying I'm done. All right. So now what I wanna do is just I don't my ribbons cert fast central figure out where the margins are, to figure out where the top is. So actually, that's easy. So you can say here that this is a shorter margin. You can see where the dots end with the paper ends is a bit shorter than when the dots men. And let a paper gets on this side. It's got a bit of a thicker margin of service, Athena margin and a thick amount. And so I want within a margin on the top, and that's the commodity on the bottom. So that means my books can go this way, which is easy. And I remember that. And COP II ribbon, so that I've got two strings coming out. The tough. So just got these fabric scissors for my fabric sewing kit thing. Just going to cut the corner just a bit longer than the width of the actual book itself so that when it's shut, I can actually see the ribbon coming out the bottom insert and then have it ideally about this. But then I have to remember that it needs to folder but this, so I'm going to add about maybe an inch extra. That looks pretty good to me. They thought it might matter what it looks like. And I'm trying to do the same thing, like follow the same width. Cut, it looks basically the same. Here, that's pretty coarse. So you've got two strings now, two ribbons, which is brilliant. I've actually added a rubric as well, so this will be fun to lend. My plan is to just put it up a bit of extra glare on the top, the topic for this edge. And put down my first ribbon and show ugly edges facing down. And maybe it will be closed. And then I'm going to add the other ribbon on top of that. Just make sure they're okay. I think that when it dries fully, it'll have an I C on it as well. So I'm just switching that off with a bit of extra and then that line to wash the put the brush. So I'll be back when it's dry.
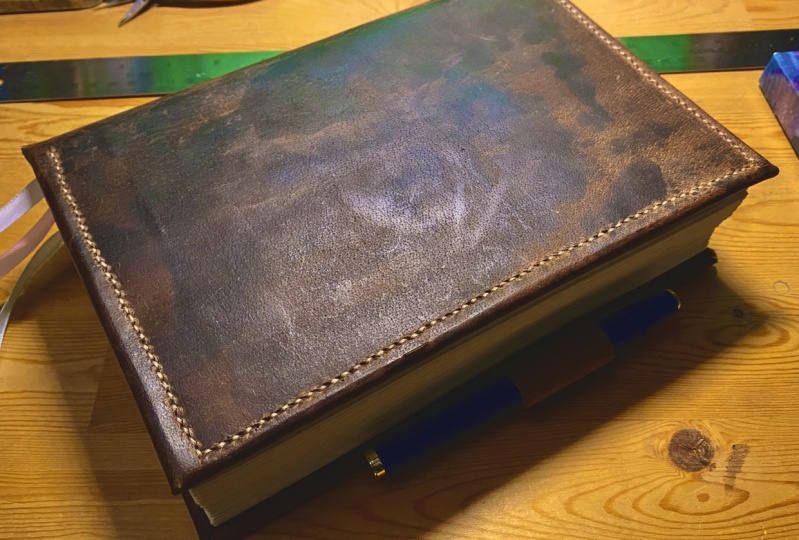
6. Creating the Covers: Okay, so we know that this is basically almost dry. It's nearly there. It's not quite yet, but it's almost there. I'm going to start making the colors. So I've got my cardboard here, my cutting mat, and I've got a book that's trying still leaning against something. I've got my fabric feel that I'm ready to cover the covers with this one quite, very thick and solid. I've purposely not to go with the cardboard that's corrugated in between. So it's got like the lines in the box. I really like that finish pump. If that's all you've got them, that's fine. You can use whatever you have, but just be careful if you're going to use I can all cereal box or something just because the shiny surface makes it difficult to stick with the PBA. So if you're going to use I like that, maybe send it down or something just to get it to stick a bit better. So to start, I'm just going to unclick this nano is mostly dry. That's looking really nice moment. And I'm just going to trace this shape of the actual book onto my frog what, and I might just do it in the corner so that I didn't have to talk too much. So just tracing around. Don't worry about something like that, that's fine. I'll be able to set off. And then we want to add the spine width next to it. Sorry. Yeah, you can say that they won't keep it. That's no good. And the other couple I'm just going to put in this corner. So I'm making the most of the corners that I've already cut, not enough to worry about cutting extra ones. So that's still drying. I'm just going to put that back where it was. So now you've seen a steel rod or a plastic one, dart, dart use a plastic one because you will just start shredding the actual plastic and not getting straight lines. Sorry, uses steel roller because we're just going to cut to these shapes out. Sorry. Oh, my real-life got these measurements and I'm just going to line them up so that it's a string as possible. That makes sense. And when you're cutting, just be really careful and make sure that your being fairly gentle, putting too much pressure on and go wherever it may be true times. And that'll get you a really clean cut rather than just pushing all the way down first and trying to cut it that way. Sorry, that's still going. You can mix your colors a little bit wider and taller if you want, then your actual book just so that it's like an S covering couple. But that's totally up to you. I'm just going to keep mine at the same height and width as my actual text flow. So there's one welcome to Essential these around the same size. Sorry this outcome. So we've got a fact about the back end and the spine. And now I'm going to cover my colors with red pepper, which we're going to assume that my pink ribbon, I think we're gonna make sure my fabric is from wrong side up there like that. So there's my right side of the fabric. Name his name wrong. So make sure it's nice and flat and you're using pipe up and that's totally all good. We're just going to make sure that there's enough gap around it so that we can fold it over. But that should be fine. So if you've got an A5 book and you've got an A3 piece of paper to use for your colors, and that would be perfect. We weren't to be like a one sheet. In fact, some possible. Otherwise if it's really not possible, you can always just sticks and sheets together. I'm just going to replace these women general position they're not quite decided on yet, but this is basically where it's going to go. So the goal is to have them evenly spaced. So we're going to use a ruler to check the measurement. This is not super necessary. And I'm going to leave about six mil seven male may be in-between each cover, the spine and the comma and the other covenant as well. So there's plenty of room to move the colors back and forth in this pizza flexibility there. So I'm going to begin grabbing my PVA. In this unit, we're going to need quite a bit of PVA for this part of the class. So yeah, all right. Cool. So I'm using a larger brush just because it'll cover the area a lot faster. But whatever you've got is fine. And just brushing and even Kurt of glue firm for this whole piece of cardboard. And I'm just holding it above this fabric so that I don't get my Sehgal, they're all over the fabric by accident. So just holding enough has been high enough. Make sure you get all the components. Alright, that looks good to me. With this. I'm just going to flip it over. And don't be afraid to get messy hands. If you're doing this with a cardboard box from the serial container, it's probably a good idea to do it. The rough side down, glue on the side. That is not trying for the first bit. Just because that'll give you like a better finish, your actual final cover. Each of the teachers and the server, make sure there's no air bubbles and it's actually really, really good. Size by that actually looks really nice. So you could say that's all nice. And we can go to second. Is that done? I'm going to move on to styling. I'm just going to put my little ruler here underneath so that I have in mind everything out for you again, students are listening for this amine 10 citizens had been easy to count her mail to say tangent empirically determined spot. So now I'm going to be really careful when I'm playing this down. I'm lining it up replacer. I'm going to do it about one centimeter away, just so that we've got plenty of room between them. I'm just lining it up against just going to try to be fairly consistent. And actually make sure that's nice and clean air bubbles. Really good. That's what it looks like on that side. And then we can add the last color. So we want it to dry file so we don't want a really thick layer Glare for the covers. So if you can get pretty thin but evenly corroded, then that's what you're aiming for. So I did one centimeter loss times a meter, one centimeter, again, the term lining everything up nicely. So you can see that like layered on top of this cargo, but that's totally fine because we're going to be folding this over anyway. So you're not going to see that and that's going to dry clean it either way so it doesn't really cut off. Yeah, nice. Not quite sure what that came from. Plants and hopefully it's just a bit of wet glue from the edge and then it will dry clear. Okay, so just make sure that's fairly dry. It doesn't have to be like all the way dry. I'm just going to cut my fabric scissors just so it's not a CRM much covered off the edge. And this applies if you're doing paper as well. To start, I want to bring your lunch by ion. That looks good. All right, so now I want to wrap this artifact. Seminar covers an oxen correctly shaped. So to do that within that cutoff old corners and make sure one thing off the corners. You leaving like about peer meal gap between the corner and do a cut edge. So a SRI with those coming down and leaving a gap here, you can see there's a gap there. So that there's plenty of space to actually cut this. That make sense. I'm going to open the flagella. And if you don't patch where it's always better to cut off too little venture much because you can always cut off extra and you can click on the start button. Keep that in mind. So now I'm going to need some more glitter and I'm going to wrap the colors. Grabbing a bunch. I'm just going to occur. This whole section of the fabric and the covers mature. It's pretty even I'm not toothache. So you don't have too many bubbles or anything. And don't worry if you go too far up because it'll just dry clear anyway, so that's all good. So now what you do is you just pull this fun and smearing it across. If you've got paper, you can use your ruler along this edge here just to make it really nice and clean. But if you're using every class that you just proliferating type, putrid sitting nicely. Great. Okay, That's pretty good. It's pretty tight but not tearing fabric or anything like that we want. And that's their applicants, which is correct to say, just keep doing that all the way around and just looking up my glue as I need to. So that's all nice and stuck down up to get drying pretty serious. And that's a really good. So that's our Kovach. What's just the glue second, say, but it'll Heraclius, it doesn't really matter. You can see that right now. It's looking really nice and really good. So you can see why we've added this extra fabric in here so that it can stick nicely. And the average finger around the cutoff, which is often why it's cool, that looks really good to serve. Going to let that dry for a little bit and then come back and we can attach the cover to the actual textbook. So see you in the next lesson when we actually attach everything together. And see you then.
7. Attaching the Covers to the Textblock: So in this class we're going to be attaching the colors to textblock. And to start with that, I'm actually going to grab these shapes to that left arm. But I think if I printed 50 instead of 40 H or African two or whatever serve, I'm actually going to use those as a way to attach the textblock to the covenants. And that should work pretty buttons. So to do that, I'm actually use for him to follow the baby's. Consuming lunch. Time's going to double-check the margins to make sure their bread. So on this refresh, shoulder margin at the top from the large margin at the bottom. And this one looks like it matches this one full circle, which was at that direction. So we're gonna keep them in the right orientation. But I'm also going to mean some score at Paypal. Use this as like scrap paper to protect the text block from my glue. So I'm going to put that under the first sheet. And groups and morphine behind my car. And brushes, homepage metros, pretty light and evil. Fingers up all of the edges, probably. That's looking pretty well Boolean. So from there I'm just going to add this extra shape. Stop it both to the textbook. So making sure all the things are pretty Thevenin's. It's not perfect, but I mean, it's a handmade Dollar General, so it doesn't have to be. That's pretty cool. That's all nice and smooth and clean use and I'm just gonna do the same to the other side. No yellow piece of scrap paper. Ones currently, they're equally. So if it helps, you can add blue to the outside, first to the edges, and then what's the way in? And then I draw the folded edge is on the right side, which is and then just Fleming's up nicely. And I was a bit cleaner than the other one, which is All right, so we have that extra page that just to help reinforce the textbook community. And something really nice. And you can use what about like pages you want, but again, use like these colored pages or something if you wanted to, instead to have black connecting to the for what it's up to you. So now we're going to accept this and this. When the final book is done, it will look like that. Really cool. But first we need to actually attach them to each other. So to do that, to make sure this is all fairly journal, which is we're going to take this piece of paper found comfort in between just the first shape, the second one, anything? And I'm just gonna brush glue onto this page. You want to fairly thick but this one just so that it looks like really strong. Can have the elusive. Okay. We can let our eyes. Now I'm going to line this up nicely. And what we're doing is we're just kinda glowing this page to read the column. Sorry, just for the entire kind of change. We're just going to line it up. I saw own Stein down. It'll be centered nicely. And just take your time with this, make sure you're getting it as being as accurate as the trend. And then I'm just pulling the page, testing it as a nice. And then return to the screen out and bubbles is tripled fairly smooth. I mean, the fabric was part. So you will be able to see it through that if you're using paper or something, it should be fairly seamless. Spear, shot match. Children of juice. So that's one down, one sugar. Also right now, I'm really liking how this is playing out. So same deal on the other side. Scrubbing spreadsheet, the scrap paper just because he eligible include race. So we need a bit more kVA direction. Sorry, let's put this loss cover on. I'm just going to add as much as I can without tearing up the page as well. So that's all done now it's time to this. I'm just going to line that up and make it as accurate and as clean as possible. It should be a bit easier this time because we're not mining up the entire textbook. Just moving any air bubbles, making sure it's all nice. And it's gonna get some ruffling phone. We're going to press it or not it over a few hours, so that should be fine. Shouldn't actually lost her mom. But there is a bit of a crazy see fabrics, simple left such. I mean, and so once it's all dry and final book, open it up again. So now that we've got it all done, pretty much. The next thing to do before we can actually start using the MOOC is to go press it under heavy stack of books. Sir, I'm just going to grab some and just leave it here while it dries. Especially well, the glue still kinda wet because that'll stop. We're going to do much when it's drying flat. Yeah, I'll give you a little close up of this one. Is really cool, it looks really good. I'm really happy with how this content out. And you can put the page mark. So if you wanted to add like a band or something around that, you could do that definitely pretty easily to tell, very simple. I heard that this was helpful. I'll see you in the conclusion, but that's how it turned it off. Sums go grab like a bunch of heavy books to check on top of this bulge. And also it presses flat urbanite and the old law replaying from glue doesn't actually lost a long time, which would be for brilliant shot. And you compile it occupies you want. The whole point is just to make this whole thing down nice and flat and make all the pages stain, asking to get them.
8. Congratulations and Conclusion: So once your bullet general or scrapped would go up gentle or whatever it is that you created. It's all dry and press urbanite over a few hours. Your finished. So congratulations, you've made your first book, or even if it's not your first, you've made a book. That's really cool. And yeah, I heard that you learned something new and that's been introduced to the world of binding and easy and exciting way. So the bullet journal or the art journal or whatever that you've made is completely customizable and it's completely urine. So you can make any kind of cover pages or different types of paper inside a if you wanted or whatever you wanna do to make it very much your own, which is your great candidates. One of the best things about making urine stuff. And also it's a lot cheaper than just going through the store and buying one because a lot of the time they mock it up quite a lot. You could also call up some thick paper and make a little pocket at the back if you wanted to or I'm elastic around it or anything that you wanna do. So feel free to customize it as much as you want. Thanks for watching this class and please feel free to post your project stumbling. I'd like to see what you've created and also feel free to follow me on Instagram, Atlas adult creations, and also own Skillshare if you want to follow me and then you can be notified whenever I make can you close? Thanks again. And take his bike.
 Liz Morrell, Graphic Designer and Digital Artist