Transcripts
1. Introduction to Class: Hello everyone and welcome
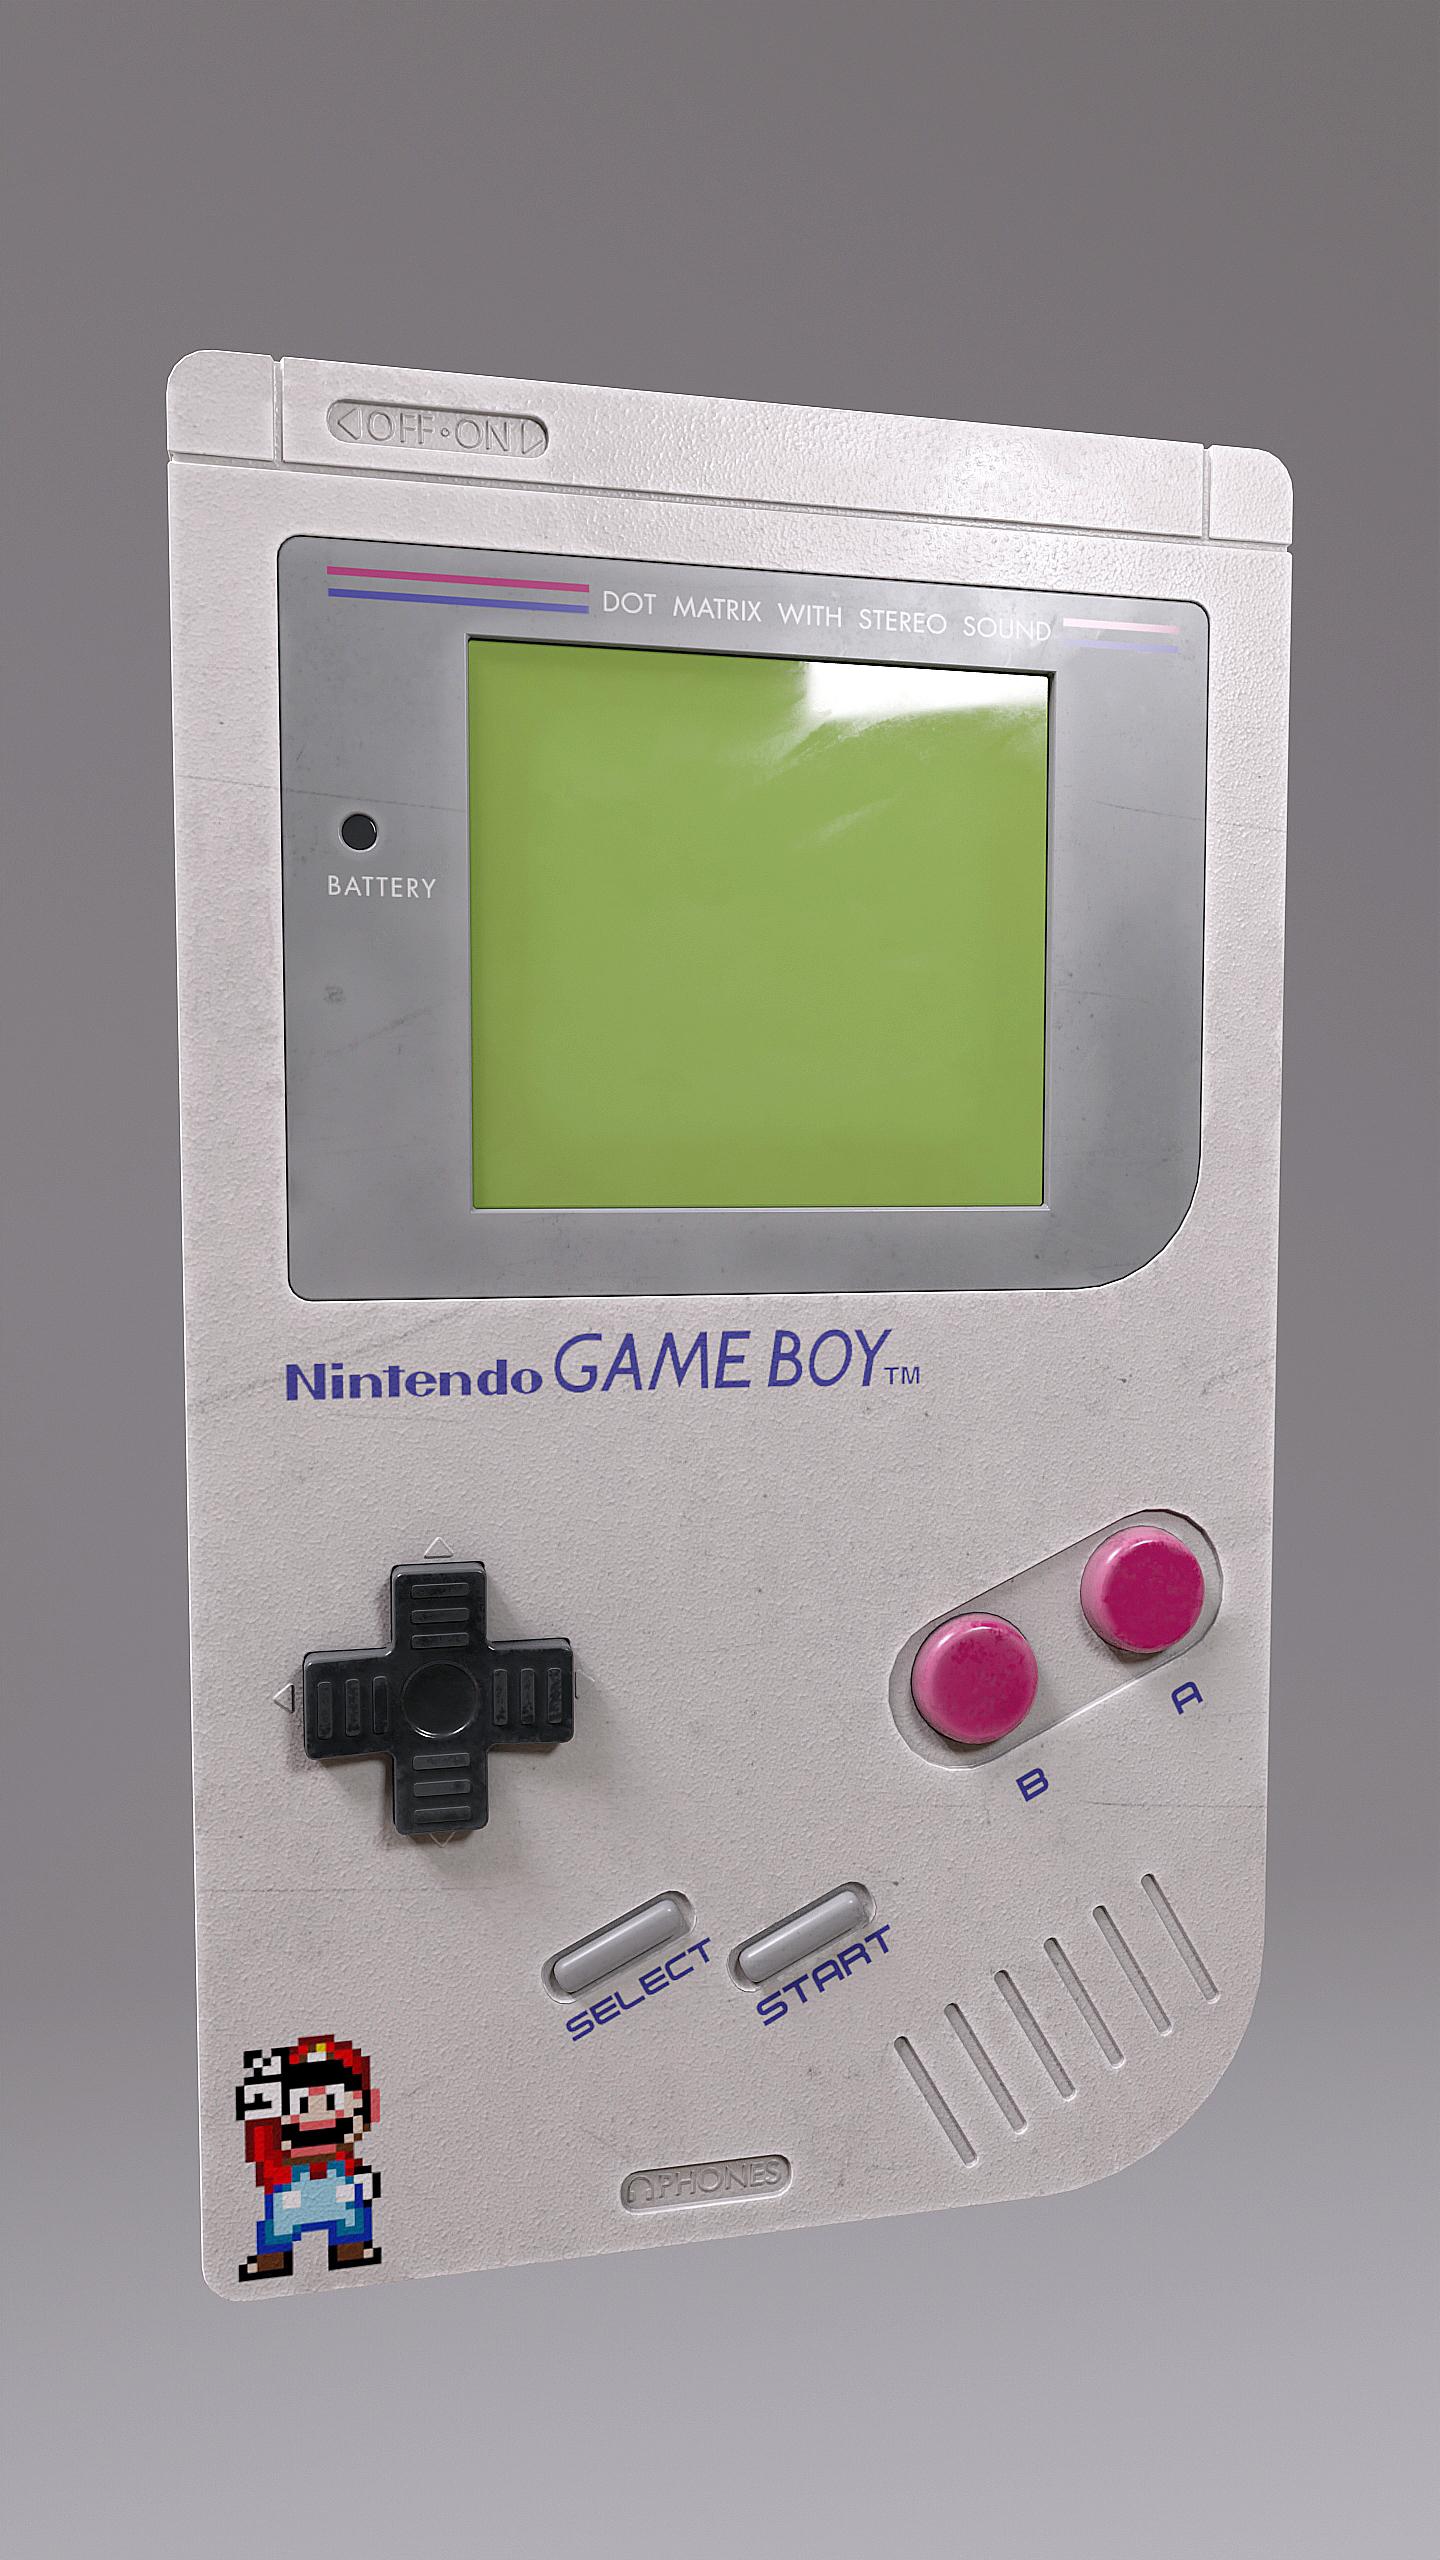
to this new course. In this course, we will go over the entire process of Creating a Nintendo Game-Boy using
Blender and Substance Painter. From start to finish, we will go over the
complete pipeline of creating a high-quality
realistic prop, starting with modelling
the prop in blender, texturing in Substance Painter, and finally, lighting and rendering a portfolio
piece back in Blender. This course will
help you improve your 3D prop modelling
and texturing skills massively as we go
through each and every step together and learn
many different techniques. After finishing the course, you would easily
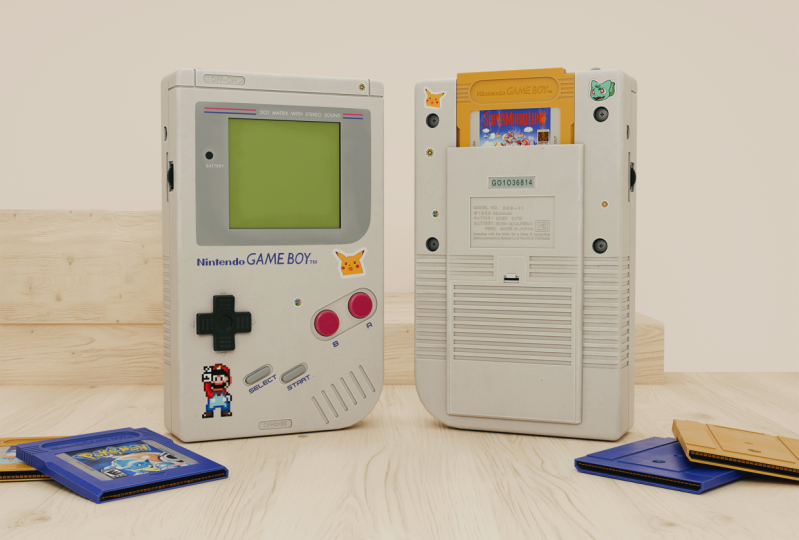
be able to create the renders shown
in the trailer. Create high quality
props of your own. This course has over
5 hours of content, and we will go over
each and every step in this course together and
nothing will be skipped. The course does not
have any kind of time-lapse so that you can
follow every step easily. We will start by modelling the prop in Blender
and learn about various modelling techniques and also learn a lot about
different modifiers. After finishing the modelling, we will apply all
the modifiers and UV unwrap our model for export. We will import our model into Substance Painter to start
with the texturing process, we will start by baking the
mesh maps for our model. We will learn to
create high quality and realistic materials. And the key features of Substance Painter
like Smart Masks, generators, smart
materials, etcetera. After modelling and
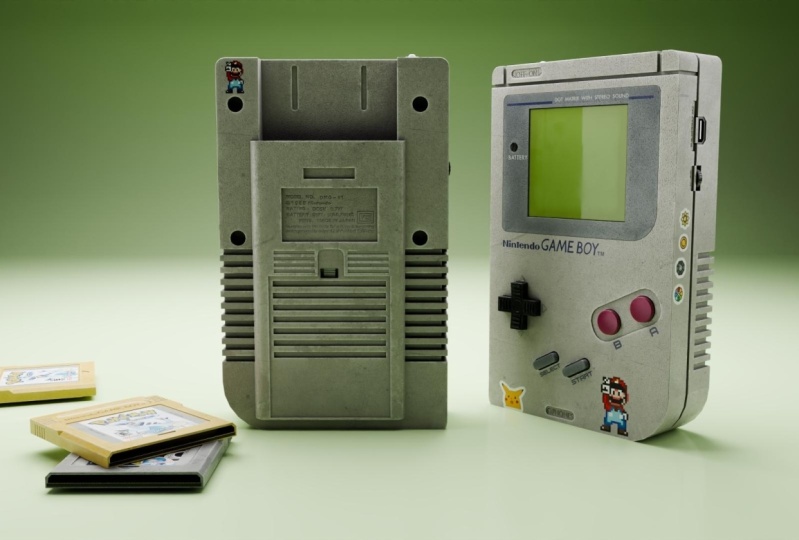
texturing our main asset, we will also model and texture
a Game-Boy Cartridge to enhance our renders and give
them a bit more detail. At last, we will take our models back to Blender and render them. We will set up the material, lighting and the cameras
and learn how to use HDRIs to light
up our scenes. We will finish the course
by taking a portfolio ready render and a little
bit of Photoshop editing. This course is for everyone who has a basic understanding of Blender and Substance Painter and wants to upgrade
their skills. I hope to see you there
in the course. Thank you.
2. Modelling the Base Shape: Hello and welcome everyone
to this new course, where we will be creating
a Nintendo Game-Boy from start to finish using
Blender and Substance Painter. So if you just look over
in the resource files that have been provided
to you with the course, you will find everything
that is needed for this tutorial in
these files only. So let's just quickly open up this reference images folder. Here, I have added a bunch of different images that will
help us in creating the model. Mainly, I will be using
this reference image only for the exact measurement of the object that we're
trying to create. But I still suggest
you guys to look over the rest of the
images from time-to-time. Just get the proper feel of the object that we
are trying to create. Like we have this one with
the backside of the model. We have this with
the Front Side. And we also have this
particular image that has all the different
views of the object. You can definitely
check these out to get the proper idea
for the object. We also have the
reference images for the small cartridges
that we will be creating to add some extra
detail to our object. Here. Let's just begin now. And what we will do now is
we will go back to Blender, and let's just start by
creating a new Blender file. So click on here and we are
in New Blender file now. So what I will do is first
I will just quickly turn on my screencast keys
so that you can see every shortcut that I over here in the bottom-left corner. So let's say I just
selected this cube, redshift plus D. You
can see I duplicate it and use the Shift plus D command and it is
appearing over here. Whatever I do will be showing up over here so that
it is easier to follow me. So let's just press a to select everything and then
just press Delete. All right, Now what
I want to do is I want to bring in this
reference image, this one into Blender, so that we can use it
to create a model. So first, what we need to
do is we need to press one. So basically, this
is the Front view. This is the orthographic
front view. You can see over here, this
is the Front Side View. If you press three, this
will be right View, that's seven would
be the top view, and nine would be
the bottom View. You should remember
all these shortcuts. There will be really useful in the course and we
will be using them a lot. So one is for Front, three is 4.7 is for top, and nine is for bottom. This is on the number
part of your keyboard. One more thing,
if you press one, it will show you the
Front orthographic view. But if you press
Control plus one, then it will show
you the Back Side. Similarly, three is for right-side and control plus
three is for left side. Alright, so now that is clear, I will press one so that I can go back into the
Front View Only. Now I've impressed Shift
plus a to add a new object. Let's go over to image and we need to add a
reference image. So now I will just head over
to my tutorial directory. Over here, open up the reference images folder and we need to just bring in
this reference image. Alright, so as you can see, it is aligned with
the Front Side View. If you press one, you can
view this image properly. If you press three, you are viewing it from the right side. It is basically a 3D plane, so we cannot really see
it from the right side, but if you press one, you will
be able to see the image. So just select the Image
Trace G, Then why? Move it like this a little bit back so that it is not at
the center of the scene. So that we can just add objects
over here and press one. And you can see we can easily match it with the
reference image. If you enable this X-ray, you can easily see the object
and a reference image. And we can easily model everything that we want
to according to it. There's just press Tab again
to go out of the edit mode, select the cube, press Delete. Alright, now what I will do is I will select the
reference image again, press Shift plus D. Duplicate this and make sure you hit Y. Lock it on the y-axis like this. Let's place this back over here. Somewhere around
in the middle only it does not have to be both it. Then you can just
press R to rotate it. Now makes sure to press Z, lock it on the z-axis, and then just type in 90. So I think you understand
what I'm doing right now. I'm creating the reference
image for the right side, G then X now, and move it like this. So this way what will happen
now is if I press one, we can see the image from here. Then we press three. And
we can see it over here also so that we can model
the right side of the model. And we will be worrying about the left side and the
backside later on. But first we will
be just modelling the Front Side and
this right side. Alright, so now all that's left to just select the images and let's do
a couple of settings. What I will do is I
will come over here in the object data properties and make sure to enable
only access aligned. This will do is it will
make the image invisible. Let's just do it
for both of them. And it will be only visible
when you are actually in the particular axis
that it is aligned to. This is currently aligned
to the front axis, or we can say the y-axis. So if you press one now, you can see, you can
now view the image. And if you press three, you
can do this right side image. But as soon as you move out of the axis, they become invisible. So that is really helpful for us because it won't be like
obstructing any View Alright, so now we can find me start modelling or objects. So press Shift plus a and
let's just add a simple cue. But before proceeding, I
will just quickly hit Save. So press Control plus S and
let's just save our file. I will head over to the
trigonal Directory Again. You can open it up and
the Blender files. Let's just save it as
Nintendo Game-Boy. All right, so now we
can start so forth plus one to go into the
Front Side View. And we can select this cube. And let's just place it
over here at the top. So to move it, you just need to G and place it over
here, its weight. You can enable X-ray
so that you can properly View the
reference image. But now you will notice
that you cannot really see Your cue. To fix that. What we basically
can do is we can, one first for the Front
View, select this image. And we can decrease its opacity until we can finally
see our cube again. So maybe we can set this
to something like 0.25 because we can
still basically see the difference image and
we can see our cube also. So that is pretty good for us. Let's just do the same
thing for this one also enabled back the opacity. And let's set the value 2.253
for the right Side View. And you can see, we
can see it properly. Next, what you can do is you
can just select this and try to move it over here to
place it with the right side. Press Tab to go
into the edit mode. Now you can press one for the
vertices select so we can select the word sees by pressing one who is for the
edge select mode, we can set up the edges. And three is for
face select mode. This is pretty basic stuff. I am pretty sure that
you are aware with this. Alright, so again, I would raise three for the
right side view, press one for vertices. Select, make sure X3 is enabled. Select all of this, press G, then by, and place it
somewhere like this, match it with the
reference image. Similarly, do it for this
side also as xi then why? And place it like this. Also lets bring it
down from over here. Press G didn't say to lock it on the Z axis and
place it like this. Alright, we are
pretty good to go. Now I will press one for
the Front Side View. And basically what we can do now is we do not
need to place it up because you will notice that it is now out of
alignment with the right side. So a simple way to do it
would be to just select the reference image and breaking down suppressor gene and Z. And let's just bring the difference image
down completely. And yeah, as you can see, it fits perfectly from
the bottom and the top. So now we do not really need to adjust it again and again. We can just select
the cube, press tab, select these vertices,
press G and X, and place it over here. Then select these
vertices plus G and X. And again, place them
over here like this. Alright, so now you will
notice that we have got our basic shape,
very basic shape. If you press one, we can perfectly viewed
in the Front View, perfectly aligned with
the reference image. And if you press three, we can see perfectly in
the right side view. Alright, so now we can
start with the modelling. Let's see what we can do first. First, what I want
to do is I want to make sure that we apply
the scale of this. Whenever we change the
scale of the object, make sure you apply the scheme. So if you aren't aware
with this concept, what this basically means
is whenever you like, change the scale of
the object like this, you just need to press Control
a and apply the scale. Make sure to just remember this. If you want to know
why we do this, let me just quickly
explain it to you by just adding
two different cubes. So let's just add this one
queue press Shift plus D to duplicate this
over here like this. And now what I will do is I
would scale it up like this. And I will skip this
one also like this. You don't need to
follow me over here. I'm just explaining you
a very simple concept. So as you have noticed, I have skilled both of them, but I haven't really apply
the scale for any of them. So we just select this one and press Control a and apply
the scale for this. Alright, so this one has your scale-up light
and this one does not. If I select this cube press tab, and let's say I select
any simple commands. So BR2 for the edge select
risky to select everything. And then basically I
will press control V. Control V is the
beveling command. And you will notice the bevel is not really working properly. It has beveled in
a very weird way. The bevel is like
very stretched over here and it is like very
short over this edge. And overall the object
looks very View. But if I select this one, press tab and let's
just do the same thing. So BR2 for it, select risky to
select everything. And then if I press Control
plus Bu to bevel, this one, you will see that the bevel is completely uniform and perfect. This is what happens
when you apply the scale of object and
you don't apply the scale, things can get a
little bit weird. So make sure whenever you
change the scale of the object, you always press Control
a and then apply the skin If that's clear, now, select this object, press
Control a, apply the scheme. Also what we can do is we can place its origin
back at its center. Because you can see this
kind of out of place. Origin is this
yellow orange point. So go to Object Set Origin
and origin to geometry. You can see now it
is perfectly center. All right, enabled that x-ray. And let's see, we can
select this edge over here, suppress to and
select this edge, this one again for Front View. And now press Control
V to bevel this, to create this sort of
shape, the scope ditch. And you can use your
scroll wheel to like increase or decrease
in number of segments. Increasing the segments will obviously increase the polygon, but it will also make
your age very smooth. So I think I will go with
the higher number, like 678, will make it just like very
smooth so that we don't have any kind of like low polythene because I don't want
this to look bad. Yeah, I think
that's pretty good. We can just hit right-click
and hit Shade Smooth. You will notice everything
is looking kind of weird. After shading smooth, you
can just come over here in the object data properties
in the normal section, make sure to enable auto smooth. So whenever you shade
smooth anything, just make sure to enable auto smooth so that everything
looks perfect. All right, One more thing. I will come up over here and enable the cavity
and the shadow. This basically enhances the look of your model and it makes it a little bit easier
to view all these edges. As you can see if
we've disabled this, the edges are not that visible. But if you enable
this back again, the edges are pretty
visible and they look good. I dislike to keep
this on enabling. These kinds of things
are like totally up to your personal preference if you want to enable them or not. I will just press one
enable X-ray and we can just continue
modelling our object. You will notice that
over here in the corner, the edges are all Bevel and they are not
like really sharp. So let's do that now. Press tab and select this edge, this edge and this one. Press one for the Front view. Zoom in on the reference image, and just press Control plus B. Makes sure to degrees
the number of segments because it
is a Small debit. So we don't want
it to be too much. Alright, That's
perfect in my opinion. And you can see on the object or our model looks pretty good
from the reference image. Let's just hit Shade smooth
again and enable auto smooth. Makes sure that you keep
on hitting Control plus S to save your files so that
none of your data is lost. Alright, so now let's
keep on moving further. I will select this
and let's just add up bevel modifier to this to smoothen out the
rest of the edges. So I will add a bevel modifier. And also when we will use
the Boolean modifier, it will work very well
with the bevel modifier. So that's why we can
add this modifier. And you can now reduce the
bevel amount to your liking. We can control it with
this option over here. So maybe something like this
is pretty good for now. We can obviously always
change it later on. Come over here in
the shading tab. And we can enable hardened
nominals from over here. Make sure that auto smooth is also enable or
disable auto smooth, then it won't work properly
and give you weird results. Make sure others mode
is enabled and we can enable harder
normals from over here. And we basically have the
Base Shape of our model. We can hit Save.
And I think this is pretty much enough
for this lecture. We will continue refining our shape and give
it more details like using the Boolean
modifiers to create all these different types
of cutouts into our model. We will continue modelling
it in the upcoming lectures. So thank you as watching,
I will see in the next one
3. Refining the Base Shape: Hello and welcome
everyone. Let's, let's continue modelling our object. I will just press one
for the Front View, enable X-ray. And let's see. We can now start by adding all these details like
creating the screens, adding these
buttons, everything. For us to do that, we need to
use the Boolean modifiers. I will just quickly give
you an overview about them. But first, I want
you guys to go over to Edit and Preferences. And in the Add-ons menu, here, makes sure to search for
the Bowl Tool add-on. So this one, and just make
sure you have this enabled. We will be using this a lot. It gives us like small shortcuts for using Boolean modifiers. It is pretty useful. We
don't have to like go into the Modify tab
again and again. This add-on like comes
pre-installed with Blender only. You just have to enable it. After you've never read it.
Just close this window. And let's see. We can start
by quickly adding a cube. We just show you what we can do with the Boolean modifiers. Select this cube and
I will just press Shift plus D to duplicate it. The first very simple
operation that we can use, Boolean modifiers, they are
like two or three of them. The first one let you can visualize easily as you
just select this cube, select this first View,
and now hold Shift, select the second queue. Then you can press Control
plus minus key on a number. But that is the shortcut for Boolean
difference operation. As soon as you do that, you
will see we have created this cutout using cube
one onto cube to. You can now select this cube one and then you move it around. You can see the cut-out
is also moving. So basically, this
is Boolean modifier. You can like create different cutouts and many other things. I will just quickly show you. This is like one of the
operations of Boolean modifier. Using this weekend like create very complex shapes
and it will help us a lot in our course. This
was the first one. You can even duplicate distinct. Let's
place it over here. And again, select this
first, then select this one, then press Control plus
minus on a number of back. And you can see we can create multiple cutouts using
multiple different objects. This is the first Boolean
modifier operation. I will select this, delete this, and
delete this one. Also, click on the
cube and make sure to remove both of these modifiers. Again, let's duplicate this. The second one is pretty basic. You can just select
the first cube, then select the second cube, then press Control plus T
on your number of bytes. Basically this one is
the union modifier. Now both of these cubes
are joined together. You can see we have like
three different operations, difference union
and intersection. Union will basically
join these two. You won't really see the
difference with this. But as soon as I select this object and let's add
a bevel modifier to it. You can see the bevel is like completely connected to
both of the objects. And they both seem like, like a single object only. If you just enable hardened
normals and auto smooth. Let's say I just
add two cubes like this and I placed them together in a
similar way like this. You will see over the edges, it is not looking at realistic, but if you use the
Boolean modifier, we can add things
like bevel to make it smooth around the edges where these two
objects are joining. Make it look to make it look like a little bit
more realistic. You can see we can
control the bevel or here also where these
two objects are joining. So that's why it is different
from doing it this way. We can also adjust maybe the segments
to make it smoother. We can do all sorts of thing, but I rarely use the
union of operation. I mainly use the difference operation and the intersection. Intersection is
also pretty cool. Let's use these two cubes now, I will select this first queue, then select this second one. And what intersection will do is you will first press Control and then the divide or the
slash key on a number back. You will see that this cube one has created like a cutout
like thing onto our two. This is like real useful. What you can do now
is you can select this main object and let's
add a bevel modify to it. And you can see we have created
some sort of this shape. It is like really helpful while creating like sci-fi
type designs. And yet anything
where you have to create like this,
cutout like shape. It will also be
really useful when we will be creating a
Nintendo Game-Boy. You can select this 12 and add a bevel modifier to this also. And you can see we can control
both of these objects. You can move it around easily. Basically, these are
the three operations of the Boolean modifier. They are like pretty
cool to use and you can get various interesting
shapes with this, with this little introduction of Boolean modifiers is done. So let's just select
this, all, delete it. And I will show you
how we can use all of them into our model. Rests. One again, let's enable X-ray. And let's first
create this thing over here, this big screen. So do that. Basically
just start a cube. Again. We need to just match it along with the
reference image properly Just press Tab restaurant
for the vertices, select, select these
vertices being them down. These two and G the next. And then select these
bottom ones in G, then zag and place
them like this. We don't really
have to worry about the thickness of the object. We can just replace
it like this. Any thickness will do.
This math is pretty good. Now if you remember,
I mentioned earlier, whenever we change the scale of the object, we need to apply it. So press Control a
and apply the scale. One for the Front
View enable X-ray. And obviously now we need to create all these small bevels. So to do that, first, press Tab to select and make
sure your scale is applied. Because if the scale is not applied and you try to
bevel all these edges, it might give you View Results. Tab press two for each
Select and select this edge. Now press Control
D to bevel it out. And you can use
your scroll wheel to increase the
number of segments. Yeah, I think
that's pretty nice. This edge now I will
select all three of these to press Tab again, hold Shift and select
all three of them. This one again for
the Front view. These now we can degrees
and number of segments. Alright, that's pretty
good in my opinion. Press tab and we have created the shape that we need
to create a cutout off. Right-click and
shared smoothness first, enable auto smooth. And now what we need to do is we need to just select this, the G, Then why? And just move it inwards
just a little bit so that these two objects
are intersecting. Now what I want you
guys to do is I want you to open up
your reference images. And now what I want
you guys to do is you can quickly open up your
reference images folder. Look at this reference image. Zooming over here
and you have to see what type of cut out
that we have to create. So obviously, we cannot
really work with the union or the
difference operation, even if you select these two press Control
plus minus V squared, something like this, that is because of the bevel modifier. We need to just move
it down like this. Yeah, you can see we
have created the cutout, but if you notice
the reference image, we don't have to create
this sort of cutout. We have to use the intersection. So let's just undo this ALL. Select this first,
then select this, then press Control plus slash. Now you will notice we have got something like the
difference image. We have something like this. We also have a cutout, but we also have a
shape in-between. For things like these are the intersect operation of the Boolean modifier
is very useful. But you can see the
shading is very weird. So to fix this, you select this and you have to
make it a rule of thumb. Whenever we're working with
the Boolean modifiers, the bevel modifier will always stay at the
bottom of the stack, no matter how many
modifiers are there, the bevel modifier,
this one will always stay at the
bottom of the stack. If you do that, all your
problems will be fixed like related to the shading
issues for this piece, also select this inside one and make sure to
move the bevel modifier. Below this. You can disable all the overlays to
see your model properly. And you can see we have got a perfect
cutout of the screen. What you can do now is you can open up this bevel
modifier and you can play around with the bevel
value. Whatever you want. Like if you want to type bevel, you can decrease it or if you
want a more smoother look. Yeah, that is
definitely up to you. We can maybe place it
somewhere around here. That looks fine in my opinion. Alright, so now I think you guys understand how to use
the Boolean modifiers. Let's keep on moving further
and make sure it's saved. Let's enable the x-ray. And let's see, we can now create this screen portion
at the middle. So do that again. We need to press Shift plus a and let's just add
a simple cube. And we can just scale this cube accordingly from the screen. Yeah, I think that
fits perfectly. Before doing anything,
let's just quickly press Control a and
apply the scale. And again, bring it out
over here. This piece. And now this time I
will select this piece. So hold Shift and then press Control plus slash to use the intersection
operation. And now we have
something like this. Obviously we need to
move the bevel modifier below this, then it
will look better. So yeah, make sure
to do this thing. After every Boolean operation, you select the
bevel modifier and move it below the
Boolean modifier. That way everything
would work perfectly and we would have like
correct shading every View. All right, this looks
pretty good in my opinion. Alright, so now let's again
press one, enable X-ray. And we have this small
battery icon over here. You can also create that. Let's add a cylinder
skin this down. Over here. There's our than X to rotate it on the
x-axis like this. And then you can type in in
your number pad 90 degrees. Then we can just scale it down Yeah, that's fine. I think. Let's bring it up over here. Shade Smooth this and
also enable auto smooth. And again, select the cylinder, then select this piece
while holding Shift. Then you can press Control plus slash to create the intersect. And now we need to again move the bevel modifier
at the bottom. So just drag it down at
the bottom of the stack. Make sure to do it for both of the pieces like this. Alright? I will reduce the level
amount just a little bit. Also, I will just
select this piece, press G, Then why? And move it a little bit
backwards like this. Just to give it like
that screen like Look, select this piece, move
this also backwards. Then I will select this again and just move it a
little bit more. I think till here
is pretty good. Yeah, that's okay, I think. All right, Next we can start to create
the buttons over here. So let's start with this
one first, or the cube. Scale it down,
place it over here. And let's see, we can
create it very easily. I think we can just
listed over here, Let's bring it out like this. And then risk control
a apply the scale. Press tab. And let's see. Three for Face Select. And let's select the top
face and the bottom phase. Press one for the Front view, press Alt plus E and
extrude faces along normal. And then you can
extrude it like this. Let's extrude this till here. Pretty good. I
will just increase the thickness of
this a little bit. Now in a similar way. Let's move these apart. Now press three,
select this face and select this face again plus one, then Alt plus E extrude
faces along normal. You can also hold Shift while extruding to move it
a little bit slow. And then you can place
it perfectly like this. I think the actual
button is still here. Alright, I think we're
pretty good to go now, let's bring it out
rigid and why? Stab breastfeed for Face Select, let's select this face and just moving
downwards like this. Shakes move this and
also enable auto smooth. Next I will add a bevel
modifier to this. Before actually adding
a bevel modifier, what I want to do is
remove the bevel modifier, select this piece
and just press Shift plus D to duplicate
it like this. And then hit right-click
over here so that both of them are exactly at the same
place like this. So the reason I'm doing this, because I have to
use like one of the piece to actually create
a difference operation. So what I mean by that is basically if I just
quickly select this one again and delete it so that it is
just one of them. I have to select this piece
and then select this one. Then press Control plus minus. You actually create the
difference operation over here. Then we can like use the other
one as the actual buttons. So yeah, I will just
undo everything quickly. And before actually creating the difference operation,
just select this piece, press Shift plus
D, duplicate it, and then hit right-click to
place it exactly over here. Then we can select this
piece instead of this one. Then press Control plus minus. To actually create the
difference operation. Move the bevel modifier
at the bottom. And yet now we can see
this is the reason I created a duplicate because we have this button over here also. And now we also have the
difference operation that we did just know. Alright. Now I will just
select this press Tab to select and select all these edges like
this one, this one. So the shortcut for
this is just hold Control and Alt. And
click over here. And you can see now all
of them are selected. Press tab first and
press Control a. Apply the scale, makes
sure the scale is applied. Press Tab again,
press Control V, and let's bevel
it out like this. I don't really know how much
revenue should go for it. Let's enable X-ray
and see over here. I think this might
is pretty good. Mood this again and
enable auto smooth. And now we can maybe add a bevel modifier to
this if you want to. Enable harder normals Alright, so next we will
detail the buttons even more. So select this piece
and if you know, whenever we like,
add a new object, so press Shift a and add a cube. It always gets added to
this 3D cursor over here. So we can change the location of this 3d goes up
wherever we want. You can hold Shift, then use your right-click to
like move it around. Wherever this 3D
cursor is placed. If you add a new object, it will be added over there at the location of the
3D cursor only. So there's this I want to move the 3d goes exactly over here. I'd origin point so that it gets added exactly at the
center of a button. So to do that, you
select the button, press Shift plus S, and
closer to select it. The cursor over
here. Now just press Shift a and let's
add a cylinder. Let's scale this down. Rotated by 90 degrees like this. And we'll just create a
small hole in the center. Shape mode this and
enable auto smooth. Select this piece,
then select this one, then risk unfold plus minus. And just make sure to quickly move the bevel
modifier below this. Select this. Let's bring it out. We don't want it too much. This money is pretty good. All right, that's fine. I think. Next, if you look over
in reference image, we have the small ridges lighting created
over our button. So let's add back to
suppress Shift a, and let's add a
cubed scaling down. Place it over here like this. Scale it up to match the scale. Let's able x-ray and let's
bring this out over here. Let's control a apply
the scale press tab and we will just bevel
it out in the corners, hold Control and Alt, and select all these edges, then the spin voltage
as V degrees, the number of segments, because this is like a
really small object mode this and enable auto smooth. One more thing that
I will show you is you can select any object, like, let's select both
of them by holding Shift. Then you can press
slash on a number back, isolate them, and work without
the rest of the objects. So this is really useful
when you just have to focus on a couple of
objects or one single one, you can just select
them and press slash to go into the local mode. And you can easily edit them
here. Just select this. Let's press three for
the right side view and rotated a little
bit like this. Now to duplicate this, we can press Shift plus D, duplicate it like this. But I think a better way would just go over
here selected. And let's add a modifier. You can see we can create duplicates in the array
modifier, any number of them. But we don't want
it on this axis. We actually wanted
on the y-axis, the zeta one for say, the factor of X to zero and increase the factor
on the Z like this. Slash again to come
out of the local mode, press one and enable X-ray. And let's just quickly
see the reference image. Alright, so that fits perfectly. Maybe I will just push
it in a little bit. And I have four of them. Lighting three was fine. I think this way it
looks much better. We don't really have to
go exactly according to the reference image. I will now select this and now add a mirror
modifier to this. And to mirror it
properly over here, we need to set our
axis so we can select this object
as the mirror axis. So select this object and
overhead in the middle object. Click over here and select this. Then set the zed axis
and disable the X. And you can see we have
mirrored perfectly, but we cannot really
mirror it over here. We just need to select it
and then duplicate it. Like this. We can disable the
x8 and say the x-axis. Now. Now just rotate it by 90 degrees is three
for right-side view. Enabled extra force Alexi, you can place them over here. But we need to fix
their rotation, R and Z and rotate it like this. Yeah, I think that
looks pretty good. Now to push it inverts
Reggie, then why? And then you can press Y
once again to align it perfectly with the rotation and just move it
inwards like this. Now I think a button
looks pretty good. We can maybe select
everything over here and just push it in. These two also.
So rigid and why? And move it inwards because I think the button
is not that big. We can see it from
the right side view. Suppress three. I
think this is fine. I will also select
the cylinder object and move it backwards. Alright. Next, let's see plus
one again, enable X-ray. Make sure to hit Save. And we can create these buttons. Now, these ones are
really easy to create. We can redshift, they add
a slender, scale it down, rotate it on the x-axis by
90 degrees. Right over here. Jay, smooth this and
enable auto smooth. And let's see, before
doing anything, we need to create the
cut-out for the buttons. So just select this one, enable X-ray redshift plus D, duplicate it over here. Now while these
two are selected, select them both, and then
select this one at the last. Less control than minus
the difference operation. Move the bevel modifier
at the bottom. Right. Now we can actually
start making the buttons. So select this one,
press Shift plus S goes into select it to
bring the cursor over here. Now we can add another cylinder, scale this down, rotate it
on the X by 90 degrees. Let's see their scale. The button now moved outwards. Shade Smooth this
first and enabled auto smooth rest Tab
to go into edit mode. First, let's press
Control a and by the scale the staff select, let's select this top face. And I will be, is its size like this. Next week can go over to modify and add a bevel
modifier to this, adjusts the level amount and enabled harder
normals and auto smooth. Let's do four and select lot and select this
complete loop, respectful, be and dry
but willingly this week, Let's see if that box. All right, this looks
pretty good in my opinion. You can also add a
weighted normal modifier to correct the
shading even more. You can see the shading is
just a little bit weird. So sometimes adding a weighted normal modified,
this fixes that. The button looks pretty
good in my opinion. Now I will just press Shift
plus D and place it over here if you want to place it perfectly at the center
of this thing over here. There is a small shortcut
for this or like a trick. But first, we need to go over to Edit Preferences
and enable another add-on for search for the coffee attributes
menu. Over here. This also comes
pre-installed with blender. You just need to enable
it from over here. And after enabling it, when you press control plus C, you will see this
huge menu appearing. So to use it for
select this object, then select this one because we want to copy the location. Who over here. Then
press Control C and then just select
Copy location. You can see it gets placed
perfectly at the center. All right, Let's hit Save. And I think this video has
gotten a little bit long. So we will end it here
and we'll continue from here in the next
one. Thanks for watching.
4. Completing the Front Side: Hello and welcome guys.
So let's continue now, I've also opened up the
reference image over here so that we can
side-by-side look at it. And one thing that I'm noticing
is that these things that we have created over here
in the left-hand sum, and you see them, they are a little bit bigger than the ones that
we have created. So let's fix that, which leaves. So just select this
and to scale it properly according to the axis because we have rotated
it a little bit on the Z. Just press S, then Z, and then present once again. And you will see that
it aligns itself and just increase scale on
the Z axis like this. Yeah, that's pretty
good in my opinion. Now select this one. For this one, I think we
need to press S again. And just scale this
one up also like this. You can press G, then Z, then Z once again and move
it downwards like this. Just increase the scale
a little bit more. Alright, that looks
perfect, I think. Let's continue also, if you will notice that there is a very light like hint of this circle
shape around the button, but we won't be creating
it in the modeling phase. I will just add it
later on while we are texturing this piece
in Substance Painter, it wouldn't be much
easier to do so. But for these buttons also, we have this shape over here. We can add this one in the modeling phase only because it is kind of easier to do. So let's just do that now. I will enable the
Willie restaurant for Front View and enable X-ray. So let's start by
adding a simple cube. So press Shift plus a cube. Let's place it according
to the object over here. So again, press R to rotate it a little bit
and scale it down. You can also view things like the rotation translation and the scale over here
also in this menu. If you don't see
this menu up here, you can press N to
bring this up like this and select the item
tab from over here. And now I will just quickly
change the rotation. So I will just
select everything, put everything to zero. And for the y-axis, we can type in -25 degrees. Yeah, I think that
works perfectly. Now. Just try to scale it properly according to
the reference image. You can press G then X and X to move it along the
rotation this way, press S and X. The next one is again to scale it like this along the rotation. Alright, I think that's
pretty good now. So what we can do is we
can first risk control, apply the scale, then press Tab and simply
press two for it. Select hold Control and select all these edges
to be able them. There's one once
again, enable X-ray. And let's see, we can
easily devil this now. I think this image is pretty
good and it fits perfectly. Let's select this shape mode. This enabled auto smooth. Now just simply select this first and select
the main object. Then press Control plus minus. We need to move the bevel
modifier below this. And yeah, that works perfectly. Just bring this out this way so that we have like
a really faint cut. I think we can bring it
outwards a little bit more. If you are seeing all these like little bits
of shading issues, you can just try moving
your object around. And most of the times they
will fix themselves only. Whenever you have
the shading issues, you can just move your object around just a little bit and you can find the perfect place where you are having no issues. I think we have to
push it in this much. Then we can select
both the buttons and push them back
also like this. I think that looks fine. Let's move further now. And we can start by making these buttons over
here. Let me see. I'm just not liking the
depth of this cutout. I want to like push it
forward a little bit, but it is giving me a little bit of shading
issues over here. I'm not a fan of Let's try adding a weighted
normal modifier to this. See if that fixes it. Yeah, I think that digit, if you just turn it off, you can see all the
shading issues. But if I turn
weighted normal on, we don't really have
them and we can, yeah, we can push it out a
lot more in my opinion. Alright, I think that
looks much, much better. Because if you see in the
reference image also, we don't have it like
this cutout too deep. This way I think it works best. You can just add
a weighted novel modified to fix that
issue of yours. Next, let's see, we can select this piece and what I
want to do is press Tab. And I want to add bevels to these edges because over the
buttons also it is there. You can just press two,
then press Control and Alt, and click over these edges, then just press control
V and then out smoothly. Alright, that looks much, much better in my opinion. Alright, so let's hit Save. And now we can start by creating
these buttons over here. So enable X-ray. And let's see. First we need to again
add a cube scaling down. Let's place it over here. For this also, let's try -25, one rotation, but I don't
think it would fit. I think it fits. Maybe we need to rotate it a
little bit more to this one. We have to light
just eyeball it. Yeah. I think that
is pretty much okay. So we can maybe set it to -26. Yeah, that looks fine to me. Press Control a and
apply the scale, press Tab and Br2 for it. Select hold Control and Lord, select all these edges. And let's just quickly bevel it. Yeah, I think
that's pretty good. I will just quickly also
open up the reference image. So let's open up this one
and we can discreetly look at how the cut-out is placed. We have one cut out over here, then we have another one inside. It, can have a button. So first let's create
this outer cut-out. Shapes. Move this
enable auto smooth. And while this is selected, Let's press Shift and
select this main object, press Control plus minus. First, let's move
the bevel modifier. Now we need to just move
both of the modifiers, the bevel and
weighted normal also. So let's just select
this Boolean modifier and bring it above them. Like this. Let's see. What we can do is we can
select this press Tab, press slash to go into the isolation mode and press
three for Face Select. Let's select this back
face to come out of the local mode and risk control V to bevel the complete
face like this. I think this way, or get out
looks much, much better. And now we can just
duplicate this over here. Selected, sorry, I
selected the wrong thing. Select this object,
press Shift plus D, and just place it right
over here like this. And now we can select this
select domain object, press Control plus minus, select the bottom
Boolean modifier and bring it above the devil
in the between nominal. And yeah, now we can start
by creating the main button. So just add another cube, scale it down, rotate
it by -26 on the Y. Make this one a little
bit bigger than your reference image because we will be using this
object as the cutout. And then we will add the
main button over it. There, just make it
a little bit larger. Press Control E, apply the scale press tab.
There's two for it. Select hold Control,
select all the edges, then press Control V and W
it out quickly like this. Pretty simple. Then we can just shade smooth this and
enabled auto smooth. Jean and why and moving
backwards like this. And before you actually use the Boolean modifier redshift
plus D to duplicate. Then hit right-click to place
it exactly dislocation. And then while it is selected, you can select the main
object, press Control minus. And we have created the cutout, but we cannot see because
of the duplicated piece. So just scale it down now a little bit so that we
can see it properly. And still not that visible, but it is there because it is like a
really small cut-out. It is causing little
bit of shading issues. But I don't think that matters that much because
it won't be visible Next, let's Shape the button and little big risk control E
apply the scale breast tab. Let's press three for phase
selects the top face. And then we can just divide
the top face like this. Make it smoother. Select all three of these objects and bring
them all the little bit. I think earlier one was fine. Now we can just select
this and select this. Then press Shift plus
D. And if you remember, we learned about the
copy attributes menu. So while both of them are
selected, select this, then press Control C and copy location to bring them
exactly at the center. Then you can just select them both and move them
backwards like this. Select this piece in the
middle and select this. Then press Control minus
to create the cutout. We forgot to move
the bevel modifier. That's why it was causing
all the shading issues. I totally forgot about it. Say I'll move the bevel modifier and we can normally below this. And I think this way
it works much better. Now I will just select
everything that we just created, all six of them and move them outwards. Like this. Turn off the overlay
to see how it looks. Yeah, I think
that's pretty good. We are having a little bit of shading shoes here and there, but I think they are really, really small and
we won't be able to even see them from faraway. So I think it's fine. We don't have to worry
too much about them. Let's just hit Save and we
can continue. Let's see. One. And next thing
that we can do is we can create the shapes
that are created over here. If you press three,
you can see them over here also on the
Side of your objects. So let's do that now. So to do that, you can select the main object and press Tab. And you will see just a little bit of the Z
fighting going on. So when the faces are like
overlapping, it happens. The reason this is happening
is because we have used the intersect operation of the Boolean modifier
two or three times. So that's why whenever
we like go into the Edit mode of
the main object, we are seeing all this. It does not cause any problem. But if you want me to show you how we can fix this,
it is really easy. Wherever we have used like
the intersect modifier, if you select any of
those objects and just quickly go into the object
data property of theirs. You will see this for number
is written over here. So that means this
object data is being shared by four
different objects. But we want that
every object should have unique object
data properties. So to do that, we just
need to select the object. Click over here. And as
soon as you do that, now the four is not written. That means this object now has a unique object
data properties. So now select this one and you will see three
written over here. That means now it is being
used by only three objects to just quickly click on
here again and again. And now each one of them
have unique properties. So now when you select the
main object and press tab, you will see it
is not appearing. It is just appearing over here because of the
overlapping phases. If you want to fix that also, you can just select
this object as G then via and bring it
out just a little bit. So just like very,
very small amount. And even if you do like
a very small amount, and now you select the
main object press tab. You will see it
is not appearing. It is only appearing over here. So again, I will select this
and we can just project and why and push it inwards
just very small amount. Now you won't see any kind of weird issues with your model. So press control S save
it for right Side View. And let's see, we can
just dab enable X-ray. You can start by pressing Control Art and adding
edge loop like this. Let's place it over here. Now press Control R again and add one edge loop
over here like this. You can hold Alt and click
on the loop to select it. I think that's pretty good. One, enable X-ray. And then press Control
R and you will see the edge loop is not really
working properly over here. We have to create in
manually and don't worry, it's not that difficult. So press control or
first advantage, you look over here like this. Then press Control or add one edge loop over
here like this. So now what we need to do is we can disable extra for now. We want to have them placed at exactly at the same height. You can see they're not
really perfect right now. For that, we can use snapping. So you can go over here
and enable vertex snapping Select vertex snapping
from over here. Now when you press G
and you hold Control, you will see you can
snap it to any vertices. So the way we will
properly align it with this edge
over here is G, then Z, and lock it on
the Z axis like this. So just come over here
plus jeden Z to move it. You can see it is
moving and hold Control and hovered
over this vertex. And you can see the
location is now snapped. And they both are perfectly
in line at the same height. So hold Alt, select this, hold Alt and Shift
select this loop, and just press G and Z
and move them up volts. Now to join them, you can
press one. Enable X-ray. You can select this word. See you hold Shift,
select this vertices, then press G, select them. And at the backside
also select them both. Then press G. And you can see we have created
the complete loop. Now. Let's disable X3 plus one. And yeah, we're over here. Let's move it right over here. Now we need to do the
same thing again to press Control or add edge
loops like this. One over here. This G Lindsay and hold Control to snap it. Select these two J to join.
And select these two. Let's J to join. We'll lot
silicon the complete loop, Jeevan Z and bring
it up like this. Press Control or. And now we need to add a couple
of loops over here. So let's see how we can do that. We can add one like this. Let's just quickly
add four loops. On the top like
this. Enable X-ray. And you can just select all
of them at once just by, just by creating a
selection over this vertex. And you will see everything
is selected because x-rays on and now you can just
move it over here, this one, and move
this one over here. Now let's see. We can
add a loops over here. So add for-each loops like this. You can select them both. So lot, click over
here and select them, press Z then X, and
just quickly snap them. So whole lot selected plus
G The next to move them and snapping so that all of them
are perfectly in place. Alright, now we can
select these two big J. So at these two threads J, so these two and press
J again and again. Let's do the same
thing over here. Press Control R and you can use a scroll wheel to increase
the number of plots. So we need FOR loops. So we'll do that. We'll
lot select this one. Let's do the next and
discreetly placed them all together. Just like that. Now we need to just
quickly join them. So select all of them one-by-one and press J
to join them together. And now we have got a
perfect loop that we can select Extrude to hold Alt. And let's just select
this complete loop. Three-four face
select, hold Alt, and select this loop
like this, X plus three. And just, let me see if the
size is right in this space, S and X and increase the
size a little bit, sorry, S Then why do increase the thickness of
this just to little bit? Yeah, I think that is perfect. Now to extrude them, we need to extrude them inwards. So now to selected,
you can hold Alt and click over here and
select this complete loop. Then hold Shift and Alt, and select this loop. Again, hold Shift and Alt
and keep on selecting all the loops that
we have to Extrude. One enabled x-ray and see if
they are placed correctly. You can also check the
proper edge length by going over here
and enabling Agilent. And when you press to select this edge and you will see that the length is
written over here, 0.0, 253. If you like. Move the vertices, you can see the edge length is changing. So let's check for both of them. If the Agilent is same, this one is a little bit larger. So what we can do is
we can just select this loop and make it
a little bit thicker. So it was 0.0 282, and now I think they
both will be saved. We can again just
disabled Agilent first, hold Shift and Alt and quickly
select all of these loops. Now, you can just press Alt E, extrude them and select
extrude faces along normals. And we will extrude them
inwards Just like that. So very simple. You don't have to extrude inverse too much. Just a little bit. And yeah, you can see that looks
pretty good in my opinion. So our Game-Boy starting to
come along a little bit. Also, if you want, like better control over
your bevel modifier, you can select the main object, go over in the bevel
modifier and just disable clamp overlap in
the geometry section. As soon as you do
that you will see everything goes a
little bit weird. But don't worry. What basically
has happened is it is now no longer clamping the overlap and if you
increase the bevel, you will see everything
is now gone haywire. So you just need to
control it very carefully. So maybe we can place it to 0.001 or you can just
try checking it. If it works perfectly with
0.0 is equal to also, if you see any kind
of shading issues, you can just decrease
it back to 0.001. So we are seeing a couple
of them over here. Let's just put it
back to 0.0, 015. Let's try one 5. I'm noticing they're like a lot of
shading issues over here. I think that is mainly
because they are like very small
Boolean modifiers and they are very
close to each other. So basically what I
will do is I will just select these two and
just delete them completely because I don't
think we really need them a really small and we won't be able to
see them properly. And it is causing to mess up our like bevels too much so
we can just remove them. And we can adjust the
bevel a little bit better. So set it to 0.002 maybe. I think, in my opinion that
works much, much better. And we don't have any kind of shading issues are like
overlapping anywhere. Alright, that looks pretty
good in my opinion. Let's just hit Save. And I think this is it for
this video Tango is watching. I will see you in the next
one where we will continue
5. Working on the Side View: Hello and welcome guys. So
let's continue modelling now. In the last lecture, I forgot to enable the screen Karski, so sorry about that. I will make sure to remember it for the upcoming lectures. All right, so this one, Let's enable the
overlays and enable X-ray and see what
we have to create. So Arnoff, like the front screen on the
Front Side of the model. We only have this thing
to create over here, this small little
panel over here also. So let's just quickly do
that. It is really simple. We just have to follow the
same steps that we have done quite a number
of times now. So press Shift plus a, and let's add a queue
basic over here. And let's scale
it down S then X, and scale it up on
the x-axis like this. Yeah, I think that's pretty
good. That's Controller. And let's apply the
scale. Stab again. There's two for it. Select
Full Control and Alt. And select all these edges. Now there's press Control
B and devil them out. Alright, that's pretty
good in my opinion. So for this type
of like a cutout, we can also use the
difference operation, or we can also use the
intersect operation. It is totally up to you,
whatever you want to do. Because as the cut
is very small, you can just maybe like select
these two press Control plus slash and create this
kind of intersection. And then what you can do is first let's move
the bevel below. And also makes sure to move the weighted normal
modifier at the bottom. Both of them. Let's just select
this Boolean modifier at the bottom and move it above. What I was mentioning
is basically we can create
intersect like this, and then we can push this object backwards to create
something like this. That would also work. Or we can directly use the
difference operation, which in my opinion would be, I think a little bit easier
and much better approach. And do everything. Here. You can also look at in the
reference image also. It does not feel like
there is abandoned inside. It feels like a cutout. So I think working with the difference, operation
will be much better. So just select them both
and press Control minus. Make sure to just, I will just collapse
every single one of them. And yet now it is much easier. We can just select
this Boolean modifier and move it above the devil. And yeah, you can
just control it now. You make the cut out
like really small. And yeah, I think this in my
opinion looks much better. There's two the same for
the bottom one also. Add a cube, scale it down. Let's control a apply the scale. Press tab is to hold Control and Alt and
select all these edges. Press one for the Front View. Let's enable X-ray
and press control V and Bevan it out again. Alright, the good in my opinion, right-click, Shade Smooth
and enable auto smooth. Again, select these both, press Control Minus and just
move the bevel modifier. Also, remove the
Boolean modifier above the bevel modifier. And yet we are
basically good to go. So if you look over here
in the reference image, we also have the top view. And we also have this small
button light thing over here, which we do not really
having a reference image. I think we can see it from
here. You can see over here. But we don't really
have a top view. So we can just
create that quickly. So let's see, we can look
at in the reference image only displaced along with this
line that goes over here. So let's just add a cube
over here like this. Press and X scale it up. I think it is around
the size of this thing, only like this written
thing or I think it is smaller than that. I think this will do is try it. I will select this and move
it backwards over here. Now, just select them both British-controlled
minus first layer smoothed the Boolean modifier
above the bevel modifier. And we can look at the
reference image ones. Yeah, I think it
looks alright. Yeah I'm happy with it. Let's just add the switch now to add a cube again and make it
roughly the size. Place it over here.
Select the box I will decrease its
size on the x-axis, sodium, the Y. Like this. I think this looks really
good for the shape we have on square at the bottom and a little cylinder.
This poking out. Press Control E
applied a scale first, we can add a bevel
modifier to this, make it a little bit smoother. Shift plus S goes to select
it so that we can bring the cylinder exactly
over here in its center. And let's just look
at its shape for now. So that is rarely
rounded at the top. In my opinion, what we
can do is shade smooth. This enabled auto smooth, stab Br2 for it, select hold Alt and select this complete loop press
Control V. And yeah, I think we basically
have got the shape down. Yeah, I'm pretty
satisfied with it. Let's continue now. Save and press three for
the right side view. Now I think we can start working on these
things over here. Again, we'll just add
a bunch of objects to create these cutouts and
match the reference image. So let's start. We can maybe start with
this thing over here. So press Shift plus a. Let's add a simple cue. And it is not really
visible over here, but this thing is
like a small dial. As you can see, this
is the volume dial. So we need to create
a get out over here. I think this bag,
as you can see, date is like a small box-like
thing I did over here. Ready, small, but we can
add that small detail. So let's bring this out. So check with the
reference image again. And yeah, I think that's fine. Select them both press Control minus and we
have this with us. They can click over
here to select this red shift plus S
and closer to select it. And now we can add a small cube, like we can use to create
this thing over here. All right, Next we have
to create the dial. So I think that is pretty easy. We can again add
a simple cylinder and now just rotate
it like this. Suppress are then type in 90
and scale it down like this. Get it up and press S Then why? And scale it down on
the y-axis like this. S then X and push
it in this words. Or we can just let see a second. I'm trying to get the
perfect scale for this. I think that's pretty good. We can select it, press Control E applied escape, obviously Shade Smooth this
and enable auto smooth. I'm to make it look a little bit more like a
dye, extra slash, pre-step, rest 34, Face, Select hold Alt and
select all these faces. Then you can press
I to concert this once and press Alt plus E and
extrude faces along normal. Insert this once again
and press it one more time so that you can insert
individual faces like this. And then again press Alt plus E, then extrude faces along normal. And you can push this outwards or inwards wherever you want. Maybe you can create
something like this and display it looks much more
like a dial in my opinion. I think the shape is
pretty good for now. Let's just select
this box over here, the Boolean for step three for Face Select and
push it inwards. Because I don't want to
make the die too big. I think that's good. Let's continue now
press three again, enable X-ray screen
this cutout next. So this is like, I think a USB connector or some
type of external connector. Because it is written over here. We can create that
simply no risk that redshift day and
let's add a queue. Scale it down. Scale
it up this much. Stab. Press one for vertices elect based the vertices
over here like this. And now we can first
apply the scale. Then we can just
press Tab to select, select both these edges. And then basically
risk control V and reduce the bevels to, to, to create the shape. It was really easy to do. You can just decrease the
amount of segments to talk. And we can easily
make this shape. And yeah, this will
be at putouts. So before actually like
making the cut out, I will just duplicate this
and place it over here, and then select it, select this, then press Control Minus. Copy this thing over here, this box that we created, duplicate it and place
it over here also. I'll select this thing
that we created. And basically what I
want to do is I just want to create like
a border lighting. So to do that, what we
can do is press Tab, rest three and select
both these phases. Then just insert this like this, X and delete the phases. Then we can press one for
vertices select hold, Alt, select this loop, hold Shift and Alt
select this loop. Then you can press Control
and select bridge edge loops. This will basically joined them so that they are
not hollow anymore. Now basically I will
select this and select this then press Control
C and Coffee location. Over here like this. Obviously I would risk
tab enable X-ray and select it and bring
it right over here. I think that looks like a pretty good outline
that we have given this. We can make this metal shape to give it like a
metal covering. I think it looks really good. Alright, to move further, let's quickly look at
in the reference image, can see this metal like thing
that I've created just now. We will like maybe create a
chip like thing inside it. So it is not really
visible over here. But we can maybe
create something like a USB chip that has like golden sticks
on it. So let's see. Let's press shift D. Let's
add a cubed scale this down. I think something like
this looks perfect. It is really small and it
won't be that visible. So we don't have to
go that deep with it. Make sure to hit Save. Now I will just
select this piece and press Slash on my number Back to go into
the local mode so that I can just work
on this one for the Front View and we can
create small boxes onto it. Just to create
those golden chips that we usually see on the USBs. We can scale it like this so
that it appears both sides. And yeah, that's pretty good. We can now just directly
use the add a modifier, the X factor to zero
and Z factor like this. And distributed a
couple of times. And yeah, I think
that's pretty good. We can print slash to come
out of the local mode again. Next what I will do is I
will just quickly add a box, scale it down, and just place it over here right at the back The reason I'm doing
this is because it will be much
easier to just select this box and give it like a black texture and
easily texture. The backside of this USB. Alright, I'm pretty
happy with this. Let's just hit Save
and rest three, and let's see what
we have to do next. We have to create
these cutouts now, which have the labels for these controls. So
let's just do that. Or the cube listed over here. Scale it down like this. It's Control a apply the scale. There's just duplicate this
over here at the top also. And scale it up like this again. And again. Apply the scale for this also. Now, make sure to just
select them both first. Okay, so you can just select
the main body hydrate, select them both to hide, you just need to
press H. So after you've selected them both
bring them out over here. Then press alt plus H to bring
back the hidden objects. Now we'll place them like this and make sure to
select both of them. And then press Control
a apply the scale. Then press Tab to go
into the edit mode is to select hold Control and
select all these four edges. Then hold Shift Control and
Alt, all three of them. You select all these
edges at once. Rest one, okay? One thing that I
completely for vertice, we don't really have to bevel
these things over here on this corner because
it is really beveled at this side only as you can see in the
reference image also, it is only ready
beveled over here on two sides, not on the bottom. We don't need to
select them all. Just hold Shift and
manually select these four, rest three, then
just press Control V. Give it a couple of segments. And yeah, that's pretty
good in my opinion. Shade Smooth this and enable auto smooth
for both of them. Select these two and
select this piece, then press Control minus. Let's move the bevel
modifier at the bottom. We have a couple of issues. Let's just quickly address them. As I mentioned earlier, whenever you have like shading issues, just move around your
objects and little bit. And as you see, more often than not, they
will fix themselves. So it was just being caused because it was too
close to the H. Just bring it up over here and select all
these things also. Move them a head a little bit. Save. And let's see. These two. Let's try. Xing them. In here. Doesn't really work. It tastes kind of giving us
a lot of shading issues. So let's just keep
it till here only. And obviously the cut-out
is like really small. So till here I think
is pretty good. Yeah, I think God object is
looking really nice now, everything is coming
along pretty well. And again, this video is like really wrong in my opinion now, so I will end it over here. Thank you. Is watching I will
see you in the next one.
6. Finishing the Side View: Hello and welcome guys. So let's continue modelling or objects. In the last lecture, we created all these
things over here, but I'm not quite liking
how this turned out. I just want to make a
couple of changes to this, or rather I will be just
modelling it completely. Again. It is looking
like really thick right now and it does not have enough segments
in my opinion. So make sure to just
select the cylinder and you can go into
the isolation mode, and then you can press
Shift plus S to bring the cursor over here
right at the cylinder. And let's press shifting now
and add another cylinder. Zoom out and forced to give it. A lot more segments. Do not click anywhere and
click on this menu over here and increase the
vertices from 32, 64. I think that is pretty good. Now I can just scale
it down like this. Rotated on the x-axis
by 90 degrees. One for Front View and scale
it up like this. For now. We can just delete
this older one or maybe you can hide it
or whatever you want. Shade Smooth, this
enabled auto smooth. And first let's see how
it looks over here. I would just make it
a little bit thinner. Push it over here, and
we can maybe just bring this out like this to cover
up the remaining space. Let's quickly check with
the reference image. I think this fits much better
with the reference image. So I'm just going
with that only. Now. Press Control E, apply this game press Tab. And now we can do
the same thing. Suppress three, hold Alt and select this loop
only complete loop. And this time just
press I to insert this. And you can press I once again, if you remember to insert
the individual phases, just insert this till here and extrude faces along normal
and extrude it inwards. And I think this looks much, much better than my opinion. Yeah, I'm pretty
happy with that now. So let's just hit Save. And now we can continue
modelling for the left side. So for the right side we
needed to press three. For the left side we need to
press Control plus three. And first we need to align
a reference image properly, because right now it is aligned
with the right side only. So basically what we can do is as our work with the
right side is done now, we can press Control plus three. Select this image, press G, Then why? Bring it over here? But you might notice that the
image is flipped right now. So we also need to flip it back. So to do that, press S Then why, and then type in minus one. And you will see that the
image is flipped back again. And we can just place it
perfectly along with our model. Alright, I think
that's pretty good. We can now continue
modelling again. Now you must remember that
you need to press Control plus three to get over
to the left side. And let's start. We can start by pressing Shift a and
let's add a cube, scale this down, and
place it over here. Stab one forward, deselect. And let's bring these
vertices right over here. This controller and
apply the scale. And now let's just press Tab
to go into the egg mode. Press two for it, select
hold Control and Alt, and select all these edges. Then again, risk unfold plus three and we can
start beveling it. Okay? I again, for what? We do not need to bevel
it over these edges. Let us just select
the top edges. Then press Control V. Then press control plus
V to bevel them out. And yeah, I think this
matches pretty good. We can now bring
it out over here. Shade Smooth, this
enabled auto smooth. And select these two
press Control Minus bring the Boolean modifier above the bevel modifier in
the weighted normal. Let's bring it out over here. Alright, now what we
need to do is we need to first let's just
press Shift plus S and closer to select
it was select this, sorry, then press Shift
plus S goes to deselect it. Bring the cursor over here. Then you can redshift tailored Side a cubed, scale this down. And it is not really
visible over here, but over here there
is another diet. I think it is for
contrast or something. You can just quickly
look it up over here. As you can see, there is
another dial over here. So we need to create a
Boolean cut out first, then another cutout inside it. And then we can place
the dial in over there. But we'll just
select this estab, enable X-ray and just move
it a little bit like this. And we can again
select the skew, deal it up like this. I'll just place it
back over here. Select these two again,
press Control Minus. Make sure to move the Boolean
modifier above the Bevan. Now we can just go
over here and copy the dial and the
square, like cube. So press control C
and then Control V, G to move them around G, then X and bring
them out over here. Press Control plus three. Let's rotate them
by 180 degrees. Let's see, I think
this pretty good. We can maybe move the
dial inside a little bit. Yeah, I think
that's pretty good. I would just select
all three of them. I increase the size and lift your right. Thats pretty good in
my opinion, I think. Yeah, that looks fine. Then again, press
Control plus three. And let's move over here again. Add a cube, scale it down. Let's it over here. Scale it on the Z axis. You can just press Tab now, select all these vertices
and bring them down. Make sure to enable the X-ray. Because if you don't enable the x-ray and select
the vertices, only the front ones
would be selected and it can mess up your model. So make sure to enable X-ray. And then select. Now
moving back over here, press Tab, press Control
a and apply the scale. And again, risk tab to
go into the edit mode, select only these two
edges that's controlled. Three enable X-ray and they will them out. That's perfect. Shade smooth. This
enabled auto smooth. And now we will just select
both of the objects. Select this one, then hold
shift, and select this one, then press Control
plus minus to create the Boolean difference and bring the Boolean
modifier above the debit. And yeah, I think
that looks nice. We can next, I'd like I think there is a charger or plug-in light
thing over here. We can be in that now. Let's see, basically
let's just add a cube. Scale it down, place it right
over here. Press Control a. Apply the scale. Press Tab to go into the edit
mode and just select these two edges
that's controlled three and Bevel them out completely like this will
make this rounded shape. Sheets moon. This
enabled auto smooth. And again, just create
a cutout of this move. The Boolean modifier above the bevel modifier,
still not working. So I think let's see. Press Tab to go into Edit mode, press a to select everything. Then you can press
Shift plus N. And now it is working basically
the normals were wrong. So by pressing Shift
plus and you can recalculate the normals
and it is six now I'm just moving this
back edge a little bit. Create something like this. Yeah, that's pretty good. And if we look in the
reference image quickly, we have like a whole
line thing over here. Let's create that. So again, I will just select this press Shift plus S
goes or the selected. Let's bring cylinder over here. In this on the y-axis
by 90 degrees. Now just before doing
anything for supply, the scale shapes
mode is enabled auto smooth, and just duplicate it. So press Shift plus D
to duplicate and hit right-click to place
it exactly over there. Now you can select
these two items then press Control Minus. Move the bevel modifier
above the bevel modifier. Now you can just
push this downward, scaled it in a little bit. And I will select this
press Tab, press Control a. Apply the scale first. Industry for Face. Select, select this
top face plus I to insert this and extrude
this inwards like this. Just to make sure it is
a little bit deeper. I will increase the size
of the Boolean cut-out. Let's select this now. Slash. We can press Tab
and delete this back face. So press X and delete the face. Let's move it backwards. Anya. That's pretty good. I will again select
this press Shift plus S goes to the selected, add another cylinder and make this one really
small like this. Rotated on the Y by
90 degrees again, scaled it down along the x-axis. And this will be like the iron. Let's stay there at the center. Maybe we can increase
the scale of this. Lighter scale shapes mode
this and enable auto smooth, stab plus three for face, select and select the top face and just bevel it out like this. And yeah, Large, pretty
good in my opinion. I will just select this thing and scale it down a little bit. And yeah, that's pretty
good in my opinion. Let's just hit Save. And I think we have also
made the left side now. Yeah, we can now
maybe move towards the backside of the model and then we would be pretty
much done with it. Alright, so I think this is it for this lecture, guys.
Thank you for watching. I'll see you in the next one.
7. Fixing a Small Issue: Hello and welcome guys. So before we actually start modelling the
backside of our model, there is one little issue
that we need to fix. One thing that I noticed was when I was looking through
the reference image, these lines that we have
created, like these ones. All these the only go at the front of the model
and not at the Back Side. Like as you can see over
handed offense image. There are no lines over here, but we have added
them at the backside. Also. Another thing, they are like really thin
in the actual model. And we have created them
like really, really thick. So I just quickly want to fix this issue before we
actually proceed further. So don't worry, it
is really easy to do what we can start with this. First, let's select
the main object and basically just
press slash for the local mode so that you can easily focus on this only and not the other objects. Then press Tab to go into the edit mode and
to delete them, rest 34, Face Select. And then hold Alt and
select this complete loop. And then hold Shift and Alt and select this
complete loop. You need to only select
these two loops. Then press X and
delete the vertices. Make sure delete the vertices and you will see
everything is removed now, only I think these four
edges are remaining. So just press two for it. Select, and just select these four edges over
here at the top. Press X and delete the vertices. And now you can see we have
this kind of hollow shape. So we just need to
fill in the faces. It is really easy to do. Basically, you can start with
this big face over here. So select these two
edges and basically just press F to fill the
space in-between them. And now you do not need to do it for each and every single edge. You can just select
this edge over here. Then keep on pressing
F like this. And you will see it
fills out automatically. Just keep on pressing
it till here. Don't go further from here because there is like
a space in between. We need to select
these two edges, press F, then select
these two edges, press F, and again select it and fill these
remaining ones out. And then again, pause over here, select these two, press F, select these to preserve. This way, we can just quickly
fill out these spaces. Again, select this and now
keep on filling these two. Press F, select these two and F. Alright, so this is done. Moving on over here, select
these two phase or edges, then press F. Similarly. Now again, select this edge over here and just fill out
everything quickly. Do it for the backside also. And yeah, you can see that
we are done so quickly. Alright, so what we
need to do first is we need to decrease
the thickness. So hold Alt and
select this loop, hold Shift and Alt
select this loop. And I want to check
the Agilent forest. So select Agilent, you can just select this edge
and you can see it as 0.028 m. And this
one is also 0.028 m. So now we can
reduce the thickness. So Lord, funny, plus
three for Face, Select hold Alt and select this, hold Shift and Alt,
and select this. And now press S and X. And you will see when
we scale them down, it does not give us
the desired results as the edge loop start moving. So to fix this, it is very easy. Currently. Median point
is selected over here. And you need to change this
to individual origins. So transform pivot point, we need to set this to
individual origins. Because when we set this
to individual origins, you will see they will
be scaling down only over their individual origins
and not moving around. So now we can scale them easily. So let's check the
Agilent over here, and maybe I want to
decrease it down to 0.01. I think that would
be pretty good. Yeah, let's do the same
thing for all of them now. So hold Alt, select this loop, then press S and Z, and you need to check
this thickness over here. So just set this to 0.01. Again, you can hold
Shift to decrease the speed so that you
can scale properly. And the last one is this one. Again, hold Alt and
select this completely. And let's see the
length over here. Possessed and why. And yeah, that's perfect. Now all of them are equal. So what we need to do now
is first disabled Agilent and also turn this
back to median point. Hold Alt, select this loop, then hold Alt and Shift. Select this loop. Again
while holding Shift and all, just select all the loops. And now we need to deselect
it from the backside. So to make a DIY selection, you can just hold Control and
just deselect it like this. Whatever comes into selection would be removed
from the selection. So hold Control and just
drag out your selection like this and make sure nothing is
over here at the backside. And yeah, I think now
it is pretty good. Suppress old plus E and
extrude faces along normal. And just extrude this downwards. Alright. Yeah, I think
this looks much, much better than the older one. Let's press Slash to come
out of the local mall. Let's see our model. I think I'm already looks much
more cleaner now. We can now finally start with
the backside of the model. So thanks for watching. I'll see in the next one
will continue modelling the backside of the model in the next video,
I'll see you there. Thank you.
8. Working on the Back Side of the model: Hello and welcome guys. So now let's continue
modelling the backside. So first we need to set
up the reference image. So let's press one. What I will do is
basically I will select this reference image, but as jeden via and
move it ahead like this. So now that when I
press Control plus one, we can see the backside. And now we can easily set up the image according
to the backside. First we need to flip it
because everything is opposite. To select it, press S and
X and type in minus one. Now just align it
with your model. Makes sure to just
align it properly. You can use this edge
as your reference and properly align
it with the image. Any. I think that's pretty
good. So let's see. We can start by creating
this panel over here. So for this, I think we need
to create a separate object. You can check in the
reference image also, we have like a extrusion
coming out of here. So let's see. What
we can do is we can first select
this press Shift S, then closer to select it. Bring the cursor
over here and let's just press Shift
and add a queue. This down. Press Control plus
one for the Back Side View. And let's scale it according
to this reference image. Yeah, that's pretty good. I think. Wring it out over here. And first, we need to press Control a and apply the scale. And in the reference image, I think it is kind of rounded. So we can just press Tab
Br2 and select this edge. This edge, make
sure the scale is applied and just press control
V and W it out like this. Shade smooth, this enabled
auto smooth, stab. And I will press three
for Face Select. And let's select
this bottom face and we can create
something like this. It is overlapping over here, so make sure there is no
overlapping going on. I think this much
bevel is pretty good. Now what we basically need
to do is we will be using the union Boolean modifier. So just select this,
then select this, then press Control and
plus one number by. And you can see now
they both have joints. So what we need to do
is we again need to just move the Boolean modifier
above the bevel modifier. This way. I think
it is working fine. Let's press three for the
right side view enable X-ray. You can see it is
not that outwards, so just push it in till here. Also, let's press Tab to enable X-ray and press
one for vertices. Select, select this and
let's bring it down. Alright, that looks pretty
good in my opinion. Next, what we need to do
is now we need to create the space over
here that there is like an empty space to insert
the Cartridge like this. Let's create that now. Again, I will press Control
plus one, enable X-ray. And let's just again add a cube. Scale it on the
x-axis student here. And let's see how much
space we have to give between the switch over
here in the space. It is something
around this much. Let's see. I think
this is pretty good. Now what I will do is press
Tab, press three for Face, Select, select this face, and let's just move it inwards. Just about till here I think. And now you can just scale
it downwards like this. And scale him down a little
bit more on the y-axis. Place it over here, press Tab, the S3, select and bring it out. Just double-click in here. Yeah, That's perfect. I'll just select
this then select this press Control minus. And you can see we have
created a cut-out. You ever press Tab, press three for free
select and let's see, let's bring it out a little bit. This will be the space
to add the Cartridge. And again, we will
be just moving the Boolean modifier
above the modifiers. And yeah, that looks alright. Let's add these things now. We can add small details. Redshift day or the cube. Scale it down,
place it over here. Risk control a. Apply
the scale and press, bring it out and press tab. And let's just select these
top two vertices, edges. And then we can just bevel
them according to the image. And yeah, that's pretty good. I think. **** smoothies
and enable auto smooth. So these are like pretty
much the same things that we have been doing a lot of
times in this course. Select this risk
control plus minus. Let's see, we can press Tab to select and select this
edge over here at the back. Just select it, press G, Then. Why I think to bring it out
on the y-axis like this. Just to create
something like this. Yeah, I think
that's pretty good. Now I will just select this press Control
plus one enable X-ray. And let's duplicate this. Make sure to press X so that it is logged on the
x-axis like this. And place it over here. Select them both
press Control Minus. Just quickly move
the Boolean modifier above the bevel modifier. Alright, so everything is
going along pretty well. Let's just add
these not so here. Again, add a cylinder. Scale it down. Over here, rotated on the y-axis
by 90 degrees. I think also on the X, Y 90 degrees. I'll
scale it down. Smooth. This enable auto smooth. Now let's just go
into the edit mode. So press Tab to
select everything, then press Shift
plus D to duplicate. The reason I'm duplicating
this in the edit mode is so that everything stays
the same object only. And we don't have like
four different objects. Select them all again, press
Shift plus D X to lock on the x-axis and
displays it like this. Now while this
object is selected, hold Shift, select
the main object, press Control plus, minus. And yeah, we'll just move
the Boolean modifier. Now. Let's see, for the nuts, what you can do is one
thing that is very simple. You can basically just add a cylinder, so
Redshift plus S, Let's just add a
cylinder like this, rotated because
it is very small. It won't be that visible. And we can push it
inwards like this. We can meet the do something at the top inserting
this extruding this, creating a light bevel. Like give this a
not like feeding. But if you want to create like a proper looking nut and bolt, there is another methodic go
over to Edit Preferences and in the add-on section,
search for Bolt. This bolt factory and display, we can lay easily create these nuts and bolts
suppress shifting. And in the mesh section
of your Add menu, you will find this over here, this bolt at the bottom. And now you can
just use this menu. We have like nut and bolt for. We only need the bold. You can choose the different types. Like you can select
this, this or this. Select None. You can also
select the different shapes. I just wanted to show you. Because if you want
to add it this way, you can definitely do it. Let's just choose something like this and change the heck. Yeah, that's the most
basic looking at I think. And what I will do is so that we don't have
too many polygons. So plus G then
move it over here, press Tab, enable X-ray. And I'm just holding Shift and Alt and selecting
all these vertices. Let's see. Then just press
X and delete the vertices. Again, select this loop, press X and delete the vertices. Everything is deleted. Just accept this top
part of the nut. The reason I'm doing this, because only this
part will be visible and the rest of it would
be pretty much invisible. So I don't want to just
waste polygons on that. If we wanted to create
something basic like that, you can definitely do it. Let's just add this one
for the sake of hiding it. It on the X, Y 90 degrees. Now you are noticing
that the origin point is located over here, so it is rotating
in a weird way. To fix this, just go to objects at origin and origin
to geometric. Now this with origin
point is over here and it is basically
at pivot point. So we can easily now rotated, properly, rotated on
the X, Y 90 degrees. Take it by -90, I think. Yeah. Let's scale it down, place it over here, and just push it backwards. Over here. You can press the dot key on a number Back to focus on the objects
very easily like this. Let's just place
this far behind. In my opinion, I think
it looks pretty good. You can definitely
customize your nut if you want to,
however you want. Now let's just duplicate this presented and
place it over here. Select them both redshift plus D inverse X and place this one over here like this.
Let's hit Save. And yeah, that looks fine. I mean, press Control
plus one enable X-ray. And let's see what
else we can create. Let's add these things now. So it is pretty simple. Look at in the
reference image first. So basically this is
like a simple cut out, this one and this one, all these numbers and
everything we will be adding in the extreme part. So yeah, let's just create
these cutouts first. Redshift, they add a cube. I will just select this
press Shift plus S goes or deselect it so that the
cube is added over here. It just makes it a
little bit easier. Press Control a apply the scale. And on this cube there is not
really any kind of bevel. It is not rounded. So let's just keep
with disability them both and press
Control Minus. Just move the bevel modifier. I mean the Boolean modifier
above the bevel modifier. I'm pulling this out just so there's like a
very faint cut. And yeah, that's pretty good. Let's do the same for
the able box also. If plus D to
duplicate it presents a lock on Z axis
and scale it down. Like this. Everything
is already set. I think we need to
displace backwards. Select them both,
press Control minus. I will also quickly collapse all these modifiers because now they're getting
a bit too much. But we are nearing the end
of our modeling phase. We will be done in, I think, maybe one or two lectures. Alright, so this is perfect. Now, I think this is it for
this lecture, Angus watching. In the next one we will continue modelling the bad
side and we will create all these panels over
here and the battery case. Thank you for watching.
I'll see in the next one
9. Finishing the Back Side: Hello and welcome guys. So let's continue modelling or objects. I'll press Control plus
one enabling strain Lexi. We can now create this
battery case over here first. So let's press
Shift plus a cubed, skin this down and just scale it according
to the reference image. One more thing that I will
do is before moving further, let's just bring this out first. I will select this
piece, restart, enable X-ray and just select all of the bottom
vertices like this, and just move it
downwards till here. Because in the reference
image also I noticed it is like laced quite
at the edge there. Let's just somewhere
in here I think. Next I want to select this enable X-ray and
scale it in here. Move this up a little bit. Yeah, I think now
it is pretty good. Alright, so press control
a, apply the scale. Stab again for edit mode, enable X-ray and add two
edge loops like this. So you can scroll your mouse. First press Control Alt and scroll mouse wheel
to edge loops. It right-click to
place them exactly at the center like this,
and just scale them. Now, the match these
two lines over here. Now we can just select
these vertices over here and pesky extrude
them in here like this. Let's scale it down
on the y-axis. Now, Rowley apply the
scale rest dab Br2 for Ed. Select and select
these two edges. Press Control plus one, enable X-ray and it's
just bevel them out. Now. That's pretty
good, I think. Now we need to use the
intersect operation again. So Shade Smooth,
this enabled auto smooth and select this incident, this then press Control Slash. Let's move the bevel mode. So let's move the
Boolean modifier above the bevel modifier.
Both of them. We are seeing a little bit
of shading issues over here because I think it is
too close to the set. So just press that.
There's three for Face Select and select
these three phases. And is moving up a little bit. Just so we don't face any
kind of shading issues. We can also press
Tab S3 for Phase. Select these two phases and just move them a little bit
inwards, press S and X. Scale them down like this. Everything is fine
in my opinion. All right, let's the next we can create
this thing over here. So let's just shifting first
time in select this piece, shift plus S because
they're just selected. I'll press Shift, they add
a cube scaling down here. Bring this out.
I'll select this, then select this, then
press Control plus minus the difference operation. And now the Boolean
modifier above the bevel. I will select this then
ratio tests because will deselect it. Let's see. Now, we can maybe start
a cube, scaled it down. We can just maybe
create randomly. Then I will just duplicate this. Move it down, scale
it up like this. That risk-free for Face Select, select this face recipe
to extrude downwards. Then select this and risky to extrude it
outwards like this. We can maybe select this press Tab to select both these phases. As I then insert them like this. Always undo this, press Control on and add an
edge loop like this. And just select
these two phases. There's already an extrude
faces along normal. And I think something
like this is fine. It won't be that visible. We can just join these
two. So select them both. Press Control J, Rowley, apply the scale and just
add a bevel modifier. Adenomas and auto smooth I think from far away
it looks all right. We can maybe select
this residue for it. Select, they said and this
bevel it out a little bit. Again, Shade Smooth. This enabled auto smooth. And maybe something like
this is pretty good. It looks fine from part of it. So yeah, let's
just continue now. Press Control plus one
again, you can enable X-ray. Now we need to add these
edges like these cutouts. So first let's start over here. These ones are only placed
inside the battery case. Cubed, scale it down and just match it with
the reference image. Scale it up like this. Yeah, I think this
might is pretty good. Now we just need to use
the array modifier, the X-Factor to zero and
increase the Z factor. Basic till here. Now just keep on duplicating. Yeah, everything fits perfectly. Stable x-ray, let's
bring them out. Select this, then select this
and press Control minus. Now, let's just move the Boolean modifier
above the pivot. Yeah, this looks fine. We can maybe move it
out a little bit. Alright, this is
pretty good, I think. Let's continue press
Control plus one again. Enable X-ray and just select this face like we just created, redshift plus D to duplicate it. And extra lock on the x-axis and just
move it up over here. You can press Tab the edit mode and see which foods
perfectly. It is fitting. Now, this increase the count
so that it comes to here. Next, what I will
do is I will use the mirror modifier to mirror
it exactly over here also. So let's just add
the mirror modifier. And we need to middle it
on the y-axis, I think. But first we need to
select the middle of objects that can
act as the axis. So I think this one, this object would be fine. Please select this first. Click on this dropper tool and select this
object like this. We need to mirror
it on the x-axis. And you can see there's
perfectly, we just see now. We can move it backwards. Now just select this, then select this, then
press Control Minus. Move it down a little bit more. You cannot really see it. But if you move the
Boolean modifier above the bevel modifier, I think it wouldn't
be better visible. Yeah. Let's just move
it a little bit more. Now, it is working perfectly. Alright. So you can see easily
duplicate it over here. Next, last thing what we need to do is we need
to copy them over here. Also. Just select this, only, duplicate it again. Enable X-ray staff
for the edit mode. And now you can easily place
it over here like this. Restaurant for the
word is select, select these vertices and
place them right about here. Maybe you can hear, I think, and just decrease the
array count to three. There are only three of them. Now again, select this incident, this press Control minus, and add the Boolean modifier
above the bevel modifier. All right, I think
that's pretty good. We can hit Save. Now. Let's see in the reference images
these cutouts that are coming over here on the right, on these sides also. Well, we can maybe do that. Now. They're appearing
in this line over here. So basically what we can do is we can edit this object only to add those lines are the cutouts over here
also. So let's see. We can first press Tab
to go into the A14 and basically press Control lot
and just add an edge loop. It wouldn't be very laggy
because it is currently a cutout in the
Boolean operations. So that's why it is
like really slow. What you can do is you
can maybe disabled the shadow and cavity
from over here. It will make it just a little bit more smooth
or not that much, but yeah, definitely help. So just add the edge loop A little bit inside like this, and then another one
like this over here, maybe somewhere around here. And we can just
select this, press X and delete the vertices, and then rest three. Select this face and press
E and extruded like this. And you can see we have
easily created the cut-out. Let's move this G Then why? And move it over here in
this line in the center. Let's see in the
reference image. So it is like
really close to it. Achieve and why again, Let's move it a little
bit more further. Until here, I think is pretty good press Tab to
come out of the edit mode. And let's see, will
notice everything is properly mirrored over
the right side also. Thirdly, the left side, but we are seeing some shading issues. So let's see again press Tab. And I will just select
this face. Then why? And come over this side first, then press G, the invite, and move it a little
bit backwards just to check if we still see any
kind of shading issues. So they are still here. I don't think they are being
caused because of this. Let's see. We can maybe check any other object is causing the shading issues. I think I think this
one, select this, this. We can enable that
the shadow and cavity because it is a
little bit difficult to see around without it. And yeah, we'll just quickly
select everything and rigid and why and move
it a little bit ahead. Now some of the shading
issues have disappeared. Select this also
and move it ahead. Mainly these two are calling the shading issues because they were like intersecting
with this edge over here. And now I think
everything is solved. Just quickly look
through your model if you find any kind of potential shading issues
in any of the objects. So I'm seeing a
little bit over here. So again, select all of it. Whatever is in the
center and move it around just a little
bit while holding Shift. And you will see
that it disappears. So you just have to move it
around a little bit here. And and most of the times the
Issue who wouldn't be gone? Select this and see if all the modifiers
stack is correct. And yet the bevel modifier and debate it normally should
we add the bottom? And you can see without
the weighted normal, we have so many shading
issues going on. Everything looks like
really weird, but yeah, with that enabled, it can fix
mostly all of our issues. I think we're pretty much
done with our model. Let's just quickly look
through the reference image, wants to see if you missed anything to press Control
plus one to see the backside. And we are in we are more or
less done with everything. Nurses here to save first. I will probably check this reference image also over here. And yeah, I think we're done. So I'm pretty happy with
how a model turned out. Let's just hit Save.
And this isn't for this lecture, guys.
Thank you for watching. I'll see in the next
one where we will continue like UV unwrapping and then we'll export this to Substance Painter to start
with the texturing process. So yeah, thank you for
watching us on the next one.
10. Adding a MissedDetail: Hello and welcome guys. So I'm just recording this
book lecture from the future because I forgot to add one
thing in our model. That's why I'm
creating this lecture so that you guys don't
forget to create it. If you press one
for the Front View, you will see we forgot to add these little cutouts over here on the Front
Side of the model. So you can just go ahead and add that on your own because it
is like really easy to do. I cannot really do it right
now because I've already recorded everything very
further into the course. So that's why I cannot really
make this change right now. But you guys can definitely do it because I will be
adding this video before everything like applying all the modifiers
and everything. So you can definitely add
these cutouts into your model. And let's just quickly set up the reference image
I will show you. You can just move
this back over here. So select this Bridgette and why and move it back over here. Press one for the
Front View now. And for a selected risk
Espen X minus one, and just flip it like this and bring it down to match
it with the model. I will quickly show you
how we can add these. I won't be adding them
or Andy won't appear in the videos because I
already forgot to add them. And I've already
recorded all the videos. I'm just going to be
showing you how we can add this because it's like a really simple and
small cut-out scale. This cube down, rotate it by 18, 45 resistors rotated
roughly first, go over to item transform
and I think -30 would work. Alright, yeah, then press S and Z and scale
it up like this. Let's control a, apply the scale press tab and just
select all of these edges. First, let's bring
it out over here. Press Tab, hold, Control
and Alt and select all these edges.
Yeah, like this. One again. And let's press
Control D to bevel them out. And now we can simply
add array modifier, increase the X-Factor, and just duplicate
it multiple times. Adjust it again. And you can see it is moving a little bit downwards so you can add in a little bit
and Y or Z, I think. You can just add
in a little bit of the axis so that it
moves down as well. And yet now I think it
is fitting numerically. Let's move backwards now. Shade Smooth. This
enable auto smooth. And now select these two. Then press Control
Minus. Select this. And let's move the
bevel modifier above. Moved the Boolean modifier,
our bevel modifier. Alright guys, so this was it. Another small change
that I want to make is if you could open up
the reference images. This change is not
really visible in our reference images. That's why we did
not really add it. If you checking the reference
image and open up this one, you will find this cutout
over here on the bottom of the model that we forgot to add. Let's add this also. We need to place it
somewhere around here. So press Control plus seven, I think for the bottom view, was we can select
this press Shift plus S goes at the selected. Then press Control plus
seven for the bottom View. And let's check the
reference image. Alright, so the shape
is something like this. It's called from over here
and straight down from the the shape is
something like this. It is called from the
top and straight at the bottom and it
connects with this line. So we can press Shift
day or the cube to scale it down and place it
over here like this. Let's just bring it out. Risk
control a apply the scale. Can fold the seven
step and reach two for and select or Shift
and select these two edges. Going to roll a
seven again and then press Control and V and
just bevel it out this way. I think we have
something like this. Only shades mode is
enabled or test mode. Select them both and
press Control minus. Now we need to just place
Blender inside this. So again, because they're
deselected, add a cylinder. I think the size is
pretty large for this one thing, it
is really small. There's just selected both
of them. Then scale it down. You didn't lie. And
bringing back over here, I think I'm happy with
something like this. Only select the cylinder. Now. Let's see we
can shade smooth. This first enable auto
smooth, then press tab. Make sure to apply
the scale also, interest step is three for free, select this I to
insert this like this, and it's extruded downwards. We can maybe increase the
size of this like this. So press S and
scale it like this. And also scale this up. Alright, so yeah,
that's pretty good. Make sure to add these two
changes and we are good to go. Also, I'm seeing some little
shading issues over here. I think we can fix them
by just selecting it, then pressing G, Then why? And moving it a little
bit outward, like this. Yeah, so just bring it
a little bit outwards. And here you can see
they're pretty much fixed. Just make sure you don't have any kind of shading
issues in your model. Should say, thankless
watching this video. Make sure to add these changes. You won't really see
these changes in the future videos because I've added them at
a later onstage. But you can make sure to
add these two changes and just texture them
accordingly because these are like very
simple changes. So yeah, thank you guys. I'll
see you in the next thing.
11. UV Unwrapping and Exporting to Painter: Hello and welcome guys. So now that we are done with the modelling in this lecture, we will apply all the modifiers
and then UV unwrap it to export it to Substance Painter so that we can start
with the texturing. So basically what
I mean by applying all the modifiers is like making all the
changes permanent. Right now, you can select any of these Boolean boxes
and move them around. And you will see the updates are being made into the model. But when you apply
all the modifiers, you cannot really
make any changes. So make sure you are happy
with your model completely. Let me just quickly show
you buy an example. If I a cube over
here, duplicate this. And let's say I use the
difference operation. So select this,
then select this. It's Control minus. You can see, I can select this cube over here
and this cutout is created and I can move it around however I like,
and it is moving. But let's say I
select this cube. And to apply the modifiers, they are two different ways. I think you need to
select the object, go over here in the Modify
tab and select the modifiers. Click over here on this
arrow and hit apply. As soon as you do that now you will see the changes
or vomiting. If you move this
around, you cannot really change the cutout. This cutout that is made on
this object is permanent. If you press tab, you can see, you can now edit it around. But you cannot really change this lake cutout by moving
this box. You can undo it. And then it will come back. And now you can again do it. But yet that is basically right now if you select
this object press tab, you will see the cube
is like complete. And as soon as you come
out of the edit mode, then you can move around
the Boolean object. But as soon as you like,
apply the modifier, when you press that, you can
edit all of these phases. Also, light is basically
applying the modifiers. Alright, so let's just
delete these things now. Alright, so back
to our main model. We cannot really
like select each and every object and one-by-one, apply all the modifiers
that would be really wrong. There is a nice and
easy shortcut for this. But before that, what I basically want to do
is I want to create a duplicate of this file because I don't really want to
apply all the modifiers on my this model because maybe later on in the future
we face some type of issue that we have to fix in
the main model or we want to modify this
model in some way. So we need to keep this leg model without
any modifiers applied. So basically I will just create
a duplicate of this file. And in that duplicate file, we will just apply
all the modifiers so that our main model
like remains intact. It has all the modifiers is
go over to File Save As, and we will just save it as
Nintendo Game-Boy in bracket, we can write up light. So that we note this file
has all the modifiers applied and hit Save As now
we are in applied files, so alright, now we need to apply all the modifiers on
our main objective. So the shortcut for that is just press K to
select everything. Then press F3. F3 is
basically to search for a command and
search for to mesh. So you will find this
one convert to mesh as soon as you do
that you selected. And you will notice that we have some kind of weird result while all the
modifiers are applied. But we have a very weird result. I mean body's disappeared. So just do this. And the reason for this
is, if you remember, I mentioned a few lectures back. Whenever we use the
intersect operation, we need to go over here in the
object data properties and make sure to like make
the object data unique. So I think before what it for some VCR for this
main object only, we forgot to like
make it unique. You can see these two over here. So there's two means it is being used by two different objects. We use like Intersect operation
just once with distinct. That time we forgot to click
over here to make it unique. So just click over here now and quickly check
if there are like any other remaining
objects that we need to make the object
data property unique. I don't think there are any. Now if we again press a
to select everything, then press F3 and the commodity is already
written over here. So just select Convert to mesh. I think it would work properly. Now, as you can see,
everything is fine. Now if we select any of the Boolean object and
try to move it around, you will see that none of
the changes are being made. That means that modify has been applied and all the
changes are not pulmonic. You can select it
and see your hand the modifier stack also,
you will see nothing. So the first thing that
I will do is I will delete all these
unnecessary objects. So just quickly select them all one by one.
Just delete them. Again, hold Shift and
create a selection like this to delete worthy
of them at once. All right. I think all
of them are deleted now. Now we can proceed
further. Let's see. Next thing that we
can do is everyone, This one we lift. Good. Now what we can do is we can risk a
to select everything. And now press M and move
this to a new collection. Let's rename this collection
to Game-Boy. It okay. So that a separate collection
is created over here. I don't want these
reference images now, so I can just select them. If you want to delete them, you can delete them
or we can just press M and move this tool, another collection
reference images so that we can basically
just hide it like this. Let's add the material
now, select this object, select any object, and
then add a new material, rename this material
to Game-Boy. This material would be like acting as a texture
set in Substance. You will understand when we export this to
Substance Painter. Now we need to copy
this material onto each and every single
object on our model. So again, the long way to do this would be to just
select each and every object, go over here and select
Game-Boy like this. But yeah, that is very
long and tedious. So the shortcut for
this is just select any object that has this material, like
the Game-Boy went. So I will select this object, then press a to select
rest of the objects. So select everything to press a, press Control L, link the data and link
materials like this. And you can see 30 is
written over here. That means this objective or this material
is being used by 30 different objects
we have copied successfully. Let's hit Save. And the next thing
to do is we need to apply all the
modifiers or sorry, next introduced to UV, unwrap this so that we can finally export this
to Substance Painter. So let's go over to
the UV Editing Tab. And UV unwrapping would be like a very straightforward
and easy process. The first step that
I want you all to do is just press K to
select everything. Then just press Control
a to apply the escape. Because of the scale
is not applied. It can mess up with the UVs. So make sure the scale is applied for each and every
single one of the object. And then press Tab, press
a to select everything. You can select this also so that corresponding vertices
are selected in the UV is also an 3D window and enable display
stretched from over here. So display stretches
basically it will show you the stretching in UV
Islands going on. Basically what this
means is it will show you different colors for
different types of stretching. So what you want to aim for
is this dark blue color. If you have this kind
of dark blue color over all your UBI eyelids, that means your
UVs a pretty good. But if the color is
yellow, green, or red, light means they are facing
some kind of stretching. So just press a to
select everything, then press U and Smart
UV project it okay. More or less, everything
is like blue-colored only. So that means the
UVs are pretty good. You can just click over here and increase the eyelid margin. Just so everything like
fills out properly. Alright, so basically
that was it. Next, what we can do is go
over to the Layout tab again. And we need to export this
to Substance Painter. So one thing that I want you guys to check
before Exporting is to go over here and
enabled face orientation. And make sure everything
is this dark blue color. If anything, you
see like red color. So let me just quickly show you. If anything is like this for
you. Because it can happen. It is like very common,
you don't have to worry. That just means that
the normals are flipped and you need
to fix the normals. So if any of the object, let me just to do three
different objects. So like that, if you have like two or three different
objects with this red color, like we can see when I missed, it was like already
this red color. Fix this. It is really
that you need to just select the
object, press Tab, press a to select
everything and Redshift plus N to recalculate
the normals. As soon as you do that, you will see it is back to its new color. So to say to select everything, then shift and just
recalculate the normals. Whenever you do like the
recalculate normals, you will notice sometimes the edges can go a
little bit weird. So you don't have to worry, just select that particular object, do modifiers and add a
weighted normal modifier. And you're basically
that will fix everything and just
quickly apply it. This is a necessary thing
that you must know. So I think this one
or the other one. Yeah. Okay. This one,
rheostat press a and Shift N. And for the last one, this one also establish
a deselect everything, then press Shift plus N. If you don't check
this and export some of the objects with
like Flip Normals. It will look like very weird in Substance Painter as if it
is like flipped inside out. So just make sure to do that. And now I think we have done everything
that we need you to do. So first, just press a
to select everything We were to File Export. And we can select any kind of format that we
want to export into. I've already like experimented
with this a little bit. So we were getting
like I was getting a little bit of problems
with all different formats. The best one that was
working was this one, dot OBJ, different OBJ legacy
one. Deselect that one. Make sure to enable
selection only so that only the selection that
you have made is exported. And the name we can
keep it to this only. Let's come back. And in the
exports folder, hit Export. Wait for it to export. And yet now the export file is created. Open up Substance Painter. Let's wait for it to
open and then we can import our exported model
into Substance Painter. Alright guys, so now that Substance Painter has opened up, you can just close this
window over here on File New, and click on the select. And let's come over to our tutorial directory
in the exports folder, just select this
file that we just exported from blender
and hit Open. You do not really need
to make any changes to this window because all of these genius we can
do later on also, like can change
the resolution or the normal map format
to anything you want. That is totally up to you if you want to make any changes, but we don't really have
to do anything over here. I will just hit Okay now and
wait for it to this pop-up. This quickly, hold Alt and
use a left-click to move around and see if there are any kind of
issues in your model. And right away and not
seeing a couple of issues. Let's see how we can fix them. So the very first thing that I'm noticing in some of
the Boolean objects, you can see they are
not visible properly. Over here also you can see they are looking
like really weird. And if you remember, we had the cut-out
here like this. But over here, we cannot
really see it on this side. And everything is pretty weird. So I think there is a
really easy fix for this. What I will do is I will
put the go back to Blender, press a to select everything, then press Tab, and then again press a to
select everything, then just hit Control plus T. And this will basically
triangulate everything. And I think that will help
with the shading issues. And then you can press Alt G to remove the little
bit of triangulation. And yeah, I think it
is pretty good now. We need to UV and
rapid once again. So let's go back to UV Editing. Tab press a to
select everything. And you can see the UVs got
messed up a little bit. Let's use Martin project it. Okay. Basically that was it. Now we need to export this
once again to go over to File, export the Front OBJ and
just don't make any changes, just hit export so that
this file that we exported earlier will get
replaced, explored. Come back to Substance
Painter and again, go to File New Project. Click on Select and
select this one. And now let's just
hit Okay again and hit Discard and see if
the problems are fixed. So again, just hold Alt, left-click and move
around the model. You will notice that all
these Boolean cutouts are not properly visible. We have a little bit of
issue going on over here. We have the shading Issue. Let's address this now. But I will just
quickly look through the complete model to see if there are any more
issues than just that. You can also hold Shift and
use your right-click to move the lighting to view
everything properly. I'm sure you are aware
with all the shortcuts, but yeah, move around. You need to just press Alt, then hold your left
mouse to move around. And then you can also
use scroll wheel to pan, and then right-click to zoom. Just hold Alt and
use all three of the mouse buttons together to
like move around properly. I don't think there are any more issues left except
this thing over here. You have this little
bit of shading Issue. So let's see how
we can fix this. I will go back to Blender. And I think the easiest
way of doing it would be you just press Tab. And I will just
select a bunch of these faces which we're
having this issue, select this one,
this one hold Shift, and just select, let's
select all of them. And what I will do
is I will just hit right-click and then select
shade flat rest tab. And you will see the issue was earlier there
in Blender also. I will just undo it. I know you can see this issue
was there in Blender also, but if I just select them all again and right-click
and shade flat it, The issue is now gone. Now we can again this a to
select everything File Export, wave front and it export again. This is like a little bit of
long and tedious process. We have to export our
model again and again to see if all the
issues are fixed. This is like a
back-and-forth process. It can take a couple of times. Sometimes it takes me like 56 or 78 times two like properly
fixed all the issues. And now you can see the
shading issue is now gone So this way you can like tackle
all these Issue that you face while Exporting from
blender to Substance Painter. And now what we need to
do is we need to post. I will go over to display
settings over here and make sure to just enable temporal
anti-aliasing from here. This will remove all
the jagged edges. So let me just show you if
you like done this off, you can see all of
the jagged edges. But if you enable this, they are like a lot more
smooth and yet it is late, nicer to look at. So now whenever you import anything into Substance Painter, the first thing
that you must do is you need to bake the mesh maps. Mesh maps are basically
like function of Substance Painter only it will help us in using
all the features, like nice features
that substance has to provide like Smart
Masks, smart materials. To use all of them.
We first need to bake the mesh
maps of our model. Also, if you remember, I mentioned that whatever
material we create, it will show up as the
extra set over here. So you can see this Game-Boy
texture set right now, because we only have one
material in our model. That's why only one of
them is showing up. But if you have multiple
different materials, we have like multiple
different extra sets appearing over here and we can isolate them by
turning them on or off. So it is really
useful when we have like four or five
different materials, but yeah, we only have one, so we don't have to worry
that much about it. Alright, so to bake
the mesh maps, also, if you've not see any of the windows from the shelf, the texture set lists,
texture set settings, anything you can
go over to window, and the views you can just
enable or disable them, and they will appear from here. Alright, so the big
mesh maps go with texture set settings and
just click on big mesh maps. The baking mesh map window
has changed quite a bit. If you are using an old
version of Substance Painter, it will look very different, but you don't have to
worry at all because the functionality is basically
more or less the same. You will see this
window appearing on your window on the left side. So just disabled
ID map from over here and rest.
Everything remains same. We don't have to
do much changes in the baking mesh map window because the default settings
are pretty much good. So the only things
that I will be changing is the output size. I will increase this to forget, to get the best
possible quality. You can maybe work
with Tokyo also, if you have like a slow PC, because baking mesh maps
can take a little while. So just take this two
foci or to enable, apply diffusion and
use low poly meshes. High poly mesh, because we only have a single measurement
if we don't have like a high-quality different one
or a low-pass anti-aliasing. I will set this to 16 X. You can work with forex also. It's fine. And rest of the settings will remain
pretty much same. We do not need to
change anything. If you want to, like,
edit a couple of settings for specific mesh maps. Lignin select the normal map or the ambient occlusion map. And you can increase
the secondary this, this will like in
visa quality of the map for ambient
occlusion Cartridge. Or you can see you can
increase the secondary risk. And this will increase the
quality of the mesh maps. But as I said, the default settings
are pretty good. So I won't change much, come back to common
settings and rest. Everything remains
pretty much the same. Just make all these changes
and hit bag selected Textures and just wait
for it to finish. You can see it is baking and it might take
a little while. So I will just resume the
video when everything is done. Alright guys, so
the baking is done. Now, I will just hit to
return to paint more quickly, look through your model
and you can see we have like nice little
shadows appearing. Now in a model. Like nice
emitted illusion appearing. So yeah, it makes it
look much, much better. And just quickly look
through your model for any kind of shading issues. You can face some after
baking the mesh maps. But I don't think there are any. So we're good to go now, we can finally start
with the texturing. So now that everything
is finally, let's save our projects
to hit Control plus S. And now we'll just quickly head over to the
tutorial directory in Substance Painter Files, let's say the name as Game-Boy. Save it for it to save. And yeah, I think this is pretty much it for this lecture. We will continue texturing
our model in the next video. So thank you guys for watching.
I'll see in the next one
12. Creating the Plastic Material: Hello and welcome guys. So now we can start with
the texturing process. So as we are now in
Substance Painter, I expect you guys to
know the basics of Substance Painter because I won't be covering
that in this course, will directly start with
the texturing process. If you want to learn about Substance Painter from
beginner to advanced, I have a complete course on it. So you can check that out if you want to learn Substance Painter. Now we can start. I will just select the
Game-Boy texture set, and we already have this
layer when agate by default. So just select this
and let's delete it. Alright, so basically
what we can do is we can start by creating the basic Plastic materials that we will be mainly
using for the body, the buttons, and
most of the things. So yeah, we first need to
create a Plastic Material. So click on here to
add a new fill layer. And this will be our base layer. Alright, so as soon as
you add a fill layer, you can scroll down and see
all the properties over here. You can change things
like the Base Color, the metallic value, roughness,
and things like that. So let's just undo it. So the only thing that I
will be changing right now is the color of our layer. So if you go over in the resources folder and
in the links section, you will find this color
palette link. Just open it up. This basically has all
the color values for our Nintendo Game-Boy that
we will be using so quickly, just open up this
link in your browser. So it will be
something like this. We have all these colors, so I will be just copying up this color over here for
copy this up from over here, the gray one, and just
paste it like this or here. And now we have the
color basically. So this will be our base color. And also I will create a new folder or a group and drag and drop this base layer
into that folder. Let's rename this
folder to Plastic. Now basically we can
start adding more layers onto it to give it
like more detail, adding all those
things like dust, roughness, radiation
and everything. All right, So basically
let's create another layer. So just select here and add a failure so that it
gets added on top of it. And you will notice as soon
as we do that or our color disappears because now we have a new fill
layer on top of it. So yeah, don't worry, we'll use masks to mask everything out. Let's rename this to and
just give this a dark color. You can also type
in my hex code. I've already decided on a color, so 747474, something like this. And now basically we
will add a black mask. This time I will
be making use of the feature of Substance
Painter that is Smart Masks. If you remember the big like some mesh
maps and the start, that was so that we can
use all these features. So if you click over here in your shelf on the
Smart Masks section, you can access all
these Smart Masks. You can drag and drop it onto your mask and you
will see its effects. As soon as you do that you
can see layer is masked out in this dirt fashion. So you can use from all these
different like Smart Masks. And we can have
all these results. You can click over
this generator and you can adjust the settings
to however you like. And if you want to like, change the color of the
dirt and everything, you can select the
layer, the fill layer, and just change the
color from over here. That often is metallic.
Obviously everything. It's undo it back and I will remove the Smart Masks as
I will not be using this. I will just showing
you for demonstration. Obviously you can choose
anyone you want from you here. You can definitely experiment
with this a little bit. I will be going for this one, soft dirt over here. Just drag and drop it onto here. Right away you won't notice any changes because it
is like very subtle. If you turn it on and off, you can see in all these edges. But if you select the dirt
generator from over here, let's adjust these
settings a little bit and then we can get
better results. I will increase the dirt live, it will maybe
something like six. And contrasts can say stare at 0.15 only.
I think that's fine. I will adjust the grungy
amount next to reduce the amount of grunge to maybe
something like pointing to. That's pretty good. Also, select the texture set
settings and please the size of the texture two foci so that you can view
everything properly over here. And I think it is still
little bit darker. So what you can do is instead of adjusting the color
again and again, you can go over
here, click on here. This is the Opacity channel. So you can increase or decrease the opacity
from over here. I will set this to
something like ad. I think this weight
adds like a nice bit of value to our texture. And it is not that
like in our feces. It is very subtle. All right? Let's move further.
And the next thing that I will be adding is I will be giving it a little bit of
height information. I will be adding some bumps to make it look like a
plastic material. So again, add a new fill layer. And this time we will be using the height can I will just
show you in a second. First, let's rename
this to bounce. I won't make any changes
to this layer right now. I will just basically
add a black mask. And this time I will not
be using a Smart Masks. I will be using a
simple failure. So to use a fill layer, we cannot really use it
directly like Smart Masks, like we cannot drag and drop a failure to properly use a failure or a
texture from over here, you can click on this
section off a shelf. This has like all the different textures that you can use, all the grunge maps
and everything. So yeah, to use
it with the mass, you first need to click over
here and add a failure. And now we can add that particular texture
to this failure. So the one that I'm looking
for is to this one sells one, right, and drop it like this. Alright, so we do not
see anything right now. But let me show you, I will first change the
suit, ripen a prediction. Basically this is
just a UV prediction and adjust the tiling. And I think you can
notice it a little bit. We can see all these
cells structure. Let's just change
the color of this so that it is easier to notice. Now you can see the like, now we can see it properly. Alright, so now let's
click over here and come back to the mask and
increase the tiling. Because as I said, I will be
creating bumps with this. So obviously the bumps
would be like really small. So set this to maybe
something like 15 or maybe even smaller. So 20. Now, obviously, I do not want
all this color information. As I said, I want to
create some bumps, so I will be only using
the height channel. So just disable everything and only keep the high channel. You can also do it like by clicking on each of them
to turn them off all you can hold Alt and
click on the height can and basically
disabled everything. Now if you increase
the height channel, you can see, you can give it
height in for very easily. Let's see. I will be going
for something like -0.02. You can see we have added
like very small bumps to our material to make it
look more like Plastic. As you can see, it gives
it a nice bit of detail. Maybe I will decrease it
a little bit to -0.015. Yeah, that looks much better. Next, what we can do
is obviously we do not want this material to appear
over all these things. This is the screen and we do not want the
material over here. So look out of this, just close the folder
and what you can do is they are like 23 different ways to
separate out the material. One of them, obviously, again, we can add a mask and
you will see it is not disappeared from
all of the model. And now we can use this
tool, the polygon. Select the mesophyll
from over here and make sure to set the
color to one to white. Now when you click over here, you can see it is filling. Now disappearing
only over this area. Again, you can
select the mask and select all different
objects like this one. Cannot really see it appearing. So just move the
lighting hold Shift and right-click and move the
lighting link over here. And you can see we're filling all these different
pieces with the material. You can also remove
it by setting it to black color
and then clicking. And you can see now the material
or the layer is removed. Let's just undo it. Also, you can switch between this black and white
color by pressing X. This is pretty basic stuff. But again, agitate. This is like one way to do it. I won't be using this method. I will be using a
different method that is much, much easier. So you can click over here, right-click and remove the mask. And you can see now it appears again over all of our objects. Click on this icon over here. This is like the geometric Masks and this is like a
really cool feature, is right-click on it
and hit Exclude all. And now you can easily
select the objects that you want to add this layer to. Select this one, this
one, and this one. I'm for now, I think only we can select this
thing also over here. These are all the objects
that we want to add. This particular
Plastic Material. And you can see
how good it works. It was like really easy to do. The others continue
making Plastic Material. Let's add some more
details to it. Next, I will add another layer, and this time I will be adding a little bit damage to our
edges or discoloration. Let's rename this to take this first and then add a black mask. You can come back to
the Brush tool so that you don't see this
appear again and again. Let's see, we can
now use Smart Masks. I will be using this one. Edges strong, scratched
edges, strong stretch. This one. It's
drag-and-drop it like this. And yet now, I don't know if
it is visible right away. If you can see right
over here on the edges, if you turn it on and off, you can see a little bit
of edge color has changed, just like the color and set
it to completely white. And yet now is really visible. Select here and
select the generator. And let's see how
we can agitate. We can definitely
decrease the contrast. Maybe something
like pointing to, yeah, it looks
much, much better. The next thing what I
will do is obviously we don't want to
appear this way. It is like very harsh. So again, we will
adjust the opacity. So just click on here and reduce the opacity until it
is like very faint. So maybe something like 40. And you can see dissuade, it looks like really good. It adds a nice bit of
value to our edges. You can just turn it
on and off and see. It makes it look
much more realistic. And yet this way it looks
like really nice material. Alright, so let's keep
on moving further. And the next thing
that I will add is maybe some scratches. So let's just make
it a dark color. Something like this, maybe. Yeah. And then let's rename this to add a black mask. And this time add a fill layer. And in the picture section,
search for scratches. And there are various
different grunge maps that you can use
for the scratches, but I will be using this one. Grunge does D scratch. I think this one is pretty good. Drag and drop it right away. You can see how it adds a
little bit of dust marks and scratches to our martin and makes it look
like more organic. And let's adjust
it a little bit. I will click on here for a certain this tool
driving a conjunction. I think we can
increase the tiling. Definitely not that big. We can also increase
the balance to make the effect a little
bit more apparent. Yeah, that's pretty
good. I think. I will just decrease the
opacity to somewhere around 70. Make it a little bit lighter. I think this looks pretty good. You're going to turn
off all the layers and then open them
one-by-one like enabled them one-by-one to see
how they act like different information to your material,
make it look better. I think the last
thing that I will be doing is I will simply be adding the roughness
variation layer. So just to add like
a little bit of roughness variation
in our model, because right now it is
all the same roughness As you can like movie
lighting and see. There is no darkness variation. I will just show you
how we can add that. Alright, so does really simple. Again, you just need to add a new layer,
roughness radiation. And obviously we only need
the roughness channel. So hold Alt, click on here
and disable everything. Let's increase the roughness
to maybe something like 0.4. Because over here
we have like 0.3. Maybe we can set this to 0.25. Now we have 0.4.
Add a black mask, and simply let start a failure. Let's search for
grunge VAB over here. And the one that I will be using is whether I will be using
this one, range map 007. So just drag and
drop it over here. And let's see. Yeah,
if you'd like, look over here now and
try to move you lighting, you can see we have like different roughness
variation over here. You can also view it properly if you go over here
and select the mask. Let's set this to try Blender and we can properly adjusted. I think this way it looks much better by setting
it to try Painter. So just press M. Now if you look over here and
move you lighting, you can clearly see
that there is a bit of roughness variation
going on over here. And we don't have like
everything is same. You're going to turn off the
layer and see for yourself. Basically, these are the
little subtle details that add a lot of Information to your material. All right, so now I think our material
is completely done. If you want to use this like Smart material in your
different projects, you can right-click and create a smart materials out
of this. Select this. And you will see it will be appearing over here as
Plastic underscored one. You can definitely use it. You can rename this
to something else, maybe smart material, Plastic. And then create a
new smart materials so that it does not clash
with anything else. Like yep, over here. Alright, so yeah, that was it. Next, what we can do is we can create duplicates of this and added to the buttons to create
like wages colors from it. Let's just first
rename it to something proper so that we can
know everything properly. I will just rename this to
Plastic white so that we know. Now let's press
Control C and Control V. And this one we can
name it Plastic red. Open up over here. Come back to that, this
website and copy this one. Copy and select the Base. Click over here and
paste it like this. I can see the color
change to red. Now, click on this
icon over here, geometric mask, right-click
and exclude all. And just select
these two buttons. And basically that was it. So you can see the
edges look like really weird because of
this particular layer. So maybe we can
just turn it off. Or if you want, you can change the color to something else. Maybe something that is
related to this color. Like this. Make it
look a little better. Also, I will be
turning off the bumps because we don't really
need them on these buttons. Like we will look
like really weird. And for the roughness mediation, I will set this to 0.3 to make it a little
bit more shiny. And the Base roughness value
goes to 0.2. Maybe 0.1. Just to make them
a little bit more shiny than the normal body. Anya, this way I think
it looks really good. Alright, let's press
Control C Then V. And this can be
at Plastic black. Again, Let's copy this
one from over here. Select the Base, click
over here and paste it. Right-click exclude
all, and select this, this, this, all these. Now obviously the edges are
again causing some issues. So first, let's just save, enable them and
change the color. Something along
these lines only. Also for the dirt layer, I will make the
color a little bit darker and reduce the
roughness value blue point to. Next for the edges, I will maybe go for somewhat
of a lighter color. We can maybe make this lighter. And then we can just use the opacity
even more to something like 20 or even less than maybe. Just so it does not
look weird over here. Yeah, that's better, I guess. Alright, next for this area, I think we can just select
this one Plastic white, copy it and paste it. Bring it over here.
The top right-click exclude all at Sandec this
part and these two buttons. And for only this color, I don't think we
have anything on this color palette
just for that color. So let's open up our reference
image and look at it. This sort of color. And let's
just created on our own. The Base Layer click on here. Done off the edges for now. Yeah, I think something like
this looks pretty good. Let's enable that the edges, Let's see, Let's go back to curvature or just
the global balance. I think this Smart Masks does not really work
well with this thing. Let's remove this and we
can try something else. So let's remove the smart filter and click on the Smart Masks, and let's try something else. Extra edges blur. Began in Italy. Use the global balance. And yeah, I think
this one looks much better for this type of thing. We definitely need to
reduce the opacity a lot. Yesterday is like
really like maybe like 15 will make the
color a bit darker. I think this looks really nice. And turn it on off and see. Obviously for this also we
will be turning off the bumps. And yeah, I think our
model looks like a really nice to Textures are
coming out pretty good. For the last thing
that we need to do is we need to
create the screen. So for that obviously, we can create a separate folder and let's rename this to screen. And let's just save everything. So before moving
further, just to save. Alright, so again,
add a new fill layer, drag and drop it
into the screen. Click on here, right-click exclude all and
just select this. And the screen can be off, somewhat like a green color. Something like this
movie works pretty good. Obviously, you can
experiment with this. And we need to set the
roughness value to zero. Just so it is like really shiny. All right, so for now, this looks pretty
good in my opinion. And this lecture is
already quite long. So I will hand it up over
here and we can continue working on a Textures from
here on the next video. So Angus watching, I'll
see in the next one
13. Working on other Materials: Hello and welcome guys.
So in this lecture, we will continue to
shrink our model. So let's work on the
screen a little bit more. I will select the fill layer and first let's
rename this to base. And I want to switch
up the color a little bit and not quite
liking this one. Again, if you remember, we can go up to this link and we can just
copy this color over here and then paste it onto our hex code over here
in the substance painter. But this color, I don't
really like it that much. It looks like really weird and I just don't like it at all. So I've decided on a
completely different color. If you want, you can
go for this one also, or you can go with the
one that I have selected. So I will just copy it up
right now if you want, we can copied from me
this is the code 83053. I think this color looks much, much better if you want to
compare it to this one. This looks like really
organic and authentic, so I wouldn't be
going with this one. Alright, so next to add a little bit more
detail to our screen, I will be adding some
roughness variation. We can add things like
fingerprints and smearing is all over it so that we get a
little bit of more detail. Because right now it
is like really plane. So create new fill layer. And again, we can disable all of the channels except
the roughness. So hold Alt and click on the roughness channel for
the roughness. Let's see. Let's keep it at
0.3 only for now. I will rename this
to fingerprints. And let's add a black mask. And now if you go into
the texture section and search for a
fingerprint range map, you will find a
lot of these ones. So let's see, we can
try maybe this one. I think this one
looks really nice. So first select the mask
and add a fill layer. And then you can just drag and drop it over here like this. And right away, we notice that it does
not look that good. So to view it properly, go over here and view the mask so that we can use
the mask properly. You can see the mask
is like really large. The fingerprint is looking
like this big onto our object. First, let's change this UV
protection to Dr. Trina. And yet now we can
increase the tiling, maybe something like two. And now I think
it is appearing a little bit more properly or not. Screen, so press M
to view it again. Now you can see it
looks pretty good. We can maybe increase
the balance. Naked, even more apparent. Maybe let's set this to 0.7. Next, what we can do is if you think this is
a little bit too much, what you can do is instead of adjusting it from over here, one thing that you're going
to do is you can select the roughness from over here and just decrease it completely. You will see that
when you decrease, the effect will soften
a little bit odd. Another thing that you can
do is go over here and select roughness and then decrease the opacity
of the roughness. If you remember, we were
earlier in base color. So this opacity is connected to the base color if you will
decrease it right now, nothing will happen
because this failure does not really have any
kind of base color channel. So to control its roughness, opacity first need to select
roughness from over here. And then we can
adjust the opacity. So maybe we can set this
to something like 75. I think now our
screen looks like really authentic
and nice flowing. Keep it this way only. Let's add another layer. Let's come back to base color. Alright, so this layer
would be our lives, a little bit of dirt and
dust onto our screen. So first let's set up the color. I've already decided
on a pillow. I will just copy of the gold. And you can copy
too if you want to. You can copy these values also. It will work pretty
much the same. This is the color that
I will be going for. An expert you can do is we
can reduce its roughness. So that is not dyed rough and
it matches with the screen. Maybe set this to 0.05,
something like that. And next, again, we need to add a black mask to mask
it out properly. And you can use a grungy
map if you want to do. It is totally up to you. I
will be using a smart mask. Smart mask I'm going
for is let's see. Yeah, this one does surface. This one works really
well with screens. And you can see it appears
something like this, not the result that we want. I want it to appear
only on the edges. So what I will do is I
will select the mask And basically we will
set it to false. And as soon as we do that, you didn't see this has
the effect that I want. And the effect was inverted. So we just need to turn it off. And now we have our dust or dirt on the edges
of the screen. So next what we can do is we can decrease the opacity of this because obviously
this is too much, so maybe something like 30. But it is really subtle. And you can see this way our screen looks
like really nice. Anya, I'm pretty happy with it. Next, what we can
do is we can ship quickly all of the
remaining things like these small
things over here. So let's see. First I will
select this material, the plastic Blackboard,
and click on this icon. And I will select this piece, this small piece over here. And this one. And maybe this beside
the back like this. These are the pieces I want
to add the black material to. Next week can create an iron material for
these nuts over here. You can also use a smart
material if you want to select a smart material
and search for iron. And you will find lots of
different iron materials or you can search,
you will meet Steve. Yeah, there are different
steel materials that you will find or you can create one
on your own if you want to. It is really easy. I,
it is really small, so it won't be
that much visible. You can add a fill
layer. You can set the metallic value to one to
make it look like a metal. And now just adjusted scholar. And we have got ourselves
looking steel material. Obviously it is not that detail, but are not suddenly really small and won't be that
much, which is good. So I just wanted to show you, you can click over here,
right-click exclude all. You select your
notes very easily. And you can see you if I did
the iron material to them, but I will delete it
and I will just use a smart material only because I think it
looks much better. Let's use this steel scratched. And you can see
smart material has all these like dust and
scratches and like bumps, everything added to it already so that we don't
have to do anything. You can click over
here, right-click exclude all, and select this. Select this, like
this, and select this. I think I will also select
this little button over here. Yeah. I will also
select this thing also. This is also steel material and the like the plastic lag and select this box also because
this is like a USB chip, so it can be a black color. And for this gold one, we can just add a fill layer, give it a gold color. The metallic value to one
degrees, the roughness. Click over here, right-click exclude all and deselect this. Basically we have a very
basic looking shape. That's perfect. I
think. Last thing to dictionaries this
thing over here. So what we can do
is, I will first, let's rename this to select the screen
material that's Control C and Control
D to duplicate it. And this will be
our battery sign. Right-click exclude all
and just select distinct. And now select the base layer and just turn the
color to black. And you can turn
off the dirt layer. That's pretty good.
So we're pretty much done with the basic
picture of a model. The next step to do is to add all these texts
written over here, here, all these things. So if we look over in
the reference image is only a methyl here, not in the reference images,
but in these textures. I've added all these
Alphas that we can use to share our martin, all these texts, I've
already added them. So it would be
really easy and fun. I think this is it
for this lecture. In the next lecture, we will be adding all the texts
and everything. I'm finished with the
texturing process of Nintendo Gameboy. So
thanks for watching. I will see you in the next one.
14. Adding Text Details: Hello and welcome guys. So
let's continue the texturing. In this video, we will
be placing all the X, all the symbols and
everything. Let's start first. What we need to do is
obviously we need to import all those textures
into Substance Painter. So just go into
your course files and the Textures folder. Let's select them all till here. I will just drag and drop them
onto the shelf like this. And this way we can
import it easily. You will see this
dialog box pop up. So what do you need to do is you need to make
sure that you select it and only imported as an
Alpha and not as a texture. Because basically all
these images are Textures. All these images are Alphas. These are like black
and white images. So yeah, we will be
using them as Alphas. And these three or
the rest of them, we will be using as
Textures when we will be creating the Cartridge is we
will import them later on. Alright, so we don't
need to select each and every one of them
and then select Alpha. We can just press Control and everything
would be selected. And now just select
Alpha for one of them. And now all of them have
been selected as Alpha. Alright, Next is where we want to import our resources to. The first one is
current session. Current session is
basically if you import it into current session when you close
Substance Painter, you won't find these
files or these Textures. You cannot use them later on. If you use project, you can only use them
in this project only. So we will select project only. Third one is liability. This way, they will get like
permanently imported into your shelf and you can use them in any
project that you want. So these are very specific to
the Nintendo Game-Boy only. So I will be just
selecting project. So we will be just
needing these images in. This. Now hit Import. And as you can see, all of them appear over here. One more thing, if you like, kind of get lost in the shelf. You can easily separate out
everything from over here. So this is Materials, smart materials, Alphas and
Textures are different. So this is for Alphas and
this is for Textures. So basically all
you grunge maps, all your light color Textures and everything Base
Color goes over here. And this is for only Alphas. And even here also, if you want to find the ones that you have
specifically important, because a lot of them already
come with Substance only. What you can do is you need to click over here so
that this thing appears theta. Now you need to select your assets. As soon
as you do that. I haven't voted a lot of
them for my other projects, but the ones that we important just now we won't
find them over here. That's because these
are the assets that were imported like
permanently into the shelf. So we do not need to
go over your assets. We need to select
the project freedom because we imported
them into a project. So click over here and
now you can find all these Alphas that we
just imported right now. So these are like a couple
of different things. So project is for the ones that you've just imported
into this project only. And your assets is
basically Once you haven't voted for life
thing into your shelf. Alright, so let's
select project. And now or we can start adding all these texts onto our
model. So now let's see. We can start by opening
up our reference image. Let's open up this one. And we can start by
adding all these ones, like this one like golf and on these ones volume
connector phones, because these are all
similar to each other, we can place them all
in a single layer only. We just need to add a little
bit high to add text or the files that we have added and we will be
done. So let's see. First we will just add a layer. So they are like 23
different ways to do it. I will show you both of them. First is we can add a
simple paint layer. Paint layer is different
from a failure. As you add it, you will see
nothing really happens, but now you can paint away your model like
this very easily. So the special thing about doing clearest that you can change the inflammation of your strokes however many times you want. Let's see. First
I said this color to red and I start
painting like this. Then maybe I want to
change the color. I changed it to blue eyed, a little bit of metallic
and decrease the roughness. Then I printed it like this. And you can see we
have painted like completely two different
strokes in a single layer only. And you can do it as many times. You can double-click on any of the Alpha and you can see
it appears over here. You can use it to
stamp it this way. You can now change the color, change the color, make it
back to zero metallic, select any different alpha, and then Stanford like this. So you can see we
can change the, all the information
of the stroke or however many times we
want in a paint layer. This is like a useful when you have to add like
different strokes of different information of roughness, metallic
and everything. But the main disadvantage of using a paint layer is that we cannot really change the
things at a later onstage. If you have like Made a stroke like this. This is like completely
permanent and we cannot really change
this later on. But the thing that filled areas. So let's just delete this. Now when I add a failure, and let's say I will
just add a black mask. And now you can start
painting again. We cannot really
see it properly, so let's make it
completely white. Now if I select the mask and again start
painting over it, you can see Migan again
paint the white color. We can select any of these logos are Alphas and
stamp them very easily. They would all be
the same color only. So that is the thing
about failure. But the great thing is we can change all of them
whenever we want. You can see we can
change the height, we can change the modelling, we can change the roughness, everything however we like, and it would affect
all the strokes. So this is the main difference between a paint layer,
new fill layer. So you can choose
according to you, I will be using a failure only
because it is very easy to change all the stuff and
customize it at a later onstage. Whereas with the paint layer, like everything is permanent and we cannot really change it. As I said, first will be doing all these ones like
this one over here. And the ones are the sites. We can add a basic
simple failure. Let's rename this to I didn't folk and disable everything
except the high channel. So we'll click over here. And now we can give it
any height value we want. We can give it a
large number for naught or less, maybe 0.254. Now, add a black mask. And now when you
painted, you can see, you can paint with height
information very easily. If you decrease it, sorry, if you select the failure and you decrease the
height information, you can see now it
appears inwards, whereas now it appears outwards. So began this height
value whenever we want. So let's first start stamping. Select the mask, and let's
select the phones one. So double-click over here. Zoom in and you can
hold Control and use a right-click to
increase the size of the brush to fit it like this and just
stamping very easily. So you can see very easily I did like alpha or
the, this detail. Also, another thing
that you can do is make sure to set this
to orthographic view. What this will basically do
is if you hold Alt and Shift, you can snap it perfectly and your model is
completely flat now, whereas if you were
in perspective, it can get a little bit weird. If you like zoom in or zoom out, you can see it is
not perfectly flat. And you can like moving around
with the perspective view, but with the orthographic view, it would be like completely
flat. Wherever you move it. If you stain the
like snapped View, you can hold Alt and Shift. And then you can snap to
different uses like this, like we had in Blender. So this can be the Front
View and you hold Alt and Shift and then move to
the bathroom very easily. With orthographic, it
really helps when you are like stamping
things like stickers. So it is very helpful when everything is like
completely flat. It makes the process
a lot easier. Whereas in perspective, you
will notice that things get a little bit weird when
you try to move it around. Make sure to set this
to orthographic view. And this is like too
much as you can see in the image also reference image. We can definitely decrease the height in for a lot negative 0.1 or even less than 0.05. In something like that
works lot better. Alright, let's see you next
week and go over here. Let's just add this backside. So select this one. Make sure to first
select the mask. Then select this
double-click over here, then hold Alt and Shift and move towards the
back side like this. Then also hold Shift, then you right-click to bring the
lighting towards the back. Now increase the size of this. I just stamp it like this. Really easy. Let's see. Next we have this external
connector and the volume one. So over here holding Shift and
again snap it to the side. Now select this external
connector Alphas, and we need to rotate it. So what you need to do
is scroll up over here. There is a shortcut also, if you hold Control and use
your left-click this time, instead of Right-click,
Right-click on for size and left
leg is for angle. You can rotate it very easily, but it won't be exact 90-degree. So we can just change
it from over here. They said this to 90 degree. And yet it is not perfect. We need to C1s
where it is facing, so it is facing this side. So I think we need to
rotate it by going at no, sorry to 70, I think.
Yeah, that's perfect. Scale it up a little bit. And just like this, you can just hit
Control Z to remove. It. Might take three times
to just get the perfect one. That's pretty good, I think. Now select the volume. So it is already
rotated scaling down. Alright, so that
looks pretty good. I think again hold Alt and
Shift and go to another side. And let's see. So firstly, this contrast, okay, so
upon Ross is not over here. I think I forgot to
copy it earlier. So I'll just quickly go
back in and bring it. You guys I think probably
already have it. I will just quickly
import it again. Select project. And
yeah, over here. So again, double-click
over here, select the mask and
we need to locate it. So just type in 90 over here because you need to
go daydream this side. We need to scale it down
a little bit, Definitely. Yeah, think that's pretty good. So next, we have over
here this long new text. Don't really know what
exactly it means. Let's see, we decided faces. So it is basically Side
only looking to scale it up and just place it like this. Yeah, I think I'm
pretty happy with it. Next we have this off
and not just again, hold Alt and Shift and
snapping in the Front View. Let's bring the lighting in
and select the often on one. The angle back to zero. And you scale it down
while holding control and right-click and dislike. It also has these ADOS, which I think Substance
Painter already has. So go back to all libraries. And in the Alphas section. Let's search for arrow. Any I think this one
would work pretty good. Stubborn link over here. We can scale it down
and just place it like this gated by Wednesday degrees
and place it like this. Next we have this dot. I am sure there wouldn't be one in give me searching
by circa lighting. There isn't one. I think. We definitely can use
something like this, namely, does not really matter. But if we want do
you can create one simple looking like alpha in Photoshop of a circle.
If you really want to. A very small one. So I
will displace this one only. I think it was. Alright. Alright, let's move ahead. I think this was it
for this layer safest. And one thing that we forgot is before to texture this part. So it is kind of
plane right now. So I've been just select this
and duplicate this Plastic. And I think this part over
here has like a grayish color. We can just extrude all and just select
this one. This one. And just change the base color
to dark grayish kind of. First, let's turn off the edges. Also turn off the bumps. Any, I think that's fine. Alright, so next we have these blue-colored text over the front screen and also
this white color text. We can create two different
fill layers for one, for the blue, 1.1,
for the white one. And that way we can do it. So let's just start. I will again add
another fill layer. Let's rename this to blue text. We can rename this
layer to hide Text. So everything stays organized. Alright, so again,
for the color, I will just quickly
open up that same link. I think that link hide the blue color to
select this link. And I'll quickly open
it up in my browser. Alright, so let's copy
this and see if it works. The Base Color just
based the heck code. Alright, next, let's add a black mask and come back to the project
Alphas, remove this circle. And we can start by
this Nintendo Game-Boy. So double-click over here, control and use right-click to increase the size and said the, or this one, set this back
to the angle back to zero. I think the Garland is fine. Let's see. The size of this. So it is roughly around, which starts from over here and comes across this
first red button. Let's see it a little bit. Something like this is fine. We need to place it a
little bit downwards. I think this is pretty good. Let's select the Select button. Next. I'm going to
rotate it. Let's see. I think we rotated it
by 30 degrees -30 in. We cannot really do
negative numbers. I think we need to
do it this way only. Let's try 3304035. It moves pretty good. You can just hold
Control and use a left-click to maybe
rotate it out roughly. And I think this
way it works best. So it is somewhere around 333. Let's just see again. Actually clean the
is a little bit. And yeah, that's fine. I think select the
start one now. And again, standing like this. Similarly for the
a and the need. Definitely a bit smaller. Yeah, that looks fine. I think in my opinion. We also have the small
arrows placed over here. Let's add them to over here. I will again come back
to the height text-only. And in the old library
research for ado, let's select this one. Is back to zero. And
please one over here. Shaky couldn't 90,
place one then this uncertainty is to one at last we put 70, I think, but yeah. And then this ****
good over here. All right, That's pretty good. Next we have this white text. So again, we will
add another layer, this keeping this
color only for now, add a black mask. Project for you can move
this arrow search query. Select the battery
relation back to zero. Yeah, First we have this
guy three over here. Yeah, I think
that's pretty good. For this one. First, Let's select scale it up And it starts from this
area of the screen and makes it roughly about
somewhere around here. So we need to basically
eyeballed it. Feels to me, I think
in guiding this, go ahead with this only
began maybe select the white color and make
it a little bit brighter. Yeah, that's fine. I think. Rename this to white text. Next, we need to add these
blue and engage stripe. So here, let's see how we can add them first
for this blue stripe, maybe we can use the blue
text narrowly. You select it. And first we need to go back to all libraries and I
search for square. And you will find this
one square rectangle. And you will notice it
is like really squarish. So like adjusted
according to this, we need to adjust
the size X and Y. I think reducing the byte. Yeah, if you reduce the Via lot, then we like, like a
really thin strip. This size is fine. Now I will show you how we can exactly place it in
a straight line. Just click over here first. Make sure the
position is perfect. So just click over
here once that hold Control and Shift and you
will see this straight line appear and just drag it till
here and click once again. And you will find this extremely straight,
like paint stroke. We will like it is the
parts that we don't need. The spirit is like
much, much easier. Yeah. So the way we will
go about erasing business, and that's very similar
way only select the it is. And what we will basically do is we want it to start from
somewhere around here. We will first degree
the size of the this hold Control and right-click
and degree the size. Then hold Control and Shift. Click over here first,
just around here. Then hit Control and Shift and just drag
it straight down. And you can erase it this way
and now remove this part. And similarly, I
will least one like this while holding
Control and Shift. And now you can
remove this area. First. Let's add
one over here also. Somewhere around here, I think you feel like
those spaces too much. You can just quickly undo it. And again, click over here once then hold Control and
Shift and bring them down. Now you can remove
everything in degree. And you can see we have created a very simple looking
straight stripe. Now. Make sure to just you don't change the size of
the brush because it can mess up with the placement and the
size of the stripe. Let's quickly create another
folder for the pink color. Let's see what we can do. First, I will copy
this color only. Or maybe you can
copy this layer only for the buttons that
you created earlier. So just select this,
basically a copy it, come out, select
this and hit Paste. Add a black mask. And let's rename this to strike. Delete this Holderfield. Anya. Now click over here and make sure to
place them perfectly. I mean, again, it is integrated onto it does not
matter that much. Let's see where it starts from. So it starts just about with the text-only somewhere around
here and refine it. Again, hold Control
and Shift and just make a stripe like this. Now go back to the it is up
and we want to make sure that everything is
aligned perfectly. This node is fine. Add one over here. You can also hold droll
and right-click and then move your mouse up and down to like increase
the hardness to what? So that it would be
like perfectly sharp. Now again, click over here. I swapped it just you move
into line in the middle. Now, I will select band of blue text again and just make sure it
has perfect edges. So just click over here
or Control and Shift. And easy playing this Just so we'd have like sharp
edges and not please let us. Now I'm just making sure
they are of equal length. That looks pretty good to week. I'm pretty happy with it. We will select this
pink stripe and maybe make the color
a little bit lighter. It is too dark
right now I think. I think that fits much better. See, I think model is
coming out pretty nice. I wouldn't select the blue text and just make it
a tad bit darker. This is too much. Yeah, I think know 11 was fine. Let's see. The thing pretty much done with the texturing
of the model. One thing is left. We
need to add the number over here, Shift
and right-click. Let's bring the lighting
back over here. And let's see how
we can do that. For this one, I think
we can simply use a paint layer only for these type of things like
this is very easy and simple. So let's just add a paint
layer. And let's see. First I will select a square. So you need to just
double-click on the square. So now it could be selected. Yeah. Let's adjust
the paint layer little bit because we
did all these things. Incentive, this simple cyan color that is
selected over here. Alexa. We need to make it rough for lighting
does not like shine. And give it a little bit
of height, 0.1. Let's see. I think this is pretty good. Just click over here, then hold Control and Shift and
drag it like this. Bring it out this way. One thing that I will do is
I will add a filter to this, and I will show you
what filters can do. A light, a basic filter, and add a blur filter to this. What I basically did is let
me just show once again, I selected this layer window
here and add a filter. And now in the filter I would
just add a blur filter. You can see as soon as I
did that it just blurred our high-intensity a little bit. And dissuade is not very sharp. Definitely. We don't want
like blur this too much. Maybe something like
this is pretty good. And we can add another
thing that we will be the HSL perceptive. And I think that
would help us to control the color a
little bit better. Even after we have
made the strokes. This is like a
little bit of hat. Then we can use like adjust the color at
a later on stage. Yeah, that's pretty good. Now let's select it back again. Go back to project and
select the number. First. We need to set
the color back to black. And then just simply stand
good over like this. Okay, So because we identified
levator and whatnot, it is kind of appearing
a little bit weird. So let's just add
another Painter. And now it would work perfectly. Make it a little bit lighter. Yeah, I think I'm pretty happy. Vedic. Rename this to what we can name is
listening with black text. And this is so let's just hit Save and
end the video for now. Maybe if we have a
couple of changes are some things that I want to add on if you can definitely
do it later on. But for now I think I'm pretty
happy with the texturing. In the next video, what
we will be doing is we will model the Cartridge
and texture it. It would be like pretty easy
and a pretty fast into them. It will just add a bit
more detail to our model. We can place a Cartridge
over here at the backside. And I would just make it
look good with the renders, tangos watching, I'll
see you managed fund
15. Modelling the Cartridge: Hello and welcome guys. So we are back in blender now and in this lecture we
will be modelling the Cartridge for our Game-Boy. So let's start, or what I will do now is I
would just turn off this Game-Boy collection so that we don't have
anything in our view. And I will press Shift plus tests and goes
into world origin, bring the cursor exactly
at the same them. Now if we will enable back the reference images collection and just quickly press three
or one for the Front View. You will see in this
reference image, we also have a smaller
proportion for the Cartridge. So we can definitely
use this image to create the
Game-Boy Cartridge. But I've also added certain separate
reference images that focus entirely on the
Game-Boy Cartridge only. And we like having proper resolution so that
we can create it properly. It is not that
high-quality over here. So it might create a little
bit of problem for us. Why modelling it? So I'll just turn it off. First, press one
for the Front view. Then we can press Shift
plus a and in the image, the reference image
and ugly head over to your reference
images folder and you will find this
image over there. So just bring it in. Like really
high-quality so we can definitely use it for
creating the Cartridge. It is much better than this one. This process is pretty similar. I will just select it because he didn't push it backwards. One again. And let's start by first pressing Shift
a and adding a cube. Enable X-ray. Let's quickly size the job. Fair, that's pretty good. Stand by. And for thickness, we can just like roughly
give it any alone for now. We will change it later on. But let's just give it
something like this. One again. And let's see, we can start by creating
this small cutouts. So press Tab, press Control R and add an edge
loop over here like this. Then add another edge
loop over here like this. Then what we can do is
press one for vertices, the length, these
vertices press X. And a. Very simple. Now you can just
press Tab rescue for Edge, Select, select this
edge and press F times to fill out the phases. Yeah, pretty easy. Alright, I will quickly
enable bad the Game-Boy. And let's just go
freaking the Game-Boy in this space so that we can know what type of thickness
we want to work with. All right, so I think something like this
would be alright. Maybe we can decrease
it a little bit more. Alright, that looks
pretty good to me. It fits pretty bad. Yeah, I think that's fine. Now what I will do is I
would just select it again. Let's bring it out over here. Miscible, bad, the Game-Boy one. And now we can just scale down the reference image
according to our new size. All right, So I think that's
perfect in my opinion. So let's press Control a, apply the scale first
and then we can add a bevel modifier just to be able out the
edges and decreasing. Enabled hardened normals
and are to smoke. Express one again, enable X-ray. And obviously we
need to bevel out these edges a little bit because
they are pretty rounded. We don't have to do the
bottom edges lighting. But for the top ones, you can do is press tab, select this one, this one, and these four hold Shift
and select all of them. Restaurant enable X-ray. Now, just press control V and
Bevel them out. Like this. That's fine. I
think sheets mode, this enabled artists mode. And let's see, next week can create this
cutout over here. So Shift plus a and
let's add a cube Scaling down, scattered about into the reference image. And yeah, I think that's good. That's controlling.
Apply the scale. Disable x-ray and press Tab. That's true for and select Full Control and Alt and
select all these edges. Then you can just
press Control V out. Wait a few segments so
that it is pretty smooth. I'm just trying to figure
out perfectly inside it. Yeah, that's pretty good. Now let's just
right-click, Shade Smooth. This. Apply the scale once
again, enable auto smooth. Now just select these
two press Control minus and move the Boolean modifier above the modifiers like this. Now to make the cutout
look a little bit better, press Tab the name but
X3 plus three for Face, Select and select
this backside face. And what I will do is I will bevel this
phase out like this. So that it gives us this like Smart age feeling
like this one. Select this, this S Then
by an idiot like this. That looks pretty good to me. I think. Let's move further. Again, enable X-ray, and
let's create this cutout now. Shifting. First, we can create
this thing over the edge. So if you see in the
reference image, these edges are like kind
of beveled out for what we can do to create this first
press Tab, press Control, our controller and you can
add edge loop over here. And again press Control R
and add edge loop like this. And if you remember,
we learned how we can snap these edges together. So make sure to select vertex
snapping from over here. Press G then Zach, move it around and hold Control. Snap it like this. One for vertices, select, select these two J, and then say these two plus
J to join them altogether. Now going to hold Alt, select the complete loop is less than Z and now press zero just to make sure they are
perfectly in straight line. Now I will place them
right about here. What I will basically
do is I would just select this edge
and select this edge. Then press Control V and degrees amount of bevels and just
bevel it out like this. Let's just quickly view it
in the reference image. How much we have to bevel it actually just about till here. And yeah, I think that's fine. Yeah. Let's proceed further now, enable that x-ray redshift. They are the cues
in this cube down. Now try to match it with
the reference image again. Yeah, that's fine. Going
to apply the scale. And now again, this tab is true for excellent hold
Control and Alt, select all these footages. Press Control V
and Bevan it out. You need to see how much
we have to give it. Yeah, that's fine. Now
you shade smoothness, enable auto smooth,
bringing back. It is like a very small
cut-out through this. A little bit inwards. And select them both
risk control minus. And now move the
Boolean modifier above the bevel modifier. Yeah, that works perfectly. If you see a little bit of
shading issues here and there, I think adding awakened
nominal modifier, Yes, will fix them. Say I just started
baking normal modifier. Next, we can create this small
little triangle over here. Shift the lexi. You
can add a cube. Maybe we can go through the cube So the way we can create a triangle shape out of
this is press Control a. Apply the scale first, restart and press one for word. Select, select
these two vertices plus M and merge and center. Just to merge them and
select these two words, sees press N and
merge at Sanctum. Create something like this. Then we can maybe press tab, select all these three edges. One for Front View enable X-ray. First, we need to align
it properly again. I think that fits better. Now, press Control E, apply the scale again and
select all of these edges. And now it says debit them out. Make sure this gain is applied. More or less enable artist mood. And let's just moving backwards. And yeah, I think I'm
just looking fine. Move the Boolean modifier
above the bevel modifier. Just a little bit of shading
issue going on over here. If you enable, it gives
sharp, it gets fixed. But I don't think it
is that seniors today, I think I'll just keep
in viscerally for now. Maybe we can fix it later on
because it is not that much. Maybe adding a bit more
edge loops would fix this. So just add a couple
of edge loops over here that fixed it. So just press tab and
in the main object just add a bunch of edge
loops by pressing Control or, and you can see that
fixed that issue. Alright, let's move further. Select this press tab and
select this bottom face. And now I will just press
I to insert this like this and extrude it
inwards like this. It won't be visible
from the bottom, but we have to create it. It is like the USB chip area that gets inserted into the machine or
something like that. And we can give it
like rough shape. Let's add a cute scaling down. Displays a small cube over here. Let's duplicate this, bring
it out. This properly. I'm selling this one. I'm
just bringing down over here. And yeah, just create
something like this. Now again, I will select this slash for the
isolation mode. Shift plus S goes or
deselected. I will add a Q. And again, we will create
those like golden chips, lighting it out over here, and just add an array modifier and duplicate take
a bunch of times. Yeah, that's pretty
good, I think. All right. Let's move further. Make sure to hit Save and just
set all of them and press M and move them to the
Cartridge collection. Enable X-ray, and let's create these cutouts now. Let's see. We can do is we can press shift D and let's add
a plain simple plane. Rotated on the x-axis
by 90 degrees. Down, please. One over here. Like this Let's bring it out over
here to here. Like this. Select this one
and move it back. I think that was pretty easy. Now, we can just duplicate this present and
moving downwards. Move both of these vertices behind and place
them accordingly. Now, we can add one more word, see if you want to make
it look a little bit mode called select the
middle-age press Control V and Bevan it out. To give it a smoother look. We can do the same
thing but this also select this now press Control me and never any doubt. Alright, so again, I will
select this, duplicate it. Let's see, we can
select all of them, press S and X and just type
in zero, make them flat. This one is like
completely straight, so I think it works. I will select all of the
edges in the between because you don't really
need them for this one, X and dissolve them like this. So pretty easy for
the bottom ones, I think we can use
these tools. Let's see. We can just select these
to enable back x-ray, duplicate them, and bring
them down over here first. Then type in S and
Z and minus one. Flip them out like this. They're pretty easy
as you can see. I think this works pretty good. Just select all of
them and just press Control J to join them and
bring them out over here. Now let's add a solid if I modifier to give them thickness, you can see the thickness is being added in
different directions. So just press Tab, press a to select everything, then press Shift plus ten and it is still
not getting fixed. So what you can
do is, let's see. I will select these faces, these phases and these spaces. So just leave these
two out because these two are the ones
that are flipped. And now press Shift plus
men and select insight. As soon as you do that, now, all of them are moving
correctly. As you can see. We have basically snacks
worked, we had to do. Now just select
this press Control minus to create the cut-out. Bring it out over
here like this. Now, we need to move the
Boolean modifier above the bevel modifier effect. And our next step is to duplicate it over
to the other side. Just select it. Added
mirror modifier. And we need to do is disabled the mirror
modifier for not, so that it does not get weird. And we can select the
middle axis as this object because it is exactly at
the center of these two. And we want to duplicate it along the left hand
right of this object only. So it selected,
go over to mirror object and select this as
the middle of the object. I'll select first,
enable it back. And yet now it is
modelling properly. Alright, so Cartridge is
looking pretty good to me. Let's hit save and keep
on working further. Hristov. And we can add a bunch of edge
loops over here just to give it a little
bit more generically. So again, press Control-A. And let's see, we can
add a single point because age is not being added. Again in these to select them, both, GA could join them. Now similarly I two
points over here also. And just select them both
and join them like this. Then select this, then
Jake and join them. And listen this inverse J Alt and select the complete loop, press S then Z, and type in zero to make them flat and move it at the top. Now just add a bunch of
edge loops in the between. The moving like this. We need to add another one. Now select this and this is J, S, and Z and type in zero. Now you can add a couple of
edge loops in the middle Alright, so that's
pretty good I think. Alright, so now what I
basically want to do is I want to make this
cut out like up here, over here also till
the Back Side. So I will just select
this enable X-ray and setting all of
the objects of it. Then just press Shift
plus D to duplicate them. And then he'd right-click to place them exactly over here. Recipe and separate out
the selection like this. Just so they are like
completely different objects. Let me select it. There are two different objects. I've been moving a
little bit behind, so that we can
easily select them, press Alt H to bring back
the hidden object idea. Basically these two
are completely safe. I will just select this one. The one will duplicate
and just now enable X-ray and just delete
all of these words. C's over here at the site
plus X and delete them. And answering all
of these vertices, risky, invest X to extrude
them to hear only. Move it over here. And
now I will just show you what I basically want
to do is select this, select this press Control minus, and create the cutout. And I was selected,
I'm moving like this. And now increase the
solidify modifier. Them didn't hear was selected and move the Boolean modifier
above the bevel modifier. Now I will just increase
the solid if I like this. That kind of looking a little
bit take from over here. So select this
best, stab it all. And just as G and X
and move it like this. Looking pretty good
in my opinion. There's continuum
and we can give it a little bit detail on
the Back Side also. If you go into the
difference images again, you will find the full dog, the backside over here. So it is something like this. Let's see how we can
create it back in Blender. And first, let's see, risk unfold plus one to view
the Back Side properly. And now we can turn off the
reference image for now. So just disable it
from over here. So now let's just add
a cube, redshift. They add a cube scaling down. Move it out over here. Now let's see. We can
first press Control a, apply the scale Stat, press Control R and add
two edge loops like this and hit right-click to
place them at the center. Press S and X, scale it out. And we can maybe select
these two loops. Let's Control V and Bevel them. Make sure they don't have
any edges in between them. Now just extrude
it out like this. Select this, then select this, then press Control minus. Let's bring it out. Yeah, I think
that's pretty good. We can now move the bevel
modifier below the Boolean. And I came, that is pretty good. Next we can add two
cylinders in the center. And once you've over here at
the top like this, again, press Control plus one and
let's add another cube, scaling down and place
it right about here. Yeah, I think something
like this is fine. More of a doubt.
Again, select this. I'm just going from minus show
duly at age the modifiers. And you finally,
you can just add two cylinders, scale them. Now, this one is kind
of like a UV sphere. So let's see, we
can add one sitting Right above this
shared smoothness enabled artists mood and
use the Boolean modifier. This move the Boolean modifier
above the bevel modifier. If you remember, we added this bolt factory add-on
so that we can add boards. So let's just place a
single mode in the Santa in maybe scale this down and little a big shift plus S goes
there to select it. Let's add a board bags. So let's see, we can this
kind of a weird shape. Maybe I'll just go in something like this and then
we'll change this to the top is
something like this. Yeah, I think that's fine. We don't have to go that
deep about this. Step. One and enable X-ray and just denude all
of these vertices. You can hold Alt and select all of the loops
X and delete them. Now just select this, then select this press
Control C and copy location. Rotate this by 90 degrees. Is by minus in getting this. Now just scale it down. Basic back over here. Yeah. I know I will add a
UV sphere just above this. Scaling down on the y-axis to make it a little
bit squished. And now use the
Boolean modifier on this NGO modifier stack. Yeah, more or less we have
something like this only. Buddy. I'm pretty happy with this. Alright, so let's hit
Save, select everything, press M and move it to the
Cartridge is collection. Okay, So one last thing before
finishing up the lecture, I'm noticing that is our bevel modifier is not
really working anymore. As you see with the edges. They look kind of like very flat and you cannot even see
them at the backside. I did not notice this earlier, but now I'm noticing that the bevel modifier is
not really working. So how can we fix this? So the way easy way to
fix it would be to just select it and come down
to the bevel modifier. And another geometry tab
is disabled clamp overlap. As soon as you do that, basically they will modify, starts to work in, but
everything would be weird. Like you will see all
the shading issues and geometry overlapping
with each other. The reason for this is whenever we disabled
clamp overlap, now the overlap clamp is removed and geometric and
freely overlap with each other. The bevel modifier
won't stop it. So when you increase it
too much and we'll see, it gets really, really weird. So first what we need
to do is we need to set this to even lower number, so something around 0.002 maybe. Now, or what we can do is if you see all
the shading issues, just select it, press tab. That is because the geometry's colliding with the
Boolean modifier. So press tab, select this one and move it
a little bit upwards so that it does not collide with this and select this
one and move downwards. Now you will notice
that we are not facing any type
of shading issue, but it still looks
like pretty weird. Let's keep one fixing it. And when I will move this
a little bit inwards. And these moms also, I will just select them. Push it a little bit inwards. Just to fix that shading issue. Maybe we can visit or
degrees it dropped to 0.001. Yeah, that looks the best, I think in my opinion. And we can see this
is poking out. So press Tab recipe for Face Select and just
moving behind like this. I wouldn't bring it out words just so the cut-out
is like very faint. Because I don't want this
Boolean cut out to be too deep. Or right now you
will notice that the edges look
much, much better. And we can see
everything properly. And we don't actually see
any huge shading issues. We see a couple of them like
very closely but far away. They won't be that noticeable. Last thing that I'm noticing is some shading shoes over
here. So let's see. This kind of tricky to like
work when you vSphere. So I will just scale it up first and address S them via
and squish it up a lot. Now we don't have any
kind of shading issues, but it looks kind of weird. But I don't think it
would matter that much. I think it looks fine. Cartridge looks much, much
better this way, I think. So let's just super safe. And yeah, I will ended up
over here, the next lecture, we will apply all the
modifiers and UV, unwrap it, and start with the texturing process
in Substance Painter. So thanks for watching.
I'll see you managed
16. Texturing the Cartridge : Hello and welcome guys. So now in this
lecture let's apply all the modifiers and UV, unwrap our Cartridge
and export it to Substance Painter to
start with the texturing. Alright, so if you remember, I mentioned that we
need to keep a copy of the original model with
all the modifiers in that. So instead of like a
creating a duplicate file, what we can do is make sure
everything is disabled, only the Cartridge
collection stays enabled. I will just select
everything over here. First, let's select this image, press M and move this to
reference images collection. And now you can just press
K to select everything. Shift plus D, duplicate it and just place it
anywhere you want. You can trace it about here, this M and move it to
a new collection and meaningless to
Cartridge up like. So now basically we have
two different collections, one with the
modifiers applied and one with the modifiers are all intact so that
whenever we have to make a change at a later
onstage, we can do that. So I will just disabled this
collection and began selling this collection to select everything or deselect
everything like this. And press F3 and search for it. Convert to mesh command and just select Convert to mesh to
apply all the modifiers. Make sure everything
is moving right. Now, just quickly delete
all of these pieces. All right, now basically
what I will do is I'll address a to select
everything first. Then we can press Control
a and apply the scale. Now while everything
is selected, just press Tab to would edit
mode a to select everything, and then press Control plus
T, triangulate everything. And then you can
press Alt plus J, remove the access triangulation. So basically, if you remember, we did this with
the Game-Boy also. It helped with the shading
in Substance Painter. So yeah, we will
do this beforehand only with the Cartridge. Alright. Now one
thing I'm noticing is we have quite a few
shading issues over here. If you look at from far away, it is not that visible, but still, if you
want to fix them, maybe we can just select
it and go over here, add a baking normal modifier
and just enabled keep sharp. Enabling keep
sharp. You will see most of the issues
are fixed Now. The model looks fine. So I will just add the wiki
novel Modified enabled, keep sharp and select Apply. Now I will again risky
to select everything. Then press Shift plus D, duplicate it in press X and
place it right over here. So basically, I'm doing
this so that we have two different cartridges and we can give them two
different colors. Just to add a bit more detail to our render, it
would look nice. If we have two
different Cartridge is will die different colors. You can maybe create more
also if you want to, but I just keep two. Now I will select it, go over
here and add new material. Let's rename this
to Cartridge to copy it to all of the objects while this is selected risky. And now press Control L and
link the materials like this. Alright, so make
sure to now apply the scale of your
spreadsheet to select everything then controlling
and apply the scheme. Let's head over to the
UV Editing tab now. Just select everything
and press U and Smart UV project and hit Okay. We can give it a little
bit of eyelid margin, but I think the UVs
are pretty good. All right, so now let's try Exporting this to
Substance Painter. Always good to reopen and
Substance Painter now. And while it is opening up, we can press a to
select everything, go over to File Export and
is quoted as different OBJ, the legacy one in the exports folder in
which to Cartridge is enabled selection
only and now it export. Let's go back to
Substance Painter close this and create
a new project. Click on Select, and we can
select the Cartridge is fine. It okay. And just quickly look for any kind of
issues if you find any. But I think everything
is pretty good. Though everything
is looking pretty good in the first row only. So I would just go over here and enable importantly
anti-aliasing. Now let's make the mesh
maps straightaway. So go over to texture set
settings in big mesh maps. And now let's do the
same settings quickly, which we did for
the Game-Boy also, I will disable it maps and rest. Everything remains
pretty much the same. It makes electric Textures. I'm just waiting
for him to finish. Alright guys, so the bag is done now I will hit Return
to painting more. And again quickly check if the, any shading issues with the big. Everything is perfect
in my opinion. So now we can finally start
with the texturing of them. The first, go back
to the Layers tab, and let's just delete
this oil layer. And before starting,
I will just quickly save my project. Control-s And even though Substance
Painter Files folder, I will save it as Cartridge is. Alright, so now for
their material, I will be using the same
Plastic material that we created in the Game-Boy,
a project already. So I will just quickly open up the Game-Boy project and create a smart
material out of it. I didn't add in the video also, but I will just
quickly show it again. Wait for it to open
up their scroll down. I can send it this
plastic white selected. We can maybe just for Exporting, rename this to something else. Let's rename history
course Plastic. And you right-click and select
Create smart materials. As soon as you do that, it
will be right over here. Now I will just quickly rename this bathroom
Plastic white only. And now you can open back. Your Cartridge is finally
of Substance Painter. Go to File and Cartridge is. Alright. So if you head over in the smart materials section
and searched by course, you will find this
course Plastic Material. Just drag and drop it
onto the Cartridge. We wait for it to load. Any. I think that's pretty good. We need to adjust a
couple of settings, but yeah, it is looking alright. In my opinion. Also,
I will go over here and increase the
size of the texture. So it gives you two foci so that we can
view everything properly. One thing that I want
to do is I want to increase a tiling of these
scratches because right now it kind of looks pretty big. We can also tell
it from here also. I think this works much better. I think There's degrees the balance to make it
a little less about it. This way. I think it
looks much better. Alright, So now I
think it is time to change up the
colors a little bit. So select the Base.
And let's see. We can made me go for like a bluish color or son doing create a new copy
of this material folder. Alright, so now for one of them, we can change the
color to something else. That's for now. And click on here, right-click exclude or click on here, right-click
exclude all. Now select this one and give
this color to this one. I'm big on here and give
this character, this one. They have completely
different colors. Now for one of them, we can maybe go for something bluish or something
kind of yellowish. I think I will go for yellow. Something like this, I
think looks pretty nice. We definitely need to adjust
the edges layer on it. Because it looks really weird. You can give it a
dark color like this. I think something
like that looks fine. Nexi just give it a
completely black color. I'm decrease the opacity
from here to 15. I'm still not sure. Yeah, I think that looks fine. I'll just go ahead
with this only. And for this one, we can change the
color to something grayish like we have in the
reference image over here. Just so it does not
like clash with a Nintendo Game-Boy because it is basically the same
Plastic Material right now. So what you can do is you can open up the reference image, open up this one,
and you can just make your Substance Painter
little bit smaller like this. Now what you can do
is go over here, select the Base Layer, and click on this
Eyedropper Tool, and select the color. Like this very easily. I think these two
colors are pretty good. I'm satisfied with them. You can adjust the
edges layer now. Maybe we can just
reduce the opacity. Yeah, that right away
looks pretty good. Let's set the opacity
to something like that. We need extra money.
20, looks alright. Let's try doing the same
thing with this also, I will send the
color back to white. And let's try decreasing the opacity to maybe
something like 15 Honestly, I think that
looks much better. I'm satisfied with this. Let's continue and texturing it. These species over
here. Let's see. We can just start a
simple black layer. Make it a black color. Right-click exclude all. And just select this piece as the black color and this one. This one, and this one. They won't even be visible. But yeah, I think this
way it looks fine. Next, create another layer. We can rename this
to black plastic. This one can be our gold color
for the chips. Let's see. Set the metallic to one degrees, the roughness and adjust. Learn a little bit. Yeah,
that looks alright. I'll select this
answer like this. Alright. Rename this to next week and in materials. So let's create one. The metallic value to one and degrees the
roughness. A little bit. Right-click exclude
all and select this. I'm I think this is too big, so we will just use
a smart materials. We can definitely create a
decent looking iron material, which is by adding these types
of layers again and again. But if we have the
smart materials, Let's just use that one. That looks fine. I'll just select the base
layer and make it a little bit brighter. Let's see. Over here, I think yeah, you can increase the
luminosity is to make it a little bit more shiny.
And yet that's fine. Let's proceed further now. I will open up the
reference image. Let's close this one.
On the backside. We have something like this. I didn't really either Front
Side different semester. Let me just quickly add it.
Alright, so here you go. I've added the Front Side
reference image also. Share it basically looks
something like this. We have a Nintendo
Game-Boy logo over here and a picture of the game. So we can definitely add
those things. Let's start. Again. Add a new layer. Rename this to Text. Disable everything except
the height channels. So hold Alt and click over here. And let's see, add a black mask and give it a
little bit of height info. Now. Okay, So this is a
completely different project, so I think we need to
import our actions. Once again, we can just select
the Nintendo Game-Boy one because rest of them we won't be using drag-and-drop
with over here. Come back to all levies
and drag and drop it. Select Alpha,
reject, uninvolved, select the project freedom, and yet it is over here. Now, select the Alpha,
increase the size. And you can easily
Stanford like this. Let's just first say the View to orthographic so that
everything is flat. The lighting over
here. Let's check if everything is in
the same though. Yeah, I think it
looks all right. Place one over here also. Yeah, I think that
is pretty good. I'll come back over here. Let's set this to 0.1. Maybe. We can also add
a blur filter to this just to make it a little
bit like not so harsh. Nothing really
happened because we added the filter to
it in the layer, but we need to add the
filter to the mask, select the mask and now add our freedom and
select the block. Nowadays working, set the intensity to
something like 0.1. We're pretty good to go. You can see if we disable the filter. It looks pretty harsh, but we did with the Front End enabled. It looks pretty
good in my opinion. Now hold Alt and Shift and
move towards the backside. Let's come over here. Select
this reference image. So we have something
written over here made in Japan and framed. This is basically paid
into bending, I think. Yeah. So let's see, if you will notice
we don't really have a texture for them. And just show you how we can do that manually in
Substance Painter. So it is pretty easy
rule to all libraries. And in the Alphas section, just search for font. And you will find a couple
of forms over here. Some of them are like my
custom font that I've added. But they are many forms that are adding by Substance Painter
only for you guys to use. We can select any one of these. Let's see, I think we can use
this one, font, Orbitron. I think it would look alright. So the way we can go about
this is just select your mask. Double-click over
here and you will see Substance is written over
here and easily standard. But if you scroll down, you will see you can
change the text. Replace this text
with invading Japan. Like it is in the
reference image over here. Let's just Stanford over here, you can see it is not
fitting properly. What you can do is you can
decrease the size like this. And now it is fitting when
Stanford like this over here. I know it does not really match
with the reference image, but I just wanted to add this segment to show you how we can use custom fonts
in Substance Painter. We can definitely create a very simple-looking
Alphas out of this in Photoshop and get the exact same font
if you want to do it. This will also list
Stanford over here also. I think in my opinion,
it looks pretty good. The Cartridge prop is like
really small to redact. There'll be save it indefinitely
if they go hybrid this. Now let's just this text. So I'm standing right over here. The size a little bit. Alright. I'm pretty happy with how the Textures
are turning out. I will hit Save.
Alright, so now we can import a texture that we will
be adding over this area. So just open up this
Textures folder and just select
these three and drag and drop them onto the shelf. Select them all, and make sure to import
these as Textures. Import them to your
project and hit Import. All right, so now again, we have a couple of different
ways that we can add these textures on do our models. So let's see. First is you
can simply add a fill layer. And then you can drag and drop this texture onto the
Base Color like this. We will see it will appear
over all of your model. So definitely we
don't want that. So add a black mask. And now go over here polygon field and just select this face. So that only appears over here. To select these parts also. Just make sure to
select them all. Don't worry. We don't have to be precise with it because I
won't be using this method. This is not that great of
a metalloid in my opinion. You can see it has its flaws as you have to select
all of these Small Faces. And now what you basically need, we need to adjust
settings from over here. So if you press F1, you will see this appear up this UE screen. There. You can see
all your UV islands. And if you move the
texture, you can see it is moving over this face. So just hold, shift and degrees the size of it and you can
place it over here. You need to maybe rotate, rotated to properly align
with the 3D model over here, then you can scale
it up accordingly. And it is like a lot of effort. You have to place it currently. This way. You get my point. You can adjust it however you want in this window and
then place it over here. We will also notice that
when you move it around, this texture is like repeating. So if you want to turn
that off and then come over here and
set this to none. As soon as you
remove that you will see it is only the
single texture. So it makes it a little bit
easier to place it around as you can properly see
where you have to place it. If you like, move it
out of the frame, you won't see anything
so we can move it back. So as I said, if you
want to place it this way, this is also a method. You can definitely do it. As you can see, I've
already placed it. It is not that perfect, but yeah, you can
definitely work with it. You can come back to
the Fill Layer now and you can adjust things
like adding height to it. As you can see, adding
height or changing the roughness and
all the things like that you can definitely
do with the failure. And it definitely
gives you much better control with all these
settings as you can change the roughness and metallic hide anything you
want at any point. But the other way that
I will be showing you, let's just delete this and
this time add a fill layer. Now you can press F2 Back to
come back to the 3D view. Any at this time we will
be using a paint layer. So just start to paint layer with paint layer as
you already know, if you like make a stroke, you cannot change the
settings of this. You have to like if we
change this red color. Now if you want
to change this to something else like
you cannot do it, you have to let completely,
it is the stroke And then you need to select
your brush back again. And then you can
change the fellow. And then you can add it again. But as I said, you cannot make any changes to the inflammation
of the existing stroke. So you cannot change any of the information
of these two strokes. You can obtain the roughness of the metallic so
you get the point. So now we're using
a paint layer. So if you add like
a sticker onto your model using Apparently you won't be able to make
changes later on. But yeah, I think
it is very easy to place it as
compared to affiliate. So how we will do it adequately enforced and select this tool, tradition one, this is the
prediction painting tool. And you will this white box
appear over your screen. And you can now
just drag and drop this ticker one onto
the Base Color. And you will see it is appearing over your screen
and you can move it around while holding Alt and using a left-click to
move it around very easily. And then you can paint
it wherever you want. Pretty basic stuff.
You can easily place it wherever you want
and then paint on it. But as I said earlier,
you cannot really make any changes to this main stroke. Now you cannot change the
metallic or the roughness. Alright, so let's see how we can place it exactly over here. So to change the settings
of this window over here, you need to first, and when you press S, you will see the screen goes darker. So that means you
get now agitate. And you will see all the
shortcuts appear over here. So if you use ascii, so press S, then use
your right-click. Then you get in visa size of it. If you use your left-click, then you can rotate it. You can also hold Shift to
snap it like this by rotating. And if you press S, then use
your middle mouse button, you can panic around like this. You're going also panic while holding Alt and then
moving around your screen. That is also a way. But even
also panic around this way. You get my point.
Now let's place this perfectly into our,
this little window. S then increase the size of it. Now this carefully, they
sit exactly in yeast. You can see this method is much, much easier as compared to
the other one, the field, even as we can easily
paint it like this, you can see how easily
we painted the sticker onto the model and don't
have to do anything. The only disadvantage of this is that you cannot really
change anything. Now, as I mentioned
earlier with paint layers, if you have to make any change, you have to maybe like erasing or just
undo it completely. Again, select the
projection painting tool. And let's say I adjust the
roughness and the metallic, and now I paint it again. You can see now it looks
completely different. But yeah, I cannot really
make any change to the existing strokes.
Get my point. I'll just quickly undo it. Said roughness back to
0.3 and metallic to zero. Or maybe we can just
disable everything except the color channel because you only need the
color information. And yet this will be
painted over your model. Basically that was it. We can now move
over to this one. And let's just drag and drop. Again, select the
prediction binding to and drag and drop this one. You can use whichever
one you like. Again, over it. Very easy. Alright, let's come back
to the paint layer. I'm in the paint tool. And you can see Cartridge is
look much better. These stickers, I don't do it. What I now want to do is I want to add HSL perceptive reader. So click on the layer one
and add a filter to it and select the cell precepting. This will help us to control the colors a little bit
as they are looking like, really bright as compared
to a cartridges. So degrees of lightness of them. Just a little bit. You can also decrease the
saturation at advect. 0.45, I think is pretty good. And 0.45 on the light
meets this video, we'll look much, much better if you've disabled the filter, you can see they will
look like ready, brighter you, but now it
looks much, much better. Another thing that
I will show you is there's just renaming
some stickers first. If you want to add a
bit of cheap damage onto your stickers
that you have added. What you can do is you can add a black mass to the
paint layer like this. They will completely
disappear, but don't worry. Now what you need
to do is you need to select, remove this. You need to select
any Smart Masks or any of the grunge maps. Like let's say I searched for. And we can use maybe
something like this. Add a fill layer to
it first and drag and drop it onto it. And you can see we have
added a bit of damage. It is not reading Perfect. Let's see. We can rotate
it by 90 degrees. I'm not going to add it, but I'm just showing you how
we can do things like this. You can increase the
contrast to make it look like as
if paper is being Stretched. And yet you can add a little bit of it here and they're leaving the
tiling a little bit. I can see it a little
bit of the day. Then you can maybe let's see. I had a mask to it, add a filter to it
and maybe select the thing that I as the glow. You can see it makes it a little bit blurry over
here on these edges. Maybe we can try
other things that, that is I walk. This will also give
it a nice effect. As you can see, who
turn the filter on-off. You can definitely
play with this. I'm just giving you my opinion. You can change the grungy map. You see different results
with different maps. And you can see
which fits better according to your
personal preference. You can also, what
you can do is, let's say I choose anything. Let's say I add this,
increase the contrast. Just the balance and
which will bring, Let's try something else. Aren't that good? Let's say we add some this type of damage. Who are cartridges? And now you want to add
a bit more by yourself, but you can do is you
can select the mask, go over here and add a
paint layer to the mask. Now, make sure to move the
paint layer below the WACC. And now let's see, we can come back over here
to the brushes section. And let's say I
send a three brush. And now if you will see if
you tried to paint around, okay, first change
the color to black. Remove the like. If you change it back to white, it will start appearing
back again as you can see. But if you change it to black, you can now manually
remove it from the areas that you want to
speak for it to save. And let's say you want to
remove it from over here. You can also manually add
the effect using a brush. Gives it a nice look like. So you change the brush. Now. If you press X to
switch back to white color, you can see you are not
painting it back again. And the stickers
that said these are some of the negatives
that you can use to make your margins are
Textures with even better. Just remove the paint layer. Let's just completely
remove the mask. If the Cartridge is clean. Or maybe we can just
add a black mask to it. Instead of a black mask. Let's add a white Masks
so that way they stay on. And now when you select a brush, so let's add a paint layer. Select the brush and then try
to paint with black color. You will see you
are removing it. It's assumed user
dirty brush and I will little bit off
along the edges. Just so it looks as if it is being shipped
off along the egg is a little bit definitely, this is totally up to you. You can do it however
you may like. I don't want to add too
much damage to my stickers. I wanted to keep them
a little bit fresher. I would just add a little bit
of damage on the corners. You can also use different types of brushes to get like
different types of deserts. There are a lot of
options to choose from, definitely like this one also. I think good in my opinion,
I'm happy with it. I will. Lastly, just quickly
item walk through into two. It makes it look better. In my opinion, density
is finite, good 0.1. Let's just hit Save. And
yet now I'm happy with how the Textures have
turned out for this. In the next video, we can
just export all the textures. The Nintendo Game-Boy, and the Cartridge is
back to Blender. And then we can start with the lighting and
rendering process. So tangos watching,
I'll see you next one.
17. Lights, Camera and Final Renders: Hello and welcome guys. So in this lecture
we will be Exporting all the textures from Substance Painter
back into Blender. But I also added a couple of more sticker Textures
that you can add to the Game-Boy if you want to
just select them both and lives drag and drop
them into the shelf. Select as texture and
into the project. It important. Again, we
need to do the same thing. Hold Alt and Shift and snap it through the
Back Side View. Maybe. You can add
a paint layer. And now use the
prediction Paint Tool. And drag and drop. Let's say this module
sticker over here began scammed very
small sticker. Just to add a bit more detail. Maybe not here we can
Lindsey to over here. You can press S, then increase the size of
it if you want to. I would just decrease the
size of it a little bit. Yeah, this is much better. And let's drag and
drop this one. We can stamp a few of
them either Back Side. These are a couple
of Pokemon sugars. Now let me just select the
eraser tool and delete. If you like painting. A little bit can access. I'm just showing
you how we can add a little bit more authentic
details to your models. In something like this
looks pretty good. Just for demonstration purposes, you can experiment along
with this however you like. You can move a lot of
different kinds of stickers or any kind of like extra
additional details that you want to add
onto your model. Let's rename this to sticker. And yet I will add
a filter same as HSL perceptive to just make
it a little bit darker. The color tone of a Nintendo
Game-Boy for 0.45 is fine. It you saturate it a little
bit. That's pretty good. Alright, so now for
export Textures from Substance
Painter to Blender, you just need to
hit Control Shift, and that is the shortcut
for Exporting Textures. You will see this window pop up, or you can also go over to
file and hit Export Textures. All right, so we only have to worry about
the settings over here. So first is output directory. This basically means where you want to export your Textures. Just click over here. And I will head over to the
tutorial that in green. And let's see, we can
create a new folder. Let's rename this to
Blender Textures. Different from this
Textures folder. In here, create another folder and let's rename
this to Game-Boy. Open it up and hit
Select Folder, and you can see the path
is appearing over here. Next is the output Template. So in this here
you will find like a various different templates
of different softwares, like we have Blender. We also have Unity
Unreal Engine. We want to export
this to Blender. So that's why we will
be selecting Blender, will be SDF is select this one. If I M lane, let's see. We can go with VNG, maybe 16 bits and size
can be for cake and rest, everything remains the same. You can also select
the extra set. So if you have like multiple different texture
sets in your model, like enabled and disabled
them from over here, if you will live on to
export one dataset or two, and you're going to adjust the specific settings
from over here. But these are global settings. And like 95% of the times, you only have to admit over here only and you don't have
to do anything else. And yet, when you have
done all the settings, just hit Export and
wait for it to finish. Also, let's open up Blender. Open up this phi, and let's disable this for now. And open up Game-Boy. Now you can go over,
do the shading tab, and let's add the materials. So one thing that I do want to suggest to you
guys first Bouvard, the Edit tab and in the Preferences menu enable
an add-on for noradrenalin. Don't have this, anybody just
enabled this Node Wrangler. It will give us a nice
little shortcut that we can use to set up the
Textures all at once. So what you need to do is just select this principle, VSD. You will find it over here
by default in your material. Then hit control shift and D. And this window
will pop up, go back. And now in the Blender
Textures folder, you select all of them at once. Hidden principles,
texture setup. And just wait for it
to load and you will see everything would
be loaded all at once. Gave it a little bit of
time. As you can see, everything has been
set up correctly. You can see, you can see the texture setup is
done all by itself. You don't need to do anything. With this helps us a lot. Make sure to check that all the other pictures are
in color space non-color, and only the Base
Color is in sRGB. Rest of them should be nonpolar. Now we didn't go back to Layout. And if you view this
in the render view. So currently we are
in the EV shading. But let's change this to cycles, because cycles is more accurate with the
lighting and everything, it would be a little bit slower. If you have a GPU, you can
change this from CPU to GPU and just give it a
little bit time here, it would be much faster. You can also enable
de-noise from over here. This will help to
remove all those like noisy Textures you will see when you are
like moving it around. We will see this
noisy grainy texture. So if we enable this, it would be reduced
a little bit. We can now press Shift a and
let's add a simple light. Let's add a directional
light so we can sunlight. You can press R and
rotated like this. You can press R2
times to rotate with phi along this plane. And then now you can see odd
extras came out pretty good. They are looking really
nice in Blender also. So let's do the same thing for the Cartridge is to enable them back and go back to
Substance Painter Files. And in the Cartridge is
make sure create sale. Alright, so now again
it's Control Shift and E. You need to again head over
to our tutorial directory. And in this folder, Let's create a new
folder to Cartridge is Open it up and select folder. And just quickly do the
same settings that you did for the other object. And now hit Export. Now
the export is done. Cancel, go back to
Blender and select the cartridges this time and head over to
the shading tab. Again, by this principle, be SDF is selected
Control Shift and deep in the Cartridge is folder select all of them and hit principle texture setup. Wait for it to load our
renders food is done. Now you can see the Textures are showing up
properly. Over here. There's going back
to the Layout tab for the render to
load up a little bit. And you can see everything looks pretty good in my opinion. I Textures came
out pretty nicely. Let's just bring them out
over here in the front. Llc. Now we can start to like setup the
render a little bit. Let's see how we can do that. First algebra Shift
a and let's add a simple plain press one for the Front View and just place it so that it
acts as the ground. Now scale it up. Make sure it is not overlapping like this because it can look
a little bit weird. This way, the shadow
looking wrapper. Now what I will do
is I will show you a nice rubric versus the
next scale it up like this. Select this press Tab to for excellent and
selling this H plus E to extrapolate like this preset and just extrude it
toward the top like this. Now you will notice we
see this weird edge. So press control and
apply the scale first. Then press Tab and I
will select this edge, then press Control V and Bevan
it out and make it smooth. Just to create that
studio lighting effect. You can scale it up a little bit more if you want to
cover it entirely. And you can see, now
you can select this. I mean, the plane that we just started adding new
material to this. And even like do things like changing the color
of the background. Also make sure that
it right-click Shade Smooth so that we don't see any of those
weird shading issues. You can do a lot of
things like in V8, a lot of different
render settings, if you'd like, set this
to completely black. And let's say I make this
degrees in roughness. You can see now the background is like really shiny and things are
being reflected. Alright, before we
actually start to set up the lighting and like setting up the camera
lighting and everything else. One thing that I wanted
to do is let's come back over here in the
viewport shading. Let's just disable
the lien for now I would select the
plane and the light, the stem, and move this
to a new collection. And let's rename
this collection, do camera and lights. We will add the camera
redrawn and disable it. Let's disable the
Cartridge is also. Now what I want to do is
that I want to create like a parent object that we can select to easily
move around this. Because right now if
we want to move it, we need to select
it all like this, then, then just move it. So it is a little bit of hassan. So what I will basically do
is I'm shifting and let's add an empty object
and add a plane axis. Move it over here in the
middle of our Game-Boy. Like it can be roughly
in the middle. It does not have to be accurate. Now while this empty
object is selected, make sure the active selection, the selection is like this
yellow-colored selection. And if you hold Shift and
select something else, you can see now it is no
longer the active selection. This object is that
because addiction. So whatever is in this yellow
color is that the selection and whatever is in orange color is not that good selection. So make sure this is
active selection. Then press a to
select everything. And now we can see
everything is selected, but our empty axis is
the main selection. And now what you need to do is right-click Parent
and paid into object. As soon as you do that, what
will happen is now if you selling this empty object
and move it around, you can see all of the objects
are moving along with it. This makes our lives a lot easier because you
can easily select this, move it around, we can
even rotate it scale. It makes it easier to
set up everything. Let's do the same thing
for the Cartridge is also, I will select this
empty and this M, and move this to the
Game-Boy collection. Let's enable the cartridges and make sure to do it for
them one-by-one redshift, they add MD plane axis,
move it over here. Now, select all of this
and press H to hide it. Now just select this one. Now plus a, so that this
stays the active selection. Right-click painting an object. There's all plus H
to bring this back. Oh hi, This 174 top view, sorry, every neighbor
screencast case. Redshift plus a and add an
empty, move it over here. Now again by this is
the active selection, this a right-click and parenting result plus H
to bring everything back, we can just press a
to select everything, press M and move this to the Cartridge is
applied collection. All right, let's enable
back everything. And this way, it
wouldn't be a lot easier for us to
move around things. We can place these
tools over here. Let's see, we can just either next locate
them by 90 degrees. That's okay then by -90 degrees like this and place
them on the ground. Let's do the same
thing for this also. Seven for top view basic
over here. On top of this. I'm just trying to
create some type of interesting looking render. Let's select this and rotate
it a little bit this way. Alright guys, so now let's
add a camera and set up the scene and little
bits of redshifts plus a and add a camera. So now we will see the
camera is added over here. If you want to view
through your camera view, you can press zero on the
number bat and you will notice that you are viewing your camera now as soon as you press zero. So to set up this camera, but properly it is really easy. What you need to do
is basically move around your scene
in normal view, how you want it to be
placed in the camera. Like let's say I want it to be placed right about
here, like this. As soon as you have placed
your view correctly, then you can press
Control Alt and Z. And you will see now the
camera fits perfectly along your view as you have
placed it, breast zero. Now if you're busy, you
on your number back will be easily able to
mute for your camera. And now to adjust
it even better, you can go over
here in this tab. So press N to view this tab. And in the View tab enabled
log camera to View. When you enable this, you can move around your camera easily now as you move
around your scene. But yeah, as soon
as you set it up, make sure we just disabled it back because it can
sometimes mess up things. Now we have done this. Let's viewed through render view once and I'm the setting
that I will enable this. I think I've already enabled it. You can come up over here in the output properties and
make sure render region. So what this will do is
it will only show you the region that
will be rendered, that is through your camera and rest of the things
would be hidden. So make sure you enable this. Alright, let's set up some
things a little bit more. What I will do is to view
both sides of the vertices. Game-boy, I will place them side-by-side. So
just select this. And now to select
all of the objects at once because we need
to duplicate them. Press Shift plus G. So this is selected group and
I will select the children. And you can see everything
is selected on its own. Make sure to hold Shift
and select it. This also And now press Shift
plus D to duplicate it. Place it over here. And now let's just rotate
it by 23 degrees. Zero to view through
your camera. And again, enabling
camera to View. And let's place this properly. Now select this, setting, this first and
rotate it like this, and select this
one and rotate it. Something like this. We can also first
disabled camera to View. We can select this thing
over here, the Cartridge. And again press Shift plus G
and select group children. And make sure to hold Shift
and select this also. Then press Shift plus
D. You can press G and then press Shift plus Z to only move it in
the X and Y plane. Let's place it over
here. Now press R Then eggs rotated
by 90 degrees. Then you can reach seven for the top view and just
place it inside this. Simply bring it out. So Bridgette and Z, Let's
move it up till here. I think it fits pretty well. Say I plus G Then by two times, just to move it
along the rotation. And now there's View,
the render view, where zero for any odd camera, I think it looks pretty nice. You can maybe bring it out
a little bit. Let's see. Yeah, that's pretty
good. Again, I will select these two
things over here. What we can do is just enable X-ray and select
everything over here. Now just make sure to deselect
this thing over here, hold Control and deselect this. And you just deselect
everything by holding Control. Now press Shift plus D. Men Shift Z to place it
right over here like this. Rotated on the y-axis by 180 degrees to
flip them completely. And we can place them
somewhere around here. Just to add a bit more
detail to the scene. Just quickly select everything. Select all of these
parent objects. Zero, nuclear camera. And let's would write about here so that everything
is in the center. And I think I'm happy when
placing the render like this. It now it's time to setup
the lighting a bit better. Alright, So let's see. I will first just
delete this one. We don't really
need it right now. And go over the shading tab now. Make sure to view
the rendered view, zero to View to camera. And now you guys must be
currently in the object. If you select any of the object, you can view it there materials. But if you go over
here and select the world, so click over here. I can get yeah, okay, yeah. Now it is looking and click
over here and select void. And then you can get the
lighting settings of the word. If you will notice, if I
select this node over here, this is the node that
is adding by default. If I just select
it and delete it, everything would go dark. Don't worry, we will
add our HDRI for own. So press Shift and select environment texture
node to add over here. Now if we will check in
the resources files, I've added a HDRIs, find that you can use. Obviously, it's
totally up to you. If you want to use
some other HDRI find, you can download it
from the Internet. They're like great websites
that provide HDRIs for free, like polyhedron 3D
or ambient CGI. So they are logic and
easily find them. I have provided you
with one of them. If you want to use that one, you can definitely go for it. So just head over to
the tutorial directory. And here it is, carpentry shop. So just open it up and now
plug it in the surface. As soon as you do
that, you can see we are doing the HDRI. It is a little bit
weird right now, but don't worry,
we'll fix everything. I think it is being
caused because of the roughness is very
low of this background, but we can fix that later on. So now select this node, press Control key, and you
will add this mapping notes. So what we can do is
we can rotate that GRA, however we want But first let's fix the
background a little bit. What we need to do is type in zero over here and rotation. Let's select the background
and come back to object. So what we basically increase the roughness
to somewhat like 0.8. Yeah, as you can see, now,
it looks pretty good. Alright, so let's
change the color. Now click over here
on the Base Color and increase the value. Maybe something like 0.3. I think this complements
our renders anyway. Alright, so now let's go back to the world settings and we can use this napping node to
maybe move around the HDRIs. And you can do things
like rotating it around. You can rotate it to find the best possible
lighting angle. These are the different settings that you can play around. Let's set it to
something like 70. Also, add onto this thing. You can redshift date and
add a thing like area light. Let's go back over here
to Viewport Shading. And you can rotate it by 90
degrees like this first. Now if you view
your rendered view, you can select the
area light and maybe just increase the power of like add a little bit
different kinds of lighting. You can change the
color and you can add multiple different lines
to create a nice setup. So that is totally up to
experimentation for you guys. You can create different
lighting setup for you. So what I will do
now is I will just quickly out of my scene. Onetime, we just see how
everything looks at. After seeing the render, we can see what things we have to free, so what is lacking
in our render. So come over here in
the render settings, make sure to just set up
everything like this enabled de-noise for both of the
viewport and the render. And we have this max
samples over here. Right now it is
currently set to 4096. That is a large number and the render can take
a lot of times, I will just quickly
decrease this 2000. And now you can hit F dwell
on your keyboard to start with the rendering process and discard the video
when the render finishes. So I'll see you there. Alright guys, so the
render is done now. And if you zoom in over here, you will notice that our
Game-Boy looks very, very weird with all these
bumpy stuff going on. So I actually knew about this error and
I know how to fix it. I just wanted to show you
guys how it might look. This is because of
the displacement map, but we basically
need to do is This. Go back to Object and select
and Nintendo Game-Boy. So currently if you
just scroll down over here and check out the
displacement node over here, the scale is currently
set to one that is quite a large number
for displacement, we need to just decrease
it down to 0.1. For this and also for the Cartridge is also
as soon as you do that, fix all of those bumpy
issues that we're going on with a Game-Boy
in the Cartridge. If you press F element
to view the render, you can see everything
looks really weird. So now when you have
done this change, again, press F dwell and render it out. I will again wait
for it to finish. Alright guys, so the
render is again done now. Now if you zoom in over your
model, it looks pretty good. Bumpy stuff is like
really small loss, so it looks much better. If you wanted, if
in-degrees it even more, but in my opinion, it looks pretty good now and the renders are coming out fine. Lighting itself is pretty basic, but I think it works.
It looks really nice. And yeah, we can
definitely work with it. If you want to now
save this image, you need to go over the image. Let's save. And I've
already created a folder, but you can just save it
wherever you want and make sure to send this to JPEG or PNG and decrease the
compression to zero, because we don't really need
any kind of compression. Jpeg and set the quality 200. You can name it
whatever you want. And then just hit Save As image. Basically the render
would be saved. So we're pretty much done
with a course over here, I've shown you how we
can render things out. So what I suggest you
guys should do now is to experiment with the
lighting a little bit. You can experiment with
the camera angles. You can take various
different portfolio shots. You can take one single
shot of the Front, only of the Game-Boy, one from the backside. You're going to take
couple of different shots with the cartridges and whatnot. I definitely suggest you guys to experiment a little bit more. As I said, you can add multiple different lights to create a different kind
of lighting setup. Another thing that I
want to mention is if you head up over here
and output properties, you can also change the
resolution of the range. You can see that
you can increase or decrease the resolution and play around with the aspect
ratio of your render. You can maybe increase it to 25, 60 by 14, 40, or even you can raise
it to focus also, I would suggest you
guys to render it out in this resolution and also increase the render
samples a little bit. Maybe 4096 is a
bit large numbers, so we can work around the
2000s. But here you are. Renders would take a little bit, but the quality would
be much nicer as the resolution is high and the
number of samples is high. So you're taking
your Final Renders, then you can maybe
render it out, render it out in a higher
resolution, higher samples. But when you are like
really testing things, you can even set this to
maybe 500 or 400 and degrees of evolution to only ten EDB. Let's render it out. One final thing in this
resolution and the samples, and I will show you a couple
of things in Photoshop. And then we'll end
with the course. I didn't just go to quickly get F dwell and wait for
the render to finish. Alright guys, so the render is done now and you will notice that the quality is much
better with this one. So let's just save
and save it as vendor to I will save it as JPEG and
increase the quantity 200, Save As image and
open a Photoshop. Disclosed this for now
there 678 Photoshop open and there's just open up our render render
to over here. So I don't really know
that much about Photoshop, but there's one little
setting that I always use and that will enhance your Renders
by two or three times. So just go over to Frito, sharpen and select sharpen move. As soon as you do that
you will see your edges are lot more sharper and you can just undo it once
and see the effect. So everything is looking
like kind of fuzzy. But as soon as you have Control Shift N Z
to undo it back, you can see everything is like Photoshop and the edges
look really nice. This is the one setting that I always do through my renders. And this will make your renders pop up
a little bit better. Obviously, you can do other
things like setting up the contrast or color, changing the brightness contrast to these are like
the basic settings. I don't really know that
deeper vote Photoshop, what you're going definitely
do all these things. You can change the
color balance, like giving it a
different type of paint, whatever you want to show, that it's totally up to you
guys how you want to do it. But there this is
the couple of things that I wanted to show
you in Photoshop. Definitely make sure
to select up and more in the filters that will
enhance your renders a lot. And yet now I wonder
suggest you guys to take out a couple of
different portfolio shots. Like you can take
single shots and like take one buckshot
Front from Front. Just set up different
kinds of lighting setups. That would be nice. Alright guys, so this is pretty
much it for this course. Thank you for watching. I
hope you liked this source. If you have any doubt, make sure to Robert in the
comments or message me. So then you watching,
I'll see you then export
 Aniket Rawat, 3D Artist