Transcripts
1. Introduction to Class: Hello everyone, and welcome
to this new course. In this course, we will go
over the entire process of creating a guitar using
blender and substance painter. We will go over the
complete pipe line of creating a high quality,
realistic prop. Starting with modeling
the prop in blender, texturing and substance
painter, and finally, lighting and rendering a
portfolio piece in blender. This course will
help you improve your three D prop modeling
and texturing skills massively as we go
through each and every step together and learn
many different techniques. After finishing the course, you would easily be able
to create the renders shown in the trailer and
create props of your own. We will start by modeling
the prop blender and learn various modeling
techniques and also learn a lot about
different modifiers. After finishing the modeling, we will apply all
the modifiers and UV and wrap our
model for export. We will import our model
into substance painter. To start with the
texturing process, we'll start by making the
mesh maps for our model. We will learn how to create high quality and realistic
materials and some of the key features of
substance painter like smart materials,
masks, et cetera. At last, we will take our model back to blender
to render it out. We will set up the material
lighting and the camera and learn how to use the
HDRIs to light a arsene. We will finish the course by taking a portfolio ready render, and a little bit of
Photoshop editing. This course is for anyone who
has a basic understanding of blender and substance painter and wants to upgrade
their skills. So I hope to see you
there. Thank you.
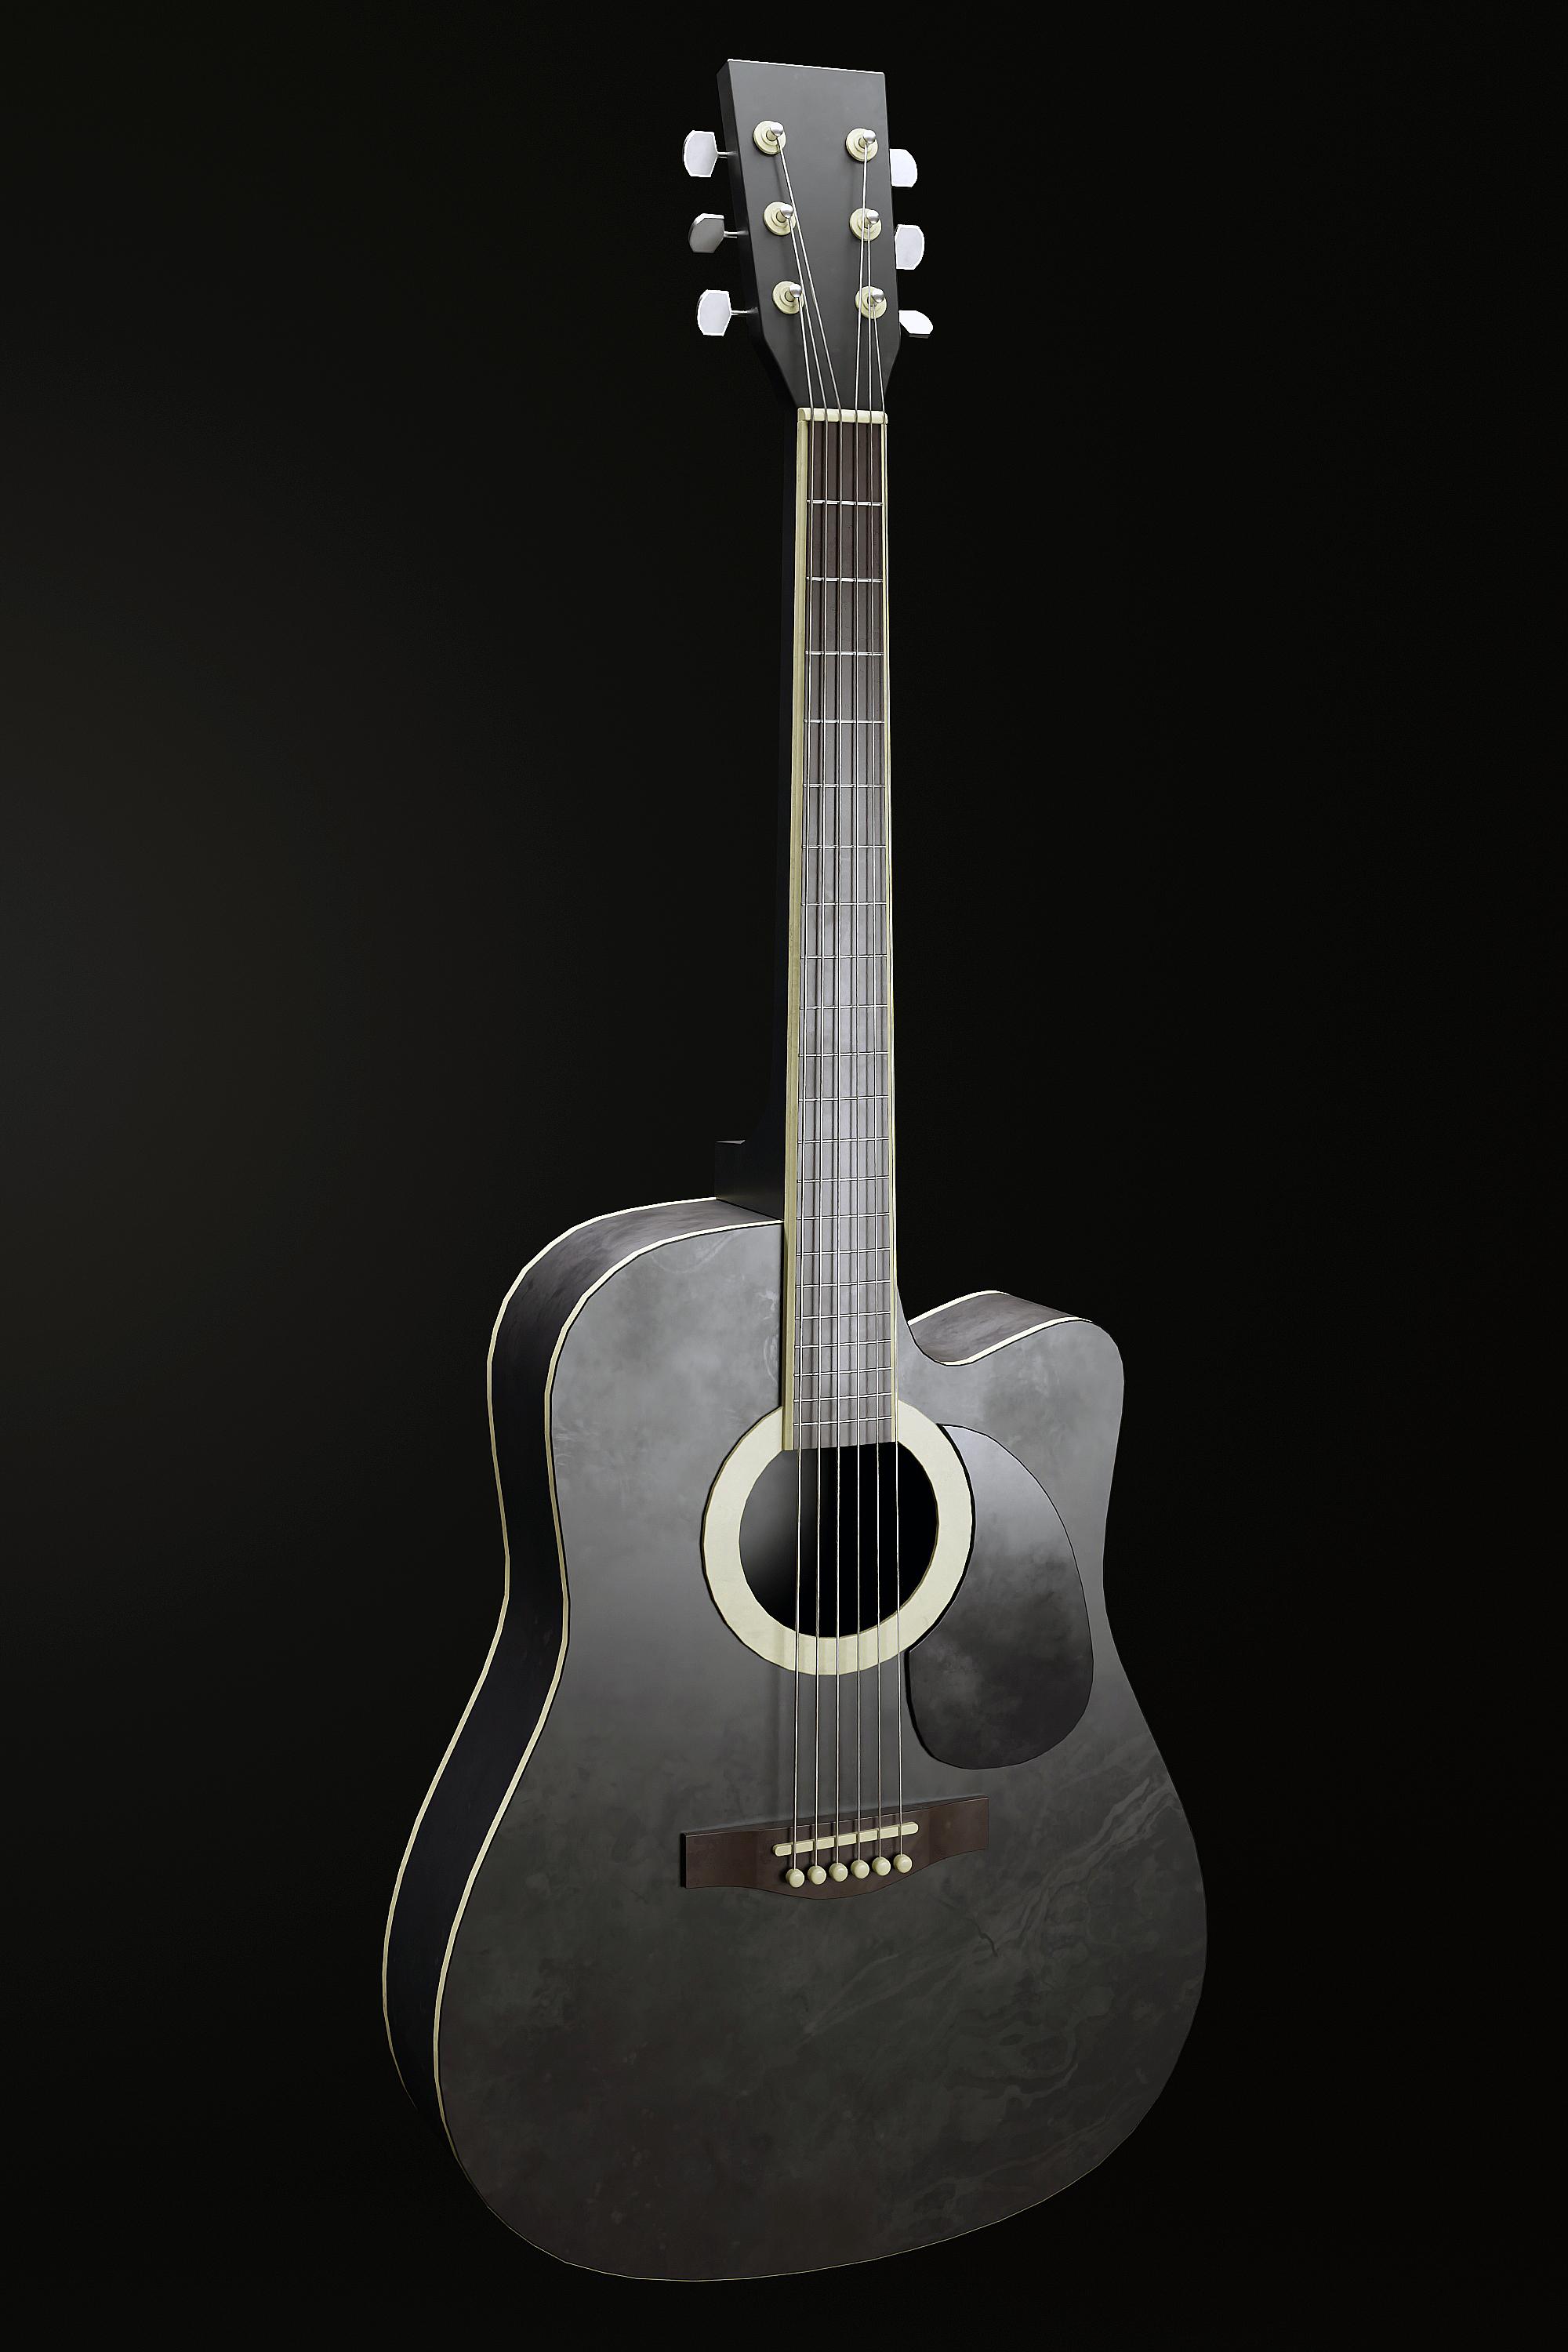
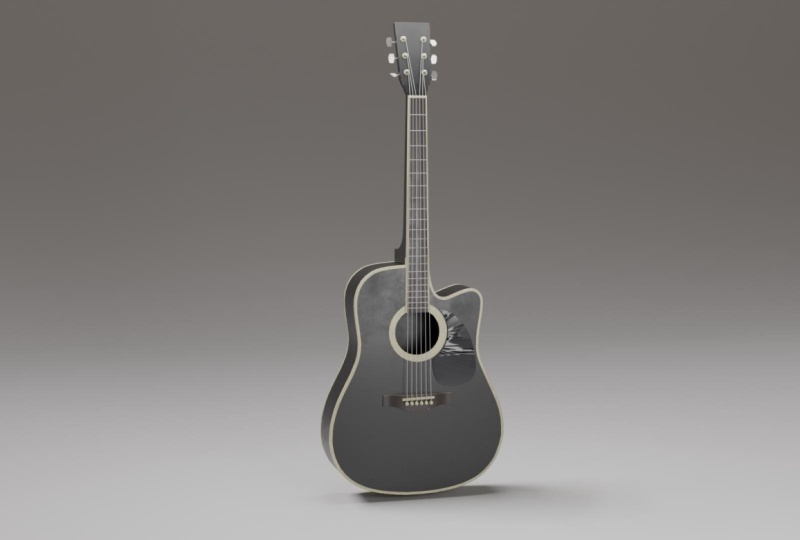
2. Creating the Base Body: Hello and welcome everyone to this new course
where we will be creating a guitar in blender and substance painter
from start to finish. Before starting, I want to just quickly mention
that I've created a new Discord server for all the news and updates related to my new
course releases, as well as things like
discounts and sale notices. Also, you can ask your
doubts and questions over there as well and
showcase your creations. Yeah, it would help me a
lot if you can join it. So to join it,
basically you just have to go to your
course files only. And I've shared
this Notepad file. You can open it up and
copy this link completely, and paste it onto your browser. And then you can join the
Discord server easily. All right, next thing is, as this course will be a
free course initially. Therefore I have to complete
it within like 2 hours. As that is the time limit
for free courses on demi things might be a bit
faster than my other courses. All right, so with all
that out of the way, let's just quickly start
with our modeling process. So I'll just quickly press a
and press Delete to delete everything we can press
to bring out this view. And I will enable my
screen cast keys so that you can just see all the shortcuts that I'm performing. As you can see, they're
appearing over here. All right, in the
course files only you will find reference images of the front site and
the back site. Let's just quickly add them. I will press one for the front view and make sure you first press
one on a number. Back to enter the front view, press Shift image and
add a reference image. I will just quickly head over to my tutorial directory in the reference images at
the front reference image. Now basically just press then y and move it
backwards like this. Again, press three for
the right side view, press Shift and again
add a reference image. And this time I accidentally
named it Guitar back, but this is actually the
side view, guitar side. Yeah, just bring it in now. All right, now press G, then
X and move it over here. Now we can easily press
one for the front view and three for the right side
view of our guitar, and we can now easily
start working right away. I will just create
this body over here. To do that, what we can do is press Shift over to Mesh
and add a single word. If you don't find a single
word option over here, quickly go over to Edit Preferences and the
add on section, search for extra
objects and just enable these both Curve
and mesh as well. Then you will find all
these extra options. Go over to Mesh and
add a single word. Add a single word. All right, now press one in the edit mode to move
this vertice around. And press and let's place
it right over here. And basically just press to extrude it and start
extruding it quickly. To trace out the reference
image like this, quick, I will speed up this part as basically what I'm doing
is I'm pressing then holding shift to place it
exactly where I want to place it and then just following
the reference image only. This is like really basic stuff and easy to do. Just
quickly do that. All right, now we
are almost done. What we basically need to
do is extrude it till here. And then select this vertice. Hold shift, and select
this vertice also. Then press F to join them together and just make
sure they are in line. What you can do is you
can snap them together. Go over here, select Vertex, then press then to
move it like this. Then hold control and snap
them together like this. I think that's pretty good. Now what you need to do is
press A to select everything, and then press to
fill in the face. Now let's press three
for the right side view. You can see everything
is fitting properly. If it is, not just adjust your image or the object a little bit so that it fits
both of the views perfectly. Press one, and you can
see it is fitting. And press three, and
that is also fitting. Now press to extrude
it here like this. Basically we have got
ourselves our guitar body right click and shade
smooth this and also enable auto
smooth from over here. I will quickly come up over here and enable cavity and shadow. Just to make things look
a little bit better. All right, Next we can create
this circle over here. This hole like shape that
is also very easy to do. What you basically need to do is the shift A go over to
mesh and add the circle. This time R, then x to rotate the circle on
the x axis by 90 degrees. Scale it down and place
it right over here. Again, scale it down. Just try to match it with
the reference image. Basically, I think
that fits pretty good. Now to create a cut
out onto this object, we will use the knife
project command. What you basically need to do is first select
this main object. Press one to go into
the front view. Press tab to go
into the edit view. And now hold control. And then click on this object, this circle that we want
to use like a cutter. What we basically need to
do now is we just need to press three knife
project and tender. You will see if you select
this circle now and delete it. Select the guitar press tab, and you will see this cutout
is created over here. We can just press three
now and select this face, press X and delete the faces. We have got ourselves a nice looking base
body of the guitar. Go over to the modifiers, and as you can see currently it does not have any thickness. Go over to modifier and
let sad solidify modifier. Make sure to select the object press control and
apply the scale. Now we can adjust the thickness. You can enable x ray
from over here to see if anything is like colliding
with each other over here. As you can see, obviously we
don't want to make this like so something like 0.00 30.03 is, I think, fine right now. We can adjust that later on, but in my opinion,
it looks all right. I will also just select it and add a Bevel modifier to it. Let's adjust the bevel. We just make it a little
bit smoother on the edges. Enable harden normals and
also enable to smooth. All right, we are good
to go, let's just hit control and save our file. Before proceeding,
I'll quickly head over to the tutorial directory
and in the blender files folder name this two guitar.
Let's just hit Save. All right, next we can
create this thing over here. I think it is called
the Pig Guard, But first I will
just select this and reduce the thickness
of this guitar. I think that's too
much right now. I will say this 20.01 maybe
that looks much better. Next, let's work on this shift. Again, add a single word, one for the vertex select, and just drag and drop it somewhere around
here like this. Again, basically we
need to just press and extrude and just trace out this object in
the reference image. All right, again it is done. Basically we need to select these two and press
now to join them. If you want to add another
vertice between them, you can just press control R
and add a vertice like this. Basically, that's pretty good. Press to select everything, then press fill in the face. Let's see, Now we can
just press and ext, I will press then Y
and move it backwards. Still here, I think
that's right. Can shade smooth this again. We will add a Bevel
modifier to this. Make sure to apply the scale, reduce the bevel amount. I think this much
is pretty good. Enable harden normals
and also Galata smooth. Another thing that
I want to do is just select press slash. By pressing, you can
isolate any object. Like let's say if you
just want to work with this object only you can press
slash on your number pad. And you can see you can
isolate it easily so that none of the objects
are obstructing your view. Press again on your number
pad to come out of it. All right, so I will just select press Tab to go into the
edit mode, basically. Right now as you can see, these vertices are
not really connected. I just want to connect
them quickly because not connecting them can give
us some problems later on, basically press three
and select this face, and select this space, press
X and delete the faces. Now to basically join all
these vertices, press one, select this one, and select
this one on one side, press to connect them together. Then select this,
then this press. Now press two for Select,
select this edge, select this edge, and
press, as you can see, a face is created between them To make it a
lot easier for us, what you can do is
press two for Select, Just select this edge. And now keep on pressing
on your keyboard. And you'll see you can
easily join them altogether. And just make sure to
fill them all like this. At the end, you can see we have a little bit of shading issue going on over here
at the bottom, press three for phase, select, select this phase and move
it a little bit downwards. And you can see we have
fixed that very easily. All right, we are
good to go again. I will press tab press one for select and do the
same for this side. Also select these two. Press select these two. Press press two for select. And make sure to select
these two edges. And press now select this edge. And now keep on
pressing to join them altogether and fill
them out completely. All right, we cannot really
see any shading issues. We are good to go. Last
thing, press tab again. Select this edge and press
and this edge and press this way we have all quart topology.
So it is much better. We are done with
this shape Also, let's hit control
to save our files. I think this much is pretty good for this lecture. We'll
continue from here. In the next one we'll continue modeling all these different
parts of the guitar. Thank you for watching.
I'll see the next one.
3. Finishing the Base Body: Hello and welcome guys. Now let's continue
working on a guitar. I'll press one for
the front view. Let's enable x ray. We can start by creating
this shape over here. Just press Shift A, and let's add a cube
press to scale it down. And just scale it according
to the reference image. Press then and scale it down
on the z axis like this. Just match it properly
with the reference image. To roughly create something
like this, you can press Tab, and you can see it is fitting our reference image
perfectly, I think. All right, after
you have scaled it, you can just press control
and apply the scale. Then let's press Tab. I will select this side
of the vertices and this side of the words
while holding Shift. Also make sure you
have enabled x ray. Okay, first what I will
do is I will press Tab Press control and add
a edge loop in the middle. Hit right click to place
it exactly over here. Then select this word, hold, shift this one also. And just press and move it
right over here like this. Now to properly create
the shape first what I will do is save a x ray press, then Y, and scale
it down like this. Now just press tab,
press two for edge. Select and select this edge. Press G, then Y, and bring
it out over here like this. We have a weird shape like this. But what I will do is I
will press Tab and hold Alt and select
this complete loop by clicking while holding all. You can see this whole loop is selected if you hold
all click over here. Now you can just press Control plus B to bevel
it out like this. Just give it a
bunch of segments. I'll press one for the front
view and let's bevel it out. Yeah, something like this.
If you enable x ray, it is not really
fitting properly. But what I will do now, just select this side
of the vertices, make sure you select
them properly. All the vertices that
are on the right side of the origin select
them like this. Then press X and
delete vertices. Then go over to Modifier and add modifier and just
add mirror modifier. And you will notice that everything is mirrored on
the right side perfectly. Now go back to front view, enable X ray and you can select all these vertices
one by one and bring them down according to
the reference image. You will see everything
would fit perfectly. Sable X ray. As you can see, we have got ourselves our
shape right click and shade, smooth this and
enable auto smooth. Let's move it backwards
a little bit till here. Now to make the shape
a little bit better, what I will do is
I will hold two. I will press two to go
into the Select mode. Hold and select this loop X
and remove the edge loop. Just select this loop over here. You can select this
top edge over here. Then press then Y and move
it downwards like this. To create something
of this sort, let's move it a
little bit upwards. And now you can again hold
all select this loop. Will press control and
bevel it completely. Make sure to apply the scale. Now let's level it to
create something like this. I think that looks nice. You can press then Y to scale it down on the y axis to make
it a little bit thinner. I think this shapes
look pretty good. We can hit save press three
for the right side view. We can move it a little
bit inwards and rest. Everything looks pretty
good in my opinion. You can see it is fitting perfectly in our
reference image. It has got a nice shape also. All right, let's move further, enable x ray again, we can create these
small shapes over here. Let's just press shift A,
add a Q and scale this down. Scale it up on the
x axis like this. And let's see, First
press control, apply the scale. Press tab. And just it, somewhat like this, you can press and move
it a little bit inwards. Yeah, I think the
shape is. All right. Bring it out over here. Now, just first press
control, apply the scale. Press and press two for
select hold control Not. And select all four
of these edges like this control and Not is
a shortcut for this. You can press one once
again, enable x ray. Just press control and level it out to create
something like this. Again, shade smooth,
this enable auto smooth. I think that's pretty good. Next, we can create these
cylindrical shapes. I think these look
like a sphere, but we can work with a
cylinder only, enable x ray. Again, press shift, and
let's add a cylinder, scale it down, rotate it on the x axis by 90 degrees and just match it with the
reference image once again. Now let's just press
to isolate this. Let's shade smooth this enable
to smooth and let's see. Okay, first let's
press slash again, come out of the isolation mode. Press three for right
side view and you can see it from the side view. We can place it somewhere
around here so that we know the length of it is
somewhere around here. And now I will scale
it down a little bit. Now press press tab
for the edit mode. Press three for
the backside face and press to inside
this like this. Now just extrude it like this, let's insert it a bit more, extrude it till here,
Create something like this. Next what I will do is I
will just press Tab again, press control or add
edge loop over here. Before doing anything else, I'll press two for select, hold a, select this
edge completely. Again, hold shift, select
this edge completely. Then just press control to
give it the smooth shape. You can see the bevel is not
really working properly. I think we need to apply
the scale first control, apply the scale now. Again, try beveling it all. That looks pretty good. I
will press three for phase. Select, hold Alt,
select this phase, then press Alt plus E to extrude it along the
normals like this. I'm pretty happy with this. We can press one for the
front view, enable x ray. Now let's just use
array modifier. Instead of duplicating
it again and again, you can simply use array
modifier like this. You can control the count and
the distance between them by using factor as
it is on the x axis. Only we only need to
change the x factor, but if you want to make it on the y axis or even on
the z, you can do that. Let's set them back to zero. Now to set them properly, enable extra quickly again
and decrease the factor. And make sure to set
the count on six and just place it according
to the reference image. Can set your factor
whatever fits best. I think 1.37 It's pretty
good in my opinion. I will just select this and move it a little bit downwards, even though it does not
match the reference image. But yeah, I think that
way it looks better. All right. I'm pretty happy with how our guitar
is coming along. Let's see what we
can work on next. We are pretty much done
over here on this side. The next thing to
create the stop part, let's see, we can press three
for the right side view. And we can start by
creating this thing. We can press Shift and add a first press one
for the front view. We will be starting from somewhere around
here to scale it down and place it just
above the guitar like this, and make sure the
reference image fits perfectly over here. Now press tab able x ray, select all the stop vertices. Move them up over
here till here. Then press then x and scale
it down on the x axis. Move it a little bit
towards the left. I think everything
fits perfectly. Again, I will select
everything over here. Lex has enabled press to extrude it and scale
it outwards like this. Let's try to match the
reference image properly. Again, press extrude
it till here. And again, scale it up. You can only scale it
on the y axis, x axis. We have something like this. Press three for the
right side view. Let's just place it
backwards over here. This shape is like
starting from over here, you can see the
partition is created. This is like a completely
different thing. We just need to
place it till here. Now we need to work
on this right side. Let's see, Press tab again. Let's, we can start from
over here at the top, select it, and move it
back over here like this. And just try to match it with the reference image,
just like that. Do it over here also, if you feel like you want to add a couple of more edge
loops, you can do that. Just press control R and
add a bunch of edge loops. And just move them according
to the reference image, we just fit everything properly. I think this is pretty good. Control R again, add edge
loop right over here. Select these two and
place them like this. Now you can select
this, press G, then Y, and hold control to snap it together so that they
stay perfectly in line. You can make sure to enable vertex from over here
and then do this thing. Now we just need to
create this over here. Press control R. Let's add
a couple of edge loops. Select this, move it like this. Then you can press G, then Y, and just snap them together. Move them a little
bit just to match the reference image because they are not like
perfectly straight. Now for this, we can just add a bunch of
edge loops over here. Just move them back to make the shape just like in
the reference image. Let's add one more over here. And I think that is pretty good. I'm happy with it to zoom out. I think it is matching
the reference image. Pretty good. We can just right click on this shade smooth and enable auto smooth
from over here. I think we did a pretty
good job with this. Let's hit Save. I think this is pretty much
it for this lecture. We'll continue from
here and next one. Thank you. Watching.
I'll see the next one.
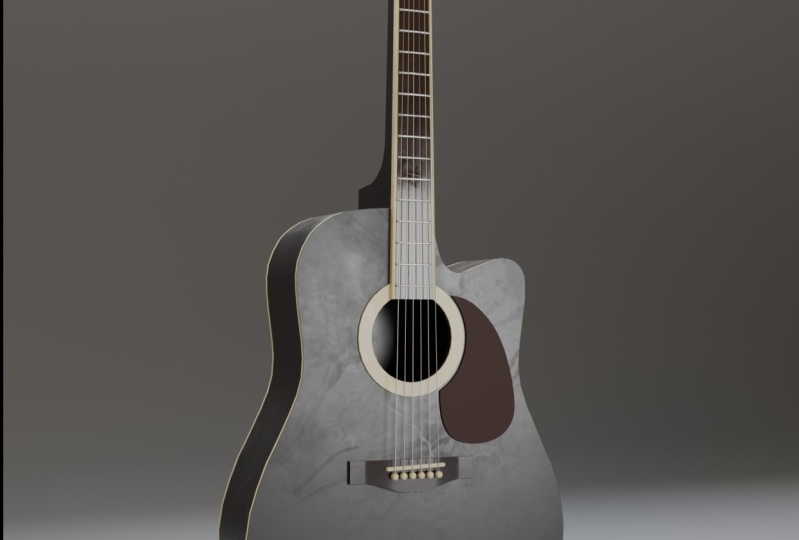
4. Adding Details: Hello and welcome guys. Let's continue
working on our model, one for the front view. Let's see, one thing
that I want to add over here is I will just add a small circle just on
the outside of this hole. It is not really added
in the reference image, but we can add that on our own. Click over here,
select this object. Let's press one for the, select Hold Alt and select
this complete loop. Hold Shift Alt and
select Completely. Now you can press Shift,
Duplicate it like this. Then hit right click to
place it exactly over here. You can just hit
Cancel any moment. Now press and separate
the selection. Now as you can see
that these two are like two separate objects, we can just select it first, I will just remove
both of the modifiers. Press tab press to select everything press you
can extrude it like this, then hit right click to place
it again exactly over here. Then press to scale it outwards. Like this. I will scale
it just about here. Now just press to
select everything, Press and extrude it
outwards, just like this. Then again, add a bevel
modifier to this. Apply the scale, shade, smooth this and
enable auto smooth, reduce the bevel amount and enable harden
normals from over here to make the edges smoother. I will also add
the Bevel modifier to this object over here. We did not add it.
Add a Bevel modifier. As you can see, the
bevel is too much. First, press control
A, Apply the scale and then reduce the bevel.
Something like this. Maybe I will press select all of them
and press then y and move them outward
just a little bit. Let's set the bevel
to something like 0.002 That's pretty good. This also add a Bevel modifier. Apply the scale and
reduce the bevel. All right, that's pretty good. Make sure to enable harden
normals for both of them. As you can see, the edges are
like really hard right now. But if I enable harden normals,
they will be smoother. You can enable that next. Let's see we can start
working this part over here, Shift, and let's add a cube. Once again, scale it down and
place it right over here. Scale it according to
the reference image. Now press Tab. Select all these stop words and move them
over here at the top. And now again press the next. And scale it down like this, I think it is, till here, only to just bring
it down till here. Next, let's first add a Bevel modifier to
this, supply the scale. And add a Bevel modifier, reduce the Bevel, enable harder normals and
enable to smooth. What I will basically
do is first I will press one for the front
view and enable x ray, you cannot really see
it properly over here. Three, and let's view
it from the right side. We need to make it
a little bit more thicker, press S then Y, and increase the thickness of this, something like this. Make sure to always apply the scale after you
have changed the scale. Now again, just press Tab, and let's see, Press control R and add edge loop in the center. Like this, I want to
add two edge loops, so you can press
control R and use your scroll wheel and add
two edge loops like this. And hit right click to
place them at the center. And basically just press then X and scale
them up like this. Place them just at the corner
of our object like this, so that we can
separate them out. Later on, I will show
you what I mean by that. Something around here is
pretty good, I think. Next I will just press first to isolate this object and I will make it a
little bit curve. The press control
are in the center and hit right click,
Press two for edge, select, select the stop edges, then y and move it out
over here like this. Then basically hold out, select this loop completely. Then press control to level it out. Simply,
just like that. Right click shade smooth. This now enable to smooth. Now basically I will press
Tab and press three for face. Select Hold Alt and
select this Hold Shift, and select this phase. Then press P and just
separate the selection out to create them two
separate objects like this. As you can see, okay, we made one mistake. We did not really select
the face over here. Just undo it quickly
and make sure to hold Shift and select
this face also over here. And this one. Then press and separate out the
selection like this. All right, now you can see there is like a weird
separation over here. We want to make it a little
bit better to do that. We can press slash
once again and once again slash to
isolate these two pieces. This time press tab
now, and press two. And select this edge over here. And just press to
fill out this face, select this edge and press
to fill out this phase. Now the separation
is a bit better. Again, select this
piece over here, press we can press Tab, and we can fill out
this face like this. And press to fill out this face. All right, now it
is much better. As you can see. I definitely want to reduce the bevel amount a little bit to maybe
something like 0.0 015 or this also. That looks much, much
better, in my opinion. Let's hit Save, and press
one for the front view. Let's create this top piece over here again, press Shift A, add a cube, scale it down, and place it right over here. Press then x scale it up Again, make sure to enable
x ray and just see if it is fitting properly. Yeah, I think it is. Now press three
for the right side and let's move it back. We need to scale it up
on the y axis like this. I definitely want to bring it out a little bit more like this. Now, press control,
Apply the scale. Let's add the Bible
modifier to this. Also, press tab,
press two for select. Slide over here at the top and press control
and bevel it out like this. Right click and shade smooth, enable harder normals
and enable auto smooth. From over here, I will select these three
pieces over here. Press then Y and scale them a little bit down and
move them back. Just to create
something like this, press three and check it
from the right side view. Once again, I think it is
a little bit outwards, but we can definitely
work with it. Yeah, I think I'm
pretty happy with how this has turned out. Select this and reduce the scale of it on the
z axis a little bit. All right, let's save and
keep on moving further. Next we can create
these lines over here. These are also
pretty easy to do. We basically just need
to shift, add a cube, let's scale it down and make
it the size of over here, Sable x ray. Bring them out over here. I will just select them
and scale them down. Just about in here to
fit exactly like this. Now to give them a
bit better shape, let's base them correctly
that not apply the scales. And I will just select these two edges control and
level them out. Something like
this, shade smooth, this enable to smooth. Let's see now we can just
keep on duplicating this. Make sure to just add a edge
loop right in the center, press control R and right click and add edge
loop like this. Now let's just duplicate this. Come out of the extreme. I also want to reduce
the thickness of this. What we can do is press Y
and scale it down like this. We move it backwards. You can see, we cannot
really see this anymore. But we will fix that later on. Let's just duplicate it. Quickly select it,
enable x ray plus D and bring it down
like this Again, D pressed and bring it down and just keep
on repeating it. Piled, then set swiftly do it. All right, we are all done. Now, quickly select each
one of them and scale them, just about these two lines. For each one of them.
Just so that we have like a reference this way, it would be much
easier as we can just quickly scale them according
to these two lines. It does not have to be
like exactly precise or perfect because it won't
be that noticeable. But yeah, just roughly scale them according to
these two lines. All right, next let's fix
their visibility issues. I can do is select all of this and
just press to hide them. You can just select
any object and press H to hide them altogether. And just quickly select
them all like this, make sure to have an
active selection first, click over here, then hold
Shift and select all of them. Then just press control
to join them altogether. Now you can again press Alt plus H to bring everything back. And now I will just select them. Let's press one for front view, enable x ray press Tab
and make sure to go into the select mode to press one and just select all the
word in the center. As I mentioned earlier, we have to add like a
edge loop in the center. Just make sure to select that
edge loop for all of them. Enable x ray press Y and
bring it out like this. As you can see now,
it is perfectly visible over all of them. Now just press control, press to level it out very easily. As you can see, now
they look perfect. Apply the scale and
let's see next. What we can do is one
more thing that I want to do is I want to fix the shape of this press tab and select these two
faces. Press three. And select these two faces, press then Y, and move them back a little bit, just like this. Then you can two
and select this. Select this pres then, and just bring it
out like this just to give it more
like curve shape. Now if you want, you
can select enable x ray and increase the size of it according to the
reference image. Still here I think in the reference image it is
scaled out like till here. If you want, you can do that. I think this looks fine. I will reduce the
size back to the original only I think this
looks much better to me. All right, let's sink. Pretty good for this
lecture. Thank you watching. I'll see the next one.
5. Detailing the Top Part: Hello, welcome guys.
So in this lecture, let's work on the top part of our guitar so we can create
all these pegs over here. All right, so first I will
just select this piece, and I will add a
Bevel modifier to it. Because we do not add it. Just add a Bevel modifier, Ply the scale and adjust it. All right, let's move further and press one
for the front view. We can look at the basic shape of this peg from over here. Only in the reference
image, basically. Just add a, scale it down and just try to
roughly match it with the reference image.
Something like this. And now press three for
the right side view. Just try to scale it
down on the Y like this. We can rotate them
at a later on stage, but for now I think
that's all right. Let's see, Press control
and apply the scale first. Now again, press on E
for the front view. Let's place it over
here. Enable x ray. Let's see, Press tab to
go into the edit mode. Press control R and add a edge loop right in the
middle. Right click like this. Let's select these two
vertices and move them up. We can move this one
over here like this, then basically just press
control and bevel it out like this and just move
it all downwards, something like that. And
we can select this one also and press control
and bevel it out just a little bit that we have
something like this. Press S, then Y, and scale it down on the Y
axis a little bit. Also, I will just scale
it down like this. Also, shade smooth this
and enable auto smooth. Next what I will
do is I will press and select this edge over here. And select this edge, press S then y and scale
it down like this. I think we did not make the
bevel like smooth enough. We can maybe select this edge and bevel them out separately. It will give us like
a weird topology, but I don't think it
matters that much. We can select these two
edges over here and scale them down a little bit. Yeah, I think, I'm
happy with this. Now what we can do is selected cursor to selected to bring the cursor over here. What this cursor basically does is you can hold your shift and rightly can move it
around wherever you place it. A new object would be
added exactly over there. To place it exactly
at like object, you can select that
object, press Shift plus, then cursor to select it. Now when I add like a cylinder, it would be added
exactly over here. This way it is like a little bit easier to move
around things. Press seven for the top view, let's just press R, then X, R, then Y, and scale it down on the
Y axis by 90 degrees. Type in 90 in your number pad. Again, shade smooth,
this enable auto smooth. And scale it up on the X
like this if you want. Maybe give it a little bit of detailed press controller at
two edge loops like this. Place them over here. Alt and extrude
faces a long normal, we can select this. Now press
control to bevel it out, give it something
like this shape. I think that's pretty good. Now we can just quickly
place around the tuners, maybe we can select them both. Press control J to
join them together. Let's see, they're a little bit smaller than the
reference image. If you want to scale
them like this, you can just scale it overall. But yeah, I think
that's pretty good. Let's move them
around over here. Press three for the
right side view. For now, let's just
set the rotation, go to item and set all
the rotations to zero. Now just rotate it on the x y 90 degrees and on the z
y 90 degrees like this. So that we can place
them perfectly for now and rotate
them later on. To press three and just
place it like this. Press Shift plus D,
place like this. And press Shift plus D.
Again, place it like this. Now press one for the front
view and bring them in. Now let's just quickly use a mirror modifier to duplicate
it on the right side that it is much easier to go
to mirror modifier modifier, Select this and add
a mirror modifier. You will notice that it
is not really working properly because we need
to set the mirror object. We want to duplicate
this thing over here according to this
object over here. Select select the
mirror object as this. And you can see it is
working perfectly. Now let's quickly do the
same thing for all of them. All that's perfect. Now we cannot really
like edit them. If you see if you rotate it, both of them would
be rotated at once. You can see if you rotate
it, move it around. Both of them would move,
rotate at the same time. First we need to
apply the modifier to change them
individually, select it, go over here and apply, do this for all of
them like that. And now you can select any one of them and both of them
like a single object. Let's just quickly
separate them out to enable x ray select this one, press P and separate selection. You can see both of
them are separate. Now let's just quickly
do this for all of them. All right, now we can just basically rotate
them individually, press R, then X, and rotate this one like this, just give them various
different angles. Just like that, maybe I
will select the cylinders, select them all, and just quick select all of the cylinders
to select them all quickly, you can just press L
while hovering over them. And you can see you can
easily select them. Now, I will just scale
it up a little bit. You will notice that when
you press and scale them up, they scale like very weirdly. What you want to do
is basically go over here and select
individual origins. Now they all will
basically scale over their individual origin
and that is what we want. Scale them up like this.
That's pretty good. Yeah, I think they look fine for the backside
of these things, we have to create like a
little holder over here that holds these like
tuners in place. I won't go too much
fancy with it, I will just simply create
a cube. Base it over here. What we can do is we can enable
snapping from over here. Enable face project snapping, select phase project
from over here. And select aligned
rotation to target. Now what will happen
is when you select this object and press to move it around,
then hold control. You will see it gets snapped
perfectly to that face. Let's place it over here. Now. Basically you can press,
then you can press every axis two times to move it along that
particular rotation. Only what I basically
mean by that is if you press then X right
now or then Y, you can see it is moving
in this straight line. But if you want to move
it along the rotation, press Y once again, or press then you can see you can move it along
the rotation like this. If you press Y and Y, you are moving it
along this rotation. Or if you press Z
and Z once again, this is like really helpful. Select them all and move
them a bit further, like this, select these three. Also, press G, then
Y, and move them. Just a little bit ahead. Now, basically, I will
select this press control, apply the scale,
select this face, and move it down again. Press G, then Z, and Z, and you can move this face exactly along the
rotation like this. Press control a knot, and select all four
of these edges. Press control and level
them out just a little bit. Enable to. So again, I will select this and
add a mirror modifier. Select the mirror object as this again selected to duplicate it, press Shift D, and this time
press and Zed once again. Press then y and Y once again. And then you can
move it below here. Move it a little bit out again. Select press Y and Y once again. Let's just select these two and move them a
little bit inwards. All right. Yeah, I'm
pretty happy with this. Now let's move further. Now one for the front view, again enable x ray. Let's create these
things over here. These are also
pretty easy to do. Let's press Shift and
add a cylinder again. We will use that
snapping on the face, scale it down a little bit
and and then hold control. And you can see you can easily snap it onto the face like this. This one once again
enable x ray. You can press and
hold control once again and snap it just
right about here. Now again, if you press
then Z and Z once again, you can move it outwards
just along the rotation. Shade smooth, this enable
auto smooth and basically selected press tab to
go into the edit mode. First, let's apply the scale. When press tab presa, select select this phase and press to insert
this like this. Now just extrude it
outwards, just like that. Just once again to insert
and this time insert this inwards.
Basically, that's it. Let's select it and add
a bevel modifier to it, reduce the bevel and
enable harder normals. We will select the
circle in the middle. You can also make a selection by pressing and just selecting
all the words like this. There are different
ways to select. I will just scale it
down a little bit. Now again, let's add a
mirror modifier to this. First, we can add the cylinder that is
at the center of this. Again, shift plus, select this, press Shift plus
cause to select it. Add a cylinder, Scale it down. It gets added exactly over here. Then you can press
and hold control. Snap it like this. Shade
smooth and enable to smooth. Let's see. Okay, before
I think snapping it, let's just properly
created, set this to zero. Press three for the
right side view, it is something like this. Let's see, I will press press control R to add
a edge loop in the middle. And scale it down from
the middle like this. Then press control
and devel it out. Let's select the top loop. So hold out and select this
top loop. Put outwards. Press three for face, select. Select the top face,
Press right click and faces that you can
select this word over here. And move it out like this.
Yeah, that's pretty good. Now, press and hold control. And snap it over here. Obviously we need to move it inwards and also scale
it up a little bit. Now press then z and z, and push it down till here. Maybe scale it up a bit more, make sure it is not working
from the back side. So you can press Tab
and select them all. All right, I think
that's pretty good. Now we can just join them both. Let's use the mirror
modifier now. Make sure to set the
mirror object as this. Yeah, it is mirroring perfectly. Let's enable x ray selectins. Place it over here again,
press Sift plus D, and we need to set a little bit. Yeah, select this one first, will then z and Z. And move it down here. Again, select this and
do the same thing. All right, we can
maybe increase the, say, scale of them a little bit. Select them all,
make sure, sorry, individual origin is selected from here and scale them up. I think this middle cylinder
is just too big for me, so I will select it quickly. Again, select them by pressing L while hovering over
them and scale it down. Also, just push it
back a little bit. I think now it is pretty good. We can definitely make
little adjustments later on. Also, you can make
them according to you. If you're feeling like something is looking too big or too small, you can definitely
adjust it on your own. But yeah, No, I think I'm
pretty happy with this. The last thing to do is just
to strings onto our guitar. Okay, Before that, let's see, I will quickly create
this little n over here. Let's just simply
add a cylinder. Bring it down over
here, scale it down. This one is really easy to do. The stab, select this thing
and scale it outwards. Like this control, I apply the scales three for the right side view
and move it over here. We can right click,
shade, smooth, enable auto smooth this face. And press and press once again
and extrude it like this. Yeah, that's pretty good. Let's save and yeah, we are pretty much
done with our guitar, so thank you for watching. In the next video we'll create the strings and finish with
the modeling. Thank you.
6. Adding the Strings : All right guys, in this lecture, let's add the strings
to our guitar. First what I want
to do is I want to add two edge loops over
here on the guitar body. If you do not really see your geometry of the
guitar, you can see it. It is towards the
inside of the guitar, but it is not visible
towards the outside. What you basically can do
is just select the guitar, stab, press A to
select everything, then you can just
press Shift plus N. And you can see this
will fix the normal, basically the normals for flip, that's why it was
appearing inside out. Now I will just press controller at two edge loops like this. Right click to place
them at the center, then press the Y
and scale them out. You will notice that
when you press S then Y, nothing really happens
because we are currently in individual origins. So we need to change
this back to maybe bounding box center
or median point. Now if you press S, then Y, you can see now it scales properly, something around here. The reason I'm creating
these edge loops is because it is easier to add a texture in substance
painted directly to these two strips because we will be making them
like a different color. That's why I'm doing it.
Let's select them both. Once again, I will decrease
the thickness a little bit. That's pretty good, I think. Now we can proceed
for the strings. Basically press shift and this time go into
curve and add a path. This is a path then type in 90 to rotate it by 90 degrees
on your number back. Let's bring it out over here. All right, let's start by giving it a little
bit of thickness to go into geometry
in the bevel section, increase the depth, and you will see it will give this cylinder. When you increase the depth, you can see it will give
this cylindrical shape. But the thing about this
is it is really easy to change the shape
of this curve. That's why I chose this. Instead of a normal cylinder, let's just set the thickness
to something like 0.03 maybe 0.03 20.003 etc. A speaking correctly,
the thickness of all the guitar
springs are different. We can maybe make this one the thickest and then we can
decrease the thickness overall. Maybe I will increase this
20.0 035 press control. I apply the scale.
Let's start press Tab, and I will enable x ray. And just delete all these
vertices over here. Press X and delete them. Make sure just two
words are there. Let's place one over here like this and another one
over here at the top. Just about somewhere
around here. Now, quickly press three to
move to the right side view. Again, select both of them. And move them over
here like this. Yeah, that's good. Select it and place this
like this over here. Now, basically, I will
press to extrude it once, and then press once again. You need to like extrude
it a couple of times, then it works correctly. Yeah, we need to extrude
it like three times. Now we can move it around. Don't really like move it
ahead. Just place it till here. Only now I will
just duplicate it. Press press then X,
and move it over here. Then again, just
press Tab and align it according to the new string. And place it just like
this, still here. I will decrease the thickness to 0.003 Maybe again,
let's duplicate this. Press X and place this
one like this press tab. Just align them all according
to the reference image. We will properly
fix them later on, but for now just
place them like this. We can keep the thickness
for these two the same. Let's again select this, press Shift D, and place
this one over here. Let's decrease the
thickness even more to 0.0 025. Again, press tab. Place this one over here again, duplicate this. Let's just quickly duplicate
it two more times. For these two, we can
finally set the thickness to 0.002 for both of them. Press tab, enable x ray again, Let quickly place them both. All right, we are
good to go now. So quickly, just press three and check from
the right side. Yeah, everything is looking
fine. Now select this. Okay, before we actually
make any changes, just select all
these pieces over here and move them
roughly in that position. Just like that. Now let's select the first string and place it directly
over here like this. If you want, you can press
three and move it like this. Press once again to extrude
it and move it inwards. Select this one, enable x ray and just move it
directly over here. Press three for the right side, press G, then Y,
and move it back. Extrude it a little bit just to make it seem like
it is going inside this. Select this one. Now stab enable x ray and this one
goes directly over here. Make sure to like check if there are any kind of shading issues. Make sure there are none. That's pretty good.
Select this one again and this one
goes right over here like this. Let's see. All right, that's pretty good. Press tab, enable X ray and this one we can
place it over here. And the last one goes
directly like this. Yeah, perfect thing is
sitting pretty good. You can check over here also. Yeah, the strings are
looking really nice. Let's just say safe. I think in my opinion, we are pretty much done with
the modeling of our guitar. In the next lecture, we will
apply all the modifiers and just quickly export it
to substance painter. First we will and wrap
it and then export it to substance painter to start with the text string. Thank you guys. Watching I'll see
in the next one.
7. UV Unwrapping : Hello and welcome guys.
So let's continue. What I will do in
this lecture is let's just select both of
the reference images first, press M and move them
to a new collection. And name this as
reference images. Okay, and we can just turn this collection
off now from over here. Now select all of
the guitar again, press M and move to a new collection and
rename it to Guitar. Basically what we
will be doing is we will be applying
all the modifiers. When we apply all the modifiers, we cannot really make any
changes to those modifiers. Like, for example, right now we can change the things like the bevel, amount of any
of the modifiers that we have added or anything
that we want to do. But if we apply this modifier, you will notice we
cannot really change the bevel amount now
as it is permanent. Make sure you are happy with your modifiers and everything. What I want to do is I just
want to create a duplicate of this guitar that if things
go wrong in the future, we always have a non applied modifier
version of our model. What I will basically do now is just press A to
select everything, then press Shift plus
D to duplicate it. Then hit right click to
place it exactly over here. Now again, press M and move
this to a new collection. And rename this to Guitar
in brackets, right? Applied. Okay, Basically, now we have two
different guitar models. One will be the Not
Applied version. We can rename this to Applied. That means the modifiers
are not applied for this and the other one
is the applied version. Let's enable the applied one and we will apply all
the modifiers now. All right, before applying them, one thing that I want you guys to check
is go over here and enable face orientation and make sure everything
is like this, dark blue color and nothing
really is red color. If you see something like this, let's just create a new object. And I will quickly show you. If you see any of
the objects with this red color, make
sure to fix this. Because this means
that the normals are flipped and if you
export it like this, only to substance painter, everything would
look inside out. If any of your objects, let's say I'll just
quickly do one of them. This object is
appearing like this. It can be any object, but
I'm just showing by example. What you basically need to do
is just selected press tab, press A to select everything, then just press Shift plus
N. As soon as you do that, the normal would be
recalculated and it would be fine just quickly do that for any of the objects,
if there are any. All right, let's disable this
for applying the modifiers. We don't really have
to go in like each and every single object and just
select Apply from over here, because that would be too long. We can just press a
to select everything, then type in three and search for the command
convert to mesh from here. Basically, if you select any
object now you will see now all the modifiers are
applied and we cannot really make any changes to our model. Now it's time to add
the material to this. Go over here, select
any of the object, come down to this tab over here, and add a new material to
rename this to Guitar. Now to copy this material
to all the objects, what you basically need to do
is just select this piece, this object which has
the material added. Then press A, make sure this
is the active selection, then press control L
and link materials. You can see 30 is
written over here. That means this material is being used by 30
different objects. Now, yeah, it is
copied successfully. Another thing that I will
do is I will press Tab. If you remember we created
these little strips. Hold Alt and select them
both. Shift and Alt. Select them both, then press P and separate the
selection like this, just so they are like
a different object. This way it would be
easier for us to add the material in substance
Painter. All right. Now move on to UV editing. It's pretty simple
and straightforward. We will directly use
smart UV project. What you basically need to do is first press A to
select everything, then make sure to press
control and apply the scale, because applying the scale
is important with UV's. Now press Tab, press again
to select everything. And then just press U and hit Smart Project
from over here. You'll see as soon
as you hit okay, over here, the UVs are here. You can enable this and enable display
stretch from over here. You can just things like the margin and the angle
limit from over here. I accidentally undo this. Yeah, you can just the
margin and the angle limit. If you decrease the angle limit, the UVs would be
like much smaller. Let's set this back to 66 only because right now
the UVs are not done. I just quickly want to show you another thing for these
things over here. For all these
cables, these ones, I want to manually unwrap them
and not use smart project. Because when I was
testing things, they were really causing
problems with the smart project. I will quickly show you how we can UV unwrap them manually. Just select them
all these cables. Then press control J
to join them together. Press to go into
the isolation mode. Basically what you need to
do is just press Tab and press two for select
and one edge like this, Hold Shift Alt, and
keep on selecting one edge from each one
of the cables like this. And then select one
edge vertically, one edge horizontally, and another one
vertically, like this. Then write, click
and select Mark. And then just press a press U, and instead of smart project, this time it unwrap. You will notice now the UVs are much better as
they're straight, so they won't give
us that many issues. You can adjust the margin. All right, let's press to come
out of the edit mode now. Basically what we want
to do is I will hide this press to select
everything except the cables. Then press Tab again. Press press U and hit
Smart Project this time. All right, now we have
two different UV islands. You will notice one
is this one and the other one is these cables, as these are like two
different UV maps and we want to combine
them into single. If you press A to select
everything, then press Tab. You can see these are like
overlapping over here. How we can do that, it is really easy just select them both. Then press Tab and press
to select everything. Then you can go to
the UV menu over here and select Average
Island Scale first. And then select Pack
Islands from over here. As soon as you do that, you can see they are now
packed perfectly. Open up this window and give
it a little bit of margin, something like 0.006 And
now the UVs are perfect. You can manually
unwrap a couple of objects and automatically
unwrap some of them. Now you've learned like
how you can just manually unwrap one object and
automatically unwrap rest of them. And then you can combine those two maps into
a single UV map only by using these two commands over average Island
and Pac Islands. All right, the UV
unwrapping is done. Now I will come
back to lay out it, Save now to export
this substance. Painter, just a
select everything. Go over to file
Export and hit Bx. Now in this folder over
here in the export folder, Let's name it as Guitar On. Make sure to limit
to selected objects. This way on the selected
objects will get exported. So make sure you select
everything before exporting. Just press to select
everything and then export. And also make sure to
select mesh from over here. None of the extra objects like
the cameras or the lights, anything won't get exported. Only the meshes
would get exported. Export and it is done. Now you can quickly open up
substance painter again. All right, now in substance
painter, let's close this. Go to file and create
a new project. Now in the file
section, click Select. And let's come back to our export folder and
select this guitar file. Everything can remain
just like this, only because all these settings we can change later on so you don't have to worry about
them right now just okay, your import is done now. You can quickly look
through your guitar for any kind of issues
like shading issues or import issues because most
of the times we have issues. Things look a little bit
weird in substance painter. One thing that is not really
a shading or anything issue but we have like a little
bit of space over here. We can let's, let's just select this and move it
downwards like this, but make sure none of the other things are
messed up because of this. I think everything
is pretty good only so we can press a again. Go over to File Export, and quickly export this
Once again, get export. Let's quickly go to File,
Create a new project. Select and select this. Okay, Hit this card. Yeah, now it's fine. The
very first thing when we do, whenever we export something or import something
into substance painter, we have to bake the mesh maps because baking the mesh maps is necessary as it will help us in using smart smart materials. Everything go to
texture set settings. Bake mesh maps, it is like a completely new
window for bake mesh maps. You can have a
different window if you have older versions
of substance painter. But don't worry, it is
pretty much the same. You just change the output size from over here.
Set this to four. You can set this two
K. Also if you have a lower end PC and
I'll just go four K, enable applied diffusion,
use low polymers, high polymers and
just set the anti easing to something
like 16 or four. Yeah, basically the rest of the settings are good
as default only, just disable ID maps
from over here as we are not really using ID maps and
a rest, everything is fine. Now, Quickly just
hit Bake selected Textures and wait
for it to finish. I will just resume the video
when everything is done. All right guys, The
baking is done. Now just return
to painting mode. You can see our model already looks much better as
the bake is done. Now we can see all
the nice ammineusion, everything quickly.
Look for your model. Uh, check it out if there
are any bake issues, but I don't think there are any. I will also go over here in the display settings
and make sure to enable temporal inter leasing. As you can see, all
these jagged edges, if you enable this, many of them would be reduced and the
model looks much better now. All right, let's just before
proceeding to save on our substance painter file and save it over
here in this folder. Screening this to Guitar. Let's just say, I think this is pretty much
it for this video. In the next video, we'll start texturing
our guitar model. Thank you for watching.
I'll see the next.
8. Texturing the Guitar: Hello and welcome guys. So in this lecture, let's start with the texturing
of our guitar. So I'll quickly just
select this layer and delete it from over here.
And also, one more thing. If you do not see any of the tabs that are
appearing on my screen, you can go over to Newport, sorry, go over to Window and you can enable
them from over here. All these tabs, assets, layers,
properties, everything. You can arrange
them accordingly. All right, so let's start. The texturing process would
be pretty straightforward. I will be using smart materials
to texture this guitar. Just go to smart
materials section and search for black latex. This one latex, black dragon. Drop it onto your
guitar and this will be the basic body of our guitar. We will like edit it
out a little bit. We'll customize it on our own. You can see this folder
is appearing over here. Just open it up for
the bass color. What I basically want
to do is I just want to change it to something
like a little bit lighter. Just set both of these
to zero and value to 0.1 make it a
little bit lighter. Also, I will increase the roughness because
right now it is too shiny. Maybe something to 0.35. Yeah, that's better. If you want, you
can turn on and off all these layers and see what are adding
all these things. Yeah, this layer is
adding this thing. What we can do is we can select this and increase the
roughness of this a little bit to maybe something like 0.25 just to make it a
little less apparent. This way looks much better. Now obviously we don't want this material over
all our pieces. We can use masking to just
make it appear over the body. Only you can click over here.
This is like a new feature. This is the geometry
mask. Click over here, right click and exclude all. Now it is disappeared
from everywhere. You can now just
click on the objects that you want to add
this material to. I think just this single one on the main body of our guitar. Now let's just
select this material and press control C.
Then we duplicate it. You can again, right
click and include all and it is covering
this entirely again, but don't worry,
we'll just fix that. I will select the base
and this time change the color to something yellowish
for our secondary color. For this the Hex code
I've decided is CBC 699. You can just go with
this color only. Let's decrease the roughness 2.3 maybe now basically I will right click again
and exclude all. And this time select
this piece over here, these two strips. Let's see, we can add it over these things,
these two pieces. Let's add this also perfect. You can see how well
this geometry mask works with adding all these things
to different objects. Also, you can go over
here in the texture set settings and increase
the size to something like four K. You won't see all those issues
that were appearing over here. That's pretty good. Fine. Now let's again select this
latex back and duplicate it. Right click, Exclude all. I will just select the base this time I just want to
keep it back to default. So just select it
and delete this one. And dragon drop it once
again from over here. Now, right click Exclude All
and just select this piece, because these things tend
to be shiny. Looks nice. If you want, you can maybe tone down the base
color a little bit, can make it a
little bit lighter. But yeah, except that
I think it looks fine. All right, another thing, let's duplicate it once
again, Right click. Let's include all first. For now, the bass color. I will set something to brownish 2118 will basically be our color for these
things over here. This right click exclude all, and select this and select
this, this one also. We will select this
black material. Only obviously, I think our guitar is
looking pretty fine. Lastly, for these cables
and all these pieces, I will simply use steel material in the smart material section, search for steel, you will
find the steel bright layered. Just drag and drop it onto here. We can edit it out a
little bit. Let's see. First I want to remove
these scratches. Next, as you can see, we have this layering thing going on over here
with the edges. Instead of removing
it completely, just select the layer and
set the height back to zero, that way it looks much better. I think again, click over here, Exclude all, select this. This Please. Okay. One thing that
I want to do is I want to make this piece iron material and these bottom cylinders of this yellow colored material, only just to give it a
little bit more detail. But now the problem is
we cannot really do that because all of this is
like a single object only. I will show you
two different ways that we can separate them out. One of them is we can totally give up on using a
geometric mask altogether. Right click and include all that way we are not really
using geometry mask now, we will just basically
use a normal black mask. Go over here, add a black mask. Select this tool over here. And select the mesh fill mold. Make sure the color is
set to white completely. Now when you select
all of these objects, you can see you can
fill them one by one, just like the
geometry mask only. But this time there is
like a slight difference. It will only fill the meshes and not all the objects
that are together. What I mean by that is
when you click over here, now you will see only this
middle cylinder is being filled. That is what we want. This these parts were
excluded out. We want it. And now we can add the yellow
material to these parts. But again, for this one, also as we were using
the geometry mask, again we need to use the
black mask over here. Also what we can do is instead
of like editing this out, we can duplicate
this once again. Place it at the top right click, Include all, add a black mask. Just select all of them, like this, one by
one, a perfect. You can see we easily made them separate materials even though they were like a single object. Only if this method is like
too confusing for you, you can just quickly
undo everything and come back to where
we were earlier. I will show you I think a
much simpler way where we just go back to blender and edit the object out completely. All right, I've unload everything and we are back
to having this steel, bright layered material
over everything. What you can do is
quickly open a blender. Instead of like making
all these changes. You can go back in blender and make these two a
separate object. That way it would be
much easier for us. Let's select all six of them. First, let's press control J
to join them all together. Now press Tab and hover over all these
cylinders like this, one by one and select them. Then you can just press and separate the selection
out like this. Now you can see both of them are like completely
different objects. Come back out here by
pressing, now you can press A. Also, I will just make these
two a little bit longer. Select them both. Make sure
to select individual origin. And press And Y. Yeah, it's safe press
to select everything. Go to file, Export, and export It Once again, enable selected objects and mesh in the exports
folder again. Export tires, guitar. Now in substance painter, what you want to do is
obviously we won't be creating a new project once again because we have all this
progress over here. First let's hit same, and I will show you how we can import updated model
into our project. Go over to Edit
Project Configuration. Select the file over here again, and make sure everything over
here is remaining the same. And just hit okay. Just
wait for it to finish. Once it will compute everything. Now you can see everything
remains the same, pretty much, but our
model has been updated. Click over here, now right
click, just exclude. All you can see these two are now completely
separate objects. You can easily select
them out like this, and you don't have to
use all those masks and everything like black
mask and everything. We can directly use a
geometry mask on a. Select the piece we want, the iron material, select
the yellow latex black, and select, you can
see how easy it was. So you can directly make the
change over in blender also. That will also work. This
piece we forgot about. Select this one and
make it again yellow. All right, let's save
and we are pretty much done with the
texturing of our guitar. It was really quick, but as I would like a
time constraint, that's why I didn't
go much in detail. What I will do now is
I will quickly rename them to their
respective materials so that it is a little
less confusing. This last one will just
rename it to Black Shine. All right guys, let's save. What we want to do
now is let's export all these textures into
blender and see how they work, how they look in blender. To do that, to do that just hit control
shift ten key in your substance painter and you will be welcomed
with this window. This is the export window. It is really easy. There's
not much things to do. We just need to edit
the settings over here. The first thing to do is click
over the output directory. This is basically where you want to save all your textures. Create a completely
new folder over here in the oil directory and I
will name it as textures. Open it up and make
sure to hit folder, Then only this path
will be selected. Over here you can make sure the path is selected
because sometimes the texture gets exported to
completely different area. Next is the Output template. Here you can decide
which software you want to export
your textures for. Like as you can see, we have
an engine, Unity everything. We also have a blender
preset already made for us, Blender principle
SDF. Just this one. We can select the file
type as PNG maybe, let's say 16 bits and
size can be four. And yeah, these are all the
settings that you need to do. You do not need
to touch anything else if we have multiple
different texture sets, as we have only a
single material only, so we have only one texture set. But if we have multiple
different texture sets, then we can enable and disable
them from over here or change their particular settings for particular texture sets. But right now as
we just have one, we can only do it in
the global settings on. All right, now
everything is done. Just hit Export and wait
for the export to finish. All right, now the
export is done. So if you open up the
folder over here, the texture folder, you can see all the textures are
appearing over here. Base color
displacement, metallic. And now we can easily go
back to blender and plug them into our like material. And the material will
appear over here. Go over to the shading tab and I will quickly show you how we can add the material or add the textures
to our material. Just select the principle BS, DF and then hit Control Shift. This is like a shortcut, but if this shortcut
does not work for you, you can go into edit references and the add on section
search for Node Wrangler. Make sure to enable
Node Wrangler, then only this
shortcut would work. Again, when a Node
Wrangler is enabled, select the principal
SDF control shift, come back to your
textures folder, fold, select everything, and then
hit principal texture set up. Wait for it to complete. And as soon as it would be done, you will see all the
textures appear over here, wait for them to load. And yeah, you can see they're looking same as they were
looking in substance painter. Our guitar is
looking pretty good. I think our textures
came out really nice. One thing that I want
to mention is there are a couple of things that you
can change up over here. A couple of things. Just some things that
you have to check. One thing, that the base
color should always be in the color space
S, RGB and rest. All of the maps
would be non color. Make sure they are in
the non color space. The last map, displacement map, you can set the scale
of this to 0.1 I don't think we have
any displacement or height values in our model, but if you have any, make
sure to just tone this back down to 0.1
or to a low value. Because in Blender it gets like really weird when the
scale is set as one. Yeah, everything is pretty good. All right, let's just hit Save. I think this is pretty
much it for this lecture. In the next video, we will
add like a little bit of lighting DRIs to set a power guitar and take
a few portfolio renders. And then we'll finish
up with this course. Thank you watching.
I'll see the next one.
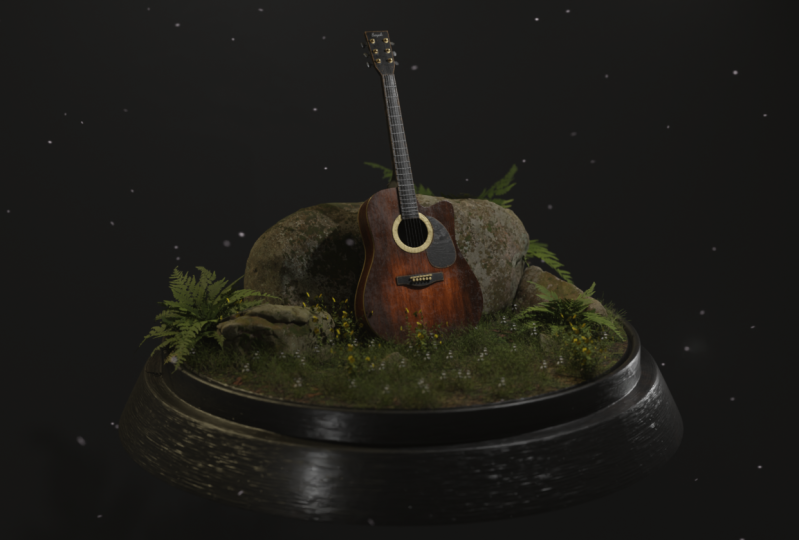
9. Lighting and Rendering: Hello and welcome
guys. In this lecture, let's just set up
arena little bit. We can add a camera, some lights and take a portfolio
ready render. Yeah, then we will end
up with this course. Let's just start. I will
go back to the layout tab. We can come into the
viewpoint shady. Currently it is set to EV, so we can change to cycles because we want to use
the rate racing engine. Set this to GPU.
If you have a P, you can also enable
noise from over here. All right, I'll come
back to layout now because it can get
a little bit laggy. Press Shift and let's
add a simple plane. Press seven for top view. Let's press one for
the front view. Place it over here.
Scale it up like this. Then just press press to select. Select this edge, press E, and then press to
extrude it upwards. Like this. Press control, apply the scale, Then
press to select. Let me enable Screencast. Okay, they are enabled.
Select this one. This edge, the press control
and level it out like this, that we have some
studio lighting set up. This looks in my opinion. Let's just press Shift
and add a camera now. Now to set up a camera, it is very easy if you press zero right now on
the number pad, you can view through the camera. This is what the
camera will see. Whatever is inside your camera
that would be rendered. Yeah, let's just set up it now. It is very easy. You can first just move your scene around. You want to place the camera over that
scene? Just move around. Normally in Blender, let's say I want to place my
camera just like this. Now you can press
control all 100. As soon as you do
that, you can see the camera is now automatically
set up Over here. You can just go back
to View View Tab. You can press to bring
this toolbar View Tab, enable camera to view. Now you can easily zoom it out and place it
however you want. These are really
handy shortcuts. Now make sure to disable this. If you don't disable,
it will go out of focus as soon
as you disable it. Now it won't go out of focus. If you press zero, you can view back your camera and this is
your normal blender view. As soon as you press zero, you can view the camera. You can view the scene
through this camera. When you press let's
say 12 to render, you can go to render and render image shortcut for that is 12. If you press F 12, you will notice that this scene will start to get render as, but right now there are
not really any lights, that's why it is so dark. Let's just close this for now. We don't want it to render it. I'll come back to
Layout and let's see, let's go back to the
shading tab over here. You can select any of the
material and you will see that the material is
appearing over here. Let's just select this thing. Also add a new material to this. We will change it later on. Right now, let's
just keep it dimly. What I was talking
about is whenever you select any objects
from over here, the material will appear
right underneath us. But if you go from object to the world settings over here, you can change the
world settings of the, you can add lights
and things like that. Let's go over to the
rendered view over here so that we can
view all the lights. Press zero for the camera, now we'll basically
just add HDRI, press Shift, and search
for environment texture. If you will look in
your course files, I've added a simple HDRI for
you guys to use if you want. Definitely, you can use
anyone that you might have. You can download it
from the Internet. There are a bunch
of different HDRIs that you can find on
line. Pretty good ones. Let's just hit open and I
will add this one for now. Let's quickly over here
in the third directory. Just open it up and now we just need to
connect it over here. As soon as you do
that, you can see light is being poured
into our scene. Now, it looks
better than before. Now select this HDRI
node over here, the environment texture
node, and risk control. As soon as you do
that, you will see this mapping node appear and you can change the rotation to
maybe something in trusting. Let's put this 2250. Then I'll select this
thing. Go back to object. Let's change the color
of this a little bit. We can make it a
little bit darker. Now, shift and add a light of your own so that we can create
some of our own lighting. Let's increase the
power to 100, maybe. Let's set this to 250. Increase the area of this, the size of this to
3 meters, maybe. Just select this light
and place it over here. Press three for the
right side view. On rotated and
rotated like this, just so it is pointing
towards a guitar like this. Press zero to view your camera and press
seven for the top you. Let's see, currently
it is straight ahead, so let's just place it
at an angle like this. Let's say increase the
power of this to 500. Yeah, I think this looks all
right. Something like this. What I will do now,
let's check this. And what I will do is you can change the resolution
from over here, but let's just quickly
render it out. Once I will decrease the samples from 4,000 to maybe
something like 500 for now. And quickly hit 12 on your keyboard and you can just wait for the
render to finish. It might take a little while, depending on your system, and I'll just come back
when it's finished. All right guys, now
the render is done. You can zoom in on it, and as you can see
all those details that we added in the textures, you can really see
them over here. If you feel like those
details are not that much, you can go back to
substance painter and edit them out a little
bit according to you. But yeah, let's just go
back and I will show you a couple more things
and then we'll just finish with the course. I will also once, take my
renders into Photoshop to show you one or two
tricks that I used to make my renders pop
a little bit more. Let's go back to render view And I will move the lights a little bit lower. Now I'll show you we can
change the resolution of this. Right now it is like
in 1920 by 1080, Normal full age resolution. But there is lots of empty
space for our guitar. We can also make a render
in like a vertical shape. Just change the resolution
from over here. Let's, I will say this
to something like 2000 and we can increase this to something like 2,500 You can see it is a lot
more like vertical. No enable camera to view and just zoom in on
your guitar like this. Maybe we can even increase
it to 3,000 Yeah, disable it back this way. You can create like
various different types of renders using different
types of camera. I will definitely suggest you guys to experiment
with this a little bit. Add different types of light, you can add them at
different angles. You can change the
color of the lights to whatever you like just to add more detail to your
scene and more variation. You can select this
backdrop and maybe give it a completely We type of color. There are definitely lots and lots of
possibilities with this. You can play around with it. Even giving it some color like this does not
look that bad. It looks all right. I will also go over here and
enable render region. This will only show us this part that is
going to be rendered. This is like a lot easier
to focus as I was saying, you can definitely
experiment with this, can change the HDRI. Also find different types of HDRI online and
you can use them. They can give you like differences with
different types of lighting change the backdrop,
add different lights. That would be my suggestion
for this backdrop. I think I will go with something like grayish but also has like a little bit
of yellow tint to it. Yeah, this looks really good. Now, come back over here
and increase the samples to maybe something like
1,500 and then just hit 12 and wait for
the render to finish. I'll continue back
when it's done. All right guys, the
render is finished. Now you can now save it by just going over
here to image save. Let's just save it outside only. I'll save it as a Jpeg, Increase the quality to 100% and let's set this to one
and save as image. Yeah, basically that
was it this way, you can render it
out and save it as images to upload them anywhere or take them
anywhere you want. Let's close it and yeah, now I'll just quickly
open Photoshop. Let's just hit open and I will open up the file that we
just exported from Render. Honestly, I don't
really know that much about Photo
editing or Photoshop. Basically, the commands
I use are very basic, decreasing or increasing, things like the
brightness contrast. You can also play
around with things like the color balance to give it different tints
of different colors. Obviously, there are
all these basic stuff. You can also just
auto tone from over here and auto color. These can sometimes
fix your color and make them pop a little
bit more as you can see. But one command
that I most often always uses the
sharpen more command. If you go to filter sharpen and just select sharp and more, you will see as soon
as you do that, all of your edges that were
looking like a little bit fuzzy and not that clear. As soon as you use sharpen, the edges will now appear like much more
clearer and sharp, and this makes the image
look a lot better. I just suggest you guys to always use sharp and
more on your renders, not only just this one, any kind of three D renders that you do. Make sure to always
use Sharp and more. As you can see, if I do this, everything is like
a little bit fuzzy. But if I just enable it, Yeah, that makes it
look much, much better. Yeah, this is what I wanted
to share with you guys. Obviously, it is not that much, but as I said, I don't really know that much
about photo shop. Yeah. Now, as I said, you can play around with different things
with your renders. Take out like 2345
different renders of your guitar from
different angles, with different colors,
lights, everything. Yeah, this is it for
the course guys. That's it from my side. Make sure to join
my Discord server. Thank you. Watching, I'll
see in the next one.
 Aniket Rawat, 3D Artist