Transcripts
1. About that class: Are you ready to
unleash your creativity and bring your ideas to life? Then let jumper this exciting journey into the
world of Blender. And near our you dive into the 3D modelling Kelvin
and the tools and techniques needed
to turn your ideas into beautiful
eye-catching designs. I'll take you
through the process, teaching you how
to use blenders, powerful 3D modeling tools to create stylish shapes
and characteristics. You'll learn how to
add colors, textures, and lighting to give
her illustrations, depth and dimension. And if you're a complete
beginner, no problem. You don't need any
prior knowledge or Blender 3D modeling
to take this class. This course is designed it
with beginners in mind. And that's not all. Our class is packed with
tips and tricks that will help you to take
your illustration game to the next level. And the best part, you will
have a lot of fun doing that. So if you are ready
to join the ranks of the elite videos traders out there and set yourself
apart from the crowd. Dive in our Skillshare
class today.
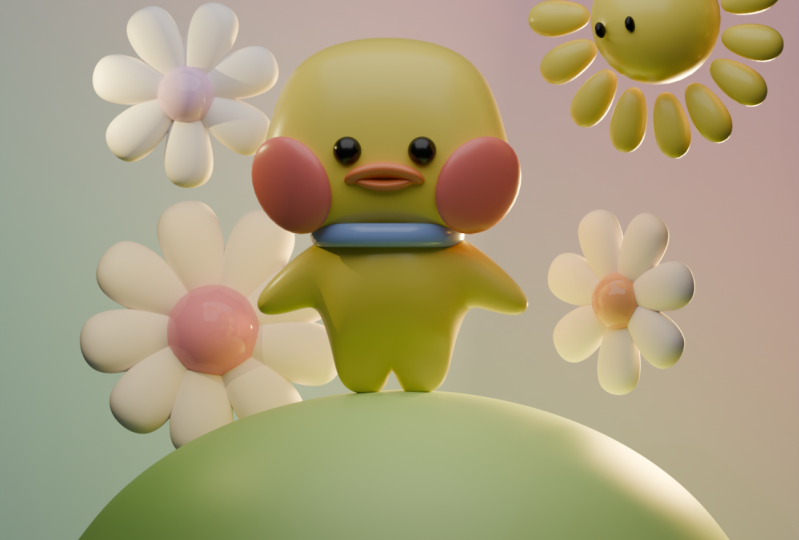
2. Lesson 1: Head: Hello everyone and welcome. Before we start, I want
to say that's completely everything that they press you can see in the left corner. So in case if you
have any question, just take a look right there. Good. If you're ready, let's start. Press a on the keyboard and delete everything because we don't need it under this course, you can find the zip file
with some references. Please download it. There. You're going to follow the
reference for our project. And at the same
time, the purpose of what you're going to have. After you're going to finish. Good. Take your image and just drag
it inside of the blender. Great job. There are three main buttons
that you're going to use most of the time
in your workflow. This is S for scale, G to move and air for rotation. This is the center of
our three-year-old. So take a look. I'm going to press Algae, GMO within the center
and then I'm going to press out air to make it flat. Because we work in a
three-dimensional world, that mean that we
have three x's. Red one is green, one is a Greek, and the blue one is that. Great. Quickly take a look. I press X 90, which mean I turn our image, or 90 degree on x-axis
or on the red one. And then I press G, e
Greek and move it behind. And then go with the S for scale and make this one a
little bit more bigger. If you want to move your
silver around the world, just hold the mouse wheel. We're, there are
three shortcuts that you're going to make it a
little bit more comfortable. This is one are numbered
for the front view, three are numbered
for the side view, and seven to look above. Come back to the one on them. But for the front
view, Let's start. In this lesson, we're going
to create only his head. I don't want you
to make it longer. I want short lessons to make your workflow more comfortable
to read any object. You press Shift a,
then you choose mesh and we're going
to choose cube. Good, G, Z, move it up, S for scale, make it a
little bit more bigger. Then quickly take a look. If you're a beginner,
I press control tube. What is that? You can
take a look right there. This is Modifier tab, so this is how it was before. And when I press Control two, I add a subdivision
surface modifier, long story short, every object have an n amount of polygons. When you sub-divide it, you increase the
amount of polygons which allow you to make
your work more detail it, I hope it was clear. You can find subdivision surface here or you can press Control, chew four more to
make it more faster. Then we go to S for
scale, make it bigger, g, g x, just place
it under this shape. Then we press three on the
number for the side view. And I will go with the
S e Greek and make it a little bit more
thinner on the green one. Good, Come back. At the moment Right now we
are in the object mode, but to add die this object, we should remove herself
in the edit mode. So you go here and select
the second one, edit mode. There are three main
aspects of every object. This is vertices which
are these points, their edges, which
are these lines, and their faces, which are this 11 for the vertices true for the age and
three for the faces. Good. Four more comfortable
workflow will shoot. You. Add another loop. How I press control air. You just don't move around
your mouse and you can see the yellow line
appear here or here, we should choose
the horizontal one. Then you go with the
one that's quick. Second left-click, I press
one for the vertices. I choose this part, S for scale. But how we can see we scale
on the part in front, but we should to work
with this one also. So there is an amazing function
like a transparent mode, which is this one or the
hotkey outset, outset. Great. Go to the transparent
mode and to make sure that you're
transparent mood, this one should be blue,
gives you this blue. That means that you turn on this if it isn't the
minute you told. Good. I'll set for the
transparent mode. Choose all of the
vertices below, and we go with the S
for scale and make this one a little
bit more, bigger. Good. Then let's choose
this one above G, Z and go down S for
scale, move it inside. And let's do this one
in the middle S for scale and make them a
little bit more bigger. Come back to the object mode, which is the shortcut tab. So or you can go here or tab. And out of the transparent mode. Right-click, Shade,
Smooth. And good. Look a little bit odd. It's always like that when
you only start everything, look on C comes up with
a more far you go, the more better
you start to look. So I want this part to be a
little bit more higher and I want this one to move a
little bit on the left. So then back to the Edit Mode, Transparent Mode, S for
scale naked bigger. And this one S. What we do is a bit inside g. Move it a little bit up. What if we're going
to choose this one, G and a bit up S
for scale, correct? Come back. You can easily find your object in the
window right there, in the right coronary above. Double-click and let's
rename this one. Had great. If you're an experienced
blender user, I'll recommend to not apply subdivision
surface right now. Let's make a few
more adjustments and you feel like only one, you'll like it, then
we can apply it. And the most important before
we finish with that lesson, Control S to save our file. So we'll go here, choose
wherever folder D1. And then let's
call this one e.g. duck, safe blender file. And good. In the next one, we're going to create his eyes, big cheeks, and choker. See you there. Thank you so
much for your attention.
3. Lesson 2: Eyes, beak, cheeks and choker: In this lesson, we're
going to create his eyes, big cheeks, and choker. Before we start, you probably notice that the objects usual appear independency where
this pivot point displaced. So to save yourself a
little bit of time, I am going through
the transparent mode, which is outset, and I press Shift right-click and then you can place it
wherever you want. If you want to come back
to the default position, you press Shift S cursor
to roll the region. Now, let's start transparent
mood shift right-click, and let's start with his eyes. Shift a mesh UV sphere. Then let's zoom in, which means move forward your
mouse wheel S for scale. And let's go like that. G is a little bit on this side out of the transparent
mode shift right-click, sorry, just right-click,
Shade Smooth. Let's go above, which is seven. And agaric, make it a
little bit more flat. Which means we're going to
make a rotation on the blue X's and move it a little
bit on the right one. But great control S to save. Let's call this
one double-click. Right? Underlying AI. There are two options, how we can add another
way so you can repeat the same steps or
you can duplicate it, which means Shift G x and
just move it on the left. Let's take a look in
the transparent mode. Whereas our left
eye somewhere here, carried out air to make it
flat seven above the Z. And this time we
move it on the left, you can see that he's
a little bit inside, so x and just get
him out like that. Good. The next one, Let's go
with chicks. I like them. So shift, right-click
somewhere here. Shift a and other UV sphere. Then we go seven
above as a Greek, make it more thinner. And then we go with the air from left towards the
right, somewhere here. Great job wanted in them but transparent moot S for scale. So there are another
tool so they're gonna be more easy to work. So instead of g x, then g e Greek in
front, take a look. I'm going seven above, and then press W times g x, x. There is another axis, and now I can move
it on the diagonal, one, which is a little
bit more easy for us. So let me take a look. Now. X one more
time for rotation. Just got down as far as scale, G, agaric, move it a
little bit in front. And let me take a look. On the onetime
right-click, Shade Smooth. She said, Oh, okay. Right there. Instead of duplicate, we can do another thing which means
to mirror. Take a look. I press here on our trick. Let me call this one. Let's all rename this one. Right underlying Cheek. Good. Take a look. I press here, then I hold Shift and left-click
on our head. Then I press out x, which is the mirror modifier. And I want to mirror
on the x-axis. In case if x doesn't
work for some reasons, you go to the edit, you go to the preferences, you watch you, they came up. And here's huge
for mirror gizmo. There it is. First of all, be sure that
you have a check in and then take a look at your shortcut. In my case, and in the
case of most of you, it will be outtakes and good. We finished with our cheeks. Let's go forward with
his big right here. So Shift right-click
and then we're going to add another cube yes. Out S to make it smaller than S, x to make it a little
bit more large. Good. Three, where it is, three on the numbered for
the side view as a Greek, big shoot you belong. So I think is good, G, agaric. Great. Quickly take a look and I think hard and just to
understand what they do. And then you're going to
repeat the same steps. I am going to the Edit mode or tip for the shortcut Control L, which we did in the
previous lesson. I want this time loop right here and I press one
last quick second one. Great. Then I'm going
through the dress burn mode. I choose vertices, this one, hold Shift, holding Shift, and drag this one too. And then I'll go with a G. I'm going down and S for scale, make them a little bit more smaller Gs that
every time a bit. Okay, and now, and I'll come
back to the object mode. I press queen throw two for
the subdivision surface. Right-click Shade Smooth. I think this one is always a bit more bigger on the x-axis, so I press S x. Let's make this one a
little bit more bigger. There is one thing that you
don't notice in the render, but we should to do that. Let's go into solo mode. And to do that, you press
Slash on the numbered. And that's how you can work with one object apart and without
seeing anything else. So we go here and I want
this one to be straight. So I go to the first level of
seven and a good edit mode, transparent mode,
which is L z. I choose all of these vertices
and quickly take a look. I press error as
e Greek is zero. And that how you
can make it flat. Again. No one will see
that on the render, but it's a useful tool and it's useful for
your own workflow. Good. Let's go forward.
This same thing we have with this beak with the second part under and before we're going
to go forward edit mode, I want this one, this one to move a
little bit more higher. Now I like it. Let's rename this
one will go here, double-click, big,
underlying upward. And good. I duplicate this one, Shift D, and then don't go with
your mouse anywhere. You just press air,
agaric and 180, which mean we did a rotation on the green axis and 180 degree. Then I go the G, I go down S to make it
smaller and move it up. Let me take a look. K edit mode and just play around how you can see I
didn't do anything advanced, use the same functions like
move or rotate and scale. So let me choose that one. And this one to G. G down S for scale. This one a little
bit more higher. S for scale. I'm good. Let me take a look. I think this one is too thick, so let me go like g as x S. One more thing I want. It's all good. I wanted
this one a board that is upward to be a little
bit more further, but they aren't in
the same level. So let me take a look
in this solo mode. If I like it, no, I want here to make
it flat shoes. So let's do this The same, The same thing one
more time. Edit Mode. Choose all of the vertices. As a Greek is zero. Now it's flipped. What if, what if we're going
to choose all of these vertices
that are in front, ji, agaric and a
little bit like that. Good. There. Or like twins can throw the S. And the last thing
we have our choker. So that time we're
going to be shift a mesh and we're going
to choose torus. Wait a second, don't
press and anything because we haven't setting
right here in the left corner. If you're going to press even onetime wherever
you'd want to be, it's going to disappear. This is f Blender, blender thing and you
can restore that. So let me delete it. We go with that, shift
a mesh and Taurus. You can go above with
your mouse wheel. And I want to make this
one to scale insights. So for this one we use minor radius and then
we press is 0.15. And it's gonna be
a little bit more thinner and more space inside. Then left-click three
for the side view, choose this one, right-click, Shade, Smooth, G, agaric. Go here. Go here. Rick. S. To make it a bit more bigger. Let me take a look. And g is it S for scale Control S to save. Let's rename this one
instead of torus. Torus, this is, Chuck care. How about our eyes? The last one that we duplicated, we should to rename this one
left underlying the rest. Everything is good.
Instead of big upward, it should, should be beak below. Now controllers. Thank you so much
for your attention. You can see there
is nothing hard. In the next lesson, we're
going to create his biting. See you there.
4. Lesson 3: Body: You probably asked herself, however thing here, up here. The thing is, when I died
this lesson with a buddy, I found that the audio quality
for some reasons was very bad and I decided to give it
towards, towards your ears. And to make this one again, I'm going to hide
all of these folders back to the viewport out, which mean here, one, give me 1 s please flowers and I'm going to hide this body. Take a look if you
like everything, I apply the subdivision
surface on the duck head, that why it's smooth in case if you didn't
know how to apply, go to the modifier window, subdivision surface
modifier and apply. Then take a look if you
like the beak length, that cheeks where
they're placed. And if you're ready,
let's start with dark. But it shifts a like always. I'm going to emphasize
the duck collection, shift a mesh and kube control to then apply
this subdivision surface. Then we go to the solo mode, which means in case if I
didn't say this one before, It's lashed are numbered. Take a look. Edit mode, one for the
vertices out outset for the desperate mode, I'm going to choose this
health x and delete vertices. My next step is next X. And I'm going to mirror
this, this part. The reason is to not waste
my own and your time, which means, you
know, do something on the right than on the left. Then again the ride
and again left everything that we're going
to do on the right side, I'm going to be
mirrored on the left, which will save us
time out from here, from the solo mode,
which is slash n. Let's fit this
shape, S for scale. Where are okay? Get out please. And g, x summer here, G is three and an
empath as a Greek, a little bit more thinner. Now, take a look. Edit mode, face mode. I'm going to choose this for X, delete faces, edge moles, which is two on the keyboard. I hold Alt and left-click to
choose the entire HE loop. Then right-click look tools. And I'm going to transform
this one into circle. When you're going to try it, you found that you don't have look tos. Everything is good. Go to the Edit
Preferences, Add-ons, and here in the search step, press loop those and be sure
that you have a check-in. Then again, right-click
Loop tools and circle. What are we going to do next? The combination of error S, x is zero and hurricanes
you will make it flat, which is more comfortable for
us and for our topology. G. A little bit, Move on the right. And then I'm going to extrude, I suppose is the
first time when we're going to extrude in this course. So it's E on the keyboard, x on the x-axis. And I'm going to move
this one on that, write S for scale, there's going to be
our wings, g, z. If you look, if you want
actually you can play them up or go down
or keep them here. I would like to move
them a little bit down. Air for rotation. Were you going to find
that we have a gap inside? Everything is good, just press F and that how you
can feel the space. Then if you like,
you can go e.g. wings are more as a Greek
like that and S z like that. It's look kinda alter
the moment right now, but like always,
subdivision surface is going to make it look better. I suppose what we can do is control error to
add one more loop, right there, double
time, left-click. So one quick second,
one left-click, air for rotation. Like that. You can play around
with these guys, transparent mood to choose
to emphasize all of them. E.g. S for scale just a
little bit more smaller. So now control to get
a little bit more. Let's go to our next
part, which mean legs. Go down and take a look. If I'm going to move myself with the mouse wheel is one thing. But if you want a
sharp angle like e.g. 13 or seven, you should
to move yourself around with mouse wheel
and then you hold Alt. And that's how you can found
a more sharper angles. So go below, hold Alt and voila, we are under his body, which probably sounds
not very cool, but you understand the context. Three phases and
choose this bowl. Then our next step. We're going to use another function for the first
time when this course is, I take a look, it's
inserted thing. So I'm going to press I and I'm going to go a little bit inside, which allow you to insert
polygon inside of your polygon. But one important
thing to explain, if you're going to press e.g. i, i, then you're going to insert the
polygon in each one. But if it's only one, I, I mean, you see
the difference. So two times is like that. One time is like that. I hope I explained it clear and you understand what I want. I want MN 100 an input
for the front view G. Go down. Our next step is
to make it flip. Left-click. Take a look. Actually nothing car, the same thing that we did
with his beings, which means X to delete faces. Edge mode, hold Alt, left-click to choose
the entire loop. Right-click, look twos
and the circle. Probably. Because I saved a lot of
like click these quick here. It looks kinda too
much, but trust me, when you're going to gain a
little bit of experience, you're going to find
that it's very easy. And my dear friends,
I commit mistake. But I'm happy
because I'm going to explain also one
important thing. So if I'm going to
scale, just take a look. Don't repeat S and I'm
going to move inside. You see, like we can
divide them there. One, they have one
connected point. The reason of that is clipping, the fact that we have
a check in right here. So why don't you to do in NUL. So again, take a look
and then you're going to repeat Control Z, Control Z. And now when we have a
space in between them, I'm going to check off
the clipping again, right-click Loop dose, circle. And now you can see
they aren't connected, which means I can
move them wherever I want and they will
not be connected. So clipping is important. Moment. Again, I hope I
explain it there. S for scale, make
them a little bit more bigger than
three and an end. But, or actually no 11 more tool we're going to learn today
is solely or Extrude. We'll insert and there
is proportional editing. Take a look at this thing or, or on the keyboard, how to activate it. When it's blue, it's mean
that you turn it on, when it's not blue
is off, so on. And one of the vertices, I choose this one on this side. Repeat it. Look, then I go g, x and how we can see
we have a circle. What is this? This is a circle which show
the area of influence. So if I'm gonna move my
mouse wheel forward, I can work only with this
vertices that I emphasized. But if I'm going to make
this circle bigger, I can work with
way more vertices. So that way, because I want this area to move a
little bit on the right, but I don't want to play
around with each one of them. That's why I go with the
Proportional diet g x. I make my circle
somewhere here and just drag this one
on there, right? What I'm going to achieve
a shape similar to that. Great. And then I tour of three
tools we'll learn today. Back to the object mode if you like to play around
with this part, e.g. Zhe excel little bit on there, write S for scale. If you want, you can make them, even though they are
the more smaller n. Let's go to the object mode, then. Coins road shoe. Oh, good. Back f n. Now, it's good for sure. But I don't like it. Wings are too long or too short. So let's bag transparent much. Choose both of them. And g, is it one more thing? If you're going to
look at the right, I would like this shape should be like that
and not this curvy. So edit, edit mode, Edge Mode, choose this one and this one, you don't see because
they're inside. But if you're going to
activate the desperate mood, you see that we emphasize them. So if you know that they
are there, so don't worry. And then G agaric, I move it like that. And the same thing I
wanted to write here, I choose this one, this one in a transparent mode. You can see that g, e Greek, go right there. Okay? One more thing is, he is winks. Like a vertices
Transparent Mode. Choose them and just
move them inside. Then what if I will do it
during beaches and low me. Just see. Okay, I will leave this loop which
men controlled air back. And then good S for scale. And I'm good with this shape if you're a good l. So g is at e.g. the bid down a few more steps. Right-click, Shade Smooth, but we still have some artifacts. So first thing, apply the mirror modifier and
then the subdivision. Because if you're
going to be reversed, take a look what your
results will be. So a subdivision and
we have this line inside which is not
very beautiful. Do like it. No Any going to
ruin your topology. So that's why first bullet, mirror modifier and
then subdivision. One more time control too. And everything. Look smoke. Do I like it? Esl like it. Let me search. Take a look in the
folder for our budget. Double-click, Let's rename
this one dark body. And ladies and gentlemen, it's enough for our lesson. We'll learn three
things, extrude, insert, and
proportional editing, which is right there. But here we can see our
topology is kinda beak. So again, if you are in very, if you don't trust
your PC specs, too much, control Z, control Z and bake yourself when the
subdivision was lower, it doesn't mean that your final
result going to look bad. You just play around and when you're going to
apply our texture, you can sub-divide it. So thank you so much. I hope that this time will be much better than
it was because trust me, it was bad and very bad. Leave me a review. If I explain everything
clear and MCU and I will see you
in the next lesson. Control S to save, Sorry.
5. Lesson 4: Sun: Hello, In this lesson we're
going to create this sad, but I would like to
give this son and flowers and different
collections. So let's call this
one double-click and it's going to
be dark and good. Then here, right-click, new collection,
double-click son, correct. Let's go shift a UV Sphere, g x on this side, g, g x S for scale. Right-click Shade Smooth. Now the question is how
to create this on arrays? Let's hide our duck. But who should you
keep a reference? So let's go here, look for the
reference m and go to this scene collection that
how we can hide our duck. But to keep our reference, what I'm gonna do, like
always shift a, mesh and q. Let's go to this hello mode. Then we go to the 300 for the side view as a
Greek, make it thinner. Then we go with the S goal like that construal error
to add one more loop, only a onetime left-click and
then go up, set it right. Here are somewhere here
at one more left Gleick, great job, transparent mode. Choose this one, s. Oops, turn off
proportional editing. So S, and make it bigger. This one, s, go inside, she said, Let's go with
this one else saw inside g. So the final shape future
looks similar to this one. And I always control to
right-click Shade, Smooth. Get out of this Hello board, make it more smaller. And let's pick this one under. Let's call this
one first of all, double-click son array,
and this is sun. So choose your son array, G. G, move it up. Let's check it where it is. I think I can make it a
little bit more thicker on the Greek ones. So as a Greek g, x, good. Move it up. Make it
a little bit more smaller to keep a small distance
in-between of SAN array. Now, take a look. You going here than the press Shift S and
core search is selected. Now we move our pivot
point right there. Then I'm going to
click on the sun ray. And here I'm going
to choose instead of individual origins that we have at the moment right now, I'm going to choose 3D cursor, which mean if I'm going
to press Enter to rotate, it will not rotate
around himself, but you're going
to rotate around this pivot point where it
displays it like that. And now take a look,
Shift D to duplicate. And then I'm gonna go
with that error e Greek. And I drag it on the right, choose both of them. And then we are
going with a shoe d, e, Greek like that. So there are
different ways how we can do this one
probably on YouTube. Someone will say like go
to the array modifier, but I felt is too complicated. And this, this one looks a little bit more easier
and more pleasant for me. Let's make them a little
bit more smaller. So choose all of them for S and make them a
little bit tomorrow. Smaller G and go up. Okay? So duplicate e Greek
more than like that. One more time shift D, e Greek. More than like that. I think we need two of them. Shift D, a Greek. He is. But let's make them, move
them to the more smaller. And this time, go here to
the individual origins. Choose scale, only genome scale around the pivot point
but around themselves. So like that. Okay. We have two more
ice to put here. So we bring ourselves shift,
right-click right there. Shift a mesh UV sphere, make it smaller than go with
the S is, make it bigger. A right-click, Shade Smooth
where it is, where it is. Let's call this one right eye. And what if we're going to
mirror which mean Shift, hold Shift, left-click
on the sun out. Unfortunately, my blend that are crushed and I forgot
to save myself. So let's wire
created everything. One thing that I forgot to rename these cubes
into the sun rays. So the more, if
you want to avoid this probability of vendor that's going to crush
injuries is duplicate this, but everything is good. Well, I'm happy for you and
let's finish our recession. But I want you to make
everything goes into the more smaller how we go right
there on our sun. Then Shift S cursor
to select it. Then here, be sure that
we have a 3D cursor. And now everything
for the collection emphasize holding
Shift and great. And go like that. Oh, okay. Actually not okay. Open your dog and
how you can see the eyes looking right here because it's still a little
bit on the diagonal. So we go to seven above agaric. Go here, go there. Check it out. G x right here. I think I moved too much. X, g right here. G, Zip, something like that. If you want to take
a look at your work without all of these great
and everything else. Just go here, turn it off. And this is what we
have in the moment right now. So it's better. In the next lesson, we're
going to create these flowers. Thank you so much. Actually
the flower is going to be with a similar
technique to use right there than the background lighting,
shading and render.
6. Lesson 5: Flowers: In this lesson, we're
going to create flowers and other collection. Tricky bit more comfortable, new collection or right? Double-click flowers,
arrange, shift a mesh UV sphere than you is fear of beer here because I
forgot to set the cursor. So Shift S, cool research world, the region now one more time. Shift a mesh. He was fear or right-click,
Shade, Smooth. Let's hide sun and duck. S for scale. And you know what we can do. We can go to our
sun right there, copy, choose wherever it
sounded, rate control Z, go to the flowers and control
V. And then how we can save a little bit of time
to ourselves so we can go into edit mode,
transparent mode. Let's make this one
out a little bit more thicker like that. Get out three, e Greek, make it a little
bit more thicker. On the green axis, g, e Greek, go right there. Let's go with our inner part of the flower S to make it smaller. One onto limpid oral
cavity bit bigger. Let's rename this one petal. And I'm going to call
this one flower. Inner. I'm going here, g x g. What about S? What about g? Is it one more time? Altair to make it
further goes how we can see his daily
bit on the diagonal, so Altair and we
make it flat and she goes somewhere here. And that good. You can set the size of these pedals and inner flower
in the way how you want, don't copy, be creative. And I'm looking forward
to see your projects. Then we are going here. Shift S, cool
researcher selected, go right there, 3D cursor, then here Shift D, e Greek and all like that, e.g. choose both of them. Shu Dee, agaric, one more
time shift D, a Greek. What I think I would
like to do is S for scale to make them bigger. And that is, now, if you like your final flower, you are sure that you
like it. Do I like it? Yes, I think I like
it only one thing, g, e, Greek, and
I'm going to move this one a little bit out. So very easy thing, you choose all of them and to connect all of these
objects into one object, you press control J. The aim. Even happy that
I've heard about this thing, that they commit this mistake
because control is it. First of all, we should apply subdivision surface on each one. And on that. After we apply a
subdivision surface, that was the reason why you
go one more time and Control. And J I forgot about
one, who you are. Go here a blind. Okay, the third one, Control G. Now everything is good and now you don't need to
bother yourself. Always emphasized you have flower number one
that's called this one, flower on their line. One opened up, open sun, place it wherever you want. Let's go e.g. g. X. Whoops, go here in the
middle or regions, or somewhere like that. S for scale, G. G. Now, Judge, waste your own time. You can create as many
flowers as you want. Just plays them again
wherever you want. And I'm gonna see
you in the next one.
7. Lesson 6: Background: Beggar on lesson I suppose is
gonna be the shortest one. So we have one sphere right there and a Blaine right here. What I'm gonna do, of course
shipped a mesh UV sphere, then make it bigger,
right-click Shade, Smooth, Color town
somewhere here. And just make it a little
bit more like that. She said 300 M5 G
agaric, go behind, just set it under his feet as x, like that. Oh, okay. One more thing. To keep it more simple. You can go into edit mode, transparent mode than
one for the vertices, choose **** for them,
and delete them. Why? Because you will not
see them on the rendering. So there is no reason to
keep them because you make our blender file a
little bit more bigger. Then we go to the m to move
into another collection. Let's create a new
collection which is gonna be back ground right here
in the background. This is fear. It's all good. We go with a shift, a mesh, and plain x 90, which allow us to make our rotation three
on this side of u, g, e, Greek, go right there. One and an input
and make it bigger. I'm not sure. I
probably like chip like subdivision surface going throw two to make
it more smooth. Now, it's all good. And g, is it? Yes. Where is our plane? Why it's not here? M background. Good. How I see the most shortest one. See you in the next one where we're going to
create the lighting.
8. Lesson 7: Lights: Lighting. So right-click new
collection number, quick. Light, rather shift a
mesh to make it bigger, S, G and go up. And here, rename it like
Blaine, underlying light. Why? You're going to find it out. So the rugged, this one
out a little bit here. And let's go here to set the rendering gene instead
of EV on the cycle. Then on our plane light, we go in this, let me do it in this
smaller red circle, where usually you add and apply
the materials on objects. So take a look. I press mu, which means adding new material. I call this one lane light. It doesn't mean that they
should share the same name, but in that case, they are adhering
to the surface. So let me show you
here how you can go in the viewport shading or what do you want to
see in the Render? At the moment you
don't see anything. But if I want to change
the principle be as dF into emission, that how you can add some light. I like this type
of flights and you can add lighting sign and
we're going to add this one, but this is one of my
favorite for the general 13 are numbered G agaric, go right there, and then x and make a small
rotation towards our Doug. And I probably want to increase
the power of the light, which mean we go
right here, 1.7. Yeah, we're probably 1.5. Let me I'll leave 1.5 at the moment right now
if I would like to change it, I'm just going to undo
that and nothing else. So let's go forward. I think this plane we should remove a little bit
behind g, e Greek. Go there. We don't need
our empty, so hide it. And let's add the second one we should you have a three
sources of flight. One, the general one behind
and one on this side. Let's go with this
one on this side. Shift Hey, light and point G. Move it up, g, x on this side, and move it a little
bit in front, further geographic,
Let's go somewhere here. Yes. The power, you don't see
any difference right? Now let's change the
color instead of white, something toward whitish blue. So somewhere here, don't
go too far with it. So we're going to keep
the biggest like, like white, one warm color
and one called color behind. So this one is going
to be the warm one. And here instead of ten, we go with the third tier,
three Congress 3023. Why not? So you can
see the difference between how it was and how
it is the moment right now. Great. And you can play around again, these settings you don't
need to be advanced to. This hadn't changed right there. I probably, I will
decrease towards three hungry g and
little bit right there. And let's go with
one more light. Shift, a light and a
really good G e Greek, move it behind g x and
move it toward our Duck. Be sure that your allied
don't go behind the airplane. So I suppose this slide should to point toward
his left shoulder. So we go with a g x
somewhere there and we go with the air
somewhere here. Let's take a look. If you want to, you
know, when you move it, it's your first, but
if you want to move it more slower hold shift. And in that case it would
be more comfortable to move it more slower. Okay. Let me leave it like that. Let me check color. Go towards red. Not very intense red, but something like that. And the power are
gonna be one-thousand. I want to underline
outline right here. So I'm going to play around
a little bit more closer. What IF error is a
little bit there? X. Yes. So how we can see
on the right side, he had this type of red outline, but don't have it right there. So that is my purpose. I suppose I suppose I will decrease this one
for around 815. Like that should not
make it so strong. And they're just play around
if you feel, you know what, let me give you a hint in case if you do this one
again for the first time, if you want to have
a few more windows, so you go right there. And when your icon to learn
from these two arrows, right click and e.g. vertical split, drag
it on the left, and now you have two lights. So one is here and
naturalized, sorry to Windows. And now we can play e.g. here to take a look,
move your light. And at the same time we want to see the changes spread there, which mean you don't
need always to go here. Then again, make
changes again, go here. So it saves you a little bit. When you are over, you
want to, you know, to bring herself
again it one window, just go right there,
join areas, e.g. drag it on the right side. So let me finish quickly. G, e Greek no, sorry, g, x right there. One and an impact. If you don't want
to see the slides, the grid, and go right there. This is what we have. I suppose I would like to have the point a little
bit more stronger. What about four? What if all hide it? Yeah. So there is a difference. You can see it clearly when you hide it, when you open it. Good. If you have another
opinion and the way how you want to see your
lights, no problem. I show you them a
technique like this. We can call this
industry standards. So you have three
sources of loads, one in general, one on this
side and one on behind. Thank you so much
for your attention. Let's go on to the
next lesson where we going to create the
shading and the texture. See you there. Goodbye.
9. Lesson 8: Materials Part 1: Let's start with our material. We should you open
another Windows or right-click, go there, vertical split and
right here, good. Then right there, go into left corner at both and
choose a shader editor. It will be more comfortable for us to play around
with the colors. How I said before in
the previous lesson here in that window is
where you add the material. So let's start with duck hit New and call this one dark
underlying yellow. Then you go right there
and we have a base color. Choose the color
that you want, e.g. these e.g. this one. Why do you can do
with your body? Because your body with a dog biting to make
it more comfortable. So you can go there, e.g. and here we can find a duck
yellow or another option. Click on the budget, then shift left-click on the
head, gone through L, and then the link materials, and now they share
the same material. Great. Let's go
forward with his eyes. So here you are. New material, ice, and then go their base color and just
turn this one toward black. Then right here, the same thing. Click on the left, I shift. Let's quick Control
L link materials. Let's go forward. We go to his cheeks, new material, let's
call it chicks. And something in between
being an violet. So how about, how
about this one? This one is skewed. Then we
go to his beak, new material. How you can see there
is nothing hard. Just create a new material and choose the color that you want. So let's go e.g. towards orange. Do I like this?
Orange? I suppose I wanted to make it a
little bit more brighter. And now it's a good go
through this one below. Shift left-click going through L link materials and we have the choker that I want
to also the black one. So we go to write new material called
this one sugar base color, and it's called toward black. And there's interesting
things like roughness. If you're going to
bring it toward left, he's going to make
it more shiny. And if you're going to
bring it toward one, you're gonna be
more like a mate, which mean it will not
reflect the sun rays. So that's why I suppose I
would like to keep it more, 1.150 to make it more shiny, but the eyes are like to make them toward or I don't know, do I like it more
mates or more shiny? I suppose more shiny. So I'm gonna keep it
like 0350. Same thing. So I'm gonna do is
chicks her roughness, 0,300.50 and you can see
a difference right there. What about the big big else? So I think with the dark, like that is too much, but 0250 or even 330. Oh, it's all good. Right now, Let's go toward our planet. I'm sorry, health plan. New material, sphere under dark, I'm going to call it like that. Then choose a pleasant green to make this one a
little bit more useful. I mean, not only at the color, Let's add the gradient. How I'm going to show you. So I'm gonna change that green towards
something like that. Go here, shift a lake Always is huge for start to take
gradient and half. And here we have a
gradient texture. Great job. Then you choose another one. It's color around it. We're going to help us to
set the colors and press on the gradient texture
and click on Control T. And it gains
if nothing compared, you go the word edit
preferences came up and here's your
age for texture. And you have a texture setup, you should you be sure
to check in and take a look at the shortcut
is Control T, and then apply the control
T. Let me drag this one over on this side
and take a look. If you're a beginner,
just take a look. I couldn't get the color with base color and I'm gonna get that color with this. Great. Then instead of linear, I'm going to choose B-spline. And here you should, you
choose your green colors. So take a look quickly, e.g. this one is gonna be, let me bring this up
and go somewhere. E.g. somewhere here,
and then we're here. And what about one? I'm gonna be more
cold and one color, one green going to be more work. And you can see a difference how this one is that color and
this one in that color. Then if you e.g. one, to play around and to
make it on the diagonal or e.g. someone else. First of all, you
have, you can be an option right here to
choose a diagonal one. You can see a big
difference because the colors are pretty
similar. But e.g. if I'm going to make
this one white, instead of displaying, I'm
going to choose constant. Like the previous one, B-spline. It was more a smooth, this transition in
between of colors. And here you can see
you have two colors and it's clear where it's
white and where it's green. And then just play around e.g. the linear or quadratic
or with spherical one. You don't want to have
like the spherical one. And here we have a scale, rotation and location
of our colors. So e.g. if I'm going to
make it bigger or smaller, I can say these settings
are very particular, so everything is very
connected to each other. And if you have here
something close, It's going to influence
in the other way. So at the end of the day, I want to keep it
e.g. like that. And here instead of constant, I'm going to choose
B-spline and not white. I want how I say
before, I want green. Let me go like that. I hope what Explain
it was clear. There is nothing card. I show you the tools, but then end of the day, I don't want to move you
through all of the steps because it's about being
creative is your personal work. So you can choose
your own colors, you can choose your own options. I show you who play around
for half fun, just have fun. They see the spherical. I'll keep linear. I'll like it more on a sweep. I'm going to make it
a little more darker. What about you can add
one more color, e.g. if you're going
to press on plus, this is how you can add colors on the minus if you
want to decrease them. So what if this one is going to be a little bit
more toward yellow? I'm gonna move it
here and right there. So I have a gradient in
between of more cold green toward more,
more warm one. Great. Let's go
toward our sun, e.g. and let me show
you another thing. Would you like to have a
gradient on his son also? If yes, instead of doing
the same steps, you know, wasting your own time, you can go right
here, choose e.g. a. Sphere under duck, which means this one. And let's duplicate
this one which is here. And now they share the
different materials, so-called this one son. And let me prove you
that I know what I see. So now we can change the colors, but it's gonna be applied
only on this one. At the same time,
you don't know, you don't need to waste your time repeating
all of these steps. So instead of linear, I'm going with
this vertical one. I suppose if you're
gonna be much better. And then when the yellow, so yellow, and let me first
of all set the colors. How about this yellow? And here I wanted
something like an orange. Yep. I want this transition
should be more smooth. And for that one,
I'm going to move it more towards yellow. So this color, so what
you read to decrease the intensity of the orange
grape and about this one, let me go toward toward that. Okay. I'm gonna keep it
like this or no. I don't like you can see this line right there and
I want it more smooth. So what I can do, I can go here plus one more. And I'm going to go
to the color picker. I'm going to choose this one. And then I'm in going
more towards orange. So now it's more smooth
because the intensity of the color is
decrease with each one. Great. What if I'm going to
share the same gradient, e.g. on our sun rays. Here. It's gonna be interesting
also because this is, they all are different objects. You have two options. You can connect all of them. E.g. I, remember when I say
like you emphasize e.g. leg of it, Control J and then how you can
connect in one object. But if you feel
that you want e.g. and in future to work in
particular with some of them. This is the option number two which actually
showed you before. So take a look. Let's go here. Let's use our sun. And let's duplicate this one. Son under, under lying
and erase and write. Then take a look. We're going to emphasize
all of our sun ray. Then you can see that there's different types
of orange outline. So Shift left-click on this
one which have the color, and this one, you know, everyone is orange and this one is more
towards the yellow M, how I say before, Control
L and link materials. And now they all share
the same object, which means if you want
to, you can see that. You can see it's more
comfortable for you to work. So what I want to do right now, I want to hear more yellow. I went first table
instead of spherical to choose, let's say diagonal. Go right there and it may
go more toward yellow. Let me go here. Around. I don't see
too much of the red. What if I'm Quinn and move it? Why did I'm going to decrease
I'm going to three colors. And this is how I keep them. Eyes of our Sun. They are black. The black color. That
color is beautiful. And ladies and gentlemen, there's very interesting woman. If you're a beginner,
please take a look because it can be interesting.
10. Lesson 8: Materials Part 2: Ladies and gentlemen, there
is very interesting moment. If you're a beginner,
please take a look because it's gonna
be interesting. So in our reference, which is right there, you can see that the
flower like always, the petals have one color. This one in the middle
have another color. But because we connect
this one, it's one object. You can emphasize this theory. I mean, you think so. Let me show you what we can do. Take a look. So new material and let's
call this one battle. Yes. The petal are white. We can e.g. to decrease or let's go let's
increase the roughness, something like 08. Good. Then I'm going to the Edit mode. I am going to choose e.g. faces, face mode. And I'm going to choose one
of the face right there. And I press on the One Button L. And that's how he emphasized
the entire sphere. Your question could be way, because blender is
a smart software created this smart people. And at the end of the day, the history of this object
was that initially was two different objects like
petal and flower inner part. And we connected. But blenders to remember that
they went different than they were when emphasized and everyone who was
an individual apart. So that's why when
you press L here, remember the topology
of this object. And this is why he
emphasized, let me go e.g. to this petal l. And he emphasized on this
petal anode, e.g. with a little bit off of them? No. So I hope I split it clear. If you've found my
explanation not very clear, please leave me a
review and I will try to do my best
on the next course. So l, I choose this fear. Then I'm going here to the plus, which means to add one more material or
shading or texture, call it wherever you want. Mu. And let's go e.g.
with flour in there. Anyway, I'm going to do is sign. Now, when I'm going
to change the color, he kept a different color. One important moment. You can add an assign one more material only
in the edit mode. So e.g. I'm gonna go
to the object mode. You can create any material, but you can assign it because
they're saying work on the, in the edit mode. I hope it was clear
and now you have the idea and understand
how to do all of that. So let's go and
choose our colors. Do I like this red? Not really like this red
to be more simple place. And this time I'm going to
like the roughness and 03. Good. Let me hide our reference. Let me go toward another flower. So just play around. We can go to the petal. Again. Let's work for our practice, for our muscle memory. Edit mode, face mode, and go to your severe
breast L mu material, sun, where it is, and add some flower, flower in here that
we created before. And then duplicate
if you want e.g. to add another color and then
assign why we duplicate. Let's say that you want e.g. to give this one to be blue. If they all share
the same material, you can't just add
another color. So that's why you, so that's why you duplicate it. And now you are able, e.g. to choose blue one. Yes. It's cute, but gradually, let me go right there. Now it's cute. I have three more
flowers right here. So let me go to this flower. New, like always, not new. I actually showed
you just a bit. And then go here. And then L plus flower
inner, duplicate, assign. Mean TO yellow. I like it. I have two more here. I don't see the flower in there, so that means drop
you on the G is it has to make it
a little smaller. My dear friend, I want
you to keep it like, whoops, sorry, not here, but one more. Flower. Nothing hard. It can
look hard only when you rush yourself to repeat everything that
someone else show you. Don't rush always first about my approach toward
tutorials because of course I'm looking
forward elsewhere to grow up and they take
different courses. I'm always first of all, look without any
practice just to understand what the coach
while the teacher do. And then I bring awareness
to my own practice. This is how you grow up. Don't progress on it
for practice first and both theory and
the practice part. Okay, How about violent? More towards pink? And they have one more
flower due to two. It looked like mosquitoes,
these flowers. And I would like to say
that we've finished, but we didn't finish
because I would like to add a gradient
on our duct to. So what we can do, go to your son, emphasize these four elements. Control C, go toward the
dark and cones will be. Then we are here, connect color with
the base color and just play around with color. I'm gonna do this one. I'm going to, I'm going
to use the color picker, choose the yellow
that was before, which mean that. And
I'm going crazy. They're good legs, I think
more towards her, right. This spherical Insert key
but linear or in diagonal. You know what? Linear is? Good. And now I'm going to play
around here to take a look. We're going to make what? We're going to help
me to move it. The other side. I think it's x. This is the
rotation on the Greek 180, and that's how I turned it on the other side here
location is zero. No, it's one. No, It's 08 years. I think rotation on the X 9,180. And I'm going to
move it like that. And I'm going to keep
the colors a little bit more toward yellow, not show much like this. Here about orange, one. Like that. What about, what
about our plane? I'm not sure that I'm
happy with the brightness. So I'm gonna go to the plain lights and I'm going
to increase it like 1.9. Okay, and I'm gonna do one
more thing is S for scale. And then I'm going to move
this plane every bit more close to us like that. And I would like to
keep this plain white. I don't have problems with it. But what if we're going
to make it look new? And they ground back, usually I call this big
around like abbreviation BG. So, so a little bit
shorter, base color. And we go toward
something like that. If you want to play around
with gradient, you can. And there's one more thing
if you're still here. So let's go here. Go down. So this icon on the
camera, color management, and we can play around
with the contrast, which means here we
have Luke and choose. Let me show you e.g.
if we're going to choose them very high contrast, you see the difference
in the colors, but usually I play around or medium contrast or
medium high cleansers. So this is how it was
before or like that. I think made him high contrast. And here you can l such
a play around e.g. standard filmy cloak,
row and false color. No, filmic. Okay. Outlines. We have outlines. Okay. I think this lesson one
of the most longest one. So to give you a little bit more simple
and when I see you in the next one where
I'm going to show you how to create the outline, 1 s the roughness. I'm going to increase
it because I don't want you to reflect
this on the race. Thank you so much.
See you there.
11. Lesson 9: Outlines: So this is the outcome
of the previous lesson. This one, I'm going
to be very short. So let's new collection, and let's rename this one out. Light and drug. This one, the right-click
join area on the right side. Everything look pretty cute. Let me turn on this part. Let's start with our dog. Actually there's nothing. So again, invest, shift a grease pencil and
object line art. There a reason why
everything turned black because we shoot
you add the camera. So let me delete
this one to show you back right there in the Viewport Shading
and then Shift a. And whereas camera
and the camera, camera should, should be in
the background, I suppose. So we go to the m and move your camera into
your background. And then your camera
is in the center. But don't waste your time trying to G e Greek and
all of that stuff. Go right there, e.g. somewhere here and
then go to the View, LAN view aligned
active camera to view, and then how you can save
yourself a little bit of time. Then when you
emphasize your camera, you're going to have a
camera icon right there. If you want to have the same, Usually I like this
same Outlook like e.g. when you press one at an input, because you can see the difference in
between all of them. You should you choose instead of perspective which we have
at the moment right now, orthographic and how you can have this same,
the same look. Then let's scale
this one, e.g. 12th. Let's go right there, where the second one under the camera icon and
change the resolution. E.g. 1500s. 1500s. Game back to
your camera, e.g. ten or even eight? No. They're all through the scale. 9.5, do I like it? I like 9.8. Drag this one over the bit
on the x-axis and whatever, 101 more time on the x. And now we have everything, everything in the image. And now if you want to
add the grease pencil, so we go here, greens
pencil, object, line art. Nothing could turn into black. I remember when I got this one, I didn't understood like why everything is
black, what strong? But everything is simple. Just add the camera
to take a look at. I didn't say that. But in case if you're a beginner and you do your first steps, if you want to move yourself
in and out of the camera, the zeros onto number, so 00 is zero. Let's go with our line art, which is in the Outline folder. And again, if you're going
to emphasize your line art, you're going to have this type
of stroke icon right here. And there is a moment
like strokes where you can play with curb resolution, which
is going to be 64. Thickness of our outline, which means you can make it bigger or you can make it e.g. smaller or leg to
keep it at 0707. It's nice. Let's go. I don't want to add on the
beak and cheeks and ice, but on the body, e.g. you're
going to be called L. So object line art 6,040.7. Let's go forward to our Sun. Shift, a Grease Pencil
object, line art 6407. And or here, we can connect all of our sun rays because
to play with each one, like add a grease pencil is
going to be a lot of time, so I don't want
to waste my time. I'm going here. Control J. And let's rename this one in sun ray in case if they don't look like that
and they change their form, they start to look more
ugly, aura, more sharper. Be sure that they all share the same subdivision
surface modifier or if you need to
apply, apply that. I don't need it. So if you repeat my steps, I suppose you don't need it elsewhere and you
have the same result. So shift a Grease
Pencil object line art. Then you go down like
always open this stroke 6,040.7 and we have our flowers. Why not shift a Grease
Pencil object line art? Do I like it? I like it. Shift a gross pencil. I'm sure by now we
should add, Well, the one thing that
you should to do is to increase the resolution. I like the thickness so I
don't want to change it. So I'm going here. Crispin's, So 64. So 64.1 more flower and we
finish with this lesson also. 64. Do I want you to add it here? I suppose? No. And
what about chicks? Archaeal has been
tried object line art. I will just try. 65, thickness is 0.7. So this is what we have
in the moment right now. Okay, I'm gonna keep the
outline on the cheeks, but in the rest I don't need it. And it's cute. Not very similar to what
I haven't done before, but I didn't have
a purpose of that. At the end of the day. I like it. And I hope you like it also. And not only like it, I hope you found it useful, especially if you're a beginner. Leave me a review. We have
one more lesson where we're going to render and we're
done with that one. Thank you so much
for your attention. And I'm gonna see you
in the next lesson.
12. Lesson 10: Render: So I'm ready for
render and I hope you are ready l. So
first thing first, let's go here, open the screen. Do you see our reference? Know, but when you're going
to render it going to appear white because we hide
it only in the viewport, which mean when you close this, I disappear only here, but not from the render part. That's why you should do
turn off this camera L. So now we don't see our reference not
only in the viewport, but they also will not see
this one in the render to, in case if you don't
have this icon, go here and then filters and
be sure that you turn it on. So let's make a quick look. If we don't have
anything that could appear in our render know the reference was
the only one thing. The one, the one thing. Let's go forward. Let's start with
this camera icon. So actually now let me go here first because it's more
easy. Choose the resolution. If you like, one hungry, if you like this one,
keep it like that. If you want to increase, okay. If you want to have e.g. like 16 towards nine, you can keep 1920 suppose to worth 1080 to
give this type of use. So, but I personally
don't want it. I love this type of square. Then we go above on our camera. And heat is very
important moment, which means samples in a moment. These samples, long
story short definition. The more better quality the one, the more samples you should
to have on the render part. I personally don't because
I did this work before. I'm really looking
forward to have 4,000 because it is too big. And if you don't
trust your PC specs, I will not recommend it. But just because
it's gonna be lower, it doesn't mean that the
quality going to be poor. Know even 256 symbols, it's pretty okay, not
like for thousands, but it's not bad. So I'm gonna keep it like
Let me go with like 756 e.g. like that, then denoise
have a check in. I'm gonna keep it on
the default settings because I like it
like albedo normal. And then one more thing
is color management, but if you choose, then there's nothing
to play around. This is what I personally
don't do and how you can see, I don't do a lot of things for
acute simple illustration, this is more than enough
what we can do L, So, you know what? I probably going to remove
this outline chicks. So hush, whoops. One more time. I'm going there. Hush. Hush. I like without them
a little bit more. But what I want is S for scale to make it a
little bit more bigger. Not this much like that, or even like that. Okay. If you want e.g. to change
your camera position, go back to your camera. Whereas our gallery,
you can see it right there in the Search tab. Keys in the background
collections suit for the icon. And let's go e.g. with 9.9 personally, for me
a little bit on this side. No. I don't want to
keep it like that. So take a look one more time.
If you like everything. If you don't want to play
around with the colors, with the shading, we can put it on the render.
One more thing. Honestly, there is an icon that looks like a
planet right here. And this is, if you e.g. don't like these grey
anyone to change this color to make
it black or white? Here it is. So would you change this color and the same time you're gonna influence on the entire
scene brightness. So I'm going to keep it a
little bit more toward black. I know if you are
ready to render, the shortcut is F 12, or you can go to the
Render Render Image. What are you gonna do? Let's go e.g. horizon there and just wait for your render. This is exactly what I told you. I commit the mistake that that's really use your help tree avoid. So I forgot to these outlines to hide
them from the render. I forgot about that. Wherever anyway my
render is done. Let's save this file so
we'll go to the Image, Save As choose wherever
folder do you want, and then go to the
color and dip. I choose 16 for a little
bit more and better colors. And then press duck, duck render if you're looking forward to make
a few more renders. So my recommendation,
at least this is how I do bring some structure. One more for you go just e.g. the render to render three, just in case if you'd like to do some more renders,
save as image. And that ladies and gentlemen, as we've finished
with this course with is beginner
friendly course. I hope everything was, you know what, let me say. All of this works
in the next lesson where we're going to worry, I'm going to congratulate you. Thank you so much and I
see you in the next one.
13. Congratulation: My congratulations. First of all, I hope this
course was not only interesting but useful because this is the proposed number
one to help you, especially if you're a beginner in and do your first steps. I try my best, so
please leave me a review and also
share your project. Don't be shy, don't be scared. I'm looking forward to
support every one of you. And thank you so much
for your attention. If you want to
bring yourself into animation or Chile or
in some other tricks, I have two more courses
on my Skillshare page and 3D industries
that are interesting. Can you have a lot of different
doors that you can open? But this is our start. Again. Thank you so much and goodbye.
 Sasha Luvr, Work in third dimension