Transcripts
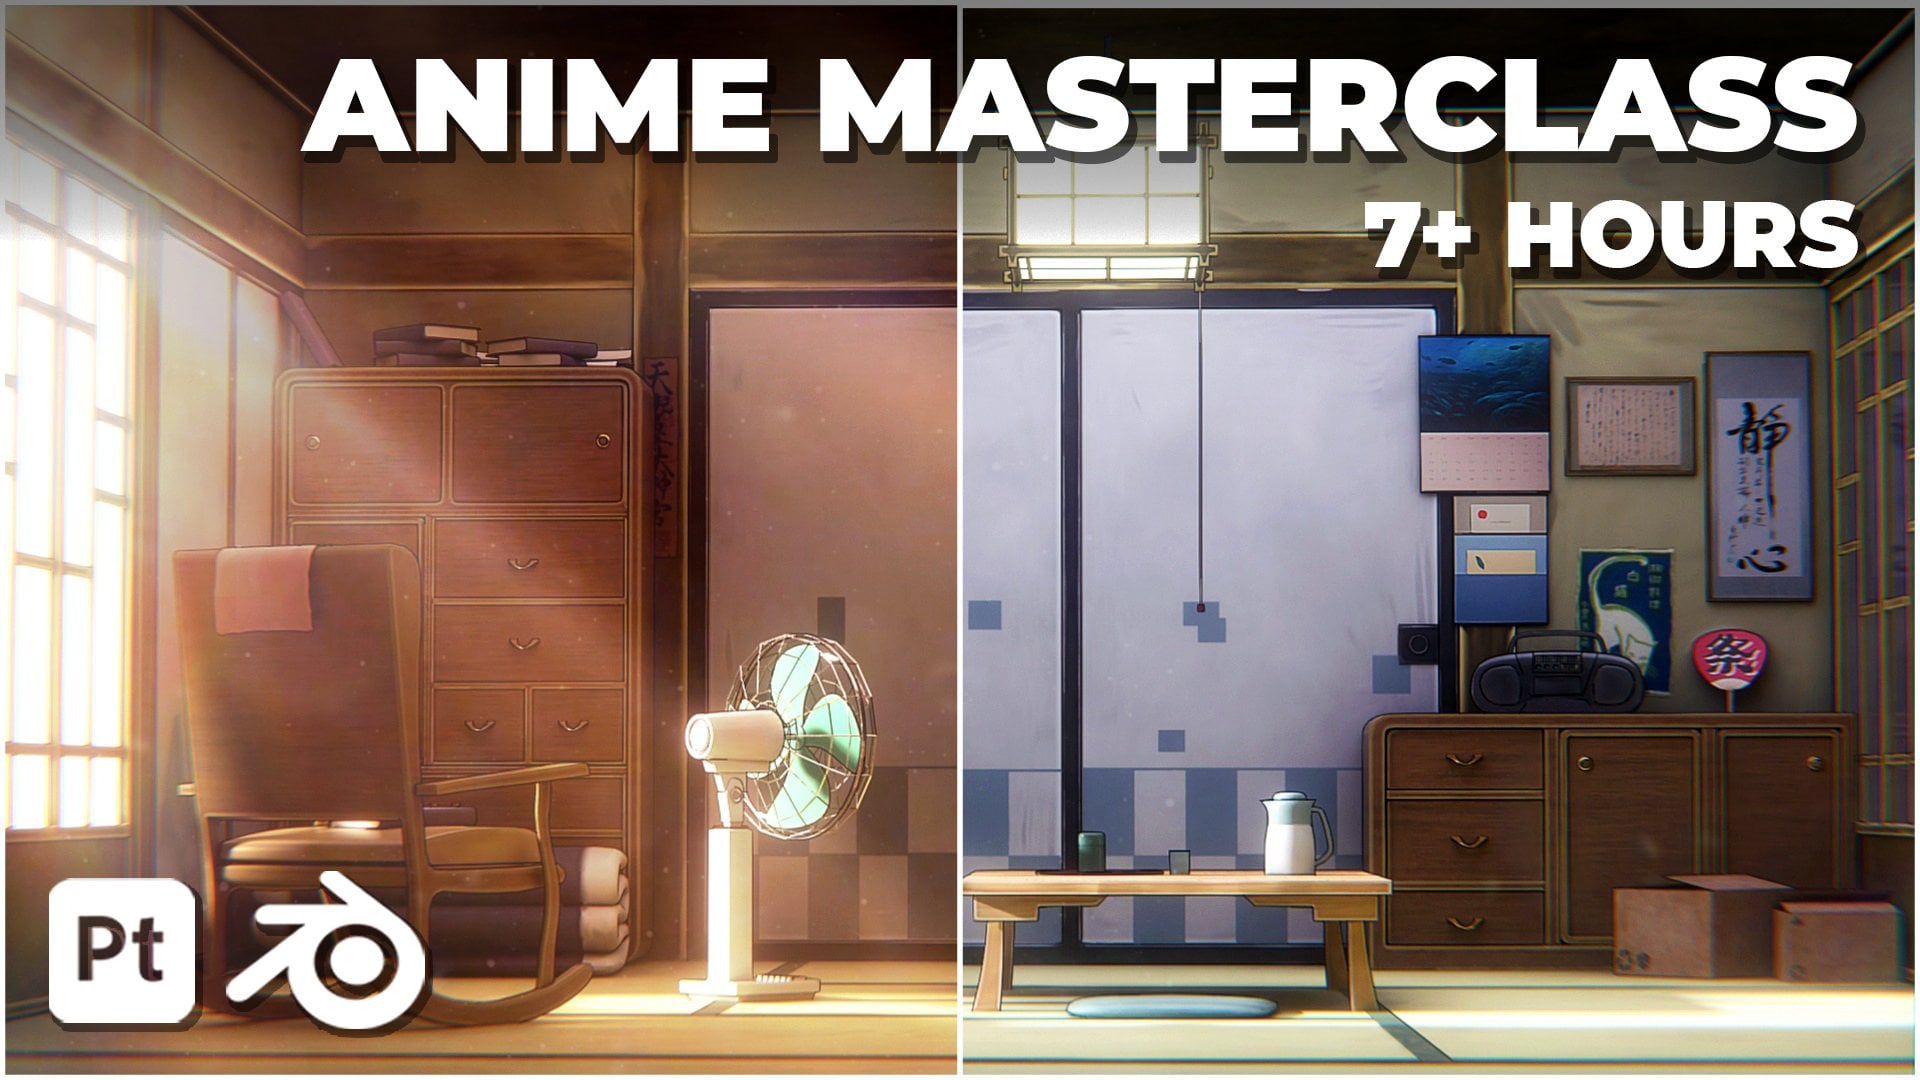
1. Introduction to Class: Hello, everyone. In this class, you will learn how to create an anime style room scene in Blender completely from scratch. We will go through the
complete process of building a stylized anime room
from blocking and modeling to lighting
materials and final render. The class is just an
hour long and follows a complete simple workflow
with no steps skipped. All project files are included, so you can follow along easily. We will begin with
scene blocking and composition to set up
a strong foundation. Then we will model all the main environment assets step by step. Next, we'll focus on creating clean anime style lighting and simple but
effective materials. You'll also learn how to set up a camera and optimize the
scene for the final render. We will then create
some props to further detail our
scene even more. To finish, we'll go
through basic compositing to polish the final look
and add atmosphere. This class is suitable
for beginers and intermediate Blender users who want to learn how
to create clean, stylized anime style
backgrounds and environments. By the end of the class, you'll
have a finished scene and a solid workflow you can
reuse in your own projects.
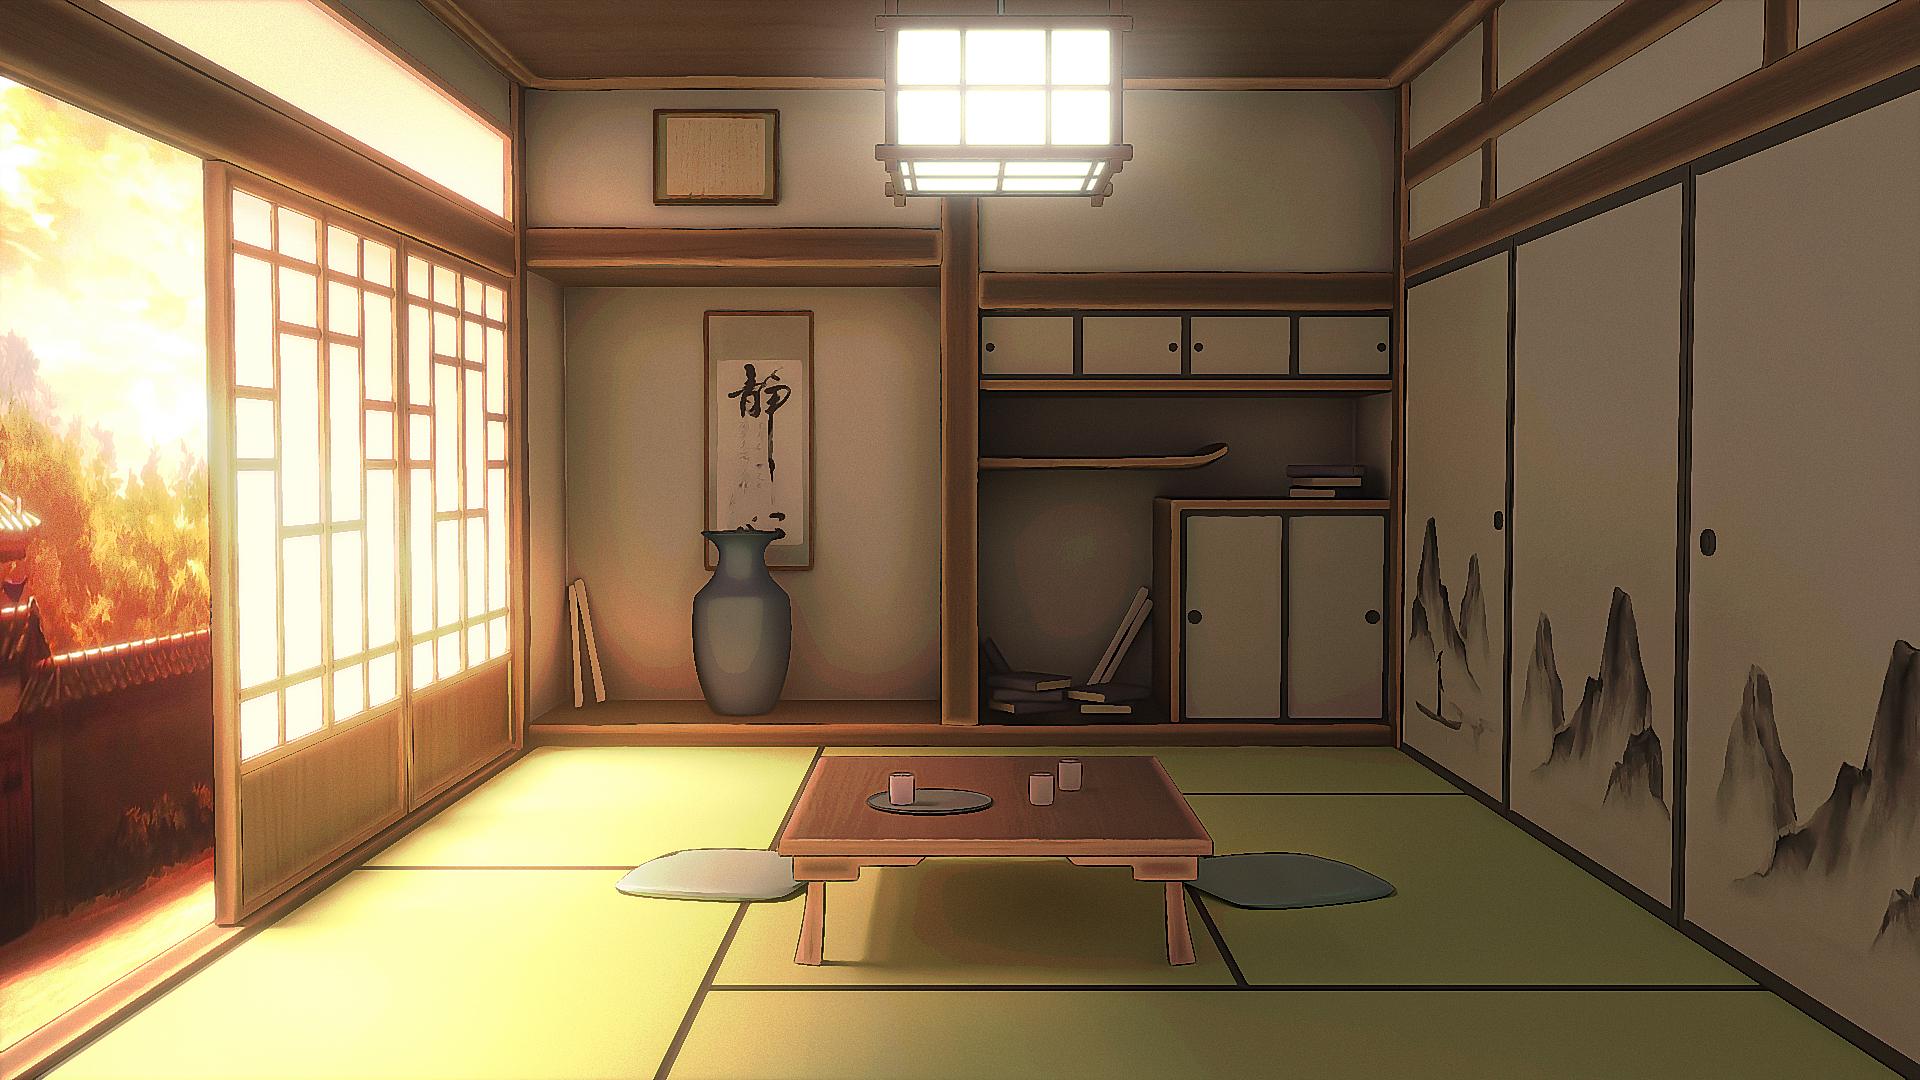
2. Modelling the Scene: I made this Japanese
anime style room in Blender from scratch and
here's how you can do it too. Let's start. Okay, so now
in a new Blender file, let's start by creating
our room first. Over here, we have
the reference image which I've taken
from Demons layer, and all of the textures that I will be using in this video, I have provided them for free in the Lincoln description so that you can easily
follow along. All right, so let's press
Shift A and add a cube first, and this cube is
going to be our room. You can press N to bring
up the side bar and the dimensions can be
something like 6 meters, 3.5 meters further Y, and the height of the
doom can be 2.7 meters. Now we can just press tab
to go into the Edit mode, press three for phase select, select this phase,
press X, and delete it. Basically, this way we
can actually see inside the room and add all of
the details over here. But before that, just
quickly apply the scale. So select your object,
press Control A, and apply the scale. Now you can press tab to
go into the Edit mode, go in over here and
enable edge length. Basically, this will help
you to see the length of any of the edges
that you are selecting, so that will help us a lot. Alright, so let's
create this part first. You can press Control and add a edge loop right about here. So 1.95 meters above the ground. Then you can once
again press Control R, add one edge loop in the
middle like this and hit right click to keep
it exactly in the middle. Now we can press
Control B and bevel it out this way to
give it thickness. So basically we are trying to create this section
right over here. So now what I will do is I'll press three for phase select, select all of these faces
because we want to extrude them to create this type of looking like structure
because as you can see, we have a space
inside over here, so we need to extrude
these walls out. But this will create
a slight problem for us because as you can see, it extrudes in a very
weird way like this. So we don't want
this. So the easy fix to avoid this is basically
you go over here, press T to bring up this toolbar and select the extrude tool, and over here, you can
select the extrude manifold. Basically, what this will
do is now if you extrude them you will see we do not get any extra
redundant faces, and basically, we can extrude
them a lot more cleanly. So somewhere around 0.83 meters. And this can give
us a nice look. You can go in the
modifier section and add in a bebel modifier. Make sure to apply the
scale and then adjust the bebel amount
Enable hard enormals. And yeah, now you can see
we kind of have a similar. But over here, this
particular area is a little bit more downwards,
so you can press tab, select this face, press G,
then z to move it down, and just move it a little
bit downwards like this so that we have a
bit uneven structure. Now, I think that
looks pretty good. Next, we can add like a platform
over here at the bottom. So press Shifte and
add in a queue. And let's press seven for
top view on the number pad, Enable Xray, and
you can just move it over here at the
back like this. Press tab and just select all of the edges and just adjust them according to our
whole building like this. It can extend up a bit, it
does not really matter. You just need to cover it
like this and now press STN Z and just scale
it down on the Z axis. Move it down over here. Yeah, I think this
is pretty good. I'll just select it
and maybe move it a bit backwards like this. Next, we can also add
in a Bel modifier, so just select it, go in the modifier section and
add in a bevel modifier. It won't really work correctly, so just press Control
A and apply the scale. So yeah, just make
sure to always remember to apply the scale. We can adjust the amount now
and just enable hard novels. Yeah, that looks pretty good. Next, we can start adding
these wooden planks. So again, press Shift
A, add in a cue. Let's press three
on a number pad. To see the front view like this, let's go in the wireframe
mode and we can just scale it according to this front wall that we
have over here. Just scale it a little
bit bigger than it, and now just press Tab. Select the top part and
move it right over here, select this bottom part and
move it right over here. Yeah, I think that
is pretty good. Maybe I'll just decrease the scale of it a
little bit like this. Now just move it back. Make sure to decrease the scale like this as well on the axis.
Now just move it back. This way we have created our wooden planks and we can just now duplicate them to
the other areas as well. So I'll just quickly
do that now. Press three on the number
pad to view it like this. Then I will just
maybe press S and Y to scale it down a tad
bit on the Y axis, press Control, apply the scale, and then we can just
start duplicating this press Shift plus D. Now, press R to rotate it and type in 90 to rotate it like this. Let's enable X ray and just
select this and move it right over here and select this now and move
it right over here. G and Z and move it right
along this all this way. And once again, just
press Shift plus D. Press Y to bring it right
over here and move it up. Yeah, that looks pretty good. I think I will also just select duplicate this once
again, press Z, bring it down, and now
press tab, enable Xray. You can select our
selection tool and just select it now and
bring it till here. Just select this
top one, press tab and select this part and
move it right over here. All right. So that looks
pretty good to me. Make sure to select all of them, and press control,
apply the scale. And now I will show you
how we can just make them look a little bit
more like wooden planks, because right now they look
like completely straight, flat like blocks, so we
want to make them look a little bit better and a little bit more
like wooden planks. So let's select this
wooden plank now and we can start by adding in
the bevel modifier. Let's adjust the bevel amount. And enable harder normals. Next, you can add in a
subdivision surface modifier, which will basically
add extra geometry into your wooden blank and
make it really smooth. You can increase the
number of levels, and now it looks much
better than before, but still we need to add
some kind of displacement in the geometry to make it look
more like a wooden plank. So we can add in a
displaced modifier, search for displace
and add that. You will get weird results
like this, but don't worry. First, we need to create a new texture and then go in over here in the texture properties and in the type, select clouds. Now when you come back
in the modifiers, you can adjust the strength, like the strength value. So somewhere around
0.02 or 0.03, something like this, then we
can control the mid level. And you will see like we get a much better plank
like looking shape. You can right click and
shade how to smooth this. Now press tab, press Control R, and add a couple of edge loops
in the corners like this. So add one over here
and add one over here. Instantly, you will
see that we get a much better plank
like looking shape. If you turn off your
displaced modifier like this, you can already see we get a much better wooden plank look. I will also just remove
this pin and move the smooth biangle to
the top. All right. Now we can just select all of the blanks and select
this one at last. So now we can press
Control J to join them together to basically add all of the modifiers
to them as well. Now you might notice
that these ones look a little bit weird. So just press tab,
press Control R, and add a couple of
supporting edge loops. You should basically
fix the geometry. Let's add one over here as well. And obviously, if
it does not fix, you can first just go into
the texture properties, play around with this size, and you will get
different results. You can also just
right click and shade or smooth this to fix
the shading issue. And yeah, now I think
it looks pretty good. Let's add a couple of edge
loops over here as well. Press tab, hold on,
select this loop, press X, and delete
the edge loop. And I think this is
much better now. One thing that I will
do is once again, press tab, press A to
select everything. Now you can press P and
separate by loose parts to now basically just once
again disconnect them all into being
single objects. I will select these two and maybe just move them a
little bit back like this. And yeah, this looks
much much better now. So we can start adding
in more planks. Let's add over here as
well in the corners. So let's select this
press Shift plus D, bring it over here,
press R, then Z, type in -90 to
rotate it like this. Let's move it over
here this way. Press tab, Nb X ray and
just bring it down. You don't really need to
copy it over here as well. Just select it, add in a mirror modifier and just select the mirror
object as the room. Now you can set it on Y axis
and remove it on the X, and you can see it will be
duplicated automatically. Let's select it and bring
it out a little bit. Yeah, this is looking
pretty good to me. Now, as you can see
on the right side, we have these doors as well, so let's add that,
and then we can add these wooden
bars on top of them. So press Shift plus A,
and let's add in a cube. Let's scale this down on
the Y axis like this. And for the X, we can put
something like 1.4 meters, and the z can be
somewhere around 1.85. Yeah, that's pretty good.
Let's just move this back and line it up with our walls and this wooden bar
right over here. You can press the dot key on your number pad to focus
on any object like this. Let's place this
right over here. What I want to do is
I will just select this wooden bar and
the door as well, and just move them
right like this. And also select the wooden bar, and let's just bring
it out a little bit more this way. Yeah,
that's pretty good. Just quickly adjust your
dough, something like this. Make sure to just select it, press Control and
apply the scale. Now we can press
Tab and press three for select select this
pace press I to inset, and let's insert this this much, and now just press E
to extrude it inwards. Basically to create this inset, and now we can add
in a Bbel modifier adjust the bevel amount and have something like
this, enable harder normals. Next, what I will do is I
will add in array modifier basically to duplicate this
to something like that. And now we can once again
just select our wooden bar, press Shift plus D. Make sure to remove the
mirror modify. We don't really need it. Remove it, and now you
can just press R then Y, type in 90 to rotate it like
this. Let's move it up. Press tab, enable Xray, select it all, and just
bring it out over here. Let's move it a bit
inwards around here, and then just select it
presi plus D Z to lock on the Z axis and move it somewhere around here to create
this type of look. I think I will select
them all and just move them like far in this way. Select the doors and bring
them out. Yeah, that's fine. Let's add these 2 bars as well. We have one over here
and one over here. So you can just select this one, pressure plus D to duplicate and place it just
like this, press tab, and enable tray just
select it all and move it up and make sure to just
push it in like this. Once again, I will
select it and remove the mirror modifier.
We don't need that. I think this is
looking fine. Maybe I will just duplicate it one more time and place it right
over here like this. Obviously, we don't
have to follow the reference image exactly. But we can just roughly follow it and create
something similar. Now I think I'm pretty happy
with the look over here. We can now start working
on the left hand side, which is basically
adding this open door so that some light can pour
in through over here. So let's create that now. First, let's just
hit save, press one. For the side view like this, press Shift plus A, go
into image reference, and we can start by adding
in this door and sealing light reference image that
I've added so that we can just easily create these doors and the ceiling light as well. So selected presifP cursor to select it to bring the
cursor right over here. Now you can press Shift
plus A, add in a cube. Adjust the scale according
to the reference image. Now we can just
quickly press tab and just adjust it according to the reference
image like this. Press, then Y, and let's
scale this down like this. Now what I will do is press tab, press Control R, add edge
loop right in the middle, hit right click and you can
just select this right side, press X, and delete
the vertices. This way, we can just add
in a mirror modifier to basically copy it over here so that we can just only work on the left hand side like this. So press Control R now and add an edge
loop right over here, add one right over here, and we can add one
right over here. Press three forhas select, select both of these phases, press X and delete the phases. Now you can just press, just quickly press Control Z to undo, enable tray, and we can just add one edge loop
right over here as well. Now you can just select
the faces again. So press three for pace select, select both of these faces
and press X, delete them. Press tab, press one for
word C select, hold At, and select this loop, hold Shift andagt and again
select this loop. Now you can press Control
E and bridge edge loops, basically to join
them like this. All right. Now the
door is almost ready. Press tab. Again, press three for phase select
and select this phase. You can insert this, or you can just directly
press Control R, add Edge loop right over here, and one over here. All right. Next, we need to
create this kind of pattern like thing within our dog first just select this, press E, and extrude
it inwards like this. You can press tab,
select this phase, and press X, delete it. Let's add in a bevel modifier to this and apply the scale.
Just the bevel amount. The door is looking pretty good. Select this press shift process
to select it once again, press Shift A and
add in a plane. Rotate it on the X axis
by 90 degrees like this. And we can just simply create
these patterns as well. I think they're pretty simple. We scale it up a little bit, press tab, press
Control R once again. Hit right click to
add it in the middle, and you can just delete
the right side once again and add a mirror modifier. Now just simply, you can go in the Edit mode, press Control R, and add edge loops wherever
you see geometry over here, you can match the edge
loops with those lines. Press Control R and keep
on adding these edge loops like Let's add one
over here as well. Now you can press two for select and select all of
these extra edges, basically, where we do
not have any geometry. Now you can press X and
delete those edges. And yeah, we can delete
these two as well. Over here, this, this as well, sex and delete everything, select these ones in
the middle as well, and again, delete the vertices, not this one, Hold control and deselect and delete
the vertices. You can press three
for has select, select all three of these faces, press X and delete only phases. This way you get something
clean like this. Press tab and you can select
these two edges as well. Press X and delete the
edges over here as well. And now, as you can
see, we only have the edges remaining
wherever we have geometry. Now you can press tab, press
A to select everything, make sure you're on the
vertice select mode, so press one, and now
press E to extrude, press Y, lock on the Y axis, and just give it a
thickness like this. Now to basically add
three D thickness to it, you can just add in
a solidify modifier. You can increase the thickness. You will see it won't
really work correctly, but don't worry,
we can fix that. Just make sure to set this to complex and set the
offset to zero. And now you can just control the thickness and you can
see it is working perfectly. You can also add in
a double modifier to it to make it a
little bit smoother. Make sure to apply
the scale as well. Enable harder normals. Let's decrease the
thickness a bit. And that's pretty good.
I'm happy with that. Let's select it, and we can
move it right over here, press R, then Z type in 180
to rotate it by 180 degrees. Obviously, let's scale
this down a bit. Bring it out over here. Press tab, we can
select this vertice and just move it up so
that it does not like, sorry, make sure to
select both of them, so we can just move them up
so that they don't overlap. That's pretty good. Press
three for the right side view, Enable Xray, and just place it right along
a wall like this. Let's decrease the scale of them now according to these
doors in the front. So you can just select
them, and the zt is around 1.85 meters. So let's just decrease
the scale of it and match the height of them to same
1.85 meters like this. Now we can just again carefully
place them like this. Let's just duplicate
them as well. So press shift plus D duplicate and place one over
here like this. I think two is fine. We do
want some open space as well. Next, I will just select
this plank over here, pressure plus D, and bring it out over
here. Pretty simple. As you can see, we have
this top part as well. So let's just
quickly create that. I will just select my
doors press shift plus further to select it so that
now when I press shift, add in a cube, it
gets added over here and I can easily
just place it like this. So let's decrease the et to somewhere around 0.4
meters in height. So something like this,
decrease the scale on the y axis and just
press staab enable Xray, and just extend it up till here. And this one also
like this till here. You can press one on the number pad to view it from over here and just carefully place
it exactly like this. And yeah, that's pretty good. I will also just quickly press
tab in the Edit mode and disable edge length now because I don't think
we need it anymore. Press control apply the
scale, and let's tab, press three for phase select, select both of these phases, and now you can just press I to inset to create
something like this. Press X and delete the phases. And again, hold, select this
loop, hold Shift naught, select this loop,
press Control E, and bridge edge loops.
All right, perfect. And now, basically what we
want is we want to create this open space
so that light can come in for our doors
right over here. So we need to delete some
faces from our room. First, select your room,
press slash to go into the local mode so that we
can freely work on this. You can press slash
on a number pad to easily isolate objects. Alright, let's press tab
to go into the Edit mode. If you press Control R,
you will notice that you cannot really add
edge loops properly. So there is a very simple
fix for this first, I will press Control R, add a Edge loop anywhere, so
you can hit right click. Press Control R, add one edge loop over
here. Hit right click. You can see you can add a
single point over here, so just add a single point and add a single
point over here. Now you can just
select this vertice, this vertice, press
J to join them, select these two, press J again, and select these two, press J. And once again, just
select these two, press J. This way we have created this one single loop that
is going through. You can hold all and
select it entirely. Press S then X and type in
zero to make it entirely flat. The reason I created
this loop is now when I place it right
over here in the corner, so you can press G the next
and move it right over here. I can just freely add edge
loops now wherever I want. All right. Press slash to come out of the isolation
mode this way. And press Control R and add
edge loop right over here. Again, press Control R, add one edge loop
right over here. So this way we can just easily select all of these
phases like both of them, press X and delete the pace. Pretty simple. That makes
it a lot easier for us. I will just decrease
the size of my windows. And with that, the is starting
to come along pretty well. I'll select this wooden plank, press Shift plus D and
press Z to bring it down. You can just flatten it up a bit and press S then Y and increase the scale like this.
Yeah, pretty good. Selected press control
apply the scale. Select the doors and
maybe move them up a tad bit like this. All right. So the overall look of the
room is pretty much done. We have to create
these sections, and then we can
just start working on the lighting and
everything else. So let's just start by creating this top compartment
right over here. I will just select this plank, go to object set origin, origin two geometry,
then press shifts cursor to selected so that I can bring the cursor point
right over here. Press three on the number pad to line up your view like this, pre shifte add in a
Que and let's scale it down to somewhat around here. Bring it down like this
and scale it up on the Y axis. Just like that. All quithi just press
one, enable Xray, press tab, and just move it
till the back like this. And yeah, we have created our pretty simple looking
compartment over here. Increase the scale
of it a little bit. Maybe I'll give it a
tad bit more thickness. And now just press Control, apply the scale, press
tab, press Control R, and add three edge loops, then hit right clay to
create four compartments. Now you can select all of
these faces in the front, press I to inset, press I once again to
insert them individually. Let's inset this
somewhere around here. And now you can just press
E and extrude it inwards. Add in a bebel modifier Let's suggest the amount
enable harder normals. And yeah, that's looking
pretty good to me. What I will do is I will just select this plank
plus shift plus D, duplicate it, squish
it down like this. Prestab. Let's press
seven for top view enable Xray and just select all of these back vertices and
move them back till here. Yeah, that's looking
pretty good. Press Controller
apply the scale. Yeah, that's looking
good. Let's add this now. So press Shift A once again, add in a cube, scale it down. Let's press three for the
front view of the room, enable X ray, and just place it right over
here in the corner. Let's increase the scale
a bit somewhere around here and let's just
move it correctly. Press S and X and scale
it down on the X axis. Something like this. Yeah, I
think this is pretty good. Next, what I will do is I will press again, apply the scale, presstab, press control, add Do right in the middle,
so hit right click. You can select both of
these faces once again, press I to insert
them like this, once again, just
extrude it like this. Pretty simple. Add
in a Bebel modifier, Enable hardened normals
and adjust the amount. So pretty simple stuff now, press tab and we can just
select these three faces. Press Shift D to duplicate them, hit right click and press B
and separate the selection so that we can create
these separate faces, maybe scale them up a
little bit like this. Go in over here and add
in a solidify modifier, and you can just
give it thickness in the opposite
direction like this. And, we have basically created
this wooden part as well. I'll set this to complex, and we do see some
issues over here. Let's move the solidify
modifier above the bevel and that
fixes our issues. And now it looks pretty good. Next, you can create this small wooden plank right over here. So just select this
one. You can press Shift plus D duplicate.
Let's bring it down. Press tab, let's enable X ray, and select it all and just
push it in over here. If you want, you can just also select this
part and move it up like this to create the
curved bit right over here. So you can do something
like that as well. Let's select it and just squish it in a bit like
this and move it back. Yeah, I think that is
looking pretty good. Next, what we can do is
we can start working on these tatami mats that
are pretty easy to make. Let's press seven for
top view, press Shift A, go to image reference, and we can add in this tatami Mat reference
image that I've added. You can use whichever
one you want. I think I will be
going with this one. So just select this press shift puss further to select it, press Shift A, and add a plane. Enable X ray, scale
this plane down and scale it according to this one. So just scale it up till here. And, I think that's pretty good. Press tab, press Control R, and just start adding edge loops wherever you see
these black line. Next, what we will do is
we'll just press two select, select all of these edges wherever we don't see
this like black line. So let's select all of them, press X and select dissolve
edges, something like this. So that you only get
the edges wherever we have like this or like
black colored part. You can select this one as well, press X and dissolve the edge. Now this way we can
just simply Press tab, and first press Control, apply the scale and select
all of these faces, press A to select everything. And now you can just
press I to insert them to create
something like that. And I'll just maybe press E
and extrude it downwards like this to create this sort of pattern and we can add a
devil modifier to this. Make sure to press
control, apply the scale. I'll just select this
image and move it aside, select your tatami Mat object, enable Xray, and we can just place it right over
here and scale it up. Or something like this, I think the size is fine. Press G in Z and move
it down right over here, just like that. Now we can just quickly go into the edit mode, enable X ray, and just select all
of these vertices so that we can just move them towards the right
a little bit and just fit it a bit more better. And with that, I
think we are pretty much done with the basic, all of the main
assets of our room. A couple of things
that I will do is I will just select
one of these plans, press Shift plus D to duplicate, and let's just create
a simple roof as well. So just place it right
over here, scale it down. Now you can press Tab. Let's
press seven for top view. Just select all of it. Press G then Y and move it like this. I'll also just hold
all, select this loop. Hold Shift and all, select
this loop, press X, and dissolve the
edge loops for now, so that we have
this kind of roof. Then we can press tab, press
three for phase select, select this phase,
press I to inset, and now just extrude
it like this. Now press Control R,
give it two edge loops, use your scroll wheel,
and then press STN Y, scale it up towards the corner. Again, add two edge
loops like this, press STN x, and scale
it up like this. This is basically a roof object set origin,
origin rigometry. Just adjust the
scale a little bit. Now, just make sure
to select it press Control A, and apply the scale. And you are perfect. I
think this is looking fine. Next thing that I will add
is we can also add these circular like things to hold the doors or open them
over here as well. So let's just quickly
select this part, pshifl select it, phifte
add in a cylinder, scale this down plus R then Y
and type in 90 to rotate it like this and just place
it right over here. Once again, you can just
press the dot number, the dot key on your number
pad to focus on any object. Let's place it right like this. Right click and shade or
to smooth this, press tab, press three for phase select, press I to insight and just
insert it inwards like this. I will just simply select it and add in a mirror modifier, select the mirror
object as this and set it on Y axis. Remove it on X. Basically, we can easily
create a duplicate. Let's press Shift plus D and
move it right over here. Remove the mirror modifier. Scale it down a bit because these ones are a little
bit smaller compartments. And once again, just add
in a miror modifier. This time, change
the mirror object to this and first set it to Y axis, remove it from the gg, now select it and just
move these ones to the corner like this. Perfect. That's looking
good. Again, select this press Shift plus
D and bring it out. Let's remove the miler
modifier, press R, then Z, type in -90 to
rotate it like this. And we can maybe place
one of them over here. Let's scale them up a bit because for the doors,
they need to be bigger. Yeah, something like
that. Now, select it PresifPlus D. Let's
bring one right over here, again, presi plus D and
use one right over here. All right, with that, all of the main assets of
the room are done. Obviously, we'll be adding
some more small props. But for now, this
is pretty good. Let's set up the
lighting now and then we can work
on the materials. Also, guys, if you're
liking the video, please make sure
to like subscribe. It doesn't help out a lot.
All right, so let's continue.
3. Camera, Lighting and Outlines: First, let's just quickly
set up our camera. I will also minimize this
reference image now. Select your floor, press Shift
plus cursor to select it. Let's press three so
that you can view it like this so that the
camera is lined up perfectly. Now press Shift plus A
and add in a camera. You can see it will be
added perfectly like this, so just move it up and
move it back over here. Press zero to view
through your camera, press zero on your number pad, and you can come over here in the object data
properties of the camera. Let's reduce the
focal length 50-35. And you can go over
here in the view tab, so press N and just
select this view tab, enable camera to view, and now you can
basically move around your camera pretty freely. So let's zoom until here
somewhere around here. Let's move it up a little bit. Now, just make sure to disable your camera to view so that you don't accidentally
move your camera view. Now we can come back over here. Let's go into the rendered view. So now our scene is all dark, so just press Shift
A and add a Sun lamp and the lighting setup is actually going to
be really simple, just one single sun lamp only. So now press R then X and
rotate the light like this. Obviously, I will
be using cycles. So switch to cycles,
set this to GPU. You can also enable denoise. Now just select your light and go in the object
data properties, and we can just select the
temperature first and decrease it because we are going for a really sunset type of scene. So we can set it
somewhere around 4,000 so that we get
this yellowish tint. Next, what I will do is
I will also increase the angle because if you will see in the
reference image as well, the shadows are
really, really soft. We don't really get to see these harsh edges of the window. So just increase the angle
over here so that you get, really, really soft shadows. So I'll increase it a
lot somewhere around 30, 35, 40, something like that. And now you can select your sun, like the sun lamp,
press R, the X, and start rotating it
like this so that we get like half of the room is
dark as it is over here, and half in half of the room, we get like sunlight,
so something like this. And now you can start
increasing the strength so that you get a
decent amount of light. And it also feels
like sunset as well. So somewhere around
here, I think, I'll increase the strength
a bit more. Don't worry. After we add the materials, it would be a lot more apparent. Let's pres zero to view
through our camera, you can also go in
over here and enable render region so
that we only get to see the area that will be rendered and nothing else.
And, yeah, that's fine. Let's add in a background
right over here. So press Shift tape and go
into image, select mesh plane. And in the textures
folder, you will find this background
image that I've added. This is basically like a
sunset type of background. So press R then Z, type in 90 to rotate
it like this. Or maybe I'll type in R then Z, type in -90 to rotate
it in this way. Let's scale it up, press
zero to view through your camera and just place
it somewhat like this. Obviously, we will be having windows over here so you don't have to worry about this area. We only really need to worry
about this area over here. L over these parts, we
will have the window. Also, as you can
see the image over here looks like really dark,
which looks pretty bad. So you can go in
over here and select Shader Editor and just select
your background image. And instead of plugging this
into the principal BSD, if you can directly plug this
into the surface over here. Select the color channel and
directly plug in surface. Instantly, you will see it
is a lot more bright now. So that is exactly what we want. And we do get this round
as well over here, so everything looks perfect. I'll select this principle
BSDF and delete it. I think for now, the basic
lighting setup is fine. So next what we will do is
we'll add some outlines, which will also give, like, a lot of anime feel
to our environment. So just press Shift A,
and you can go in over here grease pencil and
select scene in art. As soon as we do
that, you can see, we start getting all of
these lines in our scene. Go in the modifier section, and first, I will just
disable Grease threshold. So basically what ques
threshold will do is you can see we get a
lot of outlines right now, all of these extra
outlines as well. So just disable quease
threshold and you will get way more comic or anime
style feel like outlines. So just disable that.
I will also add in a thickness modifier and basically enable
uniform thickness. Now we can control the thickness overall of all the
outlines at once. So let's set this
somewhere around 0.001. Okay, that's pretty low. So 003. Yeah, that feels pretty good. Let's quickly just press
F 12, go over here first, and you can set the MAX
samples to something like 100 so that it
does not take long. Press F 12, and let's give it a quick render to see how
it looks. Alright, guys. So yeah, this is how our
render looks right now. I think it's coming
along pretty nicely. After we add all
of the materials, it will be looking
like pretty good. Alright, so let's continue. Let's close this, hit Save and start working
on the materials now.
4. Materials: So let's start by creating
the wood material, select any of the planks, click on New and
rename the To Wood. Press Shift A and add
in image texture. And once again,
if you will go in the texture that
I have provided, you will find this wood
texture just select it, and we can just first
directly plug this in and we get like
this type of look. You can select your
texture, press Control plus D to basically bring these two nodes and
select your wooden plank, press tab, press A,
to select everything. Make sure you apply
the scale first. And now you can just press After you've
selected everything, press U and just hit Smart
UV Project, and unwrap. So that we get a nice UV and wrap of A wood. I
think that looks fine. Now what I will do
is I'll press Shift and add in a huge
saturation node. Basically, this will help us to control the color of the wood. So let's make it a bit darker. So by decreasing the value, you can make the wood darker. And I will also make it a
bit desaturated, as well. Okay, one more thing
that we should change before we start working
on the materials is, if you go in the
render properties under the color
management section, make sure to change
from AGH to standard. It will basically improve
your colors a lot, as you can see over here
with the background as well with AGH. It looks kind of dull
and a bit cinematic. With standard, we get a lot
more saturated and, like, the colors are popping
a lot more and set the look to something
like medium high contrast. Yeah, that's much better. Let's select our
wood once again. And now what I basically want is the basic set of the
wood material is fine. Now what I want is I want to mask out the edges
so that we can show a little bit of edge damage as well to give it more
of that anime field. So there is a very simple
and easy way to do that. Press shifte and add
in a bevel node, press Shift again, and
add a dot product node. So plug this one over
here, press Shift again, and add in a geometry node, and now just take the
normal input from over here and plug this
into the dot product. Finally, you can just plug
this into Map range node. And we just need to
change the values a bit. So just change
this minimum value two minimum value to one and
two maximum value to zero. Now when you control
this particular value, so let's say I set this
to somewhere around 0.9 and plug this
into the base color, you will see I
have successfully, masked out the edges, and now I can just control
it by using this value. So now I want to use this to like in
combination with my wood. So to do that, you can just
add in a mixed color no and plug this into the factor and now plug the result over
here in the base color. For the wood, we can
plug this into the A. And yeah, as you can see, now we can kind of control this B color to control
the color of the edges. I will just change this
blending mode from mix to I think color dodge and just switch this to
like a white color. So decrease the saturation, maybe make it a tad bit darker. And yeah I think something
like this is pretty good. I think this gives us a nice
bit of feel to our wood. Also, I'll make the
wood a bit more darker. Yeah, that's fine. You can also control the
edges by controlling this radius value of the bebl. But I think the default is fine. Maybe let's increase from
minimum value to something like 0.95 97. Yeah, that's fine. Now that the material is done, we can just copy it up to all of the objects that need to
have the wood material. I will also just quickly
turn off my inart modifier, so turn it off in the viewboard. Now, select all of the planks that need to
have the wood material. You'll select this door as well. Now, once you have
selected all of the objects that need to
have the wood material, at last select this one,
which has the material. Now press Control L
and link materials, which will basically join them together and give them
the same material. I will just quickly reduce this from in value to
something like 0.92. And you can press
Shift A and add in a color ramp in between as well, like a color ramp node. And we can use this to control
the fall off of the edges. Yeah, I think now something
like this is pretty good. I will also select my
sunlight and maybe make it a lot more brighter. So set the intensity to
something like four, so that we get, like, a
decent amount of light. Next, we can select tatami
Mads, click on New, rename this first
material to just Tami, and we can give this like
a greenish type of color. Yeah, I think that's fine. Now you can go in over here
in the material section, click on This plus icon
and create a new material. Rename this two black, and I will just press Dab, select all of these faces. Press Control I to
invert my selection, select the black
material and hit a sign, so they all have a
different material, and now you can just
change this to like a darker color like
this. Pretty nice. I will just select
my floor, maybe increase the roughness a bit. Or both of the materials. And also, I will just press Tab, make sure X ray is enabled. Press two for Select, select this edge over here
and all these edges. Now press S and Y and
just scale them in. Make sure to select
individual origins and press S and Y to
scale them down like this so that they kind
of match the scale of the other lines. Yeah, that is pretty good. Next, you can select
the room itself, create a new material,
rename this to room. And this is going to be really,
really basic and simple. Just press Shift and add in ambient seclusion node and
plug this in over here. And now just control
the distance to a lower number,
something like that. And you can see instantly
the walls look a lot better with this
ambient digglusion node. And yeah, I think
this much is fine. We don't really need
to do too much. Yeah, select the doors now, click on New and rename
this material to doors. Click on this plus
icon to add in another slot and select
this black material. Press tab now once again. Let's just select this phase and press Control I to invert, select the black
material and hit assign. This way all of these ones get the black colored material, which is exactly what we want. I will also select
all of these handles. Just give them the black
material once again and you can press Control L
while all of them are selected and link materials. Perfect. Let's select this and give it the
same doors material and click on plus
icon and once again, just select this material
for the second slot. Press tab, select
these two faces, press Control I to
invert the selection, and now select the
black material, hit assign. Pretty easy stuff. I'll again, do the same
thing over here as well, give it the doors material, create a new slot and just press Control I once
again to invert, hit assign. Okay. Perfect. You can see how easily we can
add these materials. I will also select
my wood itself and maybe just make the color of the edges a bit darker because I think it's
a bit too much right now. Yeah, that's better. We can
also just quickly press F 11, press J to switch
between the slots and press F 12 to give it
like a quick render. All right, so this is
how our render looks. Yeah, it's coming along nicely. Let's keep on going
further and we can now add in the window part because
it is looking a bit weird. So select your doors pressure
flushes to select it, let's add in a simple plane, rotate it on the X
axis by 90 degrees. Move it up, press tab, and just select this edge
and move it right over here. Create a new material,
rename this to glass. And what I will do is
I will just select this principle BSDF delete it, press Shift A and add in A. Obviously, a glass BSD, but I won't be
using it directly. Instead, what I will
do is I'll press Shift A and add emission node. And just mix them both in.
So use a mixed shader. Now plug this in over
here and just mix in with a emission shader,
something like that. And now I will just change
the color of the emission to something orangish to feel a bit of evening type of
vibe, something like that. Now you can play
around with the factor basically turning it
to one will give it completely the emission shader and zero will be completely
the glass shader. So maybe somewhere
around 0.5 0.6. Like this. I'll increase
the roughness of this. And one thing you need to make sure to do is to
just select your glass and go in over here in the object data properties
and under the visibility, just make sure to
disable shadows. So that entire light
can pass through this. Like, it is totally up to you if you want to do it or not, but I will just disable shadows so that light can pass through. Now you can select
the frame itself, pressure plus D to duplicate
and move it up over here. Again, press tab,
select this edge, and move it right along
over here, move it up. This one is like
poking out a bit, so just fit that in properly. Yeah, that's looking
pretty good to me. What I will do is I will
just select this part plus shift plus D and duplicate
it over here as well. You can just bring
it in like this. All right. So now we can add some kind of pattern
over our doors, you can see in the
reference image as well. We have something similar. So you can use a texture
that I've prepared so press Shifte and add
in aimage mesh plane, select this scenery and just
move it right over here. And the way we mask it
out is pretty simple. You can just basically
delete this principle BSDF, plug the color channel
over here into a color ramp and press Shift A, add in a mix shade a node. This goes in the surface.
This goes in the factor, and now to basically
mask it out, we need a transparent node. So transparent BSDF and just
plug this in over here. And, now you can see, we have
masked out successfully, press R then Z type in -90, rotate it like this,
and just bring it close to our doors,
just like this. Maybe scale them up
a bit. Like that. Al pre shift plus D
and duplicate it. Maybe press S then x, type in minus one to
flip them like this. Or, no, I think this
way it was better. All right. Now, once again, I'll press Shift
A and add in the. Or instead, we can just duplicate this
super shift plus D, duplicate this, place
this one like this. And now you can just
click on this three to basically create this
into a unique material. So now we can just go over here, click on this and
select the scenery too. This way we can simply
replace them easily. Maybe scale this down
a bit and just try to fit this like that. All right. I think this
is looking pretty good. So with that, like the basic
setup of our room is done. Now we'll be adding some props. We'll add, like a small table, some like photos
over here, like, a small vase and a ceiling
light, and then we'll be done. We will be doing
some compositing.
5. Adding Small Props: All right, guys, so let's
create the sealing light first. We do have a simple
reference image for that. You can press one to
view it over here. Select this press Shift
pluses, cur to select it. Let's press Shift A and
add in a simple cube. I'll come back into
the layout tab. Let's scale it according
to the reference image. Press tab and just
bring it over here. Let's see. Now we can just make it a bit more thicker like this. So this will be the
main ceiling light, and we can just add now some
wooden lines around it. Select it first, go to object set origin, origin to geometry. Pre shifts cursor select it. Let's shift A and add
in a simple cube. Let's scale this cube down
and place it right over here and just bring
it down like this. Now you can add in a
mirror modifier to this and select the mirror
object as this cube. Bring it over here
in the corner. Also set it on the
Y axis as well. This way we can duplicate this. Let's again select this
press Shift plus D. Let's remove the middle
modifier for now, press R, and type in 90
to rotate it like this. Place one over here this way. And once again, just
stretch it till here. Scale it up a tad bit
like this and once again, add in a mirror modifier. Let's set this on the
z axis and the X, duplicate this and rotate it
90 degrees, just like that. Move it in a bit so that we get this overlapping wood type of feel. Just like that. Maybe make them a
tad bit longer. Now we just need to
duplicate them on the X axis. Perfect. Now our ceiling light is ready. We can just add
these extra details. So just select your Q, press tab, press three
for phase select. Let's select this phase,
press Shift plus D, and duplicate it out,
bring it out over here, press P, and separate the selection so that we can create it into
a different object. And once again, we'll
do the same thing, add one edge loop right over
here, add two like this. And it is like the
similar technique. Set dist bounding box, press STNxt, scale
them up a bit. And it's the same technique
that we used earlier. Instead, we can do something
even quicker as well. You can just add in a
skin modifier, press Tab, press A to select everything, and now press Control A and
scale it down like this. Move it in. And delete these word Cs to avoid
those extra ones. Delete the words, select
any one of them and select Mark root because I think I accidentally
deleted a root as well. Let's delete these edges too. Perfect. We get a similar look. Just move it in like this. Press Control A and increase
the scale of them like this, in edit more, and now add an
emirror modifier to them. Select the mirror
object as this, set it on the Y axis. Again, duplicate rotate
it by 90 degrees. Place it like this. This time, set it on the X axis. Perfect. Our searing
lights are ready. You can add in a couple of cylinders to sell
the look even more. We can put one at the
top, duplicate it, and put one over
here, scale it up, which is basically like to pull it and turn it on and off. Let's move this over
here in the corner. Select this presif process
to select it and add in or add in a cylinder
at the bottom. Like this. Pretty good. I'll select it all. Let's
move it right over here. Press zero to view through
your camera, scale it down. Let's see. I do want
it visible in my view, so it does not really matter what exactly the height
of your room is. You can place it somewhere
around here like this. Yeah, that's fine. Maybe I'll add this pattern over here
at the bottom as well. So just duplicate this and
remove the mirror modifier, rotate this on the Y axis by 90 degrees and just move it up. You can press seven
for top view. Let's enable Xray and place
it just about in the middle. Press tab and increase
the size of them. All right, so now our
sealing lights are ready. Let's look at them
through the camera, go into the reterview mode. First, I will select
this back thing and add in a new material, rename this to ceiling light. And basically, this is going to be like emission material. So add in shader and just control the strength
to whatever you want. You can also control
the color as well. But let's keep
this add one only, and the rest of the
objects can have the obviously the wood material. Select them all one by one. This is well, and now you can
select any wooden object, press Control L,
and link materials. Simple. Maybe what I'll do is I'll just select all these And before you
actually do anything, I just want to join them together so that it is
easier to manage them all. What I will do is, I'll press F three and select
Convert to mesh. Basically, this
will apply all of the modifiers so
that now I can press Control J to join them all
together into a single object. And the reason I'm doing
that is so that I can just click on this wood material and create it into a new wood material so that I can just switch
up the color a bit. So I will decrease the saturation and decrease
the value as well a bit. Increase the roughness and decrease this edge
value as well. We don't really need too much of this edge damage over here
on the ceiling light. Yeah, I think this looks
much, much better. Let's keep on adding
a few more props. Let's press one for
the front view. Press Shift A, go
to image reference, and select this vase. And once again, this
is pretty simple press shift process
to select it, press Shift A and
add in a cylinder. Match it right over
here. Obviously, it does not have to be perfect. We just need the
overall shape correct. Rest everything can be
like roughly right. So you basically just
select this top loop, press E to extrude, and then we can press S to
scale it up and match with the reference image
and just repeat these steps extrude and scale. All right, so now
our vase is ready. What we will do is first press tab and
select the top face, press X and delete it. Right click and
shade auto smooth. If you want, you can add in like a subdivision surface modifier as well to make it a
bit more smoother. Select this bottom face
press I to insert this to just fix this weird issue.
Yeah, that's much better. And we can now just select
it, move it right over here. Let's press seven
for top view enable X ray and place it
right about here. Press zero to view through your camera and
just scale it down. Although in the reference image, it is pretty small, but we'll keep it decently big because we do
want to fill up some space over here
because it does look like kind of
empty. So yeah. We can now click on
New and just remove this principle SDF
and add in tune SDF. So this will give
it like manga type of comic book type of shading. Select glossy and increase the size to one and just change the color to blue.
Something like this. I'll just desaturate
the color a bit. Yeah, I think
that's pretty good. Next, we can add in a table. So press Shift and just
simply add in a cube. Let's move this cube
right over here. Let's scale it down
on the z axis. You can come over here in the
solid view mode. Like that. And yeah, I think dismuj is
pretty good for the table. So I will be creating it pretty basic R Shift plus
cursor to select it, pre shift, and add in a cue, and these can be
like the table legs. Just place them over
here in the corner. Next, you can just add in
a mirror modifier to this and set the mirror object as this cue and set it on X and Y. Press tab, press one
for Wort select, and you can just select
these two vertices, press M, and merge
them at center. Again, select these two, press M and merge them at center. This way we can create a
slight leg like looking shape, select this vertice,
press G then Y and just move it
out a bit this way. And we can now finally add in a subdivision surface modifier, add in a couple of edge loops. O here as well. Create a bit better shape
for our table legs. I'll just quickly select
these back vertices, scale them up like this.
Yeah, I think that's fine. Sp slash to come out
of the local mode, select them both and bring
this down right over here. Yeah, that's good. Maybe I'll just press
Shift plus D to duplicate, press S then Shift plus Z, to scale it up a bit
more so that we can have a bit more detailing
with that table. Now just select all the
objects of your table, then select any of
the wooden plank, press Control L, and link materials to add the
materials over here as well. I'll once again just select
all of this, press F three, convert to mesh, and press Control J to join them together, just so I can again, create a separate
material for this wood because I do want a bit
less saturation for this and a bit less dislike
edge damage as well. To reduce this min value. I'll increase the value a bit to make it a tad bit lighter. Let's try 0.05. And now I will just
increase the hue a bit of this to give it a
different shade of wood. I think this looks pretty good. Maybe I'll do the same thing over here as well
with the doors, select them both and select
these two wooden objects, press F three and
convert to mesh, then risk Control J to join
them together and just basically change the hue of the wood just a tad
bit, not a lot. Just so there is a slight bit of variation in the environment. So set this to 0.5 free. Yeah, that feels
pretty good to me. Also, I'll come in over here in the color management just set the contrast to
medium low maybe, or I think to medium. Yeah, that works a lot better. So the last props that I
will be adding are like a couple of frames that we
can add over these walls. So just press Shift
and go to image, add in ams plane, and
you can select this one. So basically this simple scroll. Press tab, press two for it
select, select this edge, and you can now press G
twice to slide across this edge like this
to basically crop it. So press G two times and just basically slide
your edge like this. Yeah, pretty good precious
process selected, and we can just
simply add in a cube, scale this cube down and match it according to
the scroll itself. Let's hide the camera for now, select this cube again, scale it up, and this can basically act as
the frame behind. Decrease the thickness of
it on the excess like this. Yeah, that's pretty
basic and simple. We don't have to do too much. Select this and give
the wood material. Now, select these two,
place them right over here, maybe scale them up a tad bit, and just move them back. I'll do the same
thing once again, press Shift and go to image. Add a mesh plane and
this time select this. We can just select this
frame only, duplicate it, bring it out over here.
Let's select these two. Press slash to go
into the local mode, and over here in the solid view, just place it like this. Select it all and move
it right over here. Yeah, pretty simple. Now we
have created both our frames. Press slash to come
out of the local mode. Let's place this one right
over here. Yeah, pretty good. You can also select these two and add in a huge
saturation node in between. If you want to, like,
kind of control the darkness or lightness
of these textures, you can control
that using these. And with that our
environment texturing. Everything is done. We can
press F 11 now, press Jade. And press F 12 once
again to render it, and then we can
now just basically press Jake to compare
between the two. Let's wait for the render
to finish or at guess. So the render is done now, I think it looks pretty good now. And with added compositing
and everything, it will look much better. One thing that I'm noticing is that these lines are
appearing over here, which look pretty weird.
So just select them all. We can just join
them together so press Control J to
join and go in over here in object properties and under Line art, just
select exclude. Any of that is
going to fix that. Let's give it one more
render so that we can use that for
compositing or at gas. So the render is done now. Now we can just switch over
to the compositing tab.
6. Compositing and Final Polish: New and you can
create this divide, set this to image editor, and set the render
result over here. Basically, this is to see all of the changes
that we are making, we can see them
update over here. The first thing that
I will do is I always do that add the Kua hara node, which basically gives that
animate type of field. Also go over here
and set this to GBU so that it is
like a bit faster. Press shifty and now add
in the pasteurized node. So the pasteurized node
basically adds this type of effect and we can adjust this value and
increase it obviously. Let's go for somewhere
around here. What I basically want to do
is I want to mix them both. So plug this into a mixed color and now plug this into the B, and now this can
go in the result. So we get this type of result if you control the
factor value now. If you put it at one, it is basically entirely
the pasteurized node, and at zero, it is basically
entirely the Kua hara node. So we can set this
somewhere around 0.2 because we don't want too much of this
pasteurized effect. I'll set this to something like 25. Yeah, that's pretty good. Now, you can just select them
all, and when you press M, you can basically
turn them on or off and you can see
the effect they add. Instantly, it gives
it a bit more like painted type of look instead of giving like a full on CG look. Maybe I'll just increase
it a bit to 30. Let's see. Yeah, that's fine. Next, we can add something
like a glare node, because obviously we
do need a bit of glow, add a glaer, change
this to fog glow, and now just decrease
the threshold to something like strike 0.3. Instantly, you'll see we get a lot of glow in
our environment. If you increase the glaer size, we'll basically get that
dreamy or hazy type of look, as you can see. You can just select this again, press to turn it on and off. I think I'll decrease
the threshold even more so that we get
even more glow. Yeah, instantly, you can see it gives it a way more
animate type of look. Yeah, we can use
something like this. Next, we can press Shift and add in maybe a
soften filter node. So add this. Basically, it will soften up
some of the edges. You can decrease the value
of it to something like 0.5. Yeah, that's fine. We also have a couple of
nodes over here. You can add the vignette
if you want to. Basically, it will create
darkening of the corners. You can just decrease
the factor to something like 0.2 or 0.3, so that it is really faint. Basically, it creates
more focus at the center, but I don't think
I'm going to use it. So let's just remove that. You can also use this
chromatic aberration, which I think most
of you might know. It basically creates this
splitting type of effect. It does not look that great
in, like, large amounts. So just make sure to keep
it at a very low number. Something like 0.05 if
you do want to add it. I don't think I
will be adding it. Yeah, Okay, let's just use
it. It does not matter. You can also use
the sensor noise, which basically adds these
tiny particles of noises. You can definitely use that,
but at a very low number. So again, 0.025 and
this one at 0.015. So really subtle, but we
can definitely add that. One more thing that I will
do is I will add in like a color balance node to
basically control the shadows, mid tones, and the highlights. So gain is for highlights,
as you can see, I will definitely
increase it to 1.1 maybe. Maybe a bit more 1.2. Yeah, that's fine. And for the lift, again, I
will increase it. If you increase it,
basically, the shadows will get less contrasty. So not that much like 0.01. Can just select press
to mute the node now, and I think it is a bit too
much somewhere around 0.004. Sorry, zero, 04. Two zeros. Yeah, that's much better. And already you can
see compositing does a lot of heavy lifting
with these type of renders. If you just select
it all and now press to turn off the
effect of compositing. You can clearly see that it adds a huge effect
on our renders. What I will do is one thing
that I want to do is just increase the size of
these searing lights. So let's just do that quickly.
Yeah, that's much better. Press F 11, press J and press F 12 to basically give it a new render. All right, guys. So the render is done
now, you can press J to compare between the
older and new one. And I do think the
bigger searing light does look a little bit better. So yeah, I'll be
going with that. And if you come back
to compositing now, you can add a couple of
more nodes if you want. Like, we can add in a
huge saturation node to basically give it
different types of vibes by changing
these values. You can also add in like a brightness contrast node again to change all these values, you can do all different
types of image adjustments. But I think in Blender, this is pretty good
for compositing. What I will do is
I will just add a couple more things in
Photoshop to take it to, like, one another level, like adding a bit
more final polish. So you can just go in over
here and save your renders and let's bring this into
Photoshop. All right, guys. So we have our render
over here in Photoshop. I will just quickly
right click over my layer and convert
it to a Smart Object. You can go in the filters, and I will just add in a
sharpen more to basically add, like a bit of sharpness
to the render. I think that looks pretty good. It makes the details
look a lot more crisp. Next, I will go in
filter once again and add in a camera of filter. And I'm not going to do too
much because you can do, all sorts of image adjustments in this one single filter only. This is like a mega filter
with all of the effects. I will just increase
the texture a bit. So as you can see,
if you increase it, you get kind of free detail if you increase
the texture a lot. We don't want to increase that
much somewhere around 30, 40. That would be good. You can also play around with
the clarity value as well, maybe decrease it or
increase it just a tad bit. And obviously, yeah,
you can do all sorts of things with the contrast
exposure and whatnot. But, as I said, I won't be
doing too much over here. We have done enough compositing. You can just turn
them on and off. And you can see they add a bit of free detail over
here in our render. But what I actually
want to do is just basically add this
sunrays effect. So if you dragon drop this
texture that I've also added for everyone in
the Link in description, you will get this Gadays effect. We'll use this to our
advantage like basically adding these rays in our render, you can just place
them over here, press Control D to
bring this and you can just place it around
something like that. And what I will do is, first, I will just add in a filter and go to blur and add
in a Gaussian blur. And just increase the radius of it to
something like that. Now, to make it look
good, obviously, you can change the
blending mode from normal to color dodge. And instantly, you
will see you get that anime type of sunset globe. So maybe just scale it up a bit. We don't want it
over all our render, just over this area.
Like that, maybe. Yeah, as you can see, instantly, it makes it look a
lot more better. But we do want to decrease
the opacity a bit. So something like maybe 60, 65. And yeah, you can see
that it will add, like, a lot of that final
polish to your render. And now it looks like,
really, really good. One another thing that
you can do that will make your render look
a lot more like anime is that you can just
click over here to add a new layer and
just take your brush, switch to white color, and paint over your
Ceiling light. And after you've done
that, just right click and convert
to a Smart Object. Good filter again, caution blur. Not that much. Let's
just reduce it up a bit somewhere around here. And now, once again, you
can play around with the blending modes to maybe
change it to something else. But I think even
normal works fine. You just need to tone
down the opacity. So it will add like
this nice looking glow over your ceiling lights. And yeah, I think I'm pretty
happy with the render now. I also added some of
these small props later on to make the scene
a bit more detailed. I did not add this
part in the video because the video was
already pretty long. So yeah, if you
created all of this, you can definitely add these
small details as well, like these books or glasses and everything just to make the
scene a bit more lived. And yeah, guys, this was
pretty much it for the video. If you want to check
out the full version, you can do that on the Patron. I have a lot of other
stuff over there as well, like some of my
advanced Anime courses. So yeah, you can
definitely check that out. But this was pretty
much it for the video. I'm definitely very happy with the results
that we have got. And if you like the video,
please make sure you like. And subscribe. I have more
videos like this coming up. I also have, like, a small
series building up of these, like, anime type of scenes. So if you want to check
them out, you can do that. And yeah, thank
you for watching. I will see you in the next one.
 Aniket Rawat, 3D Artist