Transcripts
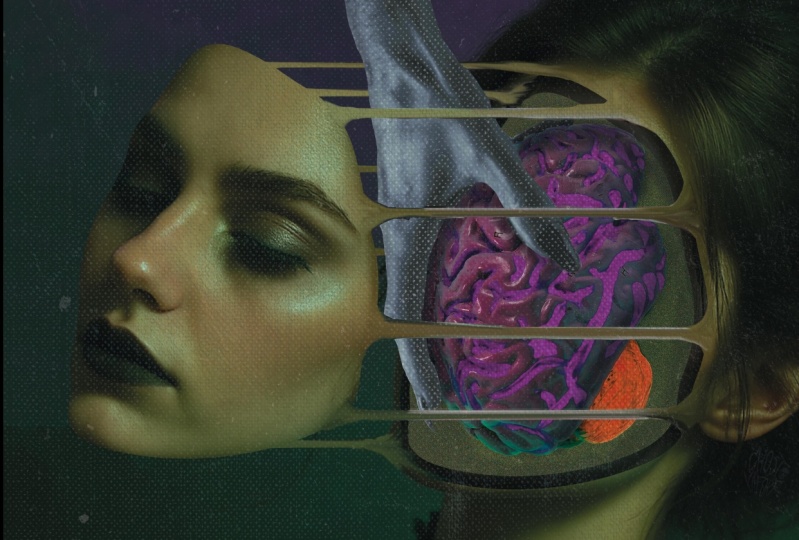
1. What will you learn and create?: Hello, my dear Polish up magicians, Welcome to the course In this closet we learn how to create this stunning artwork. It got lots of love from my instagram for lovers thousands off likes and everyone just you will learn how to create this step by step. You will learn how to cut out the face from the head, how to bring it up. How to create here. This liquid stitches together that connects ahead with the face, placing the brain into the hand and working with shadows to make it look more realistic. If you're tired of creating before the boring artworks and you want to do something that will make people go like, wow, how did you do that? So that you can look them in twice on answer for a shop magic. And whenever you have any questions, you can just leave them in comments. I can just message me at my instagram frets underscore gallery with that set C in the first Listen, my dear for a shop magician. Bye bye
2. Cutting out the face: Hello. Hello, guys. Welcome to the first lesson. Wow, this is refreshing because I usually record tutorials for you to pound recording a class. It's something that is more like a slower pace, so we can have a chat. You know, we're going to use this images here. This is the first image. Then we're going to exist. Emission, Michelle for brain. And also, this image we're going to is here for hunt to hold the brain. And you can find this images in the project. Materials are hive. I'm sure you will. See is going to be pretty obvious where to download some. Okay, it is. Of course. What? I haven't done a lot of them, huh? I forgot. Let me just click. Download were quick boom chicka boom. Now let's go to for the shop. And let's just create create new Because, of course, we're going to sell with an empty project and hear what he Actually, it's so be it. Here which 1000? Okay. Make sure it's pixels selected. No, they're into girls pixels. Height 1 to 50. Results in 300 pixels. That will make sure that we have a good quality. Okay. Call remote RGB color. Very important on was that Settler just click create. So now let me just go on the importance image. You can just take this on Boom! It's inside the forest And now with me, Just make this bigger so again can just click here on drag and then just click and dies a little bit to the left to make this like that, so insistent. Or I will assume that, you know, some basics of photo shop, you know, like make stuff bigger, smaller, how to rotate and other stuff. So that's why I will skip this details because that's like the basics, the very basics and also how to use masks. And now we first for me to rotate his face So it looks kind of like that or what we do can go here on the click on Rotate like that on religious makes this bigger boom. It's rotating this side. Let's make it even bigger, like that home chicka boom and outward to is there left, so this should kind of work. So we're going to put this part up on the brain is going to be here, maybe it down. So we have more space for his face to bring it up. Just click. OK, so now the first thing that you notice is that Oh, we have here an empty place. What are we gonna do? Oh, well, don't freak out, okay? It's pretty easy. We create annular under many different ways to, you know, get rid of this white space there. But there's this one is probably just to go here. Click right button, you sport healing brush toe on before you use it. Make sure you have content there were selected and also sample alerts selected. Now, let me just make my brush with bigger under here If I just click andro on this part easy. You see, just trust me, guys. I know what I'm doing. Now we need to go here, and I will start by cutting out his face for that. We're going to use curvature print off. Let's click right button here and here you go to your first normal, tantalizing curvature. Parental. Here to the sword, if you don't have is that Mr Partnership is too old on you need to update it. Okay? This tool helps us to automatically create curved lines. It's where and where it was full. Think Because if you know, this penalty can just use Pento if you want, but I'm gonna do it with this one was great courage. So I character Pento before you do anything, go here. Make sure you have passed selective. And also make sure this is set on combined shapes. Now we can start. So if I just start from here, I will start from the chain. I don't know, I just for some reason, but who cares? Right? So if I just started clicking here Oh, on very important thing I just noticed here on the changes we exist live here. We'll try to get rid of that. So that's why before actually cuts his face, let's actually go back to Atlanta, where? Let's select again. This sporting brush toe a listener makes a small little bit religious, not get rid of this because we don't need here. Just get rid of this because we don't need here boom easier. And now, before we cut out, anything will actually have to make this to work together. So if I just click on this one and then I hold control or common trick on this one nice. He can see both of them are selected. I click right button and choose Convert to smart objective. Now they're one object just like you and me. We're together. You know, our minds are connected because I'm teaching you under You go to any, right? So anyway, uh, let's just like parental Now, let's go and start. So if I just click boom, boom, boom who boom, boom, boom, boom, boom boom like that if you don't like anything, can just always go back. So just, you know, if you rotate, it's years under, you know, we can use the whole keep just this one. Let me just go back on. Let me try to do this one more time. A little like that. Okay, Now, the thing is that we will have to, um, go over his nose most likely and lips, too, because you're going to lift up the middle part of the face. Which means we can see only their borders is on this part. That's why we cannot cut out the notes. So that's I just imagine. What would the borders beep? And if I just go like that here like that, Exactly that on. Now, when you have done this, just go to selection on click. OK, now we will convert this past in tow selection, and now we can just click here, create mass home ready? No, of course we're not. So you got scared, right? Don't worry. Don't know what we need to do. We need to create a copy off this. And that's why we actually to make sure we include the mouth Onder not Mother knows on the mosque into the selection. So for that reason, we need to go here. Boom. And then we just start to draw over there knows on if you see that it's not aligning. You can just click here for double creating your point and then bring it ultimate up like that with the same talk. I know. Just continue. I just go like that, going around the nose. Okay, We can just finish this over here now let's go to selection. Click. OK, And now let's just go here to our image on click Create mask. Kabul were ready? Yeah, it's stand off course it's not. Come on, guys. Did you think I'm for you? We still have so much to do So what we need to do right now is actually create a copy of this initial. Just click right button here somewhere in the empty space on duplicate layer and just click . OK, come on. Now, we just need to click right button on this mask. Not only damage part owns a masked freak red button and choose the little air mask. Okay? Because we don't need it. So we ended. Only owns the 1st 1 And now that means that if I take my move to and if I go here to his face, I can click on drug and bring his first up. That's what we wanted to do. All this go back. Actually, now, now it's like this mask, not the image, but the mask on. We need to inverted, Which basically means that we need to include everything except this selected plot place, part place on how are we going to that? Like the mask. And then you go to properties. You're going to see here properties off the mask and we can just click in where Boom, chicka boom. And as you can see for closes, we see that these are two different masks. Basically the opposite. Right on. We can even see here seen land separating our face from the rest of the head. And if I just like that removed toe and click here and I can just drag this up like that challenges bring it up somewhere here on. How awesome is this, my dear friend Seaters! So now there isn't what we seek your white, because we have here is this background will just take this on. Bring this straight to the trash bin because it's so useless. Okay, that's it for our first lesson. Make sure to save this. Okay? Because if you don't say that, you have to be everything to gain, which is paying. Wow, that was a good right from Riff Marie from reform. Anyway. Good member. Right? So you guys in the next lesson Bye bye.
3. Completing face edit: and welcome back. My little for a ship. Magicians. So what we did right now? First, let me fix this place because it needs to be, like, a straight line here. So let me show you what I mean. Okay. Okay. Oh, yeah. Let me show you what I mean. They look here, we see that we see the border off the face, basically, you know? Okay, that was not the best example. Let me show you somewhere else. This. Where's that? Yeah, if you look every so that we see the border off the streets. That's what went to the right now. So we need to make sure to be happier board off the face how we're gonna do that. You asking me? Well, let me show you presently gave me just like the curvature parental. Okay, on we have to start from here. So if I just actually, we can also start from here. So now let's go here. Click right button and choose. Disable their mass for now. OK? We don't need it for now. For example, if I start from this north lies and if I just try to imagine how would the border looks like you know if he would go beyond his nose. So for that girl, if I just go like that here, here, here and here and here. And then we can just go here, for example, Onda collected. So now we have down this logistical to selection and click selection on. Okay, Now it's actually click right about statues or enable wear masks. So now what we see here we see basically the border that we need to at up on. How are we gonna do that? So first of all, you to bring this myself with up this social. I mean, I just like this still, for example. But I can just come here. I just like this rectangle marquee to also make sure to select this here. And now if I move my mouth over to the selection, I can see the movie selection toe. They can just click and like, so you have to make it kind of, you know, align with the line. So as you can see here, the line goes on. It has to align with. So I'm basically it has to continue on. The same applies to hear what we can fix here later I know when we have this mistake or brushed. Oh, okay. On the make sure you have white collar selected Whom white color? Here. We can just, you know, switch between black and white like that. We need white on now, if we can, if we just start grow. But we need to draw on the mask. You need to make sure Damascus selected if I start drunk. Look, what's gonna happen when I drove. Only do inside the selections. That's because I have a selection on it. Helps me to draw on Lee inside this election. Makes sense, right? I know this may sound a little bit difficult, but if it is difficult for you, just go over and try to repeat this. Okay? There's going to be so useful for you for all of your future projects. And I have this back on there isn't why created or this selection with the courage of parental. Because, like that, I can actually have this where where is small. So the border is going to be smooth. Okay. Under analysis, go to select on their select on Now, we don't need to make your adjustments, which means I need to take my brush toe on the make sure hardness is 100%. And also, I mean, I make those small I just need to make knows this slow like that much beautiful there, the straight line. But now we need to get rid off the north on the lips and create the board off the face. Man, early on, how are we gonna do big, big secret thoughts first create in your Empta were Just click here across we have in your toe and now I'm gonna use close stump toe So if you just go here, click right button and choose Constanta We can just click s the hokey boom. This will help us to copy and paste. So that means, for example, I can cope is this pink area and I can pressed it Tasted here to remove the north. That's what we're gonna do first. Okay, on for that again. Make sure hardness is ah percent actually actually can make that with smaller like 80% The Celtic bigger make sure sample his own sample wears this 100 is also 100% and I if I just hope all for option B facing Mac when you hold it. You see this kind off circle Basically like a circle for our Oh, you know, and I can just click Boom. That means not have copied this place. And if I start during those what was gonna happen, I drove here. Okay, I can draw like that on There isn't where we seize this and this things here because it's kind of coping from here to here. That's why BC apart off the flowers over the flowers. Yes. So if you don't know how stample worked off the this is too difficult for you. Just just go to YouTube and search Stanfel for the shop on. It's pretty pretty easy to Okay, so just those again again I hold off corruption click Boom. And I can just, you know, go under removes this part again like that under we can just do it again. And right now I just want to remove this thing here again on I want to remove this here and again. Okay. Don't worry about these. Things were going to fix everything worrisome. Let's make this smaller what I wanted. And I want to make sure that the line is straight. So basically, if I just again copy on. I want to make it like that. Whom on I can just continue on and I want to copy from here, actually on corporate to here and again make it smaller beyond a against good. Nothing they have that done. I need to make sure that this board we don't see this weird stuff here on for that we can, Actually, what we can do is actually pretty Is it just make this really, really big cape, so brushed. Make it really big. Make hardened 09 If I just again copy here and I start drawing on the border, As you can see, I can just get rid over the border if I just copy from here and draw it here and there isn't a get rid of that because I have on my bar on my brush hardness zero, which means that is, is going to blend with the border. So basically, when you make a direct, you can see it's really, really blurry on the edges. Here, we can see that that's what's going to blend with it. So I do the same here. Copy and just boom, boom. Just quickly, quickly on Douala. It's gone almost like it. If it was never there, I thought we did the same Now toe the edge of the face because we need to make sure that on we don't see the nose and lips and agreeing to see only the skin on. How are we gonna do that? Is that we're gonna just copy the skin and put it here. So basically, let's go here. Creating him to where he low the this layer, which is basically the pink color. And we can actually call it pink background. It's called, Okay, there's going to be placed border, and I want to make my brush smaller on If I just lets a copy from here just hold off or option again. Boom. And I can just continue drawing on this. What I'm gonna do now for the rest off this video. Probably because I need to make sure this is all one. I can just you know, Cokie from here and draw it here. You can just copy from here Android here to make sure there is the line. And again just continue so on. I'm just gonna go coffee from here. And if I just drove. Look what could happen. We kind of get rid off the eyebrows. Just a dribble of them. Thought we just take my brush tool now on. I want to sample this image here. This call, I mean, and if I just hold, which means I drove for two. Okay, I can just click here, for example. Boom. That's against him. No, I have sample discovered here, and if I just drove right now, what's gonna happen? I can just drove with this call here. So guys is going to be really difficult one. But don't worry. We're gonna go through this together, so we need toe copy. Like, for example, is the normal part of the skin. By normal, I mean the part that is not our advising those almost basically just simple skin. We need to compete toe the on the mouth owns the north, so we don't see the mouth or the nose for that. First of all, with the stamp tool, we need to make sure priced result down, Let's say, like, 30% of wars also went down, like, 20% under. Basically, when we do that, this numbers it helps us to draw where where is slow? So we're level when withdraw It doesn't play all the color it once it applies the color where you worry slow. Okay on that happens to make everything smooth and you will see what I mean. And now also make sure hardness zero person I'm not exemplify just cook makes it big guy Corpus This parchment rolled over here. Look at that. The kind of getting rid of the border. So our goal is to get rid off the borders that we see here. For example, you can diseases, borders. This is border because we can clearly see that they're different on campus in here again. Copy on just Drover Copy and just drove over like the copy and just do over like that and we can actually make a fast, a little bit higher. Let's say 50% to make this go faster form. And if I just zoom out on, I can look at the progress if it's looking good or it's not looking good. Okay, If it's looking good, we can just continue again here very far, Smarter as you can see it now, it's the only the skin share, which is good enough. Just continue to do the same thing over and over. I wanna corpus is here, but we just continue again here that I broz finally. So not guys. This looks much better. And now it looks like a just part of the skin. Basically off course. It's not perfect. We could make it better. But is that your first time doing artwork? Which is that difficult, even spend so much time on it. Otherwise you will get really tired off. Okay, So let me actually saves because I didn't say I told you to say what? It didn't do it myself. It's what all teachers usually do, right? They tell you to do something, but they don't do it themselves, huh? Ana? Where should? Okay, let me say this here. I'm gonna call it Brain in face tutorial. Now, when we have done that, would I want to do next? Which is going to create? Where's artwork that we're trying to copy? We're going to create the three d part. We're going to connect the face through the I mean the head to the fish with the face of the face. So basically, this is this. How are we gonna do that? Well, let's see. The first I'm going to do is we need to get rid of the background. Basically. So let's just select all of this three. So if you just click consistent and they hold shift, click on this one. As you can see, all of them are selected on ledges. Go here and click on group. Whom now they're all in the group. Allegis, Click double on this so we can rename it, which is going to be just ah, human. So that's just called human. Okay. Now, with me to let their turn over the face and let him actually related to praise as well. With not off. I want to select everything except the guy. So let's go here. So there's go click right button. I select quick selection to make this bigger A knife. I just tried Toe Select, whom it doesn't pretty OK job. I would say if I select again and one more time. Okay, that's it. We don't need to, you know, change. We don't really need to select all the background. So for level this part, this part, we can leave them. But what we need to make sure is that we don't select the border. Okay, that's very important. So now that's why if I go on so like the minus took, I can just get rid off the borders from this selection like that. OK? And now let's go to our group and click create, much as you can see Now go going to do We just need to invert the mask. So again, with, like, the mask we go to properties on, we click inward. Boom! That's what we both turn on the face cape on. And I think I should actually stop here on this one is already pretty long. And I will see in the next guys, I will see you the next lesson. Bye bye.
4. Using Smudge Tool: What's up, my dear? Little for the trip. Magician's magician. Magicians. Welcome back. Let's crash this thing. Okay? I'm not talking about you left. Don't this through your laptop, okay? What are you doing? Stop. Cash should concentrate. So now it's going to create a new empty where room the ways to be between them. Basically. So it needs to be above this in nature. But below this one here, I'm just gonna quotes much because we're going through the tool called smart Stow. So if you go here, click a button and choose much toe. This will help us to drag things. So, for example, mystery up Central were selected. Make sure strength is, let's say, around 80%. And before you actually drag anything, Okay, before you do anything, let's close it. Um I wanted to choose the right back because my brush, as you can see, is not circle. It's a different shape. We can sit here to choose this shape off brush. You need to go to window and select brush settings. Okay on. I already have it here this one time. If you just click on the brush distinct to open this and here can find right brush settings on Just click consists not the circle, but this one boom. But because is on now if I just start drawing Look, what's gonna happen pool? Because that I can Just much stuff and just goingto just going to do whatever I want to do , you know, just like that. But let me just go back, back, back, back. Need to create straight lines. Boom, boom, boom. For the first off, while I used to be able to rotate my brush if I just click right button on the mouse, I can quickly open the brush that thinks money. I can rotate brush like that as against notch working to a different site. And now let's actually start from here. But here's the problem. If I start using this brush of this much brush tool just from kill it, I want to connect this to this. I just drove like that, But what's gonna happen is going to connect this as well, because we are like drawing on this part as well. But we don't want you know, when I want to go, I want to make sure that I don't destroy this. Please hear. That's let me go back. Reasons when we drove. When we use this, Marshall, we will have to turn off this place here for driving by. To enough. Of course. I mean, toe height verified. Click on this group and I click on again and as a group. But if I just take this group and I bring it here down toe group, I can boot facet cancer. Now, I put this group inside of NASA grow. So now there is basically one group and they be open, isn't there is another group and they re opened. And then we have a really mature. Why did I do that? Let me actually closes now. I can create the mask. Okay? And I can use rushed over his back. Our get rid over this part or not. Only for now. Okay, both me. Just also make sure your hardness is 100% me. Just get rid of this. Make sure drawing on the mask. Do not wanna have get rid off it. You know, I can use much to connect this part to this part. And then when I need this part again, I can just go here. Click right button and choose disable wear masks and I will see the game. That's how easy it is. So let me just grab about financial, enable wear mask on Goto mice much later and flex much toe and start. If I just start from here, let's say whom I just realized that by accident. I made this transplant that you can see. That's why if you open the group and then as a group, this one here, where we're doing the background, I can just use white collar with my brush tool and canned. Brings this back because this is part of his face. Close this. Go too much. Um, if I just click on drag look like unethical conduct, But what's even better? I can actually make straight lines How? Let's go back If I just click here, actually, start from if I just click here, boy, if I Okay, this needs to go a little bit to the right. I can connect this place to this place so we just take the move wandering through the right . Lt. A bit like that not should be fine if I take it may be out with you so you can just use arrows on your keyboard, you know? So let's go to this much later. Let's take this much to Onder. Now if I click here once, boom isn't a whole chief and think here again because we're gonna happen. Boom! As you can see, the automatic draws a straight line. If I didn't go to the top pose were to drag more and more. So we're gonna have to click here boom and again. Shift on boom again. I have to click here once again the whole trip and click again here on Boom and, as you can see, is dragging from there to here. Anything goes here. Now again, I just need to click on drag, Click on drag, Click on drag, Click on track Boom Allegis. Do this for a while, Create all the lines that we need to create like that. Another line. One more line on the last one, Provo here. So now I can see that, um, this is not in the middle of the whole artwork, is not needs the middle, and that's actually a problem. That's what we can do. We can just, you know, so, like, this whole shift and then select this as well, and I everything is selected. We can just go to edit free transform. And now you can just click on being everything to the left a bit like that. So make it more. Is a middle boom much better. And this body can just remove like manual. It's pretty easy. Let me just opens this on gear, for example. I can just take make sure you your drink on this mask. I can take my brush. I can take black color, and I can just remove this part here, and we don't actually need to remove it because we're going to show it anyway, So it's not that important. But anyway, to actually save this, what went to not before we finish this lesson is that we need to connect this part of the face tothis lines here. So again we integrate and as a smudge line, which is going to be now above this face again, we take hours Mashtal a knife. I just started digging with what's gonna happen. I can make that with small. I can start dragging you see nine connecting this to this and again, click on Jack home A. Now they're so connected like never before I let Maxim is that with smaller begin to supplies to hear a swell, we can actually no do something manually like that as well to make it more interesting and again like that. Now this part keep We don't need to do this because it's kind of on the other side of the face, so we don't really see it, you know? And what we else need to do here is we need to work on this place is so basically, what I want to do is I can make this like that. That's what I wanted. I want to smudge Toby moralistic, which means it has to go from the sites as well. This borders there too strict like they're too edgy. And to be more around in a place here on board For this part you can actually do here. You can actually hear it with more smudging. So you get more off the hopes Not about where important cannot on this layer on this later . If you do, it's much this this lands that come from here, make sure to do Don't this later, okay? Because I don't want toe march on the light that is above this sway as I was going to smudge that so Because, for example, when I was aware that that is located below the face where if I do insanity cancer, nothing is working because I'm below. That's why it's very important. So when I can just do it like that actually makes a smaller. But let me say this on guys. My camera battery is almost dead, so C is the next. Listen, I know this Campbell to be tough, but trust me, it's worse. You gonna learn so much and create so many raising artworks after all this Love you Bye bye .
5. Adding Hand: What's up, guys? I'm welcome back, my Lito. First up, magicians. So they're the last lesson. We were doing this lines here and now we have to do the lines on the back. So basically, let me just show you what I mean. So you understand me? I'm talking about this lines. Here is the lines on the back on. How are we going to them? So, first of all, we have to bring back this part off the first. If you remember, we created a mask under. If you just click right button all this mask on go to deserve a layer mask. Boom. Now it's bad. Second thing that we need to do actually to turn off this players so that they don't mix together on We have to create another empty lor on there. Just make sure it's not in the group. It's has to be outside the group. Okay, Now let's actually turn this back on. So what? We're gonna do it again? We're gonna take hours much toe and again. We're just going through the same process on Listen, just makes it bigger on. We will just start creating lines. So again, I just marches as you can see boom, Kaboom like that, we can make a little bigger again. You click ones here and there. You hold shift and you click here and they do the same stuff again until the line is long enough like that. And also, we can just make this a little bit like that. It looks more like dragging on the same part here. - Good . So if you did that, then congratulations. We almost passed the most difficult part. I would say I just want to make this every two bit seeker because I feel like compared to the one toe the ones here, they're really, really seen. So we can just, you know, Drover pude more times, you know, to make them sicker. Onda Uh boom. And don't forget to save this. Okay? So now we have to bring back the background. First of hope. Then we need to add the hand on the brain. So toe brings it back. If you go to this group, if you're male with a mask here before this click right button and choose disable their mask. Wow. Already looks beef youthfully I'll take our hand. Onda, where is our hand? Let's see this one here on? Uh, yeah. So let me just make this bigger on duh brings to the side. It's even bigger like that. Now we need to cut out this hat on Politiken. Actually, just use what we can do. We can just turn off all of this for now, Onda. Then we can go here to the right button and choose quick selection. I mean magic wattles. And if I just click ones here on before uses makes your example were selected is gonna help us to select colors. So for them, please click here. As you can see, A with the gray and white colors are selected. And if I just now click, create mask. OK, I'm joking. We just have to inverts. Okay, So just like this, go to properties. Just make sure it's like the mask. Go to properties on inward bulge and now just need to make some little adjustments of present. Would take my brush toe, make six have a white color, make the brush small and here, for example you can see we need to bring back this part off the finger on. Let's see if there's anything else that's going to bring but get this. No. Okay, this is fine. Is fine. This is fine. Good on ya. Now, if we turn on again, everything we have our hands. Oh, we're so we'll have to do it all this as well. But don't worry about the first off. We need to figure out how it's going to. They basically so here I have a hand in this position. This is almost similar position. We can maybe know. Just go traded free transform on may be rotated a little bit like that and could work just fine just being to get rid off everything else. And I just just take our brush to make it bigger. Take blood color and just go over here and just go. Just make sure you don't go over there also, as you can see, you can way we see here is this empty place. But don't worry about it. We'll fix that at then. Okay, so now we need to make sure this hunt matches the color over the face because right now we can clearly see that it's not the same image. Like I mean, we can clear so that they don't match how are we going to do that? So, first wolf, Look here. This is more. There is more violet color here. Okay, Ondo. It's also darker on DA. Just give it a strike. So if you go to image adjustments Onder, let's go for now. Toe Kohler. Balance him on. Let's start with Magenta. Let's at some magenta here. Good, good. Now it's at some blue. Okay, that's getting much, much better not to play with science it between the left on the bomb. Almost perfect. Let's click. OK, now they actually much, Much better is only things that this is out with blurry. And this is really, really detailed. And in order to make this list, he told what we can do, we can go to filter. We can go toe camera ro filter on. Look at that. What's let's see? Double. Okay, now, um, you see here, take sure clarity. We can just make They showed with lists and she can see if you make it really, really is. It's now is with smaller, but wasn't Miguel, too? But let's clarity like that. And let's see now, okay, but now it's no dark enough, like maybe let's go toe again to camera cooler passages level click bum bum on Now we can just add a little bit more violet negative with Dark like that Anssi. Now let's go to image adjustments on brightness Contrast. Let's see if we can fix this, but with less brightness just a bit Kontras a bit more on Duh like that. OK, there should be fine. It doesn't need to be perfect, you know? I mean, it looks pretty similar, but again were in this artwork like it can be a hand off a different person. So that's why they don't need too much. Exactly. And so But the thing that me to get rid of we can clearly see here is this border, this one We don't need it. I mean, it doesn't look good, so just goto a mask, but take a brush toe. Let's make the brush later. They're small. Let's make partners around 80% on now we'll just start doing this manner with. So if I just click here once, for example on, then the whole shift and I click here, you must you can see it automatically draws the line from point A to point B and we can do again the same. Here I click ones. And the whole shift I click here from like, we just basically, we can just draw like that to, you know, just basically to make sure that we don't see this line. Yeah, like that. Okay, this is fine. So now let's just take this hand on. Put it here. And also actually, Wilson to port behind this part on boom chicka boom, as you can see, is already just inside the head, so if you'll just move it, as you can see, it just matches. Perfect. Perfect. So it just goes from here. Well, don't think maybe we should, you know, make sure that the hand is on this one. So this is behind that. Basically, we can just select this, Okay, we can create a mask. Boom. And if I just click right button here on select add master selection or actually a foot away if I hold control or common as you can see now we have a square near our mouths. And if I just click here boom. As you can see now the hand is the mask over the hand selected. Now we can go back to the mask off this much, this one. And if I take my brush toe black color on, I just let me just begin to start doing as you can see a bunch. Wow, it's gone. Let's go to select on their select. So basically, use my estimations. The hand is above the this line in front of this line. I mean, not now. We had the brain and ruled that in our next listen by you guys.
6. Adding the Brain: Hello. Hello, my dear little bullshit. Magicians. Welcome. Now, we to add the brain to the hand. You know, it's a little thing that everyone has. I mean on you should have to at least I think so. I mean, if you're following this, the girls and most likely you have it. So congratulations on, um let's take this brain challenges. Bring it to a work party into our Okay, So first of all, let's Ochlik okay, this week. Okay, But let's bring this to a top. And now, actually, I need to make sure they have only the brain here, so let's go here, click that button Just quick. Selection to let and let me make Oh, let's actually choose here. Plus toe, cause me to select, not there. Select with Make this bigger than it actually started clicking Boom. And also before you didn't make sure example alerts like that. He OK, Very important. Boom, boom, boom, boom Smaller with boom, boom and boom and boom ondo. Two more here. More here on this Looks fine. Okay, now, when you have it, just click here on this create mask to create a mask from this break and now now. Now what? We're gonna do some first away to change its course for that. Let's go. Toe filter and camera ro filter. OK, we need to make those two. It's more violent. No, the violent While Let anywhere you gives us like the magenta color. Help with more, Your lord, I would say contras out with less exposure. With less, it can get a bit darker. Ah, like Zack. Let's see. Take Cheryl's with lesson. Mr Builds with smooth on the hes Not truly Web results with less just a beat. Okay, what's going notation, lushness. And now I want to make the rich purple. This here and they should be alot is Doesn't matter. 1000 matter, actually, let's actually make it. Yeah, well, uh boom, boom! Let's click OK, now. So nice. You can see it fits our image out with Greta, but still not perfectly perfectly, But that's not too big a problem on what we want. We want to bring it. Gonna put this inside the hat before we actually continue color correcting anything. So for that will actually have to create a group. So I just click here Boom group. Let's take this. I'm put it inside the group. I think it denotes inside the group because they told which tools there, right? If I close the group and opens a group, we can clearly see it. Let's actually DoubleClick Young calls his brain on now why we did it. Because you want to bring this here just behind the hand. Actually, no. Sorry. It was a hand like that. And now we will create a mask on. Now, That's why we created a group so we can create in as a mask. And actually, you know, make sure that the fingers are found the brain not behind the brain. So let's actually select our hand again. You hold controller comment and click to select hand. Wow, Look, that is a big finger. Now let's go to our brain mask, select brush tool. And we can actually, with black calorie can start calling on the brain mask. She was gonna happen. Yeah, exactly. Reintroduces this finger for sure. We'll just color everything. Okay, so now we need to make sure we don't see this finger because it's kind of behind the brain . So let's make our mask white color, white, smaller. And now we can actually get rid off this finger call a lift on the borders because we don't need it. Can actually you want, like, take a bit off this finger? Let's go to select on their cell left. So now it looks better. But we need to actually bring this brain basically. So if we just take this, I'm going to bring it out, which was the right. So you select the brain, not the mask, the brain, not the group. I'm is the brain itself. The image and just take this and brings to the right like that. Okay, that looks good. Like that. Okay, under now again, we go to this mask on day. I want to make sure that here white color again I take my brush toe and I start up story black color and I start deleting the brain from the hand Here. It's just lots of work with mask. Let's select again the hand again. You hold control common Boom! And now we can actually see where we can draw on where we should know drove like that action. Now we had to get rid of this fingers fall. So what just makes his bite? Uh, Yeah, because not behind the brain to but go to select on the select on your we need to get rid of this, that I can see we still have the borders here. We don't just beat just a bit. So now let's just close this. Let's select the hand and the hand and the brain and let's move the multiple to the left like that so it's more in the center. It's also now opens the brain the image and make out with bigger. So again they did free transform on. I just feel like it's not big enough, so just make it bigger. Bring it out with Down like that. Click OK, there. We need to work with the mask again. As you can see here, we have some problems again. Let's go to this brain. Much truth. Our Barstow black color on Get rid of this year. Boom. This looks good. You have here some green color. We don't want it. Okay, so it's goto this mask on. Let's have a white color on this for the finger already. Okay, on we can't just drill bit and you can see it adds darker colors. Hand basically Onda That's what we need. We don't need not be the green color there. And why would a green color busy right? Also just realized We need to get rid of the brain here from the finger. It's just a bit on the finger like that. Let's go now. Back again to the hand. I know you have to go forward and about so much. But if you just follow what I do that it's gonna be fine. White color Right on. OK, this is fine if we are childhood to look realistic, But I want to repairs this think so, if I go to this much, I take my brush toe again. This white color can just call it a bit here to bring this back like that room tonight. Automates moralistic passion into at shadows on. How are we gonna do that? We will see in the next lesson. So, you guys, my bite
7. Shadows and more realism: Welcome, guys. Ho ho! We have done so much already on Duh. We are almost done. Just a be okay. We just need to have the shadow. So for the brain here. So what I'm gonna do, um I will go into the group for brain. Okay, I will create a new alert as against him. Now, this slur is located inside the brain group and I will take my brush tool. I roll. Click it. Have default black and white colors. I need the black color here. Let's make my brush. Biggers, Let's actually go here. Onder Hardly zero. Okay, capacity around 20% who were around 20%. And now Now, if I just start drove his black power, I will be able to draw a shadow. So look here if I just draw here a little bit as you can see like that, I can draw some shadows here. And the more I drove the blacker it gets, the more black color we have there. And that's why it looks like a shadow because it's not totally back. It's transparent for tomorrow. Looks pretty good on that Z after courting, right, because we're drawing inside the brain which has a mask. We cannot drawn the hand because we can only drop where the mask lost to drugs. That's why if I draw here, nothing is gonna happen. OK, so don't be afraid, dear one when I drove here, for example, are actually throw on the border here. Good on the shadows here. Okay, Much. But I also want to add a little shorter here. Smaller there is. I want a child. We're here is because it is kind of this kind already goes inside the head and it needs to get darker. But now when we did that tape, I want to do so. If I go to my hand, I go to filter lure on those simpler I want to add 0.5 though it seems we're just a bit to make this booty because everything else is blurry. And I also want to this into the brain. I go here and go toe filters on the blower on the assembler And again just a big blue Maybe 11 bonus Too much 0.5 cause the images out to be the bloody that's why and now this is done . So now we need to go on the inside part of the head. And in this artwork, as you can see, just a greedy int like this on what we're gonna do. We gonna go here below us, girls, this group to close this group. And it's creating. Empty where on, Let's put it for every single. So just double click here and we're gonna called inside the head and let's not go on and select Grady into its click right button. Isil ingredient. Okay, so here, now you want to make we want me to change. The car was a credit. You want to make it the color off the skin. Basically. So how are we going to that? So if I go here if I actually just click on this Grace note owns at the bottom of ingredients, As you can see, I opened the Grady and editor. No, I have here to course light pink and dark. So they bring it brown. So on what we're going I want to click here double and I If I go here as you can see, I can select a color. I wouldn't select some bright point like this one. Let's click. Okay. As you can see it's really, really bright pink or violet. Now let's click double on this one. And it's like some dark point like this place here, but not too dark hair like that. This is gonna actually let's actually double click here. I want to make a little bit darker because this is too bright. Mind if I just stays and brings out down and between the right to have some more colors? Room. So we do have some color that this brighter, and that's called a little bit darker. Let's now click. OK, and now let's go here Whose radio Blue? A radio grading which basically means that the grading. So we're gonna have one color in the middle, another color on the borders. But look at that. If I feel like this on, if I start calling so I start from here, just click and drag on the same color as you can see. Boom! I get my grade in which a. So we can see. I mean, we don't see about if I just turn over the brain, we can see that we have here some darker color and here on the border, some lighter color That's exactly what you want. So now I can just do it one more because I want to make it look better if I just result with longer the line they built with shorter. So I actually want to go here. Click on. I want to make this sort of darker. Just double click on it with darker just a bit. And I want to do this again like that again. Maybe again. We'll just until I'm here. I like this. I think this looks goto actually bring back my brain. So now Oh, another thing is that we need to make this as you can see here. If you look, this is this is a little bit like treaty. We have some or sickness there. We don't have it here. That's what we to do. How are we gonna do that? Very easy, my dear friends, what I'm gonna do is let him first full save this. Okay on. Let's go to our way. Mitch, it's here. Let's opens. This happens is on. This is this is image. And if I just create a corporal Fritz or click right button and choose duplicates allergic . And now we go to the image dough. And if I go notated on pre transform and I start moving it Look, what's gonna happen we get here this kind off border don't very reasonable right now, but it will be visible later. Don't worry about that. Actually, bring this out like here because so we have a border here and here. Click. OK, now, in order to make this visible were actually to go to image adjustments on brightness. Yeah, just gonna make it darker, So brightness down. As you can see, we see here our border already like that. Look, OK, easy. Right enough, for example again, for go to aided on free transform. You can move it. How you want to create this kind of border like that here? Or maybe you can do it like No, this is not a realistic. So they should be finalised. People cape. Now this looks good. What we can do is we can actually add a little bit more here off the border. And how we gonna do that? So we could We don't see this part of the face because there's a mask here. That's so if I select the mask, I go to brush white color And if I just make everything 100% around 80%. And if I just started calling us against United, start being more image And if I just can't draw, you know, kind of border manually on whom? Look at that. You want to make it see cake and just drove out, Like from here like that to make it seeker. It looks good. So let's Goto file on Say, now what I want to do is I want to add some shadows here on the borders to give it more deaths on. For that, we actually going to go here to this level, gonna the best click from creating a new layer so that anything that we throw is going to be inside the head. We goto a brush toe again. Now we go to 20%. Go to apps. What did I know? What happens is Soto 20% what makes bigger. Let's make the hardened zero black color. And if I just start doing right now here exactly as you can see, we started getting the shadow. If you just draw it like that is going to give it more steps like here and now. One more thing. I want to go here. Click right button on this one and chose Cumber to smart off this basically the background I'm gonna goto filter blue on. I wouldn't go to noise on Admiral story. And if I just a bit noise, As you can see now it just looks much more interesting. Just click, OK? As you can see now it just but noisy. And I don't know why I just like it like that. So I just think it looks good. Let's go back to shadow like there are brush. I wanna add more shoulder here to give it more depths. Okay, on one last thing. Let's try toe change completely the cars off this brain. If we just selected to go to image on the, uh, your saturation, let's have a look. If I tried toe ended, let's see what color would actually be a good This is actually not bad likeness. Not witless, maybe situation out with lists. I actually like it like that. Whoa, guys, we're almost done. I will just do some small adjustments. The first full here. This is grading Mueller on. Let's take our, um where is it? foretelling brush to make sure sample Ursus selected Onder just goers is whom go on Mars and I want to adjust this face. I don't really like the shape. As you can see, it's a little bit clumsy. So if I selected to go toe mask brush tool Onda make 600% this 100% minus 80 And I can just drove like that means local with butter. Okay. And here, bitch, Good night's much better. One more things that I always do but I forgot to do is if we take this face. I also want to create a three The sickness for this face Like it here again Just right bottom duplicate lor. Okay, uh, now let's take the one that is being behind Go to aided free transform Andi Ah, just bring it out. Down like that was thick. Okay, let's go to image adjustments on Bright and Contras and make it darker Now, um literally, again, Just open free transform I want to bring it out with Let's see how I want to make this exact fine as this looks good. I think so Like that now, the only problem is that it doesn't go along with this much. That's why it would be. But if you if we would have dances at the beginning. But if it is it now, I mean, if I did it now, I will have to, you know, go here. And the justice Mudge's. So, for example, if I just take mice much toe on Goto ones, this much less. And I can just do like that basically, to adjust this much to this part, that would be fine. Make sure you don't step on the background under I can just do it like that. Like that here a bit and boom. Perfect. Oh, my God, This was so tiring. But finally, guys, I think we're done. Of course you can go all Wait. One more thing. So in order to create this picture here, it's just actually were simple thing. You just take this texture, which feels I like the project materials. You know, in the beginning of the course where you can download when you that loads the you may just This image is also there. It can make this bigger, bigger middle. Bring this up on. Now if I just go to normal on trout, some different burning. What's as you can see? It cannot This kind of texture, Jose, Let's see. Um, no, actually, like this one, I think it looks good. You have this texture interesting on you want to make it dark? If you think it's too bright, you can always go to brightness and, you know, just make it a little bit darker, like that. It is final exists safe on boom chicka boom. That's it, guys, we did it. I'm sure I'm more happier than you are. Because it took me so much energy and therefore could record this tutorial. So I hope you enjoy this. Make sure to check out other classes. And so because he never cost there's something unique on magnificent that you will learn. So you guys involved my other lessons. Bye bye. I love you know seriously. Okay.
 Photoshop Classes By Fred, I will help you get PRO at Photoshop