Transcripts
1. Class Introduction: Hey, they're affinity fans. Today, I'm excited to share
my newest course with you, where we'll learn how to create amazing macros and
affinity photo. Macros are one of my
favorite features in affinity because with them, we can edit photos with
the click of a button. All you need to do is open a photo and then pick the
macro you'd like to use. Just like that, the photo
is instantly edited. To make macros, we first record a series of steps that we
want affinity to perform. Then after that, we
can have Affinity repeat those steps on
any of our photos. See macros can be very simple just with a
few basic steps. But other macros can
be long and complex, allowing us to perform amazing edits with the
click of a button. In this course, I'll give you 30 macros that are already made. But in addition to
giving you the macros, I'll also show you exactly
how I made all of them. Let me show you some examples of what these macros can do. Macros come in all
shapes and sizes, and in this course, we'll learn how to make a wide
variety of them. That way, you'll
have all the skills you need to make
macros on your own. But before we dive
into affinity, I want to mention that
this course comes with some important exercise files. We'll be using these
exercise files all throughout the course. Be sure to download them before continuing with the
rest of the tutorials. You can download these
files in the next lesson, and then you're ready to begin
your journey to creating amazing macros.
Let's get started.
2. Download the Class Files: Before you begin this class, I recommend you download
the Exercise files. These files will be necessary for you to
follow along with the tutorials to
download the files, come to the Project
and Resources tab. Then click on the download link. The files will
then be downloaded to your computer and you'll be totally prepared to follow along with the
rest of the class.
3. Introduction to Macros: This introductory chapter, I'll teach you the basics
of using macros. You'll learn how
to install macros, the basics of applying
those macros, and how to keep everything
nice and organized. All very useful stuff.
Let's get started.
4. Installing Macros: The first step to using macros
is installing the macros. Once your macros are installed, they'll always be ready to use anytime you open
up affinity photo. In the exercise files
for this course, if you go into the first folder, you'll see a folder
called installing macros. If you click into this folder, you'll see all of these files. These are the macros that
come with the course. That's where you'll
locate the files. But now we need to go
back into affinity photo so that we can bring those
files into affinity photo. To do that, I first
need to bring up a special panel that
helps us with macros. Go ahead and go to
the top to Window, and then go down
to where it says library. I'll click on that. Now we have this library panel that I'm just going to
talk right over here. The library panel is where all of the macros
will be stored, and by default, we actually
have a few macros right here. But I want to bring my
own macros into this. The way to do that is going to the Top Hamburger
menu right here, and then clicking Import Macros. You can go ahead and
navigate to this folder, and then we can add
these macros in. Now, unfortunately, if you
try to select them all, it will say, nope, you can only select one at
a time for this. We're going to have to
do this one at a time. There's our first
one. I'll repeat these steps, Import Macro. I'll click on the
next one and open. I'll go ahead and repeat
this for all of the files. I just finished importing them. I'm just going to close them
up using this arrow next to their names just so that we
can see all of them better. They've been numbered,
so you should have one through
seven right here. As simple as that, you now have all of the
macros that we're going to use in the course
installed into affinity photo. Because they now live
inside of affinity photo. If you wanted to clear the space off your computer and
delete these files, you could go ahead
and do that now because anytime you
open up affinity photo, all of these macros will be
right here for you to use. Now that you know how
to install the macros, I'm going to show you how to
use them in the next video.
5. Applying Macros: Applying macros is
actually really simple. First, go ahead and
open up your photo. Then you can go over
to the library panel, and we can open up any of these folders to find the
macro that you want to apply. Now, these folders are organized by the
chapters of the course. To start off, let's just stick to this very
first chapter. Macros get a little bit more complicated to use in
the later chapters. We'll get to those in a minute. First, let's go ahead and
apply one of these macros. I'll just click on it, and now the macro is
applied. Simple as that. You can see over in
the layers panel, we now have this folder with all of these
different layers in it, and we can turn them on and
off to see the difference. If you wanted to,
you could change the opacity to change the
visibility of this macro. You could even duplicate this macro if you
wanted to amplify it, just press command or
Control J to do that. Now we have it doubly applied. I love how simple
this first macro is. Just click on the
macro and you have a beautiful customization
effect here. I'm just going to delete these. Then I want to show you
another type of macro. Some macros are only semi automatic when
you click on them. Go ahead and close up
this first folder and open up the lighting
and color macros. I'm going to go
down to the macro that says black and whitish. Go ahead and click on
that one to apply it. This one is pretty interesting. When you click on it, you can see that the effect
has been applied, but we're not quite
done. Look down here. We have all of these
sliders that we can customize for this
particular photo. I'll go ahead and
adjust the red slider. Maybe I'll bring up the
yellow slider a little bit. You can make these changes to
affect all of the colors in your photo. I'll click Apply. Now we can see over here, we have our layers applied. We can click on and off
to see the difference. If we wanted to,
we could go into this group and adjust
anything here that we'd like. Sometimes when you make a macro, you'll want to add
sliders like this because your macro might need
customization to work properly. In this case, we can see that the macro looked pretty
good from the start, but it could be improved with a couple of tweaks
of those sliders. That's usually the case when you make a photo black
and white like this. Sliders are perfect
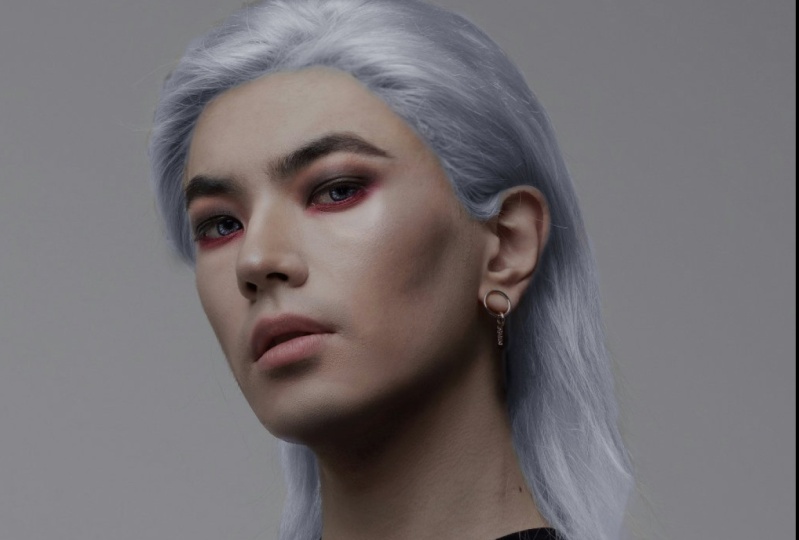
for a macro like this. I'll just delete this one. As one last example, I want to show you
a macro that needs extra special
customization by you. Let's go to the
retouching macros, and I'm going to apply the
detail extractor brush. When you apply this macro, at first, nothing happens. Let's go into our layers
to see what's going on. In this layer group, we have three high pass
filters and a black mask. High pass filters are
used to sharpen images. But with this black
mask laid over these, you actually can't see a thing. We need to paint
in white paint on this black mask to
reveal the sharpening. I'll go over here and get out the paint brush tool.
Then I'll zoom in. I'll go ahead and change
my color to white, and I think I'm going to lower
the hardness all the way. I'll just click and drag on the word hardness
to lower that down. Maybe I'll even lower the
flow a little bit too. So this is nice and soft. Now I can go ahead
and paint with this black mask selected here, you can see that I'm
sharpening up the edges of the hair. Check out
the difference. Here's the before and the after. Now, usually when you're
sharpening a photo like this, you'll want to add sharpening wherever you want
to draw attention. I'm going to lower the size of my brush using the bracket keys, and I'll just paint
this over her eyes. Maybe I'll paint this
over her eyebrows. I could paint it over
the flower in her mouth. Anything that you want to
bring forward and enhance. With all that painted,
here's the before and after. Macros like this are
special because you would not want this effect
applied to a whole photo. You can choose exactly where
you want this to be applied. Looking over in this macro
folder in the library, you can see a lot of cases where you'd want to
paint your macro on, teeth whitening,
enhancing the eyes. These features are
going to be in different places in every photo. Being able to paint
them directly onto your unique photo is super nice. Now you know how
to apply macros. There are a lot of
other unique macros that we'll work on
throughout this course. But these are the three
most common types of macros and now you
know how to use them. In the next video,
I'll show you how you can keep your
macros organized.
6. Organizing and Exporting Macros: This video, I want to
really dive into how the library panel works so that we can keep
things organized. As you can see, the more macros that you add to
the library panel, the more wild things
get over here. Let's take a look at
how all of this works. I'll just close
up these folders, and I'll go into
the first one here. When you right click on a Macro, there are a lot of
options you can do to change the individual macro. You can rename it, delete it, and you can even edit it, but we'll learn all
about that later. For now, I'll go ahead
and rename the macro. You can see it updates
automatically. I think I'll just change that back so we don't get
confused later on. But as you can see, it's
super easy to rename things. It's also very easy to
move macros around. Maybe you want to change
the order of your macros. You can just click
and drag to do that. You could even move macros
into different folders. Moving macros around is a
lot like moving layers. It's very user friendly. But what's slightly less user friendly are these
categories here. Each of these folders
is called a category, and they really don't
like being moved around. To move them, you need to
click on the Hamburger menu, and then you can move them up
or move them down one spot. This can be very tedious if you have a lot of macros over here that you
want to move around. That's just something
to be aware of. There's a lot more you can do in the hamburger menu
for the category. You can rename the
whole category. You can delete it. You
can even duplicate it. I think I actually
want to delete this default category because
we won't be using it. I'll just click that and make sure that I really want
this. You can't undo it. I'm going to press.
Now we just have the macros that we'll use in the course just to
clean things up. The last option in
this Hamburger menu is exporting the macros. If you remember, when we
installed these macros, there were seven
files to install. That's because each
of these categories had its own individual file. If you ever want to export
your macros to share them or sell them or move
them to a different computer, then you can just click here. You can navigate to whichever folder you want to save them in, and then you can click Save. Like that, you'll
have your macros in that category exported. You might be wondering though, this will export the
entire folder here. What if you just want to
export a single macro? Well, you actually
can't do that. You could create a
brand new category and put a single macro into that category
and then export it to create a new category. Just go to the Top
Hamburger menu and then click on Create
new category. You can go ahead
and give it a name. I'm just going to
call it new category. I'll press. You can see our new category has
been added right here. Now you can save new
macros into this category. Notice I said new macros. There's actually a little bug
right now where you can't drag existing macros into
a blank empty category. You actually will need to
record a brand new macro, and then you will be
able to place it into this new category.
Lucky for you. In our next chapter, I'm going to show you
how to make macros from scratch that you can go ahead and save into
your new category. I'll see you in the
next chapter. Okay.
7. How to Make Basic Macros: Now that you know the
basics of macros. It's time to make your own. I'm so excited for you because once you know how to
make your own macros, you'll save so much
time in editing. Let's go ahead and jump
right into making macros.
8. Making Macros: Making macros is super fun. Let's go ahead and get started. First, we need to add a brand new panel
called the Macro panel. I'll go up to Window, and then I'll go down to Macro. I'm just going to
tuck this macro panel right next to the
library panel like this. Using this macro panel. This is how we're going to
record the steps of our macro. Once we click this
red record button. Every action that we take
on our photo will be recorded right here.
Let's go ahead and start. I'll press the big red button, and we can begin to apply some
adjustments to our photo. The goal for this
macro is just to create some nice warm colors. Let's go ahead and start
by boosting our colors. I'll go to the adjustments, and let's apply a
vibrance adjustment. I'll go ahead and boost the
vibrance and the saturation. All right. Next, I think I
want to brighten the photo. I'll go to the brightness
and contrast adjustment. Let's just make this a bit brighter and add some contrast. This looks good,
but it might be a little bit too bright
on the highlights. I'm going to go to blend ranges, which is this gear icon. I'm going to drag
down the highlights node so that this
isn't being blown out. Now you can see that calmed down the highlights a little
bit. That's perfect. Let's go ahead and finish this off by adding a lens filter, just to add some warm colors. I think this is a
little bit too intense, so I'll just lower that down. I think that looks pretty good. Now that we're done, we
can go ahead and stop recording by clicking
this button right here. Once you're done, you can
go ahead and add this to your library by clicking
this button right here. It'll ask you which category
you'd like to saved into. I'm going to save it
into our new category. I'll just rename this warm
Color Practice. I'll press. Now you can see our new category has a single macro in it. Because this category is
now in active category. You can go ahead and drag
any other macro into it, just like you would
with the other ones. I also just want to double
check that this works. I'm going to delete
all of these layers, and then I'll click
on this macro. Yeah, you can see that
worked perfectly. Great job creating
your first macro. The next thing I want to do is actually rearrange the
library a little bit. Throughout this
course, we're going to recreate every single
macro in these folders. The library panel is
going to fill up fast. For me personally, as
I film this course, I'm going to save all of these practice macros into
this category right here. I think I'm just going
to rename this category. Practice macros. And I'll probably clear out this folder every once in
a while as it fills up. But I think that's just how
I'm going to save these. Feel free to save all of your practice macros
however you'd like. I also think I'm going to move this macro category
up to the very top. There we go. The
reason I'm doing this is because whenever
you save a new macro, it'll ask you which
category you wanted in, and it'll always default
to the top category. If we just have that
category at the top, all of our macros will go ahead and be saved in
there automatically, which just saves us a
little bit of time. Now you know how to make
a super simple macro. But there's actually
some extra steps that I like to take
when making macros. Just so things stay a little bit more clear and organized. In the next video, we'll learn some tips to make
macros work even better. O
9. Macro Tips: This video, I want to show you some tips for making
better macros. In the last video, we made
this super simple macro. But with a few more steps, this can be a lot
more functional. What do I mean by
this? Well, take a look at our layers right now. They aren't grouped together. They don't have names. It's just a little bit messy. Now I'm going to
delete these steps, and I'm going to apply the warm color macro that
came with this course. Now you can see the difference. They're in a group. They all have names for what
they're doing. Just beautiful. But how
can we do that in a macro? Well, I'll walk you
through it and give you some extra tips
along the way. First, tip number one, plan your macros before
you begin recording them. Before I even press record, I make all of my adjustments and write down what I'm doing. I write down the
adjustments name and the percentages or amounts
that I've moved thing. I write down every detail. That way, I won't make mistakes while recording the macro. I've already done all
of my experimenting and I'm ready to lock in
my adjustments in a macro. I'll just delete this
and I'll begin to make a macro and give
you tips along the way. In the macro panel. First, I'm just going
to clear off the steps that we took by hitting
this reset button. Then before I start
making my macro. Tip number two is to always have your
layer selected first. Then press record. Then click off the layer. I like doing this
by just clicking any blank spot in
the layers panel. What this does is it selects your layer by
selecting your layer, the next adjustment
that you apply to your macro will always be placed at the top of
your layers panel. To see this. Let's apply
our first adjustment, which is the vibrant adjustment. Then I'll just change this the same amounts
that I did before. We have 3010. There we go. You can see that was applied to the very top, which is perfect. Tip number three is to name your layers while
recording your macro. Having named layers just
prevents confusion later. If you decide to share
or sell your macros, how would anyone know
what each layer is doing? Naming your layers just
prevents these confusions. I'm going to double
click on the layer, and then I'll rename
it boost colors. Tip number four, to keep
the layers organized, group your first layer. I know that this is a little
different from normal. Usually we have a
bunch of layers and we group them
together at the end. But with macros, we actually can't select multiple
layers like that. Instead, I'm just going to press command or Control G right now. Then I'm going to rename
this warm colors. Then I'll open the group and I'll select
this layer again. Now, look what happens when
I select a different layer. A dialog box will pop
up and we'll ask you, are you sure you want to
select the first child layer? I'll say, yep, that is the exact layer I was
trying to select. It's just trying to
record the steps in the right way so that
nothing gets messed up. I think that's perfect. Now as I add more adjustments, they'll all be placed together
inside of this group. Let's just make a
couple more adjustments to keep warming things up. The next adjustment is the brightness and
contrast adjustment. I'm going to raise this to 30%, and I'll raise the
contrast to 15%. If you remember in
the last video, we're also going to
go into the blend ranges and I'll drag
down the highlights. For this layer, I'm just
going to rename it right now. I'll double click, and I'm going to call this Ad Contrast. If you ever accidentally click off of a layer while recording, it will record that step, which isn't very good. If you ever mess up, you
can just press command or Control Z to undo
your last action. Now we have that layer selected again and that step
has been removed. I'm just going to add
our last adjustment, which was the lens filter, and I'll bring this down to 20%. I'm going to rename
this layer warmth. Now that we've
added a few layers. I just want to show
you that you can't select multiple
layers to group them. If I hold shift and try
to select this layer. This pop up will appear that says it can't
record that action. This will happen sometimes. This reminds me of our
next tip, tip number five, which is to think creatively as you're recording your macros. Sometimes you'll want to
record a step in your macro, but then affinity tells you
it can't record that action. Think about, is there may be a different action you could take to achieve the same result? Maybe you need to do
things a little bit backwards like grouping
everything from the start. Macros can be a little
tricky like that. But I'll show you
every workaround that I can as we work
together on this course. We're done making this macro. I'm going to select
the group again. Select the parent layer. Yes, go ahead and select that by selecting
this parent layer. This just makes it. Every
time you apply the macro, the whole group
will be selected. I'm going to go over to our library now and
stop the recording. Then I'll save this. You can see it's being saved into
the practice macros. I'm going to call
this warm color Better practice, and
then I'll press. Finally, tip number six is to test your macro on a
few different photos, just to make sure it looks
good in multiple situations. A macro isn't very useful if it only works on a
single type of image. Let's delete our
layers over here. Let's test it again
on this photo. Yeah, that looks great.
We have our group. We have all of our
layers nicely named. That's perfect. Now I just want to test it
on one more photo. I'll press Command or Control
O to open a new photo. I'll just grab the next photo. I'll open that up and we can go ahead and
test it on this one. Yeah, that looks
great. We really warmed up this photo too. This is such a
beautiful, simple macro. I love that all the
layers have names now, and it's very clear
what each layer does. All the layers are
grouped together. We can easily turn
them all on and off to see the difference,
which is great. I know we covered a
lot in this video. There were some funky steps, and honestly, that was a
lot of information to take. But don't worry.
We're going to keep practicing these
steps over and over, and it'll become so much
easier the more we do it.
10. Edit Existing Macros: In this video, I
want to show you how to edit an existing macro. Let's go ahead and edit the
macro that we just made. I'll click to apply it. That way, we can see all of
the layers and what they do. Then I'm just going to right click and then press Edit Macro. We're automatically taken
to the macro panel, and here is where we
can start adjusting. First, we can adjust anything that has a gear icon next to it. Once you click on
that, you can change the parameters of
that adjustment. For example, here, we have
the lens filter parameters. If we wanted to, we could
make this very intense. We could even change
the color if we wanted to, anything like that. Once we've changed something, we can go ahead and save
this to our library. I'm just going to name this
test one and I'll press. Then I'll delete these
layers over here, and we can see what
this looks like. You can see this is much warmer. If we go into our lens
filter adjustment, you can see that that's been
raised the exact amount that I changed it over
in the macro panel. I'm just going to delete
this group again and I'll apply our main
macro one more time. I just want to show you another
way that you can edit it. I'll right click and
press Edit Macro. Another way you can edit a macro is you can add more steps to it. You can do that by looking at the very last step and making sure your macro
is set up that way. The last step was to set
the current selection, and we know we did this by selecting the main group layer. With that selected, we can go ahead and click on the
red record button, and then we can continue to add any other steps that
we want to this macro. I'm going to select one of
the child layers again. Then I can apply anything
else that I want to. Maybe I'll apply a color
balance adjustment and just make a few
adjustments here really quick. I'll just rename this color balance adjustment, more warmth. Then I'll select the
main group again. Maybe I want to
lower the opacity of the group just a little bit. Now we can stop recording. We can add this to the library. I'll call this Test two. I'll delete these layers, and we can see how
this one works. Those are some
beautiful warm colors. We can open this up and see we had a lowered opacity
for the whole group, and we have this more
warm layer here. Another way you can edit a
macro is by removing steps. We just did all of
those new steps. If we wanted to remove them, we could simply uncheck all of those layers back to
about that point there. Then we could save this macro. I'll name this test three. I'll delete these layers, and then I'll apply test three. You can open this
up and see that we're back to our
original layers. But something interesting is, if you go back to edit this one, all of those steps are still there. They're
just not checked on. At any time, you could
check them back on, save this macro again and
have these steps again. As you can see, you
can always go back and edit a macro to make
it work even better. I think I'm just going to delete these extra macros just
to clean these up. In the next video, we'll
do some more practice as we make a beautiful
macro from start to finish.
11. Macro Practice - Autumn Day: This video, we'll make a
macro from start to finish. This macro is really pretty. It turns your image into a
beautiful golden autumn day. To see how this macro looks, let's go into the
basic macros folder, and then click on
Autumn Day to apply it. Look at that difference. I purposefully chose an
image with a lot of green in it because this autumn day macro really changes up the greens. Let's just take a quick look at the layers that we'll use
to create this macro. This is the main
color shift layer. You can see this
changes our colors from green to this golden color. If I click here, you'll see we'll use a channel
mixer to do that. Next, we have a layer
adding some more warmth, and we'll use the selective
color adjustment to do that. Last, we add a little
bit of contrast to the image before and after, and we'll just use a simple
S curve to create that. Now that we know what
we're aiming for, I'll just delete
all of these layers and we can begin
making this macro. I'll go over to the macro panel, and then I'll click record. I have the layer selected, so I'll click off of it for our first step to
clear the selection. First, let's do the
channel mixer adjustment. I'll go into our adjustments. I'll select the channel mixer. Then in the red channel, I'm just going to shift
these around a little bit. For the red channel,
go ahead and lower this to negative 50%. The green channel, bring
that all the way up, and the blue channel,
go ahead and bring that down to negative 50. Here's how our picture
is looking right now. You can see that we have some strange skin
tones going on. To change this to make
that look more normal, you can go ahead and
change the blend mode of this layer to lighten. I just want to be completely
honest with you because I probably sounded
pretty confident as I was moving those
sliders around. I don't actually know exactly
how this adjustment works. Someone else actually came
up with this technique, but I think it
looks really cool. I wanted to show
you how to do it. But the channel mixer adjustment is a little bit confusing. Just follow those steps and you should have these
beautiful golden colors. I'm just going to
double click to rename this layer Main color shift. Then since this is
our first layer, I'm just going to group it
with command or Control G. Then I'll go ahead
and rename the group. I'll call it Autumn Day. Then I'll open up the group and select the main color
shift once again. Now we just need to add our
last couple adjustments. First, we have the
selective color adjustment. For this one, I want to add a little bit more
warmth to the photo. I'm going to go to the yellows, and I'm just going to warm
those up a little bit. I'll remove Cyan. Let's remove that all the way. Then I'll add a little
bit of magenta. Then I'll rename this
layer more warmth. Let's finish this
off with a curve. I'll go to the
curves adjustment. To add just a little
bit of contrast, I'll just make a super
small S curve here. Just make sure the midpoint of your curve where it bends
in and changes direction, lines up with the
center point like this. I'll just double click
and rename this contrast. With that, we have our
beautiful macro finished, so I'll just select the
group one more time. Then we can stop the recording and add
this to our library. It's going into the
Practice macros, and I'm going to call
this Autumn Day Practice. Now that we have that finished, we can quickly test
this on another photo, just to make sure it
still looks good. I'll press command or control
O to open up another photo. Let's go with this
one right here. Then I'll go into our
practice macros and I'll apply the
autumn day practice. That just looks so pretty. With the click of a button. Now any photo can
look like autumn. Great work. In the next video, we'll make another macro
from start to finish.
12. Macro Practice - Dark Moody: In this video we'll make
a dark moody macro. This macro is perfect for making your picture look a little
bit more muted and edgy. Let's go ahead and start by applying it to see how it looks. You can see this
definitely makes the picture look
a lot more moody. I'm just going to go
through the layers to see what we're doing here. The very first thing we
do is apply a vignette. You can see how this draws
the focus into the subject. Then we shift the colors, so we have a bit more cyan. You can see the
difference there. Then we desaturate that
cyan just a little bit and add some
orange to the photo, just to make sure the skin
doesn't get too blue. As last, we add just a
little bit of contrast. It's a lot of layers, but
that's actually pretty simple. Let's go ahead and
get started making this macro. I'll delete that. Then we can go ahead and
begin, I'll press record. I'll click off the layer. Now we can add our first layer, which is a vignette filter. Go down to the filters and
then apply the vignette. I'm just going to
shift this around a little bit so that we
can see this better. I want this to be darker, so maybe about like that. I don't want it to
be quite so hard. Let's soften that by
bringing this slider down. We can also scale this up,
maybe not quite that much. Like that. I think that
looks pretty good. Now, something I
always like to do with vignettes is I like to
change the blend ranges. Right now, the
Vignette looks pretty obvious on the light
parts of the photo. But by going to blend ranges and bringing down
the highlight node, you can see the
difference right here. Now it's not muddying
up the highlights, but we still have a nice
vignette everywhere else, which is really nice. Normally, I would now
rename this layer, but it's just a vignette. I'll leave that as is. Now I'm just going to group
this layer with command or Control G.
I'll rename the group. Dark Moody. And then I'll select the vignette
layer once again. Next, we want to shift all of the blue colors
more towards Cyan. We're going to do that with
the channel mixer adjustment. Go ahead and go into the blues. I want to bring the blue
slider all the way down, and I'm going to
raise the greens about to 100 I'm just going to rename this
blue to cyan. Very nice. Next, we want to
desaturate the cyans. I'll go in to our adjustments and apply an HSL adjustments. I'll go into the
Cyan color channel. Let's go ahead and desaturate
this not completely, but just to tone that
down a little bit. And I'll rename this
layer, desaturate Cyan. Next, I want to add
more orange tones. Just to make sure the skin
doesn't look too blue. Let's go in and apply a
selective color adjustment. I'm going to go into the
neutrals category for this. Then I'm just going
to lower cyan and you can see that
really warms up the photo, and I'll just warm
it up even more by adding a little
bit of yellow. Next, I'm going to
go into the reds. I'm just going to
bump up the yellows again and remove some
of the cyan again. Looking pretty good.
I'll just rename this orange skin tones. We just have one
more layer to go. Let's go ahead and
apply a curve. Once again, I'm just going
to make this a super small S curve with that center point
being right in the middle. Actually, I think I went a
little too far with that. I'm actually going
to press command or Control Z until that curves
adjustment is removed, and let's try that
one more time. I thought it looked nice, but I think that was just
a little too intense. I'm just going to make
this a very small S curve. I think that looks a lot better. I'll double click and
rename this contrast. We're done. I'm going to
select the group once again. Then we can finish
making our macro. I'll save this, and we'll just call this dark Moody practice. I'll press. Now we can go ahead and test
this on another photo. I'll press command or Control
O to open up our photos. Let's go ahead and
test it on this one. I'll click to apply it. You can see how dark and moody this makes
this picture look. I actually really like this
effect on this picture because it really draws the
focus into our subject here. All right with that,
we're finished with the basic macros
chapter. Great job. Now that we know all of the basics for the
rest of the course, we'll really dive into
making all sorts of macros and learning
techniques so that you can make any type of
macro that you want.
13. Lighting and Color Macros: This chapter, we'll learn
how to make some fun macros to change the colors and the lighting in your photos. These are some
really fun effects and you're going to learn a ton of different skills.
Let's get started.
14. Vignette: Let's make a simple
vignette macro. This macro is the
perfect finishing touch to bring more focus to the
subject of your photo. Let's start by
applying the macro. You can really see how this is drawing that attention inward. Here's the before and the after. Inside of this group, you can see I just have two
subtle vignette filters here. This one's pretty simple. But the one important feature
that I always use for my Vignettes is to lower the highlights for
the blend ranges. You can see that's right there. Otherwise, it'll just start to look too dark on the highlights. I'll make sure to do
that for each layer. Since this is pretty simple, we can go ahead and just
jump right into it. I'll go to the macro
panel and hit record. Then I'll click off of our background layer and we
can begin adding our layers. I'm going to go
down to our filters and I'll just apply a vignette. For this one, I think I do
want to make it pretty dark. I'm going to lower the
exposure down all the way. I'm going to lower the
hardness to around 10%. But this makes the
Vignette very small. We need to make sure to scale it up and I'll bring it
up to around 200. That's a good start. I'm
just going to go into blend ranges now and I'll
lower that highlight node. Now, I think I will just
go ahead and rename this. I'll double click and I'll
type in subtle Vignette. Then I'll group this layer
with command or Control G, and I'll rename the
group vignette. This is pretty simple. I'm just going to select
the subtle Vignette layer. Then I'm going to duplicate
it with command or Control J. This just enhances the effect a little bit. I think
that's perfect. And we are done. I'm going
to select the group layer. With that selected, I
can go ahead and stop the recording and save
this to my library. I'll put this into
the practice macros and I'll just call it
vignette Practice. Then I'll click Okay. All right. There it is. I'm just going to test this on one other photo. I'll press command or Control O. We can go ahead and choose any of these pictures
in this folder. I'll go with this one. Then I'll click on the Vignette
to see how this looks. Now, this is pretty interesting to see the
Vignette on this picture. Since most of these outer
areas are highlights, the Vignette really isn't
showing up too strongly. But when I turn it off,
you can see that this is making a difference and
drawing the attention inward, which is really interesting. I love this Vignette macro because it just saves
a little bit of time, but it looks good on
pretty much any photo. Now you know how to
make a Vignette macro.
15. Black Tones: This video, we'll
make a macro that really enhances the black
tones in your image. I'll go ahead and apply the black tones macro so that you can see
what this looks like. This macro really adds contrast
to make your image pop. You can see this
gets a lot darker here to contrast with
the white waterfall, which looks really pretty. In addition to that, we can see that we have some color
differences here. We have some more red
tones going on up here than we did in
the original photo. Looking at our layers, this
is actually pretty simple. We start off by desaturating
most of the colors, but boosting the red tones. Here's what that
looks like. Then we use a curves adjustment to darken the shadows of the image. Last, we add a little vignette around the edges to
darken everything. Now that we know what
we're going for, let's make this macro. I'll delete the group, and
then we can begin recording. I'll click off the
layer and we can start by making that
HSL adjustment. Using this adjustment, I'm
going to go color channel by color channel to adjust
these different values. Starting here in the
main color channel, I'm going to reduce the
saturation to negative 30%, and then I'll press enter and move on to the
next color channel. For this one, I'm
actually going to change the hue to negative 15, and I'll bring up the
saturation to 15. In the yellow channel. I'll also adjust the hue to 20, and I'll change the
saturation to 25. In the green channel,
I'm going to change the saturation to negative 30. Then I'm going to change
the luminosity to negative ten in the cyan color channel. I'll change this to negative 50, and I'll change the
luminosity to negative ten. In the blue channel, I'm going to do the same thing, negative 50 and negative ten. And last in the magenta channel. I'm just going to lower the
saturation to negative 50. That was a lot of
different numbers. Hopefully, you
could follow that. Now we're done with
the HSL adjustment. I'll just double
click to rename this. I'm going to call it D
saturate, but boost reds. With that finish,
I'll just group this layer with
command or Control G. Then I'll rename
the group black Tones. I'll just select this layer again and then we can continue. For this next part, I'm going
to add a curves adjustment. I mainly want to darken
the shadows here. I'll darken this
side of the curve. Then I'm going to level
out the highlights so that the white line matches up
to this middle area again. I think that looks pretty good. I'll go ahead and rename
this dark shadows. Last, I'm just going
to add a filter. Let's do the vignette filter. I'm just going to change
this to negative three. I'll change the hardness to 15, and I'll boost the
scale up to 200. As always, I'm just
going to change the blend ranges to bring
down that highlights node. I don't need to rename the
vignette layer. We're done. I'll just select the group. Then I'll finish my recording. I'll call this Black Tones
Practice. All right. And now we can go ahead and
test this on another picture. I'll press Command or Control
O to open up our pictures. And I'm going to go ahead and test it on this
picture right here. I'll go into our practice
macros and I'll apply the Black Tones practice and here's what
we're working with. This doesn't actually
look very good, especially on the skin. She looks very washed
out and strange. Did we mess something up
when making this macro? Well, maybe. But something to
keep in mind with macros is that they might not look good on
every single image. Sometimes you might need a particular look to make it work. Let me show you. I'm just going
to open up another photo. I'll choose this Sepia one. Then I'll apply the Black
Tones practice to it. This picture actually looks really nice with the
Black Tones macro. But what's the difference here? Well, in this
picture, there's not so much skin showing as
the focus of the picture, and it also has
beautiful contrast. You can see that the Black
Tones macro really helps the white horse to stand
out from its background. I think that just
makes this look a lot more striking to
have that contrast, where in this other picture, she's really the
focus of the picture. There's not a lot of
contrast going on. Adding this really creates too much contrast and makes
the skin look strange. In conclusion, for the
black Tones macro, I suggest using a
high contrast photo with not too much skin showing. It's a very intense macro, but it can look beautiful
on the right picture. Now that we're done with
that. In the next video, we'll create a macro that
has beautiful coloring.
16. Polaroid Picture: Let's make a polaroid
picture macro. This macro will make your
picture look faded and have different colors to make it look like a
polaroid picture. I really like the color
grading that we add here. Here's the before and the after. Let's go ahead and
see how this works. The first layer is
actually a pink layer, which adds this pink
color to the shadows. Then we have a yellow layer that adds the yellow color
to the highlights. Last, we have a
curves adjustment to lower the contrast
of the image overall. This is pretty simple,
but we will learn a new technique for how to
add colors to your macro. I'll just delete this and we can go ahead and get
started making this. I'll press record. I'll click
off the background layer. Now I want to add that pink
layer for our shadows. Now, affinity photo
will not let you record a new fill layer
and change its color, which is usually what
I would do for this. A work around is
actually to create a new pixel layer by
clicking right down here. Then you can use the
flood fill tool, which looks like a paint bucket. Go ahead and click on that. Then you can choose the
color that you want. I'm going to choose a
nice bright pink color. Then I'll click in our document to fill this pixel
layer with color. That's the work around for that. I'm just going to
adjust this layer, so it blends with the
photo beneath it. First, I'm going to change
the blend mode to Lighten. You can see how this is mainly affecting the shadows
in the picture like his black shoes or the
instrument case here. I'm just going to
lower the opacity. I'll bring it down
to around 30%. I think that looks pretty good. I'll go ahead and rename
this layer pink shadows. With our first layer done, I'll just group it with
command or Control G. Then I'll rename the
group Polaroid picture. I'll just select the inner
layer again and we can repeat this process to create our yellow highlights layer. I'll add a new pixel layer, and we still have the
fill bucket tool out. I'll just change the
color to a yellow color. I'll click in our
document to apply that. Then I can begin making
adjustments so that this blends. First, I'm going to change
the blend mode to multiply. Then I'm going to lower
the opacity quite a bit to around 15%. With that done,
I'm just going to rename this layer
Yellow Highlights. This last step is pretty easy. We're just going to decrease the contrast by adding
A curves adjustment. Instead of the
traditional S curve, I'm going to reduce the
contrast by bringing this highlight node down,
the shadow node up. Then I'm going to level
out the middle like this. I'll just rename this
layer less contrast. I'm just going to
select the group and we are done with the
Polaroid picture macro. I'll save this and I'll
rename it Polaroid picture. Now we can test it
on another picture. I'll press Command or Control O. I'll just select
the next picture. And then I'll apply it. This one is so beautiful. It really enhances the pastel
soft look of this picture. I think this looks really
nice on this picture. Here's the before and the after. Great work on creating the
polaroid picture macro.
17. Black & White-ish: Let's make the black
and whitish macro. This is a very exciting macro because not only does this black and white
effect look beautiful, but I'm also going to show you how to add sliders
to your macros. I'll just apply the macro, so we can see these
sliders in action. You can really
play up this macro to change what's
emphasized in the picture. In this case, I think I want to make everything dark except for our subject like that so that she really stands
out. I'll apply this. We can take a look
at our layers. As you can see,
super simple macro. We just have a black
and white adjustment, and then we have a
curves adjustment where we add some
colors and contrast. I'll just delete this and we can jump into
making this one. I'll hit record. I'll
click off this layer. Then we can start by adding the Black and white
adjustment layer. For this one, we actually don't want to adjust any of these. We actually just want to
click once on one of them, make sure it stays at 100%, so that this step
appears right over here. Set adjustment parameters. Once you have that, you can
click on this gear icon, and you can see all of the
sliders are visible here. Now, to make all of these sliders when the
macro first opens, we need to make them
visible by clicking on the next to
each one of these. I'll click on that.
If you'd like, you can rename it to
anything you want. I'll just leave this
alone. And then press. Because I've just made
the red slider visible, if I were to stop here, when you apply this macro, only the red slider would
pop up for you to adjust. I need to make sure to
do each one of these. I'll just quickly go through
and make them all visible. You can turn anything with a gear icon into a
visible slider like this. We'll do this more
in later videos. But for this first one, we'll just do it with a black
and white adjustment. I'll close out of this. Then we can go ahead and
group our first layer with command or Control G. I'll just rename the
group black and whitish. I'll select the layer again, and then we can apply
our last adjustment, which is a curves adjustment. The goal with this curves
adjustment is to create more contrast and add a
little bit of color to this. To start, I'm just
going to create a small S curve to add contrast. Then I'm going to go into
the red color channel, and I'm going to create a
larger S curve for this one. This adds red to the highlights
and can to the shadows. Next, we'll go into
the green channel. For this one, I'll
do a medium S curve sitting right in between the
white line and the red line. This adds a little
bit of green to the highlights and a little bit of magenta to the shadows. Last, we'll do the
blue color channel. For this one, I'm actually
going to do a reverse S curve. By lowering the blues. I'm basically adding yellow. In this case, I'm adding
yellow to the highlights, and then adding blue
to the shadows. You can see we
have our black and whitish effects
looking beautiful. It's practically
black and white, but with this little
bit of color, it just makes it a
little more interesting. I'm just going to
rename this layer. I'll call it color and contrast. And I'll just select the
group, and we are done. I'll save this, black
and white ish practice. Now we can test it
on another photo. I'll quickly test it on
this vignette photo. We can just see if the
sliders appear. They did. Because we made each one
of those sliders visible, now we can go ahead and
adjust how these look. That looks beautiful.
I'll just apply that and we can see all
of our layers here. Here's the before and after. This works perfectly, and now you know how to add
sliders to your macros. We'll do another macro with
sliders in the next video.
18. Sepia: Let's create a beautiful
sepia tooned macro. So this macro is like the
brown toned version of the last macro that we
made. Once you apply it. The same thing happens where
all these sliders appear. You can go ahead and
adjust these however you'd like, and then press apply. Once we apply it,
you can go ahead and see all of the beautiful
layers that we have here. There's a few extra
layers that I added in here to create a vintage look. The very first layer is just the black and
white adjustment layer. That's where the
sliders come from. Then we add a curves adjustment
to lessen the contrast. Then we add a brown color using the lens
filter adjustment. Here's where some of that
old tiny look come from. We're going to add a vignette
to darken the edges. Then we're going
to add some noise just to add some
graininess to the photo. Now that we know our
plan, I'll just delete this layer and we can
begin recording the macro. I'll go to the macro panel
and start recording. I'll click off this layer, and then we can begin with the black and white
adjustment layer. With that applied, I'll
just click on any of the sliders to
activate that step. Then I'm going to
turn all of these on one by one to make
the sliders visible. With that finished, we can
go ahead and close that. I don't think I need
to rename this one. I'm just going to
jump right into grouping it with
command or Control G. Then we can rename
the group, Sepia. I'll just open up the group
and select the child layer, and then we can
do the next step, which is lowering the contrast. To do this, go ahead and
apply a curves adjustment. And to lower the contrast. This is the same
thing that we did for the polaroid picture macro. We're going to lower
the highlight node, raise the shadow node, and then level it
out in the middle. There we go. I'm just going to rename this layer less contrast. Next, we're going to
create the brown color. I'll go into our adjustments
and apply the lens filter. For this one, I'm going
to change the color to a saturated brown color. I'm just going to move
the color down like this we have that nice
rich brown color. So that we could see
that color better. I'm going to up the
optical density to 90%. Then we can go ahead and
rename this brown color. This looks really good so
far and you could stop here. But I just want to add
those vintage touches to make this look a
little bit more antique. The next thing we're
going to do is go into our filters and apply
the vignette filter. The values I chose
for this one are negative 3.5 for the exposure, ten for the hardness, and 245 for the scale. As with every vignette. I'm just going to
go into our blend ranges and lower
the highlight node. The last step is going
back into our filters, and I'm going to apply
the add noise filter. I'm going to bring
this up quite a bit. I think to around
20%. There we go. I don't think I'm going to
rename either of those layers. We're done. I'm just going
to select the group. Then we can stop recording
and add this to our library. With that finished,
we can go ahead and open up another picture
to test this on. I'm going to test it on
the polaroid picture here. I'll a fly it. We can go ahead and adjust these sliders however we'd like. I think that looks really nice. Here's the before and the after. Great job. Now that we've done
a few macros with sliders. In the next video, I want to
teach you a new technique. We're going to learn
how to incorporate image overlays into your macros.
19. Orange Bokeh: In this video, we'll learn
how to make a macro that can make any photo have a
magical Boca light effect. This is a pretty exciting one. I'll just click on
the orange Boca macro so that we can see
what this looks like. This is such a pretty effect. I'm just going to
turn this on and off so you can see what
we have going on here. Layers. We only have
a few layers here. The first layer
is the Boca image that we're going to
overlay onto our document. Then we have a layer to
lessen the contrast. Last, we have a gradient
map adjustment that we're going to use to add
some warmth to the photo. So pretty. Now, before
we recreate this, I just want to take
a quick peek into how I found this boca
image in the first place. I found this image
on pexels com. I just typed in Boca. These are the images
that came up. Now, I wanted to
find an image that was on a dark background with just the Boca balls
because I'm going to use blend modes to overlay these
lights onto my design. But you can see there are
so many beautiful ones that you have to
choose from here. You can choose ones
that are more glittery. You can choose ones with
smaller brighter little balls or ones that are a little
bit more colorful. You have a lot of options
to choose from here, but I would stay away from anything that has too
much detail going on. You just want a picture
like this that has just the balls of light
and a dark background. That's how I found our
exercise file for this macro. But you can feel free to use any voc of all image
to create your own. I'm just going to delete this. Then we can begin making
the macro. I'll hit record. I'm going to click off
of the background layer. The first step is
adding that Boca image. I'll go to the top of
the screen to file, and then down to place. I'm going to select this
next image right here. I'll open that up. Then I'll click once in the document
to apply this image. To center this image, you can go to the
top right here. Then you can align it
horizontally and vertically. Go ahead and hit Apply. Then I'm just going to
change the blend mode so that it blends with
the layers beneath it. I'll go ahead and
change this to screen. Next, I'm just going
to rename this layer. I'm going to call it Boca image. Then I'm just going
to group this layer, and I'll rename the
whole group orange Boca. I'm just going to
select the layer again. Then we can add a few more
layers to enhance the effect. For the next layer, I want
to decrease the contrast, but I want to show
you a new way you can do that without
using curves. Another layer you
can use to lessen contrast is the
levels adjustment. I really like this adjustment, but there are a lot of sliders here that can make
things confusing. The first sliders enhance contrast if you
move them inward. These lower sliders will decrease the contrast as
you move them inward. I'm going to go ahead and move the output black slider to 10%, which will just lower the
contrast of the shadows, and I think that
looks really nice. I'm also going to brighten the entire photo using
this gamma slider. This one can brighten or
darken the entire photo. I'm just going to
move it over to the left to brighten things up. I'm just going to
rename this layer. I'll call it less contrast. To finish things off, I'm going to add some nice colors to this. I'm going to go into
our adjustments and apply a gradient
map adjustment. This is way too many colors, so I'm just going to select the green node and then
hit delete down here. Then I'm going to keep
the shadow set to red, but I'm going to change
the highlights to yellow. Once that's done, I'm
going to go ahead and change the blend
mode to soft light. Just so this blends
a little bit better. I'm also going to lower the
opacity down to around 30%. I'm going to rename
this layer warm colors. We're done. I'll
select the group. I'll stop the recording, and I'll save this
to my library. I'll call this orange
Boca practice. This is our very first
macro that we've ever made with an
image inside of it. This image now lives
inside of this macro. You can go ahead and delete the image off of your
computer at any time. It'll always be right here
in the library panel. Let's test this
on another photo. I'm just going to
choose this photo. Then I'll go ahead and apply it. I would suggest using this
macro on a darker image. But this is the only image I had for this chapter
that I thought would work since it's indoors and
has the right look for this. Now, one thing that
you might need to adjust with this macro
is the image size. In this case, I do
think I'm going to select the Boca image layer, and then select the move tool
just so that I can adjust the size of this because it's quite large
compared to the photo. You could go ahead and shift
that downward like that. You could also
rearrange how this is positioned if you wanted it to frame her a
little bit better. That's just a very
quick and easy way to customize this macro. Great job on finishing this
lighting and color chapter. You have a lot of great macro making tools under your belt. We're going to keep on learning
even more techniques in the next chapter as we make some beautiful
retouching macros.
20. Retouching Macros: This chapter, we're
going to learn to make macros that are perfect
for portrait retouching. We'll learn how
to edit the eyes, teeth, the skin,
stuff like that. These macros are going to
save you so much time, so let's get started.
21. Grouped Masks: In this video, I want to teach
you about grouped masks. We're not actually going
to make a new macro yet. Once you understand
grouped masks, you'll be able to make
even better macros. We're just going to
start with this. My goal for this
video is to change the color of the hat and
enhance it a little bit. I need to use a few different
adjustment layers for this, I only want these adjustments
to be applied to the hat. Here's the technique for that. First, go ahead and
apply an adjustment. I'm going to apply
the HSL adjustment, and then I'll change the color. Once you have your adjustment, we can go ahead and
put this layer in a group with command
or Control G. Now that we have a group, we need to add a mask to it
to create our grouped mask. I'm going to go down here
and click on the Mask icon. By default, this will
apply a white mask, which means that everything
in this group is visible. But I actually want
the opposite of that. I'm going to invert this by pressing command or control I. Now that this mask is
inverted and black, I can grab my brush tool and
paint in white paint with full flow to reveal the adjustments that
are inside of my group. I'm going to go ahead and paint over the edges of this hat here. Then I'll just fill it in. I'll use the bracket
keys to make my brush a little bit
smaller for the edges. If you ever paint too much, you can hit x on your keyboard to switch your color
from white to black. I'll just erase a little bit. That was the basic setup for
creating a grouped mask. Just apply an
adjustment, group it, apply a mask to it, invert it into black, and then you can
paint over the area. With that setup, we
can actually apply as many adjustments as
we want to this group. The first thing I'm going to do is I'm going to
select this layer, and I'm just going to adjust
the hue and the saturation. Then I'll apply a
curves adjustment, and I'll darken the
color of the hat. Notice only the hat is
changing as I do this. That's the magic
of grouped masks. Last, I'm going to
apply a filter. I'll apply the high pass filter. I'll really boost the radius, and then I'll change
the blend mode of this to soft light. This will just add
some nice sharpness so that we can see the
detail of the knitting. It's so nice that we
don't need to select the hat over and
over as we do this. Grouped masks are
so nice like that. In the next few videos, we're going to put
grouped masks into action with some beautiful
retouching macros.
22. Teeth Whitening: Let's make a teeth
whitening macro. Whitening teeth can take a lot of different
adjustment layers. Making a macro for it
will save a lot of time. Let's start by just seeing
what this macro looks like. I'll click on the teeth
whitening macro and you can see that at first it
looks like nothing happens. That's because we have a black mask applied
to this entire group. The way to use this
macro is to grab the brush tool and paint in white paint over the area that you want to
apply the macro to. I'll just paint in white over the teeth to reveal what
we have going on here. You can see we have some
beautiful white teeth. I'm just going to
turn the layers off so that we can see what
each one of these does. The first layer is a
desaturate yellows layer. Here's what that
looks like. You can see it makes the teeth look
a little bit more gray. We'll need to brighten them
up a little bit more with the next two layers where
we'll brighten up the shadows. Then we'll brighten
up the highlights. Now, this brightened highlights layer is a little bit different. We'll not only be
brightening the teeth, but we'll also add a
little bit of blue. That way, it just counteracts any leftover yellow that's
still on the teeth. This is a pretty
fun one. You can see that it brightens
the teeth quite a bit. If you ever feel like it's
too much for your picture, you can always just
lower the opacity down. I'll just delete this so
that we can begin recording. I'll hit record. I'll click off the layer and we can begin. First, I'm going to apply the HSL adjustment to
desaturate the yellows. I'll go into the yellow channel, and then I'll lower
the saturation to negative 75%. I'll
close out of this. Then I'll just rename this
layer desaturate yellows. Then I'll go ahead and group this layer with
command or Control G. I'll just rename this
layer, teeth whitening. Up until this point,
everything has been pretty normal
for making our macro. We applied an adjustment,
we grouped it. But here's where things get interesting because we want to apply a mask to the entire group with the group still selected. Go ahead and hit the mask icon. This will apply a white mask, but we'll want to invert this
with command or Control I. What we've done is we've applied a black
mask to the group, which means that we
won't be able to see any of the rest of the adjustments that we apply to this macro. That makes it a little
bit tricky to film. But as long as you
plan ahead and you know the amounts that you
want to adjust everything, you should be just fine
to record this macro. Don't worry, I'll walk
you through all of the adjustment layers so that
this isn't quite so tricky. Go ahead and select the
desaturate yellows layer. Then we can go ahead and apply the rest of the adjustments. First, I'm going to apply a curves adjustment.
I'll brighten the curve. This one is going to be used
for brightening the shadows. I'll go into blend ranges, and I'm just going to lower the highlight node
and bring it over so that this bright curve is only affecting the
darkest shadows. I'll just rename this layer. Brighten shadows. Let's do that one more time. I'll add a curve, and
I'll brighten it. But this time, I'm going to
add a little bit of blue. I'll go to the blue
channel and raise that. I only want this applied
to the highlights. I'll go into blend ranges. I'll leave the
highlight node raised, and I'll lower the shadow node, so it's no longer
applied to the shadows. I'll also bring it over halfway. I'll rename this layer.
Brighten highlights. Normally, at the end
of recording a macro, I would select the group. But this time, I want
the macro to start on the black mask
whenever it's applied. That way, people can jump
right into painting on it. Unfortunately, you can't
just select the mask layer. If you try. It just won't work. I'll jump to a different layer. I'm going to hit
command or Control Z. Instead, what you need to do to select the mask is actually
selecting the group. And then go ahead and
select the mask layer, and now it should
work just fine. I'll just stop the
recording now, and I'll save it
into our library. I'm going to call it
teeth whitening practice. Now we can go ahead
and test this. I'm going to open up this
subject enhance photo for this. She has such a beautiful smile
that we can apply this to. I'll just click. And you can see that because we
ended on the mask layer, it's already selected
when we apply this macro, which is perfect. I can just grab the paint brush, switch my color to white, and then I can paint over the
teeth to apply the macro. Now, she already has
pretty white teeth, I might need to lower
the opacity quite a bit. But before I do that, here
is the before and after of that. Very nice. I think for this
picture, I would just lower this
down a little bit. But you can still
see that we have whitened up the teeth to
brighten up the smile. Very nice. I'm so glad
this macro worked out. It's a little scary
recording with a black mask. But because we planned
ahead and knew what we were doing,
it wasn't too bad. Now that we've recorded
our very first macro using a black grouped mask. This will make the rest
of the chapter so much easier because we're actually going to do this
a few more times. In the next video,
we're going to use a grouped mask to make a
macro that enhances the eyes.
23. Enhance Eyes: In this video, we'll make a
macro to enhance the eyes. Eyes need multiple
adjustments to look good. We'll break this macro down into three different parts
to apply all of the different lighting and color adjustments that will really make the eyes look good. First, let's take a
look at our macro. You can see this macro
also has a black mask. But it actually has a
few more black masks because there's just so
much to add to the eyes. To start, I'm going to grab the paint brush and I'm going to paint in white
paint over the eyes. For the first black mask, I'm going to paint
this over the iris of the eye and over the pupil, just paint it over
this whole area, and I'll do that for every
eye in this picture. Painting over all of
the eyes is step one. What this is doing
is it's revealing this base edit group down here. To see this, I'll just zoom out, so we can see all of our eyes. Then I'll turn these layers off so that you can see
what each one is doing. First, we have a
sharpening layer that adds sharpness to the eyes. Maybe I'll just in like this.
We can see this better. Here's the before and
the after before after. Then we add a little bit
of saturation to the eyes. Here's the before and after. I think you might
be able to tell a little bit better
with the cat's eye. Here's the before and after. Then we add a brightness
and contrast layer, and that's our base edit
for the entire eye. Next, we have a layer that will enhance a dark rim
around the eye. To do this one, you
just need to select the layer and then paint in white paint around
the rim of the eye. Now, because we've already painted very carefully
over the eye, we actually don't
need to be as careful with this part
because our painting will be contained
to the area that we originally painted in,
if that makes sense. We just need to paint
around the rim like that. As you can see,
this just darkens the rim to enhance
the outer edge. Last, we have one more
layer called kicker light. This layer is for enhancing any of the bright
spots in the eyes. I'm just going to
paint it over all of the bright highlights that are reflecting off of the eyes. Wow, you can really
see a difference now. Here is the complete before and after of our
eye enhancements. This is such a beautiful
way to enhance the eyes. I'm just going to delete
this group so that we can try making this
macro for ourselves. I'll go to the macro
panel and hit record. I'll click off the layer,
and then we can begin. First, I'm going to apply
a sharpening layer. I'll go to my filters and I'll apply the
high pass filter. I'm going to bring the
radius up to five pixels. Then I'll change the
blend mode to overlay. I'll rename this
layer sharpening. Then I'll just press command
or Control G to group this. This is going to be
the entire group. I'll rename this enhance Is. With this group still selected, I'm going to apply a mask to it, and then I'll invert the
mask with command or Control I. I'm just going to open up this group and I'll select the
sharpening layer. Then I'm going to
group this layer one last time with Command or Control G. I'll rename
this group base it. That was a lot of
different groupings, but now that we have this setup, we should be able to easily create the rest of this macro. I'm just going to select
the sharpening layer. Then we can apply
the next layer, which is an HSL adjustment. I'm going to go into
our main color channel, and I'll increase the
saturation to 10%. Then I'll rename this
layer saturation. Keep in mind that we won't be able to see any of the rest of our adjustments because we
have this black mask of flide. I'm just following my
notes for how much to adjust everything here since
we can't actually see it. For the next layer, I'm going
to add a brightness and contrast layer and I'm going
to brighten this to 15%. I'm going to raise
the contrast to 5%. I don't want to over
brighten things. I'm actually going to go into blend ranges and I'll
lower the highlight node. Just to make sure that we don't over brighten this
highlight spot here, since we're going to paint over it later to really
brighten it up. Now that we're done
with that, we're actually done with
this base edit group. I'll select it. Now
our next layers will go on top of the group. They won't be inside of it
like the rest of these. The next layer I want
to add is a curve. I'm going to darken the curve. Then I'm going to invert this layer with
command or control I. You can see that this applies a black mask to this
curves adjustment, which means that we won't
be able to see it and we'll need to paint over it to
reveal this darkness. I'm going to call this dark
rim because that's what I want people to paint around
to reveal the darkness. I'm going to add another curve. This time I'm going
to brighten it. And I'm going to change
the blend mode to overlay. I find that this
looks a little bit better for brightening
those light spots. I'll also lower the opacity
of this layer to 50%. Just to keep it a little
bit subtle and last, I'll invert this layer
so that we won't be able to see it and we'll need to paint over it to reveal it. I'll rename this kicker light. There's actually one more layer. I really don't want
this lighting to become too sharp and harsh on the eye. I'm actually going to go
into our filters and apply a gaussian blur to blur
the kicker light layer. I'm going to raise the
radius quite a bit. I think I'll bring it
up to around seven. Then so that this only applies
to the kicker light layer. I'm actually going to
go up into our menus. I'll go to a range. Then I'll click on move inside. This makes the Gaussian blur a child layer to
the kicker light, which is why it was hidden
when we first applied this adjustment and
I forgot to show it to you. But there's that. This will make that
lighting a lot more soft. Now to finish off, I just want to make sure we have our first black mask selected. Right now I have the
Gaussian blur selected, so I need to first select
this layer, it's parent. Then I'll select the
overall parent layer. Now we can finally
select the mask layer. With that all done, we
are finished recording our macro and would you
look at all of those steps? Wow. That was a lot. I'm just going to save this and we'll call this I
enhanced Practice. With that done, we can test it. I'm going to test it on
the teeth whitening photo. I'll just zoom in here so
we can see this better. Then I'll click on the
eye enhanced Practice. Automatically, we
have the black mask selected, which is perfect. All I need to do is paint in
white paint over the eye. Then I can go down here
and paint on the dark rim. I might have painted
too much there. Last, we can paint
in white paint once again to reveal
the lighting. Now we can see the before and here's the after
of that e enhancement. I might have painted a
little bit too for the dark. I'm just going to go in here and soften that by painting in black. There we go. Here's though before
and after and feel free as always to lower the opacity
if it's too much. But I think this is such an
interesting and fun macro, and it really saves
so much time. You saw how many steps we
had to add to that macro. But we painted this over his
eyes in just a few seconds. I think this is
just a great macro to have over in your library. In the next video, we'll
take a step back and make a simpler macro that adds beautiful detail
to your photos.
24. Detail Extractor Brush: Let's make a macro to enhance
the details in a photo. I'm calling this one, the
detail extractor brush because you simply
paint on a mask and all of your
details come to life. Let's take a look at the macro. Once again, we'll be painting in white to reveal what's
inside of our group. I'll grab the paint brush, and I'll paint in white
paint to reveal this. I'll just paint
over her eyes and the flowers on her face
just to enhance them. Anything where you want
the detail pulled in, maybe even the lips
or things like that. Then we can go ahead and turn
this off to see the before and here's the after
before, after. This one's actually
pretty simple. As you can see, the layers are just three high pass filters
to enhance the effect. Since this is so simple, I think we can go ahead
and just get started with this. I'll begin recording. I'll click off the layer, and then I'll go to our filters and apply a high pass filter. For the high pass filter, I prefer using a
smaller radius and then duplicating that
high pass filter to really enhance the fine
details over and over again. You could boost the radius
quite a bit to sharpen more. But what this is doing
is it's sharpening more areas in the photo that you probably
wouldn't want sharpened. By just using a very
small two pixel radius, I can really help
to just enhance just the areas that
you want to enhance, like the eyelashes and
the iris of the eye, not all of the little red veins in her eye or other
areas like that. Set that to two pixels, and then let's change the
blend mode to soft light. With that first layer done, I'm just going to group this
with command or Control G. Then I'll rename
this detail extractor. At this point, I'm just going to select our hi pass layer, and I'm going to duplicate it twice with command or Control J. With that done, I'll just
select the group again. I'll apply a mask. Then I'll invert this mask with
command or Control I. We're done. With that
mask still selected, I'll go ahead and finish off recording the macro
and I'll save it. I'll call this detail
extructor practice. There we have it. Now we can go ahead and
test this on another photo. I'll test it on the eye photo. I'll apply this and we can just paint in white over the
eyes to enhance them. Oops. Make sure you're painting
in white. There we go. Here's the before and after
sharpening up the cat's eyes. I think that looks really
nice. It's very subtle. If you want to
really enhance this, you can always
duplicate the group, but I think that might be
a little bit too much now. Here's the before and after
of that. Very nice work. Now that we know how to enhance the small details in our photo. Let's learn how to make the skin look better in the next video.
25. Skin Smoothing: This video will
enhance the skin. This skin smoothing macro is perfect for quick and
easy skin smoothing. Let's take a look at
what this looks like. Just like all of the other
macros that we've done so far, we'll need to paint
in white paint on a black mask to
reveal this effect. I'll grab my paintbrush and I'll paint in white paint
with a low flow. Then I can begin to
paint over the skin. Now, you can see the skin has
a few little bumps on it, and as I paint over those
bumps, they're reduced. This is even more
apparent on the chin, where we have some larger bumps. I'll just paint over
those to minimize them. Here is the before and after and for the cheek up
here before and after. We're making this happen
through frequency separation. Frequency separation
will separate your photo into two layers. One that has all of
the colors on it, and the other that has
all of the texture. What we're doing
is we're blurring the colors layer and leaving a nice layer of
texture on top of that. That's why you can
still see skin texturing and it doesn't just
look like a blurry mess. Making this macro is
actually pretty easy. I'm going to start my recording, and I'll click off the layer. The first step for this macro is to go up to our
menus to layer, and then down to where
it says Merge visible. I'll use this layer for the
frequency separation step. It'll be cut into
two separate layers. That way, the
original photo layer won't be destroyed
in this process. I also chose not to duplicate this background
layer. I merged it. That's because you might apply this macro and have other
layers that you've been working on like a layer to brighten the photo
or do other edits. By merging, all of those edits that you
might have been working on will all become one layer that will
apply the effect to. Before I apply frequency
separation though, I'm just going to
group this layer, and then I'll rename
it, skin smoothing. Now I'll just select this
layer again and we can apply the frequency
separation by going to the top of the
screen to filters, and then down to
frequency separation. I'm just going to leave this
at the default settings. But I just wanted
to quickly show you the high frequency side has all of the skin
texture on it, and the low frequency side has all of the
fuzzy colors here. You can really visually see
the difference right here. I'll hit apply. You can see that that merged layer has now become these two layers. I'll select the low
frequency layer. And then I'll duplicate it
with command or Control J. Using this duplicate copy, I'm going to blur
this duplicate, which will create that
skin smoothing effect. I'll go to our filters and
I'll apply a gaussian blur. Then I'll just
increase the radius of this to around 12 pixels. I'll also turn on
preserve Alpha. With that done, I'm just going to make sure I select
its parent layer. Then I'm going to
apply a mask to this layer and I'll invert it
with command or control I. Now we'll need to paint
on this black mask to reveal this nice blurring
effect over the skin. I actually want to stop
it here with this mask selected so that whenever
you apply the macro, that mask will be selected
and ready to paint on. I'll stop the recording and
I'll save it to the library. I'll just call this skin
smoothing practice. Okay. Now we can test
it to see how it works. I'll apply this. Then I'll grab my paintbrush and I'll paint in white paint to reveal this. I'm keeping my flow nice
and low so that I can gradually build up my paint
to reveal the effect. By painting over this area, I'm just reducing the look of all of those
pores on the skin. Here's the before and that might be a little
bit too intense. You can always paint in black paint to reveal
some of that back again. Here's the before and after. I also want you to
keep in mind that as you're using
frequency separation, it's important to stay on flat areas of the
skin like this, rather than painting
on the very edges. If you paint on the very edges, they can look pretty strange. I'll just paint on the edge of this nose to show you that. Look how soft and
strange this looks. You're taking away detail
from areas where it really matters or the
edges of the lips. This can look pretty strange too as you blur
these colors out. Here's the before and after. As you're using this, just be sure to avoid any
areas like that. Even on this picture, blurring the edges of the flowers would
look really strange. That's just a little
advice for you. Just be careful as
you're painting. In the next video,
we're going to make a macro for dodging and burning.
26. Dodge & Burn: Let's make a macro for
dodging and burning. Dodging and burning is the
technique of darkening and brightening different parts of your photo to add
or remove contrast. Let's take a look at
how the macro works. This macro is a little bit
unique because we have four different black masks
that we'll paint on top of in white paint to reveal
their different effects. The first two are for darkening different parts of the photo. You can darken the highlights
or darken the shadows. Then down here, we can brighten the shadows
and highlights. Let's do some painting to see how you would
practically use this. I'll paint in white
paint with a low flow. First, we'll darken
the highlights. This is for any areas that you don't want the
attention drawn to. You might paint dark paint over the hairline
and over the neck, to frame the face and bring
the attention inward. Another area you
might want to darken are the eyebrows and eyelashes, to draw the attention there. You might also want
to darken the lips to add more emphasis
to them as well. For darkening the shadows, I would honestly darken some
of those same areas again. The hair line, just
darkening those areas. You can also come in
here and darken some of the shadows of the
hair to add contrast. Again, you could darken
the eyebrows and the eyes to enhance them. Next, we can brighten areas. Some areas you might
want to brighten for shadows are under the eyes. You also might want to
brighten areas like the center of the forehead
to bring attention, maybe the center of the chin. I think that looks pretty good. Last, we can brighten any highlight areas that
we want to enhance. In this case, I think I want to brighten the
highlights that are on the lips to make them
look nice and shiny. Maybe I'll just enhance the highlight that's on
her cheek right here, and the highlights of her hair. With that, I'll just turn
this off so that we can see the before and the after. It's a pretty
dramatic difference. She's the same person, but we've just changed
up the lighting. As we're making this macro, basically it's a simple
curves adjustment for each of these layers with different blend ranges depending
on what we're doing. Here we're darkening
the highlights, which means we need to
keep the highlights node raised and
lower the shadows. We'll make those adjustments
depending on the layers. In addition, each
of these layers has a gaussian blur
applied to them. That way, all of our painting
just stays very soft. Now that we know
how all this works, we can begin
creating this macro. I'll begin recording. I'll click off the layer, and we can start by adding
our first curves adjustment. To start, I'm going to Brighton, so I'll make this
a brighter curve. Then I'll go into
our blend ranges and I'll lower the shadows node. Now this brightness is only
affecting the highlights. I'm going to invert this layer
with command or control I. Then I'm just going to rename this so that we don't
forget what it is. This one is for brightening
the highlights. As a last step,
I'm going to go to our filters and add a
gaussian blur to this. I'm just going to raise
this five pixels. To make this a child
layer to our curve. I'm going to go to
the top to arrange, and then I'll go to where
it says, move inside. Now that's a child
layer. That's perfect. I'll just select the
main layer again. Then I'm going to
group this layer with command or Control G. I'll just re this
dodge and burn. With that setup, we can
select the child layer again and I'm going to duplicate this with
command or Control J. We already have a bright curve that has a gaussian
blur applied. I just want to change
this so that it's brightening the shadows
instead of the highlights. I'm going to go
into blend ranges, and I'm just going
to reverse this bringing down the highlights
and raising the shadows. Then I'm just going to rename
this bright end shadows. Now we can go ahead and
darken parts of the photo. I'll add a brand new
curves adjustment for this and I'll darken it. I'll go into our blend ranges, and I'm going to lower
the highlight node so that this is only
affecting our shadows. I'll invert this with
command or control I. Then I'll rename
this darken shadows. As a final step, I'm going
to add that gaussian blur to this one and I'll raise
it to five pixels. I'll go up to a range and
I'll move this one inside, so it becomes a child layer. Then I'll select the
main layer again. We just have one more
layer to create, and I'll do that with
command or control J. I'll go into our blend
ranges and reverse this. Then all I need to do is rename this layer, Darken Highlights. With that top mask
layer selected, I can end my recording
and save this. All right, Let's
see how this works. I'll open up a new photo. And then I'll apply
that practice macro. I'll get my paint brush
out with white paint, and then we can begin adjusting how things are
brightened and darkened. With that, you can see
that before and after. I just wanted to quickly show
you that this does work. But in addition to brightening and darkening parts of the face, you can always brighten and darken different
parts of a photo. It doesn't just have to be
the face of your subject. If you have a really bright background that
you want to darken, you can totally do that. In fact, I might do that with
this photo really quick. This area is a
little bit brighter. If I want to darken
a bright area, I can go to the darken
highlights and paint and white paint just
to darken this area. Now you can see the
before and after of that. I think this is such
a useful macro. All right, to finish off this
chapter in the next video, we're going to make a macro that really helps your
subject to stand out.
27. Subject Enhance: In this video, we're
going to create a very unique macro that
will enhance our subject. This macro is super unique
because we'll be using it to brighten our subject
and darken the background. This will make the
subject really pop from the background
and stand out. To see how this macro works, the first step to using this macro is to
make a selection. I'm just going to make
a rough selection of my subject here. You select too much, you
can always hold down Alt or Option and then just
click and drag to remove. Just a rough selection like that so that I can show you
what this looks like. Once you have your selection
of your subject loaded, you can click on the
subject enhanced macro. Now you can see,
we've brightened the subject and darkened
the background. Here's the before and after. This is a very unique macro. We don't need to do
any painting on it. We just need to have
that selection loaded. Click on the macro and
boom, you're done. Let's take a look at the layers
that we use to get there. First, we have a layer that
brightens our subject. Then we invert our selection
so that the background is selected and we'll darken the background and we'll
blur the background. While these steps are
all pretty simple, it can be a little
complicated to understand the selection
process through this. Recording the macro makes this a little bit more
complicated still. I'm just going to delete this and show you my process
of recording the macro. But there is a little
bit of a problem, so maybe don't follow
along quite yet. First, you have your
selection made. Then you start
recording your macro. Here's where you start to
run into some problems. I'm just going to apply a
quick brightening adjustment. Then I'm going to go into our blend ranges
to adjust these. Here's where things start to
go wrong. As I lower this. Look over in the macro panel. All I'm doing is lowering
this down and it gave us 30 different
steps here to record. I think this just has
something to do with having the selection up as
you're making a macro. Affinity doesn't like that. I've created a workaround
to avoid this issue. I'll stop the
recording and reset. Then I'll deselect this and
I'll delete this layer. Because having a selection loaded is such an
issue for affinity. Instead, I'm going to begin recording without having
a selection made. I'm going to assume
that people who use this macro do have
a selection made. But just during the
recording process, I won't have a selection. I'll begin recording and
I'll leave this layer selected since our user of this macro should
have something selected. I'll just leave that as is. Then I'll begin to
apply our adjustments. First, I'll apply a curve. I'm going to brighten
this but level out the shadows like that. Then I'm going to bring the
highlight node down just so some of these highlight
areas don't get too blown out. In blend ranges, I'll
lower this down. You can see we didn't
have that weird issue where all those steps appeared. That was a good work around. Now, I'll just rename this
layer, Brighton subject. I'm going to group this layer
with command or Control G. Then I'm going to rename
this group subject enhance. I'll select the Brighton
subject layer once again. Here's where things
get a little weird. I'm going to invert our selection with command
or control, shift, I. I know this looks weird since we
had no selection made, and now there is a
selection going on. But when we use
this macro later, this will work perfectly. I'm going to move
on to adjusting our background
with a dark curve. I'll darken this. I'm also going to adjust these points
to reduce the contrast. I raised the shadow side and
lowered the highlight side, and overall just darkened
everything down. I'm going to rename this
layer, darken background. As a last step,
I'm going to apply a gaussian blur to
blur the background. You can blur this as
much as you want. But I found two pixels
is a subtle blurring, and I'll also make sure to
check on preserve Alpha. I'll just rename this
layer, Blur background. To finish off this macro, I'll deselect by pressing
command or Control D. That way, your selection that you had made will just become unselected at the very end and I'll select
the group, and we're done. I'll stop this and save this. I'll call this subject enhanced. Now we can test this out
just to double check that it worked since that
was a weird process. I'm going to open
up another photo. I'll make our selection
to start it off. I'll refine the selection. I'll paint this over
the edges of her hair. Just to tell affinity to
take a second look at those areas. I'll hit apply. Now I'm going to click on our subject Enhanced
Practice Macro. And you can see
that that did work. We've frightened the subject and darkened the background and dulled it down. I think
that looks great. I know that was a little bit
of a funky macro to record, but I really like using the subject enhanced
macro on my photos. To end off this video, I just wanted to mention that the same technique could be
used on just about any macro. If you want your subject to
look warmer, for example, you could select the subject and then apply the
warm colors macro. The macro will
only be applied to what you have selected,
which is pretty cool. All right, and with that,
we've finished the chapter. Now that we learned
about how to create so many beautiful and
practical macros. Let's have some fun
in the next chapter as we make some
special effect macros.
28. Special Effect Macros: All of this realistic
editing has been fun, but it's time to
shake things up. In this chapter,
we're going to make some really fun
special effect macros. I think you're really
going to like these, so let's get started.
29. Gradient Effects: In this video, we'll make
a gradient macro that will have multiple layers with
different color combinations. As we know, macros are super useful because with just
the click of a button, a really cool effect is applied. But what if you
could apply a bunch of really cool
effects all at once? Let's go ahead and apply
the gradient effect macro Once this is applied, you can turn these layers
on and off to apply different color combinations to find just the right
one for your photo. You wouldn't want to turn all of these layers on all at once, but it's pretty nice that all of these combinations are
quick to click through. For each of these layers, it's just a simple gradient map adjustment with two colors. Really simple. Nothing
too fancy here. To make this macro,
I'm just going to delete this and
then we can begin. I'll hit record and
click off the layer, and then we can go ahead and add our first gradient
map adjustment. For this first one,
I want to make these colors look like
pretty pink cotton candy. I'm going to delete
this center node. Then I'm going to make the
shadows a nice pink color. And I'll make the highlight
a nice yellow color. I just roughly
added those colors, but if you'd like to make the exact same macro that I made, you can type in this color code. I'll just put those up on the screens that
you can see them. The highlight color
is the yellow one and the shadow color
is the pink one. Just type in those
codes and press enter, and you should be good to go. With that finished,
I'm just going to rename this layer cotton candy. Then I'll group this with
command or Control G, and I'll rename the
group gradient effect. Go back in here, I'll
select the child layer, and then I'll turn it off. As we go, we'll turn off each of these layers except
for the very last one. Now I'll just add another
gradient map adjustment. I'll delete the center node. For this one, I want to make the colors look like hot cocoa. These are the color codes
that I used for this. For the shadows, it's
a purple brown color. For the highlights, it's
a nice soft yellow. I like that these colors look
like sepia, very pretty. I'm just going to
rename this hot cocoa. Then I'll turn off the layer
and we can make another one. I'll add another gradient map. For this one, I want
to do some blue colors just to mix it up a little. For the shadows, I'll make
it this nice blue color, and for the highlights, I'll make a nice
light pink color. For this one, I'm just going to call this blueberry muffin. Remember to turn off this layer, and then we can go ahead and
add another gradient map. I'll delete the middle node. I'll go ahead and
make the shadows a nice, yellow green color. I'll make the highlights
of peach color. I'll rename this
one Carmel apple, and I'll turn off the layer. Just for good
measure, I want to do one last one that has
very bright warm colors. I'll add a gradient map. I'm going to make
the shadows a n d, bright red, and I'll make the highlights a
buttery yellow color. I'll just call this
one buttery waffles. I just thought these
food names were cute. With that, we can
go ahead and leave the buttery waffles layer on and we can stop
the recording. I'm just going to call this
gradient effect practice. Let's test this macro
on another photo. When we apply this
macro, as we know, we have all of these fun
flavors to choose from. I think I'll just use
the buttery waffles one. With this gradient effect, you could leave
the colors as is, or you could click into the adjustment and click
to add a center point. Once you've done
that, you can move the center point from side
to side to affect how much of the colors show up as this yellow highlight color
or the dark shadow color. For this one, I think
I'll just move it over to the left to brighten
things up a little bit. In addition to changing
that midpoint, you can also adjust the
blend mode or the opacity. To make the effects look
a little more subtle. In this case, I
think I'm going to change the blend mode to screen. Just you can still see the beautiful colors
of the bird here, and I'll also lower the
opacity down halfway. Now it's more of a subtle look. Here's the before
and after of that. With that done, I think now would be a good
time to point out that you can always add more and more macros
on top of this. For this one, for example, maybe you'd like to apply
the dark moody effect. There it is. Just to
add to the moodiness. Maybe you even want
to add a vignette. You can do that now
too. You can layer as many macros as you
want on top of each other with just the
click of a button. You have this really
cool effect instantly. Let me just show you
how this looks now. Here's the before and
after of this picture. Still dark and moody, but a different effect. I really like macros
that you can just click once like this
dark moody one, and it'll apply a really
cool effect instantly. But I also like this
technique of having lots of different adjustments
all in one place. I think that's really
fun and useful too. In the next video,
we're going to do another fun special effect
to create a dreamy haze.
30. Dreamy Haze: Let's make a macro that
has a dreamy hazy effect. First, let's take a
look at the effect. We can see here that the effect looks like you're
in a dream or that the person in the
photo is an angel or something. It's pretty fun. I'll just turn off
the layers so that we can see what we're
working with here. To create this effect, we need to create a
duplicate copy of our photo with a
motion blur on it. Here's what that looks like. Then we'll add a curve
to create some contrast. Then we'll actually
use a gradient map to add some peachy
tones to this photo. Then we'll add a layer that
adds some more sparkles. You can see this especially
in the background here. Here's the before and after. Last, we'll add just
a little bit of noise to really seal
in this effect. With that, we have
a very unique look. It took me a while
to figure out how to do this. I hope you like it. Let's get started
making this one. I deselected the layer. Now I'm going to start this off by merging all of
our visible layers. I'll go to the top to layer, and then down to where
it says merge visible. To this layer, I'm
going to add a filter, and I'm going to add
the motion blur. I'm going to increase
the radius up to 100. Then I'll select
the parent layer. I'm going to change this layer
to the screen blend mode, and all over the
opacity to around 65%, just to make this a
little more subtle. But I think this
looks really nice. I'm just going to
go ahead and rename this main layer, blur image. Then we can go ahead and
group this first layer. I'll just rename
this dreamy haze. Okay Let's select
the child layer again and we can
continue adding layers. Next, I'm going to add
a curves adjustment. I'm just going to create a tiny little S curve
here to add contrast. Raise the highlights,
lower the shadows. I'll just rename this contrast. Next, let's do a gradient
map to add those PG tones. I'll delete this
center point here. For the shadows, I'm
going to type in F AD 00. Then for this other side, I'm just going to make
this fully white. It should just be
all the way across. There we go. Now I'm going to change this
adjustment to soft light. I'll lower the opacity
down to around 25%. Then we can rename
this peach tones. Next, we're going to add some
sparkles and I figured out, you can do this with a filter. Go ahead and go up
to maximum blur. You can raise the radius 210. Then you're going to want
to turn on circular. Right now, this is creating
all of these sparkles, but they're all squares. If you turn on circular, this will just smooth those out. I think that looks nicer. I'm going to lower the
opacity to 50% for this one. Then I'm going to rename
this layer Sparkles. One last layer, let's go into our filters and apply
an add noise filter. I'm just going to
bring this up to 8%. With that, we can select the main group layer
and we're done. I'll end the recording
and save this one. Let's go ahead and test this. I'll test it on this one here. You can see how this one looks. I like using this macro on
pictures that are taken outside like this or pictures that have
a lot of sunlight. The haziness and the
light that this macro adds will play into
that sunshine. Great work on this
macro. In the next one. We're going to turn a photo
into a pencil sketch.
31. Pencil Sketch: For this video, we'll make a macro to turn our photo
into a pencil sketch. Let's apply this to
see how it works. When you apply it,
a slider comes up that allows you to change
the pencil strength. However, this slider is
actually super sensitive. I'd rather just
type in a number. For this one, I'm just
going to type in eight. I think that looks pretty
nice for this one. I'll hit apply, and then we
can go over to our layers. What's going on over here? There's a lot happening. Well, first, We have
this layer here. This is a merge visible layer with a Gaussian
blur added to it. A lot has happened
to this layer. Some of it's hard to explain, but we started with a
layer that was inverted, and then we changed it to the color dodge
blend mode and then a blur was added to help
us see the details again. It's a lot of weird
technical stuff that magically all works
itself out in the end. I don't really want to
explain the science behind it because I don't
fully understand it, but this technique makes a really beautiful
pencil sketch effect, just follow these steps
and you'll be good to go. Once we've done that
confusing step, we're going to
desaturate it with an HSL adjustment to
really make it look like pencil and
then we're going to darken the pencil lines by
using a levels adjustment. Finally, we top it all off with this layer that isn't
technically doing anything. This is a clean up layer that allows you to paint
in white paint over your document to remove anything that you don't want a part of your pencil sketch. In this case, I would
probably paint. Let me just raise the
hardness and flow there. I would probably
paint over anything that's not the
woman and her bird. Anything in the
background like that, you can just paint
that away to remove those details and that cleanup layer is
useful for doing that. So I won't do all of that, but that's what that layer
is for before and after. One last thing before
we start making it, you remember that slider
for pencil strength? Well, that was actually this
gaussian blur down here. The more you raise
the gaussian blur, the more of the image
that you can see again. That's what that one's doing. As we make this, we'll make sure to turn on the gaussian blur to make it visible so that we can have that pencil
strength slider. Now that you know
how the macro works, I'll delete this and we can begin to make it for ourselves. I'll begin recording and I'll click off the
background layer. Then I'm going to go up to
layer and merge visible. For this merge visible layer, I'm going to invert the colors
with command or control I. Then we're going to change the
blend mode to color dodge. You can see a lot of the
details have disappeared now. We're going to add that
gaussian blur layer next. This will reveal
the details again. I'm going to type in two. That's our Gaussian blur there. I'm just going to
make this visible over here in the macro panel. I'll turn that on,
and I'm going to name this pencil strength. Now that'll be visible and pop up whenever you
click on this macro. Coming over here, I'm just going to select
the parent layer. I'm going to name this merge
visible just so we can remember how we made this.
Then I'll group this. We can name this whole
group pencil sketch. A. Let's go back into our group. Next, I'm going to add
an HSL adjustment. Then in the master
color channel, I'm going to fully
desaturate this. I'll just rename
this desaturate. To darken the pencil lines. Next, I'm going to add
a levels adjustment. A great way to do this is to just bring the
black level up. The more you bring this up,
the darker the lines get. I'm going to bring
this one up to 40%. Then I'll rename this
Darken pencil lines. L ast, I'm just going to
add that clean up layer. I'll add a new pixel layer
and I'll rename that cleanup. I'm just going to keep the
cleanup layer selected for this one so that when
you apply the macro, you'll know just which layer
you're supposed to start on. With that, we're done. I'll end the recording. Now we can go ahead and
test this on another photo. There's our pencil sketch. We can raise this a little bit. Let's see how five
looks. I'll hit a fly. Now we can spend
some time painting away the background for
this to look even better. But I'll just speed this up so that you can see what
this would look like. Here's what that
would look like. Great work on creating this
fancy pencil sketch effect. In the next video, we'll
actually do a similar effect, but this time with watercolor. O
32. Watercolor Painting: Make a watercolor
painting macro. This watercolor
macro is beautiful, especially on colorful
landscapes like this one. This macro has quite a
few layers over here. I'll just turn these off so we can see what each one does. To start off, we have a
merged visible layer, and then we detect the
edges of that layer. Let me just quickly change
this to the normal blend mode. This is what detect
edges looks like. But then we'll change it to
the subtract blend mode, which really starts to make
it look like a watercolor. But we're going to
add even more effects to really boost this effect. Next, we're going to add a
brightness and contrast layer. Then we'll do a split
toning adjustment layer, which really boosts the
red tones in the picture. Then we'll boost
all of these colors once again with an
HSL adjustment. Usually at this
point, the shadows in this effect look really dark. We're going to brighten the shadows just to
bring that detail back. Then this next layer
is interesting. The main effect is
done at this point. But to soften the details and make it look more
like a painting. We'll merge visible again and then add a blur to
soften the layer. Here's what that looks like, and last just to ensure the
shadows are bright enough. We'll brighten them one last
time with this top layer. That's lots of layers, but I think the final
effect is worth it. It's just a gorgeous effect. Let's make this
thing. To start off. I'll begin recording. I'll click off our layer, and then we'll start with
a merged visible layer. I'll go to layer, merge visible. Now to detect the edges, we're going to go to
the top two filters, and then down to detect
and detect edges. Now we just need to change
the blend mode to subtract, and we can go ahead and
rename this detect edges. I'm going to group this layer. Then we can rename the
group watercolor painting. I'm just going to
select this layer again and we can continue
adding more adjustments. The next one I want to add is the brightness and
contrast adjustment. I'm just going to bring
up the brightness to 25%. Then I'll bring up
the contrast to 15%. Next, we'll do a split
to adjust. There it is. For this one, don't
change the first hue, but go ahead and change the
highlight saturation to 75. Then down here for
the shadows hue, go ahead and change that to 275. Then I'll change that
saturation to 40. Once you have that all set up, we can go ahead and rename
this layer red tones. Let's boost these
colors even more. I'll add an HSL adjustment. I'm just going to shift
the saturation of the main color
channel up to 10%. And I'll rename this
layer color boost. Next, I'm going to add a curve just so our shadows don't
look quite so dark. I'll bring this up. Then
I'll level out the top area, so we're mostly just
brightening the shadows. I'll rename this layer,
brighten shadows. Here's where we're
going to merge the layers again to
soften the effect. I'll go up to layer, then down to merge visible. I'm going to change
this layer to the soft light blend mode so that it blends with
the layers beneath it. Then I'll go into our filters
and apply a gaussian blur, and I'll set this to 20 pixels. This has been placed as a
child layer to this top layer. If your layer was placed on top, you can always go to
a range and then move inside to make sure that this
is placed as a child layer. With that done, I'll
just select its parent and I'll rename this
one soften image. Then we'll go ahead and
finish this off by adding one last curve to brighten
the shadows again. I'll brighten the shadow side and lower the mid
areas right there. I'll just rename this
brighten shadows again. I'll just select the
group and we're done. I'll end the recording, and I'll save this
Watercolor Practice. Now I can go ahead and test
this on any other photo. This generally looks best
with landscape photos, but we can go ahead and
try it on this one. This effect can look a
little strange on skin, which is why I usually
use it on landscapes. But I think this one looks nice, especially with the pretty bird over here and all of its colors. Here's the before and after. Great work on this video. In the next one, we'll do another unique and
colorful effect.
33. Pop Dots: Let's make a fun pop dots macro. Let's take a look at this. This macro comes with a lot of different
sliders over here. Let's take a look at
what each of these does. First, we have a slider
to change the dot size. As you raise this, the dots
get bigger and bigger, which can really affect how
much detail is showing. You can also make it smaller
to show more detail. Whatever look you're going
for for your picture. We also have this
contrast slighter. As you lower this down,
you'll actually get more contrast in your image
and as you raise it up, you'll get less contrast. I think I'll lower
it for this picture just to see how this looks. Then down here, we have
colors for the shadows, mid tones, and highlights
that you can adjust. This can create a really
interesting effect. But just for this demonstration, I'm going to make each of
these colors a little bit funky just so that we can see
all of the colors easier. Now that I'm done with
that, I'll hit Apply. Let's get into our layers so that we can see
what's going on here. The first layer we
have is actually this half tone filter that turns our image
into a bunch of. You'll notice this is
outside of our group, and that's just so
that it can affect our background layer directly. Once you've done
that, we'll merge everything together
into a single layer. This actually makes this
half tone layer redundant. You could delete it. But I actually like to leave
it so that I can just see the steps of creating this
macro a little more clearly. But feel free to delete that. After you merge
everything together, we'll use this single layer
to select the highlights, mid tones, and shadows so
that we can recolor them. You might notice that each of these colors has a
little f X next to it. That's because
we're going to add a color overlay effect to this, and that's how we'll be able to change our colors later on in those sliders that pop up when you first
apply the macro. This dot effect is so fun, but there are a lot of
little steps to make sure we get right so that
this functions properly. While we make this macro, we'll make sure to make the mini sliders that we're going to use visible as we go just so that we don't
forget any of them. Okay. I'm going to start recording I'll click
off of this layer. Then I'll go into our filters to apply the half tone filter. Here's where you can
change the dot size. Here it's called cell size. I'm going to turn
this down to 25. It looks like it's using
a lot of decimals though, I think I'll just
type in 25 for this. Then we have the contrast
slider here as well. I'll just leave
that one alone and I'll make both of
these sliders visible. I'll click on the next two size. I'm going to name this dot size. Then I'll go back
in here and I'm going to make the
contrast slider visible. I'll just leave it named
contrast. That's fine. Now we have the first
two sliders visible, which is perfect. I'll
close out of this. I'm going to leave
this half tome filter outside of the group. I won't group
anything quite yet. Next, we're going
to merge visible. I'll go up into layer
and then merge visible. I'll just quickly
rename this merge visible. Then I can group this. I'll rename this group Pop Dots. I'm going to select this
merge visible layer again. Here we're going to start to select the different shadows, mid tones, and highlights
for this effect. To do that, have the merged visible layer
selected and then go up to select total range. Let's start with
selecting the shadows. Right now, all of our
shadows are selected. I'm going to add a
new pixel layer. Then I'm going to
fill this with black. I'll grab the bucket tool. I'll change my color to black, and then I'll click once to apply this black paint
to our selection. I'll D select with
command or Control D. Now I can rename
this layer shadows. I'm going to go into f x right here and I'm going to
check on color overlay. Then just so this shows up
over in the macropanel. I'm going to change the color
by just moving it around. I'm going to keep it
set to black though. Then we can go to where it says, set effect color and we
can make this visible. This is our shadows. Now we have the
shadow color visible. I'm going to repeat
the same process for the mid tones
and highlights. To repeat the process, I'll select the merge
visible layer first. Then I'll go up to the top
to select total range. This time, I'll
select the mid tones. With those mid tones selected, I'm going to add
a new pixel layer that we can paint on top of. Then with the fill bucket tool, I'm just going to fill
this with a gray color. I'll D select with
command or control D. Then I can rename
this layer midtones. Next, I'm going to go into the f X. I'll turn on color overlay. Then I'll change the
color to a gray color. I'm just going to make this
set effect color visible. I'll just name that mid
tones. We're almost done. We just need to do this one
more time for the highlights. I'll select the
merge visible layer. I'll go up to select tonal
range and highlights. I'll add a new pixel
layer to painth on. I'll change my color
to white and I'll click to reveal the highlights, I'll press command or
Control D to D select. Then I can rename this
layer highlights. I'll go into the layer effects. I'll turn on color overlay, and I'll change this to white. Then I just need
to come over here, make this visible, and I'll
rename this highlights. Okay. That was a lot of
work, but we're done. I'll select the group, and we can finish
making this macro. Let's test this
on another photo. I'll just click to apply it. Then we can change any of
the settings that we want. I think I'll lower the dot size just so we can see
more detail here. Then I'm going to change all of these colors for the shadows. I think I'm going to make
it a nice navy blue. For the min toes. I think
I'd like to use a red color. Then for the highlights, I think I'm going to just do
a super light orange color. I'll hit Apply. Now you can
see our beautiful effect. Here's the before and the after. Great job following along
with this tricky macro. I know that was a
lot of sliders to keep track of, but you did it. Good job. In the next video, we're going to do another
fun colorful effect as we turn our photo
into a mosaic.
34. Mosaic: This video, I'll show you a really cool
technique to create a colorful mosaic.
Let's take a look. As you can see, when
you apply this macro, your image is divided
into four parts all with different
colors, and the layers. You can see that
each of these are labeled and each of them has an HSL adjustment as a child layer to change
up their colors. Now, this looks pretty simple, but what's tricky
is that we need to shrink down the picture
and move it around, and we'll do that with a
special filter called a fine. I'll show you how
that works as we go, but let's go ahead and get
started with this one. I'll begin recording. I'll click off of the layer. To start, I'm going to
create a duplicate copy of our picture by
going to layer, and then down to merge visible. I'll use this layer to
shrink and move around. I'm going to go
up to filters and then distort and then a fine. We'll use the special filter over and over as we
make this macro. That's where you find this one. Once you apply this filter, the style log box will appear, that allows you to scale and move things around
by percentages, which is pretty handy. To start, I'm going
to go to scale x, and I'm just going
to type in 50%, and I'll do the
same for scale y. Then where it says, extend mode. I'm just going to change this to zero. Then I'll hit apply. I'm just going to rename
this layer top left. Then I'm going to
group this layer with command or control G, and I'll rename
the group mosaic. I'll just elect the
top left layer again. Next, I want to apply an H of cell adjustment
to shift its colors. I'll go ahead and do that. I'm going to use the Hu
shift slider for this. I'm just going to type
in 30 With that done, I want to move this inside
so that it's a child layer. I'll go up to
arrange, move inside. Awesome. I'm just going to
select the parent layer, and we're done with the
first section of our mosaic. Now we just need to
repeat this process three more times to
finish this off. I'll start by duplicating this
with command or Control J. Then I'm going to move this
by going up to filters, distort, a fine I want
to move this over here. I need to move it on the x axis. I'll go to offset x, and I'll move this 50%,
and then I'll hit Apply. Top left has now
become top right, I'll just change the
name of this one. Then I want to
change the colors. I'll select the HSL adjustment. Then to open up its colors. I'm going to click right
here. This will pop up. Go ahead and click Cancel, and now we can
change the colors. I'll change this to 120. I'm just going to select
the parent layer again. Then I'll duplicate it
with command or control J. To move this layer, I'm
going to go back up to filters, distort, a py. Then I want to move this down. I'll need to use offset y, and I'll just type in 50%, and then I'll hit apply. Top right has now
become bottom right. I'm just going to select
the HSL adjustment and then change the colors. For this one, I'm just going
to type in negative 150. Then we can select
the parent layer. Then I'll just
duplicate this one. With this last duplicate
copy, I'm going to move it. I'll go to filters,
distort a fine. I just want to move it
back on the x axis. I'm actually going to
type in negative 50% to move that one. Then
I'll press apply. This has become the bottom left. Now I just need to change
this HSL adjustment. For this last one, I'm just
going to type in negative 60. As you can see, they all
have very different colors. I think this looks great. I'm just going to select
the parent layer, and then the full group
parent layer, and we're done. I'll stop the recording. I'll just save this
as mosaic practice. I'll open up another
picture to test this on. As you can see, this picture is a totally different
orientation. It's in landscape mode as opposed to the portrait mode
that we were working with. Let's see how the mosaic
effect looks on this one, and it worked perfectly. The reason why this worked
perfectly is because the a fine filter uses percentages
to move things around. No matter what size or
shape your picture is. Because we moved things
50% downward or 50% over, it's all going to
scale just fine, no matter what your
picture looks like, which I think is perfect. Another thing I want
to point out with this picture is that
you can always go into the layers and change the different HSL adjustments
into different colors, if you'd like For example, in this picture, maybe you want all the colors to
resemble autumn leaves. You could go ahead and change all of those colors if you want. I'll just quickly show you
what this could look like. Okay. Here it is with
more fall colors. You can customize this
however you want, and that's the beauty
of this effect. I just want to show you
one last thing with this mosaic macro because
I think it's funny. I'm going to click
on it one more time to apply it
just from scratch. I want to show you if you
click on it more than once, you'll just get more and
more mosaic divisions, which I think is fun. Look at it. With that, we're finished with
a mosaic macro and we're finished with a
special effects chapter. Great work. You've learned so many new unique strategies
for making macros. In the next chapter, we're
going to make some macros that are specifically designed
for text and shapes.
35. Text and Shape Macros: At this point, you've probably
realized that you can do a lot more than just a
simple edit using macros. In fact, you can also use
macros to edit text and shapes. In this chapter,
we'll do just that, so let's get started.
36. 3D Text: In this first video
of the chapter, we're going to make a
three D macro for text. First of all, I'm going to make this macro on a
brand new document. I'm going to make my document, 1920 by 1080 pixels. You can go ahead and feel free to use any other
size that you want. If you know you generally like to use
bigger documents than this. Then I suggest you make your
macro on that size document. But for this case, I'm just
going to use this size. I'll go ahead and press Create, and we can go ahead and jump in to show you how
this macro works. First, I'm going to grab
the artistic text tool, and then I'll just
type out some text. Then I can click on the
three D text to apply this. You can see we have this
beautiful three D effect. Let's take a look at the layers. Now, there are a
lot of layers here. But as you can see, most of them are just duplicate coffees. Let's take a closer look
at how this is working. First, we have main text. This is just the white
text that's over the top of all of these
other black text layers. Then each of these black
text layers are just duplicated copies that
have been moved over. As I turn these off, you can
see that's shrinking down. As I turn them back on, you can see that that drop
shadow effect is growing. We can go ahead and apply as many drop shadows as
we want to this effect. We just move the layer down
and over to create this look. This is all actually
pretty simple. I think I'll just
delete this and we can go ahead and get started
with making the macro. Now, before we make the macro, we do need to have
some text out, so I'll just type that again. Just to make this easier
to see what's happening. I'm also just going to change
the font really quick. We have a neutral other font. We have our text typed out, and we're ready to
begin recording. I'll go into the
macro and hit record. I'm not going to
deselect this layer. Instead, I'm just going
to rename it main text. Then I can group this layer, and I'll rename
this three D text. I'm just going to
select the main layer again and we can begin to
make some changes to it. Now, the first thing I'm going
to change is I'm going to change the font back to
what we had originally, which is this aerial black font. I love how bold it
is for this effect. I'll just select that
one to change it. Then I want to change the
color of this text to white. But unfortunately,
affinity actually can't change the color of text.
It won't record that. What's a work around we can do? Well, I figured out that
a great workaround for coloring text is to
use the f X down here. I'll click on this and I'll
apply a color overlay, and I'll change this to white. You can see that that was
recorded just fine over here. Now that we have the main
text layer finished. We can go ahead and duplicate this with command or Control J. Then I'll just select
this lower layer here. Over here, it says, select
the layer named main text. That isn't very helpful because we have two that
have the same name. Instead, I'm going to
change it to select layer, one below current,
just to make sure that definity registers which layer I'm actually trying to select. With that selected. Now,
I'm just going to click in here and I'm going to call
this layer drop shadow. I want to change the color of this drop shadow
layer to be black. I'm going to click on
the Fx next to its name. Then I'll just change the
color from right in here. I'll close out of this. Now you can start to see the
black peaking out there. But the way we're going to
show this text is we're actually going to
move it down and over using the arrow keys. I'll hit my down arrow
and then my right arrow. It was just a tiny
micro movement that we're going to repeat
over and over for this. I'll press command or control J. Then I'll move this
layer down and over. We can repeat this as many times as we'd like to
get the look we want. I'm just going to
repeat this over and over until I have the thickness of the
drop shadow that I want. Command or Control J, down and over and repeat. I think I've reached my desired thickness for this effect. To finish off this macro, I'm going to select
the group layer. Then I'm going to apply an
outline to the entire group. I'll go into our layer effects. Then I'll click on Outline
and I'll turn that on. Then we can raise the radius to whatever looks good for
your size document. For my document, I think around 15 pixels looks pretty good. Just to add that little detail to make the white
text stand out. I'll close this, and we're done. I'll stop the recording. I'll save this as three
D text. There it is. I want to test this
on some other text. I'm just going to move this
group to the side over here. Then I'll grab the
artistic text tool. I'm going to type some super
small text right here. Now, this is in white right now, so I'll change the
color to black, and I'll change the font
to just any other font. Now we can see what
the three D effect looks like on this
tiny text here. I'll click to apply it. You can see that this did work, but because I'm working
on a much smaller scale, all of those duplicated copies
look a lot more dramatic, and the outline looks a
lot more dramatic too. If you're trying to apply
this effect to something that's quite a bit smaller
or even quite a bit larger, all you need to do is go in here and make a few adjustments. First, I would probably adjust what our outline looks like. I'll go to the f X next
to the entire group. Then I'll just shrink this down. That looks better.
Then all you need to do is hold down shift to select multiple of
these drop shadows, you can turn them off or delete them to get the effect
that you're going for. I think that looks a lot better. Just to show you
that this doesn't just have to be used for text. I'm going to go into our shapes. Let's select the doughnut tool. I'll click and drag
to apply this. This has been added
to the group, so I'll drag it
outside of the group. Then we can go ahead and apply the three D text effect
to this doughnut. You can see that that worked. If you want, you can always
adjust the colors too. I'll go in here to show you
this to adjust the colors. Go where it says color overlay. Then you can change this to
any color that you want. This is a side tangent. But if you ever have 50
layers that you want to change all at the same time for layer effects. Here's
how to do that. Select the top layer, then hold shift and select
the bottom layer. Then you'll want to go up to the top of your
screen to window, and then down to quick effects. Using this special panel, you can go into
the color overlay and change the color from here. You can see all of those are
changing at the same time. If you go back to
the layers panel, you can see all of those have updated with their new color. You can only affect
multiple layers and layer effects with
the Quick effects panel. Now you know how to do that. The three D effect
was super fun. Great job. In the next video, we'll make a macro to
turn your text into neon.
37. Neon Text: Let's make a neon text macro. This macro is really fun. I'll just click to apply it
and you can see what I mean. A lot changed with that. Over in the layers, you
can see once again, we have quite a few layers to
make this beautiful macro. Right at the top,
we actually have an HSL adjustment that you can use to adjust the
colors of the neon. Then we have the
top layer of text, which is just this
white text right here. We have a drop shadow. Then we have all of these
different layers that just add more complexity to the light
shine that's going on. Last, we have this
black background which helps all of these
different colors to look more like neon. This is all pretty simple. Let's recreate this one. I'm just going to
change the font to a neutral font once again. Then we can begin recording. Right off the bat, I'm
just going to group this layer and I'll rename
the group neon text. Then I'll select the text layer again and we can begin to
make some edits to it. I'll grab the move tool, and then I'll change the font. The font that I think
looks pretty good for this is this aerial
rounded font. I like that it's
surrounded on the ends. That makes it look
more like neon. That's the font that I decided
to go with for this one. Now that that's done, I'm going to go into
the layer effects, and I'm going to change
the color overlay to a n dark pink color. While I'm in here,
I'll also go into the Gaussian blur, and
I'll check that on. I'm actually going to
make this 500 pixels. I'll just type that
in and press enter. This is a very subtle
layer that you won't really be
able to see until we have a black background, but we'll get to that later. For now, I'm just
going to double click to rename this
layer dark pink. Then I'm going to duplicate this layer with
command or Control J. I'll click in
the layer effects. For this one, I'm
going to change the color to a nice bright pink. Then I'll go into the
Gaussian blur and this time, I'm just going to make it
100. With that layer done. I'm just going to rename
this bright pink. Once again, I'll
duplicate this layer. Then I'll go into the
layer effects and I'll change the color
overlay to a lighter pink. Then I'm going to make the
Gaussian blur 40 pixels. Then I'll rename
this one light pink. Let's duplicate this again. I'll click on the layer effects. This time, I'm going to
make it almost white. So a super light pink
color like that. Then I'll go into
the Gaussian blur, and I'm going to change
this to 15 pixels. Duplicate this one last time. This is going to
be our top text. I'm going to make the
color overlay change to fully white. For the gaussian blur, I think I'll keep a
slight blur on it, but I think I'll
just make it 0.5. I'm going to rename
this layer top text. We have the main text done, but now I just want
to add a layer to enhance the effect by
making a drop shadow. To do this, I'm actually going
to duplicate this layer. Then I'm going to change
the color overlay to black I want this to
move back one layer, and that's actually pretty
easy to do with the menus. Just go to range and
then move back one. Now you can just use the arrow
keys on your keyboard to move it down and over until
you think it looks good. I'm just going to rename
this drop shadow. To make this look more
like a shadow though, I think I'm going to lower
the opacity to around 15%. Next, I'm going to create
a black background. To do this, I'm
actually going to go to our shapes and I'll select
the rectangle tool. Then I'll click and drag to drag a rectangle over
the top of everything. I'm going to go into
our layer effects and turn on color overlay
to turn this black. Then I want this
under everything. I'll go back up to
our menus to arrange, and this time, I'm going
to click on Move to B. That looks great. I'm just going to rename this
black background. Last, I want to add
that HSL adjustment to the top of everything just
so we can adjust our colors. I'll click on the top layer. Then I'm going to add the HSL
adjustment on top of that. I won't adjust any
of the colors here. Instead, I'm just
going to rename this adjust colors here. I just want to quickly point
out that if you wanted to, you could totally make this
HSL adjustment a color change slider that pops up
when you apply the macro. But honestly, I think sometimes those sliders
don't update as instantly for changing colors as just updating an
adjustment layer would. Sometimes I just prefer to have the color changes right here in the layers rather
than as a slider. With that, we're
done. I'll leave that layer selected and
we can finish this. There we go. Now we can go ahead and test this
on some other text. I'll just delete
that whole group. Then I can just type
out any word I want. We can go ahead and
apply the effect. I made it much smaller and you can see this actually
looks pretty good. But if you wanted to,
you could always adjust the drop shadow if you think the placement
isn't quite right. You could adjust
any of the colors and we can see what
that looks like. Very nice. I want to just test it on a shape
to finish off this video. I think this time we'll
go with the triangle. I'll drag this out of
the group like that. Then we can go ahead
and apply the effect. You can see this works
pretty well here too. However, it comes with
its own black background. If you still want to
see the neon text, you'll just need to
delete that layer. Now you can see both of them. That's how you make
the neon text macro. In the next video,
we're going to get fancy as we make some
beautiful metallic text.
38. Chrome Text: Let's make a chrome text macro. This macro is super pretty. I'm really excited to show
you how to make this one. When you open up the group, you can see that this group actually only has
two layers in it. That's because
most of this macro is actually using the
three D layer effect. If you open this up,
you can see there are a lot of different sliders that you can change
up right here, and this is the bulk of
how we create this macro. There are a lot of
sliders and things happening here and I just think it'd be easier if I
just walk you through it rather than try to
explain what's going on. We have that layer
and then we just have one extra layer that just adds a little bit more contrast. I'll delete this group. Then we can go ahead and get started with making
this chrome text. I'm just going to
change the font. Then we can go ahead and
get started with recording. The first thing
I'm going to do is group this text with command or Control G. Then I'll
just rename this text. I'll select the
text layer again, and then we can begin
to change this. With the move tool selected, I'm first going to
change the font to something that
looks like cursive. Feel free to use
any font for this. I actually found
this font online. I'll link it below if
you want to download it. But this is the lobster font, and I like how it's
connected in some areas. I think that just makes it
look more like this metal has been actually
molded this way. With that done, I'm also
going to change the color. I'll go into the layer effects, and I'll go to color overlay. I'm just going to change
the color to gray, and I'm going to
change it so that the L right here, changes to 50. It should be zero,
zero, and then 50. With that done,
I'm going to begin to change up the three D effect. I'll just check that on.
You can see right away, we have a little bit of a
three D effect going on. But the more I change this, the better it's going to look. Starting at the top, I'm going to change
the radius to 50. I'll just type that in.
Then where it says soften, I'm going to change this 24. Next, I'm going to
change the profile. The profile is basically
what the edges look like. I'm going to change it to
this last one right here. You can see this just gives
us a lot more shape to this. That looks pretty nice.
Moving on down here. I'm going to change the d 250. I'll change the specular to 100, and I'll change the
shininess to 60. If you want, you can feel free
to play around with any of these when you're not recording a macro to see what they all do. But these are the
numbers that I came up with that I think really
creates this chrome look. Feel free to type those in. As a last step, I'm going to add some light sources to this to
make this look extra shiny. First, we have one
light source here. I think that looks
good. I'll click add. Now you can see we're
on L light source two. I'm just going to change
this to bring it down here. I'll add another one, and
I'll move this one down here. I'll add another and
move it over here. We're just trying to create a bunch of different
light sources. The more light source
points we have, the shinier and more
metallic this will look. I think this is
looking really good. I think I'll leave it at that. We have five different
light sources here. If you don't like any of them, you can always go back
to them and adjust them. But with that done, I think I'm going to go ahead
and close this. Then I'm going to add our curve. This curve is going to
add extra contrast, but I'm actually
going to do it in a funky way to squiggle
around this spline. First, I'm going to
drag it all the way down right about at this one
quarter line right here. Then I'm going to
drag it like this. Then I'll drag it back around the halfway point right there. Then I'm just going to
drag this back up a little bit like that. This has given a lot
of dimension to this. You can really see
the difference now. Your curve should look
something like this, just to give a lot of
variety to the lighting. I'm just going to rename
this extra contrast. As one last step, I'm just going to select the whole group, and I'm going to
apply a shadow to it. We'll go in here and I'm
going to go to outer shadow. I'll check that on. Then I'm going to set the opacity to 15, the radius to ten and
the offset to 15. With that, we're done creating
our chrome text effect. I'll stop the recording
and I'll just save this. There it is. I'll just
move this text over. We can test this on other text just to make sure that
this worked fine. With that, I'll select
the chrome text. You can see what
that looks like. I'll also test it on a shape. I think the Cog tool
makes sense for this one. You can see that
that looks like some nice shiny metal too. I think in this one, it looks maybe a little bit
too shiny though. I'm going to go into this
three D effects here. I just want to show
you that at any time, you can remove any of these extra light sources to
change up how this looks. You can see that's a
little less shiny, maybe that's more of the
look you're going for. Feel free to play around with
the light sources and play around with this
effect because I think this one is really cool. With that, we're done
with our chrome effect. In the next video,
we'll finish off this chapter by making
some fancy golden text.
39. Gold Text: In this video, we'll make a macro to turn your
text to golden. To start, let's take a
look at this effect. Over here in the layers, you can see we actually
just have two image layers here and there are child
layers to the text. This top layer actually
has the opacity lowered so that you can see
both layers blend together. Here's what those
layers look like. Then up here, we
have a layer effect. Let's take a look at that.
Similar to the chrome text. We're going to play up the
three D effect to make it nice and shiny and to
add that three D element. We'll also add a little bit
of a outer shadow here. This is actually pretty
simple. Let's get started. To start, have your
text typed out first. Then we can go ahead
and get recording. First, with the
move tool selected, I'm just going to
change the font. I found this font
that I really like. I like that it has
nice thick letters, and you can really
see the golden effect when it's thicker like this. I'm going to use
this one. Then I'm going to click off
of this layer. Then I'm going to
place an image. I'll go to file, and
then down to place. And I'll just start
with this first one here. I'll open this up. Then I'm just going to click and drag to make this
cover the text. I'm going to go up
here and I'm just going to align this
to the center, and then I'll hit Apply. I want this to be a
child layer to our text, so I'll go up to the top to
arrange and then move inside. There we go, just
like that. We have a beautiful texture
added to our text. Let's do this one more time. I'll click off of the layer. Then I'll go up to file place, and I'll add in this
second image here. I'll make it nice and
big to cover the text. I'll just center it to make
it nice, I'll apply that. Then I can go ahead and
move this one inside, so I'll go to
arrange. Move inside. For this top one, I'm going
to lower the opacity to 65%. And now we're done with
those image layers. I'll select the parent layer. I'm just going to rename
this layer gold text. Then we can begin adding our layer effects
to the whole group. First, I'm going to apply
the three D effect. I don't think I'll
change too many things about all these
sliders this time. But I will go to
the profile and I'm just going to change it to
this fancy one right here, like how that one looks. Then I'm going to go to
and change this two 50%. Then I'm going to change
the ambient light color to a nice orange color. For this one, I'm going
to do four light sources. The first one will be
in this top corner. Then I'll add another one and I'll move this one
to the lower corner. I'll add another one
and I'll move it over here and another one that
I'll move over here. All four corners should
have a light source now. I think I'll move one of
them in just a little bit. It's not directly on the edge, but you can really see
how nice this looks. Maybe I'll move another one in. It's not directly on the edge. I just don't want it
to get too shiny, but I think this
looks pretty good. To finish this off,
I'm just going to add an outer shadow effect. I want this to be
nice and subtle. I'll keep the opacity set to 50, and then I'll just move
the radius up to 3.5, and I'll change the
offset to five. With that, we're done with
the golden text effect. I'll stop the recording
and save this. Now we can go ahead
and test this on a few other
things if we want. I think I'll first start by just testing it on
some other texts. Beautiful. Very fancy. Then maybe I'll test
it on another shape. I'll go with a double star tool. Let's see what this looks like. So fancy, so beautiful. This one's my
favorite text macro. I hope you liked
making this one. In the next chapter, we're
going to make macros to add beautiful borders
and frames to photos.
40. Border and Frame Macros: In addition to working
with text and shapes, we can also use macros to add beautiful borders and
frames to our photos. With the click of a button, your photo can be ready for a Christmas card or a scrapbook, or whatever else
you'd want to use a border for. Let's get started.
41. Simple Border: In this first video, I'll
show you how to make a macro to add a simple
border to your photos. I have this photo up, I'm
just going to go in here and click on the square border
macro to see what happens. As soon as I click, we have this pop up that lets us
change the color. I think I'm just going to sample the color using
the color picker, and I'll sample the color
of this yellow pole, and then I'll click
on it to apply it. Then I'll just press a fly. Then we can see over in the layers that we have a
layer that adds this border. We'll just use a
rectangle to do that. The rectangle has a
layer effect on it that adds a color
to this outline, we've also lowered
the fill opacity, which makes this inside
part see through. You may have also noticed that this effect has cropped
our image into a square. We can move the background
layer around using the move tool so that it's
positioned just how we'd like. We could also shrink it
down if we want more of our image exposed
inside of the frame. I'll just move that
downward, and there we go. I think to center him better, I'll just make it
a little bigger. Cropping the photo
into a square is a technique that will work
with any photo orientation. That's why I chose
to do it that way. Feel free to use
any size though. Let's go ahead and undo this
with command or Control Z. There we go until we just
have our photo again. Now we can go ahead
and create this macro. I'll begin recording. The first thing I want to do for this macro is actually
resize the Canvas. I'm going to go up to
document resize Canvas. When this box appears, we can go ahead and change the dimensions. I'm going to make
sure that this is resizing from the center point. Then I can go ahead and
unlock the width and the height so that I can type
in any number that I want. Again, like I said before, these can be any numbers, but I'm just going to
try 2,500 by 2,500. Then I'll go ahead
and click resize. With that done, I'm
going to add a rectangle that spans the width of
the entire document. I'll go into our shapes. I'll get the rectangle tool. Then I'll turn on
snapping just so that I can click and drag right
from the edge to edge. I'll just rename this
rectangle border. Then we can go ahead and go into layer effects to
change how this looks. First, I'm going to lower the fill opacity
all the way down. Then I'll turn on an outline. I'm going to set
the alignment to the inside so that
we can see it. Then I'll just
increase the radius. I think I'd like the
radius to be 50 pixels. Then we can change the color. I think I'll change it to
a lighter gentler color, maybe like a light tan, just as a good starting
point for these borders. Feel free to change this
to whatever you want. Go ahead and close out of this. Now, I'm going to
lock this border in place so that you don't
accidentally move it. Then I'll select the photo layer and I want to unlock this one. You can go ahead and
feel free to move this however you like
within this border. Before I finish, I'm just
going to make it so you can change the border
color with a slider. To do that, I'll go to
where it says set effect. I'll make this visible, and I'll just leave
that as color. We're done. I'll
stop the recording and we can go ahead
and save this. I'll call this simple
border practice. We can go ahead and test
this on another photo. I'll just click to apply it. You can see that worked. I think this color looks nice,
so I'll apply that. Because we had the background
selected when we finished, it's selected as we begin here. So I can just grab the move tool and move it just like that. Using this technique,
you can make a simple border design
macro for any type of ph, any thickness that you'd like
for the border, any color. The possibilities are
endless with this one. In the next couple of videos, I want to show you
a fun way to make more elaborate
frames using macros.
42. Flower Frame: Let's make a macro to add a
beautiful flower frame to your photos. I have
this photo up. Let's click on the flower
frame to see what happens. This one's pretty simple. We have our beautiful
flower frame, and then we have our image. I'm just going to move this
downward so we can see it. I'll walk you through
how I made this. But first, I just
want to show you where you can find
pretty frames like this. Because this frame
is pretty unique. It has foliage overlapping
onto our photo, and I think that
looks pretty nice. To find this frame,
first I went to Pixabay and then I just
searched for frames. Then I went ahead and sorted
my frames by vectors. Once you have that,
you can scroll down and see all of these
beautiful frames here. This is the one I'm using. But there are so many
different vector frames that you can use that will
overlap with your picture, just like the one I chose did.
That one's really pretty. You can see we have quite a
few really cool frames here. The next step after
you find your frame is you can go ahead and
open it up in affinity. With your new picture opened up. You can make sure you
have this hand tool out the view tool. Then you can look
right up here to see its pixel dimensions. This is what you'll
want to resize the Canvas to as
we make our macro. In this case, we
have it at 2,500 by 2,500 just like last time. Now that we have
that all prepped, we can go ahead and
make the macro. I'll just press
command or Control Z a few times to get back
to the beginning here, and then we can go ahead
and start recording. Just like last
time, my first step is going to be
resizing the Canvas. I'll go up to document,
resize Canvas. I'll make sure we're doing
it from the center point. Then I'll go ahead
and unlock this, and I'll just type
in 2,500 by 2,500. I'll just resize it now. Next, I'm going to add the
flower frame into our image. I'll go up to the top to file, then down to place. I'll select our
flower frame here. I'll open that up. Then I'm just going to click
once to place this. Then I'm going to align
this to the center. Align it horizontally
and vertically, and then I'll hit apply. To really help sell this effect, I actually like adding a
little bit of a shadow to our frame so that it
helps with this overlap. You'll be able to see
it a little better. I'm going to go into
our layer effects, and I'm going to check
on outer shadow. Then I'll just
increase the radius to 25 and I'll increase
the intensity to 25. Now you can see
that much better. It's not blending
in with her shirt, just to help it stand
out a little better. I'll close out of this, and I'm going to lock
the flower frame. Then I'll select our photo layer and I'll unlock this one. With that, we're done. I'll stop the recording, and
I'll save this. That was very simple. It takes a little bit of prep
to find the frame. But once you've done that, it all comes together
pretty quickly. I'll just test this on
another photo. There we go. Then I can just grab the
move and move this in place. In the next video,
we'll finish off this simple chapter by making
a fancy frame with glass.
43. Black & White Frame: Let's make a fancy frame for
a black and white photo. To start, let's apply this macro to see what
we're working with. Right away, you can see we have quite a few layers going on. That's because we've
turned this photo into a black and white photo and it looks like
it's behind glass. We have a lot going
on to get there. But first things first, we have a layer selected
called Move this layer. I'm going to grab the Move tool and I'll move that so
that it's in place. Then I'll just turn
off these layers so that you can see what
we have going on here. First, we actually have
a duplicate copy of our background layer here and that's because I wanted
it to be in the group so that it's affected by all
of these different effects. We have that
duplicate copy first. Then we desaturate it. We reduce the contrast so that it looks like
it's behind glass. To really nail this effect home, we have this glass layer here. This is actually just
a rectangle that we've applied a gradient
overlay effect to. You can see we'll mess with
some of the settings in here to get that
looking just right. Then of course, we have
the black and white frame that we've chosen to overlay
on top of everything. We can go ahead and start
making this, but before we do, let's just open up our
frame that we'll be using so that we can see how big we should resize the canvas to. You can see that this
frame that we'll use is 24 80 by 08. You can go ahead and write
that down and we'll use those exact measurements as we resize the canvass later on. I'll just close out of this. Then I'll press command or Control Z until we have just
the original photo again. With that done, we can go
ahead and start recording. As a first step, let's
resize the Canvas. I'll go to document,
resize Canvas. I'll make sure we're going
from the center point. Then I'll unlock this and type in those measurements
that we just saw. We have 24 80. By 30 508. I'll hit re size, and now's the perfect
size for our frame. Next, I'm going to merge visible just so we have that
duplicate copy of our layer. I'll go up to layer and then down to where it
says, merge visible. I'm going to rename
this, move this layer. Then I'll group this with
command or Control G, and I'll rename this
black and white frame. I'll just select our
child layer again. Then we can go ahead and add
our frame to this image. I'll go up to file, and then down to place. I'll select the black
and white frame. I'll click once
to place it here. Then I'll just make sure
that this is aligned center horizontally
and vertically. As a final step,
I'm going to add a little bit of a
shadow to this frame. This frame actually already
comes with a shadow, but I wanted to include
this step just in case your frame that you choose to
use doesn't have a shadow. I'm going to go into
our layer effects, and I'm going to apply
the outer shadow. I'm just going to make the
radius 15 and the intensity ten With that finished, you honestly could be
done at this point. I already think this frame looks really nice
for this photo. But we're going to take it the extra step and make a macro inside of a macro as we turn
this photo black and white. I'll select move this layer and we'll apply all of the black and white adjustments
on top of this. To start, I'm going to
add an HSL adjustment. I'll lower the
saturation all the way. I'll just rename this
layer D saturate. Next, I'll reduce the contrast
with a levels adjustment. This is my favorite
adjustment to use for this class
effect because moving these output sliders is just so easy to
reduce the contrast. For this, I'm going to
do ten for the output black and 90 for
the output white. We'll just rename this
reduced contrast. It's time for the fun
part. We're going to make our glass layer. I'll grab the rectangle tool, and I'll just drag out a rectangle that spans
the entire document. Then I'm going to go
into our layer effects, and I'm going to turn on
the gradient overlay. Now, first, I'm
actually going to lower the fill
opacity all the way. Then I'll go into our gradient and I'll begin to change this. First, I'm going to double
click to add a node here, and I'll double click
to add a node here. I'll make both of these
white. Here we go. Then I'll click on each
of the outer nodes, and I'm going to
lower their opacity all the way to make
them transparent. You can see we
already have a bit of a glass glare going on there. I'm just going to change the angle to somewhere
around here, 118 about there, so that
it's a little bit more off. I think that just makes
it look more realistic. Then we can go ahead and lower the opacity to 80 so that
we can see through this. You may notice that the edges
are looking a little harsh. A great blond mode you could use to combat that is screen. Screen really softens that up. Last, you can
change the offset y to lower or raise where
this is positioned. I think I'd like mine
more toward the top. I'll put it about there. Then I'll close out of this. I'll rename this glass
glare. All right. Then I'll just select the move this layer one last
time, and we're done. I'll stop the recording, and we can go ahead
and save this. Let's just test this
on one other photo. I'll click to apply it. You can see this
worked beautifully. I'll grab the move tool so we
can move this layer around. If you want, you can also move the glass layer around if you don't like how
it's positioned, or you could even lower the opacity if it's looking
a little too harsh. But I think this looks great. Here's the before and
the after. Great job. Now that we've finished this
borders and frames chapter, we're ready for the final
chapter of the course. Were I'll show you
how to batch process multiple photos using macros.
44. Batch Processing: Macros are amazing for
doing quick edits. But what if you could apply your macro to multiple
photos at the same time? We could edit an entire photoshoot with the
click of a button. Well, lucky for you. In this chapter,
we'll learn how to do just that. Let's get started.
45. Batch Processing 101: Let's learn the basics
of batch processing. You have a photoshoot and you want to edit them all
in a similar way. This is super common. Maybe the white balance was off or the lighting, whatever it is. It'd be easier if you
could do this all at once, let's do it. I'm going to go up to file, and then down to new Batch Job. We're going to use
this dialog box to add all of our images. To do that, first you go
to where it says sources, and then you go
down here to add. Now, I have a folder in the batch processing chapter called Batch
Processing one oh one. Go ahead and open that up, and then you can select all of the pictures from
this photoshoot. Then just click Open. Once you have all those added, you can start to adjust the settings over here
based on whatever you want. First, at the top,
we have output, which basically just means
where will these be saved? Right now, we have save into
original location turned on, which means that
this will replace the original images with these new ones that
we're about to save. If you want to avoid that, you can click on Save into, and then click on
these three dots right here to choose where
they'll be saved. You can even make a brand
new folder right from here. If I add a new folder, this will be a new folder
inside of this folder. I'll click that and then I can rename this
whatever I want. I'll click Create, and. Now, these will be saved
into that new folder. Next down here, you can choose how these
photos will be saved. Right now, all that's checked
on is save as an AF photo, which is just an
affinity photo file. If you wanted to, you could
also save them as a J peg, or you could turn this off and
just save them as a J peg, whichever makes sense
for what you're doing. I think I'll just save
them as a J peg this time. Once you have that done,
you can go down here and choose which macro will be
applied to your photos. I'm going to go into
our basic macros, and I'll choose the
warm color macro and then I'll press Apply. Over here, you can see
which macros we've applied. Keep in mind on this
step that if you choose a macro that
has sliders to adjust, the default slider position will be applied to
all of your photos because there's no
chance for you to change the sliders in this
batch process. It'd be better to choose
one without any sliders. Then you can just click, and your batch will begin
to be processed. All of these warm
versions of the photos, were saved into our
new photos folder, which is inside of our batch processing
one oh one folder. You can see all of
these are a lot warmer. Let's take a look at
the differences here. I love how quick and easy this was to apply a macro to
this whole photoshoot. In the next video, I'll show
you another way that you can alter your photos
using batch processing.
46. Resizing Images: In this video, I'll
show you how to resize all of your images in a
photoshoot at the same time. I already opened up images here and I chose a
folder to save them in. Now, I want to change the sizes. I'm going to save these as J pegs and to change the sizes. All you need to do is type in a width or a height
into these boxes. I'm going to start by typing
in 1920 into the width box. Make sure you don't press enter or you'll process all of these. Just type 1920. Once you've typed that
into the width box, this means that every image in your batch will fit
into that width. Whether that means they need
to shrink down or grow. Make sure you keep
this A checked on. This A box just means that your image won't be
distorted in any way. Once you've done
that for the width, you could also type in
1920 for the height. This will make whichever side of your image is
bigger set to 1920. The small side will keep
whatever aspect ratio that is. But all of your images at maximum will be 1920
for the big side. You can also click on the
three dots next to this. This is how you can
change the quality. I like to go in here
and just make sure our quality is set
to 100 so that they won't be downsized
and the quality lowered. With all that set up. We can go ahead and press
k to process these. All of your images
will be exported and you can check out how
they look and their size. In this case, I
just want to right click on any of these and then press on get info so that we can see how
big these images are. For that one, it says
it's 1920 by 13 34. The bigger side is 1920, and we can check that
out for any of these. This one's also 1920. It has a different smaller number because for some reason, this photo is in a slightly
different aspect ratio. But no matter which side is
the big side, it's 1920. What about this one
that's more vertical? All the rest of these
are horizontal. Let's get the info for this one. You can see that 1920 is the
large side. That's awesome. All of our pictures now have
a matching maximum width, and I think that's great. Now that we know the basics of batch processing and
resizing images. For the rest of the
videos in this chapter, we'll spend some time making macros that are perfect
for batch jobs, starting with making
a watermark macro.
47. Making a Watermark: Before we can create
our beautiful macro that applies a watermark
to every photo, we need to make the
watermark itself. First off, I'm going to
create a new document. And I'm going to make this
document 1,000 by 1,000. Then I'll press create. I'll fill this whole space with a logo that we'll
use for a watermark. Now, to make this watermark
look nice and fancy, I found an ornament that
I can add to the design, and I used Pixabay to do that. All you need to do is type
in ornament or banner. Then make sure you're
searching by vectors. Then you can scroll
down and see all of these great ornament
banner type things that you can add
to your watermark to make them look fancy. I believe this is the one
I found for this design. Back in affinity,
I'm going to go up to the top of
our screen to file, then do to p and then I'll place this
image into our document. I'm going to start at one
corner with snapping on, and I'm going to drag this
so it fills the whole space. Then I'll just make
sure it's centered. Now that we have our image, we can go ahead and type out any initials that you want
or a word that you want. I'll grab the
artistic text tool. I'll click and drag out. Then I'm just going to
type in the initials A R for Affinity revolution. I'll grab the move tool
and I'll change the font. Then I'm just going to resize these letters and
position them so that they look very nice
here. Nice and centered. To prepare this even more
to use this as a watermark, I want this to appear on a transparent background
so that we can see the picture behind this design to make the background
transparent, just go to the top to document, and then go down to where it
says transparent background. Another thing you might want to do is you might want to change this entire design into white
to see it better on photos. To do that, go up to the
top again to document, and then go down to the bottom
to where it says flatten. As you can see,
this has flattened your document into a
single pixel layer. Now we can go into
our layer effects. We can check on color overlay, and we can make this
any color we want. Feel free to use any color. I found that white stands out
nicely on a lot of photos, but you really could choose
any color that you want, anything that looks nice. With this done. Now we're
going to export this document. I'll go to file, and then down to export and to preserve the
transparent background. Just go up here and make sure that you're
exporting as a PNG. Now, strangely, it looks like I might have typed
in the wrong number. I'm going to unlock
this and just type in 1,000 right here. Just to make sure this
is 1,000 f 1,000. I'm not sure how
I messed that up. But now you can go
ahead and click Export. You can go ahead and save this. And then hit save. Now that
that design is finished. We can create a larger
document that will be overlaid onto any photo we
want to add a watermark to. I'm going to go up to the
top to file and then new. This time, I'm going to
make a very large document. Let's go with 7,000 by 7,000. I'm just going to click Create. I think 7,000 by
7,000 is a good size because it's larger than any
of my pictures that I shoot. But feel free to use a bigger size than
this, if you'd like. To turn this into a
watermark overlay. Next, we're just going to go to the top of the screen to file, and then down to
where it says place. Select the watermark design. Go ahead and open that up. Then just click once to
add this to our document. I'm going to place this right
up here in the top corner. Then I'm going to
rotate it 15 degrees by holding shift and clicking
on this rotation right here. I think I'll rotate
it like that. Then I'll press command or
Control J to duplicate this. I want this to move in a very
specific amount of pixels. I'm going to actually get
out the transform panel for this by going to Window. Transform. With this
duplicate layer selected, I'm going to move
it on the x axis, and I'm just going
to say plus 1,500. You can see that just jumped over right there.
That's perfect. Now I'm just going to power duplicate by pressing
command or Control J, and this will jump this logo across that exact same
amount of 1,500 pixels. We've now filled this top space, but it's getting a
little tricky to see. I'm going to go to
the top to document transparent background
just so we can see our design and how it's
been duplicated across. We have our first row.
I'm just going to select all of these layers
with the first one selected, I'll hold shift and click
on this bottom one. Then I'll press command or Control J to duplicate
all of this row. To drop this row down, I'm going to go into
the y axis right here, and I'm just going to
type in plus 1,500. You can see that just jump down, and if I press command or
control J a few times, you can see now this will
fill the entire document. I think this is ready now. I'm just going to
export this as a PN G. I'll go to file export. Make sure that's a PNG. I'll say, yes, that's right. Now we can go ahead
and save this. We're all prepared now
with our watermark design. We have this giant
document saved and ready to be used for making
the watermark macro. We'll create that very simple
macro in the next video.
48. Watermark Macro: Make a watermark macro. This is a super simple macro. We'll basically just need to add the large watermark
image to our document. I do have this photo open just so that we can record
the macro on something. Let's go ahead and begin. I'll hit record. I'll
deselect the layer. Then I can go ahead
and place the image by going to file place. Let's select the image
that has lots of watermarks on it.
I'll open that up. I'll click anywhere
to place this. Then I can go up here and
just make sure that it's nice and centered. I'll hit Apply. Last, you might want to
lower the opacity of this image just so you can see through
it a little better. I'm going to lower
my opacity to 70%. We're done. I'm just going to stop this and I'll add
it to our library. There we go. We now have the
watermark practice finished. Next, let's apply this to a batch job to make
sure that this works. First, go on up to file
and then new Batch job. I'm going to add all of
our images in this folder. Let's save these
into a new folder. Then we can go ahead
and save these. I'll save them as a J peg that's nice and small
to protect our work. I'm just going to do 100 by 100. Then I can come down here and apply the watermark
practice macro. I'll just hit
apply. There it is. Now we can go ahead and press. Those have all been exported. But before we finish, I just wanted to mention
that at this point, you could go ahead and delete these watermark design images. This watermark overlay has been permanently stored in
affinity with that macro. You don't need to save this
on your computer anymore. We can go in now and see
our watermark photos. Here's how those
images turned out. They all have the watermark overlaid on top of them
and they look great. Water marks are such a useful way of protecting your work. But if you simply want to sign your work in
a more subtle way, then I'll show you how
you can do that by adding a signature to your
photos in the next video.
49. Signature Macro: Let's add a signature
to our photos. First, we need to create
our signature image. You can do this
in a lot of ways. If you have a tablet
you could use, you could just draw
out your signature in affinity using
the brush tool, or you could find a pretty
font and just type it out. What I did is I actually
just used my iPad. I drew this out using
the procreate app, and then I brought it
over to my computer. No matter what method you use, just make sure that your
signature is in white and that it ends up
on a document that's one than by 1,000 pixels. Also, make sure your image
has a transparent background. I just added this
rectangle so you can see it. I'll just delete that. You can see we have a
transparent background. Remember you can do
this by going up to document and checking on
transparent background. Once you have that image, we can go ahead and start
creating this macro. I'll use this picture to create it and we can go
ahead and begin. I'll hit record. I'll click off of this to deselect
the photo layer. Then we can go up to file place, and we can go ahead and
add our signature image. I'll click anywhere to add
our signature into the image. With that image placed. The next thing I want to do is I want to resize the signature. To do that, I'm going to go up two filters, distort a fine. Then I can come
down here and I'm just going to adjust
the scale of this. I'm going to make it
110 for both of those. Just to scale this up a little bit so we
can see it better. You could also scale it down if you want this to
look more subtle. Either way, resizing it is just a good way
to customize it, but it also
rasterized our layer, which is an important step. It means that the extra space on the top and bottom of the
layer has now been cut off. The layer is perfectly cut out to whatever
size it looks like. This will come in handy as we place this in just a second. I'm just going to hit apply. You can see that dead
space was cut off. Now that that's set
up, I'm going to go and adjust this by bringing it over to the right
side and the bottom right. Then I'll hit a ply. I wanted this to be on the bottom right, but you can see
that the signature is actually touching the sides. I want to shift this
over just a little bit. I'll go back up to
filters, distort, a fine. Then I'm going to change
the offset to negative two. I'll do that for y as well. You can see this was just scaled up and over a little bit, so it's not touching.
I'll hit a ply. With that, we're
finished with our macro. I'll just stop this
and I'll save it. Okay. Let's quickly
apply this to a batch to see what
this looks like. I'll go up to file,
new Batch Job. I'll just add in our photos. I'll save them into
a brand new folder. I'm just going to check on JPEG, and then I'll apply our
signature practice macro to it, and we're done. Just as a reminder once again, feel free to delete your
signature image at this point. You don't need it anymore. Let's check out how these
signature photos turned out. All of these images
have the signature overlaid and even our one
image that's more vertical, the signature still looks great, just tucked into the
corner like that. Great work to finish off this chapter and
this entire course. We're going to
edit this batch of photos so that they look
beautiful and polished.
50. Editing a Batch of Photos: Okay. Let's edit our
batch of photos. First things first, make
sure all of your images from your batch
are JPEgs or PNGs. We can't actually
apply macros or do batch processing on raw images. But luckily, all of
these images are J pegs. It looks like we're good to go. Next, open up an image from the shot. I'll just
go with this one. I want to experiment with what will look good
for the photoshoot. I'm going to start editing this photo like I would
with any other photo. The only difference is
that I'll take note of everything I
do so that we can turn this into a macro later to apply to all of our photos. First, I want to
adjust the lighting. I'm going to apply a
levels adjustment. I think I'll stick it out 5%. Then I'm going to
bring the gamma over. To 0.75 just to
lighten everything up. Here's the before
and after of that. Just brightening things up, but keeping the shadows
nice and dark. That was a good
start. Next, I want to do a color balance
to adjust our colors. I'll start in the shadows. I'm just going to
shift the slider. I think I'll add a
little bit of cyan. I don't think the magenta
slider looks very good. Maybe I'll add just a
little bit of blue. We've added some blue
tones to the shadows. Let's go into our mid tones. I think I'll bring the
red up quite a bit. I'll leave the
magenta slider alone, and I'll add a little
bit of yellow. Last for the highlights. I'm just going to add
a little bit of red. The highlights are a
little more sensitive. I'll just do a little bit of
red and ale bit of yellow. That looks pretty good. Next, I think I want to add
just a S curve, just to add a bit more contrast. Really small bring up the highlights and
bring down the shadows. I think I want to increase the
saturation for our colors. I'll use the HSL adjustment. I think in the main
color channel, I'm just going to
increase the saturation. Maybe two round there. Let's go into the reds and
I'll increase this a bit. Let's go into the yellows
and increase that a bit. I'll bring that to around 10%. Then I'm going to go
over to the Blues. I'm just going to
increase the blues to bring out some of the
colors in his sweater, and I'll bring this to 25%. Last, I'm going to
add a couple of macros to really
help this look nice. I think I want to add the
vignette macro. Very nice. Let's add the signature
macro. That's so nice. Here is the before and after the picture is
so much more vibrant. We have beautiful
focus on the couple. Now we have our battle plan. We can go ahead and record a macro with all of these
adjustments applied. I'm going to delete
all of these layers. I'm going to start from
the very beginning. I'll begin recording the macro. Then I'll click off. And we can go ahead and start
with our levels adjustment. For this first one, the
black level was 5%, and the gamma slider
was around 0.75. Since this is just
a quick macro that I'm making specifically
for this photoshoot. I'm not going to rename my layers and group them
like I normally would. This is just to save time, since this macro
is probably only going to look good for this
specific batch of photos. That's just something to save
a little bit of time there. Next, I'm going to add the
color balance adjustment. Starting in the shadows. I'm going to make the science
slider negative seven, and then I'll bring
up the blue slider to 5% in the mites. I'm going to bring up
the scan slider to 30%. Then I'm going to
add some yellow by bringing this to negative 20. Next for the highlights, I'm going to bring
this up to 5%. I'll bring this down
to negative five. Next, let's make our baby S curve to add a little
bit of contrast. Then we'll go and add an HSL adjustment to boost
all the saturations. For this one, in the
main color channel, I'll just bring this to 12%, and the red channel,
I'll bring it to 5%. In the yellow channel,
I'll bring it to ten. Last, in the blue channel, I'll bring this up to 25. And finish this off. I'm going to add the
Vignette Macro. There it is. I'll click to add it.
Back in the macro panel, you can see this has
been added as a step, applying the Vignette Macro, which is pretty cool. I'm also going to add
our signature macro. B here, you can see
that has been added as a step. We're done. I'll stop the recording. I'll just save this and I'll
call it Couples photoshoot. All right. Let's apply this to our entire batch of photos. I'll go to file, new batch job. I'll add all of the
photos from our shot. I'll save them into
a brand new folder. In this case, I'm going
to export them as an affinity photo
file and as a JPEG. That way we could go back
and make adjustments if a specific picture
looks too bright or too dark or just need
some fine tuning. Last, I'm going to apply the macro that we just
made, and then I'll press. That's been finished.
Now we can open any of these files to make some
tweaks to them if we'd like. But before we do
that, I have noticed that sometimes this will
cause the program to crash. Once you've finished
exporting the batch, go ahead and restart
the program. I just restarted the
program and here's the folder with all of our JPEGs and the affinity photo files. At this point, we could
go in and open up any of the affinity photo files
to make adjustments. Here you can see we have
our lovely couple here, and here is the before
and after of this one. I think this one looks pretty
good, but to be honest, I think that this looks a
little bit too dark down here. I may want to go into the levels adjustment and bring down the Black level just to get that detail
back a little bit. In fact, you might want to do even more editing to this one. Say this is your favorite
picture from the shot. You might want to save
this version and save another version with
maybe a moodier look. Maybe we could apply
the dark moody macro or something like that. You could do anything you
wanted at this point, really. As you can see, using macros makes batch
editing a breeze. Great work on finishing
this batch editing chapter.
51. Class Conclusion: Congratulations. You
finished the course. Now you have everything you
need to make amazing macros. I'm so proud of you
for sticking it out, and I hope you enjoyed it. Thanks so much for
watching and I'll see you in the next Affinity
Revolution Tutorial.
 Affinity Revolution, Affinity Instructor